Содержание
- Failed remote partition length get error
- Failed remote partition length get error
- Failed remote partition length get error
- Failed remote partition length get error
- Failed remote partition length get error
Failed remote partition length get error
В теме нет куратора. Если в теме есть пользователь, желающий стать Куратором и соответствующий Требованиям для кандидатов, он может подать заявку в теме Хочу стать Куратором (предварительно изучив шапку темы и все материалы для кураторов).
До назначения куратора, по вопросам наполнения шапки, обращайтесь к модераторам раздела через кнопку  под сообщениями, на которые необходимо добавить ссылки.
Сообщение отредактировал OXALIS — 13.08.18, 21:57
Последние новости. По всем известной истории.
Ответ от Honor Россия
Здравствуйте! Мы приносим вам свои извинения за задержку с ответом. К сожалению, после установки обновления, небольшая часть смарфтонов Honor 8 Pro вышла из строя. В данный момент все усилия команды сервиса и тестировщиков направлены на решение этой ситуации. Уже есть решение, позволяющее восстановить работоспособность устройства с потерей пользовательских данных. Оно доступно во всех авторизованных сервисных центрах. Но мы считаем необходимым найти решение, которое позволит сохранить ваши данные. Сейчас мы над ним работаем. В самое ближайшее время мы сообщим, будет ли оно найдено. Спасибо за ваше время, терпение и понимание!
У знакомого Duke — L09, у него все обновилось норм.
Версия ПО стала C10B132.
Правда зная как лучше ставить Обнову, перед обновой вайпали до заводских настроек.
Потом восстановили бэкап и ОК.
Источник
Failed remote partition length get error
В теме нет куратора. По вопросам наполнения шапки, обращайтесь к модераторам раздела через кнопку под сообщениями, на которые необходимо добавить ссылки.
Сообщение отредактировал snekt — 24.02.22, 00:08


Сообщение отредактировал derak1129 — 06.08.20, 09:12
И так, инструкция как все таки заблокировать загрузчик и вернуться в сток.
Ну я восстанавливал для того чтобы нфс работал, так как я потерял флешку, и magisk не смог поставить поэтому пришлось искать способ вернуться к стоку.
1)Как я понял из своих действий, скачиваешь прошивку 122 из нее вытаскиваешь файлы образов, которые нужны для раскирпички в multi-tool, восстанавливаешь телефон там.Получается у тебя сток рекавери чистый с прошивкой.
2) если стоял supersu то удаляешь его в программе.SuperSU-Настройки-удалить root полностью, и только потом восстанавливаешь. Как восстановил, делаешь через сток рекавери хардресет. если не сделаешь, он не включиться, ну по крайнер мере у меня не включился. Как сделал сброс, и телефон вошел в систему, зашел в фастбут, и через multi-tool заблокировал загрузчик код блокировки тот же, что и разблокировки.
Надеюсь помог кому нибудь информацией.

Сообщение отредактировал Talibbbbbb — 08.11.18, 23:20
Источник
Failed remote partition length get error
В теме нет куратора. По вопросам наполнения шапки, обращайтесь к модераторам раздела через кнопку под сообщениями, на которые необходимо добавить ссылки.
Сообщение отредактировал snekt — 12.06.20, 23:45
тут иногда полезно лазить в ветку с p10, т.к. + меньше покупают
P10 PLUS Recovery (проверено на китайце VLY-AL00C00)+ROOT SU
Добавлено 17.05.2017, 00:12:
 twrpVKY-AL00.img ( 20 МБ )SuperSU-BadWolft.zip ( 9.11 МБ )
Сообщение отредактировал sabitovmarat — 17.05.17, 00:13
 sabitovmarat, чтобы прошить надо загрузчик разлочить? А при разлочке загрузчика все данные стираются, верно?
Сообщение отредактировал steelkirill — 17.05.17, 10:20
Не чего себе! Целая дипломная работа. Не ожидал что на столько сложно. Получить код не просто, а применить его ещё, ваще труба.
Наверное на этом можно не плохо зарабатывать. Я б лучше заплатил чтоб мне Рут поставили с анлоком.
Сообщение отредактировал MGAlex — 25.05.17, 16:28


Но пока не проходит проверку. ждём.
Телефон VKY-L29 C10B, офиц. Россия
Прилетела прошивка до B133 на версию для L-29. Обещают больше оптимизации работы с батареей, предустановка Сбербанка, заплатки от Гугла по безопасности. 447 мБ.
Сообщение отредактировал Alexandr Gritsayuk — 26.05.17, 13:41
Ещё бы писали откуда телефон. У мну из финки l29 ничего не получил.
HiSuite — Утилита для синхронизации, резервного копирования и многого другого от компании Huawei (содержит в себе драйверы ADB и MTP)
HUAWEI Multi-Tool — Утилита от inside!out для прошивки рекавери, открытия загрузчика, получению рут прав, смены локализации, модели и прочего
Распаковываем Официальную прошивку UPDATE.APP Honor 6 — Прошивка 4.4.2
На мой взгляд, кое какие полезности
Топ ошибок и заблуждений «новичков» на Honor 6 (да и не только) Honor 6 — Прошивка EMUI 4.0 (Android 6.0) (Пост kaban2807 #47005762)
BOOTLOADER HUAWEI UNLOCK — https://play.google.co…lock.boot.huawei&hl=ru вроде бы услуга 6долл стоит.
Взято из темы Мате9. Возможно и у нас пойдет.
видео как получить код для разблокировки загрузчика не зависимо от модели телефона за исключением китайских которые попадают в список 14 дней
https://m.youtube.com/watch?v=1dEKbWPKXKY
подходит даже для кирпичей на которых не возможно узнать Product ID
бесплатно получиь код и разблокировки бутлоадера
Источник
Failed remote partition length get error
В теме нет куратора. Если в теме есть пользователь, желающий стать Куратором и соответствующий Требованиям для кандидатов, он может подать заявку в теме Хочу стать Куратором (предварительно изучив шапку темы и все материалы для кураторов).
До назначения куратора, по вопросам наполнения шапки, обращайтесь к модераторам раздела через кнопку под сообщениями, на которые необходимо добавить ссылки.
Сообщение отредактировал OXALIS — 13.08.18, 21:57
Последние новости. По всем известной истории.
Ответ от Honor Россия
Здравствуйте! Мы приносим вам свои извинения за задержку с ответом. К сожалению, после установки обновления, небольшая часть смарфтонов Honor 8 Pro вышла из строя. В данный момент все усилия команды сервиса и тестировщиков направлены на решение этой ситуации. Уже есть решение, позволяющее восстановить работоспособность устройства с потерей пользовательских данных. Оно доступно во всех авторизованных сервисных центрах. Но мы считаем необходимым найти решение, которое позволит сохранить ваши данные. Сейчас мы над ним работаем. В самое ближайшее время мы сообщим, будет ли оно найдено. Спасибо за ваше время, терпение и понимание!
У знакомого Duke — L09, у него все обновилось норм.
Версия ПО стала C10B132.
Правда зная как лучше ставить Обнову, перед обновой вайпали до заводских настроек.
Потом восстановили бэкап и ОК.
Источник
Failed remote partition length get error
В теме нет куратора. По вопросам наполнения шапки, обращайтесь к модераторам раздела через кнопку под сообщениями, на которые необходимо добавить ссылки.
Сообщение отредактировал snekt — 25.05.21, 19:20

Сообщение отредактировал mdruger — 13.10.17, 13:54
Сохраните все данные. Будет сброс телефона.
1)Для начала нам нужно включить заводскую разблокировку:
идем в меню- о телефоне- 7 раз тапаем по номеру сборки-становимся разрабочиками
идем в меню- для разработчико- ищем пункт: заводская разблокировка- включаем (на англ. OEM Unlock)
2)Необходима установить драйвера для режима ADB и FASTBOOT (cм. шапку — драйвера и утилиты)
3)Выключить телефон, зажать клавишу громкость»-» и подключить телефон к ПК через шнур, телефон загрузится в режим — FASTBOOT,начнется установка драйвера на ПК
4)Скачать архив ADB+FASTBOOT и распаковать архив туда, куда вам удобно
5)С зажатой клавишей SHIFT, нажать правую кнопку мыши на папке ADB+FASTBOOT, выбрать — «отрыть окно команд», откроется командная строка Windows
6)Теперь в командной строке, для проверки того что соединение с компьютером установлено нормально, наберите команду fastboot devices, должен отобразиться серийный номер телефона, если нет, дальше не двигаемся по инструкции, проблема с драйверами(нет связи ПК и телефона)
7)Для проверки статуса загрузчика введи команду fastboot oem get-bootinfo
статус будет либо LOCKED, либо UNLOCKED (заблокировано, разблокировано)
если статус LOCKED -идем дальше по инструкции, если UNLOCKED- то пропускаем этот раздел
8)Далее вводим команду fastboot oem unlock ****************, где звездочки — это 16-ти значный код, полученный вами для разблокировки загрузчика
7)На экране телефона вылезет окно с предупреждением и внизу два варианте, громкость+ выбираем Yes Unlock bootloader, жмем питание
9) Далее телефон сам перезагрузиться и произойдет сброс телефона, все данные будут потеряны

Сообщение отредактировал brant34 — 07.04.17, 21:29
Только при разблокированом загрузчике.
1)Скачать TWRP 3.0.2
2)Скачанный файл помещаем в папку ADB+FASTBOOT (котороя у вас появилась из прошлого пункта инструкции)
3)Выключить телефон, зажать клавишу громкость»-» и подключить телефон к ПК через шнур, телефон загрузится в режим — FASTBOOT
4)С зажатой клавишей SHIFT, нажать правую кнопку мыши на папке ADB+FASTBOOT, выбрать — «отрыть окно команд», откроется командная строка Windows
5)Теперь в командной строке, для проверки того что соединение с компьютером установлено нормально, наберите команду fastboot devices, должен отобразиться серийный номер телефона, если нет, дальше не двигаемся по инструкции
6)Дальше вводим команду fastboot flash recovery имяфайла.img, должно два раза написать «OKAY», чтобы перезагрузить телефон вводим fastboot reboot

Возрат сток рекавери, все тоже только вот этот файл — RECOVERY.img
PS: Для AL10 используем китайское TWRP, а для возврата китайское сток рекавери
Для прошивки TWRP вместо eRecovery используйте команду . flash recovery2.
Для возврата eRecovery используйте вот этот файл — RECOVERY2.img
Для возврата eRecovery на AL10, используйте вот этот файл — RECOVERY2-CN.img

Сообщение отредактировал mdruger — 07.04.17, 23:49

Сообщение отредактировал brant34 — 30.07.16, 19:00
1)Recovery — состоит из 3 пунктов:
— Перезагрузка
— Сброс до заводских с очисткой данных
— Очистка кеша
Вход: ОТКЛЮЧАЕМ КАБЕЛЬ ОТ ПК (если подключен). Чтобы войти в рекавери, если телефон выключен, зажимаем питание + громкость»+», вибрация и появиться логотип , можно отпустить кнопки
Если телефон включен, просто делаем перезагрузку на телефоне, как только экран выключиться зажимает громкость»+», ждем вибрация и появиться логотип , можно отпустить кнопки.
Можно заменить на каcтомное рекавери -TWRP, что ХОРОШО , но для прошивки нужно заменить TWRP на сток рекавери обратно, что ПЛОХО
2)eRecovery — состоит из 3 пунктов:
— Перезагрузка
— Загрузка последней версии По и восстановление (работает только на китайских моделях)
— Выключение
Вход: Выключаем телефон, зажимаем громкость+ ,подключаем к ПК, вибрация и логотип — отпускаем
При разблокированом загрузчике, вход осуществляем из меню предупреждения, при запуске телефона, появилось желтое меню, зажимаем громкость+, не менее 3секунд, отпускаем
Можно заменить на каcтомное рекавери -TWRP, что ХОРОШО , также для прошивки не нужно заменять TWRP на сток еРекавери обратно, что тоже ХОРОШО
3)Fastboot
Выключаем телефон, зажимаем громкость- ,подключаем к ПК

Сообщение отредактировал mdruger — 03.11.16, 11:19
Установить через TWRP файл для вашей версии прошивки соответственно, рут не нужен.
4GSWITCHFORB100RU.zip ( 127.32 КБ )
4GSWITCHFORB121RU.zip ( 127.64 КБ )
4GSWITCHFORB130EU.zip ( 127.93 КБ )
PS: Постепенно буду пополнять.
пишите в личку кому надо

Сообщение отредактировал mdruger — 26.01.17, 08:53

Сообщение отредактировал mdruger — 09.08.16, 11:50
у кого AL10 3GB версия, даже не пытайтесь, на выходе труп! оживить можно, но стоит это 15 евро фантиков
у кого AL10 2GB, для перехода на EU или RU, сначала сделайте переход на UL10 версию! Также присутствуют глюки с отвалом СИМ
РАЗБЛОКИРОВАТЬ ЗАГРУЗЧИК! ОБЯЗАТЕЛЬНО! ЕСЛИ КИРПИЧ, ТО ТОЛЬКО ЗАГРУЗЧИК ВАС И СПАСЕТ
БЕКАП для ТВРП ВСЕХ РАЗДЕЛОВ ОБЯЗАТЕЛЕН!
RU-EU
1) Для перехода с русской прошивки С10B100 на европу С432В102, прошей АРР файл из папки «2-vendor/dload/UPDATE.APP», архив с европейской прошивкой,
2) Потом прошейте, основной файл АРР из папки «1-main/dload/UPDATE.APP»
3) Затем файл по пути «1-main/dload/hw/eu/update_data_hw_eu.app» переименовать в UPDATE.APP и прошить
У кого не шьется вендор, смотри те инструкцию для CN(RU)-EU.
CN(RU)-EU (обязательно проверте статус разблокировки загрузчика, и заводской разблокровки для НЕ КИТАЙСКИХ ТЕЛЕФОНОВ)
1) Ставим через ТВРП файл локации.zip, после установки жмем перезагрузку.
2) Аппарат не сможет подгрузить систему, сам перезагрузиться и запустит сток рекавери, произойдет сброс до заводских, жмешь кнопку SHUTDOWN
2.1) Только для КИТАЙСКИХ моделей. Включаем телефон, долгая загрузка и оптимизация. *
Идем в меню- для разработчиков — ищем пункт: заводская разблокировка- включаем (на англ. OEM Unlock)
3) Кидаем на карточку папку dload, с UPDATE.APP файлом прошивкой от региона-EU, делаем NORMAL или FORCED UPGRADE, все.
RU(EU)-CN (обязательно проверте статус разблокировки загрузчика и заводской разблокровки)
1) Ставим через ТВРП файл локации.zip, после установки жмем перезагрузку.
2) Аппарат не сможет подгрузить систему, сам перезагрузиться и запустит сток рекавери, произойдет сброс до заводских, жмешь кнопку SHUTDOWN
3) Кидаем на карточку папку dload, с UPDATE.APP файлом прошивкой от региона-CN (встанет NEM-UL10C00В153), вставляем карту в выключенный телефон, делаем FORCED UPGRADE, все.
CN(EU)-RU (обязательно проверте статус разблокировки загрузчика, и заводской разблокровки для НЕ КИТАЙСКИХ ТЕЛЕФОНОВ)
1) Ставим через ТВРП файл локации.zip, после установки жмем перезагрузку.
2.1) Только для КИТАЙСКИХ моделей. Включаем телефон, долгая загрузка и оптимизация. *
Идем в меню- для разработчиков — ищем пункт: заводская разблокировка- включаем (на англ. OEM Unlock)
3) Кидаем на карточку папку dload, с UPDATE.APP файлом прошивкой от региона-RU, делаем NORMAL или FORCED UPGRADE, все.
* PS: кто напоролся на ошибку такого плана — type password to decrypt storage
Сделать процедуру разблокировки загрузчика еще раз, даже если написано Phone unlock
Также рекомендую после всех действий выполненных по данной инструкции, после первого старта телефона на новой прошивке,
сделать сброс через стоковое рекавери (выполнить все вайпы)

Сообщение отредактировал mdruger — 03.04.17, 11:36
Источник
I have a problem where I always get failed (remote: partition length get error) when trying to flash twrp. I already have bootloader unlocked, but FB is locked. I bought DC-Phoenix 2 days ago and tried method 1. After still failing
Log:
16/01/2020 20:38:31 Starting to try Rescue Recovery…
Looking for a device in fastboot mode
Device found: 7EX7N1741000—-
/�/
Getting build number…
Getting base version…
Getting cust version…
Getting preload version…
Erasing ver .. .
Writing rescue_recovery partition
RESCUE_RECOVERY partition update :FAIL partition length get error
Cannot enter in Recovey mode
I later went in to fastboot to see if FB was indeed unlocked so I could flash twrp and fix the phone without using a testpoint (metod 3).
However, in fastboot fb was locked.
After seeing that there was was no solution with method 1 I decided to use method 3
I got this log:
The file was loaded successfully
Looking for a device in force upgrade mode
Device detected:
COM7: HUAWEI USB COM 1.0 (COM7)
18/01/2020 10:05:55 Starting to write device in FASTBOOT mode…
File to update: VTRAL00M00A047_Board Software_China_Nonspecific_Android 7.0_EMUI5.1_05022AVG._inc_testpoint.dgtks
Device detected:
COM7: HUAWEI USB COM 1.0 (COM7)
Writing bootloader…
Writing VTRAL00M00A047_Board Software_China_Nonspecific_Android 7.0_EMUI5.1_05022AVG._inc_testpoint_4.dtwork…
Writing VTRAL00M00A047_Board Software_China_Nonspecific_Android 7.0_EMUI5.1_05022AVG._inc_testpoint_5.dtwork…
Writing VTRAL00M00A047_Board Software_China_Nonspecific_Android 7.0_EMUI5.1_05022AVG._inc_testpoint_6.dtwork…
Waiting for fastboot device…
No devices detected in fastboot mode
Error detecting device in fastboot mode
18/01/2020 10:06:36 Writing device finished OK
Now the phone cannot enter fastboot, I have tried to start it but it is simply dead. What should I do?
Would appreciate if you could reply before my 30 or so hours that is left end.
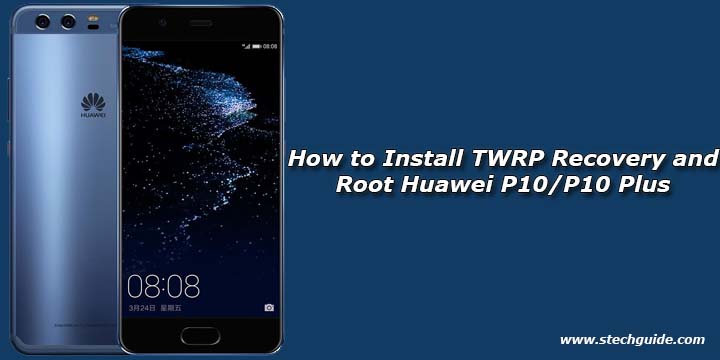
Good news for Huawei P10 users latest TWRP Recovery 3.1.0 for Huawei P10/P10 Plus is now available for download with that you can easily Root Huawei P10. The phone is already available in the market and if you bought it and looking for a way to root Huawei P10/P10 Plus then you are in the right place. Here we share easiest step by step process to Install TWRP Recovery and Root Huawei P10 and P10 Plus. First, you need to install TWRP Recovery on Huawei P10 and then flash SuperSu to Root Huawei P10. Follow this guide to Install TWRP Recovery and Root Huawei P10/P10 Plus.
If you are a Huawei P10/P10 Plus user, then you can Root and Install TWRP Recovery on Huawei P10/P10 Plus. Thanks to developer OldDroid, who provide the unofficial TWRP for Huawei P10 and yury_z share the step by step guide to Root and Install TWRP Recovery on Huawei P10/P10 Plus. Read the below note carefully before you Install TWRP Recovery and Root Huawei P10/P10 Plus.
Some benefits of Rooting –
- You can install custom ROM and custom kernel on your device for faster and better performance.
- Block Ads in apps with the help of ad blocker.
- After you root Huawei Mate 9 and install TWRP, you can install Xposed Framework to customize your device
- Increase performance and battery life by killing background process automatically.
- You can use Titanium Backup to restore all of your apps and data.
- You can uninstall bloatware (Pre-installed Apps)
Note:-
- First you need to Unlock bootloader of Huawei P10/P10 Plus (Check How to Unlock Huawei P10 Bootloader)
- Follow the steps correctly otherwise you may brick your device. We are not responsible for any damage to your phone.
- It will erase all your personal data including data of internal storage, so we advise you first to take a complete backup of your phone and then proceed.
- Ensure that your phone has at least 50-60% charged to prevent the accidental shutdown in-between the process.
Files required to Root and Install Custom Recovery on Huawei P10/P10 Plus –
- Download ADB and fastboot driver for windows or ADB and Fastboot for Mac and install it on your PC. This will also install your device driver.
- TWRP Recovery for Huawei P10 – Download (Rename it to recovery.img and save it in ADB and Fastboot folder)
- TWRP for Huawei P10 Plus – Download (Source)
- SuperRoot_noverity_nocrypt.zip for Huawei P10/Plus – Download, Mirror (Copy this file to your Phone or SD card)
- Download Boot Image for Huawei P10 – Boot_VTR-L29C10B120
- Download Boot Image for Huawei P10 – Boot_VTR-L29C432B123
- Stock Recovery and erecovery VTR-L09C423B113 – Download
Install TWRP on Huawei P10/P10 Plus –
1) First enable USB debugging from setting>developer option>. To enable Developer Options, go to About phone and tap the Build Number 7 times.

2) Now go to installation directory open ADB folder and open the command window thereby pressing and hold the ‘shift’ key and right-clicked anywhere in that folder.

3) Now connect your phone to PC and reboot the device into fastboot mode by typing
adb reboot bootloader
4) You are in Fastboot mode now to check your connection by entering below command in command prompt. It will return your device serial number means your device properly connected. Check your driver if the above command is not responding.
fastboot devices

5) Type the below command correctly in command prompt and then press enter. It will install TWRP recovery on P10/P10 Plus
fastboot flash recovery recovery.img

6) Now boot into recovery by pressing hardware button or by typing below command
fastboot boot recovery.img

7) Now follow below steps without leaving TWRP.
Root Huawei P10/Plus –
1) With above command your phone boot into the recovery mode.
2) Now from the main menu navigate to Install Zip and select ‘SuperRoot_noverity_nocrypt.zip ’ to root P10 and P10 Plus.
3) Swipe to flash the file and Root Huawei P10 and P10 Plus.
4) Now reboot your device and install phh supersu from playstore after device starts.
5) Done! You root Huawei P10/Plus successfully.
Troubleshooting –
If you get the error ‘Error 1’ during installation in TWRP, then download the boot image from above and flash the image through fastboot using the below command.
fastboot flash boot boot.img
So this is the complete guide to Install TWRP Recovery and Root Huawei P10/P10 Plus with easy steps. If you have any questions, then comment below.
Source
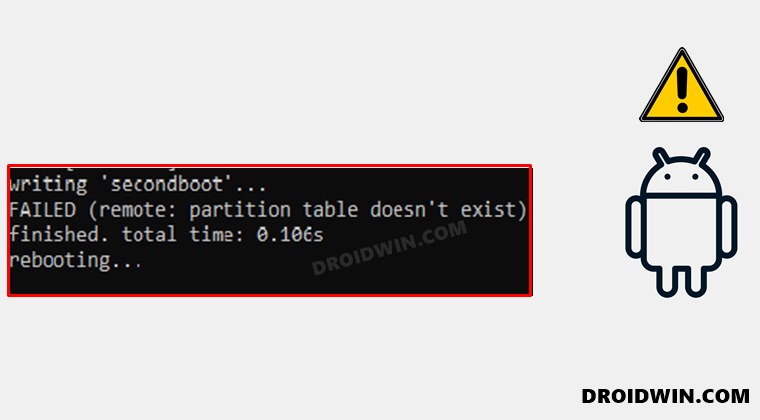
In this guide, we will show you various methods to fix the Failed (remote: partition table doesn’t exist) error. ADB and Fastboot Commands are regarded as the powerhouse of custom development and rightly so. From the first prerequisite of booting the device to Fastboot Mode to unlocking the bootloader, flashing a custom recovery, or performing sideload, each of these tasks would require this set of commands. However, this is also the domain where users generally have to face the maximum number of issues.

Among them is the issue related to the partition scheme that has always been the cause of concern. And since the introduction of the A/B partition and the removal of recovery partitions, there has been an increment in their occurrence. In this regard, the inability of a command to identify a particular partition of your device seems to be bugging quite a lot of users. If you are also on the same page, then fret not. In this guide, we will make you aware of various methods to fix the Failed (remote: partition table doesn’t exist) error. Follow along.
The Prerequisites to Fix Failed (remote: partition table doesn’t exist)
Before starting off with the fixes, you will have to checkmark a few requirements that we have listed below.
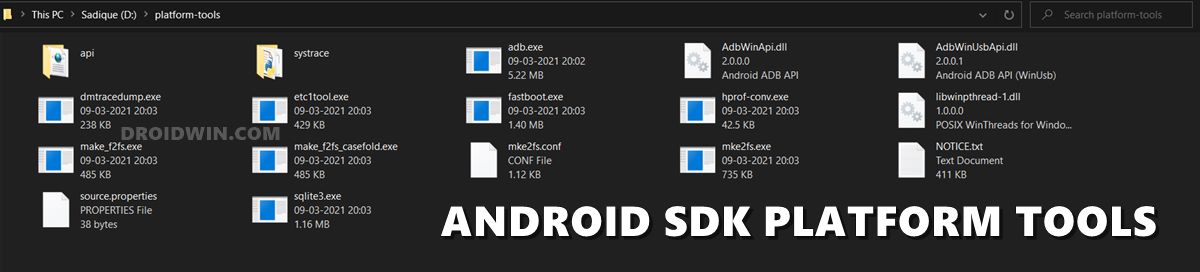
Install Android SDK
First and foremost, you will have to install the Android SDK Platform Tools on your PC. This is the official ADB and Fastboot binary provided by Google and is the only recommended one. So download it and then extract it to any convenient location on your PC. Doing so will give you the platform-tools folder, which will be used throughout this guide.
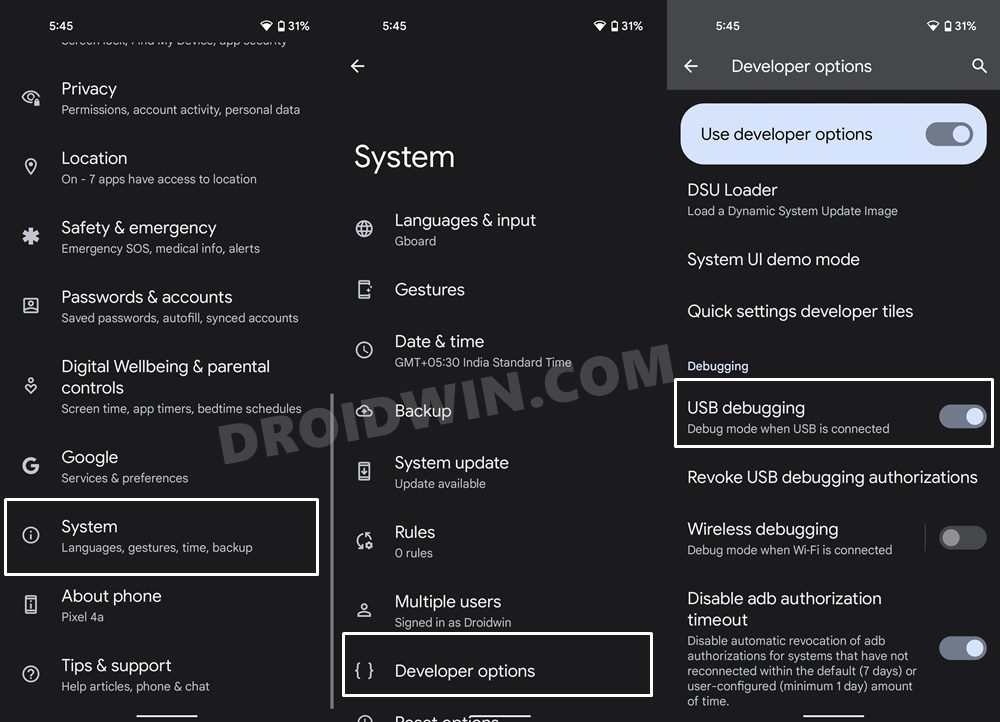
Enable USB Debugging
Next up, you will have to enable USB Debugging so as to make your device recognizable by the PC in ADB mode. This will then allow you to boot your device to Fastboot Mode. So head over to Settings > About Phone > Tap on Build Number 7 times > Go back to Settings > System > Advanced > Developer Options > Enable USB Debugging.
Unlock Bootloader (Optional)
If you are facing this issue while flashing a custom ROM, kernel, recovery, or any other related mod, then it goes without saying that your device’s bootloader needs to be unlocked. For that, you may refer to our guide on How to Unlock the Bootloader on Any Android Device. Do not that doing so will delete all the data from your device and might nullify the device’s warranty as well. So proceed ahead with caution and at your own risk. Once unlocked, move over to the next step to fix the Failed (remote: partition table doesn’t exist) error.
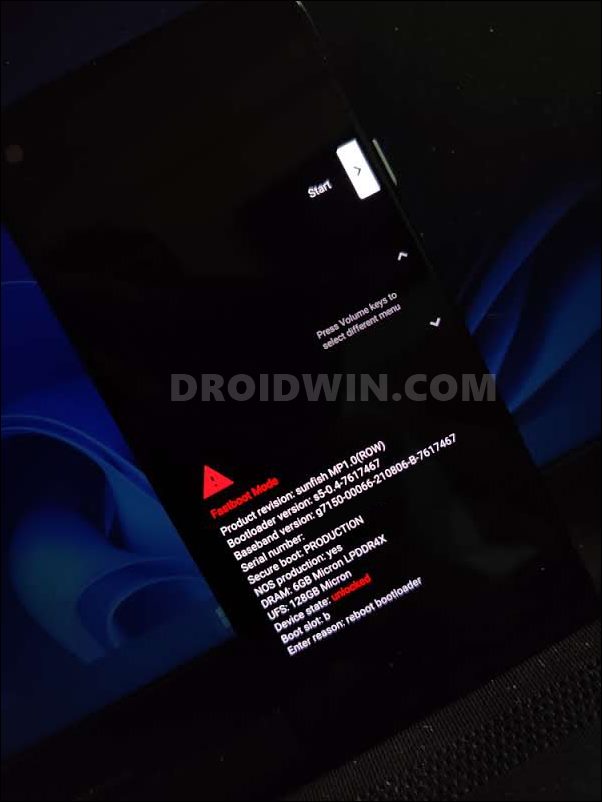
Boot to Fastboot Mode
- Now connect your device to the PC via USB cable. Make sure USB Debugging is enabled.
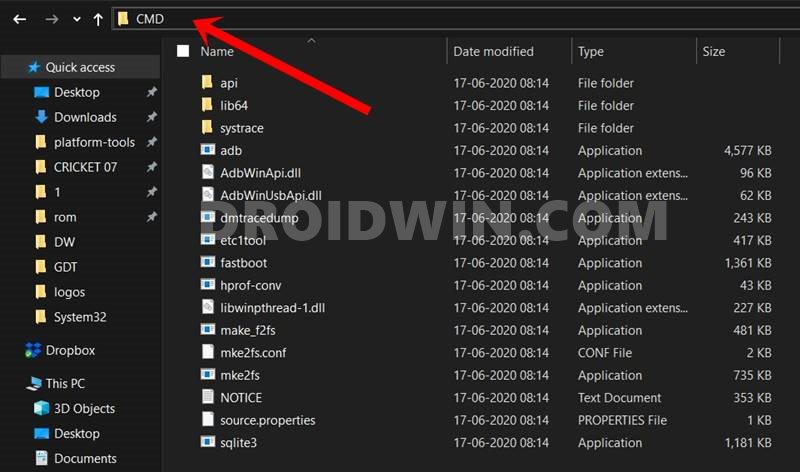
- Then head over to the platform-tools folder, type in CMD in the address bar, and hit Enter. This will launch the Command Prompt.

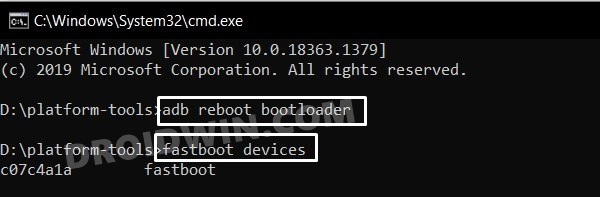
- Type in the following command in the CMD window to boot your device to Fastboot Mode
adb reboot bootloader

- To verify the Fastboot connection, type in the below command and you should get back the device ID.
fastboot devices
That’s it. These were all the requirements. You may now proceed ahead with the methods to fix the Failed remote partition table doesn’t exist error.
Do note that there’s no universal fix as such. You will have to try out each of the below-mentioned workarounds and see which one works best in your favor. So keeping that in mind, let’s get started. Droidwin and its members wouldn’t be held responsible in case of a thermonuclear war, your alarm doesn’t wake you up, or if anything happens to your device and data by performing the below steps to fix the Failed (remote: partition table doesn’t exist) error.
FIX 1: Reverify Partition
To begin with, make sure that the partition to which you are flashing the file actually exists on your device. As obvious as it may sound, the recent changes to the Android ecosystem have made some major changes. For example, many devices nowadays don’t have a dedicated recovery partition. So you cannot simply flash TWRP to that partition. Rather you will first have to boot the recovery to the Boot partition and then subsequently flash it or directly flash it to the Boot partition (recommended). Here’s how it could be done:
- First off, transfer the downloaded recovery to the platform-tools folder.
- Then name it to twrp, so that the complete name becomes twrp.img.
- After that, open CMD inside this platform-tools folder.
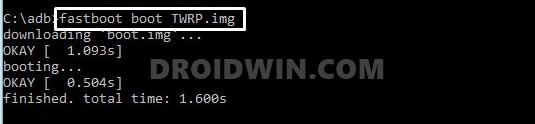
- Now use the below command to boot your device to TWRP (recommended):
fastboot boot twrp.img

- Or use the following command to directly flash the TWRP:
fastboot flash boot twrp.img
- Check if it fixes the Failed (remote: partition table doesn’t exist) error.
FIX 2: Check for Dual Slots
- On some devices, you would have to explicitly mention the slots to which you are flashing a file.
- For example, while flashing the boot.img, the below command might not work:
fastboot flash boot boot.img //this might not work
- Rather, you will have to flash this file to both the boot partitions, using the following commands:
fastboot flash boot_a boot.img //to flash to Partition A
fastboot flash boot_b boot.img //to flash to Partition B
- So try out this tweak and check if it fixes the Failed (remote: partition table doesn’t exist) error.
FIX 3: Flash in FastbootD Mode
If your device has dynamic partitions, then you might have to flash the files in the FastbootD Mode instead of the regular Fastboot. For example, in the case of Pixel devices, some of its partition files (like the radio.img) needs to be flashed in the FastbootD Mode whereas all the other files are flashed in the Fastboot Mode. So first off, let’s verify if your device has this FastbootD Mode or not.
- For that, you will first have to boot your device to the Fastboot Mode using the below command
adb reboot bootloader

- After that, execute the below command to boot your device to FastbootD Mode
fastboot reboot fastboot

- If that doesn’t work out, then try using the below command:
fastboot reboot-bootloader
- Now flash the desired files. Once done, execute the same command to come out of FastbootD mode that you had used initially to boot to this mode.
- Once you are out of FastbootD and back to Fastboot, execute the below command to reboot to the OS:
fastboot reboot
- That’s it. This should have fixed the underlying partition issue.

So with this, we round off the guide on how you could fix the Failed (remote: partition table doesn’t exist) error. We have listed three different methods for the same. Do let us know in the comments which one spelled out success for you. Likewise, all your queries are welcomed in the comments section below.
About Chief Editor

Sadique Hassan
administrator
A technical geek by birth, he always has a keen interest in the Android platform right since the birth of the HTC Dream. The open-source environment always seems to intrigue him with the plethora of options available at his fingertips. “MBA by profession, blogger by choice!”
FIX: FASTBOOT FAILED (REMOTE: COMMAND NOT ALLOWED) ERROR

What is FAILED (remote: Command not allowed) Error? It seems that one of the most common reasons behind such an issue is that you’re flashing a file to an incorrect partition. So, this can basically cause issues with the …
From getdroidtips.com
FAILED (REMOTE: PARTITION FLASHING IS NOT ALLOWED)
That is a good reason. adb is easy to do when you know the correct steps. Added some steps to make it easier for you. 1. download latest Rom. 2. copy the Rom to the directory where you installed the adb drivers on your PC (most of the times C:adb) and rename it to something easy (like update) 3. Boot into recovery.
From forums.oneplus.com
WHY AM I GETTING THE MESSAGE «WRITING ‘RECOVERY’… FAILED (REMOTE …
Answer (1 of 4): Hi buddy, You are most likely getting this error message because your flashing twrp on Oreo. Nougat and Oreo kernels have different partition …
From quora.com
ERROR: PARTITION LENGTH OF 6442450944 SECTORS EXCEEDS … — RINGING …
I’m trying to create a partition on a RHEL 6.3 machine, but parted is giving me the following error: $ sudo parted /dev/vdb mkpart logical 1 Error: partition length of 6442450944 sectors exceeds the loop-partition-table-imposed maximum of 4294967295 An alternate command for creating a partition gave me the same error:
From ringingliberty.com
GPARTED RESIZE OF AN EXTENDED PARTITION FAILS WITH ERROR «CAN’T HAVE …
This is only important if you want to hibernate your machine. If you do not hibernate you can use a much smaller swap (or even no swap partition at all if you have ‘enough’ memory). I suggest you try the following using gparted after booting your LiveCD. Ensure the swap partition is not locked. (See (1) above). Delete the swap partition /dev/sda6.
From askubuntu.com
[HUAWEI P9 PLUS] CAN´T FLASH IMG · ISSUE #546 — GITHUB
Hi, everytime i flash the image i get this error: target reported max download size of 471859200 bytes sending sparse ‘system’ 1/4 (460796 KB)… OKAY [ 10.817s] writing ‘system’ 1/4… FAILED (remote: sparse flash write failure) finished. total time: 10.859 i tried it with -S 100m and sim2img. — You are receiving this because you are …
From github.com
FASTBOOT: FAILED FLASHING (REMOTE: SIZE TOO LARGE) — ANDROID …
Sorted by: 1. Fastboot has an option -S Used to cut large files into small ones. Specific information can be found at man page: fastboot —help. So, we can set the size of the crop block to 256MB: fastboot flash -S 256M system system.img. Source.
From android.stackexchange.com
REG : ORA-14100: PARTITION EXTENDED TABLE NAME CANNOT REFER TO A …
in SQL & PL/SQL. All, I get the following error,when I try to use partition clause on a remote table. Could anyone let me know on how to use this with partition clause.. I know that we can use this option, select count (1) from [email protected]_dblink.world where bill_mo=’200701′; but I want to use partition clause and retrieve the data.
From community.oracle.com
UPDATE RECOVERY PARTTION FAIL AFTER RUN DC PHOENIX
Update recovery parttion FAIL after run DC phoenix. , 10:50 AM. Hi, I can’t upload android 7.0 nougat because I have a message: Erasing ver .. . File size: 5 261 937 616 bytes. Current version (CURVER): RNE-L21C432B100.
From forum.dc-unlocker.com
HOW TO SOLVE THE «FAILED (REMOTE: ‘ERROR FLASHING PARTITION.’)»
It could be that you are flashing to a non-existent partition. There can be other reasons. Take note PH-1 has dual partition so it is, for example in case of the boot parition, boot_a & boot_b. 2. level 2. GSI_Antix.
From reddit.com
1. THE RECEIVED MESSAGE TOO LONG ERROR
If you get an outcome, then you’ll need to modify the shell startup. In addition, you can also try: ssh [email protected] ‘echo hello’. If you get an output other than the “hello,” then probably that specific output prevents the SFTP protocol from functioning correctly. b. Locate noisy commands in .bashrc or .bash_profile
From pcwdld.com
FAILED TO PROCESS REMOTE PARTITION.
Errors in the OLE DB provider. The server returned the following error: (Server: The operation has been cancelled.). Errors in the OLE DB provider. The server returned the following error: (Internal error: The operation terminated unsuccessfully.). Why did I got this error, where should I check? Your help will be very appreciated Thanks. Winnie
From social.msdn.microsoft.com
FAILED (REMOTE: PARTITION TABLE DOESN’T EXIST) — HOW TO CREATE …
Therefore it seems I had to install TWRP-3.4.0. I tried to install it via sudo fastboot flash boot twrp-3.4.0-0-FP3.img but now it shows the message: ‘FAILED (remote: partition table doesn’t exist)’! When I lock the bootloader again it would show me that my phone is corrupt and cannot start! How can I create a partition table? I used …
From forum.fairphone.com
ROM FLASHING — HOW TO INSTALL TWRP ON TO HUAWEI P9 EVA-L09
FAILED (remote: partition length get error) finished. total time: 0.564s If anyone could assist me in the install or show me a guide on how they did it I would appreciate it as I cant find the answer anywhere. rom-flashing twrp fastboot huawei flashtool. Share. Improve this question. Follow asked Sep 17, 2021 at 1:27. Hypz Hypz. 11 1 1 bronze badge. 2. 1. guess it’s …
From android.stackexchange.com
SYSTEM IMAGES TOO LARGE FOR MY DEVICE. (UMIDIGI A7 PRO) — GITHUB
Delete product partition before flashing system partition with Fastboot delete-logical-partition product Le sam. 5 sept. 2020 à 23:51, ANDROID2468 <[email protected]> a écrit : I tried to flash system-quack-arm64-ab-vanilla.img in fastboot but i get this error: Resizing ‘system’ FAILED (remote: ‘Not enough space to resize partition’) I am only able to flash the official …
From github.com
FASTBOOT FLASH BOOTLOADER = FAILED (REMOTE: (INVALIDSTATE))
Does anyone else get a «invalidState» and «signature mismatch» message when trying to flash the bootloader.img from the new JWR66Y factory image? Flashing the previous bootloader.img from JWR66V image or JDQ39 image works just fine though. Although the thread refers to a JellyBean issue I encountered the same problem when flashing my Nexus 7 to the Lollipop (LRX21P) …
From android.stackexchange.com
TWRP FOR PRA-LX1 EMUI 8 HUAWEI P8 LITE 2017? — HUAWEISPOT
Where can I get a twrp for the PRA-LX1 (huawei p8 lite 2017) that is compatible with android or emui 8? I already found 5 pra-lx1 recoverys, but all came: target reported max download size of 471859200 bytes sending ‘recovery’ (24954 KB) … OK [0.632s] writing ‘recovery’ … FAILED (remote: partition length get error) finished. Total time: 0.642s This is supposed to be …
From huaweispot.com
REMOTE PARTITION IN FRENCH — ENGLISH-FRENCH DICTIONARY | GLOSBE
Check ‘remote partition’ translations into French. Look through examples of remote partition translation in sentences, listen to pronunciation and learn grammar. Glosbe uses cookies to ensure you get the best experience. Got it! Glosbe. Log in . English French remote operations service element remote optical detection remote optronic director Remote Order Entry …
From glosbe.com
HOW TO EXTEND PARTITION REMOTELY FOR A VIRTUAL MACHINE … — STACK …
I have attempted to write a Powershell script to remotely extend a partition of a virtual machine. I have added 1gb to the existing C drive which would make it 81GB on the VDI but I deliberately did not extended it as I want to do it by this script.
From stackoverflow.com
FAILED (REMOTE: PARTITION LENGTH GET ERROR) — XDA FORUMS
failed (remote: partition length get error) — after update mate 9 to Oreo Beta. Thread starter martin2007; Start date Oct 10, 2017; Forums. Huawei. Huawei Mate 9. Huawei Mate 9 Questions & Answers ••• Breadcrumb; Forums. Huawei. Huawei Mate 9. Huawei Mate 9 Questions & Answers. 1; 2; Next. 1 of 2 Go to page. Go. Next Last. Search This thread Search …
From forum.xda-developers.com
GETTING A VOLUME FULL ERROR WHEN TRYING TO FLASH PHONE WITH
Afterwards, no matter what I tried I couldn’t get the phone to turn back on. I was a bit fed up, especially since the main camera on my Mi 11 has been acting up and cannot focus, and so after years of being a Xiaomi user (Hongmi/Redmi Note, Mi 6, Mi 9, Mi 11) I decided to try something else. I chose the Samsung S22 8GB/256GB.
From reddit.com
FIX — NOT ENOUGH SPACE ON THE DISK TO COMPLETE THIS OPERATION
Now, shorten the length of partition handle to shrink partition. After getting desired partition size, click «OK» to go back to the main interface. After getting desired partition size, click «OK» to go back to the main interface.
From partitionwizard.com
WRITING ‘RECOVERY’ FAILED (REMOTE: ‘THIS PARTITION DOESN’T EXIST’)
fastboot flash recovery lineage-17.1-20211004-recovery-ginkgo.img. Writing ‘recovery’ FAILED (remote: ‘This partition doesn’t exist’) Redmi is unlocked, with USB debugging enabled and when in fastboot mode «fastboot devices» detects it. Just do fastboot boot recovery.img instead. Flashing the lineage rom should install the recovery anyway.
From reddit.com
10. REMOTE PARTITIONING — SPRING
A sample remote partition application can be found in the samples module of the Spring Cloud Task Project here. 10.1 Notes on developing a batch partitioned app for the Yarn platform. When deploying partitioned apps on the Yarn platform be sure to use the following dependency for the Spring Cloud Yarn Deployer (with a version 1.0.2 or higher): <dependency> …
From docs.spring.io
WRITING UPDATE.APP USING NVRECONSTRUCTOR KOW-ə-BUNG-Gə …
Search titles only. By: Search
From martview-forum.com
LVM-MANAGED GPT PARTITION: PARTITION LENGTH EXCEEDS THE
Tour Start here for a quick overview of the site Help Center Detailed answers to any questions you might have Meta Discuss the workings and policies of this site
From serverfault.com
ALL COMMON TWRP RECOVERY ERRORS AND SOLUTIONS — GET DROID TIPS
Reboot again into TWRP Recovery again. Then head to Wipe>Advanced Wipe>Data>Repair or Change File System>Repair File System and check whether this fixes the issue. If not then go to Change File System>Ext2>swipe to confirm. Head back to TWRP menu>Mount menu and check now if your partitions can be mounted now.
From getdroidtips.com
HOW TO FIX THE ERRORS WHILE CREATE NEW PARTITION IN WINDOWS 10, …
Step 2. In the command prompt, type diskpart and hit Enter key to open the diskpart.exe. Step 3. In the diskpart command prompt, type list disk. It will list all disks on your computer. Step 4. Type select disk n (n refers the target disk number), hit Enter key. And you will get “Disk n is now the selected disk”.
From diskpart.com
THE REMOTE SERVER RETURNED AN ERROR: (411) LENGTH REQUIRED
System.Net.WebException: The remote server returned an error: (411) Length Required. This is a pretty common issue that comes up when trying to make call a REST based API method through POST. Luckily, there is a simple fix for this one. This is the code I was using to call the Windows Azure Management API.
From robertgreiner.com
SOLVED: UNABLE TO GET OUTPUT FROM REMOTE VM — VMWARE
I am getting the below error, when I execute the script for remote VM. The script works fine, if I run locally, but I am not able to get the output from remote VM. get-partition : Access to a CIM resource was not available to the client.——At line:1 char:4 + & {get-partition -driveletter D | get-disk | ConvertTo-CSV-NoTypeInformation}
From communities.vmware.com
TESTPOINT RECOVERY P10 / VTR-L29 (METHOD 3) — DC-UNLOCKER
testpoint recovery P10 / VTR-L29 (method 3) I have a problem where I always get failed (remote: partition length get error) when trying to flash twrp. I already have bootloader unlocked, but FB is locked. I bought DC-Phoenix 2 days ago and tried method 1.
From forum.dc-unlocker.com
REMOTELY EXTEND A PARTITION USING WMI — STACK OVERFLOW
First, enable PSRemoting via PsExec: psexec \ [computer name] -u [admin account name] -p [admin account password] -h -d powershell.exe «enable-psremoting -force». The following PowerShell script will do the trick, without WMI, via PowerShell Sessions instead, and will do it for as many computers as you want: Here is the driver script:
From stackoverflow.com
FAILED (REMOTE: ‘PARTITION FLASHING IS NOT ALLOWED’) WHEN TRYING TO …
The heimdall print-pit ends with a reboot but when I do the heimdall flash I repeatedly get an ERROR: Failed to receive session end confirmation!. The phone started with Android 9 but I’ve updated to initial 11. Anybody want to work with me on getting this phone up and running on lineageos? I’ve gotta say I don’t know what Odin is or even where …
From reddit.com
FAILED (REMOTE: ‘NOT ENOUGH SPACE TO RESIZE PARTITION’)
(19-04-2021, 08:55 AM) Bilal Nawaz Wrote: My Device is Infinix Hot 10 (x682c) comes with android 10. I’m actually installing Havoc OS 3.12 with GApps. This GSI Rom Size is almost 2.8 GB’s. I tried i can install GSI rom without GApps.
From hovatek.com
HOW TO INSTALL TWRP ON TO HUAWEI P9 EVA-L09 — STACK …
FAILED (remote: partition length get error) finished. total time: 0.564s If anyone could assist me in the install or show me a guide on how they did it I would appreciate it as I cant find the answer anywhere. android adb huawei-developers fastboot. Share. Improve this question. Follow edited Sep 16, 2021 at 23:50. Hypz. asked Sep 16, 2021 at 23:44. Hypz Hypz. 11 2 2 …
From stackoverflow.com
PARTITION KEY LENGTH LIMIT IS ALLOWED UPTO MAX 100 CHAR LENGTH #321
azure cosmos db partition key length issue fixed : Azure/azure-cosmosdb-java#63 The text was updated successfully, but these errors were encountered: Copy link
From github.com
FASTBOOT: ERROR: CANNOT GET BOOT PARTITION SIZE (#153) · …
Hello to everybody, i have a xiaomi mi a2. there is no os on it, but twrp 3.4.0-0. the device is already unlocked, i can connect it to my debian 10 computer, «fastboot devices» shows me the device, i can install different recovery-systems (i did install twrp and the lineageos-recovery.). but i am not able to install calyxos. here is my terminal-output, trying this:
From gitlab.com
REMOTE PARTITON ERROR WITH «PARTITION CONTAINS A ROLAP OR …
The Internet_Sales_2004_Remote partition is a remote partition, but the partition contains a ROLAP or proactive cached dimension named ‘Internet Sales Order Details’. Thanks^_^ Winnie
From social.msdn.microsoft.com
В этом руководстве мы покажем вам различные способы исправления ошибки Failed (remote: таблица разделов не существует). Команды ADB и Fastboot считаются мощным двигателем пользовательской разработки, и это правильно. Начиная с первой предварительной загрузки устройства в режиме быстрой загрузки и заканчивая разблокировкой загрузчика, прошивкой пользовательского восстановления или выполнением неопубликованной загрузки, для каждой из этих задач потребуется этот набор команд. Однако именно в этой области пользователям обычно приходится сталкиваться с максимальным количеством проблем.
Среди них — проблема, связанная со схемой раздела, которая всегда вызывала беспокойство. А с момента введения раздела A/B и удаления разделов восстановления их появление увеличилось. В связи с этим неспособность команды идентифицировать конкретный раздел вашего устройства, похоже, беспокоит многих пользователей. Если вы также находитесь на той же странице, то не волнуйтесь. В этом руководстве мы расскажем вам о различных методах исправления ошибки Failed (remote: таблица разделов не существует). Следуйте вместе.
Необходимые условия для исправления ошибки (удаленное: таблица разделов не существует)
Прежде чем приступить к исправлениям, вам нужно будет отметить несколько требований, которые мы перечислили ниже.
Установите пакет SDK для Android
Прежде всего, вам нужно будет установить Android SDK Platform Tools на свой компьютер. Это официальный бинарный файл ADB и Fastboot, предоставленный Google, и единственный рекомендуемый. Поэтому загрузите его, а затем распакуйте в любое удобное место на вашем ПК. Это даст вам папку platform-tools, которая будет использоваться в этом руководстве.
Включить отладку по USB
Затем вам нужно будет включить отладку по USB, чтобы ваше устройство распознавалось ПК в режиме ADB. Это позволит вам загрузить ваше устройство в режиме быстрой загрузки. Итак, перейдите в «Настройки»> «О телефоне»> «Семь раз нажмите на номер сборки»> «Вернитесь в «Настройки»> «Система»> «Дополнительно»> «Параметры разработчика»> «Включить отладку по USB».
Разблокировать загрузчик (необязательно)
Если вы столкнулись с этой проблемой при прошивке пользовательского ПЗУ, ядра, рекавери или любого другого связанного мода, то само собой разумеется, что загрузчик вашего устройства должен быть разблокирован. Для этого вы можете обратиться к нашему руководству о том, как разблокировать загрузчик на любом устройстве Android. Не делайте этого, так как это приведет к удалению всех данных с вашего устройства, а также может привести к аннулированию гарантии на устройство. Так что действуйте осторожно и на свой страх и риск. После разблокировки перейдите к следующему шагу, чтобы исправить ошибку Failed (remote: таблица разделов не существует).
Загрузитесь в режиме быстрой загрузки
- Теперь подключите ваше устройство к ПК через USB-кабель. Убедитесь, что отладка по USB включена.
- Затем перейдите в папку инструментов платформы, введите CMD в адресной строке и нажмите Enter. Это запустит командную строку.
- Введите следующую команду в окне CMD, чтобы загрузить устройство в режим Fastboot Modeadb reboot bootloader.
- Чтобы проверить соединение Fastboot, введите приведенную ниже команду, и вы должны получить идентификатор устройства. устройства fastboot
Вот и все. Это были все требования. Теперь вы можете приступить к методам исправления ошибки «Сбой удаленной таблицы разделов не существует».
Как исправить ошибку (удаленно: таблица разделов не существует)
Обратите внимание, что универсального решения как такового не существует. Вам нужно будет попробовать каждый из нижеперечисленных обходных путей и посмотреть, какой из них лучше всего работает в вашу пользу. Итак, имея это в виду, давайте начнем. Droidwin и его участники не будут нести ответственность в случае термоядерной войны, если ваш будильник не разбудит вас, или если что-то случится с вашим устройством и данными, выполнив следующие шаги, чтобы исправить Неудачный (удаленный: таблица разделов не не существует) ошибка.
ИСПРАВЛЕНИЕ 1. Повторная проверка раздела
Для начала убедитесь, что раздел, на который вы прошиваете файл, действительно существует на вашем устройстве. Как бы очевидно это ни звучало, недавние изменения в экосистеме Android привели к значительным изменениям. Например, многие устройства в настоящее время не имеют выделенного раздела восстановления. Таким образом, вы не можете просто прошить TWRP в этот раздел. Вместо этого вам сначала придется загрузить восстановление в загрузочный раздел, а затем прошить его или напрямую прошить в загрузочный раздел (рекомендуется). Вот как это можно сделать:
- Прежде всего, перенесите скачанный рекавери в папку platform-tools.
- Затем назовите его twrp, чтобы полное имя стало twrp.img.
- После этого откройте CMD внутри этой папки инструментов платформы.
- Теперь используйте приведенную ниже команду для загрузки вашего устройства в TWRP (рекомендуется): fastboot boot twrp.img
- Или используйте следующую команду, чтобы напрямую прошить TWRP: fastboot flash boot twrp.img
- Проверьте, исправляет ли он ошибку Failed (remote: таблица разделов не существует).
ИСПРАВЛЕНИЕ 2. Проверьте наличие двух слотов
- На некоторых устройствах вам придется явно указать слоты, в которые вы прошиваете файл.
- Например, при прошивке boot.img следующая команда может не работать: fastboot flash boot boot.img // это может не сработать
- Скорее, вам придется прошить этот файл на оба загрузочных раздела, используя следующие команды: fastboot flash boot_a boot.img //для прошивки в раздел A fastboot flash boot_b boot.img //для прошивки в раздел B
- Так что попробуйте этот твик и проверьте, исправляет ли он ошибку Failed (remote: таблица разделов не существует).
ИСПРАВЛЕНИЕ 3. Прошивка в режиме FastbootD
Если на вашем устройстве есть динамические разделы, возможно, вам придется прошивать файлы в режиме FastbootD вместо обычного Fastboot. Например, в случае устройств Pixel некоторые файлы разделов (например, radio.img) необходимо прошить в режиме FastbootD, тогда как все остальные файлы прошиваются в режиме Fastboot. Итак, во-первых, давайте проверим, есть ли на вашем устройстве этот режим FastbootD или нет.
- Для этого вам сначала нужно загрузить устройство в режим быстрой загрузки, используя приведенную ниже команду adb reboot bootloader.
- После этого выполните приведенную ниже команду, чтобы загрузить ваше устройство в режим FastbootD.
- Если это не сработает, попробуйте использовать следующую команду: fastboot reboot-bootloader
- Теперь прошиваем нужные файлы. После этого выполните ту же команду, чтобы выйти из режима FastbootD, которую вы использовали изначально для загрузки в этот режим.
- Как только вы выйдете из FastbootD и вернетесь в Fastboot, выполните следующую команду, чтобы перезагрузить ОС: fastboot reboot
- Вот и все. Это должно было решить проблему с базовым разделом.
Итак, на этом мы завершаем руководство о том, как исправить ошибку Failed (remote: таблица разделов не существует). Мы перечислили три разных метода для одного и того же. Дайте нам знать в комментариях, какой из них принес вам успех. Кроме того, все ваши вопросы приветствуются в разделе комментариев ниже.