-
Partition Wizard
-
Partition Magic
- How to Fix Minecraft Server Failed to Bind to Port [5 Ways]
By Ariel | Follow |
Last Updated December 20, 2021
When running the Minecraft server, a lot of people encounter the “Minecraft server failed to bind to port” error. Are you also struggling to fix the error? Now, you come to the right place. This post of MiniTool summarizes 5 accessible troubleshooting methods.
Why Minecraft Server Failed to Bind to Port
The Minecraft server failed to bind to port error often appears while Minecraft port forwarding and hosting for friends. After analyzing multiple user reports and forums, some possible reasons for the issue are explored.
The improper IP configuration is the main cause of the Minecraft failed to bind to port. If the port and IP address is being used by another server, it will trigger the error. Besides, some users reported that the Minecraft server failed to bind to port when Java is running in the background.
How to Fix Minecraft Server Failed to Bind to Port
When you encounter the “failed to bind to port” error for the first time, you can try restarting your computer and connecting to your router. If the simple restart fails to work, don’t worry. There are many effective troubleshooting methods for you.
Fix 1. Terminate Java Through Task Manager
As mentioned above, the “failed to bind to port Minecraft” error can be triggered by any processes of Java running in the background. To fix the error, you can try terminating the Java-related processes through Task Manager. Here’s how.
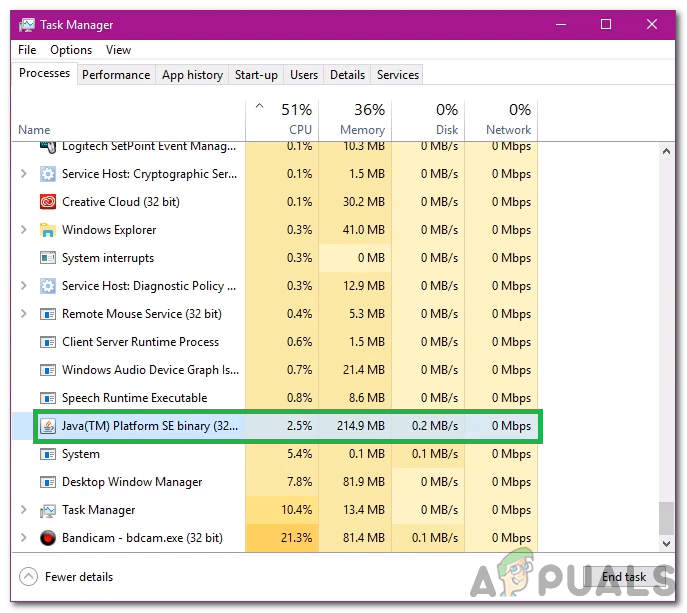
Step 1. Right-click the Start menu and select Task Manager from the context menu.
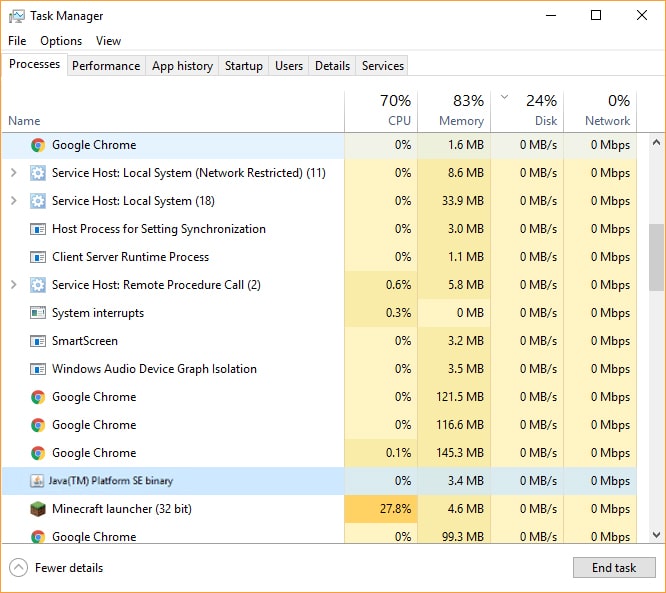
Step 2. In the Process tab, right-click the Java process and select End Task. Then follow the step to end all the Java-related processes. Make sure that a program named Java (TM) Platform SE Binary is terminated in the background.
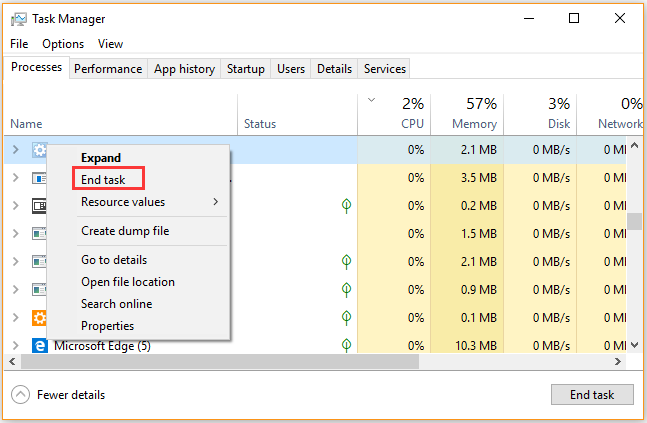
Step 3. Navigate to the Startup tab and ensure that the Java application is disabled in the startup process.
Now, you can restart the server and check if the Minecraft server failed to bind to port issue still persists.
Fix 2. Change the Server.properties for Minecraft
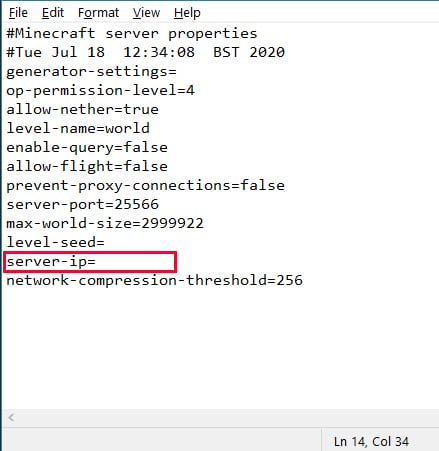
The most common reason for Minecraft failed to bind to port error comes from the incorrect IP configuration. If you have entered something besides the “server-ip=” in the server.properties file, you will encounter the “failed to bind to port Minecraft server” error.
You can fix the issue by changing the server.properties file. For that:
Step 1. If there isn’t Notepad on your Windows PC, you need to install a text editor to edit the server files.
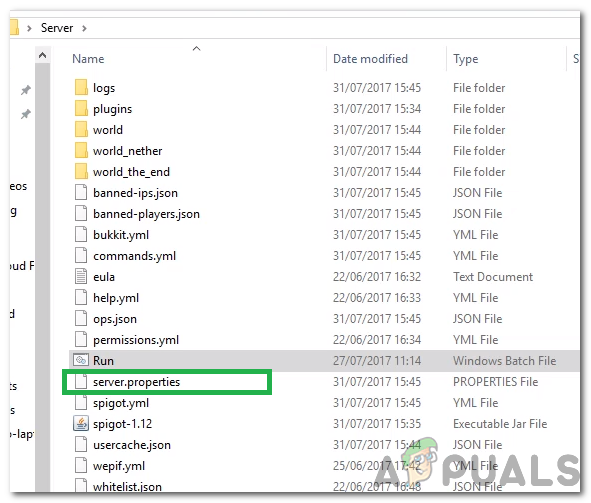
Step 2. Press Win + E keys to open the File Explorer, and then navigate to the Minecraft Server folder.
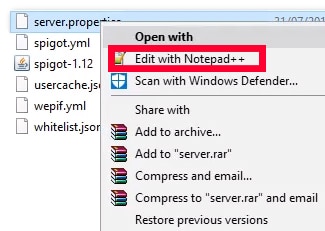
Step 3. Right-click on the Server.properties file and select Open with Notepad.
Step 4. In the text editor, find the Server-ip= option by pressing the Ctrl + F key and search for it.
Step 5. If you find an IP Address in the front of the Server-ip= option, remove the IP address. Then click on the Five > Save buttons and exit the text editor.
Now, you can run the server and see if the “failed to bind to port Minecraft server” error is fixed.
Fix 3. Add .jar/java/javaw as an Exception on Your Local Firewall
In the Minecraft forums, we found some users fixed the Minecraft failed to bind to port error by adding .jar/java/javaw as an exception to the local Firewall. Probably you should have a try. To do so, follow the steps below:
Step 1. Type firewall in the search box and then select the Windows Defender Firewall from the context menu.
Step 2. Click on Allow an app or feature through Windows Defender Firewall from the left pane.
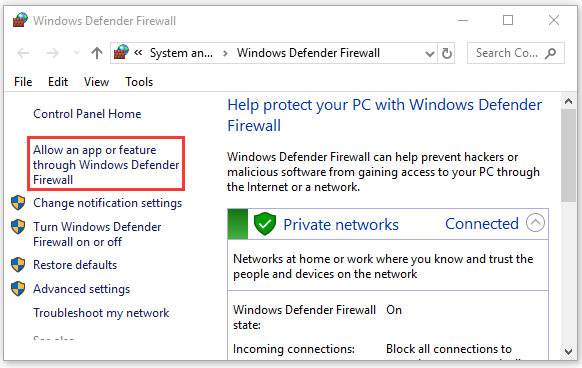
Step 3. Tick the checkbox for jar/java/javaw file from the list of installed programs and click on OK to save the changes.
Fix 4. Renew Ipconfig
As you know, the failed to bind to port Minecraft server error can be caused by network issues. Renewing ipconfig is one of the most common ways to fix the internet issue. Here we will show how to renew ipconfig.
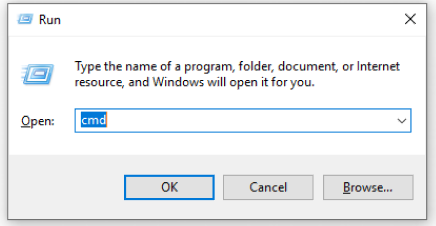
Step 1. Press Win + R keys to call out the Run dialog box and type cmd in the box. Then click on Shift + Ctrl + Enter keys to open an elevated command prompt so that you can run as administrator.
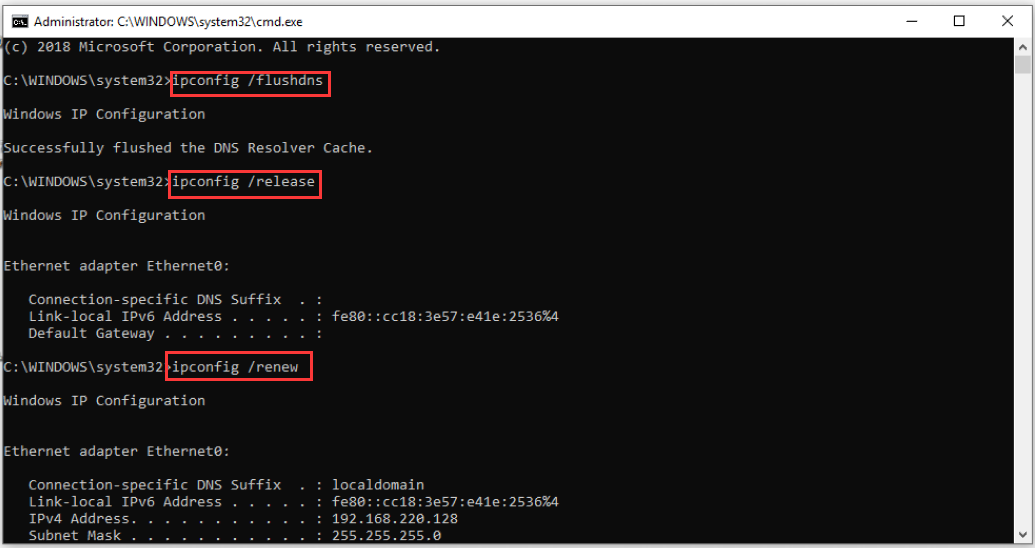
Step 2. Type the following commands one by one and hit Enter after each one. After running all commands below, you need to wait some time for this process.
- ipconfig /flushdns
- ipconfig /release
- ipconfig /renew
After that, you can check if the Minecraft server failed to bind to port issue is resolved.
Fix 5. Run Network Troubleshooter
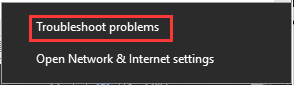
In addition, you can run the network troubleshooter to fix internet issues. It can help detect network issues and try fixing them. Right-click the Network icon at the notification menu and select Troubleshoot problems. Then Windows will diagnose the problems automatically and help you fix them.
About The Author

Position: Columnist
Ariel is an enthusiastic IT columnist focusing on partition management, data recovery, and Windows issues. She has helped users fix various problems like PS4 corrupted disk, unexpected store exception error, the green screen of death error, etc. If you are searching for methods to optimize your storage device and restore lost data from different storage devices, then Ariel can provide reliable solutions for these issues.
-
Partition Wizard
-
Partition Magic
- How to Fix Minecraft Server Failed to Bind to Port [5 Ways]
By Ariel | Follow |
Last Updated December 20, 2021
When running the Minecraft server, a lot of people encounter the “Minecraft server failed to bind to port” error. Are you also struggling to fix the error? Now, you come to the right place. This post of MiniTool summarizes 5 accessible troubleshooting methods.
Why Minecraft Server Failed to Bind to Port
The Minecraft server failed to bind to port error often appears while Minecraft port forwarding and hosting for friends. After analyzing multiple user reports and forums, some possible reasons for the issue are explored.
The improper IP configuration is the main cause of the Minecraft failed to bind to port. If the port and IP address is being used by another server, it will trigger the error. Besides, some users reported that the Minecraft server failed to bind to port when Java is running in the background.
How to Fix Minecraft Server Failed to Bind to Port
When you encounter the “failed to bind to port” error for the first time, you can try restarting your computer and connecting to your router. If the simple restart fails to work, don’t worry. There are many effective troubleshooting methods for you.
Fix 1. Terminate Java Through Task Manager
As mentioned above, the “failed to bind to port Minecraft” error can be triggered by any processes of Java running in the background. To fix the error, you can try terminating the Java-related processes through Task Manager. Here’s how.
Step 1. Right-click the Start menu and select Task Manager from the context menu.
Step 2. In the Process tab, right-click the Java process and select End Task. Then follow the step to end all the Java-related processes. Make sure that a program named Java (TM) Platform SE Binary is terminated in the background.
Step 3. Navigate to the Startup tab and ensure that the Java application is disabled in the startup process.
Now, you can restart the server and check if the Minecraft server failed to bind to port issue still persists.
Fix 2. Change the Server.properties for Minecraft
The most common reason for Minecraft failed to bind to port error comes from the incorrect IP configuration. If you have entered something besides the “server-ip=” in the server.properties file, you will encounter the “failed to bind to port Minecraft server” error.
You can fix the issue by changing the server.properties file. For that:
Step 1. If there isn’t Notepad on your Windows PC, you need to install a text editor to edit the server files.
Step 2. Press Win + E keys to open the File Explorer, and then navigate to the Minecraft Server folder.
Step 3. Right-click on the Server.properties file and select Open with Notepad.
Step 4. In the text editor, find the Server-ip= option by pressing the Ctrl + F key and search for it.
Step 5. If you find an IP Address in the front of the Server-ip= option, remove the IP address. Then click on the Five > Save buttons and exit the text editor.
Now, you can run the server and see if the “failed to bind to port Minecraft server” error is fixed.
Fix 3. Add .jar/java/javaw as an Exception on Your Local Firewall
In the Minecraft forums, we found some users fixed the Minecraft failed to bind to port error by adding .jar/java/javaw as an exception to the local Firewall. Probably you should have a try. To do so, follow the steps below:
Step 1. Type firewall in the search box and then select the Windows Defender Firewall from the context menu.
Step 2. Click on Allow an app or feature through Windows Defender Firewall from the left pane.
Step 3. Tick the checkbox for jar/java/javaw file from the list of installed programs and click on OK to save the changes.
Fix 4. Renew Ipconfig
As you know, the failed to bind to port Minecraft server error can be caused by network issues. Renewing ipconfig is one of the most common ways to fix the internet issue. Here we will show how to renew ipconfig.
Step 1. Press Win + R keys to call out the Run dialog box and type cmd in the box. Then click on Shift + Ctrl + Enter keys to open an elevated command prompt so that you can run as administrator.
Step 2. Type the following commands one by one and hit Enter after each one. After running all commands below, you need to wait some time for this process.
- ipconfig /flushdns
- ipconfig /release
- ipconfig /renew
After that, you can check if the Minecraft server failed to bind to port issue is resolved.
Fix 5. Run Network Troubleshooter
In addition, you can run the network troubleshooter to fix internet issues. It can help detect network issues and try fixing them. Right-click the Network icon at the notification menu and select Troubleshoot problems. Then Windows will diagnose the problems automatically and help you fix them.
About The Author
Position: Columnist
Ariel is an enthusiastic IT columnist focusing on partition management, data recovery, and Windows issues. She has helped users fix various problems like PS4 corrupted disk, unexpected store exception error, the green screen of death error, etc. If you are searching for methods to optimize your storage device and restore lost data from different storage devices, then Ariel can provide reliable solutions for these issues.
-
Предисловие
Так бывает, что вы хотите запустить игровой сервер для друзей со своего домашнего компьютера, но сталкиваетесь со столь популярной ошибкой — Failed to bind to port.
Казалось бы, материалов на эту тему полно, но ни один из них не помог решить проблему.
Что же, перед вами моя статья, и она поможет разобраться в вопросе.
Однако в этот раз придётся думать чуть больше, чем тогда, когда вы пытались открыть порт при помощи скайпа.
Следующая информация даст вам базовые представления о том, что и как работает в вашем же компьютере, в вашей же квартире и в нашем интернете.
Кому-то, уверен, статья поможет запустить игровой сервер.
А кому-то, возможно, откроет глаза на что-то более интересное и важное.
В любом случае, надеюсь, я смогу сэкономить время многим людям.Я не претендую на звание мудрого старца, а предоставленная мной информация не является истиной в последней инстанции.
Я не имею специального технического образования в сфере. И, как и любой другой человек, могу ошибаться.
Если вы уверены, что я не прав в чём-либо — просто напишите об этом с необходимыми пояснениями. Я всегда готов разобраться в ситуации и признать свои ошибки.
Также я буду рад предложениям дополнить статью вашими материалами.В далёком 2013-м я захотел запустить игровой сервер «для друзей».
Сколько я не пытался следовать различным гайдам — результат был неутешительный.
Тогда я был полностью уверен, что делаю что-то не так.
К сожалению, тогда я так и не наткнулся ни на один сайт, который объяснил бы, что я бьюсь головой в железную дверь.
Проще говоря, в моей ситуации не было нормальной возможности запустить сервер во внешней сети, но об этом позже.
Если бы у меня тогда была эта статья — я бы разобрался со всем буквально за час, а не тратил бы недели на тщетные попытки поиграть с друзьями.
Конечно, уже тогда был любимый Хамачи, но его 3 или даже 5 слотов нам явно не хватало.
Впрочем, обо всём по порядку.Что же, начнём с того, что определимся, на какому порту будет работать наш сервер.
По большому счёту это не имеет никакого значения.
Поэтому предлагаю стандартный для Java версии — 25565.
Именно он будет использоваться мной во всех объяснениях и примерах.Поехали дальше.
Давайте сразу разберёмся с тем, имеется ли у нас в принципе возможность сделать сервер доступным во внешней сети.
Для этого нужно понять, имеется ли у нас выделенный IP-адрес.
Выделенный — значит наш персональный.
Выделенный IP выдаётся только одному лицу — только для нашей квартиры, например.
Дело в том, что уже сейчас IPv4-адресов на всех не хватает, из-за этого за одним реальным адресом может находиться несколько лиц.
Под одним IP-адресом в сеть могут попадать сразу целые дома, улицы или даже небольшие города.
Представьте, что один из таких «коммунальных квартирантов» запустит сервер.
Как мы по одному лишь IP-адресу поймём, что нужно попасть именно к нему?
Напомню, что за этим же IP могут скрываться ещё десятки, а то и сотни других квартир.Чисто технически можно реализовать сервер даже в таких условиях — потребуется некий «проброс порта» (об этом ниже).
Но ни один провайдер не пойдёт на подобные ухищрения — если только за хорошую оплату.
Однако обычно провайдеры за дополнительные деньги предлагают услугу выделенного айпи-адреса.
Поэтому в 99% случаев для поднятия сервера наш вариант — выделенный адрес.
Такие адреса зачастую называют белыми или прямыми, хотя мне такие названия не по душе из-за несодержательности.Обязательно к прочтению:
Очень прошу не путать «Выделенный/белый IP» и «Статический IP».
Это совершенно разные понятия.
Судя названию, выделенный — это персональный.
А статический — тот, который не меняется со временам.
Даже если ваш адрес является статическим, и никогда не меняется — это не означает, что он является выделенным.
И, соответственно, не означает, что вы можете запускать свой сервер в глобальную сеть.
Опять же, целый дом из сотен и тысяч квартир может годами пользоваться одним и тем же единственным IPv4-адресом.
И ни один из жильцов при этом не сможет сделать доступным свой сервер из внешней сети.Собственно, как конкретно проверить, является ли ваш IP выделенным?
Всё довольно просто — нужно сравнить тот адрес, что выдал нам провайдер с тем адресом, который используется при выходе во внешнюю сеть.Наш внешний адрес мы можем посмотреть, например, тут: 2ip.ru
Именно под внешним адресом нас видят все сайты, другие сервера и сервисы.
Именно по этому адресу к нам будут подключаться люди на наш сервер.Адрес, выданный провайдером, нужно смотреть на том устройстве, куда, собственно, втыкается провод от провайдера.
Думаю, у большинства людей сейчас этим устройством является роутер.
Собственно, заходим туда и находим раздел IP или DHCP.
Для всех роутеров это будет выглядеть по-разному, но лично у меня вот так:

Иногда IP-адрес загружается не автоматически, а настраивается вами вручную при подключении интернета — это не столь важно.Видел и такое, что провод от провайдера втыкается сразу в компьютер.
Тут разобраться можно быстрее, потому что всё универсально.
Ну, по крайней мере для Windows…
Открываем cmd, прописываем команду ipconfig и видим список сетевых интерфейсов своего компьютера.
Нас интересует «Адаптер Ethernet», если мы подключены по проводу и «Адаптер WiFi/беспроводный сети», если подключены без лапши.
Названия могут отличаться, но суть везде одна. Главное с Bluetooth не спутайте.
Теперь нужна строка «IPv4-адрес» — это и будет адрес, выданный провайдером (или вашем же оборудованием, если подключены через него).
Выглядеть будет примерно так:
Про свитчи, патчи и прочие приблуды спрашивать не нужно. Думаю, вы и сами всё понимаете.
Собственно, теперь у нас есть адрес от провайдера и наш внешний адрес.
Теперь, как я писал выше, их нужно просто сравнить.Поздравляю, у вас выделенный адрес и вы можете без проблем организовать свой сервер во внешней сети.
Вы можете продолжать читать материал, следующая информация для вас.Что же, у меня плохие новости.
Видимо, вам придется заказывать у провайдера услугу выделенного айпи.
Вероятно, адрес, выданный вам провайдером, попадает в один из этих диапазонов:
10.0.0.0 — 10.255.255.255
100.64.0.0 — 100.127.255.255
172.16.0.0 — 172.31.255.255
192.168.0.0 — 192.168.255.255
Не исключено, что прямо сейчас ваш сосед — Вася из 5Б — оскорбляет админа на вашем любимом сервере майнкрафта.
И если его отправят в бан по IP — вы тоже не сможете построить свою коробку возле спауна.
Какая жалость.
Впрочем, вы знаете, что делать.
Васю, конечно, искать не стоит, а вот заказать выделенный IP — вполне можно.
Заодно и свой сервер удастся запустить.
А пока такой возможности нет — боюсь, эта статья не для вас.В 2013-м я как раз оказался в ситуации, когда провайдер пожадничал моей семье выделенный IP-адрес.
С вероятностью 100% два адреса не совпали бы, если бы тогда их нашёл и сравнил.
К сожалению, я не так быстро осознал всю плачевность своей ситуации.
Можно было бы поставить Хамачи и успокоиться.
Но я продолжил искать варианты решения своего вопроса, пропустив самый важный шаг — проверка наличия выделенного IP.
К сожалению, тогда я потратил ещё какое-то время на разборки с пробросом портов на роутере, открытием портов при помощи скайпа и юторрента.
Тогда я не понимал, что все эти действия не имеют ни малейшего смысла.
Поэтому поздравляю, у вас есть эта статья, а значит есть возможность не тупить из-за нехватки знаний.Теперь, когда вы уверены, что у вас выделенный адрес, вы готовы запустить сервер во внешнюю сеть «здесь и сейчас».
Но не всё так просто, если вы пользуетесь, например, своим роутером.
Проецируем ситуацию с кучей жильцов дома на вашу квартиру.
Теперь уже за вашим роутером могут скрываться несколько устройств.
Телефоны ваших родственников, ваш компьютер или ноутбук, планшет рыбки и всё остальное, что подключено к домашнему интернету.Тут на помощь приходит проброс портов.
Условно говоря, необходимо настроить роутер таким образом, чтобы при получении сигнала на 25565 порт он чётко понимал, что этот сигнал нужно перенаправить на конкретное устройство.
Например, на ваш ноутбук.
Теперь все, кто «стучится» на роутер по 25565 порту — отправляется на наш ноутбук, потому что роутер отправил «гостей» туда.
Надеюсь, суть вы уловили.
Конкретную инструкцию по пробросу не даю, т.к. всё, опять же, зависит от модели вашего устройства.
Информации в интернете полно, думаю, справитесь.Теперь, казалось бы, все запросы должны приходить на наш компьютер и прямиком на наш сервер.
Но нет… Осталась последняя преграда — фаервол (он же сетевой фильтр и брандмауэр на ОС Windows).
Это специальная программа, которая защищает компьютер от внешнего воздействия.
Это крайне важно, если компьютер подключён непосредственно ко внешней сети, а не через защищённый доверенный роутер, например.
Условно говоря, фаервол — это сторожевая собака на страже вашего компьютера.
Назначение фаервола в том, чтобы пропускать лишь тот интернет-трафик, который не сможет принести вреда.
Зачастую фаерволы запрещают абсолютно всю входящую информацию на домашних компьютерах, т.к. обычно такие компьютеры не используются в качестве серверов.
Что же, наша задача — разрешить входящие подключения на порт 25565.
Обращаю внимание, что фаервол может находиться как на уровне роутера, так и на уровне компьютера (обычно и там, и там).
Подробнее о том, как конкретно настроить разрешение порта — можно почитать в интернете.
Опять же, существует огромное множество роутеров, операционных систем и антивирусных программ (которые тоже зачастую фильтруют сетевой трафик).
Ищите то, что подходит именно вам.Вы, наверно, уже успели подумать, что сообщение «Failed to bind to port» из заголовка темы — это кликбейт?
Не тут-то было!
Решение конкретно этой проблемы можно описать одним предложением:
«Уберите из server.properties значение параметра server-ip= — оставьте его пустым«
Собственно, это всё.
Скорее всего, вы не разобрались в вопросе, поэтому вписали туда неверное значение — свой адрес с 2ip.ru, например.
Самым корректным значением параметра является то, что было там изначально — это отсутствие значения.
Ещё раз — айпи в server.properties указывать не нужно.
В 99% процентах случаев это не требуется, если вы обычный пользователь обычного домашнего интернета.
Удивлены?
Возможно, когда-нибудь я расскажу о том, почему это работает именно так.
А так же о том, что туда всё же можно вписать, если уж прям хочется.Ну и, справедливости ради, стоит упомянуть ещё о том, что порт действительно может быть занят другой программой.
Но, как правило, этого не происходит, если вы не суёте свои руки в настройки программ по типу скайпа и юторрента.
Честно откровенно, я ещё ни разу за 20 лет своей жизни не видел, чтобы на стандартном 25565 порту работало что-то кроме сервера майнкрафта.
В целом, оно и не должно.
Порт занят другим приложением?
Меняете в этом приложении порт или вовсе завершаете приложение.
Думаю, больше разжёвывать этот момент не имеет смысла.
В интернете полно однообразных статей про «Failed to bind to port», в которых вам всё подробно об этом расскажут.По итогу имеем 5 основных причин проблем неработоспособности сервера:
1) Отсутствие выделенного IP-адреса
2) Неправильная маршрутизация внутри сети — отсутствие проброса или других настроек
3) Фильтрация трафика на любом из этапов — роутер/ос/антивирус
4) Неверное заполнение server-ip в server.properties
5) Занятость порта другой программойСобственно, на этом всё.
Статья подготовлена @Dymeth специально для RuBukkit.org
Есть ли вопросы по прочитанному материалу?
Стоит ли мне продолжать писать?
Если так — о чём ещё стоит рассказать?В будущем, если будет время и желание, я займусь (или не займусь) следующими статьями:
1) Какой IP нужно указывать в server.properties? (разница 0.0.0.0, 127.0.0.1 и localhost, пара слов об интерфейсах)
2) Принципы работы…И других подобных сервисов (+пара слов о VPN, хостингах и серверах)
3) Как найти роутер и попасть в него, пара советов по настройке
4) Зачем вообще указывать IP в server.properties? (+пара слов о нескольких адресах на одном сервере)
5) Несколько слов о DynDNS и подобных сервисах (+возможно поговорим о доменах)
6) Ещё чуть-чуть о ситуации с IPv6Последнее редактирование: 15 янв 2023 -

Flajakay
Активный участник
Пользователь- Баллы:
- 76
- Имя в Minecraft:
- Flajakay
Побольше бы таких крутых гайдов))
-
Опоздал лет на 5. Уже никто дома не хостит.
-
imDaniX
Активный участник
Пользователь- Баллы:
- 96
- Имя в Minecraft:
- imDaniX
Недавно здесь был паренек с такой проблемой. Пусть будет, в конце концов — может кому и пригодится.
-
Почему бы и не похостить сервер для друзей на своём компе?
Более того, на форуме регулярно всплывают вопросы о том, почему же сервер не запускается или недоступен. Правда модер их быстро чистит.
Да и сама статья немного шире, чем просто о майнкрафте -
Laserink
Новичок- Баллы:
- 6
- Имя в Minecraft:
- Laserink
ngrok и нет никаких проблем с покупкой выделенных адресов, открытием портов и т.д.
Одна команда в командной строке программы решит всё -
Все бы сидеть за условно фришными впн тунелями. При первой же активности тебя нахер пошлют и скажут, ты нам такой не нужен «Васа»
. Да и ограничений небось дохрелион. Про пинг даже говорить не стоит. -
Laserink
Новичок- Баллы:
- 6
- Имя в Minecraft:
- Laserink
Ограничения — невозможно подключить ркон, невозможно банить по айпи (возможно, правда вот забанив одного в бан улетят все игроки сервера), а также сервер работает пока работает программа.
-
Често скажу так,если кто не хочет пользоваться хостингом, то это хороший вариант,сам сижу делают сервер не на хостинге а на втором пк с Ubuntu server, закол****ся с портами но потом оказалось всё просто)


 . Да и ограничений небось дохрелион. Про пинг даже говорить не стоит.
Поделиться этой страницей
Minecraft – одна из самых популярных игр среди симуляторов выживания. Раньше вся суть геймплея сводилась к постройке домов и защите от монстров. Сейчас же разработчики добавили возможность играть по сети, что позволяет пользователям общаться прямо во время игры. Все это достигается с помощью серверов, которые создаются самими же пользователями. В данной статье будет рассмотрена ошибка «Failed to bind to port», возникающая при попытке запуска сервера.
Устранить сбой довольно легко. Для этого достаточно проделать некоторые манипуляции с командной строкой, поэтому первым делом запустим ее: одновременно нажимаем Win + R и в появившееся поле вводим cmd. После этого нажимаем «Ок».

Открываем командную строку
На экране откроется черное окно, в котором нужно прописать слово «ipconfig». Затем нажимаем «Enter».

Пишем ipconfig
Система выведет большое количество текста, среди которого нужно скопировать содержимое строки «IPv4 адрес».

Копируем IP-адрес
Теперь переходим в папку с сервером от открываем файл «server». Здесь находим строку «server-ip» и заменяем имеющейся IP-адрес на скопированный.

Находим строку «server-ip» и заменяем имеющейся IP-адрес
Затем закрываем файл с сохранением изменений. После этого заходим в браузер и скачиваем программу UTorrent. Процесс установки софта простой, поэтому останавливаться на этом не будем. Теперь запускаем утилиту и кликаем по кнопке «Настройки», далее «Настройки программы», затем «Соединение». В последней вкладке нужно прописать свой порт. В завершении сохраняем изменения и пробуем запустить сервер.
Заключение
Таким образом, устранить ошибку Failed to bind to port в Minecraft довольно просто. Достаточно внести некоторые изменения в файл «server» и программу UTorrent. Если у вас есть другие варианты решения проблемы, то обязательно поделиться ими в комментариях.
Оценка статьи:

 (8 оценок, среднее: 4,50 из 5)
![]() Загрузка…
Загрузка…
Самое читаемое:

17.03.2022
Как установить дополнительные виджеты на экран телефона Андроид
Если у Вас возникли сложности с тем, чтобы добавить виджеты приложений на смартфон, то это пошаговое руководство…
Далее

17.03.2022
Как очистить кэш телеграмма на телефоне Андроид
Люди, которые активно используют мессенджеры, зачастую не догадываются о том, что в их мобильных гаджетах…
Далее

17.03.2022
Как скопировать ссылку на свой телеграмм Андроид
Любой из пользователей мессенджера Телеграм в тот или иной момент времени задавался вопросом, как узнать, где…
Далее

02.03.2022
Ошибка 104101 в Zoom – как исправить
Содержание
Ошибка 104101 в Zoom – как исправить
В той ситуации, что складывается в последнее время, множество…
Далее
Все проблемы можно разделить на две категории:
Часто, при решении одной проблемы возникает другая. Это может означать, что либо проблем несколько и вы решили одну из них, либо сделали всё криворуко и у вас добавилась еще одна ошибка. Так что не стоит пренебрегать инструкцией.
Проблемы при создании сервера
Причины:
Решение: Удалениеперестановка плагинов, из-за которых возникла данная ошибка. Крайне рекомендуется устанавливать плагины последовательно, по одному, а не все сразу, и проверять работоспособность сервера.
Решение: если у вас на самом деле мало оперативной памяти (256 или 512 мб), то при большом желании можно докупить новую. Если у вас ее имеется хотя бы гигабайт, то нужно сделать вот что:
Проблемы при подключении к серверу
Остальные ошибки
И хоть они возникают и не из-за проблем с сервером, но всё же я напишу о них, чтобы самые отъявленные любители нашего сайта не шли на форум и не писали о них 🙂
Итак:
Послесловие, или если статья не помогла.
Если вы не нашли своей проблемы выше (что маловероятно), либо решение по какой-то причине вам не помогло, то пишите на форум.
Для начала воспользуйтесь поиском на форуме :

И только если поиск не дал результатов, создавайте тему. Пишите так, чтобы можно было понять то, что вы написали (желательно без ошибок, если не хотите, чтобы вас засмеяли). Необходимо обязательно следовать шаблону(прямо берёте, и пишете по пунктам, а не вcё в кучу)
Шаблон для создания темы, все пункты обязательны к выполнению:
Если.
. то ваша тема будет удалена, а ее скриншот будет отправлен на Стену Позора, а вы забанены.
Ах да, можете не писать о своих ошибках в комментариях, вам никто не подскажет >:D. Извините за столь строгие меры, просто они необходимы для поддержания порядка, а также для быстрого поиска решения вашей проблемы.
Источник
Failed to bind to port в Minecraft – как исправить
Minecraft – одна из самых популярных игр среди симуляторов выживания. Раньше вся суть геймплея сводилась к постройке домов и защите от монстров. Сейчас же разработчики добавили возможность играть по сети, что позволяет пользователям общаться прямо во время игры. Все это достигается с помощью серверов, которые создаются самими же пользователями. В данной статье будет рассмотрена ошибка «Failed to bind to port», возникающая при попытке запуска сервера.
Как исправить ошибку Failed to bind to port в Minecraft
Устранить сбой довольно легко. Для этого достаточно проделать некоторые манипуляции с командной строкой, поэтому первым делом запустим ее: одновременно нажимаем Win + R и в появившееся поле вводим cmd. После этого нажимаем «Ок».
Открываем командную строку
На экране откроется черное окно, в котором нужно прописать слово «ipconfig». Затем нажимаем «Enter».
Система выведет большое количество текста, среди которого нужно скопировать содержимое строки «IPv4 адрес».
Теперь переходим в папку с сервером от открываем файл «server». Здесь находим строку «server-ip» и заменяем имеющейся IP-адрес на скопированный.
Находим строку «server-ip» и заменяем имеющейся IP-адрес
Затем закрываем файл с сохранением изменений. После этого заходим в браузер и скачиваем программу UTorrent. Процесс установки софта простой, поэтому останавливаться на этом не будем. Теперь запускаем утилиту и кликаем по кнопке «Настройки», далее «Настройки программы», затем «Соединение». В последней вкладке нужно прописать свой порт. В завершении сохраняем изменения и пробуем запустить сервер.
Заключение
Таким образом, устранить ошибку Failed to bind to port в Minecraft довольно просто. Достаточно внести некоторые изменения в файл «server» и программу UTorrent. Если у вас есть другие варианты решения проблемы, то обязательно поделиться ими в комментариях.
Источник
Minecraft Forums
FAILED TO BIND TO PORT!

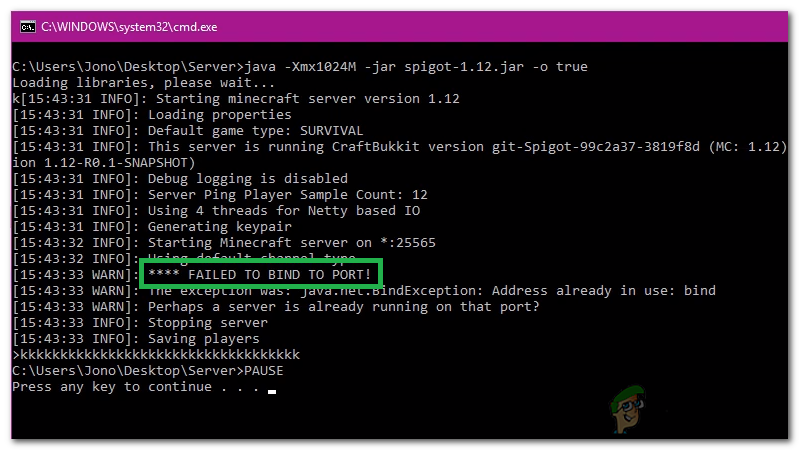
Hi. I have problem. I cant start my server.
I get crash:
And my Server.properties:
I restart computer multiple times and I have port forward for all ports.
I googled this and nothing help.
Please help.


Still not working and I dont have any programs running on this port.

Me and my friend had this problem and this is how we fixed it: Completely delete the server and everything that it has, if u have saves back them up, download a completely new server file from Bukkit or minecraft.net what ever youre using, set it up normally and do everything like you usually do EXCEPT writing your ip where it says to, when u run the server for the first time it will automatically find the ip and write it down for you, but if you write it down manually you will get that error, hope I could help.
alright my last post was a little unclear, so do what i told you to in the last post but what I am trying to emphasize is that you DONT write your IP in the properties thing, and remember you have to do this with a fresh minecraft server file. like i said hope i could help.
Nope, still nothing.
I think it’s something with my computer, beacuse I was able to run server, but I have to reinstall windows, becuse of some problems.
I will try to just update drivers.
Источник
Failed to bind to port minecraft как исправить
[Гайд] Как создать сервер, не открывая портов
Начинающие игроки часто пытаются создать сервер прямо на компе, и тут наступает облом — порты. Я видел очень много вопросов «как аткрыть портЬ я нимагу», и решил написать этот гайд.
Шаг 1 — запускаем консоль:
1. Заходим в меню «Пуск»
2. Заходим в «Все программы» — «Стандартные» — «Выполнить»
3. Вводим cmd и жмем «Ок»
В виндовс ХР — вводим в поиск Пуска cmd.exe
Шаг 2 — находим порты:
Данный способ основывается на том, что в винде всегда есть часть портов, которые открыты по умолчанию.
Итак, нам нужно:
1. Получить список портов — вводим netstat, жмем Enter и терпеливо ждем.
Получаем что-то вроде этого:

2. Ищем порты со статусом «ESTABILISHED» или «TIME_WAIT» (Внешний адрес = номер порта). Желательно, чтобы у этого порта были указаны оба статуса.
3. Запоминаем номер порта. (Если внешний адрес — www:12345, то номер порта — 12345)
Если www у вас нет, то и не надо.
Шаг 3 — узнаем свой айпи:
Просто вводим в Яндекс/Гугл «Мой айпи», и он сам вам его покажет
Шаг 4 — вводим данные:
1. Открываем файл server.properties
2. В поле «server-ip=» вводим свой айпи
3. В поле «server-port=» вводим запомненный нами порт
Шаг 5 — запускаем сервер:
Запускаем ваш сервер, и радуемся. Айпи вашего сервера будет «ВашАйпи:ВашПорт»
Если у кого-то стоит файрвол, то при запросе bukkit’у нужно будет разрешить все входящие подключения.
Вот и все, надеюсь я заслужил благодарность или плюс
Failed to bind to port в Minecraft – как исправить
Minecraft – одна из самых популярных игр среди симуляторов выживания. Раньше вся суть геймплея сводилась к постройке домов и защите от монстров. Сейчас же разработчики добавили возможность играть по сети, что позволяет пользователям общаться прямо во время игры. Все это достигается с помощью серверов, которые создаются самими же пользователями. В данной статье будет рассмотрена ошибка «Failed to bind to port», возникающая при попытке запуска сервера.
Как исправить ошибку Failed to bind to port в Minecraft
Устранить сбой довольно легко. Для этого достаточно проделать некоторые манипуляции с командной строкой, поэтому первым делом запустим ее: одновременно нажимаем Win + R и в появившееся поле вводим cmd. После этого нажимаем «Ок».
Открываем командную строку
На экране откроется черное окно, в котором нужно прописать слово «ipconfig». Затем нажимаем «Enter».
Система выведет большое количество текста, среди которого нужно скопировать содержимое строки «IPv4 адрес».
Теперь переходим в папку с сервером от открываем файл «server». Здесь находим строку «server-ip» и заменяем имеющейся IP-адрес на скопированный.
Находим строку «server-ip» и заменяем имеющейся IP-адрес
Затем закрываем файл с сохранением изменений. После этого заходим в браузер и скачиваем программу UTorrent. Процесс установки софта простой, поэтому останавливаться на этом не будем. Теперь запускаем утилиту и кликаем по кнопке «Настройки», далее «Настройки программы», затем «Соединение». В последней вкладке нужно прописать свой порт. В завершении сохраняем изменения и пробуем запустить сервер.
Заключение
Таким образом, устранить ошибку Failed to bind to port в Minecraft довольно просто. Достаточно внести некоторые изменения в файл «server» и программу UTorrent. Если у вас есть другие варианты решения проблемы, то обязательно поделиться ими в комментариях.
Datalife Engine Demo
Оглавление (жми на ошибку, если лень читать всё)
Предисловие
Все проблемы можно разделить на две категории:
Часто, при решении одной проблемы возникает другая. Это может означать, что либо проблем несколько и вы решили одну из них, либо сделали всё криворуко и у вас добавилась еще одна ошибка. Так что не стоит пренебрегать инструкцией.
Проблемы при создании сервера
Причины:
Решение: Удалениеперестановка плагинов, из-за которых возникла данная ошибка. Крайне рекомендуется устанавливать плагины последовательно, по одному, а не все сразу, и проверять работоспособность сервера.
Решение: если у вас на самом деле мало оперативной памяти (256 или 512 мб), то при большом желании можно докупить новую. Если у вас ее имеется хотя бы гигабайт, то нужно сделать вот что:
Проблемы при подключении к серверу
Остальные ошибки
И хоть они возникают и не из-за проблем с сервером, но всё же я напишу о них, чтобы самые отъявленные любители нашего сайта не шли на форум и не писали о них 🙂
Итак:
Послесловие, или если статья не помогла.
Если вы не нашли своей проблемы выше (что маловероятно), либо решение по какой-то причине вам не помогло, то пишите на форум.
Для начала воспользуйтесь поиском на форуме :
И только если поиск не дал результатов, создавайте тему. Пишите так, чтобы можно было понять то, что вы написали (желательно без ошибок, если не хотите, чтобы вас засмеяли). Необходимо обязательно следовать шаблону(прямо берёте, и пишете по пунктам, а не вcё в кучу)
Шаблон для создания темы, все пункты обязательны к выполнению:
Если.
. то ваша тема будет удалена, а ее скриншот будет отправлен на Стену Позора, а вы забанены.
Ах да, можете не писать о своих ошибках в комментариях, вам никто не подскажет >:D. Извините за столь строгие меры, просто они необходимы для поддержания порядка, а также для быстрого поиска решения вашей проблемы.
Minecrafting.ru
Проблема с сервером и hamachi
 Od1nRu 11.02.2016
Доброго времени! Проблема по организации обычного сервера, через хамачи для игры с друзьями
1. Windows 7 — 64-разрядная
2. Core i3; 4gb RAM; geforce 660.
3. 8 java — 32-разрядная (на 64той проседает фпс и фризит)
4. 1.6.4 forge
5. пиратская версия игры.
6. TLauncher
7. После установки сервера, установки форджа, за тем всех объемных модов с клиента, и копировании конфигов, сервер запускается и отлично все работает. Далее прописываю онлайн мод-фолс — все норм, далее ip сервера вывожу из хамачи и тут сервер любезно сообщает мне следующее:
Как обычно пытался черпать информацию из разных источников, решить проблему самостоятельно, прежде чем обращаться к Вам.
Краша соответственно не было, как и такового запуска. Вот лог сервера, может пригодится?, но он вырвиглазно большой и страшный как моя бывшая:
Не удаётся запустить minecraft server на хостинге amazon
Пытался запустить minecraft server на 25565 порту с командой
но получил java.net.BindException:
После этого попытался освободить порт командой:
но и это не помогло
Тогда попытался выдать специально разрешение на эти порты в iptables:
это даже было лишним наверное, всё равно не помогло.
Заметил ещё что при создании сервера на amazon-е используются 2 ip-адреса — внешний, по которому идёт подключение по ssh для работы из консоли и внутренний скрытый и интерфейс eth0 настроен как раз на внутренний ip.
Но запустить сервер minecraft на этом внутреннем ip тоже не помогло. Клиент не подключался.
Может кто-нибудь объяснить как работают эти внутренний и внешний ip и возможно ли всё-таки нормально запустить minecraft-сервер на таком устройстве хостинга.
Спасибо 
amazon cloud ec2 windows server 2008 r2
установил в amazon cloud ec2 windows server 2008 r2 привязал ip адрес открыл все tcp/udp порты.
Minecraft Delphi Server
В общем нужн люди которые бы помагали мне писать сервер для minecraft на Delphi. Почему именно.
Как можно запустить Minecraft с параметрами сервера, логина, и выделяемой памятью
Доброй ночи всем,люди добрые,подскажите пожалуста как можно запустить Minecraft с параметрами.
Источник
Failed To Bind Port

19 replies
Same prob here,
Useing 1.7.2 server and it is blank,
but this is the log for the server even tho it is blank in the console
[16:42:43] [Server thread/INFO]: Starting minecraft server version 1.7.4
[16:42:43] [Server console handler/ERROR]: Exception handling console input
java.io.IOException: The handle is invalid
at java.io.FileInputStream.readBytes(Native Method)
[?:1.7.0_45]
at java.io.FileInputStream.read(Unknown Source)
[?:1.7.0_45]
at java.io.BufferedInputStream.read1(Unknown Source)
[?:1.7.0_45]
at java.io.BufferedInputStream.read(Unknown Source)
[?:1.7.0_45]
at sun.nio.cs.StreamDecoder.readBytes(Unknown Source)
[?:1.7.0_45]
at sun.nio.cs.StreamDecoder.implRead(Unknown Source)
[?:1.7.0_45]
at sun.nio.cs.StreamDecoder.read(Unknown Source)
[?:1.7.0_45]
at java.io.InputStreamReader.read(Unknown Source)
[?:1.7.0_45]
at java.io.BufferedReader.fill(Unknown Source)
[?:1.7.0_45]
at java.io.BufferedReader.readLine(Unknown Source)
[?:1.7.0_45]
at java.io.BufferedReader.readLine(Unknown Source)
[?:1.7.0_45]
at lo.run(SourceFile:78) [minecraft_server.1.7.4.exe:?]
[16:42:43] [Server thread/INFO]: Loading properties
[16:42:43] [Server thread/INFO]: Default game type: SURVIVAL
[16:42:43] [Server thread/INFO]: Generating keypair
[16:42:43] [Server thread/INFO]: Starting Minecraft server on 192.168.1.109:25565
[16:42:44] [Server thread/WARN]: **** FAILED TO BIND TO PORT!
[16:42:44] [Server thread/WARN]: The exception was: java.net.BindException: Address already in use: bind
[16:42:44] [Server thread/WARN]: Perhaps a server is already running on that port?
[16:42:48] [Server thread/INFO]: Stopping server
[16:42:48] [Server thread/INFO]: Saving worlds
[16:42:48] [Server thread/ERROR]: Exception stopping the server
java.lang.NullPointerException
at net.minecraft.server.MinecraftServer.a(SourceFile:271)
[minecraft_server.1.7.4.exe:?]
at net.minecraft.server.MinecraftServer.n(SourceFile:296)
[minecraft_server.1.7.4.exe:?]
at net.minecraft.server.MinecraftServer.run(SourceFile:389) [minecraft_server.1.7.4.exe:?]
at lb.run(SourceFile:616) [minecraft_server.1.7.4.exe:?]
[16:42:48] [Server Shutdown Thread/INFO]: Stopping server
[16:42:48] [Server Shutdown Thread/INFO]: Saving worlds
Источник
This thread was marked as Locked by user-6840779.
-
Search
-
Search all Forums
-
Search this Forum
-
Search this Thread
-
-
Tools
-
Jump to Forum
-
- |<<
- <
- >
- >>|
- 1
- 2
- 3
- Next
-
#1
Aug 24, 2013
Northcode-
View User Profile
-
View Posts
-
Send Message
- Coal Miner
- Join Date:
1/22/2012
- Posts:
136
- Minecraft:
Jenjen1324
- Member Details
So I lately have seen a lot of posts about the «Failed to bind to port…» message so I decided to post a solution for all of those.
Just to make sure: The message has generally NOTHING to do with your router or port-forwarding!
Common solutions
- The problem is that another instance of the server is already running on that port. If you can’t find the console to that port it may have crashed.
- If you have entered something in «server-ip=» in the server.properties file REMOVE IT!
- The local firewall of your computer could be blocking it. Add .jar/java/javaw as an exception.
To solve that you need to go to your taskmanager and look for a java process and terminate it.
Other solutions
The problem can also occur when you aren’t connected to any network. You need to make sure that you are connected to your router. Try the following steps:- Restart your computer
- Renew your ipconfig
- Open the network and sharing center and Troubleshoot problems (ik that the troubleshooter is sucky in windows but it can help setting up a connection.
- Check if you have your network drivers installed
If nothing works you can try changing the port in the server.properties and check that. If it works then it’ll be most likely that something is using the port already (another server/application). If it still doesn’t work it’s probably firewall issue. You can try disabling it or adding an exception to .jar, java and/or javaw
If you have any other solutions or that doesn’t fix your problem please post it here and I will try to help and resolve the problem.
Edit: Updated with some more cases/solutions
-
-
#3
Aug 24, 2013
Northcode-
View User Profile
-
View Posts
-
Send Message
- Coal Miner
- Join Date:
1/22/2012
- Posts:
136
- Minecraft:
Jenjen1324
- Member Details
Well it can have something to do with the local computer. When the computer itself blocks the usage of the port. I can hardly believe that it has something to do with the portforwarding, and about the internet activity: it should be able to open the port if you are connected to at least one network (even if it’s online or offline from the www)
I’ll add some stuff to the main post.
-
-
#4
Aug 24, 2013
Survivzor-
View User Profile
-
View Posts
-
Send Message
- Void Walker
- Location:
Don’t matter where u from; it’s
- Join Date:
9/16/2011
- Posts:
1,670
- Member Details
THE most common cause of this is people entering a server.properties value for ‘server-ip=’
Quote from rch
I use my shoe temporary Minecraft window sponge.
-
-
#5
Aug 24, 2013
Northcode-
View User Profile
-
View Posts
-
Send Message
- Coal Miner
- Join Date:
1/22/2012
- Posts:
136
- Minecraft:
Jenjen1324
- Member Details
THE most common cause of this is people entering a server.properties value for ‘server-ip=’
Updated.
And thanks for moving my post to the right section. I didn’t notice this category
-
-
#7
Sep 25, 2013
Stuticon-
View User Profile
-
View Posts
-
Send Message
- Newly Spawned
- Join Date:
9/25/2013
- Posts:
1
- Member Details
Ok listen i need help with making my server. MY server has been portforawrd(the console works fine). So when i open the console then open my minecraft server. It will say this «[SEVERE] Reaced connection timed out. Why does that say that. I cant play my minecraft server with my friends until that thing/sentence goes Away.
So plz help me
-
-
#9
Feb 2, 2014
What do I do if the server ip looks like this:
[12:14:54 INFO]: Starting Minecraft server on *:25565
It isn’t using my IP -
#10
Apr 11, 2014
I am having the same problem as TheOneWhoIsWlarus
-
#11
Apr 12, 2014
Northcode-
View User Profile
-
View Posts
-
Send Message
- Coal Miner
- Join Date:
1/22/2012
- Posts:
136
- Minecraft:
Jenjen1324
- Member Details
What do I do if the server ip looks like this:
[12:14:54 INFO]: Starting Minecraft server on *:25565
It isn’t using my IPI am having the same problem as TheOneWhoIsWlarus
The server doesn’t need to know it’s own IP. It’s like you don’t need to know where you live to receive a letter, but you need to know where you mailbox is -> the port. The server should work for you since *:25565 is the same message as I get and that’s the message you should get.
If the server is running on the same computer as you are playing minecraft, try connecting in minecraft to «localhost». -
-
#12
Apr 25, 2014
The best answer is to go into your properties document and go down and look for something called port and enter
port: 25565— Change the port to below
port: 25573That might fix the problem! Thanks and atleast tell me if this was helpful!
-
#15
Jun 19, 2014
umm i need help im trying to make a minecraft server but i have a internet provider called WOW if u can help i cant seem to find out how to port forwarder can u plz help add me on skype it would help a lot thx
Skype:VIZekushion
-
#17
Aug 31, 2014
The best answer is to go into your properties document and go down and look for something called port and enter
port: 25565- Change the port to below
port: 25573That might fix the problem! Thanks and atleast tell me if this was helpful!
I tried that method, but it keeps showing this!
[18:20:02 INFO]: Starting minecraft server version 1.7.5
[18:20:02 INFO]: Loading properties
[18:20:02 INFO]: Default game type: SURVIVAL
[18:20:02 INFO]: Generating keypair
[18:20:02 INFO]: Starting Minecraft server on aruthor325.no-ip.org:25573
[18:20:02 WARN]: **** FAILED TO BIND TO PORT!
[18:20:02 WARN]: The exception was: java.net.BindException: Can’t assign requested address
[18:20:02 WARN]: Perhaps a server is already running on that port? -
#18
Sep 20, 2014
Northcode-
View User Profile
-
View Posts
-
Send Message
- Coal Miner
- Join Date:
1/22/2012
- Posts:
136
- Minecraft:
Jenjen1324
- Member Details
There might be a problem with the firewall of the computer. Try turning it off or if you are able to do it, add an exception.
-
-
#19
Nov 21, 2014
I am having this problem and looked and looked logs and files and I can’t find the problem!:(
-
#20
Nov 23, 2014
Ok I have a minecraft server and I can get on. How do I Get my friends on as well I’ve tried putting my ip in the server ip spot but then it just says » **FAILED TO BIND TO PORT!
the exception was : Java.net.bindException : cannot assign requested address : bind
perhaps a server is already running on that port ?
»
So that’s what it says can you help?
-
#22
Nov 28, 2014
DroidKiwi-
View User Profile
-
View Posts
-
Send Message
- Out of the Water
- Join Date:
9/1/2014
- Posts:
7
- Member Details
My friend and me are trying to play Tekkit Lite multiplayer. I can host the server without issues but he always get this erro: FAILED TO BIND TO PORT.
If the «server-ip=» value is blank, the server works, but I can’t connect. We tried to add a exception in the firewall but it doesn’t solved the error.
There is no another server running with the same IP. I also have tried to change the port to 25573 but it didn’t work.
We both use Hamachi.
-
-
#25
Dec 15, 2014
DroidKiwi-
View User Profile
-
View Posts
-
Send Message
- Out of the Water
- Join Date:
9/1/2014
- Posts:
7
- Member Details
The IP you give your friends is your external IP. Through it your friends connect to you. You also have an internal IP, in which the server runs. Your external ip is how others see your computers internal IP, so they need to use your external ip to connect to your internal ip, in which the server runs.
A few days ago, my friend also had this error, because the firewall was blocking the connection between the Internet and Minecraft. Try to create an exception for minecraft, go to: Control Panel/System and Security/Windows Firewall. Click on Allow a program or feature through Windows Firewall, Change settings and look for Java(TM) Platform SE binary. Allow all to public and private networks. Done!
If you still get errors, disable firewall and try to play online LAN.
-
-
#26
Jan 10, 2015
Sicklick-
View User Profile
-
View Posts
-
Send Message
- Out of the Water
- Join Date:
2/11/2013
- Posts:
5
- Member Details
THIS IS WRONG!
Right now, most of the people wants there friends or family to play together in there server. This thread is helpful to some people but most of the people just complain. So I want to fix the FAILED TO BLIND PORT, but you are just saying to run the server with the port *25565. That means only you can join the server cause there is no ip. Well, you can also use Hamachi or port foward I tried all of those setting but it fails. So people want to save there IP and play so other people can join. Please fix this issue and make people don’t complain
-
-
#27
Jan 15, 2015
Northcode-
View User Profile
-
View Posts
-
Send Message
- Coal Miner
- Join Date:
1/22/2012
- Posts:
136
- Minecraft:
Jenjen1324
- Member Details
I stand with my point.
To clarify: The server-ip config is the IP the server is listening on incoming connections. If you leave it empty it’s going to listen to *:[configured port (25565 by default)] which means it doesn’t matter what local and/or remote ip the server is running on. Failed to bind to port is an issue which is caused by the host operating system. Either because something is already running on that port or the OS isn’t allowing you to open a TCP connection on that port (firewall,permissions and possible a hundred other possibilities).
In my opinion I am in the right, I have a fair knowledge on how TCP/IP connections work and I have run quite a few servers at the same time on the same machine. Never have I ever put something in the server-ip unless I was running with a bungee/proxy setup and it was always accessible from local and remote.
Edit: If you are using hamachi you may have to put your hamachi ip in the server-ip. Maybe the server doesn’t listen to VPN connections by default but I’m not so sure since I haven’t really used it much after I got a root server.
-
- To post a comment, please login.


- 1
- 2
- 3
- Next
- |<<
- <
- >
- >>|
Posts Quoted:
Reply
Clear All Quotes
Minecraft is a sandbox construction game that has been developed by Mojang AB. It has been existent and popular ever since its release and has recently acquired a renewal in its popularity. Players can also create their servers and host games for their friends. However, quite recently, a lot of people have been facing the “Failed to Bind Port” Error while running their servers.
What Causes the “Failed to Bind to Port” Error on Minecraft?
After receiving numerous reports from multiple users, we decided to investigate the issue and devised a set of solutions to fix it completely. Also, we looked into the reasons due to which it is triggered and listed them as follows.
- IP Issue: In some cases, if you have set a specific IP Address for the server to use, this error can be triggered. The IP Address and the port number might already be in use by another server hosted by somebody else due to which this issue might be triggered.
- Java Binary: If there is an instance of Java running in the background, this issue can be triggered. It seems to be a glitch where sometimes Java runs in the background and the error is triggered while running the server.
Now that you have a basic understanding of the nature of the problem, we will move on towards the solutions. Make sure to implement these in the specific order in which they are provided to avoid conflict.
Solution 1: Terminating Java
This issue was triggered in some cases due to an instance of Java running in the background. Therefore, in this step, we will be using the Task Manager to identify and eliminate any instance of Java running in the background. For that:
- Press “Windows” + “R” to open the Run prompt.

Running the Task Manager - Type in “taskmgr” and press “Enter” to open the Task Manager.
- Click on the “Processes” tab and look for any instance of Java running in the background.
- If there is one, click on it and select the “End Task” Button to eliminate it.
- Make sure that there isn’t even a single application named “Java (TM) Platform SE Binary” running in the background.

Selecting Java (TM) Platform SE Binary and clicking on the “End Task” button - Start the server and check to see if the issue persists.

Solution 2: Changing the IP Configuration
In some cases, the combination of the IP Address and the port number that is being used by the computer to create the server might already be in use by another server. Therefore, in this step, we will be configuring the server in such a way that it will automatically identify a valid IP Address. For that:
- We will need a text editor to edit the server files.
- Navigate to this address and download the appropriate version of Notepad++.
- Once downloaded, install it by following the onscreen prompts.
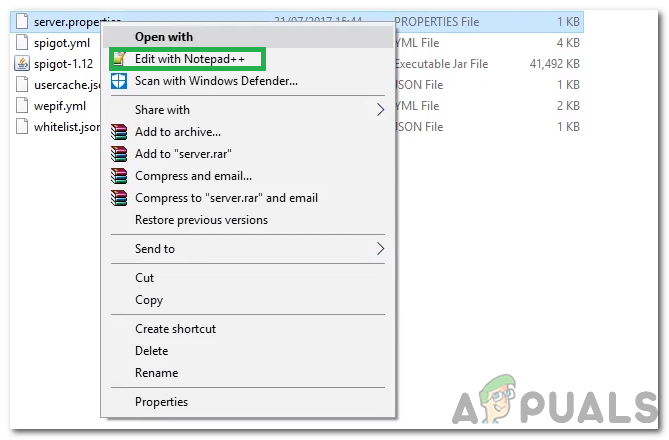
- Once installed, open the “Server” Folder for Minecraft and right-click on the “Server.properties” file.

Server.properties file inside the server folder for Minecraft - Select the “Edit with Notepad++” option.

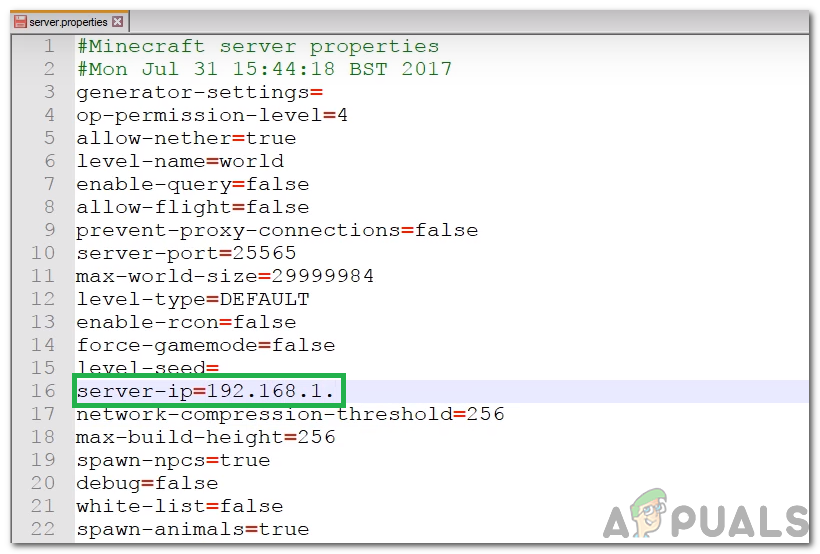
Clicking on the “Edit with Notepad++” option - Find the “Server-ip=” option.
- There might be an IP Address written in front of this option.

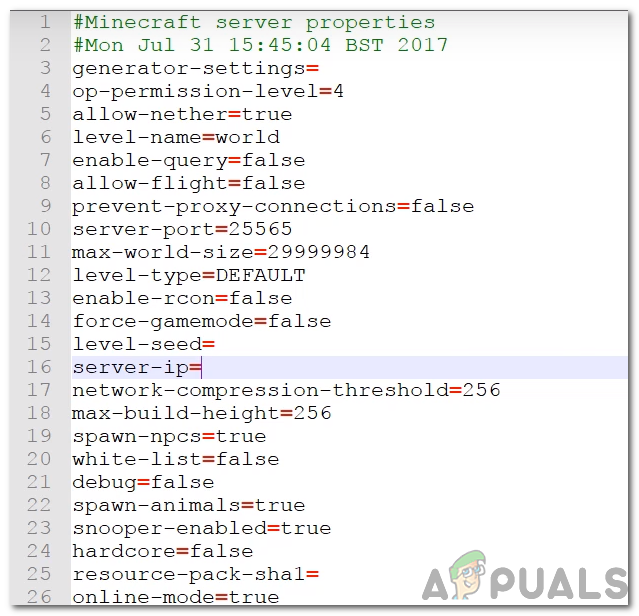
There is an IP Address written in front of the option - Erase the IP Address in front of the option and save your changes.

Erasing the address - Run the server and check to see if the issue persists.
Note: If your server has been hosted by a hosting service, it is best to contact them and get this issue sorted from their end. Also, if the above methods don’t solve your issue contact your ISP and ask them to change your IP Address and try again.

Kevin Arrows
Kevin is a dynamic and self-motivated information technology professional, with a Thorough knowledge of all facets pertaining to network infrastructure design, implementation and administration. Superior record of delivering simultaneous large-scale mission critical projects on time and under budget.
Back to top button
Can’t create or host a server on Minecraft on Windows with an error message saying ‘Failed to Bind to Port’?
One of the best features of Minecraft is that it allows you to join or host servers online, in which you can invite your friends so that you can play together in the world that you have created. However, it is really frustrating when the feature decides to malfunction especially if you are the one tasked by your friends to host the server.

This kind of error usually occurs when the Java program on your computer runs on the background, which triggers a bug or error related to server hosting. On other occasions, the ‘Failed to Bind to Port’ error can also occur due to improper network settings, outdated network drivers, or an overprotective firewall.
To eliminate this specific problem on Minecraft, we decided to create a guide that will show you different techniques on how to fix the ‘Failed to Bind to Port’ error on Minecraft.
Let’s get started!
- 1. Restart Your Computer.
- 2. Check Your Internet Connection.
- 3. Use the Network Troubleshooter.
- 4. Update Your Network Drivers.
- 5. Terminate Jave on Your Computer.
- 6. Temporarily Disable Your Firewall.
- 7. Clear Your IP Settings.
1. Restart Your Computer.
For the first method, what we recommend you do is to give your computer a simple restart. It is possible that some of your system resources related to your network may not be loaded properly the first time you turn on your computer which causes the problem on Minecraft.
To rule out this scenario, you can try rebooting your operating system by doing the steps below.
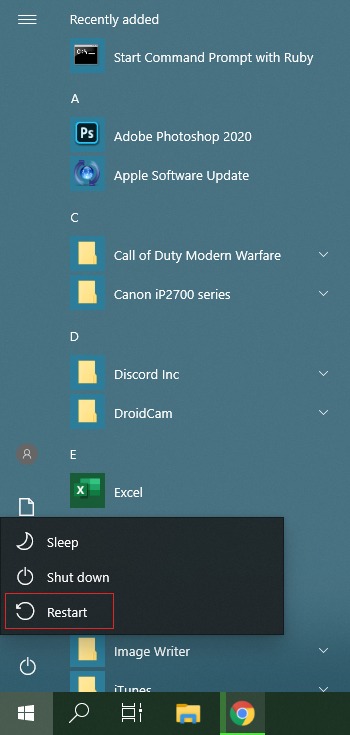
- On your computer, click on the Start button located at the taskbar below your screen.
- Inside the Start menu, click on the Power button to open the Power Options menu.
- Lastly, click on Restart. This will begin to reboot your computer.
Wait for the process to finish, then go back to Minecraft and try to host a server to see if the error message would still occur on your computer.
However, if the problem is still present after rebooting your operating system, you can proceed to the next method below to try and fix the issue with Minecraft.
2. Check Your Internet Connection.
Hosting a server on Minecraft would require a fast and stable connection from your internet so that you and your friends can play without any problems. However, if you are seeing a ‘Failed to Bind to Port’ error message on Minecraft, it can indicate that your internet connection is currently having issues.
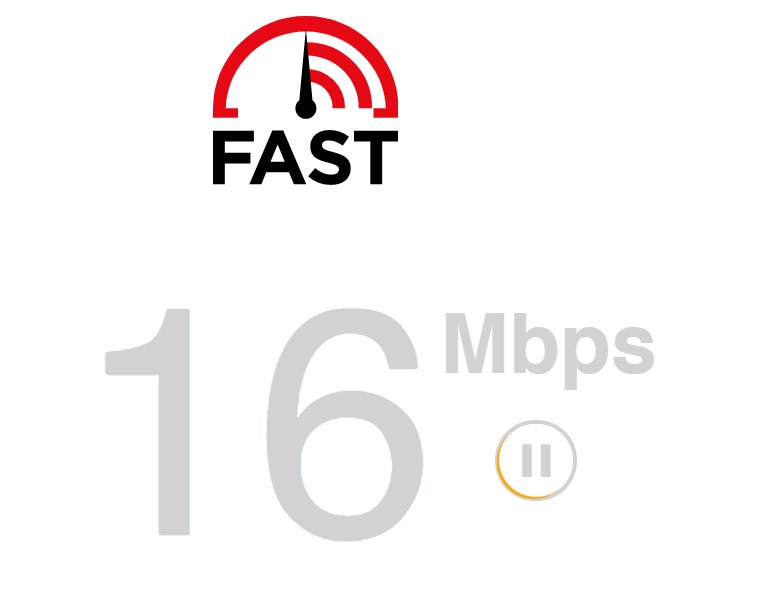
To verify this, you can try running a speed test on your computer using a third-party website like Fast.com (provided by Netflix) which can accurately measure your internet upload and download speed.
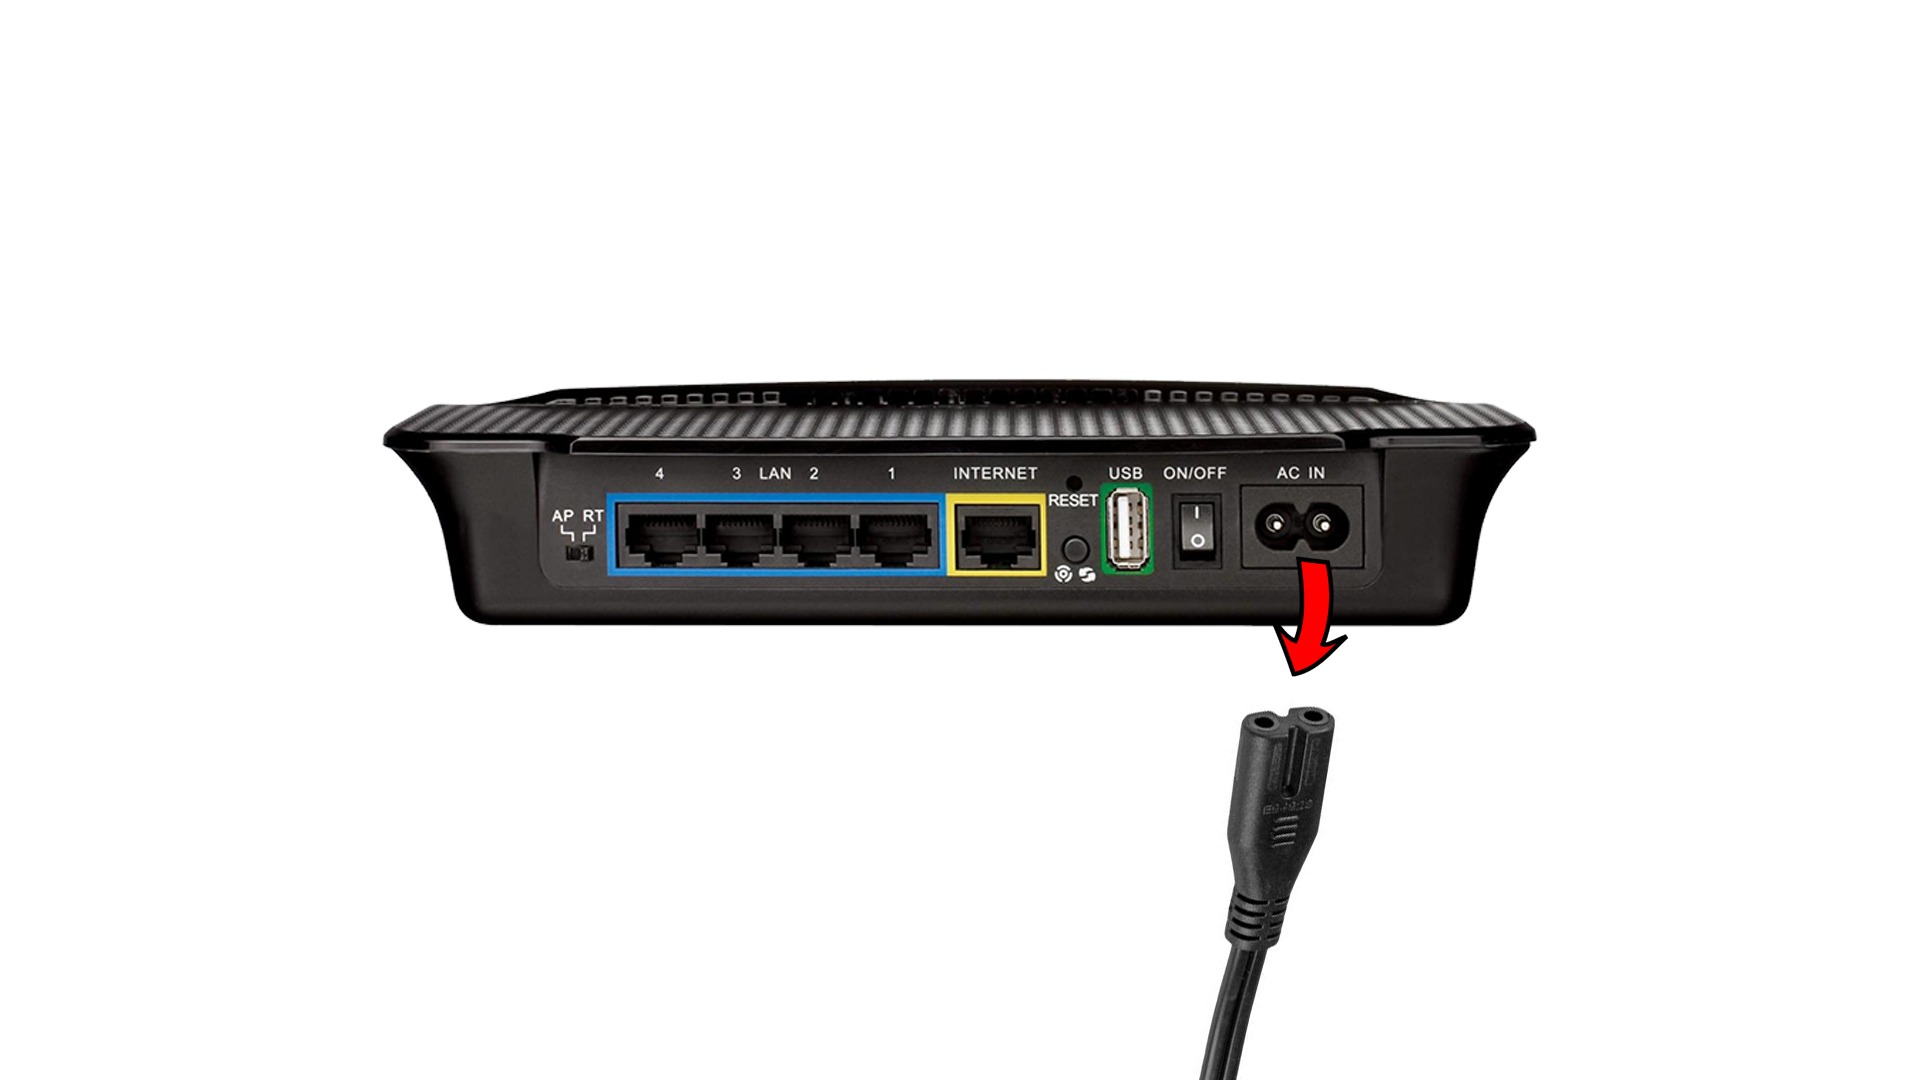
If the speed test result comes out slow or not close to the specified internet speed bandwidth on your monthly subscription, what you can do next is to restart your router. In restarting your router, locate the power cable on your router and unplug it. Now, wait for at least 5-10 seconds to allow the router to rest, then plug it back into your router to turn it on again.
Once the router has booted up, go back to your browser and perform another speed test to see if your internet connection is already fixed. However, if you are still having issues with your internet, then we recommend you to contact your ISP (Internet Service Provider) and report to them the issue that you are dealing with their internet service.
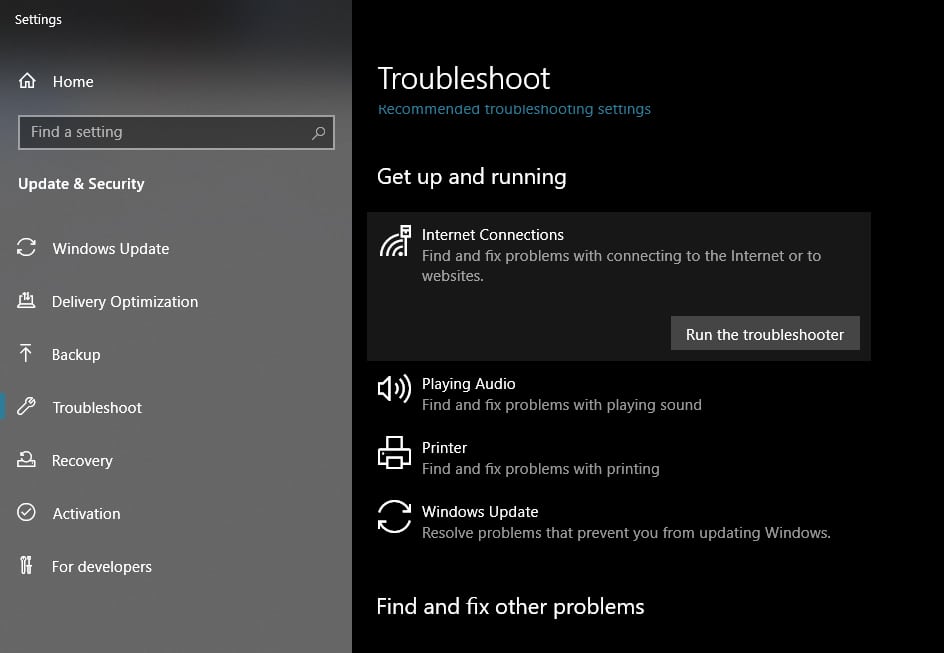
3. Use the Network Troubleshooter.
Since the ‘Failed to Bind to Port’ error message is related to your network connection, what you can try doing next is to run the Windows network troubleshooter which can effectively diagnose and fix problems related to your internet connection.
To use the troubleshooter, check out the steps below to guide you through the process.
- Press on the Windows key + S and search for Troubleshoot. Then hit Enter.
- Inside the Troubleshoot settings, click on Internet Connections.
- Lastly, click on Run the Troubleshooter. Follow the on-screen prompts to guide you on how to use the network troubleshooter.
After that, go back to Minecraft and try to host another server once again to see if the error message would still occur on the game.
4. Update Your Network Drivers.
If the troubleshooter was not able to fix the issue on Minecraft, what you can try doing next is to update your network drivers. It is possible that your drivers got corrupted during use or it has an existing bug or error which causes problems to the game when you try to host a server.
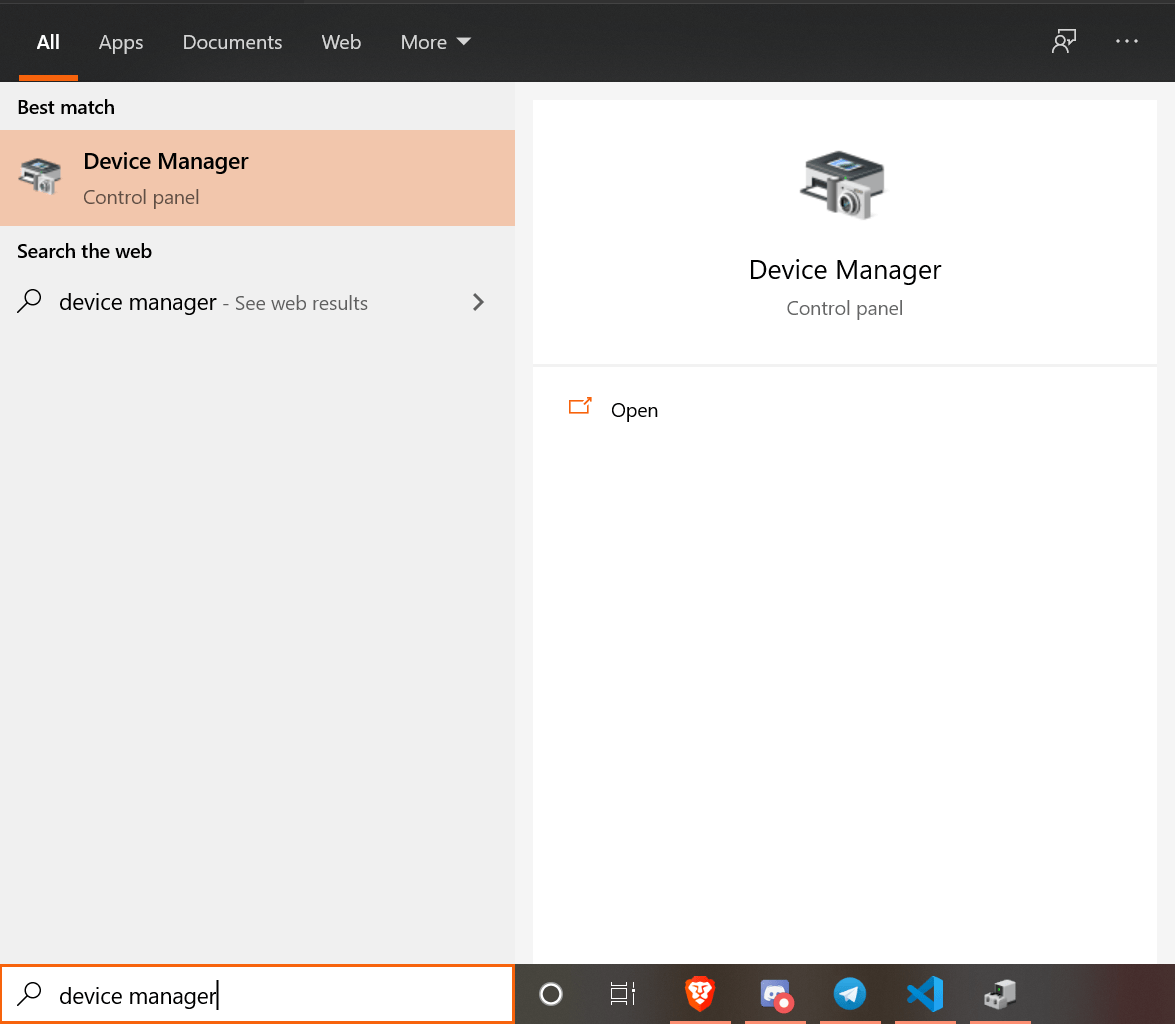
To rule this out, you can check for an update on your drivers by doing the steps below.
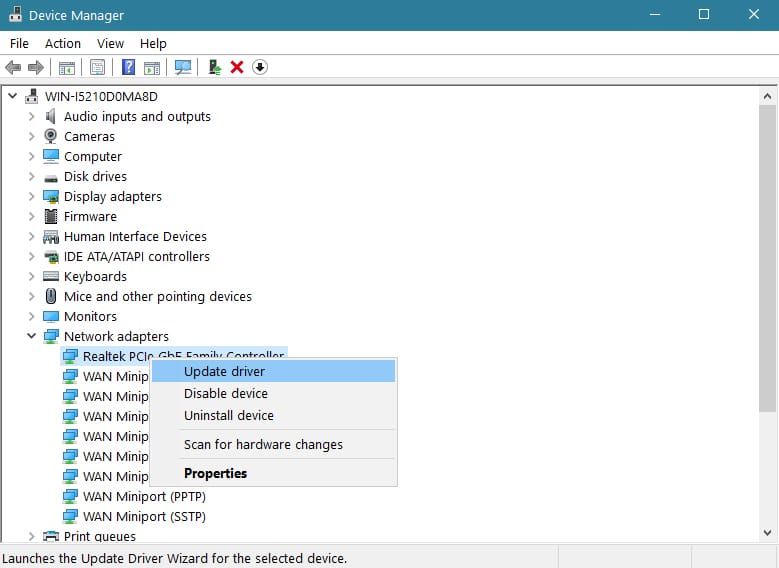
- On your keyboard, press on the Windows key + S and search for Device Manager.
- After that, click on Open to launch it.
- Next, click on Network Adapters to expand it.
- Lastly, right-click on your network driver and select Update Driver. Follow the on-screen prompts to properly update the driver on your computer.
After installing the driver update, restart your computer and try to host another server on Minecraft again to see if the ‘Failed to Bind to Port’ error message would still occur on your computer.
On the other hand, if you are still unable to host a game on Minecraft, what you can do next is to check if Java is running in the background.
5. Terminate Java on Your Computer.
For some unknown reasons, if the Java program on your computer is running in the background problems with hosting a server on Minecraft occur. In this case, what you should do is to close the Java program on your computer manually before hosting a server on the game.
To do this, check out the guide below.
- On your computer, press and hold the CTRL + ALT + DEL key on your keyboard to open the selection screen.
- Next, click on Task Manager.
- Lastly, find the Java program from the list of apps running on your computer and click the End Task button to close it.
Now, go back to Minecraft and try to host a server once again to see if the error message would still occur on your computer.
6. Temporarily Disable Your Firewall.
Since Minecraft uses your network to create a virtual server for your friends to join, it is possible that your firewall is actually blocking Minecraft from making any changes on your network which triggers the ‘Failed to Bind to Port’ error message.
To bypass this, you can try disabling your firewall while hosting servers on Minecraft. Check out the steps below on how to do this.
- First, press on Windows key + S on your keyboard and search for Windows Defender Firewall.
- Next, click on Open.
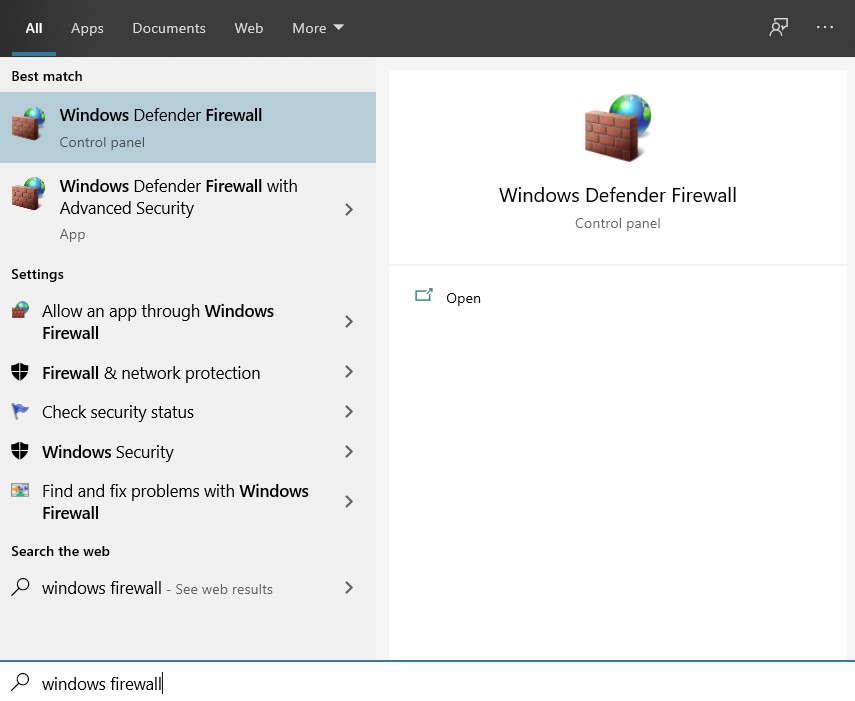
- Inside the Windows Firewall, click on Turn Windows Firewall On or Off.
- Lastly, turn off Windows Firewall and click on Ok to save the changes.

After that, go back to Minecraft once again and try to host a server to see if the ‘Failed to Bind to Port’ error message would still occur.
7. Clear Your IP Settings.
For the final method, what you can do is to erase the IP Address on Minecraft’s server properties. It is possible that the IP address set on the game’s server properties is already in use by another server which causes the error message.
To fix this, you can try clearing the IP address on your server properties.
- First, open the Server folder for Minecraft using the File Explorer.
- Next, scroll down and right-click on server.properties.
- After that, click on Edit with Notepad.
- Lastly, find the server-ip line on Notepad and clear its values. Save the changes and close Notepad.
Now, go back to Minecraft and try to host another server to check if the error message would still occur on the game.
This sums up our guide on how to fix the ‘Failed to Bind to Port’ error on Minecraft. If you know other ways on how to fix this kind of issue on the game, feel free to share it in the comment section below.
If this guide helped you, please share it. 🙂