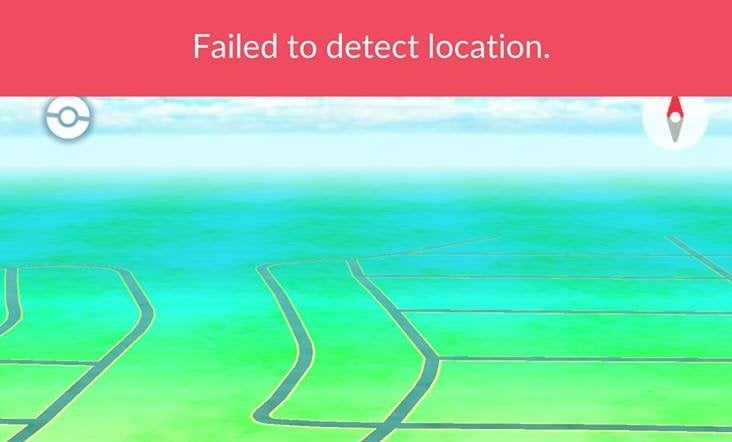
Игроки довольно часто видят ошибку Failed to detect location в Покемон ГО во время самого первого запуска. Сами того не подозревая, они пытаются включить игру в условиях использования чита. Лишь изредка данное сообщение возникает по другим причинам. Важно понимать, о каком виде обмана идёт речь, и как его устранить до получения бана.
СодержаниеСвернуть
- Устранение ошибки с помощью отключения mock location
- Убираем ошибку «Failed to detect location» в Покемон ГО с помощью GPS
- Другие пути решения проблемы
- Видео инструкция по устранению ошибки определения местоположения
Устранение ошибки с помощью отключения mock location
Каждый телефон с включённым режимом разработчика поддерживает функцию mock location (фиктивное положение) для разработки и отладки разрабатываемых приложений. Именно эта функция чаще всего становится причиной возникновения ошибки «Failed to detect location» в Pokemon GO. Кроме того, активация этого режима является одним из условий читерства, связанного с подделыванием местоположения, а потому строго отслеживается игрой. За активацию этого режима можно даже получить бан, так что без лишней необходимости рисковать не стоит.
Для деактивации этого режима необходимо зайти в настройки смартфона и пролистать вниз. Если у вас есть раздел «Для разработчиков», откройте его. Дальше можно либо полностью отключить этот режим, либо найти только опцию фиктивного местоположения и переключить ее. Если игра все еще выдает ошибку, стоит подумать о других возможных причинах.
Убираем ошибку «Failed to detect location» в Покемон ГО с помощью GPS
В редких случаях Покемон ГО пишет «Failed to detect location» даже после отключения режима разработчика. Игре просто недостаточно данных от модуля GPS для определения местоположения. Это может быть связано как с плохой сетью, так и с неисправностями устройства или отдельных его модулей. Отдельным признаком такого сценария является внезапное появление ошибки в середине игрового процесса.
Ошибка будет мучить игрока периодически, если не изменить настройки смартфона. К счастью, во всех современных устройствах есть режим определения местоположения по всем источникам, включая Wi-Fi и мобильные сети. Таким образом устройство компенсирует работу GPS модуля программно. Покемон Гоу лучше всего показывает себя именно при активации этого режима.
Другие пути решения проблемы
Есть и другие нестандартные способы улучшения работы приложения Pokemon GO. Так, некоторым игрокам помогает включение в фоновом режиме Google карт либо других приложений, активно использующих GPS-модуль. Стоит также обновить эти программы до последней доступной версии.
В некоторых случаях возникают так называемые «черные дыры», в которых игра не хочет работать полноценно. Просто попробуйте в следующий раз запустить приложение из необычного места.
Видео инструкция по устранению ошибки определения местоположения
В ролике наглядно показан процесс устранения проблем с поиском местоположения в игре Покемон Гоу.
Pokemon Go is a very popular mobile game based on Augmented Reality (AR) structured by Niantic to fulfill the needs of smartphone gaming enthusiasts. It uses the device’s GPS and provides a virtual environment to the gamer in which the gamer can simulate his character to locate, capture, train, and battle with virtual creatures. This game has mapped the future of VR gaming by providing a real-world environment to the gamer. Since the release of this game, gamers have encountered numerous glitches in the game and the most common one reported lately is: “pokemon go error 12: Failed to detect location”. We have researched and gathered all the solutions in one place so that you can fix this issue easily and never come across this glitch in the future.

What prevents you from detecting location in Pokemon GO?
There are numerous reasons that might trigger this error and some of the most common ones are indexed below:
- You will encounter this Error in Pokemon Go if Find My Device option is enabled on your smartphone.
- Error 12 might arise in your game if the Mock Location is not disabled on your smartphone’s settings.
- If you are somehow at a place where your smartphone is unable to receive GPS signals, then Error 12 might popup on your screen.
Pre-Tips:
The most basic and excellent troubleshooting approach to nullify Pokemon Go error 12 is to restart the location service of your smartphone.
- Navigate to Settings and select Location Options.

Location - First, disable it and afterward enable the Location by tapping on the toggle button at the top of the screen.
- Now tap on the Mode option and set it to High Accuracy.

High Accuracy
What can do to eliminate pokemon go error 12?
Solution 1: Clear the Cache and Data of game
Caches are the scripts of files that are stored on your device when you open a certain application whereas Data is used to load the previous information about the app when it is launched. If in any case, the data stored in Cache gets corrupted, the app will not perform properly. So, as a remedy, clear the Cache and Data of the app to resolve this issue.
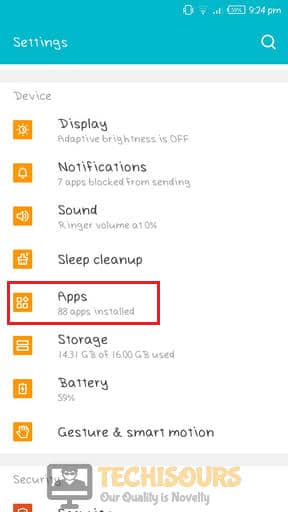
- Tap the Setting option on your mobile.
Settings - Locate and tap on Apps and notifications. It might be just Apps in some mobiles.
Apps - Now find Pokemon GO and select Storage option.
Storage - Now click the buttons that are labeled as Clear Data and Clear Cache and check whether the issue is resolved.

Clear Data and Cache


Solution 2: Uninstall Maps Updates
As Pokemon Go uses Maps to simulate the game in real-time, you will encounter Error 12 if the Maps are enabled in the background while you are spoofing. So the simplest way to resolve this issue is to navigate to settings and uninstall Maps Updates. Follow these steps below to carry this task out:
- Open Settings of your mobile and select Apps.
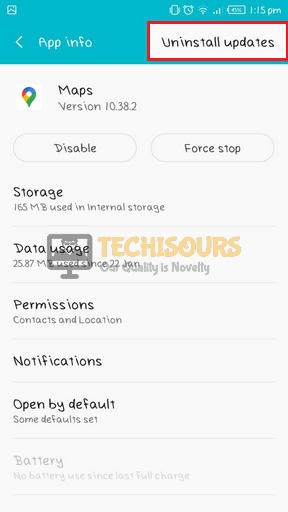
Apps - Scroll down and click on the Maps button.
Maps - Click on the Three-dot icon on the top-right of the screen and select Uninstall Updates.
Uninstall Updates - Now select Storage and tap on Clear Data and Clear Cache.

Solution 3: Install an Older Version of Google Play Services
Google Play Services is the fundamental component in an Android device that enhances user’s experience by automatically synchronizing higher quality, lower-powered location-based services. If Error 12 pops up on your screen, Uninstall Google Play Services and install an older version of it because the latest version makes it difficult to spoof in Pokemon Go.
- Open Settings of your mobile and select Apps.
Apps - Now Locate Google Play Services and open it. Click on the Three-dot icon on the top-right of the screen and select Uninstall Updates.
Uninstall Updates - Now go to the smartphone’s browser and download an older version of Google Play Services.
- Install it and check if the issue is resolved.

Solution 4: Disable “Find My Device” Option
Most of the people play Pokemon Go with a fake GPS location. If Find My Device option is enabled in your device, the Pokemon Go servers will track your device and ban you from playing the game. So, to avoid this, make sure you disable this option by following the steps indexed below:
- Open Settings of your mobile and go to Security.
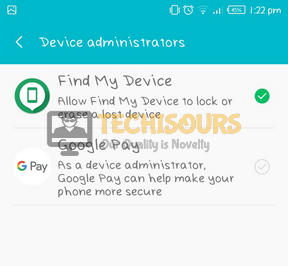
Security - Now scroll down and locate Device Administrators option.
Device Administrator - Uncheck the button parallel to Find My Device option to disable it.

Find My Device


Solution 5: Tweak some settings in FGL Pro
FGL Pro is a very popular application that lets you play Pokemon Go with a fake location. If Error 12 pops on the screen make sure you have the correct settings in the app that help the game to function properly with a fake GPS location.
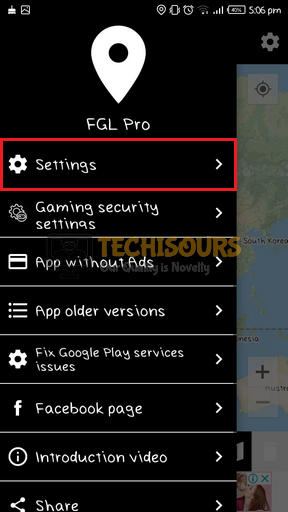
- Launch FGL Pro and open Settings from the top-left menu on the screen.
Settings - Check the box parallel to Secure Mocking and Autofix Mocking Location. Make sure that you have set the Mocking Method to Method 2. (Node: If Method 2 doesn’t work, change it to Method 1 or Method 2)

Tweak Some Settings - Restart the Pokemon Go application and see if the issue persists.

Solution 6: Spoof in Pokemon GO Application
Spoofing is a common term used in the Pokemon Go community because it helps you to simulate the game without any hurdle while sitting in one place. Follow the procedure explained below to spoof in Pokemon Go efficiently:
- Navigate to your browser on your smartphone and search for “How to Root 0000”. (Note: Replace 0000 with the name and model of your smartphone.)
- Follow the instructions provided by google to root your phone. (Please note that every device has its own procedure to root)
- After the phone is rooted, open the browser on your phone and download APK for GPS JoyStick Fake GPS Location.
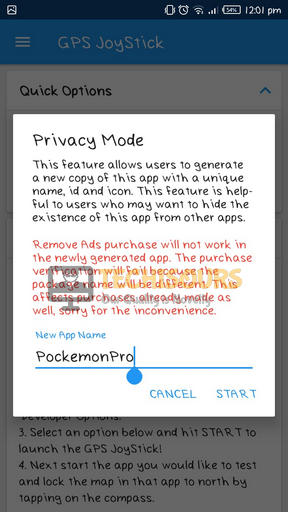
- After installing this application, launch the app and under the quick options section, select Privacy Mode.
Privacy Mode. - A window will appear asking “Do you want to generate a new app copy or update an existing generated one”. Select Generate.

Generate - Type PockemonPro as a new name for the app and tap on Start.
PockemonPro - After the new copy has been generated, tap on Install to install the applications.
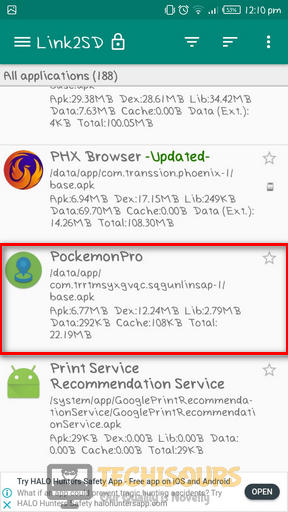
- Now go to the Play Store on your smartphone. Search for Link 2 SD and install it. (Note: Make sure you install this app on a rooted handset)

Install Link 2 SD - Now Launch Link 2 SD and search for PockemonPro, in the All applications section. (Make sure that Link 2 SD has root access)
PockemonPro - Now tap the three-dot menu on the top-right of the screen and select Convert to system app.
Convert to system app - Now launch PockemonPro and go to settings from the top left corner.
Settings - Scroll down and make sure that “Enable Indirect Mocking“, “Enable System Mode“, “Disable Location Service“, “Enable a GPS reset” options are enabled.
Enable some options - Now go to smartphone’s settings and select Location Options.
Location - Enable the Location by tapping on the toggle button at the top of the screen.
- Now tap on the Mode option and set it to Device Only.

Device Only - Now launch PockemonPro and select Set Location.
- Tap on Click here to open the map and select a location to start spoofing and check whether the issue is resolved.
Click here to open the map


Solution 7: Disable Mock Location in your Mobile
Mock Location is a service offered by Android Devices that allows the developer community to use a fake location for testing purposes. You will encounter Error 12 in Pokemon Go if the Mock Location is enabled in your Android device. Follow the steps below to nullify this problem.
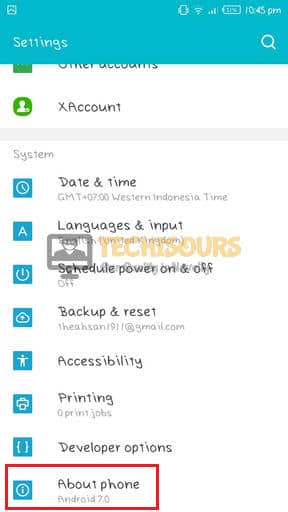
- Open Settings of your mobile and select About Phone.
About Phone - Now locate and tap on Build Number multiple times until a toast appears saying “You are now a developer”.
Build Number - Now go back to the settings menu and select Developer Options.
Developer Options - Enable Developer Options by tapping on the Toggle button at the top of the screen.
- Scroll down to the Debugging section and tap on Select mock location app.
Select mock location app - Now tap Nothing. Restart your device and see if the issue persists.
Nothing


Hopefully, the issue might have been resolved up till now and if you need further assistance, contact here.
Все мы любим Pokemon Go. Мы можем воплотить в жизнь наши фантазии о том, чтобы стать настоящим тренером покемонов. Конечно, его еще нет, но, проявив немного воображения, это лучшее, что у нас есть!
Но вы, вероятно, здесь из-за того, что Pokemon Go не смог определить местоположение. Мы заметили, что каждый раз при использовании Fake GPS Pro появляется сообщение об ошибке. Вы получаете ту же ошибку, говоря: «не удалось определить местоположение‘?
Не беспокойтесь, потому что это то, что мы будем исправлять в этой статье. Давайте посмотрим, почему это происходит и как это исправить, даже если раньше все работало нормально.
Причины, по которым Pokemon Go не смог определить местоположение 12
Может быть несколько причин, по которым Pokemon Go не может определить ваше местоположение. Проблема может быть как на iOS, так и на Android. Обычно это происходит по следующим причинам:
- Вы можете использовать приложение в квартире или высоком офисном здании. Если вы играете в Pokemon Go в высоком здании, у вашего телефона могут возникнуть проблемы с приемом сигналов GPS.
- На вашем устройстве может быть включена функция фиктивного местоположения.
- Возможно, вы используете приложение, чтобы изменить свое местоположение.
Как бы то ни было, обычно это все причины этой проблемы. Теперь мы рассмотрим решения, чтобы вы могли продолжить игру.
6 способов исправить « не удалось определить местоположение 12 » Pokemon Go
Мы нашли несколько решений, которые могут исправить ошибку определения местоположения на iOS и Android. В большинстве случаев для решения проблемы достаточно любого из приведенных ниже методов.
1. Проверьте службы геолокации.
Pokemon Go заставляет вас посещать разные места. Это то, что определяет игру. Игрокам необходимо включить службы определения местоположения, чтобы они работали.
Следовательно, если ваш смартфон не определяет местоположение 12 в Pokemon Go, GPS может быть отключен. Иногда это происходит само по себе. В основном, чтобы продлить срок службы батареи.
Чтобы исправить это, вы можете включить службы определения местоположения. Это может быть как на Android, так и на iOS, но мы подробно описываем шаги для Android:
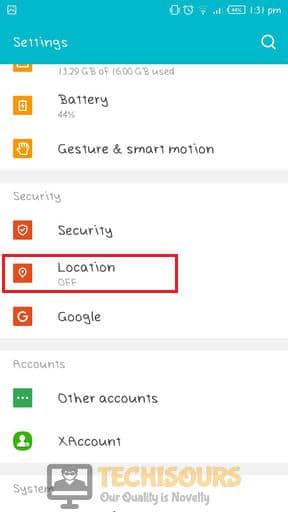
Шаг 1: Откройте «Настройки» на своем смартфоне.
Шаг 2: Перейдите в «Пароли и безопасность»> нажмите «Местоположение».
Шаг 3: Включите тумблер, чтобы включить GPS.
![[Решено] 7 простых способов исправить Pokemon GO не удалось определить местоположение 2021](https://www.getappsolution.com/images/20210325_605c3fff43b25.jpg)
Это нужно попробовать в первую очередь. Во время игры постоянно сложно включать локацию. Вы также можете найти значок с включенным GPS в верхней части смартфона. Однако в разных моделях смартфонов значки разные.
2. Установите фиктивные местоположения
Иногда сбой Pokemon GO не определяет ваше фактическое местоположение. Это может быть по причинам, не зависящим от вас. Лучший способ справиться с этим — создать имитацию местоположения.
По сути, вы устанавливаете свое местоположение в другом месте, физически оставаясь там, где находитесь. Это помогает, если Pokemon Go не может найти сайт. Вот как это можно сделать:
Шаг 1. Включите параметры разработчика на своем устройстве
Зайдите в «Настройки» на своем телефоне и перейдите в «О телефоне». Здесь выберите опцию «Информация о программном обеспечении». Нажмите на эту опцию, и вы увидите номер сборки вашего устройства.
Теперь вы можете включить параметры разработчика, семь раз нажав на номер сборки.
![[Решено] 7 простых способов исправить Pokemon GO не удалось определить местоположение 2021](https://www.getappsolution.com/images/20210325_605c3fff5aa22.jpg)
Шаг 2. Установите FakeGPS Go
Вы можете скачать FakeGPS Go в магазине Google Play. Следуйте инструкциям и установите приложение. Это приложение, которое заставляет Pokemon Go определять другое местоположение.
![[Решено] 7 простых способов исправить Pokemon GO не удалось определить местоположение 2021](https://www.getappsolution.com/images/20210325_605c3fff7187f.jpg)
Шаг 3. Включите приложение Mock Location
Теперь снова перейдите в «Настройки» и следуйте инструкциям, чтобы открыть «Параметры разработчика» на шаге 1. Оказавшись там, нажмите «Выбрать приложение фиктивного местоположения». Вы получаете новое меню, в котором отображается список приложений с этой функцией. Выберите FakeGPS.
![[Решено] 7 простых способов исправить Pokemon GO не удалось определить местоположение 2021](https://www.getappsolution.com/images/20210325_605c3fff87f69.jpg)
Шаг 4. Запустите FakeGPS
Теперь приложение FakeGPS будет работать правильно. Вы можете установить любое местоположение по своему желанию. После этого нажмите кнопку воспроизведения в левом нижнем углу. Теперь вы можете запустить Pokemon Go, и он определит местоположение, установленное приложением.
3. Сбросить данные Pokemon Go> Войти
Если ни один из методов до сих пор не помог, вы можете попробовать сбросить данные Pokemon Go, а затем повторить попытку. Это один из наиболее простых способов решить проблему «Pokemon Go не удалось определить местоположение (12)». Вот шаги:
Шаг 1: Откройте «Настройки» на своем смартфоне.
Шаг 2: Перейдите в «Приложения»> Нажмите «Управление приложениями».
Шаг 3: Из списка приложений откройте Pokemon Go.
Шаг 4: Наконец, нажмите «Очистить данные»> «Очистить кеш».
![[Решено] 7 простых способов исправить Pokemon GO не удалось определить местоположение 2021](https://www.getappsolution.com/images/20210325_605c3fff9d3f6.jpg)
Не волнуйтесь; весь ваш прогресс по-прежнему будет сохранен в вашем аккаунте. Этот процесс удалит его из вашего локального хранилища. Когда вы запустите Pokemon Go, вам будет предложено снова войти в систему. И вы получите данные обратно.
4. Выйдите из системы и войдите в учетную запись
Это простой способ решить проблему, когда Pokemon GO не определяет местоположение. Иногда для нормальной работы игры требуется перезагрузка. Вы можете сделать это, выйдя из своей учетной записи, а затем снова войдя в нее. Вот как:
Шаг 1: Откройте Pokemon Go> Коснитесь значка Pokeball.
Шаг 2: Нажмите «Настройки» в правом верхнем углу экрана.
Шаг 3: Прокрутите вниз и найдите опцию «Выйти» и нажмите на нее.
Шаг 4: После успешного выхода из системы попробуйте снова войти в систему. Это должно решить проблему.
![[Решено] 7 простых способов исправить Pokemon GO не удалось определить местоположение 2021](https://www.getappsolution.com/images/20210325_605c3fffafef8.jpg)
5. Перезагрузите телефон> Включите GPS> Повторить попытку.
Вот еще одно быстрое и простое решение для Pokemon GO, не определяющего местоположение. Перезагрузка смартфона похожа на сброс настроек. После сброса большинство функций запускаются заново.
Сообщается, что этот способ решения проблемы неплохо сработал для нескольких пользователей. Вот как это сделать:
Шаг 1: Нажимайте кнопку питания на смартфоне, пока не откроется меню> Нажмите кнопку «Перезагрузить».
![[Решено] 7 простых способов исправить Pokemon GO не удалось определить местоположение 2021](https://www.getappsolution.com/images/20210325_605c3fffc4a72.jpg)
Шаг 2: После перезагрузки телефона включите GPS и запустите игру.
Это один из самых простых способов исправить спуфинг Pokemon Go, который не смог определить местоположение. Это быстрое решение, поэтому попробуйте его, пока читаете эту статью.
6. Прекратите использовать PokemonGoSpoofers
Вы можете получить эту ошибку: «Не удалось определить местоположение Pokemon Go spoof». Спуферы местоположения Pokemon Go являются основной причиной этой ошибки.
Еще в первые дни Pokemon Go вы могли легко использовать любое из приложений для подмены местоположения, и все они работали бы. Но сейчас все по-другому.
Niantic — разработчики игры обнаружили несколько пользователей, реализующих эти приложения. Следовательно, они приняли меры, чтобы прекратить использование таких приложений.
Чтобы исправить это, перестаньте использовать такие приложения, как iSpoofer или FakeGPS Go.
Бонусное решение — iOS Location Changer, играйте в Pokemon Go из любого места
Изменение местоположения iOS — это идеальное решение, чтобы Pokemon Go не определял местоположение 12.
Это специализированное программное обеспечение, предназначенное для моделирования ваших движений в реальном месте. Но вы можете сделать это, оставаясь на диване. Это поможет вам предотвратить отслеживание и получить доступ к функциям или услугам, недоступным в вашем регионе.
Бесплатная загрузкаБесплатная загрузка
Вот некоторые из основных моментов:
- Мгновенно измените свое местоположение по GPS в любом месте.
- Установите маршрут на карте, следуя установленной вами скорости.
- Он работает с играми AR, такими как Pokemon Go, и платформами социальных сетей.
Все очень просто. Вот шаги, чтобы использовать iOS Location Changer, чтобы исправить Pokemon GO, не обнаруживающий проблемы с местоположением:
Шаг 1. Установите iOS Location Changer
Изменение местоположения iOS доступен на настольных и портативных компьютерах Windows и Mac. Вы можете скачать его с их веб-сайта и, следуя инструкциям, установить.

Шаг 2. Подключите телефон к компьютеру
Программа работает на вашем компьютере. Вам не нужно загружать его на свой телефон. Подключите телефон к компьютеру с помощью соединительного кабеля и разблокируйте телефон.
Шаг 3. Выберите место на карте в качестве пункта назначения.
Теперь вы увидите карту. Вы можете перемещаться, чтобы выбрать место, в которое хотите «телепортироваться». После того, как вы выбрали место, нажмите кнопку «Начать изменение», чтобы указать свое местоположение.
Шаг 4: проверьте новое место на Pokemon Go
Теперь вы готовы наслаждаться игрой! Запустите Pokemon Go, и он покажет вам точное местоположение, которое вы выбрали в iOS Location Changer.
Бесплатная загрузкаБесплатная загрузка
Заключительные мысли
Pokemon Go представил новый способ играть в игры. Это побуждает людей искать покемонов. Но идея повторялась. Нельзя постоянно выходить на улицу!
Многие игроки считали, что должен быть способ играть в игру, не выходя из дома. Вот почему был разработан iOS Location Changer. Вы можете попробовать БЕСПЛАТНО! Так что давай и проверь это здесь.
Насколько полезным был этот пост?
Нажмите на звезду, чтобы оценить это!
Средний рейтинг
/ 5. Подсчет голосов:
Мобильная игра про ловлю Покемонов расширенной реальности все еще остается невероятно популярной, как и наша сегодняшняя тема – ошибка Failed to detect location в Pokemon Go. Многие пользователи сталкивались с данной ошибкой и успешно исправили ее с помощью методов, которые мы как раз сейчас и будем рассматривать.
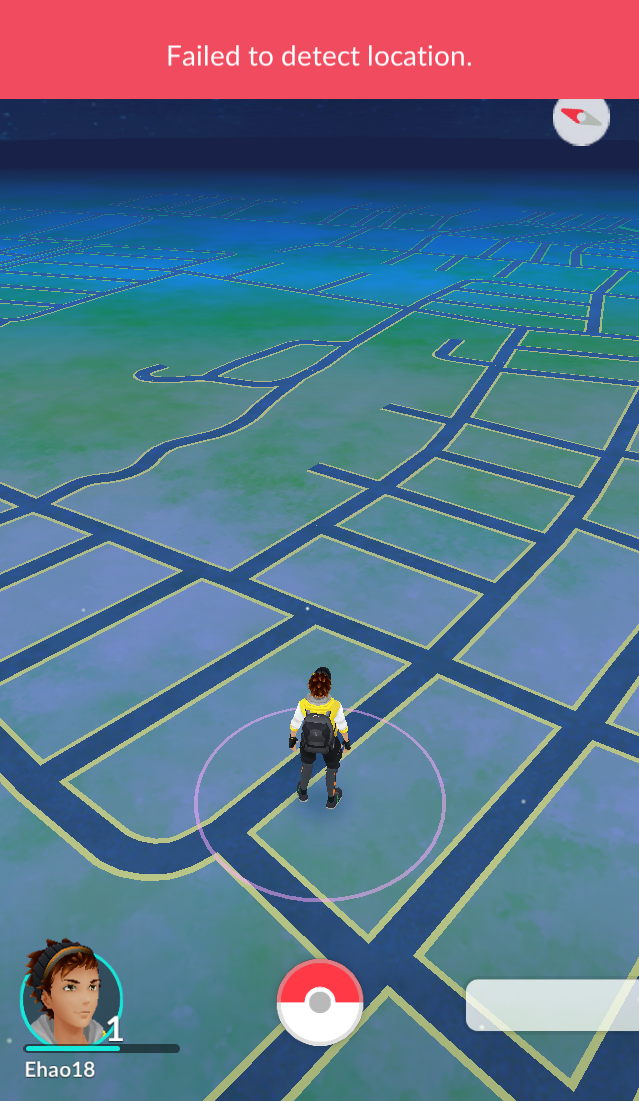
Так при каких же обстоятельствах появляется данная ошибка? Вы загружаете игру, входите в нее под своими личными данными, начинаете входить непосредственно в игровой процесс, но вместо карты, по которой ходит ваш персонаж, вы видите пустое место, а вверху окна приложения Pokemon Go можно увидеть сообщение Failed to detect location.
Содержание
- Методы решения ошибки Failed to detect location в Pokemon Go
- Метод №1 Отключение Фиктивного местоположения
- Метод №2 Включить определение местоположения по Wi-Fi
- Метод №3 Запуск приложения Google Карты
- Метод №4 Попробовать уйти в другое место
- Метод №5 Включение и отключение режима «В самолете»
Методы решения ошибки Failed to detect location в Pokemon Go
Метод №1 Отключение Фиктивного местоположения
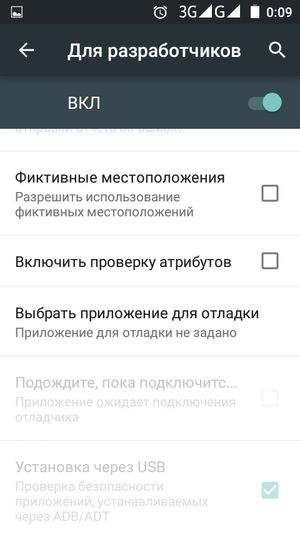
Первым делом, вам нужно проверить, не включена ли в вашем смартфоне опция «Фиктивных местоположений». Данная опция, в большинстве случае, применяется при разработке различных приложений. Как и понятно из названия, опция заменяет ваше реальное местоположение фиктивным.
Ошибка Failed to detect location в Pokemon Go как раз таки является следствием активности этой опции. Неудивительно, так как определить ваше местоположение игра не в состоянии. Чтобы отключить опцию Фиктивных местоположений, сделайте следующее:
- Пройдите в настройки своего смартфона.
- Опуститесь в самый низ настроек и выберите пункт, показывающий информацию о вашем смартфоне и ОС.
- Найдите строчку с версией сборки и нажмите на нее ровно семь раз, чтобы перейти в Меню разработчика.
- Найдите опцию «Разрешить фиктивные местоположения» и уберите с нее галочку.
Деактивировав данную опцию, проверьте наличие ошибки Failed to detect location в Pokemon Go. Скорее всего, именно эта опция и стояла за проблемой.
Метод №2 Включить определение местоположения по Wi-Fi
Вы уже должны знать, что Pokemon Go использует ваш GPS для определения местоположения. Однако, бывают такие моменты, когда игра не может обойтись одним GPS. Во время таких трудностей как раз таки и всплывает ошибка Failed to detect location в Pokemon Go. Вы можете помочь игре и включить определение вашего местоположения с помощью Wi-Fi.
- Перейдите в настройки вашего устройства.
- Перейдите во вкладку «Местоположение».
- Активируйте опции Высокой точности для геолокации и определения местоположения с помощью Wi-Fi.
Активировав Wi-Fi, снова попробуйте зайти в игру и проверьте, была ли исправлена ошибка Failed to detect location в Pokemon Go.
Метод №3 Запуск приложения Google Карты
Продолжаем лечить проблему с Pokemon Go. На этот раз вам придется еще раз попытаться помочь игре определить ваше местоположения с помощью включения приложения Google Карты.
Как только запустите приложение, сверните его на задний фон и попробуйте снова войти в Pokemon, а затем проверьте наличие ошибки Failed to detect location. Не сказать, что этот метод действенный, но некоторые пользователи в Интернете указывали, что он действительно работает.
Метод №4 Попробовать уйти в другое место
Да, данный метод навряд ли подойдет всем пользователям, но все же попробуйте войти в Pokemon Go в каком-то другом месте. Например, если вы пытаетесь начать ловлю Покемоном из дому, то попробуйте зайти в игру на улице или где-либо еще.
Метод №5 Включение и отключение режима «В самолете»
Один из самых простых методов. Возможно, какой-то из модулей в вашем устройстве(Wi-Fi или GPS) просто начал работать со сбоями. Войдите в режим «В самолете», чтобы полностью отключить их. Затем выйдите из этого режим и проверьте, была ли исправлена ошибка Failed to detect location в Pokemon Go.
На чтение 6 мин. Опубликовано 11.07.2016
Обновлено 19.05.2017

Игра Pokemon GO завоевала заслуженную популярность во всем мире. Многим пользователям пришелся по нраву необычный геймплей и задумка приложения. Однако, иногда игровой процесс омрачают разнообразные ошибки. Одними из таких ошибок являются “GPS signal not found” (“GPS сигнал не найден”) и “failed to detect location” (“не удалось определить местоположение”). Сегодня я расскажу вам о том, что делать в данной ситуации и как исправить подобные ошибки на вашем смартфоне под управлением Android или iOS.
“GPS signal not found” в Покемон ГО: что делать?

Итак, что же нужно сделать в первую очередь, если в Покемон ГО появилась ошибка “GPS signal not found”. Мы начнем с самых простых методов. Рекомендую вам внимательно прочитать всю инструкцию и точно следовать ей. Если ошибка и дальше не исчезнет – пишите в комментариях, будем разбираться вместе.
Убедитесь, что GPS включен

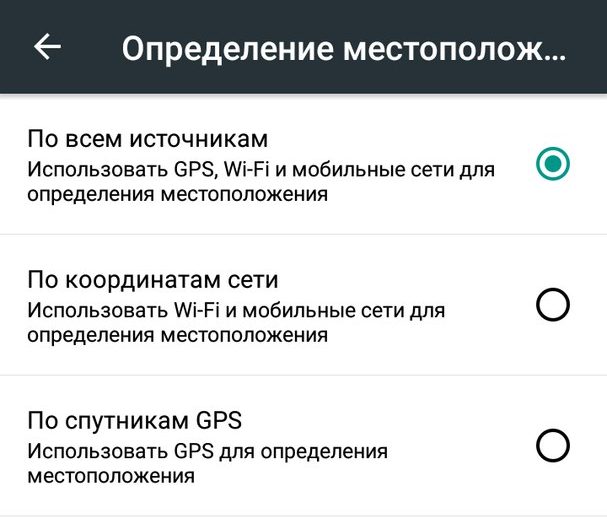
Вы уверены, что GPS включен на вашем смартфоне? Проверьте это! Если определение местоположения включено, вам необходимо проверить, что оно работает в режиме повышенной точности (эта опция называется “по всем источникам” во многих смартфонах). В разных версиях Android интерфейс немного отличается, но принцип везде тот же:
- Перейдите в настройки телефона
- Зайдите в раздел “Местоположение” (может называться иначе)
- Убедитесь, что ползунок находится в положении “вкл”
- Выберите режим “По всем источникам” (“Использовать GPS,Wi-fi и мобильные сети для определения местоположения”)
Теперь игра Pokemon GO будет использовать все возможные источники, чтобы максимально точно определить местоположение. Если использовать только wi-fi и мобильные сети для определения местоположения, то вы можете столкнуться с тем, что ваш аватар будет бегать по карте, либо прыгать из точки в точку (либо координаты будут определяться некорректно)
Отключаем фиктивные местоположения
В некоторых версиях Android разработчик отключил возможность приложениям скрывать, что они используют фиктивные местоположения (“подмену координат”). Таким образом, при запуске Pokemon GO вы можете увидеть ошибку “failed to detect location” или “GPS signal not found”. Вам необходимо отключить фиктивные местоположения в настройках вашей системы, чтобы избавиться от ошибки.
- Зайдите в настройки телефона
- Пролистайте до самого низа и нажмите на пункт “О телефоне”
- Найдите пункт “Номер сборки”, “Версия MIUI” или нечто подобное.
- Нажмите на него 7 раз. После этого вы увидите сообщение – “Вы стали разработчиком”
- Ищем в “Настройках” пункт “Для разработчиков”, заходим
- Пункт “Фиктивные местоположения” не должен быть отмечен галочкой (галочку снять!)
Если и это вам не помогло решить проблему, читайте статью дальше и пробуйте другие методы.
Другие методы устранения ошибки “GPS signal not found” в Покемон ГО
Чаще всего указанные выше методы помогают избавиться от ошибки “GPS signal not found”. Однако, если ошибка до сих пор осталась, то давайте рассмотрим другие варианты, которые могут помочь:
- Попробуйте перезагрузить смартфон
- Попробуйте выйти на открытое пространство (на улицу, допустим, если вы находитесь в помещении) и немного подождать – возможно, что GPS все же найдет спутники
- Выключите энергосберегающий режим в вашем смартфоне и удалите/отключите все программы, которые призваны экономить заряд вашей батареи – они часто “слишком сильно” заботятся о повышенном времени работы батареи и вмешиваются в нормальную работу системы
- Используйте мобильную сеть вместо wi-fi (может вы играете в кафе и используете wi-fi). Хотя, иногда, Pokemon GO не работает через мобильный интернет
- Включите режим “Полета” и через несколько секунд выключите его
- Установите последнее обновление Pokemon GO для Android
- Скачайте “Карты Google”, установите и запустите. Скачайте программу GPS Status & Toolbox, установите и запустите. Потом запустите Pokemon GO. Данные действия иногда помогают избавиться от ошибки.
- Попробуйте отключить все разрешения для приложения Pokemon GO, кроме определения местоположения
Если и это не помогло, то крайней мерой будет являться сброс настроек вашего смартфона на заводские или установка стоковой версии прошивки от производителя. Также можно написать в Niatic (разработчику) о вашей проблеме.
“GPS signal not found” на iOS в Pokemon GO
Если у вас возникает ошибка “GPS signal not found” на iPhone или другом устройстве под управлением iOS, то вы можете воспользоваться указанными выше советами (кроме тех, что касаются только Android). Кроме того:
- Если вы находитесь внутри помещения – попробуйте выйти на улицу и подождать немного, чтобы GPS обнаружил спутники
- Включите Wi-fi, даже если вы его не используете
- Включите и выключите Авиарежим
- Отключите и снова включите сотовые данные. “Настройки” -“Сотовая связь” -“Сотовые данные”
- Перезапустите приложение Pokemon GO
- Отключите и снова включите “Службы геолокации”. “Настройки” – “Конфиденциальность” – “Службы геолокации”.
- Сбросьте настройки сетей (все Wi-fi пароли и прочие сетевые настройки будут удалены!). “Настройки” – “Основные” – “Сброс” – “Сбросить настройки сети”.
Ошибка “Failed to detect location” в Pokemon GO

Еще одной частой ошибкой в Pokemon GO является “failed to detect location” (“не удалось определить местоположение”). Данная ошибка возникает в момент запуска игры или когда ваш аватар появляется на игровой карте. Чаще всего перезагрузка игры или отключение/включение GPS модуля не решает проблемы. Данная ошибка во многом схожа с упомянутой выше “GPS signal not found”, потому для ее решения можно попробовать применить те же методы. Однако, есть один совет, который непосредственно касается данной ошибки.
Удалите все программы, которые подменяют координаты
Как вы, наверное, знаете, долгое время в Pokemon GO процветал GPS-спуфинг. Разработчик не сразу принялся бороться с данным явлением, так как был занят более насущными делами. Однако, в мае 2017 Niantic начал тест нового фикса, который должен остановить “снайпинг” и спуфинг в Покемон ГО. Кроме того, Google выпустил обновление безопасности Android 7.1, которое не позволяет приложениям скрывать факт подмены местоположения от ОС.
Таким образом, с момента выхода версии 0.63.1 Pokemon GO многие тренеры, которые “баловались” GPS-спуфингом стали получать сообщение об ошибке “failed to detect location”. Если у вас установлены программы подмены координат типа Fake gps, Joystic GPS, Mock Location, Fly GPS или аналогичные им – не используйте их или удалите со своего смартфона. С каждым днем Niantic будет все сильнее “прижимать” читеров, так что пора начать играть честно прямо сейчас:)
Итак, сегодня мы поговорил об ошибках “GPS signal not found” (“GPS сигнал не найден”) и “failed to detect location” (“не удалось определить местоположение”) в Pokemon GO ,узнали, что делать в данной ситуации и как решить проблему. Надеюсь, что статья оказалась полезной для вас.
Чтобы всегда быть в курсе важных новостей из мира Pokemon GO, подписывайтесь на нас в соцсетях:


![]()
Pokémon GO users face the ‘Pokémon GO failed to detect location’ error message after enabling the mock location option in their device settings. The game sometimes displays this error message with the error code ’12’ and it looks like this:

This error message also occurs when you try to spoof or add a joystick because Niantic can now track your mock location.
This error message is one of the most common issues among the iOS and Android users of Pokémon GO. So, if you’re wondering what to do if Pokémon GO failed to detect location error messages occurs, then we have got you covered.
Contents
- Background
- Pokémon GO Failed to Detect Location? – The Reasons
- How to Fix this issue? – The Solutions
- Pre-requisites
- 1. Disabling the Mock Location
- 2. Downgrading Google Play Services & Using Mock Location
- 3. Rooting the Device & Converting GPS Spoofing to a System Application
Background
Pokémon GO users use location or GPS spoofing applications to spoof their locations in the game. Such applications allow users to travel the entire world and catch Pokémons while sitting at home.
However, before March 2017, location spoofing applications didn’t inform the system or any applications about location mocking. So, the developers were unaware of whether a person was using a location spoofing application or not.
To stop this, the developers of Pokémon GO partnered with Google in March 2017 and after that, Android users received a security patch, which forced the Android 4.4, or later version users, to patch the mock locations feature.
After installing the security patch, if you alter the GPS location, the game will know and instantly show the location not found error message. It won’t even let you play the game unless you disable the mock location option.
Users have faced this error message with different location spoofing applications, such as FGL Pro and Fake GPS Location – GPS JoyStick.
So, if you’re facing this error message, then this might be due to one of the following reasons:
- The most common reason for this error message is the enabled mock location option in the smartphone settings.
- Another popular reason for this error message is the inability of the device to receive proper GPS signals because you’re somewhere under the house/building.
- If you have enabled Find My Device (on Android) or Find My iPhone (on iOS smartphone), you will also face this error message. Because when you enable the aforementioned options, you apply restrictions on the Pokémon GO to use GPS location.
- In rare cases, if you’re using an outdated version of Pokémon GO, then this might cause this error message.
- Sometimes, users also face the GPS joystick failed to detect location error messages upon using an unreliable GPS spoofer.
How to Fix this issue? – The Solutions
Pre-requisites
Before getting to the main methods to solve this error message, try these basic tips to solve the Pokémon GO error 12 spoofing issue.
Checking the Signal Strength of Wi-Fi and Cellular Data
Whether you’re using mobile data or Wi-Fi, the signal strength of both network types can get weak at times. Therefore, make sure that you’re using a reliable internet connection.
However, a strong network (full signal bar) doesn’t always guarantee a stable connection. So, if you’re facing a network problem, try switching your network and see if that fixes this issue.
Checking whether GPS Location Service is Enabled or Not
For Android Devices
Another major reason for the GPS signal not found (11 Pokémon GO spoofing) issue is the disabled Location Accuracy settings for GPS. You can check whether you’ve enabled the Location Accuracy settings or not.
- First, you’ll go to the ‘Settings’ of your device.
- Then, you’ll find the ‘Location’ option inside the settings of your smartphone.

Entering the ‘Location’ option in the ‘Settings’ window - Now, you’ll check whether the ‘Location’ access is enabled or not. If not, then turn on this option. But if you have already enabled it, then move to the next step.

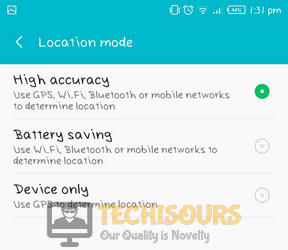
Checking whether ‘Location’ access is enabled or not - Next, tap the ‘Mode’ option and inside the new window, you’ll select the ‘High accuracy’ option in the ‘Location mode’ section.

Selecting ‘High Accuracy’ as ‘Location mode’ - If you can’t find the ‘High accuracy’ option, you’ll tap the ‘Google Location Accuracy’ option and turn on the ‘Improve Location Accuracy’ option on the next screen.

Enabling the ‘Improve Location Accuracy’ option


Note: The UI of settings will vary from device to device. So, if you can’t find the required option, you can check Google’s help.
If these tips have solved the error message for you, then good for you. Otherwise, try the methods discussed below 👇🏻.
1. Disabling the Mock Location
As mentioned, the most popular reason for facing this error message is the turned-on ‘mock location’ setting, which is preventing you from playing Pokémon GO. So, if that is your case, then you can disable it and see if that fixes this issue.
- First, you’ll go to the ‘Settings’ of your smartphone.
- Then, you’ll go to the ‘About phone’ option.

Selecting the ‘About phone’ option in the smartphone’s ‘Settings’ - After that, you’ll tap the build number of your smartphone 7 times.

Tapping the build number 7 times in the ‘About phone’ option - Once the 7 times tapping is complete, then you’ll see the following message.

Indication of the ‘Developer options’ enabled - Now, you’ll go to the ‘Developer options.‘


Note: If you can’t find the ‘Developer options,‘ you can search this option in the search bar of the ‘Settings’ window

Note: If you don’t have the search bar, go to the ‘Additional settings’ option and the ‘Developer options’ will be there

- After that, you’ll look for the option that says ‘Allow mock locations’ or ‘Select mock location app’ and see if this option is unchecked. If not, then uncheck this option.

‘Select mock location app’ is already disabled or no mock application is selected - Now, you’ll restart your device by pressing the power button for a few seconds and choosing the ‘Restart’ or ‘Reboot’ option.

Rebooting the device - After restart, open the game again and see if this method has proved useful for you.


This method will work if you were spoofing the application earlier.
However, if you still want to spoof your location, then try the next methods.
2. Downgrading Google Play Services & Using Mock Location
For FGL Pro Users – Non-Rooted Phones
tested solution
Whether you want to use ‘FGL Pro’ with Pokémon GO or you’re already using it, but if after updating the game you’ve been facing the ‘Failed to Detect Location (Error 12),’ then the following steps will come in handy.
Note: This method might prove complicated for some users so proceed at your own risk.
Step 1: Downloading and Installing ‘FGL Pro’
- First, you’ll download and install the ‘FGL Pro’ application from ‘Google Play Store.’ You can open the following link to download this application.
https://play.google.com/store/apps/details?id=com.ltp.pro.fakelocation
- Once you have installed the application, you’ll open it and allow all the permissions.
- After that, it will ask you to downgrade your ‘Google Play services’ application to version 12.6.85 or lower. So, you’ll tap on the ‘Downgrade’ button and the application will give you a set of instructions.
Step 2: Disabling the ‘Auto-update apps’ Option in ‘Google Play Store’
The first instruction is to disable the ‘auto-update apps’ in ‘Play Store.’ So, try the following steps.
- You can disable the auto-updates of the ‘Google Play Store’ by tapping on your account at the ‘top-right corner’ of the screen. Then, you’ll choose the ‘Settings’ option.

Tapping on the ‘User-Profile’ icon in the ‘Top-Right Corner’ of the screen

Tapping on the ‘Settings’ option in the ‘Google Play Store’ user profile option - In the ‘Settings’ window, you’ll expand the ‘Network preferences’ and tap on the ‘Auto-update apps’ option.

Expanding the ‘Network preferences’ and tapping on the ‘Auto-update apps’ section - A new dialog box will appear. So, you’ll choose the ‘Don’t auto-update apps’ option and tap the ‘Done’ option.

Choosing ‘Don’t auto-update apps’ and clicking the ‘Done’ option


Note: If you have an old Google Play Store version, then you’ll tap on the ‘hamburger icon,’ then choose the ‘Settings’ option and tap on the ‘Auto-update apps’ option in the ‘General’ section
Step 3: Downloading the Older Version of ‘Google Play services’ Application
The second instruction is to download the 12.6.85 version of Google Play services, but the application will give a specific CPU architecture and Screen DPI by detecting your operating system version. You’ll have to download it according to the instructions on your screen.
- Now, you’ll open the following link in your smartphone’s browser and download the ‘12.6.85 version’ of ‘Google Play services’ from it.
https://www.apkmirror.com/apk/google-inc/google-play-services/google-play-services-12-6-85-release/
Note: You can see the instructions for our device in the following picture:
![]()
- Once you’ve found the required variant of the ‘12.6.85’ version of ‘Google Play services,’ then you’ll download it.

Choosing the ‘Google Play Service 12.6.85’ variant according to the on-screen DPIs and architecture instructions

Step 4: Disabling the ‘Find My Device’ Option
The third instruction is to disable the ‘Find My Device’ option on your smartphone.
- So, you’ll go to the ‘Settings’ of your android device.
- Then, you’ll navigate to the ‘Password & security < Privacy’ options one by one.

Choosing the ‘Password & security < Privacy’ options in the ‘Settings’ of android device - Here, you’ll find the ‘Find My Device’ settings. So, you’ll tap on that and turn it off.

Choosing the ‘Find My Device’ option and then, turning off the option


Note: Some devices will have a ‘Deactivate’ button after tapping on the ‘Find My Device’ settings. So, choosing that will disable it
Note: If you have ‘Screen lock service’ option, ‘Deactivate’ that option as well
Step 5: Uninstalling the Old Version of ‘Google Play services’ Application
- Now, you’ll go to the ‘Manage apps’ window inside the ‘Settings’ option.
- After that, you’ll search for ‘Google Play services’ in the search bar.
- Once the system has found your application, then you’ll tap on it.

Searching for ‘Google Play services’ in the ‘Manage apps’ window and opening it - Now, you’ll tap on the ‘Uninstall updates’ option and then, tap on the ‘OK’ button to confirm the uninstallation process.

Confirming the uninstallation procedure by tapping on the ‘OK’ button


Step 6: Installing the Downloaded ‘.apk’ File
The fourth instruction is to install the downloaded ‘.apk’ file of ‘Google Play services’ to downgrade it.
- So, you’ll go to the file manager/explorer of your smartphone and find the downloaded file.
- Then, you’ll tap on it to begin the installation procedure.
Note: If your system blocks the installation procedure, then you need to enable the installation from ‘Unknown sources’ by going to the ‘Settings < Security’ options

- Now, you’ll again tap on the downloaded .apk file and the system will begin the installation procedure.
Step 7: Setting the ‘FGL Pro’ as ‘Mock location app’
- Once the installation is complete, then you’ll ‘follow the first 4 steps of Solution 1’ to reach the ‘Developer options’ window.
- Then, you’ll scroll down to find the ‘Select mock location app’ option and tap on it.

Choosing the ‘Select mock location app’ option inside the ‘Developer options’ - In the new window, you’ll tap on the ‘FGL Pro’ option to select it as a mock application.

Selecting ‘FGL Pro’ as mock location application - Now, you’ll select the desired location in the ‘FGL Pro’ and run the ‘Pokémon GO’ game.


Note: If you’re using ‘GPS JoyStick,’ then you’ll enable the ‘Suspended Mocking’ option in it before running the game
If this method has worked for you, then that’s great. Otherwise, you can try to download the ‘12.2.21’ version of ‘Google Play services’ and see if that works.
3. Rooting the Device & Converting GPS Spoofing to a System Application
For Android Devices
As mentioned earlier, you can’t spoof in Pokémon GO after installing the security patch of March 2017. But if you still want to spoof in Pokémon GO, you’ll have to root your device first and after that, you’ll convert the GPS spoofing application to a system application. So, we’ll divide this solution into several parts.
Step 1: Rooting the Device
In the terminology of Android, the term ‘Rooting’ is equivalent to jailbreaking an iOS device and people root their devices to get ‘Super User’ privileges and customize everything on their android devices. However, the procedure of rooting the device is different for each device. So, check our complete guide of how to root an android device and after rooting your device, follow the next steps.
Step 2: Downloading the Location Spoofing Application
- After successfully rooting your device, you’ll download and install the ‘Fake GPS Location – GPS JoyStick’ application. So, you can open this link on your Android device.
- After successfully installing the application, you’ll open it and tap on the ‘Learn How To Unlock Features for Free!’ option inside the ‘Quick Options’ section.

Clicking on the ‘Learn How To Unlock Features for Free!’ option inside the ‘Quick Options’ section - The application will take you to a new link and here, you’ll expand the ‘Unlock Features’ option.

Clicking on the ‘Unlock Features’ option in the new webpage - Now, this webpage will detect the model of your android device and according to your model, it will suggest which version of the unlocked application will be suitable for you. In this case, we have downloaded the ‘gpsjoystick-unlocked-arm64-v8a.apk’ file.

Downloading the suggested ‘.apk’ file of the unlocked version of the ‘Fake GPS Location – GPS JoyStick’ application - After completion of the downloading process, you’ll install this ‘.apk’ file and open it.Note: If your device prompts that the installation process is blocked, then you’ll turn on the ‘Unknown sources’ option by going to the ‘Settings < Security’ options
 Going to the ‘Security’ options and turning on the ‘Unknown sources’ option


Step 3: Configuring the New App Copy
- Now, you’ll tap on the ‘Privacy Mode’ under the ‘Quick Options’ section. This will create a new privacy mode feature, which hides the presence of location spoofing applications from the game (Pokémon GO).

- Upon tapping on it, the application will ask you whether you want to update the existing copy or generate a new one. So, you’ll tap on the ‘GENERATE’ option.

Tapping on the ‘GENERATE’ button to create a new app copy - Now, the application will ask you to give a new name to your new GPS JoyStick because you will need this name later on. So, you can type any name and tap on the ‘START’ button.

Typing the new app
name (New PoGo JoyStick) and tapping on the ‘START’ button - The application will start the procedure and depending on your device, it will take some time. So, be patient.

Fake GPS Location – GPS JoyStick’ application has started the procedure of generating a new app - After some time, the ‘Fake GPS Location – GPS JoyStick’ application will ask you to install the newly generated application. So, you’ll tap on the ‘Install’ button.

Tapping on the ‘Install’ button to install the newly generated application - Once the installation process is successful, then you’ll uninstall the previously installed ‘Fake GPS Location – GPS JoyStick’ application by long-tapping on it and dropping it to the ‘Uninstall’ option appearing on the top-left corner of the home screen.

Dropping the ‘Fake GPS Location – GPS JoyStick’ application icon to ‘Uninstall’ option on home screen - Next, the system will ask you to confirm the uninstallation procedure. So, you’ll tap on ‘UNINSTALL’ again.

Choosing the ‘UNINSTALL’ option to confirm the uninstallation procedure of the ‘Fake GPS Location – GPS JoyStick’ Application - Goal 4: Converting the ‘New PoGo JoyStick’ Application to a System Application
- Now, you’ll download and install a new application named ‘Link2SD’ by opening this link on your android device.
- After that, you’ll open the ‘Link2SD’ application and grant the root permissions by tapping on the ‘GRANT’ button.

Granting the root access to the ‘Link2SD’ application - Once you have granted the root permission, then the application will show the following confirmation message:
Link2SD was granted Superuser rights
- Now the ‘Link2SD’ application will show all the installed applications. So, you’ll find and open the newly created GPSs JoyStick application named ‘New PoGo JoyStick’ by either scrolling down or searching and tapping on it.

Searching and opening the newly created ‘New PoGo JoyStick’ application in the ‘Link2SD’ app - Once ‘Link2SD’ has opened the window of ‘New PoGo JoyStick,’ then you’ll tap on the ‘three-dots menu’ in the ‘top-right corner’ of the screen.

Tapping on the ‘three-dots menu’ in the ‘top-right corner’ of the screen - Now, you’ll click on the ‘Convert to system app’ option.

Clicking on the ‘Convert to system app’ option - Note: If you’re not seeing this option, then you aren’t following the procedure correctly
- In the next window, you’ll confirm this procedure by tapping the ‘OK’ option.

Confirming the procedure of converting the application to a system app by tapping the ‘OK’ option - This process will take some time and once the application has completed this procedure, it will ask you to restart your device.
- After restart, when you open the ‘New PoGo JoyStick’ application, then you’ll navigate to its ‘Settings’ by tapping on the ‘three-dots menu’ and scrolling down.

Going to the ‘Settings’ of ‘New PoGo JoyStick’ application from the ‘three-dots menu’ - In the ‘Settings’ window, you’ll scroll down to find that the following options are turned on or not.
Enable Indirect Mocking

Enable System Mode

Disable Location Service

Enable A-GPS Reset
- If these options are not turned on, then turn on them. Otherwise, leave this step.
- Now since we have turned on the option of ‘Disable Location Service,’ therefore, the application will ask us to reboot your device. So, we’ll tap the ‘OK’ option.


Step 5: Unrooting the Device
- Now, you’ll have to unroot the device because the latest versions of Pokémon GO do not allow the users to play the game on a rooted device.
- Here we don’t need to install any new applications. We’ll use the built-in abilities of ‘SuperSU’ which will be automatically installed on your device after rooting.
- So, you’ll tap on the ‘SuperSU’ application to open it.
- After that, you’ll navigate to the ‘Settings’ of this application, which is present on the third tab of this application.
- In the new window, you’ll scroll down to find the ‘Full unroot’ option.
- Now, the application will ask you to confirm this process. So, you’ll first tap on the ‘CONTINUE’ option and then (in the next dialog box, you’ll tap on) the ‘YES’ option and again, you’ll choose the ‘YES’ option in the last dialog box.
- The application will initialize the uninstalling process and after a few seconds, the ‘SuperSU’ application and root access will be removed from your device.
Step 6: Checking Whether the Unroot is Successful or Not?
- Now, you will download and install an application named ‘Root Checker’ from Google Play Store.
- Once you’ve installed the application, you’ll open it and tap on the ‘VERIFY ROOT’ option.

Clicking on the ‘VERIFY ROOT’ option to begin the Root checking process - The application will instantly tell whether the root access is installed on your device or not.
Note: If the Root access is still installed on your device, then you haven’t unrooted the device successfully

Confirmation that the Root access is not installed


Step 7: Setting Up the Location
-
- Now, you’ll ‘follow the first three steps of Basic Tip # 2’ to reach the ‘Location’ window in the ‘Settings’ of your smartphone.
- After that, you’ll choose the ‘GPS only’ (Device only) instead of the ‘High accuracy’ option.
Choosing the ‘GPS only’ option in the ‘Location mode’ section
 Choosing the ‘GPS only’ option in the ‘Location mode’ section
Note: If these settings are not present, then you’ll turn off the ‘Improve Location Accuracy’ option by going to the ‘Location < Google Location Accuracy’ options
- Now, you’ll open the ‘New PoGo JoyStick’ application and under the ‘Select an option to get started’ section, you’ll choose the ‘Set Location’ option.
- Then, you’ll enter the location and start the game.
- Note: If the game error message didn’t solve, then you’ll turn off the ‘Enable Indirect Mocking’ and Enable A-GPS Reset’ options (if these are enabled)
- Hopefully, this lengthy method has proved useful for you because it has helped several other users.

I am a BSCS graduate and a technology nerd who now loves working and writing about computers and other tech-related stuff. In my free time, I like watching Netflix and playing Cricket 22 and The Witcher 3 (Wild Hunt).