I’m having an error in importing the trial SSL certificate from CA. Below is my steps in creating the keystore. Please correct me if I’m wrong. Thank you in advance!
1.First, I created a keystore to be put in the server.
keytool -keystore server_keystore.jks -genkey -alias server -keyalg rsa -keysize 20482.Created a CSR.
keytool -keystore server_keystore.jks -certreq -alias server -keyalg rsa -file server.csr- Sent the CSR to CA (Thawte) and replied with three trial certificate namely, CA root, CA intermediate and trial SSL. Saved it to a text file with file extension .cer. (trial_ca_ssl.cer, trial_ca_root.cer, trial_ca_intermediate.cer)
3.Tried to import the trial_ca_ssl.cer in server_keystore.jks but I received an error.
keytool -import -keystore server_keystore.jks -file trial_ca_ssl.cer -alias serverError:
keytool error: java.lang.Exception: Failed to establish chain from reply![]()
asked Jul 4, 2013 at 8:12
![]()
4
You should keep your trial_ca_ssl.cer text on top of top server.cer. This will make a hierarchy of two certificate like this. Then you should import it.
——BEGIN CERTIFICATE—— MIIDSjCCAjKgAwIBAgIIEvabM2CgLZcwDQYJKoZIhvcNAQEFBQAwMzETMBEGA1UE
AxMKV2FsdGVyIENBMTEPMA0GA1UEChMGV2FsdGVyMQswCQYDVQQGEwJTRTAeFw0w
MzA5MjkwOTI2MzRaFw0wNDA5MjgwOTM2MzRaMDMxEzARBgNVBAMTCldhbHRlciBD
QTExDzANBgNVBAoTBldhbHRlcjELMAkGA1UEBhMCU0UwggEgMA0GCSqGSIb3DQEB
AQUAA4IBDQAwggEIAoIBAQC3hXksEud68WwPWWHLJQQkTCuX/K32KHPPn/uPUzab
Cpc/FnaTmF9yEHmpFdAUr0v5ZPnxVQpcuwrDZc4YfaTLfyUHicQbkftsPAj/2hE4
UukS2j+nQQcJEnIY0vSZOAOLU3j4bf/RlS6Jl7TPFFfWTxuQF8AruQ+YhaE52JFi
SapGGXKQJxhsvKT91rLaWSFWNMTTLSDPaBXYEYFuFhLNclDJWf4whfxHSHHkARB/
3Z0XlT4sFj0fmqEQ6yQb6/WqMFK+1XAIBXZO2MXe26IigWkXw1GfkIx1+fbUPrzu
8EI2jb0TWl21j1+Mvh3APZtVj5FJNuZN9bgdbrq88hLXAgERo2QwYjAPBgNVHRMB
Af8EBTADAQH/MA8GA1UdDwEB/wQFAwMHBgAwHQYDVR0OBBYEFNhHOtAwo8MOE/nI
zzg9KFxCYs8YMB8GA1UdIwQYMBaAFNhHOtAwo8MOE/nIzzg9KFxCYs8YMA0GCSqG
Sib3DQEBBQUAA4IBAQBHpvicbuJTACtpdwe6cF1nQ57FHnnYr+aAe+ZpH43R6R9d
eMps02nFAMSs5o8sbPokrpwAtk2yYwCohEFDkZ5JPzIBkgNlNnVHNNRHQTRJ6v6Q
F2MWUEPc1u5kxSjXEVMmZerG9oknMwpYFmkOnKF46vP3Njt/ExOeRAvCEQq2b8pz
2QGg8/IK6Omfi7IwxtVYUpgvhdcWekbFIlxkXZiEdlHNBIV1GzzPK1VEzg5kugD/
h6jeykrsKASx+55AkkBPt2kI+ZikVtp3SVhfZQMGY86c5QMQGlPWYNsr4ociyhfX
I52Qby+/HNG1ijpx66Z30lUMmXTtWtL4Cu8s7UvC——END CERTIFICATE——
——BEGIN CERTIFICATE—— MIICxzCCAa+gAwIBAgIIBfqGjbQu14swDQYJKoZIhvcNAQEFBQAwMzETMBEGA1UE
AxMKV2FsdGVyIENBMTEPMA0GA1UEChMGV2FsdGVyMQswCQYDVQQGEwJTRTAeFw0w
MzA5MjkwOTMzMDFaFw0wNDAxMDcwOTQzMDFaMDQxETAPBgNVBAMTCER1ZGUgQ0Ex
MRIwEAYDVQQKEwlEdWRlIEluYy4xCzAJBgNVBAYTAlNFMIGdMA0GCSqGSIb3DQEB
AQUAA4GLADCBhwKBgQCM1hR/DYPXfKDa3oVJbppV4OcYtn2XP9W5Kc1d0+U4qLOm
JsqIFHDWR07o1QFiPhc9z0UGtwYeE3CpQ8fG8zeur5e286PYptZIST77B9vOdQdl
PA+dFKFIaEwdzcS7H3Lf38WTE4D1OnyRX5jsiUe+YIQRtjv/Bmem+kSR84G9TwIB
EaNkMGIwDwYDVR0TAQH/BAUwAwEB/zAPBgNVHQ8BAf8EBQMDBwYAMB0GA1UdDgQW
BBTDrXZGYXS9GyIUBOZrglhwNjjcnTAfBgNVHSMEGDAWgBTYRzrQMKPDDhP5yM84
PshcQmLPGDANBgkqhkiG9w0BAQUFAAOCAQEAdmTP1qVUcAKOf+/zvb2lcLKvFwKT
6KqDlO5NofjqCIfNgCjO2mO176cslnFIbEZQqgGIUnJ3AwfHKHj+U3kM3n5T29kF
xiLKxIDfjsY6qC03KHeGAgxI92XZyPsO1is6Y6qUnAmiwhIp5HS6E0+xIP1shmtJ
ZvqU8bueKUWSjx3JDzq+UNLX5pFkK0P0R90TCUEkBx1FNWqoWwb8zfAuO5zcNTEj
5E9esLjwxJQnIVPiA2l3FfZN9yomK+q7kTZJkX2kMx7G850lPR8CneXZT6bIOfck
Dw3PqQiroMNx2+gzC/f/wTXsF92aujyG+IZx1FIcNg/MoHXBWG7T8YrjnQ==——END CERTIFICATE——
For details read the User Guide of EJBCA.
answered Jul 4, 2013 at 8:34
![]()
MasudulMasudul
21.7k5 gold badges41 silver badges57 bronze badges
one possibility is that you use the default openssl tool in Mac, but you copy opensslappsca-cert.srl from a newer version openssl.
answered Feb 7, 2015 at 8:37
![]()
QingQing
1,3712 gold badges20 silver badges38 bronze badges
1
Некоторые любят погорячее, а некоторые — понадежнее, поэтому те вторые некоторые не верят всяческим self-signed сертификатам.
Задача: заставить websphere принять и простить такой self-signed сертификат.
1. Для этого сначала делается простая пара ключей:
>keytool -genkey -keyalg RSA -keystore server.keystore -dname «CN=cn, OU=ou, O=o, L=l, ST=st, C=LV» -storepass server -keypass server -alias alias
2. Сделать запрос:
>keytool -certreq -alias alias -keystore server.keystore -storepass server -file request.csr
3. request.csr надо недоверчивой компании, чтобы те подписали ваш сертификат, и прислали его подписанным обратно.
4. При замене начального сертификата на подписанный вывалится ошибка:
>keytool -import -keystore server.keystore -alias alias -storepass server -file signed.cer
keytool error: java.lang.Exception: Failed to establish chain from reply
Чтобы решить ошибку, вам необходима цепь сертификатов — chain of trust — обычно это файл с расширением .pem.
keytool толком не умеет добавлять цепь, поэтому:
А) открываем chainoftrust.pem любым редактором и видим следующее:
——BEGIN CERTIFICATE——
Blablabla на кучу строк
——END CERTIFICATE——
——BEGIN CERTIFICATE——
Blablabla на кучу строк
——END CERTIFICATE——
.
——BEGIN CERTIFICATE——
Blablabla на кучу строк
——END CERTIFICATE——
Б) Каждый блок сохраняете в отдельный файлик: 1.cer, 2.cer и так далее.
Источник

We stand with our friends and colleagues in Ukraine. To support Ukraine in their time of need visit this page.
Tomcat installation error: keytool error: java.langException: Failed to establish chain from reply
During the import, this error might occur: keytool error: java.langException: Failed to establish chain from reply
This error explicitly refers to the fact that the certificate to be imported does not match either:
— The common name of the created key entry of imported certificates, or
— The alias of the key entry.
In order to avoid this error, the following points should be double-checked:
- Alias of the imported certificate: If you are importing the chain files in PEM format, each of them should have different aliases( e.g.: root for root certificates, intermediate1 or intermediate2 for intermediate certificates). The alias of private key entry (keystore alias) should match with end-entity certificate.
- The end-entity certificate imported to the keystore does not match the private key in that keystore. This means that the imported certificate differs from the key entry in the keystore either in common name or alias. To avoid this, the keystore verbose output can be checked and the correct domain name and the alias can be found:
Command is the following: keytool -list -keystore ‘keystore name’ -v
Once this is checked, rerun the import command to the correct keystore.
Once the entries are deleted, import the certificate in the correct order.
Источник
Создать хранилище ключей:
Сгенерировать запрос подписи сертификата (CSR):
Затем я отправляюсь на хостинг-провайдера и получаю несколько сертификатов. Они установлены следующим образом:
Когда я установил окончательный сертификат (my.crt), я получил следующую ошибку:
Я считаю, что я импортировал цепочку и в правильном порядке, поэтому я очень смущен этим сообщением. Может ли кто-нибудь увидеть, что я делаю неправильно?
ОТВЕТЫ
Ответ 1
Я только что обнаружил, что файлы godaddy, поставляемые вместе с моим сертификатом, являются промежуточными сертификатами (на самом деле они кажутся одним и тем же промежуточным сертификатом).
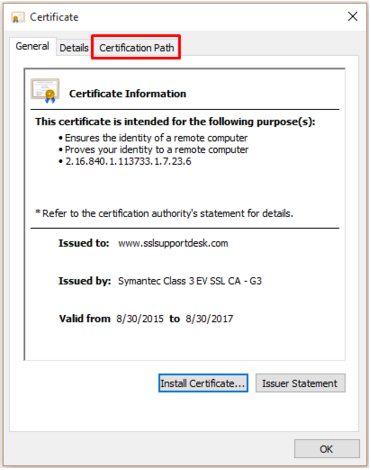
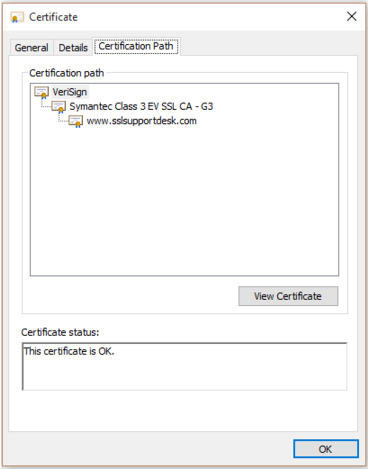
Я получил правильные корневые и промежуточные сертификаты, дважды щелкнув по моему сертификату и посмотрев путь к сертификату. отсюда я также мог загрузить каждый из этих сертификатов и использовать шаги, используемые в вопросе для их импорта

Ответ 2
Я боролся с той же проблемой около двух недель, пока не нашел способ обойти это. Проблемы заключались в том, что корневые и промежуточные сертификаты, которые поставлялись с моим сертификатом от Godaddy, были не теми, которые мне нужны. Я много раз искал в репозитории Godaddy, не в состоянии найти подходящие сертификаты.
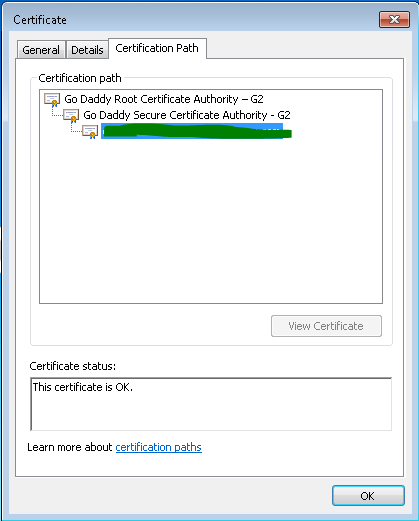
Я просмотрел свой сертификат на своем ноутбуке (используя Windows 8.1). Там я увидел цепочку сертификатов, и я смог экспортировать корневые и промежуточные сертификаты. Затем я импортировал их в хранилище ключей и работал так, как должен.
Для этого выполните следующие действия:
Просмотр сертификата на компьютере под управлением Windows. Вы увидите цепочку сертификатов на третьей вкладке, которая выглядит следующим образом. 
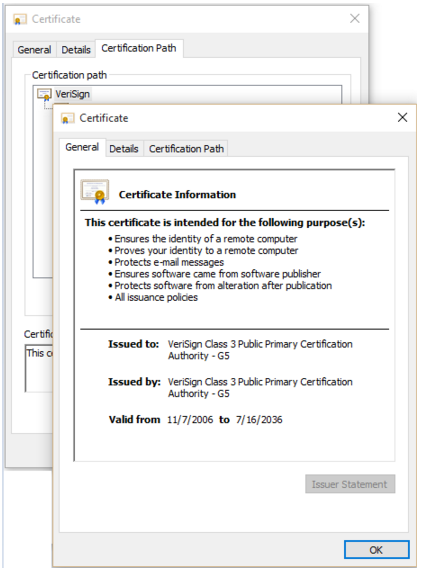
Выберите корневой сертификат из цепочки и нажмите кнопку «Просмотреть сертификат».
Примечание: Прежде чем я импортировал эти сертификаты, мне пришлось удалить те, которые были в моем хранилище ключей, и не работали. Для этого я использовал следующие инструкции:
Если вы не знаете, что находится внутри вашего keytool, вы можете просмотреть, используя:
Ответ 3
У меня такая же ошибка при попытке импортировать сертификаты, сертифицированные CA, в хранилище ключей в среде Linux.
Я выполнил множество шагов и успешно импортировал их.
После получения сертификатов, сертифицированных CA, выполните следующие шаги для импорта сертификатов в хранилище ключей.
шаг 1:
Импортировать корневой сертификат в cacerts, который будет доступен в папке JAVA_HOME/jre/lib/security, используя следующую команду:
Как только вы введете команду выше, она предложит ввести пароль, ввести пароль и нажать «Да».
шаг 2:
Импортировать корневой сертификат, используя следующую команду:
Как только вы введете команду выше, она предложит ввести пароль, ввести пароль и нажать «Да».
шаг 3:
Импортировать промежуточный сертификат, используя следующую команду:
после того, как вы введете команду выше, она предложит заменить уже имеющийся сертификат, введите yes.
Примечание: промежуточный сертификат является необязательным, его можно игнорировать, он поставляется с корневым сертификатом.
шаг 4:
Импортировать сертификат сайта, используя следующую команду:
Среда, выполняемая этими командами, представляет собой сертификат Java версии 7. GODADDY.
Ответ 4
Чтобы устранить эту проблему, используйте дополнительные ключи (-trustcacerts) в командах keytool.
Команда для импорта промежуточных сертификатов из файла intermediate.cer в файл certsks keystore должна выглядеть следующим образом:
keytool -storetype JCEKS -storepass passwd -keystore certificates.ks -import -alias промежуточное -trustcacerts файл intermediate.cer
Команда для импорта сертификата из файла http.cer в файл сертификатов cert.ks должна выглядеть так:
keytool -storetype JCEKS -storepass passwd -keystore certificates.ks -import -alias http -trustcacerts файл http.cer
Повторите попытку завершения процесса создания и импорта подписанного SSL-сертификата.
Ответ 5
Загрузите цепочку сертификатов, откройте ее в Windows — она хранит сертификат CA и ваш сертификат от CA.
Сначала импортируйте CA cert в хранилище ключей, а затем импортируйте ответ из CA.
Ответ 6
Следующий шаг очень важен, прежде чем импортировать сертификаты в локальный магазин ключей. После получения подписанных сертификатов от CA).
импортировать корневой сертификат в cacerts, который будет доступен в папке JAVA_HOME/jre/lib/security, используя следующую команду:
keytool -importcert -alias root -file [корневой сертификат] -keystore cacerts после ввода команды введите пароль, введите пароль и нажмите «Да».
Источник
Adblock
detector
создать хранилище ключей:
keytool -genkey -alias tomcat -keyalg RSA -keystore my.keystore -keysize 2048
создать запрос подписи сертификата (CSR):
keytool -certreq -alias tomcat -keyalg RSA -file my.csr -keystore my.keystore
Я ухожу с моим хостинг-провайдера и получить сертификаты. Эти я установил следующим образом:
keytool -import -alias root -keystore my.keystore -trustcacerts -file gd_bundle-g2-g1.crt
keytool -import -alias intermed -keystore my.keystore -trustcacerts -file gdig2.crt
keytool -import -alias tomcat -keystore my.keystore -trustcacerts -file my.crt
когда я установил окончательный сертификат (мой.crt) я получил следующую ошибку:
keytool error: java.lang.Exception: Failed to establish chain from reply
Я считаю, что я импортировал цепь и в правильном порядке, поэтому я очень смущен этим сообщением. Кто-нибудь видит, что я делаю не так?
6 ответов
Я только что обнаружил, что файлы godaddy, поставляемые с моим сертификатом, являются промежуточными сертификатами (на самом деле они кажутся одинаковыми промежуточными сертификатами).
Я получил правильный корневой и промежуточный сертификаты, дважды щелкнув по моему сертификату и глядя на путь сертификата… отсюда я также могу загрузить каждый из этих сертификатов и использовать шаги, используемые в вопросе, чтобы импортировать их
я боролся с той же проблемой около двух недель, пока не нашел способ обойти ее. Проблема была в том, что корневые и промежуточные сертификаты, которые пришли с моим сертификатом от Godaddy, не были теми, которые мне нужны. Я много раз заглядывал в репозиторий Godaddy, не найдя подходящих сертификатов.
Я просмотрел свой сертификат на своем ноутбуке (используя Windows 8.1). Там я увидел цепочку сертификатов, и я смог экспортировать корневые и промежуточные сертификаты. Тогда Я импортировал их в мое хранилище ключей, и он работал так, как должен.
для этого выполните следующие действия:
-
Просмотр сертификатов на компьютере под управлением Windows. Вы сможете увидеть цепочку сертификатов на третьей вкладке, которая выглядит следующим образом.

-
выберите корневой сертификат из цепочки и нажмите на кнопку «Просмотреть сертификат».
- откроется новое окно, перейдите к вторая вкладка и нажмите на кнопку» Сохранить файл». Откроется мастер экспорта для ceritficate.
- при экспорте выберите опцию X. 509 base 64 и следуйте инструкциям. Сохранить файл.
- повторите для промежуточного сертификата.
- загрузите оба сертификата на свой сервер и импортируйте в хранилище ключей, следуя порядку — первый корень, второй промежуточный и, наконец, ваш сертификат. [Нет необходимости импортировать корень сертификат]
Примечание.:
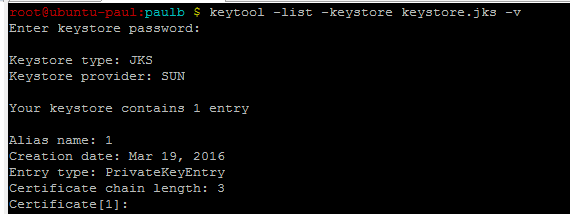
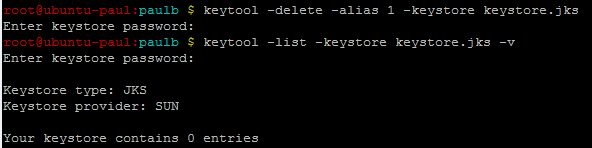
Прежде чем импортировать эти сертификаты, мне пришлось удалить те, которые были на моем хранилище ключей и не работали. Для этого я использовал следующие инструкции:
keytool -delete -alias [root] -keystore [keystore file]
Если вы не уверены, что находится внутри вашего keytool, вы можете просмотреть с помощью:
keytool -list -keystore [keystore file]
16
автор: Alejandro von Wuthenau
Я получил ту же ошибку при попытке импортировать сертификаты CA certified в хранилище ключей в среде Linux.
Я выполнил набор шагов и успешно импортировал его.
после получения сертификатов CA certified выполните следующие действия для импорта сертификатов в хранилище ключей.
Шаг 1:
импортируйте корневой сертификат в cacerts, который будет доступен в папке JAVA_HOME/jre/lib/security, используя следующее команда:
keytool -importcert -alias root -file [root certificate] -keystore cacerts
после того, как вы введете выше команду он будет запрашивать пароль, введите пароль и нажмите на да.
Шаг 2:
импорт корневого сертификата с помощью следующей команды:
keytool -importcert -alias root -file [root certificate] -keystore [keystore file name]
после того, как вы введете выше команду он будет запрашивать пароль, введите пароль и нажмите на да.
Шаг 3:
импорт промежуточного сертификата с помощью следующей команды:
keytool -importcert -alias intermediate -file [intermediate certificate] -keystore [key store file name]
как только вы введете над командой его подскажет для замены уже сертификата введите yes.
Примечание: промежуточный сертификат опционный можно проигнорировать, он приходит с сертификатом корня.
Шаг 4:
импорт сертификата сайта с помощью следующей команды:
keytool -trustcacerts -importcert -alias [alias name which give during keystore creation] -file [site certificate] -keystore [key store file name]
Environment выполняются эти команды java версии 7. сертификат выдается GODADDY.
для получения дополнительной информации см. сайт : http://docs.oracle.com/javase/7/docs/technotes/tools/windows/keytool.html#importCertCmd
чтобы решить эту проблему, используют дополнительный переключатель (-trustcacerts) в командах keytool.
команда для импорта промежуточных сертификатов из промежуточного.файл cer для сертификатов.KS файл ключей должен выглядеть так:
keytool-storetype JCEKS-storepass passwd-сертификаты хранилища ключей.КС-импорт -псевдоним промежуточными -trustcacerts -файл промежуточными.cer
команда для импорта сертификата из http.файл cer для сертификатов.KS файл ключей должен выглядеть так:
keytool-storetype JCEKS-storepass passwd-сертификаты хранилища ключей.KS-import-псевдоним http -trustcacerts -файл http.cer
повторная попытка завершить процесс создания и импорта подписанного SSL-сертификата.
загрузите цепочку сертификатов, откройте ее в Windows — она хранит сертификат CA и ваш ответ сертификата от CA.
сначала импортируйте сертификат CA в хранилище ключей, а затем импортируйте ответ из CA.
следующий шаг очень важен перед импортом сертификатов в локальное хранилище ключей. После получения подписанных сертификатов от CA).
импортируйте корневой сертификат в cacerts, который будет доступен в папке JAVA_HOME/jre/lib/security, используя следующую команду:
keytool-importcert-псевдоним корневой файл [корневой сертификат] — keystore cacerts
после того, как вы введете выше команду он будет запрашивать пароль, введите пароль и нажмите на да.
This Article consists of advanced troubleshooting to a very problematic issue that rarely comes up with versions of keytool when installing an SSL certificate in x509 format.
Issue:
By all normal means when following SSL Installation instructions for Tomcat using X509 you should have a smooth installation, but when importing the Intermediate CA Certificate or SSL Certificate received from the Certificate Authority you may get the following error message still.
“Failed to establish chain from reply”
Cause:
Tomcat/keytool is a picky system.
Tomcat wants to see the entire certificate chain before installation of the SSL Certificate. Typically this can be solved by importing the entire chaining path of your SSL Certificate in the following order: Root > Intermediate > SSL Certificate.
All of these Certificate can be gathered from the CA you purchased your SSL Certificate from.
Yet, you may still get the error message “Failed to establish chain from reply” when importing the Root or Intermediate certificates that you received from the CA. The cause for this phenomenon is unknown.
Resolution:
The following resolution requires a Microsoft OS in order to manually pull the certificate chain from the certificate.
Step 1: Retrieving your Root, Intermediate directly from your SSL certificate:
Note: you must perform this retrieval on a windows system.
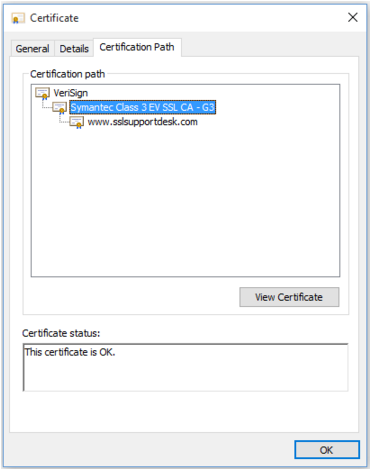
- Take your SSL certificate that you picked up following back when following the SSL Installation instructions for Tomcat using X509 it should be in x509 format with a .cer extension. and double click on it.
- At the certificate popup click on Certification Path.

- Under Certification Path you will see a tier of three certificates.
- Top certificate = Root
- Middle certificate = Intermediate
- Bottom certificate = SSL certificate for the common name it was issued to.

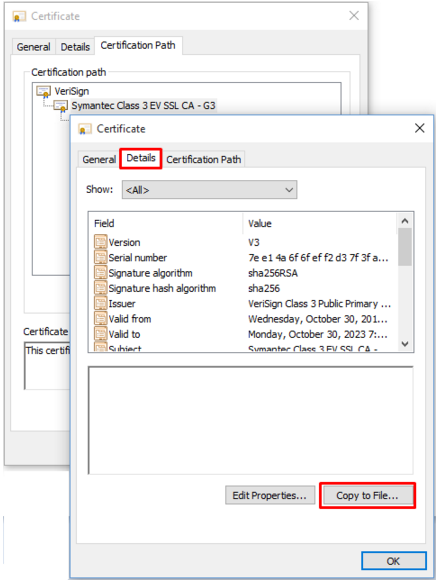
- Double click on the top certificate Root in order to bring up its information.

- Click Details.
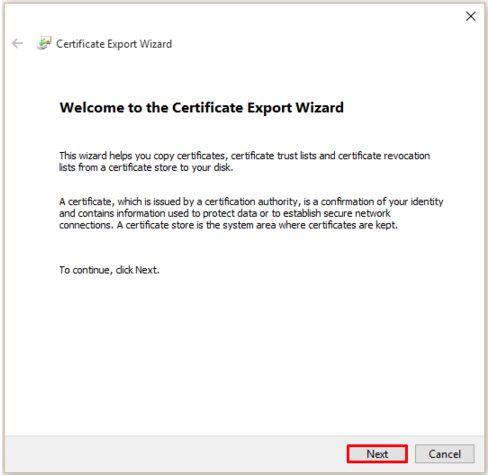
- Click Copy to File…

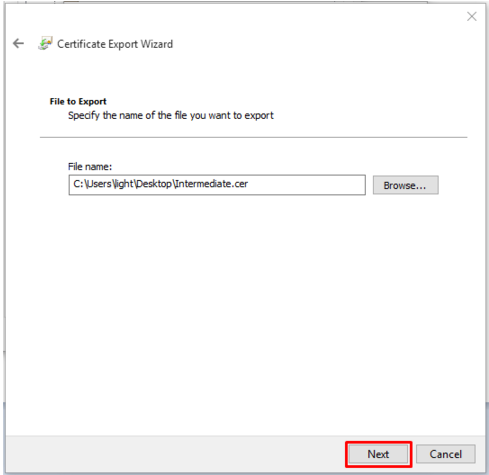
- The Certificate Export Wizard will popup. Click Next.

- Select Base-64 encoded X.509 (.cer).
- Click Next.

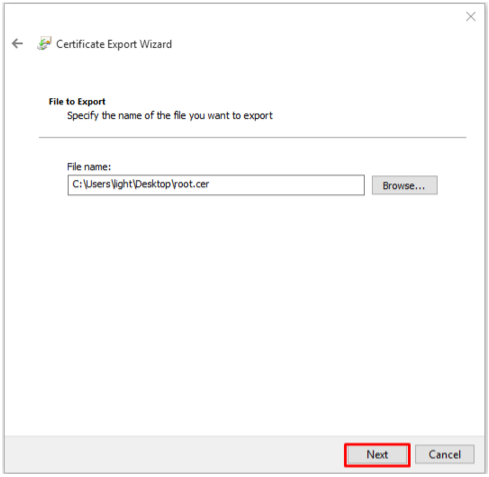
- On the next screen click Browse and specify the filename and path you want to save your Root certificate. Name it whatever you desire. Example: Root.cer
- Click Save.
- You will be taken back to the previous screen with the location and path of this file specified next to browse. Click Next.

- Complete the export wizard by clicking Finish.

Step 2: Retrieving your Intermediate CA directly from your SSL certificate (Continued):
You will perform the same steps as above in step 1 but with the Middle certificate Intermediate.
- Back to your SSL certificate under the Certification Path tab double click on the Middle Certificate Intermediate in the tier.

- Click Details.
- Click Copy to File…
- The Certificate Export Wizard will popup. Click Next.
- Select Base-64 encoded X.509 (.cer).
- Click Next.
- On the next screen click Browse and specify the filename and path you want to save your Intermediate certificate. Name it whatever you desire. Example: Intermediate.cer
- Click Save.
- You will be taken back to the previous screen with the location and path of this file specified next to browse. Click Next.
- Complete the export wizard by clicking Finish.
You should now have three files.
- Your Root Certificate.
- Your Intermediate Certificate.
- Your SSL certificate where both the Root, and Intermediate are derived from.
Step 3: Installing your Root CA, CA Intermediate, and your SSL certificate:
It is recommended that you have your Keystore, SSL certificate and Keytool.exe in the same folder or you will need to specify the full file path when running the following commands. you may want to make a copy of your Keystore in case their are issues with Installation.
Note: You will import these files into the same keystore used for CSR creation:
- Import the Root Certificate first. You will specify your own alias for this import Example: Root.
-
keytool -import -alias root -trustcacerts -file root_file_name.cer -keystore your_keystorename.Jks
-
- Import the Intermediate CA certificate second. You will specify your own alias for this import. Example: Intermediate.
-
keytool -import -alias intermediate -trustcacerts -file intermediate_file_name.cer -keystore your_keystorename.Jks
-
- Import the SSL certificate (Use the same alias name based on when you created the keystore for CSR creation)
-
keytool -import -alias your_Privatekey_Alias -trustcacerts -file your_SSLCertificate.cer -keystore your_keystorename.Jks
-
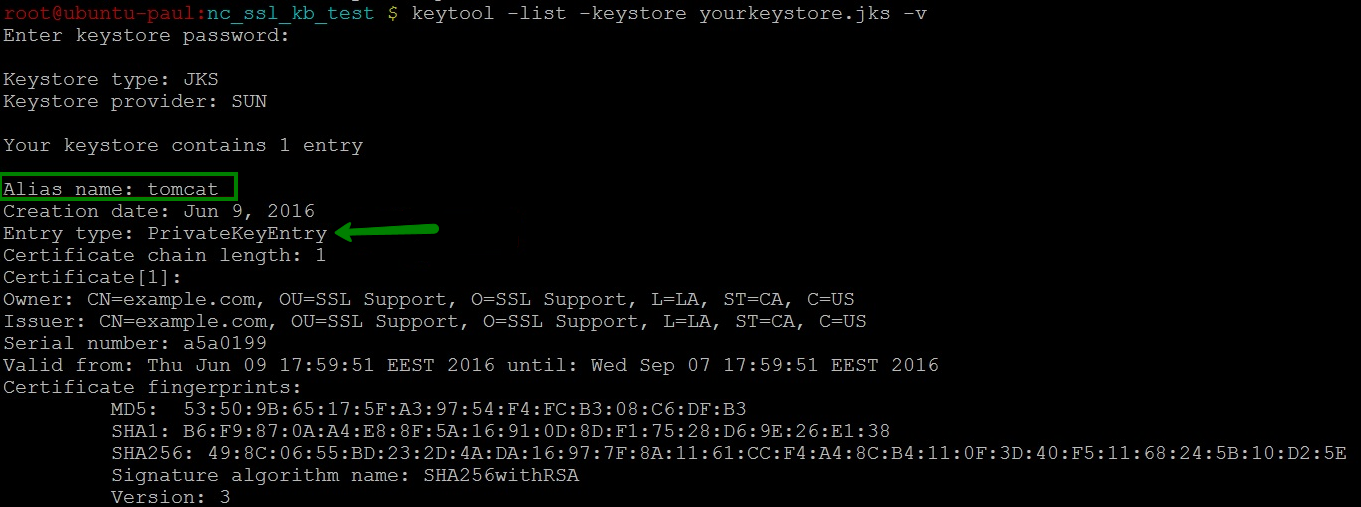
Step 4: Confirm contents of the keystore:
- At the command prompt, enter:
keytool -list -v -keystore your_keystore_filename

- Viewing the contents of the keystore.

The end entity SSL certificate is imported into the alias with the “Entry Type” of PrivateKeyEntry or KeyEntry. If not, import the certificate into the Private Key alias.
NOTE: The Certificate chain length: tells you the keystore was successful in establishing the certificate chain, and your keystore is ready for use.


Step 5: Configuring the Tomcat Server:
Tomcat keeps its configuration information in a server.xml file, which ensures Tomcat is reading the correct keystore file and keystore password.This file also allows server administrators to set the port for secure connections.
If the server.xml file is not configured, or if it is pointing to the wrong keystore, then the server may present the incorrect certificate to the client browser.
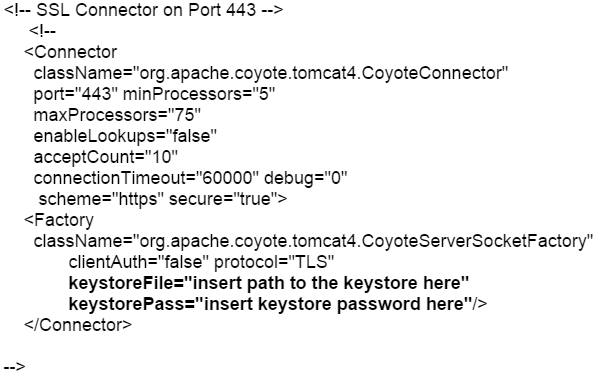
Note: Tomcat can be a custom environment. The name of your server.xml file could be something different. You should see some sort of connector within a .xml file under tomcat in the example below. This is what needs to be configured. If you are unable to figure or discover this SSL Connecter you may have to contact Tomcat for Support
- Open the server.xml config file under Tomcat using a text editor (ie. JAKARTA_HOME/conf/server.xml)
- Search for the secure element in your config file (try searching for SSL Connector). By default it should look something like this:

- Make sure to specify the correct “keystoreFile” directive to the new keystore and the “keystorePass” directive is referencing the correct keystore password.
Note: These directives are case-sensitive! Make sure the letters “F” and “P” in “keystoreFile” and “keystorePass” are in uppercase.
Note: If your keystore contains more than one private key alias, please add the “keyAlias” directive to reference the correct private key alias name.
For Example:
keystoreFile=”insert path to the keystore here”
keystorePass=”insert keystore password here”
keyAlias=”insert private key alias here”/>
- Save the changes.
- Stop and start Tomcat
Your SSL certificate is now installed and configured for its website.
These instructions are created out of troubleshooting experience in dealing with the many issues of Tomcat/Keytool. If you are unable to use these instructions for your server, or you are still having issues with Keytool/Tomcat Acmetek recommends that you contact either the vendor of your software or the organization that supports it.
Tomcat Support:
For more information, please refer to Tomcat Support
Problem
keytool error: java.lang.Exception: Failed to establish chain from reply
Resolving The Problem
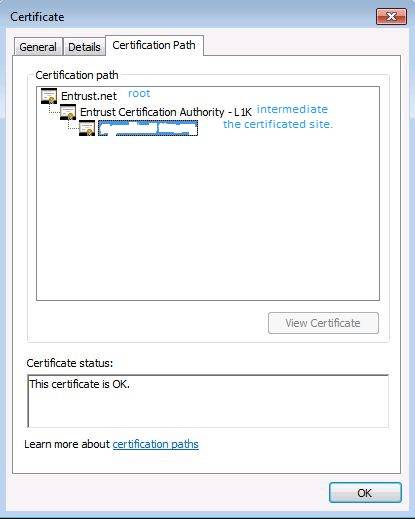
Solution: Make sure all the certificates from the chain are imported into the keystore. You can identify the certificates from the chain by opening the certificate received from the CA. Double click the file and go to the certification path tab. You should be able to get the path chain from there. In order to obtain the individual certs from the chain, contact your Certification Authority (i.e. Verisign or Entrust). If this is a self signed certificate contact your IT admin to obtain the individual certs from the chain.
[{«Product»:{«code»:»SSFUEU»,»label»:»IBM OpenPages with Watson»},»Business Unit»:{«code»:»BU059″,»label»:»IBM Software w/o TPS»},»Component»:»Not Applicable»,»Platform»:[{«code»:»PF025″,»label»:»Platform Independent»}],»Version»:»Version Independent»,»Edition»:»»,»Line of Business»:{«code»:»LOB10″,»label»:»Data and AI»}}]
Historical Number
00001381