There is a new Pokemon in another location and you want to capture it, and one of the best option is to spoof your location in the game and teleport to the location that has the new Pokemon to capture it.
3uTools virtual location is one of such Pokémon GO spoofing tools. However, according to some users, 3uTools virtual location fails to work sometimes.
This is why this guide comes in. In this guide, we have listed all the troubleshooting tips to fix 3uTools virtual location not working issue.
What is a 3uTools virtual location?

Fake your current location by using the 3uTools free virtual location mod. This mod helps you to change up your GPS coordinates on your smartphone or tablet.
This tool is used in games like Pokemon Go to teleport your character to a new location.
It can also be used for testing purposes. It is a free tool with a user-friendly UI. It also gives you the option to change back the GPS position.
Specific 3uTools virtual location not working issues
1. The map of 3uTools virtual location fails to load
If you’re encountering the issue where the 3uTools virtual location fails to load the map. Then, you need to make sure the network connection you’re using is normal.
3uTools uses Google Maps and OpenStreetMap as their API source. You can switch in between the maps to check if the map loads. By default, the map used by the tool is OpenStreetMap.

2. 3uTools failed to modify the virtual location
Check your iPhone is properly connected to the PC before using the 3uTools virtual location. The 3uTools automatically detects if an iPhone is connected to the PC.
If the tool fails to change the location on your device. Then, you can fix it by performing the following actions below:
- The dependent components are automatically downloaded to make sure the components are successfully installed on your computer.
- The virtual location mod is temporary. It can take around 2 days for an iOS 12 device. It will take 3 to 6 hours if you’re using a device with iOS 13 or up.
- Check to see if the coordinates entered in the search field are valid or not.
- The screen of the iPhone should be unlocked when using the virtual location to change the GPS coordinates.

3. Safety issue of the 3uTools virtual location
We have seen some comments on the Reddit forums about the safety of the 3uTools.
There are some instances where the Pokemon Go players are getting detected even when using the modded Pokemon Go games.
So we can conclude that the 3uTools works with the apps and games. But they’re not safe as catching you using the tool can result in a soft or permanent ban from the app.
However, if the problem still exists then you can use an alternative tool to 3uTools virtual location.

Other Useful tips to fix 3uTools virtual location not working
1. Try a 3uTools virtual location alternative: MockGo
There is a better alternative to 3uTools virtual location software to change your GPS coordination.
The alternative tool is MockGo by the trusted Foneazy. The tool is compatible with Apple devices and supports most of the latest updates on iOS including the latest iPhone 14 and iOS 16.
You don’t need to jailbreak your device in order to use the MockGo tool. You can change your GPS coordination with just one click. There are many key features of the tool such as:
- In a single click, you’re teleported to your new location within seconds.
- The joystick and keyboard allow you to easily move and control your avatar.
- Highly customizable options which you can use to change the direction, routes, and movement speed.
- Widely used with WhatsApp, Facebook apps, and games like Pokemon Go (which uses the device’s GPS feature).
- Import GPX map files that customize the routes on the map.
To use the MockGo software on your PC follow these steps below:
Step 1. Download the MockGo software on your computer. Next, launch the installer and install it.
Step 2. Once the app is installed, proceed to open the app by clicking on the MockGo icon. Connect your iPhone or any iOS device to the computer using your lightning cable.

Step 3. You will be able to see your current location displayed on the map. Choose any of the modes available like Teleport mode or Multi-stop mode.
![]()
Step 4. Look up your destination by using the search bar. To begin searching, click on the Teleport mode icon and enter the location in the search bar.
MockGo also suggests the available locations that you can choose from.

Step 5. Lastly, on the popup window click on the Move Here button after locating your destination.
If the multi-spot mode is selected then you need to choose multiple locations and customize your movement speed.


2. Restart the software
If you do not want to use the alternative software. Then, you can try fixing the problem by restarting the 3uTool Virtual Location software.
This can happen if the software has trouble with a different program or it did not start up properly. So a restart can usually fix the issue and resolve the problem.
3. Shut down and restart your computer
Restarting the software, 3uTools Virtual Location does not work then we can reboot the computer.
After you’ve successfully rebooted/restarted the computer, you can launch the 3uTools to check if the problem still exists or has been resolved.
4. Use the Internet to find help
If the problem is not fixed then you can probably find the solution over the internet. There is a likelihood that someone else has the same problem. You can begin by checking in the following places:
- Search for the right answers — Use Google, Duckduckgo, Bing, or any other search engine to find the answers. When searching for the answer, your query should include the software name, version, the problem, and how it occurred. If there is an error message then search for the exact error message.
- Look up information on the official website — Many of the software programs have a FAQ page or a thread to answer queries. You can go to the vendor page and look up ways to contact them, via email, Facebook, WhatsApp, or even a call. Let them know the error you’ve encountered and wait for the response.
- Check on blogs or third-party tech sites: There are many blogs and articles on third-party websites like Reddit that can assist you with finding the right solution to your problem.
5. Uninstall the software, then reinstall it.
If all fails. then the best solution is to just uninstall the software and then install it back again.
There are many reasons why you would consider uninstalling and then re-install the software, for example, if an important application file is accidentally deleted, updated, or got infected.
Many Windows software programs use the DLL (Dynamic Link Library) to perform actions. Most of the apps will use a similar DLL file.
So for instance, if a program is removed from your system there is a chance that the deleted DLL is used by another software. Thus, it can result in other programs acting strange or not working properly.
This can also happen if the DLL file is updated. To make sure that your program has all the necessary files to function.
You can install and then re-install the program. Even when uninstalling, the program can leave a residue in the form of files.
So the best solution is to check the default Program Files folder — mostly located in the C drive — and deleting the old files.
You can also check if the software has a new update or version before reinstalling it. Usually, developers release bug updates and patches to fix the problem you’ve encountered.
Conclusion
3uTools virtual location software is a good program that can help you change your GPS coordinates. You can use the software on different geo-location-based apps and games.
However, the 3uTools virtual location program is not reliable as many have encountered problems with it.
Therefore, you can use alternate software to change your location on your iOS device. The software is MockGo that is much faster than the 3uTools.
You can also try other methods to fix the 3uTools like reinstalling the program or restarting your computer.
Error Code 16 — What is it?
Code 16 is a type of Device Manager error code. Windows XP users are most likely to encounter it. This error pops on XP systems that are running legacy or not plug-and-play hardware.
Error code 16 is displayed in the following format:
‘Windows cannot identify all the resources this device uses. (Code 16)’
Solution
 Error Causes
 Error Causes
Error code 16 occurs when you use a peripheral device such as an external drive or a printer and that device is not properly or completely configured. Though the device may have been recognized before Windows fails to verify its configuration. Simply put, error code 16 appears when devices are partially configured.
In addition to this, another cause of error 16 is outdated or corrupt device drivers. Devices often fail to run successfully because of driver problems.
Device drivers are programs that provide instructions to control different devices attached to the computer system such as audio devices and printers to name a few.
Though error code 16 is not fatal like other PC error codes such as BSoD; however, it may hamper your ability to use certain devices installed on your system and lower your work productivity.
To avoid inconvenience, it is advisable to resolve the error immediately to avoid inconvenience.
Further Information and Manual Repair
PC error codes are often considered technical and difficult to resolve which is why many prefer to hire a professional for the repair job rather than doing it themselves.
Small repair jobs like fixing error code 16 by a professional computer programmer may cost you hundreds of dollars.
So, why incur so much cost when you can repair it easily by yourself even if you are not a technical whiz.
Error code 16 is easy to repair.
Here are some effective DIY methods that you can use for resolving error code 16 on your PC. These methods require no technical background, knowledge or expertise for that matter. Just simply follow the instructions and resolve the error code 16 issue.
Let’s get started…
Method 1 — Setup from the Disk that Came with the Hardware Device
Run setup from the disk that came with the hardware device, or you can simply copy the setup software file to your hard drive/flash drive. Refer to the vendor’s direction to set up.
If for any reason you’re unable to find the directions, simply uninstall the device. Then go to the start menu, Control Panel, and select ‘Add New Hardware’.
Now pick the appropriate hardware and follow the steps that the Wizard suggests. This is most likely to resolve the error code.
Nonetheless, if the error code still persists, then try method 2.
Method 2 — Allocate More PC Resources
Another alternative method to resolve error code 16 is to allocate more PC resources to the device. To specify additional resources:
- Go to the start menu
- Type Device Manager
- Then go to the Device properties and click the resources
- Here specify the device in the Device Manager
- If you see a resource with a question mark, assign that resource to the device
- However, if for any reason the resource is unable to change, then simply click ‘Change Setting’.
- If Change Settings is not available, then click the box to the ‘Use Automatic Settings’ box. This will make the option available.
Method 3 — Install DriverFIX
As previously stated above, device manager error codes like error code 16 may also occur due to driver problems. If this is the underlying reason for error code 16 on your system, then the best way to resolve it is to install DriverFIX.
DriverFIX is user-friendly, advanced, and feature-filled software deployed with an intelligent programming system, which detects all problematic device drivers automatically in seconds.
It matches these drivers with their latest versions and updates them smoothly without any hassle, resolving error code 16 right away.
And furthermore, once you install this software on your PC, you don’t have to worry about driver problems anymore typically because it updates drivers on a regular basis with compatible and new versions, ensuring that your computer functions properly. It is easy to install and is compatible with all Windows versions.
Click here to download DriverFIX to repair error code 16
Advanced System Repair Pro
One-click automated PC repair solution
![]()
With Advanced System Repair Pro you can easily
DOWNLOAD
Advanced System Repair Pro is compatible with all versions of Microsoft Windows including Windows 11
Share this article:
You might also like
Many Windows 10 users often change the IP addresses of their computers’ network adapter in order to connect to the internet or network they belong to in times when there is no automatic connection for their computers. In most cases, access to modifying this setting is restricted for some odd reason even if you are an administrator. So if you are one of the users whose Windows 10 VPN IPv4 Properties are not working, this post can help you remedy that so that you can open and edit the IPv4 Properties on your Windows 10 PC.
The common way to change IP settings is by going to Settings > Network and then to Internet > Change adapter options > Select Network adapter > right click and open Properties. From there, you can select TCP/IP 4 and modify it. If you aren’t able to do this, refer to the instructions laid out below to troubleshoot the problem in accessing the IPv4 Properties.
Option 1 – Try using PowerShell to manually set the IPv4 properties
As you are not able to set it using the interface, you can do so using PowerShell instead. Note that this option will only work for you if you run PowerShell with administrator privileges.
After opening PowerShell, according to many users, you have to run the this command – set-DnsClientServerAddress -InterfaceAlias “Ethernet” -ServerAddresses xxx.xx.xxx.xxx,x.x.x.x,xxx.xx.xxx.xxx,x.x.x.x
Usually, Ethernet is the name of your network adapter which is set by default. If you want to see the actual name of your network adapter, you can just type this command and tap Enter after doing so – Get-NetAdapter -physical | where status -eq ‘up’
After entering the given command, you will see a list of active Ethernet adapter in your computer as you can see on the image above. Note that the 4 sets of X like the one on the image below should match with the sequence:
Option 2 – Try editing the rasphone.pbk files
The rasphone.pbk files stores property for the connections and since you are not able to access the IPv4 properties, it is most likely that it has been disabled here. The good thing is that you can open these files and edit them using Notepad. Refer to the steps below to do so.
- Open the Windows Explorer and then enable the show hidden files option.
- After that, look for the files at this location – C:Users <username>AppDataRoamingMicrosoftNetworkConnectionsPbk_hiddenPbkrasphone.pbk
- Then right-click on it and select the “Open with” option and choose the Notepad app.
- After opening the file, look for “IpPrioritizeRemote” from the long list.
- Once you found it, set its value from “1” to “0”.
- After that, look for “IPInterfaceMetric” and set its value to “1” and tap Ctrl + S to save the changes you’ve made, and then exit and try accessing the IPv4 properties again. It should work, but if you’re still unable to access it, try the next option below.
Option 3 – Enable the Split Tunneling if you use VPN
All data goes back and forth when you are using a VPN service on your computer. And since you are using VPN, it could be that it disables the IPv4 interface. If that’s the case, you need to stay connected with both the local network and VPN and to do so, you have to enable Split Tunneling. How? Follow these steps:
- Open PowerShell with administrator privileges.
- Next, type in “Get-VpnConnection” and tap Enter. After doing so, it will give you the exact name of your VPN.
- After that, type in “Set-VpnConnection -Name “yourVPNName” -SplitTunneling $True” and tap Enter. Once you enter the command, it will free your IPv5 settings so that you can change it to connect with your local network if you prefer it to.
Read More
One of the most popular and most used web browsers commonly used by Windows users is Google Chrome. This well-known web browser has been introducing various features recently in order to stay at the top. However, it makes the web browser a lot more complex and thus prone to errors. Although this may not be a big deal, it can be quite annoying as it can interrupt your web browsing.
There are various errors that can come up with this level of complexity of the web browser. One of these errors is the “This site can’t be loaded from the cache, ERR_CACHE_MISS” error message that can suddenly appear while you browse the web using your Google Chrome browser on your Windows 10 PC.
Take note that when you encounter this particular error, there really is no direct fault in the Chrome browser as there are also issues with caching the website data locally in the computer. Moreover, this error can also occur when a website is coded in an incorrect manner or if there are some browser extensions or toolbars that are in conflict with the proper functioning of the website.
To fix the ERR_CACHE_MISS error in Google Chrome, refer to the possible solutions laid out below.
Option 1 – Try clearing browser data
There are times when some data in the browser is conflicting with the loading of the website and triggers errors like ERR_CACHE_MISS. And so you can try to clear your browser’s data. This might be a very basic solution but oftentimes it works in fixing this kind of error in Google Chrome. Follow the steps below to clear the data in your browser.
- Open your Google Chrome browser.
- After that, tap the Ctrl + H keys. Doing so will open a new panel that allows you to delete the browsing history and other data in your browser.
- Now select every checkbox that you see and click on the Clear browsing data button.
- Then restart your Chrome browser and check if you can now open any website or not.
Option 2 – Try using the Developer Tools
You can also try using the Developer tools in Google Chrome to help you fix the ERR_CACHE_MISS error. Refer to the steps below to do so.
- Open Google Chrome.
- Tap the Ctrl + Shift + I keys on your keyboard and then tap the F1 key to open the Settings tab inside the Chrome Developer Tools.
- Next, select the Disable cache option while DevTools is open and apply those settings.
- After that, refresh your browser and check if the entries you’ve seen previously in the Network tab are gone.
- Now try to load the same webpage again and see if the problem is resolved.
Option 3 – Reset Winsock, TCP/IP & Flush DNS
Resetting Winsock, TCP/IP, and flushing DNS might help you resolve the ERR_CACHE_MISS error. To do so, follow these steps:
- Right-click on the Start button and click on Command Prompt (administrator) so you can pull up an elevated Command Prompt.
- After that, execute each one of the commands listed below. And after you typed in one after the other, you have to hit Enter.
- netsh winsock reset – type in this command to reset Winsock
- netsh int ip reset resettcpip.txt – type in this command to reset TCP/IP
- ipconfig /flushdns – type in this command to flush the DNS cache
- Next, restart your PC and check if the problem’s fixed.
Option 4 – Get rid of any conflicting browser extensions
- Open Chrome and press Alt + F keys.
- Go to More tools and click Extensions to look for any suspicious browser extensions or toolbars.
- Click the Recycle bin and select Remove.
- Restart Chrome and press Alt + F keys again.
- Proceed to On Startup and mark Open a specific page or set of pages.
- To check if the browser hijacker is still active, click Set pages, if it is active, overwrite the URL.
Note: If removing the browser extensions or toolbars didn’t work, you can also try to reset your Google Chrome browser.
- Open Google Chrome, then tap the Alt + F keys.
- After that, click on Settings.
- Next, scroll down until you see the Advanced option, once you see it, click on it.
- After clicking the Advanced option, go to the “Restore and clean up option and click on the “Restore settings to their original defaults” option to reset Google Chrome.
- Now restart Google Chrome.
Read More
Buying a product and then finding out that is not working is one of the most annoying and disappointing things that a consumer can experience. It is no secret that Adobe software and services online can malfunction or detect somewhat false information and behave accordingly placing buyers in an awkward position.
Adobe no matter how huge and great can also still sometimes has software that can misbehave in this way and sometimes downloading their suite and buying it after can not be 100% registered and even after the money is transferred and purchase has been completed you can still have a trial status for your adobe cloud applications.
In this guide, we will address this issue and see how we can fix it so you can get back to your creative work in no time.
Follow this guide as it is presented step by step.
-
Wait an hour
No, seriously, wait an hour. Sometimes transaction and registration of transaction along with activation can take up to one hour of time. If you just made a purchase and you are still under trial in the launcher, give it a little time to detect the purchase and adjust accordingly.
-
Check to see if your subscription is active
Sign in to https://account.adobe.com/plans. If you have more than one account, make sure you sign in with the proper one.
Under My plans, select Manage plan.
In the Plan Information section, check to make sure that your subscription is active. If it’s expired, it’s likely why you’re seeing messaging that indicates you are in trial mode or that your trial has expired.
If your subscription is showing as active, then an out-of-date payment method may be the issue.
To see if your payment information is current, in the Plan information section, select Manage payment.
If your payment method isn’t current, update your credit card information in the pop-up window and select Save.
Your new payment method will take effect in the next billing cycle. -
Sing out and then sign back in
Open the Creative Cloud desktop app. (Select the
 icon in your Windows taskbar or the macOS menu bar.)
Select the Account icon in the upper right, and then select Sign out.
In the confirmation dialog box, select Sign Out. The Creative Cloud apps and services associated with your account are deactivated on the computer.
Sign in again to your Adobe account.
Launch any Creative Cloud app included in your membership, such as Photoshop or Illustrator. If prompted, sign-in on the next screen. -
Update creative cloud applications
Open the Creative Cloud desktop app. (Select the
icon in your Windows taskbar or the macOS menu bar.)
Depending on your version of the Creative Cloud desktop app, do one of the following:
On the Help menu, select Check for updates.
orSelect the three vertical dots icon in the upper-right corner of the app.
Choose Check for App Updates from the menu.
If you aren’t using the latest version of your Creative Cloud app, an update prompt appears next to it on the apps list. Select Update. -
Remove entries in the HOSTS file
If the previous solutions do not work, your computer could have trouble connecting to Adobe’s activation servers. This could be because of an incorrectly configured Operating System hosts file (Operating system hosts files map host names to IP addresses).
To solve this issue, try removing Adobe-related entries from the hosts file. You can remove the Adobe-related entries from the hosts file in two ways:
Automatically repair the hosts file using the Limited Access Repair tool: Repair the hosts file using the Limited Access Repair tool. With this method, you do not have to manually edit the hosts file — the tool automatically repairs the file.
Reset the hosts file manually: If the issue is not fixed even after you run the Limited Access Repair tool, reset the hosts file manually:
To reset the hosts file on Windows, do the following:
Navigate to C:WINDOWSSystem32driversetc.
Open the hosts file with a text editor such as Notepad.
Check for any Adobe-related entries in the hosts file.
If there are Adobe-related entries in the hosts file, move the file to the desktop, for example by dragging.
Delete the Adobe-related entries from the hosts file. Make sure that you do not delete any other entries.
Save the hosts file that you edited in the previous step. The updated hosts file should not have any Adobe-related entries.
Move the file from desktop to the original location: C:WINDOWSSystem32driversetc. When moving the file, select the Replace option.
To reset the hosts file on macOS, do the following:
To find the hosts file, open Finder and then choose to Go > Go to Folder. In the box, type the following location and then press Return: /private/etc/hosts
If you are unable to locate the file, it means that the hosts file is hidden. Type the following command in terminal to unhide the file, and then repeat Step 1. chflags nohidden /etc/hosts
Open the hosts file using a text editor such as Text Edit.
Check for any Adobe-related entries in the hosts file.
If there are Adobe-related entries in the hosts file, move the file to the desktop, for example by dragging.
Delete the Adobe-related entries from the hosts file. Make sure that you do not delete any other entries.
Save the hosts file that you edited in the previous step.
Move the file from the desktop to the original location: /private/etc/hosts. When moving the file, select the Replace option.
Read More
Error Code 0x8000222 — What is it?
Error Code 0x8000222 is an error that occurs during the installation process for Windows 10. It is also present in past versions of the software, going all the way back to Windows 7 and even affecting Windows software products, including Microsoft Word, PowerPoint, and other items in the Microsoft Office Suite.
Common symptoms include:
- Inability to complete the installation process for new versions of the operating system, Microsoft Office programs, or other Windows-based software
While there are several factors that can contribute to the appearance of Error Code 0x8000222 during the installation process, most of these factors can be addressed using a few high-level methods. These methods do require some advanced knowledge and computing skills, so if you are unable to complete the steps below successfully or do not have confidence in your ability to undertake these methods on your own, contact a qualified computer repair service that is familiar with the Windows 10 installation process.
Solution
Error Causes
 Error Causes
There are a few different issues that can cause Error Code 0x8000222 to arise during the installation process on your Windows operating system. The first is a corrupted file in your system library or dynamic link library, also called the DLL. The second is interference by your proxy, firewall, or antivirus software that inhibits the machine from being able to access the files that it needs to successfully complete the installation of your Windows operating system or software.
Further Information and Manual Repair
To address and resolve Error Code 0x8000222 on your Windows operating system, regardless of the version of the software that you are using, there are a few steps that you can take. Keep in mind that these steps do require some advanced skills and knowledge about your computer, so if you don’t believe that you can undertake these steps on your own or if the following methods do not fully resolve the issue on your device, talk to a qualified computer repair technician for assistance.
Here are the best ways to address Error Code 0x8000222 on your Windows machine:
Method One: Fix Your DLL Dependencies Registry
Before implementing this method, make sure that a proxy is not active on your computer. To check to see if there is an active proxy, simply press the Windows key together with the “R” key and type in the command “cmd”, then when the prompt opens up, type in the following command: “netsh winhttp import proxy source=ie”. From the box that follows, if you see a message saying that there has been an error writing in the proxy settings and that access has been denied, it means that you can turn off the proxy setting in your Internet Explorer and the error will go away on its own.
If you do not have an active proxy, it is time to check and see whether your DLL dependencies are properly set up. To do so, open up the command prompt again by pressing the Windows key and “R” key at the same time and typing in “cmd”. Once the command prompt is active, simply typing in “regsvr32 Officevalidator.dll”, then attempt to resume your installation once it has been complete.
In some cases, you may need to restart your computer before attempting the Windows installation process.
Method Two: Turn Off Firewalls and Antivirus Software Before Installing
If the above method did not successfully resolve the problem, you can go into your control panel and turn off any firewalls or antivirus programs that may be interfering with your ability to complete the Windows installation process. Depending on the programs that you use for your antivirus needs, you may need to restart your computer before you reattempt to do the installation process.
You should be able to turn your firewall and antivirus programs back on once the installation process has run through to completion.
In most cases, taking the steps above will fully resolve the appearance of Error Code 0x8000222 on your Windows 10 machine.
Method Three: Use An Automated Tool
If you wish to always have at your disposal a utility tool to fix these Windows 10 and other related issues when they do arise, download and install a powerful automated tool.
Read More
Can’t connect to this network Internet connectivity issues present a complex problem with simple solutions for PC and laptop users. First, it is usually recommended that users rule out problems with the internet connection, router, and Wi-Fi settings before proceeding to troubleshoot settings on your PC/laptop. Once the rest are ruled out, we can then proceed with the following troubleshooting steps and guidelines to fix your wifi connection issue:
The first step is to update your windows network adapter driver. Connectivity problems may arise if your network driver is not updated or if it is incompatible with the network adapter. To do so, you may resort to any third-party driver scanning and installing programs found online. This solution should have resorted if users don’t want the hassle of perusing through windows settings that users may not be familiar with.
However, this solution requires a pre-existing internet connection other than wifi, so it is recommended you have a backup internet connection via ethernet.
The second step is to uninstall the driver for your network adapter. This solution is to be reported if there is an issue with the driver as restarting the PC after the following steps let windows reinstall the driver again:
- Open the quick access menu on your keyboard by pressing the Windows key and X key at the same time and select “Device Manager” from the menu list.
- From the list of devices, select “Network Adapters”
- Usually on the top of the list is the Wireless Network Adapter
- Right-click the Wireless Network Adapter and select the option to “Uninstall device”
- You will be given a confirmation in a new separate window to proceed. Click “Uninstall” to proceed.
- After completing the previous steps, try rebooting your Windows PC and reconnecting to see if it works.
A third step is to disable the 802.1 1n modes of your network adapter by following the next steps:
- First press the Windows logo key and the X key at the same time to bring up the quick-access menu. And like the previous step, select “Device Manager”
- From the list of devices, select “Network Adapters”
- Right-click the Wireless Network Adapter from the drop-down menu and select properties
- Under properties, select the “Advanced” tab then select the 802.1 1n Mode. To the right drop-down menu change the option to “Disabled” and click “Ok”
- After, try to re-establish the connection to see if the steps have worked.
In the event that any of the preceding did not fix your problem, it helps to take a second look at the router and network settings using the interface provided by your ISP. A simple reset to the back of your router often fixes the issue. Also, try to check if you have any other administrative capabilities over the network to determine whether your device, in particular, has been MAC filtered or if the frequency of your wireless adapter is not compatible with the broadcast frequency of your router.
Read More
If you are trying to update your Windows 10 computer but are not able to do so since your computer is running low on storage then this obviously indicates that there is not enough disk space available on your drive where Windows 10 has been installed. As you know, when Windows 10 downloads the update packages, it extracts them in a separate folder which means that there should be enough space on that particular folder for the update to begin with. Windows do not really check systems for any adequate space requirements before it even initializes the update or upgrades and you only get to know about it right when the update process starts.
On Windows 10 thin clients or the ones with embedded systems that have limited storage space, when Windows Update runs, the update initialization may fail because as pointed out, Windows does not check systems for adequate space requirements so you may have to do the work for them by making sure that your disk has enough space available. Here are some suggestions you can follow to resolve Windows 10 update issues on computers with low storage space.
Option 1 – Delete the files from the Download folder
Since you are going to delete everything manually, you need to create a backup for all your important files which you may have placed in the Download folder. After you create backup copies of important files, delete the files from this folder or you could simply tap the Shift + Del keys to remove the files permanently after you selected them all.
Option 2 – Change the Windows Update Folder location
You might have to change the Windows Update folder location where Windows download all the files need to update the operating system if you cannot really create some space on your primary driver. So all you have to do is set the drive with enough space available for the update to be completed.
Option 3 – Uninstall apps and programs you no longer use
In some cases, apps and programs take up a lot of space on your drive. So if there are programs or apps that you no longer use, you can uninstall them to save storage space. To do so, follow these steps:
- In the search box, type in “control” and then click on Control Panel (desktop app) among the search results.
- After that, select Programs and Features from the list which will give you a list of all the programs installed on your computer.
- From there, look for the apps and programs that you no longer use and right-click on each one of them and click on Uninstall.
Option 4 – Move files to another drive
This is another thing you can try. You can move files, especially the ones with large sizes, to another drive to make up space on your drive. After that, install the updates once again.
Option 5 – Reduce on-drive files from Cloud services
If you are using tons of cloud backup services such as OneDrive and Dropbox, you might want to consider reducing the number of files you have on those cloud backup services. You can do what you’ve done on option number three and have those files moved to another drive to free up storage space.
Option 6 – Empty the contents in Recycle Bin
As you know, the files that are deleted from your computer goes to the Recycle Bin first. So if you have not emptied Recycle Bin for a long time now, the files you delete are still actually taking up space on your drive. Thus, you need to empty the contents in the Recycle Bin to save storage space.
Option 7 – Clean up temporary files
You can use the Windows 10 Storage Sense feature which can clean all the temporary files from your computer. To use Storage Sense, follow the steps below.
- Open Setting > System > Storage from the WinX Menu.
- From there, you will see a list of all the local and connected storage devices along with the details on the free space.
- Now make sure that the Storage Sense feature is turned On then go find a link that says “Free Up Space” and click it to open.
- After that, a screen which is the built-in program in Windows 10 will appear and will scan your computer for the following junk files so you can free up disk space:
- Windows Upgrade Log Files
- System created Windows Error Reporting Files
- Thumbnails
- Temporary Internet Files
- Previous Windows Installation Files
- Delivery Optimisation Files
- DirectX Shader Cache
Choose the files you want to get rid of and then click on the remove files option. Note that you’ll have an idea of the total size as you select any of the junk files listed above.
Read More
Manually cleaning your PC registry may be the worst or best thing you ever decide to do. Registry keys that lie around on your computer, unused, can cause your computer to lag. This can end up in your computer not being able to load the easiest of programs and being slow at loading anything, let alone something that would take up a decent amount of memory.
If your computer has slowed to almost an absolute stop, it is most probably the registry’s fault and the only option then is to clean it. You can get programs to do this for you, but they can be riddled with inaccuracies and viruses that could harm your computer even more.
This is why some people choose to manually edit their computer. However, this is not without its flaws.
Registry Keys
Registry keys tend to have really long names.
These names will be full of numbers and hyphens and will most likely give you no indication of what they do. Even some computer experts find it hard to understand what every computer’s registry keys do.
This can make it very hard to see which ones are causing the problem; and if you don’t know what’s causing the problem, then there is no way you will be able to fix it.
Some registry keys will be completely menial in what they do but some could be vital to even allow Windows to work on your computer.
Manual Registry Repair
Registry keys can also cause huge problems if you manually delete the wrong one.
A lot of registry cleaners have the option to revive a key that they have deleted on you, which means that fixing an error that they made would be easy enough to do. However, when you manually delete registry keys, it will be an awful lot harder to get them back to work again afterward.
This can cause your computer many problems and if you delete even one wrong key it is possible your computer will not even start. With the horrid naming system they have as well, it makes it very hard to determine what is important and what is not, which means it is all too likely that you will delete something important.
However, those are the risks you have to take when you are cleaning out your registry. A registry cleaner has the same likelihood of messing with your computer and deleting something wrong that you have, so it is the same either way however a registry cleaner will do it with less hassle.
But, some people say that if you do it yourself, it’s more likely to be right; that is why they prefer to do it manually and that is alright.
Conclusion
So, if you are manually deleting your registry keys that are unused, you’ll have to use a program that comes with Windows known as ‘regedit.exe’ which is incredibly difficult to use but may just be worth the hassle in the end.
So, you don’t really need to put up with a slow computer, but be careful when messing with your registry manually!
To repair and resolve this and other PC-related issues Click Here to download Restoro.
Read More
Recently, a lot of users reported getting several error messages when they upgraded their Windows 10 computers. One of these error messages users encountered during a Windows 10 upgrade is the Error 0x8007002C-0x4001E. if you are one of the users who is facing this error, read on as this post will help you fix it.
When you encounter this error, you will see the following error message on your screen:
“We couldn’t install Windows 10
We’ve set your PC back to the way it was before you started installing Windows 10
0x8007002C-0x4001E, The installation failed in the SECOND_BOOT phase with an error during PRE_OOBE operation.”
To resolve the 0x8007002C-0x4001E, The installation failed in the SECOND_BOOT phase error, here are some suggestions that might help.
Option 1 – Try flushing the SoftwareDistribution and Catroot2 folders
You have to stop a couple of services such as BITS, Cryptographic, MSI Installer, and Windows Update Services. And to do that, you need to flush the contents in the SoftwareDistribution folder. The Software Distribution folder in the Windows operating system is a folder that can be found in the Windows directory and is used to store files temporarily which might be required to install the Windows Update on your PC. Thus, it is required by the Windows Update and maintained by WUAgent. Aside from that, it also contains all the Windows Update History files and once you delete them, you will most likely lose the Update history. As a result, the next time you run the Windows Update, it may result in a longer detection time.
- Open the WinX Menu.
- From there, open Command Prompt as admin.
- Then type in the following command – don’t forget to hit Enter right after typing each one of them.
net stop wuauserv
net start cryptSvc
net start bits
net start msiserver
- After entering these commands, it will stop the Windows Update Service, Background Intelligent Transfer Service (BITS), Cryptographic, and the MSI Installer
- Next, go to the C:WindowsSoftwareDistribution folder and get rid of all the folders and files thereby tapping the Ctrl + A keys to select them all and then click on Delete. Note that if the files are in use, you won’t be able to delete them.
After flushing the SoftwareDistribution folder, you need to reset the Catroot2 folder to restart the services you just stopped. To do that, follow these steps:
- Type each one of the following commands.
net start wuauserv
net start cryptSvc
net start bits
net start msiserver
- After that, exit Command Prompt and restart your computer, and then try to run Windows Update once more.
Option 2 – Select the Keep your files option
You can also select the option to perform an in-place upgrade and opt for the “Keep my files” option during an installation as it might make the process a lot smoother and if you need to perform a clean install, you can do so once the setup is completed.
Option 3 – Try to run the Windows Update Troubleshooter
Running the built-in Windows Update troubleshooter could also help you resolve the 0x8007002C-0x4001E, The installation failed in the SECOND_BOOT phase error. To run it, go to Settings and then select Troubleshoot from the options. From there, click on Windows Update and then click the “Run the troubleshooter” button.
Option 4 – Try to run Microsoft’s online troubleshooter
Aside from the Windows Update Troubleshooter, you can also run the online troubleshooter of Microsoft as it can help you with Windows 10 upgrade errors.
Option 5 – Perform a clean install
If none of the options worked, you can try to clean install Windows 10. Just make sure that you have the ISO from the official Microsoft Website and then a bootable USB drive to install Windows 10 again. Take note that this will delete all the data from your drive where Windows 10 was installed previously.
Read More
Modem Error 633 error is a dial-up error that usually occurs when using a USB modem with a Windows computer. The Modem Error 633 error message is displayed as the following:
“Error 633: The Modem is already in use or not configured properly.”
Solution
Error Causes
This error can be triggered due to several reasons such as:
- A software program conflicts with the USB modem
- The modem is not configured properly
- The Telephon.ini file is missing or damaged
- There is some issue with the way Windows is managing the communication (COM) ports on your computer.
Further Information and Manual Repair
If you experience the Modem Error 633 on your PC, you don’t have to panic. Though this error does not pose any major threats like data loss, it may hamper your ability to use the internet therefore it is advisable to resolve the error.
Repairing the Modem Error 633 is quite easy. There are a number of ways to fix this error. So, let’s get started:
Solution 1: Delete Incompatible Software and Non-Present Modems
- Click on the start menu and go to the ‘Control Panel’. Now choose the option ‘Phone and Modem’.
- Here you will see three tabs, the dialing rules, modems, and advanced. Choose the tab ‘Modems’. As you click on it, you will see modems installed on your PC. To repair the Modem Error 633, select and remove all the incompatible software and modems that are not present and click ‘OK’.
- Now to bring the changes into effect, restart your system with the modem plugged in and try connecting to the internet again.
Solution 2: Change the Communication Ports
If the error occurs because the modem is not properly configured, then this solution is possibly the best way to resolve this error. Here’s what you need to do:
- Click on the Start menu and choose My Computer.
- Now click on the option ‘Manage’ to open the Computer Management Window.
- Once it opens, click the option ‘Device Manager and then expand the option modems. Click on Properties, then the Advanced tab, and the Advanced Port Settings button.
- As you click on the Advanced Port Settings, then click on the COM Port Number drop-down box.
- Choose a new Communication Port. However, make sure it is not already in use.
- Once you make changes, click ‘OK’ and then restart your PC.
- Now Open Device Manager again. Open the Modern Properties Window and then Click the Diagnostics tab.
- After that view the command response window to verify if the error is fixed. If yes, then create a new dial-up connection and connect to the internet with ease.
Solution 3: Disable the Startup items
- Another way to resolve Modem Error 633 on your PC is to go to the start menu and type ‘msconfig’ into the search box and then press ‘enter’.
- Open the misconfig.exe program. As you open it, you will see 4 tabs, General, Boot, Service, Start-up, and Tools.
- Now click on the ‘Start-up’, ‘Disable All’, and then press Apply.
- After you press Apply, a window will pop up asking to restart the computer.
- Confirm it and click restart.
- Once the computer restarts now try connecting to the internet again. This will hopefully resolve the Modem Error 633.
Read More
Error Code 0x80070057 – What is it?
Error code 0x80070057 occurs when Windows users are having problems installing updates on their machines. The error code may result due to issues affecting Windows Update, for instance, problems with system files or settings that can be accessed or modified using the registry in Windows. Error code 0x80070057 affects multiple versions of the Windows operating system including Windows 10. Common symptoms manifested when this error code and other update error codes occur include the following:
- Inability to complete the installation of updates via Windows Update
- Presence of error code message box
Error Causes
Update error codes like error code 0x80070057 occur when there are issues related to system files, programs or malicious software is present on one’s machine. To combat these issues, users may need to implement manual repair procedures, depending on the specific error code present on their device.
Solution
Further Information and Manual Repair
Windows users can fix error code 0x80070057 by manually repairing or deleting subkeys and values within the Windows registry. This enables Windows Update to function as the proper modification of settings and other information present in the registry can fix problems associated with certain error codes.
The manual repair procedures also enable users to address specific problems on the devices that may not be fixed through the use of other methods.
Method One: Back-Up Registry in Windows
The Windows registry contains information regarding applications installed on the version of Windows you use on your device. This information as well as settings related to hardware are all accessible to users and can be useful when combating problems like error code 0x80070057.
However, users will need to be very careful when making modifications within the registry in Windows. This is due to the fact that errors made while accessing the registry can lead to serious issues on your PC. Backing up your registry before you modify it is crucial since it will provide protection against any problems that may arise if you make an error. This is the first step in resolving error code 0x80070057. Follow the steps below to back up your registry properly.
- Step one: Type regedit.exe in the search box near the Start button.
- Step two: Type the appropriate password or provide confirmation if you are prompted to do so
- Step three: Locate Registry Editor
- Step four: Select registry key or subkey that you want to back up
- Step five: Click File > Export
- Step six: In the Export Registry File dialog box, choose a location where you will save the backup copy
- Step seven: Name the backup file then select Save.
In the case of fixing error code 0x80070057, the registry file or subkey you will need to back up relates to this: HKEY_LOCAL_MACHINE. This contains configuration details or information related to your machine regardless of the user. Also note that the registry, once you have created a backup file, will be protected, thus enabling you to move to the manual method mentioned below.
Method Two: Make Changes to the Windows Registry
The execution of modifications to the registry can be a complex procedure, especially if you are an average Windows 10 user who lacks technical knowledge. Thankfully, even non-technical users can access the solutions they need by simply following the instructions provided in this article.
You may also contact a Windows repair technician as well, in case you have trouble implementing the steps mentioned for modifying your Windows registry or if other problems arise while you are proceeding with these instructions.
Step one: Access the Windows Registry Editor by typing regedit.exe in the search box near the Start button.
Step two: Type the appropriate password or provide confirmation if you are prompted to do so
Step three: Locate Registry Editor
Step four: Enter the following:
[HKEY_LOCAL_MACHINESOFTWAREMicrosoftWindowsUpdateUX] «IsConvergedUpdateStackEnabled»=dword:00000000
[HKEY_LOCAL_MACHINESOFTWAREMicrosoftWindowsUpdateUXSettings] «UxOption»=dword:00000000
After making these modifications in the Windows registry, restart your machine. You can then check Windows Update to see if the problem has been resolved. If the modifications to the registry have proven successful, you will no longer see the error code 0x80070057 message box. You will also be able to complete all updates via Windows Update.
Method Three: Download an Automated Tool
If you wish to always have at your disposal a utility tool to fix these Windows 8 and other related issues when they do arise, download and install a powerful automated tool.
Read More
![]()
Copyright © 2022, ErrorTools. All Rights Reserved
Trademarks: Microsoft Windows logos are registered trademarks of Microsoft. Disclaimer: ErrorTools.com is not affiliated with Microsoft, nor claim direct affiliation.
The information on this page is provided for information purposes only.
![]()
Repair your PC with one click
Please be aware that our software needs to be installed on a PC system with Windows on it, Open this website on a desktop PC and download the software for easy and quick elimination of your issues.

David
3 дня назад
For some reason, sideload can’t find my Iphone 13. Can you help me?

V volkz
5 дней назад
THAAANKSSS BRO <3

Faozi Almurisi
1 неделя назад
My account was locked because he tried to hack it
Faozi Almurisi
1 неделя назад
Scam

wesley jackson
1 неделя назад
Any chance you can show how to do this with an apple watch running the latest iWatch OS?

Saad Fallah
1 неделя назад
Ur a legend mate, amazing!! U got a like from me

Tariq Iqbal
1 неделя назад
That’s happened to my iPad ninth generation

Ali Feraoon
2 недели назад
Sorry but its very long way, there are much easier way than this

Radha Manohar
2 недели назад
I have connected my pc to iPhone hotspot and sideloadly showed up the device (wifi beside to iPhone name)installed it OTA and it worked! Thanks for video !

Epic Noob Gaming
3 недели назад
super sketchy, apple locked my account and made me do a password reset. nevertheless, the option did show up.

Terrance Harrison II
3 недели назад
There’s no manage plug ins button under my mail preferences tab.

felix torcivia
1 месяц назад
I sent you message on your iMessage I keep seeing this .
Failed to modify location (Error code: -16), Restart the device and try again
What can I do to fix it

Ahmed Yousry Saber
1 месяц назад
No need to do all that , just connect the iPad to the computer and open Xcode application , the developer mode button will appear

SCP: Letters from God
1 месяц назад
This works

Mr. Brown
1 месяц назад
Bunch of BS for something that should already be there!

Neha Nandini
1 месяц назад
SUPER helpful 

Mr P
1 месяц назад
won’t let me verify app.

Sally AlRubaei
1 месяц назад
you’r amazing thank you a lot
Иногда вы можете столкнуться с ошибкой доступа отказано 16 код в вашем браузере. Это сообщение не позволит вам получить доступ к определенным веб-сайтам, и мы покажем вам, как это исправить на ПК с Windows 10.
По словам пользователей, код ошибки «Отказано в доступе 16» может помешать вам получить доступ к определенным веб-сайтам. Говоря об этой ошибке, вот некоторые связанные с этим проблемы, о которых сообщили пользователи:
- Код ошибки 16 для доступа в инкапсулах — эта ошибка обычно возникает, если ваш провайдер блокирует Inacpsula. Однако вы можете решить эту проблему, просто используя хороший VPN.
- Код ошибки 16, Chrome — многие пользователи сообщали об этой проблеме при попытке получить доступ к определенным веб-сайтам, и проблема заключалась в их антивирусах. Просто отключите ваш антивирус и проверьте, сохраняется ли проблема.
- Код ошибки 16: этот запрос был заблокирован правилами безопасности Chrome — иногда эта проблема может возникать из-за настроек вашего браузера. Если это так, попробуйте сбросить настройки браузера по умолчанию или переключиться на другой браузер.
- Проверьте свой антивирус
- Попробуйте зайти на сайт с других устройств
- Попробуйте использовать VPN
- Установите последние обновления
- Попробуйте использовать безопасный режим
- Выполните Чистую загрузку
- Свяжитесь с вашим провайдером
Решение 1. Проверьте свой антивирус

По словам пользователей, из-за вашего антивируса иногда может появляться ошибка «Отказано в доступе 16». Наличие хорошего антивируса важно, если вы хотите защитить свой компьютер от вредоносных программ, но иногда ваш антивирус может вызывать эту ошибку.
Если это произойдет, рекомендуется проверить настройки антивируса и попытаться отключить определенные функции. В некоторых случаях вам, возможно, даже придется отключить антивирус. Иногда проблема может сохраняться, даже если вы отключите антивирус. Если это так, следующим шагом будет удаление антивируса.
Многие пользователи сообщили об этой проблеме с Avast и AVG, но проблема может возникнуть с другими антивирусными приложениями. После того, как вы удалите антивирус, проверьте, сохраняется ли проблема. Если удаление антивируса решает проблему, это может быть идеальное время для вас, чтобы подумать о переходе на другой антивирус.
Bitdefender предлагает отличную защиту, и он никак не повлияет на вашу систему, поэтому он должен быть идеальной заменой. Теперь вы используете в своем арсенале механизм сканирования и множество нововведений в области безопасности в версии 2019 года.
— Получить сейчас Bitdefender 2019
- ЧИТАЙТЕ ТАКЖЕ: полное исправление: при открытии этого документа было отказано в доступе
Решение 2. Попробуйте получить доступ к сайту с других устройств.
Если вы продолжаете получать код ошибки «Отказано в доступе 16» при попытке доступа к определенному веб-сайту с вашего ПК, возможно, проблема в вашей конфигурации. Иногда ваш компьютер может быть неправильно настроен или приложение может мешать вашему интернет-соединению.
Чтобы проверить, является ли ваш компьютер проблемой, попробуйте использовать другое устройство в сети для доступа к веб-сайту. Если проблема не возникает с другим устройством, почти наверняка проблема связана с конфигурацией вашего ПК или стороннего приложения.
Это не лучшее решение, но оно должно дать вам достойное начало с точки зрения устранения неполадок.
Решение 3 — Попробуйте использовать VPN

Иногда вы можете столкнуться с ошибкой «Доступ запрещен» с кодом 16, если ваш интернет-провайдер блокирует веб-сайт, который вы пытаетесь посетить. Это может быть раздражающей проблемой, и если это произойдет, лучшим вариантом будет использование VPN.
Используя VPN, вы в основном скрываете свой IP-адрес от своего интернет-провайдера, и вы сможете получить доступ к любому веб-сайту. Это также относится к геоблоку. Помимо возможности доступа к любому веб-сайту, заблокированному вашим интернет-провайдером, вы будете скрывать свою личность в Интернете и получите дополнительный уровень конфиденциальности.
Наличие хорошего VPN очень важно, и если вы хотите защитить свою конфиденциальность в Интернете, мы рекомендуем попробовать CyberGhost VPN. Многие пользователи сообщили, что эта проблема была решена после использования VPN, поэтому обязательно попробуйте. Он будет скрывать ваш IP, предоставит вам доступ ко многим сайтам и защитит ваши личные данные от быстрых веб-атак.
- Загрузить сейчас Cyber Ghost VPN (сейчас скидка 73%)
Решение 4 — Установите последние обновления
Иногда из-за определенных проблем в Windows 10 может появиться код ошибки «Отказано в доступе 16». Windows 10 — надежная операционная система, но время от времени могут появляться сбои и ошибки, и лучший способ справиться с ними — поддерживать систему в актуальном состоянии., Windows 10 обычно загружает отсутствующие обновления автоматически, но иногда могут возникать проблемы, препятствующие загрузке обновлений. Однако вы всегда можете проверить наличие обновлений вручную, выполнив следующие действия:
- Откройте приложение «Настройки». Самый быстрый способ сделать это — использовать Windows Key + I.
- После открытия приложения «Настройки» перейдите в раздел « Обновление и безопасность ».
- Нажмите кнопку Проверить наличие обновлений на правой панели.


Теперь Windows проверит наличие обновлений и загрузит их в фоновом режиме. После загрузки обновлений просто перезагрузите компьютер, чтобы установить их. Как только ваша система обновится, убедитесь, что проблема все еще существует.
- Читайте также: Исправлено: доступ к целевой папке запрещен в Windows 10, 8.1
Решение 5 — Попробуйте использовать другой веб-браузер
Иногда Access denied error code 16 может быть связан с вашим браузером и его настройками. Чтобы проверить, является ли ваш браузер проблемой, мы советуем получить доступ к веб-сайту с помощью другого браузера. Microsoft Edge может быть хорошим выбором, но если проблема связана с вашей системой, вполне вероятно, что проблема проявится и в Edge.
Поэтому, возможно, было бы лучше использовать сторонний браузер, такой как Firefox или Opera, для устранения этой проблемы. Если проблема не появляется в этих браузерах, вполне вероятно, что ваша конфигурация браузера вызывает эту ошибку, поэтому вы можете изменить настройки или сбросить настройки браузера.
Решение 6 — Попробуйте использовать безопасный режим
Если у вас по-прежнему есть ошибка Access denied error code 16 на вашем компьютере, возможно, проблема связана с одной или несколькими настройками на вашем компьютере. Если это так, вы можете решить проблему, просто используя безопасный режим.
Если вы не знаете, безопасный режим — это особый сегмент Windows, который работает с настройками по умолчанию, поэтому он идеально подходит для устранения различных проблем. Чтобы получить доступ к безопасному режиму, вам нужно сделать следующее:
- Откройте приложение «Настройки» и перейдите в раздел « Обновление и безопасность ».
- Выберите пункт « Восстановление» на левой панели, а на правой панели нажмите кнопку « Перезагрузить сейчас».
- Теперь выберите Устранение неполадок> Дополнительные параметры> Параметры запуска. После этого нажмите кнопку « Перезагрузить».
- После перезагрузки компьютера вы увидите список параметров. Выберите нужную версию безопасного режима, нажав соответствующую клавишу клавиатуры.

После входа в безопасный режим проверьте, сохраняется ли проблема. Если проблема не появляется в безопасном режиме, возможно, проблема связана с настройками вашего компьютера, поэтому вы можете приступить к ее устранению.
Решение 7 — Выполните Чистую загрузку
Иногда в доступе отказано Код ошибки 16 может появиться из-за сторонних приложений на вашем ПК. Многие приложения и службы, как правило, запускаются автоматически с Windows, в результате чего проблема появляется, как только Windows запускается.
Чтобы решить эту проблему, рекомендуется отключить все запускаемые приложения в процессе, называемом чистой загрузкой. Для этого просто выполните следующие действия:
- Нажмите клавишу Windows + R. Когда откроется диалоговое окно Run, введите msconfig и нажмите OK или нажмите Enter.
- Откроется окно « Конфигурация системы». Перейдите на вкладку « Службы » и установите флажок « Скрыть все службы Microsoft». Теперь нажмите кнопку Отключить все.
- Перейдите на вкладку « Автозагрузка » и нажмите « Открыть диспетчер задач».
- После запуска диспетчера задач вы должны увидеть список всех запускаемых приложений. Щелкните правой кнопкой мыши первую запись в списке и выберите « Отключить» в меню. Повторяйте этот шаг, пока не отключите все автозагрузки приложений.
- После отключения всех запускаемых приложений вернитесь в окно « Конфигурация системы». Нажмите Apply и OK, чтобы сохранить изменения и перезагрузить компьютер.


После перезагрузки компьютера проверьте, не устранена ли проблема. Если проблема больше не появляется, то наверняка проблема была в одном из отключенных приложений. Чтобы устранить проблему, необходимо включить все отключенные приложения по одному или в группах, пока проблема не появится снова.
Как только вы найдете проблемное приложение, рекомендуется удалить его с вашего ПК. Лучший способ сделать это — использовать программное обеспечение для удаления, такое как Revo Uninstaller.
Иногда удаленные приложения могут оставить некоторые файлы и записи реестра, даже если вы удалите их, и для полного удаления нужного приложения рекомендуется использовать программное обеспечение для удаления.
Решение 8 — Свяжитесь с вашим провайдером
Если сообщение с кодом 16 «Отказано в доступе» все еще присутствует, возможно, проблема заключается в вашем интернет-провайдере. Некоторые интернет-провайдеры блокируют определенные веб-сайты, и, если вы перепробовали все предыдущие решения, возможно, вам следует обратиться к своему интернет-провайдеру и спросить его, могут ли они разобраться в этой проблеме.
Код ошибки 16 «Доступ запрещен» может помешать вам получить доступ к вашим любимым веб-сайтам, и если вы столкнулись с этой проблемой, обязательно попробуйте некоторые из наших решений. В большинстве случаев вы можете решить проблему, просто используя хороший VPN.
ЧИТАЙТЕ ТАКЖЕ:
- Исправлено: «Удаленное соединение было запрещено» в Windows 10
- «Ошибка 5: доступ запрещен» ошибка установки программного обеспечения в Windows
- Как исправить ошибку 0x80070005 «Доступ запрещен»
3utools virtual location not working? I used to adjust my phone location using 3utools but for today, it worked only the first few times. Anyone has this issue?
— Reported by u/indily1 from Reddit
Downloaded 3uTools virtual location but have problems using it? What should you do when 3uTools virtual location not working and is there a best alternative to this sofware?
What is 3uTools Virtual Location?
3uTools is defined as a program that can allow the person to manage their device. The VirtualLocation option in the tool provides the ability to set a virtual location on your iPhone, iPad, or any iDevice. Apart from that, you can share the location on social media and bypass the region restrictions on games and services.
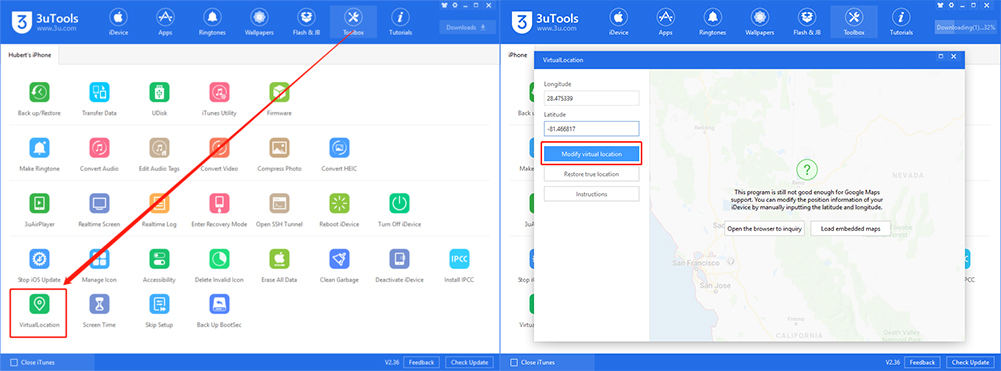
There are few steps to follow to set up 3uTools.
- Step 1: First, install 3uTools on your PC.
- Step 2: Next, connect your iPhone with the PC that you installed 3uTools.
- Step 3: Launch the 3uTools and select the Toolbox option from the top menu.
- Step 4: Under the toolbox, click on the VirtualLocation icon.
- Step 5: It will pop up a new window. In the window, you can provide the longitudes and latitudes of the location that you want to set.
- Step 6: Once you enter the relevant coordinates, click on the Modify virtual location button. After few seconds, you can see the new location.
Issues about 3uTools Virtual Location
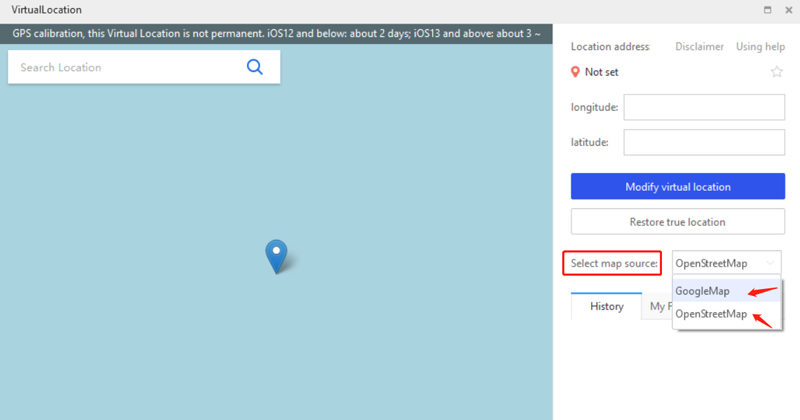
1. The map fails to load
First, make sure that your network connection is normal. The map sources used by 3uTools are Google Map and OpenStreetMap. By default, it uses OpenStreetMap. If the map fails to load, you can try to change it to Google Map.
2. 3uTools failed to modify the virtual location
Before you use the 3uTools VirtualLocation, make sure your iPhone is connected to the computer and 3uTools can recognize your phone.
The following situations can help you fix the 3uTools VirtualLocation not working:
- The program will automatically download dependent components to ensure that the dependent components are successfully installed.
- Using 3uTools to modify the virtual location is not permanent. Generally, it takes about 2 days for ios12 and above and only 3-6 hours for ios13 and above.
- Make sure the coordinates you entered are valid
- Make sure the screen of the iPhone is unlocked during the process.
If you still can’t solve the issues, please use 3uTools VirtualLocation alternative.
3uTools Virtual Location Alternative – AnyGo
iToolab AnyGo provides most of the facilities provided through 3uTools with enhanced features. AnyGo is best suited for any iOS device since it is compatible with most of the latest versions of iOS. There is no necessity to jailbreak your iPhone. Hence, it allows you to change your location with a single click.
💡 Key features
- Teleport to any location with a single click in seconds
- Easier movement control with joystick and keyboard
- Speed of the movement, direction, and routes are customizable
- Best suited for LBS apps and games like WhatsApp, Facebook, Pokémon Go, etc.
- Option to import your customized GPX map file to insert routes into the map

👍 Pros
- No jailbreaking required
- Manage multiple devices at the same time
- Hide your real identity and protect your privacy
- No technical expertise required or any learning curve
How-to-steps
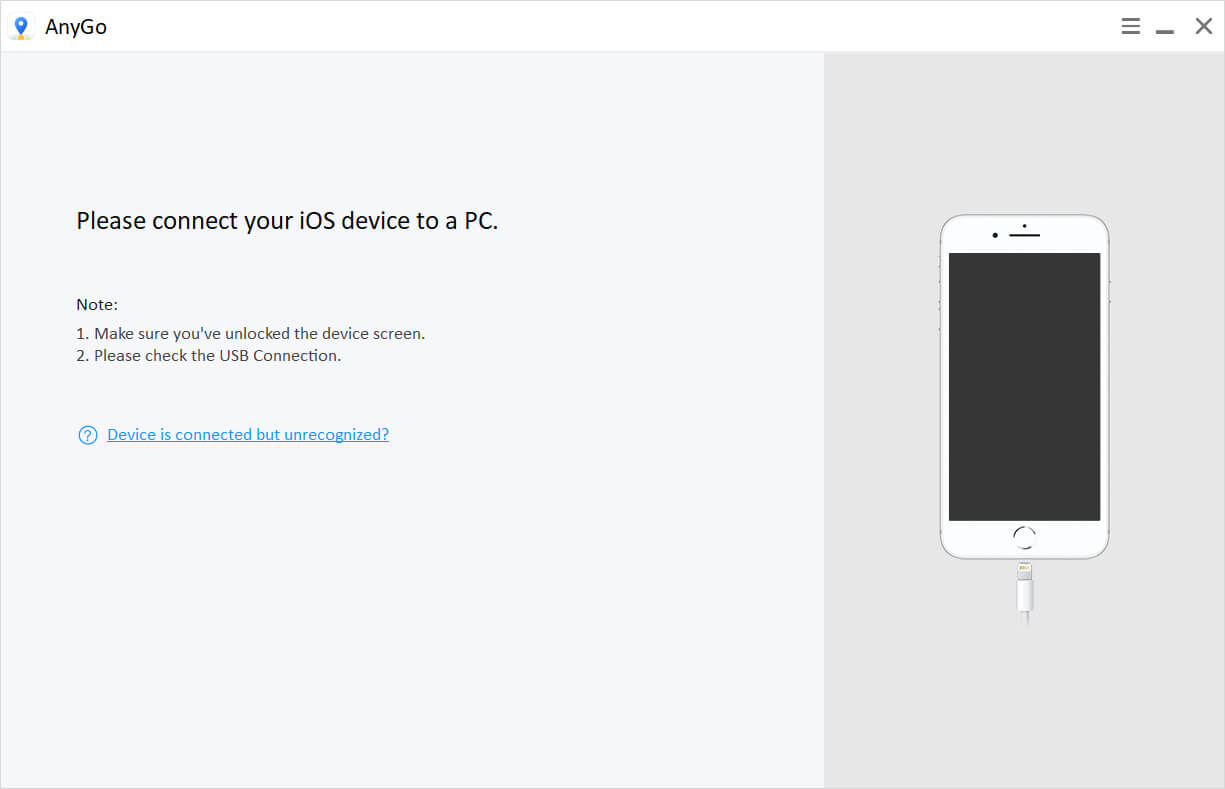
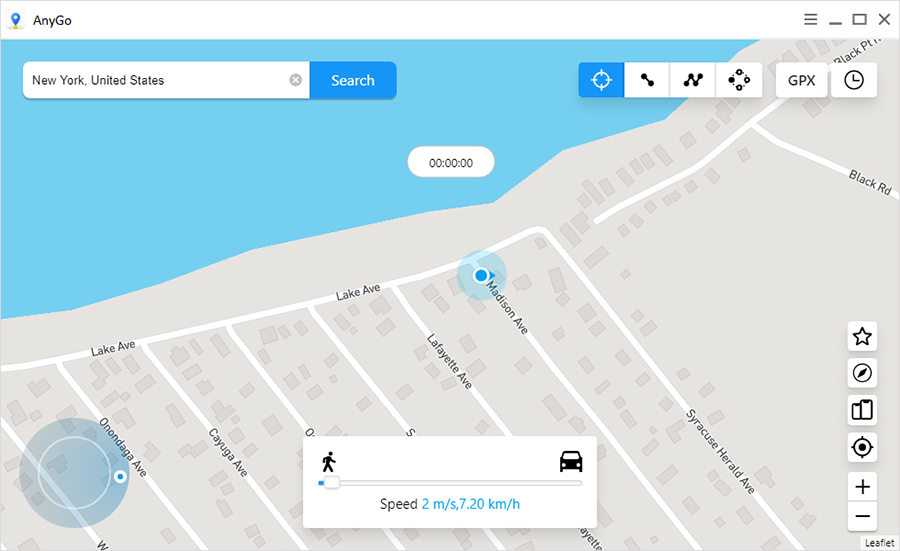
Step 1 Download and install the AnyGo software on your PC. Launch the software and connect your device to computer.
Step 2 Once the connection is successful, click on the Start button in the AnyGo home window. Then you should see a map with your current location.
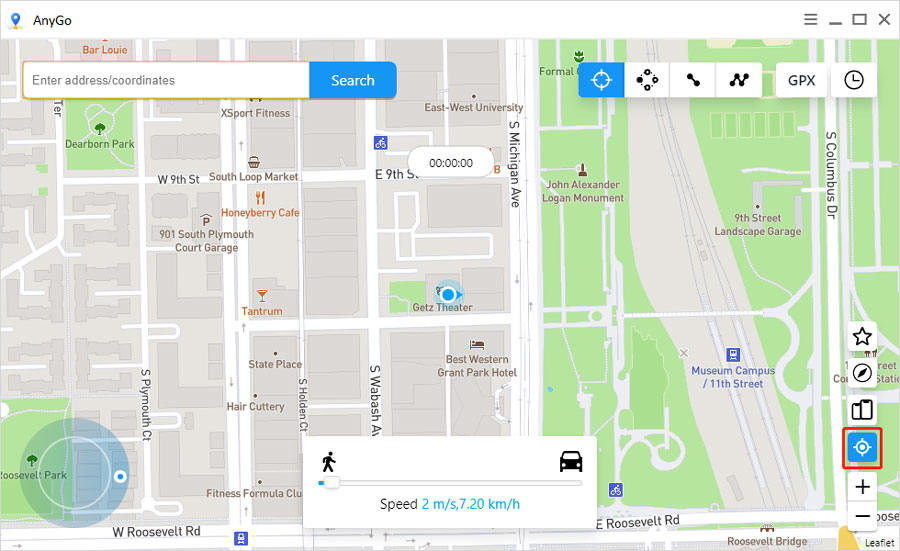
Step 3 In this step, you can select the mode you want. There are 3 modes available. i.e., Teleport mode and Multi-spot mode.
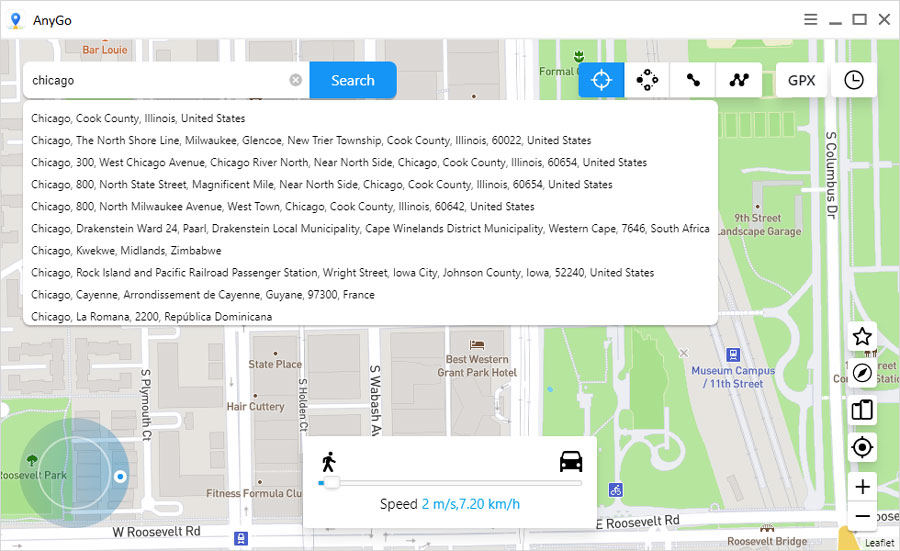
Step 4 Now you can set the destination you want using the search bar available in the AnyGo. First, click on the Teleport icon and then start typing the destination; AnyGo will suggest the available locations.
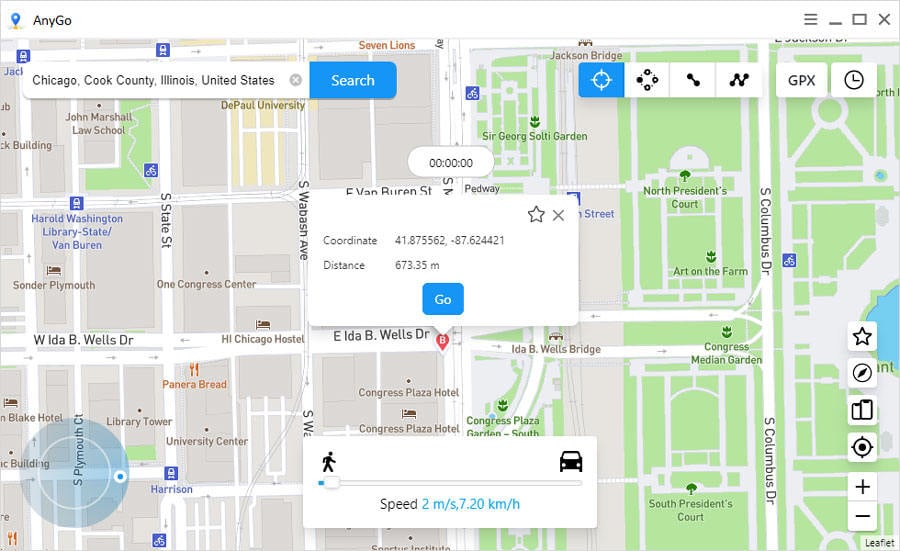
Step 5 Finally, click on the Go button in the popup card once you find the destination. If you have chosen multi-spot mode, you can set multiple locations on the map and modify the speed.
Summary
By now, you should know how to fix 3uTools virtual location failed to modify the virtual location. Also, we have provided the best tool that you can replace the 3uTools Virtual Location. Using iToolab AnyGo, you can eliminate all the problems you had with 3uTools, and you can find more enhanced versions of it.
Home
>
Location
>
[Fixed] 3utools Virtual Location Not Working? How & Alternative
I am trying to create a basic wearable app which accepts new bitmaps from the main android application. Unfortunately, when I try to .build() the GoogleApiClient I the connection failed listener is called with an error code 16.
This is the exact error received from the ConnectionFailedListener
03-21 13:36:35.903 3089-3089/com.example.android.wearable.watchface
D/Watch Face Config﹕ onConnectionFailed:
ConnectionResult{statusCode=unknown status code 16, resolution=null}
App Code:
        // create the api client to allow sending information to the wearable
    mGoogleApiClient = new GoogleApiClient.Builder(this)
            .addConnectionCallbacks(new GoogleApiClient.ConnectionCallbacks() {
                @Override
                public void onConnected(Bundle connectionHint) {
                    Log.d(TAG, "onConnected: " + connectionHint);
                    // Now you can use the Data Layer API
                }
                @Override
                public void onConnectionSuspended(int cause) {
                    Log.d(TAG, "onConnectionSuspended: " + cause);
                }
            })
            .addOnConnectionFailedListener(new GoogleApiClient.OnConnectionFailedListener() {
                @Override
                public void onConnectionFailed(ConnectionResult result) {
                    Log.d(TAG, "onConnectionFailed: " + result);
                }
            })
                    // Request access only to the Wearable API
            .addApi(Wearable.API)
            .build();
In the wearable app I have a DataListenerService created, but it doesn’t matter at the moment because the API is not build correctly.
Thanks for any assistance or comments!!
UPDATE — I changed the emulator device target from Google APIs to Android 5.0.1 and the error changed to:
03-21 14:18:24.620 3025-3025/com.example.android.wearable.watchface
D/Watch Face Config﹕ onConnectionFailed:
ConnectionResult{statusCode=SERVICE_MISSING, resolution=null}
UPDATE 2 — Found this article and followed the instructions. Then my app failed to compile. After that I went to the SDK manager based on the marked answers suggest and checked Google Play Services (they were not installed). Now the app builds but still gives the SERVICE_MISSING error above.
This posting is ~4 years years old. You should keep this in mind. IT is a short living business. This information might be outdated.
Today, a customer called me and reported, on the first sight, a pretty weired error: Only Windows clients were unable to login into a WPA2-Enterprise wireless network. The setup itself was pretty simple: Cisco Meraki WiFi access points, a Windows Network Protection Server (NPS) on a Windows Server 2016 Domain Controller, and a Sophos SG 125 was acting as DHCP for different WiFi networks.

Pixybay / pixabay.com/ Pixabay License
Windows clients failed to authenticate, but Apple iOS, Android, and even Windows 10 Tablets had no problem.
The following error was logged into the Windows Security event log.
Authentication Details:
Connection Request Policy Name: Use Windows authentication for all users
Network Policy Name: Wireless Users
Authentication Provider: Windows
Authentication Server: domaincontroller.domain.tld
Authentication Type: PEAP
EAP Type: -
Account Session Identifier: -
Logging Results: Accounting information was written to the local log file.
Reason Code: 16
Reason: Authentication failed due to a user credentials mismatch. Either the user name provided does not map to an existing user account or the password was incorrect.
The credentials were definitely correct, the customer and I tried different user and password combinations.
I also checked the NPS network policy. When choosing PEAP as authentication type, the NPS needs a valid server certificate. This is necessary, because the EAP session is protected by a TLS tunnel. A valid certificate was given, in this case a wildcard certificate. A second certificate was also in place, this was a certificate for the domain controller from the internal enterprise CA.
It was an educated guess, but I disabled the server certificate check for the WPA2-Enterprise conntection, and the client was able to login into the WiFi. This clearly showed, that the certificate was the problem. But it was valid, all necessary CA certificates were in place and there was no reason, why the certificate was the cause.
The customer told me, that they installed updates on friday (today is monday), and a reboot of the domain controller was issued. This also restarted the NPS service, and with this restart, the Wildcard certificate was used for client connections.
I switched to the domain controller certificate, restarted the NPS, and all Windows clients were again able to connect to the WiFi.
Lessons learned
Try to avoid Wildcard certificates, or at least check the certificate that is used by the NPS, if you get authentication error with reason code 16.
- Author
- Recent Posts

vcloudnine.de is the personal blog of Patrick Terlisten. Patrick has a strong focus on virtualization & cloud solutions, but also storage, networking, and IT infrastructure in general. He is a fan of Lean Management and agile methods, and practices continuous improvement whereever it is possible.
Feel free to follow him on Twitter and/ or leave a comment.