")
A year or two back, in the good old days, I was trying to wipe the cache partition of my girlfriend’s Nexus 5. I powered off the phone as it was taking too long to clear the cache partition. So when I tried to reboot the phone. It got stuck on the start screen, where the logo kept on loading, but the phone won’t start. It took me a while to figure out its fix. When I went back to the recovery menu. There I saw this error failed to mount cache (Invalid Argument). I spent some time looking for its fix, and in the end, I was successful. If you face the same issue, try the guide below to fix the failed to mount cache error.
Fix Failed to Mount Cache (Invalid Argument) error on Android Phone:
When this error (Failed to mount cache) occurred on my girlfriend’s LG Nexus 5, I didn’t have any clue on how to fix it. I tried a lot of things; one thing I didn’t try was factory reset, as it would have deleted all her data. She didn’t even have a backup of the data, so a factory reset wasn’t an option. It had all our memories and messages we couldn’t afford to lose. Finally, I came across failed to mount cache error while trying to wipe the cache partition of her nexus phone. So I was sure there must be some issue with the cache formatting.
To fix failed to mount cache issue, you have to go to the recovery menu, mount the system, and then clear the cache again. Then, it will fix the problem.
Suppose you don’t know how to do that. Then, follow the step-to-step guide below to fix failed to mount cache invalid argument error:
Note: The following guide won’t erase your data from the phone. So don’t worry about losing your pictures and contacts while trying the fix below.
- First of all, you will have to get into the recovery menu from the boot menu.
- Press and hold the volume down and the power button.
- A screen will appear with Android on the back and “Start” written inside the box, which is pointing towards the power button.
- Now press the volume down button twice. It will show the recovery menu inside the box.
- Press the power button to select.
- Now your phone will reboot, showing you an Android icon on the back.
- Press and hold the Power button and tap on the volume Up button.
- Now you will see the recovery menu. On the bottom of the screen, you will see this error Failed to Mount Cache (invalid argument)
- Now use volume buttons to navigate to Mount System/Cache. Next, press the power button to select it.
- Now navigate to Wipe Cache Partition and press the power button.
- Wait for a while. It will wipe your cache partition even if it fails to clear the cache partition. Then, you will be good to go.
Note: This step can take up to 30 minutes, depending on your phone. So just hold your horses and let it clear wipe the partition.
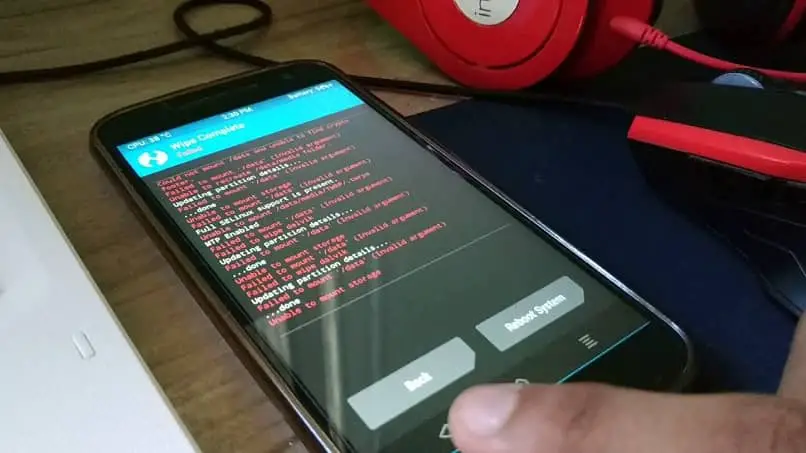
- Now select the option “Reboot System Now” from the same screen.
Note: If your phone fails to clear cache again. Just mount the system/cache and reboot system. It will work out.
Update (August 24th,2020): I used the above guide to fix my phone when I had the same error. If it is not working for you, then you should try flashing stock firmware/software on your phone:
- Use this guide to flash stock firmware on Nexus phones.
- Use this guide to install stock firmware on Samsung Galaxy phones.
- For the latest Samsung smartphones, use this guide to install stock firmware in order to fix failed to mount cache errors on your Android smartphone.
Your phone will reboot, and it will start working correctly. I have personally used this method to fix failed to mount cache partition on my Nexus 5. I hope this works for you guys as well.
Use ADB commands to Mount Cache Partition:
So if the above solution didn’t work for you, you could manually mount the cache partition using ADB commands. For that, you need to have the know-how of ADB commands and ADB and Fastboot tools installed on your Windows PC.
- First of all, you need to install ADB and Fastboot tool on your Windows or Mac computer.
- Once installed, connect your phone and make sure your phone is detected by using the following command.
-
adb devices
-
- If you see your phone is connected and displayed as in the screenshot below.
- Enter the following command:
-
adb shell "mount /cache ; mkdir -p /cache/recovery"
-
- Now restart your Android device.

I personally had this issue on LG Nexus 5. I have seen many people asking me how to fix failed to mount cache errors in several different Android devices like ASUS and Samsung, which I have no clue about. You guys can try the guide above. If it doesn’t work and your phone is still bricked, try to flash stock firmware on your phone. There are cases when this error arises because of some hardware issue; you can not fix it by tweaking the software or operating system.
If you have any issue or query regarding how to fix failed to mount cache. Let me know in the comments if this guide fixed the error. Don’t forget to drop feedback in the comments below. If you know of another method to help fix this issue, please let us know so we can update the guide.
Failed to Mount Cache error is bad news. This error occurs when the cache partition of Android phone damages & phone fails to boot up. This error can come up with any Android phone and once it happens, your phone will just get stuck on the boot screen. The error isn’t easy to handle is it requires multiple workarounds to get tackled. You can find this error on your phone when you boot into the recovery mode of your Android phone, you will find out few lines of text appearing at the bottom of the screen identifying the aforementioned error.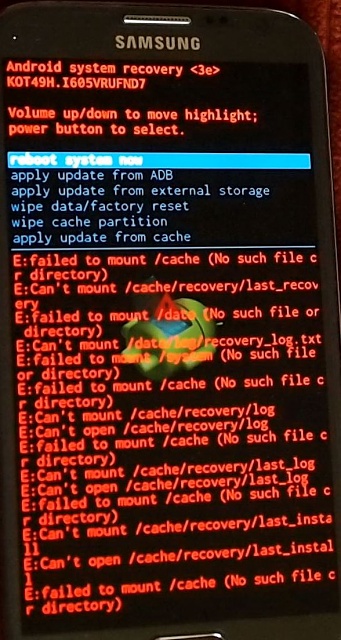
If you have just reached here while looking for a solution to this error, I would like to tell you that you have found the right place. You just have to follow a few steps to get rid of this error. During the process of fixing this issue, you will not loose your messages, contacts, call logs or any other data. We will not touch the data partition of the phone and we will try to fix it without involving ourselves in any complexity. Follow this method to fix Failed To Mount Cache (Invalid Argument) error now.
The fix given here is not supposed to work on a particular Android powered handset. It will work for all Android phones facing the Mount /Cache error. Have a look on the easy steps now to wipe off this annoying error from your Android smartphone.
- In order to kill this error, you need to boot into the recovery menu of your Android smartphone.
- If you have a Google Nexus, Volume Down + Power button will bring up the bootloader and then you can choose the recovery mode to boot int. If you have a Samsung Galaxy, Volume Up + Home + Power Key will boot you into the recovery mode. For most of the Android phones, Volume Down + Power or Volume Up + Down + Power combination will take you into the recovery mode.
- Once you are in the recovery mode, use Volume Up and Down keys to navigate to “Mount System/Cache” option and then press Power button to select it.
- Once done, navigate to Wipe Cache Partition option in the recovery using Volume Up/Down and then press power key and wipe it.
- After wiping cache, reboot your phone.
- It should boot up fine now. In case if it doesn’t, go back to recovery mode again, once again select Mount System/Cache and then reboot your phone.
- That’s all.
In case the above method fails to work for you, then unfortunately, your only option is to perform a factory reset or to flash a new stock firmware on your phone. For that, you can find several guides regarding your smartphone on our site.
-

13.01.2019, 11:23
mafproff
- Регистрация:
- 07.05.2016
- Сообщений:
- 5
- Репутация:
0
в рековери выдает такую ошибку :
помогите исправить , пытался прошить рековери , не прошивает бьет ошибку и всеHow to Fix E:failed to mount cache (Invalid argument)
Error list:
E:failed to mount /cache (Invalid argument)
E:can’t mount /cache/recovery/log
E:can’t open /cache/recovery/log
E:can’t mount /cache/recovery/last_log
E:can’t open /cache/recovery/last_log
E:can’t mount /cache/recovery/last_install
E:can’t open /cache/recovery/last_install
E:can’t open /dev/block/by_name/misc -
13.01.2019, 15:33
Fish

- Регистрация:
- 17.08.2013
- Сообщений:
- 34,065
- Репутация:
13198
Сообщение от mafproff
помогите исправить , пытался прошить рековери , не прошивает бьет ошибку и все
а как шьёшь? какое рекавери? загрузчик открыт? прошивка у тебя с какой версией Андроид?
нужно больше подробностей
-
13.01.2019, 16:28
mafproff
- Регистрация:
- 07.05.2016
- Сообщений:
- 5
- Репутация:
0
пытаюсь через ADB , recovery не ставиться не знаю какое — стандарт) , загрузчик не знаю открыт или закрыт , в систему не заходит , лого ASUS висит и все
-
13.01.2019, 17:58
mafproff
- Регистрация:
- 07.05.2016
- Сообщений:
- 5
- Репутация:
0
еще драйвер MPT не устанавливается , выдает код ошибку #10
-
14.01.2019, 13:22
Fish
- Регистрация:
- 17.08.2013
- Сообщений:
- 34,065
- Репутация:
13198
Сообщение от mafproff
в систему не заходит , лого ASUS висит и все
а в droidboot грузится?
если грузится:
— скачай raw прошивку
— залей её с помощью AFTОткрываем Asus Falsh Tool, нажимаем в верхнем левом углу и выбираем модель своего устройства.
Затем перезагружаем смартфон в режим fastboot (выключаем, громкость + плюс включение) ждем робота с выбором меню сверху (это bootloader)
Подключаем смартфон к ПК, смотрим, определился ли серийный номер.
Затем указываем путь к прошивке в формате RAW и кликаем по серийному номеру, тем самым выбирая его, потом нажимаем «Start» сверху и ждем. Кружочек станет желтым, будет написано «flash image». По окончанию кружочек станет зеленым и поменяется надпись на «Flash image successfully».Важное дополнение и решение Ваших проблем при прошивке
Если пишет — device version is null, попробуйте версию 1.0.0.17
При откате с 6.0 до 5.0 не забудьте поставить галочку на «Wipe Data!».
Если вы хотите очистить внутреннюю память, просто поставьте галочку на «wipe data» в Asus Flash Tool.
Если у вас высказывает ошибка серийника — пробуйте 1.0.0.17, на ней её, как правило, нет.
Если у вас вдруг не оказывается вашей версии телефона в Asus Flash Tool — скачайте последнюю версию, наверняка вы скачали раннюю, где наших устройств попросту не было.
Если Asus Flash Tool пишет неверный формат — проверьте, не запаковали ли вы в zip прошивку.драйвера: Fastboot | iSOC | xFSTK
-
14.01.2019, 15:51
mafproff
- Регистрация:
- 07.05.2016
- Сообщений:
- 5
- Репутация:
0
ASUS Tool не видит телефон или что , потому что нечего нет выбрал модель телефона , вставляю кабель выходит на Intel SOC USB Driver
-
14.01.2019, 15:53
Fish
- Регистрация:
- 17.08.2013
- Сообщений:
- 34,065
- Репутация:
13198
Сообщение от mafproff
ASUS Tool не видит телефон или что , потому что нечего нет выбрал модель телефона , вставляю кабель выходит на Intel SOC USB Driver
если у тебя win8 или win10, то перед установкой всех драйверов нужно отключить проверку цифровой подписи
для win10: https://mdforum.su/showthread.php?t=32420
-
14.01.2019, 15:54
mafproff
- Регистрация:
- 07.05.2016
- Сообщений:
- 5
- Репутация:
0
Win7 , и теперь при подключении телефона выдает драйвер MOOREFIELD
-
14.01.2019, 17:17
Fish
- Регистрация:
- 17.08.2013
- Сообщений:
- 34,065
- Репутация:
13198
Сообщение от mafproff
Win7 , и теперь при подключении телефона выдает драйвер MOOREFIELD
и? ставь драйвера, меняй версии AFT (устройство должно быть в этот момент в fastboot) пока он не определится в программе, ничего другого я тебе тут не подскажу

If you are versed with Android devices, there must have been a time when you sure have come across this error message in your device recovery — E: failed to mount /cache (invalid argument). I recently got a Tecno F1 Pro stock on boot and immediately formatted with NCK pro box, but the issue still persisted. At this point, I decided to flash to stock firmware but couldn’t find any firmware online for its particular build. All four firmware builds I downloaded for this model failed to load.

If you are versed with Android devices, there must have been a time when you sure have come across this error message in your device recovery — E: failed to mount /cache (invalid argument). I recently got a Tecno F1 Pro stuck on boot and immediately formatted with NCK pro box, but the issue still persisted. At this point, I decided to flash to stock firmware but couldn’t find any firmware online for its particular build. All four firmware builds I downloaded for this model failed to load.
I was really confused about the situation. I had almost given up on it until I said to myself «oh! I haven’t checked the recovery to see if everything was ok». And that is how I found out it had a corrupted cache partition. Now that I knew where the problem was coming from, fixing it was as simple as ABC without any data loss 😃.
Before we dive into how to solve the above-mentioned system error in the subsequent paragraphs, we will, first of all, enumerate some of the symptoms of this system problem.
Symptoms of a corrupted cache partition
- When the cache partition on your Android device gets corrupted so much such that the system can no longer mount it, your device will boot and get stuck at the boot logo.
- In some cases, your device may power on normally, but all apps will keep crashing.
- With the Tecno F1, I had in my possession, I couldn’t flash any other stock firmware since all I tried gave me the following error message

Although using the latest version of the flash tool, could not load firmware to the phone. This doesn’t seem to be the owing to the corrupted cache though, but a flash tool version problem.
- [message]
- ##info-circle## INFO
- We will discuss how to fix this sp flash tool error message in an upcoming article
How to fix your Tecno F1 corrupted cache partition and boot problem without data loss
When you encounter the above problem on your Tecno F1 Android or any other Android device, for I am pretty sure it should work on some other Android phones, What you need to do is mount the system and clear cache partition in recovery.
Don’t know how to do this or your phone is stuck on boot and you want to know if it’s owing to the cache partition being corrupted? Proceed as follows;
- [message]
- ##download## Download Tecno F1 stock rom
- Download for different builds Tecno F1 stock rom
- Remove your phone’s battery, reinsert and then press hold the Vol+ key and the power button.
- Release both keys when you see the factory menu below

- While in the above menu, use the Vol+ key to select and Vol- to confirm. Select recovery and wait. After a couple of seconds, you should see the Android robot and the «no command» message. At his point, press the power button, then vol+ to enter the recovery. If in your recovery menu, you see the error message
- [message]
- ##warning## ERROR MESSAGE
- E: failed to mount /cache partition (invalid argument)
Then what you need to do is;
- Click on the «mount system» option.
- After that, clear the cache partition and reboot your device.
- Your device will now power on normally and you won’t lose any data.
A word of advice
If your device is stuck at boot and there is no cache partition error, if formatting does not fix the problem, then all you have to do is flash to stock firmware.
But before you flash your device, always make sure to check the build number and get only the appropriate firmware build for your device.
While flashing some MTK Android devices, with the firmware build you downloaded, you may come across the message
- [message]
- ##exclamation-triangle## Flash tool message
- PMT changed for ROM, it must be downloaded
This message mostly occurs when flashing the firmware of different build from your device current build. When you see this message, avoid using the «format all + download» option for it will brick your device.
To proceed with the flashing in such a scenario, use the «firmware upgrade» option.
Сегодня на рынке можно найти широкий спектр электронных устройств, с мобильными телефонами на подъеме . Эти новые технологии предлагают каждому множество бесплатных и простых в использовании инструментов. Адаптируемые к потребностям пользователя, они стали незаменимыми технологиями, которыми пользуется каждый.
Благодаря этим новым технологиям, которые с каждым днем становятся все более и более инновационными, мы можем вести лучший образ жизни. Поскольку они позволяют нам поддерживать удаленную связь, мы можем чувствовать себя комфортно вдали от любимых.
Также очень важно отметить, что они стали отличными инструментами во многих областях, особенно в области здравоохранения, одним из которых является кровяное давление . Мы находим смартфоны с широким спектром бесплатных, доступных и изменяемых приложений как для медицинского персонала, так и для пациентов.
Из’ приложения, позволяющие ознакомиться со специализированным медицинским центром , специально разработан для пациентов с социальным дисбалансом. А также приложения, которые предоставляют терапевтические функции для нужд, которые в данном случае нужны пользователю.
Это обеспечило большие успехи в медицине и установило приятные, комфортные и безопасные отношения между врачом и пациентом, а также помогло в диагностике многих заболеваний, избегая осложнений. Из вышесказанного можно сказать, что эти технологии вышли на первое место по закупкам во всем мире.
С другой стороны, не менее интересно, очень важно сообщать об ошибках, которые также могут возникать в этих смартфонах. Например, ошибка в конфигурации телефона при открытии приложения, проблемы при использовании Android и другие. Эти и многие другие проблемы можно найти на наших смартфонах и во всех виды приложений.
Что такое ошибка TWRP «Не удалось смонтировать (недопустимый аргумент)»?
В какой-то момент у нас наверняка возникла проблема с нашим смартфоном, это может быть неудобно, если вы не знаете, как ее исправить. По этой причине важно иметь подробные сведения обо всех ошибках, которые мы можем найти на нашем смартфоне.
TWRP стал наиболее часто используемым средством восстановления этого времени, поскольку он дает нам различные варианты, например, он позволяет нам устанавливать новые ПЗУ, очищать систему, отформатируйте свой мобильный , Среди других.
Эта ошибка связана с тем, что некоторые ненужные файлы на нашем смартфоне автоматически блокировать использование разделов. Это мешает нам очистить файл на нашем смартфоне, а использование других приложений доставляет нам дискомфорт.
![]()
Учитывая все это, хорошо знать, что у вас есть решение этой проблемы легко, просто и в пределах досягаемости.
Что мне делать, чтобы исправить ошибку TWRP «Не удалось смонтировать (неверный аргумент)»?
Ошибка «Не удалось смонтировать (недопустимый аргумент)» сгенерировала полемика для многих из-за того, что полностью останавливает развитие TWRP. Это может появиться при удалении или очистке некоторых данных из-за нежелательного файла, вызывающего сбой. Здесь мы покажем вам несколько очень простых способов исправить ошибку TWRP «Не удалось смонтировать (недопустимый аргумент)».
Среди разделов «Wipe», которые могут отображаться как « Не удалось смонтировать / разделить (недопустимый аргумент) «Это System, Data и Caché, теперь для устранения ошибки мы поместим, например, как если бы ошибка была в« Faliled to mount / system (недопустимый аргумент) ».
Когда эта ошибка появляется на экране, вам нужно перейти в «Wipe» и сделать клип в опции «Advanced Wipe». Затем нам нужно выбрать раздел ошибок (только один), который в данном случае мы используем в качестве примера «Система».
Затем нам нужно перейти к опции «Перейти к» » Восстановить или изменить файловую систему «, Затем« Изменить файловую систему », здесь мы выбираем вариант преобразования в FAT, и перетаскиваем кнопку, затем преобразуем в EXT4 и снова перетаскиваем.
Таким образом, мы можем устранить эту ошибку, но мы должны делать это с каждым разделом, в котором есть ошибка аргумента, после чего возвращаемся в «Wipe» , очищаем нужный раздел и все пройдет успешно, без ошибок.
Наконец, мы можем быть уверены в использовать эти инновационные технологии с комфортом адаптированы к нашим потребностям. У нас также есть безопасность, чтобы разрешить любые проблемы, которые могут возникнуть, бесплатно, легко и эффективно.