![]()
I’m trying to install Net-AMQP-RabbitMQ-0.900000 on a fresh Debian install (via Vagrant) but it is failing one of its tests. The significant error is:
#   Failed test 'publish fails with error code'
#   at t/011_hearbeat.t line 31.
#                   ''
#     doesn't match '(?^:Publish failed, error code -17)'
# Looks like you failed 1 test of 6.
t/011_hearbeat.t .................... Dubious, test returned 1 (wstat 256, 0x100)
Failed 1/6 subtests
Relevant version information:
root@debian-jessie:~/rmq/Net-AMQP-RabbitMQ-0.900000# dpkg -l | grep -i rabbit
ii  librabbitmq-dev:amd64          0.5.2-2                     amd64        AMQP client library written in C - Dev Files
ii  librabbitmq1:amd64             0.5.2-2                     amd64        AMQP client library written in C
ii  rabbitmq-server                3.3.5-1.1                   all          AMQP server written in Erlang
The complete build.log is here: https://gist.github.com/dorward/226af40d8a8907dbe1fa
![]()
Six tests failed, that’s just one test. Could you provide all of them?
On Wed, Aug 12, 2015 at 12:12 David Dorward notifications@github.com
wrote:
I’m trying to install Net-AMQP-RabbitMQ-0.900000 on a fresh Debian install
(via Vagrant) but it is failing one of its tests. The significant error is:Failed test ‘publish fails with error code’
at t/011_hearbeat.t line 31.
»
doesn’t match ‘(?^:Publish failed, error code -17)’
Looks like you failed 1 test of 6.
t/011_hearbeat.t ……………….. Dubious, test returned 1 (wstat 256, 0x100)
Failed 1/6 subtestsRelevant version information:
root@debian-jessie:~/rmq/Net-AMQP-RabbitMQ-0.900000# dpkg -l | grep -i rabbit
ii librabbitmq-dev:amd64 0.5.2-2 amd64 AMQP client library written in C — Dev Files
ii librabbitmq1:amd64 0.5.2-2 amd64 AMQP client library written in C
ii rabbitmq-server 3.3.5-1.1 all AMQP server written in ErlangThe complete build.log is here:
https://gist.github.com/dorward/226af40d8a8907dbe1fa—
Reply to this email directly or view it on GitHub
https://github.com/markwellis/net-amqp-rabbitmq/issues/55.
![]()
![]()
![]()
Yes, I ran the build script several times. First via cpan minus and then manually.
Would it help if I pulled out the Vagrant config files and provisioning scripts so you could try it on what should be exactly the same system?
![]()
Complete test case, including a complete VM image follows:
- Install VirtualBox 4.3 https://www.virtualbox.org/wiki/Download_Old_Builds_4_3
- Install Vagrant https://www.vagrantup.com/
- Make a directory and
cdto it - Put the code at the end in a file called
Vagrantfile - Type
vagrant up
The build should fail as described. Use vagrant ssh to log in to the VM to examine anything you like about it. The default user is vagrant and has passwordless sudo access.
# -*- mode: ruby -*-
# vi: set ft=ruby :

$script = <<SCRIPT
echo Provisioning now.
echo Install Debian Packages.
apt-get install -y rabbitmq-server librabbitmq-dev cpanminus
echo Install CPAN modules with cpan minus
#cpanm Catalyst::Runtime
#cpanm Catalyst::Devel
#cpanm Catalyst::View::TT
#cpanm Catalyst::View::JSON
cpanm Net::AMQP::RabbitMQ
SCRIPT


Vagrant.configure(2) do |config|
  config.vm.box = "debian/jessie64"
  config.vm.network "private_network", ip: "192.168.33.10"
  config.vm.provision "shell", inline: $script
end
![]()
sorry, it worked first time for me. have you got a weird network/firewall setup or something?
mark@mark-work ~/tmpfs $ vagrant provision
==> default: Running provisioner: shell...
    default: Running: inline script
==> default: stdin: is not a tty
==> default: Provisioning now.
==> default: Install Debian Packages.
==> default: Reading package lists...
==> default: Building dependency tree...
==> default: Reading state information...
==> default: The following extra packages will be installed:
==> default:   erlang-asn1 erlang-base erlang-corba erlang-crypto erlang-diameter
==> default:   erlang-edoc erlang-eldap erlang-erl-docgen erlang-eunit erlang-ic
==> default:   erlang-inets erlang-mnesia erlang-nox erlang-odbc erlang-os-mon
==> default:   erlang-parsetools erlang-percept erlang-public-key erlang-runtime-tools
==> default:   erlang-snmp erlang-ssh erlang-ssl erlang-syntax-tools erlang-tools
==> default:   erlang-webtool erlang-xmerl libcommon-sense-perl libcpan-distnameinfo-perl
==> default:   libcpan-meta-check-perl libcpan-meta-requirements-perl libfile-pushd-perl
==> default:   libjson-perl libjson-pp-perl libjson-xs-perl liblocal-lib-perl libltdl7
==> default:   libmodule-cpanfile-perl libmodule-metadata-perl libodbc1
==> default:   libparse-pmfile-perl librabbitmq1 libsctp1 libstring-shellquote-perl
==> default:   libversion-perl lksctp-tools
==> default: Suggested packages:
==> default:   erlang erlang-manpages erlang-doc xsltproc fop erlang-ic-java
==> default:   erlang-observer libcapture-tiny-perl libmyodbc odbc-postgresql tdsodbc
==> default:   unixodbc-bin
==> default: The following NEW packages will be installed:
==> default:   cpanminus erlang-asn1 erlang-base erlang-corba erlang-crypto erlang-diameter
==> default:   erlang-edoc erlang-eldap erlang-erl-docgen erlang-eunit erlang-ic
==> default:   erlang-inets erlang-mnesia erlang-nox erlang-odbc erlang-os-mon
==> default:   erlang-parsetools erlang-percept erlang-public-key erlang-runtime-tools
==> default:   erlang-snmp erlang-ssh erlang-ssl erlang-syntax-tools erlang-tools
==> default:   erlang-webtool erlang-xmerl libcommon-sense-perl libcpan-distnameinfo-perl
==> default:   libcpan-meta-check-perl libcpan-meta-requirements-perl libfile-pushd-perl
==> default:   libjson-perl libjson-pp-perl libjson-xs-perl liblocal-lib-perl libltdl7
==> default:   libmodule-cpanfile-perl libmodule-metadata-perl libodbc1
==> default:   libparse-pmfile-perl librabbitmq-dev librabbitmq1 libsctp1
==> default:   libstring-shellquote-perl libversion-perl lksctp-tools rabbitmq-server
==> default: 0 upgraded, 48 newly installed, 0 to remove and 0 not upgraded.
==> default: Need to get 24.8 MB of archives.
==> default: After this operation, 42.4 MB of additional disk space will be used.
==> default: Get:1 http://httpredir.debian.org/debian/ jessie/main libltdl7 amd64 2.4.2-1.11 [45.2 kB]
==> default: Get:2 http://httpredir.debian.org/debian/ jessie/main libversion-perl amd64 1:0.9909-1 [85.3 kB]
==> default: Get:3 http://httpredir.debian.org/debian/ jessie/main libodbc1 amd64 2.3.1-3 [206 kB]
==> default: Get:4 http://httpredir.debian.org/debian/ jessie/main libcpan-meta-requirements-perl all 2.128-1 [15.8 kB]
==> default: Get:5 http://httpredir.debian.org/debian/ jessie/main libcpan-meta-check-perl all 0.009-1 [11.0 kB]
==> default: Get:6 http://httpredir.debian.org/debian/ jessie/main libfile-pushd-perl all 1.009-1 [13.6 kB]
==> default: Get:7 http://httpredir.debian.org/debian/ jessie/main libjson-pp-perl all 2.27300-2 [51.8 kB]
==> default: Get:8 http://httpredir.debian.org/debian/ jessie/main librabbitmq1 amd64 0.5.2-2 [35.6 kB]
==> default: Get:9 http://httpredir.debian.org/debian/ jessie/main libmodule-cpanfile-perl all 1.1000-1 [28.9 kB]
==> default: Get:10 http://httpredir.debian.org/debian/ jessie/main libsctp1 amd64 1.0.16+dfsg-2 [27.6 kB]
==> default: Get:11 http://httpredir.debian.org/debian/ jessie/main libmodule-metadata-perl all 1.000024-1 [21.6 kB]
==> default: Get:12 http://httpredir.debian.org/debian/ jessie/main libcpan-distnameinfo-perl all 0.12-1 [9,472 B]
==> default: Get:13 http://httpredir.debian.org/debian/ jessie/main libparse-pmfile-perl all 0.29-1 [15.5 kB]
==> default: Get:14 http://httpredir.debian.org/debian/ jessie/main libstring-shellquote-perl all 1.03-1 [14.0 kB]
==> default: Get:15 http://httpredir.debian.org/debian/ jessie/main erlang-base amd64 1:17.3-dfsg-4 [6,815 kB]
==> default: Get:16 http://httpredir.debian.org/debian/ jessie/main liblocal-lib-perl all 2.000014-1 [54.5 kB]
==> default: Get:17 http://httpredir.debian.org/debian/ jessie/main cpanminus all 1.7014-1 [216 kB]
==> default: Get:18 http://httpredir.debian.org/debian/ jessie/main erlang-asn1 amd64 1:17.3-dfsg-4 [786 kB]
==> default: Get:19 http://httpredir.debian.org/debian/ jessie/main erlang-mnesia amd64 1:17.3-dfsg-4 [689 kB]
==> default: Get:20 http://httpredir.debian.org/debian/ jessie/main erlang-corba amd64 1:17.3-dfsg-4 [2,259 kB]
==> default: Get:21 http://httpredir.debian.org/debian/ jessie/main erlang-syntax-tools amd64 1:17.3-dfsg-4 [324 kB]
==> default: Get:22 http://httpredir.debian.org/debian/ jessie/main erlang-edoc amd64 1:17.3-dfsg-4 [334 kB]
==> default: Get:23 http://httpredir.debian.org/debian/ jessie/main erlang-runtime-tools amd64 1:17.3-dfsg-4 [195 kB]
==> default: Get:24 http://httpredir.debian.org/debian/ jessie/main erlang-eunit amd64 1:17.3-dfsg-4 [166 kB]
==> default: Get:25 http://httpredir.debian.org/debian/ jessie/main erlang-ic amd64 1:17.3-dfsg-4 [847 kB]
==> default: Get:26 http://httpredir.debian.org/debian/ jessie/main erlang-crypto amd64 1:17.3-dfsg-4 [135 kB]
==> default: Get:27 http://httpredir.debian.org/debian/ jessie/main erlang-public-key amd64 1:17.3-dfsg-4 [541 kB]
==> default: Get:28 http://httpredir.debian.org/debian/ jessie/main erlang-odbc amd64 1:17.3-dfsg-4 [79.0 kB]
==> default: Get:29 http://httpredir.debian.org/debian/ jessie/main erlang-snmp amd64 1:17.3-dfsg-4 [1,557 kB]
==> default: Get:30 http://httpredir.debian.org/debian/ jessie/main erlang-ssl amd64 1:17.3-dfsg-4 [611 kB]
==> default: Get:31 http://httpredir.debian.org/debian/ jessie/main erlang-inets amd64 1:17.3-dfsg-4 [771 kB]
==> default: Get:32 http://httpredir.debian.org/debian/ jessie/main erlang-parsetools amd64 1:17.3-dfsg-4 [185 kB]
==> default: Get:33 http://httpredir.debian.org/debian/ jessie/main erlang-tools amd64 1:17.3-dfsg-4 [535 kB]
==> default: Get:34 http://httpredir.debian.org/debian/ jessie/main erlang-nox all 1:17.3-dfsg-4 [37.7 kB]
==> default: Get:35 http://httpredir.debian.org/debian/ jessie/main libcommon-sense-perl amd64 3.73-2+b3 [23.7 kB]
==> default: Get:36 http://httpredir.debian.org/debian/ jessie/main erlang-diameter amd64 1:17.3-dfsg-4 [646 kB]
==> default: Get:37 http://httpredir.debian.org/debian/ jessie/main libjson-perl all 2.61-1 [84.7 kB]
==> default: Get:38 http://httpredir.debian.org/debian/ jessie/main libjson-xs-perl amd64 2.340-1+b2 [85.9 kB]
==> default: Get:39 http://httpredir.debian.org/debian/ jessie/main rabbitmq-server all 3.3.5-1.1 [4,118 kB]
==> default: Get:40 http://httpredir.debian.org/debian/ jessie/main erlang-xmerl amd64 1:17.3-dfsg-4 [996 kB]
==> default: Get:41 http://httpredir.debian.org/debian/ jessie/main erlang-eldap amd64 1:17.3-dfsg-4 [123 kB]
==> default: Get:42 http://httpredir.debian.org/debian/ jessie/main erlang-erl-docgen amd64 1:17.3-dfsg-4 [165 kB]
==> default: Get:43 http://httpredir.debian.org/debian/ jessie/main erlang-os-mon amd64 1:17.3-dfsg-4 [124 kB]
==> default: Get:44 http://httpredir.debian.org/debian/ jessie/main erlang-percept amd64 1:17.3-dfsg-4 [165 kB]
==> default: Get:45 http://httpredir.debian.org/debian/ jessie/main erlang-ssh amd64 1:17.3-dfsg-4 [392 kB]
==> default: Get:46 http://httpredir.debian.org/debian/ jessie/main erlang-webtool amd64 1:17.3-dfsg-4 [68.1 kB]
==> default: Get:47 http://httpredir.debian.org/debian/ jessie/main librabbitmq-dev amd64 0.5.2-2 [27.8 kB]
==> default: Get:48 http://httpredir.debian.org/debian/ jessie/main lksctp-tools amd64 1.0.16+dfsg-2 [62.6 kB]
==> default: dpkg-preconfigure: unable to re-open stdin: No such file or directory
==> default: Fetched 24.8 MB in 11s (2,192 kB/s)
==> default: Selecting previously unselected package libltdl7:amd64.
==> default: (Reading database ...
==> default: (Reading database ... 5%
==> default: (Reading database ... 10%
==> default: (Reading database ... 15%
==> default: (Reading database ... 20%
==> default: (Reading database ... 25%
==> default: (Reading database ... 30%
==> default: (Reading database ... 35%
==> default: (Reading database ... 40%
==> default: (Reading database ... 45%
==> default: (Reading database ... 50%
==> default: (Reading database ... 55%
==> default: (Reading database ... 60%
==> default: (Reading database ... 65%
==> default: (Reading database ... 70%
==> default: (Reading database ... 75%
==> default: (Reading database ... 80%
==> default: (Reading database ... 85%
==> default: (Reading database ... 90%
==> default: (Reading database ... 95%
==> default: (Reading database ... 100%
==> default: (Reading database ...
==> default: 35752 files and directories currently installed.)
==> default: Preparing to unpack .../libltdl7_2.4.2-1.11_amd64.deb ...
==> default: Unpacking libltdl7:amd64 (2.4.2-1.11) ...
==> default: Selecting previously unselected package libodbc1:amd64.
==> default: Preparing to unpack .../libodbc1_2.3.1-3_amd64.deb ...
==> default: Unpacking libodbc1:amd64 (2.3.1-3) ...
==> default: Selecting previously unselected package librabbitmq1:amd64.
==> default: Preparing to unpack .../librabbitmq1_0.5.2-2_amd64.deb ...
==> default: Unpacking librabbitmq1:amd64 (0.5.2-2) ...
==> default: Selecting previously unselected package libsctp1:amd64.
==> default: Preparing to unpack .../libsctp1_1.0.16+dfsg-2_amd64.deb ...
==> default: Unpacking libsctp1:amd64 (1.0.16+dfsg-2) ...
==> default: Selecting previously unselected package libcpan-distnameinfo-perl.
==> default: Preparing to unpack .../libcpan-distnameinfo-perl_0.12-1_all.deb ...
==> default: Unpacking libcpan-distnameinfo-perl (0.12-1) ...
==> default: Selecting previously unselected package libversion-perl.
==> default: Preparing to unpack .../libversion-perl_1%3a0.9909-1_amd64.deb ...
==> default: Unpacking libversion-perl (1:0.9909-1) ...
==> default: Selecting previously unselected package libcpan-meta-requirements-perl.
==> default: Preparing to unpack .../libcpan-meta-requirements-perl_2.128-1_all.deb ...
==> default: Unpacking libcpan-meta-requirements-perl (2.128-1) ...
==> default: Selecting previously unselected package libcpan-meta-check-perl.
==> default: Preparing to unpack .../libcpan-meta-check-perl_0.009-1_all.deb ...
==> default: Unpacking libcpan-meta-check-perl (0.009-1) ...
==> default: Selecting previously unselected package libfile-pushd-perl.
==> default: Preparing to unpack .../libfile-pushd-perl_1.009-1_all.deb ...
==> default: Unpacking libfile-pushd-perl (1.009-1) ...
==> default: Selecting previously unselected package libjson-pp-perl.
==> default: Preparing to unpack .../libjson-pp-perl_2.27300-2_all.deb ...
==> default: Adding 'diversion of /usr/bin/json_pp to /usr/bin/json_pp.bundled by libjson-pp-perl'
==> default: Adding 'diversion of /usr/share/man/man1/json_pp.1.gz to /usr/share/man/man1/json_pp.bundled.1.gz by libjson-pp-perl'
==> default: Unpacking libjson-pp-perl (2.27300-2) ...
==> default: Selecting previously unselected package liblocal-lib-perl.
==> default: Preparing to unpack .../liblocal-lib-perl_2.000014-1_all.deb ...
==> default: Unpacking liblocal-lib-perl (2.000014-1) ...
==> default: Selecting previously unselected package libmodule-cpanfile-perl.
==> default: Preparing to unpack .../libmodule-cpanfile-perl_1.1000-1_all.deb ...
==> default: Unpacking libmodule-cpanfile-perl (1.1000-1) ...
==> default: Selecting previously unselected package libmodule-metadata-perl.
==> default: Preparing to unpack .../libmodule-metadata-perl_1.000024-1_all.deb ...
==> default: Unpacking libmodule-metadata-perl (1.000024-1) ...
==> default: Selecting previously unselected package libparse-pmfile-perl.
==> default: Preparing to unpack .../libparse-pmfile-perl_0.29-1_all.deb ...
==> default: Unpacking libparse-pmfile-perl (0.29-1) ...
==> default: Selecting previously unselected package libstring-shellquote-perl.
==> default: Preparing to unpack .../libstring-shellquote-perl_1.03-1_all.deb ...
==> default: Unpacking libstring-shellquote-perl (1.03-1) ...
==> default: Selecting previously unselected package cpanminus.
==> default: Preparing to unpack .../cpanminus_1.7014-1_all.deb ...
==> default: Unpacking cpanminus (1.7014-1) ...
==> default: Selecting previously unselected package erlang-base.
==> default: Preparing to unpack .../erlang-base_1%3a17.3-dfsg-4_amd64.deb ...
==> default: Unpacking erlang-base (1:17.3-dfsg-4) ...
==> default: Selecting previously unselected package erlang-asn1.
==> default: Preparing to unpack .../erlang-asn1_1%3a17.3-dfsg-4_amd64.deb ...
==> default: Unpacking erlang-asn1 (1:17.3-dfsg-4) ...
==> default: Selecting previously unselected package erlang-mnesia.
==> default: Preparing to unpack .../erlang-mnesia_1%3a17.3-dfsg-4_amd64.deb ...
==> default: Unpacking erlang-mnesia (1:17.3-dfsg-4) ...
==> default: Selecting previously unselected package erlang-runtime-tools.
==> default: Preparing to unpack .../erlang-runtime-tools_1%3a17.3-dfsg-4_amd64.deb ...
==> default: Unpacking erlang-runtime-tools (1:17.3-dfsg-4) ...
==> default: Selecting previously unselected package erlang-crypto.
==> default: Preparing to unpack .../erlang-crypto_1%3a17.3-dfsg-4_amd64.deb ...
==> default: Unpacking erlang-crypto (1:17.3-dfsg-4) ...
==> default: Selecting previously unselected package erlang-public-key.
==> default: Preparing to unpack .../erlang-public-key_1%3a17.3-dfsg-4_amd64.deb ...
==> default: Unpacking erlang-public-key (1:17.3-dfsg-4) ...
==> default: Selecting previously unselected package erlang-ssl.
==> default: Preparing to unpack .../erlang-ssl_1%3a17.3-dfsg-4_amd64.deb ...
==> default: Unpacking erlang-ssl (1:17.3-dfsg-4) ...
==> default: Selecting previously unselected package erlang-inets.
==> default: Preparing to unpack .../erlang-inets_1%3a17.3-dfsg-4_amd64.deb ...
==> default: Unpacking erlang-inets (1:17.3-dfsg-4) ...
==> default: Selecting previously unselected package erlang-corba.
==> default: Preparing to unpack .../erlang-corba_1%3a17.3-dfsg-4_amd64.deb ...
==> default: Unpacking erlang-corba (1:17.3-dfsg-4) ...
==> default: Selecting previously unselected package erlang-syntax-tools.
==> default: Preparing to unpack .../erlang-syntax-tools_1%3a17.3-dfsg-4_amd64.deb ...
==> default: Unpacking erlang-syntax-tools (1:17.3-dfsg-4) ...
==> default: Selecting previously unselected package erlang-diameter.
==> default: Preparing to unpack .../erlang-diameter_1%3a17.3-dfsg-4_amd64.deb ...
==> default: Unpacking erlang-diameter (1:17.3-dfsg-4) ...
==> default: Selecting previously unselected package erlang-xmerl.
==> default: Preparing to unpack .../erlang-xmerl_1%3a17.3-dfsg-4_amd64.deb ...
==> default: Unpacking erlang-xmerl (1:17.3-dfsg-4) ...
==> default: Selecting previously unselected package erlang-edoc.
==> default: Preparing to unpack .../erlang-edoc_1%3a17.3-dfsg-4_amd64.deb ...
==> default: Unpacking erlang-edoc (1:17.3-dfsg-4) ...
==> default: Selecting previously unselected package erlang-eldap.
==> default: Preparing to unpack .../erlang-eldap_1%3a17.3-dfsg-4_amd64.deb ...
==> default: Unpacking erlang-eldap (1:17.3-dfsg-4) ...
==> default: Selecting previously unselected package erlang-erl-docgen.
==> default: Preparing to unpack .../erlang-erl-docgen_1%3a17.3-dfsg-4_amd64.deb ...
==> default: Unpacking erlang-erl-docgen (1:17.3-dfsg-4) ...
==> default: Selecting previously unselected package erlang-eunit.
==> default: Preparing to unpack .../erlang-eunit_1%3a17.3-dfsg-4_amd64.deb ...
==> default: Unpacking erlang-eunit (1:17.3-dfsg-4) ...
==> default: Selecting previously unselected package erlang-ic.
==> default: Preparing to unpack .../erlang-ic_1%3a17.3-dfsg-4_amd64.deb ...
==> default: Unpacking erlang-ic (1:17.3-dfsg-4) ...
==> default: Selecting previously unselected package erlang-odbc.
==> default: Preparing to unpack .../erlang-odbc_1%3a17.3-dfsg-4_amd64.deb ...
==> default: Unpacking erlang-odbc (1:17.3-dfsg-4) ...
==> default: Selecting previously unselected package erlang-snmp.
==> default: Preparing to unpack .../erlang-snmp_1%3a17.3-dfsg-4_amd64.deb ...
==> default: Unpacking erlang-snmp (1:17.3-dfsg-4) ...
==> default: Selecting previously unselected package erlang-os-mon.
==> default: Preparing to unpack .../erlang-os-mon_1%3a17.3-dfsg-4_amd64.deb ...
==> default: Unpacking erlang-os-mon (1:17.3-dfsg-4) ...
==> default: Selecting previously unselected package erlang-parsetools.
==> default: Preparing to unpack .../erlang-parsetools_1%3a17.3-dfsg-4_amd64.deb ...
==> default: Unpacking erlang-parsetools (1:17.3-dfsg-4) ...
==> default: Selecting previously unselected package erlang-percept.
==> default: Preparing to unpack .../erlang-percept_1%3a17.3-dfsg-4_amd64.deb ...
==> default: Unpacking erlang-percept (1:17.3-dfsg-4) ...
==> default: Selecting previously unselected package erlang-ssh.
==> default: Preparing to unpack .../erlang-ssh_1%3a17.3-dfsg-4_amd64.deb ...
==> default: Unpacking erlang-ssh (1:17.3-dfsg-4) ...
==> default: Selecting previously unselected package erlang-webtool.
==> default: Preparing to unpack .../erlang-webtool_1%3a17.3-dfsg-4_amd64.deb ...
==> default: Unpacking erlang-webtool (1:17.3-dfsg-4) ...
==> default: Selecting previously unselected package erlang-tools.
==> default: Preparing to unpack .../erlang-tools_1%3a17.3-dfsg-4_amd64.deb ...
==> default: Unpacking erlang-tools (1:17.3-dfsg-4) ...
==> default: Selecting previously unselected package erlang-nox.
==> default: Preparing to unpack .../erlang-nox_1%3a17.3-dfsg-4_all.deb ...
==> default: Unpacking erlang-nox (1:17.3-dfsg-4) ...
==> default: Selecting previously unselected package libcommon-sense-perl.
==> default: Preparing to unpack .../libcommon-sense-perl_3.73-2+b3_amd64.deb ...
==> default: Unpacking libcommon-sense-perl (3.73-2+b3) ...
==> default: Selecting previously unselected package libjson-perl.
==> default: Preparing to unpack .../libjson-perl_2.61-1_all.deb ...
==> default: Unpacking libjson-perl (2.61-1) ...
==> default: Selecting previously unselected package libjson-xs-perl.
==> default: Preparing to unpack .../libjson-xs-perl_2.340-1+b2_amd64.deb ...
==> default: Unpacking libjson-xs-perl (2.340-1+b2) ...
==> default: Selecting previously unselected package librabbitmq-dev:amd64.
==> default: Preparing to unpack .../librabbitmq-dev_0.5.2-2_amd64.deb ...
==> default: Unpacking librabbitmq-dev:amd64 (0.5.2-2) ...
==> default: Selecting previously unselected package lksctp-tools.
==> default: Preparing to unpack .../lksctp-tools_1.0.16+dfsg-2_amd64.deb ...
==> default: Unpacking lksctp-tools (1.0.16+dfsg-2) ...
==> default: Selecting previously unselected package rabbitmq-server.
==> default: Preparing to unpack .../rabbitmq-server_3.3.5-1.1_all.deb ...
==> default: Unpacking rabbitmq-server (3.3.5-1.1) ...
==> default: Processing triggers for man-db (2.7.0.2-5) ...
==> default: Processing triggers for systemd (215-17+deb8u1) ...
==> default: Setting up libltdl7:amd64 (2.4.2-1.11) ...
==> default: Setting up libodbc1:amd64 (2.3.1-3) ...
==> default: Setting up librabbitmq1:amd64 (0.5.2-2) ...
==> default: Setting up libsctp1:amd64 (1.0.16+dfsg-2) ...
==> default: Setting up libcpan-distnameinfo-perl (0.12-1) ...
==> default: Setting up libversion-perl (1:0.9909-1) ...
==> default: Setting up libcpan-meta-requirements-perl (2.128-1) ...
==> default: Setting up libcpan-meta-check-perl (0.009-1) ...
==> default: Setting up libfile-pushd-perl (1.009-1) ...
==> default: Setting up libjson-pp-perl (2.27300-2) ...
==> default: Setting up liblocal-lib-perl (2.000014-1) ...
==> default: Setting up libmodule-cpanfile-perl (1.1000-1) ...
==> default: Setting up libmodule-metadata-perl (1.000024-1) ...
==> default: Setting up libparse-pmfile-perl (0.29-1) ...
==> default: Setting up libstring-shellquote-perl (1.03-1) ...
==> default: Setting up cpanminus (1.7014-1) ...
==> default: Setting up erlang-base (1:17.3-dfsg-4) ...
==> default: Searching for services which depend on erlang and should be started...
==> default: none found.
==> default: Setting up erlang-asn1 (1:17.3-dfsg-4) ...
==> default: Setting up erlang-mnesia (1:17.3-dfsg-4) ...
==> default: Setting up erlang-runtime-tools (1:17.3-dfsg-4) ...
==> default: Setting up erlang-crypto (1:17.3-dfsg-4) ...
==> default: Setting up erlang-public-key (1:17.3-dfsg-4) ...
==> default: Setting up erlang-ssl (1:17.3-dfsg-4) ...
==> default: Setting up erlang-inets (1:17.3-dfsg-4) ...
==> default: Setting up erlang-corba (1:17.3-dfsg-4) ...
==> default: Setting up erlang-syntax-tools (1:17.3-dfsg-4) ...
==> default: Setting up erlang-diameter (1:17.3-dfsg-4) ...
==> default: Setting up erlang-xmerl (1:17.3-dfsg-4) ...
==> default: Setting up erlang-edoc (1:17.3-dfsg-4) ...
==> default: Setting up erlang-eldap (1:17.3-dfsg-4) ...
==> default: Setting up erlang-erl-docgen (1:17.3-dfsg-4) ...
==> default: Setting up erlang-eunit (1:17.3-dfsg-4) ...
==> default: Setting up erlang-ic (1:17.3-dfsg-4) ...
==> default: Setting up erlang-odbc (1:17.3-dfsg-4) ...
==> default: Setting up erlang-snmp (1:17.3-dfsg-4) ...
==> default: Setting up erlang-os-mon (1:17.3-dfsg-4) ...
==> default: Setting up erlang-parsetools (1:17.3-dfsg-4) ...
==> default: Setting up erlang-percept (1:17.3-dfsg-4) ...
==> default: Setting up erlang-ssh (1:17.3-dfsg-4) ...
==> default: Setting up erlang-webtool (1:17.3-dfsg-4) ...
==> default: Setting up erlang-tools (1:17.3-dfsg-4) ...
==> default: Setting up erlang-nox (1:17.3-dfsg-4) ...
==> default: Setting up libcommon-sense-perl (3.73-2+b3) ...
==> default: Setting up libjson-perl (2.61-1) ...
==> default: Setting up libjson-xs-perl (2.340-1+b2) ...
==> default: Setting up librabbitmq-dev:amd64 (0.5.2-2) ...
==> default: Setting up lksctp-tools (1.0.16+dfsg-2) ...
==> default: Setting up rabbitmq-server (3.3.5-1.1) ...
==> default: Adding group `rabbitmq' (GID 114) ...
==> default: Done.
==> default: Adding system user `rabbitmq' (UID 109) ...
==> default: Adding new user `rabbitmq' (UID 109) with group `rabbitmq' ...
==> default: Not creating home directory `/var/lib/rabbitmq'.
==> default: Processing triggers for libc-bin (2.19-18) ...
==> default: Processing triggers for systemd (215-17+deb8u1) ...
==> default: Install CPAN modules with cpan minus
==> default: --> Working on Net::AMQP::RabbitMQ
==> default: Fetching http://www.cpan.org/authors/id/M/MA/MARKELLIS/Net-AMQP-RabbitMQ-0.900000.tar.gz ... OK
==> default: Configuring Net-AMQP-RabbitMQ-0.900000 ...
==> default: OK
==> default: ==> Found dependencies: Math::Int64
==> default: --> Working on Math::Int64
==> default: Fetching http://www.cpan.org/authors/id/S/SA/SALVA/Math-Int64-0.53.tar.gz ... OK
==> default: Configuring Math-Int64-0.53 ...
==> default: OK
==> default: Building and testing Math-Int64-0.53 ...
==> default: OK
==> default: Successfully installed Math-Int64-0.53
==> default: Building and testing Net-AMQP-RabbitMQ-0.900000 ...
==> default: OK
==> default: Successfully installed Net-AMQP-RabbitMQ-0.900000
==> default: 2 distributions installed
![]()
Nothing weird about the network here — I tried it on two different networks with the same result FWIW — although the same host machine was used (although the VM image was downloaded fresh each time).
The host environment is OS X 10.10.5 (14F27). I wonder if that might make a difference.
![]()
I’ve changed your vagrantfile to use the local rabbitmq host for the tests, as by default it uses the public test server at ‘dev.rabbitmq.com’, which might be what’s causing the issue.
this will be changed soon, but for now can you try this
# -*- mode: ruby -*-
# vi: set ft=ruby :

$script = <<SCRIPT
echo Provisioning now.
echo Install Debian Packages.
apt-get install -y rabbitmq-server librabbitmq-dev cpanminus
echo Install CPAN modules with cpan minus
#cpanm Catalyst::Runtime
#cpanm Catalyst::Devel
#cpanm Catalyst::View::TT
#cpanm Catalyst::View::JSON

#use the local rabbitmq server
MQHOST=localhost cpanm Net::AMQP::RabbitMQ --verbose

SCRIPT


Vagrant.configure(2) do |config|
  config.vm.box = "debian/jessie64"
  config.vm.network "private_network", ip: "192.168.33.10"
  config.vm.provision "shell", inline: $script
end
![]()
The public test server is back up, I believe.
On Fri, Aug 14, 2015 at 7:24 AM Mark Ellis notifications@github.com wrote:
I’ve changed your vagrantfile to use the local rabbitmq host for the
tests, as by default it uses the public test server at ‘dev.rabbitmq.com’,
which might be what’s causing the issue.this will be changed soon, but for now can you try this
—— mode: ruby ——
vi: set ft=ruby :
$script = <<SCRIPT
echo Provisioning now.
echo Install Debian Packages.
apt-get install -y rabbitmq-server librabbitmq-dev cpanminus
echo Install CPAN modules with cpan minus
#cpanm Catalyst::Runtime
#cpanm Catalyst::Devel
#cpanm Catalyst::View::TT
#cpanm Catalyst::View::JSON#use the local rabbitmq server
MQHOST=localhost cpanm Net::AMQP::RabbitMQ —verboseSCRIPT
Vagrant.configure(2) do |config|
config.vm.box = «debian/jessie64»
onfig.vm.network «private_network», ip: «192.168.33.10»
config.vm.provision «shell», inline: $script
end—
Reply to this email directly or view it on GitHub
https://github.com/markwellis/net-amqp-rabbitmq/issues/55#issuecomment-131081702
.
![]()
Switching to the local rabbitmq server for testing solved the problem, which I guess makes this a duplicate of https://github.com/markwellis/net-amqp-rabbitmq/issues/53 (which I looked at, but couldn’t get an error message out of — the links on the cpantesters matrix page sent me into a redirect loop — so didn’t realise it was the same error).
Thanks for your patience!
CS:GO Workshop «Failed to publish file»
CS:GO Workshop «Failed to publish file»
I was about to submit de_investment to the Workshop, but I encountered a issue. The Map Publisher gives me the error «Failed to publish file» when I try.
The map is about 190 MB, because a lot of custom materials and props are included (via Pakrat). The NAV, overview, a txt and a preview pic are seperate, as the documentation requires — it is not over 200 MB big.
The map works fine, we played it yesterday with quite a few players here …
Any ideas what the issue can be?
-

Sathor - Senior Member

- Joined: Sat Jan 20, 2007 10:31 pm
- Location: Germany


Re: CS:GO Workshop «Failed to publish file»
![]() by shadowmancer471 on Sat Aug 03, 2013 9:26 pm
by shadowmancer471 on Sat Aug 03, 2013 9:26 pm
Any chance its just a steam bug?
I have no idea either way, but have you tried changing region and/or deleting the client registry blob file?
I had an issue like this with the portal 2 PTI
I want to get off Mr.Bones Wild Ride
- shadowmancer471
- Regular
- Joined: Sat Aug 06, 2011 2:08 am

Re: CS:GO Workshop «Failed to publish file»
![]() by Sathor on Sun Aug 04, 2013 8:31 am
by Sathor on Sun Aug 04, 2013 8:31 am
I don’t know, it just happens with my map. I will try to recompile it and see if that changes anything.
Your solution advise did not work.
-
Sathor - Senior Member
- Joined: Sat Jan 20, 2007 10:31 pm
- Location: Germany
Re: CS:GO Workshop «Failed to publish file»
![]() by Armageddon on Sun Aug 04, 2013 9:53 am
by Armageddon on Sun Aug 04, 2013 9:53 am
Zeh Germans are not allowed.
-

Armageddon - Forum Goer Elite™
- Joined: Sun Dec 14, 2008 5:53 am


Re: CS:GO Workshop «Failed to publish file»
![]() by Deh0lise on Sun Aug 04, 2013 11:40 am
by Deh0lise on Sun Aug 04, 2013 11:40 am
I’ve suffered the same problem with my maps too. I’ve tried it until it worked.
I don’t know if there is a size limit though.
-

Deh0lise - Regular
- Joined: Sat Sep 22, 2007 11:33 pm
Re: CS:GO Workshop «Failed to publish file»
![]() by Sathor on Mon Aug 05, 2013 9:46 am
by Sathor on Mon Aug 05, 2013 9:46 am
I did not find a solution yet, but at least I think I am slowly able to isolate the problem.
I compiled the map just with world brushes AND props. That file can be uploaded to the Workshop.
Also, I was able to publish BSPs from 40 MB to 123 MB to the Workshop, so it is not file size related either.
What did not work was to publish a version with world brushes AND func details.
What did not work EITHER was publish a version with world brushes and ALL entities, except func_detail
Although it is a rather frustrating task, I hope to find a solution soon. 
-
Sathor - Senior Member
- Joined: Sat Jan 20, 2007 10:31 pm
- Location: Germany
Re: CS:GO Workshop «Failed to publish file»
![]() by ErikKiller on Mon Aug 05, 2013 12:22 pm
by ErikKiller on Mon Aug 05, 2013 12:22 pm
Armageddon wrote:Zeh Germans are not allowed.
Basically.


-
ErikKiller - May Contain Skills
- Joined: Sun Sep 09, 2007 4:05 pm
- Location: Estonia
-
- Website

Re: CS:GO Workshop «Failed to publish file»
![]() by Stormy on Fri Aug 09, 2013 2:36 am
by Stormy on Fri Aug 09, 2013 2:36 am
Email valve. They won’t respond, but email them anyway, they should know about your map.
-
Stormy - May Contain Skills
- Joined: Sun Nov 28, 2010 6:03 am
- Location: Cairns, QLD, AUS
-
- Website

Re: CS:GO Workshop «Failed to publish file»
![]() by Sathor on Fri Aug 09, 2013 4:45 am
by Sathor on Fri Aug 09, 2013 4:45 am
Well, the Steam support was most useless. They sent the link to the FAQ, which does not answer my question at all.
But do not worry, I got in contact with Valve devs directly.
-
Sathor - Senior Member
- Joined: Sat Jan 20, 2007 10:31 pm
- Location: Germany
Re: CS:GO Workshop «Failed to publish file»
![]() by MrTwoVideoCards on Sat Aug 17, 2013 9:51 pm
by MrTwoVideoCards on Sat Aug 17, 2013 9:51 pm
I am ahving this same problem attempting to publish blackgold, what the fuck
-

MrTwoVideoCards - Monothetic
- Joined: Thu Aug 02, 2007 11:18 am
- Location: IN YOUR SOUL

Return to Gaming Chat
Who is online
Users browsing this forum: No registered users
Наши новости: |
 Правила форума
Этот раздел, как вы могли заметить по названию, предназначен для решения вопросов по поводу уже существующих модов и плагинов.
Пожалуйста, если у вас проблема с написанием плагина, не путайте этот раздел с разделом по скриптингу.
Для поиска плагинов и модов существует соответствующий раздел.
Название темы должно соответствовать содержанию. Темы с названием типа «Помогите», «Вопрос», «парни подскажите…» — будут удалены.
Все темы, не относящиеся к «Вопросам по модам и плагинам», будут удалены или перемещены в соответствующий раздел.
Правила оформления темы:
1. Помимо заголовка не забудьте верно сформулировать свой вопрос.
2. Выложите исходник (в тег кода  +
+  ) или ссылку на плагин который вызывает у вас вопросы.
3. Выложите лог с ошибками (если имеется) под спойлер
|
|

|
TheArtemMaps |
Сообщение
|
|
Стаж: 3 года 5 месяцев Сообщений: 703 |
Всем привет! Скажите, пожалуйста почему не запускаются плагины? В логе пишется это [AMXX] Load error 17 (invalid file format or version) (plugin «buy_hp_armor.amxx») И так со всеми плагинами. Отредактировал: TheArtemMaps, — 27.2.2021, 21:37
Register System <== Register System от m0skVi4a ;] |
|
|
|


|
alodia |
Сообщение
|
|
Стаж: 6 лет 11 месяцев Сообщений: 1897 |
|
|
|
|


 Поблагодарили
|
TheArtemMaps |
Сообщение
|
|
Стаж: 3 года 5 месяцев Сообщений: 703 |
Цитата(alodia @ 27.2.2021, 23:03)
Тоесть нужно обновить амхмодх до нужной версии нужна для плагина, или скомпилировать плагин для версии амхмодх? Цитата(alodia @ 27.2.2021, 23:03)
Но у меня не только с этим плагином проблемы со всеми. Прийдётся по одному компилировать. Через локальный пробовал да но ошибки. Во всех локальных компиляторах. В онлайн компиляторах нету ошибок.
Register System <== Register System от m0skVi4a ;] |
|
|
|

|
alodia |
Сообщение
|
|
Стаж: 6 лет 11 месяцев Сообщений: 1897 |
|
|
|
|
0 пользователей и 1 гостей читают эту тему:
![]()
Здравствуйте уважаемые форумчане, возникла у меня такая вот проблема.
Скачал «[RLS] Мод SAMP RP v11» из соседнего раздела, залил базу данных, врубил на win XP и все работает отлично. Потом попробовал залить на свой VPS, все настроил, и при запуске получаю такую вот ошибку
Код
Script[gamemodes/reznov.amx]: Run time error 19: «File or function is not found»
Сразу говорю, в папке gamemode reznov.amx присутсвует.
В конфигах все прописал. Ниже приложу конфиг и лог
Конфиг
Код
echo Executing Server Config…
lanmode 0
rcon_password qwerty
maxplayers 40
bind «тут у меня ип»
port «Тут порт»
hostname SA-MP 0.3 Server
gamemode0 reznov 1
filterscripts
announce 0
query 1
weburl www.sa-mp.com
maxnpc 0
onfoot_rate 40
incar_rate 40
weapon_rate 40
stream_distance 300.0
stream_rate 1000
logtimeformat [%H:%M:%S]
language Russian
plugins streamer.so sscanf.so dc_cmd.so mysql.so
Лог
Код
———-
Loaded log file: «server_log.txt».
———-
SA-MP Dedicated Server
———————-
v0.3.7, (C)2005-2015 SA-MP Team
[17:40:00] filterscripts = «» (string)
[17:40:00]
[17:40:00] Server Plugins
[17:40:00] —————
[17:40:00] Loading plugin: streamer.so
[17:40:00]
*** Streamer Plugin v2.6.1 by Incognito loaded ***
[17:40:00] Loaded.
[17:40:00] Loading plugin: sscanf.so
[17:40:00]
[17:40:00] ===============================
[17:40:00] sscanf plugin loaded.
[17:40:00] Version: 2.8.1
[17:40:00] (c) 2012 Alex «Y_Less» Cole
[17:40:00] ===============================
[17:40:00] Loaded.
[17:40:00] Loading plugin: dc_cmd.so
[17:40:00] Daniel’s CMD plugin v2.8
[17:40:00] (c) 2014 Daniel_Cortez
[17:40:00] www.pro-pawn.ru
[17:40:00] Loaded.
[17:40:00] Loading plugin: mysql.so
[17:40:00]
> MySQL plugin R5 successfully loaded.
[17:40:00] Loaded.
[17:40:00] Loaded 4 plugins.
[17:40:00]
[17:40:00] Filterscripts
[17:40:00] —————
[17:40:00] Loaded 0 filterscripts.
[17:40:00] Script[gamemodes/reznov.amx]: Run time error 19: «File or function is not found»
[17:40:00] Number of vehicle models: 0
Рассчитываю на вашу помощь
Contents
- Change your Steam nickname
- If you don’t know how to change your Steam nickname, follow the steps below:
- Add the Social Club folder as an exception in your antivirus program
- Note that the folders you’re to add as an exception are:
- Verify the game’s files
- Rename the game’s configuration files
- Grant the Social Club application admin privileges
- Reinstall the Social Club app
- Uninstall Social Club
- Conclusion

The Social Club app is a Rockstar Games introduction that validates a member’s profile. Being a member of the Rockstar Games Social Club offers you many in-game and online benefits. You’ll have exclusive access to member-only weaponry, cars, haircuts, and statistics, among other offerings.
The Social Club application is meant to start up whenever you launch GTA V. If it doesn’t, the game won’t run. Many gamers have reported that the “Social Club failed to initialize. Error code 17” error keeps popping up whenever they try to run the game. If you’re experiencing this problem, not to worry, we’ll be showing you how to resolve Error code 17 in Grand Theft Auto 5.
Change your Steam nickname
As bizarre as it sounds, changing the username in Steam and using one without any special characters resolved the problem for many gamers. The solution felt like a joke until frustrated players began to give it a try. There are no specifics as to how the username affects GTA V’s Social Club app or how changing it gets rid of the problem. What matters is that it works.
Note that the name you’re changing is what other users see you as and can search for you with. It isn’t your Steam account name.
If you don’t know how to change your Steam nickname, follow the steps below:
- Go to the Start menu, search for Steam, and then click on the app’s icon once it shows up in the results. If you have a desktop shortcut, double-click it.
- Once the Steam client appears, go to the top of the window (where you’ll find the Store, Library, and Community menus) and hover your mouse pointer over your username.
- Once you see a context menu, click on Profile.
- On the page that appears, click on the Edit Profile button on the right side of the window.
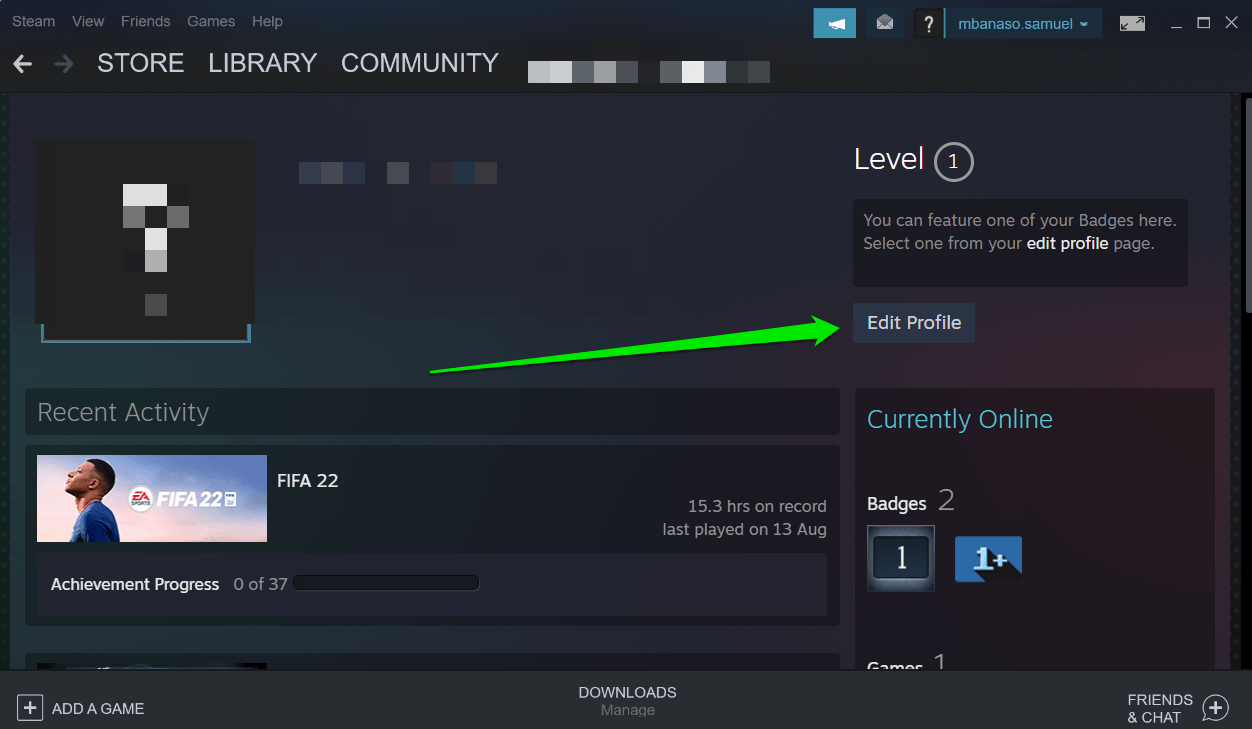
- Now, go to the Profile Name box on the next screen and change your username. Make sure you use only letters.
- Scroll down and click on the Save Changes button.
- You can now launch GTA V and check if that resolves the problem.
Antivirus interference is a common issue in the gaming world. Many protection programs block files associated with games because they consider them to be security threats. This issue mostly occurs when the game files are relatively new. As it turns out, this could be the cause of the Social Club Error Code 17. You can easily resolve the problem by adding the Social Club installation folder as an exception in your antivirus program.
Depending on the antivirus program you’re using, you might have to add the folder as an exclusion or exemption. In other cases, you’ll be working with the SafeList or Whitelist feature. Whatever program you’re using, you can easily find the feature in the Settings or Preferences environment. If you don’t know what to do, go to the website of the app’s developer to search for a guide that will show you what to do.
Note that the folders you’re to add as an exception are:
C:Program FilesRockstar GamesSocial Club
C:Program Files (x86)Rockstar GamesSocial Club
You don’t have to go anywhere if you rely on Windows Security as your system’s primary protection program as the steps below will guide you:
- Launch the Settings application by clicking on the gear icon in the Start menu or by pressing the Windows key and I key simultaneously.
- After the application opens, click on the Update & Security icon at the bottom of the window.
- Next, click on Windows Security in the left pane of the Update & Security interface.
- Now, go to the right pane and click on Virus & Threat Protection under Protection Areas.
Note: You can open the Virus & Threat protection page in Windows 11 by going to the Start menu and searching for it.

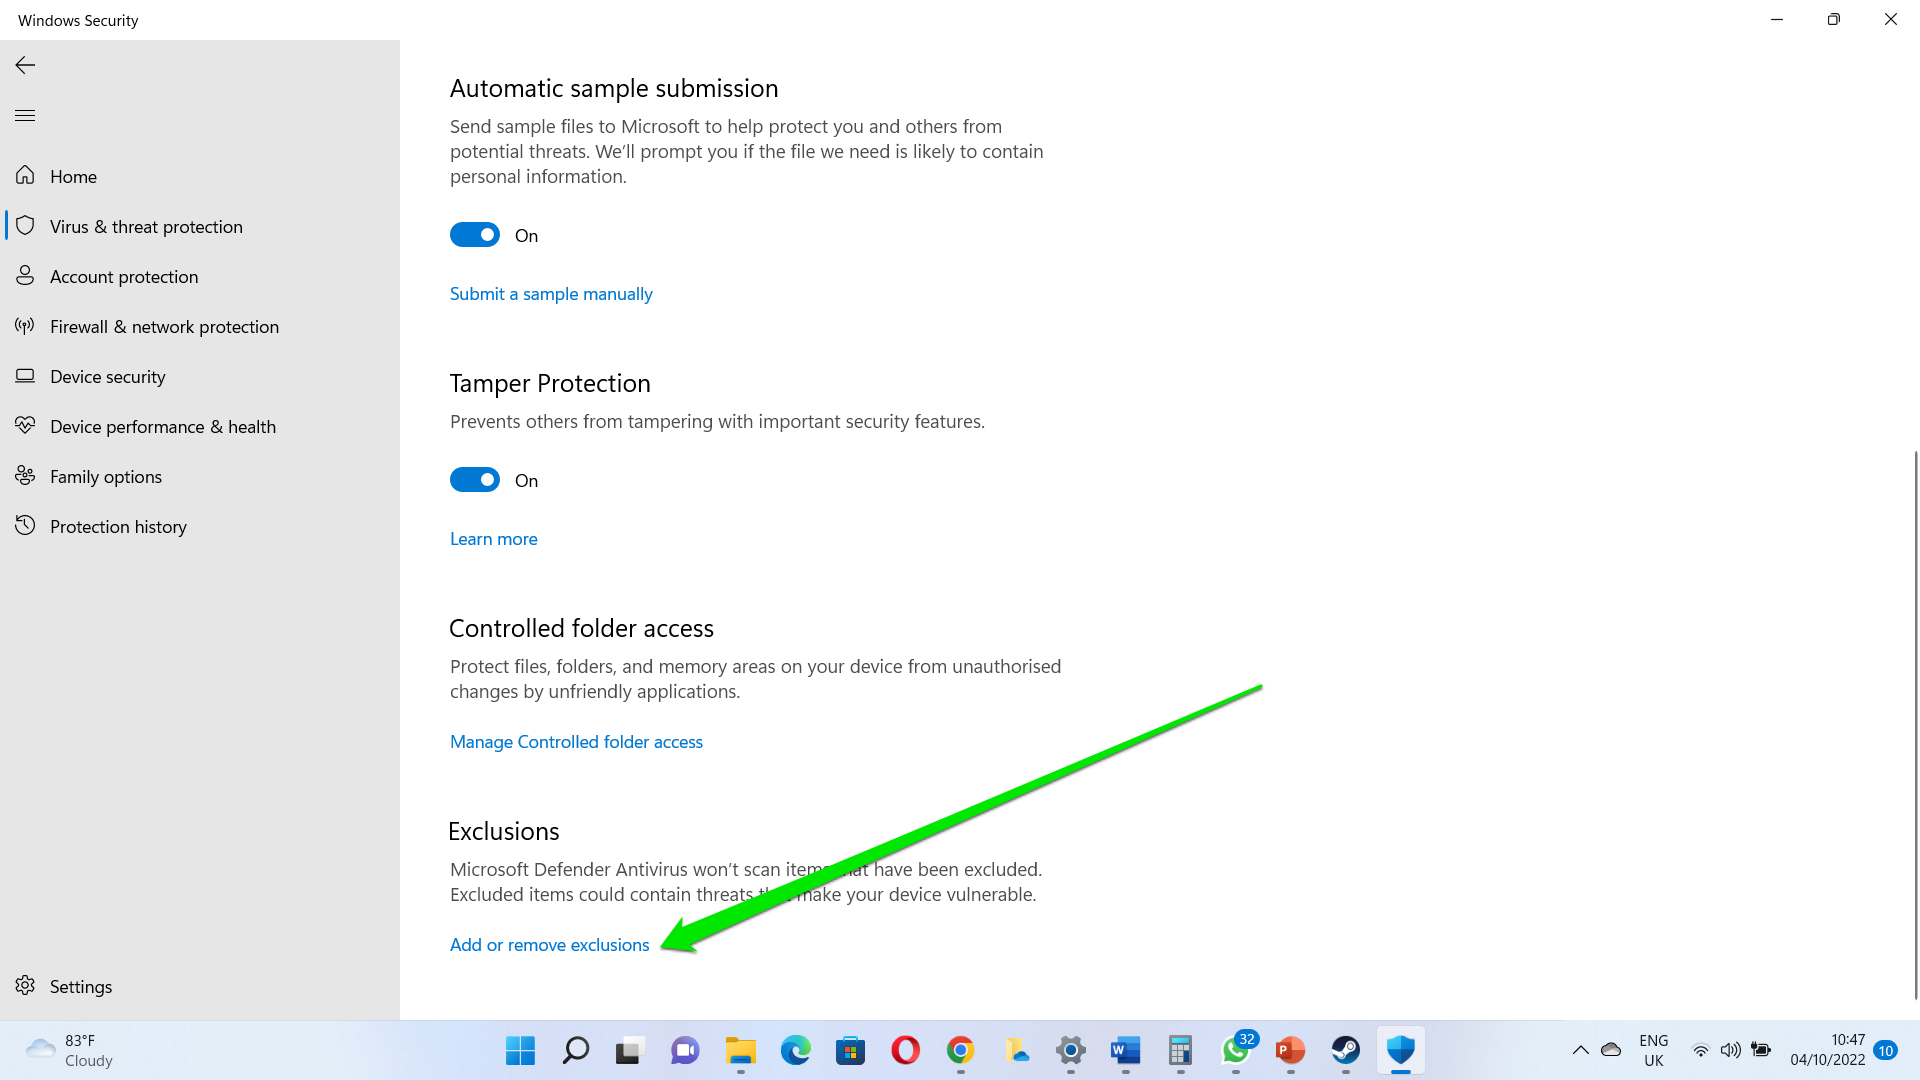
- Once the Virus & Threat Protection interface of the Windows Security application shows up, go to the Virus & Threat Protection Settings segment and click on the Manage Settings link.
- The Virus & Threat Protection Settings screen will now appear. Scroll down and click on “Add or remove exclusions” under the Exclusions section.
- After the Exclusions screen appears, click on “Add an exclusion,” and then select Folder.
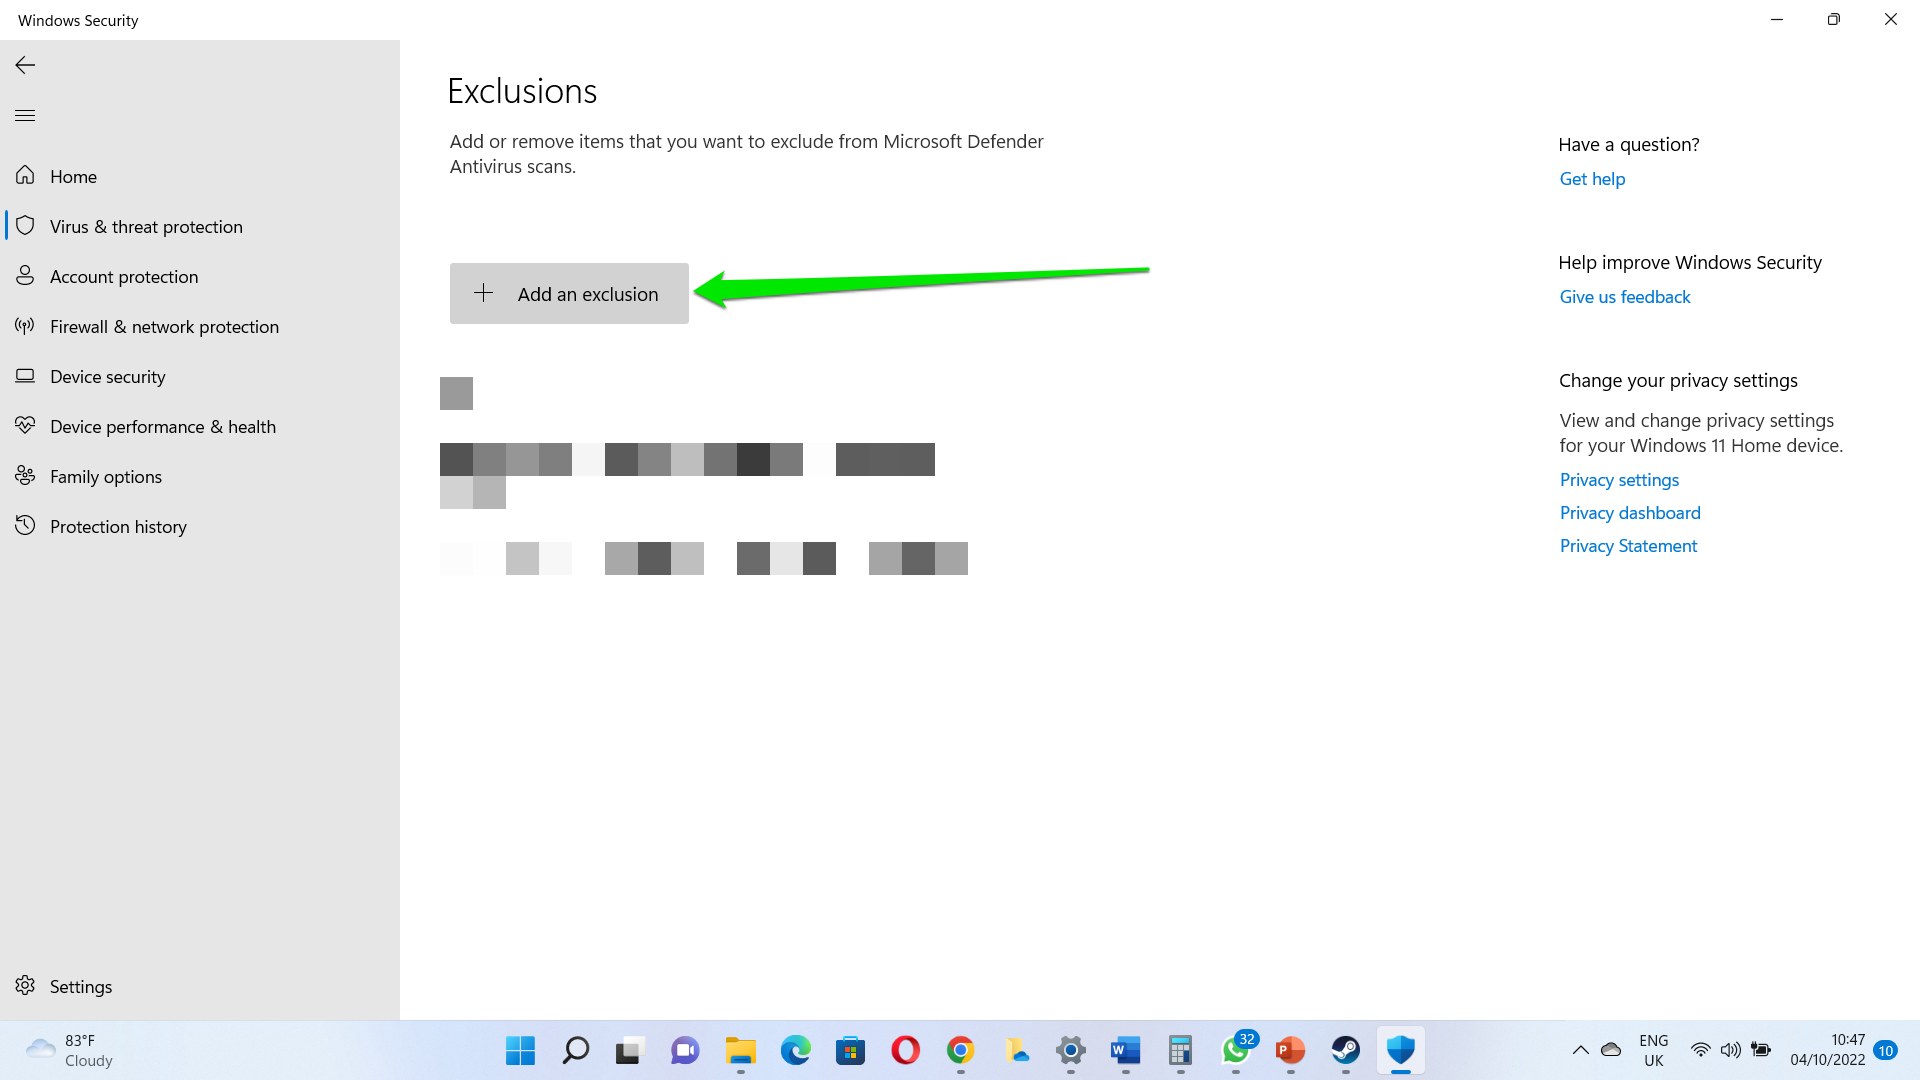
- Once you see the Select Folder dialog, navigate to the installation folder shown before in this guide and select it.
- Now, run GTA V and check if the error message shows up again.
You can enhance your system’s security by installing Auslogics Anti-Malware. The tool is an excellent malware remover with little to no cases of false positives. It can work with other antivirus programs without causing conflicts, and it’s perfectly compatible with Windows 10.
Verify the game’s files
Some corrupt game files in GTA V’s folder might be the cause of the error. Whenever you launch the game from the Steam client, it refers to some game files to initialize the Social Club application. If these files are broken or missing, the process will fail and the error message will appear. So, try repairing problematic game files and check if that resolves the problem.
The steps below will show you how to do that:
- Go to the Start menu, search for Steam, and then click on the client’s icon once it shows up in the results. You can double-click on the app’s desktop icon if you have one.
- After Steam opens, go to the top of the window and click on Library.
- Once you see your list of games, locate GTA V, right-click it, and then click on Properties.
- After the Properties page of the game shows up on the right, navigate to the Local Files tab on the left side of the window.
- Under the Local Files tab, click on the “Verify integrity of game files” button.
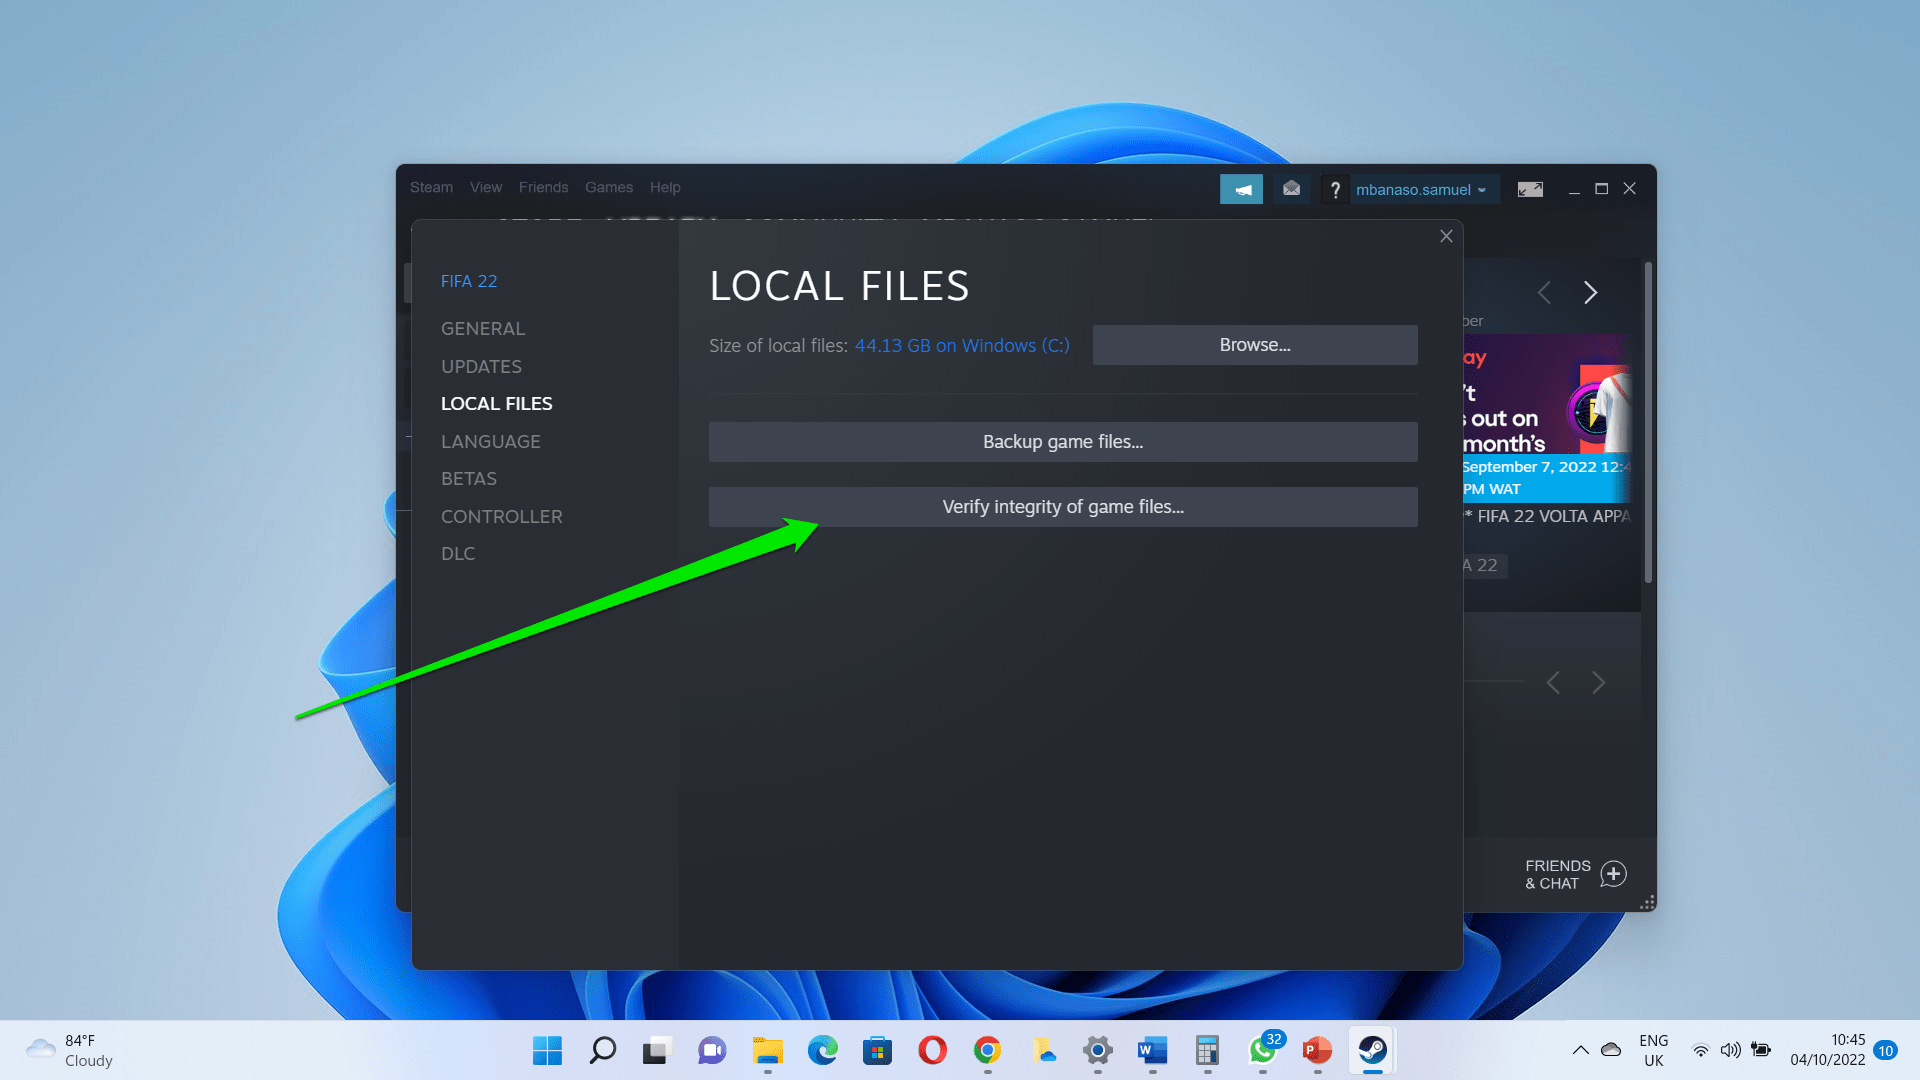
- The client will now begin to compare the game’s files on your computer with their updated versions on its servers. If any game file doesn’t match its counterpart, Steam will automatically replace it.
- Note that the duration of the process depends on your system’s general speed, the strength of your Internet connection, and the size of the files being replaced.
- After the client validates your game’s installation, restart it and launch GTA V to check for the problem.
Rename the game’s configuration files
The issue might be tied to some of your current settings. Since you can’t open the game to change those settings, renaming its configuration files might do the trick. Once you rename these files, every setting in the game, including sound, control, and graphics settings, will be rolled back to its default state. The Story Mode Cloud Save settings will also be rolled back to the defaults.
The guide below will walk you through the process step by step:
- Launch a File Explorer window. You can do that by right-clicking the Start button and selecting File Explorer. If you want to launch the app faster, click on the folder icon in the taskbar or press the Windows key and E key on your keyboard together.
- After File Explorer opens, go to the left pane of the window and click on Documents. Specifically, you need to open the Documents folder of your user account. To do that, click on This PC, then go to the right side of the window and navigate to C:Users-USERNAME-Documents.
Note that -USERNAME- is a placeholder for the name of your current user account.
- After you get to the Documents folder, navigate to the Rockstar Games folder and open it.
- Now, open the GTA V folder.
- Locate the ‘settings.xml’ file and rename it to “Settings.old” (no quotes).
- Accept any pop-up.
- Next, open the Profiles folder under the GTA V folder.
- Once you get to the Profiles folder, go to the folder named after your profile and open it. Normally, this should be a bunch of random codes.
- Now, locate the “cfg.dat” and “pc_settings.bin” files and rename them.
After you rename the files, the game will automatically create new ones, which will contain default settings. Restart GTA V and check if the error message shows up again.
It’s possible that the “Social Club failed to initialize. Error Code 17” is coming up because the Social Club application doesn’t have the permission to run properly. The main fix to this issue is granting the program administrator rights.
To apply this fix, make sure you’re logged into an administrator user account. The steps below will show you what to do:
- Launch a File Explorer window. You can do that by right-clicking the Start button and selecting File Explorer. If you want to launch the app faster, click on the folder icon in the taskbar or press the Windows key and E key on your keyboard together.
- After File Explorer opens, go to the left pane of the window and click on This PC.
- Go to the right side of the window and open your Windows volume, which should be the Local Disk C under normal circumstances.
- After the Local Disk C shows up, open the Program Files (x86) folder.
- Once you get to the Program Files (x86) folder, open the Rockstar Games folder.
- Now, locate the Social Club folder under the Rockstar Games folder and open it.
- Once you get to the folder, go to the “subprocess.exe” file, right-click it, and then click on Properties.
- After the Properties dialog window opens, go to the Compatibility tab.
- Under the Compatibility tab, check the box next to “Run this program as an administrator,” and then click on the OK button.
According to Rockstar Games, incorrect installation is the most common cause of the “Failed to initialize” error. So, if nothing has worked to this point, consider uninstalling and reinstalling the Social Club application.
You’ll find guides explaining every procedure below.
You can do this by using the Programs and Features window via Control Panel or via the Settings application. Here’s how to use the former method:
- Click on the magnifying glass in the taskbar or press the Windows key and S key simultaneously to open the search function beside the Start button.
- Next, type “Control Panel” without the quotes and click on Control Panel once the results show up.
- After the Control Panel window opens, click on Uninstall a Program under Programs.
- Once the Programs and Features window opens, locate Social Club, click on it, and then click on the Uninstall button.
- Accept any pop-up, then follow the on-screen instructions in the wizard to remove the application.
Now, go to the Rockstar Games website, download the Social Club application, and then make sure you install the app to the right directory – Program FilesRockstar GamesSocial Club – so that it can be called up appropriately. Also, make sure you log in to the right Social Club account when you’re setting things up.
Conclusion
That’s it! The “Social Club failed to initialize” error shouldn’t be an issue anymore. If you have further issues or questions, do well to use the comments section below.
Do you like this post? 🙂
Please rate and share it and subscribe to our newsletter!
23 votes,
average: 2.17 out of
5
Loading…