
Have you ever been in the situation of failed to start erase of disk due to error (-9999, 0) ? Are you thinking about the solution to fix this error in a simple way? If yes then you have arrived at the correct place. This post will describe you all the essential informations about this error message that comes in your Mac system. Well, the failed to start erase of disk due to error (-9999, 0) is not a very strange, eventhough it is observed by the many users globally. Let me tell you that this error will appear in your Mac computer when the users is trying to use multiple method offered in order to create the bootable thumb drive version of your Mac computer. It is required 8 GB or more than this so you will get failed to start erase of disk due to error (-9999, 0). The effect of this error in the Mac computer is so worst and this may lead to the data loss scenario. Therefore it is advised to all the Mac users that keep yourself backup of all the file. Sometimes users don’t have backup file of their lost data so in that condition only Mac data recovery software will help you to retrieve the lost files.
Although Mac OS X is quite reliable, but still it is not free from glitches. Sometimes, users also have to face failed to start erase of disk due to error (-9999, 0) issues unexpectedly. It is one issue that continues to bother irrespective of the Mac versions you might use. Eventually, as a result of it, Mac system fails to process all your request and may crash severely. What more, due to failed to start erase of disk due to error (-9999, 0) issue, users also have to face some difficulties while accessing their hard drive files and other installed apps, which really presses a panic button at times. Wait that’s not the end, it has also been reported that system’s processing speed might get slow and even terminate abruptly, which may result in total loss of saved data on Mac. If you are also in the same situation and looking for failed to start erase of disk due to error (-9999, 0) solution then you need not worry because you will find complete guide to fix failed to start erase of disk due to error (-9999, 0) issue.
failed to start erase of disk due to error (-9999, 0): What are the Causes for Data Inaccessibility
There are various reasons behind the emergence of failed to start erase of disk due to error (-9999, 0) creating panic situation. Any inconsistencies pertaining to Mac OS X files system might result in corruption of data thus making it completely inaccessible. Let’s take a look at some of the probable reasons for the same.
Human mistakes: It might be due to unintentional mistakes such as accidental deletion, formatting mac files and volumes during normal course of operation
Emptying Trash: Many a time users might empty their trash files without cross checking them, which might result in complete wipe of even important Mac data.
Sudden termination of system files: Some time due to power surge, Mac system gets terminated abruptly, due to which some of the files fail to mount and become unresponsive.
Interrupted read/write operation: The chances of Mac file corruption or deletion also takes place when we interrupt the ongoing read/write process in midway resulting in failed to start erase of disk due to error (-9999, 0) situation.
Unintentional Formatting: Pressing wrong button will sometime lead to emergence of very critical failed to start erase of disk due to error (-9999, 0) problem.
Sharing of data/file on unsupported platforms: Due to presence of unsupported platform, sometimes shared files becomes unresponsive and get corrupted.
Virus attack: Although Mac is considered lot more safe as compared to Windows but still few nasty viruses are being written for it. Downloading apps & other related files will lead to security issue, which further influence the entire file system.
Modification in BIOS setting: Sometime when we go for some changes into the BIOS sector it will lead to emergence of several erroneous situation related to failed to start erase of disk due to error (-9999, 0) problem which you would never like to have.
Corruption in header file: Header file are one of the crucial file that contain entire information about the file that you are going to access. Hence, if there is a problem the requested file fails to respond and even generates failed to start erase of disk due to error (-9999, 0) corruption messages.
Catalog files node corruption: Catalog is the system generated file which keep record of file type and its recent accessing type.
Problem with boot sector: When there is a problem with boot sector, Mac system fails to load and as a result you are unable to access the stored data files and there arises failed to start erase of disk due to error (-9999, 0) issues.
Kernel Panic issues: Like BSOD in Windows, Mac users might come across kernel Panic issues.
Improper installation of program: installing of unwanted apps & programs without checking its source and agreement.
Hardware or software issue: It is also a common factor that is quite responsible for Mac file corruption and in a lieu emergence of erroneous situation.
All the above mentioned reasons are the probable causes for inaccessibility of Mac data. Now a question arises that, how a novice user know about failed to start erase of disk due to error (-9999, 0) ? Well, for your feasibility here are given some of the common symptoms.

Symptoms Related to failed to start erase of disk due to error (-9999, 0)
- The system will get terminated automatically after few minutes of working.
- Slow & sluggish behavior of Mac system
- The stored Mac file gets corrupted or damaged without any warning
- Installed programs gets crashed or freezes frequently
- The emergence of annoying error messages like “unable to find .dmg file”
- “file not found”
- “access denied”
Precautions & Tips For Avoiding failed to start erase of disk due to error (-9999, 0)
There is a well known proverb that precaution is better than cure, this too is applicable in case of Mac data. In order to avoid failed to start erase of disk due to error (-9999, 0) situation and keep all Mac files safe and secure, following tips might prove to be helpful. So, let’s have a look.
-
Stop using Mac at once if you do not want to aggravate failed to start erase of disk due to error (-9999, 0) issue and go for inbuilt disk recovery option.
-
Never overwrite the free space created after deletion of Mac files.
-
Don’t restart the Mac as the deleted or corrupted data might get overwritten with some other file.
-
Do not switch off system by ejecting the power plug.
-
Avoid upgrading system files.
-
Do not share any new data after the deletion or corruption issue.
-
Search the Mac Trash files.
-
Avoid downloading software from untrustworthy or suspicious websites.
-
Always shutdown your PC properly.
-
Always keep your Mac system update with patches & security fixes to protect against software loopholes
-
Always have a proper & updated backup of your saved Mac files to overcome data loss and failed to start erase of disk due to error (-9999, 0) issue.
At this juncture it has been commonly seen that the majority of users may lose their hope and get indulged in some expensive procedure for failed to start erase of disk due to error (-9999, 0) issue. But, why to do so! If here available an effective solution for it.
failed to start erase of disk due to error (-9999, 0): Manual Method to Get Rid of It
In case of Mac file corruption resulting in failed to start erase of disk due to error (-9999, 0) complications, follow this:
-
Search and launch “Disk Utility”
-
Click on “check file system”option
-
Wait till the scanning process gets over
-
Select the file that you want to mount it
2.If there is a problem with Mac file system due to failed to start erase of disk due to error (-9999, 0) then you may try this
-
Insert the Mac Bootable CD/Flash drive and restart the PC.
-
Click on “Install Mac OS X” option.
-
Continuously press “C” button from your keyboard.
-
Accept the license agreement & select the desired language.
-
Choose the destination drive which has the problem. In general, click on “Macintosh HD”.
-
After that click on “Options” icon to select the installation method. Further, if you want to save your personal file folders, networking accounts & user accounts click on “Archive to Install” & select “Preserve Users and Network Settings.
-
Restart your Mac system and reply to configuration prompt.
Note: Attempting to fix failed to start erase of disk due to error (-9999, 0) manually requires technical skills which newbie lacks. Even slight mistake might bring risk to data. So, it is recommended to take the help of Mac Data Recovery tool to rescue data in case of failed to start erase of disk due to error (-9999, 0) issue.
Mac Data Recovery Software: Automatic Way to Resolve failed to start erase of disk due to error (-9999, 0) Issue
No doubt, Mac data recovery software is an extremely simple and reliable tool that rescues data in case of its loss. It has also been noted that, the tool is quite effective in any case of data loss situation no irrespective of the reasons behind the corruption or deletion issues. Apart from that, its robust recovery algorithm performs thorough scanning of entire Mac hard drives either its internal or external and provide the users with optimum result.
Furthermore, Mac data recovery software has been well developed with layman prospective to provide simple working environment for the beginner users too. Another property of this very software is that, it can easily be installed and operate with minimal system resource utilization. In addition, due to all these effectiveness and meritorious work in the field of data recovery, the tool has gained 8 out of 10 rewards globally. Do not delay anymore, there is nothing as good as Mac data recovery software. Just download and install it to avoid failed to start erase of disk due to error (-9999, 0) scenario.
Striking Features of Mac Data Recovery Software
Undelete Mac data: Reliable and advance tool to perform smooth recovery of Mac data/files in any failed to start erase of disk due to error (-9999, 0) situation.
- Developed with robust scanning & recovery algorithm to provide complete failed to start erase of disk due to error (-9999, 0) solution.
- Highly applicable in case of Mac data corruption/ deletion issue
Deleted volume recovery: Also works effectively in case of Mac system file corruption or erroneous situation
-
Enabled with advance inbuilt file searching and recovery features in a single click
RAW file recovery: Supports recovery of more than 300 popular files including spreadsheets, ZIP archives, RAR files, PPT files ,PSD files, RAW files,music files, videos, etc.
Lost partition recovery: Safe data recovery from NTFS, FAT, ExFAT, HFS, HFSX based Boot Camp Partitions
-
Works as a system start up in case of boot failure issue
-
Maintains and preserves the integrity of data
-
Also, provide the preview of scanned & recovered files along with the option to see the ongoing scanning process during failed to start erase of disk due to error (-9999, 0)
-
Enable with resume recovery to later recovery of data from .dmg file format
-
saves recovered files at the user’s desired location
-
it is Cost effective
System Requirements for Mac data Recovery Software
- Processor: Intel
- Memory: 1GB
- Free Space on Hard Disk: 50 MB
- OS: OS X Mavericks 10.9, Mountain lion 10.8, Lion 10.7, Snow Leopard 10.6, Leopard 10.5, Tiger 10.4
Pros and Cons of the Software
Pros:
- Very easy to use
- Highly reliable
- Scan and recover entire Mac hard drive data irrespective of circumstances
- best to overcome and fix failed to start erase of disk due to error (-9999, 0)
Cons:
- Demo version can only be used to see the preview of recovered files.
- licensed version is required for saving the recovered data on desired location.
Conclusion: Now there is no need to worry at all! You can easily be able to rescue Mac data irrespective of the circumstances behind failed to start erase of disk due to error (-9999, 0) issue using an reliable and sophisticated Mac data recovery software.
failed to start erase of disk due to error (-9999, 0): Users Guide to Operate Mac Data Recovery Software
Step 1: Download and install Mac data recovery software to resolve failed to start erase of disk due to error (-9999, 0) issue.

Step:2 click on ‘Quick Recovery’ which is located below of the tab ‘Drive Recovery’.

Step 3: Select the Mac volume to be recovered by clicking on either “Volume recovery” or “formatted recovery” option for best failed to start erase of disk due to error (-9999, 0) solution.

Step 4: Now, click on start scan button.

Step 5: Wait till the scanning process gets over, after that a list of scanned files are displayed.

Step 6: Choose the file/folder or volume to be repaired and then select the desired location to save all recovered data and thus fix failed to start erase of disk due to error (-9999, 0) problem.
Step:7 Progress bar will confirm the saving of selected files to the desired destination.
-
#76
on 10.6. this is not working, you will get the following error:
Failed to start erase of disk due to error (-9999, 0).
erasing via diskutil works:
diskutil eraseDisk jhfs+ XYZ disk3
Started erase on disk3
Unmounting disk
Creating partition map
Waiting for disks to reappear
Formatting disk3s2 as Mac OS Extended (Journaled) with name XYZ
Finished erase on disk3
Any ideas to get this bootstick in a 10.6?
-
#77
i did with the uSB and its working just awesome, but i like to have this OSX on DVD, i have created a dvd from the DMG file but it is not working, can u please help me making DVD of this OSX Mavericks?
Thanks
-
#78
on 10.6. this is not working, you will get the following error:
Failed to start erase of disk due to error (-9999, 0).
erasing via diskutil works:
diskutil eraseDisk jhfs+ XYZ disk3
Started erase on disk3
Unmounting disk
Creating partition map
Waiting for disks to reappear
Formatting disk3s2 as Mac OS Extended (Journaled) with name XYZ
Finished erase on disk3Any ideas to get this bootstick in a 10.6?
I am getting this same error. I had the GM on my machine but it crashed after I downloaded something sketchy and had to delete the webkits. Mistakenly deleted the webkits from the system folder and the entire machine crashed. Apple restore all the way back to 10.6.8 so Im stuck just like you.
Any help guys?
-
#79
Hi Windnsea,
I just ran through the process again and tried it with one USB drive DataTraveler 111 (16GB) and a Kingston DataTraveler G3 (16GB).Exactly the same process.
DataTraveler 111 won’t show up during the boot process while the DataTraveler G3 (16GB) will do.
So I believe it has something to do with the USB drive I am using.
But this is actually a problem because I tried 4 USB drives so far and only one is working!
If somebody can help on this subject I would very much appreciate.
Thanks and regards,
Mo
Just curious Mo but when you have the drives mounted and look at them in Disk Utility, what does the «Partition Map Scheme» show at the bottom of the Disk Utility application screen.
If you have an Intel Based Mac you need — GUID Partition Table. If it is a Power — PC Mac it will need to be formatted as Apple Partition Map. And of course if it is partitioned as MBR, it will not allow you to boot to the drive.
All that being said, it seems that Disk Utility will select GUID if you choose Mac OS Extended (Journaled) for the Formatting type.
-
#80
Lion DiskMaker 3b3
Lion Diskmaker has a beta out, and it is free. Still in beta, though.
-
#81
this might be a stupid question, but where does the installer download to? (Not seeing it in downloads )
-
#82
this might be a stupid question, but where does the installer download to? (Not seeing it in downloads )
The installer is downloading an Application. When it is done it will try to run. You can CMD-Q it to exit if you don’t want to do the install right then. You can open your Applications later or make an install Drive later when you are ready.
-
#83
The installer is downloading an Application. When it is done it will try to run. You can CMD-Q it to exit if you don’t want to do the install right then. You can open your Applications later or make an install Drive later when you are ready.
Ah, I now see downloading to the Apps folder. Thanks.
I assume if I’m not sitting right next to my computer, it will wait until I click on some kind of «OK» or «START» or «CONTINUE» button, right?
-
#84
Ah, I now see downloading to the Apps folder. Thanks.
I assume if I’m not sitting right next to my computer, it will wait until I click on some kind of «OK» or «START» or «CONTINUE» button, right?
Yep, it will not start automatically.
-
#85
Sometimes during installation it seems to hang. But it isn’t really hanging. I and others have said that we get a message about a second remaining — half an hour later it finishes!
So you just have to patient. Leave it alone and it will eventually install.
That is so frustrating. I have waited for 45 minutes until it finally rebooted. That reminded me on old Windows 95 progress bars…
-
#86
I like most of what you posted there, except the bit about torrents.
The installer could get corrupted in that, so it would be better to get a redemption code in the mac dev center and then redeem it in the mac app store, i.e., use apple’s correct method for obtaining the GM (or just wait till it is publicly released.)
By the nature of how torrents work they have built in validation against corruption. The mac app store on the other hand is a different story, many people downloading Mavericks have had corrupt downloads:
https://discussions.apple.com/thread/5466903?start=15&tstart=0
-
#87
Followed the instructions from page 1 over an hour ago and it’s still ‘copying’ Is this normal?
-
#88
Followed the instructions from page 1 over an hour ago and it’s still ‘copying’ Is this normal?
Depends on the speed of your machine and USB stick. On my late 2011 MBP, it took about 30 minutes to finish. I think that was mainly due to the brand of my USB.
-
#89
on 10.6. this is not working, you will get the following error:
Failed to start erase of disk due to error (-9999, 0).
erasing via diskutil works:
diskutil eraseDisk jhfs+ XYZ disk3
Started erase on disk3
Unmounting disk
Creating partition map
Waiting for disks to reappear
Formatting disk3s2 as Mac OS Extended (Journaled) with name XYZ
Finished erase on disk3Any ideas to get this bootstick in a 10.6?
I had the same problem with my Mac Pro running 10.6.8, both with DiskMaker X (formerly Lion DiskMaker) and the command line. My only solution was to re-download 10.9 on the MBP (with 10.8.5) and it worked perfectly there (and only took 10 minutes!). I realize that doesn’t help people who don’t have access to later versions of OS X, but just wanted to let others know of my experience.
-
#90
I had the same problem with my Mac Pro running 10.6.8, both with DiskMaker X (formerly Lion DiskMaker) and the command line. My only solution was to re-download 10.9 on the MBP (with 10.8.5) and it worked perfectly there (and only took 10 minutes!). I realize that doesn’t help people who don’t have access to later versions of OS X, but just wanted to let others know of my experience.
This is what I was thinking.
-
#91
Ok here is my question. I have great internet speed compared to my friend.
He has a 2013 Macbook Air, I have a 2012 Macbook Pro. I have already installed Mavericks yesterday as soon as it came out.
My question: Can I download it from my Mac and put it on a flash drive for him to install since my connection is faster?
-
#92
I can’t seem to download the Mavericks installer from App Store. I installed Mavericks yesterday and everything went fine. But when I click download I says that I already have Mavericks installed and that I need to click «Continue» in order to download the file. But I don’t see Mavericks in the applications folder — and when I click download in the App Store, I don’t see it downloading anywhere — only a something ‘loading’ in the menu bar — but it is not downloaded at all! I tried the option+click method but I don’t see it in «Purchases» or in the application folder…
Last edited: Oct 23, 2013
-
#93
Absolutely. The installer itself is not Apple ID-dependent, so just download it and put it on a flash drive, then have him install it.
Be sure to follow the instructions upthread on how to create an install flash drive!
Ok here is my question. I have great internet speed compared to my friend.
He has a 2013 Macbook Air, I have a 2012 Macbook Pro. I have already installed Mavericks yesterday as soon as it came out.
My question: Can I download it from my Mac and put it on a flash drive for him to install since my connection is faster?
-
#94
I can’t seem to download the Mavericks installer from App Store. I installed Mavericks yesterday and everything went fine. But when I click download I says that I already have Mavericks installed and that I need to click «Continue» in order to download the file. But I don’t see Mavericks in the applications folder — and when I click download in the App Store, I don’t see it downloading anywhere — only a something ‘loading’ in the menu bar — but it is not downloaded at all! I tried the option+click method but I don’t see it in «Purchases» or in the application folder…
Anyone?
-
#95
So my question/problem
I wanted to do a clean install of mavericks and in a guide from macworld I saw that I will have an option to choose a clean drive well there was no options as there was only my drive, I thought maybe this option will pop up latter but…
So now I am with mavericks on top and can’t download them again just like the guy above me wrote, it just keeps loading and nothing..
1. Why I can’t download them again?
2. Would I be able to use this method with external hard drive and not an usb?
I am using MBPr if that says anything.
Thanks in advance and sorry for my bad english.
-
#96
Hey all, I made an applescript to simplify the command line process. The applescript will completely wipe the device you use for the installer to make sure that it is correctly partitioned so I recommend using an 8GB or larger flash/thumb drive that has nothing of importance on it. Here is a link to my post.
http://musings.silvertooth.us/2013/10/mavericks-bootable-disk-creation-tool/
Cheers and thanks to tywebb13 for the command.
Chris
This is excellent. It is faster than lion diskmaker for me. Very nice
-
#97
So my question/problem
I wanted to do a clean install of mavericks and in a guide from macworld I saw that I will have an option to choose a clean drive well there was no options as there was only my drive, I thought maybe this option will pop up latter but…
So now I am with mavericks on top and can’t download them again just like the guy above me wrote, it just keeps loading and nothing..
1. Why I can’t download them again?
2. Would I be able to use this method with external hard drive and not an usb?
I am using MBPr if that says anything.Thanks in advance and sorry for my bad english.
You should have created a bootable USB before you instal mavericks… If not done yet you can still create a bootable disk…. I believe you can make external HD a bootable disk too but you need to create a partition. I never tried it but if I am correct you need to partition a HD at least 8gb for GUID… Unless you want to waste the whole 500gb or 1 tb or whatever size your external drive has.
When you create a bootable usb shutdown your comp… Boot while holding option/alt key…. You can choose where to boot… Then diskutility you might want to format which HD you want to instal mavericks with. Or partition its up to you then… Just follow direction
-
#98
You should have created a bootable USB before you instal mavericks… If not done yet you can still create a bootable disk…. I believe you can make external HD a bootable disk too but you need to create a partition. I never tried it but if I am correct you need to partition a HD at least 8gb for GUID… Unless you want to waste the whole 500gb or 1 tb or whatever size your external drive has.
When you create a bootable usb shutdown your comp… Boot while holding option/alt key…. You can choose where to boot… Then diskutility you might want to format which HD you want to instal mavericks with. Or partition its up to you then… Just follow direction
I wish I could understand all what you say.
-
#99
I wish I could understand all what you say.
Which part? Did I loss you
-
#100
Which part? Did I loss you
Could you just explain in steps what should I do for clean install with external hdd.
or I can do this just use my external hdd and not an usb stick ?
«To make a bootable USB, use this method:
Your 8 GB USB drive should be called Untitled and formatted as Mac OS Extended (Journaled). The installer should be called Install OS X Mavericks.app and should be in your Applications folder.
Run this in terminal and wait about 20 minutes:
sudo /Applications/Install OS X Mavericks.app/Contents/Resources/createinstallmedia —volume /Volumes/Untitled —applicationpath /Applications/Install OS X Mavericks.app —nointeraction
You should see something like this:
Erasing Disk: 0%… 10%… 20%… 100%…
Copying installer files to disk…
Copy complete.
Making disk bootable…
Copying boot files…
Copy complete.
Done.
You can then boot up from the USB by holding down the option key, then install the GM from the USB.
This is probably going to be the same for the public release.»
 В этой пошаговой инструкции подробно о том, как создать загрузочную флешку с OS X 10.11 El Capitan для чистой установки на iMac или MacBook, а также, возможно для переустановки системы при возможных сбоях. Также такой накопитель может быть полезен, если вам требуется быстро обновиться до El Capitan на нескольких Mac без необходимости скачивать его из App Store на каждом из них. Обновление: Загрузочная флешка MacOS Mojave.
Основное, что потребуется для описываемых ниже действий — флешка размером не менее 8 гигабайт, отформатированная для Mac (будет описано, как это сделать), права администратора в OS X и возможность загрузить установку El Capitan из App Store.
Подготовка флешки
Первый шаг — отформатировать флешку с помощью дисковой утилиты, используя схему разделов GUID. Запустите дисковую утилиту (проще всего воспользоваться поиском Spotlight, также можно найти в Программы — Утилиты). Учтите, следующие шаги удалят все данные с флешки.
В левой части выберите подключенный USB-накопитель, перейдите на вкладку «Стереть» (в OS X Yosemite и более ранних) или нажмите кнопку «Стереть» (в OS X El Capitan), выберите формат «OS X Extended (журналируемый)» и схему разделов GUID, также укажите метку диска (используйте латиницу, без пробелов), нажмите «Стереть». Дождитесь завершения процесса форматирования.
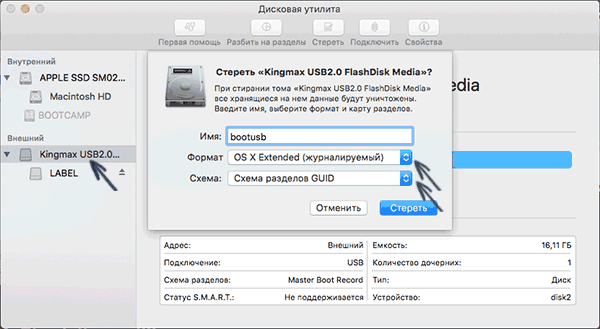
Если все прошло успешно, можно продолжать. Запомните метку, которую вы задавали, она пригодится на следующем этапе.
Загрузка OS X El Capitan и создание загрузочной флешки
Следующее действие — зайти в App Store, найти там OS X El Capitan и нажать «Загрузить», после чего ожидать завершения загрузки. Общий размер составляет около 6 гигабайт.

После того, как файлы установки будут загружены и откроется окно настройки параметров установки OS X 10.11 не нужно нажимать «Продолжить», вместо этого закройте окно (через меню или Cmd+Q).
Само создание загрузочной флешки OS X El Capitan выполняется в терминале с помощью утилиты createinstallmedia, которая содержится в дистрибутиве. Запустите терминал (опять же, быстрее всего это сделать с помощью поиска Spotlight).
В терминале введите команду (в этой команде — bootusb — метка USB диска, которую вы задавали при форматировании):
sudo /Applications/Install OS X El Capitan.app/Contents/Resources/createinstallmedia —volume /Volumes/bootusb —applicationpath /Applications/Install OS X El Capitan.app —nointeraction

Вы увидите сообщение «Copying installer files to disk…», означающее, что файлы копируются, а сам процесс копирования на флешку займет довольно продолжительное время (около 15 минут для USB 2.0). По завершении и сообщении «Done.» можно закрыть терминал — загрузочная флешка для установки El Capitan на Mac готова.

Для того, чтобы загрузиться с созданного USB накопителя для установки, при перезагрузке или включении вашего Mac, нажмите клавишу Option (Alt) для появления меню выбора устройства загрузки.
Many Mac users like to make a bootable installer drive for installing OS X El Capitan, whether for performing a clean install, or for making it easier to install OS X 10.11 onto multiple Macs. We will walk through creating a bootable install flash drive from OS X El Capitan with the final public version.
Before getting started, know the requirements necessary to make a bootable OS X El Capitan installer drive are as follows:
- An 8GB or larger USB Flash Drive like these
 , this will be formatted and turn into the OS X El Capitan bootable installer
 - The OS X El Capitan installer application must be on the Mac and in the /Applications/ folder, download OS X El Capitan here if you haven’t done so yet (yes. you can re-download it)
Presumably you have already made the USB flash drive into a Mac compatible format with Disk Utility, if not you can follow the directions here to format a drive for Mac OS X compatibility HFS+.
When you’re ready, plug the USB / flash drive into the Mac with the OS X El Capitan installer application on it.
1: Rename the USB Flash Drive to Become the OS X El Capitan Bootable Installer
The next thing you’ll want to do is rename the target volume that you wish to turn into a bootable installer drive, in this case an external USB flash drive. To avoid any confusion, we’re naming the USB drive to “ElCapInstaller” (without the quotations), though you can name it whatever you want as long as you adjust the command line syntax to match.
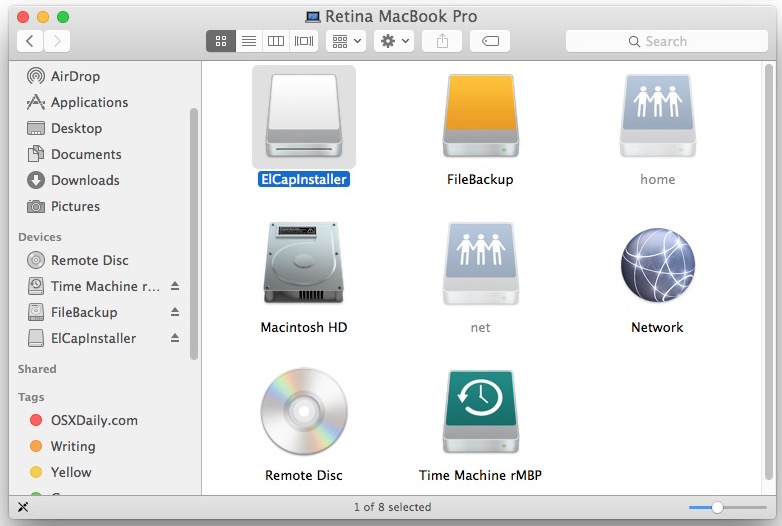
You can do this through the Terminal or the Finder as shown above.
2: Make the OS X El Capitan Bootable Installer Drive with a Terminal Command
Launch the Terminal application, found in /Applications/Utilities/ and enter the following command exactly (unless you changed the target volume name from ElCapInstaller to something else) onto a single line, the text will wrap because it is long, but it’s important to have proper syntax:
sudo /Applications/Install OS X El Capitan.app/Contents/Resources/createinstallmedia --volume /Volumes/ElCapInstaller --applicationpath /Applications/Install OS X El Capitan.app --nointeraction
Hit the Return key and enter the administrator password when requested.
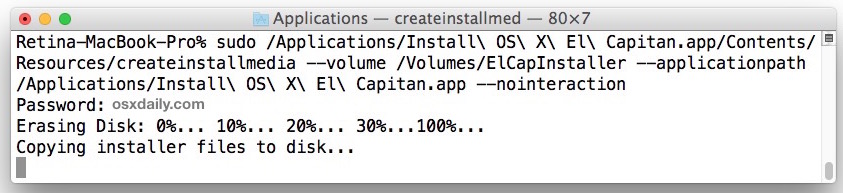
You’ll then see the following screen text in the Terminal:
“Erasing Disk: 0%… 10%… 20%… 30%…100%…
Copying installer files to disk…
Copy complete.
Making disk bootable…
Copying boot files…
Copy complete.
Done.”
The target USB disk or flash drive will be erased first and then copy the files to it so that it will become a bootable OS X El Capitan installer. This can take a while to complete, so wait for the “Done” message before continuing.
When you see “Done”, that’s it, your OS X El Capitan installer drive has been created, it’s bootable, and you can use it to update as many Macs as you want to with OS X 10.11.
To boot from the installer drive, hold down the Option key during Mac system start, and select it from the startup volume menu.

Otherwise, you can insert the installer USB disk / flash drive into any Mac and launch the installer directly from the drive.
Can you show me how to make an Install OS X El Capitan boot drive?
If you want to watch a video walkthrough of the entire process of making an OS X El Capitan bootable installer drive, we’ve got you covered, here it is embedded below for easy viewing:
If you have any questions, thoughts, or info about making an OS X El Capitan bootable installer drive, do let us know in the comments!