Let’s look at this from a troubleshooting perspective. The number one thing to do instead of guessing is diagnose and the best way to do that when you don’t know what the problem is. I’ll take you through the steps for my particular use case but it should give you a general idea on how to look at the problem in order to find the correct solution.
a.-Have a look at the actual logs of the VM:
Click on the Menu Item, you should see three choices:
- Details
- Snapshots
- Logs
Look for this error code:
VMSetError and look for the matching RETURN CODE (rc)
rc=VERR_VD_IMAGE_READ_ONLY
In the example below the file under /build/virtualbox….is in read only mode.
VMSetError: /build/virtualbox-8vePuu/virtualbox-6.1.16-dfsg/src/VBox/Devices/Storage/DrvVD.cpp(5228) int drvvdConstruct(PPDMDRVINS, PCFGMNODE, uint32_t); rc=VERR_VD_IMAGE_READ_ONLY
b.-Interpret what that means:
But the problem is the /build directory does not exist at all. So what the rc above really means is that it cannot FIND that file, because /build doesn’t even exist (nor it seems to be supposed to).
cd: /build/virtualbox-8vePuu/virtualbox-6.1.16-dfsg/src/VBox/Devices/Storage/: No such file or directory
root@pop-os:~# cd /build/virtualbox-8vePuu/virtualbox-6.1.16-dfsg/
-bash: cd: /build/virtualbox-8vePuu/virtualbox-6.1.16-dfsg/: No such file or directory
root@pop-os:~# cd /build
-bash: cd: /build: No such file or directory
root@pop-os:~# ls /
bin   dev  home  lib32  libx32      media  opt   root  sbin  sys  usr
boot  etc  lib   lib64  lost+found  mnt    proc  run   srv   tmp  var
Another thing to notice is that for my case other VMs with VDIs in the same location don’t have the problem.
That completely discards two possibilities:
- There’s a problem with the install of Virtual Box
- There’s an actual file permissions issue
The possibility is that the VM got corrupted at some point during shut down and that created the config corruption, not a VDI corruption at the VM level, not VirtualBox level.
Unless you power off your VM the «Close» function on your Vm window will ALWAYS save the state of the machine, so «Discarding» the state is only possible when you have two or more states because in that case at a minimum there is always the LAST state.
The conclusion is then that the corruption is at the VM state level and we need to get rid of that.
c.-Solution:
Go to VM-> Menu->Snapshots -> Clone
Create a linked Clone. That will simply copy the config files to the right place and link with the same VDI.
Start that one.
If it starts you know you have a problem with the original VM. You can either re-create the VM and point to the existing VDI or create a full clone (it will take longer) and the delete the original.
To prevent this (at least for my case), avoid sending the Power Off Message to your VM when closing, better use the ACPI Shutdown method as Power off can leave (as we saw) your machine on an unwanted state.
Problem
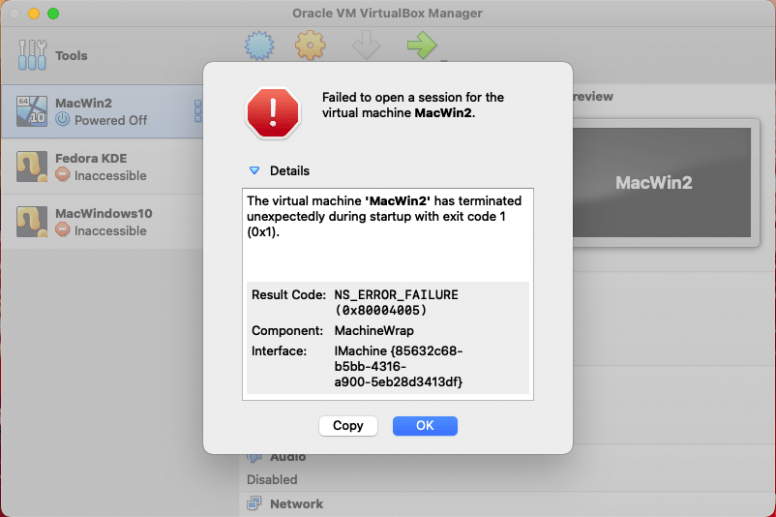
After updating my MacBook macOS Big Sur to version 11.6.5, I was getting the below NS_ERROR_FAILURE error while trying to launch the Windows virtual machine on VirtualBox 6.1. I was unable to launch the virtual machine. I got the same error after updating macOS Big Sur to version 11.6.8 as well.
Errors
Failed to open a session for the virtual machine MacWin2.
The virtual machine ‘MacWin2’ has terminated unexpectedly during startup with exit code 1 (0x1).
Result Code: NS_ERROR_FAILURE (0x80004005)
Component: MachineWrap
Interface: IMachine {85632c68-b5bb-4316-a900-5eb28d3413df}
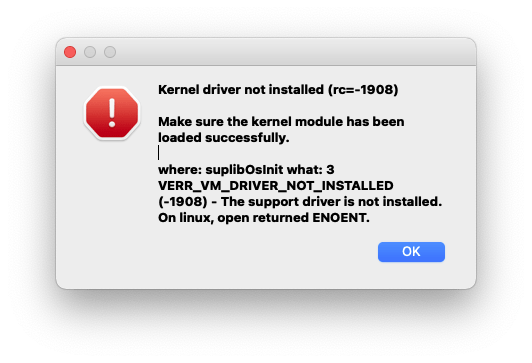
At the same time another error window appeared with the below error:
Kernel driver not installed (rc=-1908)
Make sure the kernel module has been loaded successfully.
where: suplibOsInit what: 3 VERR_VM_DRIVER_NOT_INSTALLED (-1908) – The support driver is not installed. On linux, open returned ENOENT.
Solution 1: (Restart The Mac)
Before thinking too much, make sure you have restarted your Mac after completing the OS update.
In my case, after updating the OS, even before restarting my Mac, I tried to launch the virtual machine and got the errors. After restarting the Mac, the errors vanished. So, before trying anything dramatic, try restarting the Mac. If you are still getting the error, then try the below solutions one by one.
Solution 2: (Re-enable SIP)
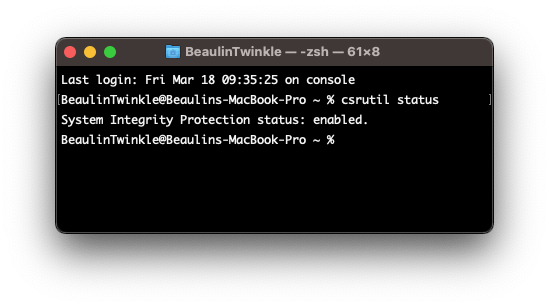
The next thing to do is to check and make sure SIP (System Integrity Protection) is enabled. To check it, run this command in the terminal.
System Integrity Protection should be in enabled state. If it is in disabled state for some reason, then enable it by following these steps:
- Restart the Mac by holding the Command and R keys together.
- Leave the keys when the apple logo appears.
- In the recovery mode, go to the Utilities menu.
- Select Terminal.
- In the terminal window, run the below command to enable SIP and reboot the Mac.
- Allow the mack to launch in normal mode.
- Launch terminal and run the command csrutil status and make sure SIS is enabled.
Solution 3: (Access Device Permission)
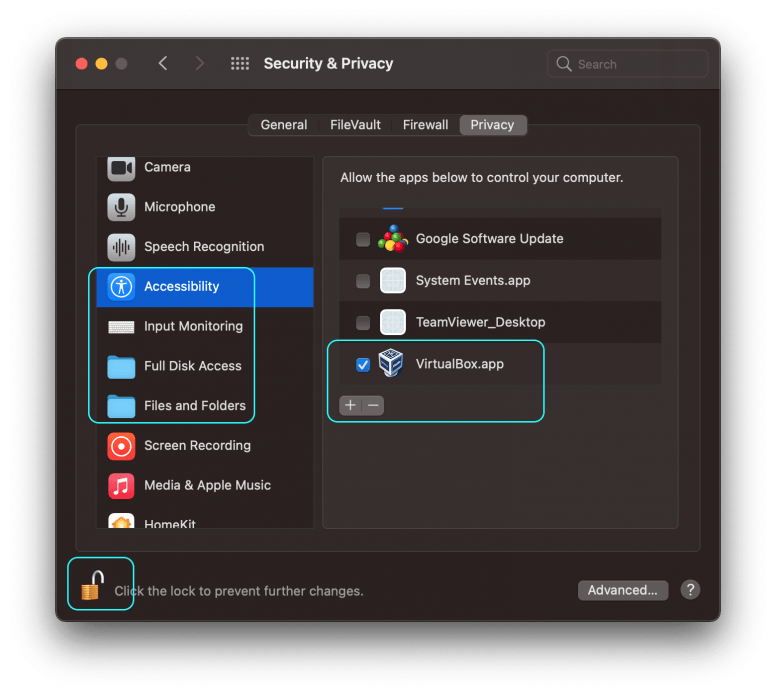
- Quit VirtualBox.
- In the Mac, launch the System Preferences.
- Go to Security & Privacy.
- Go to the Privacy tab.
- Unlock the privacy screen to make changes by pressing the lock icon at the bottom left of the screen and provide your authentication.
- From the left panel, go through the permissions Accessibility, Input Monitoring, Full Disk Access, Files and Folders and make sure VirtualBox.app is listed under the allow list (right panel) and the checkbox is selected. If not then add it to the list using the + button and select the check boxes.
- Launch VirtualBox and the virtual machine.
If you are still getting the NS_ERROR_FAILURE (0x80004005) error, then try the below solution.
Solution 4: (Allow identified developer in Security & Privacy)
Usually this solution is needed when you get errors after installing VirtualBox. As we are discussing the errors obtained after updating macOS, this solution may be irrelevant. Still I’m adding this solution here, just to check the settings before moving to the next solution.
- Quit VirtualBox.
- Launch the System Preferences.
- Go to Security & Privacy >> General tab.
- In the General tab, Unlock the security and privacy screen to make changes by clicking on the lock icon at the bottom of the screen and provide your authentication.
- Under the Allow apps downloaded from section, make sure the App Store and identified developers option is selected.
- Keep the System Preferences screen open and launch the virtual box and then the virtual machine. If the errors appear again, check the System Preferences >> Security & Privacy >> General tab and see if there is a warning like System software from developer “Oracle America, Inc.” was blocked from loading along with an Allow button that appears below the App Store and identified developers option. If so, press the Allow button.
- Quit the VirtualBox and launch it again.
Solution 5: (Update VirtualBox)
If the above solution were not fixing the problem, then see if there is any update available for the VirtualBox and install the update if there is any. To update the VirtualBox to its latest version follow these steps:
- Launch VirtualBox.
- From the menu select VirtualBox >> Check for updates…
- A small screen will popup and check for any update.
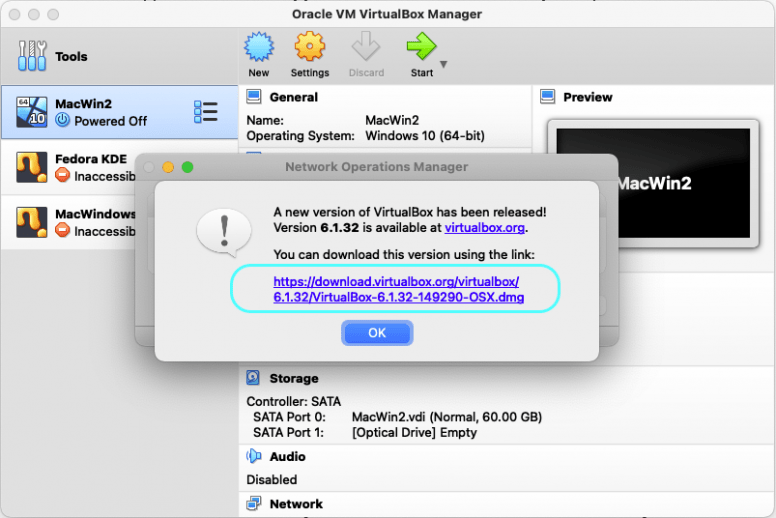
- If there is any update available, another window will popup and display the available update and the link of the dmg file.
- Download the dmg and follow the installation process.
- Once installed, perform the steps listed in Solution 4 above.
Solution 6: (Re-install VirtualBox)
If none of the above solutions are not fixing the NS_ERROR_FAILURE (0x80004005) error, then uninstall the VirtualBox and re-install it again.
Uninstalling VirtualBox
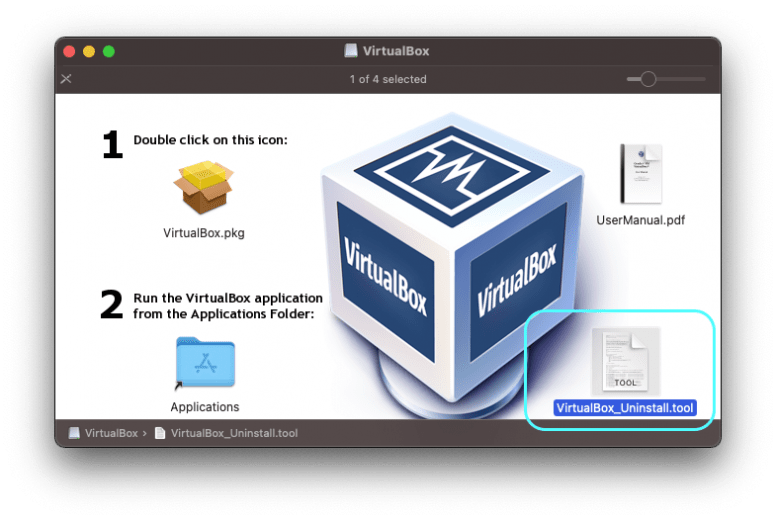
- To uninstall the VirtualBox, download the latest version from https://www.virtualbox.org/wiki/Downloads. Open the installation package. In the installation screen, you can see the uninstallation package VistualBox_Uninstall.tool at the bottom right corner.
- Right click VistualBox_Uninstall.tool and select Open with >> Terminal.
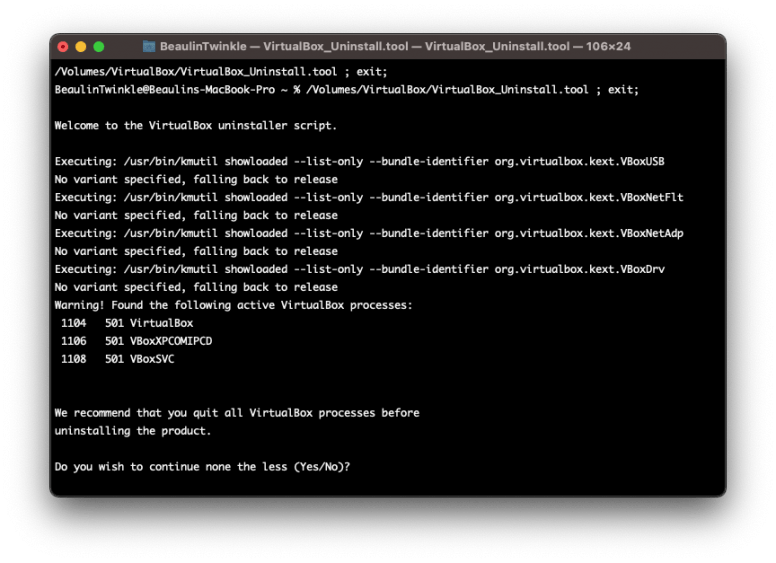
- In the terminal window, the uninstallation scripts will be opened and executed. Finally displays the list of VirtualBox programs installed in the Mac.
- Type Yes to confirm the installation process.
Clear existing permissions
- Restart the Mac in recovery mode by holding the Command and R keys together.
- Leave the keys when the apple logo appears.
- In the recovery mode, go to the Utilities menu.
- Select Terminal.
- In the terminal window, run the below command to clear all the existing permissions and then reboot the Mac.
Instal VirtualBox
Finally install the fresh copy of the VirtualBox using the dmg file downloaded earlier. After installation, if needed, perform the steps mentioned in Solution 4 and then Solution 3 above.
Reference
- Details about NS_ERROR_FAILURE error at VirtualBox.org Forums.
Related Topics
- Shrinking VirtualBox virtual machine vdi on macOS with Windows 10 guest OS.
- Increasing the disk space of Windows guest OS In VirtualBox on macOS.
I just upgraded to kernel 4.18.7 in my Arch Linux system and it broke the VirtualBox. VirtualBox has stopped working after updating the kernel. When I start a VM, I got this error:
Kernel driver not installed (rc=-1908)

The VirtualBox Linux kernel driver (vboxdrv) is either not loaded or there is a permission problem with /dev/vboxdrv. Please reinstall the kernel module by executing

'/sbin/vboxconfig'

as root.

where: suplibOsInit what: 3 VERR_VM_DRIVER_NOT_INSTALLED (-1908) - The support driver is not installed. On linux, open returned ENOENT.
And this error too:
The virtual machine 'Ubuntu 18.04 LTS Server' has terminated unexpectedly during startup with exit code 1 (0x1).
| Result Code: | NS_ERROR_FAILURE (0x80004005) |
| Component: | MachineWrap |
| Interface: | IMachine {85cd948e-a71f-4289-281e-0ca7ad48cd89} |
VirtualBox Error
Weird? I ran the command the following command as suggested in the first image to reinstall the kernel module.
$ sudo /sbin/vboxconfig
But my Arch Linux systems said there was no such command:
sudo: /sbin/vboxconfig: command not found
Then, I head over to Arch Linux forum. While looking through the forum, someone has suggested to run this command:
$ sudo modprobe vboxdrv
And.. I got this error:
modprobe: ERROR: could not insert 'vboxdrv': Exec format error
After spending few more minutes on the forum, finally I fixed this error by updating virtualbox-host-modules package.
If ever run into this error, all you have to do is update your virtualbox-host-modules package or better run a complete update.
To do so, simply run:
$ sudo pacman -Syyu
Finally, run this command to reload the kernel module:
$ sudo /sbin/rcvboxdrv setup
Unloading modules:
Loading modules: vboxnetadp vboxnetflt vboxpci vboxdrv
VirtualBox should work now.
For Ubuntu systems, refer this link:
- VirtualBox error after installing Linux Kernel 4.4.4 in Ubuntu
This guide is bit old. I can’t guarantee this guide still applies to the new kernel.
Update:
If you still get the same error, find the installed virtualbox host modules:
$ pacman -Q | grep virtual
virtualbox 5.2.18-1
virtualbox-guest-iso 5.2.18-1
virtualbox-host-modules-arch 5.2.18-8
virtualbox-sdk 5.2.18-1
And, replace virtualbox-host-modules-arch package with virtualbox-host-dkms
package like below.
$ sudo pacman -Syu
$ sudo pacman -S virtualbox-host-dkms
You will prompted to remove virtualbox-host-modules-arch package. Just type Y and hit ENTER to install virtualbox-host-dkms.
Make sure you have installed the kernel headers:
$ sudo pacman -S linux-headers
Finally, run the following commands:
$ sudo modprobe vboxdrv
$ sudo /sbin/rcvboxdrv setup
Reboot the system and now VirtualBox should work.
Related read:
- How To Fix «Kernel driver not installed (rc=-1908)» VirtualBox Error In Ubuntu
- Solve «Cannot change group vboxusers for device /dev/vboxdrv» Virtualbox Error
sk
Senthilkumar Palani (aka SK) is the Founder and Editor in chief of OSTechNix. He is a Linux/Unix enthusiast and FOSS supporter. He lives in Tamilnadu, India.
Содержание
- Причины возникновения ошибки 0x80004005 в VirtualBox
- Способ 1: Переименование внутренних файлов
- Способ 2: Включение поддержки виртуализации в BIOS
- Способ 3: Обновление VirtualBox
- Способ 4: Отключение Hyper-V
- Способ 5: Изменение типа запуска гостевой ОС
- Способ 6: Удаление/исправление обновления Windows 7
- Вопросы и ответы
При попытке запуска операционной системы Windows или Linux в виртуальной машине VirtualBox пользователь может столкнуться с ошибкой 0x80004005. Она возникает до старта ОС и препятствует любой попытке ее загрузки. Есть сразу несколько способов, помогающих устранить существующую проблему и продолжить пользоваться гостевой системой в обычном режиме.
Ситуаций, из-за которых не получается открыть сессию для виртуальной машины, может быть несколько. Зачастую данная ошибка возникает спонтанно: еще вчера вы спокойно работали в операционной системе на VirtualBox, а сегодня выполнить то же самое не удается из-за сбоя при запуске сессии. Но в некоторых случаях не удается выполнить первичный (установочный) запуск ОС.
Это может произойти вследствие одной из следующих причин:
- Ошибка при сохранении последней сессии.
- Отключенная поддержка виртуализации в BIOS.
- Некорректно работающая версия VirtualBox.
- Конфликт гипервизора (Hyper-V) с VirtualBox на 64-разрядных системах.
- Проблемное обновление хостовой Windows.
Далее мы рассмотрим, как устранить каждую из этих проблем и начать/продолжить пользоваться виртуальной машиной.
Способ 1: Переименование внутренних файлов
Сохранение сессии может завершиться ошибочно, в результате чего последующий ее запуск будет невозможен. В этом случае достаточно выполнить переименование файлов, связанных с запуском гостевой ОС.
Для выполнения дальнейших действий вам необходимо включить отображение расширений файлов. Это можно сделать через «Параметры папок» (в Windows 7) или «Параметры Проводника» (в Windows 10).
- Откройте папку, где хранится файл, отвечающий за запуск операционной системы, т.е. сам образ. Он располагается в папке VirtualBox VMs, место сохранения которой вы выбирали при установке самой VirtualBox. Обычно она находится в корне диска (диска С или диска D, если HDD разбит на 2 раздела). Также она может располагаться в персональной папке пользователя по пути:
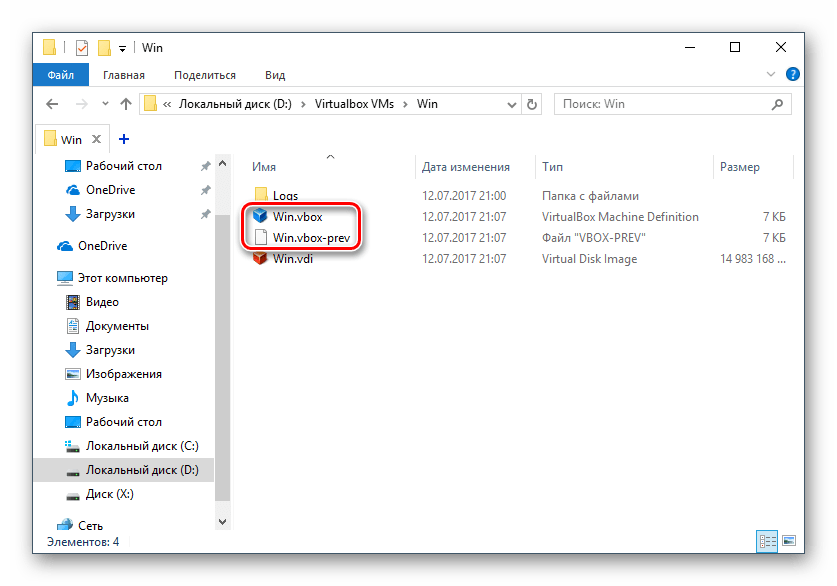
С:UsersИМЯ_ПОЛЬЗОВАТЕЛЯVirtualBox VMsИМЯ_ГОСТЕВОЙ_ОС - В папке с операционной системой, которую вы хотите запустить, должны быть следующие файлы: Name.vbox и Name.vbox-prev. Вместо Name будет имя вашей гостевой операционной системы.
Скопируйте файл Name.vbox в другое место, например, на рабочий стол.
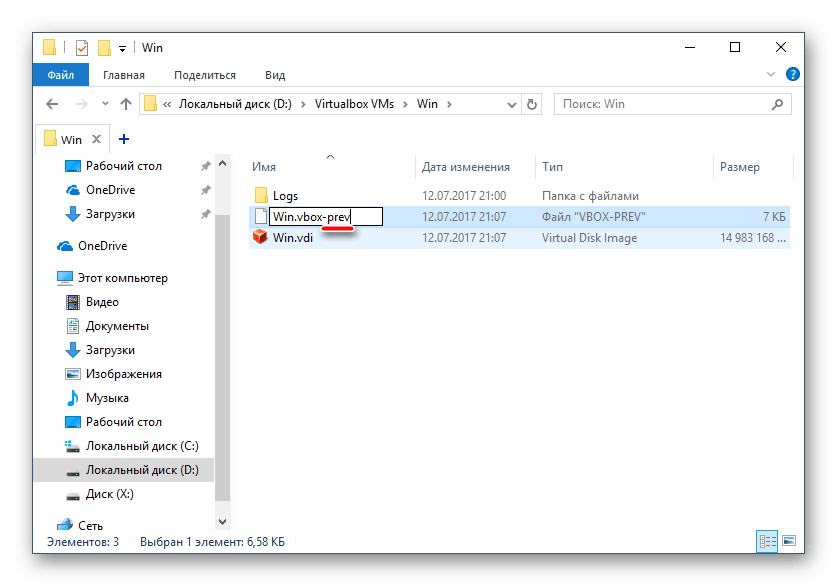
- Файл Name.vbox-prev необходимо переименовать вместо перемещенного файла Name.vbox, то есть удалить «-prev».
- Эти же действия необходимо проделать и внутри другой папки, находящейся по следующему адресу:
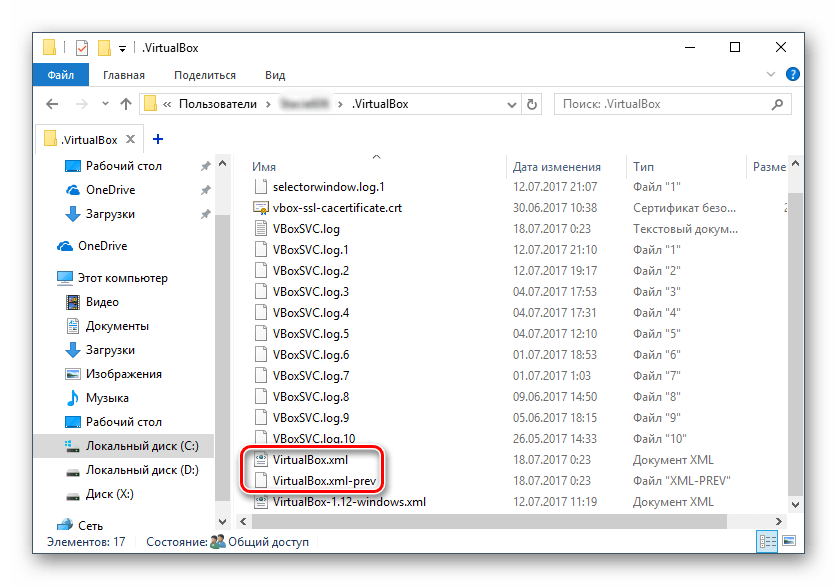
C:UsersИМЯ_ПОЛЬЗОВАТЕЛЯ.VirtualBox
Здесь вы будете менять файл VirtualBox.xml — скопируйте его в любое другое место.
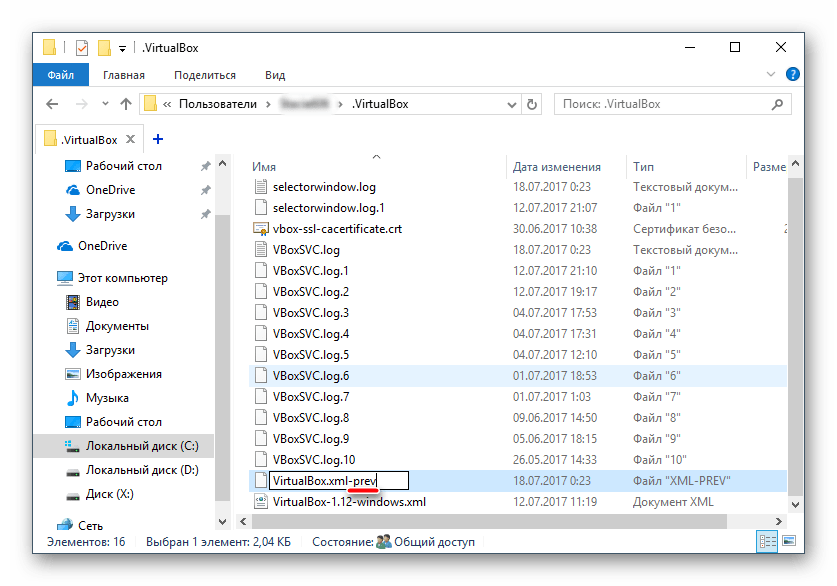
- У файла VirtualBox.xml-prev удалите приписку «–prev», чтобы получилось имя VirtualBox.xml.
- Попробуйте запустить операционную систему. Если не сработало, восстановите все назад.
Способ 2: Включение поддержки виртуализации в BIOS
Если вы решили воспользоваться ВиртуалБокс впервые, и сразу же столкнулись с вышеупомянутой ошибкой, то, возможно, загвоздка кроется в не настроенном BIOS для работы с технологией виртуализации.
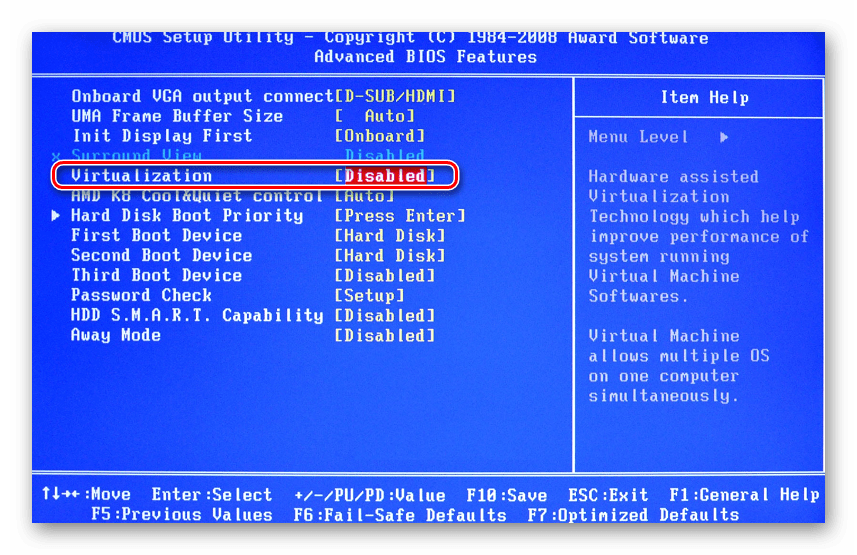
Чтобы осуществить запуск виртуальной машины, в БИОС достаточно включить всего лишь одну настройку, которая называется Intel Virtualization Technology.
- В Award BIOS путь к этой настройке следующий: Advanced BIOS Features > Virtualization Technology (или просто Virtualization) > Enabled.
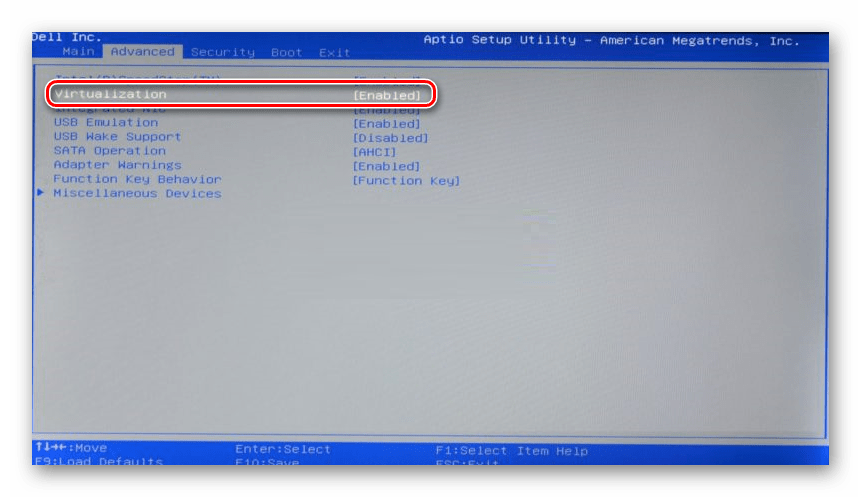
- В AMI BIOS: Advanced > Intel(R) VT for Directed I/O > Enabled.
- В ASUS UEFI: Advanced > Intel Virtualization Technology > Enabled.
Настройка может иметь и другой путь (например, в BIOS на ноутбуках HP или в БИОС Insyde H20 Setup Utility):
- System Configuration > Virtualization Technology > Enabled;
- Configuration > Intel Virtual Technology > Enabled;
- Advanced > Virtualization > Enabled.
Если вы не нашли данной настройки в своей версии BIOS, то ищите ее вручную во всех пунктах меню по ключевым словам virtualization, virtual, VT. Для включения выбирайте состояние Enabled.
Способ 3: Обновление VirtualBox
Возможно, состоялось очередное обновление программы до последней версии, после чего и появилась ошибка запуска «E_FAIL 0x80004005». Есть два выхода из сложившейся ситуации:
- Дождитесь выхода стабильной версии VirtualBox.
Те, кто не хочет заморачиваться с выбором рабочей версии программы, может просто дождаться обновления. Узнать о выходе новой версии можно на официальном сайте VirtualBox или через интерфейс программы:
- Запустите Менеджер виртуальных машин.
- Нажмите «Файл» > «Проверить обновления…».
- Дождитесь проверки и при необходимости установите обновление.
- Переустановите VirtualBox на текущую или предыдущую версию.
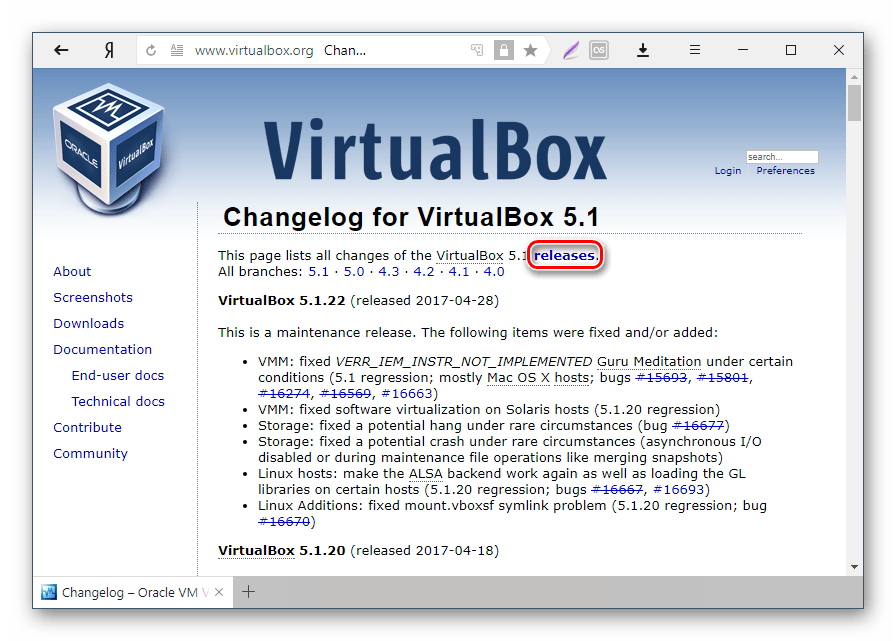
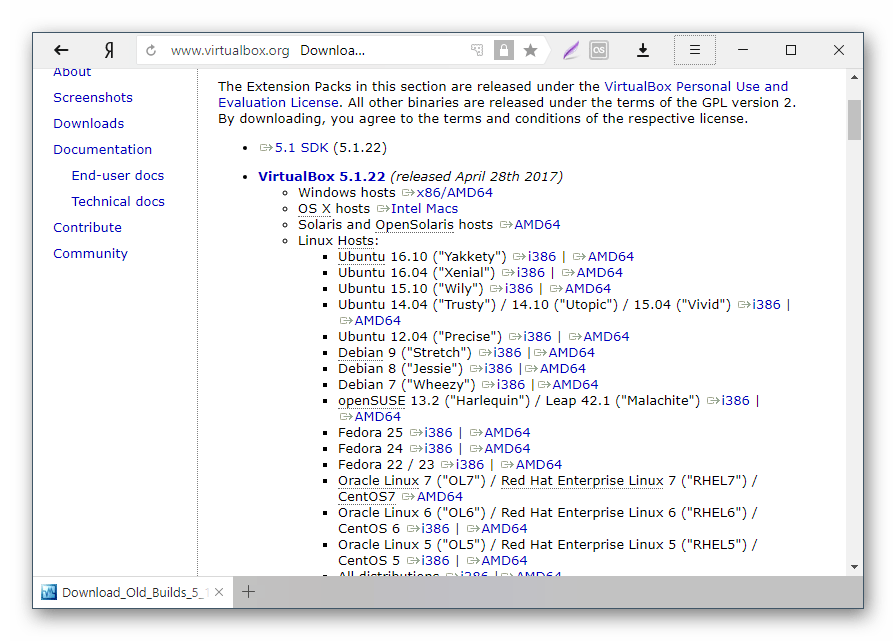
- Если у вас есть установочный файл VirtualBox, то используйте его для переустановки. Для повторного скачивания актуальной или предыдущей версии перейдите по этой ссылке.
- Нажмите на ссылку, ведущую к странице со списком всех предыдущих релизов для текущей версии VirtualBox.
- Выберите подходящую для хостовой ОС сборку и скачайте ее.
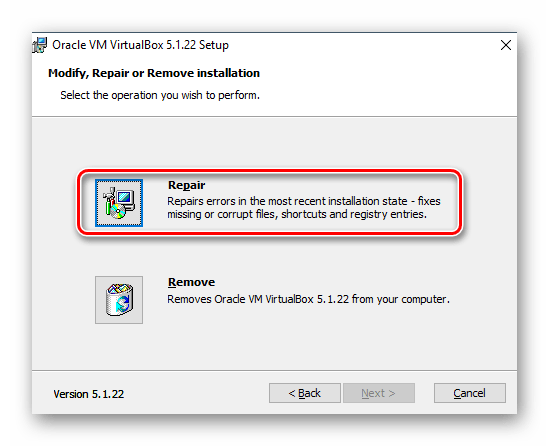
- Для переустановки установленной версии VirtualBox: запустите инсталлятор и в окне с типом установки выберите «Repair». Установите программу в обычном режиме.
- Если вы делаете откат до предыдущей версии, то лучше сперва удалить VirtualBox через «Установку и удаление программ» в Windows.
Или через установщик VirtualBox.
Не забудьте сделать резервные копии своих папок с образами ОС.
Способ 4: Отключение Hyper-V
Hyper-V — система виртуализации для 64-разрядных систем. Иногда у нее может возникнуть конфликт с VirtualBox, что и провоцирует появление ошибки при старте сессии для виртуальной машины.
Для отключения гипервизора выполните следующее:
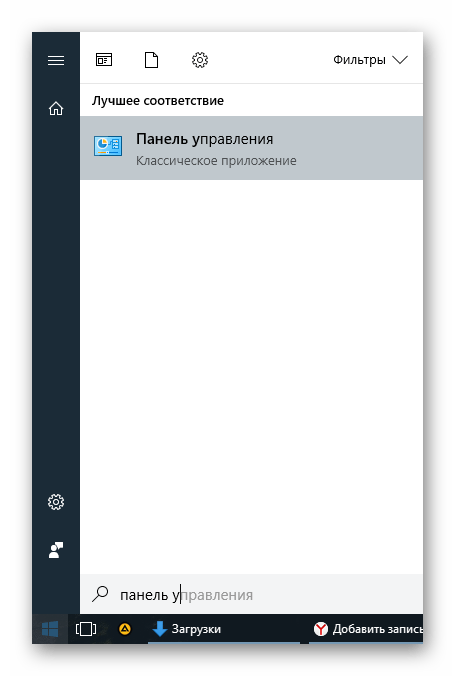
- Запустите «Панель управления».
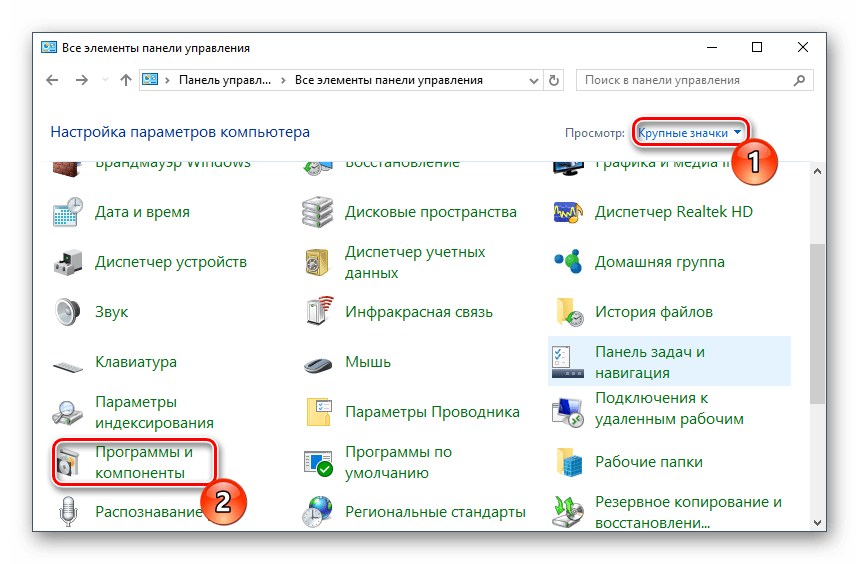
- Включите просмотр по значкам. Выберите пункт «Программы и компоненты».
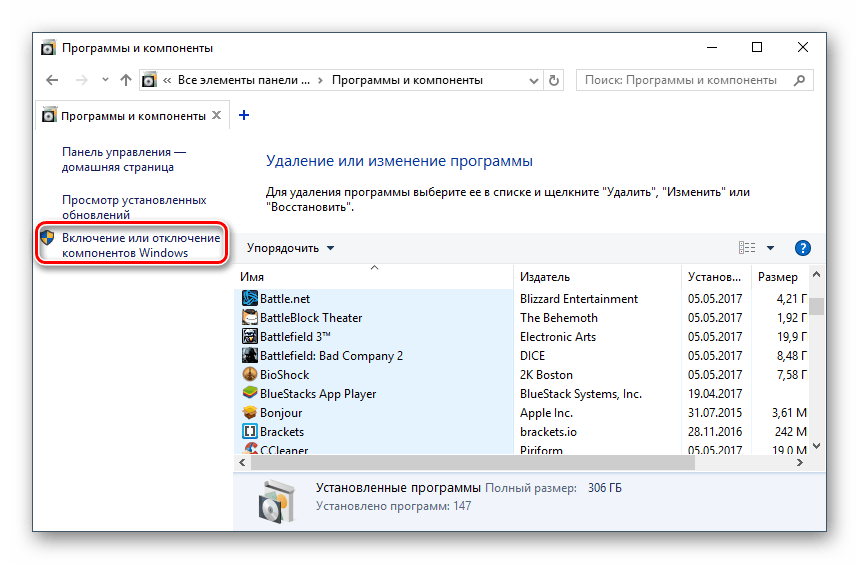
- В левой части окна нажмите на ссылку «Включение или отключение компонентов Windows».
- В открывшемся окне необходимо снять галочку с компонента Hyper-V, а затем нажать «ОК».
- Перезагрузите компьютер (необязательно) и попробуйте запустить ОС в VirtualBox.
Способ 5: Изменение типа запуска гостевой ОС
В качестве временного решения (например, до выпуска новой версии VirtualBox) можно попробовать изменить тип запуска ОС. Этот способ помогает не во всех случаях, но, возможно, сработает у вас.
- Запустите Менеджер VirtualBox.
- Нажмите по проблемной операционной системе правой кнопкой мыши, наведите курсор на пункт «Запустить» и выберите вариант «Запуск в фоновом режиме с интерфейсом».
Данная функция доступна только в VirtualBox, начиная с версии 5.0.
Способ 6: Удаление/исправление обновления Windows 7
Этот способ считается устаревшим, поскольку после неудачного патча KB3004394, приводящего к прекращению работы виртуальных машин в ВиртуалБокс, была выпущена заплатка KB3024777, устраняющая данную проблему.
Тем не менее, если у вас на компьютере по каким-то причинам отсутствует фикс-патч, а проблемный присутствует, то есть смысл либо удалить KB3004394, либо установить KB3024777.
Удаление KB3004394:
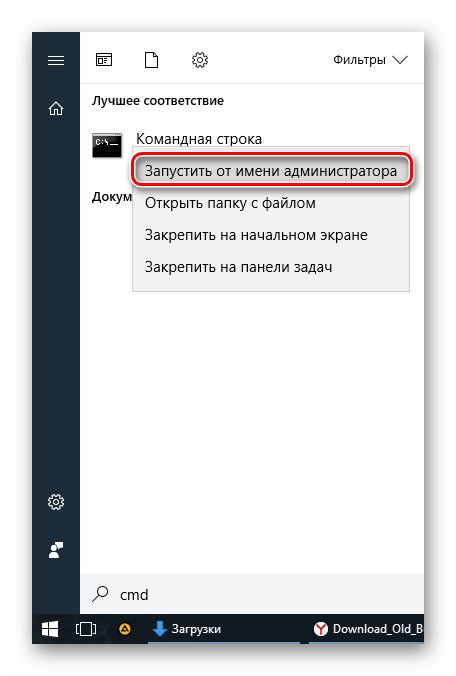
- Откройте «Командную строку» с правами администратора. Для этого откройте окно «Пуск», напишите cmd, правым кликом мыши выберите пункт «Запустить от имени администратора».
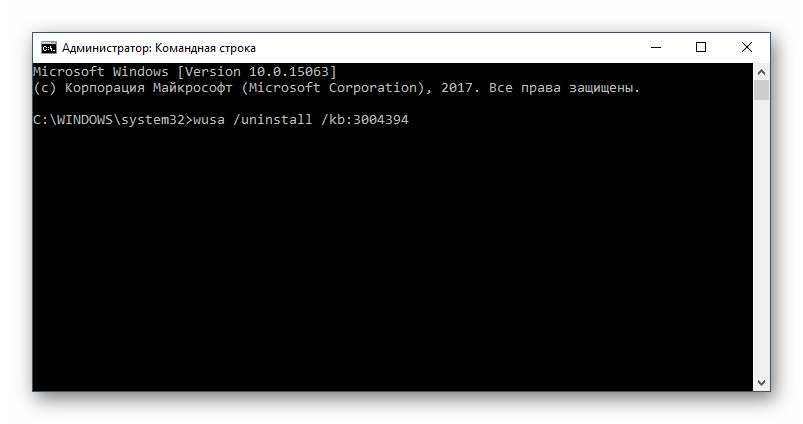
- Пропишите команду
wusa /uninstall /kb:3004394и нажмите Enter.
- После выполнения этого действия может потребоваться перезагрузка компьютера.
- Попробуйте еще раз запустить гостевую ОС в ВиртуалБоксе.
Установка KB3024777:
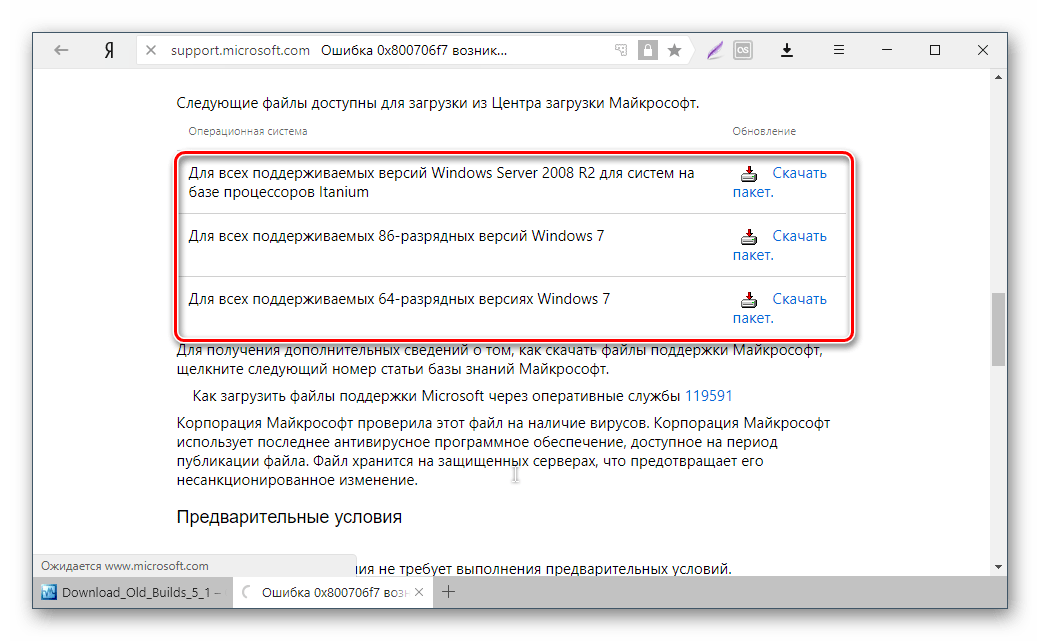
- Перейдите по этой ссылке на сайт Microsoft.
- Скачайте версию файла с учетом разрядности своей ОС.
- Установите файл вручную, если необходимо, перезагрузите ПК.
- Проверьте запуск виртуальной машины в VirtualBox.
В подавляющем большинстве случаев точное выполнение данных рекомендаций приводит к устранению ошибки 0x80004005, и пользователь может без труда начать или продолжить работать с виртуальной машиной.
Содержание
- Не удалось создать COM-объект VirtualBox. NS_ERROR_FAILURE (0x80004005)
- Устраняем ошибку 0x80004005 в VirtualBox
- Причины возникновения ошибки 0x80004005 в VirtualBox
- Способ 1: Переименование внутренних файлов
- Способ 2: Включение поддержки виртуализации в BIOS
- Способ 3: Обновление VirtualBox
- Способ 4: Отключение Hyper-V
- Способ 5: Изменение типа запуска гостевой ОС
- Способ 6: Удаление/исправление обновления Windows 7
Всем привет сегодня поговорим о ошибке 0x80004005 Linux которая в основном связана с VirtualBox. У этой ошибки есть различные причины так что разберём несколько из них.
Ошибка: Linux код ошибки 0x80004005 virtualbox
Решение:
- Отключите машину и в свойствах отключите подмонтированный привод
- Удалите полностью VirtualBox и установите заново
- Попробуйте скопировать старые конфигурации VirtualBox
- Попробуй заново создать виртуальную машину
- Иногда помогает удаление /home/maksim/.VirtualBox/VirtualBox.xml
- При загрузке Ubuntu, есть экран с выбором «Обычная загрузка», «Загрузка консоли» и «Memory Test».
- Запускаем в режиме Memory Test и ждем окончания проверки.
- Полностью обновите систему.
- Создайте заново виртуальную машину выберите старый жесткий диск, потом запустите sudo /etc/init.d/vboxdrv setup
Ошибка: Не удалось открыть файл VMDK имеется несоответствие между таблицами VERR_VD_VMDK_INVALID_HEADER (0x80004005)
Решение:
- Загрузите комплект VDD с VMWare выполните следующую команду: vmware-vdiskmanager -R
- В главном окне Oracle VM VirtualBox Manager выберите виртуальную машину, которая не запускается. Нажмите на снимки в правом верхнем углу.
- Выберите предпоследнию запись. Щелкните правой кнопкой мыши по нему и выберите «Восстановить»
Ошибка: VT-x отключен в BIOS для всех режимов процессора VERR_VMX_MSR_ALL_VMX_DISABLED (0x80004005)
Решение: Включите в биосе поддержку vt-x
Ошибка: Не удалось открыть сессию для виртуальной машины WInXP NS_ERROR_FAILURE (0x80004005)
Решение:
Установите все репаки
- Сommunity/virtualbox 4.1.8-1
- Powerful x86 virtualization for enterprise as well home use community/virtualbox-additions 4.1.8-1
- The official all-in-one VirtualBox Guest Additions ISO/CD image local/virtualbox-ext-oracle 4.1.8-1
- Oracle VM VirtualBox Extension Pack community/virtualbox-modules 4.1.8-1
- Kernel modules for VirtualBox community/virtualbox-source 4.1.8-1
- VirtualBox kernel modules source
- Выполните команду modprobe vboxdrv
Ошибка: Виртуальная машина неожиданно прервалась во время запуска NS_ERROR_FAILURE (0x80004005)
Решение: Попробуйте обновить пакет virtualbox-host-modules или лучше запустить полное обновление.
- Для этого просто запустите: $ sudo pacman -Syu
- Перезагружаем модуль ядра: $ sudo / sbin / rcvboxdrv setup
- Загрузка модулей: vboxnetadp vboxnetflt vboxpci vboxdrv
Если не помогло то найдите установленные модули хоста virtualbox:
virtual virtualbox 5.2.18-1
И замените пакет virtualbox-host-modules-arch на пакет virtualbox-host-dkms как показано ниже.
$ sudo pacman -Syu
$ sudo pacman -S virtualbox-host-dkms
Вам будет предложено удалить пакет virtualbox-host-modules-arch . Просто введите Y и нажмите ENTER, чтобы установить virtualbox-host-dkms
Убедитесь, что вы установили заголовки ядра:
$ sudo pacman -S linux-заголовки
Наконец, выполните следующие команды:
$ sudo modprobe vboxdrv
$ sudo / sbin / rcvboxdrv setup
Перезагрузите систему, и теперь VirtualBox должен работать.
Еще один вариант убеждаемся что virtualbox-dkms был установлен выполнив команду:
dpkg -l | grep virtualbox-dkms
Потом очищаем и переустанавливаем dkms:
apt-get purge virtualbox-dkms &
& sudo apt-get install dkms
Далее делаем перестройку ядра:
Ну и последний вариант переходим в папку
/.config/VirtualBox ищем файл VirtualBox.xml-prev и переименовываем его в VirtualBox.xml
Ошибка: The installer failed with exit code 254 Используйте —help для вывода списка доступных параметров..
Решение: обновлением VirtualBox до актуальной версии: командой
VBoxManage extpack install —replace Oracle_VM_VirtualBox_Extension_Pack- .vbox-extpack
На этом все надеюсь данные советы вам помогут. В комментариях пишите свое мнение о этой ошибке и как вы ее побороли будет интересно почитать.
Источник
Устраняем ошибку 0x80004005 в VirtualBox
При попытке запуска операционной системы Windows или Linux в виртуальной машине VirtualBox пользователь может столкнуться с ошибкой 0x80004005. Она возникает до старта ОС и препятствует любой попытке ее загрузки. Есть сразу несколько способов, помогающих устранить существующую проблему и продолжить пользоваться гостевой системой в обычном режиме.
Причины возникновения ошибки 0x80004005 в VirtualBox
Ситуаций, из-за которых не получается открыть сессию для виртуальной машины, может быть несколько. Зачастую данная ошибка возникает спонтанно: еще вчера вы спокойно работали в операционной системе на VirtualBox, а сегодня выполнить то же самое не удается из-за сбоя при запуске сессии. Но в некоторых случаях не удается выполнить первичный (установочный) запуск ОС.
Это может произойти вследствие одной из следующих причин:
- Ошибка при сохранении последней сессии.
- Отключенная поддержка виртуализации в BIOS.
- Некорректно работающая версия VirtualBox.
- Конфликт гипервизора (Hyper-V) с VirtualBox на 64-разрядных системах.
- Проблемное обновление хостовой Windows.
Далее мы рассмотрим, как устранить каждую из этих проблем и начать/продолжить пользоваться виртуальной машиной.
Способ 1: Переименование внутренних файлов
Сохранение сессии может завершиться ошибочно, в результате чего последующий ее запуск будет невозможен. В этом случае достаточно выполнить переименование файлов, связанных с запуском гостевой ОС.
Для выполнения дальнейших действий вам необходимо включить отображение расширений файлов. Это можно сделать через «Параметры папок» (в Windows 7) или «Параметры Проводника» (в Windows 10).
- Откройте папку, где хранится файл, отвечающий за запуск операционной системы, т.е. сам образ. Он располагается в папке VirtualBox VMs, место сохранения которой вы выбирали при установке самой VirtualBox. Обычно она находится в корне диска (диска С или диска D, если HDD разбит на 2 раздела). Также она может располагаться в персональной папке пользователя по пути:
С:UsersИМЯ_ПОЛЬЗОВАТЕЛЯVirtualBox VMsИМЯ_ГОСТЕВОЙ_ОС
В папке с операционной системой, которую вы хотите запустить, должны быть следующие файлы: Name.vbox и Name.vbox-prev. Вместо Name будет имя вашей гостевой операционной системы.
Скопируйте файл Name.vbox в другое место, например, на рабочий стол.
C:UsersИМЯ_ПОЛЬЗОВАТЕЛЯ.VirtualBox
Здесь вы будете менять файл VirtualBox.xml — скопируйте его в любое другое место.
Способ 2: Включение поддержки виртуализации в BIOS
Если вы решили воспользоваться ВиртуалБокс впервые, и сразу же столкнулись с вышеупомянутой ошибкой, то, возможно, загвоздка кроется в не настроенном BIOS для работы с технологией виртуализации.
Чтобы осуществить запуск виртуальной машины, в БИОС достаточно включить всего лишь одну настройку, которая называется Intel Virtualization Technology.
- В Award BIOS путь к этой настройке следующий: Advanced BIOS Features >Virtualization Technology (или просто Virtualization) >Enabled.
В AMI BIOS: Advanced >Intel(R) VT for Directed I/O >Enabled.
В ASUS UEFI: Advanced >Intel Virtualization Technology >Enabled.
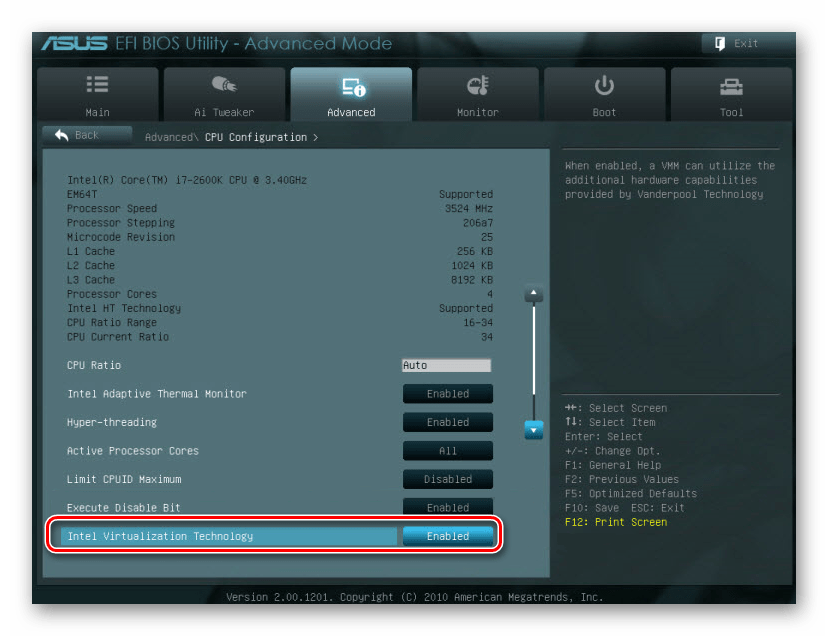
Настройка может иметь и другой путь (например, в BIOS на ноутбуках HP или в БИОС Insyde H20 Setup Utility):
- System Configuration >Virtualization Technology >Enabled;
- Configuration >Intel Virtual Technology >Enabled;
- Advanced >Virtualization >Enabled.
Если вы не нашли данной настройки в своей версии BIOS, то ищите ее вручную во всех пунктах меню по ключевым словам virtualization, virtual, VT. Для включения выбирайте состояние Enabled.
Способ 3: Обновление VirtualBox
Возможно, состоялось очередное обновление программы до последней версии, после чего и появилась ошибка запуска «E_FAIL 0x80004005». Есть два выхода из сложившейся ситуации:
- Дождитесь выхода стабильной версии VirtualBox.
Те, кто не хочет заморачиваться с выбором рабочей версии программы, может просто дождаться обновления. Узнать о выходе новой версии можно на официальном сайте VirtualBox или через интерфейс программы:
- Запустите Менеджер виртуальных машин.
- Нажмите «Файл» >«Проверить обновления…».
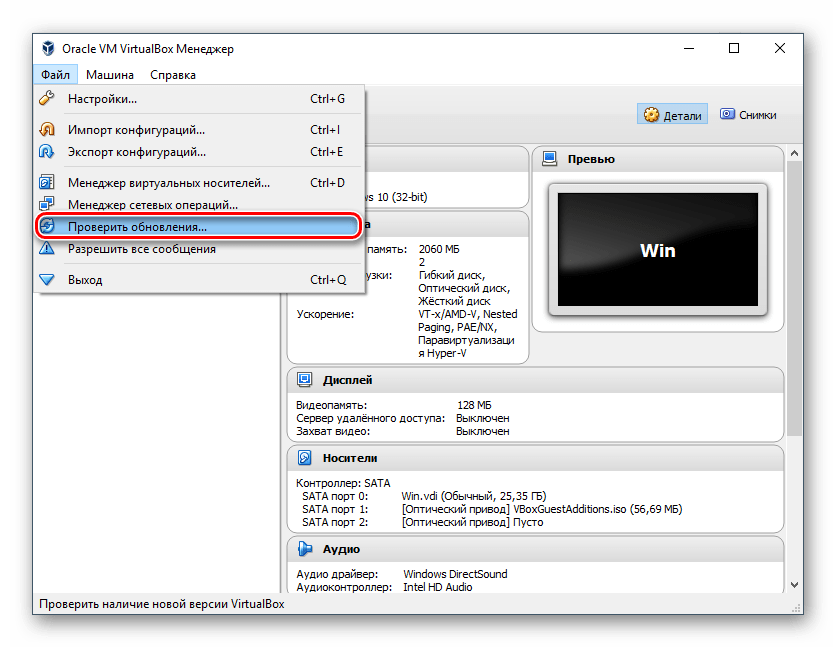
- Если у вас есть установочный файл VirtualBox, то используйте его для переустановки. Для повторного скачивания актуальной или предыдущей версии перейдите по этой ссылке.
- Нажмите на ссылку, ведущую к странице со списком всех предыдущих релизов для текущей версии VirtualBox.
Выберите подходящую для хостовой ОС сборку и скачайте ее.
Для переустановки установленной версии VirtualBox: запустите инсталлятор и в окне с типом установки выберите «Repair». Установите программу в обычном режиме.
Если вы делаете откат до предыдущей версии, то лучше сперва удалить VirtualBox через «Установку и удаление программ» в Windows.Или через установщик VirtualBox.
Не забудьте сделать резервные копии своих папок с образами ОС.
Способ 4: Отключение Hyper-V
Hyper-V — система виртуализации для 64-разрядных систем. Иногда у нее может возникнуть конфликт с VirtualBox, что и провоцирует появление ошибки при старте сессии для виртуальной машины.
Для отключения гипервизора выполните следующее:
- Запустите «Панель управления».
- Включите просмотр по значкам. Выберите пункт «Программы и компоненты».
В левой части окна нажмите на ссылку «Включение или отключение компонентов Windows».
В открывшемся окне необходимо снять галочку с компонента Hyper-V, а затем нажать «ОК».
Способ 5: Изменение типа запуска гостевой ОС
В качестве временного решения (например, до выпуска новой версии VirtualBox) можно попробовать изменить тип запуска ОС. Этот способ помогает не во всех случаях, но, возможно, сработает у вас.
- Запустите Менеджер VirtualBox.
- Нажмите по проблемной операционной системе правой кнопкой мыши, наведите курсор на пункт «Запустить» и выберите вариант «Запуск в фоновом режиме с интерфейсом».

Данная функция доступна только в VirtualBox, начиная с версии 5.0.
Способ 6: Удаление/исправление обновления Windows 7
Этот способ считается устаревшим, поскольку после неудачного патча KB3004394, приводящего к прекращению работы виртуальных машин в ВиртуалБокс, была выпущена заплатка KB3024777, устраняющая данную проблему.
Тем не менее, если у вас на компьютере по каким-то причинам отсутствует фикс-патч, а проблемный присутствует, то есть смысл либо удалить KB3004394, либо установить KB3024777.
- Откройте «Командную строку» с правами администратора. Для этого откройте окно «Пуск», напишите cmd, правым кликом мыши выберите пункт «Запустить от имени администратора».
Пропишите команду
wusa /uninstall /kb:3004394
и нажмите Enter.
- Перейдите по этой ссылке на сайт Microsoft.
- Скачайте версию файла с учетом разрядности своей ОС.
В подавляющем большинстве случаев точное выполнение данных рекомендаций приводит к устранению ошибки 0x80004005, и пользователь может без труда начать или продолжить работать с виртуальной машиной.
Источник
[Solved] VBoxManage: error: Details: code NS_ERROR_FAILURE (0x80004005), component MachineWrap, interface IMachine
Issue
When starting up Virtual Box VMs using vagrant in mac, it throws the following errors.
VBoxManage: error: Details: code NS_ERROR_FAILURE (0x80004005), component MachineWrap, interface IMachineVBoxManage: error: Failed to create the host-only adapterIn this blog, we have given a step-by-step guide to solve this issue.
Solution For VBoxManage: error: Details: code
This component MachineWrap interface IMachine issue happens when there is insufficient permission for the Virtual box to start up the VM in mac.
Follow the steps given below to resolve this issue.
Step 1: Open MAC system preferences
Step 2: Select the security and privacy option.
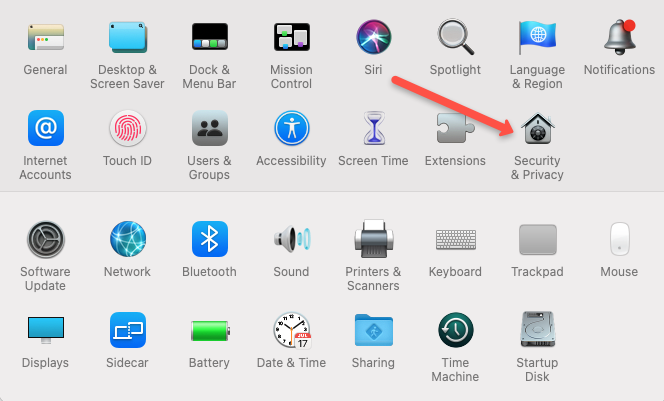
Step 3: Select the General tab and enable the lock icon to make changes. Then there will be an option to enable system extensions. Instead of the restart, you will see another option. Once you click that, you will see Oracle on the list. Enable that in the checkbox. It will ask for a system restart and restart the system.
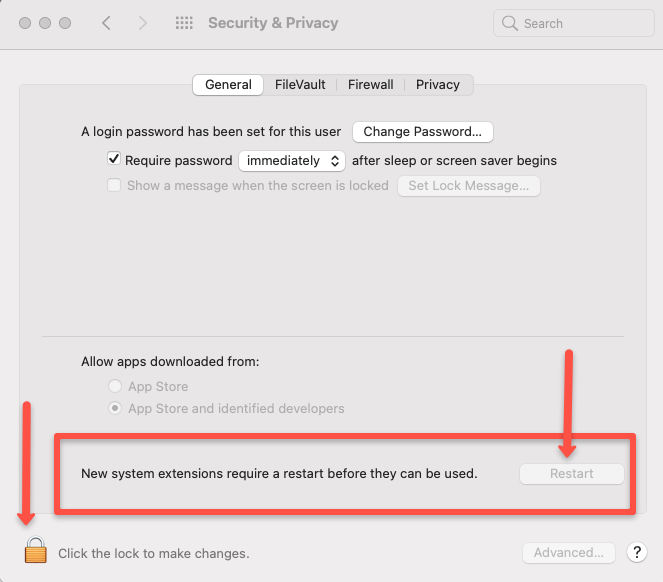
Now if you try to bring up the VM, you won’t see the component MachineWrap, interface machine issue.
VBoxManage: error: Failed to create the host-only adapter
“Failed to create the host-only adapter” is also related to MAC security. You need to allow the changes in the security setting as explained in step 3 of the before section.
Mac OS Issue: error: VBoxNetAdpCtl: Error while adding new interface
There is also an issue with the new MAC OS Monterey version. Which is fixed in the latest Virtual box build. So you need to remove the existing version of Virtualbox and reinstall the latest build to get rid of this issue.
There was an error while executing `VBoxManage`, a CLI used by Vagrant
for controlling VirtualBox. The command and stderr is shown below.

Command: ["hostonlyif", "create"]

Stderr: 0%...
Progress state: NS_ERROR_FAILURE
VBoxManage: error: Failed to create the host-only adapter
VBoxManage: error: VBoxNetAdpCtl: Error while adding new interface: failed to open /dev/vboxnetctl: No such file or directory
VBoxManage: error: Details: code NS_ERROR_FAILURE (0x80004005), component HostNetworkInterfaceWrap, interface IHostNetworkInterface
VBoxManage: error: Context: "RTEXITCODE handleCreate(HandlerArg *)" at line 95 of file VBoxManageHostonly.cpp
Let me know if it fixes your virtual box error.
Error Creating Network
With OS Monterey update you could get errors with networks if you try to create an IP other than the 198 range.
To rectify this issue, open the networks file.
sudo vi /etc/vbox/networks.confAdd the following to the file.
* 0.0.0.0/0 ::/0It should solve the network create error.

