A new Windows 10 Pro 1803 computer could not establish a connection through a Server 2016 machine running Remote Desktop Gateway. The Win10 machine showed this error:

Update November 27, 2021 Had an almost identical error with a new laptop running Windows 10 21H!. The message was slightly different:

Also in 2021 (and maybe in 2018), on the client, in the Microsoft-Windows-TerminalServices-RDPClient/Operational event log, there is EventID 1026, “RDP ClientActiveX has been disconnected (Reason= 50331656)”.
In both cases, the server’s Security event log had a 4625 Audit Failure event with Status 0xC000035B:
Log Name:      Security
Source:        Microsoft-Windows-Security-Auditing
Date:          12/14/2018 1:49:08 PM
Event ID:      4625
Task Category: Logon
Level:         Information
Keywords:      Audit Failure
User:          N/A
Computer:      MyServer.mydomain.local
Description:
An account failed to log on.

Subject:
	Security ID:		NULL SID
	Account Name:		-
	Account Domain:		-
	Logon ID:		0x0

Logon Type:			3

Account For Which Logon Failed:
	Security ID:		NULL SID
	Account Name:		User1
	Account Domain:		mydomain

Failure Information:
	Failure Reason:		An Error occured during Logon.
	Status:			0xC000035B
	Sub Status:		0x0

Process Information:
	Caller Process ID:	0x0
	Caller Process Name:	-

Network Information:
	Workstation Name:	WIN10PRO-LAPTOP
	Source Network Address:	xxx.xxx.xxx.xxx
	Source Port:		60469

Detailed Authentication Information:
	Logon Process:
	Authentication Package:	NTLM
	Transited Services:	-
	Package Name (NTLM only):	-
	Key Length:		0
Note that that there are no events in the server’s
KB2903333 identifies this as a channel binding issue because the client is forcing NTLMv1. It recommends setting the LmCompatibilityLevel registry value to 3 or higher. (The article incorrectly refers to the LmCompatibility registry value. The correct name is LmCompatibilityLevel.)
I was skeptical of this as the cause because another off-site computer has LmCompatibilityLevel of 0 and connects through the same gateway without issues.
LmCompatibilityLevel can also be set in Local Security Policy by changing the Network security; LAN Manager authentication level:

I changed that to Send NTLMv2 response only:

This changed the registry value HKLMSYSTEMCurrentControlSetControlLsaLmCompatibilityLevel to 3:

Once I’d made that change (no reboot required), I was able to log on from this computer through the gateway to an office computer.
What is still unclear is why this setting is only required on some client computers. However, considering how much time I’ve spent spinning my wheels on this issue, I think I’ll just set up a group policy to set Send NTLMv2 response only on all machines in the network:
Computer Configuration > Policies > Windows Setting . Security Settings > Local Policies > Security Options > Network security; LAN Manager authentication level – Send NTLMv2 response only

Server Side
KB2903333 mentions that the other option is to set this registry value to 0:
HKLMSoftwareMicrosoftWindows NTCurrentVersionTerminalServerGatewayConfigCoreEnforceChannelBinding
That would disable the Channel Binding requirement, which seems like it’s not a good idea. My server does not have that registry value, so it’s using the default of EnforceChannelBinding turned on.
- Remove From My Forums
-
Question
-
We’re getting these random errors on our ADFS security logs, how can I track down what is generating them?
An account failed to log on.

Subject:
	Security ID:		NULL SID
	Account Name:		-
	Account Domain:		-
	Logon ID:		0x0

Logon Type:			3

Account For Which Logon Failed:
	Security ID:		NULL SID
	Account Name:
	Account Domain:

Failure Information:
	Failure Reason:		An Error occured during Logon.
	Status:			0xC000035B
	Sub Status:		0x0

Process Information:
	Caller Process ID:	0x0
	Caller Process Name:	-

Network Information:
	Workstation Name:	-
	Source Network Address:	-
	Source Port:		-

Detailed Authentication Information:
	Logon Process:		Kerberos
	Authentication Package:	Kerberos
	Transited Services:	-
	Package Name (NTLM only):	-
	Key Length:		0

This event is generated when a logon request fails. It is generated on the computer where access was attempted.

The Subject fields indicate the account on the local system which requested the logon. This is most commonly a service such as the Server service, or a local process such as Winlogon.exe or Services.exe.

The Logon Type field indicates the kind of logon that was requested. The most common types are 2 (interactive) and 3 (network).

The Process Information fields indicate which account and process on the system requested the logon.

The Network Information fields indicate where a remote logon request originated. Workstation name is not always available and may be left blank in some cases.

The authentication information fields provide detailed information about this specific logon request.
	- Transited services indicate which intermediate services have participated in this logon request.
	- Package name indicates which sub-protocol was used among the NTLM protocols.
	- Key length indicates the length of the generated session key. This will be 0 if no session key was requested.
Answers
-
-
Marked as answer by
Tuesday, January 3, 2017 9:41 PM
-
Marked as answer by
- Remove From My Forums
-
Question
-
I’ve been trying to setup an ADFS SQL farm. I’ve been running into an issue when trying to authenticate a use using Windows Integrate Authentication. I get it in all the browsers that I’ve tried (IE, Firefox, Chrome). What’s happening is that the HTTP challenge
box keeps popping up. I put in valid credentials (I’ve entered them in in various forms, UPN, domainusername, etc.), but the system never accepts them and keeps challenging until I cancel or I get a 401. When I look into the logs I see the following:An account failed to log on. Subject: Security ID: NULL SID Account Name: - Account Domain: - Logon ID: 0x0 Logon Type: 3 Account For Which Logon Failed: Security ID: NULL SID Account Name: portaluser1 Account Domain: vo Failure Information: Failure Reason: An Error occured during Logon. Status: 0xc000035b Sub Status: 0x0 Process Information: Caller Process ID: 0x0 Caller Process Name: - Network Information: Workstation Name: CROBISON-PC Source Network Address: - Source Port: - Detailed Authentication Information: Logon Process: Authentication Package: NTLM Transited Services: - Package Name (NTLM only): - Key Length: 0
During the setup of the ADFS SQL farm, I got a warning about the service principle name being already taken by some other AD object. Upon further investigation, that error is appearing because the setup is trying to assign an SPN to a domain user that is
already assigned to the machine in the AD. So, I found ADFS docs that show how to manually assign an SPN to a service account. Still no go.So here is a run down on how ADFS is being accessed. We have a reverse proxy that all web traffic is going through. The ADFS server farm (a farm of one server) is behind this reverse proxy. I’ve tried assigning SPNs to the service account that ADFS is running
under that reflect external and internal DNS names. Can anyone shed some light on this? Windows integrated auth works great when I setup a stand-alone server and don’t have to do all the service account stuff.
Answers
-
Hallis:
I have a web application running on Azure, the ADFS server is published to the internet using TMG.
When accessing the application from my internal network everything works as expected. I see from the logs that the user is loggen on using Kerberos. This works for both domain joined computers and others.But, when accessing the application from outside my internal network I get the same behaviour as you described.
The only difference in these scenarios is the reverse proxy. When it fails NTLM is used, when it works Kerberos is used. Maybe ADFS does not support NTLM?
pagefaulted:
I’m having the same issue except replace a reverse proxy with a F5 Bigip. Anyone out there have any solutions or at least explain why it is failing?
Hi all,
I’ve encountered the same issue a few of you mentioned above, when using a reverse proxy. In my case, the solution was to turn off Extended Protection (see
Configure Extended Protection in IIS 7.5 orWindows Extended Protection) on the LS folder, or to configure it to match your use scenario and not perform channel-binding token (CBT) checking.
To turn Extended Protection off, on the AD FS server, launch IIS Manager, then, on the left side tree view, access
Sites -> Default Web Site -> adfs -> ls. Once you’ve selected the “/adfs/ls” folder, double-click the
Authentication icon, then right-click Windows Authentication and select
Advanced Settings… On the Advanced Settings dialog, choose Off for
Extended Protection.HTH,
-Ran
-
Proposed as answer by
Monday, November 8, 2010 10:26 PM
-
Marked as answer by
cdrobison
Thursday, June 2, 2011 4:37 PM
-
Proposed as answer by
Exchange Server Support for Windows Extended Protection
Overview
Windows Extended Protection enhances the existing authentication in Windows Server and mitigates authentication relay or «man in the middle» (MitM) attacks. This mitigation is accomplished by using security information that is implemented through Channel-binding information specified through a Channel Binding Token (CBT) which is primarily used for SSL connections.
Windows Extended Protection is supported on Exchange Server 2013, 2016 and 2019 starting with the August 2022 Exchange Server Security Update (SU) releases.
While Extended Protection can be enabled on each virtual directory manually, we have provided a script that can help you accomplish this in bulk. Windows Extended Protection is supported on Exchange Server 2013, 2016 and 2019 starting with the August 2022 Exchange Server Security Update (SU) releases.
Terminology used in this document
Virtual Directory, or vDir, is used by Exchange Server to allow access to web applications such as Exchange ActiveSync, Outlook on the Web, and the Autodiscover service. Several virtual directory settings can be configured by an admin, including authentication, security, and reporting settings. Extended Protection is one such authentication setting.
The Extended Protection setting controls the behavior for checking of CBTs. Possible values for this setting are listed in the following table:
| Extended Protection Setting | Description |
|---|---|
| None | Specifies that IIS will not perform CBT checking. |
| Allow | Specifies that CBT checking is enabled, but not required. This setting allows secure communication with clients that support extended protection, and still supports clients that are not capable of using extended protection. |
| Require | This value specifies that CBT checking is required. This setting blocks clients that do not support extended protection. |
SSL Flags: Configuration of SSL settings is required to ensure that clients connect to IIS virtual directories in a specific way with client certificates. To enable Extended Protection, the required SSL flags are SSL and SSL128.
SSL offloading terminates the connection on a device between the client and the Exchange Server and then uses a non-encrypted connection to connect to the Exchange Server.
Example:
flowchart LR
    A[Client] ==>|HTTPS| B
    B["Device (e.g., Load Balancer) terminates the connection"] ==>|HTTP| C["Web Server"]
SSL bridging is a process where a device, usually located at the edge of a network, decrypts SSL traffic, and then re-encrypts it before sending it on to the Web server.
Example:
flowchart LR
    A[Client] ==>|HTTPS| B
    B["Device (e.g., Load Balancer) terminates the connection"] ==>|HTTPS| C["Web Server"]
Modern Hybrid or Hybrid Agent is a mode of configuring Exchange Hybrid that removes some of the configuration requirements for Classic Hybrid (like Inbound network connections through your firewall) to enable Exchange hybrid features. You can learn more about this here.
Public Folders are designed for shared access and to help make content in a deep hierarchy easier to browse. You can learn more about Public Folders here.
Prerequisites for enabling Extended Protection on Exchange servers
Make sure you are on the correct versions
Extended Protection is supported on Exchange Server 2013 CU23 and Exchange Server 2016 CU22 and Exchange Server 2019 CU11 or later with the August 2022 Security Updates installed.
If your organization has Exchange Server 2016 or Exchange Server 2019 installed, it must be running either the September 2021 Quarterly Exchange Updates (CU) with the August 2022 Security Update (SU) or later installed or the 2022 H1 Cumulative Update (CU) with the August 2022 Security Update (SU) or later installed.
If your organization has Exchange Server 2013 installed, it must be running CU23 with the August 2022 SU (or later) installed.
You must ensure all your Exchange servers are on the required CU and have the August 2022 SU (or later) before you proceed further.
Extended Protection cannot be enabled on Exchange Server 2013 servers with Public Folders in a coexistence environment
To enable Extended Protection on Exchange Server 2013, ensure you do not have any Public Folders on Exchange Server 2013. If you have coexistence of Exchange Server 2013 with Exchange Server 2016 or Exchange Server 2019, you must migrate your Public Folders to 2016 or 2019 before enabling Extended Protection. After enabling Extended Protection, if there are Public Folders on Exchange 2013, they will no longer appear to end users.
Extended Protection cannot be enabled on Exchange Server 2016 CU22 or Exchange Server 2019 CU11 or older that hosts a Public Folder Hierarchy
If you have an environment containing Exchange Server 2016 CU22 or Exchange Server 2019 CU11 or older and are utilizing Public Folders, before enabling extended protection you must confirm the version of the server hosting the Public Folder hierarchy. Ensure the server hosting the Public Folder hierarchy is upgraded to Exchange Server 2016 CU23 or Exchange Server 2019 CU12 with the latest Security Updates or move the hierarchy to one with these latest versions and updates.
The following table should help clarify:
| Exchange version | CU installed | SU installed | Hosts PF mailboxes | Is EP supported? |
|---|---|---|---|---|
| Exchange 2013 | CU23 | Aug 2022 (or higher) | No | Yes |
| Exchange 2016 | CU22 | Aug 2022 (or higher) | No hierarchy mailboxes | Yes |
| Exchange 2016 | CU23+ (2022 H1) | Aug 2022 (or higher) | Any | Yes |
| Exchange 2019 | CU11 | Aug 2022 (or higher) | No hierarchy mailboxes | Yes |
| Exchange 2019 | CU12+ (2022 H1) | Aug 2022 (or higher) | Any | Yes |
| Any other version | Any other CU | Any other SU | Any | No |
Extended Protection does not work with hybrid servers using Modern Hybrid configuration
Extended Protection cannot be enabled on Hybrid Servers which uses Modern Hybrid configuration. In Modern Hybrid configuration, Hybrid Server are published to Exchange Online via Hybrid Agent which proxies the Exchange Online call to Exchange Server.
Enabling Extended Protection on Hybrid servers using Modern Hybrid configuration will lead to disruption of hybrid features like mailbox migrations and Free/Busy. Hence, it is important to identify all the Hybrid Servers in the organization published via Hybrid Agent and not enable Extended Protection specifically on these servers.
Identifying hybrid Exchange servers published using Hybrid Agent
Note: This step is not required if you are using classic Hybrid configuration.
In case you don’t have a list of servers published via Hybrid Agent, you can use the following steps to identify them:
- Log into a machine where the Hybrid Agent is installed and running. Open the PowerShell module of the Hybrid Agent and run Get-HybridApplication to identify the TargetUri used by the Hybrid Agent.
- The TargetUri parameter gives you the FQDN of the Exchange Server that is configured to use Hybrid Agent.
- Deduce the Exchange Server identity using the FQDN and make a note of this Exchange Server.
- If you are using a Load Balancer URL in TargetUri, you need to identify all the Exchange servers running the Client Access role behind the load balancer URL.
Extended Protection should not be enabled for hybrid servers that are published using Hybrid Agent. You need to identify these hybrid servers and ensure you skip enabling Extended Protection on them using the SkipExchangeServerNames parameter of the script.
Steps to safeguard hybrid servers using Modern Hybrid
- Inbound connections to Exchange servers in a Modern Hybrid configuration should be restricted via firewall to allow connections only from Hybrid Agent machines.
- No mailboxes should be hosted on the hybrid server, and if any mailbox exists, they should be migrated to other mailbox servers.
- You can enable Extended Protection on all virtual directories except Front End EWS on the hybrid Exchange server.
Note: Specifically skipping extended protection on Front End EWS of Exchange Server is not supported via script. So, you would need to change this setting manually.
NTLMv1 is not supported when Extended Protection is enabled
Note: To increase security, we recommend that you review and configure this setting regardless of whether you experience problems or not.
NTLMv1 is weak and doesn’t provide protection against man-in-the-middle (MitM) attacks. It should be considered as vulnerable and so, no longer be used. Therefore NTLMv1 should not be used together with Extended Protection. Additionally, if you enforce a client to use NTLMv1 instead of NTLMv2 and you have Extended Protection enabled on your Exchange server, this will lead to password prompts on the client side without a way to authenticate successfully against Exchange.
If you experience password prompts on your clients once Extended Protection is enabled, you should check the following registry key and value on client and Exchange server side:
Registry key: HKEY_LOCAL_MACHINESystemCurrentControlSetControlLsa
Registry value: LmCompatibilityLevel
It must be set to at least 3 or higher (best practice is to set it to 5 which is: Send NTLMv2 response only. Refuse LM & NTLM). It’s also possible to delete this value to enforce the system default. If it’s not set, we treat it as if it is set to 3 (on Windows Server 2008 R2 and later) which is: Send NTLMv2 response only.
If you want to manage the setting centrally, you can do so via Group Policy:
Policy location: Computer ConfigurationWindows SettingsSecurity SettingsLocal PoliciesSecurity Options
More information: Network security: LAN Manager authentication level
SSL Offloading scenarios are not supported
Extended Protection is not supported in environments that use SSL offloading. SSL termination during SSL offloading causes Extended Protection to fail. To enable Extended Protection in your Exchange environment, you must not be using SSL offloading with your Load Balancers.
SSL Bridging supported scenarios
Extended Protection is supported in environments that use SSL Bridging under certain conditions. To enable Extended Protection in your Exchange environment using SSL Bridging, you must use the same SSL certificate on Exchange and your Load Balancers. If not this will cause Extended Protection to fail.
TLS configuration must be consistent across all Exchange servers
Before enabling Extended Protection, you must ensure that all TLS configurations are consistent across all Exchange servers. For example, if one of the servers uses TLS 1.2, you must ensure that all the servers in the organization are configured using TLS 1.2. Any variation in TLS version use across servers can cause client connections to fail.
In addition to this, the value of SchUseStrongCrypto registry value must be set to 1 across all the Exchange Servers in the organization.
If this value is not explicitly set to 1, the default value of this key may be interpreted as 0 or 1 depending on the .NET version in use by the Exchange binaries.
The same applies to the SystemDefaultTlsVersions registry value which must also be explicitly set to 1. If they aren’t set as expected, this can cause TLS mismatch and so, leading to client connectivity issues.
Please refer to this guide to configure the required TLS settings on your Exchange servers.
Third-party software compatibility
Please ensure to test all third-party products in your Exchange Server environment to ensure that they work properly when Extended Protection is enabled. For example we have seen AntiVirus solutions send connections through a proxy in order to protect the client machine, this would prevent communication to the Exchange Server and would need to be disabled.
Enabling Extended Protection
Extended Protection can be enabled manually through IIS Manager or via a script (strongly recommended). To correctly configure Extended Protection, each virtual directory on all Exchange servers in the organization (excluding Edge Transport servers) should be set to prescribed value of Extended Protection as well as sslFlags. The following table summarizes the settings needed for each virtual directory on the supported versions of Microsoft Exchange.
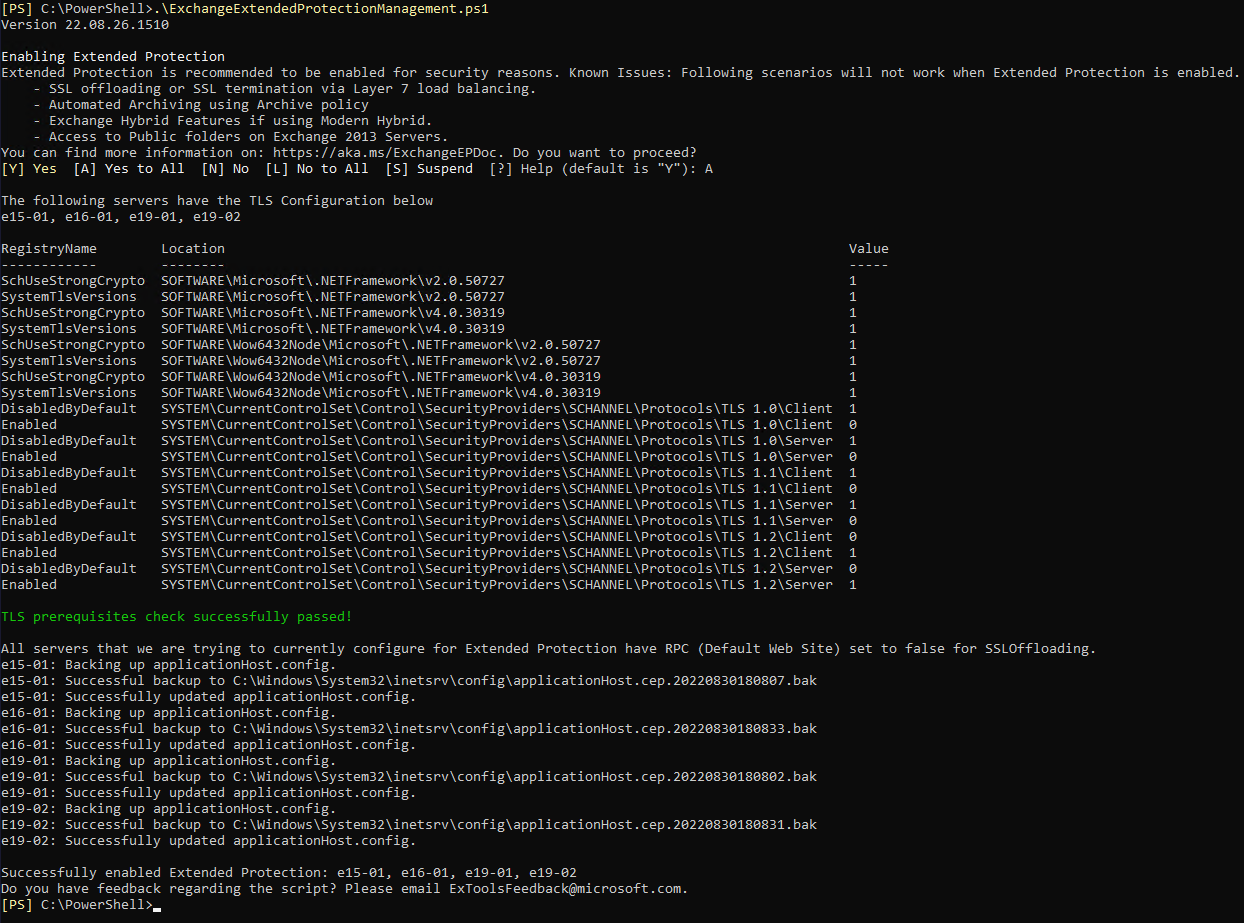
Enabling Extended Protection involves making many changes on all Exchange servers, so we strongly recommend using the ExchangeExtendedProtectionManagement.ps1 script that can be downloaded from https://aka.ms/ExchangeEPScript.
| IIS Website | Virtual Directory | Recommended Extended Protection | Recommended sslFlags |
|---|---|---|---|
| Default Website | API | Required | Ssl,Ssl128 |
| Default Website | AutoDiscover | Off | Ssl,Ssl128 |
| Default Website | ECP | Required | Ssl,Ssl128 |
| Default Website | EWS | Accept (UI) /Allow (Script) | Ssl,Ssl128 |
| Default Website | MAPI | Required | Ssl,Ssl128 |
| Default Website | Microsoft-Server-ActiveSync | Accept (UI) /Allow (Script) | Ssl,Ssl128 |
| Default Website | OAB | Required | Ssl,Ssl128 |
| Default Website | OWA | Required | Ssl,Ssl128 |
| Default Website | PowerShell | Required | SslNegotiateCert |
| Default Website | RPC | Required | Ssl,Ssl128 |
| Exchange Backend | API | Required | Ssl,Ssl128 |
| Exchange Backend | AutoDiscover | Off | Ssl,Ssl128 |
| Exchange Backend | ECP | Required | Ssl,Ssl128 |
| Exchange Backend | EWS | Required | Ssl,Ssl128 |
| Exchange Backend | Microsoft-Server-ActiveSync | Required | Ssl,Ssl128 |
| Exchange Backend | OAB | Required | Ssl,Ssl128 |
| Exchange Backend | OWA | Required | Ssl,Ssl128 |
| Exchange Backend | PowerShell | Required | Ssl,SslNegotiateCert,Ssl128 |
| Exchange Backend | RPC | Required | Ssl,Ssl128 |
| Exchange Backend | PushNotifications | Required | Ssl,Ssl128 |
| Exchange Backend | RPCWithCert | Required | Ssl,Ssl128 |
| Exchange Backend | MAPI/emsmdb | Required | Ssl,Ssl128 |
| Exchange Backend | MAPI/nspi | Required | Ssl,Ssl128 |
SSL offloading for Outlook Anywhere is enabled by default and must be disabled for extended protection by following the steps shown here.
Enabling Extended Protection using the script
Before enabling Extended Protection in your Exchange environment, ensure you meet all the prerequisites listed in this document.
To enable Extended Protection on all your Exchange Servers, you can use the ExchangeExtendedProtectionManagement.ps1 script, which is hosted on the Microsoft Exchange-CSS repository on GitHub.
It’s not required to run the script directly on any specific Exchange Server in your environment. Just copy it to a machine that has the Exchange Management Shell (EMS) installed.
Note: Over time, we will be updating the script and documentation. The script will attempt to auto-update when it is run. If the computer where the script is run is not connected to the Internet, this update check will fail. You should always check for the latest version of the script before running it.
Parameters
If the script is executed without any parameters, it will enable Extended Protection on any Exchange Server that can be reached from the machine where the script was run. You can use the following parameters to specify the scope of script operations:
| Parameter | Usage |
|---|---|
| ExchangeServerNames | Used to specify which Exchange servers should be included in the scope of script execution. It can be either a single Exchange server hostname or a comma separated list of hostnames. Parameter values: Exchange Server Hostname (NetBIOS or FQDN) |
| SkipExchangeServerNames | Used to specify which Exchange servers should be excluded from the scope of script execution. It can be either a single Exchange Server hostname or a comma separated list of hostnames. Parameter values: Exchange Server Hostname (NetBIOS or FQDN) |
| RollbackType | Used to revert changes made by the Extended Protection script. Parameter Values: «RestoreIISAppConfig, RestrictTypeEWSBackend»« |
| ShowExtendedProtection | Used to display the current Extended Protection configuration state in your organization or on a specific computer (use the ExchangeServerNames or SkipExchangeServerNames parameter to show the configuration for a subset of Exchange servers). |
| RestrictType | Used to restrict incoming IP connections on specified vDir Parameter Value: EWSBackend: This parameter should be used to restrict incoming IP connections to a specified allow list of IP addresses or Subnets. This will also turn off EP on EWSBackend. Note: This parameter should only be used if automated archiving via retention tags is enabled in the Exchange environment. |
| IPRangeFilePath | This is a mandatory parameter which must be used to provide an allow list of IP ranges when RestrictType parameter is used. The filepath provides should be of a .TXT file with IP addresses or subnets. |
| ValidateType | Used to cross check allow list of IP addresses on vDir against IPList file provided in IPRangeFilePath. Parameter Value: RestrictTypeEWSBackend: should be used to cross check allow list of IP addresses on EWS Backend vDir against IPList file provided in IPRangeFilePath. |
| FindExchangeServerIPAddresses | Used to create list of IPv4 and IPv6 addresses of all Exchange Servers in the organization. |
Enabling Extended Protection on all Exchange servers
After copying the script to a suitable machine, create a directory to store the script and move the script there. Then open the Exchange Management Shell (EMS) and go to the respective directory where the script is stored.
Make sure that the account you are using is a member of the Organization Management role group.
Execute the script as follows:
.ExchangeExtendedProtectionManagement.ps1
In case that you have Modern Hybrid configuration, you need to skip Exchange servers published using the Hybrid Agent. This can be done by using the SkipExchangeServerNames parameter:
.ExchangeExtendedProtectionManagement.ps1 -SkipExchangeServerNames HybridServer1, HybridServer2
The script will check to ensure that all Exchange servers in scope have the minimum CU and SU required to enable Extended Protection.
The script will also check if all Exchange servers in scope have the same TLS configuration. An inconsistent (or invalid) TLS configuration will cause client connections or connections to Exchange Online to fail.
After the prerequisites checks have been passed, the script will enable Extended Protection and add the required SSL flags on all virtual directories of all Exchange servers in scope.
Scenario 2: Using Retention Policies for automated archiving of mailboxes
If you are using a Retention Policy containing Retention Tags which perform Move to Archive actions, you should use the script as follows:
.ExchangeExtendedProtectionManagement.ps1 -RestrictType EWSBackend -IPRangeFilePath "IPList.txt"
Executing the script this way, configures extended protection on all vDirs like scenario 1 barring Exchange Back End/EWS vDir, where it sets the Extended Protection setting to OFF. The Extended Protection setting is required to be turned OFF to ensure automated archiving works without any hinderance.
As turning OFF Extended Protection settings in Backend EWS vDir is not recommended, this command mitigates the risk by limiting the incoming connections to Backend EWS vDir. The script does this by installing an IIS module called IP Address and Domain Restriction and adding allow rules for IP addresses of Exchange Servers. It then adds a deny rule for any incoming connections which is not present in the list.
While using this command customers must provide the list of IPv4 addresses (and IPv6 if used) of all Exchange Servers in the organization.
This list of addresses should be provided in a TXT file in this way:
  10.68.12.48

  2001:4898:5808:14:3938:7838:67ab:cdf4

  10.128.4.204

  10.231.234.140/20
File should contain only IP addresses or IP subnets of Exchange servers separated by newline character. For customers who have more than 100 servers, it is recommended to use IP subnets instead of IP addresses, so that the list is short and efficient.
To help get all the IP addresses of all Exchange Servers in the organization, customers can use the following command.
.ExchangeExtendedProtectionManagement.ps1 -FindExchangeServerIPAddresses
The above command will generate a file IPList.txt in the directory where script is stored.
Important Note: Customers with many Exchange Servers are expected to modify this list and use IP subnets to reduce the number of allow rules to be added.
Scenario 3: Using Modern Hybrid Configuration or Hybrid Agent
In case you have Modern Hybrid configuration, you need to skip Exchange servers published using the Hybrid Agent. This can be done by using the SkipExchangeServerNames parameter:
.ExchangeExtendedProtectionManagement.ps1 -SkipExchangeServerNames HybridServer1, HybridServer2
Or
.ExchangeExtendedProtectionManagement.ps1 -RestrictType EWSBackend -IPRangeFilePath "IPList.txt" -SkipExchangeServerNames HybridServer1, HybridServer2
Troubleshooting warnings and errors during script execution
- Script gives a cursory warning of known issues before enabling Extended Protection
To prevent a scenario where existing Exchange functions are disrupted due to enabling Extended Protection, the script provides a list of scenarios that have known issues. You should read and evaluate this list carefully before enabling Extended Protection.
You can proceed to turn on Extended Protection by pressing Y.

- Script does not enable Extended Protection because of Failed Prerequisite Check
- No Exchange server runs an Extended Protection supported build:
If no Exchange server in the organization is running a CU that supports Extended Protection, the script will not enable Extended Protection on unsupported servers thereby ensuring server-to-server communication does not fail.
To resolve this, upgrade all servers to the latest CU and SU and re-run the script to enable Extended Protection. - TLS mismatch
A valid and consistent TLS configuration is required on all Exchange servers in scope. If the TLS settings on all servers in scope are not the same, enabling Extended Protection will disrupt client connections to mailbox servers.
To resolve this, configure the TLS settings on all servers in the organization to be the same and then re-run the script. You can find an overview of the Exchange Server TLS configuration best practices here. - Some Exchange servers are not reachable
Cause
The script performs multiple tests against all Exchange servers in scope. If one or more of these servers aren’t reachable, the script will exclude them and not configure Extended Protection on them.
If the server is offline, you should enable Extended Protection on it once it is back online. If the server was unreachable for other reasons, you should run the script directly on the servers to enable Extended Protection.


Rolling back Extended Protection settings
You can also use the script to roll back the Extended Protection settings and any IP restriction rules added via script from one or more servers. When Extended Protection settings are modified by the script, an applicationHost.cep.*.bak file is created on each server, which contains a backup of pre-existing settings before the script is run. Those files are going to be local to each individual server that the script modifies. Therefore, the rollback of Extended Protection settings can be rolled back from any machine where the script will run using the earliest version of the .bak file to roll back the changes.
The following command initiates a full rollback of Extended Protection settings and IP restriction rules on any Exchange server where it was enabled using the script:
.ExchangeExtendedProtectionManagement.ps1 –RollbackType RestoreIISAppConfig
Rolling back IP Restriction settings
You can use the script to only roll back Allow and Deny rules set in Backend EWS vDir’s IP Address and Domain Restriction module in the following way.
.ExchangeExtendedProtectionManagement.ps1 -RollbackType RestrictTypeEWSBackend
Note: To safeguard Backend EWS vDir against NTLM relay, executing above command will set Extended Protection setting back to Required. If automated archiving is enabled, executing this command can cause automated archiving to stop working till the time Allow and Deny rules are not added back using the following command.
.ExchangeExtendedProtectionManagement.ps1 -RestrictType EWSBackend -IPRangeFilePath «IPList.txt»
.ExchangeExtendedProtectionManagement.ps1 –RollbackType "RestoreIISAppConfig"
Enabling Extended Protection manually via IIS settings
If you want to enable Extended Protection in your environment manually without using the script, you can use the following steps.
Note: When manually enabling Extended Protection, ensure that all virtual directories on the Exchange servers have Extended Protected configured according to the table above.
Set Extended Protection to either Required or Accept for an Exchange Virtual Directory
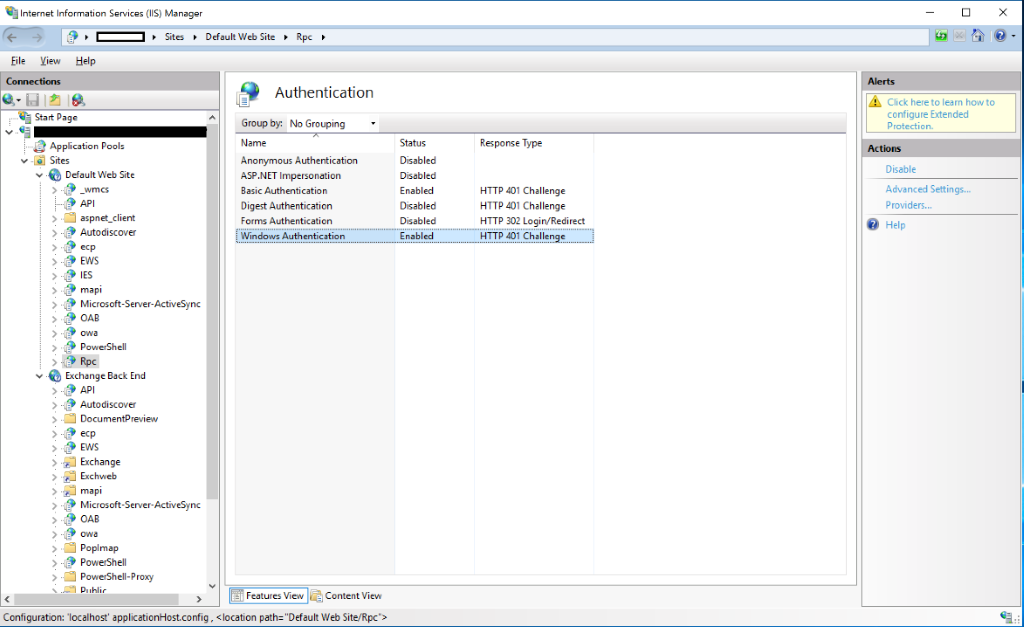
- Launch IIS Manager on the Exchange server where you want to configure Extended Protection.
- Go to Sites and select either the Default Web Site or Exchange Back End.
- Select the Virtual Directory for which you want to change.
- Go to Authentication.
- If Windows Authentication is enabled, then select Windows Authentication.
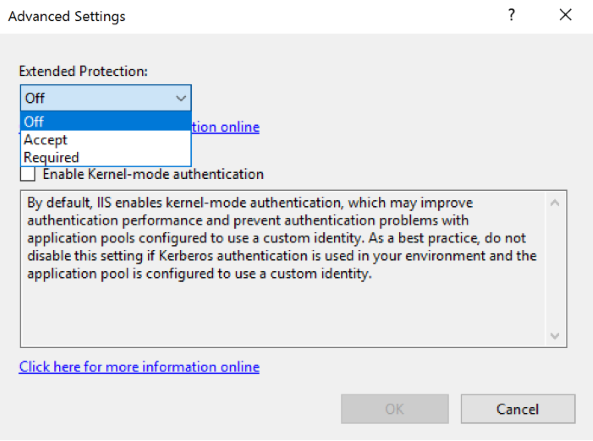
- Select Advanced Settings (on the right side) and in Advanced Settings window, select the suitable value from the Extended Protection Dropdown.
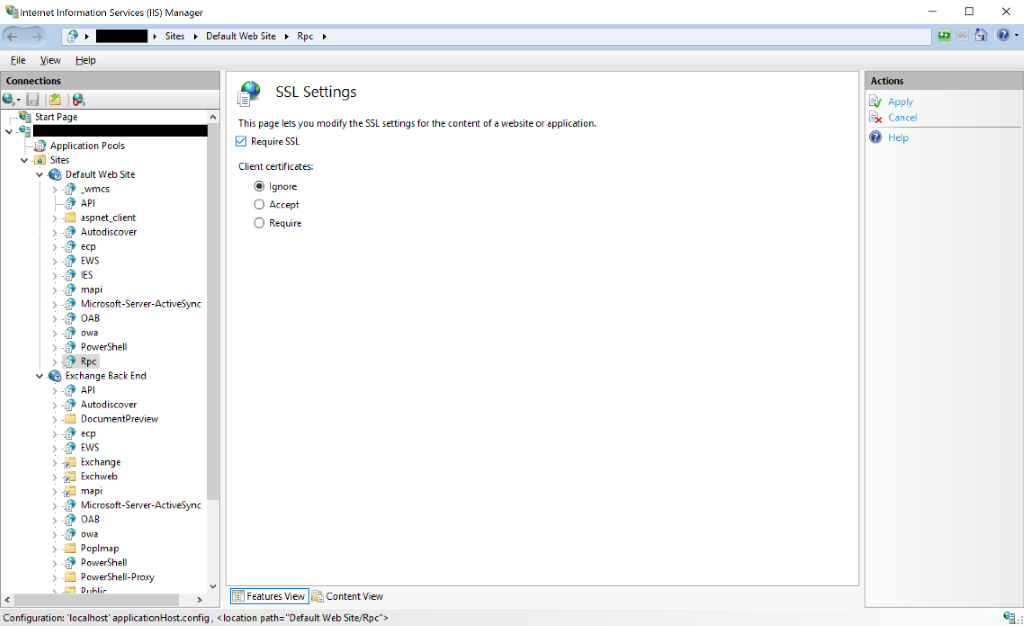
Set Require SSL settings to either Required or Accept for an Exchange Virtual Directory
- Go to the Virtual Directory’s home page.
- Go to SSL Settings.
- Check the Require SSL checkbox to make sure that Require SSL is enabled for this Virtual Directory.
- Click Apply.

Known issues and workarounds
-
Customers using a Retention Policy containing Retention Tags which perform Move to Archive can now configure Extended Protection with this update. We are actively working on a permanent solution to resolve this issue. Once we ship the solution you will be required to run this script again and rollback the changes.
-
In Exchange Server 2013, 2016 and 2019 the following probes will show FAILED status after running the script which switches on Extended Protection with required SSL flags on various vDirs as per recommended guidelines:
- OutlookMapiHttpCtpProbe
- OutlookRpcCtpProbe
- OutlookRpcDeepTestProbe
- OutlookRpcSelfTestProbe
- ComplianceOutlookLogonToArchiveMapiHttpCtpProbe
- ComplianceOutlookLogonToArchiveRpcCtpProbe
You will also notice that some Health Mailbox logins fail with event ID: 4625 and failure reason «An Error occurred during Logon» and status 0xC000035B which is related to the failed probes. Get-ServerHealth command will also show RPC and Mapi monitors as Unhealthy.
Impact of these failures: Due to this probe failure, the Mapi and Rpc App pools will get restarted once. There should be no other impact.
You can also turn off any of the above probes temporarily (till the fix is provided) by going through steps mentioned in Configure managed availability overrides | Microsoft Docs.
Fixed: This issue has been addressed with the October 2022 (and later) Exchange Server Security Updates.
Troubleshooting issues after enabling Extended Protection
Users cannot access their mailbox through one or more clients
There may be multiple reasons why some or all clients may start giving authentication errors to users after enabling Extended Protection. If this happens, check the following:
- If the TLS configuration across the Exchange organization is not the same (e.g., the TLS configuration was changed on one of the Exchange servers after Extended Protection was enabled), this may cause client connections to fail. To resolve this, refer to earlier instructions to configure the same TLS version across all Exchange servers and then use the script to configure Extended Protection again.
- Check if SSL offload is enabled. Any SSL termination causes the Extended Protection to fail for client connections. Usually if this is the case, users will be able to access their mailbox using Outlook on the Web but Outlook for Windows, Mac or mobile will fail.
To resolve this issue, disable SSL offloading and then use the script to configure Extended Protection. - Users can access their emails using Outlook for Windows and Outlook on the Web, but not through non-Windows clients like Outlook for Mac, Outlook on iOS, the iOS native email app, etc. This can happen if the Extended Protection setting for EWS and/or Exchange ActiveSync is set to Required on one or all Front-End servers.
To resolve this issue, either run the ExchangeExtendedProtectionManagement.ps1 script with the –ExchangeServerNames parameter and pass the name of the Exchange server which has the problem. You can also run the script without any parameter and configure Extended Protection for all servers.
.ExchangeExtendedProtectionManagement.ps1
or
.ExchangeExtendedProtectionManagement.ps1 -ExchangeServerNames Server1, Server2
Alternatively, you can also use INetMgr.exe and change the Extended Protection setting for those virtual Directories to the «Accept» value. However, we recommend using the script as it checks for the correct values and automatically performs a reconfiguration if the values are not set as expected.
- If after doing the above, some clients are still not working properly, you can rollback Extended Protection temporarily and report the issue to us. If script was used to configure Extended Protection, you can use the -RollbackType «RestoreIISAppConfig» parameter to revert any changes. If Extended Protection was enabled manually (through IIS Manager) you need to revert the settings manually.
Hybrid Free/Busy or mailbox migration is not working
If you are using Modern Hybrid or the Hybrid Agent enabling Extended Protection will cause Hybrid features like Free/Busy and mailbox migration to stop working. To resolve this issue, identify the hybrid servers that are published using Hybrid Agent and disable Extended Protection on the Front-End EWS endpoints for these servers.
Public Folders are not accessible
There are two issues that currently impact Public Folders Connectivity:
Exchange 2013
If Public Folders exist on Exchange 2013 servers and Extended Protection is enabled, they will no longer appear and end users will be unable to access them. To resolve the issue in a coexistence environment, migrate all Public Folders to Exchange Server 2016 or Exchange Server 2019. If you have an environment containing only Exchange 2013 servers with Public Folders, you can manually remove the SSL flag from the Backend RPC virtual directory to make Public Folders accessible.
Exchange Server 2016 CU22 / Exchange Server 2019 CU11 or Older
If you have an environment containing Exchange Server 2016 CU22 or Exchange Server 2019 CU11 or older and are utilizing Public Folders, before enabling extended protection you must confirm the version of the server hosting the Public Folder hierarchy. Ensure the server hosting the Public Folder hierarchy is upgraded to Exchange Server 2016 CU23 or Exchange Server 2019 CU12 with the latest Security Updates or move the hierarchy to one with these latest versions and updates.
FAQs
Q: Is it required to install the August 2022 Security Update (SU) if it was already installed on the previous Cumulative Update (CU)?
A: Yes, it’s required to install the August 2022 SU again if you update to a newer CU build (e.g., Exchange Server 2019 CU11 —> Exchange Server 2019 CU12).
Please remember:
If you plan to do the update immediately (means CU + SU installation) Extended Protection does not need to be switched off.
If you plan to stay on the CU without installing the SU immediately, you must disable Extended Protection (find the required steps above) as the CU without the SU being installed doesn’t support Extended Protection and therefore, you’ll experience client connectivity issues.
Q: Is it safe to enable Windows Extended Protection on an environment that uses Active Directory Federation Services (ADFS) for OWA?
A: Yes, ADFS is not impacted by this change.
Q: Is it safe to enable Windows Extended Protection on an environment that uses Hybrid Modern Auth (HMA)?
A: Yes, HMA is not impacted by this change. While EP does not further enhance HMA, windows auth may still be used for applications that do not support Hybrid Modern Auth. Considering this, the enablement of Extended Protection would be recommended in any environment eligible that still has Exchange on-premises services.
Q: Does Extended Protection Impact Hybrid Modern Auth or Teams Integration?
A: Extended Protection will not influence Teams Integration or Hybrid Modern Auth.
Q: While we understand that preventing MitM attacks is important, can we have our own devices in the middle with our own certificates?
A: If the device uses the same certificate as the Exchange Server, they can be used.
Last update:
January 13, 2023
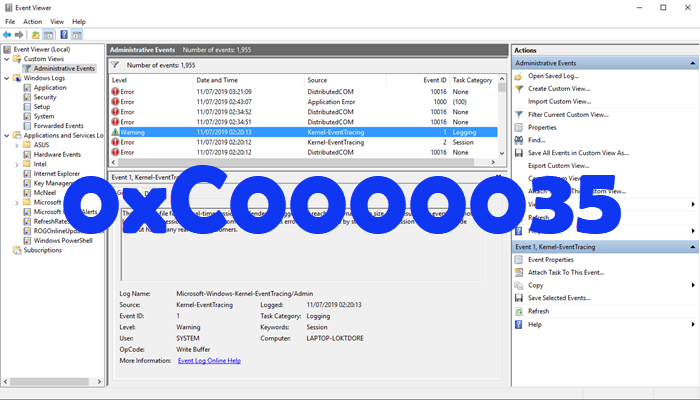
По правде говоря, ошибку 0xC0000035 может увидеть у себя в средстве просмотра событий любой пользователь. Она означает, что системе не удалось запустить определенную службу. Бывает довольно много ее разновидностей, в том числе связанных с Circular Kernel Context Logger, Kernel EventTracing, STATUS_OBJECT_NAME_COLLISION и другими. Однако самая распространенная ошибка выглядит так:
Не удалось начать сеанс “Microsoft.Windows.Remediation” из-за следующей ошибки: 0xC0000035!
Нужно ли что-то делать при ошибке 0xC0000035?
На самом деле вам ничего не нужно делать в большинстве случаев. Как говорят в одной из веток технической поддержки Microsoft, это одна из банальных ошибок, которая обычно не нуждается в дополнительном исправлении. Если ошибка не приводит к каким-нибудь реальным проблемам, можно ее просто игнорировать либо просто отключить отображение данного кода. Она появляется по той причине, что система просто не успела запустить какую-то службу или ее вызов был произведен слишком рано (до того, как успела запуститься). Обычная реакция Windows на подобный код – повторная попытка, которая в следующий раз заканчивается успешно.
Если вас не устраивает игнорирование данного кода ошибки, можете отключить его появление с помощью редактора реестра. Вот, как это можно сделать:
- Клавишами Win + R запускаем строку «Выполнить».
- Вводим в пустую строку команду rededit и нажимаем Enter.
- Последовательно открываем Компьютер HKEY_LOCAL_MACHINE SYSTEM CurrentControlSet Control WMI Autologger EventLog-System {b675ec37-bdb6-4648-bc92-f3fdc74d3ca2}.
- В правой рабочей области дважды кликаем по EnableProperly и устанавливаем значение для параметра – Hexadecimal, вместо стандартного Base. Если есть параметр Enable, ему тоже устанавливаем такое же значение.
- Для параметра Value устанавливаем 0.
Если вы не можете мириться с данной ошибкой, то можете попробовать несколько способов. Несколько людей написали, что у них это сработало.
Что можно предпринять?
Вот все, что кто-то советовал и эффективность чего была подтверждена другими пользователями:
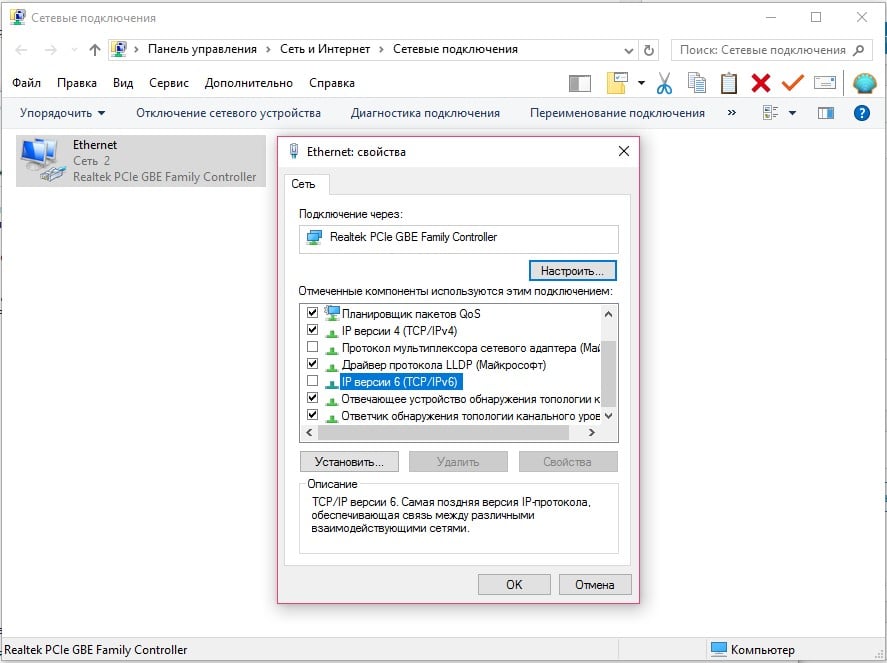
- Отключить протокол IPv6. Похоже, он в старых версиях Windows работает не очень стабильно. Для этого нужно перейти в «Центр управления сетями и общим доступом», выбрать «Изменение параметров адаптеров» и перейти в свойства того подключения, которое активно используется. Просто снимаем галочку с «IP версии 6», сохраняем изменения и выходим.
- Восстановить ассоциации. Некачественные установщики могут нарушить ассоциации системных файлов, из-за чего Windows не удается запустить службы. Самый простой способ – скачать с интернета reg-файл для восстановления ассоциации под конкретную версию Windows и запустить его.
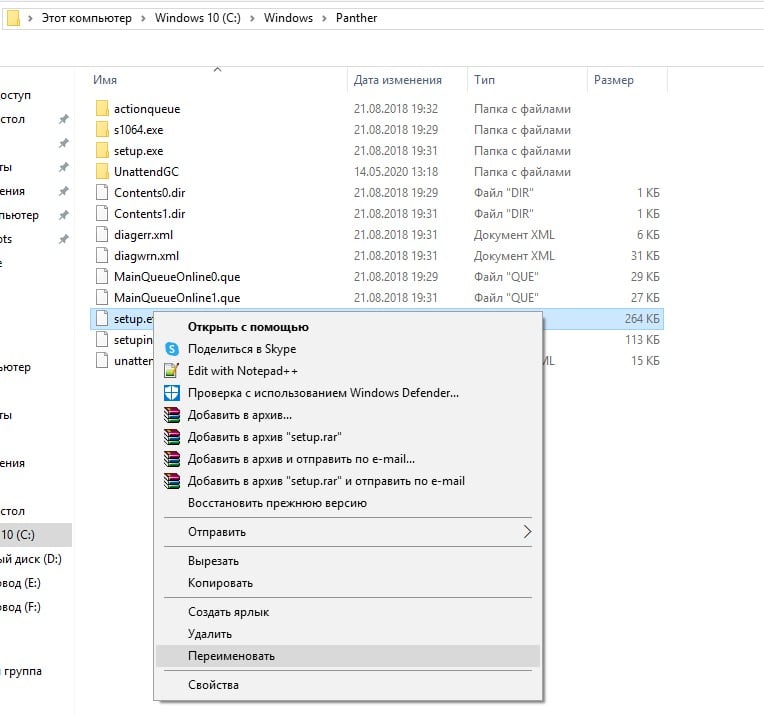
- Обновить циклический регистратор контекста ядра. Служба создает снимки системы размером 100 Мб и в них могут быть проблемы. Нужно вставить в строку Выполнить %windir%panther и найти setup.etl, а затем переименовать данный файл в setup.old. Система автоматически сгенерирует новый файл и, возможно, ошибка исчезнет.
В качестве итога можно отметить, что сама по себе ошибка с кодом 0xC0000035 не является чем-то экстравагантным, что требует исправления. Она появляется практически во всех операционных системах, когда Windows не удается запустить службу. В конечном итоге ОС повторяет запрос и выполняет поставленную задачу. Если каких-то дополнительных проблем ошибка не создает, ее лучше игнорировать. В остальных случаях можно попробовать те несколько решений, которые описаны выше.
Если у вы знаете что-нибудь еще, пожалуйста, напишите нам об этом в комментариях. Возможно, это поможет другим читателям в поиске ответа или нам в целях создания максимально полезного материала.
Если вы используете средство просмотра событий в Windows 11/10, то, возможно, в последнее время вы сталкивались с кодом ошибки 0xC0000035, который указывает непосредственно на ошибку отслеживания событий ядра. Конечно, это не новая ошибка, но для многих это первый раз, когда они сталкиваются с ней лицом к лицу.
Что такое ошибка 0xC0000035?
Код ошибки 0xC0000035 возвращается как «STATUS_OBJECT_NAME_COLLISION». Этот код ошибки был связан с обнаруженным идентичным идентификатором безопасности домена (SID). Более того, поскольку «регистратор событий заполнен» сеансом, «регистратор контекста кругового ядра» не запустился успешно.
В чем причина ошибки 0xC0000035 в Windows 11?
Это происходит, когда некоторые процессы не запускаются. Это могут быть сетевые или другие процессы. некоторые примеры: PerfDiag Logger, NetCfgTrace, Microsoft.Windows.Remediation, sensorframework и т. д.
Поскольку существует несколько способов вызвать ошибку 0xC0000035 на компьютере с Windows, в этой статье основное внимание будет уделено объяснению того, как выполнить работу несколькими из этих способов.
- Измените раздел реестра Autologg
- Отключите или удалите сторонний антивирус
- Обновите Intel или другие сетевые драйверы
- Выполнить сброс сети
- Запустите сканирование DISM, чтобы восстановить образ системы
1]Мы предлагаем изменить ключ реестра Autologg.
Бывают случаи, когда этот код ошибки вообще не вызывает никаких проблем. Если вы понимаете, что это действительно так, то лучший шаг, который можно предпринять, — это вообще предотвратить его появление.
Сделайте это, открыв диалоговое окно «Выполнить». Нажмите клавишу Windows + R, затем введите Regedit и нажмите клавишу Enter. Сразу появится редактор реестра
В редакторе перейдите к следующему:
Компьютер HKEY_LOCAL_MACHINE SYSTEM CurrentControlSet Control WMI Autologger EventLog-System {b675ec37-bdb6-4648-bc92-f3fdc74d3ca2}
Как только вы окажетесь в нужном разделе, следующий шаг — перейти вправо от редактора реестра и не забудьте дважды щелкнуть ключ Enabled.
Теперь в параметре Edit DWORD (32-bit) Value измените Base на Hexadecimal, затем отредактируйте данные Value с любого текущего значения на 0. Нажмите OK, чтобы сохранить изменения.
После того, как вы выполнили эту задачу, вам нужно будет дважды щелкнуть EnableProperly, а затем изменить Base на Hexadecimal и установить значение Value равным 0. Наконец, нажмите OK, чтобы сохранить изменения.
Следующим шагом является перезагрузка компьютера и проверка, сохраняется ли ошибка 0xC0000035.
2]Отключите или удалите сторонний антивирус.
В некоторых случаях причиной ошибки 0xC0000035 в средстве просмотра событий может быть сторонний антивирус. Мы считаем, что вам нужно отключить антивирусную программу, а затем, надеюсь, перезагрузить компьютер, чтобы устранить ошибку.
Если это не сработает, скорее всего, вам может потребоваться полностью удалить утилиту. Чтобы выполнить эту работу в Windows 11, вам необходимо запустить приложение «Настройки», нажав клавишу Windows + I. Оттуда выберите «Приложения»> «Приложения и функции», затем прокрутите вниз, пока не увидите свою антивирусную программу в списке. .
3]Обновите Intel или другие сетевые драйверы.
Итак, есть несколько способов обновить Intel или другие сетевые драйверы на вашем компьютере с Windows 11.
Для начала откройте Настройки, нажав клавишу Windows + I. Оттуда выберите Центр обновления Windows снизу, затем нажмите кнопку «Обновить», чтобы операционная система проверила наличие новых обновлений.
Если какие-либо драйверы доступны, Windows 11 загрузит и установит их автоматически или запросит вашу помощь. Все это зависит от ваших конкретных настроек Центра обновления Windows.
4]Выполнить сброс сети
Еще один способ избавиться от кода ошибки 0xC0000035 — сбросить настройки сети. Это простая задача. Все, что вам нужно сделать, это прочитать Как сбросить сетевые адаптеры с помощью функции сброса сети в Windows 11.
5]Запустите сканирование DISM, чтобы восстановить образ системы.
Восстановление образа вашей системы — один из лучших способов исправить код ошибки 0xC0000035. Для этого необходимо сразу запустить DISM (управление развертыванием образов и обслуживанием). Чтобы узнать, как сканировать компьютерную систему с помощью DISM, мы предлагаем прочитать «Запуск DISM для восстановления образа системы Windows и хранилища компонентов Windows в Windows 11/10».
Читайте: Как найти и просмотреть файлы журнала BSOD в средстве просмотра событий Windows 10
.
![]()
Добрый день! Уважаемые читатели и гости IT блога Pyatilistnik.org. В прошлый раз мы с вами научились искать mac-адрес на DHCP сервере средствами PowerShell. Сегодня расскажу вам про ситуацию, когда ваша учетная запись не может пройти аутентификацию на контроллере домена, получая ошибку со статусом «0xC000018C An Error occured during Logon«, в результате чего если она используется для сервиса вы не сможете его использовать. Мы разберем причины и методы устранения, а главное недопущения подобной ситуации. Давайте начинать траблшутить и прокачивать свои знания.
Описание ошибки 0xC000018C на контроллерах домена
Есть лес Active Directory, в корневой домен и ряде других дочерних доменов были установлены ноябрьские обновления KB5019964. В результате стали появляться обращения от технической поддержки, что ряд сервисов стали недоступны, отправка почты, сканирование на принтерах и так далее. В логах контроллера домена было событие ID 4625:
An account failed to log on.
Subject:
Security ID: SYSTEM
Account Name: DC01$
Account Domain: ROOT
Logon ID: 0x3E7
Logon Type: 3
Account For Which Logon Failed:
Security ID: NULL SID
Account Name: scaners
Account Domain: PYATILISTNIK
Failure Information:
Failure Reason: An Error occured during Logon.
Status: 0xC000018C
Sub Status: 0x0
Process Information:
Caller Process ID: 0x384
Caller Process Name: C:WindowsSystem32lsass.exe
Network Information:
Workstation Name: DC01
Source Network Address: 10.1.0.2
Source Port: 56374
Detailed Authentication Information:
Logon Process: Advapi
Authentication Package: MICROSOFT_AUTHENTICATION_PACKAGE_V1_0
Transited Services: —
Package Name (NTLM only): —
Key Length: 0
This event is generated when a logon request fails. It is generated on the computer where access was attempted.
The Subject fields indicate the account on the local system which requested the logon. This is most commonly a service such as the Server service, or a local process such as Winlogon.exe or Services.exe.
The Logon Type field indicates the kind of logon that was requested. The most common types are 2 (interactive) and 3 (network).
The Process Information fields indicate which account and process on the system requested the logon.
The Network Information fields indicate where a remote logon request originated. Workstation name is not always available and may be left blank in some cases.
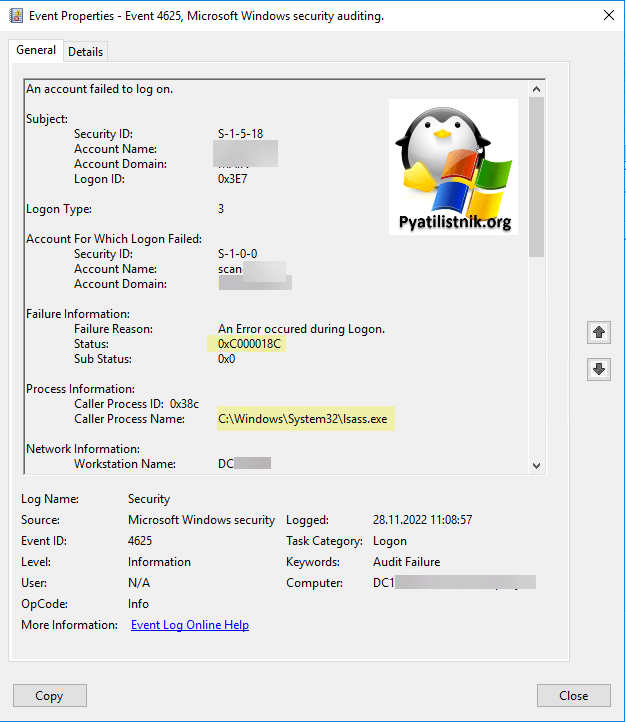
Код 0xC000018C говорил, что между доменами перестали быть доверительные, транзитивные отношения.
0xC000018C — Запрос на вход не выполнен из-за сбоя доверительных отношений между основным доменом и доверенным доменом (The logon request failed because the trust relationship between the primary domain and the trusted domain failed)
Подробнее — https://learn.microsoft.com/en-us/windows/security/threat-protection/auditing/event-4625
Так же если изучить текущие проблемы, что присутствуют для Windows Server, то тут еще можно выделить:
Возможная утечка памяти в службе подсистемы локального органа безопасности (LSASS, exe)
. LSASS может со временем использовать больше памяти, а контроллер домена может перестать отвечать на запросы и перезапуститься.
Подробнее — https://learn.microsoft.com/en-us/windows/release-health/status-windows-10-1809-and-windows-server-2019#2966msgdesc
Предлагается лечить установкой KB5019966, но это не решало ошибки между доменами и доверительном отношении.
Устранение ошибки аутентификации между доменами
Тут Америку открывать не буду, на 29 ноября 2022 года у вас один вариант — это полное удаление KB5019964, и ожидание декабрьских обновлений от Microsoft. Откройте оснастку appwiz.cpl и отфильтруйте по коду KB5019964, после чего выберите, что нужно удалить обновление.
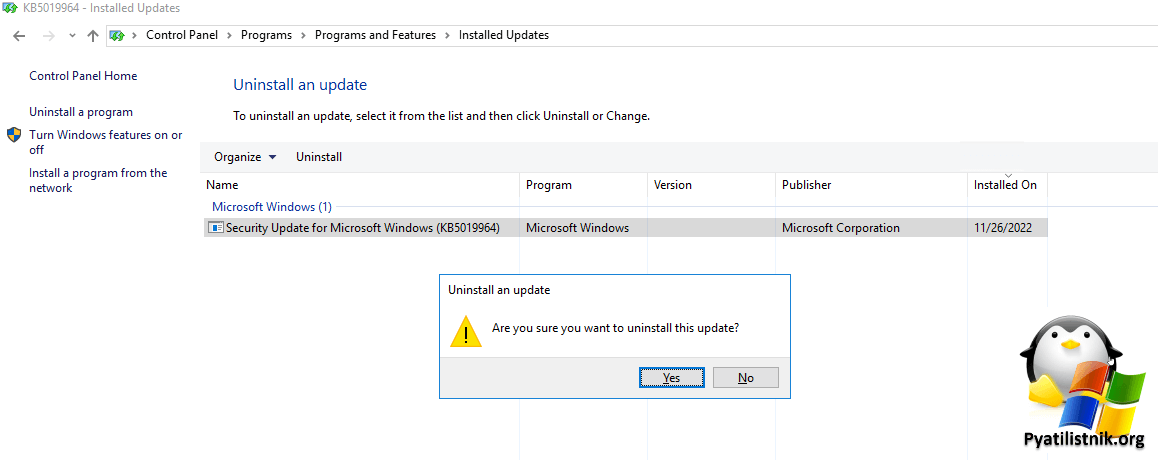
Далее потребуется перезагрузка.
Небольшой совет, я надуюсь, что у вас в домене несколько контроллеров домена, поэтому перезагружайте их поочереди, дождавшись когда они полностью удалят обновление и загрузятся. чтобы ваши серверы в домене не потеряли связь с Active Directory
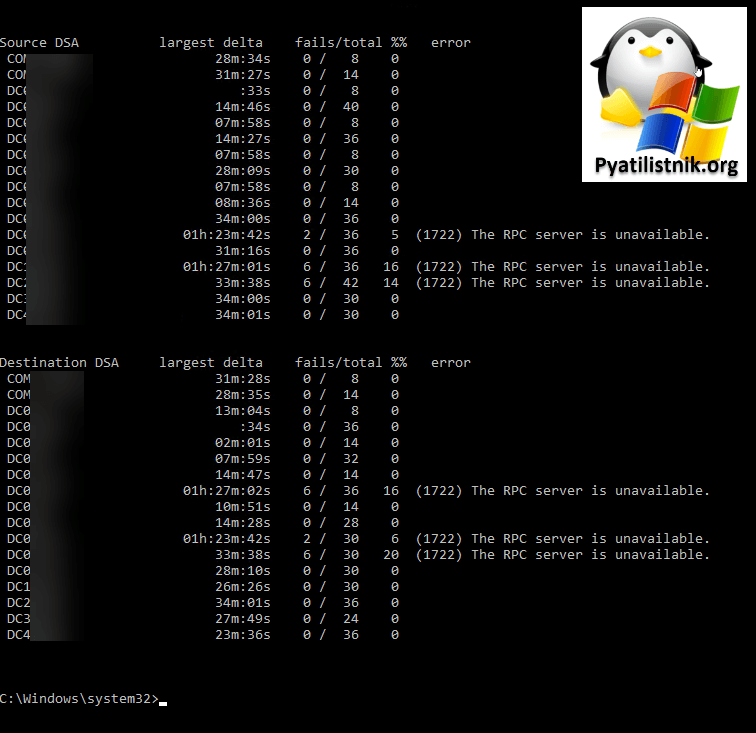
Так же перед отправкой других контроллеров домена, убедитесь, что пошли реплики через Repadmin и счетчики на ошибке 1722 уменьшаются.
После того как в доменах появилось по одному контроллеру домена, без обновления KB5019964, то ошибки ID 4625: An Error occured during Logon, перестали появляться и аутентификация стала проходить без проблем.
Как такое не допускать?
- ✅Не нужно гнаться за безопасностью ради безопасности
- ✅Тестировать, но если у вас большая компания, то это дополнительные человеко/часы, выливающееся в серверные мощности и деньги
- ✅Откладывать такие обновления на месяц позже, чтобы можно было сразу накатить следующие.
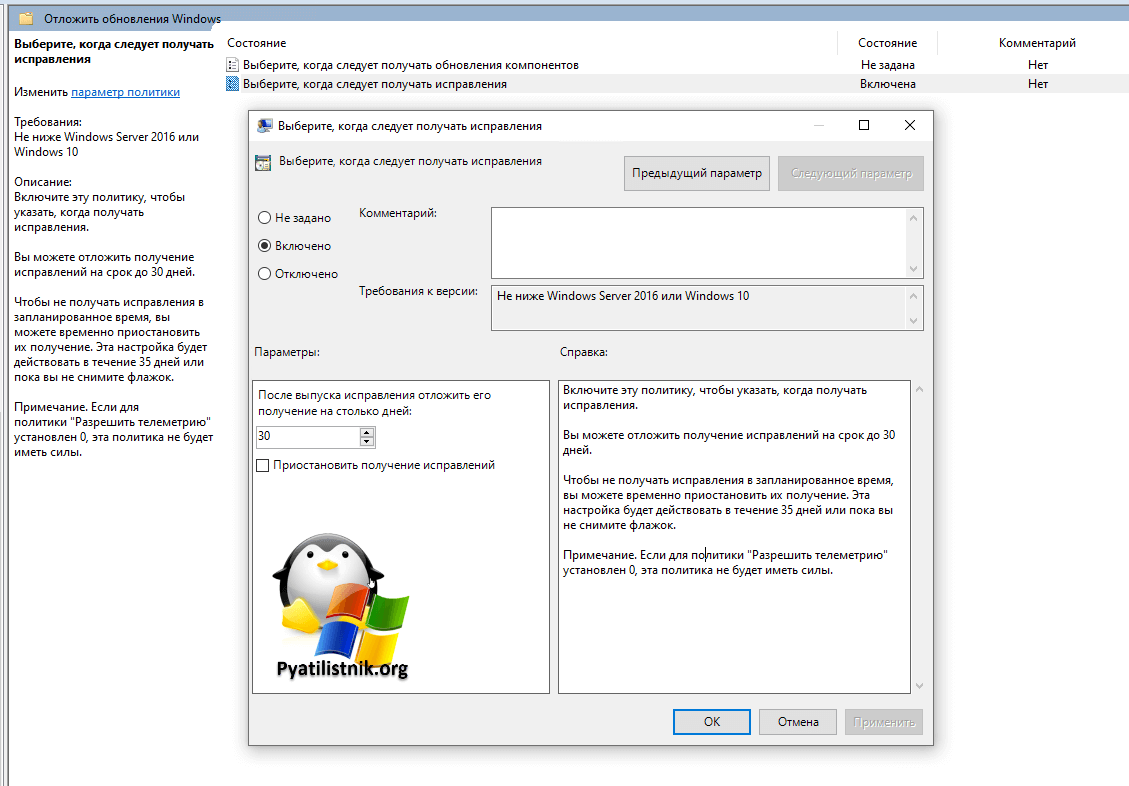
Например, в групповых политиках есть параметр «Выберите, когда следует получать обновления«, тут можно отсрочить их на 30 дней (Вы можете отложить получение исправлений на срок до 30 дней).
На этом у меня все. С вами был Иван Сёмин, автор и создатель IT портала Pyatilistnik.org.
|
4AVA |
|
|
1 |
|
|
20.03.2012, 19:50. Показов 44367. Ответов 8
При устанвки W7 выбило ошибку 0xc000035a там написано что нужно переустановить систему, вставить диск, переустановить заново, но нечего не получается. Всё время выбивает ошибку 0xc000035a!!! Как с ней боротся?
__________________ |

|
13175 / 4623 / 168 Регистрация: 25.10.2010 Сообщений: 9,412 |
|
|
20.03.2012, 20:02 |
2 |
|
4AVA, а покажите ка скрин с ошибкой не такая в точности
и проц какой стоит?
0 |
|
2 / 2 / 0 Регистрация: 31.03.2011 Сообщений: 73 |
|
|
03.08.2012, 11:36 |
3 |
|
а может ли это быть связано с недостатком объема оперативной памяти, даже не смотря на то, что процессор двухъядерный? Добавлено через 1 минуту
0 |
|
gecata |
|
03.08.2012, 11:43
|
|
Не по теме: Hudjin, Не думаю, что эта тема ещё актуальна… Всё-таки, несколько месяцев уже прошло…
0 |
|
174 / 84 / 2 Регистрация: 06.05.2012 Сообщений: 324 |
|
|
05.08.2012, 11:25 |
5 |
|
Hudjin, причем память и количество ядер ? В самом низу ясно написано — процессор не поддерживает 64 бита.
1 |
|
2 / 2 / 0 Регистрация: 31.03.2011 Сообщений: 73 |
|
|
05.08.2012, 18:19 |
6 |
|
да я вижу что тема старая, но я столкнулся просто с такой же проблемой как на скрине…
1 |
|
14338 / 6166 / 327 Регистрация: 03.07.2010 Сообщений: 20,690 |
|
|
05.08.2012, 18:30 |
7 |
|
LGR400 архитектура вашего ЦП х86
0 |

|
2 / 2 / 0 Регистрация: 31.03.2011 Сообщений: 73 |
|
|
05.08.2012, 19:10 |
8 |
|
все почитал описание своего проца и нашел в поисании, что мой процессор тоже не поддерживает 64-разрядную ось.
0 |
|
2 / 2 / 0 Регистрация: 06.11.2010 Сообщений: 6 |
|
|
22.07.2013, 00:29 |
9 |
|
Так же ошибка, только процессор-то двухъядерный 64-битный Intel Atom N2800… Добавлено через 12 минут
0 |