What are system error memory dump files? Is it safe to delete system error memory dump files? In this post from MiniTool, this article will show you what system error memory dump files are and how to delete them with detailed steps.
What Are System Error Memory Dump Files
After performing a disk cleanup on your PC, you may find that the system error memory dump files take up much space. You want to delete it to release some free space but you don’t know what it is and whether it is safe to delete it.
Actually, it is not hard to understand what the system error memory dump files are. When your Windows operating system crashes or encounters error like BSOD (Blue Screen of Death), Windows collects all available information stored in memory at the time of the crash and «dumps» it into a file, which is helpful to be used to diagnose the system error.
Here are four kinds of memory dump files. All of these dump files are stored on the drive where your operating system installed, normally the C drive.
- Complete memory dump: this type of memory dump file takes up the most disk space, as it contains a copy of all the data used by your operating system in the physical memory. Let me explain it to you with an example: If Windows uses 6GB at the time of the system crash, the memory dump will be of 4GB as well.
- Small memory dump (256 Kb): this type of memory dump takes up the least disk space. It contains very little information but it is very useful in the debugging process.
- Kernel memory dump: this type of memory dump is the 1/3rd the size of your physical memory. It includes the memory allocated to Windows kernel and hardware abstraction level.
- Automatic memory dump: this type of memory dump has the exact same size of memory of Kernel memory dump.
Is It Safe to Delete System Error Memory Dump Files?
Support engineers can use dump files to determine and diagnose the possible reasons for the system error. However, for ordinary users, they will not use the dump files for debugging.
Besides, as the dump files keep accumulating, they also take up a lot of disk space. Sometimes the system error memory dump files can even reach the size of 100GB, which may affect your computer performance.
At this, some users wonder: can I delete system error memory dump files? Is it safe to delete system error memory dump files? Well, deleting the files will not affect the normal use of your computer. So it is safe to delete system error memory dump files.
By deleting system error memory dump files, you can get some free space on your system disk. However, dump files can be recreated automatically every time when there is a system crash. So it is necessary to delete system error memory dump files on a regular basis.
However, some users report that they are unable to delete the system error memory dump files Windows 10 by using Disk Cleanup utility on Windows operating system. Is there any other way to delete system error memory dump files Windows 10/8/7? Don’t worry. The following will show you 5 effective methods to delete system error memory dump files with detailed steps and screenshots.
Method 1. Delete Dump Files via Elevated Disk Cleanup
If the normal disk cleanup utility cannot help you delete system error memory dump files, you can run elevated disk cleanup instead. Here are the detailed steps.
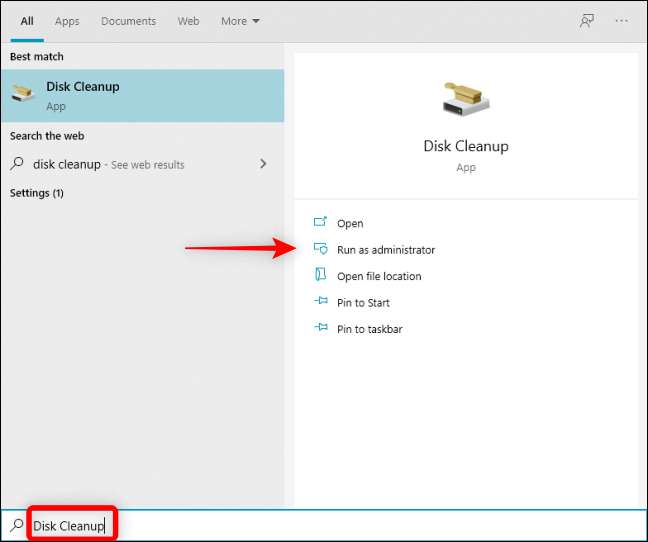
Step 1. Type disk cleanup in the Windows 10 Cortana search box. You can also press Windows + S keys on the keyboard to open the search box.
Step 2. Right click on the best match Disk Cleanup and choose Run as administrator.
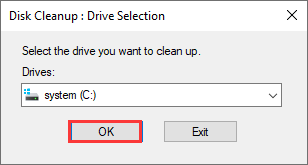
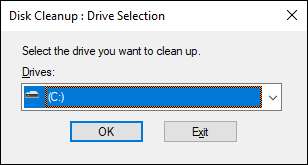
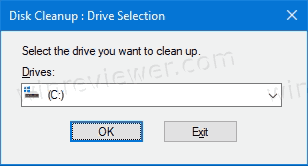
Step 3. Select the drive you want to clean up. If your operating system is installed on C drive, just select C drive and click OK. Then wait patiently when the tool scans your drive.
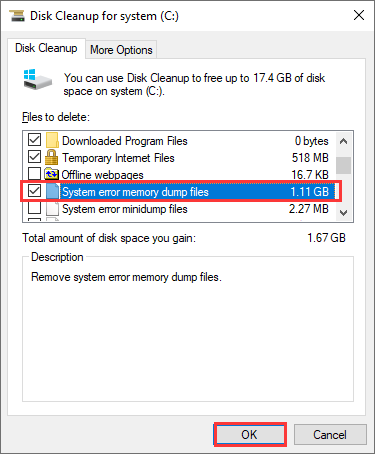
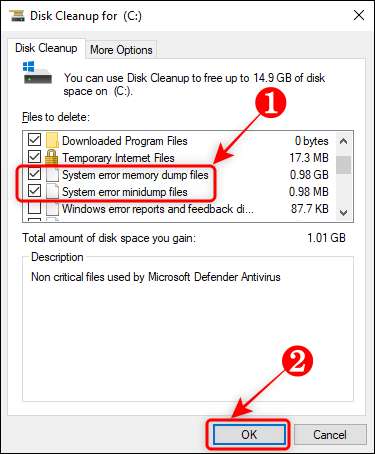
Step 4. Check all the boxes which you want to remove and press OK. Windows will automatically check some useless files by default. Scroll down and you will see the system error memory dump files listed, check it and click OK.
Method 2. Delete Dump Files via Third-party Space Analyzer
Using third-party space analyzer is also a simple way for you to delete the system error memory dump files on the C drive. And I recommend you to use the Space Analyzer embedded in MiniTool Partition Wizard Free Edition, for it is a piece of 100% safe and reliable partition and disk management software.
MiniTool Partition Wizard Free Edition is an all-in-one partition manager. It can help you extend C drive without data loss, migrate OS from HDD to SSD, convert MBR to GPT to enjoy the benefits of GPT disk, format partition, convert FAT to NTFS and so on.
And its Space Analyzer feature is extremely useful when your hard drive is running out of space, and you wonder which file is taking up too much space. The Space Analyzer uses graphics to give a better view of the hard drive space usage.
Next I will show you how to use the Space Analyzer feature to find and delete the system error dump files on your PC. Before proceeding, you can download the free software by clicking the following button.
Free Download
Then follow the steps below to go ahead.
Step 1. After downloading the MiniTool Partition Wizard Free Edition, install it on your PC and launch it to get the main interface. If you have not downloaded yet, click the following button.
Free Download
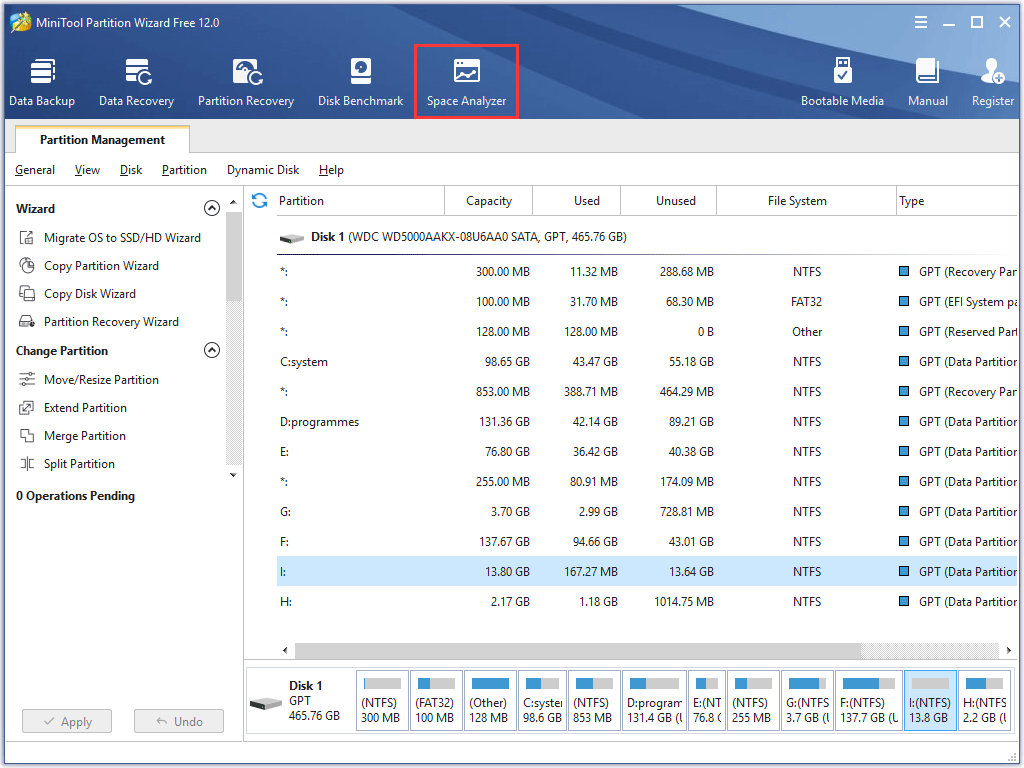
Step 2. On the main interface, select the Space Analyzer feature from the top toolbar to launch it.
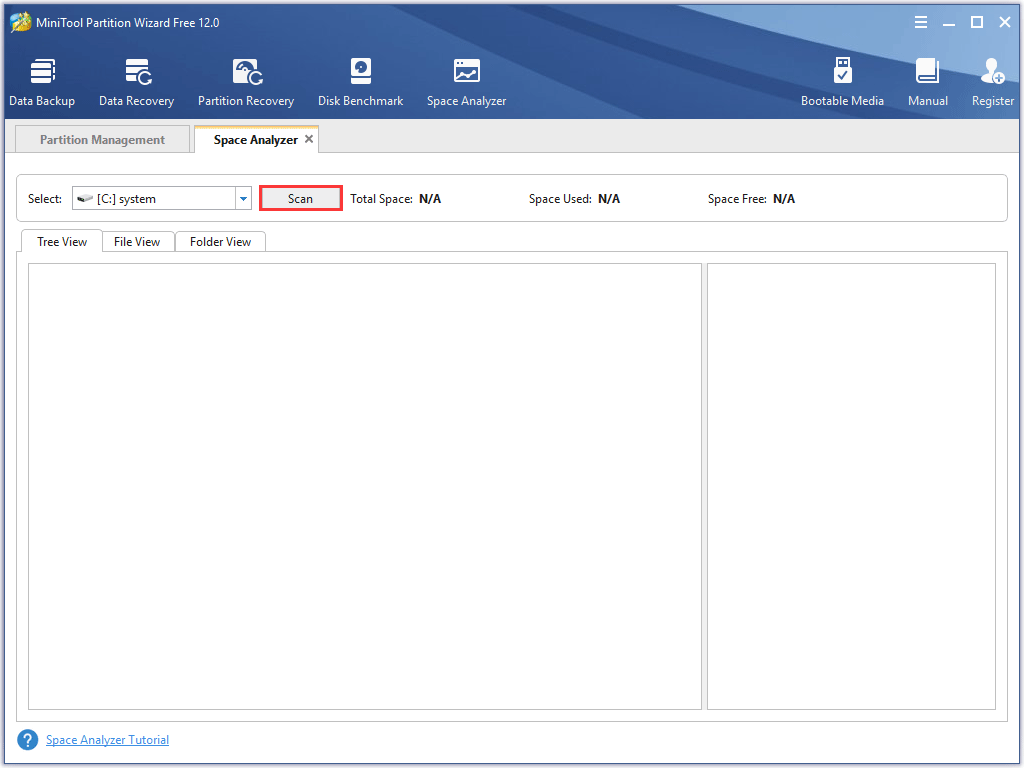
Step 3. Choose a partition to scan from the drop-down menu and click Scan. To find the system error memory dump files, you should choose the drive where your operating system installed, usually C drive.
Step 4. Wait for the completion of the scanning. Depending on the number and size of files, the time for analyzing the disk usage may vary from a few minutes to hours for files.
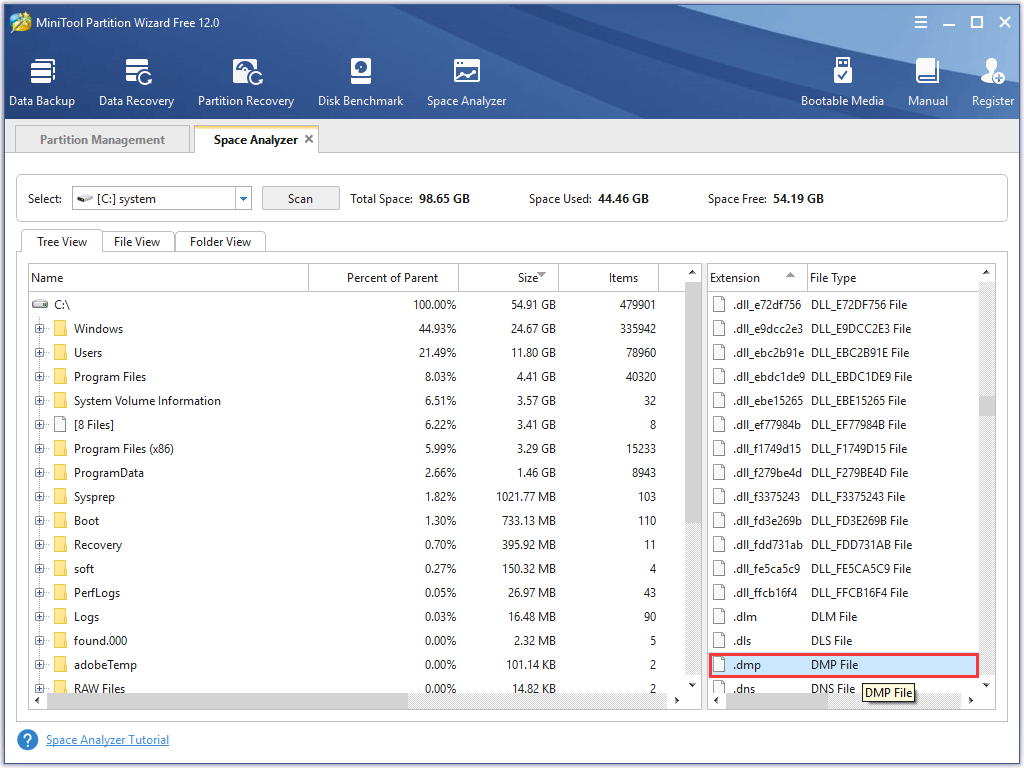
Step 5. Here you might have noticed that the interface is divided into two parts. Double click the .dmp file extension from the right side of the panel.
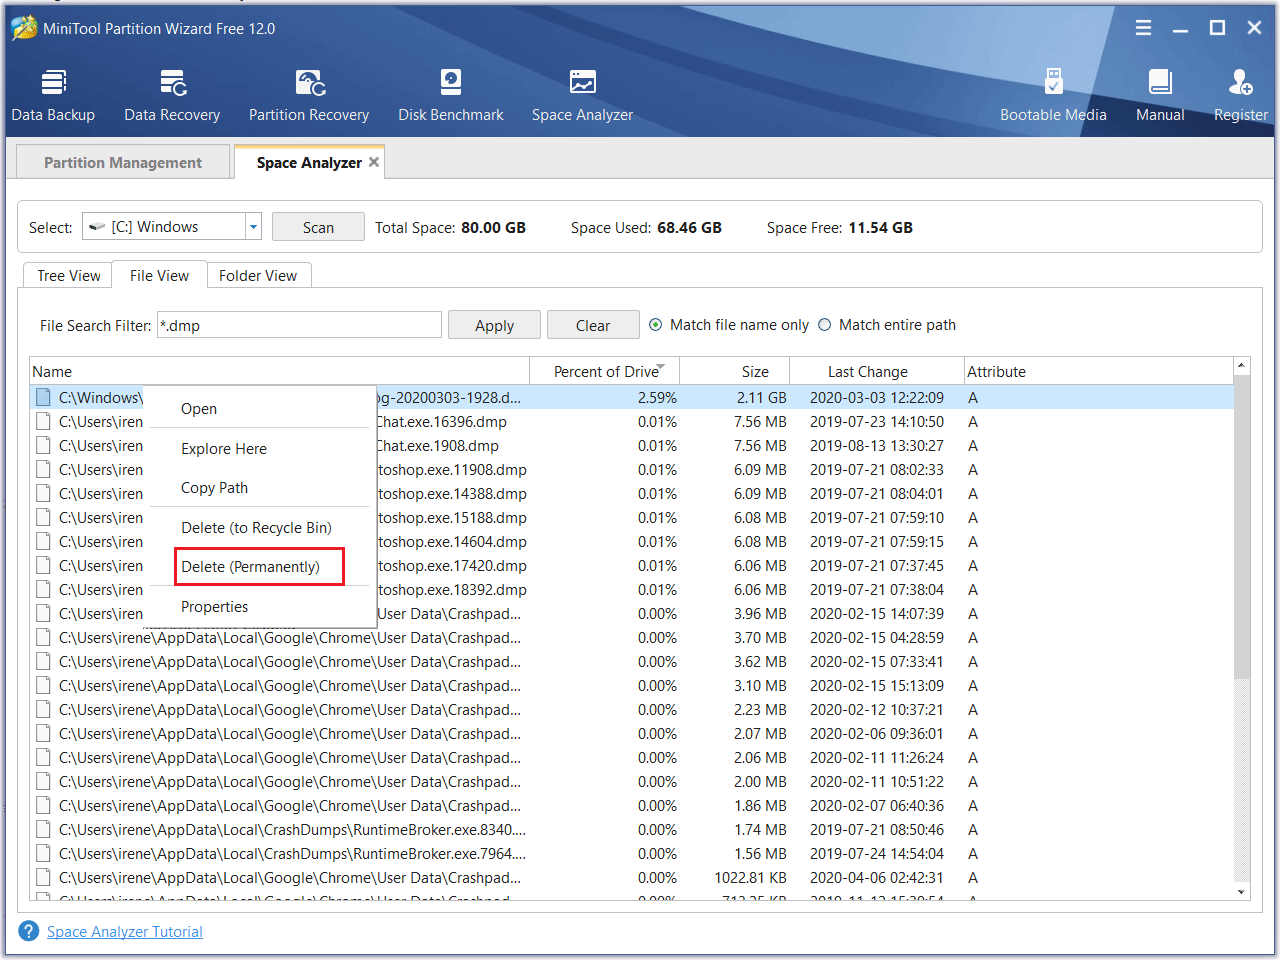
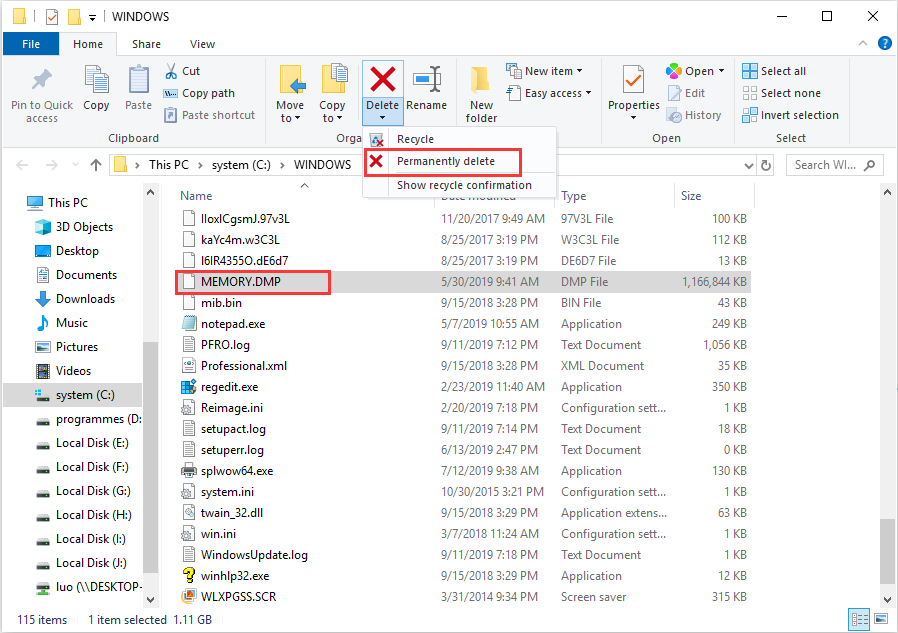
Step 6. Then you get the following interface. Right-click the MEMORY.DMP files from the list and choose Delete (Permanently) from the menu.
When the system error memory dump files are deleted successfully, you can close the Space Usage Analyzer. You can also delete other types of useless dump files on your PC if they take up too much disk space.
You see, how simple it is to delete system error memory dump files with this Space Analyzer. If you need to delete dump files or free up disk space on your Windows PC, you can download the free software.
Free Download
Method 3. Delete Dump Files via Extended Disk Cleanup Utility
You can use the Extended Disk Cleanup utility to clean system error memory dump files if the normal Disk Cleanup tool doesn’t work. Let’s see how to run this tool and delete system error memory dump files via it.
Step 1. Type command prompt in the dialogue box.
Step 2. Right click the best match Command Prompt and choose Run as administrator from the right-click menu.
Step 3. In the command prompt window, copy and paste the following command and hit Enter.
cmd.exe /c Cleanmgr /sageset:65535 & Cleanmgr /sagerun:65535
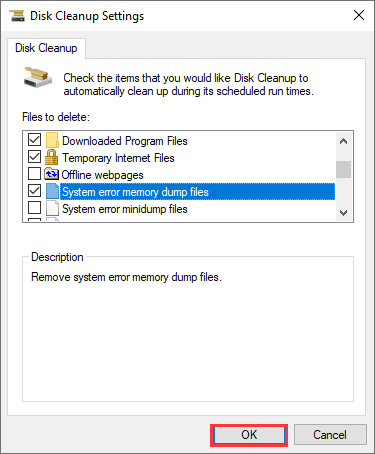
Step 4. Then the Disk Cleanup Settings window will pop up. Select the files you want to delete including the system error memory dump files and click OK.
Step 5. Restart your computer and check if system error memory dump files have been deleted.
Method 4. Delete the Dump Files from the File Location
If the above two solutions don’t work, you can try deleting the files physically. First, navigate to the dump file location via Windows File Explorer and then delete the system error memory dump files manually. Here are detailed steps.
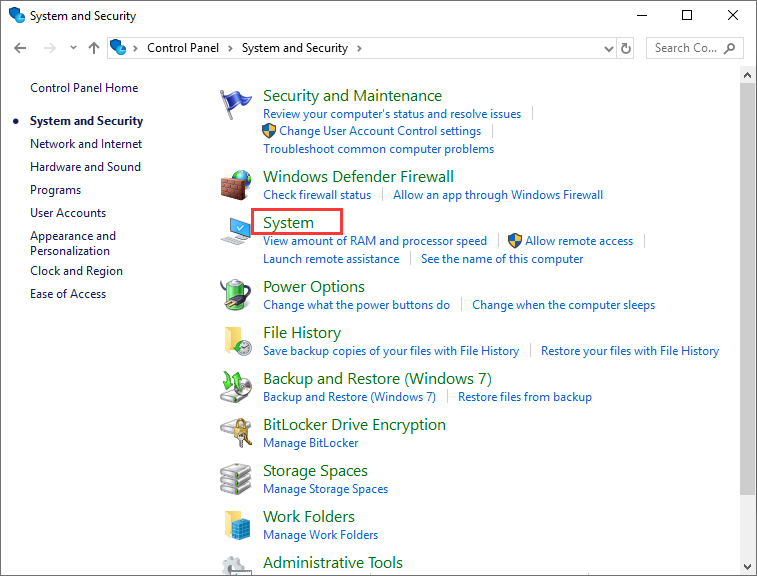
Step 1. Type Control Panel in the Windows 10 Cortana search box and click the best match to launch it.
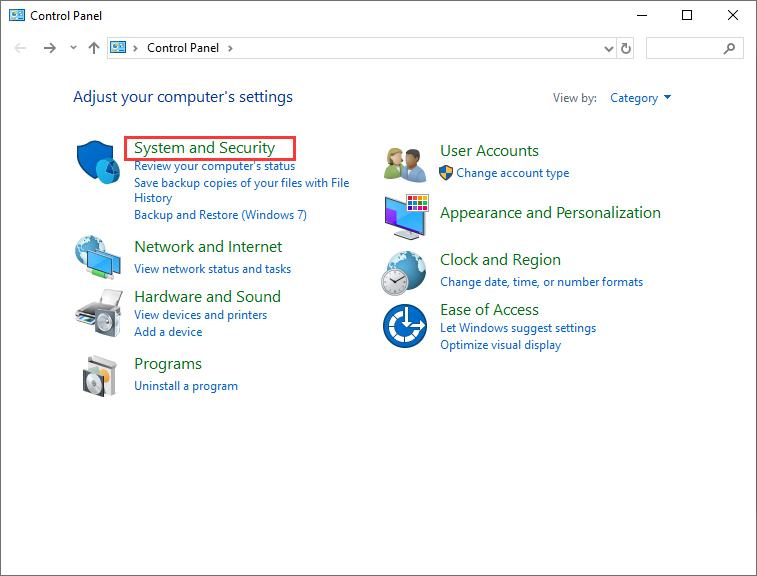
Step 2. Then select System and Security.
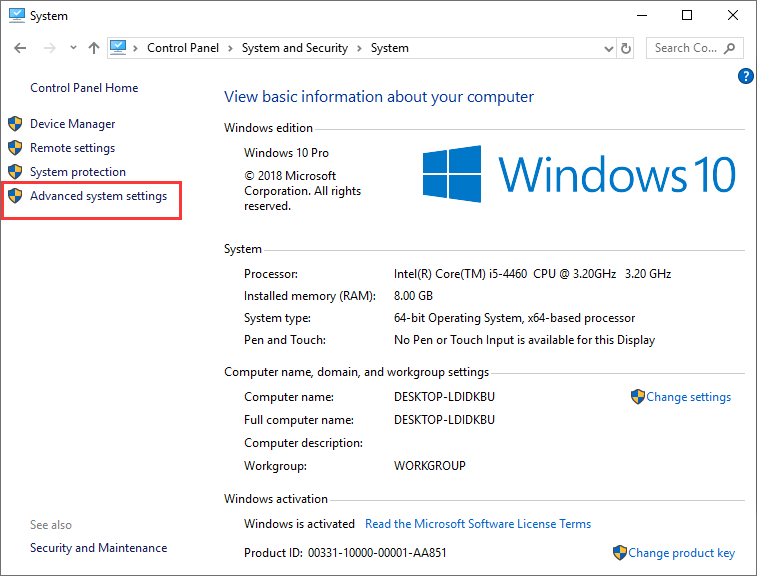
Step 3. Click the System category on the panel.
Step 4. Click Advanced system settings.
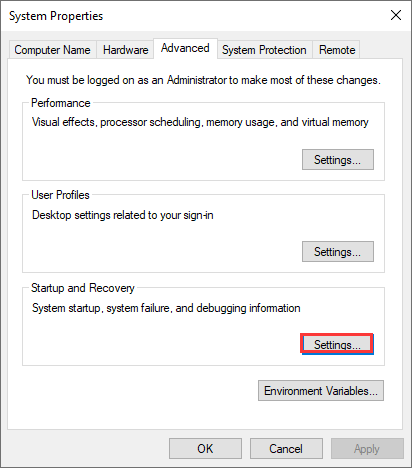
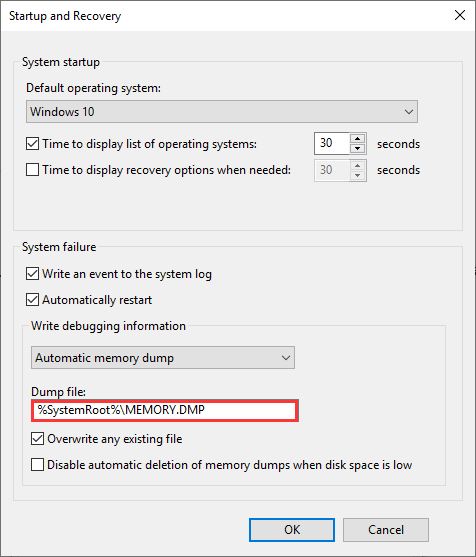
Step 5. Click Settings button under Startup and Recovery.
Step 6. Now you can see that the dump files are saved in the system root folder. Click on the drop-down menu under the Write debugging information; you can select a type of dump files and check where it is stored.
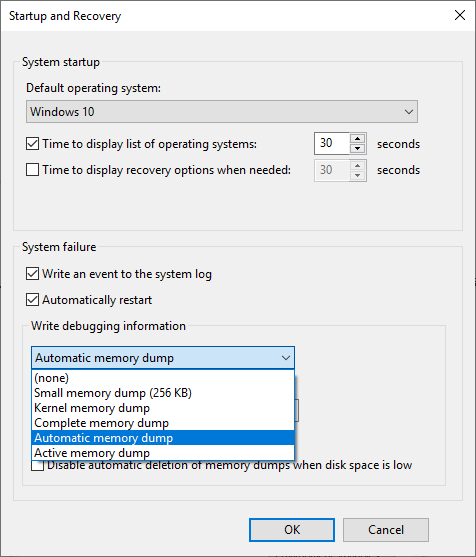
Step 7. Then copy the location of the dump file. Don’t copy and paste the whole path, as you just want to navigate to the location but not to open. As for the screenshot, you just need to copy %SystemRoot%.
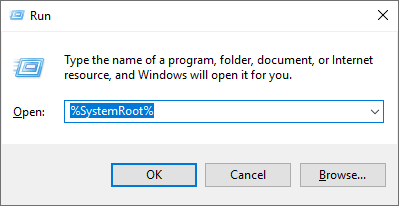
Step 8. Press Windows + R keys to open the Run dialog box. Then paste the dump file location to the Run box and hit Enter.
Step 9. Search for the file named MEMORY.DMP and delete it permanently.
Step 10. Restart your PC and the dump files will disappear.
Method 5. Delete Dump Files via CMD Commands
You can delete system error memory dump files via Command Prompt. By running commands listed in this part, you can remove dump files and other unnecessary files on your PC, such as system log files, temporary files, etc. Now follow the steps below.
Step 1. Type cmd in the Windows 10 search box. You can also press Windows + S keys on the keyboard to launch the search box.
Step 2. Right click the best match Command Prompt and select Run as administrator.
Step 3. On the Command Prompt window, type the following command one by one and hit Enter after each.
fsutil usn deletejournal /d /n c:
del “%temp%*” /s /f /q
del “C:$Recycle.bin*” /s /f /q
del “%systemroot%temp*” /s /f /q
vssadmin delete shadows /for=c: /all /quiet
Dism /Online /Cleanup-Image /StartComponentCleanup /ResetBase
Step 4. Restart your computer.
By following the steps in this post, I successfully deleted the system error memory dump files on my C drive. And Method 2 is awesome!Click to Tweet
Bottom Line
Now you should know what system error memory dump files are and how to delete it with 5 different methods if the normal Disk Cleanup utility doesn’t work. If you want to delete system error memory dump files Windows 10 to release some free space, try the above method right now!
If you have any question about how to delete system error memory dump file on a Windows PC, you can leave a message in the following comment zone and we will reply as soon as possible. If you have other better solutions, we are glad to have you share it with us. If you need any help when using MiniTool software, you may contact us via [email protected].
System Error Memory Dump Files FAQ
What are system error memory dump files in disk cleanup?
System error memory dump files are generated when your operating system crashes or encounters various blue screen errors. The dump files are stored on the C drive. If you run disk cleanup to scan C drive, you will find the system error memory dump files. You can delete them via disk cleanup.
How do I get rid of system error memory dump files?
The disk cleanup utility can be used to get rid of the system error memory dump files stored on the C drive. Besides, third-party space analyzer such as MiniTool Partition Wizard Free Edition can also help to find the memory dump files by the .dmp file extension and get rid of those memory dump files though its Delete option.
Where is system error memory dump files?
System error memory dump files are stored on the drive where the Windows operating system is installed. So, normally the system error memory dump files will be stored on the C drive.
How do I delete a win dump file?
- Type disk cleanup in the Windows search box.
- Right click on Disk Cleanup and choose Run as administrator.
- Select the drive (normally C drive) to clean up and click OK.
- Scroll down to find the system error memory dump files on the list.
- Check the box next the system error memory dump files and click OK to delete the win dump file.
What are system error memory dump files? Is it safe to delete system error memory dump files? In this post from MiniTool, this article will show you what system error memory dump files are and how to delete them with detailed steps.
What Are System Error Memory Dump Files
After performing a disk cleanup on your PC, you may find that the system error memory dump files take up much space. You want to delete it to release some free space but you don’t know what it is and whether it is safe to delete it.
Actually, it is not hard to understand what the system error memory dump files are. When your Windows operating system crashes or encounters error like BSOD (Blue Screen of Death), Windows collects all available information stored in memory at the time of the crash and «dumps» it into a file, which is helpful to be used to diagnose the system error.
Here are four kinds of memory dump files. All of these dump files are stored on the drive where your operating system installed, normally the C drive.
- Complete memory dump: this type of memory dump file takes up the most disk space, as it contains a copy of all the data used by your operating system in the physical memory. Let me explain it to you with an example: If Windows uses 6GB at the time of the system crash, the memory dump will be of 4GB as well.
- Small memory dump (256 Kb): this type of memory dump takes up the least disk space. It contains very little information but it is very useful in the debugging process.
- Kernel memory dump: this type of memory dump is the 1/3rd the size of your physical memory. It includes the memory allocated to Windows kernel and hardware abstraction level.
- Automatic memory dump: this type of memory dump has the exact same size of memory of Kernel memory dump.
Is It Safe to Delete System Error Memory Dump Files?
Support engineers can use dump files to determine and diagnose the possible reasons for the system error. However, for ordinary users, they will not use the dump files for debugging.
Besides, as the dump files keep accumulating, they also take up a lot of disk space. Sometimes the system error memory dump files can even reach the size of 100GB, which may affect your computer performance.
At this, some users wonder: can I delete system error memory dump files? Is it safe to delete system error memory dump files? Well, deleting the files will not affect the normal use of your computer. So it is safe to delete system error memory dump files.
By deleting system error memory dump files, you can get some free space on your system disk. However, dump files can be recreated automatically every time when there is a system crash. So it is necessary to delete system error memory dump files on a regular basis.
However, some users report that they are unable to delete the system error memory dump files Windows 10 by using Disk Cleanup utility on Windows operating system. Is there any other way to delete system error memory dump files Windows 10/8/7? Don’t worry. The following will show you 5 effective methods to delete system error memory dump files with detailed steps and screenshots.
Method 1. Delete Dump Files via Elevated Disk Cleanup
If the normal disk cleanup utility cannot help you delete system error memory dump files, you can run elevated disk cleanup instead. Here are the detailed steps.
Step 1. Type disk cleanup in the Windows 10 Cortana search box. You can also press Windows + S keys on the keyboard to open the search box.
Step 2. Right click on the best match Disk Cleanup and choose Run as administrator.
Step 3. Select the drive you want to clean up. If your operating system is installed on C drive, just select C drive and click OK. Then wait patiently when the tool scans your drive.
Step 4. Check all the boxes which you want to remove and press OK. Windows will automatically check some useless files by default. Scroll down and you will see the system error memory dump files listed, check it and click OK.
Method 2. Delete Dump Files via Third-party Space Analyzer
Using third-party space analyzer is also a simple way for you to delete the system error memory dump files on the C drive. And I recommend you to use the Space Analyzer embedded in MiniTool Partition Wizard Free Edition, for it is a piece of 100% safe and reliable partition and disk management software.
MiniTool Partition Wizard Free Edition is an all-in-one partition manager. It can help you extend C drive without data loss, migrate OS from HDD to SSD, convert MBR to GPT to enjoy the benefits of GPT disk, format partition, convert FAT to NTFS and so on.
And its Space Analyzer feature is extremely useful when your hard drive is running out of space, and you wonder which file is taking up too much space. The Space Analyzer uses graphics to give a better view of the hard drive space usage.
Next I will show you how to use the Space Analyzer feature to find and delete the system error dump files on your PC. Before proceeding, you can download the free software by clicking the following button.
Free Download
Then follow the steps below to go ahead.
Step 1. After downloading the MiniTool Partition Wizard Free Edition, install it on your PC and launch it to get the main interface. If you have not downloaded yet, click the following button.
Free Download
Step 2. On the main interface, select the Space Analyzer feature from the top toolbar to launch it.
Step 3. Choose a partition to scan from the drop-down menu and click Scan. To find the system error memory dump files, you should choose the drive where your operating system installed, usually C drive.
Step 4. Wait for the completion of the scanning. Depending on the number and size of files, the time for analyzing the disk usage may vary from a few minutes to hours for files.
Step 5. Here you might have noticed that the interface is divided into two parts. Double click the .dmp file extension from the right side of the panel.
Step 6. Then you get the following interface. Right-click the MEMORY.DMP files from the list and choose Delete (Permanently) from the menu.
When the system error memory dump files are deleted successfully, you can close the Space Usage Analyzer. You can also delete other types of useless dump files on your PC if they take up too much disk space.
You see, how simple it is to delete system error memory dump files with this Space Analyzer. If you need to delete dump files or free up disk space on your Windows PC, you can download the free software.
Free Download
Method 3. Delete Dump Files via Extended Disk Cleanup Utility
You can use the Extended Disk Cleanup utility to clean system error memory dump files if the normal Disk Cleanup tool doesn’t work. Let’s see how to run this tool and delete system error memory dump files via it.
Step 1. Type command prompt in the dialogue box.
Step 2. Right click the best match Command Prompt and choose Run as administrator from the right-click menu.
Step 3. In the command prompt window, copy and paste the following command and hit Enter.
cmd.exe /c Cleanmgr /sageset:65535 & Cleanmgr /sagerun:65535
Step 4. Then the Disk Cleanup Settings window will pop up. Select the files you want to delete including the system error memory dump files and click OK.
Step 5. Restart your computer and check if system error memory dump files have been deleted.
Method 4. Delete the Dump Files from the File Location
If the above two solutions don’t work, you can try deleting the files physically. First, navigate to the dump file location via Windows File Explorer and then delete the system error memory dump files manually. Here are detailed steps.
Step 1. Type Control Panel in the Windows 10 Cortana search box and click the best match to launch it.
Step 2. Then select System and Security.
Step 3. Click the System category on the panel.
Step 4. Click Advanced system settings.
Step 5. Click Settings button under Startup and Recovery.
Step 6. Now you can see that the dump files are saved in the system root folder. Click on the drop-down menu under the Write debugging information; you can select a type of dump files and check where it is stored.
Step 7. Then copy the location of the dump file. Don’t copy and paste the whole path, as you just want to navigate to the location but not to open. As for the screenshot, you just need to copy %SystemRoot%.
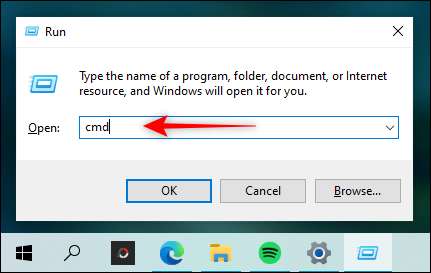
Step 8. Press Windows + R keys to open the Run dialog box. Then paste the dump file location to the Run box and hit Enter.
Step 9. Search for the file named MEMORY.DMP and delete it permanently.
Step 10. Restart your PC and the dump files will disappear.
Method 5. Delete Dump Files via CMD Commands
You can delete system error memory dump files via Command Prompt. By running commands listed in this part, you can remove dump files and other unnecessary files on your PC, such as system log files, temporary files, etc. Now follow the steps below.
Step 1. Type cmd in the Windows 10 search box. You can also press Windows + S keys on the keyboard to launch the search box.
Step 2. Right click the best match Command Prompt and select Run as administrator.
Step 3. On the Command Prompt window, type the following command one by one and hit Enter after each.
fsutil usn deletejournal /d /n c:
del “%temp%*” /s /f /q
del “C:$Recycle.bin*” /s /f /q
del “%systemroot%temp*” /s /f /q
vssadmin delete shadows /for=c: /all /quiet
Dism /Online /Cleanup-Image /StartComponentCleanup /ResetBase
Step 4. Restart your computer.
By following the steps in this post, I successfully deleted the system error memory dump files on my C drive. And Method 2 is awesome!Click to Tweet
Bottom Line
Now you should know what system error memory dump files are and how to delete it with 5 different methods if the normal Disk Cleanup utility doesn’t work. If you want to delete system error memory dump files Windows 10 to release some free space, try the above method right now!
If you have any question about how to delete system error memory dump file on a Windows PC, you can leave a message in the following comment zone and we will reply as soon as possible. If you have other better solutions, we are glad to have you share it with us. If you need any help when using MiniTool software, you may contact us via [email protected].
System Error Memory Dump Files FAQ
What are system error memory dump files in disk cleanup?
System error memory dump files are generated when your operating system crashes or encounters various blue screen errors. The dump files are stored on the C drive. If you run disk cleanup to scan C drive, you will find the system error memory dump files. You can delete them via disk cleanup.
How do I get rid of system error memory dump files?
The disk cleanup utility can be used to get rid of the system error memory dump files stored on the C drive. Besides, third-party space analyzer such as MiniTool Partition Wizard Free Edition can also help to find the memory dump files by the .dmp file extension and get rid of those memory dump files though its Delete option.
Where is system error memory dump files?
System error memory dump files are stored on the drive where the Windows operating system is installed. So, normally the system error memory dump files will be stored on the C drive.
How do I delete a win dump file?
- Type disk cleanup in the Windows search box.
- Right click on Disk Cleanup and choose Run as administrator.
- Select the drive (normally C drive) to clean up and click OK.
- Scroll down to find the system error memory dump files on the list.
- Check the box next the system error memory dump files and click OK to delete the win dump file.
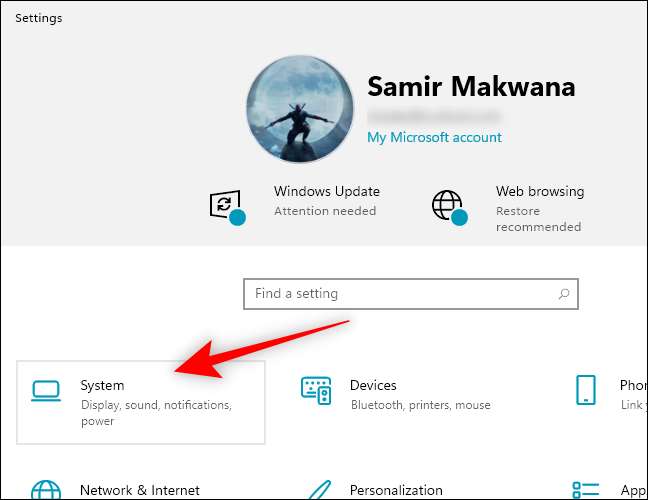
Каждый раз, когда Windows случается завершить свою работу сбоем с экраном BSOD, в системной папке %SystemRoot% создаётся отчёт — бинарный файл дампа памяти в формате DMP. Также файлы дампов могут создаваться сторонним программным обеспечением, например, популярным браузером Chrome. Дампы бывают весьма полезны в деле диагностики возникающих в работе системы и программ проблем, с другой стороны, они могут занимать на диске немало места, что не есть хорошо для небольших SSD-дисков.
Поэтому поставленный вопрос вполне закономерен и естественен — можно ли удалять файлы дампов и если можно, то как это правильно делать? Ответ на этот вопрос — да, файлы дампов можно удалять, это никак не повредит системе и установленным на компьютере программам. Более того, вы вообще можете отключить создание дампов, по крайней мере тех, которые создаются операционной системой при критических сбоях.
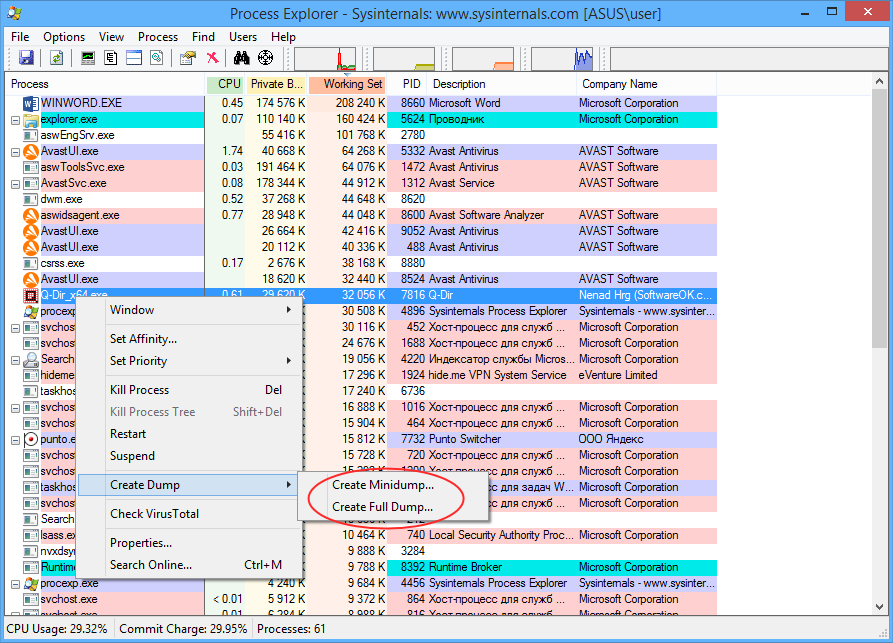
Windows поддерживается несколько типов системных дампов: полный, памяти ядра и малый дамп памяти. Полный дамп содержит всю физическую память системы, дамп памяти ядра — только ту часть ОЗУ, которая используется ядром, малый дамп содержит сведения об ошибках, загруженных драйверах и прочую служебную информацию. «Большие» дампы сохраняются в каталоге %SystemRoot% (Windows), под хранение минидампов в системе отведена папка %SystemRoot%Minidump. Дампы сторонних программ обычно хранятся в папках профиля пользователя. Существуют также дампы отдельных процессов, создать такой дамп можно из Диспетчера задач или с помощью небезызвестной утилиты Process Explorer.
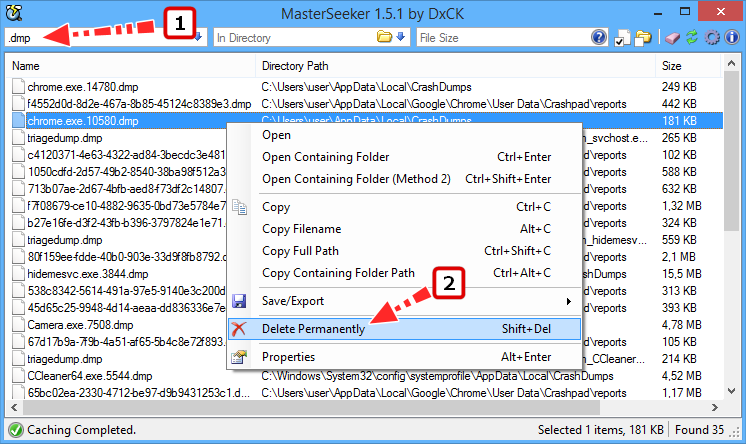
Этот способ сводится к поиску всех файлов в формате DMP и их удалению. Как уже было сказано, системные файлы дампов располагаются в папках C:Windows и C:WindowsMinidump, для обнаружения дампов, созданных другими программами можно задействовать встроенный поиск Windows или сторонние утилиты, например, MasterSeeker. Запустите утилиту и вставьте в поле поиска запрос «.dmp» без кавычек, и утилита тут же выведет список всех имеющихся на жёстком диске файлов дампов. Чтобы удалить дампы, выделите их кликом левой кнопкой мыши с зажатой Shift и нажмите Shift + Del или выберите опцию «Delete Permanently» в контекстном меню.
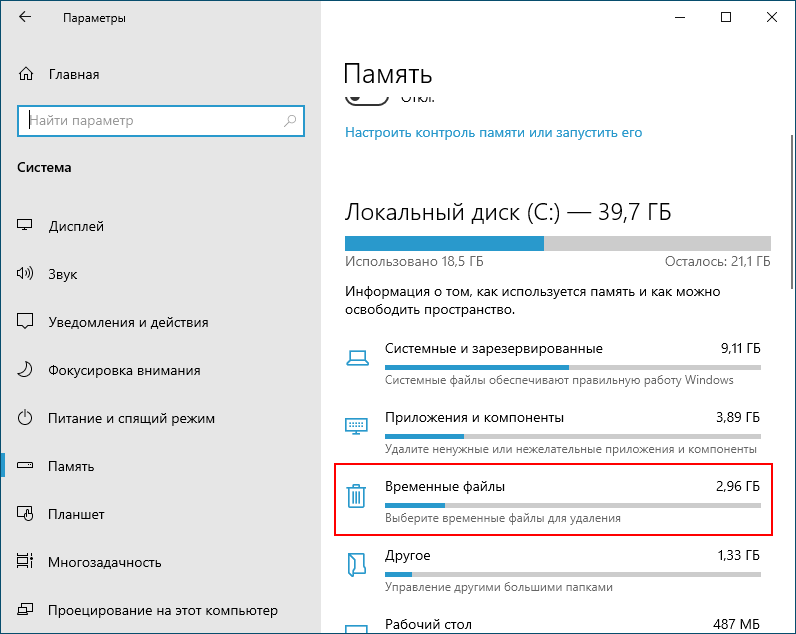
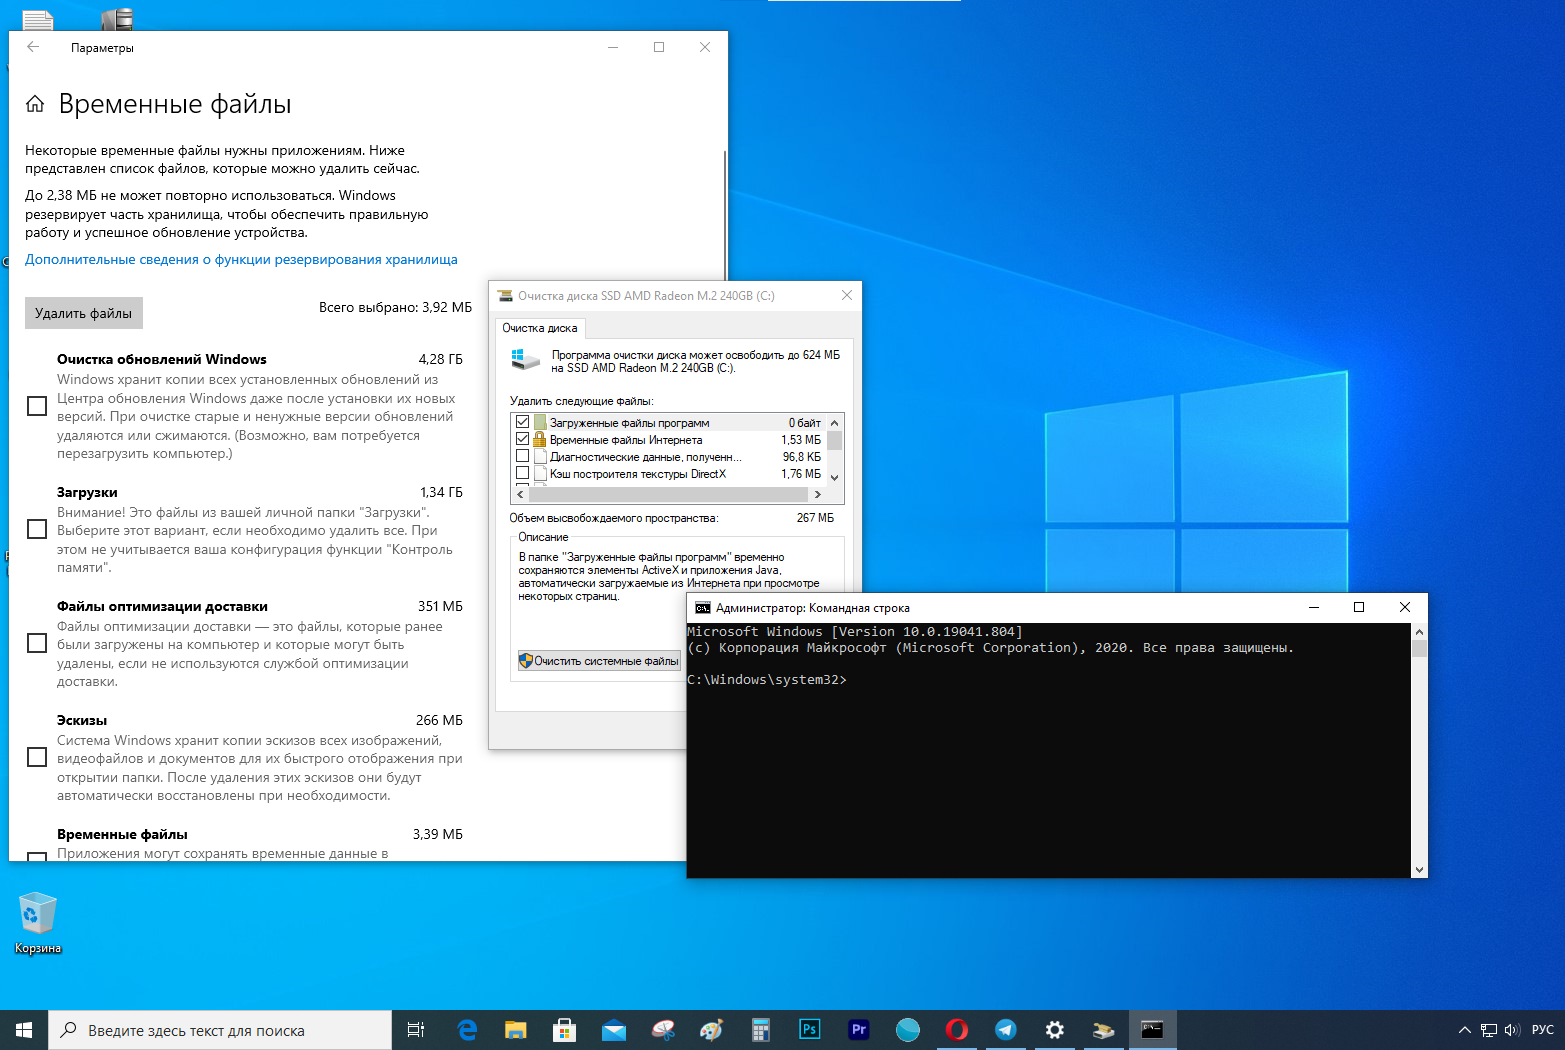
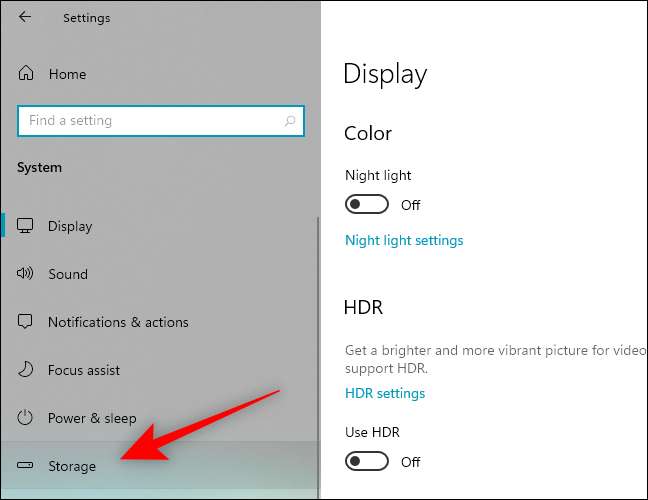
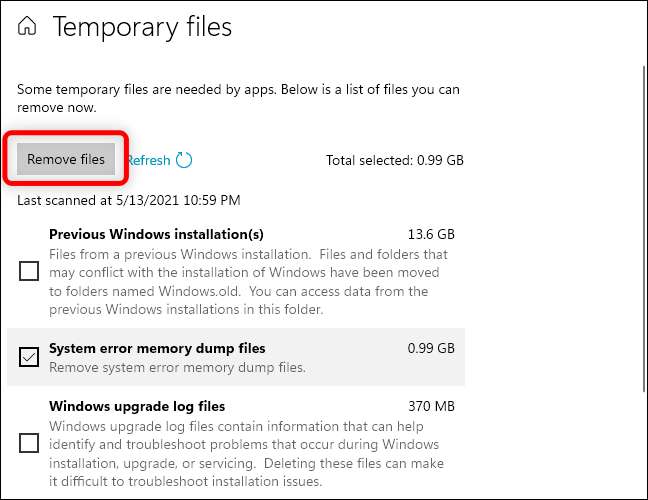
В Windows 10 удалить файлы дампов можно через приложение Параметры. Открыв последнее, перейдите в раздел Система → Память → Временные файлы, отметьте флажком пункт «Файлы дампа памяти и системных ошибок» и нажмите кнопку «Удалить файлы».

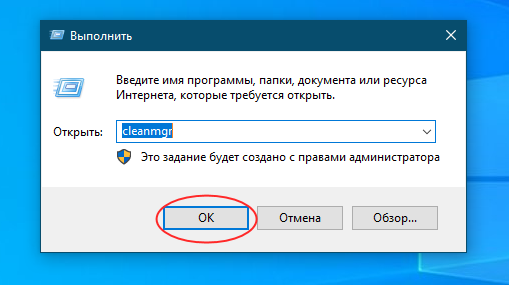
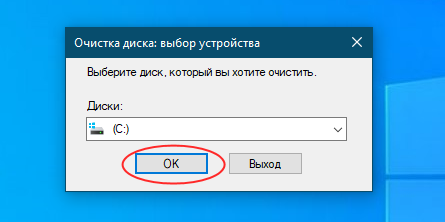
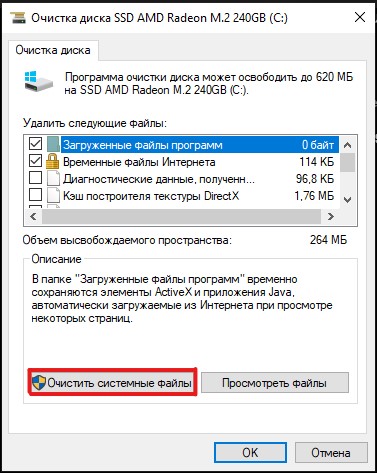
Более универсальным способом очистки (работает в Windows 10, 8.1 и 7) является использование классической утилиты cleanmgr. Запустите ее одноименной командой через диалоговое окошко «Выполнить», выберите очищаемый диск C и нажмите в открывшемся окне очистки диска кнопку «Очистить системные файлы».
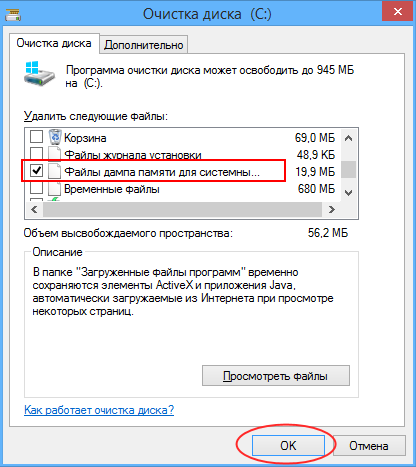
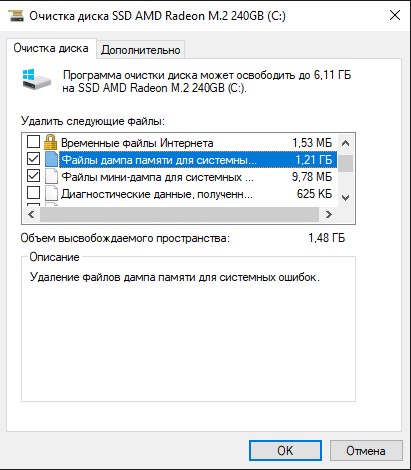
Опять выберите системный раздел, нажмите «OK» и дождитесь завершения сканирования. Отметьте в открывшемся окошке флажками пункты файлов дампов, нажмите «OK» и подтвердите действие.
Наконец, для удаления временных файлов дампов можно использовать сторонние программы-чистильщики, ту же CCleaner. Кстати, по умолчанию этот чистильщик уже настроен на удаление дампов памяти, в чём вы сами можете убедиться, внимательно изучив список удаляемых данных в категории «Система» на вкладке «Система». Примечательно, что CCleaner обнаруживает дампы, созданные не только Windows, но и другими программами, в частности, браузером Google Chrome.
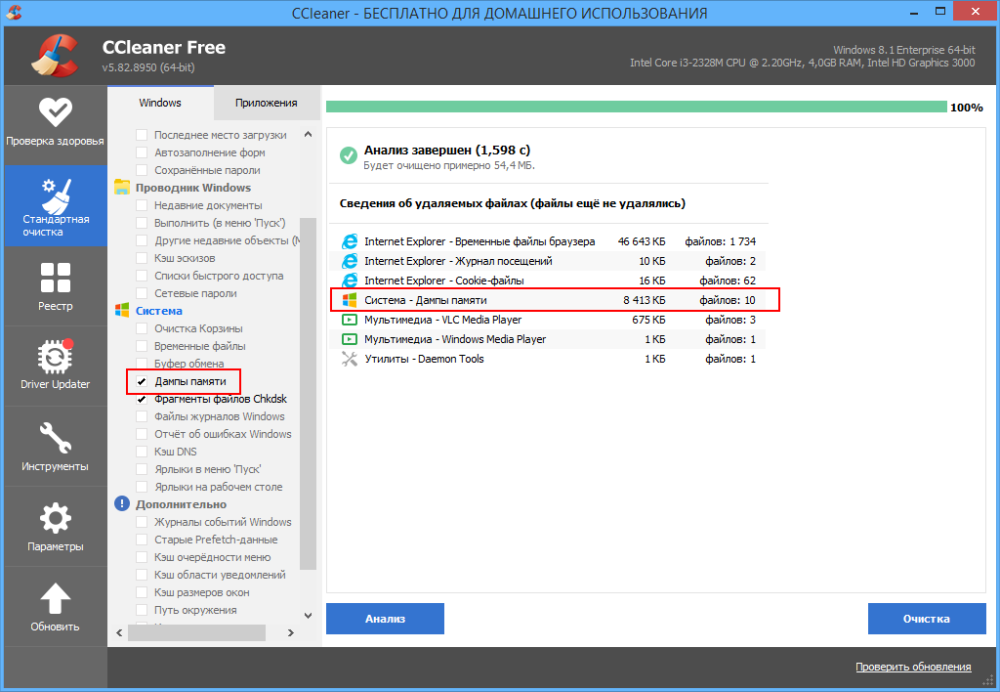
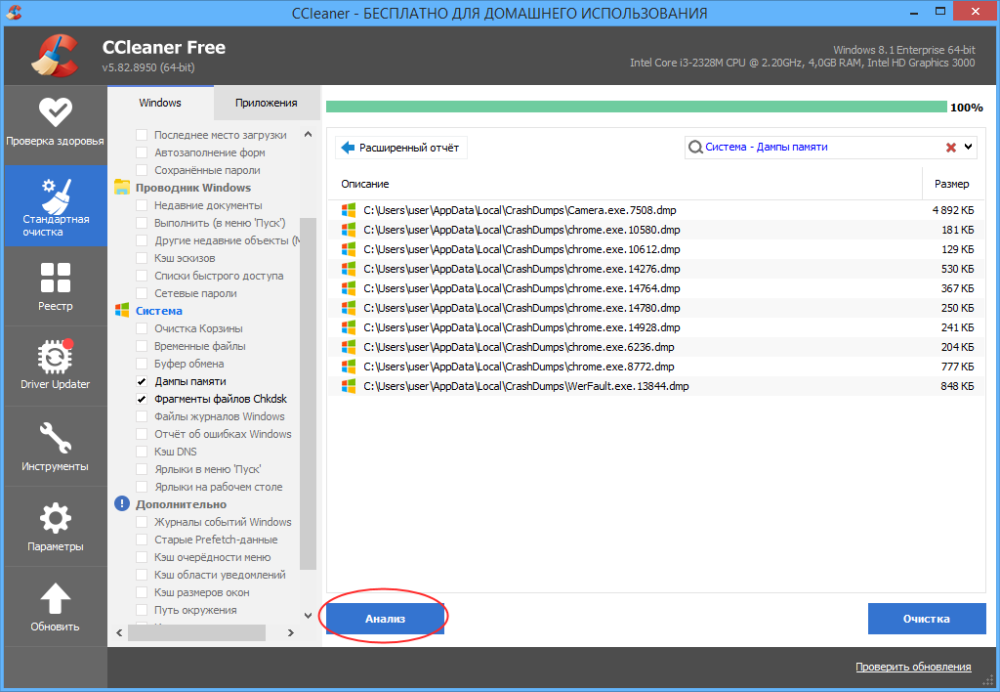
Приводить инструкцию по использованию чистильщика здесь не будем, программа достаточно известная, отметим лишь, что по сравнению с ручным поиском она выводит меньше результатов, но она же предлагает и более безопасное решение проблемы.
 По умолчанию, Windows 10 создает дампы памяти и минидампы при сбоях системы — синих экранах BSoD. Эти файлы могут быть полезны для диагностики проблемы, но занимают место на диске, которое, особенно в случае небольших SSD может быть критичным. Можно ли удалить дампы памяти? — да, сделать это можно и к каким-либо последствиям не приведёт.
В этой простой инструкции подробно о способах удалить файлы дампов памяти Windows 10 и минидампы. При желании вы можете отключить создание дампов памяти при сбоях, используйте инструкцию Как включить создание дампа памяти в Windows 10, но установите «Нет» в параметрах записи отладочной информации.
Ручное удаление файлов из их расположения
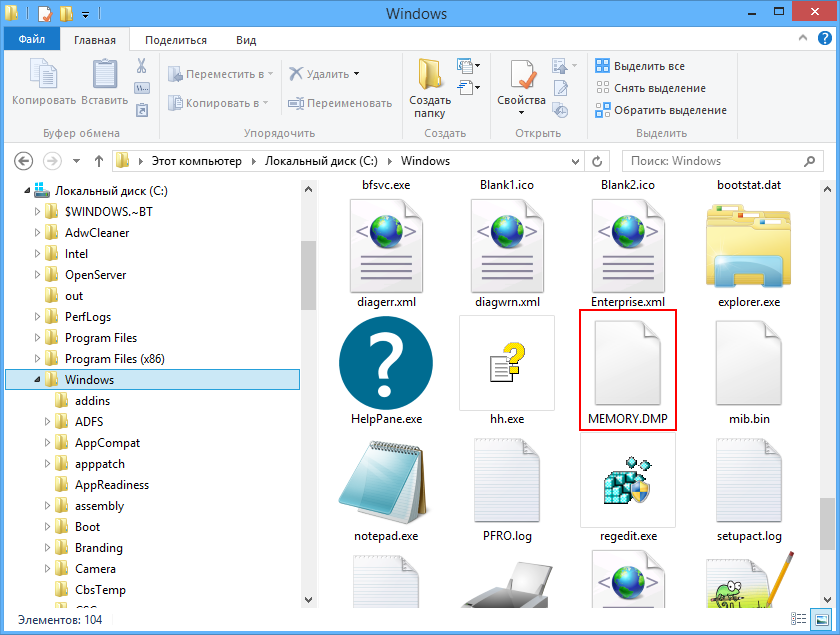
Дамп памяти Windows 10 по умолчанию — это файл C:WindowsMemory.dmp, размер которого может превышать 800 Мб, минидампы хранятся в виде файлов папке C:WindowsMinidump.

Если у вас есть права администратора на вашем компьютере, вы можете удалить эти файлы средствами Windows 10 также, как и любой другой файл (используйте Shift+удаление, чтобы файл не был помещен в корзину).
Удаление возможно и другими методами, в частности — с помощью встроенных инструментов очистки диска Windows 10 от ненужных файлов.
Удаление дампов памяти в Параметрах Windows 10
Для того, чтобы удалить дампы памяти в параметрах, выполните следующие шаги:
- Откройте параметры Windows 10 (для этого можно нажать клавиши Win+I на клавиатуре).
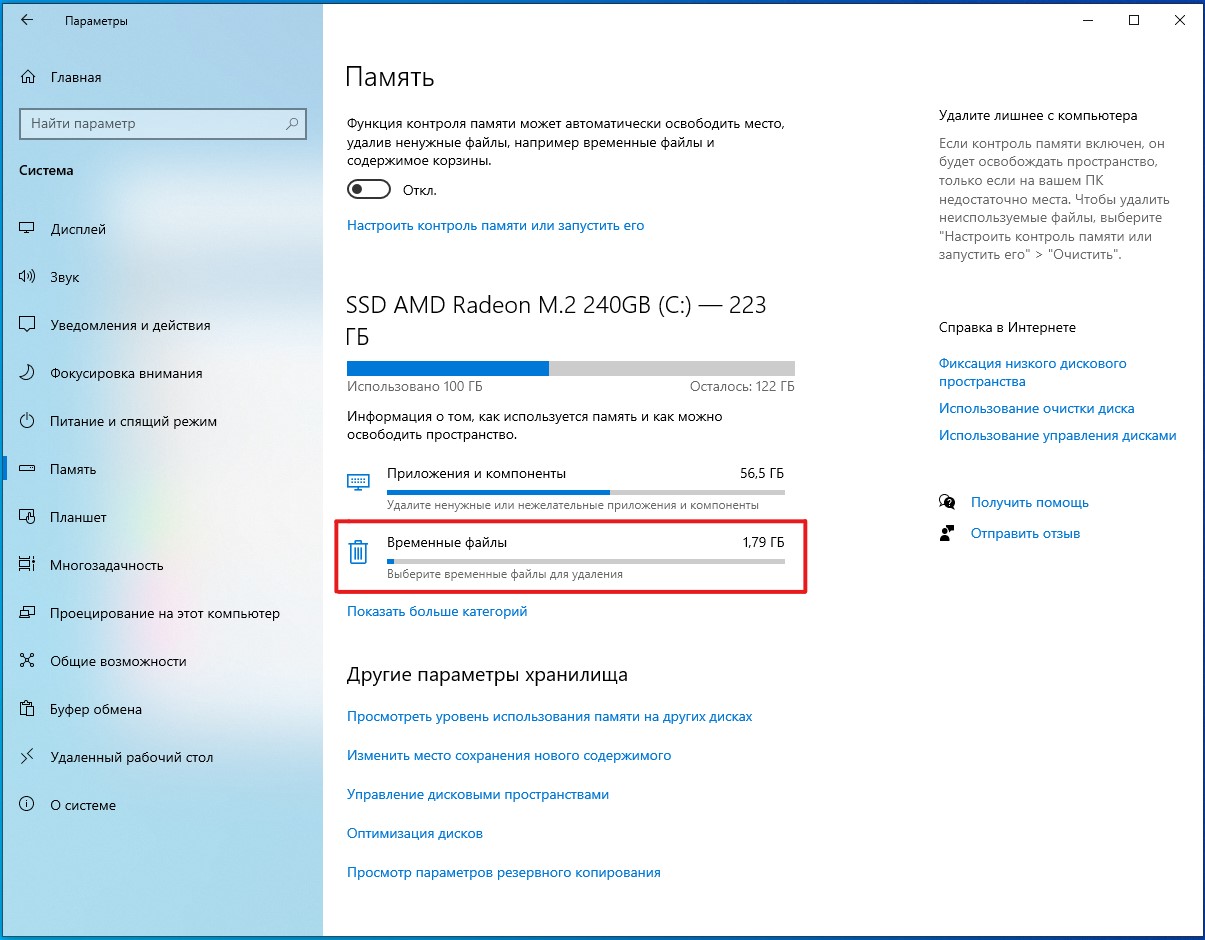
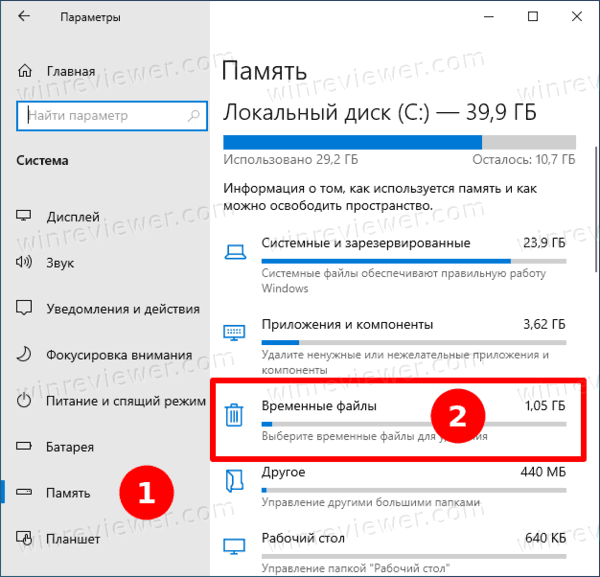
- Перейдите в раздел «Система» — «Память», а затем откройте пункт «Временные файлы».

- Отметьте пункты «Файлы дампа памяти для системных ошибок» и, при желании — «Файлы мини-дампа для системных ошибок».

- Нажмите кнопку «Удалить файлы» вверху окна.


Файлы дампа памяти и остальные отмеченные вами элементы будут удалены с диска компьютера.
Использование утилиты «Очистка диска» для удаления дампов памяти
Также можно использовать классическую утилиту очистки диска для удаления рассматриваемых файлов:
- Нажмите клавиши Win+R на клавиатуре, введите cleanmgr и нажмите Enter.
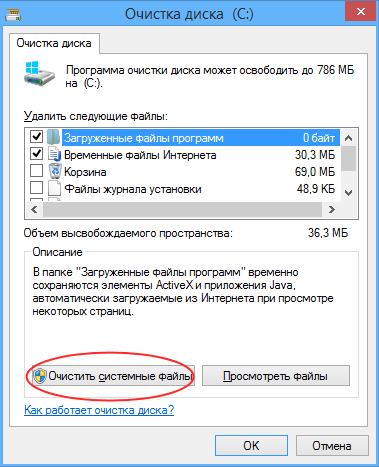
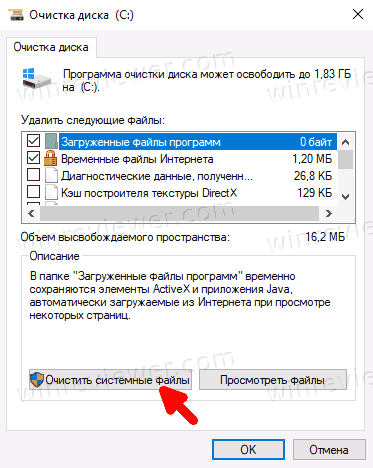
- После запуска утилиты очистки диска нажмите по кнопке «Очистить системные файлы».

- Отметьте пункты для удаления дампов памяти и нажмите кнопку «Ок».

- Дождитесь завершения очистки.


И в завершение ещё один момент — по умолчанию в Windows 10 включена опция автоматического удаления дампов памяти при нехватке места на диске (настраивается в параметрах загрузки и восстановления системы, Win+R — sysdm.cpl), причём под «нехваткой» по умолчанию считается менее 25 Гб свободного места на диске. Если на вашем диске объём свободного пространства меньше, не исключено, что вы и не увидите полных дампов памяти (а лишь небольшие файлы минидампов). Возможно, в контексте рассматриваемой темы вас заинтересует статья Лучшие программы для очистки диска Windows.
Когда в Windows 10 возникает критическая ошибка — например, появляется синий экран смерти — система создает файлы дампа памяти. В этих файлах содержится копия системной памяти на момент ошибки — она может помочь определить причину проблемы.
Файлы дампа системных ошибок могут пригодиться во многих ситуациях, но если вы не разработчик и отправлять файлы в службу поддержки Microsoft не планируете, они будут только тратить место на жестком диске.
Если у вас на компьютере не хватает места, или вы просто решили избавиться от ненужного балласта, есть целых три метода безопасного удаления этих файлов: с помощью приложения Параметры, Очистки диска и Командной строки.
В этой инструкции мы расскажем, как найти и удалить файлы дампа системных ошибок.
Как удалить файлы дампа системных ошибок с помощью Параметров
Чтобы удалить файлы, проделайте следующее:
- Откройте Параметры.
- Выберите Система.
- Выберите Память.
- В разделе основного диска выберите Временные файлы.

- Отметьте опцию Файлы дампа памяти системных ошибок.

- (Опционально) Отметьте опцию файлы небольшого дампа системных ошибок.
На заметку: файлы дампа памяти содержат все доступные данные памяти и из-за этого, как правило, имеют объем, равный объему памяти. Файлы небольшого дампа занимают всего несколько мегабайт и содержат только основную информацию о сбое. - Уберите галочки возле остальных доступных вариантов.
- Нажмите Удалить файлы.
После выполнения этих шагов файлы будут удалены с вашего компьютера, освободив дополнительное пространство для более важных вещей.
Как удалить файлы дампа системных ошибок с помощью Очистки диска
Чтобы удалить файлы дампа системы с помощью очистки диска, проделайте следующее:
- Откройте Пуск.
- В Средствах администрирования Windows найдите приложение Очистка диска и откройте его.
- Нажмите Очистить системные файлы.

- Отметьте опцию Файлы дампа памяти системных ошибок.
- (Опционально) Отметьте опцию файлы небольшого дампа системных ошибок.
- Нажмите ОК.
После выполнения этих шагов файлы дампа и небольшого дампа будут удалены с устройства.
Как удалить файлы дампа системных ошибок с помощью Командной строки
Чтобы удалить файлы дампа системы с помощью Командной строки, проделайте следующее:
- Откройте Пуск.
- В разделе Служебные программы найдите Командную строку, щелкните правой кнопкой мыши верхний результат и выберите Запуск от имени администратора.
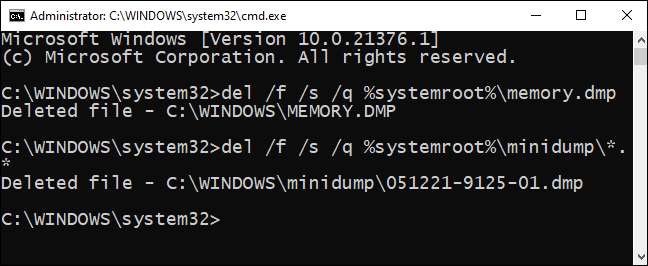
- Введите следующую команду и нажмите Enter:
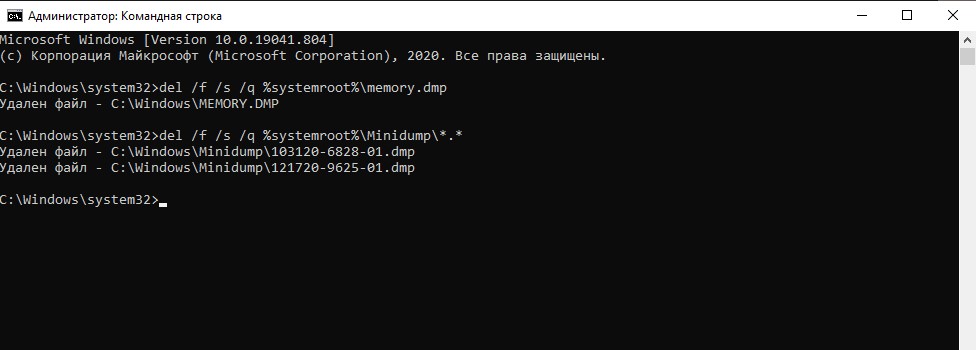
del /f /s /q %systemroot%memory.dmp
- (Опционально) Введите следующую команду, чтобы удалить также файлы небольшого дампа, и нажмите Enter:
del /f /s /q %systemroot%Minidump*.*
После выполнения этих действий будут удалены memory.dmp и все файлы небольшого дампа.
Если никаких критических ошибок за последнее время не случалось или производилась очистка памяти устройства, скорее всего, никаких файлов дампа на нем и не будет. В таком случае, соответствующей графы в Параметрах не окажется, и в системных папках файлы также будут отсутствовать.
Новости о программах, устройствах и технологиях Microsoft
Windows создает
Дамп памяти и файлы MiniDump
Когда это вылетает. Эти файлы занимают место на жестком диске или SSD вашей системы, и вы можете удалить их, чтобы освободить место. Вот как.
Что такое дамп памяти и файлы MiniDump?
Всякий раз, когда окна страдают
Синий экран смерти (BSOD)
Ошибка, она генерирует файл сбоя или файла дампы памяти, содержащий много информации, подобно технологическим потокам, действующим перед сбоями, запускими программами и приложениями, активными драйверами, информацией о ядер и мероприятия мероприятия.
Windows удерживает максимум одного файла дампа памяти (как правило, на C: Windows Memory.dmp), который он перезаписывает каждый раз, когда ваша система синих экранов. Этот файл может быть размером до 800 МБ, и он содержит много деталей, которые могут быть полезны для программиста или разработчика, который должен отлаживать сбой.
Существуют также меньшие файлы MiniDump, которые являются файлами дампы памяти, которые содержат меньше деталей. Как правило, вы можете найти эти файлы в C: Windows miniDump.
Если вы не планируете поделиться этими файлами с кем-то или использование их самостоятельно, чтобы помочь устранить неисправность системного сбоя или другой проблемы, вы можете безопасно удалить их, чтобы освободить место.
СВЯЗАННЫЕ С:
Дампы памяти Windows: что именно они для?
Удалить дампы памяти с настройками Windows
Вы можете использовать приложение настроек Windows, чтобы избавиться от файлов дампы памяти системы.
Чтобы открыть приложение настроек Windows, нажмите Windows + I и выберите раздел «Система».
Нажмите на опцию «Хранение» на левой панели.
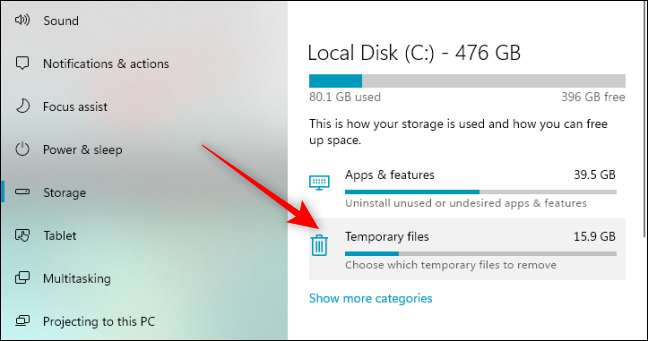
Нажмите «Временные файлы» на правой панели.
Установите флажок рядом с «Файлы дампа памяти системы ошибки», если он не выбран по умолчанию. Вы можете проверить ящики для других вариантов, чтобы освободить больше места.
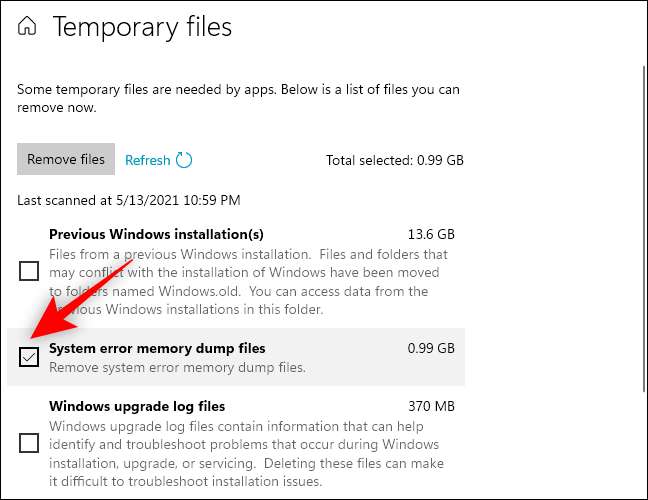
Нажмите кнопку «Удалить файлы» в верхней части окна.
Windows удалит файлы дамп памяти системной ошибки с вашего ПК.
Протрите файлы очисткой диска
Вы также можете поджечь
Инструмент очистки диска
Отказ Он может удалить файлы дамп памяти и другие системные файлы, которые раздел хранения приложения настроек Windows не спитно.
СВЯЗАННЫЕ С:
Безопасно ли удалять все в уборке диска Windows?
Чтобы начать работу с инструментом очистки диска, нажмите Пуск, введите «Установка диска», и выберите «Run As Administrator» с правой панели. Нажмите «Да» в приглашении элемента управления учетной записью пользователя.
Выберите свой системный диск Windows — вообще «C:» диск-и нажмите «ОК».
Очистка диска рассчитывает количество места, которое вы можете освободить, удалив разные типы файлов.
После этого прокрутите вниз, чтобы проверить ящики для «Файлы дампа памяти системной ошибки» и «Системные ошибки miniDumps». Вы также можете выбрать другие системные файлы, которые вы хотите удалить. Затем нажмите «ОК».
Инструмент очистки диска удалит все выбранные файлы с вашего ПК.
Удалить файлы в командной строке
Если вам удобно, используя
Командная строка
, вы можете быстро ввести команду, чтобы удалить файл дампа памяти.
Нажмите Windows + R, чтобы открыть флажок «RUN», введите «CMD» в поле, и нажмите Ctrl + Shift + Enter, чтобы открыть командную строку с привилегиями администратора.
Тип (или скопируйте и вставьте) следующую команду и нажмите Enter:
Del / F / S / Q% SystemRoot% Memory.dmp

Вы увидите «удаленный файл» в строке подтверждения в командной строке.
Чтобы удалить файлы MiniDump, введите (или вставьте) следующую команду и нажмите Enter:
del / f / s / q% systemroot% miniDump *. *
Теперь у вас нет файлов дампы памяти, занимающих дисковое пространство — не до тех пор, пока все равно в любом случае.
СВЯЗАННЫЕ С:
10 способов открыть командную строку в Windows 10
Вы можете удалить файлы дампа памяти в Windows 10, которые ОС создает при возникновении системной ошибки с BSoD (синий экран смерти). Эти файлы полезны для устранения неполадок, например, когда нужно найти драйвер, вызывающий сбой системы. После того, как вы закончили устранение неполадок, они просто понапрасну занимают место на диске. Если у вас ограниченный размер хранилища, вы определенно захотите их удалить.
Но для начала рассмотрим некоторые подробности о мини-дампах памяти.
Что такое файлы дампа памяти
Дампы памяти — это снимки оперативной памяти компьютера, сделанные в момент сбоя с системной ошибкой BSOD. Windows создает такие файлы автоматически. Снимок памяти содержит много информации, полезной для устранения неполадок. Сюда входят и запущенные приложения, и системные события, и многое другое.
Windows хранит файлы дампа памяти с именем C:WindowsMemory.dmp, и его размер может быть под гигабайт. ИТ-специалисты поддержки, разработчики и системные администраторы могут использовать такие файлы для диагностики ошибок ОС.
Таким образом, они могут быть полезны опытным пользователям, в то время как обычным пользователям Windows они могут не понадобиться, поскольку для устранения неполадок часто требуются глубокие знания и особые навыки.
Файлы минидампа
Файл минидампа — это меньший по размеру снимок памяти, который не включает все содержимое памяти. Тем не менее, он по-прежнему включает в себя некоторые полезные сведения для устранения неполадок. Из такого файла вы можете извлечь сообщение Stop (код ошибки BSOD), его параметры, список загруженных драйверов, контекст процессора, в котором он был остановлен, и некоторые детали рухнувшего процесса вместе со стеком вызовов.
По умолчанию Windows 10 создает минидампы при каждом сбое. Они хранятся в папке C:WindowsMinidump.
Опять же, дампы памяти очень полезны для устранения неполадок. Если ваша Windows 10 продолжает давать сбой, они помогут вам найти причину. Однако после устранения проблемы можно спокойно их удалить и освободить место на диске.
Эта статья подробно рассматривает, как удалить дамп памяти при системных ошибках.
- Откройте приложение «Параметры», нажав сочетания клавиш Win + I.
- Перейдите в Система > Память.
- Справа нажмите «Временные файлы».

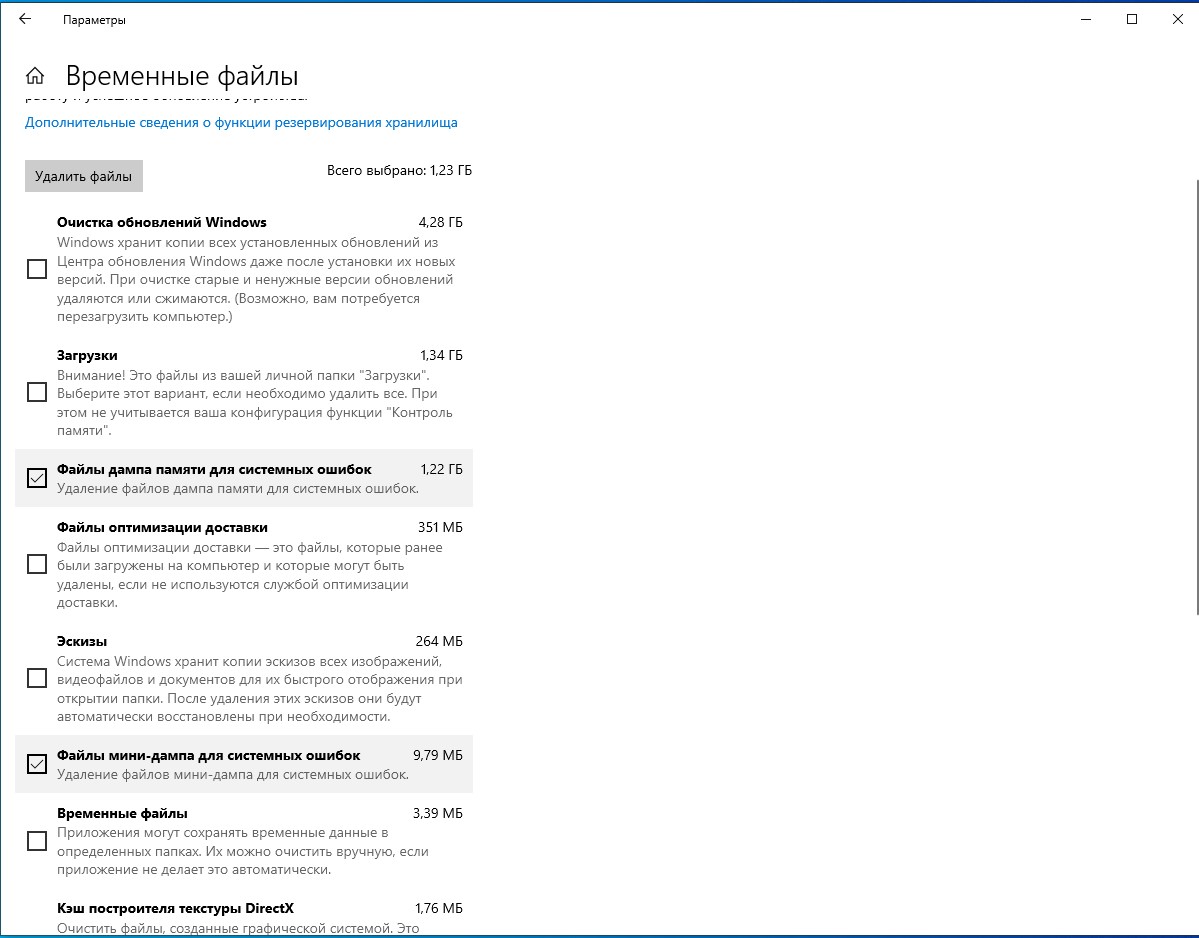
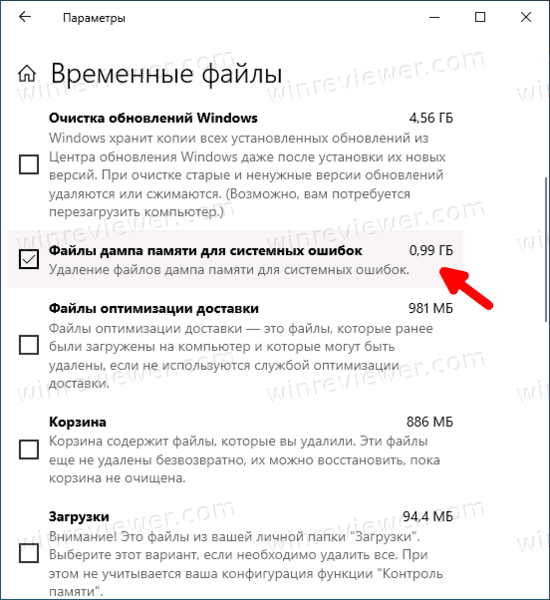
- На следующей странице установите флажок «Файлы дампа памяти для системных ошибок» и «Файлы мини-дампа для системных ошибок»

- Нажмите кнопку «Удалить файлы».
Вот таким несложным способом можно удалить дампы памяти с жесткого диска.
Кроме того, вы можете воспользоваться классическим инструментом «Очистка диска». Хотя Microsoft и считает его устаревшим и рекомендует использовать приложение «Параметры», старый добрый cleanmgr остается доступным в ОС и может быть использован для нашей задачи.
Удаление дампов памяти с помощью утилиты ‘Очистка диска’ (cleanmgr)
- Нажмите сочетания клавиш
Win+R, чтобы открыть диалоговое окно «Выполнить», и введитеcleanmgr. - Выберите системный диск, обычно это
C:.
- В появившемся окне нажмите кнопку Очистить системные файлы.

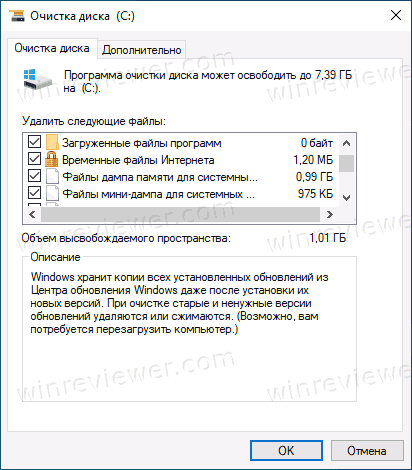
- На следующей странице поставьте флажки для дампов памяти системных ошибок и файлов мини-дампа системных ошибок.
- Нажмите OK, чтобы удалить файлы дампа памяти, и дождитесь завершения очистки.
Готово! Windows удалит файлы дампа с диска.
Используя любой из вышеперечисленных методов, вы также можете очистить и другие временные файлы и компоненты обновлений Windows, которые часто занимают значительно больше места на диске, чем дампы памяти. В зависимости от того, как вы используете Windows 10, вы можете освободить от 10 до 30 ГБ, что важно, если у вас небольшой SSD.
💡Узнавайте о новых статьях быстрее. Подпишитесь на наши каналы в Telegram и Twitter.
Судя по тому, что вы читаете этот текст, вы дочитали эту статью до конца. Если она вам понравилась, поделитесь, пожалуйста, с помощью кнопок ниже. Спасибо за вашу поддержку!

Windows создает файлы дампа памяти и минидампа при сбое. Эти файлы занимают место на жестком диске или твердотельном накопителе вашей системы, и вы можете удалить их, чтобы освободить место. Вот как.
Что такое файлы дампа памяти и минидампа?
Всякий раз, когда Windows сталкивается с ошибкой Blue Screen of Death (BSOD), она генерирует файл сбоя или файл дампа памяти, содержащий много информации, например, потоки процессов, активные до сбоя, запущенные программы и приложения, активные драйверы, информацию о ядре и события. отметки времени.
Windows хранит максимум один файл дампа памяти (обычно в C: Windows MEMORY.DMP), который она перезаписывает каждый раз, когда ваша система показывает синий экран. Этот файл может иметь размер до 800 МБ и содержать множество деталей, которые могут быть полезны программисту или разработчику, которому необходимо отладить сбой.
Существуют также файлы минидампа меньшего размера, которые представляют собой файлы дампа памяти, содержащие меньше деталей. Обычно вы можете найти эти файлы в C: Windows Minidump.
Если вы не планируете делиться этими файлами с кем-то или использовать их самостоятельно для устранения сбоев системы или других проблем, вы можете безопасно удалить их, чтобы освободить место.
Вы можете использовать приложение Windows Settings, чтобы избавиться от файлов дампа памяти системной ошибки.
Чтобы открыть приложение «Параметры Windows», нажмите Windows + i и выберите раздел «Система».
Щелкните параметр «Хранилище» на левой панели.
Щелкните «Временные файлы» на правой панели.
Установите флажок рядом с «Файлы дампа памяти системной ошибки», если он не установлен по умолчанию. Вы также можете установить флажки для других параметров, чтобы освободить больше места.
Нажмите кнопку «Удалить файлы» вверху окна.
Windows удалит файлы дампа памяти системной ошибки с вашего ПК.
Удалите файлы с помощью очистки диска
Вы также можете запустить инструмент очистки диска. Он может удалять файлы дампа памяти и другие системные файлы, которые не указаны в разделе «Хранилище» приложения «Параметры Windows».
Чтобы начать работу с инструментом очистки диска, нажмите «Пуск», введите «Очистка диска» и выберите «Запуск от имени администратора» на правой панели. Нажмите «Да» в ответ на запрос управления учетными записями пользователей.
Выберите системный диск Windows — обычно это диск «C:» — и нажмите «ОК».
Очистка диска рассчитает объем пространства, который вы можете освободить, удалив файлы разных типов.
После этого прокрутите вниз и установите флажки для «Файлы дампа памяти системной ошибки» и «Файлы мини-дампа системной ошибки». Вы также можете выбрать другие системные файлы, которые хотите удалить. Затем нажмите «ОК».
Инструмент очистки диска удалит все выбранные файлы с вашего ПК.
Удалить файлы в командной строке
Если вам удобно использовать командную строку, вы можете быстро ввести команду для удаления файла дампа памяти.
Нажмите Windows + R, чтобы открыть поле «Выполнить», введите в поле «cmd» и нажмите Ctrl + Shift + Enter, чтобы открыть командную строку с правами администратора.
Введите (или скопируйте и вставьте) следующую команду и нажмите Enter:
del / f / s / q% systemroot% memory.dmp
Вы увидите строку подтверждения «Удаленный файл» в командной строке.
Чтобы удалить файлы минидампа, введите (или вставьте) следующую команду и нажмите Enter:
del / f / s / q% systemroot% minidump *. *
Теперь у вас нет файлов дампа памяти, занимающих дисковое пространство, по крайней мере, до тех пор, пока Windows снова не отобразит синий экран.
Если файл дампа памяти со временем увеличился, удалите файл, чтобы освободить место на жестком диске. Самый простой способ очистить файлы дампа — выполнить очистку с повышенными правами с помощью служебной программы очистки диска Windows. … Выберите все параметры или, по крайней мере, выберите «Системные отчеты об ошибках Windows» или «Файлы дампа памяти системных ошибок».
Так что безопасно удалить дамп памяти системной ошибки файлы.
Удалив файлы дампа памяти системной ошибки, вы можете получить немного свободного места на системном диске. Однако файлы дампа можно автоматически воссоздавать каждый раз при сбое системы. … Есть ли другой способ удалить файлы дампа памяти системных ошибок Windows 10/8/7?
Можно ли удалять файлы аварийного дампа?
Файлы минидампа создаются всякий раз, когда в вашей системе появляется синий экран смерти или когда в фоновом режиме происходит сбой любого другого приложения. Если вы не хотите устранять эту проблему,вы можете удалить их как безопасно но вы не должны удалять все при очистке диска.
Что означают файлы дампа памяти системной ошибки?
Файлы дампа памяти, иначе аварийные дампы, являются системные файлы, сохраненные при сбоях синего экрана. Когда появляется сообщение об ошибке BSOD, Windows сохраняет копию системной памяти. Эти файлы аварийного дампа могут затем помочь разработчикам исправить сбои системы BSOD. … Они могут занимать гигабайты на жестком диске.
Как исправить системные ошибки в файлах дампа памяти?
Чтобы удалить файлы дампа системной ошибки в Windows 10, выполните следующие действия:
- Открыть настройки.
- Нажмите «Система».
- Нажмите на хранилище.
- В разделе основного диска выберите параметр «Временные файлы». …
- Установите флажок «Системная ошибка файлов дампа памяти». …
- (Необязательно) Установите флажок «Файлы минидампа системных ошибок». …
- Очистите другие выбранные элементы.
Как очистить Windows 7?
Чтобы запустить очистку диска на компьютере с Windows 7, выполните следующие действия:
- Нажмите кнопку Пуск.
- Щелкните Все программы | Аксессуары | Системные инструменты | Очистка диска.
- В раскрывающемся меню выберите Диск C.
- Нажмите кнопку ОК.
- Очистка диска вычислит свободное пространство на вашем компьютере, что может занять несколько минут.
Как очистить файлы обновлений Windows?
Как удалить старые файлы Центра обновления Windows
- Откройте меню «Пуск», введите «Панель управления» и нажмите клавишу «Ввод».
- Зайдите в Администрирование.
- Дважды щелкните Очистка диска.
- Выберите Очистить системные файлы.
- Установите флажок рядом с Очисткой Центра обновления Windows.
- Если доступно, вы также можете установить флажок рядом с предыдущими установками Windows.
Безопасно ли удалить Windows Update Cleanup?
Очистка Центра обновления Windows: при установке обновлений из Центра обновления Windows Windows сохраняет старые версии системных файлов. Это позволяет вам удалить обновления позже. … Этот безопасно удалить, пока ваш компьютер работает правильно и вы не планируете удалять какие-либо обновления.
Что такое файл Mdmp, который я могу удалить?
В IICS hs_err_pid Файл дампа .mdmp создается при сбое любого процесса. Эти файлы создаются в. {Informatica Cloud Secure Agent} appsData_Integration_Server ICSmainbinrdtm. Если эти файлы занимают место, вы можете удалить эти файлы, так как это файлы дампа.
Безопасно ли удалять временные файлы?
Удалить временные файлы с вашего компьютера совершенно безопасно.. … Работа обычно выполняется вашим компьютером автоматически, но это не значит, что вы не можете выполнить задачу вручную.
Что такое аварийный дамп системы?
В вычислениях дамп ядра, дамп памяти, аварийный дамп, системный дамп или дамп ABEND состоит записанного состояния рабочей памяти компьютерной программы в определенное время, как правило, когда программа аварийно завершилась или иным образом завершилась ненормально.
Где файлы дампа системной памяти?
5. Файл дампа памяти обычно находится в % SystemRoot% ПАМЯТЬ. DMP. Системный корень обычно — это C: Windows. Если вы настроили систему для минидампа, папка расположения по умолчанию -% SystemRoot% Minidump.
Безопасно ли удалять кеш шейдеров DirectX?
Это окончательное удаление… Однако, если вы считаете, что ваш кэш шейдеров DirectX поврежден или слишком велик, вы можете удалить его. Содержимое в нем удаляется безвозвратно, но кеш будет восстановлен и снова заполнен. Однако для его восстановления может потребоваться перезагрузка.