My disk system is killing me ive tried to fix it for hours to no avail. I got it with a new belt so im assuming the belt was replaced but the system clearly wasnt calibrated and has been giving me the err 22 message relentlessly. i messed around with the motor speed and that didnt help then I tried to realign the spindle hub. I didnt have a hex screwdriver so i kind of nudged it into place and it worked and successfully read the disk 3 times. It went back to error 22 after i assumed it was because I kind of half assed it so i did the same thing but a little better and it worked for a whole day. the next day it wasnt working i assumed because i didnt really tighten the screw at all so i ordered the right scew driver and disassembled the whole thing properly and tightened the screw in the correct position and it didnt work. Ive probably redone it 20 times and have gotten nothing but error 22. twice i got it to work after adjusting the speed two but it failed to successfully read the disk more than once. Im dying
Make sure the belt hasn’t slipped off the small spindle. I messed with mine for like 3hrs before checking the belt  after setting it back it worked perfect.
the belt doesnt slip off all the way but rides up to the to a little leaving it not entirely on the spindle im not sure how to stop this and all the gears turn etc in spite of it..
Post Merge: March 26, 2015, 09:59:56 pm
its also managed to stay fully on for a decent amount of times that ive booted it up with no difference. I really cant figure out what the problem is
i did all of that before but i thought i’d try again because its a different method than what i ve done but stll got err 22
Post Merge: March 27, 2015, 04:43:01 pm
i pushed the belt down as low as it would go on the metal spindle and it worked.i tried it again later and now it throws out 27 22 21 7 pretty much anything but mostly 22 and 27 ive gone through all the drive speeds numerous times to be sure that wasnt the problem
I would buy the belt I linked to and try again.
yeah I was thinking i might try that.. thank you for your help!
Sometimes my belt would slowly start to get towards the edge of the spindle as well. Getting error 22 or 27 is the most frustrating thing in the world. I wish I could help you but I’m not that good at fixing FDS. However, there was a little mini guide on here about correctly aligning all the holes in the metal plates. I remember that helped out a lot.
Is the drive head moving back all the way to the home position? Sometimes the return spring gets weak or it binds up and no longer slides smooth on the rails.
a few times before it wast sliding all the way back but i dont think its done it since
- Famicom World
-
►
Family Computer -
►
Technical & Repair Assistance (Moderators: manuel, L___E___T) -
►
Disk system problems err 22
Ok, I got a famicom bundle off ebay, «tested and working!»
so the disk system belt was snapped on arrival, but I half expected that and had ordered a belt at the same time as I won the auction, so I whacked that in there and plugged it all back up, disk spins, but all I get are error messages for whatever games I put in, seems to randomly pick between 21 and 22.
what can I try?
Quote from: phreak97 on October 21, 2009, 10:47:42 PM
what can I try?
The search function 
http://nfggames.com/forum2/index.php?topic=1711.0
Anyway you’ll need to align the spindle as explained in the Jfgoods guide. If it still doesn’t work, and you are sure that your disks are good, then you may try to tweak the trimmer that changes the rotation speed.
BTW the original belts can be replaced by those used on Sinclair spectrum/Amstrad CPC/PCW 3″ drives. The belts are a 100% match and cost a fraction of the Japanese imports.
ah lol.
well.. I’ve tried adjusting the disk speed and the head position, but no luck.
the head moves half way, stops for a fraction of a second, then moves to the outside, then moves back to the inside over a couple of seconds or so, then starts over.. does that about twice before showing an error. is that the movement I should expect?
ok, I think my spindle alignment is wrong, how do I set it? none of the guides online give me anything except a 404 slap in the face.
thanks:)
I actually got it running last night but I’m not confident about it’s reliability, I may have another go using this guide.
bloody 7 hours of fiddling, 4 hours before I got a game to boot once.
Can you borrow an O-Scope ? with such tool you should be able to make a very good adjustment on the heads and drive speed.
yeah i sure can, where do i measure and what am i looking for?
- nfg.forums
-
►
NFG Forums -
►
Repair Division -
►
Famicom Disk system ERR.21/ERR.22 Help?

-
#1
So I been playing around with these Famicom Disk System drives for a bit of which i have 2.
Both give me error 22.
From what i read error 22 could be multiple things, including Spindal misalignment
I have no way of testing my 2 test diskettes either so im not positive but maybe if they are bad this error could happen.
When i received them the belt drives were of course rotted so temporarily i used a small rubber band on each one. Maybe this is not creating the right amount of torque so I might go ahead and buy replacement belts anyways.
If you look at the diskette while the drive is reading the head is moving down the disk and the disk is spinning.
I have tried adjusting the Spindle Hub but i havent gotten any results. I tried following the guide for Spindle adjustments but im not exactly sure i am following what they are talking about, http://prntscr.com/ik808j Is there a home position i am supposed to start adjusting the Hub at? The way i gathered is, you have to position the drive head so it is at its farthest point from the spindle and hub just before the drive head starts to move back towards the spindle. This is the point where you make any adjustments so everything is synced up, Maybe thats not right?
Does anyone have any suggestions about this. Maybe it just takes alot of time to tune it just right on the spindle hub, or maybe thats not it at all.
Thanks
Guide Reference:
http://www.famicomdisksystem.com/tutorials/fds-repair-mod/belt-replacement-adjustment/
Last edited: Feb 26, 2018

-
#2
replace that belt . thats probably causing most of your problems. you can adjust the spindles from there. get the amstrad belt- same exact thing as the nintendo one, only they were made more recently. plus like 1/3 the price.

-
#3
Yeah start with the belt.
Would also be worth making sure the disks work. Whenever I get a stack of disks it’s common for about 10% not to work, it wouldn’t be unreasonable for the only 2 you have not to work.
Adjusting the spindle is finicky and can take multiple tries. Once you’ve done it enough times you’ll start to get a feel for it. Good luck!
-
#4
Alright Ill go ahead and order some replacement belts it could just be the rubberband isnt enough torque to pull the hub at the correct speed
Thanks

-
#5
95% of the time a belt replacement solves the problem. If it’s the original belt it’s probably barely staying together. Probably brittle as hell.
Case in point my 3DO FZ-1’s rubber feet literally turned to goo in the last six months. Rubber does weird shit over time
-
#6
95% of the time a belt replacement solves the problem. If it’s the original belt it’s probably barely staying together. Probably brittle as hell.
Case in point my 3DO FZ-1’s rubber feet literally turned to goo in the last six months. Rubber does weird shit over time
hehe there was no belt left other than some remnants (it wasnt tampered with though)
I read or heard some where that the reason rubber will turn to goo instead of becoming brittle is because it wasnt treated
Last edited: Feb 27, 2018

HMG
H = Heinously, M = Massive, G = Gonad,
-
#7
You might find this of use.

-
#8
You might find this of use.

AH HAH, I knew that square hole and metal hole had some sort of purspose, thank you this was helpful

-
#10
This is the video I used to replace the belts on all my disk systems that doesn’t require post-belt-replacement adjustment. Maybe it’ll be of help to you:
I found that newer method after i did the first drive sadly … but the second drive i did I used the newer method, but i read online even with the newer method an adjustment might be required if the gears are not alligned to the correct degree/teeth. Either way they both give error 22.
Do you guys recommend a belt or maybe a better rubberband?? lol
Edit, i skipped through some more, clearly the «seating» of the gears using the holes was something i was not aware of i might go back tonight and try this before bed.
Thanks for the continued help and tips everyone
Last edited: Feb 28, 2018
HMG
H = Heinously, M = Massive, G = Gonad,
-
#11
I always just used rubber bands from the junk drawer, you probably have one too. I don’t know where you’d buy a suitable rubber band, just go with something that fills the space of the motor spinner well, something like the cheap yellow belt off eBay but thicker. The material of the rubber band is also important, it needs to grip the smooth metal and plastic wheels, just try out as many rubber bands as you can find.

-
#13
Those look like tape worms!

madman
Blame madman, You Know You Want To.,
So the Famicom Disk System is really hard to get up and running again for a number of reasons. The most common reason is that the rubber belt needs to be replaced. This is a relatively easy and well documented fix. But after you get the belt on, the system still usually doesn’t work. You will often get Errors 21, 22, or 27 when trying to get it to read discs. It can take hours of tinkering to get past these errors, and even at that point, some discs will load while others will not. I thought I’d make a post about what I have done with much success. I’ve gotten about 5 systems up and running using the process below, and it gets easier every time.

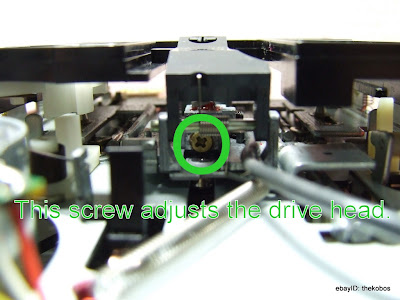
The first thing you want to do is adjust the motor speed. Use a thin, flat-head screw driver and insert it into motor as depicted above. If 10 is all the way counter-clockwise, and 0 is all the way clockwise, set it to around 7. It seems to be able to read most discs at that speed.


Note the little indention on the spindle. This is a cause of much consternation, as you must align the tip of the little black grub screw perfectly into this little hole. It can be tricky because it can’t be too tight, too high, or too low. It has to be perfect. In my experience, if it’s too tight, you will get a lot of Error 27s. I’m not sure if this being misaligned is THE cause for error 27s, but that’s what I have observed. But I’ve also seen error 27s with bad discs, so who knows… You may have to realign it a few times. It’s my personal belief that this is the source of the problem most of the time. If you try many times and it still doesn’t work, you can try adjusting the drive head as described below.
The next thing you can try doing is adjusting the drive head. To do that, you need to turn the screw above 1/8th turns at a time to see if it makes a difference. Be careful not to strip this screw! If you strip it, game over.
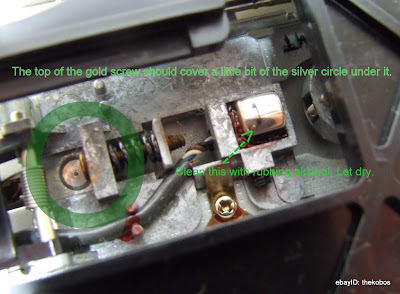
The ideal position I have found is shown in the picture above. You want to have the top of the gold screw positioned slightly over the silver circle below it. While you’re at it, swab the little silver thing with rubbing alcohol and let it air dry.
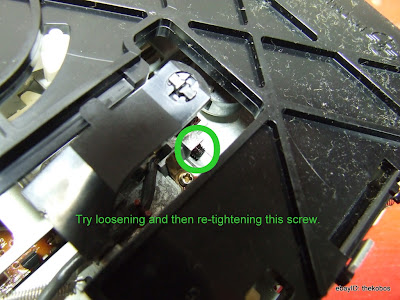
Lastly, there’s one more grub screw which you can try adjusting. I don’t know what it’s supposed to do, but I always loosen it and re-tighten it just for kicks.
By the way, it is possible to use a drive from the standard red FDS system and transplant it into a Sharp Twin Famicom. On the Twin Famicom system I had, the drive head screw was stripped and therefore the drive was unfixable. So I put a regular FDS drive in there and it works great.
Update 2013-10-08: There is now a
great article available
at the Famicom Disk System site, which I’d
highly recommend. See
my addendum
for more info.
This isn’t the usual fare from this blog, but this is good information that took
me quite some time to find. I’m also an avid video game collector, and i
recently picked up a Sharp Twin Famicom and a few Famicom Disk System
games; notably Kid Icarus and the infamous Doki Doki Panic!, which later
became the USA/World Super Mario Brothers 2.
Anyhow, my Twin Famicom came with Super Mario Brothers 2 (known as the Lost
Worlds outside of Japan) which works perfectly, but the game on the back (some
sort of Tennis game) wouldn’t ever work. I didn’t think much of it, until both
of my new games didn’t work either. I would receive an Err.21 or Err.22 message
each time I attempted to load the games. The drive would attempt to read, come
to a full stop (note: this is important!) and then attempt to read again,
shortly before throwing the error message.
So, my Twin Famicom came with a broken belt, which is very common, and the
seller shipped the system with a new belt that would have to be installed.
This part went swell, but apparently there’s more to be done. There’s a lot of
random forum posts out there, telling you to adjust the potentiometer on
the motor to adjust the drive speed, or the read head on the disk drive.
Adjusting the pot was simple, but didn’t give me any results, and the read head
is factory set (and thoroughly waxed/glued in) and seemed a little too dangerous
to adjust, so I didn’t want to try.
I found a lot of passing mentions to aligning the spindle, but no real good
information on how to do so, until I came across this forum post by “Zach”:
The tough part (for me, at least) comes when you have to phyiscally align the
drive. The first time I replaced a belt, the drive worked (without any
alignment) for most of my games, but not some others.
[…]
So what you have to do is reach in from the front of the drive, loosen the
SMALL black allen head set screw that holds the grey metal block to the
spindle, then rotate the big gear with the belt slot around until it clicks
(you’ll see the spring-loaded piece snap into place, dropping down a steep
notch). At that point, you have to rotate the big gear another quarter turn.
This is the position where you want the assembly to be when you have the
little, black set screw pointing straight out the front of the drive, so line
up the smal, grey metal disk pickup block (which should be free to spin around
the spindle since the set screw is loose) , and tighten the set screw with
your little allen wrench. Try it out and see if more disks are loading (or see
if you’ve messed up the drive even more!)
I followed his instructions by performing the following:
- Remove the FDS drive from the system, and disassemble the following:
- Front faceplate and drive door
- Bottom Plate
- Look inside the drive from the front (where the drive door was), and spin
the spindle (from the gear at the bottom of the drive) until the small allen
screw faces you. - Loosen the screw, and keep the allen key in the screw to hold the spindle
still. - Spin the drive pulley clockwise until you hear a small click (clockwise
should be observed by looking at the bottom of the drive. The spindle (if
you were looking straight down at the top, would be moving
counter-clockwise). - Once you hear the small click, spin one quarter turn clockwise, and tighten
down the spindle (allen screw).
I half reassembled things to see if the trick worked, and I was getting a new
behavior! Now, the drive would spin up, attempt to read, and go to a black
screen! The drive would continue spinning (and wouldn’t come to a full stop mid
read, very important!), and then eventually the Famicom BIOS screen would
return, with Err.27. I was on the way!
From here, I did the following:
- Loosen spindle, and turn the pulley 5 degrees or so clockwise, then
retighten the spindle. - Try a disk again.
I repeated those steps until the drive began exhibiting somewhat similar
behavior as before (coming to a full stop during the read operation). Then I did
the same, only moving 5 degrees counter-clockwise instead; and you know what?
IT WORKED.
Stupid thing loaded. It turns out that the systems are aware of the spindle
position, and if it isn’t correct it will cause them to read the header data
incorrectly, causing the games to fail. Afterwards, I reassembled the system and
all of my games have been loading flawlessly.
Someday in the future maybe I’ll turn this into a guide with pretty pictures and
everything, but for now hopefully this’ll help someone get their FDS working.
For reference, here’s a list of FDS Error Codes:
ERROR 01 Disk not correctly inserted. (No Disk Card)
ERROR 02 Battery error. Check power adaptor or batteries.
ERROR 03 Broken prong on disk card.
ERROR 04 Wrong gamemaker ID.
ERROR 05 Wrong game name.
ERROR 06 Wrong version name.
ERROR 07 A, B side error (eject disk, turn and insert disk again).
ERROR 08 Disk #1 wrong.
ERROR 09 Disk #2 wrong.
ERROR 10 Disk #3 wrong.
ERROR 20 screen data differs.
ERROR 21 Disk header block(NINTENDO-HVC) part is wrong.
ERROR 22 Disk header block reecognition #$01 isn’t read and cant be ignored.
ERROR 23 File recognition block #$02 can’t read for several reasons and cant
be ignored.
ERROR 24 File header block recognition #$03 can’t read and cant be ignored.
ERROR 25 File data block recognition #$04 can’t read and cant be ignored.
ERROR 26 Can’t save properly to disk card.
ERROR 27 Block end mark seen and ends prematurely.
ERROR 28 The disk unit and the same period can’t take it.
ERROR 29 The disk unit and the same period can’t take it.
ERROR 30 Disk card too full to save.
ERROR 31 Data number of a disk card doesn’t match up.
Then, a commenter named “Jon” posted the following:
Thanks for posting this! When I got a “broken” FDS recently this helped direct
me towards the cure.I did find a much more direct & accurate way to align these though. It can be
done during belt replacement & should eliminate the need for fine-tuning
afterward.How? When the gear assembly retainer (triangular piece) is removed for belt
replacement, simply point the rectangular notch in the large white gear to the
largest notch in the metal cam below it.Maintain those positions during reinstall & you should be good to go. No need
to hunt for a hex key (1.5mm BTW) to adjust the disk catch on the spindle &
all positioning remains at original factory settings.
Back to posts