Содержание
- Fastboot error cannot load boot img no such file or directory
- 4 Ways to Fix “Cannot load twrp.img” Error in Fastboot
- Fix “Cannot load twrp.img” Error
- 4 Solutions to Fix TWRP Error
- Ошибка в Fastboot cannot load ‘image’, как исправить?
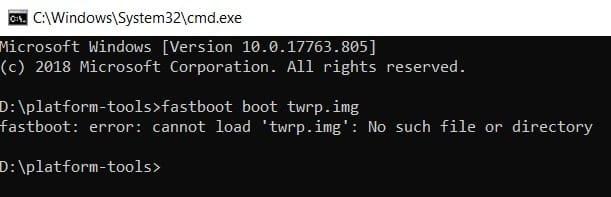
Fastboot error cannot load boot img no such file or directory
Platform-tools: r33.0.3
ADB: 1.0.41 (33.0.3-8952118)
Fastboot: 33.0.3-8952118
Make_f2fs (casefold): 1.15.0 (2022-05-20)
Mke2fs: 1.46.2 (28-Feb-2021)
Последнее обновление утилит в шапке: 23.08.2022
ADB (Android Debug Bridge — Отладочный мост Android) — инструмент, который устанавливается вместе с Android-SDK и позволяет управлять устройством на базе ОС Android.
Работает на всех Android-устройствах, где данный функционал не был намеренно заблокирован производителем.
Здесь и далее: PC — ПК, компьютер к которому подключено устройство.
ADB — консольное приложение для PC, с помощью которого производится отладка Android устройств, в том числе и эмуляторов.
Работает по принципу клиент-сервер. При первом запуске ADB с любой командой создается сервер в виде системной службы (демона), которая будет прослушивать все команды, посылаемые на порт 5037.
Официальная страница
ADB позволяет:
- Посмотреть какие устройства подключены и могут работать с ADB.
- Просматривать логи.
- Копировать файлы с/на аппарат.
- Устанавливать/Удалять приложения.
- Удалять (очищать) раздел data.
- Прошивать (перезаписывать) раздел data.
- Осуществлять различные скрипты управления.
- Управлять некоторыми сетевыми параметрами.
Поставляется ADB в составе инструментария разработчика Андроид (Android SDK), который, в свою очередь входит в состав Android Studio.
Если что-то неправильно, то в списке подключенных устройств (List of devices attached) будет пусто.
Скрытые команды ADB
adb -d Команда посылается только на устройство подключенное через USB.
Внимание: Выдаст ошибку, если подключено больше одного устройства.
adb -e Команда посылается на устройство в эмуляторе.
Внимание: Выдаст ошибку, если подключено больше одного эмулятора.
adb -s Команда посылается на устройство с указанным серийным номером:
adb -p Команда посылается на устройство с указанным именем:
Если ключ -p не указан, используется значение переменной ANDROID_PRODUCT_OUT.
adb devices Список всех подсоединенных устройств.
adb connect [: ] Подсоединиться к андроид хосту по протококу TCP/IP через порт 5555 (по умолчанию, если не задан).
adb disconnect [ [: ]] Отсоединиться от андроид подключенного через TCP/IP порт 5555 (по умолчанию, если не задан).
Если не задан ни один параметр, отключиться от всех активных соединений.
adb push Копировать файл/папку PC->девайс.
adb pull [ ] Копировать файл/папку девайс->PC.
adb sync [ ] Копировать PC->девайс только новые файлы.
Ключи:
-l Не копировать, только создать список.
adb shell Запуск упрощенного unix shell.
Примеры использования
adb emu Послать команду в консоль эмулятора
adb install [-l] [-r] [-s] Послать приложение на устройство и установить его.
Пример: adb install c:/adb/app/autostarts.apk Установить файл autostarts.apk лежащий в папке /adb/app/ на диске с:
Ключи:
-l Блокировка приложения
-r Переустановить приложение, с сохранением данных
-s Установить приложение на карту памяти
Установка split apk
adb uninstall [-k] Удаление приложения с устройства.
Ключи:
-k Не удалять сохраненные данные приложения и пользователя.
adb wait-for-device Ждать подключения устройства.
adb start-server Запустить службу/демон.
adb kill-server Остановить службу/демон.
adb get-state Получить статус:
offline Выключен.
bootloader В режиме начальной загрузки.
device В режиме работы.
adb get-serialno Получить серийный номер.
adb status-window Непрерывный опрос состояния.
adb remount Перемонтировать для записи. Требуется для работы скриптов, которые изменяют данные на.
adb reboot bootloader Перезагрузка в режим bootloader.
adb reboot recovery Перезагрузка в режим recovery.
adb root Перезапуск демона с правами root
adb usb Перезапуск демона, прослушивающего USB.
adb tcpip Перезапуск демона, прослушивающего порт TCP.
adb ppp [параметры] Запуск службы через USB.
Note: you should not automatically start a PPP connection. refers to the tty for PPP stream. Eg. dev:/dev/omap_csmi_tty1
Параметры:
defaultroute debug dump local notty usepeerdns
FastBoot — консольное приложение для PC. Используется для действий над разделами
fastboot devices Список присоединенных устройств в режиме fastboot.
fastboot flash Прошивает файл .img в раздел устройства.
fastboot erase Стереть раздел.
Разделы: boot, recovery, system, userdata, radio
Пример: fastboot erase userdata Стирание пользовательских данных.
fastboot update Прошивка из файла имя_файла.zip
fastboot flashall Прошивка boot + recovery + system.
fastboot getvar Показать переменные bootloader.
Пример: fastboot getvar version-bootloader Получить версию bootloader.
fastboot boot [ ] Скачать и загрузить kernel.
fastboot flash:raw boot [ ] Создать bootimage и прошить его.
fastboot devices Показать список подключенных устройств.
fastboot continue Продолжить с автозагрузкой.
fastboot reboot Перезагрузить аппарат.
f astboot reboot-bootloader Перезагрузить девайсв режим bootloader.
Перед командами fastboot можно использовать ключи:
-w стереть данные пользователя и кэш
-s Указать серийный номер устройства.
-p
Указать название устройства.
-c Переопределить kernel commandline.
-i Указать вручную USB vendor id.
-b Указать в ручную базовый адрес kernel.
-n
Указать размер страниц nand. по умолчанию 2048.
Команду logcat можно использовать с машины разработки
$ adb logcat
или из удаленного shell
# logcat Каждое сообщение лога в Android имеет тэг и приоритет
Тэг – это строка указывающая компонент системы, от которого принято сообщение (например: View для системы view)
Приоритет – имеет одно из нижеследующих значений (в порядке от меньшего к большему):
V — Verbose (Низший приоритет).
D — Debug
I — Info
W — Warning
E — Error
F — Fatal
S — Silent (Наивысший приоритет, при котором ничего не выводится).
Получить список тэгов, используемых в системе, вместе с их приоритетами можно запустив logcat. В первых двух столбцах каждого из выведенных сообщений будут указаны / .
Пример выводимого logcat сообщения:
I/ActivityManager( 585): Starting activity: Intent
Для уменьшения вывода лога до приемлемого уровня нужно использовать выражения фильтра. Выражения фильтра позволяют указать системе нужные комбинации и , остальные сообщения система не выводит.
Выражения фильтра имеют следующий формат : . где указывает нужный тэг, указывает минимальный уровень приоритета для выбранного тэга. Сообщения с выбранным тэгом и приоритетом на уровне или выше указанного записываются в лог. Можно использовать любое количество пар : в одном выражении фильтра. Для разделения пар : используется пробел.
Пример ниже выводит в лог все сообщения с тэгом «ActivityManager» с приоритетом «Info» или выше, и сообщения с тэгом «MyApp» и приоритетом «Debug» или выше:
adb logcat ActivityManager:I MyApp:D *:S
Последний элемент в выражении фильтра *:S устанавливает приоритет «silent» для всех остальных тэгов, тем самым обеспечивая вывод сообщений только для «View» и «MyApp». Использование *:S – это отличный способ для вывода в лог только явно указанных фильтров (т.е. в выражении фильтра указывается «белый список» сообщений, а *:S отправляет все остальное в «черный список»).
При помощи следующего выражения фильтра отображаются все сообщения с приоритетом «warning» или выше для всех тэгов:
adb logcat *:W
Если logcat запускается на машине разработчика (не через удаленный adb shell), можно также установить значение выражения фильтра по умолчанию задав переменную окружения ANDROID_LOG_TAGS:
export ANDROID_LOG_TAGS=»ActivityManager:I MyApp:D *:S»
Следует обратить внимание что задав переменную окружения ANDROID_LOG_TAGS она не будет работать в эмуляторе/устройстве, если вы будете использовать logcat в удаленном shell или используя adb shell logcat.
Вышеописанная команда export работает в ОС *nix и не работает в Windows.
Контроль формата вывода лога
Сообщения лога в дополнение к тэгу и приоритету содержат несколько полей метаданных. Можно изменять формат вывода сообщений показывая только конкретные поля метаданных. Для этого используется параметр -v и указывается один из ниже перечисленных форматов вывода.
brief Показывать приоритет/тэг и PID процесса (формат по умолчанию).
process Показывать только PID.
tag Показывать только приоритет/тэг.
thread Показывать только процесс:поток и приоритет/тэг.
raw Показать необработанное сообщение, без полей метаданных.
time Показывать дату, время вызова, приоритет/тэг и PID процесса.
long Показывать все поля метаданных и отдельно сообщения с пустыми строками.
При запуске logcat можно указать формат вывода используя параметр -v:
adb logcat [-v
Источник
4 Ways to Fix “Cannot load twrp.img” Error in Fastboot
After unlocking the device’s bootloader, the first thing a user does is install a TWRP Recovery on their device. This is because custom recoveries like TWRP allow you to install custom ROMs, flash .zip or .img files, mount partitions, encrypt or decrypt storage, create a Nandroid backup, etc. But what we would be discussing here is a general error that many of you might face while installing the TWRP Recovery on your Android. The error we are talking about fixing is: “Cannot load twrp.img. No such file or directory”. Let us see how why this error pops up and steps to rectify it. Before carrying out these steps, it is recommended that you take a full backup of your Android device beforehand.
Fix “Cannot load twrp.img” Error
Before discussing the steps to fix the “Cannot load twrp.img” error, let us first understand why this error occurs.
For installing a custom recovery like TWRP, first, we boot our Android device to fastboot mode. Then we take the help of any of the two Fastboot commands:
There exist two different commands because of the difference in partitions. Older devices have a separate recovery partition and hence you could directly flash it using the fastboot flash recovery command. But since the inception of A/B partition devices, there is no separate recovery partition. Everything is managed by the boot partition now. Hence we now boot the recovery into the boot partition rather than flashing it to the non-existing recovery partition.
Now let’s come back to fixing of the “Cannot load ‘twrp.img’: No such file or directory”. There exist two reasons why this could happen. Let’s have a look at both of them.
4 Solutions to Fix TWRP Error
Below, we have provided four different fixes for the “Cannot load twrp.img. No such file or directory”. You don’t have to try all the four fixes. Anyone of them should do the job for you.
1. It goes without saying that for executing any fastboot command, you should have Android SDK Platform-tools installed on your desktop. Moreover, most of the guides on the internet simply refer to the command for flashing TWRP Recovery as fastboot flash recovery twrp.img or fastboot boot twrp.img. In this command the name of the recovery is TWRP.
However, that is hardly the case. None of the recoveries presents online is named as twrp. As a result, users directly execute the above commands without renaming the recovery. If that is the case, make sure to rename the recovery to twrp before proceeding further. This should fix the “Cannot load twrp.img. No such file or directory” error. If that is not the case, head over to our next solution.
2. In another scenario, some of the guides do tell the users to rename the recovery to twrp.img. But this is where the problem occurs. The .img is not the part of the recovery name but is rather the file extension. Without realizing it, users end up renaming the recovery to twrp.img and the complete name goes as twrp.img.img. So if you are going to rename the recovery, make sure to rename it to just twrp. However, if you still can’t fix the “Cannot load twrp.img. No such file or directory” error, then refer to the third and final solution below.
3. Make sure to always place the TWRP Recovery where the Android SDK and Platform Tools are installed. To be precise, it should be inside the platform-tools folder. Most of the time, users fail to move the recovery file inside the said folder and execute the command for flashing recovery. In that case, the said error pops up. So moving the recovery inside the platform-tools folder should fix the ”Cannot load twrp.img. No such file or directory” error.
4. However, if you don’t want to move the recovery to the platform-tools folder, there is another workaround. Just enter the fastboot flash recovery or fastboot boot recovery command and leave a space after the command. Now drag and drop the TWRP file next to that code.
For example, suppose the downloaded recovery is TWRP-3.3.1_Motorola_One_Action and is placed inside the Downloads folder. Then on dragging it next to the fastboot command, the code should look like fastboot flash recovery C:DownloadsTWRP-3.3.1_Motorola_One_Action. This should fix the “Cannot load twrp.img. No such file or directory TWRP” error.
So these were the various steps of fixing the TWRP error. Do let us know if you face any issues while trying out the above solutions.
Источник
Ошибка в Fastboot cannot load ‘image’, как исправить?
Решил прошить Android в Fastboot и наткнулся на ошибку fastboot: error: cannot load ‘image’? Исправить ее очень просто! Как это сделать и необходимо чтобы она вновь не появлялась, можете узнать на сайте Android +1!

Итак, еще раз об ошибке cannot load ‘image’, вместо ‘image’ может быть указана любое имя twrp.img, recovery.img или еще что-то еще. Откуда взялась эта ошибка? Все дело в том, что утилита Fastboot которая используется для прошивки Android, распознает название прошиваемых файлов только в том виде как они указаны. Сейчас объясню на примере.
Предположим вам на форуме сказали что необходимо прошить recovery, дали команду:
вы скачали файл, twrp-recovery.img, пишите в командной строке команду и получили ошибку cannot load recovery.img.
Все дело в том, что в Fastboot вы пытались прошить файл, которого не существует, правильно было бы написать команду в вашем случае:
Теперь прошивка в Fastboot пройдет нормально!
Еще один момент который стоит уточнить, если вы скачали файл TwRP.img и будете прошивать его таким образом:
То вы также получите ошибку, так как Fastboot чувствителен к регистру букв. То-есть, чтобы прошить файл TwRP.img необходимо было надо было написать команду так:
и последний момент, чтобы избегать большинства проблем, всегда размещайте прошиваемые файлы в одной папке с утилитой Fastboot!
У вас еще остались дополнительные вопросы? Задавайте их в комментариях, рассказывайте о том, что у вас получилось или наоборот!
Вот и все! Оставайтесь вместе с сайтом Android +1, дальше будет еще интересней! Больше статей и инструкций читайте в разделе Статьи и Хаки Android.
Источник
After unlocking the device’s bootloader, the first thing a user does is install a TWRP Recovery on their device. This is because custom recoveries like TWRP allow you to install custom ROMs, flash .zip or .img files, mount partitions, encrypt or decrypt storage, create a Nandroid backup, etc. But what we would be discussing here is a general error that many of you might face while installing the TWRP Recovery on your Android. The error we are talking about fixing is: “Cannot load twrp.img. No such file or directory”. Let us see how why this error pops up and steps to rectify it. Before carrying out these steps, it is recommended that you take a full backup of your Android device beforehand.
Before discussing the steps to fix the “Cannot load twrp.img” error, let us first understand why this error occurs.
For installing a custom recovery like TWRP, first, we boot our Android device to fastboot mode. Then we take the help of any of the two Fastboot commands:
fastboot flash recovery <recovery-name>.img
fastboot boot <recovery-name>.img
There exist two different commands because of the difference in partitions. Older devices have a separate recovery partition and hence you could directly flash it using the fastboot flash recovery command. But since the inception of A/B partition devices, there is no separate recovery partition. Everything is managed by the boot partition now. Hence we now boot the recovery into the boot partition rather than flashing it to the non-existing recovery partition.
Now let’s come back to fixing of the “Cannot load ‘twrp.img’: No such file or directory”. There exist two reasons why this could happen. Let’s have a look at both of them.
4 Solutions to Fix TWRP Error
Below, we have provided four different fixes for the “Cannot load twrp.img. No such file or directory”. You don’t have to try all the four fixes. Anyone of them should do the job for you.
1. It goes without saying that for executing any fastboot command, you should have Android SDK Platform-tools installed on your desktop. Moreover, most of the guides on the internet simply refer to the command for flashing TWRP Recovery as fastboot flash recovery twrp.img or fastboot boot twrp.img. In this command the name of the recovery is TWRP.
However, that is hardly the case. None of the recoveries presents online is named as twrp. As a result, users directly execute the above commands without renaming the recovery. If that is the case, make sure to rename the recovery to twrp before proceeding further. This should fix the “Cannot load twrp.img. No such file or directory” error. If that is not the case, head over to our next solution.
2. In another scenario, some of the guides do tell the users to rename the recovery to twrp.img. But this is where the problem occurs. The .img is not the part of the recovery name but is rather the file extension. Without realizing it, users end up renaming the recovery to twrp.img and the complete name goes as twrp.img.img. So if you are going to rename the recovery, make sure to rename it to just twrp. However, if you still can’t fix the “Cannot load twrp.img. No such file or directory” error, then refer to the third and final solution below.
3. Make sure to always place the TWRP Recovery where the Android SDK and Platform Tools are installed. To be precise, it should be inside the platform-tools folder. Most of the time, users fail to move the recovery file inside the said folder and execute the command for flashing recovery. In that case, the said error pops up. So moving the recovery inside the platform-tools folder should fix the ”Cannot load twrp.img. No such file or directory” error.
4. However, if you don’t want to move the recovery to the platform-tools folder, there is another workaround. Just enter the fastboot flash recovery or fastboot boot recovery command and leave a space after the command. Now drag and drop the TWRP file next to that code.
For example, suppose the downloaded recovery is TWRP-3.3.1_Motorola_One_Action and is placed inside the Downloads folder. Then on dragging it next to the fastboot command, the code should look like fastboot flash recovery C:DownloadsTWRP-3.3.1_Motorola_One_Action. This should fix the “Cannot load twrp.img. No such file or directory TWRP” error.
So these were the various steps of fixing the TWRP error. Do let us know if you face any issues while trying out the above solutions.
Read Next: How to Install Latest TWRP Recovery on Android Devices

Installing TWRP onto a smartphone or tablet typically requires you to use a Fastboot command to overwrite your current recovery system. Some people have trouble with the Command Prompt and in turn end up getting a cannot load twrp.img error, or being told there is no such file or directory. But there is a way to fix it.
The reason why someone is getting this specific error has to do with the last part of the Fastboot command. So, for example, a typical command to install a Custom Recovery (TWRP in this case) onto an Android device looks like this: fastboot flash recovery twrp.img. We can break this command down to see what it’s actually doing. . .
Fastboot – this initiates the Fastboot.exe file which is the file doing all of the work
Flash – this tells the Fastboot.exe file we want to install something onto the connected device
Recovery – this tells the Fastboot.exe file that when we install something, we’re installing it onto the recovery partition
TWRP.img – this tells the Fastboot.exe file what we want to install onto the connected device
So what the “cannot load ‘twrp.img’: No such file or directory” error is telling us is what it looked for the twrp.img file in the current directory (which should be where your ADB and Fastboot tools are installed) and couldn’t find it. There are a few ways this can happen but 9 times out of 10 it has to do with the file path of the twrp.img file.
Some people forget to rename the file to twrp.img. Others may forget to put it in the ADB and Fastboot tools folder. They may even have two different installs of ADB and Fastboot tools over the years. There are many reasons but we can eliminate any file path related issues by doing the following.
Time needed: 3 minutes.
- Drag and drop the twrp.img file into the Command Prompt instead of typing out the filename
Watch the video below to show how it’s done.
I received a comment the other day from someone who was receiving this exact error. Again, the only reason why this error would come up is related to the file path of the twrp.img image. There are so many ways this can get mixed up when trying to execute that Fastboot command but the suggestion above should avoid all of that.
It can be a bit difficult to explain over text so you may want to see me do it via the video.
Instead of typing out that twrp.img part of the Fastboot command, we’re going to leave it open-ended right before the file. So instead of the typed out command being fastboot flash recovery twrp.img, we’re just going to type out “fastboot flash recovery “.
You’ll want to make note of the extra space I left after the word “recovery”.
That is very important because we need a space after the word recovery and before the file path of the twrp.img image. If not, we end up with a command that looks like fastboot flash recoveryE:ImagesXiaomiRedmi-Note-6-Protwrp.img. To the Fastboot.exe file, this command messes up the syntax.
In this tutorial, we will show you how to fix the “cannot load recovery.img error”. There exists a countless number of tweaks that could be carried out on an Android device. Well, we aren’t just talking about installing custom launchers or themes from Play Store. This is just the tip of the iceberg. If you unlock your device’s bootloader, then you have literally unlocked the floodgates to the customization world. From installing custom ROMs to flashing Magisk Modules and Xposed Framework and Substratum Themes, there is no limit up to which you could carry out these customizations.
But for most of these modifications (apart from unlocking the bootloader), you need a working custom recovery like TWRP in the first place. It doesn’t really matter whether it is the official build, an unofficial one, or modified ones that make use of TWRP’s source code. If you have TRWP, you have the keys to the customizations. Although every Android device does come up with its own stock recovery, its functionality is highly limited. You could only carry out activities that are possible on a locked bootloader.
This is because OEMs are against the practice of unlocking the bootloader and they only want the stock OS that they ship with the device to be used by one and all. But since we are living in an open-source ecosystem, such restrictions are easily bypassed by one and all. So a custom recovery is the major prerequisites for the aforementioned tweaks. Unfortunately flashing it in the first place might prove to be a little challenging for some users. We are seeing countless users getting stuck at the initial flashing/booting screen itself.
They get greeted with the message that spells out as Error: Cannot load recovery.img. In this tutorial, we will look at all the possible reasons as to why you might be facing this issue. Furthermore, we will also list out all the possible fixes for this issue. Overall, we will be mentioning three different types of fixes for Error: Cannot load recovery.img. We guarantee you that any of the three methods will surely fix this error. So without further ado here are all the required instructions in this regard. Follow along.
- How to Install OTA Updates in Rooted Android Device
- How to Permanently Install TWRP without TWRP ZIP File (only using TWRP.img file)
- Root Android Devices Without TWRP Recovery
- How to Fix TWRP Error 7 (While Flashing Custom ROM via TWRP)
Important Updates related to Flashing of TWRP
Up until a few years back, there was just a single command to install TWRP onto your device. But with Android Oreo 8.1, Google introduced the concept of Project Treble, which then gave rise to A/B partition devices. Subsequently, this gave rise to one more command to flash the TWRP Recovery. During the initial phases, we only used the below command to install TWRP:
fastboot flash recovery recovery.img
This would directly flash the recovery into the recovery partition of your device without any issue. However, with Project Treble, device partitions underwent major changes. There is no longer the recovery partition. The role of that partition has now been assigned to the boot partition. So now we cannot directly use the above command to flash the recovery to the recovery partition, but we rather use the below command to boot the device to the boot partition:
fastboot boot recovery.img
After the device boots to TWRP, you then flash the twrp.zip file to permanently install the TWRP or use the Ramdisk functionality of TWRP. So this was one of the major changes that pertain to how we deal with TWRP Recovery. Although this ain’t any fix as such, we thought to make yourself aware of important information. With the explanation now clear, here are all the three methods to fix the cannot load recovery.img error. Don’t Miss: How to Flash a Custom ROM without TWRP Recovery
Cannot load recovery.img Fix 1: Android SDK Platform Tools
We need the Android SDK Platform Tools installed onto the PC for the successful execution of ADB and Fastboot commands. Although there exist many other third-party tools, yet we would recommend you to only for this one created by Google. This is because other tools might have missing binaries. With that said, the biggest mistake that many users end up committing is that they forget to transfer the downloaded TWRP Recovery inside the Android SDK Platform Tools folder.
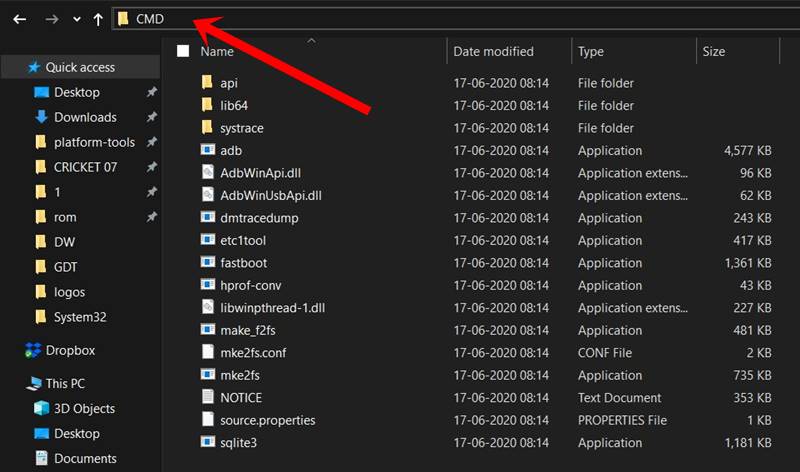
- In other words, you have to transfer the TWRP Recovery inside the platform-tools folder.
- Once that is done, head over to the platform-tools folder’s address bar, type in CMD in the address bar, and hit Enter. This will launch the Command Prompt.
- Now boot the device to fastboot mode and then connect it to PC. For that enable USB Debugging on your device and enter the below command:
adb reboot bootloader

Fastboot Mode in Xiaomi - Your device will now boot to Fastboot/Bootloader mode. Use thje below command to boot your device to TWRP:
fastboot boot recovery.img
- Likewise, you may also directly flash the TWRP to the boot partition. This could be done via the following command:
fastboot flash boot recovery.img
- On executing any of the two above commands, your device will boot to TWRP. But it might be just a temporary install. To permanently install it, there are two different approaches. Some devices have both the TWRP ZIP and TWRP IMG files. However other devices only have the TWRP IMG File.
- If your device has a TWRP ZIP file a well, then transfer it to your device. On the other hand, if it only has an IMG file, then transfer that TWRP IMG file to your device. For file transfer, you may use the ADB Sideload method, Mount your device via TWRP, or use a USB-OTG. All these have been explained in depth here: [3 METHODS] How To Transfer or Install Files via TWRP Recovery.
- Once the file has been flashed, let’s proceed ahead, If you have transferred the TWRP ZIP file, then go to Install, select the TWRP.ZIP and perform a right swipe to flash it.

- On the other hand, if you have transferred the TWRP IMG file, then you would have to install it to the Ramdisk partition. For that, go to Advanced > Install Recovery Ramdisk > Select TWRP IMG file > Perform a right swipe to flash it.


That is it. This was the first method to fix the cannot load recovery.img error. For most of the readers, this method might have fixed this issue. However, if you don’t belong to that group, not an issue. There are two more fixes waiting for you, give them a try!
- [GUIDE] Flash ROMs/Magisk/TWRP/Kernels on A/B Partition Devices
- Everything About Magisk- Manager, Modules, and More
- Best Magisk Modules of 2020 [PART-1]
- [3 METHODS] Unroot any Android Device-Uninstall Magisk
Cannot load recovery.img Fix 2: Check the Name of Recovery
While booting the TWRP Recovery, we usually use the fastboot boot twrp.img command. Similarly, for flashing, users make use of the fastboot flash recovery twrp.img command. But here is the thing. Most of the time, the recovery isn’t named just named as TWRP. The complete name of the recovery is something along the lines that include the twrp keyword followed by the version name and then the device codename.
For example, the complete name of the recovery for the OnePlus 7 Pro is twrp-3.4.0-0-guacamole.img. In this instance, if you try out the fastboot boot twrp.img command, the CMD window wouldn’t be able to recognize this file type. So to fix this issue, make sure to rename the custom recovery to twrp. After this, execute the fastboot flash recovery twrp.img or fastboot boot twrp.img command and the cannot load recovery.img issue would no longer be there.
However, if you don’t wish to for the rename route, there is another way of dealing with this issue. You could just write the “fastboot flash recovery” or “fastboot boot” command and then drag the TWRP Recovery file next to that command. The Command Window will automatically pick up the rest of the recovery name. But even for that, you will have to move that TWRP to the platform-tools folder. Once that is done, here is what needs to be done:
- Launch the Command Prompt window inside the platform-tools folder by typing in CMD in the address bar and hitting Enter.

- Now type in fastboot flash recovery or fastboot boot command as per the need and drag the twrp recovery next to it (see below image). Suppose we are using the OnePlus 7 Pro TWRP file, and have placed the twrp.img file inside D:platform-tools, then the command will automatically transform to fastboot boot D:platform-toolstwrp-3.4.0-0-guacamole.img.

- Once the command gets automatically populated, hit the Enter key to execute the command. That is it. You have successfully flashed the TWRP Recovery and also fixed the cannot load recovery.img error.

- How to Disable Screenshot Captured Notification and Sound without Root
- How to Watch Netflix in HD on Rooted Devices ( Get Widevine L1 Support )
- Enable USB Debugging on a Broken Android Device’s Screen? Here’s a Workaround
- How to Go Back to Stock ROM from GSI ROM (All Android Devices)
Cannot load recovery.img Fix 3: The Naming Extension Issue
The first-timers usually end up looking for guides across the web for flashing instructions. And although the steps are mentioned well and good, there is just one issue that I have seen across countless many blogs. Most of these guides tell the users to rename the recovery to twrp.img or recovery.img. And they end this sentence. But this is where the problem lies.
The .img part is not the name of the recovery but is rather the extension. However, judging by the above rule, many users end up naming the downloaded recovery as twrp.img or recovery.img, which in turn makes the complete name as twrp.img.img or recovery.img.img. Yes, you might have unknowingly added two .img, one for the naming convention, and the other as part of the extension.
And while writing the commands, we always write the extension of the file as well. This is one reason why you might be greeted with the cannot load recovery.img error. So to correct this issue, simply rename the recovery to twrp or recovery. The complete name would then be twrp.img or recovery.img, and with this, the issue will be rectified as well.
Conclusion
With this, we conclude the guide on how to fix the cannot load recovery.img error. We have mentioned three different fixes for the same, any one of which will definitely rectify this issue. But if you still end up facing this issue (chances of which are quite rare) then do let us know in the comments. Apart from that, if there is any other Android rooting, unlocking, or TWRP issues, you may ask us that as well. You own the comments section 🙂 Don’t Miss: Download Google Camera GCam Port for all Android Devices.
About Chief Editor

Sadique Hassan
administrator
A technical geek by birth, he always has a keen interest in the Android platform right since the birth of the HTC Dream. The open-source environment always seems to intrigue him with the plethora of options available at his fingertips. “MBA by profession, blogger by choice!”