Windows 8 Enterprise Windows 8 Pro Windows 8 Windows 7 Enterprise Windows 7 Professional Windows 7 Ultimate Windows 7 Home Premium Windows 7 Home Basic Windows 7 Starter Windows Vista Enterprise Windows Vista Ultimate Windows Vista Business Windows Vista Home Premium Windows Vista Home Basic Windows Vista Starter Microsoft Windows XP Professional Microsoft Windows XP Home Edition Microsoft Windows XP Starter Edition More…Less
Summary
When you try to access or work with files and folders in Windows, you experience one or more of the following issues:
-
Issue 1: You receive an «Access Denied» error message or a similar message.
-
Issue 2: You cannot access, change, save, or delete files and folders.
-
Issue 3: You cannot open a file or folder after you install a new version of Windows.
Resolution
To resolve a particular issue, follow the steps for the issue that best describes your situation. Use the method for your version of Windows.
Note You may not always receive an “Access Denied” error message for these kinds of issues. If particular steps do not resolve the issue, try a different set of steps.
Cause
An «Access Denied» error message can occur for one or more of the following reasons:
-
The folder ownership has changed.
-
You do not have the appropriate permissions.
-
The file is encrypted.
Resolution
Windows 8
You may not have ownership of a file or folder
If you recently upgraded your computer to Windows 8 from an earlier version of Windows, some of your account information may have changed. Therefore, you may no longer have ownership of some files or folders. You might be able to resolve this issue by restoring your ownership of the files and folders.
To take ownership of a file or folder, follow these steps:
-
Press and hold the folder that you want to take ownership of, then tap Properties. (If you are using a mouse, right-click the folder, and then click Properties.)
-
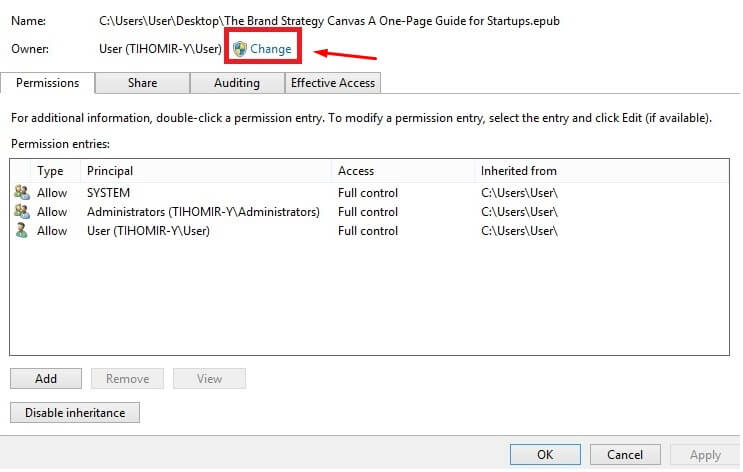
Tap or click the Security tab, tap or click Advanced, then tap or click Change. If you are prompted for an administrator password or for confirmation, type the password or provide confirmation.
-
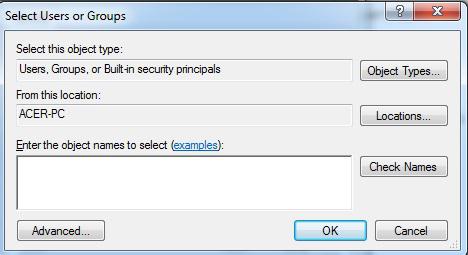
Type the name of the person that you want to give ownership to, and then click Check Names.
Note The account name for the person that you are assigning ownership to is displayed.
-
Click OK.
-
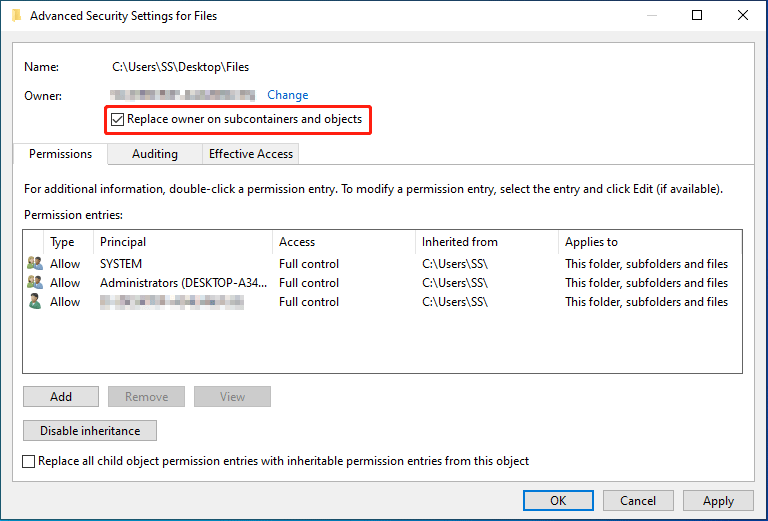
If you want this person to be the owner of the files and subfolders that are contained in this folder, select the Replace owner on subcontainers and objects check box.
-
Click OK.
You may not have the appropriate permissions
Issues that you experience when you try to access files and folders may be related to permissions. Permissions are rules that determine whether you can access or change files and folders. To check permissions on a file or folder, follow these steps:
-
Press and hold or right-click the file or folder, and then click Properties.
-
Tap or click the Security tab.
-
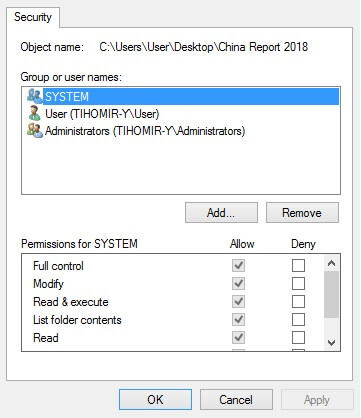
Under Group or user names, tap or click your name to see the permissions that you have.
To open a file, you have to have the Read permission. To change the permissions of a file or folder, follow these steps.
Important You must be logged on as an administrator to change permissions on files and folders.
-
Press and hold or right-click the file or folder, and then tap or click Properties.
-
Tap or click the Security tab.
-
Under Group or user names, tap or click your name to see the permissions that you have.
-
Tap or click Edit, tap or click your name, select the check boxes for the permissions that you must have, and then click OK.
The file or folder may be encrypted
Encryption can help protect files and folders from unwanted access. You cannot open an encrypted file or folder without the certificate that was used to encrypt it. To determine whether a file or folder is encrypted, follow these steps:
-
Press and hold or right-click the file or folder, and then tap or click Properties.
-
Tap or click the General tab, and then tap or click Advanced.
If the Encrypt contents to secure data check box is selected, you have to have the certificate that was used to encrypt the file or folder to be able to open it. In this situation, you should obtain the certificate from the person who created or encrypted the file or folder, or have that person decrypt the file or folder.
Windows 7
You may not have ownership of a file or folder
If you recently upgraded your computer to Windows 7 from an earlier version of Windows, some of your account information may have changed. Therefore, you may no longer have ownership of some files or folders. You might be able to resolve this issue by restoring your ownership of the files and folders.
To take ownership of a file or a folder, follow these steps:
-
Right-click the folder that you want to take ownership of, then click Properties.
-
Click the Security tab, click Advanced, then click the Owner tab.
-
Click Edit.
Note If you are prompted for an administrator password or for confirmation, type the password or provide confirmation.
-
Click the name of the person that you want to give ownership to.
-
If you want this person to be the owner of files and subfolders in this folder, select the Replace owner on subcontainers and objects check box.
-
Click OK.
You may not have the appropriate permissions
Issues that you experience when you try to access files and folders may be related to permissions. Permissions are rules that determine whether you can access or change files and folders. To determine the permissions of the file or folder, follow these steps:
-
Right-click the file or folder, then click Properties.
-
Click the Security tab.
-
Under Group or user names, click your name to see the permissions that you have.
To open a file, you have to have the Read permission. To change permissions on a file or folder, follow these steps.
Important You must be logged on as an administrator to change permissions on files and folders.
-
Right-click the file or folder, and then click Properties.
-
Click the Security tab.
-
Under Group or user names, click your name to see the permissions that you have.
-
Click Edit, click your name, select the check boxes for the permissions that you must have, and then click OK.
For more information about permissions, see What are permissions?.
The file or folder may be encrypted
Encryption can help protect files and folders from unwanted access. You cannot open an encrypted file or folder without the certificate that was used to encrypt it. To determine whether a file or folder is encrypted, follow these steps:
-
Right-click the file or folder, and then click Properties.
-
Click the General tab, then click Advanced.
If the Encrypt contents to secure data check box is selected, you have to have the certificate that was used to encrypt the file or folder to be able to open it.
You should obtain the certificate from the person who created or encrypted the file or folder, or have that person decrypt the file or folder.
For more information, see Import or export certificates and private keys.
Cause
A problem that prevents you from accessing or working with files and folders can occur for one or more of the following reasons:
-
The folder ownership has changed
-
You do not have the appropriate permissions
-
The file is encrypted
-
The file is corrupted
-
The user profile is corrupted
Resolution
Windows 8
You may not have ownership of a file or folder
If you recently upgraded your computer to Windows 8 from an earlier version of Windows, some of your account information may have changed. Therefore, you may no longer have ownership of some files or folders. You might be able to resolve this issue by restoring your ownership of the files and folders.
To take ownership of a file or folder, follow these steps:
-
Press and hold the folder that you want to take ownership of, then tap Properties. (If you are using a mouse, right-click the folder, and then click Properties.)
-
Tap or click the Security tab, tap or click Advanced, then tap or click Change. If you are prompted for an administrator password or for confirmation, type the password or provide confirmation.
-
Type the name of the person that you want to give ownership to, and then click Check Names.
Note The account name for the person that you are assigning ownership to is displayed.
-
Click OK.
-
If you want this person to be the owner of the files and subfolders that are contained in this folder, select the Replace owner on subcontainers and objects check box.
-
Click OK.
You may not have the appropriate permissions
Issues that you experience when you try to access files and folders may be related to permissions. Permissions are rules that determine whether you can access or change files and folders. To check permissions on a file or a folder, follow these steps:
-
Press and hold or right-click the file or folder, and then click Properties.
-
Tap or click the Security tab.
-
Under Group or user names, tap or click your name to see the permissions that you have.
To open a file, you have to have the Read permission. To change the permissions of a file or folder, follow these steps.
Important You must be logged on as an administrator to change permissions on files and folders.
-
Press and hold or right-click the file or folder, and then tap or click Properties.
-
Tap or click the Security tab.
-
Under Group or user names, tap or click your name to see the permissions that you have.
-
Tap or click Edit, tap or click your name, select the check boxes for the permissions that you must have, and then click OK.
For more information about permissions, see What are permissions?.
The file or folder may be encrypted
Encryption can help protect files and folders from unwanted access. You cannot open an encrypted file or folder without the certificate that was used to encrypt it. To determine whether a file or folder is encrypted, follow these steps:
-
Press and hold or right-click the file or folder, and then tap or click Properties.
-
Tap or click the General tab, and then tap or click Advanced.
If the Encrypt contents to secure data check box is selected, you have to have the certificate that was used to encrypt the file or folder to be able to open it. In this situation, you should obtain the certificate from the person who created or encrypted the file or folder, or have that person decrypt the file or folder.
The file or folder may be corrupted
Files can become corrupted for several reasons. The most common reason is that you have a file open when your computer crashes or loses power. Most corrupted files cannot be repaired. In this situation, you should either delete the file or restore the file from a backup copy.
For more information about corrupted files and how to fix them, see Corrupted files: frequently asked questions.
Your local user profile may be corrupted
Occasionally, Windows might not read your local user profile correctly. This may prevent you from accessing files and folders. In this situation, you may have to use a new local user profile. To create the profile, you must first create a local user account. When the new account is created, the profile is also created. To create a local user account, follow these steps:
-
Swipe from the right edge of the screen, tap Settings, and then tap Change PC settings. (If you are using a mouse, point to the upper-right corner of the screen, move the mouse pointer down, click Settings, and then click Change PC settings)
-
In the navigation pane, tap or click Users.
-
Tap or Click Add a User, then tap or click Can they sign in without a Microsoft account?
-
Tap or click Local account.
-
Enter your new account name.
-
If you want to use a password, enter and verify the password that you want to use. If you decide not to use a password, tap or click Next without entering a password.
-
Tap or click Finish.
Windows 7
You may not have ownership of a file or folder
If you recently upgraded your computer to Windows 7 from an earlier version of Windows, some of your account information may have changed. Therefore, you may no longer have ownership of some files or folders. You might be able to resolve this issue by restoring your ownership of the files and folders.
To take ownership of a file or a folder, follow these steps:
-
Right-click the folder that you want to take ownership of, and then click Properties.
-
Click the Security tab, click Advanced, and then click the Owner tab.
-
Click Edit. If you are prompted for an administrator password or for confirmation, type the password or provide confirmation.
-
Click the name of the person that you want to give ownership to.
-
If you want that person to be the owner of files and subfolders in this folder, select the Replace owner on subcontainers and objects check box.
-
Click OK.
You may not have the appropriate permissions
Issues that you experience when you try to access files and folders may be related to permissions. Permissions are rules that determine whether you can access or change files and folders. To check permissions on a file or a folder, follow these steps:
-
Press and hold or right-click the file or folder, and then click Properties.
-
Tap or click the Security tab.
-
Under Group or user names, tap or click your name to see the permissions that you have.
To open a file, you have to have the Read permission. To change permissions on a file or folder, follow these steps.
Important You must be logged on as an administrator to change permissions on files and folders.
-
Right-click the file or folder, and then click Properties.
-
Click the Security tab.
-
Under Group or user names, click your name to see the permissions you have.
-
Click Edit, click your name, select the check boxes for the permissions that you must have, and then click OK.
For more information about permissions, see What are permissions?.
The file or folder may be encrypted
Encryption can help protect files and folders from unwanted access. You cannot open an encrypted file or folder without the certificate that was used to encrypt it. To determine whether a file or folder is encrypted, follow these steps:
-
Right-click the file, then click Properties.
-
Click the General tab, and then click Advanced.
If the Encrypt contents to secure data check box is selected, you have to have the certificate that was used to encrypt the file or folder to be able to open it.
You should obtain the certificate from the person who created the file. For more information, see Import or export certificates and private keys.
The file or folder may be corrupted
Files can become corrupted for several reasons. The most common reason is that you have a file open when your computer crashes or loses power. Most corrupted files cannot be repaired. In this situation, you should either delete the file or restore the file from a backup copy.
For more information about corrupted files and how to fix them, see Corrupted files: frequently asked questions.
Your user profile may be corrupted
Occasionally, Windows might not read your local user profile correctly. This may prevent you from accessing files and folders. In this situation, you may have to use a new local user profile. To create the profile, you must first create a local user account. When the new account is created, the profile is also created.
For more information about how to create user profiles, see Fix a corrupted user profile. After the new user profile is created, you can copy your existing user files to the new profile so that you can access them.
Cause
Problems that prevent you from accessing files and folders after you upgrade to a new version of Windows can occur for one or more of the following reasons:
-
The folder ownership has changed.
-
The files are being stored in a Windows.old folder from your previous system.
Resolution
Windows 8
You may not have ownership of a file or folder
If you recently upgraded your computer to Windows 8 from an earlier version of Windows, some of your account information may have changed. Therefore, you may no longer have ownership of some files and folders. You might be able to resolve this issue by restoring your ownership of the files and folders.
To take ownership of a file or a folder, follow these steps:
-
Press and hold the folder that you want to take ownership of, then tap Properties. (If you are using a mouse, right-click the folder, and then click Properties.)
-
Tap or click the Security tab, tap or click Advanced, then tap or click Change. If you are prompted for an administrator password or for confirmation, type the password or provide confirmation.
-
Type the name of the person that you want to give ownership to, and then click Check Names.
Note The account name for the person that you are assigning ownership to is displayed.
-
Click OK.
-
If you want this person to be the owner of the files and subfolders that are contained in this folder, select the Replace owner on subcontainers and objects check box.
-
Click OK.
You have to recover files from the Windows.old folder
If you recently upgraded your computer to Windows 8 from an earlier version of Windows, and you did not reformat the hard disk, you might still be able to access your old files from the Windows.old folder.
To fix this problem automatically, click the Fix it button or link. In the File Download dialog box, click Run, and then follow the steps in the Fix it Wizard. If you prefer to fix this problem yourself, go to the «Let me fix it myself» section.
Fix it for me
Notes
-
This wizard may be in English only. However, the automatic fix also works for other language versions of Windows.
-
If you are not on the computer that has the problem, save the Fix it solution to a flash drive or a CD, and then run it on the computer that has the problem.
Let me fix it myself
To manually retrieve the files, follow these steps:
-
Open the desktop, tap the folder icon, and then click Computer. Or, press the Windows logo key+E.
-
Double-tap or double-click the drive that Windows is installed on (typically, drive C).
-
Double-tap or double-click the Windows.old folder.
-
Double-tap or double-click the Users folder.
-
Double-tap or double-click your user name.
-
Open the folders that contain the files that you want to retrieve. For example, to retrieve files in the Documents folder, double-tap or double-click Documents.
-
Copy the files that you want from each folder and paste them to a folder in Windows 8. For example, if you want to retrieve everything from the Documents folder, copy all the files and folders from the Documents folder in the Windows.old folder, and then paste them to the Documents library in Windows 8.
-
Repeat steps 5-7 for each user account on your computer.
For more information about how to recover data from an earlier version of Windows, see Recover lost or deleted files.
Windows 7
You may not have ownership of a file or folder
If you recently upgraded your computer to Windows 7 from an earlier version of Windows, some of your account information may have changed. Therefore, you may no longer have ownership of some files and folders. You might be able to resolve this issue by restoring your ownership of the files and folders.
To take ownership of a file or a folder, follow these steps:
-
Right-click the folder that you want to take ownership of, and then click Properties.
-
Click the Security tab, click Advanced, and then click the Owner tab.
-
Click Edit. If you are prompted for an administrator password or confirmation, type the password or provide confirmation.
-
Click the name of the person that you want to give ownership to.
-
If you want that person to be the owner of files and subfolders in this folder, select the Replace owner on subcontainers and objects check box.
-
Click OK.
You may have to recover files from the Windows.old folder
If you recently upgraded your computer to Windows 7 from an earlier version of Windows, and you did not reformat your hard disk, you might still be able to access your old files from the Windows.old folder.
To fix this problem automatically, click the Fix it button or link. In the File Download dialog box, click Run, and then follow the steps in the Fix it Wizard.If you prefer to fix this problem yourself, go to the «Let me fix it myself» section.
Fix it for me
Notes
-
This wizard may be in English only. However, the automatic fix also works for other language versions of Windows.
-
If you are not on the computer that has the problem, save the Fix it solution to a flash drive or a CD, and then run it on the computer that has the problem.
Let me fix it myself
To manually retrieve the files, follow these steps:
-
Click Start, then click Computer.
-
Double-click the drive that Windows is installed on (typically, drive C).
-
Double-click the Windows.old folder.
-
Double-click the Users folder.
-
Double-click your user name.
-
Open the folders that contain the files that you want to retrieve. For example, to retrieve files in the Documents folder, double-click Documents.
-
Copy the files that you want from each folder and paste them to a folder in Windows 7. For example, if you want to retrieve everything from the Documents folder, copy all the files and folders from the Documents folder in the Windows.old folder, and then paste them to the Documents library in Windows 7.
-
Repeat steps 5-7 for each user account on your computer.
For more information about how to recover data from an earlier version of Windows, see Recover lost or deleted files.
Need more help?
It’s a very common action to move a file or folder from one place to another due to certain needs (free up disk space or ensure security). However, it would be much depressed when you can’t copy files from external hard drive to computer (or vice versa). This post shows you how to deal with the Windows can’t copy or move files problem efficiently.
File Access Denied When Copying or Moving Files
According to users’ feedback, the file access denied error appears now and then on their device to prevent them from copying or moving files successfully. Some people reported Windows 10 not copying all files while others said that they can’t move files between folders or Windows 10 cannot copy multiple folders.
Believe it or not, MiniTool Solution is very professional in data backup, file recovery, and problems troubleshooting.
There are many people complained Windows 10 won’t let me move files; they said the system doesn’t allow them to copy, move or delete a file/folder.
Case 1: Windows 10 won’t let me move a file.
I have recently downloaded a file folder and it contains a file rld.dll. When I try to copy this file to a different folder it asks for administrator permission. After I give the administrator permission it pops up with you need permission to perform this action and also you require permission from everyone to edit this file, but I have the only account on the PC. Does anyone know a solution to this?— from AlexTravers
Case 2: Windows 10 won’t let me move/delete files as an Admin.
Went from Windows 7 to Windows 10, and while there are some serious issues I’m really liking Windows 10 so far—unfortunately, I can’t delete/move files on my PC though I am an Admin with full controls and such. One file is on my desktop, but it won’t let me delete from libraries either, or move them to another local. Any help?— from AtheresRiften
Case 3: I can’t copy a folder to my USB drive.
I have an 8 GB USB drive. When I tried copying a folder of 90 MB with 4 files, it becomes unresponsive (Not Responding is displayed). I have to go to Task manager to end the task. It is not write protected in any way. I can create a folder and then copy my files individually to that folder. Also, I can copy files back from USB to my hard drive. Details of my USB drive: Files System: NTFS, Free Space Available: 7.03 GB.— from skay
Case 4: Windows 10 can’t drag & drop files at times… and other bugs.
Not sure what happened or if it’s a virus???? But I can’t drag & drop files at times, sometimes I can, sometimes it won’t, when I can’t drag n drop I also can’t right-click anything. The options window would pop up for a millisecond and just vanish. It’ll get pretty bad; it would also just close programs automatically. I’ve tried the end process tree in explorer, disabling chrome extensions, uninstalling chrome, explorer, etc., disabled my touch pad, tried a new mouse; even did a factory reset on my laptop and still no fixes. Someone please help!!!!— from The©hosenOne
In summary, the Windows 10 can’t copy or move files cases can be divided into the following 6 types; please read them with care to find out the best solutions for fixing file or folder access denied.
Can’t Copy or Move Files/Folder Windows 10
Please try the methods mentioned below when you can’t copy files to external hard drive Windows 10 or to the local drive.
#1. Check account permissions.
- Press Windows + S to open the Windows search bar.
- Type control panel into it and hit Enter.
- Select User Accounts. (Click User Accounts again if you view by Category.)
- Click Manage another account link under Make changes to your user account section.
- Take a look at the accounts in the list and check whether there’s an “Administrator” word under the target account name.

How to change your account to Administrators if it’s not:
- Press Windows + X simultaneously.
- Choose Computer Management from the WinX menu.
- Expand Local Users and Groups under System Tools.
- Select Users in the left sidebar and then look at the right panel.
- Double click on the target account to open the Properties window.
- Shift to the Member Of tab at the top.
- Click on the Add… button at the bottom left.
- Look for the Enter the object names to select section in Select Groups window.
- Type Administrators into the text box and click Check Names.
- Click on the OK button.
- Select Administrators. Then, click Apply and OK to confirm changes.
- Restart your computer.
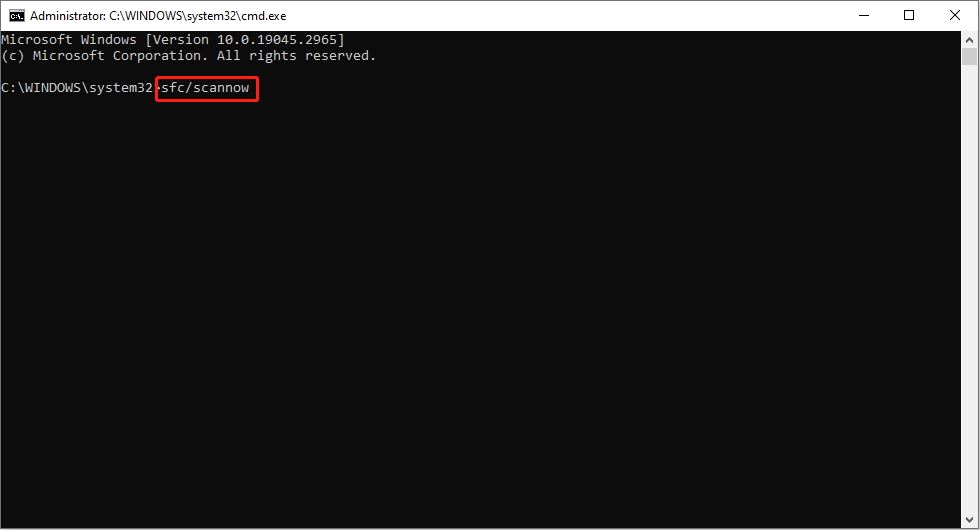
#2. Run SFC scan.
- Open Windows search bar and type cmd.
- Right click on Command Prompt from the search result.
- Choose Run as administrator from the menu. (Click Yes if you see a User Account Control window.)
- Type (or copy & paste) the command: sfc/scannow.
- Press Enter and wait for the scan to finish.
If the SFC scan failed, you should try the DISM tool.
- Repeat step 1 to step 3.
- Copy & paste this command and press Enter: DISM /online /Cleanup-Image / ScanHealth.
- Wait for the command to finish.
- Copy & paste this command and press Enter: DISM /Online /Cleanup-Image /RestoreHealth.
- Wait for the command to end and reboot your PC.
[Solved 2020] DISM Failed On Windows 10/8/7 Computer!
#3. Restart Windows Explorer.
Another way to fix when you cannot move files in Windows Explorer is restarting it by following steps:
- Right click on the blank space in the task bar.
- Choose Task Manager from the pop-up menu. (You also press Ctrl + Alt + Delete to choose Task Manager.)
- Make sure the Processes tab is chosen.
- Look for Windows Explorer and select it.
- Click on the Restart button in the lower right corner. (You can also choose Restart from the context menu of Windows Explorer.)
[SOLVED] Windows Explorer Needs To Be Restarted: Problem Fixed!
#4. Scan for virus and malware.
- Close all the programs, applications, and pages you’re working on.
- Press Windows + I to open the Settings app.
- Choose Update & Security.
- Select Windows Security from the left sidebar and click Virus & threat protection from the right pane.
- Choose Scan options under Current threats if your Windows 10 is up to date; select Run a new advanced scan under Threat history if you’re running a previous version.
- Follow the instructions to finish the scan and remove viruses found on the device.
- Restart your computer.
Can’t Copy or Move File/Folder Open in Another Program
Sometimes when you’re trying to copy or move a file/folder, you’ll get this error message: The action cannot be completed because the file (or folder) is open in another program. How to fix this on Windows 10?
#1. Close applications.
You should check the programs and apps currently running on your PC. Then, close the applications that may use the file or folder you want to copy/move.
#2. Empty Recycle Bin.
- Look for the Recycle Bin icon on your desktop.
- Right click on it and choose Empty Recycle Bin.
- You can also empty the Recycle Bin manually: open Recycle Bin -> press Ctrl + A to select all items here -> press Shift + Delete to clear them.
How to recover files deleted from Recycle Bin?
#3. Modify local group policy.
- Press Windows + R to open Run dialog.
- Type msc into the textbox and hit Enter.
- Expand User Configuration, Administrative Templates, and Windows Components one by one.
- Select File Explorer in the left panel. Double click on Turn off caching of thumbnails in hidden thumbs.db files in the right panel.
- Check Enabled instead of Not Configured or Disabled.
- Click Apply and OK to save the changes.

#4. Modify Registry.
- Open Run dialog.
- Type regedit and click OK.
- Copy and paste this to the address bar of Registry Editor and hit Enter: ComputerHKEY_CURRENT_USERSoftwareMicrosoftWindowsCurrentVersionExplorerAdvanced.
- Double click on the IconsOnly DWORD in the right panel.
- Change the value data from 0 to 1 and click OK.
You can also fix the problem by:
- Changing DisableThumbnails DWORD
- Creating Explorer key and creating & modifying DisableThumbsDBOnNetworkFolders DWORD
#5. Delete the Temp folders.
- Type %temp% into the textbox of Run dialog and hit Enter.
- Press Ctrl + A to select all items. Press Shift + Delete to delete them.
- Type temp and press Enter.
- Press Ctrl + A to select all items. Press Shift + Delete to delete them.
#6. Perform Disk Cleanup.
- Press Windows + S and type disk cleanup.
- Press Enter to open Disk Cleanup window.
- Select the drive you want to clean up and click OK.
- Wait for the scanning process to end.
- Check Thumbnails and click OK.
- Wait for the action to complete.

Disk Cleanup Cleans Downloads Folder In Windows 10 After Update.
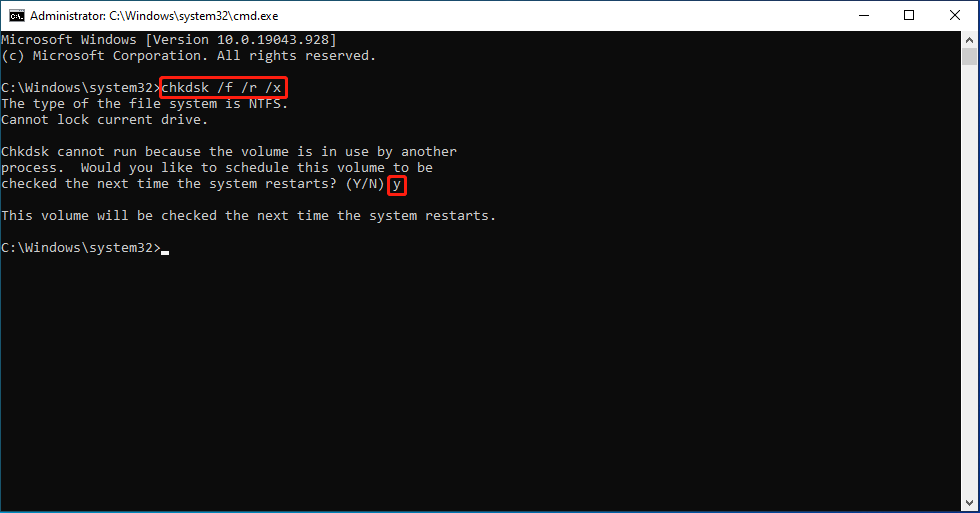
#7. Check disk for errors.
- Open File Explorer and right click on the drive with destination folder access denied error.
- Choose Properties from the context menu.
- Shift to Tools tab and go to the Error checking section.
- Click on the Check button and follow the instructions to finish scanning the drive.
You can also run CHKDSK command in Command Prompt tool to check & repair errors. How to fix if CHKDSK deletes your useful data?
Can’t Move or Delete File Windows 10
Sometimes, you can’t delete a file or folder even by pressing Shift + Delete. This part focuses on how to delete files that cannot be deleted. First of all, you should make sure all the applications that are using the file you try to delete (or containing it) are closed. If the problem persists, please try the following methods.
#1. Use Command Prompt.
- Click Start and scroll down to find Windows System.
- Expand it and right click on Command Prompt.
- Choose More and then Run as administrator.
- Type del and the location of the file/folder you want to delete. For instance, E:Testtext.txt.
- Press Enter on the keyboard.
#2. Delete in Safe Mode.
- Open Settings by pressing Windows + I.
- Choose Update & Security and navigate to Recovery in the left window.
- Look for Advanced startup in the right window and click Restart now under it.
- Choose Troubleshoot, Advanced options, and Startup Settings in order.
- Press F4 to enable Safe Mode.
- Open Windows Explorer to locate the target file or folder.
- Delete the file/folder and restart your PC.

Another way to delete items forcibly is using third-party tool.
Click to Tweet
If you have deleted useful files permanently by mistake, please read this to know how to get it back:
Can’t Read from the Source File or Disk
#1. Turn off your computer completely and turn it on again.
#2. Make sure the external storage is connected properly to your computer.
#3. Check the file system of the destination drive.
- Right click on the drive that you plan to move files/folders to.
- Choose Properties and look for the File system information.
- If it’s FAT32 or FAT16, please format it to NTFS. The FAT file system can’t support a large file (up to 4GB or 2GB). That’s why Windows 10 can’t copy large files.
You can choose to reformat the drive or convert FAT to NTFS directly!

The Volume Does Not Contain A Recognized File System — How To Fix?
Windows 10 Can’t Copy Paste Files
If you can’t copy and paste files/folders or can’t drag and drop, you should do the following things.
#1. Make sure Windows 10 is up to date.
- Press Windows + I.
- Choose Update & Security.
- Click on the Check for updates button in the right window.
- Wait for the process to finish and install any update it founds.

#2. End rdpclip.exe and run it manually.
- Right click on the taskbar to choose Task Manager.
- Shift to the Details tab and look forexe under it.
- Right click on the process and choose End task.
- Go to this path: C:/Windows/System32 to find rdpclip.exe.
- Run it manually.
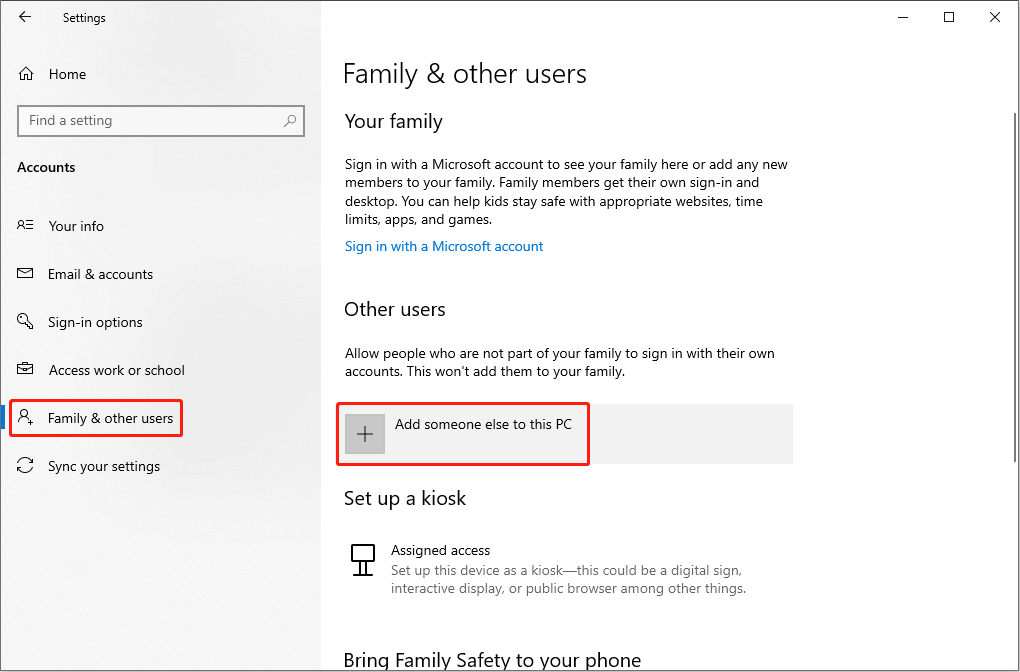
#3. Create a new user account.
- Open Settings to choose Accounts.
- Select Family & other people in the left window.
- Click Add someone else to this PC in the right window.
- Choose I don’t have this person’s sign-in information.
- Click Add a user without a Microsoft account. Enter a user name and click Next.
- Follow the instructions to finish the process and switch to this new account.
#4. Check disk for errors.
You should follow the steps mentioned in the above content to check disk in File Explorer or Command Prompt. Some users reported that checking disk has helped them solve copy and paste not working.
In addition, you can try the following methods when copy and paste doesn’t work:
- Disable the shared clipboard feature of VirtualBox.
- Disable Send to Bluetooth add-on.
- Use third-party clipboard manager.
Note: You may see an Error Copying File or Folder window popping up to stop you from copying/moving files. There are many reasons causing it; for instance, there is insufficient disk space to complete operation. You should use different ways to solve the problem according to actual situation.
How to fix if you can’t move or copy a file or folder on Mac?
Can’t Copy Files/Folders to USB
In addition to the reasons and solutions mentioned in above cases, there’s a special reason to explain why you can’t copy a file or folder to a USB drive. That is the write-protection feature. If the USB drive is write-protected, you can’t add new data or edit files in it.
In this case, you’ll need to clear write-protection on it first by following ways mentioned here.
Recover Files & Folders Windows
How to Recover Mistakenly Deleted Data
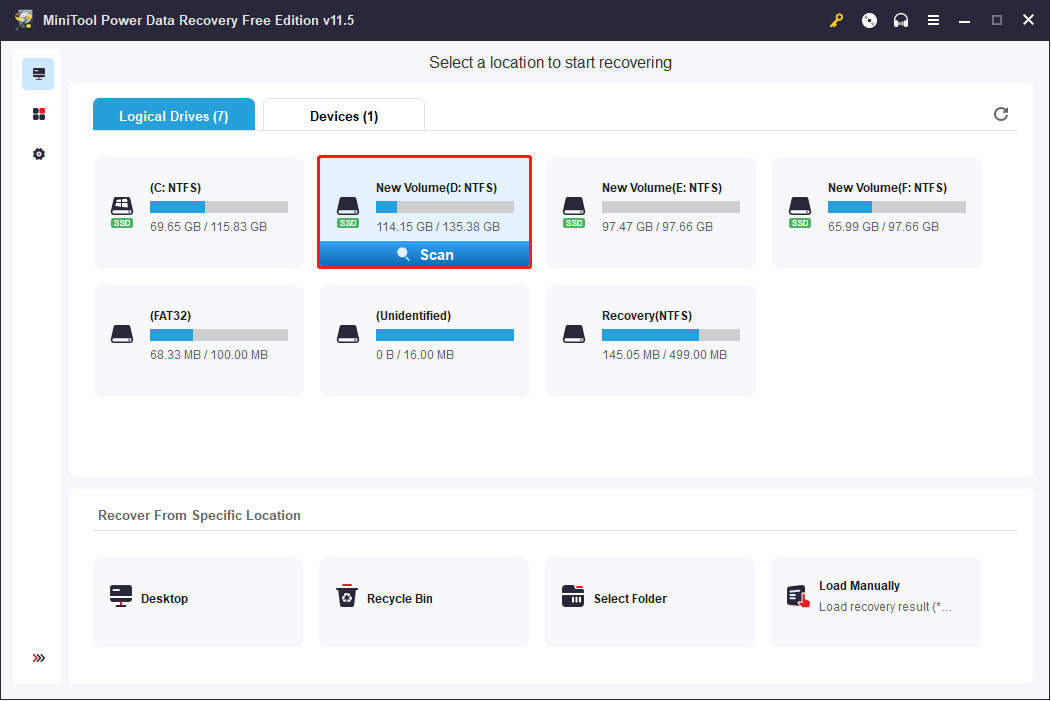
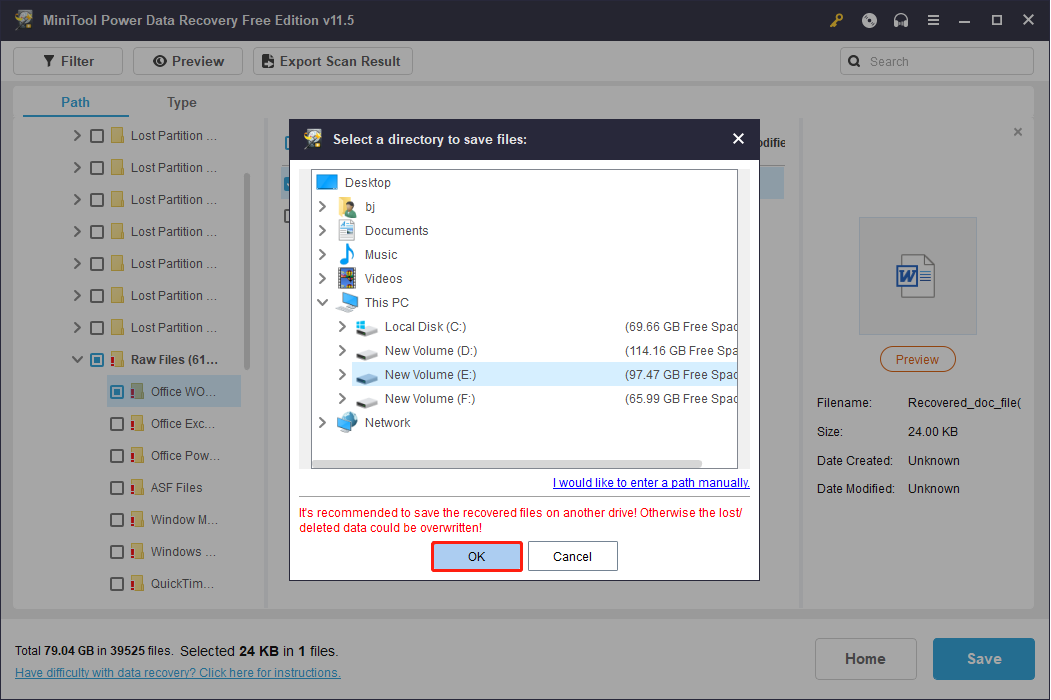
Step 1: get MiniTool Power Data Recovery and install it properly (please don’t save it to the drive containing deleted files).
Free Download
Step 2: launch the software and select This PC from the left sidebar.
Step 3: specify the drive containing deleted data and double click on it.
Step 4: wait for the scan and choose the files you want to recover from the scan result.
Step 5: click Save and choose a storage destination. Click OK and wait for the recovery to end.

Please read this page to know more details on how to retrieve deleted files on PC.
How to Recover Files from External Storage
- Install MiniTool Power Data Recovery and run it at the end of installation.
- Select Removable Disk Drive from the left sidebar.
- Choose the target drive and click Scan.
- Wait for the scan and choose the file/folder you want to recover.
- Click Save and choose a storage path.
- Click OK and wait for the recovery to complete.

Click to Tweet
Please read this page if you find files lost from an external hard drive:
Verdict
In this article, I have introduced the common types of file access denied error and gave the corresponding solutions to fix it. You should determine which type your case belongs to and follow the suggestions one by one to solve the problem yourself. If you still can’t copy or move files on Windows 10 (or other systems), please leave a message below.
Причиной ошибки может быть то, что файл был поврежден или файл был зашифрован …..
В процессе открытия файла или папки в Windows, но вы не можете открыть его, и на экране вы получите сообщение об ошибке «Отказано в доступе». Эта статья покажет вам несколько способов исправить ошибки «Отказано в доступе», которые появляются в разных ситуациях.
Инструкция по исправлению ошибок Access Denied при доступе к файлам или папкам в Windows
Обзор ошибки «Отказано в доступе»
Это довольно распространенная ошибка в Windows, связанная с доступом, файловой системой и т. Д. Эта проблема возникает, когда вы не можете открыть файлы или папки, службы на компьютере, которые не могут быть запущены, не можете открыть файлы в Интернете, не можете получить доступ к сайту, и т. д. Причиной ошибки может быть то, что файл был поврежден, или файл был зашифрован, профиль пользователя поврежден, … Даже при входе в систему Часто используются правильные имя пользователя и пароль, вы не можете открыть папку. Сообщения об ошибках различаются в зависимости от проблемы.
Проблема 1: Ошибка Ошибка 5: Доступ запрещен
Сообщение об ошибке Ошибка 5: доступ запрещен
При установке приложений или игр на компьютер вы не можете получить доступ к определенным местам или редактировать файлы. Вы пытаетесь перезапустить определенную службу или программное обеспечение, но не можете. Вы получаете одно из следующих сообщений об ошибке:

- «Windows не удалось запустить службу SSHD на локальном компьютере. Ошибка 5: доступ запрещен» (Windows не может запустить службу SSHD на локальном компьютере. Ошибка 5: доступ запрещен)
- «При установке не удалось создать каталог с полным путем к файлу. Ошибка 5: доступ запрещен» (программа установки не может создать каталог с полным путем к файлу. Ошибка 5: доступ запрещен).
- «Исправлена ошибка, из-за которой не удалось выполнить установку. Ошибка 5: доступ запрещен» (невозможно выполнить файл во временном каталоге. Программа установки отменена. Ошибка 5: доступ запрещен).
Причина ошибки 5: доступ запрещен
- Окно контроля учетных записей (UAC) не авторизует локальных пользователей.
- Существующие пользователи не имеют достаточных разрешений для доступа.
- Отсутствие разрешения на доступ к удаленным компьютерам.
- Ошибка синхронизации времени.
- Брандмауэр или программное обеспечение сторонних программ может удалить соединение с удаленным компьютером.
Как исправить ошибку Ошибка 5: Доступ запрещен
1. Проверьте, правильно ли установлены дата и время на вашем компьютере.
Если дата и время на вашем компьютере установлены неправильно, это может вызвать много ошибок в системе, включая ошибку 5: доступ запрещен. Поэтому, чтобы исправить ошибку, первое решение, которое вы можете применить, — это убедиться, что дата и время на вашем компьютере установлены правильно.
2. Запустите программу под Admin
Иногда некоторые программы требуют определенных разрешений для выполнения действий. Поэтому попробуйте запустить программу с правами администратора и проверьте, не исчезла ли ошибка.
— Если вы запускаете программу из меню «Пуск», щелкните правой кнопкой мыши любую программу и выберите «Запуск от имени администратора».
— Если вы запустите программу в другом разделе, щелкните правой кнопкой мыши любую программу, затем выберите Запуск от имени администратора.
— Если вы хотите запустить командную строку под Admin, просто щелкните правой кнопкой мыши кнопку «Пуск» и выберите «Командная строка» (Admin)

3. Очистить систему от вирусов.
Вирусы оказывают огромное «влияние» на вашу систему. Если ваш компьютер подвергся вирусной атаке, это может привести к ошибкам в файлах, включить / отключить службы, отключить брандмауэр Windows и заставить ваш компьютер работать все медленнее и медленнее.
Вирусы могут влиять на «основные» файлы, которые требуются Windows для запуска приложений, вызывая ошибку 5. Чтобы убедиться, что ошибок нет, перейдите к очистке системы. с эффективным антивирусом.
Читатели могут обратиться к некоторым эффективным антивирусным программам для компьютеров Windows здесь.
4. Очистите временные файлы и системные папки
Windows хранит ненужные файлы, в то время как пользователи используют компьютеры и выходят в Интернет. И это также причина того, что ваш компьютер становится все медленнее и медленнее, потому что он хранит много ненужных файлов и является причиной ошибки 5. Чтобы очистить ненужные файлы, выполните следующие действия:
1. Нажмите комбинацию клавиш Windows + R, чтобы открыть окно команды «Выполнить», затем введите в него cmd, но не нажимайте Enter.
2. Нажмите и удерживайте Ctrl + Shift и нажмите Enter, чтобы открыть командную строку под Admin.
3. В окне командной строки введите в него «cleanupmgr» и нажмите Enter.
4. Очистка диска начнет вычислять пространство, которое занимают ненужные файлы, и отобразит список на экране.
5. В это время на экране отображается список нежелательных файлов. Ваша задача — выбрать элементы, которые вы хотите очистить, и затем нажать «ОК».
5. Обновить (обновить) драйвер
Если версия драйвера слишком старая, это может привести к ошибке. Поэтому, чтобы исправить ошибку, вы можете попробовать применить решение для обновления драйвера.
Чтобы обновить драйвер, выполните следующие действия:
1. Щелкните правой кнопкой мыши Мой компьютер (или Этот компьютер в Windows 10), затем нажмите Свойства.
2. В окне «Свойства» вы увидите элемент «Диспетчер устройств» на левой панели (в Windows 10, 8x, Windows 7 и Windows Vista).
Если вы используете Windows XP, вам нужно будет добавить шаги, чтобы перейти на вкладку «Оборудование», и вы увидите запись диспетчера устройств.
3. В окне диспетчера устройств проверьте, есть ли какие-либо значки в списке желтого цвета. Если это так, щелкните правой кнопкой мыши и выберите «Свойства». В окне «Свойства» перейдите на вкладку «Драйверы» и нажмите «Обновить драйверы».
Чтобы обновить (обновить) все последние версии драйверов, перейдите в Панель управления, затем нажмите «Центр обновления Windows» (в Windows 10 выберите «Настройки»> «Обновление и безопасность» и нажмите «Проверить наличие обновлений»). Этот процесс загрузит и установит последние версии драйверов и установит необходимые файлы на ваш компьютер.
6. Зашифруйте файлы или папки
Шифрование — лучшее решение для защиты ваших файлов и папок от несанкционированного доступа других лиц. Если вы не можете получить доступ к этим файлам и папкам, лучше всего зашифровать файлы и папки.
Выполните следующие действия для шифрования файлов и папок:
Щелкните правой кнопкой мыши файл или папку и выберите «Свойства». Далее в окне «Свойства» выберите вкладку «Общие» и нажмите кнопку «Дополнительно».
Здесь вам просто нужно удалить содержимое зашифрованного содержимого, чтобы обеспечить безопасность данных.

Если выбран параметр «Зашифровать содержимое для защиты данных», необходимо подтвердить расшифровку файлов и открыть эти файлы.
7. Восстановить право собственности на файлы или каталоги
Чтобы восстановить право собственности на файлы или каталоги, сначала щелкните правой кнопкой мыши файл или папку, которую хотите открыть, и выберите «Свойства», чтобы открыть окно «Свойства». Здесь вы выбираете вкладку Безопасность.
Если нет доступа к каталогу, на экране вы увидите сообщение с просьбой использовать права администратора для доступа к каталогу. Ваша задача — нажать Продолжить, чтобы продолжить. В это время появится всплывающее окно с опциями для смены владельца.

В разделе «Смена владельца» выберите свою учетную запись администратора или учетную запись пользователя. Затем выберите опцию «Заменить владельца» для подконтейнеров и объектов.

Нажмите кнопку «ОК», чтобы увидеть содержимое папки «Папка». Хотите заменить права доступа к каталогу разрешениями, предоставляющими вам полный доступ? Все разрешения будут заменены, если вы нажмете «Да».
Нажмите Да, чтобы продолжить.

Вы можете сбросить режим безопасности и разрешить необходимые разрешения для каталога и содержимого каталога выше.
8. Использование проверки ошибок диска
Выполнение команды CheckDisk или Disk Error Checking интегрировано в Windows 8. В Windows 8 Microsoft перепроектировала утилиту chkdsk — инструмент для обнаружения, проверки и исправления ошибок разделов диска. В дополнение к Windows 8, Microsoft также представила системный файл с именем ReFS, который не требует chkdsk в автономном режиме для исправления ошибок.
9. Отключите простой общий доступ к файлам (в Windows XP)
Чтобы отключить режим простого общего доступа к файлам, сначала нажмите Пуск, Мой компьютер. В меню «Сервис» выберите «Свойства папки», «Просмотр».
Затем в разделе «Дополнительные настройки» удалите раздел «Использовать простой общий доступ к файлам (рекомендуется)» и нажмите «ОК» для завершения.
")
Проблема 2: Не удается открыть файл или папку
Сообщения об ошибках не могут открыть файлы или папки
При попытке открыть файлы или папки в Microsoft Windows вы не можете получить доступ и получать сообщения об ошибках, такие как:
- «Папка недоступна. Доступ запрещен» (Невозможно получить доступ к каталогу. Доступ запрещен — каталог представляет собой имя папки, которую вы не можете открыть).
- «В настоящее время у вас нет прав доступа к этой папке. Нажмите« Продолжить », чтобы получить доступ к этой папке» (в настоящее время у вас нет доступа к этой папке, нажмите «Продолжить», чтобы получить постоянный доступ к этой папке).
- «Bđn đã được phép phép phép nhập vao thư mục này. Hаy lấy truy cập cho thư mục này. (Вам было отказано в доступе к этой папке. Чтобы получить доступ к этой папке, вам потребуется использовать вкладку Security).

Причиной ошибки не может открыть файл или папку
Ошибка «Отказано в доступе» может возникнуть по одной или нескольким из следующих причин:
- Владение папками было изменено
- У вас нет соответствующих прав
- Файл зашифрован
- Файлы хранятся в папке Windows.old из предыдущей системы. Обычно это происходит после обновления вашего компьютера до новой версии Windows.
Как исправить ошибки не могу открыть файлы или папки
1. Получить право собственности на файлы или папки в Windows
Шаг 1. Выберите файл или папку, владельцем которой вы хотите стать, и щелкните правой кнопкой мыши, чтобы выбрать «Свойства» в контекстном меню.
Шаг 2. Выберите вкладку «Безопасность» и нажмите кнопку «Дополнительно», затем нажмите «Изменить». Если вас попросят предоставить подтверждающий пароль или пароль администратора, предоставьте подтверждение или введите пароль.
Шаг 3. Введите имя человека, которому вы хотите предоставить право собственности, и нажмите «Проверить».
Шаг 4. Нажмите ОК. Если вы хотите, чтобы этот человек был владельцем папок и файлов, хранящихся в этой папке, установите флажок Заменить владельца для подконтейнеров и объектов.
Шаг 5. Нажмите ОК.
2. Изменить доступ
Как правило, ошибки «Отказано в доступе» связаны с доступом к файлам и папкам или их изменениям. Если у вас нет прав, вы не можете получить доступ к указанному местоположению. Если вы вошли в систему как администратор и по-прежнему не можете получить доступ к каталогу, вы можете изменить разрешения. Примечание: для изменения разрешений необходимо войти в систему как администратор.
Шаг 1. Выберите файл или папку и щелкните правой кнопкой мыши, чтобы выбрать «Свойства», затем перейдите на вкладку «Безопасность».
Шаг 2. Нажмите свое имя в группе или имена пользователей, чтобы увидеть свои права.
Шаг 3. Выберите все параметры в Разрешить и нажмите OK и Применить. После этого вы будете иметь полные права на управление файлами или каталогами, такими как редактирование, чтение, выполнение, просмотр содержимого каталога и т. Д.
3. Файл или папка зашифрованы
Шифрование данных является одним из лучших способов защиты данных от несанкционированного доступа. Вы не можете получить доступ к зашифрованным файлам или папкам без соответствующего сертификата. Вы можете проверить, зашифрована ли папка:
Шаг 1. Выберите и щелкните правой кнопкой мыши определенный файл или папку, чтобы выбрать Свойства.
Шаг 2. Выберите вкладку General, затем нажмите кнопку Advanced. Если вы видите опцию Зашифровать содержимое для защиты данных, файл зашифрован, вам нужен сертификат, чтобы открыть его.
Проблема 3: Отклонить при доступе к файлам / папкам, об ошибках изменения или удалить файлы или папки
Сообщение об ошибке отклонено при доступе к файлам / папкам
Когда вы удаляете, копируете, перемещаете или изменяете файл или папку на своем компьютере, вы можете быть заблокированы ошибкой «Отказано в доступе», сообщающей, что у вас нет разрешения на это. Сообщение об ошибке:
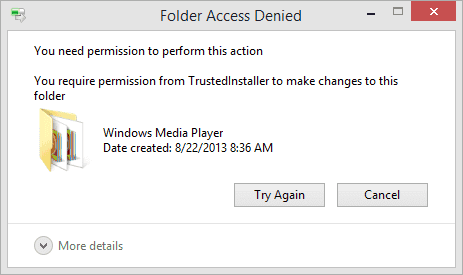
- «Доступ к папке запрещен. Для выполнения этого действия вам необходимо разрешение. Вы можете запросить разрешение у TrustedInstaller для внесения изменений в эту папку» (Доступ к каталогу запрещен. Для выполнения этого действия вам необходимо разрешение. Для внесения изменений необходимо разрешение TrustedInstaller. папка).
- «Доступ к целевой папке запрещен. Для выполнения этого действия требуется разрешение» (Доступ к целевой папке запрещен. Для выполнения этой задачи требуется разрешение).

Причина ошибки отказа при доступе к файлам / папкам
Эта ошибка может быть вызвана следующими причинами:
- Файл, к которому у вас нет доступа, используется.
- У вас нет доступа к этому файлу.
- Профили пользователей могут быть повреждены.
Как исправить ошибки отклонения при доступе к файлам / папкам
1. Получить право собственности с помощью командной строки
Есть несколько способов получить право собственности на файл или каталог, и это решение использует командную строку для восстановления прав владения.
Шаг 1. Щелкните правой кнопкой меню «Пуск» и выберите «Командная строка» («Администратор»). Если в сообщении введите пароль или подтвердите, введите пароль и подтвердите.
Шаг 2. Подтвердите путь к каталогу, владельцем которого вы хотите стать. Например, вы хотите восстановить право собственности на папку «Фото» на диске E, адрес которой: E: Фото.
Шаг 3. Введите команду takeown / f «E: Фотографии (замените путь к вашему каталогу), затем нажмите Enter.
Шаг 4. После завершения процесса перезагрузите компьютер и проверьте, устранена ли проблема.
2. Удалите поврежденные файлы сторонним программным обеспечением.
Поврежденные файлы не могут работать должным образом, это могут быть файлы изображений, документы, системные файлы и т. Д. Многие файлы повреждены или не могут быть удалены. Вот самый простой способ удалить поврежденные файлы.
Шаг 1. Скачайте, установите и запустите Eassos PartitionGuru.
Шаг 2. Выберите поврежденный файл или папку, которую вы хотите удалить, щелкните правой кнопкой мыши и выберите «Удалить файлы напрямую».

Шаг 3. Нажмите кнопку Удалить, чтобы удалить выбранный файл. Обратите внимание, что файлы, удаленные таким образом, не попадут в корзину, поэтому следует удалять файлы, которые больше не важны
Советы по предотвращению поврежденных файлов:
- Сохраните файл правильно. Когда возникает проблема или ошибка при сохранении файла, файл может быть поврежден
- Удалите безопасное запоминающее устройство USB. Нажмите на устройство «Безопасное извлечение и извлечение носителя» перед удалением USB-устройства.
- Выключите компьютер правильно. Чтобы выключить компьютер, вы должны нажать кнопку «Пуск» и нажать «Выключить» вместо прямого нажатия кнопки питания.
3. Создайте новую учетную запись локального пользователя
Если проблема с отказом в доступе вызвана поврежденной учетной записью, вы можете решить проблему, создав новую учетную запись / профиль локального пользователя. Чтобы создать новую учетную запись, выполните следующие действия:
Шаг 1. Нажмите на меню «Пуск» и выберите «Настройки». Нажмите Учетные записи в настройках Windows.
Шаг 2. Выберите «Семья и другие люди» слева, а затем нажмите «Добавить кого-то еще на этот компьютер».
Шаг 3. Нажмите на ссылку У меня нет этой информации для входа и нажмите Далее. На следующем экране нажмите Добавить учетную запись пользователя без Microsoft, затем нажмите Далее. Теперь вы можете ввести свое имя пользователя, пароль, подсказку к паролю и выбрать Далее.
Проблема 4: Получите сообщение об ошибке «Местоположение не доступно. Доступ запрещен»
Thông báo lỗi Местоположение не доступно. В доступе отказано
При открытии раздела на жестком диске компьютера или USB-устройстве вы не можете открыть его и получить ошибку
- «Местоположение недоступно. E: недоступно. Доступ запрещен» (Местоположение недоступно. Не удается получить доступ к диску E:. Доступ запрещен.)
Причина ошибки местоположения недоступна. L trui truy cập Access
- Файловая система повреждена. Файловая система на диске повреждена и поэтому более недоступна.
- У вас нет соответствующих прав.
Cách sửa lỗi Местоположение не доступно. В доступе отказано
1. Измените права доступа к диску
Шаг 1. В проводнике Windows щелкните правой кнопкой мыши раздел, к которому у вас нет доступа, и выберите Свойства> Безопасность> Дополнительно.
Шаг 2. Нажмите Добавить в разделе «Дополнительные параметры безопасности» и на следующем экране нажмите «Выбрать»
Шаг 3. Введите имя пользователя и нажмите ОК. Затем вы можете выбрать следующую информацию:
Тип: Разрешить Применяется к: этой папке, подпапкам и файлам Основные разрешения: Полный доступ
Шаг 4. Нажмите OK и Применить, чтобы сохранить изменения.
2. Восстановление данных с диска не может получить доступ и отформатировать его
Если изменение разрешений не решает проблему, вы можете восстановить данные с диска, который недоступен, и отформатировать их для устранения проблемы. Это легко получить данные из любого места и отказано в доступе. Вот шаги для восстановления данных с поврежденного диска.
Шаг 1. Установите и запустите Eassos PartitionGuru, затем проверьте, отображается ли раздел напрямую. Если нет, перейдите к следующему шагу.
Шаг 2. Выберите диск, к которому нет доступа, и нажмите кнопку «Восстановление файлов» на панели инструментов. Вы должны быть уверены, что выбрали правильный раздел.
Шаг 3. Выберите режим полного восстановления и нажмите кнопку «Пуск», чтобы начать сканирование файлов и папок в выбранном разделе.

Шаг 4. Предварительный просмотр файла. Файлы, найденные Eassos PartitionGuru, автоматически отображаются во время сканирования, и вы можете просмотреть перечисленные файлы и папки, чтобы проверить, не повреждены ли они.
Шаг 5. Восстановите данные. Выберите файлы и папки, которые вы хотите восстановить, и щелкните их правой кнопкой мыши, чтобы выбрать «Копировать в», затем вы можете выбрать место для сохранения восстановленных данных.

Проблема 5: Ошибка доступа запрещена при использовании DiskPart
Сообщение об отказе в доступе при использовании DiskPart
При использовании DiskPart для очистки диска вы не можете выполнить и получить сообщение об ошибке:
- «ДИСКПАРТ> Чисто»
- «DiskPart обнаружил ошибку: доступ запрещен» (DiskPart имеет ошибку: отказ в доступе).
- «См. Системный журнал событий для получения дополнительной информации» (См. Журнал событий для получения дополнительной информации).
Причина ошибки «Отказано в доступе» при использовании DiskPart
- Вы не авторизованы.
- Устройство, которое вы хотите очистить в режиме защиты от записи.
Как исправить ошибки Access Denied при использовании DiskPart
1. Запустите командную строку от имени администратора.
Шаг 1. Войдите в систему с учетной записью администратора. Если нет, перезагрузите компьютер и получите доступ к учетной записи администратора.
Шаг 2. Нажмите на меню «Пуск» и введите cmd в поле поиска.
Шаг 3. Щелкните правой кнопкой мыши «cmd.exe» и выберите «Запуск от имени администратора». Если запрашивается пароль или подтверждение, следуйте.
2. Удалить режим защиты от записи
Шаг 1. Нажмите Windows + R, чтобы открыть Run, введите regedit и нажмите OK, чтобы открыть редактор реестра.
Шаг 2. В редакторе реестра перейдите к HKEY_LOCAL_MACHINESYSTEMCurrentControlSetControlStorageDevicePolicies
Шаг 3. Щелкните правой кнопкой мыши WriteProtect и измените цену на 0.
Обратитесь к некоторым из следующих статей:
Удачи!
We’ve all encountered it – you attempt to open a file and the File Access Denied error pops. This problem often happens after reinstallation of Windows. Other cases when you can encounter this error is when you try to move a file from one folder to another. Another possibility is security related. Your system can deny access to some files if it sees them as a threat.
So why does the “Access Denied” error appear?
There are plenty of reasons why this error can appear, but the most common are:
- The folder ownership has changed
- You don’t have the appropriate permissions
- The file may be encrypted
- The file may be corrupted
What are your options if you want to access the restricted files and fix the access denied error?
Method 1 – Get ownership of the file or folder
If by any chance you upgrade your Windows to the latest version your account information might change. This is the reason why you lost ownership of some folder and files and you see the “Access Denied” error.
So how to restore the ownership of your files and folders?
For Windows 10 and Windows 8 follow these steps:
- Right-click on the folder, and then, choose “Properties” on the menu
- Click “Advanced” in the “Security” tab. Click on “Change”
- Type the account name that you want to assign ownership to. Then click on “Check Names” button > “OK”

- If you want to give this account the ownership of the files and subfolders contained in this folder, enable the “Replace owner on subcontainers and objects” option. Click “OK”
For Windows 7:
- Right-click on the folder, and then, choose “Properties”
- Click on the “Security” tab>”Advanced” button
- Choose “Edit” in the “Owner” tab to change the owner
- Hit on “Other users or groups…” button to manually choose the username and type your account name
- Next, click on the “Check Names” button>”OK”. Enable “Replace owner on subcontainers and objects” option, if you want to take the ownership of the files and subfolders
- Click “OK”
Method 2 – Get Permission of the File or Folder
If you are not granted the appropriate permissions to access files and folders you will be faced again with the “Access Denied” error. You can get permissions for files and folders by following the steps:
First of all, you need to check permissions on a file or a folder. Here we’ll show you a simple tutorial below.
- Right-click on the folder and then hit “Properties”
- Select the “Security” tab
- Click on your name in “Group or user names” to check the permission that you have
If you want to change the permissions on a file or a folder, you should log on the PC as an administrator. Next, click on “Edit” in “Security” tab. And then, choose your name and enable the check boxes of the permissions that you need.
You can also check our more detailed tutorial about this method here.
Method 3 – Unencrypt File or Folder
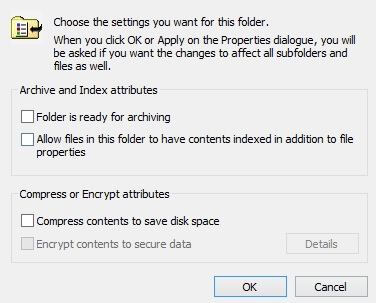
The role of file encryption is to protect the users’ files and folders. If you want to access encrypted files you will need the certificate that was used to encrypt it in the first place. To check the files or folders for encryption follow these steps:
- Right-click on the folder and then hit “Properties”
- In “General” tab, click on the “Advanced” button
After that, you can check if “Encrypt Content to Secure Data” option is enabled. If it is checked, you will need the certificate to open the file or folder. If “Encrypt Content to Secure Data” option is unchecked, the file or folder is not encrypted.
Method 4 – add your account to the Administrators group
Windows 10 by details has an Administrator account that is built-in. By using this account you should be able to access all your files and folders.
Due to security reasons, it is not easy to access this account. Here are the steps you need to follow:
- Press Windows Key + X and select Command Prompt (Admin) from the menu
- When Command Prompt starts, type the following
net user administrator /active: yescommand. By doing so the administrator account will be unlocked - Log off of your account and switch to the newly enabled Administrator account. You should be able to access your files without any problems
- After you’re done using the Administrator account, switch back to your main account and start Command Prompt as administrator again. Type the following
net user administrator /active: noto disable the Administrator account
Keep in mind that when you switch to your regular account the Access denied error can still appear. In this case you need to get back to the Administrator account and make the necessary changes that we talked about in the previous steps.
Method 5 – Use Command Prompt to reset permissions
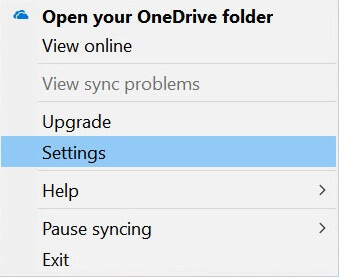
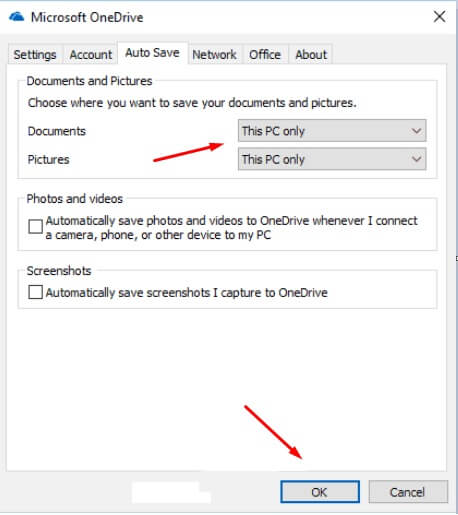
There are cases where OneDrive causes problems when it comes to getting access to the Pictures folder. You can do the following to fix the problem:
- Right-click the OneDrive icon in the bottom right corner and choose Settings from the menu
- Go to the Auto Save tab. Set both Documents and Pictures to This PC only. Click OK to save changes
In case that this does not solve the problem, you need to do the following in Command Prompt:
- Open Command Prompt as administrator
- Type in the following commands:
- cd /users/Your_Username
- icacls Pictures /reset /t /q
- cd /<path to OneDrive folder>
- icacls Pictures /reset /t /q
- After that restart your PC
Access denied error can prevent you from installing new applications, because you can’t access your files and folders. We hope that we have managed to solve your issues with the solutions that we provided!
Post Views: 1,860
This article talks about «access denied» error which may appear in a variety of situations, and provides step-by-step solutions for each Access Denied scenarios. This error is explained in 5 cases, including most situations you may encounter. If you are experiencing same error message, keep reading to check solutions.
Overview on access denied error
If you are getting Access Denied error in Windows, then you are not alone. This is a quite common problem related to permission, file system, etc. It occurs when you are unable to open a file or folder, a service on your computer fails to start, cannot open file on a network, unable to access web site, etc. Error messages differ from issue to issue, for example, it can be «Folder Access Denied. You need permission to perform this action. You require permission from TrustedInstaller to make changes to this folder» or «Location is not available. E: is not accessible. Access is denied.»

Let’s see two real world cases on this error:
«I got problem in deleting a folder. Here is the story: I attempted to delete a folder using Shift + Del, but the Access Denied error occurred. The folder cannot be deleted and so did files in the folder. Also, I tried deleting as an Administrator, but it says I do not have that privileges. However, I’m the only user and it is the very administrator account. The error message is: <file path> is not accessible. Access is denied. I checked solutions online, and tried some, but none worked. Any suggestions?»
» couple of day ago I downloaded DOTA from STEAM I got an update error when I tried to launch the game. I looked to solutions and found one which asks to delete ‘downloading’ folder located in Steamapps. Unfortunately, I couldn’t delete it, as it requires Administrator permission. I clicked Continue and got Access Denied error. I restarted PC and logged in as Administrator and still cannot delete it! Any idea to fix this?»
Issue 1: You cannot open a file or folder
Symptom
When you try to open a file or folder in Microsoft Windows, you are unable to access is and receive error message like:
«Folder is not accessible. Access is denied.» (Folder here represents the name of the folder you cannot open.)
«You don’t currently have permission to access this folder. Click Continue to permanently get access to this folder.»
«You have been denied permission to access this folder. To gain access to this folder you will need to use the security tab.»
Causes
An «Access Denied» error can occur for one or more of the following reasons:
Resolution
Solution 1: Take ownership of the file or folder in Windows
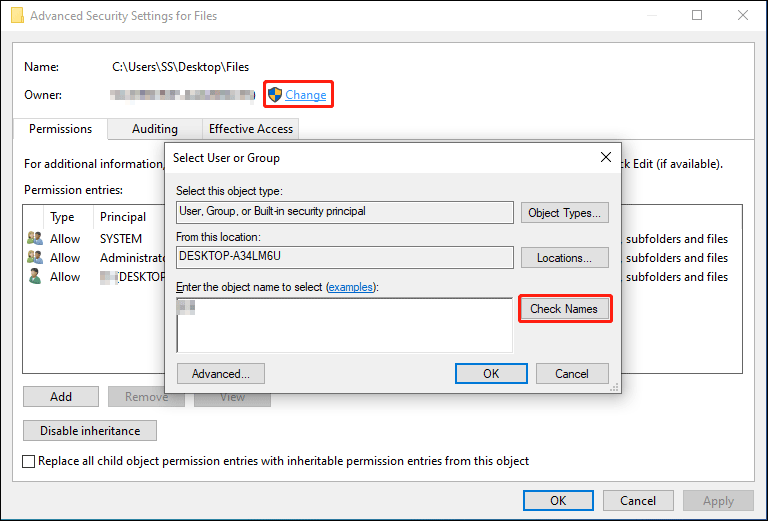
Step 1 Select the file or folder you want to take ownership and right-click it to select Properties from context menu.
Step 2 Select the Security tab and click Advanced button. Then click Change. If you are asked to give confirmation or administrator password, then provide confirmation or type the password.
Step 3 Type the name of the person whom you want to give ownership to, and click Check Names.
Step 4 Click OK. If you want this person to be the owner of the folders and files that are stored in this folder, select check box of Replace owner on subcontainers and objects.
Step 5 Click OK.
Solution 2: Change permission
It is common that the access denied error you experience is related to permission. Permissions rules whether you can access or change files and folders. If you do not gain permission, you are not able to access specified location. If you are logging in as administrator and still cannot access a folder, you can try changing permissions. Note: to change permission you should log on as an administrator.
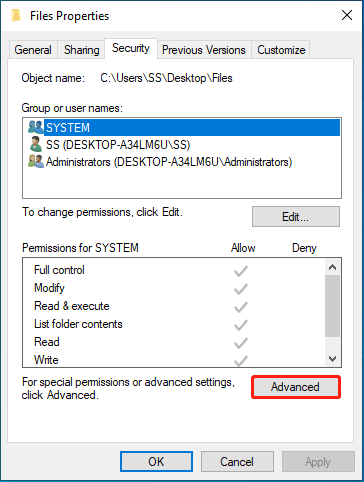
Step 1 Select the file or folder and right-click it to select Properties. Then click Security tab.
Step 2 Click your name under Group or user names, and you can see permissions you have.
Step 3 Select all boxes under Allow and click OK and Apply. Then you’ll get full control of the file or folder, such as modify, read & execute, list folder contents, etc.
Solution 3: The file or folder is encrypted
Data encryption is one of the best solutions to protect data again any unwanted access. You are unable to access encrypt file or folder without proper certificate. You can have a check whether the folder is encrypted or not.
Step 1 Select and right-click the file or folder to click Properties.
Step 2 Select General tab, and then click Advanced button. If the Encrypt contents to secure data is selected, then file is encrypted, and you’ll have to get the certificate to open it.
Issue 2: File / Folder access denied, error changing or deleting file or folder
Symptom
When you try to delete, copy, move or change a file or folder on your computer, you might be blocked by Accedd denied error which prompts you donot have permission to do so. The error message could be:
«Folder Access Denied. You need permission to perform this action. You require permission from TrustedInstaller to make changes to this folder.»
«Destination Folder Access Denied. You need permission to perform this action.»
Causes
This error might be caused by following reasons:
Resolution
Solution 1: Take ownership using Command Prompt
There are a couple of methods to take ownership of a file or folder, and this solution modifies ownership in Command Prompt. It’s OK if you follow steps in previous part to take ownership.
Step 1 Right-click on Start menu and select Command Prompt (Admin). If you are prompted for password or conformation, provide password or give confirmation.
Step 2 Confirm the path of the folder you want to take ownership. Here, say you want to take ownership of the folder Photos of E drive and the address is : E:Photos
Step 3 Type command takeown /f «full path of the file or folder», which, in this case, should be takeown /f «E:Photos«. Then press Enter.
Step 4 Once the process completes, restart computer and check if the problem is removed.
Solution 2: Delete corrupt files with third-party software
Corrupted files cannot work properly and these files can be of any file type like pictures, documents, system files, etc. Many corrupted files cannot be repaired or even cannot be deleted. Here is an easier solution to delete corrupt files.
Step 1 Download, install and launch Eassos DiskGenius.
Step 2 Select the corrupt file or folder you want to delete, right-click it and select Delete Files Directly.
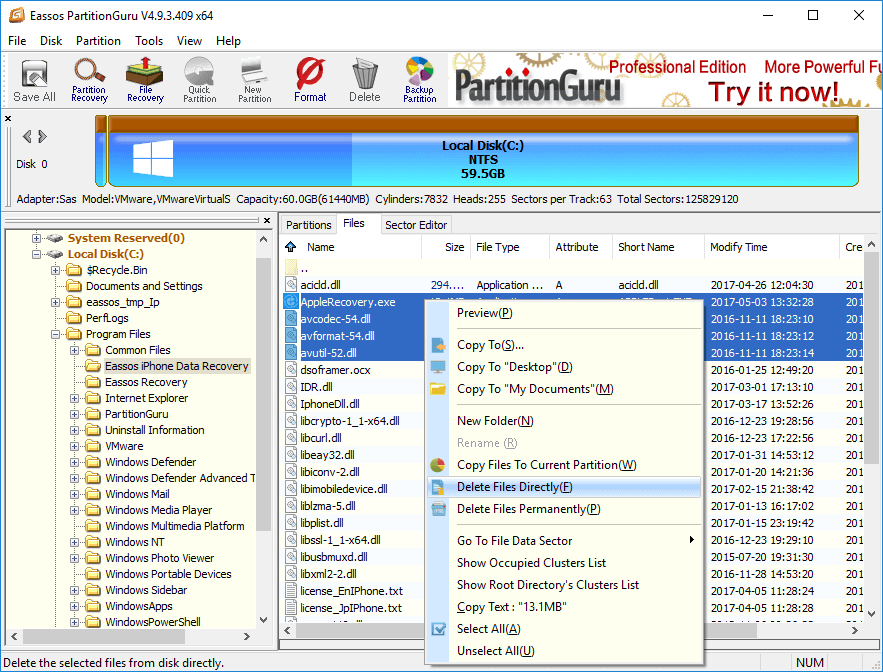
Step 3 Click Delete button to delete selected file. Note: files deleted in this way won’t be put into Recycle Bin, please make sure these files are no longer important to you.
Tips on preventing files from getting corrupted:
Solution 3: Create a new local user account
If the access denied issue is caused by a corrupt account, you can resolve it by creating a new local user profile / account. To do that, follow these steps:
Step 1 Click Start menu and select Settings. Click Accounts on the Windows Settings pane.
Step 2 Select «Family & other people» on the left side and then click «Add someone else to this PC».
Step 3 Click link «I don’t have this person’s sign-in information» and click Next. On next screen, click «Add a user account without a Microsoft» account and click Next. Then you can enter user name, password and password hint, and then select Next.
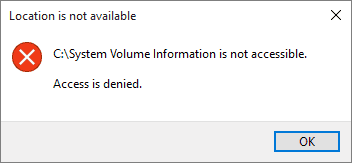
Issue 3:Receive «Location is not available. Access is denied.» error message
Symptom
When you are trying to open a partition on local hard drive or USB devices, you cannot open it and receive error message:
Location is not available. E: is not accessible. Access is denied.
Causes
Resolution
Solution 1: Change permission for the drive
Step 1 In Windows Explorer, right-click the partition that you cannot access and click Properties. Continue clicking Security -> Advanced.
Step 2 Click Add in Advanced Security Settings and on next screen click Select a principal.
Step 3 Enter the username to select and click OK. Then you should select follow information:
Type: Allow
Applies to: This Folder, subfolder and files
Basic Permissions: Full Control
Step 4 Click OK and Apply to save changes.
Solution 2: Recover data from inaccessible drive and format it.
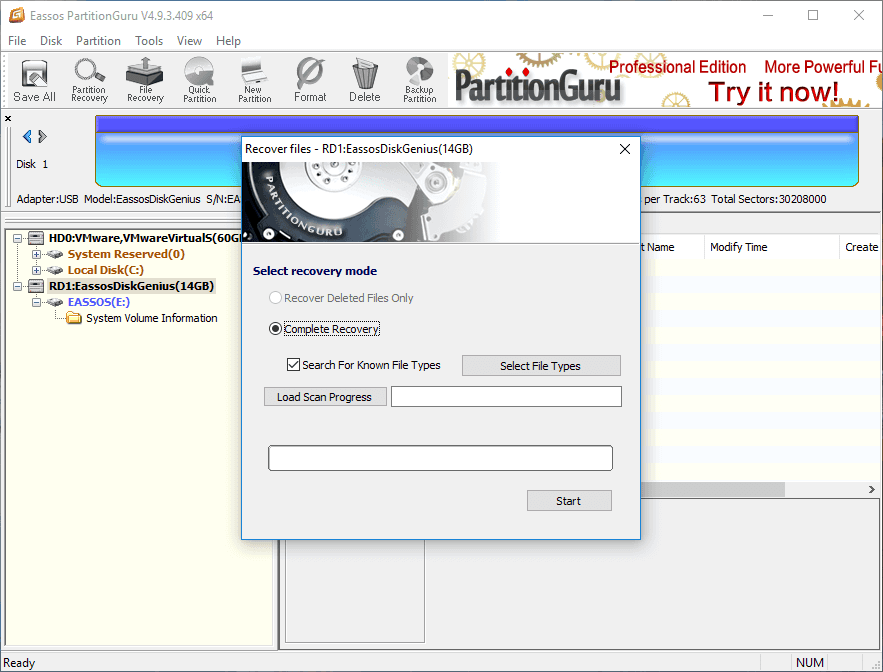
If changing permission does not help, you can recover data from the inaccessible drive and format the disk to repair the error. It’s easy to retrieve data when location is not available and access is denied. Here is the guide to recover data from corrupt drive.
Step 1 Install and launch Eassos DiskGenius, then check if files in this partition can be displayed directly. If not, go to next step.
Step 2 Select the inaccessible drive and click File Recovery button from the toolbar. Make sure you are selecting the correct partition.
Step 3 Select Complete Recovery mode and click Start button. The full scan will start to search for files and folders in selected partition.
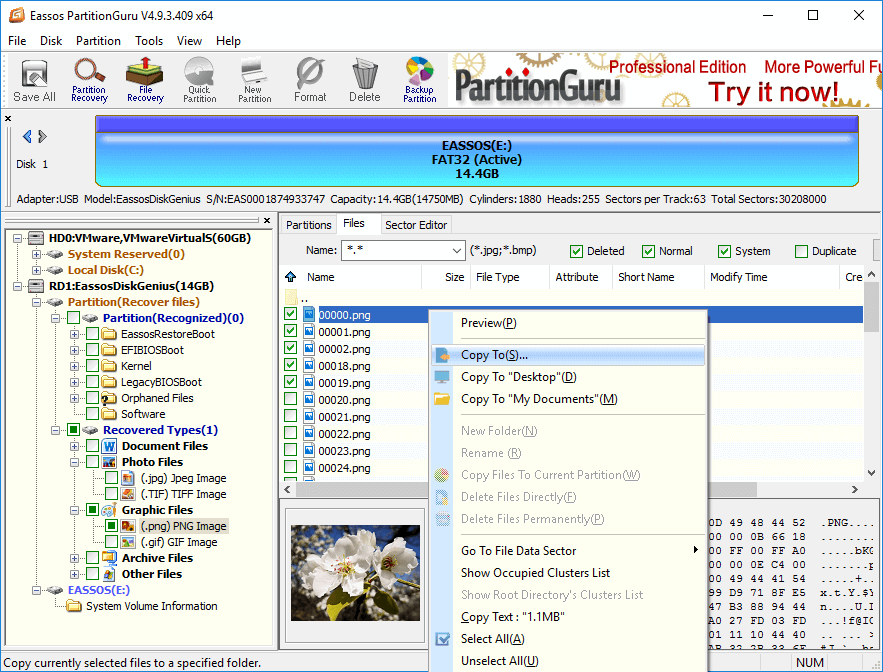
Step 4 Preview files. File found by Eassos DiskGenius will be displayed automatically during scanning, and you can preview listed files and folders to check whether they are correct or damaged.
Step 5 Recover data. Select files and folders you want to recover and right-click them to select «Copy to». Then you can set a location to save recovered data.
Issue 4: Error 5: Access Denied
Symptom
When you install application or game on your computer, you are prevented from accessing certain location or modifying files; also, you attempt to start certain service or software but fails. Error messages you may receive as follows:
«Windows could not start the sshd service on local computer. Error 5: Access is denied.»
«Setup was unable to create the directory «full file path». Error 5: Access is denied.»
«Unable to execute file in the temporary directory. Setup aborted. Error 5: Access is denied.»
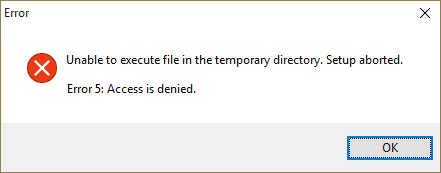
Cause
The main reason of this error is permission issue. If you do not have the Administrator privileges or the account you logged in is not administrator account, the access denied error is tend to appear.
Resolution
Solution 1: Fix permission issue in temp folder
Step 1 Double click Computer icon to open Windows Explorer. Then type %appdata%..local in the address bar and press Enter.
Step 2 Select and right-click on Temp folder and click Properties. Click Security tab and click Advanced button.
Step 3 Make sure the option «Replace all child object permission with inheritable permissions from this object» is selected.
Step 4 Select entries that are not inherited from «C:Users[Username]» folder and click Remove. Click Apply and OK.
Solution 2: Make your account administrator
Step 1 Press key combination Windows + R to open Run dialogue where you should type netplwiz and press Enter.
Step 2 Select the user account that you want to change it to administrator and click Properties.
Step 3 Click «Group Membership» tab and select Administrator, then click Apply and OK.
Issue 5: DiskPart has encountered an error: Access is denied
Symptom
When you use DiskPart to clean a disk, you cannot complete the task and receive error message:
DISKPART> clean
DiskPart has encountered an error: Access is denied.
See the System Event Log for more information.
Causes
Resolution
Solution 1: Run Command Prompt as Administrator
Step 1 Make sure you are logging on your computer as the Administrator account. If not, restart your PC and log on Administrator account.
Step 2 Click Start menu and enter cmd in search box.
Step 3 Right-click «cmd.exe» and choose Run as administrator. If you are prompted for password or confirmation, then enter password or give confirmation.
Solution 2: Remove write protection
Step 1 Click Windows + R to open Run. Type regedit in Run dialog and click OK to open Registry Editor.
Step 2 In Registry Editor browse path HKEY_LOCAL_MACHINESYSTEMCurrentControlSetControlStorageDevicePolicies
Step 3 Right click key WriteProtect and change the value to 0.
Summary
In this article we discuss Access Denied error in 5 scenarios and provide step-by-step solutions to each issue. We hope these solutions are useful to you. If they are proved to be useful, please share it to help more people. If you have any questions or better solutions, please feel free to share or contact us.
Содержание
- Исправление ошибки «Отказано в доступе»
- Способ 1: Специализированный софт
- Способ 2: Настройки Windows
- Способ 3: Командная строка
- Вопросы и ответы
Открыть нужную папку или файл в операционной системе Windows получается не всегда. Одна из причин, по которой не получается это сделать – ошибка «Отказано в доступе». Из данной статьи вы узнаете о том, как устранить указанную проблему на устройствах под управлением Windows 10.
Исправление ошибки «Отказано в доступе»
Одна из основных причин появления ошибки – отсутствие соответствующих прав доступа у пользователя. Тем не менее, бывают случаи, когда проблема вызвана системным сбоем и решается банальной перезагрузкой компьютера. Можно выделить три основных метода ее устранения – через настройки ОС, системными утилитами и сторонним софтом. О каждом из них мы и расскажем далее в деталях.
Способ 1: Специализированный софт
Начнем с самого простого метода. Его суть заключается в том, чтобы выдать текущей учетной записи права на использование проблемной папкой или файлом. Делать это будем с помощью программы TakeOwnershipEx. Порядок действий должен быть следующим:
Скачать TakeOwnershipEx
- Перейдите на официальный сайт программы и загрузите архив с софтом. Ссылка на него находится в самом низу указанной страницы.
- Извлеките все файлы из скачанного архива в отдельную папку, после чего запустите «TakeOwnershipEx–1.2.0.1-Win8».
- В следующем окне нужно выбрать язык, на котором будет происходить дальнейшая установка программы.
- За этим последует весьма стандартный процесс – подтверждение лицензионного соглашения, выбор папки для софта и непосредственно установка. Останавливаться на каждом шаге не будем, так как проблемы на этом этапе у вас вряд ли возникнут.
- По окончании установки запустите программу. При первом запуске будет произведена проверка на наличие системных компонентов. Если таковые не будут обнаружены, вы увидите окно с предложением их установки. Нажмите кнопку «Скачать и установить этот компонент».
- После этого подождите. Процесс инсталляции займет около 10 минут. Он будет отображаться в отдельном окне в виде заполняющейся шкалы.
- По завершении инсталляции вы увидите соответствующее уведомление. Закройте его и перезапустите приложение.
- После запуска интерфейс по умолчанию будет на английском языке. Переключите его по желанию на русский (выберите соответствующий пункт в выпадающем меню в правом нижнем углу), затем нажмите кнопку «Получить права доступа».
- Появится небольшое окно с древовидным каталогом всех разделов жесткого диска. Вам нужно найти и указать в нем проблемную папку, после чего нажать «OK».
- Процесс выдачи соответствующих прав начнется автоматически. Вам же нужно дождаться, пока на экране не появится уведомление об успешном завершении операции.
- Закройте его и само приложение. Попробуйте снова открыть проблемную папку. Помните, что все внесенные изменения можно вернуть в исходное состояние. Для этого после запуска программы просто нажмите вторую кнопку «Восстановить права доступа» и выберите модифицированную ранее папку.
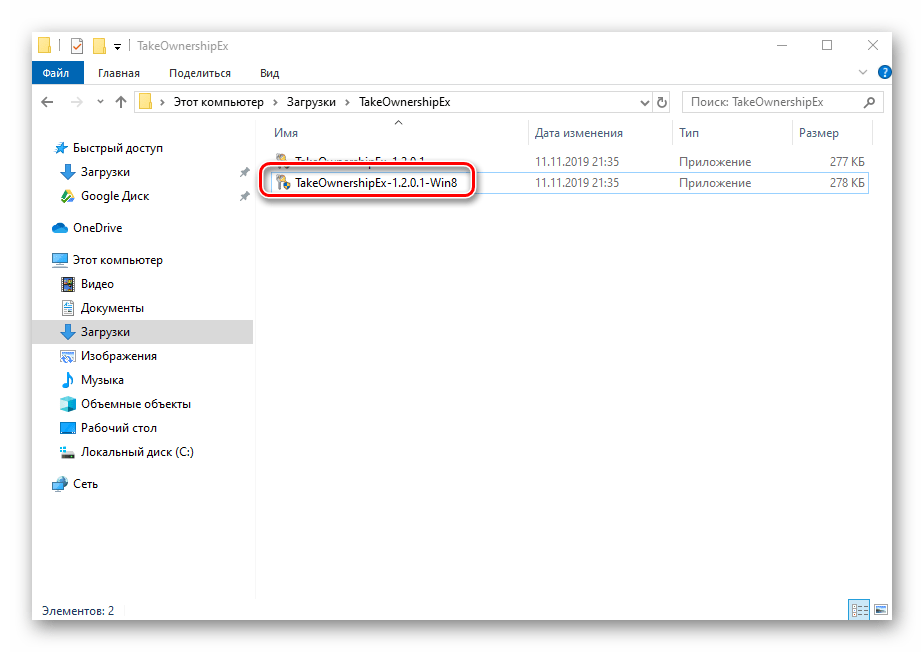
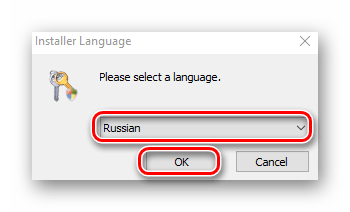
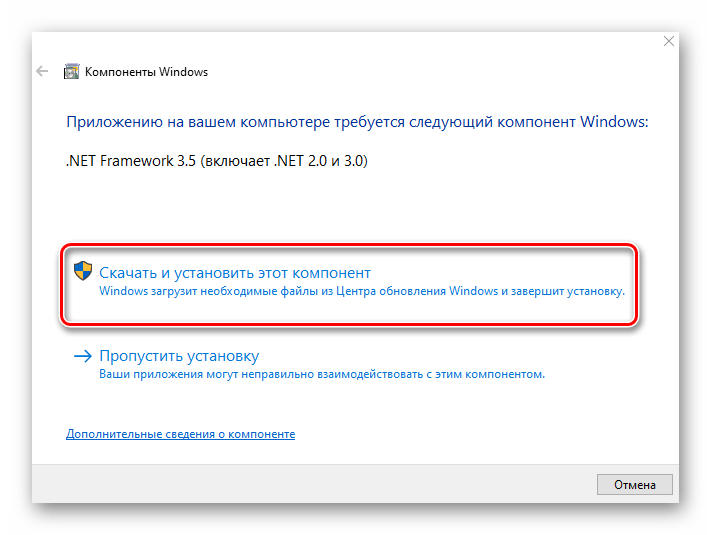
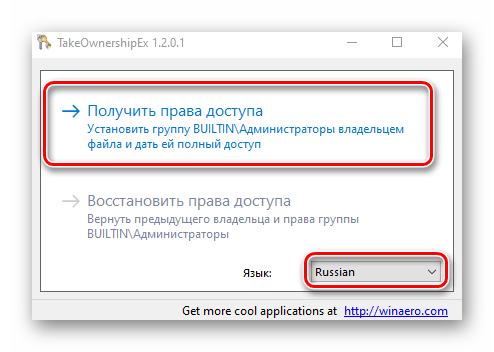
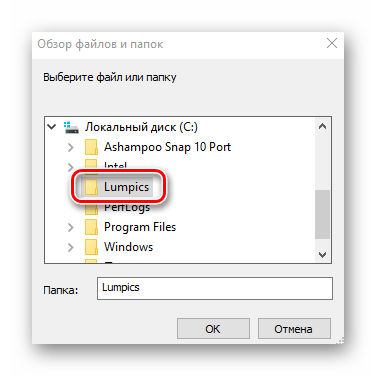
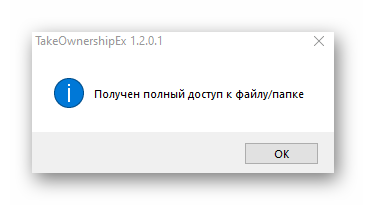
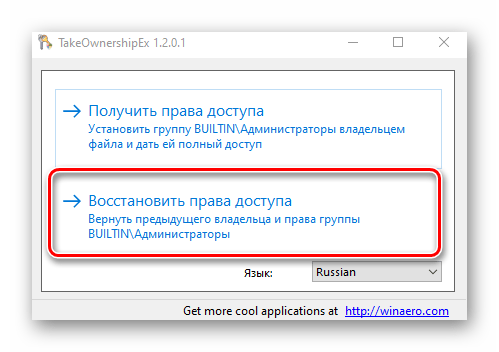
Способ 2: Настройки Windows
Этот метод решает проблему в большинстве случаев. Как и предыдущий, он заключается в выдаче специальных прав нужному пользователю ПК. От вас потребуется следующее:

- На той папке или файле, к которому нужно восстановить доступ, кликните правой кнопкой мышки. В появившемся контекстном меню выберите строку «Свойства».
- Появится новое окно с несколькими вкладками сверху. Перейдите во вкладку «Безопасность». В ней обратите внимание на самый первый блок «Группы и пользователи». Вам необходимо нажать кнопку «Изменить», которая находится под ним.
- Далее проверьте, нет ли в перечне пользователей в открывшемся окне имени учетной записи, через которую вы вошли в систему. Если есть, тогда выберите ее одиночным нажатием левой кнопки мышки и поставьте отметку в нижнем блоке напротив строки «Полный доступ». В противном случае нажмите кнопку «Добавить».
- В нижнее поле введите полное имя своей учетной записи с учетом букв верхнего и нижнего регистра, а после нажмите кнопку «Проверить имена». Система сформирует запись должным образом, дописав свои значения. Затем кликните по кнопке «OK».
- В открытом ранее окне, в списке пользователей, появится добавленная учетная запись. Выполните действия, описанные выше: выберите имя пользователя и поставьте отметку возле строки «Полный доступ». Подтвердите свои намерения, нажав «Применить» и «OK».
- После этого закройте все окна и попробуйте открыть проблемную папку или файл. С большой долей вероятности все заработает как положено.
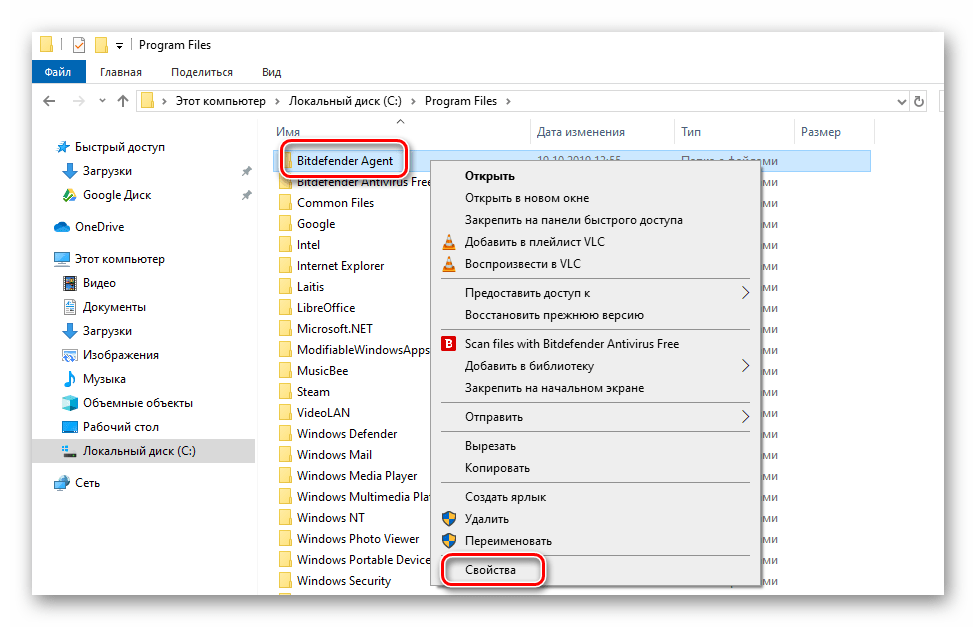
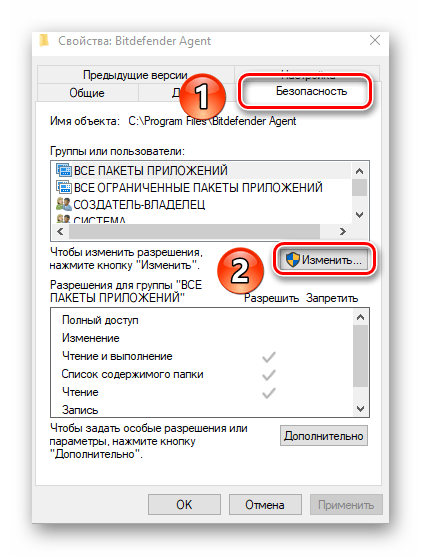
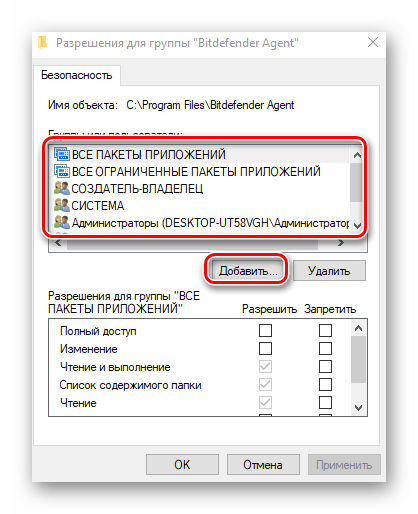
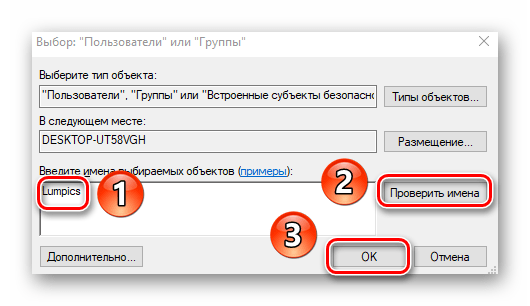
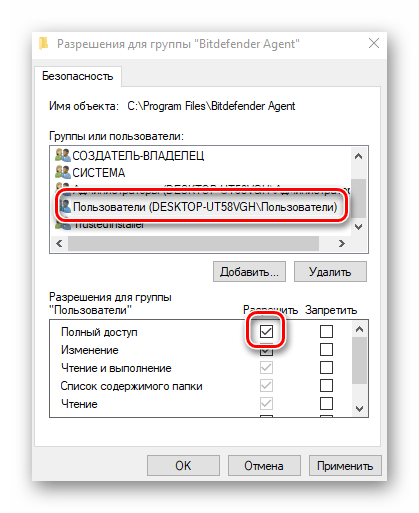
Способ 3: Командная строка
Как понятно из названия метода, для его реализации нужно прибегнуть к помощи «Командной строки». В ней прописывается специальная команда, которая автоматически выдаст разрешения нужной папке или файлу. Выполните следующий ряд действий:
- Нажмите сочетание клавиш «Win» и «R». Появится окно программы «Выполнить», в котором нужно ввести команду
cmd. Затем, удерживая вместе клавиши «Shift» и «Ctrl», нажать на клавиатуре «Enter». Данные действия позволят запустить «Командную строку» от имени администратора. Напомним, что сделать это можно и другими способами.

Подробнее: Запуск «Командной строки» от имени администратора в Windows 10
- Далее нужно ввести в открывшееся окно следующую команду и нажать «Enter»:
takeown /F "C:FolderLumpics" /R /D YОбратите внимание, что вместо значения в кавычках нужно указать путь к проблемной папке или файлу на диске вашего ПК.
- После этого нужно подождать. Если в указанной папке находится большое количество вложенных файлов, процесс займет некоторое время. В любом случае, в конце вы увидите следующее сообщение:
- Остается лишь закрыть все программы и окна, после чего вновь попробовать открыть файл или папку, доступ к которой был закрыт.
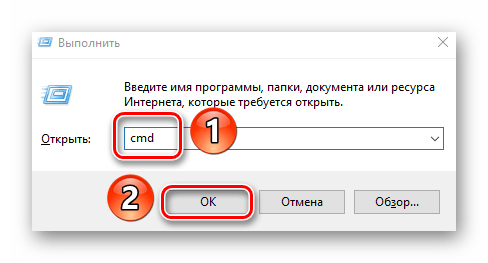
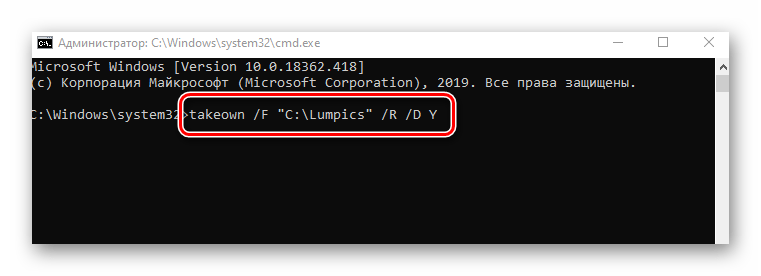
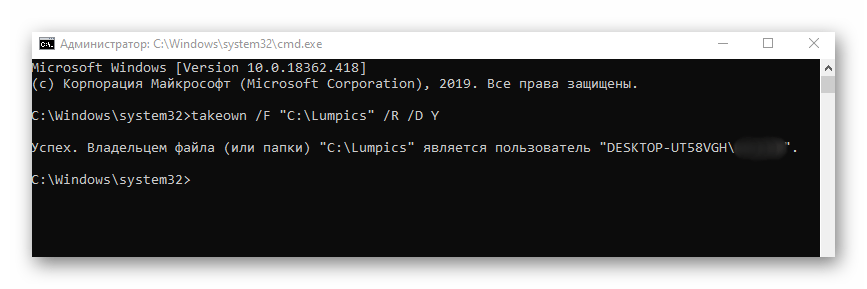
Таким образом, воспользовавшись любым из описанных методов, вы сможете избавиться от ошибки «Отказано в доступе». Напомним, что аналогичная проблема нередко встречается и при попытке открыть каталог на флешке. Если вы столкнулись с подобным, рекомендуем прочитать наше отдельное руководство:
Подробнее: Решение проблемы «Отказано в доступе» к флешке
Еще статьи по данной теме:
Помогла ли Вам статья?
«I am simply trying to delete a few unused folders. But I get the error that ‘Folder Access denied — Need to
provide admin permission to delete this file’. I am the Administrator. Yet it won’t let me delete. «
It is annoying when Windows tells you are not allowed to access folders or files on your own PC. Fortunately, you are
not the only one who has experienced «Access Denied» error on Windows 10/8/7. According to some users, Access Denied
error usually appears after updating Windows system.
Why does «Access Denied» error appear?
- The folder ownership has changed;
- You don’t have the appropriate permissions;
- The file may be encrypted;
- The file may be corrupted.

To fix «Access Denied » folder or file errors, try out the following methods one by one until the problem is solved.
# Method 1: Get the ownership of the file or folder
Sometimes, some of your account information might have changed when you’ve upgraded your Windows to the latest
version. That’s why you lost your ownership of some folders and files and can’t access the folders or files. In this
case, you should restore your ownership of the file or folder by following the steps below.
NOTE:
The steps to get the ownership of the file or folder are slightly different between Windows 10/8 and Windows 7.
For Windows 10/8:
Step 1. Right-click on the folder, and then, choose «Properties» on the menu.
Step 2. Click «Advanced» in «Security» tab. Click on «Change».
Step 3. Type the account name that you want to assign ownership to. Then click on
«Check Names» button > «OK».
Step 4. If you want to give this account the ownership of the files and subfolders
contained in this folder, enable the «Replace owner on subcontainers and objects» option. Click «OK»
For Windows 7:
Step 1. Right-click on the folder, and then, choose «Properties».
Step 2. Click on «Security» tab>»Advanced» button.
Step 3. Choose «Edit» in «Owner» tab to change the owner.
Step 4. Hit on «Other users or groups…» button to manually choose the username and
type your account name.
Step 5. Next, click on «Check Names» button>»OK». Enable «Replace owner on
subcontainers and objects» option, if you want to take the ownership of the files and subfolders.
Step 6. Click «OK».
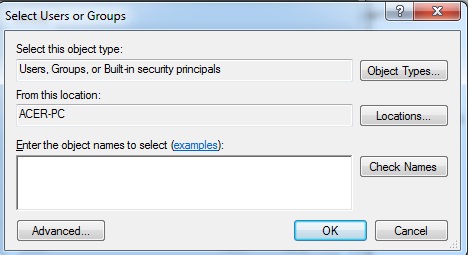
# Method 2: Get Permission of the File or Folder
As we know, permission is the basic factor for users to access files and folders on PC. If you do not have the
appropriate permission, you can’t access or change files or folders. So if Windows denies your access to a certain
file or folder, you get the permission of the file or folder in following steps.
First of all, you need to check permissions on a file or a folder. Here we’ll show you a simple tutorial below.
Step 1. Right-click on the folder and then hit «Properties».
Step 2. Select «Security» tab.
Step 3. Click on your name in «Group or user names» to check the permission that you
have.
If you want to change the permissions on a file or a folder, you should log on the PC as an administrator. Next,
click on «Edit» in «Security» tab. And then, choose your name and enable the check boxes of the permissions that you
need.
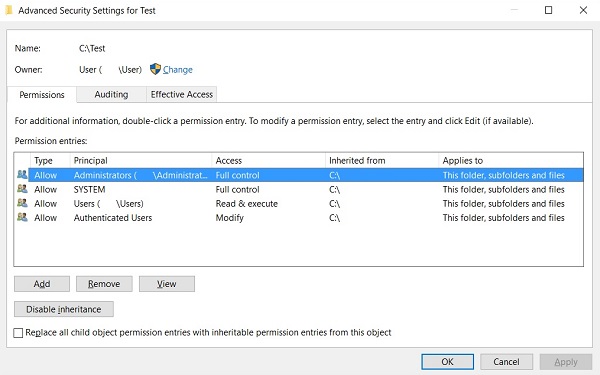
#
Method 3: Unencrypt File or Folder
File encryption has the ability to protect users’ files and folders. Moreover, if a file is encrypted, you need the
certificate that used to encrypt it to open the encrypted file or folder. Otherwise, you may get the «Access Denied»
error. To check encrypted file or folder, follow these steps.
Step 1. Right-click on the folder and then hit «Properties».
Step 2. In «General» tab, click on «Advanced» button.
After that, you can check if «Encrypt Content to Secure Data» option is enabled. If it is checked, you will need the
certificate to open or the file or folder. If «Encrypt Content to Secure Data» option is unchecked, the file or folder
is not encrypted.
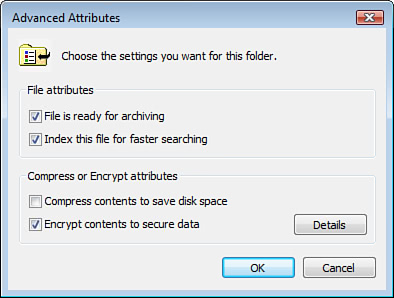
# Method 4: Recover Corrupted File & Folder
If all methods above are not helpful to fix your «Access Denied» file/folder errors on Windows 10/8/7, the
file/folder may be corrupt. You are able to delete the whole file/folder and then recover the data with data recovery
software. FonePaw Data Recovery has the ability to scan your deleted files and restore them to Windows
10/8/7. It takes just a few simple steps to recover the corrupted file or folder.
Step 1. Download FonePaw Data Recovery
Download FonePaw Data Recovery on your Windows PC. Next, you can
launch the software to check if it’s successfully running on your PC. Hint: You may want to install data recovery on a
partition that doesn’t contain the data you want to recover. Otherwise, the installation could overwrite the data.
Free Download Buy with 20% off
Step 2. Choose File Types and Hard Disk Drive
If the software is successfully running, you are able to select the files types you need on the main interface. Files
types like image, video, audio, email, document are available to restore. And then, choose the scanning hard disk
drive. Moreover, removable drives such as USB, memory card, digital camera are supported.
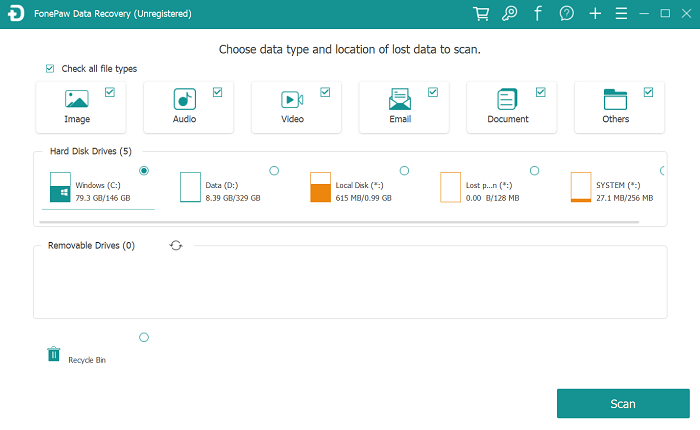
Step 3. Start Scanning Deleted File/Folder
Click on the «Scan» button, FonePaw Data Recovery will begin to scan deleted data on a drive you choose. It offers
two modes: quick scan and deep scan.

Step 4. Recover File/Folder
After scanning, you can find out the file/folder you want to retrieve. And then, enable its checkbox. Then click on
«Recover» button. After few seconds, the file/folder you choose will retrieve on your PC.
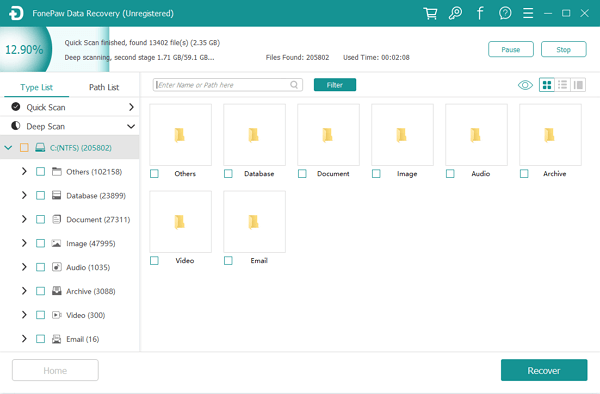
In many situations, windows pop up a dialogue box with an error message “Access is denied, You cannot Access this file or Folder or you don’t have permission to access this file”. As you clock on any file or folder to access it and you are getting the message as stated above then you need to assign the ownership or permission to the particular file or folder. It is a common error being faced by the users, sometimes it suggests you to delete the file but you need not delete the file or folder. In this article, I am going to discuss the best way to resolve this error, read the complete article to know to how to assign ownership or permission to a particular file or folder and you can easily resolve the access denied error.
There are mainly three issues which result in access denied message lets talk about them separately and also their resolution method to fix access denied error in windows. This error can occur in any version of windows os like win 10, win 8, win 7, win vista, win XP etc.
Case 1: – An Access Denied message will be displayed.
Case 2: – You can’t access this folder or file kindly delete, save or change the file or folder.
Case 3: – As you installed a new version of windows so you cannot open a file or folder in the new version of window.
Here I listed the common reasons for folder access denied error and any other cause may be there behind access denied error lets talk about its resolution method.
Case 1: – Getting “Access Denied Error Message” Error
The folder/file access denied error message appears mainly in three situations which are given below:
- If the file is encrypted.
- If the folder ownership has changed.
- If you do not have the appropriate permission.
Resolution Method for Windows Access Denied Error for File / Folder
1. If the File or Folder is Encrypted then
Encryption is a way to convert a readable text (plain text) into nonreadable text (ciphertext) by applying any encryption mechanism like public key or private key and this method is known as cryptography. If a folder or file is encrypted then you should have a decryption key to convert ciphertext into plain text. So first you need to determine whether the file is decrypted or not, follow the steps given below.
- Right Click on the folder and click on the Properties option.
- Locate the General tab and click on it.
- Now go to the Advance button and click on it.
Now check whether the Encrypt Content to Secure Data check box is checked or not. If it is checked then you need to acquire the certificate from the person who encrypted the folder or file. If it is not checked that shows the file is not encrypted, in this situation move to the other method to resolve file access denied error in windows os.
2. Fix Access Denied Error When Folder / File Ownership changed
Folder ownership is changed error occurred when you upgrade the windows from earlier version to the newer version. During this process, some of your account information might be changed due to which you don’t have the permission to access the file or folder. In this situation, you need to assign the ownership to the folder to fix access denied error in windows 10, 8, 7, follow the steps given below to resolve this issue.
- Right Click on the file or folder and click on the Properties from the list.
- Click on the Security Tab and then hit Advance button from the bottom.
- Now click on Change Tab, if a pop up appears and ask for username and password then provide the detail click on Ok.
- Enter the name of the person to which you want to give permission, click on Check Name tab and then click on Ok.
- If you want to assign the permission to the person for the subfolder contained by the folder then check on the Replace Owner on Sub-containers and Object.
- At the end click on Ok to finish this process.
3. Resolve Access Denied Error If you don’t have Appropriate Permission
Permissions are basically a set of rule which checks that you have rights to access or made any change to the particular file and folder. If you do not have appropriate permission then windows show file/folder access denied error. To check the permission follow the steps given below.
- Right Click on the File or Folder and then hit on the Properties from the list.
- Click on the Security Tab from the menu bar.
- Go to Group or User Name, find your name and click on it to view permission that you have.
If you are not able to open a file and getting folder access denied error. Then check that you have read permission or not. If you don’t have read permission then follow the steps given below and to perform this operation you need to be logged in as an Administrator.
- Right-Click on the file or folder then hit on Properties from the opened list.
- Click on the Security Tab from the menu bar.
- Go under the Group or User Name, click on your name to view the permission that you have.
- Click on the Edit option and check the check boxes of permissions which you want to acquire.
- At the end click on OK to finish the process.
Case 2: – When you are not Able to Change, Save, Access & Delete Particular File/Folder
There are many situations in which you are not able to perform some operations like change, save, access or delete a specified folder and getting folder/file access denied error in windows. Here I am listing all possible reasons.
- If the File is corrupted.
- If the file is encrypted.
- If the user profile is corrupted.
- The folder ownership is changed.
- If you don’t have required permission.
At the above I discussed how to resolve the folder access denied issues when file is encrypted, ownership is changed and if you don’t have required permission you can resolve these error from there, here I am going to discuss what to do when user profile is corrupted and file is corrupted and you are getting access denied error in windows. Then follow the steps given below:
1. When File or Folder is Corrupted then
File corruption is the most frequent reason due to which you are not able to access or modify the particular file and getting folder access denied error in windows. The most frequent reason for corruption is when a file is open and suddenly system crashed or losses power. The file may be corrupt by any virus attack as well, so in this situation, you can either delete the file if you have updated backup to resolve this issues.
2. When the User Profile Is Corrupted Then
Sometimes your local user profile got corrupted then the window will prevent you to access the file or folder and shows file or folder access denied error. In this situation, you need to delete the current profile and create new local user profile. Follow the steps given below to create the new user profile.
- Find and click on Change PC Settings.
- A new panel will appear, from menu bar click on Users tab.
- Hit on the Add User button and then click on the Can they Sign in without Microsoft Account.
- Navigate to Local Account and click on it.
- Enter the new account name in the username field.
- If you want to assign a password then enter the password and verify the password as well. If you don’t want to assign a password simply click on Next button without entering the password.
- At the end click on Finish button to complete the process.
Case 3: – You are not Able to Access file or folder after Upgrading new Version of Windows
When you upgrade an existing windows version to new version then also the window shows error when you try to access a file or folder. This situation can be occurred due to some reason which is given below.
- If the folder ownership is changed.
- If the files are being stored in the windows.old folder from your previous system.
I have discussed above how to resolve access is denied for the file or folder error due to ownership changed you can follow the steps. Here I am going discuss what to do when the file is stored in windows.old folder.
If the File is Being Stored in Windows.old Folder Then
- Go to My Computer and click on it or press window-E
- Click on the drive in which window is installed, commonly its C drive.
- Find the windows.old folder and click on it.
- Click on the Users Folder from the list.
- Find your file by pacifying username.
- Open the file which you want to retrieve.
- Copy the files which you want to access and past it into new upgraded windows library.
- Repeat the copying and pasting steps for all files.
- At the end close all opened tab.
Final Words!!
In this article, I tried to list all possible reasons that can cause file/folder access denied error in windows while accessing a file or folder and their resolution method. I hope this effort will help you to resolve access denied error for folder or file in windows.
Download PC Repair Tool to quickly find & fix Windows errors automatically
At times, you may run into the problem of being unable to open or access or work with files and folder. The simple message that flashes on your computer screen when you try doing so reads – ‘Access Denied’. This can occur for one or more of the following reasons:
- The folder ownership may have changed
- You do not have the proper permissions
- The file may be encrypted
- The file may be in use
- The file may be corrupt
- The user profile may be corrupt
In such a case, you may be unable to open, work with, access, edit, save or delete files and folders. Such problems are usually caused due to permissions issues, corrupted user accounts or even corrupted files. We have already seen a few troubleshooting steps and what to do if you get the Access Denied error while deleting files or folders. This post throws up a few more troubleshooting steps. Here’s what you can try to address the issue and get back to work.
1] Run Disk Error Checking
Run CheckDisk or Disk Error Checking in Windows 10/8. Microsoft has redesigned chkdsk utility – the tool for detecting and fixing disk corruption. In Windows 11/10, Microsoft introduced a file system called ReFS, which does not require an offline chkdsk to repair corruptions – as it follows a different model for resiliency and hence does not need to run the traditional chkdsk utility.
2] Take ownership of a file or folder
If you have upgraded your machine to a different or the most recent OS such as Windows 10, chances are some of your account information may have changed during the process. If it is so, you may no longer have ownership of some of your files or folders. So, take ownership in the first place. If this does not help, you may want to troubleshoot File and Folder Permission Issues in Windows.
3] The file or folder may be Encrypted
The encryption method is best to ensure protection against any unauthorized access to files and folders. If you do not have access to a file or folder, it is possible the file is encrypted.
Try the following steps to check the same.
Right-click the file/folder and select the Properties option. Next, hit the ‘General’ tab, and press the ‘Advanced’ button.
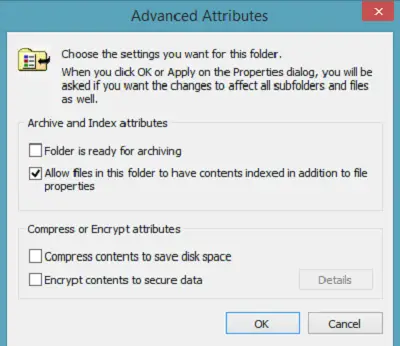
Uncheck the ‘Encrypt contents to secure data checkbox. If you find ‘Encrypt contents to secure data’ checkbox is checked, you will need the certificate to decrypt the file and open it. You can get it from the person who had encrypted the folder.
See this if you see An Unexpected Error is keeping you from renaming the folder message.
Related reads:
- Access denied, Please log in with administrator privileges and try again
- Location is not available, Access is denied
- Access Denied, You don’t have permission to access on this Server.

Anand Khanse is the Admin of TheWindowsClub.com, a 10-year Microsoft MVP (2006-16) & a Windows Insider MVP (2016-2022). Please read the entire post & the comments first, create a System Restore Point before making any changes to your system & be careful about any 3rd-party offers while installing freeware.