Файл или папка повреждены, чтение невозможно — способы исправить ошибку
 При открытии диска, флешки, папки или конкретного файла в Windows 11 и Windows 10 вы можете получить сообщение об ошибке: «Файл или папка повреждены. Чтение невозможно». Иногда в заголовке окна указано «Расположение недоступно», иногда — путь к самому файлу, но суть ошибки и причины обычно одни и те же.
В этой инструкции подробно о том, что может вызывать рассматриваемую ошибку, способах её исправить и вернуть доступ к файлам. Обратите внимание: если вы видите сообщение «Расположение недоступно» без указаний на повреждения файла или папки, это может быть отличающаяся ситуация — Что делать при ошибке «Расположение недоступно. Отказано в доступе».
Ошибки файловой системы и файловой таблицы — самая распространенная причина

Самая частая причина проблемы — ошибки файловой системы и MFT («Главной файловой таблицы») на накопителе или разделе диска, особенно если сообщение о том, что «Файл или папка повреждены» появляется при открытии определенной папки или файла.
Самый быстрый способ исправления, который часто срабатывает в рассматриваемой ситуации — использовать встроенные средства проверки диска Windows:
- Запустите командную строку от имени Администратора. В Windows 11/10 для этого можно начать вводить «Командная строка» в поиске на панели задач, а когда результат будет найден — выбрать пункт «Запуск от имени администратора».
- Введите следующую команду, заменив в ней E на букву диска, на котором проявляется ошибка и нажмите Enter:
chkdsk E: /f
- Дождитесь завершения проверки диска и отчета о найденных и исправленных проблемах.
- Если выполнение команды не помогло, попробуйте другой её вариант, включающий дополнительную проверку и восстановление данных из поврежденных секторов. Букву диска, как и в предыдущем случае, меняем на нужную и учитываем, что процесс может занять продолжительное время:
chkdsk E: /f /r


Этот простой способ вернуть доступ к диску, папке или файлу обычно срабатывает, при условии, что накопитель не имеет серьезных повреждений, а причиной было лишь повреждение файловой системы вследствие экстренного отключения питания, извлечения накопителя в процессе записи и похожие ситуации.
Неисправности HDD, SSD, флешки или проблемы с подключением
Следующая по распространенности причина — какие-либо проблемы при обмене данными с накопителем вследствие его неисправности или нестабильного подключения. Рекомендую предпринять следующие действия, если исправление ошибок предыдущим методом не помогло:
- Если ошибка «Файл или папка повреждены. Чтение невозможно» возникла при работе со съемным накопителем (флешка, внешний жесткий диск или SSD), а вариант с исправлением файловой системы не помог, проверьте работу накопителя при подключении к другим разъемам, по возможности — USB 2.0 вместо 3.0 и без использования USB-хабов (разветвителей). Ещё лучше, если есть возможность проверки на другом устройстве, чтобы выяснить: кроется ли проблема в самом накопителе или конкретном компьютере или операционной системе.
- Для дисков HDD и SSD компьютера или ноутбука рекомендую проверить состояние диска, например, с помощью CrystalDiskInfo, подробнее о программе в статье (эта утилита подойдет и для HDD): Как проверить SSD на ошибки и посмотреть состояние диска.
- Можно попробовать выполнить проверку с помощью Victoria (см. Программы для проверки жесткого диска на ошибки), но под свою ответственность — прямых рекомендаций здесь я давать не могу, так как не исключены случаи, когда исправление в Victoria может навредить на выходящем из строя накопителе.
В завершение — ещё несколько вариантов, которые относительно редко оказываются работоспособными, но иметь их в виду стоит:
- Если с того же диска или флешки на другом компьютере чтение проходит без ошибок, попробуйте использовать точки восстановления, а также восстановление целостности системных файлов с помощью команды sfc /scannow запущенной в командной строке от имени Администратора.
- Выполните проверку оперативной памяти на ошибки, а если ранее повышали частоты памяти, попробуйте отключить разгон.
- При возникновении ошибки во время открытия конкретной папки или файла, проверьте: возможно ли скопировать его на другой диск. Если да — выполните действие и проверьте открытие с другого диска.
- Если такой поврежденный файл или папку нужно удалить, можно попробовать выполнить удаление при загрузке с LiveCD, а также использовать способы удаления из статей: Как удалить файл или папку, если элемент не найден, 3 способа удалить файл, который не удаляется.
- Проверьте ваш компьютер на наличие вирусов и вредоносных программ с помощью любого антивируса, средств наподобие AdwCleaner и Dr.Web CureIt!
- Иногда ошибку может вызывать плохое подключение внутреннего накопителя — плохой контакт или неисправность кабеля SATA, иногда — проблемы с питанием.
- В ситуации, когда все флешки на компьютере сообщают «Файл или папка повреждены. Чтение невозможно», попробуйте установить драйверы чипсета и, при наличии — USB материнской платы ПК или ноутбука с официального сайта производителя.
- При отсутствии важных данных на накопителе его можно попробовать отформатировать средствами Windows или, если речь идёт о системном разделе диска — выполнить чистую установку системы с предварительным форматированием раздела. Учитывайте: если причиной ошибки были неисправности диска, установка может пройти неудачно.
- При ошибке, возникающей при работе с флешкой, попробуйте использовать (при условии, что вы готовы на потерю данных) специальные программы для восстановления флешек.
Завершая статью, ещё один, самый неприятный вариант, который нельзя исключать — такая ошибка может быть признаком выхода накопителя из строя и не всегда его работоспособность можно восстановить.
There are three simple and useful ways to fix Windows has detected file system corruption on local disk C. The following table shows an outline of the solutions. Read in-depth to check the details.
| Workable Solutions | Step-by-step Troubleshooting |
|---|---|
| Fix 1. Check the disk for errors | When Windows has detected file system corruption error occurs, you can try to check the disk for errors…Full steps |
| Fix 2. Run SFC scan | Run SFC scan to check the Windows system file that can be a reason for the disk Windows C has errors…Full steps |
| Fix 3. Run CHKDSK C: /f | If there is a file system error on the C drive, run CHKDSK C: /f can solve the problem. Use a free tool…Full steps |
| File system error — 2147219196 | What is File system error — 2147219196 and how to fix the issue when open a jpg or png file using Photos…Full steps |
- «The local disk (C:) has errors. Windows has detected file system corruption on local disk (C:). You must check the disk for errors before it can be restored.»
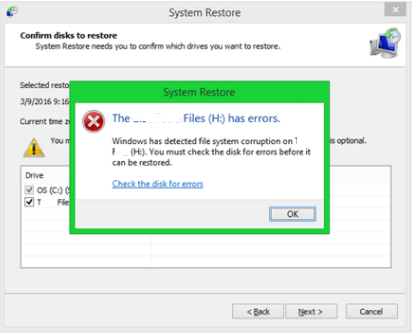
- «The disk OS (C:) has errors. Windows has detected file system corruption on local disk (C:). You must check the disk for errors before it can be restored.»
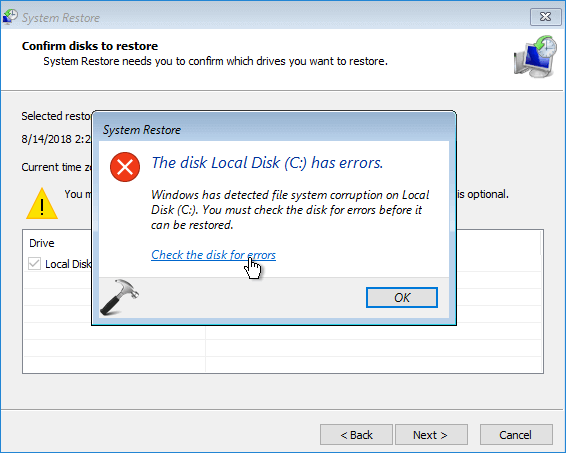
These are Windows 10/8/7 System Restore errors mainly caused by the damaged file system on the selected hard disk or corruption of Windows system files. When encountering the disk local disk has errors, you cannot perform any system restore point until the problem is thoroughly resolved.
In this tutorial, we will explain several useful ways to solve Windows has detected file system corruption on local disk C error.
How to Fix Windows Has Detected File System Corruption Error
Facing Windows has detected file system corruption on local disk C issue when you restore the system, you can start to troubleshoot by first checking the disk recommended by Windows.
Fix 1. Check the Disk for Errors to Fix the Disk Local Disk Has Errors
When Windows has detected file system corruption error pops up, on the dialogue box beneath the full error message, there is a link which says: «Check the disk for errors». This is where you can get the most straightforward troubleshooting solution from Microsoft. Click this link and let Windows run the disk check and do the repair for you. After this step, reboot your computer and try to perform the restore again.
Move on to the following advanced solutions if you’re out of luck to overcome the trouble after the initial attempt.
Fix2 . Run System File Checker Scan (Sfc) to Fix Corrupted System Files
One of the main factors that cause Windows has detected file system corruption error is the corrupted Windows system file. Follow the step-by-step instruction provided here to use the System System File Checker tool to scan system files and repair missing or corrupted system files. Those system files in question are prominent reasons for Windows being unable to run System Restore properly.
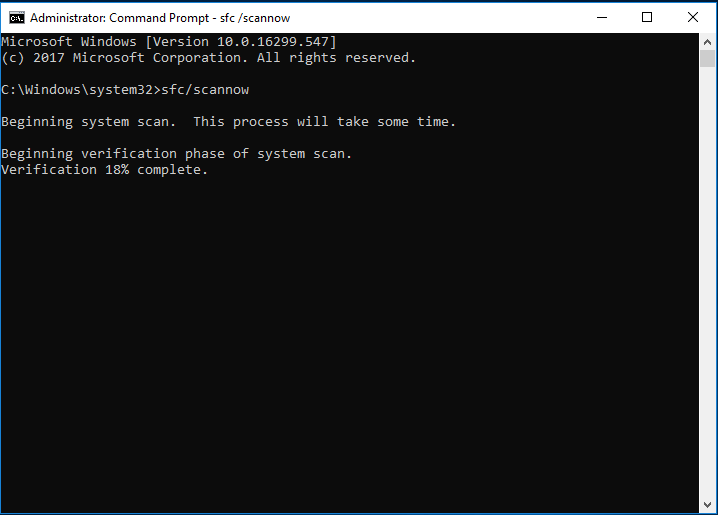
Step 1. Right-click the «Start» button and select «Command Prompt (Admin)».
Step 2. Type sfc /scannow into the Command Prompt window and press Enter to run a full system scan.
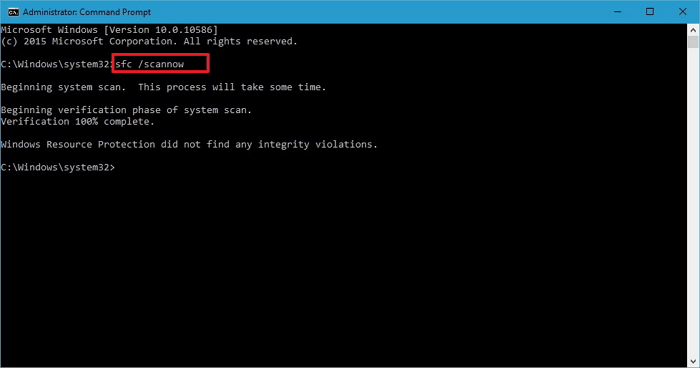
If you see this message: Windows Resource Protection did not find any integrity violations, it means there is nothing wrong with the Windows system files. Move to the next solution to check and repair the corrupted file system on the local disk.
Fix 3. Run CHKDSK to Check File System and Repair Bad Sectors
Like we previously mentioned, Windows has detected file system corruption is also largely attributed to bad sectors and corrupted file system. Here, we show you two ways to check and repair the corrupted file system using the CHKDSK utility.
1. Use a Free Partition Manager to Check File System
EaseUS Partition Master is a free disk management tool that provides full-around partition organizing options, for example: resize/move partition to solve low disk space issue, clone disk, merge partitions, create/delete/format partition, wipe data, and disk/partition conversion (convert MBR to GPT), which are totally free.
Now, download this free partition manager to check and repair the corrupted file system with a few clicks.
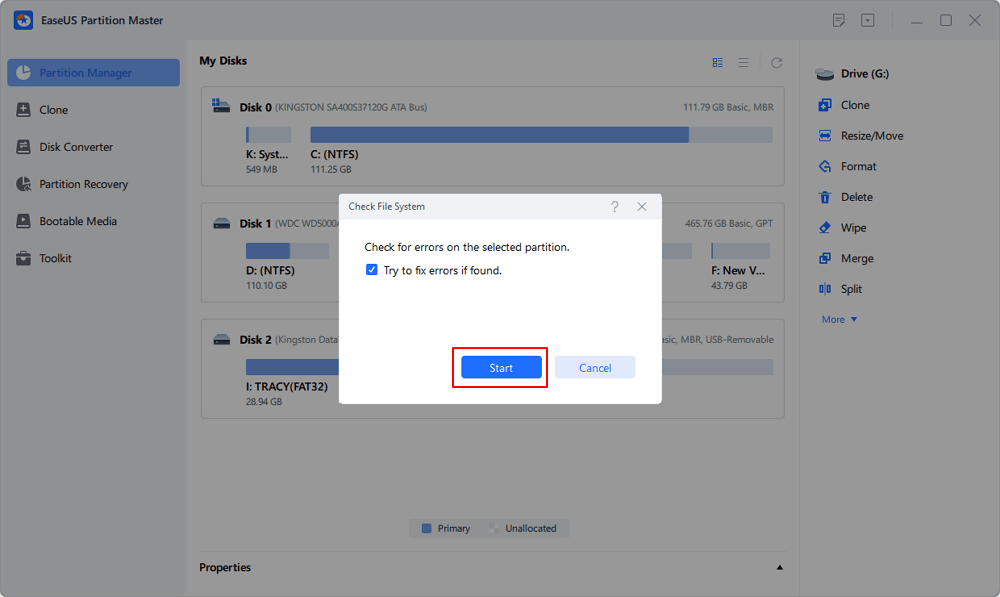
Step 1. Open EaseUS Partition Master on your computer. Then, locate the disk, right-click the partition you want to check, and choose «Advanced» > «Check File System».
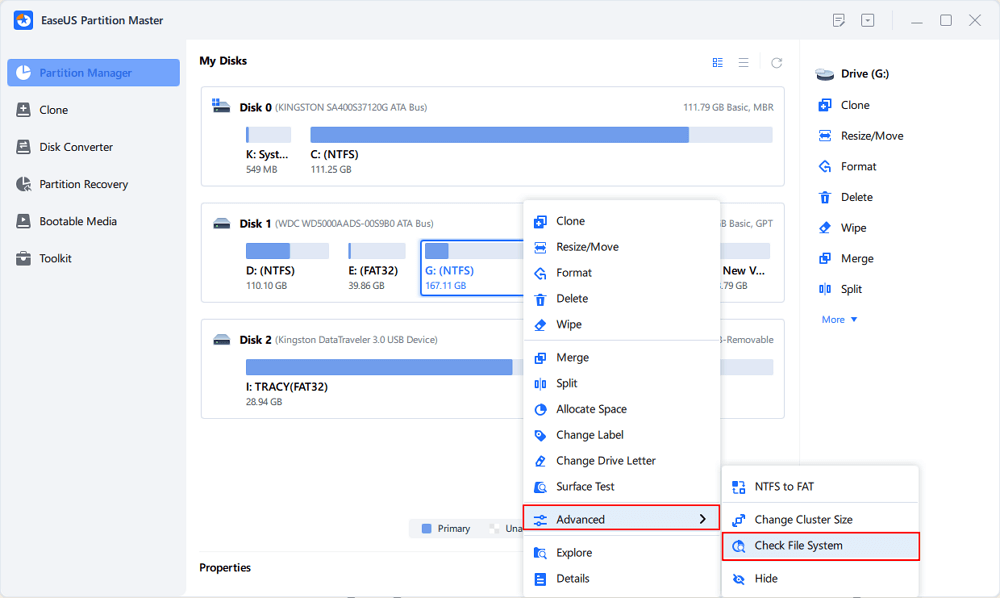
Step 2. In the Check File System window, keep the «Try to fix errors if found» option selected and click «Start».
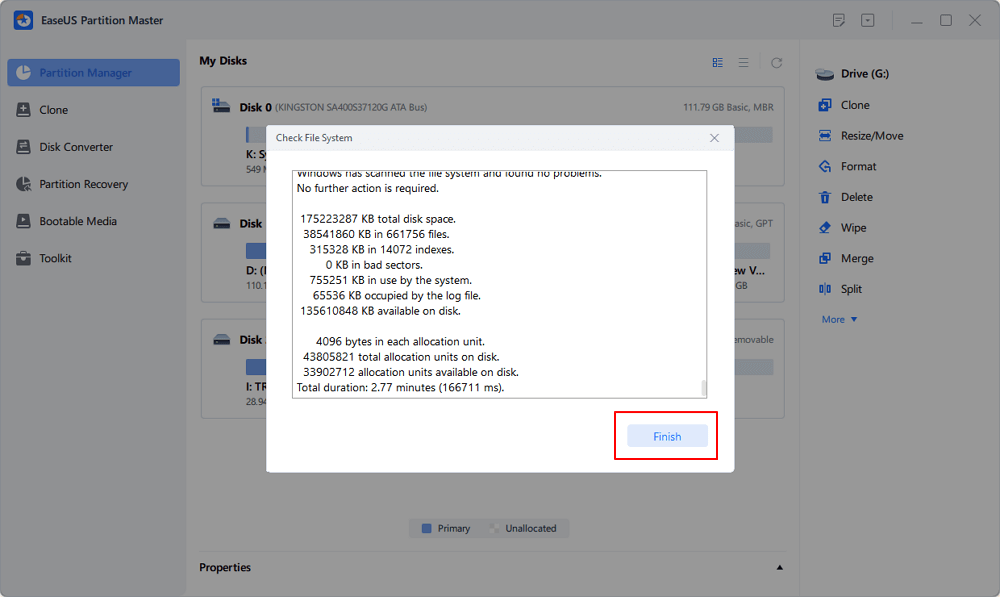
Step 3. The software will begin checking your partition file system on your disk. When it completes, click «Finish».
2. Run CHKDSK in Command Prompt
If you don’t like to use the free third-party program, you can also manually run CHKDSK in Command Prompt to scan your hard drive for errors and bad sectors.
Step 1. Click the Search button, type CMD. Right-click Command Prompt and choose «Run as administrator».
Step 2. To run chkdsk on C drive, type chkdsk c: /f, and then press Enter.
Step 3. You need to type Y to schedule the volume to be checked when you next restart your operating system because the volume is in use by another process.
Tip: If the CHKDSK gets stuck unfortunately at a certain percentage number, check this post to get over with it.
To Sum Up
If you get Windows has detected file system corruption error on system restore, do not worry. Read this post and apply the above methods check and repair Windows system files, bad sectors, or partition file system. To fix a corrupted file system on the local C drive, you can use EaseUS free partition management software for help.
This free partition tool is designed for both professionals and beginners to manage disk and enhance the computer’s capableness. It helps you create, resize, clone, move, merge, format partitions, and so on. Try it now.
See More: What Is File System Error — 2147219196
You might see the File system error — (2147219196), or File system error — (-2147219194)/(2147416359) when trying to open image files such as .jpg .jpeg .png and so on via the Windows Photo App. In some cases, you might also see a File system error (-2147219196) when trying to open other Windows apps like Calculator, etc. This error only appears on Windows 10, and it will prevent you from using a particular app (in most cases, your photo app) or a group of apps.
The error message appears because:
- The file you are trying to open has become corrupted.
- The application you are trying to use to open the image file has become corrupt.
- There is a bug in Windows Update.
You can use the following methods to fix File system error — (2147219196):
- Open photos or other files with another application
- Run system error check and SFC scan
- Upgrade Windows 10 version
- Run Windows update
- Run Windows Troubleshooter
Windows Has Detected File System Corruption FAQs
Here are more topics about the disk local disk has errors, Windows has detected file system corruption. Check the questions and answers listed below.
What causes file system corruption?
The most common causes of file system corruption are improper shutdown, startup procedures, hardware failures, virus attack, or other errors. The hardware failures could be a bad sector, a bad disk controller, or a power outage.
When the file system corruption occurs, you can run the CHKDSK tool to check and repair bad sectors and damaged file system.
How do I fix corrupted Windows files?
You can try to fix corrupted system files on Windows 10 with SFC scan:
Step 1. Press Windows Key + X to open the Win + X menu and choose Command Prompt (Admin).
Step 2. When Command Prompt opens, enter sfc /scannow and press Enter.
Step 3. The system file repair process will now start.
How do I fix a corrupted NTFS file?
You can fix the corrupted NTFS partition in Windows File Explorer.
Step 1. Right-click the corrupted NTFS partition
Step 2. Go to «Properties» > «Tools», click «Check» under «Error Checking». Then, Windows will check the selected partition for file system error.
Make sure that you have tried at least one solution to work on «Windows has detected file system corruption» error. You can perform the system restore after taking the corresponding solutions many times.
Windows 7 Enterprise Windows 7 Home Basic Windows 7 Home Premium Windows 7 Professional Windows 7 Starter Windows 7 Ultimate Windows Server 2008 R2 Datacenter Windows Server 2008 R2 Enterprise Windows Server 2008 R2 Standard Windows Server 2008 R2 Foundation Windows Embedded Standard 7 More…Less
Symptoms
On a computer that is running Windows 7 or Windows Server 2008 R2, you may receive an error message that states the file system is corrupt. For example, assume that you run an application that uses the MoveFileEx() function to replace files. If this function is used multiple times during a brief period, you may receive an «ERROR_FILE_CORRUPT» error message. Additionally, you may experience one of the following issues:
-
A warning message is displayed in the notification area. This warning message indicates that you should run the Chkdsk.exe utility to check the disk.
-
A disk check is scheduled for the next time that you start the computer.
Resolution
To resolve this issue, apply the following update.
Note This issue is fixed in Service Pack 1 for Windows 7 and for Windows Server 2008 R2. You can also install the latest service pack for Windows 7 and for Windows Server 2008 R2 to resolve the issue.
Update information
How to obtain this update
The following files are available for download from the Microsoft Download Center:
|
Operating system |
Update |
|---|---|
|
All supported x86-based versions of Windows 7 |
|
|
All supported x64-based versions of Windows 7 |
|
|
All supported x64-based versions of Windows Server 2008 R2 |
|
|
All supported x86-based versions of Windows Embedded Standard 7 |
|
|
All supported x64-based versions of Windows Embedded Standard 7 |
|

For more information about how to download Microsoft support files, click the following article number to view the article in the Microsoft Knowledge Base:
119591 How to obtain Microsoft support files from online services
Microsoft scanned this file for viruses. Microsoft used the most current virus-detection software that was available on the date that the file was posted. The file is stored on security-enhanced servers that help prevent any unauthorized changes to the file.
Prerequisites
To apply this update, you must be running Windows 7 or Windows Server 2008 R2.
Registry information
To use the update in this package, you do not have to make any changes to the registry.
Restart requirement
You must restart the computer after you apply this update.
Update replacement information
This update does not replace a previously released update.
File information
The global version of this hotfix installs files that have the attributes that are listed in the following tables. The dates and the times for these files are listed in Coordinated Universal Time (UTC). The dates and the times for these files on your local computer are displayed in your local time together with your current daylight saving time (DST) bias. Additionally, the dates and the times may change when you perform certain operations on the files.
Windows 7 and Windows Server 2008 R2 file information notes
-
The files that apply to a specific product, milestone (RTM, SPn), and service branch (LDR, GDR) can be identified by examining the file version numbers as shown in the following table:
Version
Product
Milestone
Service branch
6.1.760
0.16xxxWindows 7 and Windows Server 2008 R2
RTM
GDR
6.1.760
0.20xxxWindows 7 and Windows Server 2008 R2
RTM
LDR
-
GDR service branches contain only those fixes that are widely released to address widespread, extremely important issues. LDR service branches contain hotfixes in addition to widely released fixes.
-
The MANIFEST files (.manifest) and the MUM files (.mum) that are installed for each environment are listed separately in the «Additional file information for Windows Server 2008 R2 and for Windows 7» section. MUM and MANIFEST files, and the associated security catalog (.cat) files, are extremely important to maintain the state of the updated components. The security catalog files, for which the attributes are not listed, are signed with a Microsoft digital signature.
For all supported x86-based versions of Windows 7
|
File name |
File version |
File size |
Date |
Time |
Platform |
|---|---|---|---|---|---|
|
Ntkrnlpa.exe |
6.1.7600.16746 |
3,957,120 |
24-Jan-2011 |
05:39 |
x86 |
|
Ntoskrnl.exe |
6.1.7600.16746 |
3,901,824 |
24-Jan-2011 |
05:39 |
x86 |
|
Ntkrnlpa.exe |
6.1.7600.20886 |
3,966,848 |
24-Jan-2011 |
05:43 |
x86 |
|
Ntoskrnl.exe |
6.1.7600.20886 |
3,911,552 |
24-Jan-2011 |
05:43 |
x86 |
For all supported x64-based versions of Windows 7 and of Windows Server 2008 R2
|
File name |
File version |
File size |
Date |
Time |
Platform |
|---|---|---|---|---|---|
|
Ntoskrnl.exe |
6.1.7600.16746 |
5,510,528 |
24-Jan-2011 |
06:31 |
x64 |
|
Ntoskrnl.exe |
6.1.7600.20886 |
5,475,712 |
24-Jan-2011 |
06:28 |
x64 |
|
Ntkrnlpa.exe |
6.1.7600.16746 |
3,957,120 |
24-Jan-2011 |
05:39 |
x86 |
|
Ntoskrnl.exe |
6.1.7600.16746 |
3,901,824 |
24-Jan-2011 |
05:39 |
x86 |
|
Ntkrnlpa.exe |
6.1.7600.20886 |
3,966,848 |
24-Jan-2011 |
05:43 |
x86 |
|
Ntoskrnl.exe |
6.1.7600.20886 |
3,911,552 |
24-Jan-2011 |
05:43 |
x86 |
For more information about software update terminology, click the following article number to view the article in the Microsoft Knowledge Base:
824684 Description of the standard terminology that is used to describe Microsoft software updates
Additional file information
Additional file information for Windows 7 and for Windows Server 2008 R2
Additional files for all supported x86-based versions of Windows 7
|
File name |
Update.mum |
|
File version |
Not applicable |
|
File size |
1,881 |
|
Date (UTC) |
24-Jan-2011 |
|
Time (UTC) |
17:43 |
|
Platform |
Not applicable |
|
File name |
X86_494bd5ead267ea879ebbeec30221dd1e_31bf3856ad364e35_6.1.7600.20886_none_b38c6e3bdfc0f406.manifest |
|
File version |
Not applicable |
|
File size |
697 |
|
Date (UTC) |
24-Jan-2011 |
|
Time (UTC) |
17:43 |
|
Platform |
Not applicable |
|
File name |
X86_adc121c090e18fffafccf67cad7cbf9f_31bf3856ad364e35_6.1.7600.16746_none_42070caf981e57e2.manifest |
|
File version |
Not applicable |
|
File size |
697 |
|
Date (UTC) |
24-Jan-2011 |
|
Time (UTC) |
17:43 |
|
Platform |
Not applicable |
|
File name |
X86_dcd961f9d35186a22a6f3b4d475b841c_31bf3856ad364e35_6.1.7600.20886_none_f758a334add0718d.manifest |
|
File version |
Not applicable |
|
File size |
717 |
|
Date (UTC) |
24-Jan-2011 |
|
Time (UTC) |
17:43 |
|
Platform |
Not applicable |
|
File name |
X86_e552cdc647ff1839d0fe779770be9639_31bf3856ad364e35_6.1.7600.16691_none_328fb89470173739.manifest |
|
File version |
Not applicable |
|
File size |
717 |
|
Date (UTC) |
24-Jan-2011 |
|
Time (UTC) |
17:43 |
|
Platform |
Not applicable |
|
File name |
X86_microsoft-windows-os-kernel_31bf3856ad364e35_6.1.7600.16746_none_6c32ff5615554608.manifest |
|
File version |
Not applicable |
|
File size |
16,151 |
|
Date (UTC) |
24-Jan-2011 |
|
Time (UTC) |
06:14 |
|
Platform |
Not applicable |
|
File name |
X86_microsoft-windows-os-kernel_31bf3856ad364e35_6.1.7600.20886_none_6c915c712e935596.manifest |
|
File version |
Not applicable |
|
File size |
16,151 |
|
Date (UTC) |
24-Jan-2011 |
|
Time (UTC) |
06:09 |
|
Platform |
Not applicable |
|
File name |
X86_microsoft-windows-r..gistry-trustedtypes_31bf3856ad364e35_6.1.7600.16691_none_83c584548fc7607d.manifest |
|
File version |
Not applicable |
|
File size |
8,047 |
|
Date (UTC) |
20-Oct-2010 |
|
Time (UTC) |
05:25 |
|
Platform |
Not applicable |
|
File name |
X86_microsoft-windows-r..gistry-trustedtypes_31bf3856ad364e35_6.1.7600.20886_none_845ef463a8d86030.manifest |
|
File version |
Not applicable |
|
File size |
8,047 |
|
Date (UTC) |
24-Jan-2011 |
|
Time (UTC) |
05:59 |
|
Platform |
Not applicable |
Additional files for all supported x64-based versions of Windows 7 and of Windows Server 2008 R2
|
File name |
Amd64_3552926e9edd357496372b851f68e1bb_31bf3856ad364e35_6.1.7600.16691_none_9a7046efb6fa0929.manifest |
|
File version |
Not applicable |
|
File size |
721 |
|
Date (UTC) |
24-Jan-2011 |
|
Time (UTC) |
17:43 |
|
Platform |
Not applicable |
|
File name |
Amd64_494bd5ead267ea879ebbeec30221dd1e_31bf3856ad364e35_6.1.7600.20886_none_0fab09bf981e653c.manifest |
|
File version |
Not applicable |
|
File size |
699 |
|
Date (UTC) |
24-Jan-2011 |
|
Time (UTC) |
17:43 |
|
Platform |
Not applicable |
|
File name |
Amd64_5305f193d7d526143a89238545422ad3_31bf3856ad364e35_6.1.7600.16746_none_74e6969899667b44.manifest |
|
File version |
Not applicable |
|
File size |
701 |
|
Date (UTC) |
24-Jan-2011 |
|
Time (UTC) |
17:43 |
|
Platform |
Not applicable |
|
File name |
Amd64_720cbdcd240a98e770f63fb1dc4ce7cf_31bf3856ad364e35_6.1.7600.20886_none_b82adb0ffe96a292.manifest |
|
File version |
Not applicable |
|
File size |
721 |
|
Date (UTC) |
24-Jan-2011 |
|
Time (UTC) |
17:43 |
|
Platform |
Not applicable |
|
File name |
Amd64_adc121c090e18fffafccf67cad7cbf9f_31bf3856ad364e35_6.1.7600.16746_none_9e25a833507bc918.manifest |
|
File version |
Not applicable |
|
File size |
699 |
|
Date (UTC) |
24-Jan-2011 |
|
Time (UTC) |
17:43 |
|
Platform |
Not applicable |
|
File name |
Amd64_b51aa9c0e654bd850a18e3739a4e2bee_31bf3856ad364e35_6.1.7600.20886_none_3b43ecb48bf81ed9.manifest |
|
File version |
Not applicable |
|
File size |
701 |
|
Date (UTC) |
24-Jan-2011 |
|
Time (UTC) |
17:43 |
|
Platform |
Not applicable |
|
File name |
Amd64_e5a01863bd64ea8bbdb465b99f33fd1f_31bf3856ad364e35_6.1.7600.16746_none_a68e7a982309438c.manifest |
|
File version |
Not applicable |
|
File size |
1,042 |
|
Date (UTC) |
24-Jan-2011 |
|
Time (UTC) |
17:43 |
|
Platform |
Not applicable |
|
File name |
Amd64_fba3b2f79934802eb1345bed42630298_31bf3856ad364e35_6.1.7600.20886_none_9947d3940b1c2da6.manifest |
|
File version |
Not applicable |
|
File size |
1,042 |
|
Date (UTC) |
24-Jan-2011 |
|
Time (UTC) |
17:43 |
|
Platform |
Not applicable |
|
File name |
Amd64_microsoft-windows-os-kernel_31bf3856ad364e35_6.1.7600.16746_none_c8519ad9cdb2b73e.manifest |
|
File version |
Not applicable |
|
File size |
15,291 |
|
Date (UTC) |
24-Jan-2011 |
|
Time (UTC) |
07:03 |
|
Platform |
Not applicable |
|
File name |
Amd64_microsoft-windows-os-kernel_31bf3856ad364e35_6.1.7600.20886_none_c8aff7f4e6f0c6cc.manifest |
|
File version |
Not applicable |
|
File size |
15,291 |
|
Date (UTC) |
24-Jan-2011 |
|
Time (UTC) |
07:07 |
|
Platform |
Not applicable |
|
File name |
Amd64_microsoft-windows-r..gistry-trustedtypes_31bf3856ad364e35_6.1.7600.16691_none_dfe41fd84824d1b3.manifest |
|
File version |
Not applicable |
|
File size |
8,049 |
|
Date (UTC) |
20-Oct-2010 |
|
Time (UTC) |
06:15 |
|
Platform |
Not applicable |
|
File name |
Amd64_microsoft-windows-r..gistry-trustedtypes_31bf3856ad364e35_6.1.7600.20886_none_e07d8fe76135d166.manifest |
|
File version |
Not applicable |
|
File size |
8,049 |
|
Date (UTC) |
24-Jan-2011 |
|
Time (UTC) |
06:57 |
|
Platform |
Not applicable |
|
File name |
Update.mum |
|
File version |
Not applicable |
|
File size |
2,115 |
|
Date (UTC) |
24-Jan-2011 |
|
Time (UTC) |
17:43 |
|
Platform |
Not applicable |
|
File name |
X86_microsoft-windows-os-kernel_31bf3856ad364e35_6.1.7600.16746_none_6c32ff5615554608.manifest |
|
File version |
Not applicable |
|
File size |
16,151 |
|
Date (UTC) |
24-Jan-2011 |
|
Time (UTC) |
06:14 |
|
Platform |
Not applicable |
|
File name |
X86_microsoft-windows-os-kernel_31bf3856ad364e35_6.1.7600.20886_none_6c915c712e935596.manifest |
|
File version |
Not applicable |
|
File size |
16,151 |
|
Date (UTC) |
24-Jan-2011 |
|
Time (UTC) |
06:09 |
|
Platform |
Not applicable |
Need more help?
Have you come across the issue called ‘The file or directory is corrupted and unreadable’ and become frustrated? Don’t worry. We will show you how to overcome this issue for good and start using your hard drive again.
If you don’t know yet, The file or directory is corrupted, and an unreadable issue occurs with external hard drives. This is not a very new issue. When you use an external hard drive, there is a possibility of experiencing such an issue sooner or later.
In fact, this error emerges whenever Windows OS cannot read the external hard drive or access it. If you wonder what might cause this issue, there is no shortage of reasons behind it.
In other words, ‘The file or directory is corrupted and unreadable’ can occur for various reasons. However, the good news is that there are several fixes to address this issue successfully.
What Causes ‘the File or Directory is Corrupted and Unreadable’ Issue?
Before we look into the fixes, it is better to get a clear idea of the causes. Such an approach will give you a better idea about what you are dealing with. Also, it helps you to address the issue with a better understanding. In a nutshell, you know what you do.
So, below is a list of common reasons that cause the ‘The file or directory is corrupted and unreadable’ issue.
- Corrupted FAT or MFT partitions on your hard drive.
- Your external hard drive is infected by dangerous malware such as a virus. As a result, the malware can corrupt the partitions created in the hard drive. In addition to that, such malware can cause damage to all or some of the files stored.
- The respective external hard drive has physical damage or malfunction.
- The troublesome external hard drive was not removed properly from the computer. As a result, partitions and files stored in the same hard drive can corrupt.
- There is something wrong (physical defect, malfunction) with the USB port of the computer. As a result, the computer will not be able to read the data on the hard drive properly.
If you are bothered with the PFN_LIST_CORRUPT or a file too large for the destination file system, here are the top solutions for you.
What Are the Best Ways to Fix ‘the File or Directory is Corrupted and Unreadable’ Issue?
Now, in this section of our guide, we will explain the best ways of addressing this issue. In fact, we basically talk about two methods in this section.
Besides, click here to find out how to fix corrupted files, as well as how to fix the cannot open volume for Direct Access error.
01. Use the CHKDSK tool to Overcome the Issue
When you come across the issue ‘The file or directory is corrupted and unreadable,’ don’t panic. Instead, think of the fact that there is a built-in tool to address this issue. This tool is called CHKDSK (Disk Check Utility). Through this tool, you will be able to see if the disk has some fixable issues.
To launch this tool, you will have to enter the command CHKDSK. To enter this command, you should simply use the command prompt. Through this single line of command, you will be able to scan the respective drive.
Moreover, it will fix a variety of issues, such as bad sectors, directory errors, lost clusters, etc.
Mentioned Below Are the Instructions You Should Follow to Fix This Issue.
- First of all, you should launch the command prompt using the start menu of the computer. If not, you can easily enter the text CMD on the ‘Run’ box and hit Enter. Make sure that you run this process in administrator mode.
- When the command prompt is opened, type the text CHKDSK /f X: in the command prompt. Please note that the letter X should be replaced with the drive letter of the potentially erroneous disk.

- After executing the command, you will see that Windows starts a process to scan the drive. Then, after the scan, it will display the results. In this result, you will be able to see the potential errors.
By the way, click here for the full Raid 0 vs. Raid 1 comparison.
02. Format the Faulty Device without Affecting the Existing Data
The next solution we offer is formatting the respective hard drive and overcoming the issue. One would say that formatting the hard disk will erase all the data in it. If you do it regularly, yes, you will lose all the data on the hard drive.
However, a tool like Tenorshare 4DDiG can format hard disks without affecting the existing data. Isn’t that good news? Mentioned below are the steps you should take in order to format a hard drive without losing data.
Recover the Files using Tenorshare 4DDiG
In fact, formatting your hard drive means getting rid of all the data, including valuable files. So, the trick here is to use professional data recovery software (Tenorshare 4DDiG).
With such a tool, you will be able to avoid the frustration of losing all the files prior to formatting. We highly recommend using Tenorshare 4DDiG because of obvious reasons. This tool allows you to recover files using a single recovery session without any hassle.
PS: also, you will find out how to get rid of the error of the GPT protective partition.
Main Features Associated with Tenorshare 4DDiG
In this section of our article, we list the most notable features associated with 4DDiG.
- This software is capable of recovering all types of files using a couple of clicks.-It comes with an exceptionally friendly user interface to allow users better convenience and achieve better productivity.
- 4DDiG works with more than 1000 file formats, including images, documents, videos, audio, etc.
- It can recover lost data from your external hard drives faster and easier.
- In addition to external hard drives, it supports internal hard drives, USB flash drives, memory cards, cameras, etc.
- This software allows you to recover files effortlessly regardless of how you lost them. For instance, it can recover intentionally deleted files and files lost due to a system crash. Also, it can recover files that are damaged due to a physical defect, malware attack, or any other reason.
Get Tenorshare 4DDiG
How to Overcome ‘The File or Directory is Corrupted and Unreadable’ Issue using 4DDiG
Now, let’s take a look at the steps to follow in order to resolve this issue.
Phase 01: File Recovery
- Download and launch Tenorshare 4DDiG on your computer, and connect your affected USB drive to it. Then you will see below, including Drives, Devices, and Standard Position sections. Now, you should select the USB drive in which you dropped your data and click the Start button to proceed.

The tool scans your targeted drive all over for lost data immediately. Once you find your lost files, you can pause the scanning process.
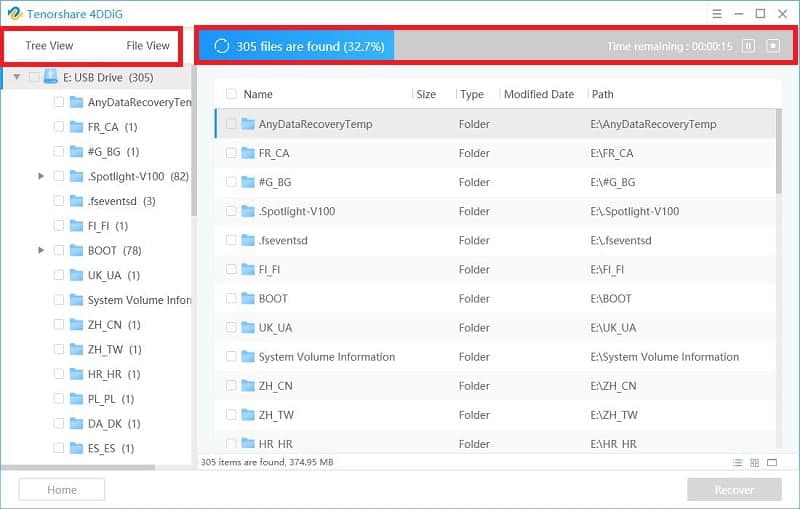
Tenorshare 4DDiG can let you preview and retrieve various file types, including videos, photos, audio and document files, etc. Please just select and preview your desired files, and then click Recover to retrieve them from your drive.
Once you select the distinct location to save the recovered files. The task is completed. Congratulations!

Phase 02: Format a drive
01. Now that you have recovered the files from your hard disk, you can proceed to format.
02. In fact, you don’t need to use any third-party tool to format your external hard drive. It can be done using two official methods provided by Windows itself. To do this, you can choose either Windows Explorer or CMD.
We strongly recommend that you format the external hard drive through Windows Explorer. That is because it is faster and more convenient, even if you are a novice user.
03. Mentioned below are the instructions to format your external hard drive through Windows Explorer.
- Go to ‘My Computer’ or ‘This PC’ depending on the operating system you use.
- Then, navigate to the external hard drive that needs to be formatted and rectified.
- Right-click on the respective device and then go to the option called ‘Format.’
- Now, you should choose the file system. In addition to that, you should choose the option called ‘Quick Format,’ which is located under the ‘Format’ options.

- Then, click on the option labeled ‘Start.’
Conclusion
Now, that is how to address the error ‘The file or directory is corrupted and unreadable.’
As we have mentioned, there are basically two methods to address this issue. If you use the second option (format the disk), make sure that you use Tenorshare 4DDiG. It will help you format the disk without causing data loss.
Try Tenorshare 4DDiG
This website uses cookies to ensure you get the best experience on our website
Are you troubled by the issue Windows has detected file system corruption when you make a system restore in Windows? You can try to use the following methods to solve the system restore error.
Phenomenon
Recently, many computer users say that they have encountered a system restore error “Windows has detected file system corruption on OS (C:). You must check the disk for errors before it can be restored”.

As a matter of fact, the issue “Window has detected file system corruption on OS” indicates file system corruption on local disk C. Then you are unable to restore system successfully.
There is no doubt that many reasons could lead to this file system corruption error. For example, File system of the system drive or system partition is damaged or corrupted. In addition, bad sector of the system hard drive can also lead to the issue “Windows has detected file system corruption”.
Thus, we will introduce how to solve Windows has detected file system corruption on local disk C issue step by step.
Fix#1.Check Windows System Files
If you have encountered the error “Windows has detected file system corruption on OS” when you restore system, you can try to check system files by using Command Prompt to solve this system restore error.
Then what commands can be used to check for file system errors? Look the following part.
Step 1: Type Command Prompt in search box. Choose Command Prompt in the list and right-click it. Then choose Run as administrator from the context menu.
Step 2: Then type sfc/scannow command and you should wait patiently since this process will take much time.
Step 3: After checking, if you get the message “Windows Resource protection did not find any integrity violations” which means that there is no wrong on your system file, you can try to restart your computer, try to restore system again and check whether file system corruption on local disk C issue still occurs.
If you encounter the issue of Windows resource protection could not perform the requested operations, try to read SFC scannow not working.
Fix#2.Check File System
Check File System by Command Prompt
When a corruption was discovered in the file system structure on volume, you will encounter the error Windows has detected file system corruption, you can try to check file system to solve file system corruption on local disk C.
Next, we will introduce how to check file system step by step.
Step 1: Type Command Prompt in the search box of Windows 10 and choose it in the list. Then right-click it and choose Run as administrator.
Step 2: Type chkdsk c: /f command and hit Enter to continue.

Step 3: You need to type Y to schedule this volume to be checked when you next restart your operating system because the volume is in use by another process.
After that, you can restart your computer to check whether the issue file system error 2147219200 still occurs.
Check File System by MiniTool Partition Wizard
In order to check file system, you can also use a kind of free professional partition management software since it even can help you to check and fix the error. It is MiniTool Partition Wizard specializing in optimizing partition and disk use.
With its various features, it can handle all kind of partition and disk matters. For example, it can help you to convert MBR to GPT without data loss and to clone hard drive to SSD.
As to checking file system, MiniTool Partition Wizard is competent and it is very easy to operate. Next, we will introduce how to check file system by using MiniTool Partition Wizard.
First of all, you can get the free partition management software – MiniTool Partition Wizard Free from the following button.
Free Download
Now, we will introduce how to check file system in detail.
Step 1: Install this free software and launch it to enter its main interface.
Step 2: Selected the C partition and choose Check File System from the left panel or from the context menu.
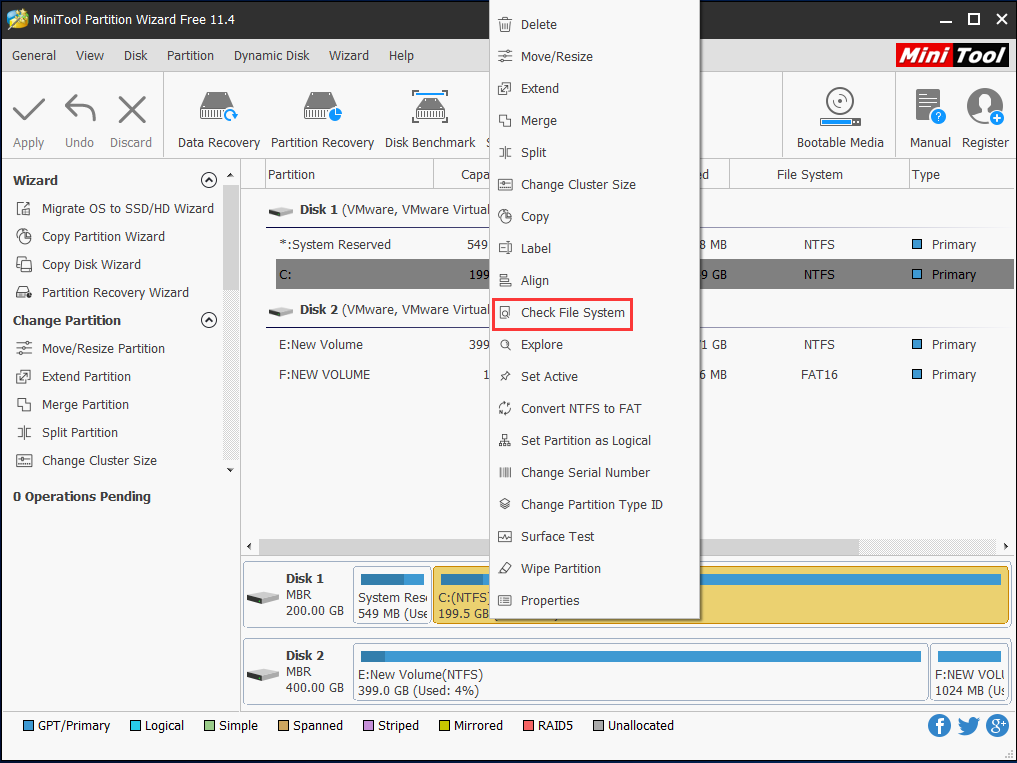
Step 3: In the next popup window, you can see two options. You can choose either based on your own needs. Then click Start to continue.
Check only helps check the errors of file system.
Check & fix detected errors helps to check as well as repair errors of file system.
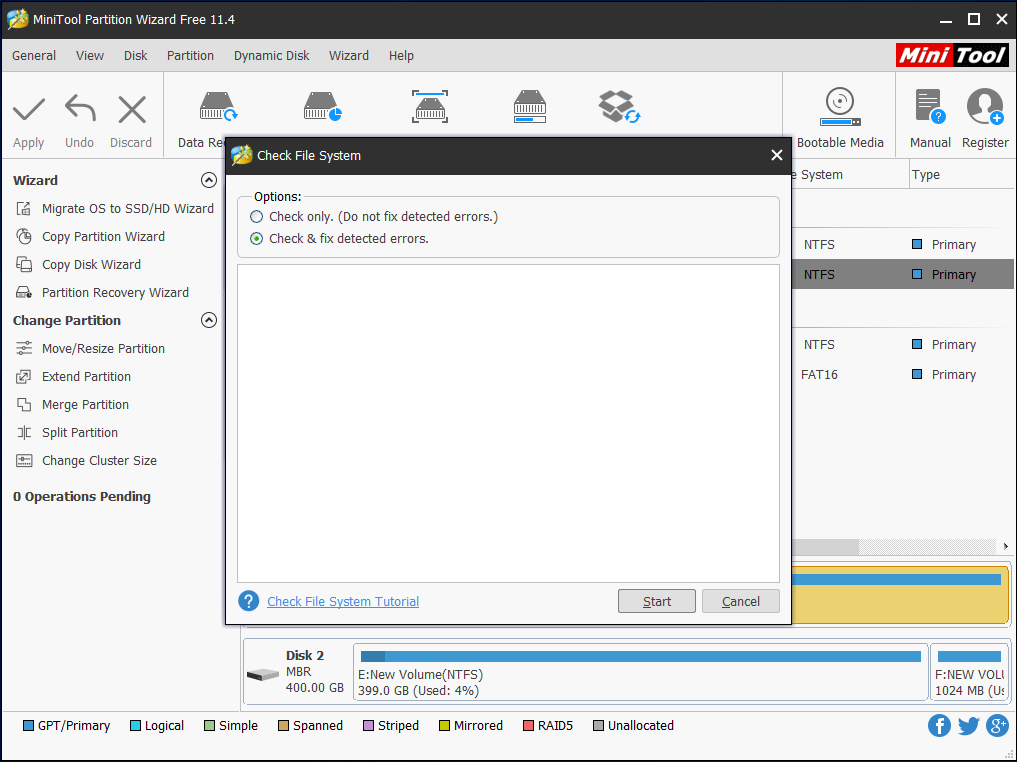
Step 4: Then you will see a warning message and click Yes to continue. Next, click Cancel to return to the main interface.
After that, you can restart your computer and try to check whether the issue “Windows has detected file system corruption” is solved.
Fix#3.Run Disk Defragment from Command Prompt
You can also take advantage of disk defragment to solve file system corruption on local disk C issue.
Now, the detailed operations are as follows.
Step 1: Type Command Prompt in the search box of Windows 10 and choose it in the list. Then right-click it and choose Run as administrator.
Step 2: Type the defrag.exe c: -a command and hit Enter to perform an analysis of C drive.
Step 3: Type the defrag.exe c: command and hit Enter to perform defragment of the C drive.
After that, you can restart your computer to check whether the system restore failed issue is solved.
Fix#4.Reset the Computer
If above methods are not effective, you can try to reset your computer without losing personal files to solve the issue “Windows had detected the file system on OS.”
There is a feature of Windows 10 called Reset This PC which can help you to choose to keep your personal files or remove them and then reinstall Windows 10.
Now, the detailed operations are as follows.
Step 1: Right-click Start, choose Setting, then go to Update & Security.
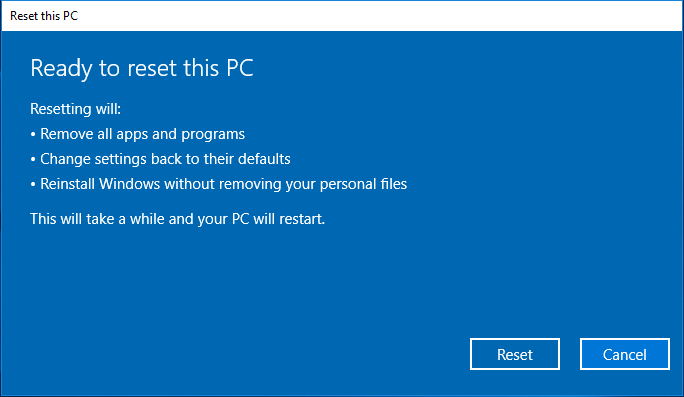
Step 2: Next, choose Recovery in the left panel and click Get started under Reset this PC section.
Step 3: In the next popup windows, you will see two options. If you want to reset your computer without losing data you can choose Keep my Files.

Step 4: After things get ready, you will see a popup window that reminds you that which programs will be removed. And you need to click Next to continue.
Step 5: In the next popup window, you need to click Reset to continue to reinstall your Windows 10 without losing personal files.
After resetting your computer, you can create a system restore point and try to check whether system restore error is solved.
RECOMMENDED: Here Are Three Ways to Fix Windows 10 Reset Stuck Issue!
After reading this article, I have successfully solved system restore error ‘Windows has detected the file system corruption’. It is very useful.Click to Tweet
If you encounter the issue of system restore C drive corrupted when you perform system restore, you can try to use MiniTool ShadowMaker to perform system restore instead.
MiniTool ShadowMaker is a piece of Windows backup software, which can be used to back up the operating system, disk, partition, files and folder.
In addition, it also can help you to perform some recovery solutions. So when you encounter the issue Windows has detected file system corruption during system restore, you can take MiniTool ShadowMaker to have a try. It also plays an important role when System Restore did not complete successfully.
Free Download
But please note that the prerequisite of system restore using MiniTool ShadowMaker is that you have a system backup image, which is created in advance.
Easily & Free Create a Windows 10 Image Backup Now — MiniTool
And to perform system restore, you also need to create bootable media which can be used to boot your computer when it can’t boot from the operating system normally.
And now, we will show you how to perform system restore with step-by-step guide.
Step 1: Boot your computer which has encountered the issue Windows has detected file system corruption from the bootable media.
Step 2: After entering the main interface, please go to the Restore page.
Step 3: Then you can see that the backup image is listed here. If no, click the Add Backup to add the backup image to the list. And click Restore to continue.

Step 4: In the popup window, choose the backup version and click Next to continue. You can choose the backup version based on the created time.

Step 5: Choose the partitions to restore from the selected backup files. Please note the mbr and Track 0 must be chosen and click Next to continue.
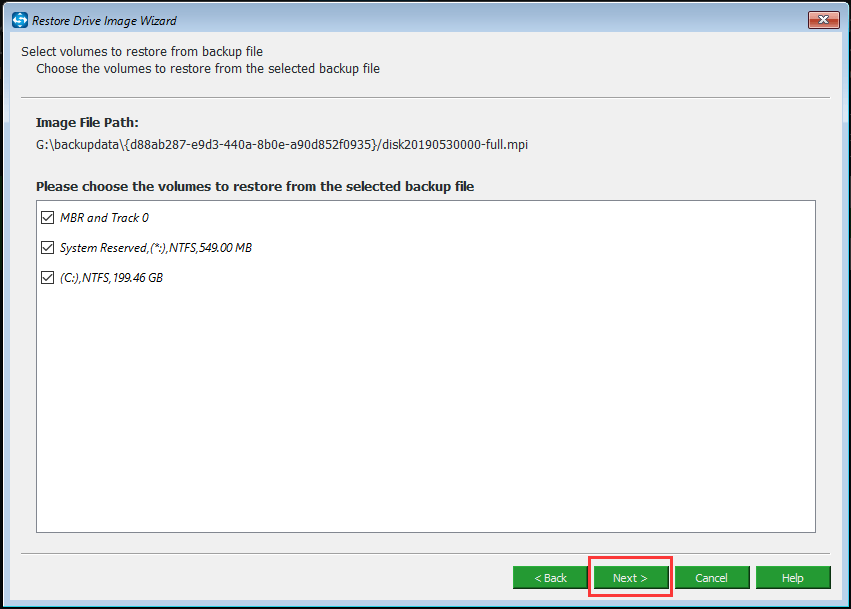
Step 6: Then choose a target disk to save the restored files and click Next to continue. Please don’t choose the disk which holds the backup image.

Step 7: Please note all data on the target disk will be destroyed. So if you have important files on it, please back up them in advance.
Step 8: Then the system restore process will begin. Please don’t interpret the system restore process, otherwise your computer can’t boot normally.
When you have finished all steps, you have successes performed system restore. So if you encounter the issue Windows has detected file system corruption on local disk C, you can try MiniTool ShadowMaker, which can help to restore your computer to a normal state.
Free Download
So from above information, you can know the importance of the system image. When you encounter the issue Windows has detected file system corruption during system restore, the system images created in advance can help you to restore your computer to a normal state. And MiniTool ShadowMaker plays an important role.
MiniTool ShadowMaker is a piece of powerful program which helps me to create the backup image and restore my computer to an earlier state successfully. Click to Tweet
Bottom Line
In short, this article has shown you four ways to solve the issue “Windows has detected the file system corruption”. You can try to use one of them to solve the file system corruption on local disk C problem.
In addition, if you have any better solution to solve the issue “Windows has detected file system corruption on OS”, you can share it in the comment zone.
Another important thing is that you had better develop a habit of backing up system so as to avoid some accidents. And if you have any problem with MiniTool products, you can contact us via the email [email protected].