Handling Application Errors
Applications fail, servers fail. Sooner or later you will see an exception
in production. Even if your code is 100% correct, you will still see
exceptions from time to time. Why? Because everything else involved will
fail. Here are some situations where perfectly fine code can lead to server
errors:
- the client terminated the request early and the application was still
reading from the incoming data - the database server was overloaded and could not handle the query
- a filesystem is full
- a harddrive crashed
- a backend server overloaded
- a programming error in a library you are using
- network connection of the server to another system failed
And that’s just a small sample of issues you could be facing. So how do we
deal with that sort of problem? By default if your application runs in
production mode, and an exception is raised Flask will display a very simple
page for you and log the exception to the :attr:`~flask.Flask.logger`.
But there is more you can do, and we will cover some better setups to deal
with errors including custom exceptions and 3rd party tools.
Error Logging Tools
Sending error mails, even if just for critical ones, can become
overwhelming if enough users are hitting the error and log files are
typically never looked at. This is why we recommend using Sentry for dealing with application errors. It’s
available as a source-available project on GitHub and is also available as a hosted version which you can try for free. Sentry
aggregates duplicate errors, captures the full stack trace and local
variables for debugging, and sends you mails based on new errors or
frequency thresholds.
To use Sentry you need to install the sentry-sdk client with extra
flask dependencies.
$ pip install sentry-sdk[flask]
And then add this to your Flask app:
import sentry_sdk
from sentry_sdk.integrations.flask import FlaskIntegration

sentry_sdk.init('YOUR_DSN_HERE', integrations=[FlaskIntegration()])
The YOUR_DSN_HERE value needs to be replaced with the DSN value you
get from your Sentry installation.
After installation, failures leading to an Internal Server Error
are automatically reported to Sentry and from there you can
receive error notifications.
See also:
- Sentry also supports catching errors from a worker queue
(RQ, Celery, etc.) in a similar fashion. See the Python SDK docs for more information. - Getting started with Sentry
- Flask-specific documentation
Error Handlers
When an error occurs in Flask, an appropriate HTTP status code will be
returned. 400-499 indicate errors with the client’s request data, or
about the data requested. 500-599 indicate errors with the server or
application itself.
You might want to show custom error pages to the user when an error occurs.
This can be done by registering error handlers.
An error handler is a function that returns a response when a type of error is
raised, similar to how a view is a function that returns a response when a
request URL is matched. It is passed the instance of the error being handled,
which is most likely a :exc:`~werkzeug.exceptions.HTTPException`.
The status code of the response will not be set to the handler’s code. Make
sure to provide the appropriate HTTP status code when returning a response from
a handler.
Registering
Register handlers by decorating a function with
:meth:`~flask.Flask.errorhandler`. Or use
:meth:`~flask.Flask.register_error_handler` to register the function later.
Remember to set the error code when returning the response.
@app.errorhandler(werkzeug.exceptions.BadRequest)
def handle_bad_request(e):
    return 'bad request!', 400

# or, without the decorator
app.register_error_handler(400, handle_bad_request)
:exc:`werkzeug.exceptions.HTTPException` subclasses like
:exc:`~werkzeug.exceptions.BadRequest` and their HTTP codes are interchangeable
when registering handlers. (BadRequest.code == 400)
Non-standard HTTP codes cannot be registered by code because they are not known
by Werkzeug. Instead, define a subclass of
:class:`~werkzeug.exceptions.HTTPException` with the appropriate code and
register and raise that exception class.
class InsufficientStorage(werkzeug.exceptions.HTTPException):
    code = 507
    description = 'Not enough storage space.'

app.register_error_handler(InsufficientStorage, handle_507)

raise InsufficientStorage()
Handlers can be registered for any exception class, not just
:exc:`~werkzeug.exceptions.HTTPException` subclasses or HTTP status
codes. Handlers can be registered for a specific class, or for all subclasses
of a parent class.
Handling
When building a Flask application you will run into exceptions. If some part
of your code breaks while handling a request (and you have no error handlers
registered), a «500 Internal Server Error»
(:exc:`~werkzeug.exceptions.InternalServerError`) will be returned by default.
Similarly, «404 Not Found»
(:exc:`~werkzeug.exceptions.NotFound`) error will occur if a request is sent to an unregistered route.
If a route receives an unallowed request method, a «405 Method Not Allowed»
(:exc:`~werkzeug.exceptions.MethodNotAllowed`) will be raised. These are all
subclasses of :class:`~werkzeug.exceptions.HTTPException` and are provided by
default in Flask.
Flask gives you the ability to raise any HTTP exception registered by
Werkzeug. However, the default HTTP exceptions return simple exception
pages. You might want to show custom error pages to the user when an error occurs.
This can be done by registering error handlers.
When Flask catches an exception while handling a request, it is first looked up by code.
If no handler is registered for the code, Flask looks up the error by its class hierarchy; the most specific handler is chosen.
If no handler is registered, :class:`~werkzeug.exceptions.HTTPException` subclasses show a
generic message about their code, while other exceptions are converted to a
generic «500 Internal Server Error».
For example, if an instance of :exc:`ConnectionRefusedError` is raised,
and a handler is registered for :exc:`ConnectionError` and
:exc:`ConnectionRefusedError`, the more specific :exc:`ConnectionRefusedError`
handler is called with the exception instance to generate the response.
Handlers registered on the blueprint take precedence over those registered
globally on the application, assuming a blueprint is handling the request that
raises the exception. However, the blueprint cannot handle 404 routing errors
because the 404 occurs at the routing level before the blueprint can be
determined.
Generic Exception Handlers
It is possible to register error handlers for very generic base classes
such as HTTPException or even Exception. However, be aware that
these will catch more than you might expect.
For example, an error handler for HTTPException might be useful for turning
the default HTML errors pages into JSON. However, this
handler will trigger for things you don’t cause directly, such as 404
and 405 errors during routing. Be sure to craft your handler carefully
so you don’t lose information about the HTTP error.
from flask import json
from werkzeug.exceptions import HTTPException

@app.errorhandler(HTTPException)
def handle_exception(e):
    """Return JSON instead of HTML for HTTP errors."""
    # start with the correct headers and status code from the error
    response = e.get_response()
    # replace the body with JSON
    response.data = json.dumps({
        "code": e.code,
        "name": e.name,
        "description": e.description,
    })
    response.content_type = "application/json"
    return response
An error handler for Exception might seem useful for changing how
all errors, even unhandled ones, are presented to the user. However,
this is similar to doing except Exception: in Python, it will
capture all otherwise unhandled errors, including all HTTP status
codes.
In most cases it will be safer to register handlers for more
specific exceptions. Since HTTPException instances are valid WSGI
responses, you could also pass them through directly.
from werkzeug.exceptions import HTTPException

@app.errorhandler(Exception)
def handle_exception(e):
    # pass through HTTP errors
    if isinstance(e, HTTPException):
        return e

    # now you're handling non-HTTP exceptions only
    return render_template("500_generic.html", e=e), 500
Error handlers still respect the exception class hierarchy. If you
register handlers for both HTTPException and Exception, the
Exception handler will not handle HTTPException subclasses
because it the HTTPException handler is more specific.
Unhandled Exceptions
When there is no error handler registered for an exception, a 500
Internal Server Error will be returned instead. See
:meth:`flask.Flask.handle_exception` for information about this
behavior.
If there is an error handler registered for InternalServerError,
this will be invoked. As of Flask 1.1.0, this error handler will always
be passed an instance of InternalServerError, not the original
unhandled error.
The original error is available as e.original_exception.
An error handler for «500 Internal Server Error» will be passed uncaught
exceptions in addition to explicit 500 errors. In debug mode, a handler
for «500 Internal Server Error» will not be used. Instead, the
interactive debugger will be shown.
Custom Error Pages
Sometimes when building a Flask application, you might want to raise a
:exc:`~werkzeug.exceptions.HTTPException` to signal to the user that
something is wrong with the request. Fortunately, Flask comes with a handy
:func:`~flask.abort` function that aborts a request with a HTTP error from
werkzeug as desired. It will also provide a plain black and white error page
for you with a basic description, but nothing fancy.
Depending on the error code it is less or more likely for the user to
actually see such an error.
Consider the code below, we might have a user profile route, and if the user
fails to pass a username we can raise a «400 Bad Request». If the user passes a
username and we can’t find it, we raise a «404 Not Found».
from flask import abort, render_template, request

# a username needs to be supplied in the query args
# a successful request would be like /profile?username=jack
@app.route("/profile")
def user_profile():
    username = request.arg.get("username")
    # if a username isn't supplied in the request, return a 400 bad request
    if username is None:
        abort(400)

    user = get_user(username=username)
    # if a user can't be found by their username, return 404 not found
    if user is None:
        abort(404)

    return render_template("profile.html", user=user)
Here is another example implementation for a «404 Page Not Found» exception:
from flask import render_template

@app.errorhandler(404)
def page_not_found(e):
    # note that we set the 404 status explicitly
    return render_template('404.html'), 404
When using :doc:`/patterns/appfactories`:
from flask import Flask, render_template

def page_not_found(e):
  return render_template('404.html'), 404

def create_app(config_filename):
    app = Flask(__name__)
    app.register_error_handler(404, page_not_found)
    return app
An example template might be this:
{% extends "layout.html" %}
{% block title %}Page Not Found{% endblock %}
{% block body %}
  <h1>Page Not Found</h1>
  <p>What you were looking for is just not there.
  <p><a href="{{ url_for('index') }}">go somewhere nice</a>
{% endblock %}
Further Examples
The above examples wouldn’t actually be an improvement on the default
exception pages. We can create a custom 500.html template like this:
{% extends "layout.html" %}
{% block title %}Internal Server Error{% endblock %}
{% block body %}
  <h1>Internal Server Error</h1>
  <p>Oops... we seem to have made a mistake, sorry!</p>
  <p><a href="{{ url_for('index') }}">Go somewhere nice instead</a>
{% endblock %}
It can be implemented by rendering the template on «500 Internal Server Error»:
from flask import render_template

@app.errorhandler(500)
def internal_server_error(e):
    # note that we set the 500 status explicitly
    return render_template('500.html'), 500
When using :doc:`/patterns/appfactories`:
from flask import Flask, render_template

def internal_server_error(e):
  return render_template('500.html'), 500

def create_app():
    app = Flask(__name__)
    app.register_error_handler(500, internal_server_error)
    return app
When using :doc:`/blueprints`:
from flask import Blueprint

blog = Blueprint('blog', __name__)

# as a decorator
@blog.errorhandler(500)
def internal_server_error(e):
    return render_template('500.html'), 500

# or with register_error_handler
blog.register_error_handler(500, internal_server_error)
Blueprint Error Handlers
In :doc:`/blueprints`, most error handlers will work as expected.
However, there is a caveat concerning handlers for 404 and 405
exceptions. These error handlers are only invoked from an appropriate
raise statement or a call to abort in another of the blueprint’s
view functions; they are not invoked by, e.g., an invalid URL access.
This is because the blueprint does not «own» a certain URL space, so
the application instance has no way of knowing which blueprint error
handler it should run if given an invalid URL. If you would like to
execute different handling strategies for these errors based on URL
prefixes, they may be defined at the application level using the
request proxy object.
from flask import jsonify, render_template

# at the application level
# not the blueprint level
@app.errorhandler(404)
def page_not_found(e):
    # if a request is in our blog URL space
    if request.path.startswith('/blog/'):
        # we return a custom blog 404 page
        return render_template("blog/404.html"), 404
    else:
        # otherwise we return our generic site-wide 404 page
        return render_template("404.html"), 404

@app.errorhandler(405)
def method_not_allowed(e):
    # if a request has the wrong method to our API
    if request.path.startswith('/api/'):
        # we return a json saying so
        return jsonify(message="Method Not Allowed"), 405
    else:
        # otherwise we return a generic site-wide 405 page
        return render_template("405.html"), 405
Returning API Errors as JSON
When building APIs in Flask, some developers realise that the built-in
exceptions are not expressive enough for APIs and that the content type of
:mimetype:`text/html` they are emitting is not very useful for API consumers.
Using the same techniques as above and :func:`~flask.json.jsonify` we can return JSON
responses to API errors. :func:`~flask.abort` is called
with a description parameter. The error handler will
use that as the JSON error message, and set the status code to 404.
from flask import abort, jsonify

@app.errorhandler(404)
def resource_not_found(e):
    return jsonify(error=str(e)), 404

@app.route("/cheese")
def get_one_cheese():
    resource = get_resource()

    if resource is None:
        abort(404, description="Resource not found")

    return jsonify(resource)
We can also create custom exception classes. For instance, we can
introduce a new custom exception for an API that can take a proper human readable message,
a status code for the error and some optional payload to give more context
for the error.
This is a simple example:
from flask import jsonify, request

class InvalidAPIUsage(Exception):
    status_code = 400

    def __init__(self, message, status_code=None, payload=None):
        super().__init__()
        self.message = message
        if status_code is not None:
            self.status_code = status_code
        self.payload = payload

    def to_dict(self):
        rv = dict(self.payload or ())
        rv['message'] = self.message
        return rv

@app.errorhandler(InvalidAPIUsage)
def invalid_api_usage(e):
    return jsonify(e.to_dict()), e.status_code

# an API app route for getting user information
# a correct request might be /api/user?user_id=420
@app.route("/api/user")
def user_api(user_id):
    user_id = request.arg.get("user_id")
    if not user_id:
        raise InvalidAPIUsage("No user id provided!")

    user = get_user(user_id=user_id)
    if not user:
        raise InvalidAPIUsage("No such user!", status_code=404)

    return jsonify(user.to_dict())
A view can now raise that exception with an error message. Additionally
some extra payload can be provided as a dictionary through the payload
parameter.
Logging
See :doc:`/logging` for information about how to log exceptions, such as
by emailing them to admins.
Debugging
See :doc:`/debugging` for information about how to debug errors in
development and production.
Prerequisite: Creating simple application in Flask
A 404 Error is showed whenever a page is not found. Maybe the owner changed its URL and forgot to change the link or maybe they deleted the page itself. Every site needs a Custom Error page to avoid the user to see the default Ugly Error page.
GeeksforGeeks also has a customized error page. If we type a URL like
www.geeksforgeeks.org/ajneawnewiaiowjf
Default 404 Error
GeeksForGeeks Customized Error Page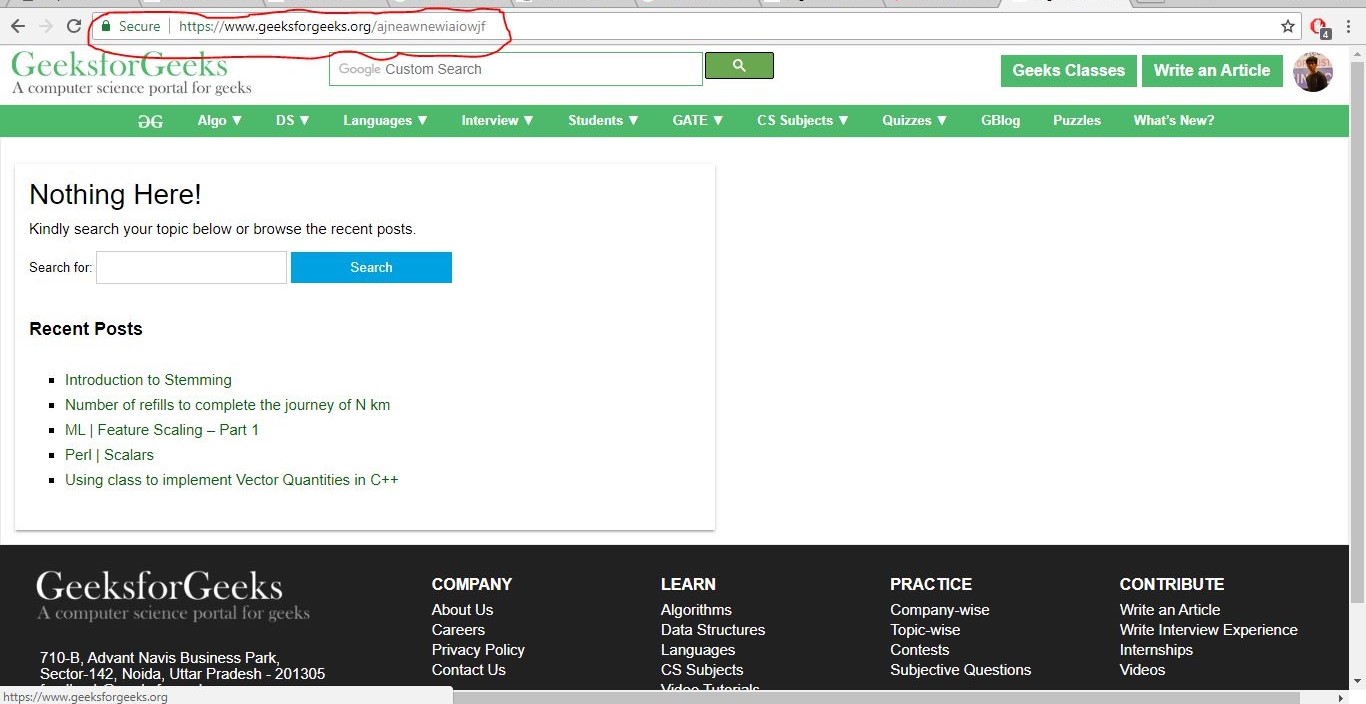
It will show an Error 404 page since this URL doesn’t exist. But an error page provides a beautiful layout, helps the user to go back, or even takes them to the homepage after a specific time interval. That is why Custom Error pages are necessary for every website.
Flask provides us with a way to handle the error and return our Custom Error page.
For this, we need to download and import flask. Download the flask through the following commands on CMD.
pip install flask
Using app.py as our Python file to manage templates, 404.html be the file we will return in the case of a 404 error and header.html be the file with header and navbar of a website.
app.py
Flask allows us to make a python file to define all routes and functions. In app.py we have defined the route to the main page (‘/’) and error handler function which is a flask function and we passed 404 error as a parameter.
from flask import Flask, render_template
app = Flask(__name__)
@app.errorhandler(404)
def not_found(e):
return render_template("404.html")
The above python program will return 404.html file whenever the user opens a broken link.
404.html
The following code exports header and navbar from header.html.
Both files should be stored in templates folder according to the flask.
{% extends "header.html" %}
{% block title %}Page Not Found{% endblock %}
{% block body %}
<h1>Oops! Looks like the page doesn't exist anymore</h1>
<a href="{{ url_for('index') }}"><p>Click Here</a>To go to the Home Page</p>
{% endblock %}
Automatically Redirecting to the Home page after 5 seconds
The app.py code for this example stays the same as above.
The following code Shows the Custom 404 Error page and starts a countdown of 5 seconds.
After 5 seconds are completed, it redirects the user back to the homepage.
404.html
The following code exports header and navbar from header.html.
Both files should be stored in the templates folder according to the flask.
After 5 seconds, the user will get redirected to the Home Page Automatically.
<html>
<head>
<title>Page Not Found</title>
<script language="JavaScript" type="text/javascript">
var seconds =6;
// countdown timer. took 6 because page takes approx 1 sec to load
var url="{{url_for(index)}}";
// variable for index.html url
function redirect(){
if (seconds <=0){
// redirect to new url after counter down.
window.location = url;
} else {
seconds--;
document.getElementById("pageInfo").innerHTML="Redirecting to Home Page after "
+seconds+" seconds."
setTimeout("redirect()", 1000)
}
}
</script>
</head>
{% extends "header.html" %}
//exporting navbar and header from header.html
{% block body %}
<body onload="redirect()">
<p id="pageInfo"></p>
{% endblock %}
</html>
Sample header.html
This is a sample header.html which includes a navbar just like shown in the image.
It’s made up of bootstrap. You can also make one of your own.
For this one, refer the bootstrap documentation.
<!DOCTYPE html>
<html>
<head>
css/bootstrap.min.css"
integrity="sha384-Gn5384xqQ1aoWXA+058RXPxPg6fy4IWvTNh0E26
3XmFcJlSAwiGgFAW/dAiS6JXm" crossorigin="anonymous">
<title>Flask</title>
</head>
<body>
"sha384-KJ3o2DKtIkvYIK3UENzmM7KCkRr/rE9/Qpg6aAZGJwFDMVNA/GpGFF93hXpG5KkN"
crossorigin="anonymous"></script>
/popper.min.js" integrity="sha384-ApNbgh9B+Y1QKtv3Rn7W3mgPxhU9K
/ScQsAP7hUibX39j7fakFPskvXusvfa0b4Q" crossorigin="anonymous"></script>
integrity="sha384-JZR6Spejh4U02d8jOt6vLEHfe/JQGiRRSQQxSfFWpi1MquVdAyjUar5+76PVCmYl"
crossorigin="anonymous"></script>
<header>
<nav class="navbar navbar-expand-lg navbar-light bg-light">
<a class="navbar-brand" href="#">Navbar</a>
<button class="navbar-toggler" type="button" data-toggle="collapse" data-target=
"#navbarSupportedContent" aria-controls="navbarSupportedContent"
aria-expanded="false" aria-label="Toggle navigation">
<span class="navbar-toggler-icon"></span>
</button>
<div class="collapse navbar-collapse" id="navbarSupportedContent">
<ul class="navbar-nav mr-auto">
<li class="nav-item active">
<a class="nav-link" href="#">Home <span class="sr-only">(current)</span></a>
</li>
<li class="nav-item">
<a class="nav-link" href="#">Link</a>
</li>
<li class="nav-item dropdown">
<a class="nav-link dropdown-toggle" href="#" id="navbarDropdown"
role="button data-toggle="dropdown" aria-haspopup="true" aria-expanded="false">
Dropdown
</a>
<div class="dropdown-menu" aria-labelledby="navbarDropdown">
<a class="dropdown-item" href="#">Action</a>
<a class="dropdown-item" href="#">Another action</a>
<div class="dropdown-divider"></div>
<a class="dropdown-item" href="#">Something else here</a>
</div>
</li>
<li class="nav-item">
<a class="nav-link disabled" href="#">Disabled</a>
</li>
</ul>
<form class="form-inline my-2 my-lg-0">
<input class="form-control mr-sm-2" type="search"
placeholder="Search" aria-label="Search">
<button class="btn btn-outline-success my-2 my-sm-0"
type="submit">Search</button>
</form>
</div>
</nav>
</head>
<body >
{%block body%}
{%endblock%}
</body>
</html>
Output:
The output will be a custom error page with header.html that the user exported.
The following is an example output with my custom header, footer, and 404.html file.

Обработка HTTP-ошибок 404, 500 и т.д. во Flask.
Если какая-то часть кода кода сайта на Flask ломается при обработке запроса и нет зарегистрированных обработчиков ошибок, то по умолчанию будет возвращена ошибка 500 Internal Server Error (InternalServerError). Точно так же будет выводится стандартная страница с ошибкой 404 Not Found , если запрос будет отправлен на незарегистрированный URL-адрес. Если маршрут получает недопустимый метод запроса, будет активирован HTTP-метод 405 Not Allowed. Все это подклассы HTTPException, которые по умолчанию предоставляются в Flask.
Фреймворк Flask дает возможность вызывать любое исключение HTTP, зарегистрированное Werkzeug, но по умолчанию отдаются простые/стандартные страницы ошибок. Для удобства пользователя сайта, а так же повышения лояльности поисковых систем к сайту необходимо показывать настроенные страницы ошибок (вместо стандартных). Это можно сделать, зарегистрировав обработчики ошибок.
Обработчик ошибок — это функция, которая возвращает ответ при возникновении определенного типа ошибки, аналогично тому, как представление является функцией, которая возвращает ответ при совпадении URL-адреса запроса. Ему передается экземпляр обрабатываемой ошибки, который будет является исключением werkzeug.exceptions.HTTPException.
Когда Flask перехватывает исключение при обработке запроса, сначала выполняется поиск по коду. Если в коде не зарегистрирован обработчик, то Flask ищет ошибку в иерархии классов и выбирает наиболее конкретный обработчик. В том случае, если обработчик не зарегистрирован, то подклассы HTTPException показывают наиболее подходящую стандартную страницу с ошибкой, в то время как другие исключения преобразуются в общую страницу 500 Internal Server Error.
Например, если возникает экземпляр ConnectionRefusedError и зарегистрированы обработчики ConnectionError и ConnectionRefusedError, то для генерации ответа будет вызываться более конкретный обработчик ConnectionRefusedError.
Содержание.
- Регистрация обработчика ошибок в веб-приложении на Flask;
- Универсальные обработчики исключений во Flask;
- Как Flask обрабатывает необработанные исключения?
- Создание собственной страницы с HTTP-ошибкой 404;
- Пример пользовательской страницы ошибки с кодом 500;
- Особенности обработки ошибок в схемах
blueprintFlask; - Возврат ошибок API в формате JSON.
Регистрация обработчика ошибок в веб-приложении на Flask.
Зарегистрировать функцию-обработчик для модуля Flask, можно указав перед ней декоратор @app.errorhandler(), или зарегистрировать обработчик, использовав функцию app.register_error_handler(). Не забудьте установить код ошибки при возврате ответа.
# регистрируем обработчик `handle_bad_request()` декоратором
@app.errorhandler(werkzeug.exceptions.BadRequest)
def handle_bad_request(e):
    return 'bad request!', 400

# регистрируем тот же обработчик без декоратора
app.register_error_handler(400, handle_bad_request)
Подклассы HTTPException, такие как BadRequest и их HTTP-коды, взаимозаменяемы при регистрации обработчиков. (BadRequest.code == 400)
Нестандартные HTTP-коды (такие как HTTP 507 Insufficient Storage) нельзя зарегистрировать, так как они не известны модулю Werkzeug. Для регистрации неизвестных HTTP-кодов определите подкласс werkzeug.exceptions.HTTPException с соответствующим кодом, зарегистрируйте и где надо вернуть HTTP-код 507 Insufficient Storage принудительно вызовите этот класс исключения при помощи инструкции raise.
# создаем подкласс исключения HTTP 507
class InsufficientStorage(werkzeug.exceptions.HTTPException):
    code = 507
    description = 'Not enough storage space.'

# регистрируем HTTP 507
app.register_error_handler(InsufficientStorage, handle_507)

# принудительно вызываем исключение `InsufficientStorage`
raise InsufficientStorage()
Обработчики могут быть зарегистрированы для любого класса исключений, а не только для подклассов HTTPException или кодов состояния HTTP. Обработчики могут быть зарегистрированы для определенного класса или для всех подклассов родительского класса.
Обработчики, зарегистрированные в blueprint, имеют приоритет над обработчиками, зарегистрированными глобально в веб-приложении, при условии, что blueprint (схема) обрабатывает запрос, вызывающий исключение. Однако blueprint не может обрабатывать ошибки маршрутизации 404, так как ошибка 404 возникает на уровне маршрутизации до того, как можно определить схему blueprint.
Универсальные обработчики исключений.
Можно зарегистрировать обработчики ошибок для очень общих базовых классов, таких как HTTPException или даже Exception, но имейте в виду, что они будут ловить все ошибки подряд (больше, чем можно ожидать) и в итоге получится одна страница ошибки на разные ситуации.
Например, обработчик ошибок для HTTPException может быть полезен для преобразования страниц ошибок HTML по умолчанию в JSON. Но тогда этот обработчик будет запускать, например ошибки 404 и 405 во время маршрутизации. В общем будьте внимательны при создании универсальных обработчиков.
from flask import json
from werkzeug.exceptions import HTTPException

@app.errorhandler(HTTPException)
def handle_exception(e):
    """Возвращает JSON вместо HTML для ошибок HTTP"""
    # сначала перехватываем ответ Flask для извлечения
    # правильных заголовков и кода состояния из ошибки
    response = e.get_response()
    # заменяем тело ответа сервера на JSON
    response.data = json.dumps({
        "code": e.code,
        "name": e.name,
        "description": e.description,
    })
    response.content_type = "application/json"
    # возвращаем ответ сервера
    return response
Обработчик ошибок для Exception может !показаться! полезным для изменения способа представления пользователю всех ошибок, даже не перехваченных в коде. Другими словами: страница ошибки с одним и тем же HTTP-кодом для разных ситуаций (о чем говорилось выше). Исключение Exception в Python фиксирует все необработанные ошибки, при этом будут включены все коды состояния HTTP.
Правильнее будет безопаснее зарегистрировать обработчики для более конкретных исключений, т.к. экземпляры HTTPException являются действительными ответами WSGI.
from werkzeug.exceptions import HTTPException

@app.errorhandler(Exception)
def handle_exception(e):
    # исключаем ошибки HTTP
    if isinstance(e, HTTPException):
        # если это ошибка HTTP, то просто
        # возвращаем ее без изменений
        return e

    # в остальных случаях (ошибка кода веб-приложения)
    # генерируем страницу с ошибкой HTTP 500
    return render_template("500_generic.html", e=e), 500
Обработчики ошибок по-прежнему соблюдают иерархию классов исключений. Если зарегистрировать обработчики как для HTTPException, так и для Exception, то обработчик Exception не будет обрабатывать подклассы HTTPException, т.к. он является более конкретным обработчиком HTTPException.
Как Flask обрабатывает необработанные исключения?
Если код сайта на Flask во время работы ломается, то есть возникло исключение, для которого не зарегистрирован обработчик ошибок, то будет возвращена ошибка 500 Internal Server
Если для исключения InternalServerError зарегистрирован обработчик ошибок, то будет вызван этот обработчик. Начиная с Flask 1.1.0, этому обработчику ошибок всегда будет передаваться экземпляр InternalServerError, а не исходная не перехваченная ошибка. Исходная ошибка доступна как e.original_exception.
Обработчику ошибок 500 Internal Server Error будут передаваться неперехваченные исключения в дополнение к явным ошибкам 500. В режиме отладки обработчик 500 Internal Server Error не используется, а показывается интерактивный отладчик.
Создание собственной страницы с HTTP-ошибкой 404.
Почти всегда при создании сайта на Flask необходимо потребоваться вызвать исключение HTTPException, чтобы сообщить пользователю, что с запросом что-то не так. Фреймворк Flask поставляется с удобной функцией flask.abort(), которая прерывает запрос со стандартной страницей HTTP-ошибки (только основное описание), зарегистрированной в модуле werkzeug.
В зависимости от кода ошибки, вероятность того, что пользователь действительно увидит конкретную ошибку, меньше или больше.
Рассмотрим приведенный ниже код. Например, может быть маршрут профиля пользователя, и если пользователь не может передать имя пользователя, то можно выдать 400 Bad Request. Если пользователь передает имя пользователя, а сайт не можем его найти, то выдаем сообщение 404 Not Found.
from flask import abort, render_template, request

# имя пользователя должно быть указано в параметрах запроса
# успешный запрос будет похож на /profile?username=jack
@app.route("/profile")
def user_profile():
    username = request.arg.get("username")
    # если имя пользователя не указано в запросе,
    # то вернем `400 Bad Request`
    if username is None:
        abort(400)

    user = get_user(username=username)
    # Если пользователь не наёден, то `404 not found`
    if user is None:
        abort(404)

    return render_template("profile.html", user=user)
Для того, что бы возвращалась страница 404 not found с собственным дизайном, необходимо создать функцию обработчик:
from flask import render_template

@app.errorhandler(404)
def page_not_found(e):
    # в функцию `render_template()` передаем HTML-станицу с собственным
    # дизайном, а так же явно устанавливаем статус 404
    return render_template('404.html'), 404
from flask import Flask, render_template

# обработчик
def page_not_found(e):
  return render_template('404.html'), 404

def create_app(config_filename):
    app = Flask(__name__)
    # регистрация обработчика
    app.register_error_handler(404, page_not_found)
    return app
Пример шаблона страницы с ошибкой 404.html может быть таким:
{% extends "layout.html" %}
{% block title %}Page Not Found{% endblock %}
{% block body %}
  <h1>Page Not Found</h1>
  <h3>То, что вы искали, просто не существует.</h3>
  <p>Для продолжения перейдите <a href="{{ url_for('index') }}">на главную страницу сайта</a></p>
{% endblock %}
Пример пользовательской страницы ошибки с кодом 500.
Приведенные выше примеры не на много улучшат страницы HTTP-ошибок по умолчанию. Так же можно создать собственный шаблон 500.html следующим образом:
{% extends "layout.html" %}
{% block title %}Internal Server Error{% endblock %}
{% block body %}
  <h1>Internal Server Error</h1>
  <h3>Мы уже знаем об этой ошибке и делаем все возможное для ее устранения!</h3>
  <p>Приносим извинения за причлененные неудобства, скоро все заработает.</p>
{% endblock %}
Создаем функцию обработчик HTTP-ошибок 500 Internal Server Error:
from flask import render_template

@app.errorhandler(500)
def internal_server_error(e):
    # Обратите внимание, что необходимо
    # явно установить статус 500
    return render_template('500.html'), 500
При использовании фабрик приложений:
from flask import Flask, render_template

# обработчик
def internal_server_error(e):
  return render_template('500.html'), 500

def create_app():
    app = Flask(__name__)
    # регистрация обработчика
    app.register_error_handler(500, internal_server_error)
    return app
from flask import Blueprint

blog = Blueprint('blog', __name__)

# регистрация обработчика при помощи декоратора
@blog.errorhandler(500)
def internal_server_error(e):
    return render_template('500.html'), 500

# или с использованием метода `register_error_handler()`
blog.register_error_handler(500, internal_server_error)
Особенности обработки ошибок в схемах blueprint Flask.
В модульных приложениях с blueprint большинство обработчиков ошибок будут работать должным образом, но есть предостережение относительно обработчиков исключений 404 и 405. Эти обработчики вызываются только из соответствующего оператора raise или вызывают flask.abort() в другой функции-представлении схемы blueprint. Они не вызываются, например, из-за недействительного доступа к URL-адресу.
Это связано с тем, что blueprint не принадлежит определенное пространство URL-адресов, поэтому экземпляр приложения не имеет возможности узнать, какой обработчик ошибок схемы (blueprint) необходимо запустить, если указан недопустимый URL-адрес. Если необходимо использовать различные стратегии обработки этих ошибок на основе префиксов URL-адресов, то они могут быть определены на уровне приложения с помощью объекта прокси-сервера запроса flask.request.
from flask import jsonify, render_template

# на уровне всего веб-приложения
# это не уровень определенной схемы blueprint
@app.errorhandler(404)
def page_not_found(e):
    # Если запрос находится в пространстве URL блога
    if request.path.startswith('/blog/'):
        # то возвращаем кастомную 404 ошибку для блога
        return render_template("blog/404.html"), 404
    else:
        # в противном случае возвращаем
        # общую 404 ошибку  для всего сайта
        return render_template("404.html"), 404

@app.errorhandler(405)
def method_not_allowed(e):
    # Если в запросе указан неверный метод к API
    if request.path.startswith('/api/'):
        # возвращаем json с 405 HTTP-ошибкой
        return jsonify(message="Method Not Allowed"), 405
    else:
        # в противном случае возвращаем
        # общую 405 ошибку для всего сайта
        return render_template("405.html"), 405
Возврат ошибок API в формате JSON
При создании API-интерфейсов во Flask некоторые разработчики понимают, что встроенные исключения недостаточно выразительны для API-интерфейсов и что тип содержимого text/html, который они генерируют, не очень полезен для потребителей API.
Используя те же методы, что и выше плюс flask.jsonify(), можно возвращать ответы JSON на ошибки API. Функция flask.abort() вызывается с аргументом description. Обработчик ошибок будет использовать это как сообщение об ошибке JSON и установит код состояния на 404.
from flask import abort, jsonify

@app.errorhandler(404)
def resource_not_found(e):
    return jsonify(error=str(e)), 404

@app.route("/cheese")
def get_one_cheese():
    resource = get_resource()

    if resource is None:
        abort(404, description="Resource not found")

    return jsonify(resource)
Можно создавать собственные классы исключений. Например, можно ввести новое настраиваемое исключение для API, которое будет принимать правильное удобочитаемое сообщение, код состояния для ошибки и некоторую дополнительную полезную информацию, чтобы дать больше конкретики для ошибки.
from flask import jsonify, request

class InvalidAPIUsage(Exception):
    status_code = 400

    def __init__(self, message, status_code=None, payload=None):
        super().__init__()
        self.message = message
        if status_code is not None:
            self.status_code = status_code
        self.payload = payload

    def to_dict(self):
        rv = dict(self.payload or ())
        rv['message'] = self.message
        return rv

@app.errorhandler(InvalidAPIUsage)
def invalid_api_usage(e):
    return jsonify(e.to_dict())

# маршрут API для получения информации о пользователе
# правильный запрос может быть /api/user?user_id=420
@app.route("/api/user")
def user_api(user_id):
    user_id = request.arg.get("user_id")
    if not user_id:
        raise InvalidAPIUsage("No user id provided!")

    user = get_user(user_id=user_id)
    if not user:
        raise InvalidAPIUsage("No such user!", status_code=404)

    return jsonify(user.to_dict())
Теперь функция-представление может вызвать это исключение с сообщением об ошибке. Кроме того, дополнительная полезная информация может быть предоставлена в виде словаря через параметр payload.
This is the seventh installment of the Flask Mega-Tutorial series, in which I’m going to tell you how to do error handling in a Flask application.
For your reference, below is a list of the articles in this series.
- Chapter 1: Hello, World!
- Chapter 2: Templates
- Chapter 3: Web Forms
- Chapter 4: Database
- Chapter 5: User Logins
- Chapter 6: Profile Page and Avatars
- Chapter 7: Error Handling (this article)
- Chapter 8: Followers
- Chapter 9: Pagination
- Chapter 10: Email Support
- Chapter 11: Facelift
- Chapter 12: Dates and Times
- Chapter 13: I18n and L10n
- Chapter 14: Ajax
- Chapter 15: A Better Application Structure
- Chapter 16: Full-Text Search
- Chapter 17: Deployment on Linux
- Chapter 18: Deployment on Heroku
- Chapter 19: Deployment on Docker Containers
- Chapter 20: Some JavaScript Magic
- Chapter 21: User Notifications
- Chapter 22: Background Jobs
- Chapter 23: Application Programming Interfaces (APIs)
In this chapter I’m taking a break from coding new features into my microblog application, and instead will discuss a few strategies to deal with bugs, which invariably make an appearance in every software project. To help illustrate this topic, I intentionally let a bug slip in the code that I’ve added in Chapter 6. Before you continue reading, see if you can find it!
The GitHub links for this chapter are: Browse, Zip, Diff.
Error Handling in Flask
What happens when an error occurs in a Flask application? The best way to find out is to experience it first hand. Go ahead and start the application, and make sure you have at least two users registered. Log in as one of the users, open the profile page and click the «Edit» link. In the profile editor, try to change the username to the username of another user that is already registered, and boom! This is going to bring a scary looking «Internal Server Error» page:
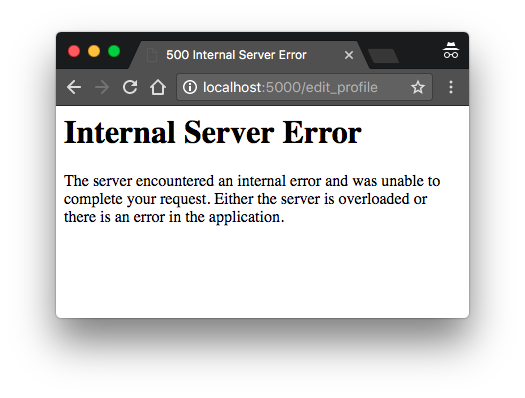
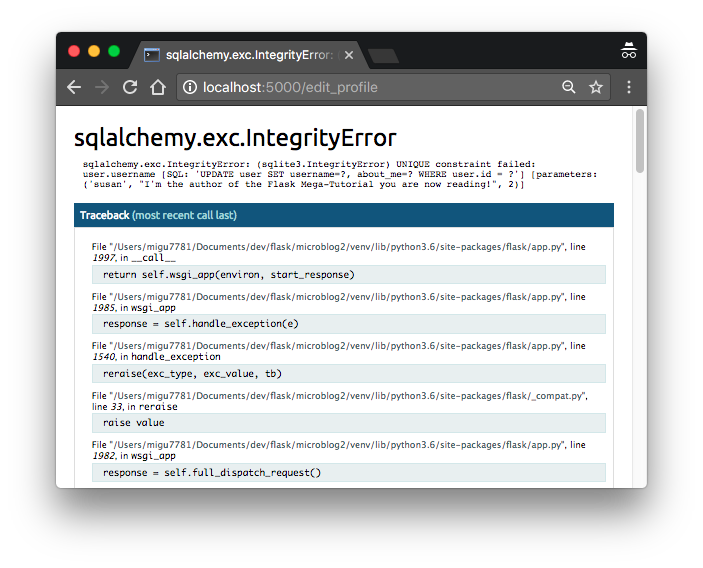
If you look in the terminal session where the application is running, you will see a stack trace of the error. Stack traces are extremely useful in debugging errors, because they show the sequence of calls in that stack, all the way to the line that produced the error:
(venv) $ flask run
 * Serving Flask app "microblog"
 * Running on http://127.0.0.1:5000/ (Press CTRL+C to quit)
[2021-06-14 22:40:02,027] ERROR in app: Exception on /edit_profile [POST]
Traceback (most recent call last):
  File "venv/lib/python3.6/site-packages/sqlalchemy/engine/base.py", in _execute_context
    context)
  File "venv/lib/python3.6/site-packages/sqlalchemy/engine/default.py", in do_execute
    cursor.execute(statement, parameters)
sqlite3.IntegrityError: UNIQUE constraint failed: user.username
The stack trace indicates what is the bug. The application allows a user to change the username, and does not validate that the new username chosen does not collide with another user already in the system. The error comes from SQLAlchemy, which tries to write the new username to the database, but the database rejects it because the username column is defined with unique=True.
It is important to note that the error page that is presented to the user does not provide much information about the error, and that is good. I definitely do not want users to learn that the crash was caused by a database error, or what database I’m using, or what are some of the table and field names in my database. All that information should be kept internal.
There are a few things that are far from ideal. I have an error page that is very ugly and does not match the application layout. I also have important application stack traces being dumped on a terminal that I need to constantly watch to make sure I don’t miss any errors. And of course I have a bug to fix. I’m going to address all these issues, but first, let’s talk about Flask’s debug mode.
Debug Mode
The way you saw that errors are handled above is great for a system that is running on a production server. If there is an error, the user gets a vague error page (though I’m going to make this error page nicer), and the important details of the error are in the server process output or in a log file.
But when you are developing your application, you can enable debug mode, a mode in which Flask outputs a really nice debugger directly on your browser. To activate debug mode, stop the application, and then set the following environment variable:
(venv) $ export FLASK_ENV=development
If you are on Microsoft Windows, remember to use set instead of export.
After you set FLASK_ENV, restart the server. The output on your terminal is going to be slightly different than what you are used to see:
(venv) microblog2 $ flask run
 * Serving Flask app 'microblog.py' (lazy loading)
 * Environment: development
 * Debug mode: on
 * Running on http://127.0.0.1:5000/ (Press CTRL+C to quit)
 * Restarting with stat
 * Debugger is active!
 * Debugger PIN: 118-204-854
Now make the application crash one more time to see the interactive debugger in your browser:
The debugger allows you expand each stack frame and see the corresponding source code. You can also open a Python prompt on any of the frames and execute any valid Python expressions, for example to check the values of variables.
It is extremely important that you never run a Flask application in debug mode on a production server. The debugger allows the user to remotely execute code in the server, so it can be an unexpected gift to a malicious user who wants to infiltrate your application or your server. As an additional security measure, the debugger running in the browser starts locked, and on first use will ask for a PIN number, which you can see in the output of the flask run command.
Since I am in the topic of debug mode, I should mention the second important feature that is enabled with debug mode, which is the reloader. This is a very useful development feature that automatically restarts the application when a source file is modified. If you run flask run while in debug mode, you can then work on your application and any time you save a file, the application will restart to pick up the new code.
Custom Error Pages
Flask provides a mechanism for an application to install its own error pages, so that your users don’t have to see the plain and boring default ones. As an example, let’s define custom error pages for the HTTP errors 404 and 500, the two most common ones. Defining pages for other errors works in the same way.
To declare a custom error handler, the @errorhandler decorator is used. I’m going to put my error handlers in a new app/errors.py module.
app/errors.py: Custom error handlers
from flask import render_template
from app import app, db

@app.errorhandler(404)
def not_found_error(error):
    return render_template('404.html'), 404

@app.errorhandler(500)
def internal_error(error):
    db.session.rollback()
    return render_template('500.html'), 500
The error functions work very similarly to view functions. For these two errors, I’m returning the contents of their respective templates. Note that both functions return a second value after the template, which is the error code number. For all the view functions that I created so far, I did not need to add a second return value because the default of 200 (the status code for a successful response) is what I wanted. In this case these are error pages, so I want the status code of the response to reflect that.
The error handler for the 500 errors could be invoked after a database error, which was actually the case with the username duplicate above. To make sure any failed database sessions do not interfere with any database accesses triggered by the template, I issue a session rollback. This resets the session to a clean state.
Here is the template for the 404 error:
app/templates/404.html: Not found error template
{% extends "base.html" %}

{% block content %}
    <h1>File Not Found</h1>
    <p><a href="{{ url_for('index') }}">Back</a></p>
{% endblock %}
And here is the one for the 500 error:
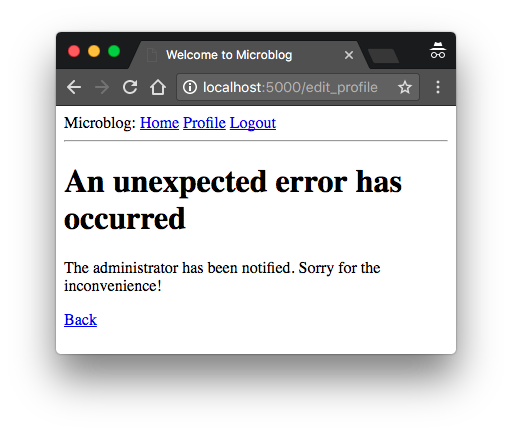
app/templates/500.html: Internal server error template
{% extends "base.html" %}

{% block content %}
    <h1>An unexpected error has occurred</h1>
    <p>The administrator has been notified. Sorry for the inconvenience!</p>
    <p><a href="{{ url_for('index') }}">Back</a></p>
{% endblock %}
Both templates inherit from the base.html template, so that the error page has the same look and feel as the normal pages of the application.
To get these error handlers registered with Flask, I need to import the new app/errors.py module after the application instance is created:
app/__init__.py: Import error handlers
# ...

from app import routes, models, errors
If you set FLASK_ENV=production in your terminal session and then trigger the duplicate username bug one more time, you are going to see a slightly more friendly error page.
Sending Errors by Email
The other problem with the default error handling provided by Flask is that there are no notifications, stack trace for errors are printed to the terminal, which means that the output of the server process needs to be monitored to discover errors. When you are running the application during development, this is perfectly fine, but once the application is deployed on a production server, nobody is going to be looking at the output, so a more robust solution needs to be put in place.
I think it is very important that I take a proactive approach regarding errors. If an error occurs on the production version of the application, I want to know right away. So my first solution is going to be to configure Flask to send me an email immediately after an error, with the stack trace of the error in the email body.
The first step is to add the email server details to the configuration file:
config.py: Email configuration
class Config(object):
    # ...
    MAIL_SERVER = os.environ.get('MAIL_SERVER')
    MAIL_PORT = int(os.environ.get('MAIL_PORT') or 25)
    MAIL_USE_TLS = os.environ.get('MAIL_USE_TLS') is not None
    MAIL_USERNAME = os.environ.get('MAIL_USERNAME')
    MAIL_PASSWORD = os.environ.get('MAIL_PASSWORD')
    ADMINS = ['your-email@example.com']
The configuration variables for email include the server and port, a boolean flag to enable encrypted connections, and optional username and password. The five configuration variables are sourced from their environment variable counterparts. If the email server is not set in the environment, then I will use that as a sign that emailing errors needs to be disabled. The email server port can also be given in an environment variable, but if not set, the standard port 25 is used. Email server credentials are by default not used, but can be provided if needed. The ADMINS configuration variable is a list of the email addresses that will receive error reports, so your own email address should be in that list.
Flask uses Python’s logging package to write its logs, and this package already has the ability to send logs by email. All I need to do to get emails sent out on errors is to add a SMTPHandler instance to the Flask logger object, which is app.logger:
app/__init__.py: Log errors by email
import logging
from logging.handlers import SMTPHandler

# ...

if not app.debug:
    if app.config['MAIL_SERVER']:
        auth = None
        if app.config['MAIL_USERNAME'] or app.config['MAIL_PASSWORD']:
            auth = (app.config['MAIL_USERNAME'], app.config['MAIL_PASSWORD'])
        secure = None
        if app.config['MAIL_USE_TLS']:
            secure = ()
        mail_handler = SMTPHandler(
            mailhost=(app.config['MAIL_SERVER'], app.config['MAIL_PORT']),
            fromaddr='no-reply@' + app.config['MAIL_SERVER'],
            toaddrs=app.config['ADMINS'], subject='Microblog Failure',
            credentials=auth, secure=secure)
        mail_handler.setLevel(logging.ERROR)
        app.logger.addHandler(mail_handler)
As you can see, I’m only going to enable the email logger when the application is running without debug mode, which is indicated by app.debug being True, and also when the email server exists in the configuration.
Setting up the email logger is somewhat tedious due to having to handle optional security options that are present in many email servers. But in essence, the code above creates a SMTPHandler instance, sets its level so that it only reports errors and not warnings, informational or debugging messages, and finally attaches it to the app.logger object from Flask.
There are two approaches to test this feature. The easiest one is to use the SMTP debugging server from Python. This is a fake email server that accepts emails, but instead of sending them, it prints them to the console. To run this server, open a second terminal session and run the following command on it:
(venv) $ python -m smtpd -n -c DebuggingServer localhost:8025
Leave the debugging SMTP server running and go back to your first terminal and set export MAIL_SERVER=localhost and MAIL_PORT=8025 in the environment (use set instead of export if you are using Microsoft Windows). Make sure the FLASK_ENV variable is set to production or not set at all, since the application will not send emails in debug mode. Run the application and trigger the SQLAlchemy error one more time to see how the terminal session running the fake email server shows an email with the full stack trace of the error.
A second testing approach for this feature is to configure a real email server. Below is the configuration to use your Gmail account’s email server:
export MAIL_SERVER=smtp.googlemail.com
export MAIL_PORT=587
export MAIL_USE_TLS=1
export MAIL_USERNAME=<your-gmail-username>
export MAIL_PASSWORD=<your-gmail-password>
If you are using Microsoft Windows, remember to use set instead of export in each of the statements above.
The security features in your Gmail account may prevent the application from sending emails through it unless you explicitly allow «less secure apps» access to your Gmail account. You can read about this here, and if you are concerned about the security of your account, you can create a secondary account that you configure just for testing emails, or you can enable less secure apps only temporarily to run this test and then revert back to the default.
Yet another alternative is to use a dedicated email service such as SendGrid, which allows you to send up to 100 emails per day on a free account. The SendGrid blog has a detailed tutorial on using the service in a Flask application.
Logging to a File
Receiving errors via email is nice, but sometimes this isn’t enough. There are some failure conditions that do not end in a Python exception and are not a major problem, but they may still be interesting enough to save for debugging purposes. For this reason, I’m also going to maintain a log file for the application.
To enable a file based log another handler, this time of type RotatingFileHandler, needs to be attached to the application logger, in a similar way to the email handler.
app/__init__.py: Logging to a file
# ...
from logging.handlers import RotatingFileHandler
import os

# ...

if not app.debug:
    # ...

    if not os.path.exists('logs'):
        os.mkdir('logs')
    file_handler = RotatingFileHandler('logs/microblog.log', maxBytes=10240,
                                       backupCount=10)
    file_handler.setFormatter(logging.Formatter(
        '%(asctime)s %(levelname)s: %(message)s [in %(pathname)s:%(lineno)d]'))
    file_handler.setLevel(logging.INFO)
    app.logger.addHandler(file_handler)

    app.logger.setLevel(logging.INFO)
    app.logger.info('Microblog startup')
I’m writing the log file with name microblog.log in a logs directory, which I create if it doesn’t already exist.
The RotatingFileHandler class is nice because it rotates the logs, ensuring that the log files do not grow too large when the application runs for a long time. In this case I’m limiting the size of the log file to 10KB, and I’m keeping the last ten log files as backup.
The logging.Formatter class provides custom formatting for the log messages. Since these messages are going to a file, I want them to have as much information as possible. So I’m using a format that includes the timestamp, the logging level, the message and the source file and line number from where the log entry originated.
To make the logging more useful, I’m also lowering the logging level to the INFO category, both in the application logger and the file logger handler. In case you are not familiar with the logging categories, they are DEBUG, INFO, WARNING, ERROR and CRITICAL in increasing order of severity.
As a first interesting use of the log file, the server writes a line to the logs each time it starts. When this application runs on a production server, these log entries will tell you when the server was restarted.
Fixing the Duplicate Username Bug
I have exploited the username duplication bug for too long. Now that I have showed you how to prepare the application to handle this type of errors, I can go ahead and fix it.
If you recall, the RegistrationForm already implements validation for usernames, but the requirements of the edit form are slightly different. During registration, I need to make sure the username entered in the form does not exist in the database. On the edit profile form I have to do the same check, but with one exception. If the user leaves the original username untouched, then the validation should allow it, since that username is already assigned to that user. Below you can see how I implemented the username validation for this form:
app/forms.py: Validate username in edit profile form.
class EditProfileForm(FlaskForm):
    username = StringField('Username', validators=[DataRequired()])
    about_me = TextAreaField('About me', validators=[Length(min=0, max=140)])
    submit = SubmitField('Submit')

    def __init__(self, original_username, *args, **kwargs):
        super(EditProfileForm, self).__init__(*args, **kwargs)
        self.original_username = original_username

    def validate_username(self, username):
        if username.data != self.original_username:
            user = User.query.filter_by(username=self.username.data).first()
            if user is not None:
                raise ValidationError('Please use a different username.')
The implementation is in a custom validation method, but there is an overloaded constructor that accepts the original username as an argument. This username is saved as an instance variable, and checked in the validate_username() method. If the username entered in the form is the same as the original username, then there is no reason to check the database for duplicates.
To use this new validation method, I need to add the original username argument in the view function, where the form object is created:
app/routes.py: Validate username in edit profile form.
@app.route('/edit_profile', methods=['GET', 'POST'])
@login_required
def edit_profile():
    form = EditProfileForm(current_user.username)
    # ...
Now the bug is fixed and duplicates in the edit profile form will be prevented in most cases. This is not a perfect solution, because it may not work when two or more processes are accessing the database at the same time. In that situation, a race condition could cause the validation to pass, but a moment later when the rename is attempted the database was already changed by another process and cannot rename the user. This is somewhat unlikely except for very busy applications that have a lot of server processes, so I’m not going to worry about it for now.
At this point you can try to reproduce the error one more time to see how the new form validation method prevents it.