Handling Application Errors
Applications fail, servers fail. Sooner or later you will see an exception
in production. Even if your code is 100% correct, you will still see
exceptions from time to time. Why? Because everything else involved will
fail. Here are some situations where perfectly fine code can lead to server
errors:
- the client terminated the request early and the application was still
reading from the incoming data - the database server was overloaded and could not handle the query
- a filesystem is full
- a harddrive crashed
- a backend server overloaded
- a programming error in a library you are using
- network connection of the server to another system failed
And that’s just a small sample of issues you could be facing. So how do we
deal with that sort of problem? By default if your application runs in
production mode, and an exception is raised Flask will display a very simple
page for you and log the exception to the :attr:`~flask.Flask.logger`.
But there is more you can do, and we will cover some better setups to deal
with errors including custom exceptions and 3rd party tools.
Error Logging Tools
Sending error mails, even if just for critical ones, can become
overwhelming if enough users are hitting the error and log files are
typically never looked at. This is why we recommend using Sentry for dealing with application errors. It’s
available as a source-available project on GitHub and is also available as a hosted version which you can try for free. Sentry
aggregates duplicate errors, captures the full stack trace and local
variables for debugging, and sends you mails based on new errors or
frequency thresholds.
To use Sentry you need to install the sentry-sdk client with extra
flask dependencies.
$ pip install sentry-sdk[flask]
And then add this to your Flask app:
import sentry_sdk
from sentry_sdk.integrations.flask import FlaskIntegration

sentry_sdk.init('YOUR_DSN_HERE', integrations=[FlaskIntegration()])
The YOUR_DSN_HERE value needs to be replaced with the DSN value you
get from your Sentry installation.
After installation, failures leading to an Internal Server Error
are automatically reported to Sentry and from there you can
receive error notifications.
See also:
- Sentry also supports catching errors from a worker queue
(RQ, Celery, etc.) in a similar fashion. See the Python SDK docs for more information. - Getting started with Sentry
- Flask-specific documentation
Error Handlers
When an error occurs in Flask, an appropriate HTTP status code will be
returned. 400-499 indicate errors with the client’s request data, or
about the data requested. 500-599 indicate errors with the server or
application itself.
You might want to show custom error pages to the user when an error occurs.
This can be done by registering error handlers.
An error handler is a function that returns a response when a type of error is
raised, similar to how a view is a function that returns a response when a
request URL is matched. It is passed the instance of the error being handled,
which is most likely a :exc:`~werkzeug.exceptions.HTTPException`.
The status code of the response will not be set to the handler’s code. Make
sure to provide the appropriate HTTP status code when returning a response from
a handler.
Registering
Register handlers by decorating a function with
:meth:`~flask.Flask.errorhandler`. Or use
:meth:`~flask.Flask.register_error_handler` to register the function later.
Remember to set the error code when returning the response.
@app.errorhandler(werkzeug.exceptions.BadRequest)
def handle_bad_request(e):
    return 'bad request!', 400

# or, without the decorator
app.register_error_handler(400, handle_bad_request)
:exc:`werkzeug.exceptions.HTTPException` subclasses like
:exc:`~werkzeug.exceptions.BadRequest` and their HTTP codes are interchangeable
when registering handlers. (BadRequest.code == 400)
Non-standard HTTP codes cannot be registered by code because they are not known
by Werkzeug. Instead, define a subclass of
:class:`~werkzeug.exceptions.HTTPException` with the appropriate code and
register and raise that exception class.
class InsufficientStorage(werkzeug.exceptions.HTTPException):
    code = 507
    description = 'Not enough storage space.'

app.register_error_handler(InsufficientStorage, handle_507)

raise InsufficientStorage()
Handlers can be registered for any exception class, not just
:exc:`~werkzeug.exceptions.HTTPException` subclasses or HTTP status
codes. Handlers can be registered for a specific class, or for all subclasses
of a parent class.
Handling
When building a Flask application you will run into exceptions. If some part
of your code breaks while handling a request (and you have no error handlers
registered), a «500 Internal Server Error»
(:exc:`~werkzeug.exceptions.InternalServerError`) will be returned by default.
Similarly, «404 Not Found»
(:exc:`~werkzeug.exceptions.NotFound`) error will occur if a request is sent to an unregistered route.
If a route receives an unallowed request method, a «405 Method Not Allowed»
(:exc:`~werkzeug.exceptions.MethodNotAllowed`) will be raised. These are all
subclasses of :class:`~werkzeug.exceptions.HTTPException` and are provided by
default in Flask.
Flask gives you the ability to raise any HTTP exception registered by
Werkzeug. However, the default HTTP exceptions return simple exception
pages. You might want to show custom error pages to the user when an error occurs.
This can be done by registering error handlers.
When Flask catches an exception while handling a request, it is first looked up by code.
If no handler is registered for the code, Flask looks up the error by its class hierarchy; the most specific handler is chosen.
If no handler is registered, :class:`~werkzeug.exceptions.HTTPException` subclasses show a
generic message about their code, while other exceptions are converted to a
generic «500 Internal Server Error».
For example, if an instance of :exc:`ConnectionRefusedError` is raised,
and a handler is registered for :exc:`ConnectionError` and
:exc:`ConnectionRefusedError`, the more specific :exc:`ConnectionRefusedError`
handler is called with the exception instance to generate the response.
Handlers registered on the blueprint take precedence over those registered
globally on the application, assuming a blueprint is handling the request that
raises the exception. However, the blueprint cannot handle 404 routing errors
because the 404 occurs at the routing level before the blueprint can be
determined.
Generic Exception Handlers
It is possible to register error handlers for very generic base classes
such as HTTPException or even Exception. However, be aware that
these will catch more than you might expect.
For example, an error handler for HTTPException might be useful for turning
the default HTML errors pages into JSON. However, this
handler will trigger for things you don’t cause directly, such as 404
and 405 errors during routing. Be sure to craft your handler carefully
so you don’t lose information about the HTTP error.
from flask import json
from werkzeug.exceptions import HTTPException

@app.errorhandler(HTTPException)
def handle_exception(e):
    """Return JSON instead of HTML for HTTP errors."""
    # start with the correct headers and status code from the error
    response = e.get_response()
    # replace the body with JSON
    response.data = json.dumps({
        "code": e.code,
        "name": e.name,
        "description": e.description,
    })
    response.content_type = "application/json"
    return response
An error handler for Exception might seem useful for changing how
all errors, even unhandled ones, are presented to the user. However,
this is similar to doing except Exception: in Python, it will
capture all otherwise unhandled errors, including all HTTP status
codes.
In most cases it will be safer to register handlers for more
specific exceptions. Since HTTPException instances are valid WSGI
responses, you could also pass them through directly.
from werkzeug.exceptions import HTTPException

@app.errorhandler(Exception)
def handle_exception(e):
    # pass through HTTP errors
    if isinstance(e, HTTPException):
        return e

    # now you're handling non-HTTP exceptions only
    return render_template("500_generic.html", e=e), 500
Error handlers still respect the exception class hierarchy. If you
register handlers for both HTTPException and Exception, the
Exception handler will not handle HTTPException subclasses
because it the HTTPException handler is more specific.
Unhandled Exceptions
When there is no error handler registered for an exception, a 500
Internal Server Error will be returned instead. See
:meth:`flask.Flask.handle_exception` for information about this
behavior.
If there is an error handler registered for InternalServerError,
this will be invoked. As of Flask 1.1.0, this error handler will always
be passed an instance of InternalServerError, not the original
unhandled error.
The original error is available as e.original_exception.
An error handler for «500 Internal Server Error» will be passed uncaught
exceptions in addition to explicit 500 errors. In debug mode, a handler
for «500 Internal Server Error» will not be used. Instead, the
interactive debugger will be shown.
Custom Error Pages
Sometimes when building a Flask application, you might want to raise a
:exc:`~werkzeug.exceptions.HTTPException` to signal to the user that
something is wrong with the request. Fortunately, Flask comes with a handy
:func:`~flask.abort` function that aborts a request with a HTTP error from
werkzeug as desired. It will also provide a plain black and white error page
for you with a basic description, but nothing fancy.
Depending on the error code it is less or more likely for the user to
actually see such an error.
Consider the code below, we might have a user profile route, and if the user
fails to pass a username we can raise a «400 Bad Request». If the user passes a
username and we can’t find it, we raise a «404 Not Found».
from flask import abort, render_template, request

# a username needs to be supplied in the query args
# a successful request would be like /profile?username=jack
@app.route("/profile")
def user_profile():
    username = request.arg.get("username")
    # if a username isn't supplied in the request, return a 400 bad request
    if username is None:
        abort(400)

    user = get_user(username=username)
    # if a user can't be found by their username, return 404 not found
    if user is None:
        abort(404)

    return render_template("profile.html", user=user)
Here is another example implementation for a «404 Page Not Found» exception:
from flask import render_template

@app.errorhandler(404)
def page_not_found(e):
    # note that we set the 404 status explicitly
    return render_template('404.html'), 404
When using :doc:`/patterns/appfactories`:
from flask import Flask, render_template

def page_not_found(e):
  return render_template('404.html'), 404

def create_app(config_filename):
    app = Flask(__name__)
    app.register_error_handler(404, page_not_found)
    return app
An example template might be this:
{% extends "layout.html" %}
{% block title %}Page Not Found{% endblock %}
{% block body %}
  <h1>Page Not Found</h1>
  <p>What you were looking for is just not there.
  <p><a href="{{ url_for('index') }}">go somewhere nice</a>
{% endblock %}
Further Examples
The above examples wouldn’t actually be an improvement on the default
exception pages. We can create a custom 500.html template like this:
{% extends "layout.html" %}
{% block title %}Internal Server Error{% endblock %}
{% block body %}
  <h1>Internal Server Error</h1>
  <p>Oops... we seem to have made a mistake, sorry!</p>
  <p><a href="{{ url_for('index') }}">Go somewhere nice instead</a>
{% endblock %}
It can be implemented by rendering the template on «500 Internal Server Error»:
from flask import render_template

@app.errorhandler(500)
def internal_server_error(e):
    # note that we set the 500 status explicitly
    return render_template('500.html'), 500
When using :doc:`/patterns/appfactories`:
from flask import Flask, render_template

def internal_server_error(e):
  return render_template('500.html'), 500

def create_app():
    app = Flask(__name__)
    app.register_error_handler(500, internal_server_error)
    return app
When using :doc:`/blueprints`:
from flask import Blueprint

blog = Blueprint('blog', __name__)

# as a decorator
@blog.errorhandler(500)
def internal_server_error(e):
    return render_template('500.html'), 500

# or with register_error_handler
blog.register_error_handler(500, internal_server_error)
Blueprint Error Handlers
In :doc:`/blueprints`, most error handlers will work as expected.
However, there is a caveat concerning handlers for 404 and 405
exceptions. These error handlers are only invoked from an appropriate
raise statement or a call to abort in another of the blueprint’s
view functions; they are not invoked by, e.g., an invalid URL access.
This is because the blueprint does not «own» a certain URL space, so
the application instance has no way of knowing which blueprint error
handler it should run if given an invalid URL. If you would like to
execute different handling strategies for these errors based on URL
prefixes, they may be defined at the application level using the
request proxy object.
from flask import jsonify, render_template

# at the application level
# not the blueprint level
@app.errorhandler(404)
def page_not_found(e):
    # if a request is in our blog URL space
    if request.path.startswith('/blog/'):
        # we return a custom blog 404 page
        return render_template("blog/404.html"), 404
    else:
        # otherwise we return our generic site-wide 404 page
        return render_template("404.html"), 404

@app.errorhandler(405)
def method_not_allowed(e):
    # if a request has the wrong method to our API
    if request.path.startswith('/api/'):
        # we return a json saying so
        return jsonify(message="Method Not Allowed"), 405
    else:
        # otherwise we return a generic site-wide 405 page
        return render_template("405.html"), 405
Returning API Errors as JSON
When building APIs in Flask, some developers realise that the built-in
exceptions are not expressive enough for APIs and that the content type of
:mimetype:`text/html` they are emitting is not very useful for API consumers.
Using the same techniques as above and :func:`~flask.json.jsonify` we can return JSON
responses to API errors. :func:`~flask.abort` is called
with a description parameter. The error handler will
use that as the JSON error message, and set the status code to 404.
from flask import abort, jsonify

@app.errorhandler(404)
def resource_not_found(e):
    return jsonify(error=str(e)), 404

@app.route("/cheese")
def get_one_cheese():
    resource = get_resource()

    if resource is None:
        abort(404, description="Resource not found")

    return jsonify(resource)
We can also create custom exception classes. For instance, we can
introduce a new custom exception for an API that can take a proper human readable message,
a status code for the error and some optional payload to give more context
for the error.
This is a simple example:
from flask import jsonify, request

class InvalidAPIUsage(Exception):
    status_code = 400

    def __init__(self, message, status_code=None, payload=None):
        super().__init__()
        self.message = message
        if status_code is not None:
            self.status_code = status_code
        self.payload = payload

    def to_dict(self):
        rv = dict(self.payload or ())
        rv['message'] = self.message
        return rv

@app.errorhandler(InvalidAPIUsage)
def invalid_api_usage(e):
    return jsonify(e.to_dict()), e.status_code

# an API app route for getting user information
# a correct request might be /api/user?user_id=420
@app.route("/api/user")
def user_api(user_id):
    user_id = request.arg.get("user_id")
    if not user_id:
        raise InvalidAPIUsage("No user id provided!")

    user = get_user(user_id=user_id)
    if not user:
        raise InvalidAPIUsage("No such user!", status_code=404)

    return jsonify(user.to_dict())
A view can now raise that exception with an error message. Additionally
some extra payload can be provided as a dictionary through the payload
parameter.
Logging
See :doc:`/logging` for information about how to log exceptions, such as
by emailing them to admins.
Debugging
See :doc:`/debugging` for information about how to debug errors in
development and production.
We’re using Flask for one of our API’s and I was just wondering if anyone knew how to return a HTTP response 201?
For errors such as 404 we can call:
from flask import abort
abort(404)
But for 201 I get
LookupError: no exception for 201
Do I need to create my own exception like this in the docs?
![]()
asked Oct 19, 2011 at 15:48
![]()
2
You can use Response to return any http status code.
> from flask import Response
> return Response("{'a':'b'}", status=201, mimetype='application/json')
answered Sep 13, 2017 at 13:52
![]()
YasirYasir
4,4576 gold badges22 silver badges19 bronze badges
0
You can read about it here.
return render_template('page.html'), 201
answered Oct 19, 2011 at 16:23
![]()
IacksIacks
3,7092 gold badges20 silver badges24 bronze badges
2
You can do
result = {'a': 'b'}
return result, 201
if you want to return a JSON data in the response along with the error code
You can read about responses here and here for make_response API details
answered Jan 25, 2019 at 8:28
![]()
Kishan KKishan K
5815 silver badges17 bronze badges
0
As lacks suggested send status code in return statement
and if you are storing it in some variable like
notfound = 404
invalid = 403
ok = 200
and using
return xyz, notfound
than time make sure its type is int not str. as I faced this small issue
also here is list of status code followed globally
http://www.w3.org/Protocols/HTTP/HTRESP.html
Hope it helps.
answered Jul 18, 2014 at 12:22
![]()
Harsh DaftaryHarsh Daftary
2,5351 gold badge13 silver badges12 bronze badges
1
In your flask code, you should ideally specify the MIME type as often as possible, as well:
return html_page_str, 200, {'ContentType':'text/html'}

return json.dumps({'success':True}), 200, {'ContentType':'application/json'}
…etc
![]()
Axe
6,2153 gold badges30 silver badges38 bronze badges
answered Sep 11, 2017 at 16:51
![]()
Ben WheelerBen Wheeler
6,5332 gold badges44 silver badges55 bronze badges
Ripping off Luc’s comment here, but to return a blank response, like a 201 the simplest option is to use the following return in your route.
return "", 201
So for example:
    @app.route('/database', methods=["PUT"])
    def database():
        update_database(request)
        return "", 201
answered Jan 26, 2021 at 11:12
![]()
you can also use flask_api for sending response
from flask_api import status

@app.route('/your-api/')
def empty_view(self):
    content = {'your content here'}
    return content, status.HTTP_201_CREATED
you can find reference here http://www.flaskapi.org/api-guide/status-codes/
answered Oct 12, 2019 at 11:04
![]()
1
In my case I had to combine the above in order to make it work
return Response(json.dumps({'Error': 'Error in payload'}),
status=422,
mimetype="application/json")
answered Oct 3, 2019 at 10:29
![]()
CheetaraCheetara
1651 gold badge5 silver badges14 bronze badges
Dependent on how the API is created, normally with a 201 (created) you would return the resource which was created. For example if it was creating a user account you would do something like:
return {"data": {"username": "test","id":"fdsf345"}}, 201
Note the postfixed number is the status code returned.
Alternatively, you may want to send a message to the client such as:
return {"msg": "Created Successfully"}, 201
answered Dec 4, 2019 at 7:34
![]()
CrocCroc
7717 silver badges13 bronze badges
for error 404 you can
def post():
    #either pass or get error
    post = Model.query.get_or_404()
    return jsonify(post.to_json())
for 201 success
def new_post():
    post = Model.from_json(request.json)
    return jsonify(post.to_json()), 201,
      {'Location': url_for('api.get_post', id=post.id, _external=True)}
answered Apr 19, 2021 at 5:27
![]()
Josie KoayJosie Koay
6375 silver badges8 bronze badges
You just need to add your status code after your returning data like this:
from flask import Flask

app = Flask(__name__)
@app.route('/')
def hello_world():  # put application's code here
    return 'Hello World!',201
if __name__ == '__main__':
    app.run()
It’s a basic flask project. After starting it and you will find that when we request http://127.0.0.1:5000/ you will get a status 201 from web broswer console.
answered Dec 18, 2021 at 14:01
![]()
1
So, if you are using flask_restful Package for API’s
returning 201 would becomes like
def bla(*args, **kwargs):
    ...
    return data, 201
where data should be any hashable/ JsonSerialiable value, like dict, string.
answered Dec 4, 2019 at 4:48
![]()
Applications fail, servers fail. Sooner or later you will see an exception
in production. Even if your code is 100% correct, you will still see
exceptions from time to time. Why? Because everything else involved will
fail. Here are some situations where perfectly fine code can lead to server
errors:
-
the client terminated the request early and the application was still
reading from the incoming data -
the database server was overloaded and could not handle the query
-
a filesystem is full
-
a harddrive crashed
-
a backend server overloaded
-
a programming error in a library you are using
-
network connection of the server to another system failed
And that’s just a small sample of issues you could be facing. So how do we
deal with that sort of problem? By default if your application runs in
production mode, and an exception is raised Flask will display a very simple
page for you and log the exception to the logger.
But there is more you can do, and we will cover some better setups to deal
with errors including custom exceptions and 3rd party tools.
Error Logging Tools
Sending error mails, even if just for critical ones, can become
overwhelming if enough users are hitting the error and log files are
typically never looked at. This is why we recommend using Sentry for dealing with application errors. It’s
available as a source-available project on GitHub and is also available as a hosted version which you can try for free. Sentry
aggregates duplicate errors, captures the full stack trace and local
variables for debugging, and sends you mails based on new errors or
frequency thresholds.
To use Sentry you need to install the sentry-sdk client with extra
flask dependencies.
$ pip install sentry-sdk[flask]
And then add this to your Flask app:
import sentry_sdk
from sentry_sdk.integrations.flask import FlaskIntegration

sentry_sdk.init('YOUR_DSN_HERE', integrations=[FlaskIntegration()])
The YOUR_DSN_HERE value needs to be replaced with the DSN value you
get from your Sentry installation.
After installation, failures leading to an Internal Server Error
are automatically reported to Sentry and from there you can
receive error notifications.
See also:
-
Sentry also supports catching errors from a worker queue
(RQ, Celery, etc.) in a similar fashion. See the Python SDK docs for more information. -
Getting started with Sentry
-
Flask-specific documentation
Error Handlers
When an error occurs in Flask, an appropriate HTTP status code will be
returned. 400-499 indicate errors with the client’s request data, or
about the data requested. 500-599 indicate errors with the server or
application itself.
You might want to show custom error pages to the user when an error occurs.
This can be done by registering error handlers.
An error handler is a function that returns a response when a type of error is
raised, similar to how a view is a function that returns a response when a
request URL is matched. It is passed the instance of the error being handled,
which is most likely a HTTPException.
The status code of the response will not be set to the handler’s code. Make
sure to provide the appropriate HTTP status code when returning a response from
a handler.
Registering
Register handlers by decorating a function with
errorhandler(). Or use
register_error_handler() to register the function later.
Remember to set the error code when returning the response.
@app.errorhandler(werkzeug.exceptions.BadRequest)
def handle_bad_request(e):
    return 'bad request!', 400

# or, without the decorator
app.register_error_handler(400, handle_bad_request)
werkzeug.exceptions.HTTPException subclasses like
BadRequest and their HTTP codes are interchangeable
when registering handlers. (BadRequest.code == 400)
Non-standard HTTP codes cannot be registered by code because they are not known
by Werkzeug. Instead, define a subclass of
HTTPException with the appropriate code and
register and raise that exception class.
class InsufficientStorage(werkzeug.exceptions.HTTPException):
    code = 507
    description = 'Not enough storage space.'

app.register_error_handler(InsufficientStorage, handle_507)

raise InsufficientStorage()
Handlers can be registered for any exception class, not just
HTTPException subclasses or HTTP status
codes. Handlers can be registered for a specific class, or for all subclasses
of a parent class.
Handling
When building a Flask application you will run into exceptions. If some part
of your code breaks while handling a request (and you have no error handlers
registered), a “500 Internal Server Error”
(InternalServerError) will be returned by default.
Similarly, “404 Not Found”
(NotFound) error will occur if a request is sent to an unregistered route.
If a route receives an unallowed request method, a “405 Method Not Allowed”
(MethodNotAllowed) will be raised. These are all
subclasses of HTTPException and are provided by
default in Flask.
Flask gives you the ability to raise any HTTP exception registered by
Werkzeug. However, the default HTTP exceptions return simple exception
pages. You might want to show custom error pages to the user when an error occurs.
This can be done by registering error handlers.
When Flask catches an exception while handling a request, it is first looked up by code.
If no handler is registered for the code, Flask looks up the error by its class hierarchy; the most specific handler is chosen.
If no handler is registered, HTTPException subclasses show a
generic message about their code, while other exceptions are converted to a
generic “500 Internal Server Error”.
For example, if an instance of ConnectionRefusedError is raised,
and a handler is registered for ConnectionError and
ConnectionRefusedError, the more specific ConnectionRefusedError
handler is called with the exception instance to generate the response.
Handlers registered on the blueprint take precedence over those registered
globally on the application, assuming a blueprint is handling the request that
raises the exception. However, the blueprint cannot handle 404 routing errors
because the 404 occurs at the routing level before the blueprint can be
determined.
Generic Exception Handlers
It is possible to register error handlers for very generic base classes
such as HTTPException or even Exception. However, be aware that
these will catch more than you might expect.
For example, an error handler for HTTPException might be useful for turning
the default HTML errors pages into JSON. However, this
handler will trigger for things you don’t cause directly, such as 404
and 405 errors during routing. Be sure to craft your handler carefully
so you don’t lose information about the HTTP error.
from flask import json
from werkzeug.exceptions import HTTPException

@app.errorhandler(HTTPException)
def handle_exception(e):
    """Return JSON instead of HTML for HTTP errors."""
    # start with the correct headers and status code from the error
    response = e.get_response()
    # replace the body with JSON
    response.data = json.dumps({
        "code": e.code,
        "name": e.name,
        "description": e.description,
    })
    response.content_type = "application/json"
    return response
An error handler for Exception might seem useful for changing how
all errors, even unhandled ones, are presented to the user. However,
this is similar to doing except Exception: in Python, it will
capture all otherwise unhandled errors, including all HTTP status
codes.
In most cases it will be safer to register handlers for more
specific exceptions. Since HTTPException instances are valid WSGI
responses, you could also pass them through directly.
from werkzeug.exceptions import HTTPException

@app.errorhandler(Exception)
def handle_exception(e):
    # pass through HTTP errors
    if isinstance(e, HTTPException):
        return e

    # now you're handling non-HTTP exceptions only
    return render_template("500_generic.html", e=e), 500
Error handlers still respect the exception class hierarchy. If you
register handlers for both HTTPException and Exception, the
Exception handler will not handle HTTPException subclasses
because it the HTTPException handler is more specific.
Unhandled Exceptions
When there is no error handler registered for an exception, a 500
Internal Server Error will be returned instead. See
flask.Flask.handle_exception() for information about this
behavior.
If there is an error handler registered for InternalServerError,
this will be invoked. As of Flask 1.1.0, this error handler will always
be passed an instance of InternalServerError, not the original
unhandled error.
The original error is available as e.original_exception.
An error handler for “500 Internal Server Error” will be passed uncaught
exceptions in addition to explicit 500 errors. In debug mode, a handler
for “500 Internal Server Error” will not be used. Instead, the
interactive debugger will be shown.
Custom Error Pages
Sometimes when building a Flask application, you might want to raise a
HTTPException to signal to the user that
something is wrong with the request. Fortunately, Flask comes with a handy
abort() function that aborts a request with a HTTP error from
werkzeug as desired. It will also provide a plain black and white error page
for you with a basic description, but nothing fancy.
Depending on the error code it is less or more likely for the user to
actually see such an error.
Consider the code below, we might have a user profile route, and if the user
fails to pass a username we can raise a “400 Bad Request”. If the user passes a
username and we can’t find it, we raise a “404 Not Found”.
from flask import abort, render_template, request

# a username needs to be supplied in the query args
# a successful request would be like /profile?username=jack
@app.route("/profile")
def user_profile():
    username = request.arg.get("username")
    # if a username isn't supplied in the request, return a 400 bad request
    if username is None:
        abort(400)

    user = get_user(username=username)
    # if a user can't be found by their username, return 404 not found
    if user is None:
        abort(404)

    return render_template("profile.html", user=user)
Here is another example implementation for a “404 Page Not Found” exception:
from flask import render_template

@app.errorhandler(404)
def page_not_found(e):
    # note that we set the 404 status explicitly
    return render_template('404.html'), 404
When using Application Factories:
from flask import Flask, render_template

def page_not_found(e):
  return render_template('404.html'), 404

def create_app(config_filename):
    app = Flask(__name__)
    app.register_error_handler(404, page_not_found)
    return app
An example template might be this:
{% extends "layout.html" %}
{% block title %}Page Not Found{% endblock %}
{% block body %}
  <h1>Page Not Found</h1>
  <p>What you were looking for is just not there.
  <p><a href="{{ url_for('index') }}">go somewhere nice</a>
{% endblock %}
Further Examples
The above examples wouldn’t actually be an improvement on the default
exception pages. We can create a custom 500.html template like this:
{% extends "layout.html" %}
{% block title %}Internal Server Error{% endblock %}
{% block body %}
  <h1>Internal Server Error</h1>
  <p>Oops... we seem to have made a mistake, sorry!</p>
  <p><a href="{{ url_for('index') }}">Go somewhere nice instead</a>
{% endblock %}
It can be implemented by rendering the template on “500 Internal Server Error”:
from flask import render_template

@app.errorhandler(500)
def internal_server_error(e):
    # note that we set the 500 status explicitly
    return render_template('500.html'), 500
When using Application Factories:
from flask import Flask, render_template

def internal_server_error(e):
  return render_template('500.html'), 500

def create_app():
    app = Flask(__name__)
    app.register_error_handler(500, internal_server_error)
    return app
When using Modular Applications with Blueprints:
from flask import Blueprint

blog = Blueprint('blog', __name__)

# as a decorator
@blog.errorhandler(500)
def internal_server_error(e):
    return render_template('500.html'), 500

# or with register_error_handler
blog.register_error_handler(500, internal_server_error)
Blueprint Error Handlers
In Modular Applications with Blueprints, most error handlers will work as expected.
However, there is a caveat concerning handlers for 404 and 405
exceptions. These error handlers are only invoked from an appropriate
raise statement or a call to abort in another of the blueprint’s
view functions; they are not invoked by, e.g., an invalid URL access.
This is because the blueprint does not “own” a certain URL space, so
the application instance has no way of knowing which blueprint error
handler it should run if given an invalid URL. If you would like to
execute different handling strategies for these errors based on URL
prefixes, they may be defined at the application level using the
request proxy object.
from flask import jsonify, render_template

# at the application level
# not the blueprint level
@app.errorhandler(404)
def page_not_found(e):
    # if a request is in our blog URL space
    if request.path.startswith('/blog/'):
        # we return a custom blog 404 page
        return render_template("blog/404.html"), 404
    else:
        # otherwise we return our generic site-wide 404 page
        return render_template("404.html"), 404

@app.errorhandler(405)
def method_not_allowed(e):
    # if a request has the wrong method to our API
    if request.path.startswith('/api/'):
        # we return a json saying so
        return jsonify(message="Method Not Allowed"), 405
    else:
        # otherwise we return a generic site-wide 405 page
        return render_template("405.html"), 405
Returning API Errors as JSON
When building APIs in Flask, some developers realise that the built-in
exceptions are not expressive enough for APIs and that the content type of
text/html they are emitting is not very useful for API consumers.
Using the same techniques as above and jsonify() we can return JSON
responses to API errors. abort() is called
with a description parameter. The error handler will
use that as the JSON error message, and set the status code to 404.
from flask import abort, jsonify

@app.errorhandler(404)
def resource_not_found(e):
    return jsonify(error=str(e)), 404

@app.route("/cheese")
def get_one_cheese():
    resource = get_resource()

    if resource is None:
        abort(404, description="Resource not found")

    return jsonify(resource)
We can also create custom exception classes. For instance, we can
introduce a new custom exception for an API that can take a proper human readable message,
a status code for the error and some optional payload to give more context
for the error.
This is a simple example:
from flask import jsonify, request

class InvalidAPIUsage(Exception):
    status_code = 400

    def __init__(self, message, status_code=None, payload=None):
        super().__init__()
        self.message = message
        if status_code is not None:
            self.status_code = status_code
        self.payload = payload

    def to_dict(self):
        rv = dict(self.payload or ())
        rv['message'] = self.message
        return rv

@app.errorhandler(InvalidAPIUsage)
def invalid_api_usage(e):
    return jsonify(e.to_dict()), e.status_code

# an API app route for getting user information
# a correct request might be /api/user?user_id=420
@app.route("/api/user")
def user_api(user_id):
    user_id = request.arg.get("user_id")
    if not user_id:
        raise InvalidAPIUsage("No user id provided!")

    user = get_user(user_id=user_id)
    if not user:
        raise InvalidAPIUsage("No such user!", status_code=404)

    return jsonify(user.to_dict())
A view can now raise that exception with an error message. Additionally
some extra payload can be provided as a dictionary through the payload
parameter.
Logging
See Logging for information about how to log exceptions, such as
by emailing them to admins.
Debugging
See Debugging Application Errors for information about how to debug errors in
development and production.
Время прочтения
14 мин
Просмотры 50K
blog.miguelgrinberg.com
Miguel Grinberg
<<< предыдущая следующая >>>
Эта статья является переводом седьмой части нового издания учебника Мигеля Гринберга, выпуск которого автор планирует завершить в мае 2018.Прежний перевод давно утратил свою актуальность.
Я, со своей стороны, постараюсь не отставать с переводом.
Это седьмая глава серии Flask Mega-Tutorial, в которой я расскажу вам, как выполнять обработку ошибок в приложении Flask.
Для справки ниже приведен список статей этой серии.
Примечание 1: Если вы ищете старые версии данного курса, это здесь.
Примечание 2: Если вдруг Вы хотели бы выступить в поддержку моей(Мигеля) работы в этом блоге, или просто не имеете терпения дожидаться неделю статьи, я (Мигель Гринберг)предлагаю полную версию данного руководства упакованную электронную книгу или видео. Для получения более подробной информации посетите learn.miguelgrinberg.com.
В этой главе я перехожу от кодирования новых функций для моего микроблогического приложения и вместо этого обсужу несколько стратегий борьбы с ошибками, которые неизменно появляются в любом программном проекте. Чтобы проиллюстрировать эту тему, я намеренно допустил ошибку в коде, который я добавил в главе 6. Прежде чем продолжить чтение, посмотрите, сможете ли вы его найти!
Ссылки GitHub для этой главы: Browse, Zip, Diff.
Обработка ошибок в Flask
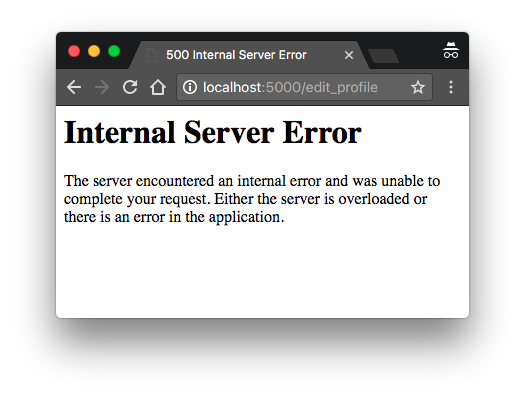
Что происходит, когда возникает ошибка в приложении Flask? Лучший способ узнать это — испытать это самому. Запустите приложение и убедитесь, что у вас зарегистрировано не менее двух пользователей. Войдите в систему как один из пользователей, откройте страницу профиля и нажмите ссылку «Изменить». В редакторе профиля попробуйте изменить имя пользователя на существующее имя другого пользователя, который уже зарегистрирован, и попытайтесь применить исправления! Это приведет к появлению страшной страницы «Internal Server Error» ( «Внутренняя ошибка сервера» ):
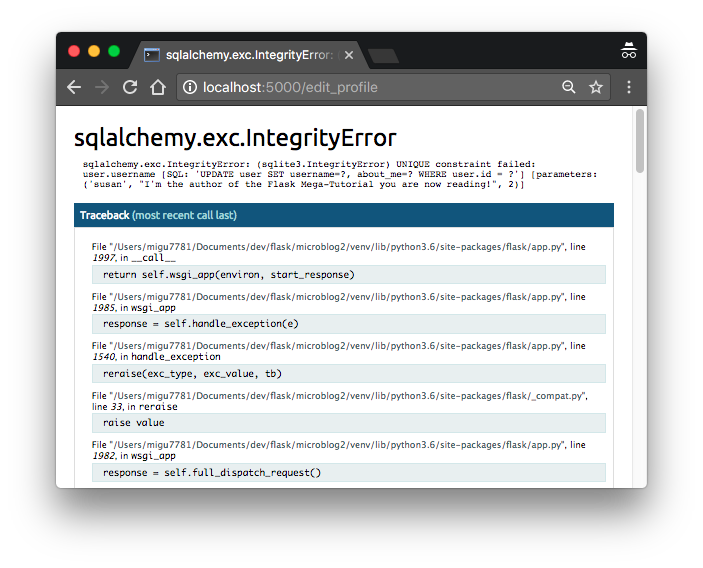
В сеансе терминала, на котором запущено приложение, вы видите трассировку стека ошибки. Трассировки стека чрезвычайно полезны при отладке ошибок, поскольку они показывают последовательность вызовов в этом стеке, вплоть до строки, вызвавшей ошибку:
(venv) $ flask run
 * Serving Flask app "microblog"
 * Running on http://127.0.0.1:5000/ (Press CTRL+C to quit)
[2017-09-14 22:40:02,027] ERROR in app: Exception on /edit_profile [POST]
Traceback (most recent call last):
  File "/home/miguel/microblog/venv/lib/python3.6/site-packages/sqlalchemy/engine/base.py", line 1182, in _execute_context
    context)
  File "/home/miguel/microblog/venv/lib/python3.6/site-packages/sqlalchemy/engine/default.py", line 470, in do_execute
    cursor.execute(statement, parameters)
sqlite3.IntegrityError: UNIQUE constraint failed: user.username
Трассировка стека указывает, чем вызвана ошибка. Приложение позволяет пользователю изменять имя пользователя без проверки, что новое имя пользователя не совпадает с другим пользователем, уже находящимся в системе. Ошибка возникает из SQLAlchemy, которая пытается записать новое имя пользователя в базу данных, но база данных отвергает его, потому что столбец имени пользователя определен с unique = True.
Важно, что страница с ошибкой, представленная пользователю, не содержит много информации об ошибке, и это правильно. Я определенно не хочу, чтобы пользователи узнали, что авария была вызвана ошибкой базы данных или какой базой данных я пользуюсь, а также именами таблиц и полей в моей базе данных. Вся эта информация должна быть внутренней.
Есть несколько вещей, которые далеки от идеала. У меня есть страница с ошибкой, которая безобразна и не соответствует макету приложения. У меня также есть важные трассировки стека приложений, которые сбрасываются на терминале, и мне нужно постоянно следить за тем, чтобы я не пропустил никаких ошибок. И, конечно, у меня есть ошибка. Я собираюсь решить все эти проблемы, но сначала поговорим о режиме отладки Flask.
Режим отладки
То, как ошибки обрабатываются выше, отлично подходит для системы, которая работает на production сервере. Если есть ошибка, пользователь получает страницу с неопределенной ошибкой (хотя я собираюсь сделать эту страницу с ошибкой более приятной), а важные данные об ошибке — в выводе сервера или в файле журнала.
Но когда вы разрабатываете приложение, вы можете включить режим отладки, режим, в котором Flask выводит действительно хороший отладчик непосредственно в ваш браузер. Чтобы активировать режим отладки, остановите приложение, а затем установите следующую переменную среды:
(venv) $ export FLASK_DEBUG=1Если вы работаете в ОС Microsoft Windows, не забудьте использовать set вместо экспорта.
После того, как вы установили FLASK_DEBUG, перезапустите сервер. Строки на вашем терминале будут немного отличаться от того, что вы привыкли видеть:
(venv) microblog2 $ flask run
 * Serving Flask app "microblog"
 * Forcing debug mode on
 * Running on http://127.0.0.1:5000/ (Press CTRL+C to quit)
 * Restarting with stat
 * Debugger is active!
 * Debugger PIN: 177-562-960
Теперь устроим приложению аварийный сбой еще раз, чтобы увидеть интерактивный отладчик в вашем браузере:
Отладчик позволяет развернуть каждый уровень стека и увидеть соответствующий исходный код. Вы также можете открыть Python для любого из фреймов и выполнить любые допустимые выражения Python, например, чтобы проверить значения переменных.
Крайне важно, чтобы вы никогда не запускали приложение Flask в режиме отладки на рабочем сервере. Отладчик позволяет удаленно выполнять код на сервере, поэтому он может стать неожиданным подарком злоумышленнику, который хочет проникнуть в ваше приложение или на ваш сервер. В качестве дополнительной меры безопасности отладчик, запущенный в браузере, закроется, и при первом использовании запросит PIN-код, который вы можете увидеть на выходе команды flask run.
Поскольку я говорю о режиме отладки, следует упомянуть про вторую важную функцию, которая включена в режиме отладки — перезагрузка. Это очень полезная функция разработки, которая автоматически перезапускает приложение при изменении исходного файла. Если вы выполните flask run в режиме отладки, можно продолжать работать в своем приложении и при каждом сохранении файла, приложение перезапустится, чтобы забрать новый код.
Пользовательские страницы ошибок
Flask предоставляет механизм приложения для создания собственных страниц ошибок, так что вашим пользователям не нужно видеть простые и скучные значения по умолчанию. В качестве примера давайте определим пользовательские страницы ошибок для ошибок HTTP 404 и 500, двух наиболее распространенных. Определение страниц для других ошибок работает одинаково.
Чтобы объявить пользовательский обработчик ошибок, используется декоратор @errorhandler. Я собираюсь поместить обработчики ошибок в новый модуль app/errors.py.
from flask import render_template
from app import app, db

@app.errorhandler(404)
def not_found_error(error):
    return render_template('404.html'), 404

@app.errorhandler(500)
def internal_error(error):
    db.session.rollback()
    return render_template('500.html'), 500
Функции ошибок работают аналогично функциям просмотра. Для этих двух ошибок я возвращаю содержимое их соответствующих шаблонов. Обратите внимание, что обе функции возвращают второе значение после шаблона, который является номером кода ошибки. Для всех функций представления, которые я создал до сих пор, мне не нужно было добавлять второе возвращаемое значение, потому что по умолчанию 200 (код состояния для успешного завершения) — это то, что я хотел. Сейчас это страницы с ошибками, поэтому я хочу, чтобы код состояния ответа это отражал.
Обработчик ошибок для 500-й ошибки может быть вызван после возникновения сбоя базы данных, которая на самом деле была вызвана умышленным случаем дубликата имени пользователя. Чтобы убедиться, что неудачные сеансы базы данных не мешают доступу к базе данных, вызванным шаблоном, я выдаю откат сеанса. Это сбрасывает сеанс в чистое состояние.
Вот шаблон для ошибки 404:
{% extends "base.html" %}

{% block content %}
    <h1>File Not Found</h1>
    <p><a href="{{ url_for('index') }}">Back</a></p>
{% endblock %}
И вот одна из ошибок 500:
{% extends "base.html" %}

{% block content %}
    <h1>An unexpected error has occurred</h1>
    <p>The administrator has been notified. Sorry for the inconvenience!</p>
    <p><a href="{{ url_for('index') }}">Back</a></p>
{% endblock %}
Оба шаблона наследуют шаблон base.html, так что страница с ошибками имеет тот же внешний вид, что и обычные страницы приложения.
Чтобы получить эти обработчики ошибок, зарегистрированные в Flask, мне нужно импортировать новый модуль app/errors.py после создания экземпляра приложения:
# ...

from app import routes, models, errors
Если вы установили FLASK_DEBUG = 0 в сеансе терминала и затем снова вызвали ошибку повторного имени пользователя, вы увидите более приятную страницу с ошибкой.
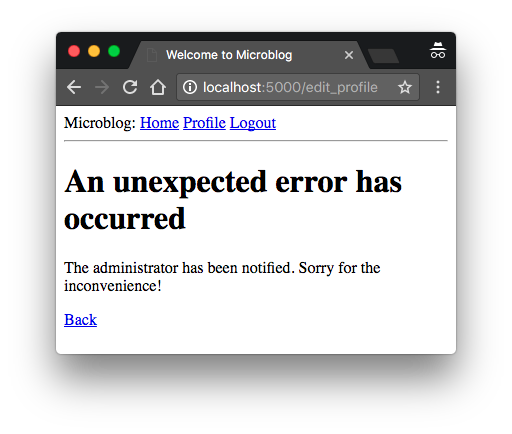
Или так! Рекомендую придумать что то свое в качестве упражнения.

Отправка ошибок по электронной почте
Другая проблема с обработкой ошибок по умолчанию, предоставляемой Flask, заключается в том, что нет уведомлений! Трассировка стека ошибки печатается на терминале, а это означает, что вывод процесса сервера должен контролироваться на обнаружение ошибок. Когда вы запускаете приложение во время разработки, это нормально, но как только приложение будет развернуто на production сервере, никто не будет смотреть на результат, поэтому необходимо создать более надежное решение.
Я думаю, что очень важно, чтобы я активно реагировал на ошибки. Если в production версии приложения возникает ошибка, я хочу знать сразу. Таким образом, моим первым решением будет сконфигурировать Flask для отправки мне сообщения по email сразу после возникновения ошибки с трассировкой стека ошибки в сообщении электронной почты.
Первым шагом является добавление данных сервера электронной почты в файл конфигурации:
class Config(object):
    # ...
    MAIL_SERVER = os.environ.get('MAIL_SERVER')
    MAIL_PORT = int(os.environ.get('MAIL_PORT') or 25)
    MAIL_USE_TLS = os.environ.get('MAIL_USE_TLS') is not None
    MAIL_USERNAME = os.environ.get('MAIL_USERNAME')
    MAIL_PASSWORD = os.environ.get('MAIL_PASSWORD')
    ADMINS = ['your-email@example.com']
Переменные конфигурации для электронной почты содержат сервер и порт, флаг для включения зашифрованных соединений и необязательное имя пользователя и пароль. Пять переменных конфигурации получены из их сопоставлений переменным среды. Если сервер электронной почты не установлен в среде, то я буду использовать это как знак того, что ошибки электронной почты должны быть отключены. Порт сервера электронной почты также можно указать в переменной среды, но если он не установлен, используется стандартный порт 25. Учетные данные почтового сервера по умолчанию не используются, но могут быть предоставлены при необходимости. Переменная конфигурации ADMINS представляет собой список адресов электронной почты, которые будут получать отчеты об ошибках, поэтому ваш собственный адрес электронной почты должен быть в этом списке.
Flask использует пакет logging Python для ведения своих журналов, а этот пакет уже имеет возможность отправлять журналы по электронной почте. Все, что мне нужно сделать, чтобы отправлять электронные сообщения, содержащие ошибки, — это добавить экземпляр SMTPHandler в объект журнала Flask, которым является app.logger:
import logging
from logging.handlers import SMTPHandler

# ...

if not app.debug:
    if app.config['MAIL_SERVER']:
        auth = None
        if app.config['MAIL_USERNAME'] or app.config['MAIL_PASSWORD']:
            auth = (app.config['MAIL_USERNAME'], app.config['MAIL_PASSWORD'])
        secure = None
        if app.config['MAIL_USE_TLS']:
            secure = ()
        mail_handler = SMTPHandler(
            mailhost=(app.config['MAIL_SERVER'], app.config['MAIL_PORT']),
            fromaddr='no-reply@' + app.config['MAIL_SERVER'],
            toaddrs=app.config['ADMINS'], subject='Microblog Failure',
            credentials=auth, secure=secure)
        mail_handler.setLevel(logging.ERROR)
        app.logger.addHandler(mail_handler)
Как видно, я включил регистратор электронной почты только, когда приложение работает без режима отладки, что определено приложением в app.debug как True, а также когда сервер электронной почты существует в конфигурации.
Настройка почтового регистратора несколько утомительна из-за необходимости обрабатывать дополнительные параметры безопасности, которые присутствуют на многих серверах электронной почты. Но в сущности, вышеприведенный код создает экземпляр SMTPHandler, устанавливает его уровень, чтобы он отправлял только сообщения об ошибках, а не предупреждения, информационные или отладочные сообщения и, наконец, прикреплял их к app.logger из Flask.
Существует два подхода к проверке работоспособности этой функции. Самый простой способ — использовать SMTP-сервер отладки от Python. Это ложный почтовый сервер, который принимает сообщения электронной почты, но вместо их отправки выводит их на консоль. Чтобы запустить этот сервер, откройте второй сеанс терминала и запустите на нем следующую команду:
(venv) $ python -m smtpd -n -c DebuggingServer localhost:8025Оставьте запущенный SMTP-сервер отладки и вернитесь к своему первому терминалу и установите export MAIL_SERVER = localhost и MAIL_PORT = 8025 (используйте set вместо export, если вы используете Microsoft Windows). Убедитесь, что для переменной FLASK_DEBUG установлено значение 0 или не установлено вообще, так как приложение не будет отправлять электронные письма в режиме отладки.
Запустите приложение и вызовите ошибку SQLAlchemy еще раз, чтобы узнать, как сеанс терминала, на котором работает поддельный почтовый сервер, показывает электронное письмо с полным содержимым стека ошибки.
Второй метод тестирования для этой функции — настроить настоящий почтовый сервер. Ниже приведена конфигурация для использования почтового сервера для учетной записи Gmail:
export MAIL_SERVER=smtp.googlemail.com
export MAIL_PORT=587
export MAIL_USE_TLS=1
export MAIL_USERNAME=<your-gmail-username>
export MAIL_PASSWORD=<your-gmail-password>
Если вы используете Microsoft Windows, не забудьте использовать set вместо export в каждой из приведенной выше инструкции.
Функции безопасности вашей учетной записи Gmail могут препятствовать приложению отправлять электронную почту через нее, если вы явно не разрешаете «less secure apps» («менее безопасным приложениям») доступ к вашей учетной записи Gmail. Прочитать об этом можно здесь, и если вас беспокоит безопасность вашей учетной записи, можно создать вторичную учетную запись, которую настройте только для проверки электронной почты, или временно включите разрешение для менее безопасных приложений на время запуска этого теста, а затем вернитесь к умолчанию.
Запись лога в файл
Получение ошибок по электронной почте полезно, но иногда недостаточно. Есть некоторые случаи сбоя, которые не описываются исключением Python и не являются серьезной проблемой, но они все равно могут быть достаточно интересными для сохранения в целях отладки. По этой причине я также буду поддерживать логфайл для приложения.
Чтобы включить ведение журнала другого обработчика, на этот раз типа RotatingFileHandler необходимо включить logger приложения аналогично обработчику электронной почты.
# ...
from logging.handlers import RotatingFileHandler
import os

# ...

if not app.debug:
    # ...

    if not os.path.exists('logs'):
        os.mkdir('logs')
    file_handler = RotatingFileHandler('logs/microblog.log', maxBytes=10240,
                                       backupCount=10)
    file_handler.setFormatter(logging.Formatter(
        '%(asctime)s %(levelname)s: %(message)s [in %(pathname)s:%(lineno)d]'))
    file_handler.setLevel(logging.INFO)
    app.logger.addHandler(file_handler)

    app.logger.setLevel(logging.INFO)
    app.logger.info('Microblog startup')
Я пишу логфайл с именем microblog.log в каталоге logs, который я создаю, если он еще не существует.
Класс RotatingFileHandler удобен, потому что он переписывает журналы, гарантируя, что файлы журнала не будут слишком большими, если приложение работает в течение длительного времени. В этом случае я ограничиваю размер логфайла 10 КБ, и храню последние десять файлов журнала в качестве резервных копий.
Класс logging.Formatter предоставляет настройку формата сообщений журнала. Поскольку эти сообщения отправляются в файл, я хочу, чтобы они содержали как можно больше информации. Поэтому я использую формат, который включает отметку времени, уровень ведения журнала,
сообщение, исходный файл и номер строки, откуда возникла запись в журнале.
Чтобы сделать регистрацию более полезной, я также понижаю уровень ведения журнала до категории INFO, как в регистраторе приложений, так и в обработчике файлов. Если вы не знакомы с категориями ведения журнала, это DEBUG, INFO, WARNING,ERROR и CRITICAL в порядке возрастания степени тяжести.
В качестве первого полезного использования логфайла сервер записывает строку в журнал каждый раз, когда он запускается. Когда приложение запускается на production сервере, эти записи журнала сообщают вам, когда сервер был перезапущен.
Исправление дубля имени пользователя
Я слишком долго использовал ошибку дублирования имени пользователя. Теперь, когда я показал вам, как подготовить приложение для обработки подобных ошибок, я могу наконец-то это исправить.
Если вы помните, RegistrationForm уже выполняет проверку для имен пользователей, но требования формы редактирования немного отличаются. Во время регистрации мне нужно убедиться, что имя пользователя, введенное в форму, не существует в базе данных. В форме профиля редактирования я должен выполнить ту же проверку, но с одним исключением. Если пользователь оставляет исходное имя пользователя нетронутым, то проверка должна его разрешить, поскольку это имя пользователя уже назначено этому пользователю. Ниже вы можете увидеть, как я выполнил проверку имени пользователя для этой формы:
class EditProfileForm(FlaskForm):
    username = StringField('Username', validators=[DataRequired()])
    about_me = TextAreaField('About me', validators=[Length(min=0, max=140)])
    submit = SubmitField('Submit')

    def __init__(self, original_username, *args, **kwargs):
        super(EditProfileForm, self).__init__(*args, **kwargs)
        self.original_username = original_username

    def validate_username(self, username):
        if username.data != self.original_username:
            user = User.query.filter_by(username=self.username.data).first()
            if user is not None:
                raise ValidationError('Please use a different username.')
Реализация выполняется в специальном методе проверки, функция super в конструкторе класса, который принимает исходное имя пользователя в качестве аргумента. Это имя пользователя сохраняется как переменная экземпляра и проверяется в методе validate_username(). Если имя пользователя, введенное в форму, совпадает с исходным именем пользователя, то нет причин проверять базу данных на наличие дубликатов.
Чтобы использовать этот новый метод проверки, мне нужно добавить исходный аргумент имени пользователя в функцию вида, где создается объект формы:
@app.route('/edit_profile', methods=['GET', 'POST'])
@login_required
def edit_profile():
    form = EditProfileForm(current_user.username)
    # ...
Теперь ошибка исправлена, и дубликаты в форме профиля редактирования будут предотвращены в большинстве случаев. Это не идеальное решение, поскольку оно может не работать, когда два или несколько процессов одновременно обращаются к базе данных. В этой ситуации состояние гонки может привести к валидации, но спустя мгновение при попытке переименования база данных уже была изменена другим процессом и не может переименовать пользователя. Это несколько маловероятно, за исключением очень занятых приложений, у которых много серверных процессов, поэтому я пока не буду беспокоиться об этом.
На этом этапе вы можете попытаться воспроизвести ошибку еще раз, чтобы увидеть, как ее предотвращает метод проверки формы.
<<< предыдущая следующая >>>
P.S.
Работа над ошибками
От переводчика
Решил я проверить получение сообщений ошибки админу на почту. Для этого я испортил модуль routes.py. Для этой самой «порчи», я закомментировал декоратор @app.route('/edit_profile', methods=['GET', 'POST']) перед def edit_profile(). В итоге получил ошибку и в файл лога все это вывалилось, а вот письмо не прилетело. Я использую Python 3.3. Возможно в более новых версиях этого и не случится. Но в Windows 7 с русской раскладкой это случилось.
При попытке отправить сообщение админу приложение получило ошибку кодировки при формировании сообщения. В окне консоли содержались такие строки:

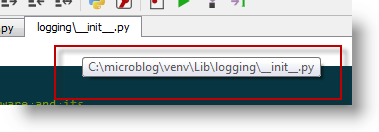
Как видим ссылка указывает на директорию в стандартном питоне, а не в виртуальном окружении.
logging в 3-й версии является стандартной библиотекой Python, поэтому вам не нужно устанавливать ее используя pip.
Про стандартные модули
И модуль протоколирования, который вы можете найти в PyPI, устаревший, а не Python3-совместимый.
(Согласно файлу README его последняя версия была выпущена 02 марта 2005 года.)
Поэтому просто не пытайтесь установить logging.
Возьмите новый модуль в стандартной библиотеке как должное. Если вам принципиально использовать его в виртальной библиотеке.
После копии в venvLib logging импортируется из виртуальной среды
Еще раз получаю ошибку

logging теперь виртуальный. А вот smtplib стандартный.
Не думаю, что надо тащить все библиотеки из стандартной среды в виртуальную.
Ошибка от этого не исчезнет.
Про стандартный модуль email
Проблема с кодировкой в сообщении решается использованием стандартного пакета email для создания сообщения с указанием предпочитаемой кодировки.
Вот пример с просторов интернета для этого пакета :
# -*- coding: utf-8 -*-
from email.mime.multipart import MIMEMultipart
from email.mime.text import MIMEText
import quopri
def QuoHead(String):
    s = quopri.encodestring(String.encode('UTF-8'), 1, 0)
    return "=?utf-8?Q?" + s.decode('UTF-8') + "?="
FIOin = "Хрюша Степашкин"
emailout = "some@test.ru"
emailin = "some2@test.ru"
msg = MIMEMultipart()
msg["Subject"] = QuoHead("Добрый день " + FIOin).replace('=n', '')
msg["From"] = (QuoHead("Каркуша Федоровна") + "  <" + emailout + ">").replace('=n', '')
msg["To"] = (QuoHead(FIOin) + "  <" + emailin + ">").replace('=n', '')
m = """Добрый день.
  Это тестовое письмо.
Пожалуйста, не отвечайте на него."""
text = MIMEText(m.encode('utf-8'), 'plain', 'UTF-8')
msg.attach(text)
print(msg.as_string())
Но, как это применить для отправки сообщений об ошибке?!
Может кто-то предложит в комментариях к статье.
В модуле flask-mail эта ситуевина вроде как поправлена. Но тут используется logging и smtplib
В итоге пока так. Поправил я строку в модуле smtplib.py .
Добавил encode('utf-8')

И после перезапуска сервера при искусственной ошибке я, наконец-то, получил сообщение на почту.

<<< предыдущая следующая >>>
This part of the documentation covers all the interfaces of Flask. For
parts where Flask depends on external libraries, we document the most
important right here and provide links to the canonical documentation.
Application Object
-
class
flask.Flask(import_name, static_path=None, static_url_path=None, static_folder=’static’, template_folder=’templates’, instance_path=None, instance_relative_config=False)¶ -
The flask object implements a WSGI application and acts as the central
object. It is passed the name of the module or package of the
application. Once it is created it will act as a central registry for
the view functions, the URL rules, template configuration and much more.The name of the package is used to resolve resources from inside the
package or the folder the module is contained in depending on if the
package parameter resolves to an actual python package (a folder with
an __init__.py file inside) or a standard module (just a .py file).For more information about resource loading, see
open_resource().Usually you create a
Flaskinstance in your main module or
in the __init__.py file of your package like this:from flask import Flask app = Flask(__name__)
About the First Parameter
The idea of the first parameter is to give Flask an idea what
belongs to your application. This name is used to find resources
on the file system, can be used by extensions to improve debugging
information and a lot more.So it’s important what you provide there. If you are using a single
module, __name__ is always the correct value. If you however are
using a package, it’s usually recommended to hardcode the name of
your package there.For example if your application is defined in yourapplication/app.py
you should create it with one of the two versions below:app = Flask('yourapplication') app = Flask(__name__.split('.')[0])
Why is that? The application will work even with __name__, thanks
to how resources are looked up. However it will make debugging more
painful. Certain extensions can make assumptions based on the
import name of your application. For example the Flask-SQLAlchemy
extension will look for the code in your application that triggered
an SQL query in debug mode. If the import name is not properly set
up, that debugging information is lost. (For example it would only
pick up SQL queries in yourapplication.app and not
yourapplication.views.frontend)New in version 0.7: The static_url_path, static_folder, and template_folder
parameters were added.New in version 0.8: The instance_path and instance_relative_config parameters were
added.Parameters: - import_name – the name of the application package
- static_url_path – can be used to specify a different path for the
static files on the web. Defaults to the name
of the static_folder folder. - static_folder – the folder with static files that should be served
at static_url_path. Defaults to the'static'
folder in the root path of the application. - template_folder – the folder that contains the templates that should
be used by the application. Defaults to
'templates'folder in the root path of the
application. - instance_path – An alternative instance path for the application.
By default the folder'instance'next to the
package or module is assumed to be the instance
path. - instance_relative_config – if set to True relative filenames
for loading the config are assumed to
be relative to the instance path instead
of the application root.
-
add_template_filter(*args, **kwargs)¶ -
Register a custom template filter. Works exactly like the
template_filter()decorator.Parameters: name – the optional name of the filter, otherwise the
function name will be used.
-
add_template_global(*args, **kwargs)¶ -
Register a custom template global function. Works exactly like the
template_global()decorator.New in version 0.10.
Parameters: name – the optional name of the global function, otherwise the
function name will be used.
-
add_template_test(*args, **kwargs)¶ -
Register a custom template test. Works exactly like the
template_test()decorator.New in version 0.10.
Parameters: name – the optional name of the test, otherwise the
function name will be used.
-
add_url_rule(*args, **kwargs)¶ -
Connects a URL rule. Works exactly like the
route()
decorator. If a view_func is provided it will be registered with the
endpoint.Basically this example:
@app.route('/')
def index():
    pass
Is equivalent to the following:
def index():
    pass
app.add_url_rule('/', 'index', index)
If the view_func is not provided you will need to connect the endpoint
to a view function like so:app.view_functions['index'] = index
Internally
route()invokesadd_url_rule()so if you want
to customize the behavior via subclassing you only need to change
this method.For more information refer to URL Route Registrations.
Changed in version 0.2: view_func parameter added.
Changed in version 0.6: OPTIONS is added automatically as method.
Parameters: - rule – the URL rule as string
- endpoint – the endpoint for the registered URL rule. Flask
itself assumes the name of the view function as
endpoint - view_func – the function to call when serving a request to the
provided endpoint - options – the options to be forwarded to the underlying
Ruleobject. A change
to Werkzeug is handling of method options. methods
is a list of methods this rule should be limited
to (GET, POST etc.). By default a rule
just listens for GET (and implicitly HEAD).
Starting with Flask 0.6, OPTIONS is implicitly
added and handled by the standard request handling.
-
after_request(*args, **kwargs)¶ -
Register a function to be run after each request. Your function
must take one parameter, aresponse_classobject and return
a new response object or the same (seeprocess_response()).As of Flask 0.7 this function might not be executed at the end of the
request in case an unhandled exception occurred.
-
after_request_funcs= None¶ -
A dictionary with lists of functions that should be called after
each request. The key of the dictionary is the name of the blueprint
this function is active for, None for all requests. This can for
example be used to open database connections or getting hold of the
currently logged in user. To register a function here, use the
after_request()decorator.
-
app_context()¶ -
Binds the application only. For as long as the application is bound
to the current context theflask.current_apppoints to that
application. An application context is automatically created when a
request context is pushed if necessary.Example usage:
with app.app_context():
    ...
New in version 0.9.
-
app_ctx_globals_class¶ -
The class that is used for the
ginstance.Example use cases for a custom class:
- Store arbitrary attributes on flask.g.
- Add a property for lazy per-request database connectors.
- Return None instead of AttributeError on expected attributes.
- Raise exception if an unexpected attr is set, a “controlled” flask.g.
In Flask 0.9 this property was called request_globals_class but it
was changed in 0.10 toapp_ctx_globals_classbecause the
flask.g object is not application context scoped.New in version 0.10.
alias of
_AppCtxGlobals
-
auto_find_instance_path()¶ -
Tries to locate the instance path if it was not provided to the
constructor of the application class. It will basically calculate
the path to a folder namedinstancenext to your main file or
the package.New in version 0.8.
-
before_first_request(*args, **kwargs)¶ -
Registers a function to be run before the first request to this
instance of the application.New in version 0.8.
-
before_first_request_funcs= None¶ -
A lists of functions that should be called at the beginning of the
first request to this instance. To register a function here, use
thebefore_first_request()decorator.New in version 0.8.
-
before_request(*args, **kwargs)¶ -
Registers a function to run before each request.
-
before_request_funcs= None¶ -
A dictionary with lists of functions that should be called at the
beginning of the request. The key of the dictionary is the name of
the blueprint this function is active for, None for all requests.
This can for example be used to open database connections or
getting hold of the currently logged in user. To register a
function here, use thebefore_request()decorator.
-
blueprints= None¶ -
all the attached blueprints in a dictionary by name. Blueprints
can be attached multiple times so this dictionary does not tell
you how often they got attached.New in version 0.7.
-
config= None¶ -
The configuration dictionary as
Config. This behaves
exactly like a regular dictionary but supports additional methods
to load a config from files.
-
context_processor(*args, **kwargs)¶ -
Registers a template context processor function.
-
create_global_jinja_loader()¶ -
Creates the loader for the Jinja2 environment. Can be used to
override just the loader and keeping the rest unchanged. It’s
discouraged to override this function. Instead one should override
thejinja_loader()function instead.The global loader dispatches between the loaders of the application
and the individual blueprints.New in version 0.7.
-
create_jinja_environment()¶ -
Creates the Jinja2 environment based on
jinja_options
andselect_jinja_autoescape(). Since 0.7 this also adds
the Jinja2 globals and filters after initialization. Override
this function to customize the behavior.New in version 0.5.
-
create_url_adapter(request)¶ -
Creates a URL adapter for the given request. The URL adapter
is created at a point where the request context is not yet set up
so the request is passed explicitly.New in version 0.6.
Changed in version 0.9: This can now also be called without a request object when the
URL adapter is created for the application context.
-
debug¶ -
The debug flag. Set this to True to enable debugging of the
application. In debug mode the debugger will kick in when an unhandled
exception occurs and the integrated server will automatically reload
the application if changes in the code are detected.This attribute can also be configured from the config with the DEBUG
configuration key. Defaults to False.
-
debug_log_format= ‘———————————————————————————n%(levelname)s in %(module)s [%(pathname)s:%(lineno)d]:n%(message)sn———————————————————————————‘¶ -
The logging format used for the debug logger. This is only used when
the application is in debug mode, otherwise the attached logging
handler does the formatting.New in version 0.3.
-
default_config= ImmutableDict({‘JSON_AS_ASCII’: True, ‘USE_X_SENDFILE’: False, ‘SESSION_COOKIE_PATH’: None, ‘SESSION_COOKIE_DOMAIN’: None, ‘SESSION_COOKIE_NAME’: ‘session’, ‘LOGGER_NAME’: None, ‘DEBUG’: False, ‘SECRET_KEY’: None, ‘MAX_CONTENT_LENGTH’: None, ‘APPLICATION_ROOT’: None, ‘SERVER_NAME’: None, ‘PREFERRED_URL_SCHEME’: ‘http’, ‘JSONIFY_PRETTYPRINT_REGULAR’: True, ‘TESTING’: False, ‘PERMANENT_SESSION_LIFETIME’: datetime.timedelta(31), ‘PROPAGATE_EXCEPTIONS’: None, ‘TRAP_BAD_REQUEST_ERRORS’: False, ‘JSON_SORT_KEYS’: True, ‘SESSION_COOKIE_HTTPONLY’: True, ‘SEND_FILE_MAX_AGE_DEFAULT’: 43200, ‘PRESERVE_CONTEXT_ON_EXCEPTION’: None, ‘SESSION_COOKIE_SECURE’: False, ‘TRAP_HTTP_EXCEPTIONS’: False})¶ -
Default configuration parameters.
-
dispatch_request()¶ -
Does the request dispatching. Matches the URL and returns the
return value of the view or error handler. This does not have to
be a response object. In order to convert the return value to a
proper response object, callmake_response().Changed in version 0.7: This no longer does the exception handling, this code was
moved to the newfull_dispatch_request().
-
do_teardown_appcontext(exc=None)¶ -
Called when an application context is popped. This works pretty
much the same asdo_teardown_request()but for the application
context.New in version 0.9.
-
do_teardown_request(exc=None)¶ -
Called after the actual request dispatching and will
call every asteardown_request()decorated function. This is
not actually called by theFlaskobject itself but is always
triggered when the request context is popped. That way we have a
tighter control over certain resources under testing environments.Changed in version 0.9: Added the exc argument. Previously this was always using the
current exception information.
-
enable_modules= True¶ -
Enable the deprecated module support? This is active by default
in 0.7 but will be changed to False in 0.8. With Flask 1.0 modules
will be removed in favor of Blueprints
-
endpoint(*args, **kwargs)¶ -
A decorator to register a function as an endpoint.
Example:@app.endpoint('example.endpoint') def example(): return "example"
Parameters: endpoint – the name of the endpoint
-
error_handler_spec= None¶ -
A dictionary of all registered error handlers. The key is None
for error handlers active on the application, otherwise the key is
the name of the blueprint. Each key points to another dictionary
where they key is the status code of the http exception. The
special key None points to a list of tuples where the first item
is the class for the instance check and the second the error handler
function.To register a error handler, use the
errorhandler()
decorator.
-
errorhandler(*args, **kwargs)¶ -
A decorator that is used to register a function give a given
error code. Example:@app.errorhandler(404) def page_not_found(error): return 'This page does not exist', 404
You can also register handlers for arbitrary exceptions:
@app.errorhandler(DatabaseError)
def special_exception_handler(error):
    return 'Database connection failed', 500
You can also register a function as error handler without using
theerrorhandler()decorator. The following example is
equivalent to the one above:def page_not_found(error): return 'This page does not exist', 404 app.error_handler_spec[None][404] = page_not_found
Setting error handlers via assignments to
error_handler_spec
however is discouraged as it requires fiddling with nested dictionaries
and the special case for arbitrary exception types.The first None refers to the active blueprint. If the error
handler should be application wide None shall be used.New in version 0.7: One can now additionally also register custom exception types
that do not necessarily have to be a subclass of the
HTTPExceptionclass.Parameters: code – the code as integer for the handler
-
extensions= None¶ -
a place where extensions can store application specific state. For
example this is where an extension could store database engines and
similar things. For backwards compatibility extensions should register
themselves like this:if not hasattr(app, 'extensions'): app.extensions = {} app.extensions['extensionname'] = SomeObject()
The key must match the name of the flaskext module. For example in
case of a “Flask-Foo” extension in flaskext.foo, the key would be
'foo'.New in version 0.7.
-
full_dispatch_request()¶ -
Dispatches the request and on top of that performs request
pre and postprocessing as well as HTTP exception catching and
error handling.New in version 0.7.
-
get_send_file_max_age(filename)¶ -
Provides default cache_timeout for the
send_file()functions.By default, this function returns
SEND_FILE_MAX_AGE_DEFAULTfrom
the configuration ofcurrent_app.Static file functions such as
send_from_directory()use this
function, andsend_file()calls this function on
current_appwhen the given cache_timeout is None. If a
cache_timeout is given insend_file(), that timeout is used;
otherwise, this method is called.This allows subclasses to change the behavior when sending files based
on the filename. For example, to set the cache timeout for .js files
to 60 seconds:class MyFlask(flask.Flask): def get_send_file_max_age(self, name): if name.lower().endswith('.js'): return 60 return flask.Flask.get_send_file_max_age(self, name)
New in version 0.9.
-
got_first_request¶ -
This attribute is set to True if the application started
handling the first request.New in version 0.8.
-
handle_exception(e)¶ -
Default exception handling that kicks in when an exception
occurs that is not caught. In debug mode the exception will
be re-raised immediately, otherwise it is logged and the handler
for a 500 internal server error is used. If no such handler
exists, a default 500 internal server error message is displayed.New in version 0.3.
-
handle_http_exception(e)¶ -
Handles an HTTP exception. By default this will invoke the
registered error handlers and fall back to returning the
exception as response.New in version 0.3.
-
handle_url_build_error(error, endpoint, values)¶ -
Handle
BuildErroronurl_for().
-
handle_user_exception(e)¶ -
This method is called whenever an exception occurs that should be
handled. A special case are
HTTPExceptions which are forwarded by
this function to thehandle_http_exception()method. This
function will either return a response value or reraise the
exception with the same traceback.New in version 0.7.
-
has_static_folder¶ -
This is True if the package bound object’s container has a
folder named'static'.New in version 0.5.
-
init_jinja_globals()¶ -
Deprecated. Used to initialize the Jinja2 globals.
New in version 0.5.
Changed in version 0.7: This method is deprecated with 0.7. Override
create_jinja_environment()instead.
-
inject_url_defaults(endpoint, values)¶ -
Injects the URL defaults for the given endpoint directly into
the values dictionary passed. This is used internally and
automatically called on URL building.New in version 0.7.
-
instance_path= None¶ -
Holds the path to the instance folder.
New in version 0.8.
-
jinja_env¶ -
The Jinja2 environment used to load templates.
-
jinja_loader¶ -
The Jinja loader for this package bound object.
New in version 0.5.
-
jinja_options= ImmutableDict({‘extensions’: [‘jinja2.ext.autoescape’, ‘jinja2.ext.with_’]})¶ -
Options that are passed directly to the Jinja2 environment.
-
json_decoder¶ -
The JSON decoder class to use. Defaults to
JSONDecoder.New in version 0.10.
alias of
JSONDecoder
-
json_encoder¶ -
The JSON encoder class to use. Defaults to
JSONEncoder.New in version 0.10.
alias of
JSONEncoder
-
log_exception(exc_info)¶ -
Logs an exception. This is called by
handle_exception()
if debugging is disabled and right before the handler is called.
The default implementation logs the exception as error on the
logger.New in version 0.8.
-
logger¶ -
A
logging.Loggerobject for this application. The
default configuration is to log to stderr if the application is
in debug mode. This logger can be used to (surprise) log messages.
Here some examples:app.logger.debug('A value for debugging') app.logger.warning('A warning occurred (%d apples)', 42) app.logger.error('An error occurred')
New in version 0.3.
-
logger_name¶ -
The name of the logger to use. By default the logger name is the
package name passed to the constructor.New in version 0.4.
-
make_config(instance_relative=False)¶ -
Used to create the config attribute by the Flask constructor.
The instance_relative parameter is passed in from the constructor
of Flask (there named instance_relative_config) and indicates if
the config should be relative to the instance path or the root path
of the application.New in version 0.8.
-
make_default_options_response()¶ -
This method is called to create the default OPTIONS response.
This can be changed through subclassing to change the default
behavior of OPTIONS responses.New in version 0.7.
-
make_null_session()¶ -
Creates a new instance of a missing session. Instead of overriding
this method we recommend replacing thesession_interface.New in version 0.7.
-
make_response(rv)¶ -
Converts the return value from a view function to a real
response object that is an instance ofresponse_class.The following types are allowed for rv:
response_classthe object is returned unchanged stra response object is created with the
string as bodyunicodea response object is created with the
string encoded to utf-8 as bodya WSGI function the function is called as WSGI application
and buffered as response objecttupleA tuple in the form (response, status,where response is any of the
headers)
types defined here, status is a string
or an integer and headers is a list of
a dictionary with header values.Parameters: rv – the return value from the view function Changed in version 0.9: Previously a tuple was interpreted as the arguments for the
response object.
-
name¶ -
The name of the application. This is usually the import name
with the difference that it’s guessed from the run file if the
import name is main. This name is used as a display name when
Flask needs the name of the application. It can be set and overridden
to change the value.New in version 0.8.
-
open_instance_resource(resource, mode=’rb’)¶ -
Opens a resource from the application’s instance folder
(instance_path). Otherwise works like
open_resource(). Instance resources can also be opened for
writing.Parameters: - resource – the name of the resource. To access resources within
subfolders use forward slashes as separator. - mode – resource file opening mode, default is ‘rb’.
- resource – the name of the resource. To access resources within
-
open_resource(resource, mode=’rb’)¶ -
Opens a resource from the application’s resource folder. To see
how this works, consider the following folder structure:/myapplication.py /schema.sql /static /style.css /templates /layout.html /index.htmlIf you want to open the schema.sql file you would do the
following:with app.open_resource('schema.sql') as f: contents = f.read() do_something_with(contents)
Parameters: - resource – the name of the resource. To access resources within
subfolders use forward slashes as separator. - mode – resource file opening mode, default is ‘rb’.
- resource – the name of the resource. To access resources within
-
open_session(request)¶ -
Creates or opens a new session. Default implementation stores all
session data in a signed cookie. This requires that the
secret_keyis set. Instead of overriding this method
we recommend replacing thesession_interface.Parameters: request – an instance of request_class.
-
permanent_session_lifetime¶ -
A
timedeltawhich is used to set the expiration
date of a permanent session. The default is 31 days which makes a
permanent session survive for roughly one month.This attribute can also be configured from the config with the
PERMANENT_SESSION_LIFETIME configuration key. Defaults to
timedelta(days=31)
-
preprocess_request()¶ -
Called before the actual request dispatching and will
call every asbefore_request()decorated function.
If any of these function returns a value it’s handled as
if it was the return value from the view and further
request handling is stopped.This also triggers the
url_value_processor()functions before
the actualbefore_request()functions are called.
-
preserve_context_on_exception¶ -
Returns the value of the PRESERVE_CONTEXT_ON_EXCEPTION
configuration value in case it’s set, otherwise a sensible default
is returned.New in version 0.7.
-
process_response(response)¶ -
Can be overridden in order to modify the response object
before it’s sent to the WSGI server. By default this will
call all theafter_request()decorated functions.Changed in version 0.5: As of Flask 0.5 the functions registered for after request
execution are called in reverse order of registration.Parameters: response – a response_classobject.Returns: a new response object or the same, has to be an
instance ofresponse_class.
-
propagate_exceptions¶ -
Returns the value of the PROPAGATE_EXCEPTIONS configuration
value in case it’s set, otherwise a sensible default is returned.New in version 0.7.
-
register_blueprint(*args, **kwargs)¶ -
Registers a blueprint on the application.
New in version 0.7.
-
register_error_handler(code_or_exception, f)¶ -
Alternative error attach function to the
errorhandler()
decorator that is more straightforward to use for non decorator
usage.New in version 0.7.
-
register_module(module, **options)¶ -
Registers a module with this application. The keyword argument
of this function are the same as the ones for the constructor of the
Moduleclass and will override the values of the module if
provided.Changed in version 0.7: The module system was deprecated in favor for the blueprint
system.
-
request_class¶ -
The class that is used for request objects. See
Request
for more information.alias of
Request
-
request_context(environ)¶ -
Creates a
RequestContextfrom the given
environment and binds it to the current context. This must be used in
combination with the with statement because the request is only bound
to the current context for the duration of the with block.Example usage:
with app.request_context(environ):
    do_something_with(request)
The object returned can also be used without the with statement
which is useful for working in the shell. The example above is
doing exactly the same as this code:ctx = app.request_context(environ) ctx.push() try: do_something_with(request) finally: ctx.pop()
Changed in version 0.3: Added support for non-with statement usage and with statement
is now passed the ctx object.Parameters: environ – a WSGI environment
-
response_class¶ -
The class that is used for response objects. See
Responsefor more information.alias of
Response
-
route(rule, **options)¶ -
A decorator that is used to register a view function for a
given URL rule. This does the same thing asadd_url_rule()
but is intended for decorator usage:@app.route('/') def index(): return 'Hello World'
For more information refer to URL Route Registrations.
Parameters: - rule – the URL rule as string
- endpoint – the endpoint for the registered URL rule. Flask
itself assumes the name of the view function as
endpoint - options – the options to be forwarded to the underlying
Ruleobject. A change
to Werkzeug is handling of method options. methods
is a list of methods this rule should be limited
to (GET, POST etc.). By default a rule
just listens for GET (and implicitly HEAD).
Starting with Flask 0.6, OPTIONS is implicitly
added and handled by the standard request handling.
-
run(host=None, port=None, debug=None, **options)¶ -
Runs the application on a local development server. If the
debugflag is set the server will automatically reload
for code changes and show a debugger in case an exception happened.If you want to run the application in debug mode, but disable the
code execution on the interactive debugger, you can pass
use_evalex=Falseas parameter. This will keep the debugger’s
traceback screen active, but disable code execution.Keep in Mind
Flask will suppress any server error with a generic error page
unless it is in debug mode. As such to enable just the
interactive debugger without the code reloading, you have to
invokerun()withdebug=Trueanduse_reloader=False.
Settinguse_debuggerto True without being in debug mode
won’t catch any exceptions because there won’t be any to
catch.Changed in version 0.10: The default port is now picked from the
SERVER_NAMEvariable.Parameters: - host – the hostname to listen on. Set this to
'0.0.0.0'to
have the server available externally as well. Defaults to
'127.0.0.1'. - port – the port of the webserver. Defaults to
5000or the
port defined in theSERVER_NAMEconfig variable if
present. - debug – if given, enable or disable debug mode.
Seedebug. - options – the options to be forwarded to the underlying
Werkzeug server. See
werkzeug.serving.run_simple()for more
information.
- host – the hostname to listen on. Set this to
-
save_session(session, response)¶ -
Saves the session if it needs updates. For the default
implementation, checkopen_session(). Instead of overriding this
method we recommend replacing thesession_interface.Parameters: - session – the session to be saved (a
SecureCookie
object) - response – an instance of
response_class
- session – the session to be saved (a
-
secret_key¶ -
If a secret key is set, cryptographic components can use this to
sign cookies and other things. Set this to a complex random value
when you want to use the secure cookie for instance.This attribute can also be configured from the config with the
SECRET_KEY configuration key. Defaults to None.
-
select_jinja_autoescape(filename)¶ -
Returns True if autoescaping should be active for the given
template name.New in version 0.5.
-
send_static_file(filename)¶ -
Function used internally to send static files from the static
folder to the browser.New in version 0.5.
-
session_cookie_name¶ -
The secure cookie uses this for the name of the session cookie.
This attribute can also be configured from the config with the
SESSION_COOKIE_NAME configuration key. Defaults to'session'
-
session_interface= <flask.sessions.SecureCookieSessionInterface object>¶ -
the session interface to use. By default an instance of
SecureCookieSessionInterfaceis used here.New in version 0.8.
-
should_ignore_error(error)¶ -
This is called to figure out if an error should be ignored
or not as far as the teardown system is concerned. If this
function returns True then the teardown handlers will not be
passed the error.New in version 0.10.
-
teardown_appcontext(*args, **kwargs)¶ -
Registers a function to be called when the application context
ends. These functions are typically also called when the request
context is popped.Example:
ctx = app.app_context()
ctx.push()
...
ctx.pop()
When
ctx.pop()is executed in the above example, the teardown
functions are called just before the app context moves from the
stack of active contexts. This becomes relevant if you are using
such constructs in tests.Since a request context typically also manages an application
context it would also be called when you pop a request context.When a teardown function was called because of an exception it will
be passed an error object.New in version 0.9.
-
teardown_appcontext_funcs= None¶ -
A list of functions that are called when the application context
is destroyed. Since the application context is also torn down
if the request ends this is the place to store code that disconnects
from databases.New in version 0.9.
-
teardown_request(*args, **kwargs)¶ -
Register a function to be run at the end of each request,
regardless of whether there was an exception or not. These functions
are executed when the request context is popped, even if not an
actual request was performed.Example:
ctx = app.test_request_context()
ctx.push()
...
ctx.pop()
When
ctx.pop()is executed in the above example, the teardown
functions are called just before the request context moves from the
stack of active contexts. This becomes relevant if you are using
such constructs in tests.Generally teardown functions must take every necessary step to avoid
that they will fail. If they do execute code that might fail they
will have to surround the execution of these code by try/except
statements and log occurring errors.When a teardown function was called because of a exception it will
be passed an error object.Debug Note
In debug mode Flask will not tear down a request on an exception
immediately. Instead if will keep it alive so that the interactive
debugger can still access it. This behavior can be controlled
by thePRESERVE_CONTEXT_ON_EXCEPTIONconfiguration variable.
-
teardown_request_funcs= None¶ -
A dictionary with lists of functions that are called after
each request, even if an exception has occurred. The key of the
dictionary is the name of the blueprint this function is active for,
None for all requests. These functions are not allowed to modify
the request, and their return values are ignored. If an exception
occurred while processing the request, it gets passed to each
teardown_request function. To register a function here, use the
teardown_request()decorator.New in version 0.7.
-
template_context_processors= None¶ -
A dictionary with list of functions that are called without argument
to populate the template context. The key of the dictionary is the
name of the blueprint this function is active for, None for all
requests. Each returns a dictionary that the template context is
updated with. To register a function here, use the
context_processor()decorator.
-
template_filter(*args, **kwargs)¶ -
A decorator that is used to register custom template filter.
You can specify a name for the filter, otherwise the function
name will be used. Example:@app.template_filter() def reverse(s): return s[::-1]
Parameters: name – the optional name of the filter, otherwise the
function name will be used.
-
template_global(*args, **kwargs)¶ -
A decorator that is used to register a custom template global function.
You can specify a name for the global function, otherwise the function
name will be used. Example:@app.template_global() def double(n): return 2 * n
New in version 0.10.
Parameters: name – the optional name of the global function, otherwise the
function name will be used.
-
template_test(*args, **kwargs)¶ -
A decorator that is used to register custom template test.
You can specify a name for the test, otherwise the function
name will be used. Example:@app.template_test() def is_prime(n): if n == 2: return True for i in range(2, int(math.ceil(math.sqrt(n))) + 1): if n % i == 0: return False return True
New in version 0.10.
Parameters: name – the optional name of the test, otherwise the
function name will be used.
-
test_client(use_cookies=True)¶ -
Creates a test client for this application. For information
about unit testing head over to Testing Flask Applications.Note that if you are testing for assertions or exceptions in your
application code, you must setapp.testing = Truein order for the
exceptions to propagate to the test client. Otherwise, the exception
will be handled by the application (not visible to the test client) and
the only indication of an AssertionError or other exception will be a
500 status code response to the test client. See thetesting
attribute. For example:app.testing = True client = app.test_client()
The test client can be used in a with block to defer the closing down
of the context until the end of the with block. This is useful if
you want to access the context locals for testing:with app.test_client() as c: rv = c.get('/?vodka=42') assert request.args['vodka'] == '42'
See
FlaskClientfor more information.Changed in version 0.4: added support for with block usage for the client.
New in version 0.7: The use_cookies parameter was added as well as the ability
to override the client to be used by setting the
test_client_classattribute.
-
test_client_class= None¶ -
the test client that is used with when test_client is used.
New in version 0.7.
-
test_request_context(*args, **kwargs)¶ -
Creates a WSGI environment from the given values (see
werkzeug.test.EnvironBuilder()for more information, this
function accepts the same arguments).
-
testing¶ -
The testing flag. Set this to True to enable the test mode of
Flask extensions (and in the future probably also Flask itself).
For example this might activate unittest helpers that have an
additional runtime cost which should not be enabled by default.If this is enabled and PROPAGATE_EXCEPTIONS is not changed from the
default it’s implicitly enabled.This attribute can also be configured from the config with the
TESTING configuration key. Defaults to False.
-
trap_http_exception(e)¶ -
Checks if an HTTP exception should be trapped or not. By default
this will return False for all exceptions except for a bad request
key error ifTRAP_BAD_REQUEST_ERRORSis set to True. It
also returns True ifTRAP_HTTP_EXCEPTIONSis set to True.This is called for all HTTP exceptions raised by a view function.
If it returns True for any exception the error handler for this
exception is not called and it shows up as regular exception in the
traceback. This is helpful for debugging implicitly raised HTTP
exceptions.New in version 0.8.
-
update_template_context(context)¶ -
Update the template context with some commonly used variables.
This injects request, session, config and g into the template
context as well as everything template context processors want
to inject. Note that the as of Flask 0.6, the original values
in the context will not be overridden if a context processor
decides to return a value with the same key.Parameters: context – the context as a dictionary that is updated in place
to add extra variables.
-
url_build_error_handlers= None¶ -
A list of functions that are called when
url_for()raises a
BuildError. Each function registered here
is called with error, endpoint and values. If a function
returns None or raises a BuildError the next function is
tried.New in version 0.9.
-
url_default_functions= None¶ -
A dictionary with lists of functions that can be used as URL value
preprocessors. The key None here is used for application wide
callbacks, otherwise the key is the name of the blueprint.
Each of these functions has the chance to modify the dictionary
of URL values before they are used as the keyword arguments of the
view function. For each function registered this one should also
provide aurl_defaults()function that adds the parameters
automatically again that were removed that way.New in version 0.7.
-
url_defaults(*args, **kwargs)¶ -
Callback function for URL defaults for all view functions of the
application. It’s called with the endpoint and values and should
update the values passed in place.
-
url_map= None¶ -
The
Mapfor this instance. You can use
this to change the routing converters after the class was created
but before any routes are connected. Example:from werkzeug.routing import BaseConverter class ListConverter(BaseConverter): def to_python(self, value): return value.split(',') def to_url(self, values): return ','.join(BaseConverter.to_url(value) for value in values) app = Flask(__name__) app.url_map.converters['list'] = ListConverter
-
url_rule_class¶ -
The rule object to use for URL rules created. This is used by
add_url_rule(). Defaults towerkzeug.routing.Rule.New in version 0.7.
alias of
Rule
-
url_value_preprocessor(*args, **kwargs)¶ -
Registers a function as URL value preprocessor for all view
functions of the application. It’s called before the view functions
are called and can modify the url values provided.
-
url_value_preprocessors= None¶ -
A dictionary with lists of functions that can be used as URL
value processor functions. Whenever a URL is built these functions
are called to modify the dictionary of values in place. The key
None here is used for application wide
callbacks, otherwise the key is the name of the blueprint.
Each of these functions has the chance to modify the dictionaryNew in version 0.7.
-
use_x_sendfile¶ -
Enable this if you want to use the X-Sendfile feature. Keep in
mind that the server has to support this. This only affects files
sent with thesend_file()method.New in version 0.2.
This attribute can also be configured from the config with the
USE_X_SENDFILE configuration key. Defaults to False.
-
view_functions= None¶ -
A dictionary of all view functions registered. The keys will
be function names which are also used to generate URLs and
the values are the function objects themselves.
To register a view function, use theroute()decorator.
-
wsgi_app(environ, start_response)¶ -
The actual WSGI application. This is not implemented in
__call__ so that middlewares can be applied without losing a
reference to the class. So instead of doing this:It’s a better idea to do this instead:
app.wsgi_app = MyMiddleware(app.wsgi_app)
Then you still have the original application object around and
can continue to call methods on it.Changed in version 0.7: The behavior of the before and after request callbacks was changed
under error conditions and a new callback was added that will
always execute at the end of the request, independent on if an
error occurred or not. See Callbacks and Errors.Parameters: - environ – a WSGI environment
- start_response – a callable accepting a status code,
a list of headers and an optional
exception context to start the response
Blueprint Objects
-
class
flask.Blueprint(name, import_name, static_folder=None, static_url_path=None, template_folder=None, url_prefix=None, subdomain=None, url_defaults=None)¶ -
Represents a blueprint. A blueprint is an object that records
functions that will be called with the
BlueprintSetupStatelater to register functions
or other things on the main application. See Modular Applications with Blueprints for more
information.New in version 0.7.
-
add_app_template_filter(f, name=None)¶ -
Register a custom template filter, available application wide. Like
Flask.add_template_filter()but for a blueprint. Works exactly
like theapp_template_filter()decorator.Parameters: name – the optional name of the filter, otherwise the
function name will be used.
-
add_app_template_global(f, name=None)¶ -
Register a custom template global, available application wide. Like
Flask.add_template_global()but for a blueprint. Works exactly
like theapp_template_global()decorator.New in version 0.10.
Parameters: name – the optional name of the global, otherwise the
function name will be used.
-
add_app_template_test(f, name=None)¶ -
Register a custom template test, available application wide. Like
Flask.add_template_test()but for a blueprint. Works exactly
like theapp_template_test()decorator.New in version 0.10.
Parameters: name – the optional name of the test, otherwise the
function name will be used.
-
add_url_rule(rule, endpoint=None, view_func=None, **options)¶ -
Like
Flask.add_url_rule()but for a blueprint. The endpoint for
theurl_for()function is prefixed with the name of the blueprint.
-
after_app_request(f)¶ -
Like
Flask.after_request()but for a blueprint. Such a function
is executed after each request, even if outside of the blueprint.
-
after_request(f)¶ -
Like
Flask.after_request()but for a blueprint. This function
is only executed after each request that is handled by a function of
that blueprint.
-
app_context_processor(f)¶ -
Like
Flask.context_processor()but for a blueprint. Such a
function is executed each request, even if outside of the blueprint.
-
app_errorhandler(code)¶ -
Like
Flask.errorhandler()but for a blueprint. This
handler is used for all requests, even if outside of the blueprint.
-
app_template_filter(name=None)¶ -
Register a custom template filter, available application wide. Like
Flask.template_filter()but for a blueprint.Parameters: name – the optional name of the filter, otherwise the
function name will be used.
-
app_template_global(name=None)¶ -
Register a custom template global, available application wide. Like
Flask.template_global()but for a blueprint.New in version 0.10.
Parameters: name – the optional name of the global, otherwise the
function name will be used.
-
app_template_test(name=None)¶ -
Register a custom template test, available application wide. Like
Flask.template_test()but for a blueprint.New in version 0.10.
Parameters: name – the optional name of the test, otherwise the
function name will be used.
-
app_url_defaults(f)¶ -
Same as
url_defaults()but application wide.
-
app_url_value_preprocessor(f)¶ -
Same as
url_value_preprocessor()but application wide.
-
before_app_first_request(f)¶ -
Like
Flask.before_first_request(). Such a function is
executed before the first request to the application.
-
before_app_request(f)¶ -
Like
Flask.before_request(). Such a function is executed
before each request, even if outside of a blueprint.
-
before_request(f)¶ -
Like
Flask.before_request()but for a blueprint. This function
is only executed before each request that is handled by a function of
that blueprint.
-
context_processor(f)¶ -
Like
Flask.context_processor()but for a blueprint. This
function is only executed for requests handled by a blueprint.
-
endpoint(endpoint)¶ -
Like
Flask.endpoint()but for a blueprint. This does not
prefix the endpoint with the blueprint name, this has to be done
explicitly by the user of this method. If the endpoint is prefixed
with a . it will be registered to the current blueprint, otherwise
it’s an application independent endpoint.
-
errorhandler(code_or_exception)¶ -
Registers an error handler that becomes active for this blueprint
only. Please be aware that routing does not happen local to a
blueprint so an error handler for 404 usually is not handled by
a blueprint unless it is caused inside a view function. Another
special case is the 500 internal server error which is always looked
up from the application.Otherwise works as the
errorhandler()decorator
of theFlaskobject.
-
get_send_file_max_age(filename)¶ -
Provides default cache_timeout for the
send_file()functions.By default, this function returns
SEND_FILE_MAX_AGE_DEFAULTfrom
the configuration ofcurrent_app.Static file functions such as
send_from_directory()use this
function, andsend_file()calls this function on
current_appwhen the given cache_timeout is None. If a
cache_timeout is given insend_file(), that timeout is used;
otherwise, this method is called.This allows subclasses to change the behavior when sending files based
on the filename. For example, to set the cache timeout for .js files
to 60 seconds:class MyFlask(flask.Flask): def get_send_file_max_age(self, name): if name.lower().endswith('.js'): return 60 return flask.Flask.get_send_file_max_age(self, name)
New in version 0.9.
-
has_static_folder¶ -
This is True if the package bound object’s container has a
folder named'static'.New in version 0.5.
-
jinja_loader¶ -
The Jinja loader for this package bound object.
New in version 0.5.
-
make_setup_state(app, options, first_registration=False)¶ -
Creates an instance of
BlueprintSetupState()
object that is later passed to the register callback functions.
Subclasses can override this to return a subclass of the setup state.
-
open_resource(resource, mode=’rb’)¶ -
Opens a resource from the application’s resource folder. To see
how this works, consider the following folder structure:/myapplication.py /schema.sql /static /style.css /templates /layout.html /index.htmlIf you want to open the schema.sql file you would do the
following:with app.open_resource('schema.sql') as f: contents = f.read() do_something_with(contents)
Parameters: - resource – the name of the resource. To access resources within
subfolders use forward slashes as separator. - mode – resource file opening mode, default is ‘rb’.
- resource – the name of the resource. To access resources within
-
record(func)¶ -
Registers a function that is called when the blueprint is
registered on the application. This function is called with the
state as argument as returned by themake_setup_state()
method.
-
record_once(func)¶ -
Works like
record()but wraps the function in another
function that will ensure the function is only called once. If the
blueprint is registered a second time on the application, the
function passed is not called.
-
register(app, options, first_registration=False)¶ -
Called by
Flask.register_blueprint()to register a blueprint
on the application. This can be overridden to customize the register
behavior. Keyword arguments from
register_blueprint()are directly forwarded to this
method in the options dictionary.
-
route(rule, **options)¶ -
Like
Flask.route()but for a blueprint. The endpoint for the
url_for()function is prefixed with the name of the blueprint.
-
send_static_file(filename)¶ -
Function used internally to send static files from the static
folder to the browser.New in version 0.5.
-
teardown_app_request(f)¶ -
Like
Flask.teardown_request()but for a blueprint. Such a
function is executed when tearing down each request, even if outside of
the blueprint.
-
teardown_request(f)¶ -
Like
Flask.teardown_request()but for a blueprint. This
function is only executed when tearing down requests handled by a
function of that blueprint. Teardown request functions are executed
when the request context is popped, even when no actual request was
performed.
-
url_defaults(f)¶ -
Callback function for URL defaults for this blueprint. It’s called
with the endpoint and values and should update the values passed
in place.
-
url_value_preprocessor(f)¶ -
Registers a function as URL value preprocessor for this
blueprint. It’s called before the view functions are called and
can modify the url values provided.
-
Incoming Request Data
-
class
flask.Request(environ, populate_request=True, shallow=False)¶ -
The request object used by default in Flask. Remembers the
matched endpoint and view arguments.It is what ends up as
request. If you want to replace
the request object used you can subclass this and set
request_classto your subclass.The request object is a
Requestsubclass and
provides all of the attributes Werkzeug defines plus a few Flask
specific ones.-
form¶ -
A
MultiDictwith the parsed form data from POST
or PUT requests. Please keep in mind that file uploads will not
end up here, but instead in thefilesattribute.
-
args¶ -
A
MultiDictwith the parsed contents of the query
string. (The part in the URL after the question mark).
-
values¶ -
A
CombinedMultiDictwith the contents of both
formandargs.
-
cookies¶ -
A
dictwith the contents of all cookies transmitted with
the request.
-
stream¶ -
If the incoming form data was not encoded with a known mimetype
the data is stored unmodified in this stream for consumption. Most
of the time it is a better idea to usedatawhich will give
you that data as a string. The stream only returns the data once.
-
The incoming request headers as a dictionary like object.
-
data¶ -
Contains the incoming request data as string in case it came with
a mimetype Flask does not handle.
-
files¶ -
A
MultiDictwith files uploaded as part of a
POST or PUT request. Each file is stored as
FileStorageobject. It basically behaves like a
standard file object you know from Python, with the difference that
it also has asave()function that can
store the file on the filesystem.
-
environ¶ -
The underlying WSGI environment.
-
method¶ -
The current request method (
POST,GETetc.)
-
path
-
script_root
-
url
-
base_url
-
url_root¶ -
Provides different ways to look at the current URL. Imagine your
application is listening on the following URL:http://www.example.com/myapplication
And a user requests the following URL:
http://www.example.com/myapplication/page.html?x=y
In this case the values of the above mentioned attributes would be
the following:path /page.htmlscript_root /myapplicationbase_url http://www.example.com/myapplication/page.htmlurl http://www.example.com/myapplication/page.html?x=yurl_root http://www.example.com/myapplication/
-
is_xhr¶ -
True if the request was triggered via a JavaScript
XMLHttpRequest. This only works with libraries that support the
X-Requested-Withheader and set it to XMLHttpRequest.
Libraries that do that are prototype, jQuery and Mochikit and
probably some more.
-
blueprint¶ -
The name of the current blueprint
-
endpoint¶ -
The endpoint that matched the request. This in combination with
view_argscan be used to reconstruct the same or a
modified URL. If an exception happened when matching, this will
be None.
-
get_json(force=False, silent=False, cache=True)¶ -
Parses the incoming JSON request data and returns it. If
parsing fails theon_json_loading_failed()method on the
request object will be invoked. By default this function will
only load the json data if the mimetype isapplication/json
but this can be overriden by the force parameter.Parameters: - force – if set to True the mimetype is ignored.
- silent – if set to False this method will fail silently
and return False. - cache – if set to True the parsed JSON data is remembered
on the request.
-
json¶ -
If the mimetype is application/json this will contain the
parsed JSON data. Otherwise this will be None.The
get_json()method should be used instead.
-
max_content_length¶ -
Read-only view of the MAX_CONTENT_LENGTH config key.
-
module¶ -
The name of the current module if the request was dispatched
to an actual module. This is deprecated functionality, use blueprints
instead.
-
on_json_loading_failed(e)¶ -
Called if decoding of the JSON data failed. The return value of
this method is used byget_json()when an error occurred. The
default implementation just raises aBadRequestexception.Changed in version 0.10: Removed buggy previous behavior of generating a random JSON
response. If you want that behavior back you can trivially
add it by subclassing.New in version 0.8.
-
routing_exception= None¶ -
if matching the URL failed, this is the exception that will be
raised / was raised as part of the request handling. This is
usually aNotFoundexception or
something similar.
-
url_rule= None¶ -
the internal URL rule that matched the request. This can be
useful to inspect which methods are allowed for the URL from
a before/after handler (request.url_rule.methods) etc.New in version 0.6.
-
view_args= None¶ -
a dict of view arguments that matched the request. If an exception
happened when matching, this will be None.
-
-
class
flask.request¶ -
To access incoming request data, you can use the global request
object. Flask parses incoming request data for you and gives you
access to it through that global object. Internally Flask makes
sure that you always get the correct data for the active thread if you
are in a multithreaded environment.This is a proxy. See Notes On Proxies for more information.
The request object is an instance of a
Request
subclass and provides all of the attributes Werkzeug defines. This
just shows a quick overview of the most important ones.
Response Objects
-
class
flask.Response(response=None, status=None, headers=None, mimetype=None, content_type=None, direct_passthrough=False)¶ -
The response object that is used by default in Flask. Works like the
response object from Werkzeug but is set to have an HTML mimetype by
default. Quite often you don’t have to create this object yourself because
make_response()will take care of that for you.If you want to replace the response object used you can subclass this and
setresponse_classto your subclass.-
A
Headersobject representing the response headers.
-
status¶ -
A string with a response status.
-
status_code¶ -
The response status as integer.
-
data¶ -
A descriptor that calls
get_data()andset_data(). This
should not be used and will eventually get deprecated.
-
mimetype¶ -
The mimetype (content type without charset etc.)
-
set_cookie(key, value=», max_age=None, expires=None, path=’/’, domain=None, secure=None, httponly=False)¶ -
Sets a cookie. The parameters are the same as in the cookie Morsel
object in the Python standard library but it accepts unicode data, too.Parameters: - key – the key (name) of the cookie to be set.
- value – the value of the cookie.
- max_age – should be a number of seconds, or None (default) if
the cookie should last only as long as the client’s
browser session. - expires – should be a datetime object or UNIX timestamp.
- domain – if you want to set a cross-domain cookie. For example,
domain=".example.com"will set a cookie that is
readable by the domainwww.example.com,
foo.example.cometc. Otherwise, a cookie will only
be readable by the domain that set it. - path – limits the cookie to a given path, per default it will
span the whole domain.
-
Sessions
If you have the Flask.secret_key set you can use sessions in Flask
applications. A session basically makes it possible to remember
information from one request to another. The way Flask does this is by
using a signed cookie. So the user can look at the session contents, but
not modify it unless they know the secret key, so make sure to set that
to something complex and unguessable.
To access the current session you can use the session object:
-
class
flask.session¶ -
The session object works pretty much like an ordinary dict, with the
difference that it keeps track on modifications.This is a proxy. See Notes On Proxies for more information.
The following attributes are interesting:
-
new¶ -
True if the session is new, False otherwise.
-
modified¶ -
True if the session object detected a modification. Be advised
that modifications on mutable structures are not picked up
automatically, in that situation you have to explicitly set the
attribute to True yourself. Here an example:# this change is not picked up because a mutable object (here # a list) is changed. session['objects'].append(42) # so mark it as modified yourself session.modified = True
-
permanent¶ -
If set to True the session lives for
permanent_session_lifetimeseconds. The
default is 31 days. If set to False (which is the default) the
session will be deleted when the user closes the browser.
-
Session Interface
New in version 0.8.
The session interface provides a simple way to replace the session
implementation that Flask is using.
-
class
flask.sessions.SessionInterface¶ -
The basic interface you have to implement in order to replace the
default session interface which uses werkzeug’s securecookie
implementation. The only methods you have to implement are
open_session()andsave_session(), the others have
useful defaults which you don’t need to change.The session object returned by the
open_session()method has to
provide a dictionary like interface plus the properties and methods
from theSessionMixin. We recommend just subclassing a dict
and adding that mixin:class Session(dict, SessionMixin): pass
If
open_session()returns None Flask will call into
make_null_session()to create a session that acts as replacement
if the session support cannot work because some requirement is not
fulfilled. The defaultNullSessionclass that is created
will complain that the secret key was not set.To replace the session interface on an application all you have to do
is to assignflask.Flask.session_interface:app = Flask(__name__) app.session_interface = MySessionInterface()
New in version 0.8.
-
get_cookie_domain(app)¶ -
Helpful helper method that returns the cookie domain that should
be used for the session cookie if session cookies are used.
-
get_cookie_httponly(app)¶ -
Returns True if the session cookie should be httponly. This
currently just returns the value of theSESSION_COOKIE_HTTPONLY
config var.
-
get_cookie_path(app)¶ -
Returns the path for which the cookie should be valid. The
default implementation uses the value from the SESSION_COOKIE_PATH«
config var if it’s set, and falls back toAPPLICATION_ROOTor
uses/if it’s None.
-
get_cookie_secure(app)¶ -
Returns True if the cookie should be secure. This currently
just returns the value of theSESSION_COOKIE_SECUREsetting.
-
get_expiration_time(app, session)¶ -
A helper method that returns an expiration date for the session
or None if the session is linked to the browser session. The
default implementation returns now + the permanent session
lifetime configured on the application.
-
is_null_session(obj)¶ -
Checks if a given object is a null session. Null sessions are
not asked to be saved.This checks if the object is an instance of
null_session_class
by default.
-
make_null_session(app)¶ -
Creates a null session which acts as a replacement object if the
real session support could not be loaded due to a configuration
error. This mainly aids the user experience because the job of the
null session is to still support lookup without complaining but
modifications are answered with a helpful error message of what
failed.This creates an instance of
null_session_classby default.
-
null_session_class¶ -
make_null_session()will look here for the class that should
be created when a null session is requested. Likewise the
is_null_session()method will perform a typecheck against
this type.alias of
NullSession
-
open_session(app, request)¶ -
This method has to be implemented and must either return None
in case the loading failed because of a configuration error or an
instance of a session object which implements a dictionary like
interface + the methods and attributes onSessionMixin.
-
pickle_based= False¶ -
A flag that indicates if the session interface is pickle based.
This can be used by flask extensions to make a decision in regards
to how to deal with the session object.New in version 0.10.
-
save_session(app, session, response)¶ -
This is called for actual sessions returned by
open_session()
at the end of the request. This is still called during a request
context so if you absolutely need access to the request you can do
that.
-
-
class
flask.sessions.SecureCookieSessionInterface¶ -
The default session interface that stores sessions in signed cookies
through theitsdangerousmodule.-
static
digest_method()¶ -
the hash function to use for the signature. The default is sha1
-
key_derivation= ‘hmac’¶ -
the name of the itsdangerous supported key derivation. The default
is hmac.
-
salt= ‘cookie-session’¶ -
the salt that should be applied on top of the secret key for the
signing of cookie based sessions.
-
serializer= <flask.sessions.TaggedJSONSerializer object>¶ -
A python serializer for the payload. The default is a compact
JSON derived serializer with support for some extra Python types
such as datetime objects or tuples.
-
session_class¶ -
alias of
SecureCookieSession
-
static
-
class
flask.sessions.SecureCookieSession(initial=None)¶ -
Baseclass for sessions based on signed cookies.
-
class
flask.sessions.NullSession(initial=None)¶ -
Class used to generate nicer error messages if sessions are not
available. Will still allow read-only access to the empty session
but fail on setting.
-
class
flask.sessions.SessionMixin¶ -
Expands a basic dictionary with an accessors that are expected
by Flask extensions and users for the session.-
modified= True¶ -
for some backends this will always be True, but some backends will
default this to false and detect changes in the dictionary for as
long as changes do not happen on mutable structures in the session.
The default mixin implementation just hardcodes True in.
-
new= False¶ -
some session backends can tell you if a session is new, but that is
not necessarily guaranteed. Use with caution. The default mixin
implementation just hardcodes False in.
-
permanent¶ -
this reflects the
'_permanent'key in the dict.
-
-
flask.sessions.session_json_serializer= <flask.sessions.TaggedJSONSerializer object>¶ -
A customized JSON serializer that supports a few extra types that
we take for granted when serializing (tuples, markup objects, datetime).This object provides dumping and loading methods similar to simplejson
but it also tags certain builtin Python objects that commonly appear in
sessions. Currently the following extended values are supported in
the JSON it dumps:MarkupobjectsUUIDobjectsdatetimeobjectstuples
Notice
The PERMANENT_SESSION_LIFETIME config key can also be an integer
starting with Flask 0.8. Either catch this down yourself or use
the permanent_session_lifetime attribute on the
app which converts the result to an integer automatically.
Test Client
-
class
flask.testing.FlaskClient(application, response_wrapper=None, use_cookies=True, allow_subdomain_redirects=False)¶ -
Works like a regular Werkzeug test client but has some knowledge about
how Flask works to defer the cleanup of the request context stack to the
end of a with body when used in a with statement. For general information
about how to use this class refer towerkzeug.test.Client.Basic usage is outlined in the Testing Flask Applications chapter.
-
session_transaction(*args, **kwds)¶ -
When used in combination with a with statement this opens a
session transaction. This can be used to modify the session that
the test client uses. Once the with block is left the session is
stored back.- with client.session_transaction() as session:
- session[‘value’] = 42
Internally this is implemented by going through a temporary test
request context and since session handling could depend on
request variables this function accepts the same arguments as
test_request_context()which are directly
passed through.
-
Application Globals
To share data that is valid for one request only from one function to
another, a global variable is not good enough because it would break in
threaded environments. Flask provides you with a special object that
ensures it is only valid for the active request and that will return
different values for each request. In a nutshell: it does the right
thing, like it does for request and session.
-
flask.g¶ -
Just store on this whatever you want. For example a database
connection or the user that is currently logged in.Starting with Flask 0.10 this is stored on the application context and
no longer on the request context which means it becomes available if
only the application context is bound and not yet a request. This
is especially useful when combined with the Faking Resources and Context
pattern for testing.Additionally as of 0.10 you can use the
get()method to
get an attribute or None (or the second argument) if it’s not set.
These two usages are now equivalent:user = getattr(flask.g, 'user', None) user = flask.g.get('user', None)
It’s now also possible to use the
inoperator on it to see if an
attribute is defined and it yields all keys on iteration.This is a proxy. See Notes On Proxies for more information.
Useful Functions and Classes
-
flask.current_app¶ -
Points to the application handling the request. This is useful for
extensions that want to support multiple applications running side
by side. This is powered by the application context and not by the
request context, so you can change the value of this proxy by
using theapp_context()method.This is a proxy. See Notes On Proxies for more information.
-
flask.has_request_context()¶ -
If you have code that wants to test if a request context is there or
not this function can be used. For instance, you may want to take advantage
of request information if the request object is available, but fail
silently if it is unavailable.class User(db.Model): def __init__(self, username, remote_addr=None): self.username = username if remote_addr is None and has_request_context(): remote_addr = request.remote_addr self.remote_addr = remote_addr
Alternatively you can also just test any of the context bound objects
(such asrequestorgfor truthness):class User(db.Model): def __init__(self, username, remote_addr=None): self.username = username if remote_addr is None and request: remote_addr = request.remote_addr self.remote_addr = remote_addr
New in version 0.7.
-
flask.copy_current_request_context(f)¶ -
A helper function that decorates a function to retain the current
request context. This is useful when working with greenlets. The moment
the function is decorated a copy of the request context is created and
then pushed when the function is called.Example:
import gevent
from flask import copy_current_request_context

@app.route('/')
def index():
    @copy_current_request_context
    def do_some_work():
        # do some work here, it can access flask.request like you
        # would otherwise in the view function.
        ...
    gevent.spawn(do_some_work)
    return 'Regular response'
New in version 0.10.
-
flask.has_app_context()¶ -
Works like
has_request_context()but for the application
context. You can also just do a boolean check on the
current_appobject instead.New in version 0.9.
-
flask.url_for(endpoint, **values)¶ -
Generates a URL to the given endpoint with the method provided.
Variable arguments that are unknown to the target endpoint are appended
to the generated URL as query arguments. If the value of a query argument
is None, the whole pair is skipped. In case blueprints are active
you can shortcut references to the same blueprint by prefixing the
local endpoint with a dot (.).This will reference the index function local to the current blueprint:
For more information, head over to the Quickstart.
To integrate applications,
Flaskhas a hook to intercept URL build
errors throughFlask.build_error_handler. The url_for function
results in aBuildErrorwhen the current app does
not have a URL for the given endpoint and values. When it does, the
current_appcalls itsbuild_error_handlerif
it is not None, which can return a string to use as the result of
url_for (instead of url_for‘s default to raise the
BuildErrorexception) or re-raise the exception.
An example:def external_url_handler(error, endpoint, **values): "Looks up an external URL when `url_for` cannot build a URL." # This is an example of hooking the build_error_handler. # Here, lookup_url is some utility function you've built # which looks up the endpoint in some external URL registry. url = lookup_url(endpoint, **values) if url is None: # External lookup did not have a URL. # Re-raise the BuildError, in context of original traceback. exc_type, exc_value, tb = sys.exc_info() if exc_value is error: raise exc_type, exc_value, tb else: raise error # url_for will use this result, instead of raising BuildError. return url app.build_error_handler = external_url_handler
Here, error is the instance of
BuildError, and
endpoint and **values are the arguments passed into url_for. Note
that this is for building URLs outside the current application, and not for
handling 404 NotFound errors.New in version 0.10: The _scheme parameter was added.
New in version 0.9: The _anchor and _method parameters were added.
New in version 0.9: Calls
Flask.handle_build_error()on
BuildError.Parameters: - endpoint – the endpoint of the URL (name of the function)
- values – the variable arguments of the URL rule
- _external – if set to True, an absolute URL is generated. Server
address can be changed via SERVER_NAME configuration variable which
defaults to localhost. - _scheme – a string specifying the desired URL scheme. The _external
parameter must be set to True or a ValueError is raised. - _anchor – if provided this is added as anchor to the URL.
- _method – if provided this explicitly specifies an HTTP method.
-
flask.abort(code)¶ -
Raises an
HTTPExceptionfor the given
status code. For example to abort request handling with a page not
found exception, you would callabort(404).Parameters: code – the HTTP error code.
-
flask.redirect(location, code=302, Response=None)¶ -
Returns a response object (a WSGI application) that, if called,
redirects the client to the target location. Supported codes are 301,
302, 303, 305, and 307. 300 is not supported because it’s not a real
redirect and 304 because it’s the answer for a request with a request
with defined If-Modified-Since headers.New in version 0.6: The location can now be a unicode string that is encoded using
theiri_to_uri()function.New in version 0.10: The class used for the Response object can now be passed in.
Parameters: - location – the location the response should redirect to.
- code – the redirect status code. defaults to 302.
- Response (class) – a Response class to use when instantiating a
response. The default iswerkzeug.wrappers.Responseif
unspecified.
-
flask.make_response(*args)¶ -
Sometimes it is necessary to set additional headers in a view. Because
views do not have to return response objects but can return a value that
is converted into a response object by Flask itself, it becomes tricky to
add headers to it. This function can be called instead of using a return
and you will get a response object which you can use to attach headers.If view looked like this and you want to add a new header:
def index():
    return render_template('index.html', foo=42)
You can now do something like this:
def index():
    response = make_response(render_template('index.html', foo=42))
    response.headers['X-Parachutes'] = 'parachutes are cool'
    return response
This function accepts the very same arguments you can return from a
view function. This for example creates a response with a 404 error
code:response = make_response(render_template('not_found.html'), 404)
The other use case of this function is to force the return value of a
view function into a response which is helpful with view
decorators:response = make_response(view_function()) response.headers['X-Parachutes'] = 'parachutes are cool'
Internally this function does the following things:
- if no arguments are passed, it creates a new response argument
- if one argument is passed,
flask.Flask.make_response()
is invoked with it. - if more than one argument is passed, the arguments are passed
to theflask.Flask.make_response()function as tuple.
New in version 0.6.
-
flask.after_this_request(f)¶ -
Executes a function after this request. This is useful to modify
response objects. The function is passed the response object and has
to return the same or a new one.Example:
@app.route('/')
def index():
    @after_this_request
    def add_header(response):
        response.headers['X-Foo'] = 'Parachute'
        return response
    return 'Hello World!'
This is more useful if a function other than the view function wants to
modify a response. For instance think of a decorator that wants to add
some headers without converting the return value into a response object.New in version 0.9.
-
flask.send_file(filename_or_fp, mimetype=None, as_attachment=False, attachment_filename=None, add_etags=True, cache_timeout=None, conditional=False)¶ -
Sends the contents of a file to the client. This will use the
most efficient method available and configured. By default it will
try to use the WSGI server’s file_wrapper support. Alternatively
you can set the application’suse_x_sendfileattribute
toTrueto directly emit an X-Sendfile header. This however
requires support of the underlying webserver for X-Sendfile.By default it will try to guess the mimetype for you, but you can
also explicitly provide one. For extra security you probably want
to send certain files as attachment (HTML for instance). The mimetype
guessing requires a filename or an attachment_filename to be
provided.Please never pass filenames to this function from user sources without
checking them first. Something like this is usually sufficient to
avoid security problems:if '..' in filename or filename.startswith('/'): abort(404)
New in version 0.2.
New in version 0.5: The add_etags, cache_timeout and conditional parameters were
added. The default behavior is now to attach etags.Changed in version 0.7: mimetype guessing and etag support for file objects was
deprecated because it was unreliable. Pass a filename if you are
able to, otherwise attach an etag yourself. This functionality
will be removed in Flask 1.0Changed in version 0.9: cache_timeout pulls its default from application config, when None.
Parameters: - filename_or_fp – the filename of the file to send. This is
relative to theroot_pathif a
relative path is specified.
Alternatively a file object might be provided
in which case X-Sendfile might not work and
fall back to the traditional method. Make sure
that the file pointer is positioned at the start
of data to send before callingsend_file(). - mimetype – the mimetype of the file if provided, otherwise
auto detection happens. - as_attachment – set to True if you want to send this file with
aContent-Disposition: attachmentheader. - attachment_filename – the filename for the attachment if it
differs from the file’s filename. - add_etags – set to False to disable attaching of etags.
- conditional – set to True to enable conditional responses.
- cache_timeout – the timeout in seconds for the headers. When None
(default), this value is set by
get_send_file_max_age()of
current_app.
- filename_or_fp – the filename of the file to send. This is
-
flask.send_from_directory(directory, filename, **options)¶ -
Send a file from a given directory with
send_file(). This
is a secure way to quickly expose static files from an upload folder
or something similar.Example usage:
@app.route('/uploads/<path:filename>')
def download_file(filename):
    return send_from_directory(app.config['UPLOAD_FOLDER'],
                               filename, as_attachment=True)
Sending files and Performance
It is strongly recommended to activate either X-Sendfile support in
your webserver or (if no authentication happens) to tell the webserver
to serve files for the given path on its own without calling into the
web application for improved performance.New in version 0.5.
Parameters: - directory – the directory where all the files are stored.
- filename – the filename relative to that directory to
download. - options – optional keyword arguments that are directly
forwarded tosend_file().
-
flask.safe_join(directory, filename)¶ -
Safely join directory and filename.
Example usage:
@app.route('/wiki/<path:filename>')
def wiki_page(filename):
    filename = safe_join(app.config['WIKI_FOLDER'], filename)
    with open(filename, 'rb') as fd:
        content = fd.read() # Read and process the file content...
Parameters: - directory – the base directory.
- filename – the untrusted filename relative to that directory.
Raises: NotFoundif the resulting path
would fall out of directory.
-
flask.escape(s) → markup¶ -
Convert the characters &, <, >, ‘, and ” in string s to HTML-safe
sequences. Use this if you need to display text that might contain
such characters in HTML. Marks return value as markup string.
-
class
flask.Markup¶ -
Marks a string as being safe for inclusion in HTML/XML output without
needing to be escaped. This implements the __html__ interface a couple
of frameworks and web applications use.Markupis a direct
subclass of unicode and provides all the methods of unicode just that
it escapes arguments passed and always returns Markup.The escape function returns markup objects so that double escaping can’t
happen.The constructor of the
Markupclass can be used for three
different things: When passed an unicode object it’s assumed to be safe,
when passed an object with an HTML representation (has an __html__
method) that representation is used, otherwise the object passed is
converted into a unicode string and then assumed to be safe:>>> Markup("Hello <em>World</em>!") Markup(u'Hello <em>World</em>!') >>> class Foo(object): ... def __html__(self): ... return '<a href="#">foo</a>' ... >>> Markup(Foo()) Markup(u'<a href="#">foo</a>')
If you want object passed being always treated as unsafe you can use the
escape()classmethod to create aMarkupobject:>>> Markup.escape("Hello <em>World</em>!") Markup(u'Hello <em>World</em>!')
Operations on a markup string are markup aware which means that all
arguments are passed through theescape()function:>>> em = Markup("<em>%s</em>") >>> em % "foo & bar" Markup(u'<em>foo & bar</em>') >>> strong = Markup("<strong>%(text)s</strong>") >>> strong % {'text': '<blink>hacker here</blink>'} Markup(u'<strong><blink>hacker here</blink></strong>') >>> Markup("<em>Hello</em> ") + "<foo>" Markup(u'<em>Hello</em> <foo>')
-
classmethod
escape(s)¶ -
Escape the string. Works like
escape()with the difference
that for subclasses ofMarkupthis function would return the
correct subclass.
-
striptags()¶ -
Unescape markup into an text_type string and strip all tags. This
also resolves known HTML4 and XHTML entities. Whitespace is
normalized to one:>>> Markup("Main » <em>About</em>").striptags() u'Main xbb About'
-
unescape()¶ -
Unescape markup again into an text_type string. This also resolves
known HTML4 and XHTML entities:>>> Markup("Main » <em>About</em>").unescape() u'Main xbb <em>About</em>'
-
classmethod
Message Flashing
-
flask.flash(message, category=’message’)¶ -
Flashes a message to the next request. In order to remove the
flashed message from the session and to display it to the user,
the template has to callget_flashed_messages().Changed in version 0.3: category parameter added.
Parameters: - message – the message to be flashed.
- category – the category for the message. The following values
are recommended:'message'for any kind of message,
'error'for errors,'info'for information
messages and'warning'for warnings. However any
kind of string can be used as category.
-
flask.get_flashed_messages(with_categories=False, category_filter=[])¶ -
Pulls all flashed messages from the session and returns them.
Further calls in the same request to the function will return
the same messages. By default just the messages are returned,
but when with_categories is set to True, the return value will
be a list of tuples in the form(category, message)instead.Filter the flashed messages to one or more categories by providing those
categories in category_filter. This allows rendering categories in
separate html blocks. The with_categories and category_filter
arguments are distinct:- with_categories controls whether categories are returned with message
text (True gives a tuple, where False gives just the message text). - category_filter filters the messages down to only those matching the
provided categories.
See Message Flashing for examples.
Changed in version 0.3: with_categories parameter added.
Changed in version 0.9: category_filter parameter added.
Parameters: - with_categories – set to True to also receive categories.
- category_filter – whitelist of categories to limit return values
- with_categories controls whether categories are returned with message
JSON Support
Flask uses simplejson for the JSON implementation. Since simplejson
is provided both by the standard library as well as extension Flask will
try simplejson first and then fall back to the stdlib json module. On top
of that it will delegate access to the current application’s JSOn encoders
and decoders for easier customization.
So for starters instead of doing:
try:
    import simplejson as json
except ImportError:
    import json
You can instead just do this:
For usage examples, read the json documentation in the standard
lirbary. The following extensions are by default applied to the stdlib’s
JSON module:
datetimeobjects are serialized as RFC 822 strings.- Any object with an
__html__method (likeMarkup)
will ahve that method called and then the return value is serialized
as string.
The htmlsafe_dumps() function of this json module is also available
as filter called |tojson in Jinja2. Note that inside script
tags no escaping must take place, so make sure to disable escaping
with |safe if you intend to use it inside script tags unless
you are using Flask 0.10 which implies that:
<script type=text/javascript>
    doSomethingWith({{ user.username|tojson|safe }});
</script>
-
flask.json.jsonify(*args, **kwargs)¶ -
Creates a
Responsewith the JSON representation of
the given arguments with an application/json mimetype. The arguments
to this function are the same as to thedictconstructor.Example usage:
from flask import jsonify

@app.route('/_get_current_user')
def get_current_user():
    return jsonify(username=g.user.username,
                   email=g.user.email,
                   id=g.user.id)
This will send a JSON response like this to the browser:
{
    "username": "admin",
    "email": "admin@localhost",
    "id": 42
}
For security reasons only objects are supported toplevel. For more
information about this, have a look at JSON Security.This function’s response will be pretty printed if it was not requested
withX-Requested-With: XMLHttpRequestto simplify debugging unless
theJSONIFY_PRETTYPRINT_REGULARconfig parameter is set to false.New in version 0.2.
-
flask.json.dumps(obj, **kwargs)¶ -
Serialize
objto a JSON formattedstrby using the application’s
configured encoder (json_encoder) if there is an
application on the stack.This function can return
unicodestrings or ascii-only bytestrings by
default which coerce into unicode strings automatically. That behavior by
default is controlled by theJSON_AS_ASCIIconfiguration variable
and can be overriden by the simplejsonensure_asciiparameter.
-
flask.json.dump(obj, fp, **kwargs)¶ -
Like
dumps()but writes into a file object.
-
flask.json.loads(s, **kwargs)¶ -
Unserialize a JSON object from a string
sby using the application’s
configured decoder (json_decoder) if there is an
application on the stack.
-
flask.json.load(fp, **kwargs)¶ -
Like
loads()but reads from a file object.
-
class
flask.json.JSONEncoder(skipkeys=False, ensure_ascii=True, check_circular=True, allow_nan=True, sort_keys=False, indent=None, separators=None, encoding=’utf-8′, default=None)¶ -
The default Flask JSON encoder. This one extends the default simplejson
encoder by also supportingdatetimeobjects,UUIDas well as
Markupobjects which are serialized as RFC 822 datetime strings (same
as the HTTP date format). In order to support more data types override the
default()method.-
default(o)¶ -
Implement this method in a subclass such that it returns a
serializable object foro, or calls the base implementation (to
raise aTypeError).For example, to support arbitrary iterators, you could implement
default like this:def default(self, o): try: iterable = iter(o) except TypeError: pass else: return list(iterable) return JSONEncoder.default(self, o)
-
-
class
flask.json.JSONDecoder(encoding=None, object_hook=None, parse_float=None, parse_int=None, parse_constant=None, strict=True, object_pairs_hook=None)¶ -
The default JSON decoder. This one does not change the behavior from
the default simplejson encoder. Consult thejsondocumentation
for more information. This decoder is not only used for the load
functions of this module but alsoRequest.
Template Rendering
-
flask.render_template(template_name_or_list, **context)¶ -
Renders a template from the template folder with the given
context.Parameters: - template_name_or_list – the name of the template to be
rendered, or an iterable with template names
the first one existing will be rendered - context – the variables that should be available in the
context of the template.
- template_name_or_list – the name of the template to be
-
flask.render_template_string(source, **context)¶ -
Renders a template from the given template source string
with the given context.Parameters: - source – the sourcecode of the template to be
rendered - context – the variables that should be available in the
context of the template.
- source – the sourcecode of the template to be
-
flask.get_template_attribute(template_name, attribute)¶ -
Loads a macro (or variable) a template exports. This can be used to
invoke a macro from within Python code. If you for example have a
template named _cider.html with the following contents:{% macro hello(name) %}Hello {{ name }}!{% endmacro %}
You can access this from Python code like this:
hello = get_template_attribute('_cider.html', 'hello')
return hello('World')
New in version 0.2.
Parameters: - template_name – the name of the template
- attribute – the name of the variable of macro to access
Configuration
-
class
flask.Config(root_path, defaults=None)¶ -
Works exactly like a dict but provides ways to fill it from files
or special dictionaries. There are two common patterns to populate the
config.Either you can fill the config from a config file:
app.config.from_pyfile('yourconfig.cfg')
Or alternatively you can define the configuration options in the
module that callsfrom_object()or provide an import path to
a module that should be loaded. It is also possible to tell it to
use the same module and with that provide the configuration values
just before the call:DEBUG = True SECRET_KEY = 'development key' app.config.from_object(__name__)
In both cases (loading from any Python file or loading from modules),
only uppercase keys are added to the config. This makes it possible to use
lowercase values in the config file for temporary values that are not added
to the config or to define the config keys in the same file that implements
the application.Probably the most interesting way to load configurations is from an
environment variable pointing to a file:app.config.from_envvar('YOURAPPLICATION_SETTINGS')
In this case before launching the application you have to set this
environment variable to the file you want to use. On Linux and OS X
use the export statement:export YOURAPPLICATION_SETTINGS='/path/to/config/file'
On windows use set instead.
Parameters: - root_path – path to which files are read relative from. When the
config object is created by the application, this is
the application’sroot_path. - defaults – an optional dictionary of default values
-
from_envvar(variable_name, silent=False)¶ -
Loads a configuration from an environment variable pointing to
a configuration file. This is basically just a shortcut with nicer
error messages for this line of code:app.config.from_pyfile(os.environ['YOURAPPLICATION_SETTINGS'])
Parameters: - variable_name – name of the environment variable
- silent – set to True if you want silent failure for missing
files.
Returns: bool. True if able to load config, False otherwise.
-
from_object(obj)¶ -
Updates the values from the given object. An object can be of one
of the following two types:- a string: in this case the object with that name will be imported
- an actual object reference: that object is used directly
Objects are usually either modules or classes.
Just the uppercase variables in that object are stored in the config.
Example usage:app.config.from_object('yourapplication.default_config') from yourapplication import default_config app.config.from_object(default_config)
You should not use this function to load the actual configuration but
rather configuration defaults. The actual config should be loaded
withfrom_pyfile()and ideally from a location not within the
package because the package might be installed system wide.Parameters: obj – an import name or object
-
from_pyfile(filename, silent=False)¶ -
Updates the values in the config from a Python file. This function
behaves as if the file was imported as module with the
from_object()function.Parameters: - filename – the filename of the config. This can either be an
absolute filename or a filename relative to the
root path. - silent – set to True if you want silent failure for missing
files.
New in version 0.7: silent parameter.
- filename – the filename of the config. This can either be an
- root_path – path to which files are read relative from. When the
Extensions
-
flask.ext¶ -
This module acts as redirect import module to Flask extensions. It was
added in 0.8 as the canonical way to import Flask extensions and makes
it possible for us to have more flexibility in how we distribute
extensions.If you want to use an extension named “Flask-Foo” you would import it
fromextas follows:from flask.ext import foo
New in version 0.8.
Stream Helpers
-
flask.stream_with_context(generator_or_function)¶ -
Request contexts disappear when the response is started on the server.
This is done for efficiency reasons and to make it less likely to encounter
memory leaks with badly written WSGI middlewares. The downside is that if
you are using streamed responses, the generator cannot access request bound
information any more.This function however can help you keep the context around for longer:
from flask import stream_with_context, request, Response

@app.route('/stream')
def streamed_response():
    @stream_with_context
    def generate():
        yield 'Hello '
        yield request.args['name']
        yield '!'
    return Response(generate())
Alternatively it can also be used around a specific generator:
from flask import stream_with_context, request, Response

@app.route('/stream')
def streamed_response():
    def generate():
        yield 'Hello '
        yield request.args['name']
        yield '!'
    return Response(stream_with_context(generate()))
New in version 0.9.
Useful Internals
-
class
flask.ctx.RequestContext(app, environ, request=None)¶ -
The request context contains all request relevant information. It is
created at the beginning of the request and pushed to the
_request_ctx_stack and removed at the end of it. It will create the
URL adapter and request object for the WSGI environment provided.Do not attempt to use this class directly, instead use
test_request_context()and
request_context()to create this object.When the request context is popped, it will evaluate all the
functions registered on the application for teardown execution
(teardown_request()).The request context is automatically popped at the end of the request
for you. In debug mode the request context is kept around if
exceptions happen so that interactive debuggers have a chance to
introspect the data. With 0.4 this can also be forced for requests
that did not fail and outside of DEBUG mode. By setting
'flask._preserve_context'to True on the WSGI environment the
context will not pop itself at the end of the request. This is used by
thetest_client()for example to implement the
deferred cleanup functionality.You might find this helpful for unittests where you need the
information from the context local around for a little longer. Make
sure to properlypop()the stack yourself in
that situation, otherwise your unittests will leak memory.-
copy()¶ -
Creates a copy of this request context with the same request object.
This can be used to move a request context to a different greenlet.
Because the actual request object is the same this cannot be used to
move a request context to a different thread unless access to the
request object is locked.New in version 0.10.
-
match_request()¶ -
Can be overridden by a subclass to hook into the matching
of the request.
-
pop(exc=None)¶ -
Pops the request context and unbinds it by doing that. This will
also trigger the execution of functions registered by the
teardown_request()decorator.Changed in version 0.9: Added the exc argument.
-
push()¶ -
Binds the request context to the current context.
-
-
flask._request_ctx_stack¶ -
The internal
LocalStackthat is used to implement
all the context local objects used in Flask. This is a documented
instance and can be used by extensions and application code but the
use is discouraged in general.The following attributes are always present on each layer of the
stack:- app
- the active Flask application.
- url_adapter
- the URL adapter that was used to match the request.
- request
- the current request object.
- session
- the active session object.
- g
- an object with all the attributes of the
flask.gobject. - flashes
- an internal cache for the flashed messages.
Example usage:
from flask import _request_ctx_stack

def get_session():
    ctx = _request_ctx_stack.top
    if ctx is not None:
        return ctx.session
-
class
flask.ctx.AppContext(app)¶ -
The application context binds an application object implicitly
to the current thread or greenlet, similar to how the
RequestContextbinds request information. The application
context is also implicitly created if a request context is created
but the application is not on top of the individual application
context.-
pop(exc=None)¶ -
Pops the app context.
-
push()¶ -
Binds the app context to the current context.
-
-
flask._app_ctx_stack¶ -
Works similar to the request context but only binds the application.
This is mainly there for extensions to store data.New in version 0.9.
-
class
flask.blueprints.BlueprintSetupState(blueprint, app, options, first_registration)¶ -
Temporary holder object for registering a blueprint with the
application. An instance of this class is created by the
make_setup_state()method and later passed
to all register callback functions.-
add_url_rule(rule, endpoint=None, view_func=None, **options)¶ -
A helper method to register a rule (and optionally a view function)
to the application. The endpoint is automatically prefixed with the
blueprint’s name.
-
app= None¶ -
a reference to the current application
-
blueprint= None¶ -
a reference to the blueprint that created this setup state.
-
first_registration= None¶ -
as blueprints can be registered multiple times with the
application and not everything wants to be registered
multiple times on it, this attribute can be used to figure
out if the blueprint was registered in the past already.
-
options= None¶ -
a dictionary with all options that were passed to the
register_blueprint()method.
-
subdomain= None¶ -
The subdomain that the blueprint should be active for, None
otherwise.
-
url_defaults= None¶ -
A dictionary with URL defaults that is added to each and every
URL that was defined with the blueprint.
-
url_prefix= None¶ -
The prefix that should be used for all URLs defined on the
blueprint.
-
Signals
New in version 0.6.
-
flask.signals_available¶ -
True if the signalling system is available. This is the case
when blinker is installed.
-
flask.template_rendered¶ -
This signal is sent when a template was successfully rendered. The
signal is invoked with the instance of the template as template
and the context as dictionary (named context).
-
flask.request_started¶ -
This signal is sent before any request processing started but when the
request context was set up. Because the request context is already
bound, the subscriber can access the request with the standard global
proxies such asrequest.
-
flask.request_finished¶ -
This signal is sent right before the response is sent to the client.
It is passed the response to be sent named response.
-
flask.got_request_exception¶ -
This signal is sent when an exception happens during request processing.
It is sent before the standard exception handling kicks in and even
in debug mode, where no exception handling happens. The exception
itself is passed to the subscriber as exception.
-
flask.request_tearing_down¶ -
This signal is sent when the application is tearing down the request.
This is always called, even if an error happened. An exc keyword
argument is passed with the exception that caused the teardown.Changed in version 0.9: The exc parameter was added.
-
flask.appcontext_tearing_down¶ -
This signal is sent when the application is tearing down the
application context. This is always called, even if an error happened.
An exc keyword argument is passed with the exception that caused the
teardown. The sender is the application.
-
flask.appcontext_pushed¶ -
This signal is sent when an application context is pushed. The sender
is the application.New in version 0.10.
-
flask.appcontext_popped¶ -
This signal is sent when an application context is popped. The sender
is the application. This usually falls in line with the
appcontext_tearing_downsignal.New in version 0.10.
-
flask.message_flashed¶ -
This signal is sent when the application is flashing a message. The
messages is sent as message keyword argument and the category as
category.New in version 0.10.
-
class
flask.signals.Namespace¶ -
An alias for
blinker.base.Namespaceif blinker is available,
otherwise a dummy class that creates fake signals. This class is
available for Flask extensions that want to provide the same fallback
system as Flask itself.-
signal(name, doc=None)¶ -
Creates a new signal for this namespace if blinker is available,
otherwise returns a fake signal that has a send method that will
do nothing but will fail with aRuntimeErrorfor all other
operations, including connecting.
-
Class-Based Views
New in version 0.7.
-
class
flask.views.View¶ -
Alternative way to use view functions. A subclass has to implement
dispatch_request()which is called with the view arguments from
the URL routing system. Ifmethodsis provided the methods
do not have to be passed to theadd_url_rule()
method explicitly:class MyView(View): methods = ['GET'] def dispatch_request(self, name): return 'Hello %s!' % name app.add_url_rule('/hello/<name>', view_func=MyView.as_view('myview'))
When you want to decorate a pluggable view you will have to either do that
when the view function is created (by wrapping the return value of
as_view()) or you can use thedecoratorsattribute:class SecretView(View): methods = ['GET'] decorators = [superuser_required] def dispatch_request(self): ...
The decorators stored in the decorators list are applied one after another
when the view function is created. Note that you can not use the class
based decorators since those would decorate the view class and not the
generated view function!-
classmethod
as_view(name, *class_args, **class_kwargs)¶ -
Converts the class into an actual view function that can be used
with the routing system. Internally this generates a function on the
fly which will instantiate theViewon each request and call
thedispatch_request()method on it.The arguments passed to
as_view()are forwarded to the
constructor of the class.
-
decorators= []¶ -
The canonical way to decorate class-based views is to decorate the
return value of as_view(). However since this moves parts of the
logic from the class declaration to the place where it’s hooked
into the routing system.You can place one or more decorators in this list and whenever the
view function is created the result is automatically decorated.New in version 0.8.
-
dispatch_request()¶ -
Subclasses have to override this method to implement the
actual view function code. This method is called with all
the arguments from the URL rule.
-
methods= None¶ -
A for which methods this pluggable view can handle.
-
classmethod
-
class
flask.views.MethodView¶ -
Like a regular class-based view but that dispatches requests to
particular methods. For instance if you implement a method called
get()it means you will response to'GET'requests and
thedispatch_request()implementation will automatically
forward your request to that. Alsooptionsis set for you
automatically:class CounterAPI(MethodView): def get(self): return session.get('counter', 0) def post(self): session['counter'] = session.get('counter', 0) + 1 return 'OK' app.add_url_rule('/counter', view_func=CounterAPI.as_view('counter'))
URL Route Registrations
Generally there are three ways to define rules for the routing system:
- You can use the
flask.Flask.route()decorator. - You can use the
flask.Flask.add_url_rule()function. - You can directly access the underlying Werkzeug routing system
which is exposed asflask.Flask.url_map.
Variable parts in the route can be specified with angular brackets
(/user/<username>). By default a variable part in the URL accepts any
string without a slash however a different converter can be specified as
well by using <converter:name>.
Variable parts are passed to the view function as keyword arguments.
The following converters are available:
| string | accepts any text without a slash (the default) |
| int | accepts integers |
| float | like int but for floating point values |
| path | like the default but also accepts slashes |
Here are some examples:
@app.route('/')
def index():
    pass

@app.route('/<username>')
def show_user(username):
    pass

@app.route('/post/<int:post_id>')
def show_post(post_id):
    pass
An important detail to keep in mind is how Flask deals with trailing
slashes. The idea is to keep each URL unique so the following rules
apply:
- If a rule ends with a slash and is requested without a slash by the
user, the user is automatically redirected to the same page with a
trailing slash attached. - If a rule does not end with a trailing slash and the user requests the
page with a trailing slash, a 404 not found is raised.
This is consistent with how web servers deal with static files. This
also makes it possible to use relative link targets safely.
You can also define multiple rules for the same function. They have to be
unique however. Defaults can also be specified. Here for example is a
definition for a URL that accepts an optional page:
@app.route('/users/', defaults={'page': 1})
@app.route('/users/page/<int:page>')
def show_users(page):
    pass
This specifies that /users/ will be the URL for page one and
/users/page/N will be the URL for page N.
Here are the parameters that route() and
add_url_rule() accept. The only difference is that
with the route parameter the view function is defined with the decorator
instead of the view_func parameter.
| rule | the URL rule as string |
| endpoint | the endpoint for the registered URL rule. Flask itself assumes that the name of the view function is the name of the endpoint if not explicitly stated. |
| view_func | the function to call when serving a request to the provided endpoint. If this is not provided one can specify the function later by storing it in the view_functions dictionary with theendpoint as key. |
| defaults | A dictionary with defaults for this rule. See the example above for how defaults work. |
| subdomain | specifies the rule for the subdomain in case subdomain matching is in use. If not specified the default subdomain is assumed. |
| **options | the options to be forwarded to the underlyingRule object. A change toWerkzeug is handling of method options. methods is a list of methods this rule should be limited to (GET, POST etc.). By default a rule just listens for GET (and implicitly HEAD). Starting with Flask 0.6, OPTIONS is implicitly added and handled by the standard request handling. They have to be specified as keyword arguments. |
View Function Options
For internal usage the view functions can have some attributes attached to
customize behavior the view function would normally not have control over.
The following attributes can be provided optionally to either override
some defaults to add_url_rule() or general behavior:
- __name__: The name of a function is by default used as endpoint. If
endpoint is provided explicitly this value is used. Additionally this
will be prefixed with the name of the blueprint by default which
cannot be customized from the function itself. - methods: If methods are not provided when the URL rule is added,
Flask will look on the view function object itself is an methods
attribute exists. If it does, it will pull the information for the
methods from there. - provide_automatic_options: if this attribute is set Flask will
either force enable or disable the automatic implementation of the
HTTP OPTIONS response. This can be useful when working with
decorators that want to customize the OPTIONS response on a per-view
basis. - required_methods: if this attribute is set, Flask will always add
these methods when registering a URL rule even if the methods were
explicitly overriden in theroute()call.
Full example:
def index():
    if request.method == 'OPTIONS':
        # custom options handling here
        ...
    return 'Hello World!'
index.provide_automatic_options = False
index.methods = ['GET', 'OPTIONS']

app.add_url_rule('/', index)
New in version 0.8: The provide_automatic_options functionality was added.
This article will deal with different types of HTTP errors and then learn how to use Flask error handling to tackle these errors. So let’s get started!
Why do we Need Error Handling?
An error in a web application can happen due to several reasons. It can be due to an incorrect code in the App or some bad requests by the user or server downtime.
Hence it is critical to handle these errors. The browsers, though by-default handles HTTP errors for you, the output is not quite aesthetic.
For example, while building a Flask application, you might have come across 500 internal server error.
A simple line indicating the reason for the error would have sufficed, instead of displaying irrelevant data.
This is where Flask Error handlers come into the picture.
With Flask error Handlers, we can:
- Customize the error page look.
- Show only relevant data to the user.
Common HTTP errors
Some of the most common errors raised are:
| HTTP Error Codes | Meaning |
|---|---|
| 301 | Moved Permanently |
| 302 | Moved Temporarily |
| 400 | Bad Request |
| 403 | Forbidden |
| 404 | Not Found |
| 429 | Too Many Requests |
| 500 | Internal Server Error |
| 502 | Bad Gateway |
| 503 | Service Unavailable |
| 504 | Gateway Timeout |
Hands-On with Flask Error Handling
Error codes – 404 and 500 are the most common errors that we deal with every day.
So in this section we will build a simple Error handler for 404 and 500. The syntax for other errors will be exactly the same.
In flask, we use the built-in error_handler decorator.
The syntax is:
@app.errorhandler(status_code)
def function_name(error):
    return render_template('xyz.html'),status_code
Hence consider the following Flask application example:
from flask import Flask, render_template

app = Flask(__name__)

@app.route('/blogs')
def blog():
    return render_template('blog.html')

#Handling error 404 and displaying relevant web page
@app.errorhandler(404)
def not_found_error(error):
    return render_template('404.html'),404

#Handling error 500 and displaying relevant web page
@app.errorhandler(500)
def internal_error(error):
    return render_template('500.html'),500

#app.run(host='localhost', port=5000)
app.run(host='localhost', port=5000)
The Blog.html:
<h2>Welcome to the Blog</h2>
The 404.html file:
<h2>The webpage you are trying is not found</h2>
<img src = "{{url_for('static','images/opps.jpg') }}"
Here we are using a image to show on the 404 web page as well
Similarly the 500.html file:
<h2>Something Went Wrong</h2>
Implementation
Now run the server and go to any arbitary non-existant URL endpoint
Now to get the 500 error, deliberately interchange a few letters of render_template() to let’s say remder_template()
Now restart the server and go to “/blogs” URL. You will now get the 500 error page
Perfect!
Conclusion
That’s it, guys !! You can now customize the error pages as well based on your webpage theme. Do check out our other Flask tutorials to know more about Flask.
See you guys in the next article !! Happy Coding 🙂
![]() Abhilash
Abhilash
What is Flask?
Flask is a lightweight Python framework for quick and rapid web application development.
What are status codes in HTTP?
HTTP response status codes are used in web development to determine whether a particular HTTP request has been completed successfully.
Status code in a tuple
The view function can return the status code as one of a tuple’s elements. A response object is automatically created from the return result of a view function. It is possible to get a tuple back that contains additional information. The tuple with the status code to be returned can be in any of the following formats:
(response, status_code)(response, status_code, headers)
Code
from flask import Flask, make_response, request

app = Flask(__name__)

@app.route("/userDetails", methods=["GET", "POST"])
def user_details():

    if request.method == "POST":

        username = request.form.get("username")
        firstname = request.form.get("firstname")
        lastname = request.form["lastname"]

        return "Success", 201

@app.route("/userSignUp", methods=["POST"])
def sign_up():

    if request.method == "POST":

        username = request.form.get("username")
        password = request.form.get("password")

        return "Success", 200, {"Access-Control-Allow-Origin": "*"}
Explanation
In the code above, the important lines to focus on are the following:
- Line 14: We are returning the response as a tuple with the response body as
Successand the status code of201. - Line 24: We are returning the response as a tuple with the response body as
Success, status code of200, and some headers as a dictionary.
Use the following curl commands to test the userDetails endpoint.
curl -X POST http://localhost:5000/userDetails -H "Content-Type: application/x-www-form-urlencoded" -d "username=sam&firstname=john&lastname=king"
Use the following curl commands to test the userSignUp endpoint.
curl -X POST http://localhost:5000/userSignUp -H "Content-Type: application/x-www-form-urlencoded" -d "username=sam&firstname=john"
The make_response() method
The make_response method from Flask returns a Response object that can be used to send custom headers and change the properties such as status_code, mimetype, and so on.
We can set the status code using the make_response method in two ways:
- Pass the status code as a constructor parameter.
- Use the property
status_codeto set the status code. Here, the value set has to be an integer.
Code
from flask import Flask, make_response, request

app = Flask(__name__)

@app.route("/userDetails", methods=["GET", "POST"])
def user_details():

    if request.method == "POST":

        username = request.form.get("username")
        firstname = request.form.get("firstname")
        lastname = request.form["lastname"]

        response = make_response("<h1>Success</h1>", 201)
        return response

@app.route("/userSignUp", methods=["POST"])
def sign_up():

    if request.method == "POST":

        username = request.form.get("username")
        password = request.form.get("password")

        response = make_response("<h1>Success</h1>")
        response.status_code = 200
        return response
Explanation
In the code above, the important lines to focus on are the following:
- Line 14: We use the
make_responsemethod to create an instance of theResponseclass. We pass the status code as a constructor parameter. - Lines 25–26: We use the
make_responsemethod to create an instance of theResponseclass. We set the status code by explicitly setting thestatus_codeproperty of the response object.
Use the following curl commands to test the userDetails endpoint.
curl -X POST http://localhost:5000/userDetails -H "Content-Type: application/x-www-form-urlencoded" -d "username=sam&firstname=john&lastname=king"
Use the following curl commands to test the userSignUp endpoint.
curl -X POST http://localhost:5000/userSignUp -H "Content-Type: application/x-www-form-urlencoded" -d "username=sam&firstname=john"
CONTRIBUTOR
![]() Abhilash
Abhilash
Copyright ©2023 Educative, Inc. All rights reserved
Работа с ошибками приложения
Приложения отказывают,серверы отказывают.Рано или поздно вы увидите исключение в производстве.Даже если ваш код на 100% правильный,вы все равно будете время от времени видеть исключения.Почему? Потому что все остальное,что задействовано в коде,не работает.Вот несколько ситуаций,когда совершенно правильный код может привести к ошибкам сервера:
- клиент завершил запрос раньше времени,а приложение все еще считывало входящие данные
- сервер базы данных был перегружен и не смог обработать запрос
- файловая система заполнена
- разбился жесткий диск
- перегрузка внутреннего сервера
- программная ошибка в используемой вами библиотеке
- сетевое подключение сервера к другой системе не удалось
И это лишь небольшая часть проблем, с которыми вы можете столкнуться. Итак, как нам справиться с такой проблемой? По умолчанию, если ваше приложение работает в производственном режиме и возникает исключение, Flask отобразит для вас очень простую страницу и зарегистрирует исключение в logger .
Но есть и другие возможности,и мы расскажем о некоторых лучших настройках для работы с ошибками,включая пользовательские исключения и инструменты сторонних производителей.
Инструменты протоколирования ошибок
Отправка сообщений об ошибках, даже если это критические сообщения, может стать чрезмерным, если достаточное количество пользователей сталкивается с ошибкой, а файлы журналов обычно никогда не просматриваются. Вот почему мы рекомендуем использовать Sentry для работы с ошибками приложений. Он доступен в виде проекта с исходным кодом на GitHub , а также доступен в виде размещенной версии , которую вы можете попробовать бесплатно. Sentry собирает повторяющиеся ошибки, фиксирует полную трассировку стека и локальные переменные для отладки и отправляет вам письма на основе новых ошибок или пороговых значений частоты.
Чтобы использовать Sentry, вам необходимо установить клиент sentry-sdk с дополнительными зависимостями flask .
$ pip install sentry-sdk[flask]
А затем добавьте это в ваше приложение Flask:
import sentry_sdk
from sentry_sdk.integrations.flask import FlaskIntegration

sentry_sdk.init('YOUR_DSN_HERE', integrations=[FlaskIntegration()])
Значение YOUR_DSN_HERE необходимо заменить значением DSN, полученным при установке Sentry.
После установки сбои,приводящие к внутренней ошибке сервера,автоматически сообщаются в Sentry,откуда вы можете получать уведомления об ошибках.
See also:
- Sentry также поддерживает перехват ошибок из рабочей очереди (RQ, Celery и т. Д.) Аналогичным образом. Дополнительную информацию см. В документации Python SDK .
- Начало работы с Sentry
- Flask-specific documentation
Error Handlers
Когда во Flask возникает ошибка, будет возвращен соответствующий код состояния HTTP . 400-499 указывают на ошибки в данных запроса клиента или в запрошенных данных. 500-599 указывают на ошибки сервера или самого приложения.
Вы можете захотеть показывать пользователю пользовательские страницы ошибок при возникновении ошибки.Это можно сделать,зарегистрировав обработчики ошибок.
Обработчик ошибок — это функция, которая возвращает ответ при возникновении ошибки определенного типа, подобно тому, как представление — это функция, возвращающая ответ при совпадении URL-адреса запроса. Ему передается экземпляр обрабатываемой ошибки, который, скорее всего, является HTTPException .
Код состояния ответа не будет установлен на код обработчика.При возврате ответа от обработчика обязательно указывайте соответствующий код состояния HTTP.
Registering
Зарегистрируйте обработчики, украсив функцию errorhandler() . Или используйте register_error_handler() чтобы зарегистрировать функцию позже. Не забудьте установить код ошибки при возврате ответа.
@app.errorhandler(werkzeug.exceptions.BadRequest)
def handle_bad_request(e):
    return 'bad request!', 400


app.register_error_handler(400, handle_bad_request)
Подклассы werkzeug.exceptions.HTTPException ,такие как BadRequest , и их HTTP-коды взаимозаменяемы при регистрации обработчиков. ( BadRequest.code == 400 )
Нестандартные коды HTTP не могут быть зарегистрированы с помощью кода, поскольку они неизвестны Werkzeug. Вместо этого определите подкласс HTTPException с соответствующим кодом, зарегистрируйте и поднимите этот класс исключения.
class InsufficientStorage(werkzeug.exceptions.HTTPException):
    code = 507
    description = 'Not enough storage space.'

app.register_error_handler(InsufficientStorage, handle_507)

raise InsufficientStorage()
Обработчики могут быть зарегистрированы для любого класса исключений, а не только для подклассов HTTPException или кодов состояния HTTP. Обработчики могут быть зарегистрированы для определенного класса или для всех подклассов родительского класса.
Handling
При создании приложения Flask вы столкнетесь с исключениями. Если какая-то часть вашего кода сломается при обработке запроса (и у вас нет зарегистрированных обработчиков ошибок), по умолчанию будет возвращено «500 Internal Server Error» ( InternalServerError ).Точно так же ошибка «404 Not Found» ( NotFound ) возникает, если запрос отправляется на незарегистрированный маршрут. Если маршрут получает неразрешенный метод запроса, будет поднято «Метод 405 не разрешен» ( MethodNotAllowed ).Все они являются подклассами HTTPException и по умолчанию предоставляются во Flask.
Flask дает вам возможность поднять любое исключение HTTP,зарегистрированное Werkzeug.Однако HTTP-исключения по умолчанию возвращают простые страницы исключений.Возможно,вы захотите показывать пользователю пользовательские страницы ошибок при возникновении ошибки.Это можно сделать,зарегистрировав обработчики ошибок.
Когда Flask перехватывает исключение при обработке запроса, оно сначала ищется по коду. Если для кода не зарегистрирован обработчик, Flask ищет ошибку по иерархии классов; выбирается наиболее конкретный обработчик. Если обработчик не зарегистрирован, подклассы HTTPException отображают общее сообщение об их коде, в то время как другие исключения преобразуются в общее сообщение «500 Internal Server Error».
Например, если возникает экземпляр ConnectionRefusedError и зарегистрирован обработчик для ConnectionError и ConnectionRefusedError , более конкретный обработчик ConnectionRefusedError вызывается с экземпляром исключения для генерации ответа.
Обработчики,зарегистрированные на чертеже,имеют приоритет над обработчиками,зарегистрированными глобально в приложении,при условии,что чертеж обрабатывает запрос,вызвавший исключение.Однако блюпринт не может обрабатывать ошибки маршрутизации 404,поскольку 404 происходит на уровне маршрутизации до того,как можно определить блюпринт.
Общие обработчики исключений
Можно зарегистрировать обработчики ошибок для очень общих базовых классов, таких как HTTPException или даже Exception . Однако имейте в виду, что они поймают больше, чем вы могли ожидать.
Например, обработчик ошибок для HTTPException может быть полезен для преобразования страниц ошибок HTML по умолчанию в формат JSON. Однако этот обработчик срабатывает для вещей, которые вы не вызываете напрямую, таких как ошибки 404 и 405 во время маршрутизации. Тщательно создавайте свой обработчик, чтобы не потерять информацию об ошибке HTTP.
from flask import json
from werkzeug.exceptions import HTTPException

@app.errorhandler(HTTPException)
def handle_exception(e):
    """Return JSON instead of HTML for HTTP errors."""

    response = e.get_response()

    response.data = json.dumps({
        "code": e.code,
        "name": e.name,
        "description": e.description,
    })
    response.content_type = "application/json"
    return response
Обработчик ошибок для Exception может показаться полезным для изменения способа представления пользователю всех ошибок, даже необработанных. Однако это похоже на выполнение, except Exception: в Python он фиксирует все необработанные в противном случае ошибки, включая все коды состояния HTTP.
В большинстве случаев будет безопаснее зарегистрировать обработчики для более конкретных исключений. Поскольку экземпляры HTTPException являются действительными ответами WSGI, вы также можете передать их напрямую.
from werkzeug.exceptions import HTTPException

@app.errorhandler(Exception)
def handle_exception(e):

    if isinstance(e, HTTPException):
        return e


    return render_template("500_generic.html", e=e), 500
Обработчики ошибок по-прежнему соблюдают иерархию классов исключений. Если вы зарегистрируете обработчики как для HTTPException ,так и для Exception , обработчик Exception не будет обрабатывать подклассы HTTPException , поскольку он является более конкретным обработчиком HTTPException .
Unhandled Exceptions
Если для исключения не зарегистрирован обработчик ошибок, вместо этого будет возвращена ошибка 500 Internal Server Error. См. flask.Flask.handle_exception() для получения информации об этом поведении.
Если для InternalServerError зарегистрирован обработчик ошибок , он будет вызван. Начиная с Flask 1.1.0, этому обработчику ошибок всегда будет передаваться экземпляр InternalServerError , а не исходная необработанная ошибка.
Исходная ошибка доступна как e.original_exception .
В обработчик ошибки «500 Internal Server Error» будут передаваться не пойманные исключения в дополнение к явным 500 ошибкам.В режиме отладки обработчик для «500 Internal Server Error» не будет использоваться.Вместо этого будет показан интерактивный отладчик.
Пользовательские страницы ошибок
Иногда при создании приложения Flask вы можете захотеть создать исключение HTTPException , чтобы сообщить пользователю, что с запросом что-то не так. К счастью, Flask поставляется с удобной функцией abort() , которая прерывает запрос с ошибкой HTTP от werkzeug по желанию. Он также предоставит вам простую черно-белую страницу ошибки с основным описанием, но ничего особенного.
В зависимости от кода ошибки вероятность того,что пользователь действительно увидит такую ошибку,меньше или больше.
Рассмотрим код ниже,у нас может быть маршрут профиля пользователя,и если пользователь не передает имя пользователя,мы можем выдать сообщение «400 Bad Request».Если пользователь передает имя пользователя,но мы не можем его найти,мы выдаем сообщение «404 Not Found».
from flask import abort, render_template, request


@app.route("/profile")
def user_profile():
    username = request.arg.get("username")

    if username is None:
        abort(400)

    user = get_user(username=username)

    if user is None:
        abort(404)

    return render_template("profile.html", user=user)
Вот еще один пример реализации исключения «404 Page Not Found»:
from flask import render_template

@app.errorhandler(404)
def page_not_found(e):

    return render_template('404.html'), 404
При использовании фабрик приложений :
from flask import Flask, render_template

def page_not_found(e):
  return render_template('404.html'), 404

def create_app(config_filename):
    app = Flask(__name__)
    app.register_error_handler(404, page_not_found)
    return app
Пример шаблона может быть следующим:
{% extends "layout.html" %}
{% block title %}Page Not Found{% endblock %}
{% block body %}
  <h1>Page Not Found</h1>
  <p>What you were looking for is just not there.
  <p><a href="{{ url_for('index') }}">go somewhere nice</a>
{% endblock %}
Further Examples
Приведенные выше примеры на самом деле не являются улучшением стандартных страниц исключений.Мы можем создать пользовательский шаблон 500.html следующим образом:
{% extends "layout.html" %}
{% block title %}Internal Server Error{% endblock %}
{% block body %}
  <h1>Internal Server Error</h1>
  <p>Oops... we seem to have made a mistake, sorry!</p>
  <p><a href="{{ url_for('index') }}">Go somewhere nice instead</a>
{% endblock %}
Это можно реализовать путем рендеринга шаблона при «500 Internal Server Error»:
from flask import render_template

@app.errorhandler(500)
def internal_server_error(e):

    return render_template('500.html'), 500
При использовании фабрик приложений :
from flask import Flask, render_template

def internal_server_error(e):
  return render_template('500.html'), 500

def create_app():
    app = Flask(__name__)
    app.register_error_handler(500, internal_server_error)
    return app
При использовании модульных приложений с Blueprints :
from flask import Blueprint

blog = Blueprint('blog', __name__)


@blog.errorhandler(500)
def internal_server_error(e):
    return render_template('500.html'), 500


blog.register_error_handler(500, internal_server_error)
Обработчики ошибок чертежей
В Modular Applications with Blueprints большинство обработчиков ошибок будут работать должным образом. Однако есть предостережение относительно обработчиков исключений 404 и 405. Эти обработчики ошибок вызываются только из соответствующего оператора raise или вызова abort в другой функции представления схемы; они не вызываются, например, недопустимым доступом по URL-адресу.
Это связано с тем, что схема не «владеет» определенным пространством URL-адресов, поэтому экземпляр приложения не может узнать, какой обработчик ошибок схемы следует запустить, если указан недопустимый URL-адрес. Если вы хотите использовать разные стратегии обработки этих ошибок на основе префиксов URL, их можно определить на уровне приложения с помощью прокси-объекта request
from flask import jsonify, render_template


@app.errorhandler(404)
def page_not_found(e):

    if request.path.startswith('/blog/'):

        return render_template("blog/404.html"), 404
    else:

        return render_template("404.html"), 404

@app.errorhandler(405)
def method_not_allowed(e):

    if request.path.startswith('/api/'):

        return jsonify(message="Method Not Allowed"), 405
    else:

        return render_template("405.html"), 405
Возврат ошибок API в формате JSON
При создании API-интерфейсов во Flask некоторые разработчики понимают, что встроенные исключения недостаточно выразительны для API-интерфейсов и что тип содержимого text / html, который они генерируют, не очень полезен для потребителей API.
Используя те же методы, что и выше, и jsonify() , мы можем возвращать ответы JSON на ошибки API. abort() вызывается с параметром description . Обработчик ошибок будет использовать это как сообщение об ошибке JSON и установит код состояния 404.
from flask import abort, jsonify

@app.errorhandler(404)
def resource_not_found(e):
    return jsonify(error=str(e)), 404

@app.route("/cheese")
def get_one_cheese():
    resource = get_resource()

    if resource is None:
        abort(404, description="Resource not found")

    return jsonify(resource)
Мы также можем создавать пользовательские классы исключений.Например,мы можем создать новое пользовательское исключение для API,которое может принимать сообщение,читаемое человеком,код состояния ошибки и некоторую необязательную полезную нагрузку для создания дополнительного контекста ошибки.
Это простой пример:
from flask import jsonify, request

class InvalidAPIUsage(Exception):
    status_code = 400

    def __init__(self, message, status_code=None, payload=None):
        super().__init__()
        self.message = message
        if status_code is not None:
            self.status_code = status_code
        self.payload = payload

    def to_dict(self):
        rv = dict(self.payload or ())
        rv['message'] = self.message
        return rv

@app.errorhandler(InvalidAPIUsage)
def invalid_api_usage(e):
    return jsonify(e.to_dict()), e.status_code


@app.route("/api/user")
def user_api(user_id):
    user_id = request.arg.get("user_id")
    if not user_id:
        raise InvalidAPIUsage("No user id provided!")

    user = get_user(user_id=user_id)
    if not user:
        raise InvalidAPIUsage("No such user!", status_code=404)

    return jsonify(user.to_dict())
Теперь представление может вызвать это исключение с сообщением об ошибке. Кроме того, некоторая дополнительная полезная нагрузка может быть предоставлена в виде словаря через параметр payload .
Logging
См. Ведение журнала для получения информации о том, как регистрировать исключения, например, отправляя их администраторам по электронной почте.
Debugging
См. Отладка ошибок приложений для получения информации о том, как отлаживать ошибки при разработке и производстве.
Flask
2.2
-
Waitress
-
Проектные решения во Flask
-
Extensions
-
Installation