- Python
- Основы Python
- Python ООП
- wxPython
- Модули
- Flask
- Django
- JavaScript
- Основы JavaScript
- JavaScript DOM
- JavaScript ООП
- Java
- Основы Java
- Java ООП
- Обработка данных
- Нейронные сети
- ЦОС
- Фракталы
- Генетические алгоритмы
- Tensorflow
- ML
- Еще
- Структуры данных
|
Файл проекта: https://github.com/selfedu-rus/flasksite-18 Продолжаем предыдущее занятие и если мы сейчас form.<переменная поля>.errors Добавим их {{ form.email.label() }} {% if form.email.errors %} {{ form.email(class="invalid") }} <span class="invalid-feedback"> {% for e in form.email.errors %} {{ e }} {% endfor %} </span> {% else %} {{ form.email() }} {% endif %} {{ form.psw.label() }} {% if form.psw.errors %} {{ form.psw(class="invalid") }} <span class="invalid-feedback"> {% for e in form.psw.errors %} {{ e }} {% endfor %} </span> {% else %} {{ form.psw() }} {% endif %} Мы здесь после Чтобы все .form-contact .invalid { display: inline-block; background: #FF9898; } .form-contact .invalid-feedback { color: #CC0000; } Перейдем в Invalid email address. По умолчанию в WTForms ошибки class LoginForm(FlaskForm): email = StringField("Email: ", validators=[Email("Некорректный email")]) psw = PasswordField("Пароль: ", validators=[DataRequired(), Length(min=4, max=100, message="Пароль должен быть от 4 до 100 символов")]) remember = BooleanField("Запомнить", default = False) submit = SubmitField("Войти") Теперь, при Формирование полей в шаблоне через циклЕсли вернуться к {% for field in form if field.name not in ['csrf_token', 'remember', 'submit'] -%} {{ field.label() }} {% if field.errors %} {{ field(class="invalid") }} <span class="invalid-feedback"> {% for e in field.errors %} {{ e }} {% endfor %} </span> {% else %} {{ field() }} {% endif %} {% endfor %} Смотрите, мы здесь выбираем все поля (field) из формы, кроме полей с именами ‘csrf_token’, ‘remember’ Если теперь Форма регистрацииДавайте заменим class RegisterForm(FlaskForm): name = StringField("Имя: ", validators=[Length(min=4, max=100, message="Имя должно быть от 4 до 100 символов")]) email = StringField("Email: ", validators=[Email("Некорректный email")]) psw = PasswordField("Пароль: ", validators=[DataRequired(), Length(min=4, max=100, message="Пароль должен быть от 4 до 100 символов")]) psw2 = PasswordField("Повтор пароля: ", validators=[DataRequired(), EqualTo('psw', message="Пароли не совпадают")]) submit = SubmitField("Регистрация") Мы здесь Далее, шаблон register.html запишем в виде: {% extends 'base.html' %} {% block content %} {{ super() }} {% for cat, msg in get_flashed_messages(True) %} <div class="flash {{cat}}">{{msg}}</div> {% endfor %} <form action="{{ url_for('register') }}" method="post" class="form-contact"> {{ form.hidden_tag() }} {% for field in form if field.name not in ['csrf_token', 'submit'] -%} {{ field.label() }} {% if field.errors %} {{ field(class="invalid") }} <span class="invalid-feedback"> {% for e in field.errors %} {{ e }} {% endfor %} </span> {% else %} {{ field() }} {% endif %} {% endfor %} {{ form.submit() }} </form> {% endblock %} И обработчик register: @app.route("/register", methods=["POST", "GET"]) def register(): form = RegisterForm() if form.validate_on_submit(): hash = generate_password_hash(request.form['psw']) res = dbase.addUser(form.name.data, form.email.data, hash) if res: flash("Вы успешно зарегистрированы", "success") return redirect(url_for('login')) else: flash("Ошибка при добавлении в БД", "error") return render_template("register.html", menu=dbase.getMenu(), title="Регистрация", form=form) Как видите, все Конечно, мы Видео по теме
|
In this Flask Tutorial we are going to learn about Flask-WTF Form Error Messages, so in the
previous article we have learned that how you can use Flask-WTF Form, but we have not done
validation on our Forms. this article is basically for the form validation on Flask-WTF Forms.
you can Check the article on this link Flask Forms with Flask-WTF.
So this is our forms.py file, and in this file we have created our simple login form and you
can see that we have added some ready validators from Flask-WTF that is InputRequired().
For more information about Flask-WTF you can read this article Flask Forms with Flask-WTF.
|
from flask_wtf import FlaskForm from wtforms import StringField, PasswordField from wtforms.validators import InputRequired class LoginForm(FlaskForm): username = StringField(‘Username’, validators=[InputRequired()]) password = PasswordField(‘Password’, validators=[InputRequired()]) |
And this is our app.py file with our required view functions and you can see that we have also
added our login view function in here. in this view function just by submitting of the form
we are going to redirect the users to the index using redirect function.
|
1 2 3 4 5 6 7 8 9 10 11 12 13 14 15 16 17 18 19 20 21 22 23 24 25 26 27 28 29 30 31 32 33 |
from flask import Flask, render_template, redirect, url_for from forms import LoginForm #create the object of Flask app = Flask(__name__) app.config[‘SECRET_KEY’] = ‘hardsecretkey’ #creating our routes @app.route(‘/’) def index(): return render_template(‘index.html’) #login route @app.route(‘/login’ , methods = [‘GET’, ‘POST’]) def Login(): form = LoginForm() if form.validate_on_submit(): return redirect(url_for(‘index’)) return render_template(‘login.html’, form = form) #run flask app if __name__ == «__main__»: app.run(debug=True) |
This is our base.html, we have already talked about creating templates in Flask, you can
read this article Introduction to Flask Templates. you need to just create templates folder
in your working directory.
|
1 2 3 4 5 6 7 8 9 10 11 12 13 14 15 16 17 18 19 20 21 22 23 24 25 26 27 28 29 30 31 32 33 34 35 36 37 38 39 40 41 42 43 44 45 46 47 48 49 50 51 52 53 54 55 56 57 58 59 60 61 62 63 64 65 |
<!DOCTYPE html> <html lang=«en»> <head> <meta charset=«UTF-8»> <title>{% block title %} {% endblock %}</title> <!— CSS Bootstrap CDN Link —> <link rel=«stylesheet» href=«https://stackpath.bootstrapcdn.com/bootstrap/4.5.0/css/bootstrap.min.css» integrity=«sha384-9aIt2nRpC12Uk9gS9baDl411NQApFmC26EwAOH8WgZl5MYYxFfc+NcPb1dKGj7Sk» crossorigin=«anonymous»> </head> <body> <nav class=«navbar navbar-expand-lg navbar-dark bg-dark»> <div class=«container»> <a class=«navbar-brand» href=«{{url_for(‘index’)}}»>CodeLoop</a> <button class=«navbar-toggler» type=«button» data—toggle=«collapse» data—target=«#navbarSupportedContent» aria—controls=«navbarSupportedContent» aria—expanded=«false» aria—label=«Toggle navigation»> <span class=«navbar-toggler-icon»></span> </button> <div class=«collapse navbar-collapse» id=«navbarSupportedContent»> <ul class=«navbar-nav mr-auto»> <li class=«nav-item active»> <a class=«nav-link» href=«{{url_for(‘index’)}}»>Home <span class=«sr-only»>(current)</span></a> </li> <li class=«nav-item»> <a class=«nav-link» href=«#»>Logout</a> </li> </ul> <form class=«form-inline my-2 my-lg-0»> <input class=«form-control mr-sm-2» type=«search» placeholder=«Search» aria—label=«Search»> <button class=«btn btn-outline-success my-2 my-sm-0» type=«submit»>Search</button> </form> </div> </div> <a href=«{{url_for(‘Login’)}}»><button class=«btn btn-success navbar-btn»>Login</button> </a> <a href=«»><button class=«btn btn-success navbar-btn»>Signup</button> </a> </nav> <!— JS, Popper.js, and jQuery —> <script src=«https://code.jquery.com/jquery-3.5.1.slim.min.js» integrity=«sha384-DfXdz2htPH0lsSSs5nCTpuj/zy4C+OGpamoFVy38MVBnE+IbbVYUew+OrCXaRkfj» crossorigin=«anonymous»></script> <script src=«https://cdn.jsdelivr.net/npm/popper.js@1.16.0/dist/umd/popper.min.js» integrity=«sha384-Q6E9RHvbIyZFJoft+2mJbHaEWldlvI9IOYy5n3zV9zzTtmI3UksdQRVvoxMfooAo» crossorigin=«anonymous»></script> <script src=«https://stackpath.bootstrapcdn.com/bootstrap/4.5.0/js/bootstrap.min.js» integrity=«sha384-OgVRvuATP1z7JjHLkuOU7Xw704+h835Lr+6QL9UvYjZE3Ipu6Tp75j7Bh/kR0JKI» crossorigin=«anonymous»></script> {% block body %} {% endblock %} </body> </html> |
So now this is our login.html file , basically in here we need to put our Flask-WTF validation
errors. and you can use this code for adding validation errors. this is for username, you can add
the same for password, just change the username to the password.
|
{% for error in form.username.errors %} <span style=«color:red;»> {{error}} </span> {% endfor %} |
This is the complete login.html file.
templates/login.html
|
1 2 3 4 5 6 7 8 9 10 11 12 13 14 15 16 17 18 19 20 21 22 23 24 25 26 27 28 29 30 31 32 33 34 35 36 37 38 39 40 41 42 43 44 45 46 47 48 49 50 51 52 53 54 55 56 57 58 59 60 61 62 63 64 65 66 67 |
{% extends ‘base.html’ %} {% block title %} Home {% endblock %} {% block body %} <div class=«container»> <h1>Home Page — Welcome to codeloop.org</h1> <h3>Tutorial Number 9 </h3> <br> <br> <hr> <h1>Please Login</h1> <form action=«» method=«post» novalidate> {{form.csrf_token}} <p> {{form.username.label}} {{form.username(size=32)}} {% for error in form.username.errors %} <span style=«color:red;»> {{error}} </span> {% endfor %} </p> <p> {{form.password.label}} {{form.password(size=32)}} {% for error in form.password.errors %} <span style=«color:red;»> {{error}} </span> {% endfor %} </p> <p> <input type=«submit» value=«Login» class=«btn btn-success»> </p> </form> </div> {% endblock %} |
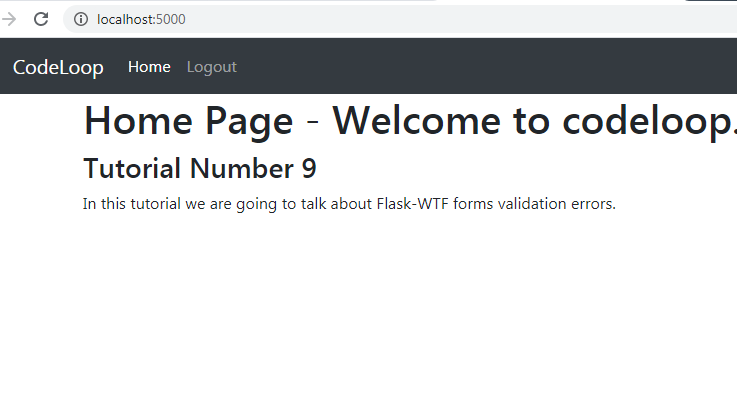
And this is our index.html file.
templates/index.html
|
1 2 3 4 5 6 7 8 9 10 11 12 13 14 15 16 17 18 19 20 21 22 23 |
{% extends ‘base.html’ %} {% block title %} Home {% endblock %} {% block body %} <div class=«container»> <h1>Home Page — Welcome to codeloop.org</h1> <h3>Tutorial Number 9 </h3> <p> In this tutorial we are going to talk about Flask—WTF forms validation errors. </p> </div> {% endblock %} |
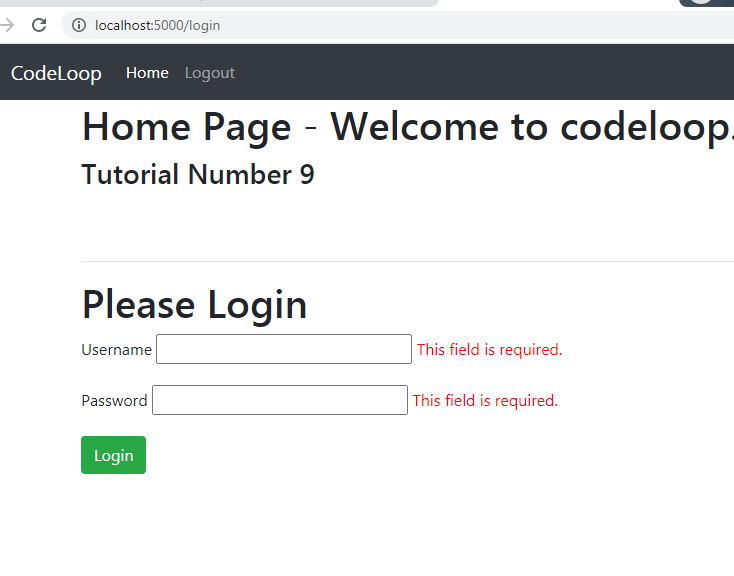
Now run the project and go to http://localhost:5000/login, if you leave blank the fields and
click on login, you will see this error message.
And if you give a random password and email you will redirected to the index page. right
now we have not used any database functionality for our application, we will do this in the
next tutorials.
Also you can watch my complete 4 hours training on Flask Web Development
Thank you for visiting my website! If you enjoyed this article, please consider supporting my works on Patreon.

Время прочтения
10 мин
Просмотры 127K
Это третья статья в серии, где я описываю свой опыт написания веб-приложения на Python с использованием микрофреймворка Flask.
Цель данного руководства — разработать довольно функциональное приложение-микроблог, которое я за полным отсутствием оригинальности решил назвать microblog.
Краткое повторение
В предыдущей части мы определили простой шаблон для домашней страницы и использовали мнимые объекты в качестве прототипов вещей, которых у нас еще нет. К примеру пользователи или записи.
В этой статье мы собираемся заполнить один из пробелов, которые есть в нашем приложении. Мы рассмотрим работу с формами.
Формы являются одними из самых основных блоков в любом веб-приложении. Использование форм позволит пользователям оставлять записи в блоге, а также логиниться в приложение.
Чтобы следовать этой части, ваше приложение микроблога должно быть таким, каким мы оставили его в конце предыдущей. Пожалуйста, убедитесь, что прилолжение установлено и работает.
Конфигурация
Для обработки форм мы будем использовать расширение Flask-WTF, которое является оберткой WTForms и прекрасно интегрируется с Flask приложениями.
Многие расширения Flask требуют некоторой настройки, поэтому мы создадим файл конфигурации внутри нашей корневой папки microblog, так что он будет легко доступен для изменения, если понадобится. Вот с чего мы начнем (файл config.py):
CSRF_ENABLED = True
SECRET_KEY = 'you-will-never-guess'
Все просто, это две настройки, которые нужны нашему расширению Flask-WTF. CSRF_ENABLED активирует предотвращение поддельных межсайтовых запросов. В большинстве случаев вы захотите включить эту опцию, что сделает ваше приложение более защищенным.
SECRET_KEY нужен только тогда, когда включен CSRF. Он используется для создания криптографического токена, который используется при валидации формы. Когда вы пишете свое приложение, убедитесь, что ваш секретный ключ сложно подобрать.
Теперь у нас есть конфиг, и мы должны сказать Flask’у прочесть и использовать его. Мы сможем сделать это сразу после того, как объект приложения Flask создан. (файл app/__init__.py):
from flask import Flask

app = Flask(__name__)
app.config.from_object('config')

from app import views
Форма входа
В Flask-WTF формы представлены в виде объектов подкласса от класса Form. Подкласс форм просто определяет поля форм как переменные в классе.
Мы создадим форму логина, которая будет использоваться вместе с системой идентификации. Механизм входа, который мы будем поддерживать в нашем приложении, не стандартного типа имя пользователя/пароль, — мы будем использовать OpenID в качестве логинов. Преимущество OpenID в том, что авторизация пройдена у провайдера OpenID, поэтому нам не нужно проверять пароли, что сделает наш сайт более защищенным для наших пользователей.
OpenID логин требует только одну строку под названием OpenID. Также мы закинем чекбокс ‘Запомнить меня’ в форму, чтобы пользователь мог установить cookie в свой браузер, который будет помнить их логин, когда они вернутся.
Напишем нашу первую форму (файл app/forms.py):
from flask.ext.wtf import Form
from wtforms import TextField, BooleanField
from wtforms.validators import Required

class LoginForm(Form):
    openid = TextField('openid', validators = [Required()])
    remember_me = BooleanField('remember_me', default = False)
Уверен, что класс говорит сам за себя. Мы импортировали класс Form и два класса полей, который нам понадобятся, TextField и BooleanField.
Импортированный Required — это валидатор, функция, которая может быть прикреплена к полю, для выполнения валидации данных отправленных пользователем. Валидатор Required просто проверяет, что поле не было отправлено пустым. В Flask-WTF есть много валидаторов, мы будем использовать несколько новых в будущем.
Шаблоны форм
Еще нам нужен HTML шаблон, который содержит форму. Хорошей новостью будет то, что класс LoginForm, который мы только что создали, знает как отдавать поля формы в HTML, поэтому нам просто нужно сконцентрироваться на макете. Вот наш шаблон логина: (файл app/templates/login.html):
<!-- extend from base layout -->
{% extends "base.html" %}

{% block content %}
<h1>Sign In</h1>
<form action="" method="post" name="login">
    {{form.hidden_tag()}}
    <p>
        Please enter your OpenID:<br>
        {{form.openid(size=80)}}<br>
    </p>
    <p>{{form.remember_me}} Remember Me</p>
    <p><input type="submit" value="Sign In"></p>
</form>
{% endblock %}
Обратите внимание, что мы снова используем шаблон base.html через оператор наследования, расширяя его. Мы будем делать так со всеми нашими шаблонами, обеспечивая согласование макета на всех страницах.
Есть несколько интересных отличий между обычной HTML формой и нашим шаблоном. Шаблон ожидает экземпляр класса формы, который мы только что назначили в аргументе шаблона form. Мы позаботимся об отправке этого аргумента шаблона в будущем, когда напишем функцию представления, которая отдает этот шаблон.
Параметр шаблона form.hidden_tag() будет заменен скрытым полем для предотвращения CSRF, включенное в нашем файле настроек. Это поле должно быть во всех ваших формах, если CSRF включен.
Поля нашей формы отданы объектом формы, вы просто должны обращаться к аргументу {{form.field_name}} в том месте шаблона, где должно быть вставлено поле. Некоторые поля могут принимать аргументы. В нашем случае, мы просим форму создать наше поле openid с шириной в 80 символов.
Так как мы не определили кнопку отправки в классе формы, мы должны определить её как обычное поле. Поле отправки не несет каких-либо данных, поэтому нет нужды определять его в классе формы.
Представления форм
Последним шагом перед тем, как мы сможем увидеть нашу форму, будет написание функции представления, которая отдает шаблон.
На самом деле это весьма просто, так как мы должны всего лишь передать объект формы в шаблон. вот наша новая функция представления (файл app/views.py):
from flask import render_template, flash, redirect
from app import app
from forms import LoginForm

# функция представления index опущена для краткости

@app.route('/login', methods = ['GET', 'POST'])
def login():
    form = LoginForm()
    return render_template('login.html',
        title = 'Sign In',
        form = form)
Мы импортировали наш класс LoginForm, создали его экземпляр и отправили в шаблон. Это все что нужно для того, чтобы отрисовать поля формы.
Не будем обращать внимания на импорт flash и redirect. Мы используем их чуть позже.
Еще одно нововведение — это аргументы метода в декораторе route. Здесь мы говорим Flask, что функция представления принимает GET и POST запрос. Без этого представление будет принимать только GET запросы. Мы хотим получать POST запросы, которые будут отдавать форму с веденными пользователем данными.
На этой стадии вы можете запустить приложение и посмотреть на вашу форму в браузере. После запуска откройте адрес, который мы связали с функцией представления login: http://localhost:5000/login
Мы еще не запрограммировали ту часть, которая принимает данные, поэтому нажатие на кнопку submit не принесет никакого эффекта.
Получение данных формы
Еще одна область, где Flask-WTF облегчает нашу работу — обработка отправленных данных. Это новая версия нашей функции представления login, которая валидирует и сохраняет данные формы (файл app/views.py):
@app.route('/login', methods = ['GET', 'POST'])
def login():
    form = LoginForm()
    if form.validate_on_submit():
        flash('Login requested for OpenID="' + form.openid.data + '", remember_me=' + str(form.remember_me.data))
        return redirect('/index')
    return render_template('login.html',
        title = 'Sign In',
        form = form)
Метод validate_on_submit делает весь процесс обработки. Если вы вызвали метод, когда форма будет представлена пользователю (т.е. перед тем, как у пользователя будет возможность ввести туда данные), то он вернет False, в таком случае вы знаете, что должны отрисовать шаблон.
Если validate_on_submit вызывается вместе как часть запроса отправки формы, то он соберет все данные, запустит любые валидаторы, прикрепленные к полям, и если все в порядке вернет True, что указывает на валидность данных. Это означает, что данные безопасны для включения в приложение.
Если как минимум одно поле не проходит валидацию, тогда функция вернет False и это снова вызовет отрисовку формы перед пользователем, тем самым дав возможность исправить ошибки. Позже мы научимся показывать сообщения об ошибке, когда не проходит валидация.
Когда validate_on_submit возвращает True, наша функция представления вызывает две новых функции, импортированных из Flask. Функция Flash — это быстрый способ отображения сообщения на следующей странице, представленной пользователю. В данном случае мы будем использовать это для отладки до тех пор, пока у нас нет инфраструктуры, необходимой для логирования, вместо этого мы просто будем выводить сообщение, которое будет показывать отправленные данные. Также flash чрезвычайно полезен на продакшн сервере для обеспечения обратной связи с пользователем.
Flash сообщения не будут автоматически появляться на нашей странице, наши шаблоны должны отображать сообщени в том виде, который подходит для макета нашего сайта. Мы добавим сообщения в базовый шаблон, так что все наши шаблоны наследуют эту функциональность. Это обновленный шаблон base (файл app/templates/base.html):
<html>
  <head>
    {% if title %}
    <title>{{title}} - microblog</title>
    {% else %}
    <title>microblog</title>
    {% endif %}
  </head>
  <body>
    <div>Microblog: <a href="/index">Home</a></div>
    <hr>
    {% with messages = get_flashed_messages() %}
    {% if messages %}
    <ul>
    {% for message in messages %}
        <li>{{ message }} </li>
    {% endfor %}
    </ul>
    {% endif %}
    {% endwith %}
    {% block content %}{% endblock %}
  </body>
</html>
Надеюсь способ отображения сообщений не требует пояснений.
Другая новая функция, которую мы использовали в нашем представлении login — redirect. Эта функция перенаправляет клиентский веб-браузер на другую страницу, вместо запрашиваемой. В нашей функции представления мы использовали редирект на главную страницу, разработанную в предыдущих частях. Имейте в виду, что flash сообщения будут отображены даже если функция заканчивается перенаправлением.
Прекрасное время для того, чтобы запустить приложение и проверить как работают формы. Попробуйте отправить форму с пустым полем openid, чтобы увидеть как валидатор Required останавливает процесс передачи.
Улучшение валидации полей
С приложением в его текущем состоянии, переданные с неверными данными формы не будут приняты. Вместо этого форма снова будет отдана пользователю для исправления. Это именно то, что нам нужно.
Что мы пропустили, так это уведомления пользователя о том, что именно не так с формой. К счастью, Flask-WTF также облегчает эту задачу.
Когда поле не проходит валидацию Flask-WTF добавляет наглядное сообщение об ошибке в объект формы. Эти сообщения доступны в шаблоне, так что нам просто нужно добавить немного логики для их отображения.
Это наш шаблон login с сообщениями валидации полей (файл app/templates/login.html):
<!-- extend base layout -->
{% extends "base.html" %}

{% block content %}
<h1>Sign In</h1>
<form action="" method="post" name="login">
    {{form.hidden_tag()}}
    <p>
        Please enter your OpenID:<br>
        {{form.openid(size=80)}}<br>
        {% for error in form.errors.openid %}
        <span style="color: red;">[{{error}}]</span>
        {% endfor %}<br>
    </p>
    <p>{{form.remember_me}} Remember Me</p>
    <p><input type="submit" value="Sign In"></p>
</form>
{% endblock %}
Единственное изменение, которое мы сделали — добавили цикл, отрисовывающий любые добавленные валидатором сообщения об ошибках справа от поля openid. Как правило, любые поля имеющие прикрепленные валидаторы будут иметь ошибки, добавленные как form.errors.имя_поля. В нашем случае мы используем form.errors.openid. Мы отображаем эти сообщения в красном цвете, чтобы обратить на них внимание пользователя.
Взаимодействие с OpenID
На деле, мы будем сталкиваться с тем, что много людей даже не знают, что у них уже есть парочка OpenID. Не слишком известно, что ряд крупных поставщиков услуг в интернете поддерживает OpenID аутентификацию для их пользователей. Например, если у вас есть аккаунт в Google, то с ним у вас есть и OpenID. Так же как и в Yahoo, AOL, Flickr и множестве других сервисов.
Чтобы облегчить пользователю вход на наш сайт с одним из часто используемых OpenID, мы добавим ссылки на часть из них, чтобы пользователю не нужно было вводить OpenID вручную.
Начнем с определения списка OpenID провайдеров, которых мы хотим представить. Мы можем сделать это в нашем файле конфигурации (файл config.py):
OPENID_PROVIDERS = [
    { 'name': 'Google', 'url': 'https://www.google.com/accounts/o8/id' },
    { 'name': 'Yahoo', 'url': 'https://me.yahoo.com' },
    { 'name': 'AOL', 'url': 'http://openid.aol.com/<username>' },
    { 'name': 'Flickr', 'url': 'http://www.flickr.com/<username>' },
    { 'name': 'MyOpenID', 'url': 'https://www.myopenid.com' }]
Теперь посмотрим как мы используем этот список в нашей функции представления login:
@app.route('/login', methods = ['GET', 'POST'])
def login():
    form = LoginForm()
    if form.validate_on_submit():
        flash('Login requested for OpenID="' + form.openid.data + '", remember_me=' + str(form.remember_me.data))
        return redirect('/index')
    return render_template('login.html',
        title = 'Sign In',
        form = form,
        providers = app.config['OPENID_PROVIDERS'])
Тут мы получаем настройки путем их поиска по ключу в app.config. Дальше список добавляется в вызов render_template как аргумент шаблона.
Как вы догадались, нам нужно сделать еще один шаг, чтобы покончить с этим. Сейчас нам нужно указат как мы хотели бы отображать ссылки на этих провайдеров в нашем шаблоне login (файл app/templates/login.html):
<!-- extend base layout -->
{% extends "base.html" %}

{% block content %}
<script type="text/javascript">
function set_openid(openid, pr)
{
    u = openid.search('<username>')
    if (u != -1) {
        // openid requires username
        user = prompt('Enter your ' + pr + ' username:')
        openid = openid.substr(0, u) + user
    }
    form = document.forms['login'];
    form.elements['openid'].value = openid
}
</script>
<h1>Sign In</h1>
<form action="" method="post" name="login">
    {{form.hidden_tag()}}
    <p>
        Please enter your OpenID, or select one of the providers below:<br>
        {{form.openid(size=80)}}
        {% for error in form.errors.openid %}
        <span style="color: red;">[{{error}}]</span>
        {% endfor %}<br>
        |{% for pr in providers %}
        <a href="javascript:set_openid('{{pr.url}}', '{{pr.name}}');">{{pr.name}}</a> |
        {% endfor %}
    </p>
    <p>{{form.remember_me}} Remember Me</p>
    <p><input type="submit" value="Sign In"></p>
</form>
{% endblock %}
Шаблон получился несколько длинным в связи со всеми этими изменениями. Некоторые OpenID включают в себя имена пользователей, для них у нас должно быть немного javascript магии, которая запрашивает имя пользователя, а затем создает OpenID. Когда пользователь кликает на ссылку OpenID провайдера и (опционально) вводит имя пользователя, OpenID для этого провайдера вставляется в текстовое поле.
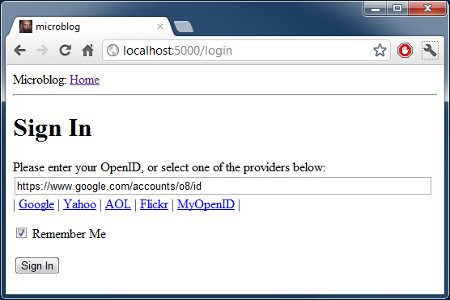
скриншот нашей страницы входа после нажатия на ссылку Google OpenID
Заключительные слова
Хотя мы добились большого прогресса с нашими формами логина, в действительности мы не сделали ничего для входа пользователей в нашу систему. Все что мы сделали имело отношение к GUI процесса входа. Это потому, что прежде чем мы сможем сделать реальные логины, нам нужно иметь базу данных, где мы можем записывать наших пользователей.
В следующей части мы мы поднимем и запустим нашу базу данных, чуть позже мы завершим нашу систему входа, так что следите за обновлениями следующих статей.
Приложение microblog в его текущем состоянии доступно для загрузки здесь:
microblog-0.3.zip
Учтите, что zip файл не содержит в себе виртуального окружения flask. Создайте его сами, следуя инструкциям в первой части, перед тем, как вы сможете запустить приложение.
Если у вас есть какие-то вопросы или комментарии, то свободно оставляйте их ниже.
Мигель
Currently in WTForms to access errors you have to loop through field errors like so:
for error in form.username.errors:
        print error
Since I’m building a rest application which uses no form views, I’m forced to check through all form fields in order to find where the error lies.
Is there a way I could do something like:
for fieldName, errorMessage in form.errors:
        ...do something
![]()
Bob Jordan
2,9492 gold badges33 silver badges41 bronze badges
asked Jun 24, 2011 at 3:31
![]()
The actual form object has an errors attribute that contains the field names and their errors in a dictionary. So you could do:
for fieldName, errorMessages in form.errors.items():
    for err in errorMessages:
        # do something with your errorMessages for fieldName
answered Jun 24, 2011 at 17:01
![]()
Sean VieiraSean Vieira
153k32 gold badges311 silver badges290 bronze badges
0
A cleaner solution for Flask templates:
Python 3:
{% for field, errors in form.errors.items() %}
<div class="alert alert-error">
    {{ form[field].label }}: {{ ', '.join(errors) }}
</div>
{% endfor %}
Python 2:
{% for field, errors in form.errors.iteritems() %}
<div class="alert alert-error">
    {{ form[field].label }}: {{ ', '.join(errors) }}
</div>
{% endfor %}
answered Dec 17, 2013 at 20:58
![]()
WolphWolph
77k11 gold badges136 silver badges148 bronze badges
4
For anyone looking to do this in Flask templates:
{% for field in form.errors %}
{% for error in form.errors[field] %}
    <div class="alert alert-error">
        <strong>Error!</strong> {{error}}
    </div>
{% endfor %}
{% endfor %}
answered Feb 20, 2013 at 20:44
![]()
TrentTrent
2,7671 gold badge30 silver badges44 bronze badges
With ModelFormFields in SqlAlchemy when used with WTForms, if you have a nested object inside an object (foreign key relationships), here is how you show the relevant errors for fields properly.
Python side:
def flash_errors(form):
    for field, errors in form.errors.items():
        if type(form[field]) == ModelFormField:
            for error, lines in errors.iteritems():
                description = "n".join(lines)
                flash(u"Error in the %s field - %s" % (
                    #getattr(form, field).label.text + " " + error,
                    form[field][error].label.text,
                    description
                ))
        else:
            for error, lines in errors.iteritems():
                description = "n".join(lines)
                flash(u"Error in the %s field - %s" % (
                    #getattr(form, field).label.text + " " + error,
                    form[field].label.text,
                    description
                ))
Jinja side:
  {% with messages = get_flashed_messages(with_categories=true) %}
    {% for message in messages %}
      {% if "Error" not in message[1]: %}
        <div class="alert alert-info">
          <strong>Success! </strong> {{ message[1] }}
        </div>
      {% endif %}

      {% if "Error" in message[1]: %}
        <div class="alert alert-warning">
         {{ message[1] }}
        </div>
      {% endif %}
    {% endfor %}
  {% endwith %}
Hope that helps.
answered Sep 6, 2018 at 20:55
![]()
phyattphyatt
18.2k5 gold badges60 silver badges79 bronze badges
(Great news! There is a new version of this tutorial!)
This is the third article in the series in which I document my experience writing web applications in Python using the Flask microframework.
The goal of the tutorial series is to develop a decently featured microblogging application that demonstrating total lack of originality I have decided to call microblog.
NOTE: This article was revised in September 2014 to be in sync with current versions of Python and Flask.
Here is an index of all the articles in the series that have been published to date:
- Part I: Hello, World!
- Part II: Templates
- Part III: Web Forms (this article)
- Part IV: Database
- Part V: User Logins
- Part VI: Profile Page And Avatars
- Part VII: Unit Testing
- Part VIII: Followers, Contacts And Friends
- Part IX: Pagination
- Part X: Full Text Search
- Part XI: Email Support
- Part XII: Facelift
- Part XIII: Dates and Times
- Part XIV: I18n and L10n
- Part XV: Ajax
- Part XVI: Debugging, Testing and Profiling
- Part XVII: Deployment on Linux (even on the Raspberry Pi!)
- Part XVIII: Deployment on the Heroku Cloud
Recap
In the previous chapter of the series we defined a simple template for the home page and used fake objects as placeholders for things we don’t have yet, like users or blog posts.
In this article we are going to fill one of those many holes we still have in our app, we will be looking at how to work with web forms.
Web forms are one of the most basic building blocks in any web application. We will be using forms to allow users to write blog posts, and also for logging in to the application.
To follow this chapter along you need to have the microblog app as we left it at the end of the previous chapter. Please make sure the app is installed and running.
Configuration
To handle our web forms we are going to use the Flask-WTF extension, which in turn wraps the WTForms project in a way that integrates nicely with Flask apps.
Many Flask extensions require some amount of configuration, so we are going to setup a configuration file inside our root microblog folder so that it is easily accessible if it needs to be edited. Here is what we will start with (file config.py):
WTF_CSRF_ENABLED = True
SECRET_KEY = 'you-will-never-guess'
Pretty simple, it’s just two settings that our Flask-WTF extension needs. The WTF_CSRF_ENABLED setting activates the cross-site request forgery prevention (note that this setting is enabled by default in current versions of Flask-WTF). In most cases you want to have this option enabled as it makes your app more secure.
The SECRET_KEY setting is only needed when CSRF is enabled, and is used to create a cryptographic token that is used to validate a form. When you write your own apps make sure to set the secret key to something that is difficult to guess.
Now that we have our config file we need to tell Flask to read it and use it. We can do this right after the Flask app object is created, as follows (file app/__init__.py):
from flask import Flask

app = Flask(__name__)
app.config.from_object('config')

from app import views
The user login form
Web forms are represented in Flask-WTF as classes, subclassed from base class Form. A form subclass simply defines the fields of the form as class variables.
Now we will create a login form that users will use to identify with the system. The login mechanism that we will support in our app is not the standard username/password type, we will have our users login using their OpenID. OpenIDs have the benefit that the authentication is done by the provider of the OpenID, so we don’t have to validate passwords, which makes our site more secure to our users.
The OpenID login only requires one string, the so called OpenID. We will also throw a ‘remember me’ checkbox in the form, so that users can choose to have a cookie installed in their browsers that remembers their login when they come back.
Let’s write our first form (file app/forms.py):
from flask_wtf import Form
from wtforms import StringField, BooleanField
from wtforms.validators import DataRequired

class LoginForm(Form):
    openid = StringField('openid', validators=[DataRequired()])
    remember_me = BooleanField('remember_me', default=False)
I believe the class is pretty much self-explanatory. We imported the Form class, and the two form field classes that we need, StringField and BooleanField.
The DataRequired import is a validator, a function that can be attached to a field to perform validation on the data submitted by the user. The DataRequired validator simply checks that the field is not submitted empty. There are many more validators included with Flask-WTF, we will use some more in the future.
Form templates
We will also need a template that contains the HTML that produces the form. The good news is that the LoginForm class that we just created knows how to render form fields as HTML, so we just need to concentrate on the layout. Here is our login template (file app/templates/login.html):
<!-- extend from base layout -->
{% extends "base.html" %}

{% block content %}
  <h1>Sign In</h1>
  <form action="" method="post" name="login">
      {{ form.hidden_tag() }}
      <p>
          Please enter your OpenID:<br>
          {{ form.openid(size=80) }}<br>
      </p>
      <p>{{ form.remember_me }} Remember Me</p>
      <p><input type="submit" value="Sign In"></p>
  </form>
{% endblock %}
Note that in this template we are reusing the base.html template through the extends template inheritance statement. We will actually do this with all our templates, to ensure a consistent layout across all pages.
There are a few interesting differences between a regular HTML form and our template. This template expects a form object instantiated from the form class we just defined stored in a template argument named form. We will take care of sending this template argument to the template next, when we write the view function that renders this template.
The form.hidden_tag() template argument will get replaced with a hidden field that implements the CSRF prevention that we enabled in the configuration. This field needs to be in all your forms if you have CSRF enabled. The good news is that Flask-WTF handles it for us, we just need to make sure it is included in the form.
The actual fields of our form are rendered by the field objects, we just need to refer to a {{form.field_name}} template argument in the place where each field should be inserted. Some fields can take arguments. In our case, we are asking the text field to generate our openid field with a width of 80 characters.
Since we have not defined the submit button in the form class we have to define it as a regular field. The submit field does not carry any data so it doesn’t need to be defined in the form class.
Form views
The final step before we can see our form is to code a view function that renders the template.
This is actually quite simple since we just need to pass a form object to the template. Here is our new view function (file app/views.py):
from flask import render_template, flash, redirect
from app import app
from .forms import LoginForm

# index view function suppressed for brevity

@app.route('/login', methods=['GET', 'POST'])
def login():
    form = LoginForm()
    return render_template('login.html',
                           title='Sign In',
                           form=form)
So basically, we have imported our LoginForm class, instantiated an object from it, and sent it down to the template. This is all that is required to get form fields rendered.
Let’s ignore for now the flash and redirect imports. We’ll use them a bit later.
The only other thing that is new here is the methods argument in the route decorator. This tells Flask that this view function accepts GET and POST requests. Without this the view will only accept GET requests. We will want to receive the POST requests, these are the ones that will bring in the form data entered by the user.
At this point you can try the app and see the form in your web browser. After you start the application you will want to open http://localhost:5000/login in your web browser, as this is the route we have associated with the login view function.
We have not coded the part that accepts data yet, so pressing the submit button will not have any effect at this time.
Receiving form data
Another area where Flask-WTF makes our job really easy is in the handling of the submitted form data. Here is an updated version of our login view function that validates and stores the form data (file app/views.py):
@app.route('/login', methods=['GET', 'POST'])
def login():
    form = LoginForm()
    if form.validate_on_submit():
        flash('Login requested for OpenID="%s", remember_me=%s' %
              (form.openid.data, str(form.remember_me.data)))
        return redirect('/index')
    return render_template('login.html',
                           title='Sign In',
                           form=form)
The validate_on_submit method does all the form processing work. If you call it when the form is being presented to the user (i.e. before the user got a chance to enter data on it) then it will return False, so in that case you know that you have to render the template.
When validate_on_submit is called as part of a form submission request, it will gather all the data, run all the validators attached to fields, and if everything is all right it will return True, indicating that the data is valid and can be processed. This is your indication that this data is safe to incorporate into the application.
If at least one field fails validation then the function will return False and that will cause the form to be rendered back to the user, and this will give the user a chance to correct any mistakes. We will see later how to show an error message when validation fails.
When validate_on_submit returns True our login view function calls two new functions, imported from Flask. The flash function is a quick way to show a message on the next page presented to the user. In this case we will use it for debugging, since we don’t have all the infrastructure necessary to log in users yet, we will instead just display a message that shows the submitted data. The flash function is also extremely useful on production servers to provide feedback to the user regarding an action.
The flashed messages will not appear automatically in our page, our templates need to display the messages in a way that works for the site layout. We will add these messages to the base template, so that all our templates inherit this functionality. This is the updated base template (file app/templates/base.html):
<html>
  <head>
    {% if title %}
    <title>{{ title }} - microblog</title>
    {% else %}
    <title>microblog</title>
    {% endif %}
  </head>
  <body>
    <div>Microblog: <a href="/index">Home</a></div>
    <hr>
    {% with messages = get_flashed_messages() %}
      {% if messages %}
        <ul>
        {% for message in messages %}
            <li>{{ message }} </li>
        {% endfor %}
        </ul>
      {% endif %}
    {% endwith %}
    {% block content %}{% endblock %}
  </body>
</html>
The technique to display the flashed message is hopefully self-explanatory. One interesting property of flash messages is that once they are requested through the get_flashed_messages function they are removed from the message list, so these messages appear in the first page requested by the user after the flash function is called, and then they disappear.
The other new function we used in our login view is redirect. This function tells the client web browser to navigate to a different page instead of the one requested. In our view function we use it to redirect to the index page we developed in previous chapters. Note that flashed messages will display even if a view function ends in a redirect.
This is a great time to start the app and test how the form works. Make sure you try submitting the form with the openid field empty, to see how the DataRequired validator halts the submission process.
Improving field validation
With the app in its current state, forms that are submitted with invalid data will not be accepted. Instead, the form will be presented back to the user to correct. This is exactly what we want.
What we are missing is an indication to the user of what is wrong with the form. Luckily, Flask-WTF also makes this an easy task.
When a field fails validation Flask-WTF adds a descriptive error message to the form object. These messages are available to the template, so we just need to add a bit of logic that renders them.
Here is our login template with field validation messages (file app/templates/login.html):
<!-- extend base layout -->
{% extends "base.html" %}

{% block content %}
  <h1>Sign In</h1>
  <form action="" method="post" name="login">
      {{ form.hidden_tag() }}
      <p>
          Please enter your OpenID:<br>
          {{ form.openid(size=80) }}<br>
          {% for error in form.openid.errors %}
            <span style="color: red;">[{{ error }}]</span>
          {% endfor %}<br>
      </p>
      <p>{{ form.remember_me }} Remember Me</p>
      <p><input type="submit" value="Sign In"></p>
  </form>
{% endblock %}
The only change we’ve made is to add a for loop that renders any messages added by the validators below the openid field. As a general rule, any fields that have validators attached will have errors added under form.field_name.errors. In our case we use form.openid.errors. We display these messages in a red style to call the user’s attention.
Dealing with OpenIDs
In practice, we will find that a lot of people don’t even know that they already have a few OpenIDs. It isn’t that well known that a number of major service providers on the Internet support OpenID authentication for their members. For example, if you have an account with Google, you have an OpenID with them. Likewise with Yahoo, AOL, Flickr and many other providers. (Update: Google is shutting down their OpenID service on April 15 2015).
To make it easier for users to login to our site with one of these commonly available OpenIDs, we will add links to a short list of them, so that the user does not have to type the OpenID by hand.
We will start by defining the list of OpenID providers that we want to present. We can do this in our config file (file config.py):
WTF_CSRF_ENABLED = True
SECRET_KEY = 'you-will-never-guess'

OPENID_PROVIDERS = [
    {'name': 'Google', 'url': 'https://www.google.com/accounts/o8/id'},
    {'name': 'Yahoo', 'url': 'https://me.yahoo.com'},
    {'name': 'AOL', 'url': 'http://openid.aol.com/<username>'},
    {'name': 'Flickr', 'url': 'http://www.flickr.com/<username>'},
    {'name': 'MyOpenID', 'url': 'https://www.myopenid.com'}]
Now let’s see how we use this array in our login view function:
@app.route('/login', methods=['GET', 'POST'])
def login():
    form = LoginForm()
    if form.validate_on_submit():
        flash('Login requested for OpenID="%s", remember_me=%s' %
              (form.openid.data, str(form.remember_me.data)))
        return redirect('/index')
    return render_template('login.html',
                           title='Sign In',
                           form=form,
                           providers=app.config['OPENID_PROVIDERS'])
Here we grab the configuration by looking it up in app.config with its key. The array is then added to the render_template call as a template argument.
As I’m sure you guessed, we have one more step to be done with this. We now need to specify how we would like to render these provider links in our login template (file app/templates/login.html):
<!-- extend base layout -->
{% extends "base.html" %}

{% block content %}
<script type="text/javascript">
function set_openid(openid, pr)
{
    u = openid.search('<username>')
    if (u != -1) {
        // openid requires username
        user = prompt('Enter your ' + pr + ' username:')
        openid = openid.substr(0, u) + user
    }
    form = document.forms['login'];
    form.elements['openid'].value = openid
}
</script>
<h1>Sign In</h1>
<form action="" method="post" name="login">
    {{ form.hidden_tag() }}
    <p>
        Please enter your OpenID, or select one of the providers below:<br>
        {{ form.openid(size=80) }}
        {% for error in form.openid.errors %}
          <span style="color: red;">[{{error}}]</span>
        {% endfor %}<br>
        |{% for pr in providers %}
          <a href="javascript:set_openid('{{ pr.url }}', '{{ pr.name }}');">{{ pr.name }}</a> |
        {% endfor %}
    </p>
    <p>{{ form.remember_me }} Remember Me</p>
    <p><input type="submit" value="Sign In"></p>
</form>
{% endblock %}
The template got somewhat long with this change. Some OpenIDs include the user’s username, so for those we have to have a bit of javascript magic that prompts the user for the username and then composes the OpenID with it. When the user clicks on an OpenID provider link and (optionally) enters the username, the OpenID for that provider is inserted in the text field.
Below is a screenshot of our login screen after clicking the Google OpenID link:

Final Words
While we have made a lot of progress with our login form, we haven’t actually done anything to login users into our system, all we’ve done so far had to do with the GUI aspects of the login process. This is because before we can do real logins we need to have a database where we can record our users.
In the next chapter we will get our database up and running, and shortly after we will complete our login system, so stay tuned for the follow up articles.
The microblog application in its current state is available for download here:
Download microblog-0.3.zip.
Remember that the Flask virtual environment is not included in the zip file. For instructions on how to set it up see the first chapter of the series.
Feel free to leave comments or questions below. I hope to see you in the next chapter.
Miguel
Introduction
Form validation is one of the most essential components of data entry in web applications. Users can make mistakes, some users are malicious. With input validation, we protect our app from bad data that affects business logic and malicious input meant to harm our systems
Trying to process unvalidated user inputs can cause unexpected/unhandled bugs, if not a server crash. In this context, validating data means verifying input and checking if it meets certain expectations or criteria(s). Data validation can be done on both the front and back end.
In this tutorial, we will learn how to validate user input in Flask forms using the Flask-WTForms extension.
By the end of this tutorial, we will have the following user registration form with validation criteria:
We will use Flask version 1.1.2 and Flask-WTF with version 0.14.3.
Setup
While not necessary, we recommend you create a virtual environment to follow along:
$ mkdir flask-form-validation
$ cd flask-form-validation
$ python3 -m venv .
$ . bin/activate
In your activated virtual environment, we will install our packages by typing:
$ pip install Flask Flask-WTF
Note that if you want to use email validation, you’ll also need to install the email_validator package (current version is 1.1.1):
$ pip3 install email_validator
Now let’s create our necessary files. We’ll start by creating a basic app.py, which, for simplicity, will contain our Flask app, routes, and forms:
from flask import Flask, render_template

app = Flask(__name__, template_folder='.')
app.config['SECRET_KEY']='LongAndRandomSecretKey'
We created a Flask object and set template_folder to the current folder. We then assigned the Flask object into app variable. We added SECRET_KEY to our app object’s configuration.
The SECRET_KEY is commonly used for encryption with database connections and browser sessions. WTForms will use the SECRET_KEY as a salt to create a CSRF token. You can read more about CSRF on this wiki page.
If your application already uses the SECRET_KEY config for other purposes, you would want to create a new one for WTForms. In that case, you can set the WTF_CSRF_SECRET_KEY config.
Let’s create and add a form to our current app.py:
from flask import Flask, render_template
from flask_wtf import FlaskForm
from wtforms import StringField, SubmitField

class GreetUserForm(FlaskForm):
    username = StringField(label=('Enter Your Name:'))
    submit = SubmitField(label=('Submit'))

# ...
Our simple GreetUserForm class contains a StringField. As the name implies, this field expects and will return a string value (you can always convert that input to other data types as the need arises). The name of the field is username, and we’ll use this name to access data of the form element.
The label paremeters are what will be rendered on our page so that users would understand what data a form element captures. We also have a submit button, which will try to submit the form if all fields pass our validation criteria.
Now that we’re set up, let’s use WTForms to validate our data!
Flask Form Validation With Flask-WTForms
Let’s begin by creating a route to display and process our form:
# ...

@app.route('/', methods=('GET', 'POST'))
def index():
    form = GreetUserForm()
    if form.validate_on_submit():
        return f'''<h1> Welcome {form.username.data} </h1>'''
    return render_template('index.html', form=form)
Our route has GET and POST methods. The GET method displays the form, whereas the POST method processes the form data on submission. We set the URL path to /, or the root URL, so it will appear as our web app’s home page. We render the index.html template and pass the form object as a parameter.
Let’s pause and pay close attention to this line: if form.validate_on_submit():. This rule says ‘if the request method is POST and if the form field(s) are valid, then proceed. If our form input passes our validation criteria, on the next page a simple greet message will be rendered with the user’s name. Notice here we used field name (username) to access input data.
To see the form, we need to create the index.html template. Create the file and add the following code to it:
<form method="POST" action="">
    <div class="form-row">
        <div class="form-group col-md-6">
            {{ form.csrf_token() }}
            <label for=""> {{ form.username.label }}</label>
            {{ form.username }}
        </div>
        <div class="form-group">
            {{ form.submit(class="btn btn-primary")}}
        </div>
    </div>
</form>
We use our form object to pass WTform elements into Jinja2 — the template parser for Flask.
Note: The csrf_token is generated automatically by the WTForms and it changes each time the page is rendered. This helps us to protect our site against CSRF attacks. By default, it is a hidden field. You could also choose to use {{ form.hidden_field() }} to render all hidden fields, including CSRF token, but that’s not advised.
Now, let’s go to our terminal to start our Flask app by typing:
$ FLASK_ENV=development flask run
For convenience, we set the FLASK_ENV environment variable to ‘development’ while developing. This allows the app to hot-reload each time we hit save. For Windows you may have to use set FLASK_ENV=development into your terminal/console before running your flask app.
Here’s what we’ll see if we navigate to the localhost:
Type a name in the input field and submit the form. You will see the greetings message we defined in our route:
It works as expected. But what if we didn’t type anything into the input field? It would still validate the form:
Let’s prevent that from happening and only allow users who typed their names to see the next page. To do so, we need to ensure that our username field has input data.
We’ll import one of the built-in WTForms validation methods: DataRequired() from wtforms.validators and pass it into our username field.
Check out our hands-on, practical guide to learning Git, with best-practices, industry-accepted standards, and included cheat sheet. Stop Googling Git commands and actually learn it!
# ...
from wtforms.validators import ValidationError, DataRequired

class GreetUserForm(FlaskForm):
    username = StringField(label=('Enter Your Name:'),
                           validators=[DataRequired()])
    submit = SubmitField(label=('Submit'))

# ...
Notice that we are passing the validators parameter as a list. This tells us that we can have multiple validators for each field.
Now that we are using DataRequired(), the username field will not be validated if there is no input data:
In fact, if we right-click and inspect the form element, we’ll see that WTForms automatically added the required attribute to the input field:
By doing so, WTForms adds a basic front-end validation to our form field. You wouldn’t be able to submit that form without the username field even if you try to post the form using tools like cURL or Postman.
Now, let’s say we want to set a new validation rule that will only allow names that are at least 5 characters long. We can use the Length() validator with min parameter:
# ...
from wtforms.validators import ValidationError, DataRequired, Length

class GreetUserForm(FlaskForm):
    username = StringField(label=('Enter Your Name:'),
    	validators=[DataRequired(), Length(min=5)])
    submit = SubmitField(label=('Submit'))

# ...
If we try to submit the form with input data less than 5 chars long, the validation criteria will not be fulfilled, and the submission will fail:
Clicking on the submit button does nothing for invalid data, it also does not display any error to the user. We need to provide error messages so the user would understand what’s going on and how to fix it.
In our index.html template, right under the {{ form.username }}, add the following Jinja2 for-loop to display errors:
 {% for field, errors in form.errors.items() %}
    <small class="form-text text-muted ">
        {{ ', '.join(errors) }}
    </small>
{% endfor %}
Our form can render clean validation errors now:
For any reason, if we need to limit the maximum length of our field data, we can do it by passing the max parameter to the Length() validator. It’s also possible to customize the error message by passing an optional message parameter with a custom error string.
Let’s update the username field accordingly:
# ...

class GreetUserForm(FlaskForm):
    username = StringField(label=('Enter Your Name:'),
        validators=[DataRequired(),
        Length(min=5, max=64, message='Name length must be between %(min)d and %(max)dcharacters') ])
    submit = SubmitField(label=('Submit'))

# ...
More WTForms Fields and Validators With the User Registration Form
Our current form has a single field, which is kind of dull. WTForms provides extensive form validation criteria and a variety of form fields, so let’s take advantage of it and create something with practical use.
We’ll create a user registration form and use built-in WTForms validators.
We will use the DataRequired() validator for the fields that we want to make sure that the user fills in. We’ll check the minimum and maximum length of the fields with Length() validator, validate emails with Email() validator and check if two fields contain the same data with EqualTo() validator.
Remove the GreetUserForm class and replace the beginning of your code with our new form:
from flask import Flask, render_template
from flask_wtf import FlaskForm
from wtforms import StringField, PasswordField, BooleanField,
    SubmitField
from wtforms.validators import ValidationError, DataRequired,
    Email, EqualTo, Length

class CreateUserForm(FlaskForm):
    username = StringField(label=('Username'),
        validators=[DataRequired(),
        Length(max=64)])
    email = StringField(label=('Email'),
        validators=[DataRequired(),
        Email(),
        Length(max=120)])
    password = PasswordField(label=('Password'),
        validators=[DataRequired(),
        Length(min=8, message='Password should be at least %(min)d characters long')])
    confirm_password = PasswordField(
        label=('Confirm Password'),
        validators=[DataRequired(message='*Required'),
        EqualTo('password', message='Both password fields must be equal!')])

    receive_emails = BooleanField(label=('Receive merketting emails.'))

    submit = SubmitField(label=('Submit'))

# ...
We have four different fields in our forms. The last one is a regular submit button. We used StringField to get string input from users, such as username and email. On the other hand, PasswordField hides the password text on the front-end. BooleanField renders as a checkbox on the front-end since it only contains either True (Checked) or False (Unchecked) values.
We need to modify out index.html template to render our new form fields:
<div class="container">
    <h2>Registration Form</h2>
    {% for field, errors in form.errors.items() %}
    {{ ', '.join(errors) }}
    {% endfor %}
    <form class="form-horizontal" method="POST" action="">
        {{ form.csrf_token() }}
        <div class="form-group">
            {{ form.username.label }}
            {{ form.username(class="form-control") }}
        </div>
        <div class="form-group">
            {{ form.email.label }}
            {{ form.email(class="form-control") }}
        </div>
        <div class="form-group">
            {{ form.password.label }}
            {{ form.password(class="form-control") }}
        </div>
        <div class="form-group">
            {{ form.confirm_password.label }}
            {{ form.confirm_password(class="form-control") }}
        </div>
        <div class="form-group">
            {{ form.receive_emails.label }}
        </div>
        <div class="form-group">
            {{ form.submit(class="btn btn-primary")}}
        </div>
    </form>
</div>
Our form fields rendered properly as you can see:
Note: If your website is going to have multiple different forms, you may want to use Jinja2 macros instead of typing each form field one by one. Using macros is beyond the scope of this article, but it greatly speeds up the form creation processes.
Creating Your Own Custom Validators
In most web sites, certain characters are not allowed in usernames. It can be for security purposes, it can be for cosmetics. WTForms doesn’t have that logic by default but we can define it ourselves.
WTForms allows us to add custom validators by adding a validation method to our UserRegistrationForm class. Let’s implement that custom validation into our form by adding the validate_username() method right below the submit button.
# ...

class UserRegistrationForm(FlaskForm):
    # ...
    submit = SubmitField(label=('Submit'))

    def validate_username(self, username):
        excluded_chars = " *?!'^+%&/()=}][{$#"
        for char in self.username.data:
            if char in excluded_chars:
                raise ValidationError(
                    f"Character {char} is not allowed in username.")

# ...
We can add as many or as few validation methods as we like. WTForms will run validation methods automatically once defined.
The ValidationError class gives us a convenient way to define our custom validation message. Note that you will need to import it from wtforms.validators before using it.
Let’s test this new method by entering proper data to all fields except the username field, which will contain an excluded character — ‘%’.
As you can see, our custom validation method runs perfectly and provides us with a clean validation error, which helps us to understand what’s wrong with our input data. Doing so, greatly improves the user experience.
You can use external libraries, your database, or APIs to combine with WTForms and to validate the incoming input data. When you want to capture {{ form.some_field.data }} and write into or query from the database, use WTForms validators to ensure it’s safe to be saved.
Note: We’ve excluded most of the HTML codes out since they are not directly related to our tutorial. The full code will be available on this GitHub repository, in case you want to check out.
Conclusion
Validating data is one of the most essential parts of the Flask web applications. Flask-WTforms provides very powerful and easy to learn ways to handle form data.
Now that you know the fundamentals of data validation with Flask-WTF, you can go ahead and apply your own validation logic and/or implement your own methods for both security and better user experience.
| FLASK-WTF(1) | Flask-WTF | FLASK-WTF(1) |
NAME
flask-wtf — Flask-WTF 1.0.1 [image: Flask-WTF] [image]
Simple integration of Flask and WTForms, including
CSRF, file upload, and reCAPTCHA.
FEATURES
- Integration with WTForms.
- Secure Form with CSRF token.
- Global CSRF protection.
- reCAPTCHA support.
- File upload that works with Flask-Uploads.
- Internationalization using Flask-Babel.
USER’S GUIDE
This part of the documentation, which is mostly prose, begins with
some background information about Flask-WTF, then focuses on step-by-step
instructions for getting the most out of Flask-WTF.
Installation
The Python Packaging Guide contains general information
about how to manage your project and dependencies.
Released version
Install or upgrade using pip.
Development
The latest code is available from GitHub. Clone the
repository then install using pip.
git clone https://github.com/wtforms/flask-wtf
pip install -e ./flask-wtf
Or install the latest build from an archive.
pip install -U https://github.com/wtforms/flask-wtf/archive/main.tar.gz
Quickstart
Eager to get started? This page gives a good introduction to
Flask-WTF. It assumes you already have Flask-WTF installed. If you do not,
head over to the Installation section.
Creating Forms
Flask-WTF provides your Flask application integration with
WTForms. For example:
from flask_wtf import FlaskForm
from wtforms import StringField
from wtforms.validators import DataRequired
class MyForm(FlaskForm):


    name = StringField('name', validators=[DataRequired()])
NOTE:
From version 0.9.0, Flask-WTF will not import anything
from wtforms, you need to import fields from wtforms.
In addition, a CSRF token hidden field is created automatically.
You can render this in your template:
<form method="POST" action="/">


    {{ form.csrf_token }}


    {{ form.name.label }} {{ form.name(size=20) }}


    <input type="submit" value="Go">
</form>
If your form has multiple hidden fields, you can render them in
one block using hidden_tag().
<form method="POST" action="/">


    {{ form.hidden_tag() }}


    {{ form.name.label }} {{ form.name(size=20) }}


    <input type="submit" value="Go">
</form>
Validating Forms
Validating the request in your view handlers:
@app.route('/submit', methods=['GET', 'POST'])
def submit():


    form = MyForm()


    if form.validate_on_submit():


        return redirect('/success')


    return render_template('submit.html', form=form)
Note that you don’t have to pass request.form to Flask-WTF;
it will load automatically. And the convenient validate_on_submit
will check if it is a POST request and if it is valid.
If your forms include validation, you’ll need to add to your
template to display any error messages. Using the form.name field
from the example above, that would look like this:
{% if form.name.errors %}


    <ul class="errors">


    {% for error in form.name.errors %}


        <li>{{ error }}</li>


    {% endfor %}


    </ul>
{% endif %}
Heading over to Creating Forms to learn more skills.
Creating Forms
Secure Form
Without any configuration, the FlaskForm will be a session
secure form with csrf protection. We encourage you not to change this.
But if you want to disable the csrf protection, you can pass:
form = FlaskForm(meta={'csrf': False})
You can disable it globally—though you really
shouldn’t—with the configuration:
In order to generate the csrf token, you must have a secret key,
this is usually the same as your Flask app secret key. If you want to use
another secret key, config it:
WTF_CSRF_SECRET_KEY = 'a random string'
File Uploads
The FileField provided by Flask-WTF differs from the
WTForms-provided field. It will check that the file is a non-empty instance
of FileStorage, otherwise data will be None.
from flask_wtf import FlaskForm
from flask_wtf.file import FileField, FileRequired
from werkzeug.utils import secure_filename
class PhotoForm(FlaskForm):


    photo = FileField(validators=[FileRequired()])
@app.route('/upload', methods=['GET', 'POST'])
def upload():


    form = PhotoForm()


    if form.validate_on_submit():


        f = form.photo.data


        filename = secure_filename(f.filename)


        f.save(os.path.join(


            app.instance_path, 'photos', filename


        ))


        return redirect(url_for('index'))


    return render_template('upload.html', form=form)
Remember to set the enctype of the HTML form to
multipart/form-data, otherwise request.files will be
empty.
<form method="POST" enctype="multipart/form-data">


    ...
</form>
Flask-WTF handles passing form data to the form for you. If you
pass in the data explicitly, remember that request.form must be
combined with request.files for the form to see the file data.
form = PhotoForm()
# is equivalent to:
from flask import request
from werkzeug.datastructures import CombinedMultiDict
form = PhotoForm(CombinedMultiDict((request.files, request.form)))
Validation
Flask-WTF supports validating file uploads with
FileRequired and FileAllowed. They can be used with both
Flask-WTF’s and WTForms’s FileField classes.
FileAllowed works well with Flask-Uploads.
from flask_uploads import UploadSet, IMAGES
from flask_wtf import FlaskForm
from flask_wtf.file import FileField, FileAllowed, FileRequired
images = UploadSet('images', IMAGES)
class UploadForm(FlaskForm):


    upload = FileField('image', validators=[


        FileRequired(),


        FileAllowed(images, 'Images only!')


    ])
It can be used without Flask-Uploads by passing the extensions
directly.
class UploadForm(FlaskForm):


    upload = FileField('image', validators=[


        FileRequired(),


        FileAllowed(['jpg', 'png'], 'Images only!')


    ])
Recaptcha
Flask-WTF also provides Recaptcha support through a
RecaptchaField:
from flask_wtf import FlaskForm, RecaptchaField
from wtforms import TextField
class SignupForm(FlaskForm):


    username = TextField('Username')


    recaptcha = RecaptchaField()
This comes with a number of configuration variables, some of which
you have to configure.
Example of RECAPTCHA_PARAMETERS, and RECAPTCHA_DATA_ATTRS:
RECAPTCHA_PARAMETERS = {'hl': 'zh', 'render': 'explicit'}
RECAPTCHA_DATA_ATTRS = {'theme': 'dark'}
For your convenience, when testing your application, if
app.testing is True, the recaptcha field will always be
valid.
And it can be easily setup in the templates:
<form action="/" method="post">


    {{ form.username }}


    {{ form.recaptcha }}
</form>
We have an example for you: recaptcha@github.
CSRF Protection
Any view using FlaskForm to process the request is already
getting CSRF protection. If you have views that don’t use FlaskForm
or make AJAX requests, use the provided CSRF extension to protect those
requests as well.
Setup
To enable CSRF protection globally for a Flask app, register the
CSRFProtect extension.
from flask_wtf.csrf import CSRFProtect
csrf = CSRFProtect(app)
Like other Flask extensions, you can apply it lazily:
csrf = CSRFProtect()
def create_app():


    app = Flask(__name__)


    csrf.init_app(app)
NOTE:
CSRF protection requires a secret key to securely sign
the token. By default this will use the Flask app’s SECRET_KEY. If
you’d like to use a separate token you can set
WTF_CSRF_SECRET_KEY.
HTML Forms
When using a FlaskForm, render the form’s CSRF field like
normal.
<form method="post">


    {{ form.csrf_token }}
</form>
If the template doesn’t use a FlaskForm, render a hidden
input with the token in the form.
<form method="post">


    <input type="hidden" name="csrf_token" value="{{ csrf_token() }}"/>
</form>
JavaScript Requests
When sending an AJAX request, add the X-CSRFToken header to
it. For example, in jQuery you can configure all requests to send the
token.
<script type="text/javascript">


    var csrf_token = "{{ csrf_token() }}";


    $.ajaxSetup({


        beforeSend: function(xhr, settings) {


            if (!/^(GET|HEAD|OPTIONS|TRACE)$/i.test(settings.type) && !this.crossDomain) {


                xhr.setRequestHeader("X-CSRFToken", csrf_token);


            }


        }


    });
</script>
In Axios you can set the header for all requests with
axios.defaults.headers.common.
<script type="text/javascript">


    axios.defaults.headers.common["X-CSRFToken"] = "{{ csrf_token() }}";
</script>
Customize the error response
When CSRF validation fails, it will raise a CSRFError. By
default this returns a response with the failure reason and a 400 code. You
can customize the error response using Flask’s errorhandler().
from flask_wtf.csrf import CSRFError
@app.errorhandler(CSRFError)
def handle_csrf_error(e):


    return render_template('csrf_error.html', reason=e.description), 400
Exclude views from protection
We strongly suggest that you protect all your views with CSRF. But
if needed, you can exclude some views using a decorator.
@app.route('/foo', methods=('GET', 'POST'))
@csrf.exempt
def my_handler():


    # ...


    return 'ok'
You can exclude all the views of a blueprint.
csrf.exempt(account_blueprint)
You can disable CSRF protection in all views by default, by
setting WTF_CSRF_CHECK_DEFAULT to False, and selectively call
protect() only when you need. This also enables you to do some
pre-processing on the requests before checking for the CSRF token.
@app.before_request
def check_csrf():


    if not is_oauth(request):


        csrf.protect()
Configuration
| WTF_CSRF_ENABLED | Set to False to disable all CSRF protection. Default is True. |
| WTF_CSRF_CHECK_DEFAULT | When using the CSRF protection extension, this controls whether every view is protected by default. Default is True. |
| WTF_CSRF_SECRET_KEY | Random data for generating secure tokens. If this is not set then SECRET_KEY is used. |
| WTF_CSRF_METHODS | HTTP methods to protect from CSRF. Default is {‘POST’, ‘PUT’, ‘PATCH’, ‘DELETE’}. |
| WTF_CSRF_FIELD_NAME | Name of the form field and session key that holds the CSRF token. Default is csrf_token. |
| WTF_CSRF_HEADERS | HTTP headers to search for CSRF token when it is not provided in the form. Default is [‘X-CSRFToken’, ‘X-CSRF-Token’]. |
| WTF_CSRF_TIME_LIMIT | Max age in seconds for CSRF tokens. Default is 3600. If set to None, the CSRF token is valid for the life of the session. |
| WTF_CSRF_SSL_STRICT | Whether to enforce the same origin policy by checking that the referrer matches the host. Only applies to HTTPS requests. Default is True. |
| WTF_I18N_ENABLED | Set to False to disable Flask-Babel I18N support. Also set to False if you want to use WTForms’s built-in messages directly, see more info here. Default is True. |
Recaptcha
| RECAPTCHA_PUBLIC_KEY | required A public key. |
| RECAPTCHA_PRIVATE_KEY | required A private key. https://www.google.com/recaptcha/admin |
| RECAPTCHA_PARAMETERS | optional A dict of configuration options. |
| RECAPTCHA_HTML | optional Override default HTML template for Recaptcha. |
| RECAPTCHA_DATA_ATTRS | optional A dict of data- attrs to use for Recaptcha div |
| RECAPTCHA_SCRIPT | optional Override the default captcha script URI in case an alternative service to reCAPtCHA, e.g. hCaptcha is used. Default is ‘https://www.google.com/recaptcha/api.js’ |
| RECAPTCHA_DIV_CLASS | optional Override the default class of the captcha div in case an alternative captcha service is used. Default is ‘g-recaptcha’ |
| RECAPTCHA_VERIFY_SERVER | optional Override the default verification server in case an alternative service is used. Default is ‘https://www.google.com/recaptcha/api/siteverify’ |
Logging
CSRF errors are logged at the INFO level to the
flask_wtf.csrf logger. You still need to configure logging in your
application in order to see these messages.
API DOCUMENTATION
If you are looking for information on a specific function, class
or method, this part of the documentation is for you.
Developer Interface
Forms and Fields
CSRF Protection
ADDITIONAL NOTES
Legal information and changelog are here.
BSD-3-Clause License
Copyright 2010 WTForms
Redistribution and use in source and binary forms, with or without
modification, are permitted provided that the following conditions are
met:
- 1.
- Redistributions of source code must retain the above copyright notice,
this list of conditions and the following disclaimer. - 2.
- Redistributions in binary form must reproduce the above copyright notice,
this list of conditions and the following disclaimer in the documentation
and/or other materials provided with the distribution. - 3.
- Neither the name of the copyright holder nor the names of its contributors
may be used to endorse or promote products derived from this software
without specific prior written permission.
THIS SOFTWARE IS PROVIDED BY THE COPYRIGHT HOLDERS AND
CONTRIBUTORS «AS IS» AND ANY EXPRESS OR IMPLIED WARRANTIES,
INCLUDING, BUT NOT LIMITED TO, THE IMPLIED WARRANTIES OF MERCHANTABILITY AND
FITNESS FOR A PARTICULAR PURPOSE ARE DISCLAIMED. IN NO EVENT SHALL THE
COPYRIGHT HOLDER OR CONTRIBUTORS BE LIABLE FOR ANY DIRECT, INDIRECT,
INCIDENTAL, SPECIAL, EXEMPLARY, OR CONSEQUENTIAL DAMAGES (INCLUDING, BUT NOT
LIMITED TO, PROCUREMENT OF SUBSTITUTE GOODS OR SERVICES; LOSS OF USE, DATA,
OR PROFITS; OR BUSINESS INTERRUPTION) HOWEVER CAUSED AND ON ANY THEORY OF
LIABILITY, WHETHER IN CONTRACT, STRICT LIABILITY, OR TORT (INCLUDING
NEGLIGENCE OR OTHERWISE) ARISING IN ANY WAY OUT OF THE USE OF THIS SOFTWARE,
EVEN IF ADVISED OF THE POSSIBILITY OF SUCH DAMAGE.
Changes
Version 1.0.1
Released 2022-03-31
- •
- Update compatibility with the latest Werkzeug release. #511
Version 1.0.0
Released 2021-11-07
- Deprecated items removal #484
- Support for alternatives captcha services #425 #342
#387 #384
Version 0.15.1
Released 2021-05-25
- •
- Add python_requires metadata to avoid installing on unsupported
Python versions. #442
Version 0.15.0
Released 2021-05-24
- Drop support for Python < 3.6. #416
- FileSize validator. #307#365
- Extra requirement email installs the email_validator
package. #423 - Fixed Flask 2.0 warnings. #434
- Various documentation fixes.
#315#321#335#344#386#400,
#404#420#437 - Various CI fixes. #405#438
Version 0.14.3
Released 2020-02-06
- •
- Fix deprecated imports from werkzeug and collections.
Version 0.14.2
Released 2017-01-10
- •
- Fix bug where FlaskForm assumed meta argument was not
None if it was passed. #278
Version 0.14.1
Released 2017-01-10
- •
- Fix bug where the file validators would incorrectly identify an empty file
as valid data. #276, #277
- FileField is no longer deprecated. The data is checked during
processing and only set if it’s a valid file. - has_file is deprecated; it’s now equivalent to
bool(field.data). - FileRequired and FileAllowed work with both the Flask-WTF
and WTForms FileField classes. - The Optional validator now works with FileField.
Version 0.14
Released 2017-01-06
- •
- Use ItsDangerous to sign CSRF tokens and check expiration instead of doing
it ourselves. #264
- All tokens are URL safe, removing the url_safe parameter from
generate_csrf. #206 - All tokens store a timestamp, which is checked in validate_csrf.
The time_limit parameter of generate_csrf is removed.
- Remove the app attribute from CsrfProtect, use
current_app. #264 - CsrfProtect protects the DELETE method by default.
#264 - The same CSRF token is generated for the lifetime of a request. It is
exposed as g.csrf_token for use during testing.
#227#264 - CsrfProtect.error_handler is deprecated. #264
- Handlers that return a response work in addition to those that raise an
error. The behavior was not clear in previous docs. - #200#209#243#252
- •
- Use Form.Meta instead of deprecated SecureForm for CSRF (and
everything else). #216#271
- •
- csrf_enabled parameter is still recognized but deprecated. All
other attributes and methods from SecureForm are removed.
#271
- Provide WTF_CSRF_FIELD_NAME to configure the name of the CSRF
token. #271 - validate_csrf raises wtforms.ValidationError with specific
messages instead of returning True or False. This breaks
anything that was calling the method directly. #239#271
- •
- CSRF errors are logged as well as raised. #239
- CsrfProtect is renamed to CSRFProtect. A deprecation warning
is issued when using the old name. CsrfError is renamed to
CSRFError without deprecation. #271 - FileField is deprecated because it no longer provides functionality
over the provided validators. Use wtforms.FileField directly.
#272
Version 0.13.1
Released 2016-10-6
- Deprecation warning for Form is shown during __init__
instead of immediately when subclassing. #262 - Don’t use pkg_resources to get version, for compatibility with GAE.
#261
Version 0.13
Released 2016-09-29
- Form is renamed to FlaskForm in order to avoid name
collision with WTForms’s base class. Using Form will show a
deprecation warning. #250 - hidden_tag no longer wraps the hidden inputs in a hidden div. This
is valid HTML5 and any modern HTML parser will behave correctly.
#193#217 - flask_wtf.html5 is deprecated. Import directly from
wtforms.fields.html5. #251 - is_submitted is true for PATCH and DELETE in addition
to POST and PUT. #187 - generate_csrf takes a token_key parameter to specify the key
stored in the session. #206 - generate_csrf takes a url_safe parameter to allow the token
to be used in URLs. #206 - form.data can be accessed multiple times without raising an
exception. #248 - File extension with multiple parts (.tar.gz) can be used in the
FileAllowed validator. #201
Version 0.12
Released 2015-07-09
- Abstract protect_csrf() into a separate method.
- Update reCAPTCHA configuration.
- Fix reCAPTCHA error handle.
Version 0.11
Released 2015-01-21
- •
- Use the new reCAPTCHA API. #164
Version 0.10.3
Released 2014-11-16
- Add configuration: WTF_CSRF_HEADERS. #159
- Support customize hidden tags. #150
- And many more bug fixes.
Version 0.10.2
Released 2014-09-03
- •
- Update translation for reCaptcha. #146
Version 0.10.1
Released 2014-08-26
- Update RECAPTCHA_API_SERVER_URL. #145
- Update requirement Werkzeug >= 0.9.5.
- Fix CsrfProtect exempt for blueprints. #143
Version 0.10.0
Released 2014-07-16
- Add configuration: WTF_CSRF_METHODS.
- Support WTForms 2.0 now.
- Fix CSRF validation without time limit (time_limit=False).
- csrf_exempt supports blueprint. #111
Version 0.9.5
Released 2014-03-21
- csrf_token for all template types. #112
- Make FileRequired a subclass of InputRequired.
#108
Version 0.9.4
Released 2013-12-20
- Bugfix for csrf module when form has a prefix.
- Compatible support for WTForms 2.
- Remove file API for FileField
Version 0.9.3
Released 2013-10-02
- Fix validation of recaptcha when app in testing mode. #89
- Bugfix for csrf module. #91
Version 0.9.2
Released 2013-09-11
- Upgrade WTForms to 1.0.5.
- No lazy string for i18n. #77
- No DateInput widget in HTML5. #81
- PUT and PATCH for CSRF. #86
Version 0.9.1
Released 2013-08-21
- •
- Compatibility with Flask < 0.10. #82
Version 0.9.0
Released 2013-08-15
- Add i18n support. #65
- Use default HTML5 widgets and fields provided by WTForms.
- Python 3.3+ support.
- Redesign form, replace SessionSecureForm.
- CSRF protection solution.
- Drop WTForms imports.
- Fix recaptcha i18n support.
- Fix recaptcha validator for Python 3.
- More test cases, it’s 90%+ coverage now.
- Redesign documentation.
Version 0.8.4
Released 2013-03-28
- Recaptcha Validator now returns provided message. #66
- Minor doc fixes.
- Fixed issue with tests barking because of nose/multiprocessing issue.
Version 0.8.3
Released 2013-03-13
- Update documentation to indicate pending deprecation of WTForms namespace
facade. - PEP8 fixes. #64
- Fix Recaptcha widget. #49
Version 0.8.2 and prior
Initial development by Dan Jacob and Ron Duplain.
How to contribute to Flask-WTF
Thank you for considering contributing to Flask-WTF!
Support questions
Please don’t use the issue tracker for this. The issue tracker is
a tool to address bugs and feature requests in Flask-WTF itself. Use one of
the following resources for questions about using Flask-WTF or issues with
your own code:
- The #get-help channel on our Discord chat:
https://discord.gg/pallets - The mailing list flask@python.org for long term discussion or
larger issues. - Ask on Stack Overflow. Search with Google first using:
site:stackoverflow.com flask-wtf {search term, exception message,
etc.}
Reporting issues
Include the following information in your post:
- Describe what you expected to happen.
- If possible, include a minimal reproducible example to help us
identify the issue. This also helps check that the issue is not with your
own code. - Describe what actually happened. Include the full traceback if there was
an exception. - List your Python, Flask-WTF, and WTForms versions. If possible, check if
this issue is already fixed in the latest releases or the latest code in
the repository.
Submitting patches
If there is not an open issue for what you want to submit, prefer
opening one for discussion before working on a PR. You can work on any issue
that doesn’t have an open PR linked to it or a maintainer assigned to it.
These show up in the sidebar. No need to ask if you can work on an issue
that interests you.
Include the following in your patch:
- Use Black to format your code. This and other tools will run
automatically if you install pre-commit using the instructions
below. - Include tests if your patch adds or changes code. Make sure the test fails
without your patch. - Update any relevant docs pages and docstrings. Docs pages and docstrings
should be wrapped at 72 characters. - Add an entry in CHANGES.rst. Use the same style as other entries.
Also include .. versionchanged:: inline changelogs in relevant
docstrings.
First time setup
- Download and install the latest version of git.
- Configure git with your username and email.
$ git config --global user.name 'your name'
$ git config --global user.email 'your email'
- Make sure you have a GitHub account.
- Fork Flask-WTF to your GitHub account by clicking the Fork
button. - Clone the main repository locally.
$ git clone https://github.com/wtforms/flask-wtf
$ cd flask-wtf
- •
- Add your fork as a remote to push your work to. Replace {username}
with your username. This names the remote «fork», the default
WTForms remote is «origin».
$ git remote add fork https://github.com/{username}/flask-wtf
- •
- Create a virtualenv.
$ python3 -m venv env
$ . env/bin/activate
On Windows, activating is different.
- •
- Upgrade pip and setuptools.
$ python -m pip install --upgrade pip setuptools
- •
- Install the development dependencies, then install Flask-WTF in editable
mode.
$ pip install -r requirements/dev.txt && pip install -e .
- •
- Install the pre-commit hooks.
Start coding
- •
- Create a branch to identify the issue you would like to work on. If you’re
submitting a bug or documentation fix, branch off of the latest
«.x» branch.
$ git fetch origin
$ git checkout -b your-branch-name origin/1.0.x
If you’re submitting a feature addition or change, branch off of
the «main» branch.
$ git fetch origin
$ git checkout -b your-branch-name origin/main
- Using your favorite editor, make your changes, committing as you
go. - Include tests that cover any code changes you make. Make sure the test
fails without your patch. Run the tests as described below. - Push your commits to your fork on GitHub and create a pull request.
Link to the issue being addressed with fixes #123 in the pull
request.
$ git push --set-upstream fork your-branch-name
Running the tests
Run the basic test suite with pytest.
This runs the tests for the current environment, which is usually
sufficient. CI will run the full suite when you submit your pull request.
You can run the full test suite with tox if you don’t want to wait.
Running test coverage
Generating a report of lines that do not have test coverage can
indicate where to start contributing. Run pytest using
coverage and generate a report.
$ pip install coverage
$ coverage run -m pytest
$ coverage html
Open htmlcov/index.html in your browser to explore the
report.
Read more about coverage.
Building the docs
Build the docs in the docs directory using Sphinx.
Open _build/html/index.html in your browser to view the
docs.
Read more about Sphinx.
WTForms
COPYRIGHT
2022 WTForms