Содержание
- How to handle 401(unauthorised) with Dio interceptor— Flutter
- Basic Authentication flow with refresh and access tokens
- Dio Interceptors in Flutter
- Dio Configuration
- Adding dynamic headers
- Verifying the Response
- Verifying Errors from the Server
- Creating an Interceptor Class
- Putting it all together — Creating a simple Cache
- Bonus Tip — Logging Everything Dio
- error_handler 1.1.0
- Metadata
- Index #
- Motivation #
- Functionality #
- How to use #
- install #
- Example #
- .future get api result directly full example #
- .stream provide Loading and Idle State full example #
- Advance login example for post request full example #
- Other Example #
- Contribute #
- A wrapper around the HTTP library Dio to make network requests and error handling simpler
- App HTTP Client
- Tutorial
- Create a Dart Package
- Dependencies
- Production Dependencies
- Development Dependencies
- The Problem
- Considering Errors
- Creating the HTTP Client Wrapper
- The Error Handling Mechanism
- Handling the Errors
- Testing
In this article I am going to explain about how to make network calls with flutter dio(4.0.0) and handling 401 when you use refresh tokens and access tokens to handle authorization in your flutter application.
Before reading this, I expect you have a basic knowledge about flutter mobile app development.
Basic Authentication flow with refresh and access tokens
As you can see in the above diagram, it’s clear that what is the flow when you use refresh and access token in authentication flow. After logging in you will get two tokens called refresh and access. This access token is expiring quickly(refresh token also expiring but it will take more time than access token). When you make a request with expired access token you get status code 401(unauthorised) in the response.In that situation you have to ask for a new tokens from the server and make the previous request with valid access token again. If the refresh token also has expired you have to direct the user to login page and force to login again.
Above is the full class and I am going to explain the most important parts there.
Mainly, as you can see inside the createDioInstance method you have to add an interceptor to catch the 401.when 401 occurred onError: (DioError e, handler) async<> is getting called. so inside that you
- Check the error code(401),
- Get new access token
above code will call the refreshToken method and store new refresh and access tokens in the repository.(for repository you can use flutter secure storage or shared preferences)
3. Make a clone of the previous request and set new access token
4. Make the previous call again
once the response is came, call
Then the response will be sent to the place where you called api as follows.
Thats all. happy coding 🙂
Hit on clap if this helped you and follow me for more articles.
Источник
Dio Interceptors in Flutter
Sometimes we don’t need complex apps, sometimes we just need an app that displays a list of items from one endpoint, and we can manage to do it with a simple method:
And we don’t have any errors, there’s no need to log our responses. What about cache? Nobody cares about it!
But truth be told, almost no apps are as simple as this one. Some apps do require more in order for us to get the response from our request, such as:
- Sending dynamic headers to the server, such as a stored key from the shared preferences or the time of the request;
- Checking each response header and saving its values locally;
- Verifying the errors sent from the server and directly map them to Error classes that our app understands;
- Adding a simplified cache to our app so that if the connection is timed out or if the user does not have internet access, we can display the previous response for that request;
- Additionally, we might want to add logging to all our responses and requests.
Interceptors will help us handle this by giving us specific callbacks for errors, requests and response.
Before diving into how we can use interceptors, let’s take a step back and look at how we can configure Dio.
Dio Configuration
Dio can be configured with a BaseOption object that let us initialise a new Dio instance with a set of rules: connectTimeout , receiveTimeout and baseUrl that will be used for every API call we make.
However, one thing that we cannot add in the base configurations (at the time the article was written) is interceptors. For that, we need to create the new Dio instance and add the interceptors that we want in the interceptors list.
And with this, we have setup a Dio instance that can be used for any API call that we make.
As stated in the introduction, let us suppose that the app that we are making needs a header that contains a value stored in the shared preferences. Additionally, that value must have the timestamp and can change at any time.
/As a side note/: Since the data can be changed, we cannot use the BaseOptions ’s extra field, which would conveniently let us access data static data that we passed to it on its creation. So, we will need to access the shared preferences each time we are making a request.
The InterceptorsWrapper gives us the RequestOptions object which has the following properties:
- Request dynamic data
- Url String path
- Query Parameters Map queryParameters
With this information, we can start implementing our requestInterceptor method.
This method returns a dynamic type that can be:
- The RequestOptions object if we want to continue with the request
- A Response object if we want the app to take care of the request by itself
- a DioError or dio.reject object, that will throw an error.
This will let us have the flexibility to validate each request before it’s being made, add data, and throw any error if necessary. For our case, we just need to add some data and proceed with the request.
Knock, knock the Project Manager comes to tell you that now, for some reason, you cannot send the headers for a specific set of endpoints.
We could quickly solve this by using a switch statement with the path parameter. But we don’t want that. We want to be able to see in the endpoint declaration if that endpoints needs, or does not need the token. So, instead of searching for the paths in the interceptor, we are going to add an auxiliary header to each endpoint request.
Then, we will be able to verify if the request has that header, remove it, and add the token.
Verifying the Response
As it was with the Request , we also have a specific key stored in our shared preferences with which we must verify our responses. If we cannot find the specified header or if the key is different than the one stored, we throw an error message saying that the user is no longer active.
In the same way that we created a method for the request, we can do the same for the response. The key difference is that now we are dealing with a Response object which in part has the same data as the Request such as data , headers but it also has the statusCode and the original Request data.
As with the response , we have a dynamic type as a return for this function which can be:
- The Response object if we want to continue with the request
- A DioError if we to throw an error after validating the response data
Which means that, if the boolean value for the header isUserActive is false, we can return a DioError object as follows:
Verifying Errors from the Server
Let us assume that we have some mechanism in our server that can delete a user account completely. In this case, the app has to return to the login screen in order for the user to create a new account. The error from the server has the following message: <“error”:”ERROR_001”>, and as with the Response and Request , we will create an interceptor in order to catch all the incoming errors.
Looking at the documentation, we can see that the type for the error interceptor is also dynamic with the following specification:
- If we want to continue the request with an error, we return the DioError object.
- If we want to resolve the request and return a Response object, we can do it, in this case, our app is not aware that there has been an error with the server, and continues with the request normally.
To go to a different screen, since we are dealing with the first version of the app (read: something to be refactored later on), we directly navigate the user to another screen from this class using the Navigator widget with a GlobalKey.
Creating an Interceptor Class
Creating a function for each interceptor can be an acceptable approach, but what if we have more than one response interceptor? One approach that we can have is to create a class that extends the Interceptor class and overrides the onRequest , onError and onResponse methods.
This class can then be easily added to the Dio object interceptors:
Putting it all together — Creating a simple Cache
One thing we can do with the interceptors is to create a simple cache for our requests. The concept is simple: if the user is using the app normally and for some reason there’s a network error or a connection-timeout, then we still want the user to see the feed or home page of the app. To do that, we have to save in memory all the requests that we are making, and, when verifying for the connection timeout error or an internal error from Dio ( DioErrorType.DEFAULT ), if there’s a request that we have saved for the same endpoint, with the same parameters, then we return the old response and warn the user that he’s offline at the moment.
We could further improve this cache by modifying our response and give it a parameter to warn the UI that this response is now a cache, or implement a persistent cache with SQL that would let the user see the previous feed if he opens the app offline, much like what the Linkedin app does.
Bonus Tip — Logging Everything Dio
For the majority of the time spent creating a project, we are going to stumble on errors upon errors when making API requests. Maybe we forgot a query parameter, or the header, or the body has a missing parameter or it’s just a case of the backend having a nasty bug. For all these cases, the best would be to have all the requests logged into our console so that we can easily check what has happened.
As with before, we create a new Interceptor class, implement all the necessary methods and log all the information that we want from the requests. Furthermore, since we want our logs to easily stand out, we might want to format them to always start and end with the following:
- For our Request , we want to print out the query parameters and the body of the request (if available) , headers and the URL;
- For the Response , we want to print out the URL, headers, body and status code
- As for the Error , we will want the status code and the error itself
Testing it out in with the Json Placeholder website, we get the following logged:
As a further note, we are currently using the print method for displaying the logs. This might not be ideal since these logs will also appear in the production app, which means that anyone who connects the phone with this app open and runs flutter logs will be able to see the full output. As a better alternative, we can use debugPrint with Product Flavors as seen in this article — debugPrint and the power of hiding and customizing your logs in Dart.
And that’s it 👻 with this we have at least mastered the basics of Interceptor s in Dio and can now add more functionality, logging and better error handling to our apps.
As always, please do tell me on Twitter what are going to be your uses for them!
Want to get the latest articles and news? Subscribe to the newsletter here 👇
And for other articles, check the rest of the blog! Blog — Gonçalo Palma
Источник
error_handler 1.1.0
Metadata
error handler for all http client in dart like dio, chopper http and more
Welcome to ErrorHandler, error handler with type-safety/streaming/freezed-functionality/cover-all-clients-exceptions
Index #
Motivation #
try<>catch(e)<> or then(()<>).catch(()<>) make code hard to read and modify
Functionality #
- handle all api possible state init/loading/data/error easily
- logging the state states
- built above freezed
- **work with any http client like chopper,dio and more **
| Before | After |
|---|---|
 |
 |
How to use #
install #
For a Flutter project:
For a Dart project:
Example #
.future get api result directly full example #
- errorHandler.future(()<. >) return safe data
.stream provide Loading and Idle State full example #
- errorHandler.stream(()<. >) first return loading and then return data or error
Advance login example for post request full example #
Other Example #
Contribute #
please fork the repo and be part of maintainers team ❤️🔥
Источник
A wrapper around the HTTP library Dio to make network requests and error handling simpler
App HTTP Client
App HTTP Client is a wrapper around the HTTP library Dio to make network requests and error handling simpler, more predictable, and less verbose.
Tutorial
Note: This tutorial is the first of a multipart series where we craft an auth-enabled app that provides both anonymous and authenticated user flows while storing data in the cloud. The author makes her best attempt to provide insight into best practices whenever and wherever possible.
Ever wondered how to build a simple HTTP client for your Flutter application? In this tutorial, we’ll create a wrapper around the multi-platform http library Dio, which supports interceptors, global configuration, form data, request cancellation, file downloading, and timeouts—just about everything you’ll ever need.
Why create an http client wrapper? The answer is essentially «to make error handling easy and predictable.» A typical state-driven application benefits from a clearly defined, finite set of errors.
As part of this app development series, we will leverage this client in a later tutorial to build our application service layer, domain layer, and state management—all of which will benefit from the error resolution this wrapper will provide.
By carefully catching Dio errors and transforming them into simple errors that our application cares about, we can drastically simplify error handling in our application state—and, as you know, simple code is easier to test. Since we use Bloc for our state management, we will construct our wrapper in such a way that makes error handling inside our blocs painless.
Even if you’re taking a different approach, we hope you will find the organizational techniques presented here useful for your application, regardless of the http library and state management framework you are using.
Create a Dart Package
We plan on reusing this http client wrapper, so let’s make it a package. All we need to do is create a Dart package (not a Flutter one). We’ll call it app_http_client so we can use it in our apps, but you can call yours whatever you want. 
Creating a package with Dart is fairly straightforward (once you know the required command line flags):
To run tests with coverage, you will need to add the following to the .gitignore file:
Dependencies
Before we start coding, let’s setup our dependencies.
Production Dependencies
- Dio—Since we’re creating a wrapper for Dio, we’ll need to include it.
Development Dependencies
- test_coverage—Allows us to easily gather test coverage.
- Very Good Analysis—we’ll use these linter rules as a development dependency to keep our codebase clean and consistent looking.
- Mocktail—provides null-safe mocking capabilities, inspired by Mockito.
Let’s add the dependencies to the pubspec.yaml:
Make sure you’ve removed the pedantic development dependency from pubspec.yaml that Dart automatically adds when you create a new project.
Replace the contents of analysis_options with the following:
Finally, you may want to create a .vscode folder in the root of the project with a launch.json file so that you can run tests:
Run the following and you’ve got yourself a new project:
To run tests with test coverage, you can use the following:
The Problem
Imagine you have a very simple service class which fetches data from your team’s backend servers, perhaps something like this:
While this code is simple and friendly looking, it is lacking a few critical details. Notably, there is no easy way to handle errors it throws. Catching errors inside each of the service’s methods would likely result in duplicate code, and catching the errors above the service would force the abstraction layers above the service layer to handle Dio-specific errors.
Currently, any errors thrown by the http library—in this case, Dio—will propagate upwards to the function where the UserService is being called. Such error propagation is often intended—but what if your server produces validation errors that you want to catch? Where do you intercept those?
To complicate matters further, how do you go distinguish between expected validation errors from your server which might contain certain failing http status codes on purpose, and other failing requests—such as network errors or other runtime errors—thrown by your http client library?
Because backend error responses are often consistent across multiple API routes, the practice of always handling errors on a case-by-case basis can result in redundant code that is painful to test.
What follows is what each service method might look like if we put a try / catch clause in it. For the sake of brevity, we’ve omitted any custom error handling that might be necessary and left a comment and a rethrow statement where you might otherwise find more error handling in a real application.
Programmers often avoid this problem—like any other architecture problem—by introducing another abstraction layer. You may recognize this as the classic adapter or decorator pattern.
In this case, we avoid most redundant error handling clauses in a rather elementary way by simply creating a class that wraps the http library of choice.
While it is a bit tedious, it can make error handling code much simpler and more concise. Additionally, the developers creating services which use the wrapper to make network requests don’t need to remember the details of backend services which utilize common response schemas.
If we make it easy for the wrapper to handle errors with enough flexibility, we can drastically reduce the complexity of error handling for a given app. If needed, each service can utilize a different http client wrapper to provide custom error handling for groups of API requests which may have similar backend response schemas.
Hopefully, the code presented here will prevent you from having to suffer through much of the required monotony, as you may copy and paste to your liking freely under the MIT license.
Considering Errors
To catch an error, one must understand the kinds of errors which can be caught. Let’s pause for a moment and describe the errors a network application might be interested in.
At its core, our applications are interested in 3 basic kinds of errors:
- Network Errors
- Sometimes well-formed requests fail through no fault of their own, due to extraneous network conditions, dropped packets, poor signals, busy servers, etc.
- Response Errors
- The request was received by the server, but the server returned a bad response—presumably with an http status code indicative of the problem. Validation errors, redirects, poorly formed requests, requests without proper authorization, etc, can all be responsible for rejection from the server.
- As far as application state logic is concerned, these errors are most likely to have a practical use. Perhaps your backend form validation system relies on certain error schemas to be returned from your servers to describe invalid fields that were submitted.
- Other / Runtime Errors
- Other errors in the http library or service layer code can cause problems—tracking these is important for developers, but as far as users are concerned, these are largely equivalent to a network error if it doesn’t completely break the application.
We want errors generated by our http library to be transformed into one of these 3 types of errors. To facilitate this, we need to create 3 error classes.
For the sake of convenient error handling in our application, we consider a response error a subtype of a network error. Placing errors into the following class hierarchy should allow for greatly simplified state management:
AppHttpClientException is the base class. For any error generated by our wrapper, the expression (error is AppHttpClientException) should always be true .
Let’s take a look at the implementation:
Pretty straightforward—we require the original exception in the constructor of AppHttpClientException so that developers are able to easily debug errors specific to the http library being used.
Additionally, developers writing app-specific subclasses of AppHttpClientException can pass other exceptions in which further represent the type of error, if needed.
We can describe the network exception just as simply:
Finally, we can create a class for network response errors:
Developers are encouraged to subclass AppNetworkResponseException for app-specific response errors. More on that later.
Now that our basic error hierarchy is in place, it’s time to create the http client wrapper class.
Creating the HTTP Client Wrapper
We want our wrapper to receive a pre-configured Dio instance so that the code instantiating the wrapper has full control over network requests. By injecting a Dio instance into our wrapper, it encourages developers to take advantage of everything Dio has to offer—like request interceptors.
Our wrapper should provide a method for each http request method like GET , POST , PUT , PATCH , etc. These methods should pass their parameters through to the Dio instance and perform relevant error handling by catching errors in a uniform way.
Note: Dio exposes a lot of methods, but we are only interested in wrapping the methods that use a String path as opposed to a Uri , which seems overly complex in this scenario.
Let’s make a class that meets our criteria:
The Error Handling Mechanism
The real meat-and-potatoes of our wrapper is hiding in the private method _mapException() . It takes one parameter named method which is a callback (that should call a Dio method).
The _mapException proceeds to return the awaited callback’s result via return await method(); , catching any errors in the process. If no errors occur, it just returns whatever the callback returned (which in this case will be the response object returned by the Dio method that the callback called).
If an error occurs, things get much more interesting. The error handling that takes place inside the wrapper is dependent on your http library of choice. Since we’re using Dio, we know that Dio already wraps all of its errors into DioError objects.
Dio’s errors are perfectly decent, but we don’t want the error handling our app’s codebase to be directly tied to any particular http library. If you need to change the http library you’re using, it’s much easier to write another wrapper class which satisfies a similar interface than it is to hunt for http-library-specific error handling throughout the app’s code.
Note: There is one caveat—because our methods directly wrap Dio’s methods, the parameters have types which are only found inside the Dio library, such as Options , CancelToken , ProgressCallback , etc. Our app’s service code which calls our wrapper will still be tied to Dio when it passes in these objects, but changing such details strictly within the service layer should be fairly straightforward in the event of swapping over to another wrapper and http library.
We could have stopped and written a platform-agnostic http request interface library, but the payoff for doing so would be minimal compared to the enormous effort required. While it would spare you from having to touch any service code at all if you suddenly switched http libraries, swapping dependencies like that just doesn’t seem like a frequent enough occurrence to merit an entire library of carefully constructed interfaces. You’d also have to create and maintain the mappings from the platform-agnostic classes to the platform specific ones for every http library you intended to support.
The rest of _mapException proceeds to map each type of Dio error into one of the 3 types of errors we care about. Everything is fairly straightforward, with the exception of response errors.
Our wrapper would not be very useful if that was all it did. The main reason we created the wrapper is to allow the code using the wrapper to provide custom response error handling. The _mapException method uses some optional chaining and null coalescing operators to delegate any Dio response error containing a valid response object (with the expected response type) to an optional mapping function—if such a callback is provided in the wrapper’s constructor: ResponseExceptionMapper? exceptionMapper .
The exceptionMapper function receives two arguments: the first is the Dio response object of type Response (where T is the type of data passed into the wrapper, usually Map for JSON) and the second is the original exception which was caught.
In case you weren’t sure, you can specify the type of the type of the data you expect Dio to return by passing in the expected type when you call our wrapper’s generic delegate methods:
The following are some of the response types Dio supports:
You can implement the exceptionMapper function however you like. If you don’t know what to do with the Dio response, simply return null to let AppHttpClient wrap the response error using the default error handling logic. If your exceptionMapper function is able to recognize a certain kind of response, it is welcome to return an instance or subclass of AppNetworkResponseException which better represents the error.
In the next section, we will construct an example exceptionMapper which unwraps a certain kind of backend error it receives.
Handling the Errors
Imagine you’ve defined the following service which calls your internet-of-things-enabled teapot and tells it to brew coffee erroneously:
Because you’ve made the wrong request, the teapot should respond back with a 418 I’m a Teapot error. Perhaps it even replies with json data in its response body:
Let’s pretend, while we’re at it, that you want to catch these specific errors and wrap them in an error class, preserving the server’s error message so that you can show it to the user of your remote tea-brewing app.
This is all you have to do:
Note: Because Dart generic types are reified, you can check the type of the response data inside the exceptionMapper function.
To use your service and consume teapot errors, this is all you need to do:
Note that you can access the error’s data since you created a custom TeapotResponseException class. On top of that, it integrates seamlessly with Dart’s try/catch clauses. The try / catch clauses Dart provides out of the box are incredibly useful for catching specific types of errors—exactly what our wrapper helps us with!
So that’s pretty much it—I like to think it’s worth the hassle of creating a custom http client wrapper. 
Testing
A wrapper whose sole job is to wrap errors would be completely useless if there were mistakes in its code which caused it to throw errors that didn’t get wrapped. Whew, that was a mouthful. We can prevent just such a catastrophe by keeping the wrapper code as simple as possible and testing all of its functionality.
To prevent such a catastrophe, I have tried to reduce the wrapper’s code as much as possible and have tested it to the best of my ability. Because of the code’s simplicity, you can check the tests here to ensure that you are satisfied with its functionality.
Источник
In this article I will show you how you can handle network calls and exceptions using dio, flutter_bloc and freezed package
To start with this we need to add the dependencies in the pubspec.yaml file.
Add the dependencies
dependencies:
  flutter:
    sdk: flutter
  cupertino_icons: ^0.1.3
  dio: 3.0.8
  freezed: 0.10.9
  flutter_bloc: 5.0.0

dev_dependencies:
  flutter_test:
    sdk: flutter
  build_runner:
We are using
- dio for making network calls
- flutter_bloc for UI and state management
- freezed for generating Unions/Sealed classes
- build_runner for generating output files from input files
First of all, we will need to add the to set up the API call.
Create an API client
we are using the dio package so we will create a DioClient class
We will be accessing this class using the repository
import 'package:dio/dio.dart';
import 'package:network_handling/services/dio_client.dart';

class APIRepository {
  DioClient dioClient;
  String _baseUrl = "";

  APIRepository() {
    var dio = Dio();

    dioClient = DioClient(_baseUrl, dio);
  }
}
Now if you see when we hit an API we have 2 result
Api Call
—>> Success 🏆
—>> Failure ❌
Create an API Result handler
Create 2 freezed classes to handle data,
- API Result
- Network Exceptions (In case API result returns a failure)
api_result.dart
import 'package:flutter/foundation.dart';
import 'package:freezed_annotation/freezed_annotation.dart';

import 'network_exceptions.dart';


part 'api_result.freezed.dart';

@freezed
abstract class ApiResult<T> with _$ApiResult<T> {
  const factory ApiResult.success({@required T data}) = Success<T>;

  const factory ApiResult.failure({@required NetworkExceptions error}) =
      Failure<T>;
}
network_exceptions.dart
import 'dart:io';

import 'package:dio/dio.dart';
import 'package:freezed_annotation/freezed_annotation.dart';

part 'network_exceptions.freezed.dart';

@freezed
abstract class NetworkExceptions with _$NetworkExceptions {
  const factory NetworkExceptions.requestCancelled() = RequestCancelled;

  const factory NetworkExceptions.unauthorisedRequest() = UnauthorisedRequest;

  const factory NetworkExceptions.badRequest() = BadRequest;

  const factory NetworkExceptions.notFound(String reason) = NotFound;

  const factory NetworkExceptions.methodNotAllowed() = MethodNotAllowed;

  const factory NetworkExceptions.notAcceptable() = NotAcceptable;

  const factory NetworkExceptions.requestTimeout() = RequestTimeout;

  const factory NetworkExceptions.sendTimeout() = SendTimeout;

  const factory NetworkExceptions.conflict() = Conflict;

  const factory NetworkExceptions.internalServerError() = InternalServerError;

  const factory NetworkExceptions.notImplemented() = NotImplemented;

  const factory NetworkExceptions.serviceUnavailable() = ServiceUnavailable;

  const factory NetworkExceptions.noInternetConnection() = NoInternetConnection;

  const factory NetworkExceptions.formatException() = FormatException;

  const factory NetworkExceptions.unableToProcess() = UnableToProcess;

  const factory NetworkExceptions.defaultError(String error) = DefaultError;

  const factory NetworkExceptions.unexpectedError() = UnexpectedError;

}
If you see the ApiResult class, in case of the success, I am returning the data of T type but in the case of failure, I have to return a network exception.
How will I return network exception and determine which network exception has occurred?
Now you have seen the line part of'<file-name>.freezed.dart'
We will need to generate the freezer file
- Run this command in terminal
flutter packages pub run build_runner build
- Run this command in terminal to watch auto change
flutter packages pub run build_runner watch
- Run this command in terminal to watch auto change and delete previously generated files
flutter packages pub run build_runner watch --delete-conflicting-outputs
Create a new method in NetworkExceptions class which will return NetworkExceptions
  static NetworkExceptions getDioException(error) {
    if (error is Exception) {
      try {
        NetworkExceptions networkExceptions;
        if (error is DioError) {
          switch (error.type) {
            case DioErrorType.CANCEL:
              networkExceptions = NetworkExceptions.requestCancelled();
              break;
            case DioErrorType.CONNECT_TIMEOUT:
              networkExceptions = NetworkExceptions.requestTimeout();
              break;
            case DioErrorType.DEFAULT:
              networkExceptions = NetworkExceptions.noInternetConnection();
              break;
            case DioErrorType.RECEIVE_TIMEOUT:
              networkExceptions = NetworkExceptions.sendTimeout();
              break;
            case DioErrorType.RESPONSE:
              switch (error.response.statusCode) {
                case 400:
                  networkExceptions = NetworkExceptions.unauthorisedRequest();
                  break;
                case 401:
                  networkExceptions = NetworkExceptions.unauthorisedRequest();
                  break;
                case 403:
                  networkExceptions = NetworkExceptions.unauthorisedRequest();
                  break;
                case 404:
                  networkExceptions = NetworkExceptions.notFound("Not found");
                  break;
                case 409:
                  networkExceptions = NetworkExceptions.conflict();
                  break;
                case 408:
                  networkExceptions = NetworkExceptions.requestTimeout();
                  break;
                case 500:
                  networkExceptions = NetworkExceptions.internalServerError();
                  break;
                case 503:
                  networkExceptions = NetworkExceptions.serviceUnavailable();
                  break;
                default:
                  var responseCode = error.response.statusCode;
                  networkExceptions = NetworkExceptions.defaultError(
                    "Received invalid status code: $responseCode",
                  );
              }
              break;
            case DioErrorType.SEND_TIMEOUT:
              networkExceptions = NetworkExceptions.sendTimeout();
              break;
          }
        } else if (error is SocketException) {
          networkExceptions = NetworkExceptions.noInternetConnection();
        } else {
          networkExceptions = NetworkExceptions.unexpectedError();
        }
        return networkExceptions;
      } on FormatException catch (e) {
        // Helper.printError(e.toString());
        return NetworkExceptions.formatException();
      } catch (_) {
        return NetworkExceptions.unexpectedError();
      }
    } else {
      if (error.toString().contains("is not a subtype of")) {
        return NetworkExceptions.unableToProcess();
      } else {
        return NetworkExceptions.unexpectedError();
      }
    }
  }
This method will return the NetworkExceptions and we can use this to show different types of errors.
Also, sometimes we will need to show the error message on different errors
Let’s create a new method for the error message
  static String getErrorMessage(NetworkExceptions networkExceptions) {
    var errorMessage = "";
    networkExceptions.when(notImplemented: () {
      errorMessage = "Not Implemented";
    }, requestCancelled: () {
      errorMessage = "Request Cancelled";
    }, internalServerError: () {
      errorMessage = "Internal Server Error";
    }, notFound: (String reason) {
      errorMessage = reason;
    }, serviceUnavailable: () {
      errorMessage = "Service unavailable";
    }, methodNotAllowed: () {
      errorMessage = "Method Allowed";
    }, badRequest: () {
      errorMessage = "Bad request";
    }, unauthorisedRequest: () {
      errorMessage = "Unauthorised request";
    }, unexpectedError: () {
      errorMessage = "Unexpected error occurred";
    }, requestTimeout: () {
      errorMessage = "Connection request timeout";
    }, noInternetConnection: () {
      errorMessage = "No internet connection";
    }, conflict: () {
      errorMessage = "Error due to a conflict";
    }, sendTimeout: () {
      errorMessage = "Send timeout in connection with API server";
    }, unableToProcess: () {
      errorMessage = "Unable to process the data";
    }, defaultError: (String error) {
      errorMessage = error;
    }, formatException: () {
      errorMessage = "Unexpected error occurred";
    }, notAcceptable: () {
      errorMessage = "Not acceptable";
    });
    return errorMessage;
  }
Have a look at the full network exceptions class
Call the API in the APIRepository class
I am using the movieDB API to get popular movies.
Create a PODO for parsing the response JSON from the API.
Fetch the movie API in APIRepository class
import 'package:dio/dio.dart';
import 'package:network_handling/model/movie_response.dart';
import 'package:network_handling/services/api_result.dart';
import 'package:network_handling/services/dio_client.dart';
import 'package:network_handling/services/network_exceptions.dart';

class APIRepository {
  DioClient dioClient;
  final String _apiKey = <apikey>;
  String _baseUrl = "http://api.themoviedb.org/3/";

  APIRepository() {
    var dio = Dio();

    dioClient = DioClient(_baseUrl, dio);
  }

  Future<ApiResult<List<Movie>>> fetchMovieList() async {
    try {
      final response = await dioClient
          .get("movie/popular", queryParameters: {"api_key": _apiKey});
      List<Movie> movieList = MovieResponse.fromJson(response).results;
      return ApiResult.success(data: movieList);
    } catch (e) {
      return ApiResult.failure(error: NetworkExceptions.getDioException(e));
    }
  }
}
Now, this is just the API call, How to show it in the UI?
I am using flutter_bloc to manage the data in the UI
Create a Bloc class
In the bloc class, we will need two thing
- event (input)
- state (output)
Create Event class
Since we have only one event which is to call the API we are going to have only one event in the class
import 'package:flutter/foundation.dart';
import 'package:freezed_annotation/freezed_annotation.dart';

part 'movie_event.freezed.dart';

@freezed
abstract class MovieEvent with _$MovieEvent {
  const factory MovieEvent.loadMovie() = LoadMovies;
}
Create State class
Now we need to understand why this is important.
When we generally open any app we see some events are happening like loading, displaying data, showing error.
That’s what we need to implement in our app , so all these things will be our result states
- Idle
- Loading
- Data
- Error
import 'package:flutter/foundation.dart';
import 'package:freezed_annotation/freezed_annotation.dart';
import 'package:network_handling/services/network_exceptions.dart';

part 'result_state.freezed.dart';

@freezed
abstract class ResultState<T> with _$ResultState<T> {
  const factory ResultState.idle() = Idle<T>;

  const factory ResultState.loading() = Loading<T>;

  const factory ResultState.data({@required T data}) = Data<T>;

  const factory ResultState.error({@required NetworkExceptions error}) =
      Error<T>;
}
Now generate these files
flutter packages pub run build_runner build
Now that we have created the event and states, Let’s create Bloc class.
import 'package:flutter_bloc/flutter_bloc.dart';
import 'package:network_handling/api_repository.dart';
import 'package:network_handling/bloc/movie/movie_event.dart';
import 'package:network_handling/bloc/movie/result_state.dart';
import 'package:network_handling/model/movie_response.dart';

class MovieBloc extends Bloc<MovieEvent, ResultState<List<Movie>>> {
  final APIRepository apiRepository;

  MovieBloc({this.apiRepository})
      : assert(apiRepository != null),
        super(Idle());

  @override
  Stream<ResultState<List<Movie>>> mapEventToState(MovieEvent event) {

  }
}
now we need to call the API here and sink the states into the blocs
class MovieBloc extends Bloc<MovieEvent, ResultState<List<Movie>>> {
  final APIRepository apiRepository;

  MovieBloc({this.apiRepository})
      : assert(apiRepository != null),
        super(Idle());

  @override
  Stream<ResultState<List<Movie>>> mapEventToState(MovieEvent event) async* {

    yield ResultState.loading();

    if (event is LoadMovies) {

      ApiResult<List<Movie>> apiResult = await apiRepository.fetchMovieList();

      yield* apiResult.when(success: (List<Movie> data) async* {

        yield ResultState.data(data: data);

      }, failure: (NetworkExceptions error) async* {

        yield ResultState.error(error: error);

      });
    }
  }
}
If you see we have implemented all the states
-
Idlestate in the beginning - and an event comes up and it starts to pass the
Loadingstate - at last, it depends on the API call whether it returns the data or error.
Now we have created the Bloc class and implemented the logic inside, Now we need to use this bloc class in the UI.
void main() {
  runApp(MyApp());
}

class MyApp extends StatelessWidget {
  @override
  Widget build(BuildContext context) {
    return MultiBlocProvider(
      providers: [
        BlocProvider<MovieBloc>(
          create: (BuildContext context) {
            return MovieBloc(apiRepository: APIRepository());
          },
          child: MyHomePage(),
        )
      ],
      child: MaterialApp(
        title: 'Flutter Demo',
        theme: ThemeData(
          primarySwatch: Colors.blue,
          visualDensity: VisualDensity.adaptivePlatformDensity,
        ),
        home: MyHomePage(),
      ),
    );
  }
}
Add the BlocProvider top of the widget tree so we can access the data.
Now in the HomePage we will call the API
  @override
  void initState() {

    context.bloc<MovieBloc>().add(LoadMovies());

    super.initState();
  }
And we will listen the changes in the BlocBuilder.
BlocBuilder<MovieBloc, ResultState<List<Movie>>>(
        builder: (BuildContext context, ResultState<List<Movie>> state) {
          return state.when(
            loading: () {
              return Center(child: CircularProgressIndicator());
            },
            idle: () {
              return Container();
            },
            data: (List<Movie> data) {
              return dataWidget(data);
            },
            error: (NetworkExceptions error) {
              return Text(NetworkExceptions.getErrorMessage(error));
            },
          );
        },
      )
Check out the Ui code
class MyHomePage extends StatefulWidget {
  @override
  _MyHomePageState createState() => _MyHomePageState();
}

class _MyHomePageState extends State<MyHomePage> {
  @override
  void initState() {
    context.bloc<MovieBloc>().add(LoadMovies());
    super.initState();
  }

  @override
  Widget build(BuildContext context) {
    return Scaffold(
      appBar: AppBar(
        title: Text("Movies"),
      ),
      body: BlocBuilder<MovieBloc, ResultState<List<Movie>>>(
        builder: (BuildContext context, ResultState<List<Movie>> state) {
          return state.when(
            loading: () {
              return Center(child: CircularProgressIndicator());
            },
            idle: () {
              return Container();
            },
            data: (List<Movie> data) {
              return dataWidget(data);
            },
            error: (NetworkExceptions error) {
              return Text(NetworkExceptions.getErrorMessage(error));
            },
          );
        },
      ),
    );
  }

  Widget dataWidget(List<Movie> data) {
    return ListView.builder(
      itemCount: data.length,
      itemBuilder: (BuildContext context, int index) {
        return Container(
          height: 300,
          width: 300,
          child: Card(
            elevation: 1,
            child: Image.network(
              "https://image.tmdb.org/t/p/w342${data[index].posterPath}",
            ),
          ),
        );
      },
    );
  }
}
Now let’s see what we have built:
-
When we get the result from the API

-
When we get an error


Check out the full code here
Network and Error Handling in FLutter
Network and error handling in flutter using Dio , flutter_bloc and freezed package
Screenshots

Thanks for reading this article ❤
If I got something wrong, Let me know in the comments. I would love to improve.
Let’s connect: https://www.ashishrawat.dev
A crucial part of application development is gracefully handling network requests. Responses returned by a network may consist of unexpected results, and in order to have a good user experience, you need to take care of edge cases in advance.
In this article, we will take a look at how to handle REST API requests in Flutter using the Dio package.
What is Dio?
Dio is a powerful HTTP client for Dart. It has support for interceptors, global configuration, FormData, request cancellation, file downloading, and timeout, among others. Flutter offers an http package that’s nice for performing basic network tasks but is pretty daunting to use when handling some advanced features. By comparison, Dio provides an intuitive API for performing advanced network tasks with ease.
Getting started
Let’s get started by creating a new Flutter project. Use the following command:
flutter create dio_networking
You can open the project using your favorite IDE, but for this example, I’ll be using VS Code:
code dio_networking
Add the Dio package to your pubspec.yaml file:
dependencies:
  dio: ^4.0.0
Replace the content of your main.dart file with the following:
import 'package:flutter/material.dart';

void main() {
  runApp(MyApp());
}

class MyApp extends StatelessWidget {
  @override
  Widget build(BuildContext context) {
    return MaterialApp(
      title: 'Dio Networking',
      theme: ThemeData(
        primarySwatch: Colors.blue,
      ),
      debugShowCheckedModeBanner: false,
      home: HomePage(),
    );
  }
}
We will define the HomePage class after fetching the network data.
Now, let’s take a look at the network data that we’ll use for the demonstration.
Testing with API data
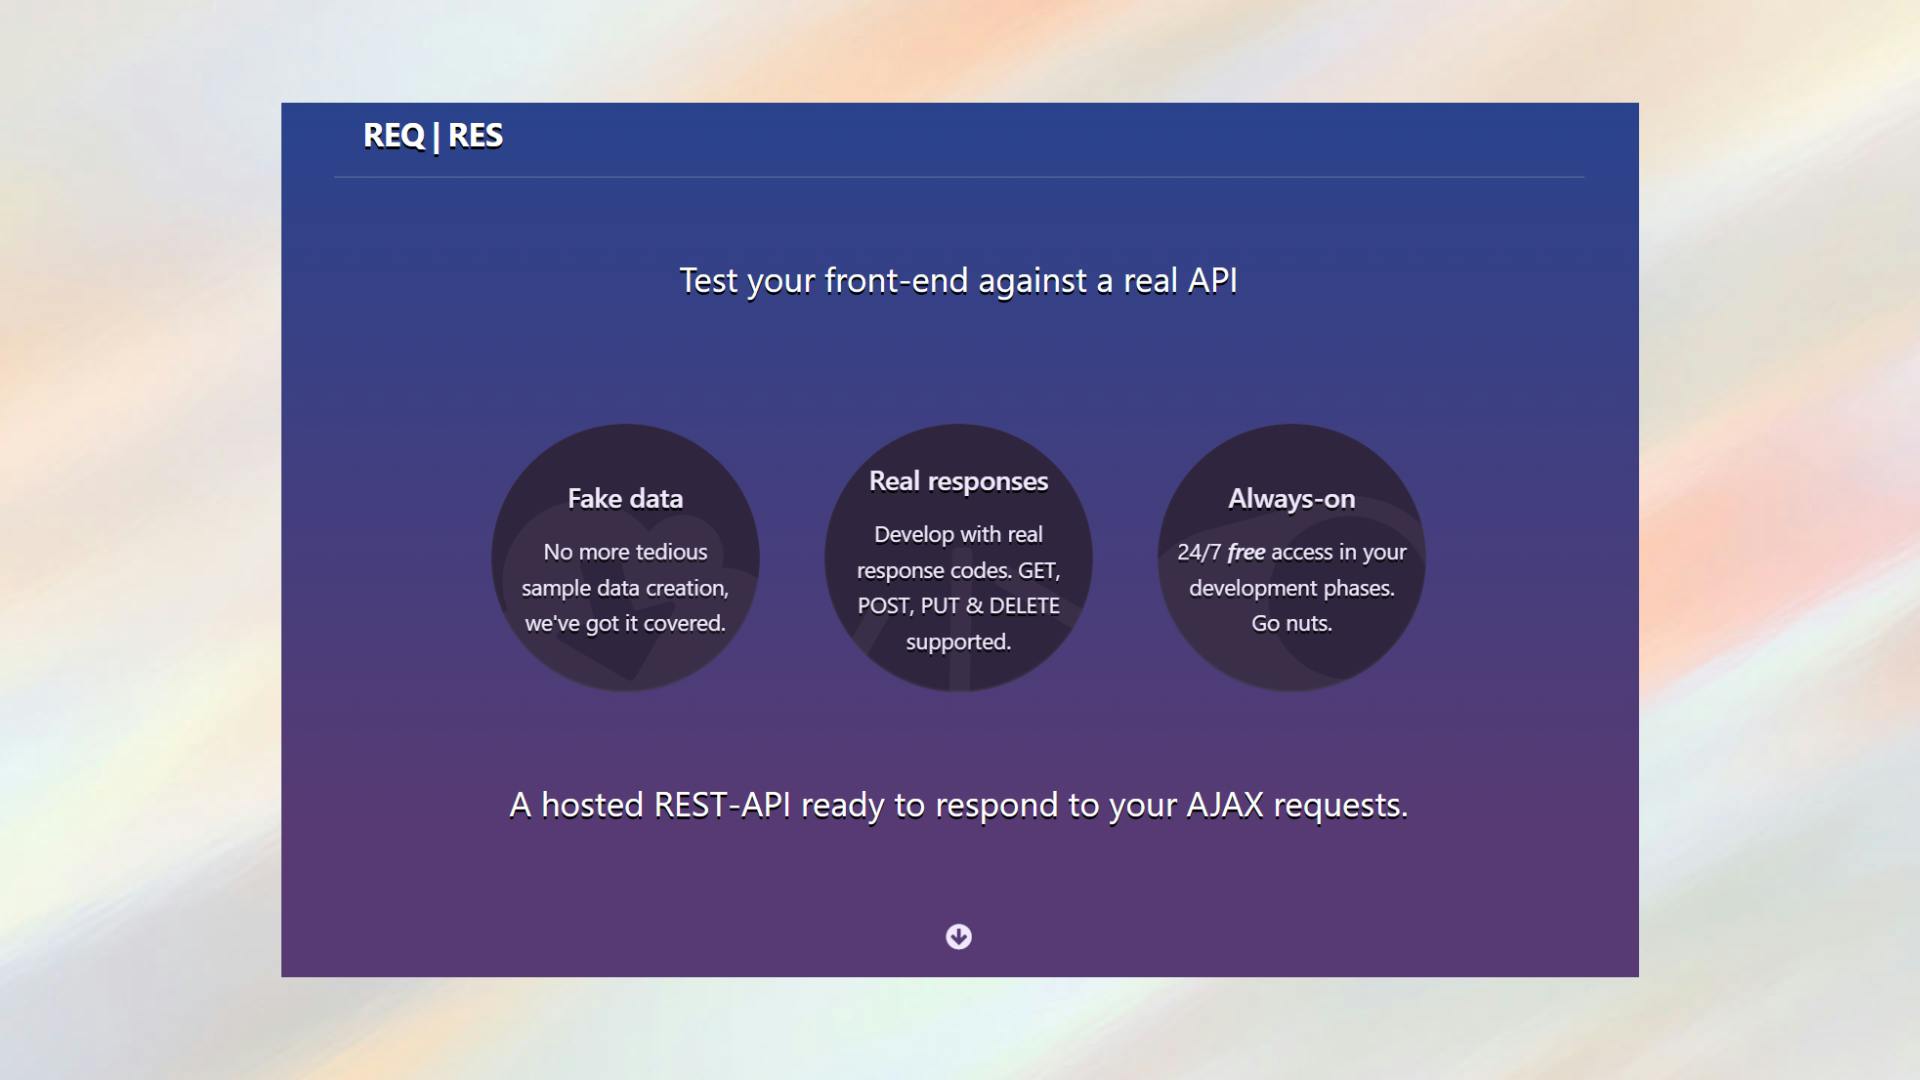
We will use REQ | RES to test our network data because it provides you with a hosted REST API consisting of sample user data and allows you to perform a variety of network operation tests.
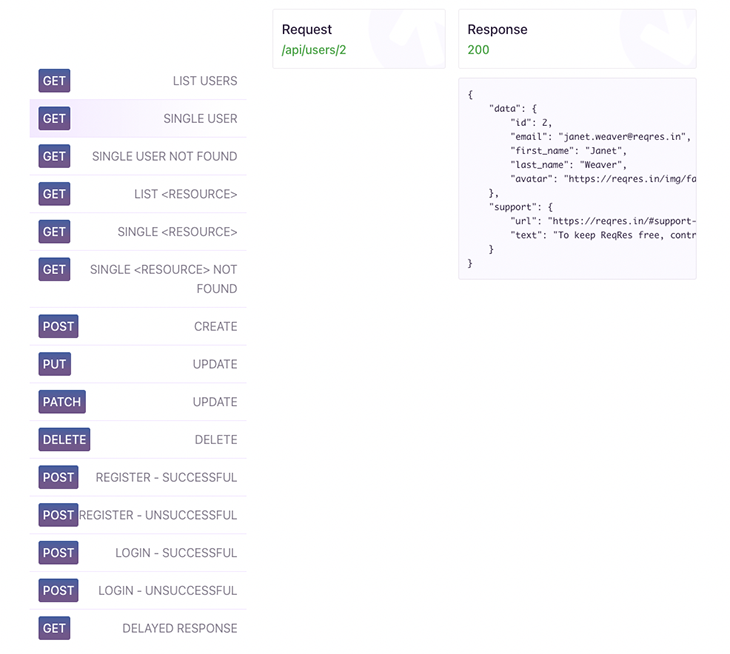
We will start by doing a simple GET request for fetching Single User data. The endpoint required for that is:
GET https://reqres.in/api/users/<id>
Note here that <id> has to be replaced with an integer value that corresponds with and is used to find a specific user.
Below is what a sample JSON response should look like when the request is successful:
{
    "data": {
        "id": 2,
        "email": "[email protected]",
        "first_name": "Janet",
        "last_name": "Weaver",
        "avatar": "https://reqres.in/img/faces/2-image.jpg"
    }
}
Defining a model class
If you want to easily handle the data returned from a REST API request, you’ll want to define a model class.
For now, we’ll just define a simple class for storing single user data. You can use either pure Dart code or a library interchangeably without making any other changes in the same example app. We’ll define a model class manually like this:
class User {
  User({
    required this.data,
  });

  Data data;

  factory User.fromJson(Map<String, dynamic> json) => User(
        data: Data.fromJson(json["data"]),
      );

  Map<String, dynamic> toJson() => {
        "data": data.toJson(),
      };
}


class Data {
  Data({
    required this.id,
    required this.email,
    required this.firstName,
    required this.lastName,
    required this.avatar,
  });

  int id;
  String email;
  String firstName;
  String lastName;
  String avatar;

  factory Data.fromJson(Map<String, dynamic> json) => Data(
        id: json["id"],
        email: json["email"],
        firstName: json["first_name"],
        lastName: json["last_name"],
        avatar: json["avatar"],
      );

  Map<String, dynamic> toJson() => {
        "id": id,
        "email": email,
        "first_name": firstName,
        "last_name": lastName,
        "avatar": avatar,
      };
}
To prevent any unnoticed errors that might occur while defining manually, you can use JSON serialization and generate the factory methods automatically.
For this, you will need the following packages:
json_serializablejson_annotationbuild_runner
Add them to your pubspec.yaml file:
dependencies:
  json_annotation: ^4.0.1

dev_dependencies:
  json_serializable: ^4.1.3
  build_runner: ^2.0.4
Separate the user and data classes into two Dart files — user.dart and data.dart, respectively — and modify their content.
The User class content will be as follows:
import 'package:json_annotation/json_annotation.dart';

import 'data.dart';

part 'user.g.dart';

@JsonSerializable()
class User {
  User({
    required this.data,
  });

  Data data;

  factory User.fromJson(Map<String, dynamic> json) => _$UserFromJson(json);
  Map<String, dynamic> toJson() => _$UserToJson(this);
}
The Data class content will be as follows:
import 'package:json_annotation/json_annotation.dart';

part 'data.g.dart';

@JsonSerializable()
class Data {
  Data({
    required this.id,
    required this.email,
    required this.firstName,
    required this.lastName,
    required this.avatar,
  });

  int id;
  String email;
  @JsonKey(name: 'first_name')
  String firstName;
  @JsonKey(name: 'last_name')
  String lastName;
  String avatar;

  factory Data.fromJson(Map<String, dynamic> json) => _$DataFromJson(json);
  Map<String, dynamic> toJson() => _$DataToJson(this);
}
The fromJson and toJson methods will be generated by the json_serializable package. Some of the class attributes are annotated with @JsonKey because the name defined in the Map (and returned by the API request) is different than their attribute name.
You can trigger the code generation using the following command:
flutter pub run build_runner build
Keep the code generator running in a server so that any new changes to the class automatically trigger the code generation. Use the following command to do this:
flutter pub run build_runner serve --delete-conflicting-outputs
The --delete-conflicting-outputs flag helps to regenerate a part of the generated class if any conflicts are found.
Initialize Dio
You can create a separate class containing the methods for performing the network operations. This helps to separate the functional logic from the user interface code.
To do this, create a new file dio_client.dart containing the DioClient class:
class DioClient {
  // TODO: Set up and define the methods for network operations
}
You can initialize Dio using the following:
import 'package:dio/dio.dart';

class DioClient {
  final Dio _dio = Dio();
}
Define the base URL of the API server:
import 'package:dio/dio.dart';

class DioClient {
  final Dio _dio = Dio();

  final _baseUrl = 'https://reqres.in/api';

  // TODO: Add methods
}
Now, we can define the methods required for performing the network requests.
Defining the GET request
We will define a method for retrieving a single user data from the API by passing an id:
Future<User> getUser({required String id}) async {
    // Perform GET request to the endpoint "/users/<id>"
    Response userData = await _dio.get(_baseUrl + '/users/$id');

    // Prints the raw data returned by the server
    print('User Info: ${userData.data}');

    // Parsing the raw JSON data to the User class
    User user = User.fromJson(userData.data);

    return user;
}
The above method works, but if there are any coding errors here, the app will crash when you run it.
A better and more functional way to do this is to wrap the get() method with a try-catch block:
Future<User?> getUser({required String id}) async {
  User? user;
  try {
    Response userData = await _dio.get(_baseUrl + '/users/$id');
    print('User Info: ${userData.data}');
    user = User.fromJson(userData.data);
  } on DioError catch (e) {
    // The request was made and the server responded with a status code
    // that falls out of the range of 2xx and is also not 304.
    if (e.response != null) {
      print('Dio error!');
      print('STATUS: ${e.response?.statusCode}');
      print('DATA: ${e.response?.data}');
      print('HEADERS: ${e.response?.headers}');
    } else {
      // Error due to setting up or sending the request
      print('Error sending request!');
      print(e.message);
    }
  }
  return user;
}
In this example, we have also made the User nullable so that, in case of any error, the server will return null instead of any actual user data.
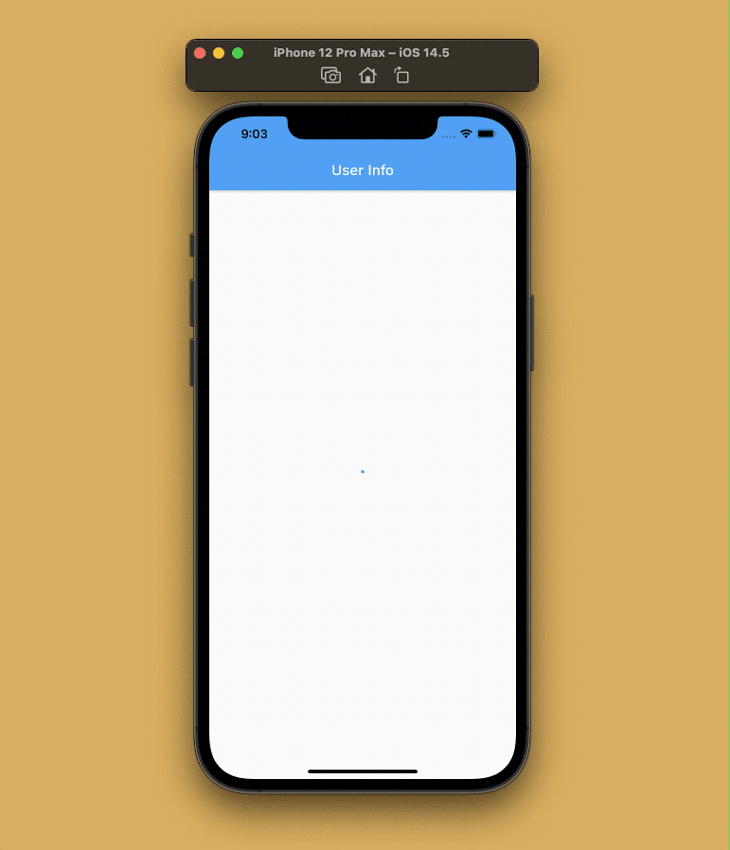
In order to display the user data, we have to build the HomePage class. Create a new file called home_page.dart and add the following to it:
class HomePage extends StatefulWidget {
  @override
  _HomePageState createState() => _HomePageState();
}

class _HomePageState extends State<HomePage> {
  final DioClient _client = DioClient();

  @override
  Widget build(BuildContext context) {
    return Scaffold(
      appBar: AppBar(
        title: Text('User Info'),
      ),
      body: Center(
        child: FutureBuilder<User?>(
          future: _client.getUser(id: '1'),
          builder: (context, snapshot) {
            if (snapshot.hasData) {
              User? userInfo = snapshot.data;
              if (userInfo != null) {
                Data userData = userInfo.data;
                return Column(
                  mainAxisSize: MainAxisSize.min,
                  children: [
                    Image.network(userData.avatar),
                    SizedBox(height: 8.0),
                    Text(
                      '${userInfo.data.firstName} ${userInfo.data.lastName}',
                      style: TextStyle(fontSize: 16.0),
                    ),
                    Text(
                      userData.email,
                      style: TextStyle(fontSize: 16.0),
                    ),
                  ],
                );
              }
            }
            return CircularProgressIndicator();
          },
        ),
      ),
    );
  }
}
Inside the _HomePageState class, the DioClient is instantiated first. Then, inside the build method, a FutureBuilder is used to retrieve and show the user data. A CircularProgressIndicator will be displayed while the result is being fetched.
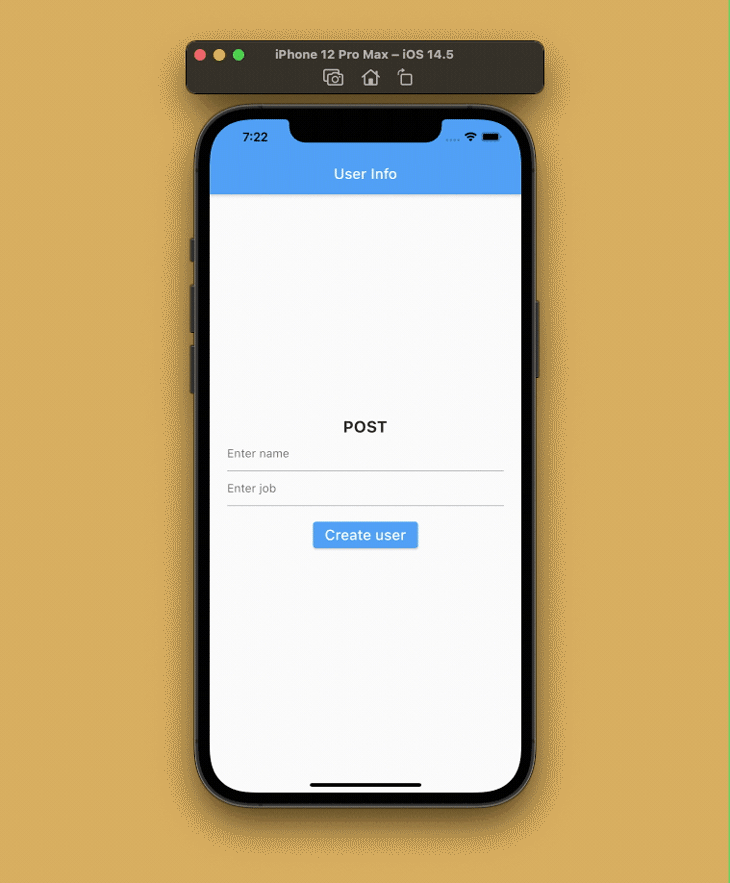
Defining the POST request
You can use a POST request for sending data to the API. Let’s try sending a request and creating a new user.
First, I’ll define another model class, because the properties of this JSON data will be different from the earlier defined User model class, for handling the user information that we have to send:
import 'package:json_annotation/json_annotation.dart';

part 'user_info.g.dart';

@JsonSerializable()
class UserInfo {
  String name;
  String job;
  String? id;
  String? createdAt;
  String? updatedAt;

  UserInfo({
    required this.name,
    required this.job,
    this.id,
    this.createdAt,
    this.updatedAt,
  });

  factory UserInfo.fromJson(Map<String, dynamic> json) => _$UserInfoFromJson(json);
  Map<String, dynamic> toJson() => _$UserInfoToJson(this);
}
Specify a method inside the DioClient class for creating a new user:
Future<UserInfo?> createUser({required UserInfo userInfo}) async {
  UserInfo? retrievedUser;

  try {
    Response response = await _dio.post(
      _baseUrl + '/users',
      data: userInfo.toJson(),
    );

    print('User created: ${response.data}');

    retrievedUser = UserInfo.fromJson(response.data);
  } catch (e) {
    print('Error creating user: $e');
  }

  return retrievedUser;
}
This takes a UserInfo object as the parameter, which it then sends to the /users endpoint of the API. It returns a response with the newly created user information and the creation date and time.
Defining the PUT request
You can update the data present in the API server by using a PUT request.
To define a new method for updating a user within the DioClient class, we have to pass the updated UserInfo object along with the id of the user to whom we want to apply the update.
Future<UserInfo?> updateUser({
  required UserInfo userInfo,
  required String id,
}) async {
  UserInfo? updatedUser;

  try {
    Response response = await _dio.put(
      _baseUrl + '/users/$id',
      data: userInfo.toJson(),
    );

    print('User updated: ${response.data}');

    updatedUser = UserInfo.fromJson(response.data);
  } catch (e) {
    print('Error updating user: $e');
  }

  return updatedUser;
}
The above code will send a PUT request to the endpoint /users/<id> along with the UserInfo data. It then returns the updated user information and the date and time of the update.

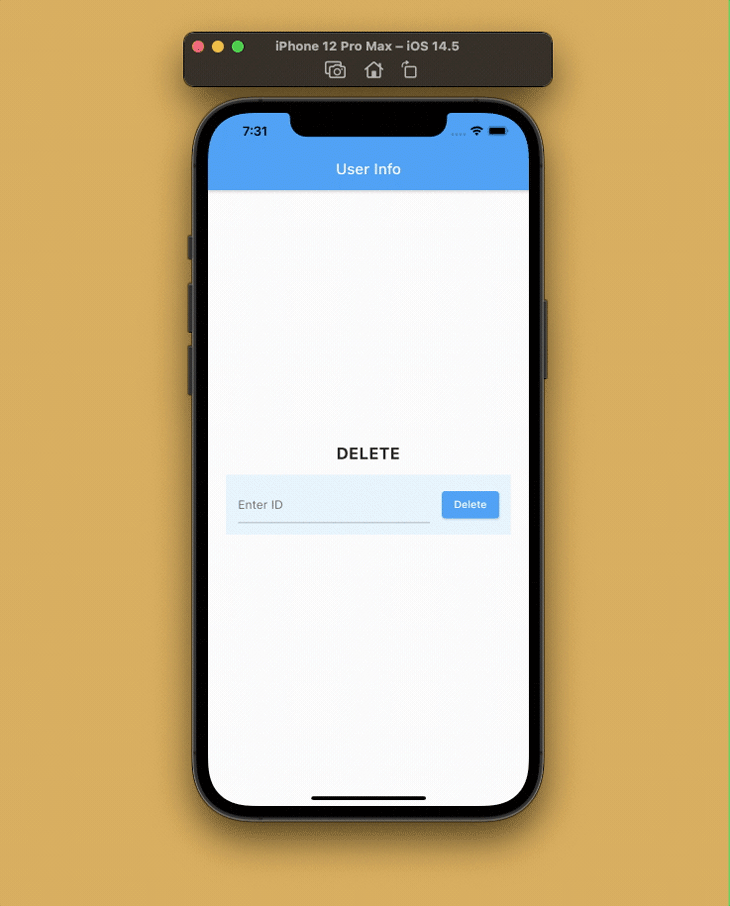
Defining the DELETE request
You can delete some data from the server by using a DELETE request.
Define a new method inside the DioClient class for deleting a user from the API server by passing the id of the user.
Future<void> deleteUser({required String id}) async {
  try {
    await _dio.delete(_baseUrl + '/users/$id');
    print('User deleted!');
  } catch (e) {
    print('Error deleting user: $e');
  }
}
Choosing and defining your base
Instead of passing the endpoint with baseUrl every time, you can just define it inside BaseOptions and pass it once while instantiating Dio.
To do this, you’ll want to initialize Dio as follows:
final Dio _dio = Dio(
  BaseOptions(
    baseUrl: 'https://reqres.in/api',
    connectTimeout: 5000,
    receiveTimeout: 3000,
  ),
);
This method provides various other customizations as well — in this same example, we have defined the connectTimeout and receiveTimeout for the requests.
Uploading files
Dio makes the process of uploading files to a server much simpler. It can process multiple simultaneous file uploads and has a simple callback for tracking their progress, which makes it much easier to use than the http package.
You can easily upload files to a server using FormData and Dio. Here’s an example of what sending an image file to the API would look like:
String imagePath;

FormData formData = FormData.fromMap({
  "image": await MultipartFile.fromFile(
    imagePath,
    filename: "upload.jpeg",
  ),
});

Response response = await _dio.post(
  '/search',
  data: formData,
  onSendProgress: (int sent, int total) {
    print('$sent $total');
  },
);
Interceptors
You can intercept Dio requests, responses, and errors before they are handled by using then or catchError. In a practical scenario, interceptors are useful for authorization using JSON Web Tokens (JWT), parsing JSON, handling errors, and easily debugging Dio network requests.
You can run the interceptor by overriding the callbacks at three places: onRequest, onResponse, and onError.
For our example, we will define a simple interceptor for logging different types of requests. Create a new class called Logging that extends from Interceptor:
import 'package:dio/dio.dart';

class Logging extends Interceptor {
  @override
  void onRequest(RequestOptions options, RequestInterceptorHandler handler) {
    print('REQUEST[${options.method}] => PATH: ${options.path}');
    return super.onRequest(options, handler);
  }

  @override
  void onResponse(Response response, ResponseInterceptorHandler handler) {
    print(
      'RESPONSE[${response.statusCode}] => PATH: ${response.requestOptions.path}',
    );
    return super.onResponse(response, handler);
  }

  @override
  void onError(DioError err, ErrorInterceptorHandler handler) {
    print(
      'ERROR[${err.response?.statusCode}] => PATH: ${err.requestOptions.path}',
    );
    return super.onError(err, handler);
  }
}
Here, we have overridden various callbacks that get triggered by Dio requests and added a print statement to each of them for logging the requests in the console.
Add the interceptor to Dio during initialization:
final Dio _dio = Dio(
    BaseOptions(
      baseUrl: 'https://reqres.in/api',
      connectTimeout: 5000,
      receiveTimeout: 3000,
    ),
  )..interceptors.add(Logging());
The logged results in the Debug console will look like this:
Conclusion
Networking in Flutter using Dio feels like a breeze and it gracefully handles many edge cases. Dio makes it easier to handle multiple simultaneous network requests, all with the safety of an advanced error handling technique. It also allows you to avoid the boilerplate code you’d need to use the http package for tracking any file upload progress. And there are various other advanced customizations that you can pull off using the Dio package that go beyond what we’ve covered here.
Thank you for reading the article! If you have any suggestions or questions about the article or examples, feel free to connect with me on Twitter or LinkedIn. You can also find the repository of the sample app on my GitHub.
LogRocket: Full visibility into your web and mobile apps

LogRocket is a frontend application monitoring solution that lets you replay problems as if they happened in your own browser. Instead of guessing why errors happen, or asking users for screenshots and log dumps, LogRocket lets you replay the session to quickly understand what went wrong. It works perfectly with any app, regardless of framework, and has plugins to log additional context from Redux, Vuex, and @ngrx/store.
In addition to logging Redux actions and state, LogRocket records console logs, JavaScript errors, stacktraces, network requests/responses with headers + bodies, browser metadata, and custom logs. It also instruments the DOM to record the HTML and CSS on the page, recreating pixel-perfect videos of even the most complex single-page and mobile apps.
Try it for free.
Your browser does not support the audio element.
Table of contents
- Why choose Dio over HTTP?
- Dependency Installation
- Folder Structure
- ReqRes API
- DioClient
- Endpoints
- Creating (GET, POST, PUT, DELETE) Methods
- GET
- POST
- PUT (UPDATE)
- DELETE
- Model Creation
- UserModel
- NewUser
- UserModel
- API Request Class
- Repository
- Error Handling
- Injecting Dependency
- Building UI
- Application Flow
- Final Output
- Final Repo
- Wrapping Up
Why choose Dio over HTTP?
- If you want a short answer to this question… It is because of More Featuresthat Dio provides.
- Yes, Dio provides a lot of capabilities that HTTP lacks. Interceptors, Global configuration, FormData, Request Cancellation, File downloading, Timeout, and so on.
- If you’re not familiar with these terms, don’t worry; in this post, I’ll go through them one by one with some examples.
- Isn’t CRUD operation the first thing that comes to mind when we think about networking? Then let’s look at how we can use the DIO package to conduct CRUD tasks. Believe me when I say it’s a lot easier than HTTP.
- However, we must first include the Dio package in the pubspec.yaml file.
Dependency Installation
- Install the dependencies listed below. In our example, we’ll need all three.
dependencies: dio: ^4.0.6 get_it: ^7.2.0 intl: ^0.17.0 - Run
flutter pub getand you are ready to go.
Folder Structure
- It is advised that we follow a set structure when working on a large project.
- Let’s have a look at how I’ve organized the project for this example.
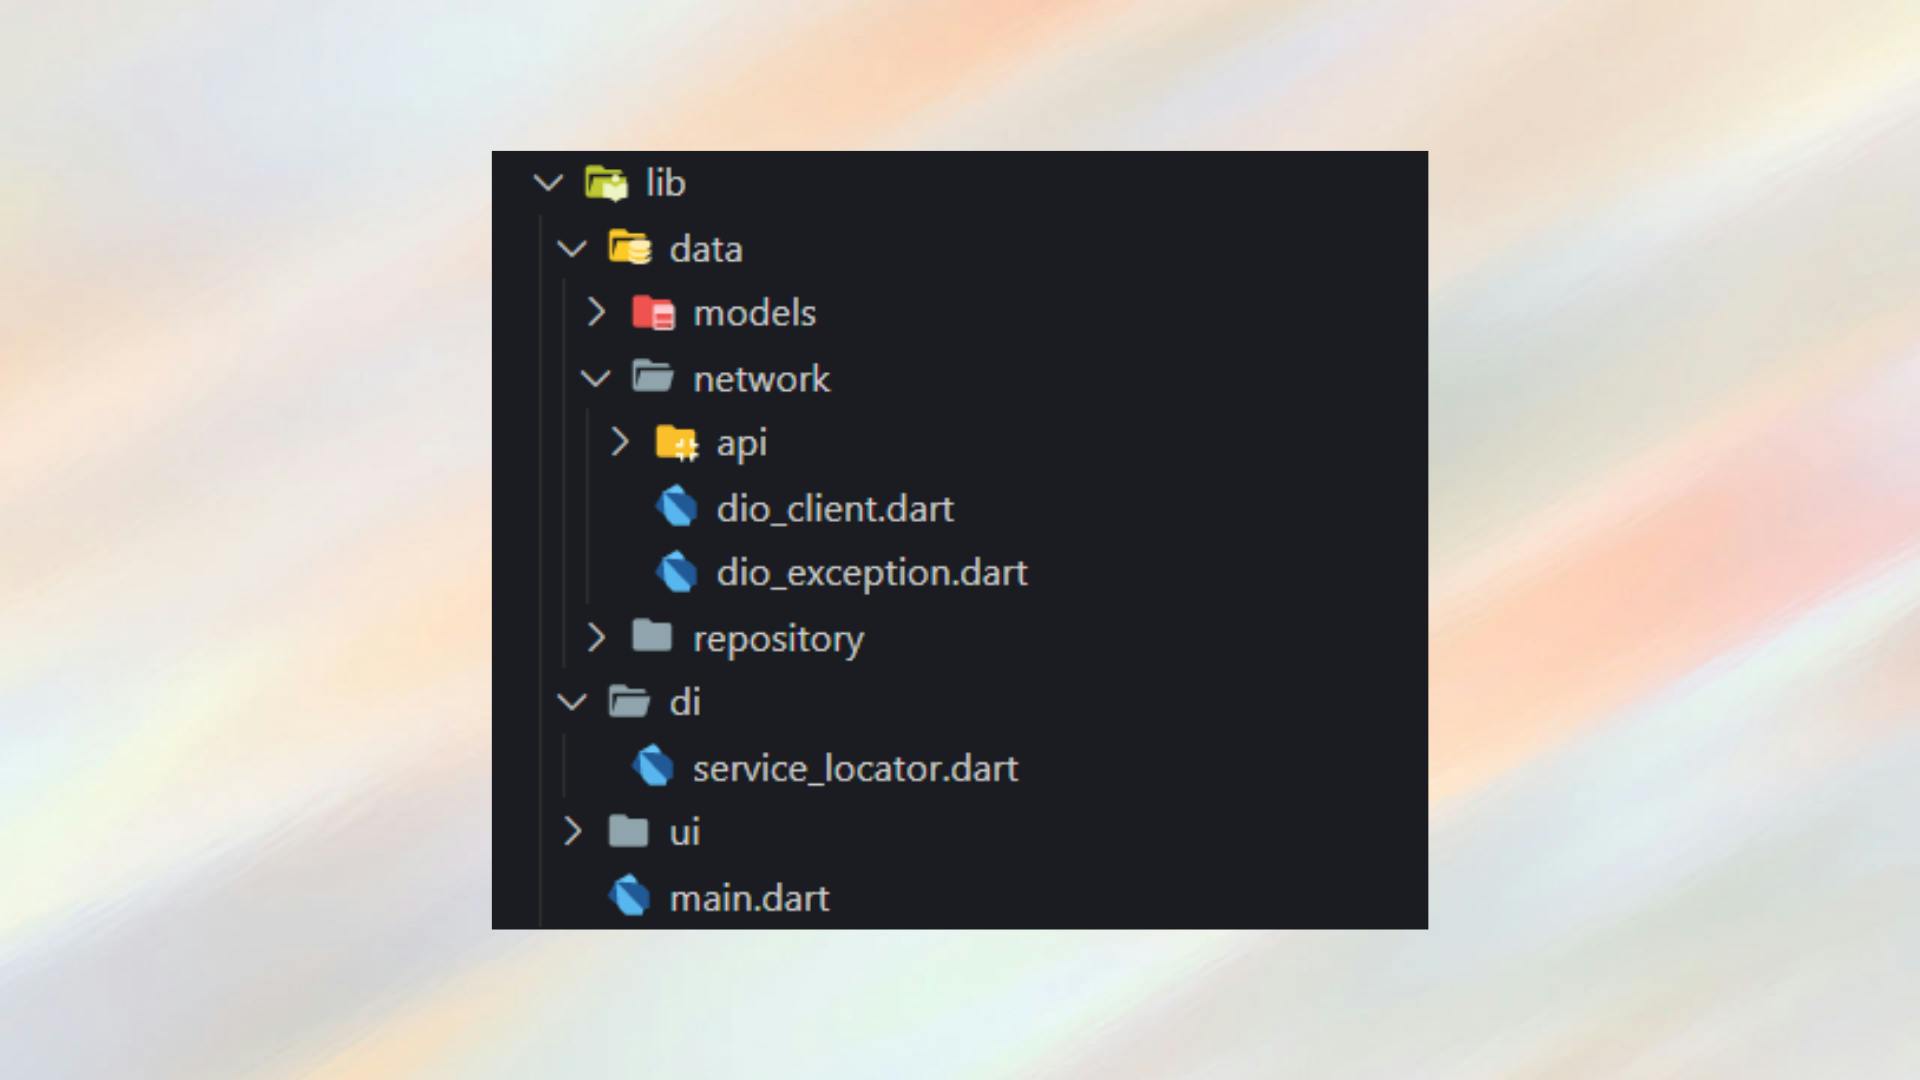
- As you can see there are 3 main folders:
- Data: Contains all the networking related stuff like Models, Apis, Repositories, etc
- DI : For dependency injection.
- UI : Contains screens, widgets.
ReqRes API
- We will be using REQ | RES API in our example. This API provides all sorts of methods that we wanted: GET, POST, PUT, DELETE.
- Visit reqres.in for more info.
DioClient
- To send a request to the server, we must first create a Client. A client may be thought of as a middleman who makes requests and then responds to us.
- Here we can set the Base Url, Connection Timeout, Receive Timeout, and other options. As a result, we won’t have to send all of these parameters in every request.
- Head over to
lib > data > networkand create a dio_client.dart file in it. -
Create a Dio instance and assign different parameters inside the constructor as below:
class DioClient { // dio instance final Dio _dio; DioClient(this._dio) { _dio ..options.baseUrl = Endpoints.baseUrl ..options.connectTimeout = Endpoints.connectionTimeout ..options.receiveTimeout = Endpoints.receiveTimeout ..options.responseType = ResponseType.json } } - As you can see we’ve assigned different properties as discussed above.
- Here you will be getting an error saying, Endpoints is not defined.
- To solve that, head over to
lib > data > network > api > constantand create a file named endpoints.dart - In this, we will define all the endpoints that we want to use in our application
Endpoints
class Endpoints {
  Endpoints._();

  // base url
  static const String baseUrl = "https://reqres.in/api";

  // receiveTimeout
  static const int receiveTimeout = 15000;

  // connectTimeout
  static const int connectionTimeout = 15000;

  static const String users = '/users';
}
Creating (GET, POST, PUT, DELETE) Methods
- Now that we’ve configured the Dio instance, it’s time to create HTTP methods.
- Let’s create a GET method first inside the same DioClient class
GET
// Get:-----------------------------------------------------------------------
  Future<Response> get(
    String url, {
    Map<String, dynamic>? queryParameters,
    Options? options,
    CancelToken? cancelToken,
    ProgressCallback? onReceiveProgress,
  }) async {
    try {
      final Response response = await _dio.get(
        url,
        queryParameters: queryParameters,
        options: options,
        cancelToken: cancelToken,
        onReceiveProgress: onReceiveProgress,
      );
      return response;
    } catch (e) {
      rethrow;
    }
  }
- URL:
- There is only one required parameter in Get method, URL. Whenever we want to make a GET request we need to pass that path from which we want a response back.
- Query Parameter:
- You can also define different query parameters if that is the case in your project. For example in some cases, the path could be:
https://abcapi.com/user?name=xyz. Herenameis the query parameter and you can pass this parameter in queryParameter in Map format: { 'name' : 'xyz' }
- You can also define different query parameters if that is the case in your project. For example in some cases, the path could be:
- Options:
- The Options describe the HTTP request information and configuration. We can pass basic configurations like Headers, Method Type, Content-Type, Response Type, etc.
- Cancel Token:
- You can cancel a request by using a cancel token. One token can be shared with different requests. when a token’s [cancel] method is invoked, all requests with this token will be canceled.
- onReceiveProgress
- This is a callback which is used to listen the progress for sending/receiving data. It has two parameters.
- count: Indicates the length of the bytes that have been sent/received.
- total: Indicates the length of the response/body.
- You don’t need to use these types of callback if you are doing a simple task. I’m just mentioning, so that you should know that it exists.
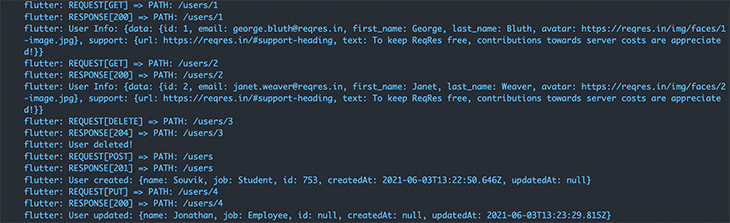
- Anyway, so these are the parameters that we are using in order to make a get request.
-
We are also catching the error on SocketException, FormatException. We are going to handle different errors further in this article.
-
Now let’s define the remaining 3 methods:
POST
- While making GET requests we don’t pass any data usually. But when making the request like POST, PUT, DELETE we need to pass the body/data.
- In our example, we will send a username and job type when we will make a post request.
- The parameters will remain same for all these 3 methods (POST, PUT, DELETE ) only the type of method will change (i.e _dio.post(), _dio.put(), _dio.delete().
- Consider the below 3 methods for POST, PUT and DELETE
// Post:----------------------------------------------------------------------
Future<Response> post(
  String url, {
  data,
  Map<String, dynamic>? queryParameters,
  Options? options,
  CancelToken? cancelToken,
  ProgressCallback? onSendProgress,
  ProgressCallback? onReceiveProgress,
}) async {
  try {
    final Response response = await _dio.post(
      url,
      data: data,
      queryParameters: queryParameters,
      options: options,
      cancelToken: cancelToken,
      onSendProgress: onSendProgress,
      onReceiveProgress: onReceiveProgress,
    );
    return response;
  } catch (e) {
    rethrow;
  }
}
PUT (UPDATE)
// Put:-----------------------------------------------------------------------
  Future<Response> put(
    String url, {
    data,
    Map<String, dynamic>? queryParameters,
    Options? options,
    CancelToken? cancelToken,
    ProgressCallback? onSendProgress,
    ProgressCallback? onReceiveProgress,
  }) async {
    try {
      final Response response = await _dio.put(
        url,
        data: data,
        queryParameters: queryParameters,
        options: options,
        cancelToken: cancelToken,
        onSendProgress: onSendProgress,
        onReceiveProgress: onReceiveProgress,
      );
      return response;
    } catch (e) {
      rethrow;
    }
  }
DELETE
// Delete:--------------------------------------------------------------------
  Future<dynamic> delete(
    String url, {
    data,
    Map<String, dynamic>? queryParameters,
    Options? options,
    CancelToken? cancelToken,
    ProgressCallback? onSendProgress,
    ProgressCallback? onReceiveProgress,
  }) async {
    try {
      final Response response = await _dio.delete(
        url,
        data: data,
        queryParameters: queryParameters,
        options: options,
        cancelToken: cancelToken,
      );
      return response.data;
    } catch (e) {
      rethrow;
    }
  }
Model Creation
- We need to develop a model for the data we’re obtaining from the server in order to parse it in a Dart-readable format.
- In our case, we’ll make two models. One is for the list of Users, and the other is for the new user we’ll create as part of the POST method example.
UserModel
class UserModel {
  int? id;
  String? email;
  String? firstName;
  String? lastName;
  String? avatar;

  UserModel({this.id, this.email, this.firstName, this.lastName, this.avatar});

  UserModel.fromJson(Map<String, dynamic> json) {
    id = json['id'];
    email = json['email'];
    firstName = json['first_name'];
    lastName = json['last_name'];
    avatar = json['avatar'];
  }

  Map<String, dynamic> toJson() {
    final Map<String, dynamic> data = <String, dynamic>{};
    data['id'] = id;
    data['email'] = email;
    data['first_name'] = firstName;
    data['last_name'] = lastName;
    data['avatar'] = avatar;
    return data;
  }
}
NewUser
class NewUser {
  String? name;
  String? job;
  String? id;
  String? createdAt;
  String? updatedAt;

  NewUser({this.name, this.job, this.id, this.createdAt, this.updatedAt});

  NewUser.fromJson(Map<String, dynamic> json) {
    name = json['name'];
    job = json['job'];
    id = json['id'];
    createdAt = json['createdAt'];
    updatedAt = json['updatedAt'];
  }

  Map<String, dynamic> toJson() {
    final Map<String, dynamic> data = <String, dynamic>{};
    data['name'] = name;
    data['job'] = job;
    data['id'] = id;
    data['createdAt'] = createdAt;
    data['updatedAt'] = updatedAt;
    return data;
  }
}
- I’ve used Dart Model Generator for creating the above models.
API Request Class
- Now that we are all set to make an API request. Let’s head over to
lib > data > network > apiand create a user folder and inside it create auser_api.dartfile. - In this, We are going to define different API request methods which will directly call the client’s method and will return the RAW data. Notice I said the methods defined in this class will return the RAW data, not the model that we created earlier.
-
Consider the below code:
class UserApi { final DioClient dioClient; UserApi({required this.dioClient}); Future<Response> addUserApi(String name, String job) async { try { final Response response = await dioClient.post( Endpoints.users, data: { 'name': name, 'job': job, }, ); return response; } catch (e) { rethrow; } } Future<Response> getUsersApi() async { try { final Response response = await dioClient.get(Endpoints.users); return response; } catch (e) { rethrow; } } Future<Response> updateUserApi(int id, String name, String job) async { try { final Response response = await dioClient.put( Endpoints.users + '/$id', data: { 'name': name, 'job': job, }, ); return response; } catch (e) { rethrow; } } Future<void> deleteUserApi(int id) async { try { await dioClient.delete(Endpoints.users + '/$id'); } catch (e) { rethrow; } } } - As you can see, the code is pretty straightforward. We are simply calling different methods of the DioClient by passing the required path/endpoint.
- As we have already defined the base URL in the DioClient, we only need to pass the rest of the Endpoint and not the full URL.
- For the POST method the required data is passed in Map format.
- For the PUT method we need an Id, which is used to update only the user that contains that Id.
- For DELETE we only need the Id of the user that we want to delete.
Repository
- Remember I said, the UserApi class only returns the RAW data. Yes, that RAW data is converted to the UserModel/NewUser model inside the repository class.
- The reason for separating this logic is for better code readability and testing purpose.
- Another major reason for separation is in this class you can manipulate the data that you are passing to the server and also, you can manipulate the data the server is giving to you. You can perform validations, handle errors, etc in this class.
- Consider the below code:
class UserRepository {
  final UserApi userApi;

  UserRepository(this.userApi);

  Future<List<UserModel>> getUsersRequested() async {
    try {
      final response = await userApi.getUsersApi();
      final users = (response.data['data'] as List)
          .map((e) => UserModel.fromJson(e))
          .toList();
      return users;
    } on DioError catch (e) {
      final errorMessage = DioExceptions.fromDioError(e).toString();
      throw errorMessage;
    }
  }

  Future<NewUser> addNewUserRequested(String name, String job) async {
    try {
      final response = await userApi.addUserApi(name, job);
      return NewUser.fromJson(response.data);
    } on DioError catch (e) {
      final errorMessage = DioExceptions.fromDioError(e).toString();
      throw errorMessage;
    }
  }

  Future<NewUser> updateUserRequested(int id, String name, String job) async {
    try {
      final response = await userApi.updateUserApi(id, name, job);
      return NewUser.fromJson(response.data);
    } on DioError catch (e) {
      final errorMessage = DioExceptions.fromDioError(e).toString();
      throw errorMessage;
    }
  }

  Future<void> deleteNewUserRequested(int id) async {
    try {
      await userApi.deleteUserApi(id);
    } on DioError catch (e) {
      final errorMessage = DioExceptions.fromDioError(e).toString();
      throw errorMessage;
    }
  }
}
Error Handling
- If you see the above repository class I’ve used DioException class for catching the DioError. What is it?
- Basically, I’ve created a separate class that returns the human-understandable error message. It could be the connection timeout message, cancel request error, or the error that has been sent by the server too.
- This class is very handy when you are handling errors.
- Head over to
lib > data > networkand create dio_exception.dart class. -
Paste the below code inside this class
class DioExceptions implements Exception { late String message; DioExceptions.fromDioError(DioError dioError) { switch (dioError.type) { case DioErrorType.cancel: message = "Request to API server was cancelled"; break; case DioErrorType.connectTimeout: message = "Connection timeout with API server"; break; case DioErrorType.receiveTimeout: message = "Receive timeout in connection with API server"; break; case DioErrorType.response: message = _handleError( dioError.response?.statusCode, dioError.response?.data, ); break; case DioErrorType.sendTimeout: message = "Send timeout in connection with API server"; break; case DioErrorType.other: if (dioError.message.contains("SocketException")) { message = 'No Internet'; break; } message = "Unexpected error occurred"; break; default: message = "Something went wrong"; break; } } String _handleError(int? statusCode, dynamic error) { switch (statusCode) { case 400: return 'Bad request'; case 401: return 'Unauthorized'; case 403: return 'Forbidden'; case 404: return error['message']; case 500: return 'Internal server error'; case 502: return 'Bad gateway'; default: return 'Oops something went wrong'; } } @override String toString() => message; } - Now you just need to pass DioError inside the fromDioError method and it will return a relavent message
final errorMessage = DioExceptions.fromDioError(e).toString();
Injecting Dependency
- In order to inject the singleton classes we are using the GetIt package.
- For more info on Dependency Injection visit the following article.
- Paste the below code inside
lib > di > service_locator.dartfile
final getIt = GetIt.instance;

Future<void> setup() async {
  getIt.registerSingleton(Dio());
  getIt.registerSingleton(DioClient(getIt<Dio>()));
  getIt.registerSingleton(UserApi(dioClient: getIt<DioClient>()));
  getIt.registerSingleton(UserRepository(getIt.get<UserApi>()));
}
Building UI

- As you can see, the HomePage contains list of users. We will use FutureBuilder in order to display users, When the server successfully returns a data otherwise we will show an error.
-
Create a home_page.dart file inside
lib > ui > homeand paste the below code.class HomePage extends StatelessWidget { HomePage({Key? key}) : super(key: key); final homeController = getIt<HomeController>(); @override Widget build(BuildContext context) { return Scaffold( appBar: const BaseAppBar(), floatingActionButton: AddUserBtn(), body: FutureBuilder<List<UserModel>>( future: homeController.getUsers(), builder: (context, snapshot) { if (snapshot.connectionState == ConnectionState.waiting) { return const Center(child: CircularProgressIndicator()); } else if (snapshot.hasError) { final error = snapshot.error; return Center( child: Text( "Error: " + error.toString(), ), ); } else if (snapshot.hasData) { if (snapshot.data!.isEmpty) { return const Center( child: Text('No data'), ); } return ListView.builder( itemCount: snapshot.data?.length, itemBuilder: (context, index) { final user = snapshot.data![index]; return ListTile( leading: user.avatar != null ? ClipRRect( borderRadius: BorderRadius.circular(50), child: Image.network( user.avatar!, width: 50, height: 50, ), ) : null, title: Text(user.email ?? ''), subtitle: Text(user.firstName ?? ''), ); }, ); } return Container(); }, ), ); } } - As you can see we’ve created a controller for the home page. We will request data from the UI by triggering methods defined in the controller. And then controller will take rest of the responsibilities.
- Create a
controller.dartfile inside the same directory and paste the below code.
class HomeController {
  // --------------- Repository -------------
  final userRepository = getIt.get<UserRepository>();

  // -------------- Textfield Controller ---------------
  final nameController = TextEditingController();
  final jobController = TextEditingController();

  // -------------- Local Variables ---------------
  final List<NewUser> newUsers = [];

  // -------------- Methods ---------------

  Future<List<UserModel>> getUsers() async {
    final users = await userRepository.getUsersRequested();
    return users;
  }

  Future<NewUser> addNewUser() async {
    final newlyAddedUser = await userRepository.addNewUserRequested(
      nameController.text,
      jobController.text,
    );
    newUsers.add(newlyAddedUser);
    return newlyAddedUser;
  }

  Future<NewUser> updateUser(int id, String name, String job) async {
    final updatedUser = await userRepository.updateUserRequested(
      id,
      name,
      job,
    );
    newUsers[id] = updatedUser;
    return updatedUser;
  }

  Future<void> deleteNewUser(int id) async {
    await userRepository.deleteNewUserRequested(id);
    newUsers.removeAt(id);
  }
}
- The reason for creating the controller is to separate the business logic from the UI.
- You can define your input controllers, repositories, validations, etc.
Application Flow
- When you first launch the app, the FutureBuilder calls the controller’s ‘getUser()’ function and attempts to retrieve the data. We display the data inside the ListTile after it has been successfully fetched.
- If an error occurs, the error will be shown by the FutureBuilder. We also show the progress indicator while the data is being fetched.
- If you wish to add a new user, simply click the FloatingAction button, which will open a bottom sheet where you can enter the new user’s name and job description. After clicking the Add button, you’ll be sent to the New Users page, which lists all of the newly added users.
- To update the details of a newly added user, simply click on any of the user ListTiles, and a bottom sheet will appear, from which you can alter the person’s name and job.
You may remove a user from the newly added users list by holding down the ListTile.
Final Output

Final Repo
Wrapping Up
- I hope you enjoyed and learned something from this article. If you have any feedback/queries, leave them in the comments.
- Thank you for spending time reading this article. See you in the next article. Until then…

Did you find this article valuable?
Support Dhruv Nakum by becoming a sponsor. Any amount is appreciated!
You can manage timeout exception using DioClient:
There are two way, declaring customized Option then assign to the Dio or directly assign below option to it, but I prefer to separate these type of Option for oriented need.
You can set a condition to get all problems except 400 (success) response, but you have to aware of Connection Timeout, so here a integrated in Dio way:
class YourRepositary {
  Dio dioClient;

  YourRepositary() {
    if (dioClient == null) {
      BaseOptions options = new BaseOptions(
          baseUrl: "YOUR_APIs_BASE_URL",
          receiveDataWhenStatusError: true,
          connectTimeout: 30000, // 30 seconds
          receiveTimeout: 30000 // 30 seconds
          );

      dioClient = new Dio(options);
    }
  }

  Future<ProductResponseModel> getProduct(var productRequestInputDto) async {
    try {
      Response response = await dio.post("/api/getProduct", data: productRequestInputDto);
      final ProductResponseModel _productModel = ProductResponseModel.fromJson(response.data);
      return _productModel ;
    } on DioError  catch (ex) {
      if(ex.type == DioErrorType.CONNECT_TIMEOUT){
        throw Exception("Connection Timeout Exception");
      }
      throw Exception(ex.message);
    }
  }

}
At the end, below example demonstrate how you handle Timeout exception or even handled by your backend 500 error in API call:
void getProduct(){
 ProductRequestInputDto productRequest = new ProductRequestInputDto(productId: "666");

        var requestBody = jsonEncode(loginRequest);
        debugPrint("Request Data : $requestBody");

        _apiRepositary.getProduct(requestBody).then((response){
          debugPrint("Login Success $response");
          //manage your response here
         },
          onError: (exception){
              //Handle exception message
            if(exception.message != null ){
              debugPrint(exception.message); // Here you get : "Connection  Timeout Exception" or even handled 500 errors on your backend.
            }
          },
        );
}
To conclusion, it’s all about receiveDataWhenStatusError: true, in the option of Dio.
App HTTP Client
App HTTP Client is a wrapper around the HTTP library Dio to make network requests and error handling simpler, more predictable, and less verbose.
Tutorial
Note: This tutorial is the first of a multipart series where we craft an auth-enabled app that provides both anonymous and authenticated user flows while storing data in the cloud. The author makes her best attempt to provide insight into best practices whenever and wherever possible.
Ever wondered how to build a simple HTTP client for your Flutter application? In this tutorial, we’ll create a wrapper around the multi-platform http library Dio, which supports interceptors, global configuration, form data, request cancellation, file downloading, and timeouts—just about everything you’ll ever need.
Why?
Why create an http client wrapper? The answer is essentially «to make error handling easy and predictable.» A typical state-driven application benefits from a clearly defined, finite set of errors.
As part of this app development series, we will leverage this client in a later tutorial to build our application service layer, domain layer, and state management—all of which will benefit from the error resolution this wrapper will provide.
By carefully catching Dio errors and transforming them into simple errors that our application cares about, we can drastically simplify error handling in our application state—and, as you know, simple code is easier to test. Since we use Bloc for our state management, we will construct our wrapper in such a way that makes error handling inside our blocs painless.
Even if you’re taking a different approach, we hope you will find the organizational techniques presented here useful for your application, regardless of the http library and state management framework you are using.
Create a Dart Package
We plan on reusing this http client wrapper, so let’s make it a package. All we need to do is create a Dart package (not a Flutter one). We’ll call it app_http_client so we can use it in our apps, but you can call yours whatever you want. 
Creating a package with Dart is fairly straightforward (once you know the required command line flags):
dart create --template package-simple app_http_client
cd app_http_client
git init
# Open VS Code from the Terminal, if you've installed the VS Code Shell Extensions:
code .
To run tests with coverage, you will need to add the following to the .gitignore file:
# Code coverage
coverage/
test/.test_coverage.dart
Dependencies
Before we start coding, let’s setup our dependencies.
Production Dependencies
- Dio—Since we’re creating a wrapper for Dio, we’ll need to include it.
Development Dependencies
- test_coverage—Allows us to easily gather test coverage.
- Very Good Analysis—we’ll use these linter rules as a development dependency to keep our codebase clean and consistent looking.
- Mocktail—provides null-safe mocking capabilities, inspired by Mockito.
Let’s add the dependencies to the pubspec.yaml:
dependencies:
  dio: ^4.0.0

dev_dependencies:
  test: ^1.16.0
  test_coverage: ^0.5.0
  mocktail: ^0.1.4
  very_good_analysis: ^2.1.2
Make sure you’ve removed the pedantic development dependency from pubspec.yaml that Dart automatically adds when you create a new project.
Replace the contents of analysis_options with the following:
include: package:very_good_analysis/analysis_options.yaml
Finally, you may want to create a .vscode folder in the root of the project with a launch.json file so that you can run tests:
{
	"version": "0.2.0",
	"configurations": [
		{
			"name": "Run Tests",
			"type": "dart",
			"request": "launch",
			"program": "./test/"
		},
	]
}
Run the following and you’ve got yourself a new project:
flutter pub get
git add . # Add all files
git commit -m "Initial commit"
To run tests with test coverage, you can use the following:
dart run test_coverage && genhtml -o coverage coverage/lcov.info
open coverage/index.html
The Problem
Imagine you have a very simple service class which fetches data from your team’s backend servers, perhaps something like this:
import 'package:dio/dio.dart';

class UserService {
  UserService({required this.client});

  final Dio client;

  Future<Map<String, dynamic>?> createUser({
    required String email,
    required String password,
  }) async {
    final response = await client.post<Map<String, dynamic>>('/users', data: {
      'email': email,
      'password': password,
    });
    return response.data;
  }
}
While this code is simple and friendly looking, it is lacking a few critical details. Notably, there is no easy way to handle errors it throws. Catching errors inside each of the service’s methods would likely result in duplicate code, and catching the errors above the service would force the abstraction layers above the service layer to handle Dio-specific errors.
Currently, any errors thrown by the http library—in this case, Dio—will propagate upwards to the function where the UserService is being called. Such error propagation is often intended—but what if your server produces validation errors that you want to catch? Where do you intercept those?
To complicate matters further, how do you go distinguish between expected validation errors from your server which might contain certain failing http status codes on purpose, and other failing requests—such as network errors or other runtime errors—thrown by your http client library?
Because backend error responses are often consistent across multiple API routes, the practice of always handling errors on a case-by-case basis can result in redundant code that is painful to test.
What follows is what each service method might look like if we put a try/catch clause in it. For the sake of brevity, we’ve omitted any custom error handling that might be necessary and left a comment and a rethrow statement where you might otherwise find more error handling in a real application.
  Future<Map<String, dynamic>?> createUser({
    required String email,
    required String password,
  }) async {
    try {
    final response = await client.post<Map<String, dynamic>>('/users', data: {
      'email': email,
      'password': password,
    });
    return response.data;
    } catch (e) {
      // Check which type of error e is, unwrap error response data,
      // throw custom exceptions, etc
      rethrow;
    }
  }
Programmers often avoid this problem—like any other architecture problem—by introducing another abstraction layer. You may recognize this as the classic adapter or decorator pattern.
In this case, we avoid most redundant error handling clauses in a rather elementary way by simply creating a class that wraps the http library of choice.
While it is a bit tedious, it can make error handling code much simpler and more concise. Additionally, the developers creating services which use the wrapper to make network requests don’t need to remember the details of backend services which utilize common response schemas.
If we make it easy for the wrapper to handle errors with enough flexibility, we can drastically reduce the complexity of error handling for a given app. If needed, each service can utilize a different http client wrapper to provide custom error handling for groups of API requests which may have similar backend response schemas.
Hopefully, the code presented here will prevent you from having to suffer through much of the required monotony, as you may copy and paste to your liking freely under the MIT license.
Considering Errors
To catch an error, one must understand the kinds of errors which can be caught. Let’s pause for a moment and describe the errors a network application might be interested in.
At its core, our applications are interested in 3 basic kinds of errors:
- Network Errors
- Sometimes well-formed requests fail through no fault of their own, due to extraneous network conditions, dropped packets, poor signals, busy servers, etc.
- Response Errors
- The request was received by the server, but the server returned a bad response—presumably with an http status code indicative of the problem. Validation errors, redirects, poorly formed requests, requests without proper authorization, etc, can all be responsible for rejection from the server.
- As far as application state logic is concerned, these errors are most likely to have a practical use. Perhaps your backend form validation system relies on certain error schemas to be returned from your servers to describe invalid fields that were submitted.
- Other / Runtime Errors
- Other errors in the http library or service layer code can cause problems—tracking these is important for developers, but as far as users are concerned, these are largely equivalent to a network error if it doesn’t completely break the application.
We want errors generated by our http library to be transformed into one of these 3 types of errors. To facilitate this, we need to create 3 error classes.
For the sake of convenient error handling in our application, we consider a response error a subtype of a network error. Placing errors into the following class hierarchy should allow for greatly simplified state management:
   ┌──────────────────────────┐
   │  AppHttpClientException  │
   └──────────────────────────┘
                 ▲
                 │
   ┌──────────────────────────┐
   │   AppNetworkException    │
   └──────────────────────────┘
                 ▲
                 │
 ┌───────────────────────────────┐
 │  AppNetworkResponseException  │
 └───────────────────────────────┘
AppHttpClientException is the base class. For any error generated by our wrapper, the expression (error is AppHttpClientException) should always be true.
Let’s take a look at the implementation:
class AppHttpClientException<OriginalException extends Exception>
    implements Exception {
  AppHttpClientException({required this.exception});
  final OriginalException exception;
}
Pretty straightforward—we require the original exception in the constructor of AppHttpClientException so that developers are able to easily debug errors specific to the http library being used.
Additionally, developers writing app-specific subclasses of AppHttpClientException can pass other exceptions in which further represent the type of error, if needed.
We can describe the network exception just as simply:
enum AppNetworkExceptionReason {
  canceled,
  timedOut,
  responseError
}

class AppNetworkException<OriginalException extends Exception>
    extends AppHttpClientException<OriginalException> {
  /// Create a network exception.
  AppNetworkException({
    required this.reason,
    required OriginalException exception,
  }) : super(exception: exception);

  /// The reason the network exception ocurred.
  final AppNetworkExceptionReason reason;
}
Finally, we can create a class for network response errors:
class AppNetworkResponseException<OriginalException extends Exception, DataType>
    extends AppNetworkException<OriginalException> {
  AppNetworkResponseException({
    required OriginalException exception,
    this.statusCode,
    this.data,
  }) : super(
          reason: AppNetworkExceptionReason.responseError,
          exception: exception,
        );

  final DataType? data;
  final int? statusCode;
  bool get hasData => data != null;

  /// If the status code is null, returns false. Otherwise, allows the
  /// given closure [evaluator] to validate the given http integer status code.
  ///
  /// Usage:
  /// ```
  /// final isValid = responseException.validateStatusCode(
  ///   (statusCode) => statusCode >= 200 && statusCode < 300,
  /// );
  /// ```
  bool validateStatusCode(bool Function(int statusCode) evaluator) {
    final statusCode = this.statusCode;
    if (statusCode == null) return false;
    return evaluator(statusCode);
  }
}
Developers are encouraged to subclass AppNetworkResponseException for app-specific response errors. More on that later.
Now that our basic error hierarchy is in place, it’s time to create the http client wrapper class.
Creating the HTTP Client Wrapper
We want our wrapper to receive a pre-configured Dio instance so that the code instantiating the wrapper has full control over network requests. By injecting a Dio instance into our wrapper, it encourages developers to take advantage of everything Dio has to offer—like request interceptors.
Our wrapper should provide a method for each http request method like GET, POST, PUT, PATCH, etc. These methods should pass their parameters through to the Dio instance and perform relevant error handling by catching errors in a uniform way.
Note: Dio exposes a lot of methods, but we are only interested in wrapping the methods that use a String path as opposed to a Uri, which seems overly complex in this scenario.
Let’s make a class that meets our criteria:
/// A callback that returns a Dio response, presumably from a Dio method
/// it has called which performs an HTTP request, such as `dio.get()`,
/// `dio.post()`, etc.
typedef HttpLibraryMethod<T> = Future<Response<T>> Function();

/// Function which takes a Dio response object and optionally maps it to an
/// instance of [AppHttpClientException].
typedef ResponseExceptionMapper = AppNetworkResponseException? Function<T>(
  Response<T>,
  Exception,
);

class AppHttpClient {
  AppHttpClient({required Dio client, this.exceptionMapper}) : _client = client;

  final Dio _client;

  final ResponseExceptionMapper? exceptionMapper;

    /// HTTP GET request.
  Future<Response<T>> get<T>(
    String path, {
    Map<String, dynamic>? queryParameters,
    Options? options,
    CancelToken? cancelToken,
    ProgressCallback? onReceiveProgress,
  }) {
    return _mapException(
      () => _client.get(
        path,
        queryParameters: queryParameters,
        options: options,
        cancelToken: cancelToken,
        onReceiveProgress: onReceiveProgress,
      ),
    );
  }

  // ...
  //
  // see repository for full implementation
  //
  // ...

  Future<Response<T>> _mapException<T>(HttpLibraryMethod<T> method) async {
    try {
      return await method();
    } on DioError catch (exception) {
      switch (exception.type) {
        case DioErrorType.cancel:
          throw AppNetworkException(
            reason: AppNetworkExceptionReason.canceled,
            exception: exception,
          );
        case DioErrorType.connectTimeout:
        case DioErrorType.receiveTimeout:
        case DioErrorType.sendTimeout:
          throw AppNetworkException(
            reason: AppNetworkExceptionReason.timedOut,
            exception: exception,
          );
        case DioErrorType.response:
          // For DioErrorType.response, we are guaranteed to have a
          // response object present on the exception.
          final response = exception.response;
          if (response == null || response is! Response<T>) {
            // This should never happen, judging by the current source code
            // for Dio.
            throw AppNetworkResponseException(exception: exception);
          }
          throw exceptionMapper?.call(response, exception) ??
              AppNetworkResponseException(
                exception: exception,
                statusCode: response.statusCode,
                data: response.data,
              );
        case DioErrorType.other:
        default:
          throw AppHttpClientException(exception: exception);
      }
    } catch (e) {
      throw AppHttpClientException(
        exception: e is Exception ? e : Exception('Unknown exception ocurred'),
      );
    }
  }
}
The Error Handling Mechanism
The real meat-and-potatoes of our wrapper is hiding in the private method _mapException(). It takes one parameter named method which is a callback (that should call a Dio method).
The _mapException proceeds to return the awaited callback’s result via return await method();, catching any errors in the process. If no errors occur, it just returns whatever the callback returned (which in this case will be the response object returned by the Dio method that the callback called).
If an error occurs, things get much more interesting. The error handling that takes place inside the wrapper is dependent on your http library of choice. Since we’re using Dio, we know that Dio already wraps all of its errors into DioError objects.
Dio’s errors are perfectly decent, but we don’t want the error handling our app’s codebase to be directly tied to any particular http library. If you need to change the http library you’re using, it’s much easier to write another wrapper class which satisfies a similar interface than it is to hunt for http-library-specific error handling throughout the app’s code.
Note: There is one caveat—because our methods directly wrap Dio’s methods, the parameters have types which are only found inside the Dio library, such as Options, CancelToken, ProgressCallback, etc. Our app’s service code which calls our wrapper will still be tied to Dio when it passes in these objects, but changing such details strictly within the service layer should be fairly straightforward in the event of swapping over to another wrapper and http library.
We could have stopped and written a platform-agnostic http request interface library, but the payoff for doing so would be minimal compared to the enormous effort required. While it would spare you from having to touch any service code at all if you suddenly switched http libraries, swapping dependencies like that just doesn’t seem like a frequent enough occurrence to merit an entire library of carefully constructed interfaces. You’d also have to create and maintain the mappings from the platform-agnostic classes to the platform specific ones for every http library you intended to support…
The rest of _mapException proceeds to map each type of Dio error into one of the 3 types of errors we care about. Everything is fairly straightforward, with the exception of response errors.
Our wrapper would not be very useful if that was all it did. The main reason we created the wrapper is to allow the code using the wrapper to provide custom response error handling. The _mapException method uses some optional chaining and null coalescing operators to delegate any Dio response error containing a valid response object (with the expected response type) to an optional mapping function—if such a callback is provided in the wrapper’s constructor: ResponseExceptionMapper? exceptionMapper.
The exceptionMapper function receives two arguments: the first is the Dio response object of type Response<T> (where T is the type of data passed into the wrapper, usually Map<String, dynamic> for JSON) and the second is the original exception which was caught.
In case you weren’t sure, you can specify the type of the type of the data you expect Dio to return by passing in the expected type when you call our wrapper’s generic delegate methods:
// Perform a GET request with a JSON return type: Map<String, dynamic>
final response = appHttpClient.get<Map<String, dynamic>>('url');
The following are some of the response types Dio supports:
client.get<Map<String, dynamic>>() // JSON data
client.get<String>()               // Plain text data
client.get<ResponseBody>()         // Response stream
client.get<List<int>>()            // Raw binary data (as list of bytes)
You can implement the exceptionMapper function however you like. If you don’t know what to do with the Dio response, simply return null to let AppHttpClient wrap the response error using the default error handling logic. If your exceptionMapper function is able to recognize a certain kind of response, it is welcome to return an instance or subclass of AppNetworkResponseException which better represents the error.
In the next section, we will construct an example exceptionMapper which unwraps a certain kind of backend error it receives.
Handling the Errors
Imagine you’ve defined the following service which calls your internet-of-things-enabled teapot and tells it to brew coffee erroneously:
import 'package:dio/dio.dart';

class TeaService {
  TeaService({required this.client});

  final AppHttpClient client;

  Future<Map<String, dynamic>?> brewTea() async {
    final response = await client.post<Map<String, dynamic>>(
      '/tea',
      data: {
        'brew': 'coffee',
      },
    );
    return response.data;
  }
}
Because you’ve made the wrong request, the teapot should respond back with a 418 I’m a Teapot error. Perhaps it even replies with json data in its response body:
{
  "message": "I can't brew 'coffee'"
}
Let’s pretend, while we’re at it, that you want to catch these specific errors and wrap them in an error class, preserving the server’s error message so that you can show it to the user of your remote tea-brewing app.
This is all you have to do:
class TeapotResponseException extends AppNetworkResponseException {
  TeapotResponseException({
    required String message,
  }) : super(exception: Exception(message));
}

final client = AppHttpClient(
  client: Dio(),
  exceptionMapper: <T>(Response<T> response) {
    final data = response.data;
    if (data != null && data is Map<String, dynamic>) {
      // We only map responses containing data with a status code of 418:
      return TeapotResponseException(
        message: data['message'] ?? 'I'm a teapot',
      );
    }
    return null;
  },
);
Note: Because Dart generic types are reified, you can check the type of the response data inside the exceptionMapper function.
To use your service and consume teapot errors, this is all you need to do:
final teaService = TeaService(client: client);

try {
  await teaService.brewTea();
} on TeapotResponseException catch (teapot) {
  print(teapot.exception.toString());
} catch (e) {
  print('Some other error');
}
Note that you can access the error’s data since you created a custom TeapotResponseException class. On top of that, it integrates seamlessly with Dart’s try/catch clauses. The try/catch clauses Dart provides out of the box are incredibly useful for catching specific types of errors—exactly what our wrapper helps us with!
So that’s pretty much it—I like to think it’s worth the hassle of creating a custom http client wrapper. 
Testing
A wrapper whose sole job is to wrap errors would be completely useless if there were mistakes in its code which caused it to throw errors that didn’t get wrapped. Whew, that was a mouthful. We can prevent just such a catastrophe by keeping the wrapper code as simple as possible and testing all of its functionality.
To prevent such a catastrophe, I have tried to reduce the wrapper’s code as much as possible and have tested it to the best of my ability. Because of the code’s simplicity, you can check the tests here to ensure that you are satisfied with its functionality.
GitHub
https://github.com/definitelyokay/app_http_client