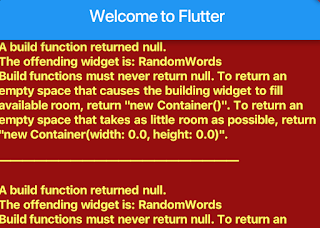
A widget that renders an exception’s message.
This widget is used when a build method fails, to help with determining
where the problem lies. Exceptions are also logged to the console, which you
can read using flutter logs. The console will also include additional
information such as the stack trace for the exception.
It is possible to override this widget.
This example shows how to override the standard error widget builder in release
mode, but use the standard one in debug mode.
The error occurs when you click the «Error Prone» button.
link
To create a local project with this code sample, run:
flutter create —sample=widgets.ErrorWidget.1 mysample
See also:
- FlutterError.onError, which can be set to a method that exits the
application if that is preferable to showing an error message. - flutter.dev/docs/testing/errors, more information about error
handling in Flutter.
- Inheritance
-
- Object
- DiagnosticableTree
- Widget
- RenderObjectWidget
- LeafRenderObjectWidget
- ErrorWidget
Constructors
- ErrorWidget(Object exception)
- Creates a widget that displays the given exception.
- ErrorWidget.withDetails({String message = », FlutterError? error})
- Creates a widget that displays the given error message.
Properties
-
hashCode
→ int -
The hash code for this object.
read-onlyinherited
-
key
→ Key? -
Controls how one widget replaces another widget in the tree.
finalinherited
-
message
→ String -
The message to display.
final
-
runtimeType
→ Type -
A representation of the runtime type of the object.
read-onlyinherited
Methods
-
createElement()
→ LeafRenderObjectElement
-
RenderObjectWidgets always inflate to a RenderObjectElement subclass.
inherited
-
createRenderObject(BuildContext context)
→ RenderBox
-
Creates an instance of the RenderObject class that this
RenderObjectWidget represents, using the configuration described by this
RenderObjectWidget.override
-
debugDescribeChildren()
→ List<DiagnosticsNode>
-
Returns a list of
DiagnosticsNodeobjects describing this node’s
children.inherited
-
debugFillProperties(DiagnosticPropertiesBuilder properties)
→ void
-
Add additional properties associated with the node.
override
-
didUnmountRenderObject(covariant RenderObject renderObject)
→ void
-
A render object previously associated with this widget has been removed
from the tree. The given RenderObject will be of the same type as
returned by this object’s createRenderObject.inherited
-
noSuchMethod(Invocation invocation)
→ dynamic
-
Invoked when a non-existent method or property is accessed.
inherited
-
toDiagnosticsNode({String? name, DiagnosticsTreeStyle? style})
→ DiagnosticsNode
-
Returns a debug representation of the object that is used by debugging
tools and by DiagnosticsNode.toStringDeep.inherited
-
toString({DiagnosticLevel minLevel = DiagnosticLevel.info})
→ String
-
A string representation of this object.
inherited
-
toStringDeep({String prefixLineOne = », String? prefixOtherLines, DiagnosticLevel minLevel = DiagnosticLevel.debug})
→ String
-
Returns a string representation of this node and its descendants.
inherited
-
toStringShallow({String joiner = ‘, ‘, DiagnosticLevel minLevel = DiagnosticLevel.debug})
→ String
-
Returns a one-line detailed description of the object.
inherited
-
toStringShort()
→ String
-
A short, textual description of this widget.
inherited
-
updateRenderObject(BuildContext context, covariant RenderObject renderObject)
→ void
-
Copies the configuration described by this RenderObjectWidget to the
given RenderObject, which will be of the same type as returned by this
object’s createRenderObject.inherited
Operators
-
operator ==(Object other)
→ bool
-
The equality operator.
inherited
Static Properties
-
builder
↔ ErrorWidgetBuilder -
The configurable factory for ErrorWidget.
read / write

Hi Guys, Welcome to Proto Coders Point. In this Article will learn errors handling in flutter.
What is your code throws an error, suppose say initState method throws an error, this will simply return a red color screen with the error message printed in it, and no developer likes to see read color error screen in flutter development.
So here, In this flutter article, I have a solution for you, so that you learn how to handle errors in flutter by showing error with beautiful custom build design for error screen, so that we get rid of the red exception error page in flutter.
A ErrorWidget is an widget that is build specially for error handling, so this widget will render a separate custom build exception message screen when error occurs.
Flutter ErrorWidget is used when our app fails to build methods. and we can show error with custom UI, it will also help determine where the problem lies exactly.
How to show user friendly error page in flutter
It’s possible to show a custom UI error handling page by making use if ErrorWidget.builder (code example is below). Instead of Red error exception.
If your flutter app is published & is been used by lot’s of user, then at some point of time if error occurs then user might see red exception which is not good as user-experience & might leave a negative feedback about our app.
So it better to implement an custom global error handling in flutter by which we can show a user-freindly error page rather then red color error page with message.
How to use Flutter Error Widget
In void main(), before runApp(), add ErrorWidget.builder as shown below(UI Design in MaterialApp, customize as per your for error UI design).
void main() {
  // Set the ErrorWidget's builder before the app is started.
  ErrorWidget.builder = (FlutterErrorDetails details) {
    return MaterialApp(
       ....
    );
  };
  // Start the app.
  runApp(const MyApp());
}
Now, throws error, from where you think error might occur. Just for an example I am throwing error from initState() method as below:
@override
  void initState() {
    // TODO: implement initState
    super.initState();
    throw("Error thrown from initState(), This is Dummy Error Example");
}
How to use ErrorWidget Builder in Flutter
Here is a example, The error is throws then user clicks on “don’t click me” button.
Complete Code with custom UI design for Error Widget for Error handling in flutter below. main.dart
import 'package:flutter/material.dart';

void main() {
  // Set the ErrorWidget's builder before the app is started.
  ErrorWidget.builder = (FlutterErrorDetails details) {
    // In release builds, show a yellow-on-blue message instead:
    return MaterialApp(
      home: Scaffold(
        body: Center(
          child: Container(
          alignment: Alignment.center,
          width: 250,
          height: 200,
          decoration: BoxDecoration(
              borderRadius: BorderRadius.circular(10),
              color: Colors.amber[300],
              boxShadow: [
                BoxShadow(color: Colors.green, spreadRadius: 3),
              ],
            ),
          child: Text(
            ' Error!n ${details.exception}',
            style: const TextStyle(color: Colors.red,fontSize: 20),
            textAlign: TextAlign.center,

            textDirection: TextDirection.ltr,
          ),
      ),
        ),),
    );
  };

  // Start the app.
  runApp(const MyApp());
}

class MyApp extends StatefulWidget {
  const MyApp({Key? key}) : super(key: key);

  static const String _title = 'ErrorWidget Sample';

  @override
  State<MyApp> createState() => _MyAppState();
}

class _MyAppState extends State<MyApp> {
  bool throwError = false;

  @override
  Widget build(BuildContext context) {
    if (throwError) {
      // Since the error widget is only used during a build, in this contrived example,
      // we purposely throw an exception in a build function.
      return Builder(
        builder: (BuildContext context) {
          throw Exception('oh no, You clicked on Button..! | Error Caught');
        },
      );
    } else {
      return MaterialApp(
        title: MyApp._title,
        home: Scaffold(
          appBar: AppBar(title: const Text(MyApp._title)),
          body: Center(
            child: TextButton(
                onPressed: () {
                  setState(() {
                    //by setting throwError to true, above if condition will execute.
                    throwError = true;
                  });
                },
                child: const Text('Do Not Click me')),
          ),
        ),
      );
    }
  }
}
Result of ErrorWidget for Error handling in flutter
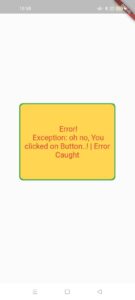
In Flutter, the ErrorWidget widget is used to render an error message when a build method falls. You can easily implement an ErrorWidget by adding ErrorWidget.builder to the main() function like this:
void main() {
  ErrorWidget.builder = (FlutterErrorDetails details) {
    return <your widget>;
  };

  return runApp(MyApp());
}
For more clarity, please see the example below.
Example
In this example, we’ll create a dummy error by doing this:
@override
void initState() {
    super.initState();
    throw ("Hi there. I am an error");
}
Screenshots
Without WidgetError, you’ll see a red screen with yellow text when the error occurs. By using WidgetError, you can display anything you want when your Flutter app runs into a problem:


The console will display additional information about the error as default.
The complete code:
// main.dart
import 'package:flutter/material.dart';

void main() {
  ErrorWidget.builder = (FlutterErrorDetails details) {
    return Material(
      child: Container(
        color: Colors.purple,
        alignment: Alignment.center,
        child: const Text(
          'Something went wrong!',
          style: TextStyle(fontSize: 20, color: Colors.white),
        ),
      ),
    );
  };

  return runApp(const MyApp());
}

class MyApp extends StatelessWidget {
  const MyApp({Key? key}) : super(key: key);

  @override
  Widget build(BuildContext context) {
    return const MaterialApp(
      // Remove the debug banner
      debugShowCheckedModeBanner: false,
      title: 'Kindacode.com',
      home: HomePage(),
    );
  }
}

class HomePage extends StatefulWidget {
  const HomePage({Key? key}) : super(key: key);

  @override
  State<HomePage> createState() => _HomePageState();
}

class _HomePageState extends State<HomePage> {
  @override
  void initState() {
    super.initState();
    // throw a custom error
    throw ("Hi there. I am an error");
  }

  @override
  Widget build(BuildContext context) {
    return Scaffold(
        appBar: AppBar(
          title: const Text('Kindacode.com'),
        ),
        body: const Center());
  }
}
References
- ErrorWidget class (flutter.dev)
- Error Handling: Human Interface (developer.apple.com)
- Error message (wikipedia.org)
Afterword
We’ve created a small app that demonstrates an elegant way to handle errors in Flutter. At this point, you should have a better understanding of the ErrorWidget. If you’d like to explore more new and interesting stuff about Flutter and Dart, take a look at the following articles:
- How to make an image carousel in Flutter
- How to implement Star Rating in Flutter
- Flutter & SQLite: CRUD Example
- Flutter and Firestore Database: CRUD example
- Flutter: CupertinoPicker Example
You can also check out our Flutter category page or Dart category page for the latest tutorials and examples.
You can try something like this but please the next time explicate your questions (adding some code) cause people can’t stay here to understand what you want… if you want help you need to be clear:
Main
import 'package:flutter/material.dart';

void main() => runApp(MyApp());

class MyApp extends StatelessWidget {
  // This widget is the root of your application.
  @override
  Widget build(BuildContext context) {
    return MaterialApp(
      title: 'Flutter Demo',
      theme: ThemeData(
        primarySwatch: Colors.blue,
      ),
      home: MyHomePage(title: 'Flutter Demo Home Page'),
    );
  }
}
HomePage
class MyHomePage extends StatefulWidget {
  MyHomePage({Key key, this.title}) : super(key: key);

  final String title;

  @override
  _MyHomePageState createState() => _MyHomePageState();
}

class _MyHomePageState extends State<MyHomePage> {
  ErrorIcon errorIcon = new ErrorIcon(false);

  @override
  Widget build(BuildContext context) {
    debugPrint("Rebuilding main widget");

    return Scaffold(
      appBar: AppBar(
        title: Text(widget.title),
      ),
      body: Center(
        child: Padding(
          //Add padding around textfield
          padding: EdgeInsets.symmetric(horizontal: 25.0),
          child: TextField(
            onChanged: (text) {
              // DEFINE YOUR RULES HERE
              if (text.contains("1")) {
                setState(() {
                  errorIcon = new ErrorIcon(true);
                });
              } else {
                setState(() {
                  errorIcon = new ErrorIcon(false);
                });
              }
            },
            decoration: InputDecoration(
              hintText: "Enter Username",
              icon: errorIcon,
            ),
          ),
        ),
      ),
    );
  }
}
The error widget for the error icon
class ErrorIcon extends StatefulWidget {
  bool _isError = false;

  ErrorIcon(this._isError);

  bool get isError => _isError;

  @override
  _ErrorIconState createState() => _ErrorIconState();
}

class _ErrorIconState extends State<ErrorIcon> {
  @override
  Widget build(BuildContext context) {
    Widget out;

    debugPrint("Rebuilding ErrorWidget");
    widget.isError
        ? out = new Icon(
            Icons.error,
            color: Color(Colors.red.value),
          )
        : out = new Icon(null);

    return out;
  }
}
Please note that this code can be improved so i let you play with it 
EDIT
Cleaner code, i’m having fun with this so just a little bit of refactor:
class MyHomePage extends StatefulWidget {
  MyHomePage({Key key, this.title}) : super(key: key);

  final String title;

  @override
  _MyHomePageState createState() => _MyHomePageState();
}

class _MyHomePageState extends State<MyHomePage> {
  ErrorIcon _errorWidget = new ErrorIcon(false);

  set errorWidget(ErrorIcon value) {
    setState(() {
      _errorWidget = value;
    });
  }

  @override
  Widget build(BuildContext context) {
    debugPrint("Rebuilding main widget");

    return Scaffold(
      appBar: AppBar(
        title: Text(widget.title),
      ),
      body: Center(
        child: Padding(
          //Add padding around textfield
          padding: EdgeInsets.symmetric(horizontal: 25.0),
          child: TextField(
            onChanged: (text) {
              // DEFINE YOUR RULES HERE
              text.contains("1")
                  ? errorWidget = new ErrorIcon(true)
                  : errorWidget = new ErrorIcon(false);
            },
            decoration: InputDecoration(
              hintText: "Enter Username",
              icon: _errorWidget,
            ),
          ),
        ),
      ),
    );
  }
}

class ErrorIcon extends StatelessWidget {
  bool _isError;

  ErrorIcon(this._isError);

  bool get isError => _isError;

  @override
  Widget build(BuildContext context) {
    Widget out;

    debugPrint("Rebuilding ErrorWidget");
    isError
        ? out = new Icon(
            Icons.error,
            color: Color(Colors.red.value),
          )
        : out = new Icon(null);

    return out;
  }
}
Error handling is a complex process. It’s very boring and takes a lot of time. One of the problems is showing errors to the user in the Flutter application. Today we will talk about this.
All projects use different ways to showing exceptions and errors information to user.
Sometimes applications show common snackbars

Sometimes it realized with modal dialogs
Sometimes it make with banner screens
But I thinks that’s not a problem.
We are all cool developers and know how to make any things in UI of our applications.
The problem starts at the moment when we need to understand which messages and where we want to show. And the most important problem is how to process them in a simple way for all services and repositories of the application
Just for this, you can use the talker library.
How to configure it for the application I showed in this article
But today we will talk about something else.
We need a simple way to set up the error messages showing once and not copy this code in the application all the time.
😎 Let’s do this…
1) Add talker_flutter dependency in pubspec.yaml
talker_flutter: ^1.4.0
Enter fullscreen mode
Exit fullscreen mode
2) Init talker for your application
void main() {
  final talker = Talker(
    loggerSettings: TalkerLoggerSettings(
      enableColors: !Platform.isIOS,
    ),
  );
  runZonedGuarded(
    () => runApp(
      CustomErrorMessagesExample(talker: talker),
    ),
    (Object error, StackTrace stack) {
      talker.handle(error, stack, 'Uncaught app exception');
    },
  );
}
Enter fullscreen mode
Exit fullscreen mode
3) You need to implement wrapper at initial route of your application or at screen which where you want to show error messages.
@override
  Widget build(BuildContext context) {
    return Scaffold(
      body: TalkerWrapper(
        talker: talker,
        options: const TalkerWrapperOptions(
          enableErrorAlerts: true,
        ),
        child: const Center(child: Text('Your screen')),
      ),
    );
  }
Enter fullscreen mode
Exit fullscreen mode
You can see the full example in the project repository.
And you can check talker_shop_app_example application example with BLoC as state management and tuned exceptions showing by talker

Customization
But everyone wants to use different widgets to display errors.
And this point can be solved using the talker_flutter library.
In order to customize snackbars, you can use options of TalkerWrapper
class TalkerWrapperOptions {
  final String exceptionTitle;
  final String errorTitle;
  final TalkerExceptionBuilder? exceptionAlertBuilder;
  final TalkerErrorBuilder? errorAlertBuilder;
  final bool enableErrorAlerts;
  final bool enableExceptionAlerts;
}
Enter fullscreen mode
Exit fullscreen mode
- Use exceptionAlertBuilder and errorAlertBuilder for build custom widgets in snackbars.
- Use enableErrorAlerts and enableExceptionAlerts for filtering snackbars.
- Use exceptionTitle and errorTitle for custom snackbar titles.
More customization
And if you want to show other widgets (other than Snackbars) — you can use TalkerListener instead of TalkerWrapper.
TalkerListener(
  talker: talker,
  listener: (data) {
    /// Show your error messages on modal dialogs, screens, etc
  },
  child: /// Your screen or app widget,
);
Enter fullscreen mode
Exit fullscreen mode
Conclusion
I hope I managed to explain everything I wanted in the article.
Thank you for reading this small post🙏!
Connect with me on GitHub and pls put ✨star✨ for talker package
I will be very pleased if you try to use it in your application
When you started work on Flutter application screen design. You definitely face a red screen that shows UI error. It is most irritating and makes us unhappy when you are a beginner.
In Flutter, it’s important to understand how your user experiences these bugs and where those bugs occur. How we can find the bugs with the highest impact and work to fix them. Sometimes, it’s necessary to show a meaningful message to make it more sensible for the tester and developer. Flutter framework provides us customization feature to handle these error widget. According to the docs, Flutter shows red screen error whenever a widget fails to build. There is a performRebuild() method inside of StatefulWidget.dart class that invoke to build the widget.
performRebuild

@override
void performRebuild() {
  //..//
  try {
    built = build();
    debugWidgetBuilderValue(widget, built);
  } catch (e, stack) {
    built = ErrorWidget.builder(_debugReportException('building $this', e, stack));
  }
 //..//
}
As we can see, the red screen error is nothing but a widget named ErrorWidget provided by the framework. The ErrorWidget will be invoked only when a widget building fails. When widget building fails, Error Widget replaces with your widget. That’s why it’s visible only in the area occupied by the widget that has failed to build.
In this post, We going to create a custom red screen error message for a particular case. We’ll display red screen error without being depended on widget building fails. We’ll display a user-friendly error page instead of showing red exception. The final output will look lie below:
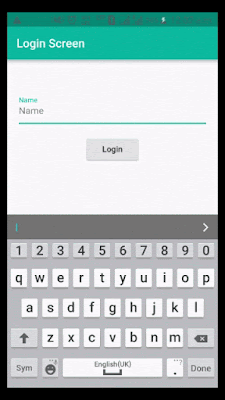
As you can see above, when we enter developerlibs text. It’s working fine but when we not entered any text and pushing login button. It’s showing red screen error. So, let’s create this example with the help of following steps.
Creating a new Project
1. Create a new project from File ⇒ New Flutter Project with your development IDE.
2. After that open main.dart file and edit it. As we have set our theme and change debug banner property of Application. Now define a method onError which accepts a message string as a parameter. Call setState() to set the _errorMessage field and add a condition to build() method to show ErrorWidget when _errorMessage is not null. Here, if _errorMessage is null ErrorWidget is returned else MaterialApp will be returned.
main.dart
import 'package:flutter/material.dart'; import 'package:flutter_custom_error/home_page.dart'; GlobalKey<MyAppState> rootKey = new GlobalKey(); void main() => runApp( MyApp(key: rootKey), ); class MyApp extends StatefulWidget { MyApp({Key key}) : super(key: key); @override MyAppState createState() { return new MyAppState(); } } class MyAppState extends State<MyApp> { String _errorMessage; onError(String message) { if (mounted) setState(() { _errorMessage = message; }); } @override Widget build(BuildContext context) { return _errorMessage != null ? ErrorWidget(_errorMessage) : MaterialApp( debugShowCheckedModeBanner: false, theme: ThemeData( primaryColor: const Color(0xFF02BB9F), primaryColorDark: const Color(0xFF167F67), accentColor: const Color(0xFF167F67), ), home: HomePage(), ); } }
to track and manage build method error. We have created a key by using the global key. The Global key will uniquely identify elements across the entire app.
3. Now, create a landing screen of an example where we’ll display a text field to enter some text and button for the move to another screen as shown above.
home_page.dart

import 'package:flutter/material.dart';
import 'package:flutter_custom_error/main.dart';
import 'package:flutter_custom_error/second_page.dart';

class HomePage extends StatefulWidget {
  @override
  _HomePageState createState() => _HomePageState();
}

class _HomePageState extends State<HomePage> {

  final teFirstName = TextEditingController();

  @override
  Widget build(BuildContext context) {
    return Scaffold(
        appBar: AppBar(
          title: Text("Login Screen",style: TextStyle(color: Colors.white),),
        ),
        body: new Padding(
          padding: EdgeInsets.fromLTRB(20.0, 50.0, 20.0, 0.0),
          child: Column(
            children: <Widget>[
              TextField(
                controller: teFirstName,
                decoration: InputDecoration(
                  labelText: "Name",
                  hintText: "Name",
                ),
              ),
              new SizedBox(
                width: 0.0,
                height: 20.0,
              ),
              RaisedButton(
                onPressed: _showSecondPage,
                child: Text("Login"),
              ),
            ],
          ),
        ));
  }

  void _showSecondPage() {
    if (teFirstName.text.isNotEmpty)
      Navigator.of(context)
          .push(MaterialPageRoute(builder: (context) => FirstPage(teFirstName.text)));
    else
      rootKey.currentState.onError(" Please enter name ");
  }
}
as you can see _showSecondPage method. Here, we checking enter text value and showing red screen widget if the user does not enter any text.
4. Here, we have the second screen of the example where we simply displaying text that send from the landing screen.
second_page.dart

import 'package:flutter/material.dart';

class FirstPage extends StatefulWidget {
  String list;
  FirstPage(this.list);
  @override
  _FirstPageState createState() => _FirstPageState();
}

class _FirstPageState extends State<FirstPage> {
  @override
  Widget build(BuildContext context) {
    return Scaffold(
      appBar: AppBar(
        title: Text("Welcome",style: TextStyle(color: Colors.white),),
      ),
      body: Container(
        child: Center(
          child: Column(
            mainAxisSize: MainAxisSize.min,
            children: <Widget>[
              Text(
                "Hi, " + widget.list.toString(),
              ),
            ],
          ),
        ),
      ),
    );
  }
}
Now, merge all files and run the example. You can see the app running very smoothly as shown above. But if you are facing any problem or you have any quires, please feel free to ask it from below comment section.
Время прочтения
8 мин
Просмотры 3K

Состояния загрузки и ошибки очень часто встречаются в приложениях, работающих асинхронно.
Если мы не отобразим пользовательский интерфейс (UI) загрузки или ошибки, когда это необходимо, пользователи могут посчитать, что приложение не работает, и не определят, была ли операция, которую они пытаются выполнить, успешной.
Для примера, вот страница с кнопкой, которую мы можем использовать при оплате товара с помощью Stripe:

Анимация: Пример страницы оплаты с помощью Stripe
Как мы видим, при нажатии кнопки «Pay (Оплатить)» появляется индикатор загрузки. И сама платежная страница также показывает индикатор загрузки, до тех пор, пока не будут доступны способы оплаты.
Если платеж не проходит по какой-либо причине, надо показать пользователю UI с ошибкой, чтобы проинформировать его об этом.
Давайте попробует вникнуть в суть, чтобы узнать, как можно решить эти проблемы в наших приложениях Flutter.
Состояния загрузки и ошибки с использованием StatefulWidget
Состояния загрузки и ошибки очень распространены, и мы должны их обрабатывать на каждой странице или виджете, который работает асинхронно.
Для примера предположим, что у нас есть кнопка PaymentButton, которую можно использовать для совершения платежа:
class PaymentButton extends StatelessWidget {
  @override
  Widget build(BuildContext context) {
    // note: this is a *custom* button class that takes an extra `isLoading` argument
    return PrimaryButton(
      text: 'Pay',
      // this will show a spinner if loading is true
      isLoading: false,
      onPressed: () {
        // use a service locator or provider to get the checkout service
        // make the payment
      },
    );
  }
}
Можно сделать этот виджет стейтфул и добавить две переменные состояния:
class _PaymentButtonState extends State<PaymentButton> {
  // loading and error state variables
  bool _isLoading = false;
  String _errorMessage = '';

  Future<void> pay() async {
    // make payment, update state variables, and show an alert on error
  }

  @override
  Widget build(BuildContext context) {
    // same as before,
    return PrimaryButton(
      text: 'Pay',
      // use _isLoading variable defined above
      isLoading: _isLoading,
      onPressed: _isLoading ? null : pay,
    );
  }
}
Этот подход будет работать, но он весьма рутинный и чреват ошибками.
В конце концов, мы же не хотим сделать все наши виджеты стейтфул и повсюду добавлять переменные состояния, верно?
Делаем состояния загрузки и ошибки все более DRY
Что нам действительно нужно, так это последовательный способ управления состояниями загрузки и ошибки во всем приложении.
Для этого мы воспользуемся AsyncValue и StateNotifier из пакета Riverpod.
Когда мы закончим, то сможем отображать любой UI загрузки и ошибки с помощью нескольких строк кода, как показано здесь:
class PaymentButton extends ConsumerWidget {
  @override
  Widget build(BuildContext context, WidgetRef ref) {
    // error handling
    ref.listen<AsyncValue<void>>(
      paymentButtonControllerProvider,
      (_, state) => state.showSnackBarOnError(context),
    );
    final paymentState = ref.watch(paymentButtonControllerProvider);
    // note: this is a *custom* button class that takes an extra `isLoading` argument
    return PrimaryButton(
      text: 'Pay',
      // show a spinner if loading is true
      isLoading: paymentState.isLoading,
      // disable button if loading is true
      onPressed: paymentState.isLoading
        ? null
        : () => ref.read(paymentButtonControllerProvider.notifier).pay(),
    );
  }
}
Но давайте будем действовать поэтапно.
Базовая настройка: виджет PaymentButton
Начнем с базового виджета PaymentButton, который был представлен ранее:
import 'package:flutter_riverpod/flutter_riverpod.dart';

// note: this time we subclass from ConsumerWidget so that we can get a WidgetRef below
class PaymentButton extends ConsumerWidget {
  @override
  Widget build(BuildContext context, WidgetRef ref) {
    // note: this is a custom button class that takes an extra `isLoading` argument
    return PrimaryButton(
      text: 'Pay',
      isLoading: false,
      onPressed: () => ref.read(checkoutServiceProvider).pay(),
    );
  }
}
Когда кнопка нажата, мы вызываем ref.read(), чтобы с помощью сервиса оформления заказа совершить оплату.
Если вы не знакомы с
ConsumerWidgetи синтаксисомref.read(), обратитесь к моему Essential Guide to Riverpod.
Для справки, вот как можно имплементировать CheckoutService и соответствующий провайдер:
// sample interface for the checkout service
abstract class CheckoutService {
  // this will succeed or throw an error
  Future<void> pay();
}

final checkoutServiceProvider = Provider<CheckoutService>((ref) {
  // return some concrete implementation of CheckoutService
});
Это работает, но метод pay() может затянуться на несколько секунд, и у нас нет никакого UI загрузки или ошибки.
Давайте разберемся с этим.
Управление состояниями загрузки и ошибки с помощью AsyncValue
В нашем примере UI должен управлять тремя возможными состояниями:
-
не загружается (по умолчанию)
-
загрузка
-
ошибка
Для представления этих состояний мы можем использовать класс AsyncValue, поставляемый вместе с пакетом Riverpod.
Для справки, вот как определяется этот класс:
@sealed
@immutable
abstract class AsyncValue<T> {
  const factory AsyncValue.data(T value) = AsyncData<T>;
  const factory AsyncValue.loading() = AsyncLoading<T>;
  const factory AsyncValue.error(Object error, {StackTrace? stackTrace}) =
        AsyncError<T>;
}
Обратите внимание, что данный класс является абстрактным и что мы можем инстанцировать его только с помощью одного из существующих фабричных конструкторов.
А под капотом эти конструкторы реализованы с помощью следующих конкретных классов:
class AsyncData<T> implements AsyncValue<T>
class AsyncLoading<T> implements AsyncValue<T>
class AsyncError<T> implements AsyncValue<T>
Самое главное, что мы можем использовать AsyncValue для представления трех состояний, которые нас так интересуют:
не загружено → AsyncValue.data
загрузка → AsyncValue.loading
ошибка → AsyncValue.error
Но где мы должны разместить нашу логику?
Для этого необходимо определить подкласс StateNotifier, который будет использовать AsyncValue<void> в качестве состояния.
Подкласс StateNotifier
Сначала мы определим класс PaymentButtonController, который использует CheckoutService в качестве зависимости и устанавливает состояние по умолчанию:
class PaymentButtonController extends StateNotifier<AsyncValue<void>> {
  PaymentButtonController({required this.checkoutService})
      // initialize state
      : super(const AsyncValue.data(null));
  final CheckoutService checkoutService;
}
Примечание: AsyncValue.data() обычно используется для передачи некоторых данных с помощью обобщенного аргумента <T>.
Но в нашем случае нет данных, поэтому можно использовать AsyncValue<void> для определения нашего StateNotifier и AsyncValue.data(null) при установке начального значения.
Затем добавляем метод pay(), который будет вызываться из класса виджета:
 Future<void> pay() async {
    try {
      // set state to `loading` before starting the asynchronous work
      state = const AsyncValue.loading();
      // do the async work
      await checkoutService.pay();
    } catch (e) {
      // if the payment failed, set the error state
      state = const AsyncValue.error('Could not place order');
    } finally {
      // set state to `data(null)` at the end (both for success and failure)
      state = const AsyncValue.data(null);
    }
  }
}
Обратите внимание, как состояние устанавливается несколько раз, чтобы наш виджет мог соответствующим образом перестраивать и обновлять UI.
Чтобы сделать PaymentButtonController доступным для нашего виджета, определяем StateNotifierProvider следующим образом:
final paymentButtonControllerProvider =
    StateNotifierProvider<PaymentButtonController, AsyncValue<void>>((ref) {
  final checkoutService = ref.watch(checkoutServiceProvider);
  return PaymentButtonController(checkoutService: checkoutService);
});
Обновленный виджет PaymentButton
Теперь, когда у нас есть PaymentButtonController, его можно использовать в нашем классе виджета:
class PaymentButton extends ConsumerWidget {
  @override
  Widget build(BuildContext context, WidgetRef ref) {
    // 1. listen for errors
    ref.listen<AsyncValue<void>>(
      paymentButtonControllerProvider,
      (_, state) => state.whenOrNull(
        error: (error) {
          // show snackbar if an error occurred
          ScaffoldMessenger.of(context).showSnackBar(
            SnackBar(content: Text(error)),
          );
        },
      ),
    );
    // 2. use the loading state in the child widget
    final paymentState = ref.watch(paymentButtonControllerProvider);
    final isLoading = paymentState is AsyncLoading<void>;
    return PrimaryButton(
      text: 'Pay',
      isLoading: isLoading,
      onPressed: isLoading
        ? null
        // note: this was previously using the checkout service
        : () => ref.read(paymentButtonControllerProvider.notifier).pay(),
    );
  }
}
Несколько замечаний:
-
мы используем
ref.listen()иstate.whenOrNull()для показа снэкбара, если найдено состояние ошибки -
мы проверяем, является ли состояние платежа инстансом
AsyncLoading<void>(помните:AsyncLoadingявляется подклассомAsyncValue) -
мы передаем переменную
isLoadingвPrimaryButton, который позаботится о демонстрации правильного UI.
Если вы не знакомы с листенерами в Riverpod, см. Раздел «Прослушивание изменений состояния провайдера» в моем основном руководстве по Riverpod.
Это работает, но можем ли мы получить такой же результат с меньшим количеством шаблонного кода?
Расширения Dart спешат на помощь
Давайте определим расширение для AsyncValue<void>, чтобы было легче проверять состояние загрузки и показывать снэкбар при ошибке:
extension AsyncValueUI on AsyncValue<void> {
  // isLoading shorthand (AsyncLoading is a subclass of AsycValue)
  bool get isLoading => this is AsyncLoading<void>;

  // show a snackbar on error only
  void showSnackBarOnError(BuildContext context) => whenOrNull(
        error: (error, _) {
          ScaffoldMessenger.of(context).showSnackBar(
            SnackBar(content: Text(error.toString())),
          );
        },
      );
}
С помощью этих изменений упрощаем наш класс виджета:
class PaymentButton extends ConsumerWidget {
  const PaymentButton({Key? key}) : super(key: key);

  @override
  Widget build(BuildContext context, WidgetRef ref) {
    // 1. listen for errors
    ref.listen<AsyncValue<void>>(
      paymentButtonControllerProvider,
      (_, state) => state.showSnackBarOnError(context),
    );
    // 2. use the loading state in the child widget
    final paymentState = ref.watch(paymentButtonControllerProvider);
    return PrimaryButton(
      text: 'Pay',
      isLoading: paymentState.isLoading,
      onPressed: paymentState.isLoading
        ? null
        : () => ref.read(paymentButtonControllerProvider.notifier).pay(),
    );
  }
}
При этом, для данной страницы, состояния загрузки и ошибки обрабатываются надлежащим образом:

Заключение
Вот законченная имплементация для расширения AsyncValueUI:
import 'package:flutter/material.dart';
import 'package:flutter_riverpod/flutter_riverpod.dart';

// Bonus: define AsyncValue<void> as a typedef that we can
// reuse across multiple widgets and state notifiers
typedef VoidAsyncValue = AsyncValue<void>;

extension AsyncValueUI on VoidAsyncValue {
  bool get isLoading => this is AsyncLoading<void>;

  void showSnackBarOnError(BuildContext context) => whenOrNull(
        error: (error, _) {
          ScaffoldMessenger.of(context).showSnackBar(
            SnackBar(content: Text(error.toString())),
          );
        },
      );
}
Благодаря методам расширения AsyncValueUI мы можем легко обрабатывать состояния загрузки и ошибки в нашем приложении.
Фактически, для каждой страницы, которая выполняется асинхронно, нам нужно сделать два шага:
-
добавить подкласс
StateNotifier<VoidAsyncValue>, являющийся посредником между классом виджета и указанными выше классами сервиса или хранилища -
модифицировать метод
build()виджета, обрабатывая состояние ошибки черезref.listen()и проверяя состояние загрузки по мере необходимости.
Хотя для того, чтобы настроить все подобным образом, потребуется немного предварительной работы, полученные преимущества оправдывают затраченное время:
-
мы можем обрабатывать состояния загрузки и ошибки с помощью небольшого количества кода в наших виджетах;
-
мы можем перенести всю логику управления состояниями из наших виджетов в отдельные классы контроллеров.
Материал подготовлен в рамках курса «Flutter Mobile Developer».
Всех желающих приглашаем на бесплатный двухдневный интенсив «Flutter engine, анимация и ее оптимизация». На этом интенсиве мы рассмотрим самые глубокие механизмы Flutter Engine и научимся создавать сложные и плавные анимации как на мобильных платформах, так и веб-версии, использовать инструменты профилирования для исключения «замерзания» интерфейса. Также мы затронем тему использования WebGL в веб-приложениях на Flutter для создания трехмерных сцен. Регистрация здесь.

Foreword
Due to the rising popularity of Flutter I feel it’s a good time to review some of the aspects of keeping your code clean and maintainable.
One of the things that developers might not pay so much attention to while building apps is error handling. While it might not be so glamorous it is definitely a key part of your application.
Who wants to use an app which looks unresponsive; having confusing error messages; or downright crashing in every step? With this article I’d like to give some good pointers on how to deal with error handling in flutter.
Set up
Let’s start by making a simple application. (If you want to skip right to the meaty part then check out the “handling errors” section.)
I will be using the test drive app as a base (https://flutter.dev/docs/get-started/test-drive#create-app) and start building it from there.

As you can see the app doesn’t do much at the moment. Let’s make a bit more exciting by trying to build a simple screen where you enter your phone number and it returns a one time password(OTP)
Let’s start by creating a number input field with a submit button.
import 'package:flutter/material.dart';
import 'package:flutter/services.dart';

...

class _MyHomePageState extends State<MyHomePage> {
 String _phoneNumber;

 void getOneTimePassword(){}

 @override
 Widget build(BuildContext context) {
   return Scaffold(
     appBar: AppBar(
       title: Text(widget.title),
     ),
     body: Center(
       child: Column(
         mainAxisAlignment: MainAxisAlignment.center,
         children: <Widget>[
           Container(
             child: TextField(
                 onChanged: (phoneNumber) {
                   setState(() {
                     _phoneNumber = phoneNumber;
                   });
                 },
                 decoration: InputDecoration(hintText: 'Enter a phone number'),
                 inputFormatters: [WhitelistingTextInputFormatter.digitsOnly],
                 keyboardType: TextInputType.number),
             width: MediaQuery.of(context).size.width * 0.5,
           ),
           RaisedButton(
             onPressed: () {getOneTimePassword();},
             child: Text('Get Code'),
           ),
         ],
       ),
     ),
   );
 }
}

This looks better. But it still doesn’t have any functionality yet. Let’s change that.
Adding more functionality
We will create a OneTimePasswordService and a mock HttpClient that servers our requests. Oh and we also need a response object that will parse the json string we get from the mock client. Let’s create the following 2 files.
import 'dart:math';
import 'otp_response.dart';

class MockHttpClient {
 var randomGenerator = new Random();

 Future<String> getResponseBody() async {
   await Future.delayed(Duration(milliseconds: 1000));
   return _generateOneTimePassword();
 }

 _generateOneTimePassword() {
   return '{ "verificationCode": "' +
       randomGenerator.nextInt(10).toString() +
       randomGenerator.nextInt(10).toString() +
       randomGenerator.nextInt(10).toString() +
       randomGenerator.nextInt(10).toString() +
       '"}';
 }
}

class OneTimePasswordService {
 final httpClient = MockHttpClient();
 Future<OneTimePasswordResponse> getOneTimePassword(String phoneNumber) async {
   final responseBody = await httpClient.getResponseBody();
   return OneTimePasswordResponse.fromJson(responseBody);
 }
}
import 'dart:convert';
import 'package:flutter/foundation.dart';
class OneTimePasswordResponse {
final String verificationCode;
OneTimePasswordResponse({
@required this.verificationCode,
});
static OneTimePasswordResponse fromMap(Map<String, dynamic> map) {
if (map == null) return null;
return OneTimePasswordResponse(
verificationCode: map['verificationCode'],
);
}
static OneTimePasswordResponse fromJson(String source) => fromMap(json.decode(source));
@override
String toString() {
return 'verificationCode: $verificationCode';
}
}
Let’s also modify our main.dart as well
...
import 'otp_service.dart';
...
class _MyHomePageState extends State<MyHomePage> {
 String _phoneNumber;
 String _oneTimePassword;
 final otpService = OneTimePasswordService();
 void getOneTimePassword() async {
   var oneTimePasswordResponse = await otpService.getOneTimePassword(_phoneNumber);
   setState(() {
     _oneTimePassword = oneTimePasswordResponse.toString();
   });
 }

 @override
 Widget build(BuildContext context) {
   return Scaffold(
...
             width: MediaQuery.of(context).size.width * 0.5,
           ),
           if(_oneTimePassword != null) Text(_oneTimePassword),
           RaisedButton(
...
Now it’s faintly starting to look like something that actually resembles an application.
In a perfect world, everything works flawlessly and there is no need to worry about errors or bugs that might ruin our day. Sadly we don’t live in a perfect world.
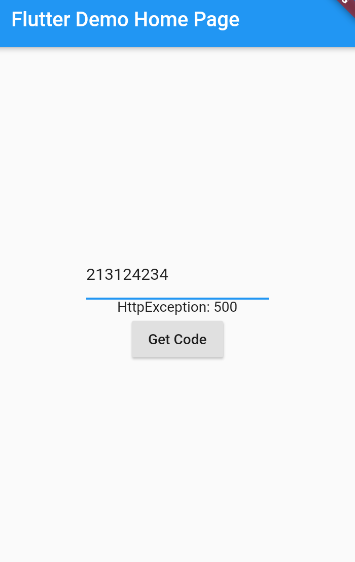
Let’s see what will happen if for some reason there is an error from the HttpClient side.
Since we are using our own Mock client we can just replace
return _generateOneTimePassword();
with
throw HttpException(‘500’);
in otp_service.dart
When we try to get the code this time we will be greeted by an error in the console. For the user however nothing will be shown. This is not good because the user might think the application is buggy and broken.
Catching exceptions
Let’s try catching the exception.
...
Future<OneTimePasswordResponse> getOneTimePassword(String phoneNumber) async {
 try {
   final responseBody = await httpClient.getResponseBody();
   return OneTimePasswordResponse.fromJson(responseBody);
 } catch (e) {
   print(e);
 }
}
...
Looks good right?
Well. Not really. We actually didn’t really make it any better since all it does now is that it prints the error message in the console. The user will still have no idea why the app is not working. We should avoid this blanket catching at all costs.
But the problem remains. We have to get the error message to the UI somehow.
Useful widgets
Luckily Flutter has an awesome widget called Futurebuilder just for this purpose.
I won’t go over the details for this but if you want to know more then check out the link:
https://api.flutter.dev/flutter/widgets/FutureBuilder-class.html
Let’s modify our main.dart to add the previously mentioned Widget
It will allow us to display the latest snapshot based on the otpResponseFuture response
...
import 'otp_response.dart';
...
class _MyHomePageState extends State<MyHomePage> {
 String _phoneNumber;
 Future<OneTimePasswordResponse> otpResponseFuture;
 final otpService = OneTimePasswordService();

 void getOneTimePassword() async {
   setState(() {
     otpResponseFuture = otpService.getOneTimePassword(_phoneNumber);
   });
 }
...
 width: MediaQuery.of(context).size.width * 0.5,
),
FutureBuilder<OneTimePasswordResponse>(
 future: otpResponseFuture,
 builder: (context, snapshot) {
   if (snapshot.connectionState == ConnectionState.waiting) {
     return CircularProgressIndicator();
   } else if (snapshot.hasError) {
     final error = snapshot.error;
     return Text(error.toString());
   } else if (snapshot.hasData) {
     final response = snapshot.data;
     return Text(response.toString());
   } else {
     return Text('After entering the phone number, press the button below');
   }
 },
),
RaisedButton(
...
We also need to remove the try catch block we added in OneTimePasswordService and let the error propagate to our Futurebuilder.
...
Future<OneTimePasswordResponse> getOneTimePassword(String phoneNumber) async {
final responseBody = await httpClient.getResponseBody();
return OneTimePasswordResponse.fromJson(responseBody);
}
Let’s try it out now!
Success! We can now display the error message. The only problem is that the user still won’t understand what this means. We shouldn’t actually show low-level error messages like that to the user.
Another big problem is that we let every exception propagate and get caught by the Futurebuilder. In some cases it might be better to let the app crash instead.
Customized exceptions
A good way is to catch only a particular set of exceptions and display a message based on those.
For that we are also going to create our own custom VerificationException class to customize our messages.
class VerificationException {
 final String message;

 VerificationException(this.message);

 @override
 String toString() => message;
}
Let’s also add an additional catch block for SocketExceptions. (You can additionally test it by throwing a SocketException instead of HttpException in our Mock client)
...
import 'verification_exception.dart';
...
try {
 final responseBody = await httpClient.getResponseBody();
 return OneTimePasswordResponse.fromJson(responseBody);
}
on SocketException {
 throw VerificationException('No Internet connection');
} on HttpException {
 throw VerificationException("Service is unavailable");
}
...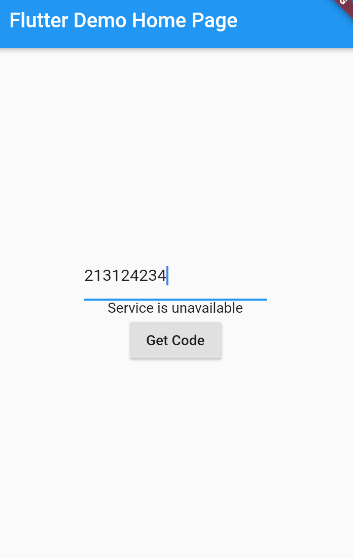
Looks much more readable for the user now doesn’t it?
There is still one issue we need to address. Namely our FutureBuilder currently still catches all errors and displays them which is bad. We only want to catch our own custom exceptions.
Having more control
Thankfully there is a better solution: ChangeNotifier (https://api.flutter.dev/flutter/foundation/ChangeNotifier-class.html)
Let’s create a new file called verification_change_notifier
import 'otp_response.dart';
import 'otp_service.dart';
import 'verification_exception.dart';
import 'package:flutter/cupertino.dart';

enum NotifierState { initial, loading, loaded }

class VerificationChangeNotifier extends ChangeNotifier {
  final _otpService = OneTimePasswordService();

  NotifierState _state = NotifierState.initial;
  NotifierState get state => _state;
  void _setState(NotifierState state) {
    _state = state;
    notifyListeners();
  }

  VerificationException _exception;
  VerificationException get exception => _exception;
  void _setVerificationException(VerificationException exception) {
    _exception = exception;
  }

  OneTimePasswordResponse _otpResponse;
  OneTimePasswordResponse get otpResponse => _otpResponse;
  void _setOtpResponse(OneTimePasswordResponse otpResponse) {
    _otpResponse = otpResponse;
  }

  void getOneTimePassword(String phoneNumber) async {
    _setState(NotifierState.loading);
    try {
      final otpResponse = await _otpService.getOneTimePassword(phoneNumber);
      _setOtpResponse(otpResponse);
    } on VerificationException catch (f) {
      _setVerificationException(f);
    }
    _setState(NotifierState.loaded);
  }
}
I feel a little bit of explanation is in order.
First of all we have a NotifierState with 3 values:
initial – This is the UI state for when the screen is initially loaded
loading – This state will display the loading indicator
loaded – Finally this state will display us the result or the error, depending on the response from the client
We also define getters and setters for private fields _state,_otpResponse,_exception
Now whenever we call the getOneTimePassword method it will set the correct state and only when we have our custom exception it will set the exception.
In our main class we will replace our Futurebuilder with a Consumer widget (Don’t forget to add the provider dependency)
...
 width: MediaQuery.of(context).size.width * 0.5,
),
Consumer<VerificationChangeNotifier>(
 builder: (_, notifier, __) {
   if (notifier.state == NotifierState.initial) {
     return Text('After entering the phone number, press the button below');
   } else if (notifier.state == NotifierState.loading) {
     return CircularProgressIndicator();
   } else {
     if (notifier.exception != null) {
       return Text(notifier.exception.toString());
     } else {
       return Text(notifier.otpResponse.toString());
     }
   }
 },
),
RaisedButton(
...
...
dependencies:
 flutter:
   sdk: flutter
 provider: ^3.2.0
...
We will replace our getOneTimePassword method as well and remove otpResponseFuture &otpService since our ChangeNotifier does everything already.
Finally we need to wrap all this into a ChangeNotifierProvider
...
class MyApp extends StatelessWidget {
 @override
 Widget build(BuildContext context) {
   return MaterialApp(
     title: 'Flutter Demo',
     theme: ThemeData(
       primarySwatch: Colors.blue,
       visualDensity: VisualDensity.adaptivePlatformDensity,
     ),
     home: ChangeNotifierProvider(
       create: (_) => VerificationChangeNotifier(),
       child: MyHomePage(title: 'Flutter Error Handling Demo'),
     ),
   );
 }
}
...
void getOneTimePassword() async {
 Provider.of<VerificationChangeNotifier>(context).getOneTimePassword(_phoneNumber);
}
...
There you have it! Now we have a working app that shows an intelligible error message to the user and also doesn’t catch and show all errors.
Conclusion
Handling errors is nothing you should be afraid of. It will save you a lot of headache later on if you properly manage your errors. The suggestions in this article is only the tip of the iceberg when it comes to error handling but I hope it gave a vague idea how it’s possible to do this in Flutter.
Happy Coding!