The @font-face CSS at-rule specifies a custom font with which to display text; the font can be loaded from either a remote server or a locally-installed font on the user’s own computer.
Syntax
@font-face {
  font-family: "Trickster";
  src: local("Trickster"),
    url("trickster-COLRv1.otf") format("opentype") tech(color-COLRv1), url("trickster-outline.otf")
      format("opentype"), url("trickster-outline.woff") format("woff");
}
Descriptors
ascent-override-
Defines the ascent metric for the font.
descent-override-
Defines the descent metric for the font.
font-display-
Determines how a font face is displayed based on whether and when it is downloaded and ready to use.
font-family-
Specifies a name that will be used as the font face value for font properties.
font-stretch-
A
font-stretchvalue. Accepts two values to specify a range that is supported by a font-face, for examplefont-stretch: 50% 200%; font-style-
A
font-stylevalue. Accepts two values to specify a range that is supported by a font-face, for examplefont-style: oblique 20deg 50deg; font-weight-
A
font-weightvalue. Accepts two values to specify a range that is supported by a font-face, for examplefont-weight: 100 400;Note: The font-variant descriptor was removed from the specification in 2018. The
font-variantvalue property is supported, but there is no descriptor equivalent. font-feature-settings-
Allows control over advanced typographic features in OpenType fonts.
font-variation-settings-
Allows low-level control over OpenType or TrueType font variations, by specifying the four letter axis names of the features to vary, along with their variation values.
line-gap-override-
Defines the line gap metric for the font.
size-adjust-
Defines a multiplier for glyph outlines and metrics associated with this font. This makes it easier to harmonize the designs of various fonts when rendered at the same font size.
src-
Specifies references to font resources including hints about the font format and technology. It is required for the @font-face rule to be valid.
unicode-range-
The range of Unicode code points to be used from the font.
Description
It’s common to use both url() and local() together, so that the user’s installed copy of the font is used if available, falling back to downloading a copy of the font if it’s not found on the user’s device.
If the local() function is provided, specifying a font name to look for on the user’s device, and if the user agent finds a match, that local font is used. Otherwise, the font resource specified using the url() function is downloaded and used.
Browsers attempt to load resources in their list declaration order, so usually local() should be written before url(). Both functions are optional, so a rule block containing only one or more local() without url() is possible.
If a more specific fonts with format() or tech() values are desired, these should be listed before versions that don’t have these values, as the less-specific variant would otherwise be tried and used first.
By allowing authors to provide their own fonts, @font-face makes it possible to design content without being limited to the so-called «web-safe» fonts (that is, the fonts which are so common that they’re considered to be universally available). The ability to specify the name of a locally-installed font to look for and use makes it possible to customize the font beyond the basics while making it possible to do so without relying on an internet connection.
Note: Fallback strategies for loading fonts on older browsers are described in the src descriptor page.
The @font-face at-rule may be used not only at the top level of a CSS, but also inside any CSS conditional-group at-rule.
Font MIME Types
| Format | MIME type |
|---|---|
| TrueType | font/ttf |
| OpenType | font/otf |
| Web Open Font Format | font/woff |
| Web Open Font Format 2 | font/woff2 |
Notes
- Web fonts are subject to the same domain restriction (font files must be on the same domain as the page using them), unless HTTP access controls are used to relax this restriction.
@font-facecannot be declared within a CSS selector. For example, the following will not work:.className { @font-face { font-family: "MyHelvetica"; src: local("Helvetica Neue Bold"), local("HelveticaNeue-Bold"), url("MgOpenModernaBold.ttf"); font-weight: bold; } }
Formal syntax
@font-face =
  @font-face { <declaration-list> }
Examples
Specifying a downloadable font
This example specifies a downloadable font to use, applying it to the entire body of the document:
<!DOCTYPE html>
<html lang="en-US">
  <head>
    <meta charset="utf-8" />
    <meta name="viewport" content="width=device-width" />
    <title>Web Font Sample</title>
    <style media="screen, print">
      @font-face {
        font-family: "Bitstream Vera Serif Bold";
        src: url("https://mdn.github.io/css-examples/web-fonts/VeraSeBd.ttf");
      }

      body {
        font-family: "Bitstream Vera Serif Bold", serif;
      }
    </style>
  </head>
  <body>
    This is Bitstream Vera Serif Bold.
  </body>
</html>
The output of this example code looks like so:
Specifying local font alternatives
In this example, the user’s local copy of «Helvetica Neue Bold» is used; if the user does not have that font installed (both the full font name and the Postscript name are tried), then the downloadable font named «MgOpenModernaBold.ttf» is used instead:
@font-face {
  font-family: "MyHelvetica";
  src: local("Helvetica Neue Bold"), local("HelveticaNeue-Bold"),
    url("MgOpenModernaBold.ttf");
  font-weight: bold;
}
Specifications
| Specification |
|---|
| CSS Fonts Module Level 4 # font-face-rule |
Browser compatibility
BCD tables only load in the browser
See also
Нестандартные шрифты: как подключить и оптимизировать
Время прочтения
8 мин
Просмотры 40K
Текст — основная часть контента на большинстве сайтов, и важно грамотно подходить к его отрисовке. В этой статье мы разберём базовые моменты, касающиеся подключения и оптимизации шрифтов.
Сразу стоит отметить, что самый простой вариант — вообще не подключать сторонние шрифты и пользоваться стандартными, которые предустановлены в большинстве операционных систем. Это хорошо знакомые Arial, Times New Roman и так далее — эти шрифты называются веб-безопасными, достаточно просто указать название одного из таких шрифтов в коде, и всё будет работать.
Но чаще всего дизайн макета не позволяет обойтись веб-безопасным шрифтом, а требует использовать какой-то нестандартный. В этом случае при загрузке страницы файл со шрифтом нужно подгружать с сервера по той же схеме, что и остальные ресурсы — CSS-файлы, изображения и так далее. Он может весить довольно много, именно поэтому для быстрой загрузки страницы выгоднее сначала рассмотреть возможность использования стандартных шрифтов. Но даже с нестандартными шрифтами можно избежать большинства проблем, если уделить внимание оптимизации.
Выбираем формат шрифта
Все слышали про TTF и OTF. Но это форматы, которые предоставляются с минимальным сжатием или совсем без него. Их стоит использовать только в том случае, если нужна поддержка очень старых браузеров.
Во всех остальных ситуациях можно выбрать WOFF и WOFF2 — форматы, которые отличаются высокой степенью сжатия. WOFF2 вообще можно считать лучшим из существующих. Тем не менее, поддержка WOFF2 хотя и очень хорошая, но пока не абсолютная, поэтому в качестве подстраховки для не самых современных браузеров стоит использовать WOFF.
Подключение шрифтов с помощью Google Fonts
Есть простой и удобный способ подключить нестандартный шрифт — использовать Google Fonts. Это бесплатный сервис, с помощью которого можно подключать шрифты, но не хранить их на своём сервере. Чтобы им воспользоваться, необходимо выбрать шрифт и добавить одно или несколько нужных начертаний, а затем вставить в <head> ссылку, которую сгенерирует Google Fonts во вкладке Embed.
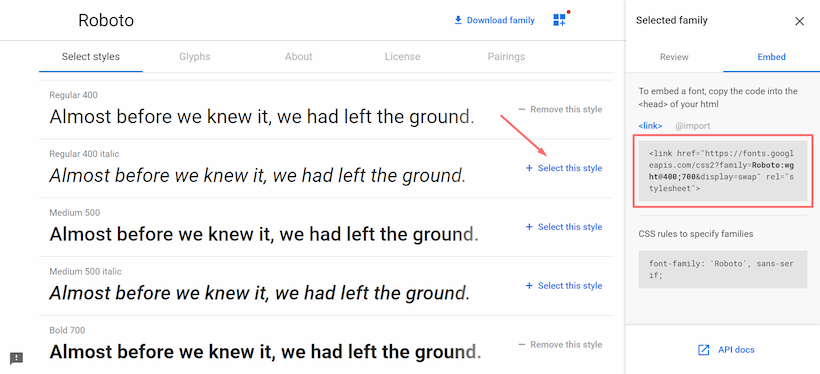
Этого достаточно, чтобы шрифт подключился. Теперь его можно использовать в свойстве font-family без каких-либо дополнительных действий.
body {
  font-family: "Roboto", "Arial", sans-serif;
}
Стоит отметить, что после основного шрифта важно указать веб-безопасный. В случае, если нестандартный шрифт не загрузится, браузер воспользуется альтернативным. Его нужно подобрать максимально похожим на основной шрифт.
Плюсы этого способа — простота использования и всегда актуальные версии шрифтов, Google Fonts их часто обновляет. Но у него есть и минус — запросы к сторонним серверам могут негативно повлиять на скорость загрузки страницы. Если выбираете этот способ, стоит обратить внимание на оптимизацию.
Подключение шрифтов с помощью правила @font-face
Есть альтернативный способ, при котором файлы со шрифтами хранятся вместе с остальными ресурсами сайта. Для них принято заводить отдельную директорию в корне проекта — например, fonts. В неё следует поместить файлы для каждого начертания в нужных форматах — в большинстве случаев, если не требуется поддержка старых браузеров, подойдут .woff и .woff2, о которых мы говорили ранее. Шрифты можно скачать на различных ресурсах. При этом всегда нужно обращать внимание на лицензию — некоторые шрифты могут быть недоступны для коммерческого использования.
После того, как шрифты добавлены в проект, их нужно подключить в CSS-файле. Для этого используется правило @font-face. В самом базовом варианте оно будет включать:
-
Название шрифта, которое затем нужно использовать, чтобы задать элементам подключённый шрифт.
-
Адрес файла со шрифтом, который нужно подключить, и его формат. Если адресов несколько, их можно указать через запятую. В этом случае важен порядок — браузер будет последовательно пытаться подключить файлы. Первым должен быть самый подходящий формат, а далее — запасные варианты. Также с помощью функции
localможно добавить возможность перед загрузкой шрифта с сервера проверить, установлен ли он на компьютере пользователя. Если да, запроса к серверу за шрифтом не будет — при рендеринге используется локальная версия. Но у этого способа есть минус — шрифт на компьютере пользователя может быть устаревшим, и тогда страница отобразится не совсем так, как было задумано. -
Начертания: жирное, курсивное и так далее. Для каждого начертания нужно отдельное правило
@font-face.
Базовый вариант правила:
@font-face {
  font-family: "Roboto";
  font-style: normal;
  font-weight: 400;

  /* Браузер сначала попробует найти шрифт локально */
  src: local("Roboto"),
       /* Если не получилось, загрузит woff2 */
       url("/fonts/roboto.woff2") format("woff2"),
       /* Если браузер не поддерживает woff2, загрузит woff */
       url("/fonts/roboto.woff") format("woff");
}

/* Теперь можно использовать шрифт */
body {
  font-family: "Roboto", "Arial", sans-serif;
}
Для улучшения производительности правило @font-face лучше всего прописывать в самом начале CSS-файла. Так браузер сможет раньше начать обработку шрифта.
Оптимизация
Выбор современного формата шрифта, который обладает хорошей степенью сжатия — это только первый шаг к оптимизации. Можно сделать гораздо больше, чтобы увеличить скорость загрузки страницы и сделать пользовательский опыт при взаимодействии с интерфейсом приятнее.
FOIT, FOUT и FOFT
Пока шрифт загружается, при рендеринге можно наблюдать разное поведение текста.
FOIT (Flash of Invisible Text) — с англ. «мелькание невидимого текста». При таком поведении, пока шрифт не загрузится, текст не отображается и появляется только после загрузки шрифта. Значительная проблема — во время загрузки нет доступа к текстовому контенту.
FOUT (Flash of Unstyled Text) — с англ. «мелькание неоформленного текста». Во время загрузки используется шрифт, заданный по умолчанию (системный, например), а после загрузки страница перерисовывается с использованием загрузившегося шрифта. Эта перерисовка довольно заметна и может быть нежелательна.
FOFT (Flash of Faux Text) — с англ. «мелькание синтезированного текста». Это поведение можно наблюдать в промежутке, когда основное начертание уже загрузилось, а дополнительные (жирное, курсивное и так далее) — нет. Браузер имитирует нужное начертание до загрузки настоящей версии. В этом случае страница может перерисовываться несколько раз по мере загрузки начертаний.
В разных браузерах логика рендеринга текста во время загрузки шрифта отличается. Например, Chrome и Firefox в течение трёх секунд не отрисовывают ничего, затем используют веб-безопасный шрифт, а после окончания загрузки текст перерисовывается. IE поступает похоже, но при этом не ждёт три секунды. Подобное поведение в разных браузерах можно унифицировать, используя свойство font‑display.
Свойство font-display
У свойства есть несколько значений, которые определяют поведение текста во время загрузки шрифта:
-
auto— поведение по умолчанию, зависит от браузера. -
block— текст не отображается в течение короткого периода (3 секунды), затем отрисовывается запасной шрифт, если основной ещё не загрузился. Как только загрузка завершается, текст перерисовывается снова. -
swap— сразу же отрисовывается запасной шрифт, после загрузки шрифта — повторный рендеринг. -
fallback— в течение очень короткого периода (100 миллисекунд) не отображается ничего, затем браузер использует запасной шрифт и ждёт 3 секунды — если шрифт всё ещё не загрузился, остаётся запасной шрифт. Далее не важно, загрузился шрифт или нет, замена не произойдёт. Если шрифт загрузится, то он применится только при обновлении страницы. -
optional— текст не отображается в течение 100 миллисекунд, а затем отрисовывается запасным шрифтом. Даже если шрифт загрузится после этого, замена произойдёт только при обновлении страницы.
Оптимальное значение — swap, его можно использовать в большинстве случаев, оно удобно для пользователей. При подключении шрифта с помощью Google Fonts это значение установлено по умолчанию. Если же есть необходимость избежать мелькания текста (например, для вдумчивого чтения), подойдёт optional.
Предзагрузка шрифтов
Ещё один способ оптимизации — предварительная загрузка шрифтов. С её помощью можно изменить обычную приоритизацию загрузки ресурсов, тем самым сказав браузеру, что важно загрузить шрифт в первую очередь.
Стоит учесть, что браузер загрузит шрифт в любом случае — даже если он не используется на странице. И, обладая высоким приоритетом, эта загрузка может блокировать загрузку других ресурсов, поэтому нужно грамотно выбирать, что именно предзагружать. Например, если на странице используются три разных шрифта, стоит предзагрузить только основной шрифт без дополнительных начертаний.
Для того, чтобы предзагрузка сработала, нужно поместить в <head> ссылку на шрифт и задать атрибуту rel значение preload:
<link rel="preload" href="/fonts/roboto.woff2" as="font">Также необходимо добавить тип ресурса, в данном случае — font. Предзагружать можно и другие ресурсы — CSS-файлы, изображения и так далее.
Уменьшение количества глифов шрифта
По умолчанию шрифт может содержать глифы (буквы, символы) разных языков и просто редко используемые. С помощью свойства unicode-range можно установить диапазон нужных символов в системе Unicode, тогда браузер будет подгружать сабсет (подмножество) шрифта только в тот момент, когда на странице появится символ из этого диапазона. Предварительно нужно подготовить файлы шрифтов, разбив их на группы.
Например, можно отдельно подключить латиницу и кириллицу, если на сайте представлены версии на двух языках. И с помощью unicode-range браузер поймёт, какой сабсет нужен для конкретной страницы, и загрузит только его. Такой файл будет иметь меньший вес и ускорит загрузку страницы.
Также можно проанализировать, какие конкретно глифы используются на сайте и создать кастомный сабсет исключительно с ними. Для этого есть специальные инструменты.
Google Fonts по умолчанию использует сабсеты. Это можно увидеть, открыв CSS-файл, который подключается в <head> при использовании сервиса. Для каждого языка есть отдельный сабсет. Пример для латиницы и кириллицы:
/* latin */
@font-face {
  font-family: "Roboto";
  font-style: normal;
  font-weight: 400;
  font-display: swap;
  src: local("Roboto"),
       local("Roboto-Regular"),
       url(https://fonts.gstatic.com/s/roboto/v20/KFOmCnqEu92Fr1Mu4mxK.woff2)
       format("woff2");
  unicode-range: U+0000-00FF, U+0131, U+0152-0153, U+02BB-02BC, U+02C6, U+02DA,
                 U+02DC, U+2000-206F, U+2074, U+20AC, U+2122, U+2191, U+2193,
                 U+2212, U+2215, U+FEFF, U+FFFD;
}

/* cyrillic */
@font-face {
  font-family: "Roboto";
  font-style: normal;
  font-weight: 400;
  font-display: swap;
  src: local("Roboto"),
       local("Roboto-Regular"),
       url(https://fonts.gstatic.com/s/roboto/v20/KFOmCnqEu92Fr1Mu5mxKOzY.woff2)
       format("woff2");
  unicode-range: U+0400-045F, U+0490-0491, U+04B0-04B1, U+2116;
}
В статье разобраны только базовые способы оптимизации шрифтов. Но даже их достаточно, чтобы улучшить пользовательский опыт и значительно уменьшить вес файлов шрифтов, ускорив тем самым загрузку страницы.
Полезности
-
HTML шорты: посторонние шрифты. Про подключение шрифтов и методы оптимизации.
-
Статья о font-display. В ней кроме прочего приведена наглядная схема того, как работают все значения свойства.
-
Исчерпывающее руководство по стратегиям загрузки веб-шрифтов. Подробный разбор плюсов и минусов методов подключения и оптимизации шрифтов.
-
Оптимизация шрифтов. В статье разобраны разные методы: использование сабсетов шрифтов в зависимости от языка, HTTP-кеширование, Font Loading API и так далее.
-
Доклад Вадима Макеева про шрифты.
-
Subsetting Fonts with Glyphhanger. Статья о том, как использовать инструмент для создания сабсетов.
The @font-face rule allows custom fonts to be loaded on a webpage. Once added to a stylesheet, the rule instructs the browser to download the font from where it is hosted, then display it as specified in the CSS.
Without the rule, our designs are limited to the fonts that are already loaded on a user’s computer, which vary depending on the system being used. Here’s a nice breakdown of existing system fonts.
Table of contents
- Practical level of browser support
- Deepest possible browser support
- Slightly deeper browser upport
- Alternative techniques
- Understanding font file types
- A note on performance
- Font services
- What about icon fonts?
- More @font-face resources
General browser support
Desktop
| Chrome | Firefox | IE | Edge | Safari |
|---|---|---|---|---|
| 4 | 3.5 | 9 | 12 | 3.2 |
Mobile / Tablet
| Android Chrome | Android Firefox | Android | iOS Safari |
|---|---|---|---|
| 109 | 109 | 4 | 4.2-4.3 |
Practical level of browser support
Things are shifting heavily toward WOFF and WOFF 2, so we can probably get away with:
@font-face {
  font-family: 'MyWebFont';
  src:  url('myfont.woff2') format('woff2'),
        url('myfont.woff') format('woff');
}
You could probably even get away with just WOFF2 these days.
@font-face {
  font-family: 'MyWebFont';
  src: url('myfont.woff2') format('woff2');
}
Desktop
| Chrome | Firefox | IE | Edge | Safari |
|---|---|---|---|---|
| 36 | 39 | No | 14 | 12 |
Mobile / Tablet
| Android Chrome | Android Firefox | Android | iOS Safari |
|---|---|---|---|
| 109 | 109 | 109 | 10.0-10.2 |
The only practical thing also using WOFF buys you is Internet Explorer 11 support.
Deepest possible browser support
This is the method with the deepest support possible right now. The @font-face rule should be added to the stylesheet before any styles.
@font-face {
  font-family: 'MyWebFont';
  src: url('webfont.eot'); /* IE9 Compat Modes */
  src: url('webfont.eot?#iefix') format('embedded-opentype'), /* IE6-IE8 */
       url('webfont.woff2') format('woff2'), /* Super Modern Browsers */
       url('webfont.woff') format('woff'), /* Pretty Modern Browsers */
       url('webfont.ttf')  format('truetype'), /* Safari, Android, iOS */
       url('webfont.svg#svgFontName') format('svg'); /* Legacy iOS */
}
Then use it to style elements like this:
body {
  font-family: 'MyWebFont', Fallback, sans-serif;
}
Slightly deeper browser upport
If you need a sort of a happy medium between full support and practical support, adding a .ttf will cover a few more bases:
@font-face {
  font-family: 'MyWebFont';
  src: url('myfont.woff2') format('woff2'),
       url('myfont.woff') format('woff'),
       url('myfont.ttf') format('truetype');
}| Chrome | Safari | Firefox | Opera | IE | Android | iOS |
|---|---|---|---|---|---|---|
| 3.5+ | 3+ | 3.5+ | 10.1+ | 9+ | 2.2+ | 4.3+ |
Alternative techniques
@import
While @font-face is excellent for fonts that are hosted on our own servers, there may be situations where a hosted font solution is better. Google Fonts offers this as a way to use their fonts. The following is an example of using @import to load the Open Sans font from Google Fonts:
@import url(//fonts.googleapis.com/css?family=Open+Sans);Then we can use it to style elements:
body {
  font-family: 'Open Sans', sans-serif;
}
If you open the URL for the font, you can actually see all the @font-face work being done behind the scenes.
A benefit of using a hosted service is that it is likely to include all the font file variations, which ensures deep cross-browser compatibility without having to host all those files ourselves.
<link> a stylesheet
Similarly, you could link to the same asset as you would any other CSS file, in the of the HTML document rather than in the CSS. Using the same example from Google Fonts, this is what we would use:
<link rel="preconnect" href="https://fonts.googleapis.com">
<link rel="preconnect" href="https://fonts.gstatic.com" crossorigin>
<link href="https://fonts.googleapis.com/css2?family=Open+Sans&display=swap" rel="stylesheet">
Then, we can style our elements like the other methods:
body {
  font-family: 'Open Sans', sans-serif;
}
Again, this is importing the @font-face rules but, instead of injecting them to our stylesheet, they are added to our HTML instead.
It’s about the same thing… both techniques download the assets needed.
Understanding font file types
The original snippet at the top of this post references a lot of files with strange extensions. Let’s go over each one and get a better understanding of what they mean.
WOFF / WOFF2
Stands for: Web Open Font Format.
Created for use on the web, and developed by Mozilla in conjunction with other organizations, WOFF fonts often load faster than other formats because they use a compressed version of the structure used by OpenType (OTF) and TrueType (TTF) fonts. This format can also include metadata and license info within the font file. This format seems to be the winner and where all browsers are headed.
WOFF2 is the next generation of WOFF and boasts better compression than the original.
SVG / SVGZ
Stands for: Scalable Vector Graphics (Font)
SVG is a vector re-creation of the font, which makes it much lighter in file size, and also makes it ideal for mobile use. This format is the only one allowed by version 4.1 and below of Safari for iOS. SVG fonts are not currently supported by Firefox, IE or IE Mobile. Firefox has postponed implementation indefinitely to focus on WOFF.
SVGZ is the zipped version of SVG.
EOT
Stands for: Embedded Open Type.
This format was created by Microsoft (the original innovators of @font-face) and is a proprietary file standard supported only by IE. In fact, it’s the only format that IE8 and below will recognize when using @font-face.
OTF / TTF
Stands for: OpenType Font and TrueType Font.
The WOFF format was initially created as a reaction to OTF and TTF, in part, because these formats could easily (and illegally) be copied, However, OpenType has capabilities that many designers might be interested in (ligatures and such).
A note on performance
Web fonts are great for design but it’s important to also understand their impact on web performance. Custom fonts often cause sites to take a performance hit because the font must be downloaded before it’s displayed.
A common symptom used to be a brief moment where fonts first load as the fallback, then blink to the downloaded font. Paul Irish has an older post on this (dubbed “FOUT”: Flash Of Unstyled Text).
These days, browsers are generally hiding the text before the custom font loads by default. Better or worse? You decide. You can exert some control over this through various techniques. A little out-of-scope for this article, but here’s a trifecta of articles by Zach Leatherman to get you started down the rabbit hole:
- Better @font-face with Font Load Events
- How we use web fonts responsibly, or, avoiding a @font-face-palm
- Flash of Faux Text—still more on Font Loading
Here are some more considerations when implementing custom fonts:
Watch the file size
Fonts can be surprisingly heavy, so lean towards options that offer lighter versions. For example, favor a font set that is 50KB versus one that weighs 400KB.
Limit the character set, if possible
Do you really need the bold and black weights for one font? Limiting your font sets to load only what is used is a good idea and there are some good tips on that here.
Consider system fonts for small screens
Many devices are stuck on crappy connections. One trick might be to target larger screens when loading the custom font using @media.
In this example, screens smaller than 1000px will be served a system font instead and screens that wide and above will be served the custom font.
@media (min-width: 1000px) {
  body {
    font-family: 'FontName', Fallback, sans-serif;
  }
}
Font services
There are a number of services that will host fonts and provide access to commercially-licensed fonts as well. The benefits of using a service often boil down to having a large selection of legal fonts delivered efficiently (e.g. serving them on a speedy CDN).
Here are a few hosted font services:
- Cloud Typography
- Typekit
- Fontdeck
- Webtype
- Fontspring
- Typotheque
- Fonts.com
- Google Fonts
- Font Squirrel
What about icon fonts?
It’s true, @font-face can load a font file full of icons that can be used for an icon system. However, I think you’re far better off using SVG as an icon system. Here’s a comparison of the two methods.
Next steps with @font-face
Article
on
Jan 29, 2018
A New Responsive Font Format for the Web
Snippet
on
Jan 26, 2015
Basics of Google Font API
Article
on
Dec 17, 2015
Custom Fonts in Emails
Article
on
Jun 21, 2017
Google Font API & Interview
Article
on
Apr 17, 2018
Hey hey `font-display`
Article
on
Dec 17, 2015
The @font-face dilemma
Article
on
May 13, 2015
The At-Rules of CSS
Article
on
Apr 22, 2021
The Making (and Potential Benefits) of a CSS Font
Article
on
Dec 17, 2015
The New Bulletproof @Font-Face Syntax
Article
on
Sep 10, 2019
Typography for Developers
Article
on
Oct 27, 2020
Understanding Web Fonts and Getting the Most Out of Them
Article
on
Jan 29, 2018
What’s the deal with declaring font properties on @font-face?
More on @font-face performance
Article
on
Jun 19, 2018
Don’t just copy the @font-face out of Google Fonts URLs
Article
on
Apr 1, 2015
FOUT, FOIT, FOFT
Article
on
Sep 18, 2021
Getting the Most Out of Variable Fonts on Google Fonts
Article
on
Dec 6, 2020
How to Load Fonts in a Way That Fights FOUT and Makes Lighthouse Happy
Article
on
Aug 3, 2017
If you really dislike FOUT, `font-display: optional` might be your jam
Article
on
Jul 27, 2021
Learnings From a WebPageTest Session on CSS-Tricks
Article
on
Dec 17, 2015
Loading Web Fonts with the Web Font Loader
Article
on
Dec 17, 2015
Public Service Announcement: Watch Your @font-face font-weight
Article
on
Mar 5, 2018
Three Techniques for Performant Custom Font Usage
Video
on
Feb 20, 2017
#152: Font Loading with Zach Leatherman
▶ Running Time: 56:36
on
Oct 7, 2015
#035: Preventing Typekit FOUT
Related CSS properties
Almanac
on
Mar 25, 2020
font-display
Article
on
Dec 31, 2020
A font-display setting for slow connections
Article
on
Jan 29, 2018
A New Responsive Font Format for the Web
Almanac
on
Sep 22, 2022
font
Almanac
on
Jul 20, 2020
font-feature-settings
Almanac
on
May 15, 2015
font-family
Almanac
on
May 20, 2015
font-size
Almanac
on
Feb 23, 2017
font-style
Snippet
on
Apr 21, 2012
Font Stacks
More @font-face resources
- CSS Fonts Module Level 4 (W3C)
- How to Use the URL Thingy in the
@font-faceRule (DigitalOcean)
Ensuring that your website matches your brand and house style is incredibly important for anyone working on their own website. Despite this, most DIY website builders and other website platforms come with limited font options, making it hard to achieve the consistent brand you have been dreaming of.
So, how exactly can you make your website reflect the style that you have painstakingly designed? @font-face and CSS are the answer to this question, and we are going to show you exactly how to change your website’s fonts using these tools.
Why You Should Use CSS @font-face on Your Website
Before diving into the meat of this process, it makes sense to explore the reasons for using this method to apply custom fonts to your website. @font-face comes with a range of different benefits, making it an excellent choice for beginners and web design experts alike.
- Easy to use: You don’t need to be able to write CSS from memory to use rules like this. This makes it easy for anyone to add a font to their website with this method, all without having to rely on plugins or extensions.
- Light and fast: Using @font-face doesn’t add another CDN connection to your website, with the font files being hosted on your own server. This means that your CSS rules and font files will be cached with the rest of your website.
- Versatile: Just about any font can be used with @font-face, and it provides you with a huge range of options when it comes to controlling the way that your new font looks by default when it is used.
How to Use CSS @font-face to Load Custom Fonts

Using @font-face rules on your websites isn’t too hard at all. There are loads of tools around the web that can help you with this, and we’re going to show you each of the steps you will need to take to get a new font online.
1. Find Your Font

This all starts with some font hunting. You need to find a font that you like and will work for your website, and there are plenty of places to look when you’re approaching this. Of course, though, you can skip this step if you already have a font picked out.
Websites like DaFont can be great for those who are looking for fonts that can be used commercially for free. This is where we found the font that we are using in this guide. It’s called Kaiju Monster by Goma Shin, coming with a 100% free commercial license that means it can be used on any website.
Alongside DaFont, there are loads of other free font websites on the web. If you have a font example but don’t know its name, you can use the font identification tool on Font Squirrel to find fonts inside an image. This doesn’t always work, but it can be a great way to find similar fonts around the web.
If you’re looking for more inspiration, check out our guide on how to find free fonts similar to paid fonts.
2. Convert Your Font Into a Webfont
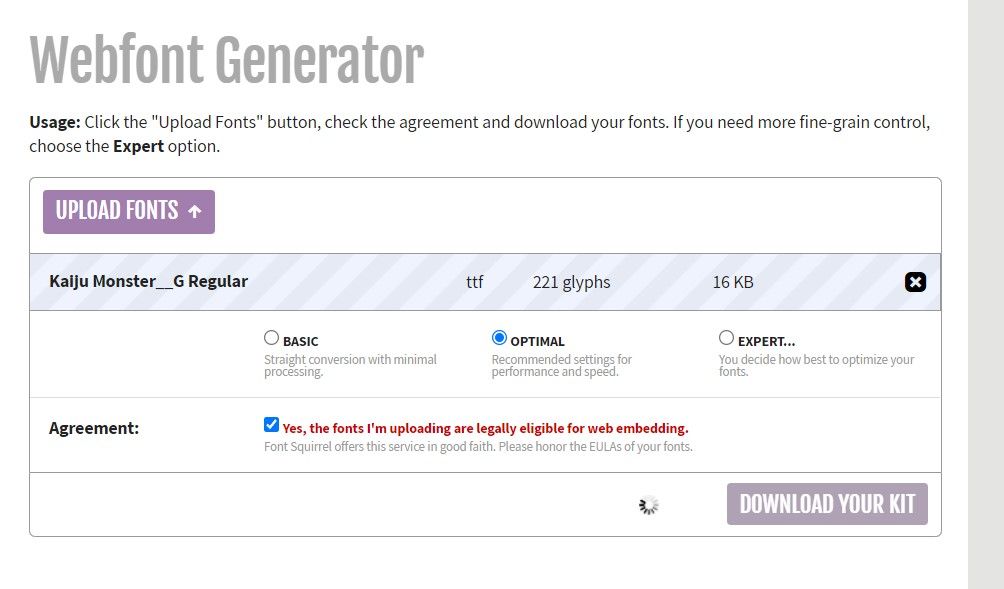
Once you have downloaded your font files, it will be time to convert your font into a format that your website will be able to display. Alongside being able to identify fonts, Font Squirrel also has a tool to convert fonts into webfont packs. Go to this page and follow the steps below to convert your font.
- Unzip your font.
- Click on Upload Font and select the font you are converting.
- Tap on the textbox to agree that you have permission to use the font.
- Click Download Your Kit and wait for the download to start.
- Unzip the new font file.
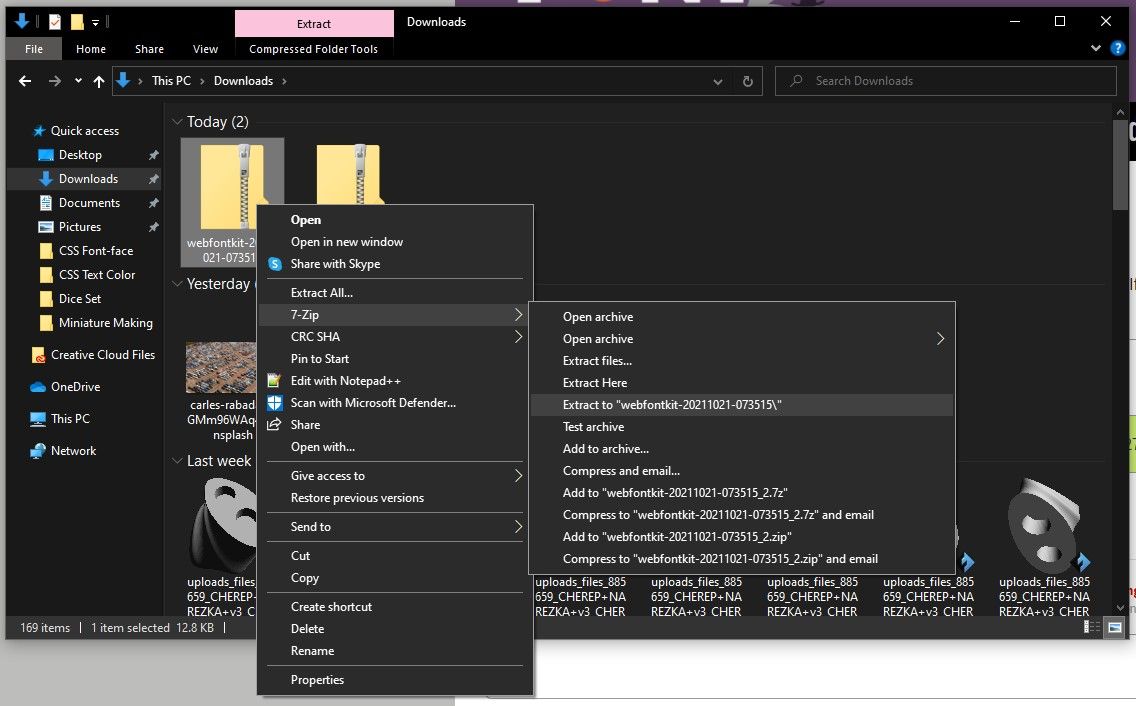
3. Upload Your Webfont to Your Website
Now that you have your font downloaded, it’s time to add it to the file directory that stores your live website. This will usually be on your webserver, and you can use either an FTP client like FileZilla or the tools that come on your webserver to add the files. We will be using the latter method for this.
The site that we are doing this to is a WordPress website. This means that there is already a file called wp-content that is ideal for our font, and we can start from here.
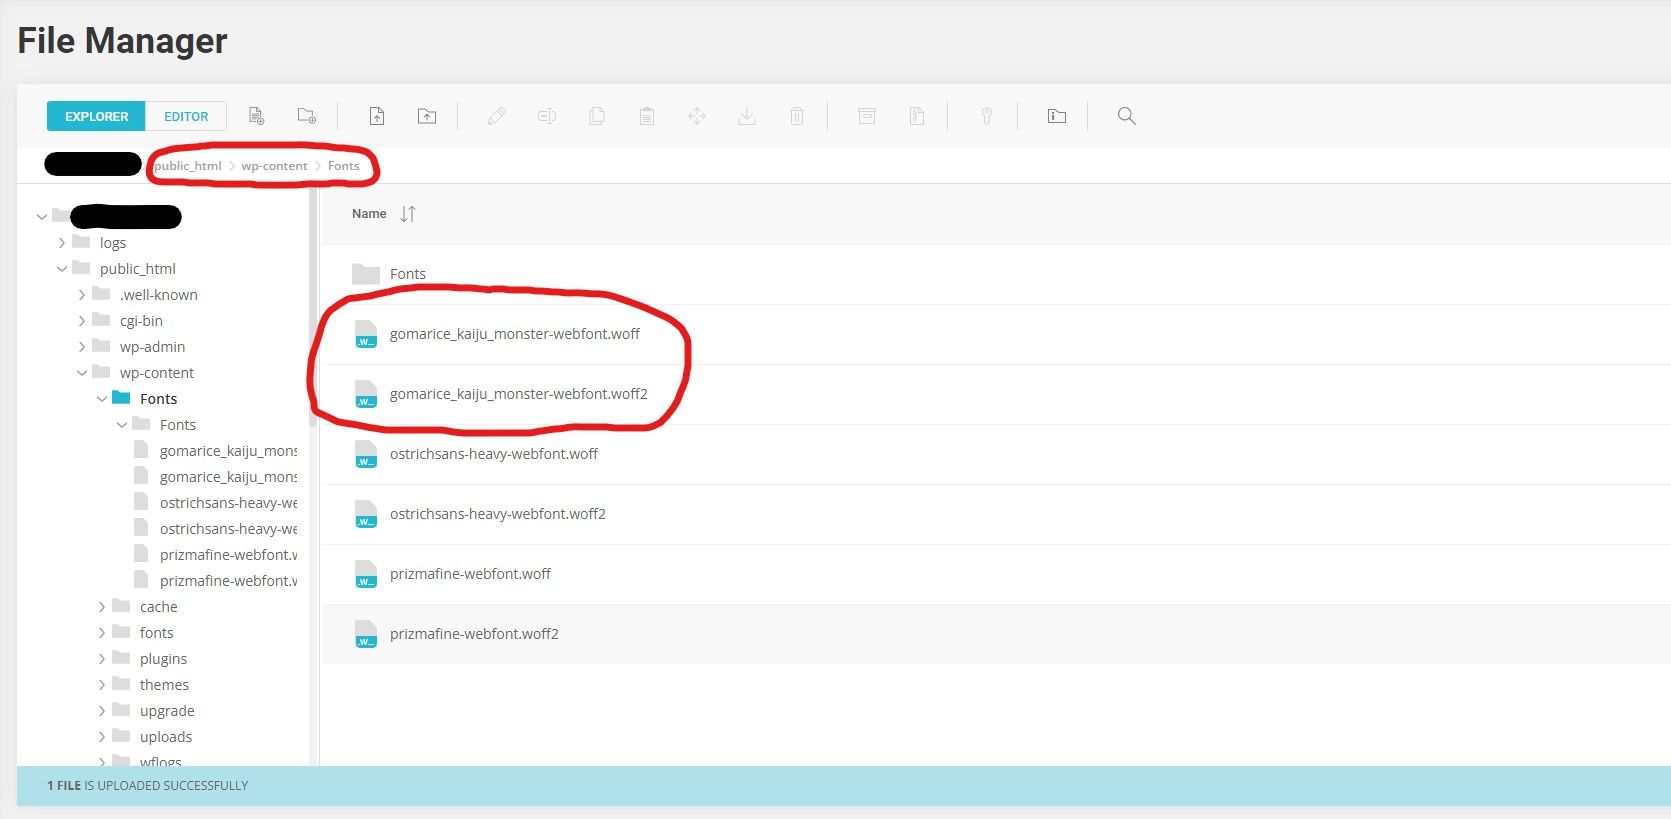
Go to the root directory in your website’s files and find somewhere suitable for your font (for WordPress, we used public_html > wp-content > and created a file called Fonts). Then, upload the .woff and .woff2 files that came with your Webfont pack.
4. Add an @font-face Rule to Your Site’s CSS
This next step is possibly the trickiest element of this process. Font Squirrel provides a sample @font-face rule with the folder that you downloaded, and this can be found by opening the stylesheet.css file inside.
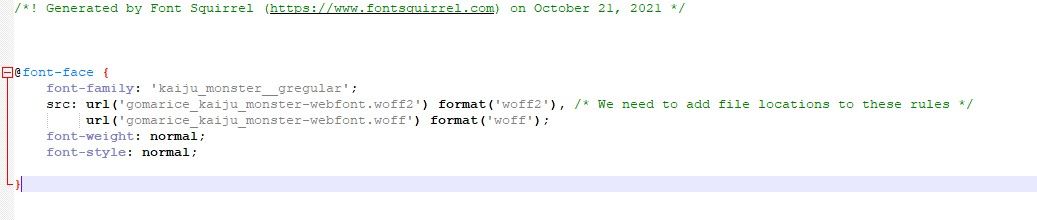
As you can see, this rule is almost complete, but it doesn’t include our file location. This can be a little tricky to figure out, as you don’t need to include the entire file path to get the job done. In our case, we only need to add /wp-content/Fonts/ to our @font-face rule, as the user will already be beyond the root file of our website when this CSS loads.

You can see what this makes the rules look like above.
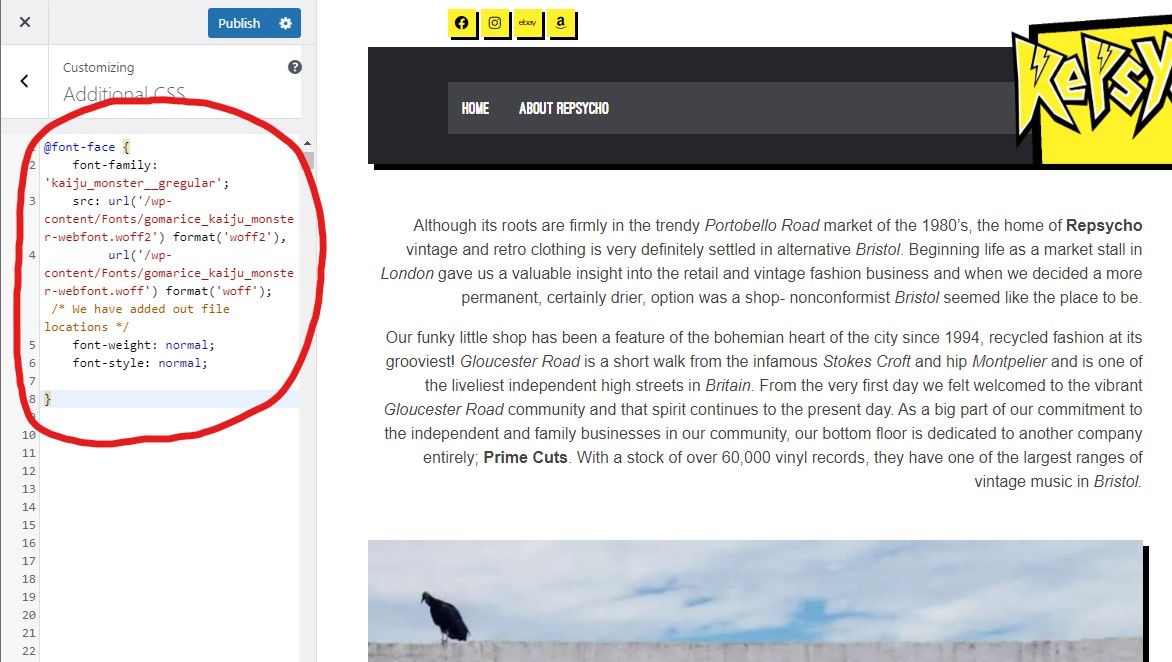
Finally, it’s time to add your @font-face rule to your website’s CSS. As we’re using WordPress, we will do this through our website’s customizer. Most modern website platforms offer custom CSS options, though you can also add this rule straight into a CSS file on your website.
An important note: We would usually provide a code sample at this stage in a guide. The CSS code that you will be using will almost certainly be different from ours, and this means that it is better for you to use the sample CSS provided by Font Squirrel.
5. Change Your Website Fonts With Font-Family CSS Rules
As the final stage in the process, you need to add new CSS rules to all of the text that you want to add your new font to. We showed you how to find the CSS classes and IDs of specific text elements on your website in our recent article about changing font colors with CSS.
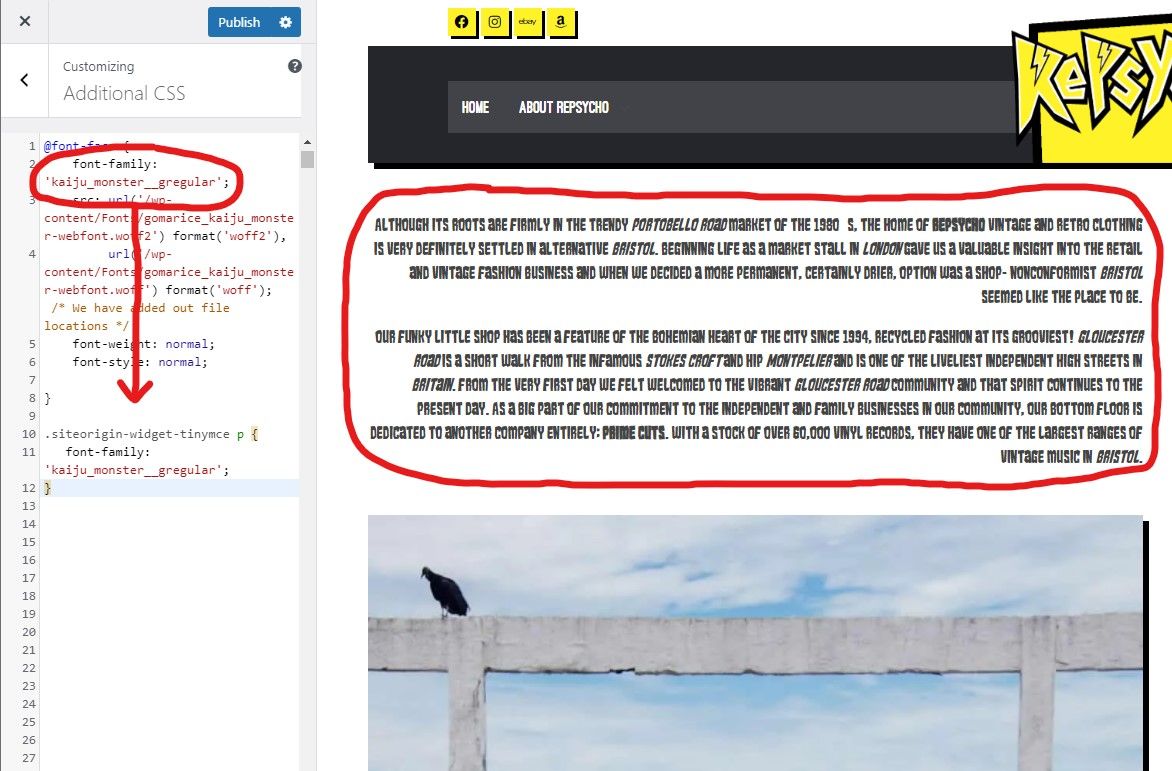
Once you know the class or ID you are working with, you can add this to your CSS file. In our case, we are going to change the main body text on one of our pages.
Add your class name followed by a set of curly brackets (our example — .siteorigin-widget-tinymce p {}). After that, add the font-family rule found at the top of your @font-face CSS group to the class you just set up. Then, check to make sure that the font has changed.
If your font hasn’t changed, you may have gotten your CSS class name wrong, or there could be another rule getting in the way. Using your browser’s development inspector can be a good way to determine what is stopping CSS from working.
Other Ways to Load New Website Fonts
Using @font-face isn’t the only way to add new fonts to your website. Companies like Google host their own libraries of fonts, enabling you to load fonts from their CDN rather than your own website. Options like this can be quicker and easier, but they also come with some downsides.
@font-face is a robust and reliable way to change the fonts on a website, giving you everything you need with forcing you to rely on services offered by other companies.
Ensuring that your website matches your brand and house style is incredibly important for anyone working on their own website. Despite this, most DIY website builders and other website platforms come with limited font options, making it hard to achieve the consistent brand you have been dreaming of.
So, how exactly can you make your website reflect the style that you have painstakingly designed? @font-face and CSS are the answer to this question, and we are going to show you exactly how to change your website’s fonts using these tools.
Why You Should Use CSS @font-face on Your Website
Before diving into the meat of this process, it makes sense to explore the reasons for using this method to apply custom fonts to your website. @font-face comes with a range of different benefits, making it an excellent choice for beginners and web design experts alike.
- Easy to use: You don’t need to be able to write CSS from memory to use rules like this. This makes it easy for anyone to add a font to their website with this method, all without having to rely on plugins or extensions.
- Light and fast: Using @font-face doesn’t add another CDN connection to your website, with the font files being hosted on your own server. This means that your CSS rules and font files will be cached with the rest of your website.
- Versatile: Just about any font can be used with @font-face, and it provides you with a huge range of options when it comes to controlling the way that your new font looks by default when it is used.
How to Use CSS @font-face to Load Custom Fonts
Using @font-face rules on your websites isn’t too hard at all. There are loads of tools around the web that can help you with this, and we’re going to show you each of the steps you will need to take to get a new font online.
1. Find Your Font
This all starts with some font hunting. You need to find a font that you like and will work for your website, and there are plenty of places to look when you’re approaching this. Of course, though, you can skip this step if you already have a font picked out.
Websites like DaFont can be great for those who are looking for fonts that can be used commercially for free. This is where we found the font that we are using in this guide. It’s called Kaiju Monster by Goma Shin, coming with a 100% free commercial license that means it can be used on any website.
Alongside DaFont, there are loads of other free font websites on the web. If you have a font example but don’t know its name, you can use the font identification tool on Font Squirrel to find fonts inside an image. This doesn’t always work, but it can be a great way to find similar fonts around the web.
If you’re looking for more inspiration, check out our guide on how to find free fonts similar to paid fonts.
2. Convert Your Font Into a Webfont
Once you have downloaded your font files, it will be time to convert your font into a format that your website will be able to display. Alongside being able to identify fonts, Font Squirrel also has a tool to convert fonts into webfont packs. Go to this page and follow the steps below to convert your font.
- Unzip your font.
- Click on Upload Font and select the font you are converting.
- Tap on the textbox to agree that you have permission to use the font.
- Click Download Your Kit and wait for the download to start.
- Unzip the new font file.
3. Upload Your Webfont to Your Website
Now that you have your font downloaded, it’s time to add it to the file directory that stores your live website. This will usually be on your webserver, and you can use either an FTP client like FileZilla or the tools that come on your webserver to add the files. We will be using the latter method for this.
The site that we are doing this to is a WordPress website. This means that there is already a file called wp-content that is ideal for our font, and we can start from here.
Go to the root directory in your website’s files and find somewhere suitable for your font (for WordPress, we used public_html > wp-content > and created a file called Fonts). Then, upload the .woff and .woff2 files that came with your Webfont pack.
4. Add an @font-face Rule to Your Site’s CSS
This next step is possibly the trickiest element of this process. Font Squirrel provides a sample @font-face rule with the folder that you downloaded, and this can be found by opening the stylesheet.css file inside.
As you can see, this rule is almost complete, but it doesn’t include our file location. This can be a little tricky to figure out, as you don’t need to include the entire file path to get the job done. In our case, we only need to add /wp-content/Fonts/ to our @font-face rule, as the user will already be beyond the root file of our website when this CSS loads.
You can see what this makes the rules look like above.
Finally, it’s time to add your @font-face rule to your website’s CSS. As we’re using WordPress, we will do this through our website’s customizer. Most modern website platforms offer custom CSS options, though you can also add this rule straight into a CSS file on your website.
An important note: We would usually provide a code sample at this stage in a guide. The CSS code that you will be using will almost certainly be different from ours, and this means that it is better for you to use the sample CSS provided by Font Squirrel.
5. Change Your Website Fonts With Font-Family CSS Rules
As the final stage in the process, you need to add new CSS rules to all of the text that you want to add your new font to. We showed you how to find the CSS classes and IDs of specific text elements on your website in our recent article about changing font colors with CSS.
Once you know the class or ID you are working with, you can add this to your CSS file. In our case, we are going to change the main body text on one of our pages.
Add your class name followed by a set of curly brackets (our example — .siteorigin-widget-tinymce p {}). After that, add the font-family rule found at the top of your @font-face CSS group to the class you just set up. Then, check to make sure that the font has changed.
If your font hasn’t changed, you may have gotten your CSS class name wrong, or there could be another rule getting in the way. Using your browser’s development inspector can be a good way to determine what is stopping CSS from working.
Other Ways to Load New Website Fonts
Using @font-face isn’t the only way to add new fonts to your website. Companies like Google host their own libraries of fonts, enabling you to load fonts from their CDN rather than your own website. Options like this can be quicker and easier, but they also come with some downsides.
@font-face is a robust and reliable way to change the fonts on a website, giving you everything you need with forcing you to rely on services offered by other companies.