DJI forward vision sensor error is the most common error that related to vision sensors. Also, many DJI drone users are asking for solutions for the forward sensor error in many DJI forums.

Therefore I’m writing this article about the causes of DJI forward sensor error and how to fix the DJI forward vision sensor error for users who are struggling with this error. Hope this article will help you to fix your DJI vision sensor error.
Causes for DJI Forward Vision Sensor Error.
Let’s talk quickly about the causes of DJI forward sensor error.
1. Miscalibrated forward vision sensors.
As I think this is the most common reason for the DJI forward sensor error in most cases. When vision sensors are miscalibrated it would feed faulty data and when the system detects the discrepancy of those data, the system throws the forward sensor error immediately.
2. Dirt/fog accumulation on the vision sensor surface.
As it sounds, the forward vision sensors sit on the forward of the DJI aircraft. If you fly the drone mostly in a dusty/foggy environment or stored in that kind of environment, that would cause dust/fog accumulation on the forward sensor surface. Therefore it would be unable to feed data properly and ultimately cause the forward sensor error.
3. Firmware Issues.
The firmware is the wizard software that manages all the data collected from the inputs of the drone (including sensors). Hence, having the latest and bug-free firmware is so important. So if you got glitched or outdated firmware it also could cause this error because of malfunctioning firmware that is unable to manage data properly.
3. Faulty sensor data or settings.
Faulty sensor data is one of the things that cause to trigger the vision sensor error. So if your drone has stored faulty settings or data related to vision sensors, it also could cause this error. Also, those settings could be permanent or temporary. Don’t worry we would treat both situations in the next section of the article.
5. Faulty or damaged forward sensors.
Having faulty or damaged forward sensors is the worst situation when it comes to the causes of the forward vision sensor error. Because most of the time they need to be replaced. If you are having the forward vision sensor error after a severe crash or just after the unboxing, there is a huge chance of having faulty or damaged forward vision sensors.
How to Fix DJI Foward Vision Sensor Error.
Let’s go through the step-by-step process of knocking down the causes of DJI forward vision sensor error, that ultimately fix the forward vision sensor error.
1. Restart the aircraft.
If you are getting the forward vision sensor error, this is the first you need to try. Because you might be getting the forward vision sensor error just because of a faulty temporary setting or data. Restarting the aircraft would erase all the temporary stored data and settings. So restart the aircraft first and check whether the forward vision sensor error is gone. If it doesn’t let’s go to the next step.
2. Turn on the drone mid-air.
When I was researching solutions for the forward vision sensor error, I found this solution that has been recommended by some users. personally, I don’t have any explanation about how it could help fix the error but it’s worth trying.
- Hold the drone mid-air about 1ft from a straight wall without covering forward vision sensors.
- Then restart the aircraft and check whether the error is gone. Else, let’s go to the next step.
3. Clean forward vision sensors surface.
As I said before flying or storing the DJI aircraft in a dusty or foggy environment causes covering the vision sensors’ surface with dust or fog. So use a soft cloth or cotton bud and clean the surface of the aircraft’s forward sensors.
4. Refresh/Update/Downgrade the firmware using DJI Assistant 2.
Having the latest and properly installed firmware is so important to avoid this kind of error. So let’s update or refresh the firmware to the latest next. Also when updating the DJI aircraft’s firmware, I personally advise using DJI Assistant 2 PC application to reduce the risk of having glitched firmware update.
- Download and install DJI Assistant from the DJI Download center to the PC.
- Connect the DJI aircraft to the computer using a micro USB cable and power on the aircraft.
- Open DJI Assistant 2 application on the PC and log in to your DJI account.
- Then select your DJI Drone and click on the “Firmware Updates” on the left panel and click on the “Upgrade” option.
- Click on “Start Update”.
- Wait until the firmware is completely downloaded and installed.
- Follow the same steps with the remote controller and update the controller’s firmware.
Once the firmware is successfully updated, power on the aircraft and check whether the error is gone. If it’s not let’s move to the next step which is so effective of fixing the forward vision sensor error.
5. Factory reset the aircraft.
This step would clear permanently stored faulty settings and data (including settings and data related to vision sensors).
- Download and install DJI Assistant 2 and connect the aircraft to the PC and turn it on.
- Open DJI Assistant 2 application and log in to your DJI account. Once you logged choose DJI drone and hit “Factory Restore Defaults”. Then wait until the process completes.
6. Calibrate Forward Vision Sensors using DJI Assistant 2.
Calibrating the forward vision sensors is the most effective action for fixing the forward sensor error and many users are able to fix the error after calibrating the vision sensors. But the above steps also are so important in preparing the DJI aircraft for the vision sensor calibration.
- Download and install DJI Assistant from the DJI Download center to the PC.
- Connect the DJI aircraft to the computer using a micro USB cable and power on the aircraft.
- Open DJI Assistant 2 application on the PC and log in to your DJI account.
- Then select your DJI Drone and click on the “Calibrate” on the left panel. Then you will be directed to the tutorial of vision sensor calibration. Also, I highly suggest you to check out the below video, because it demonstrates the process of vision calibration clearly.
- Follow those demonstrations and calibrate the vision sensors properly.
Most likely, right now you must have fixed the forward vision sensor error.
7. Contact Professionals or DJI Support.
Read the detailed article: How to get DJI Support to repair/fix your DJI drone issue.
If you are still struggling with the forward sensor error, mate there is something wrong with the hardware of the vision sensors or circuit. So you might have to replace those vision sensors or repair the circuit. Therefore this is the time to contact professionals and get help. Also, it’s so advisable to contact DJI Support and inform them about the issue and take help for repairing or replacing.

#1
![]()
OFFLINE
Commander
-

- Пользователи
-
- 11 сообщений
Начинающий летчик


- Город:Москва
- Коптер:mavic
Отправлено 12 Май 2017 — 11:41
После 3-4 полетов перестали работать сенсоры. Коптер не падал, не врезался, сенсоры чистые, обновлений и даже калибровок не делал (за эти 3-4 полета осваивал азы). Освещенности более чем достаточно, в первый раз обнаружил их неработоспособность в солнечный день. При этом dji go не выдает никаких ошибок, что сенсоры не исправны. Предложений откалибровать их также нет.
Что сделал: через assistant скачал новую прошивку. Далее захожу в калибровку, пролистываю три слайда tutorial, и кнопка «Начать калибровку» оказывается недоступной (серая). Рядом вращается значок «солнышка», типа система думает, но я оставлял в таком состоянии ее больше чем на час, ничего не происходит.
В общем такое ощущение, что как будто сенсоры с дрона исчезли как класс, и при этом dji go это полностью устраивает.
Что посоветуете?
P.S. Одновременно с этой проблемой перестал работать active track и прочие интеллектуальные режимы.
-
0
#2
![]()
OFFLINE
olegnsk
olegnsk
-
- Модераторы
-
- 7 702 сообщений
Опытный летчик АС

- Город:Москва, исторически Новосибирск и Камчатка
- Коптер:младшенький Mavic и ещё небольшая эскадрилья
Отправлено 12 Май 2017 — 11:48
Commander, Настройки GO бывают при переустановках слетают, проверяли а у вас сенсоры в приложении включены — в полётном меню иконка круг с дужками первая команда передние камеры, далее advance setting и команда нижние камеры.
-
1
#3
![]()
OFFLINE
Commander
Commander
-
- Пользователи
-
- 11 сообщений
Начинающий летчик
- Город:Москва
- Коптер:mavic
Отправлено 12 Май 2017 — 12:15
Да, эти настройки все включены. Да и повторюсь, я не менял ничего за время сделанных 3-4х полетов, обновлений не ставил. Прошивку сделал уже после того, как сенсоры перестали работать.
-
0
#4
![]()
OFFLINE
olegnsk
olegnsk
-
- Модераторы
-
- 7 702 сообщений
Опытный летчик АС
- Город:Москва, исторически Новосибирск и Камчатка
- Коптер:младшенький Mavic и ещё небольшая эскадрилья
Отправлено 15 Май 2017 — 02:01
Commander, через GO провести калибровку не пробовали?
-
0
#5
![]()
OFFLINE
Commander
Commander
-
- Пользователи
-
- 11 сообщений
Начинающий летчик
- Город:Москва
- Коптер:mavic
Отправлено 15 Май 2017 — 03:40
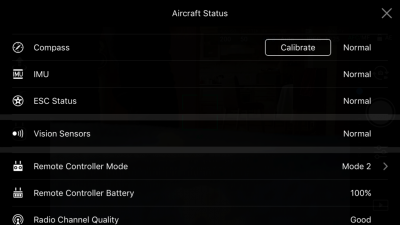
olegnsk, хотел, но не знаю как это сделать. Нет ни в одном из меню igo такого варианта. В одной из тем про калибровку (http://dji-club.ru/i…-vision-sensor/) видел скрин, на котором в меню «Aircraft status» есть пункт «Calibration vision sensors». Но у меня такого нет 
Добавлено позже (15 Май 2017 — 15:40)
По статусу с сенсорами все ОК:
-
0
#6
![]()
OFFLINE
olegnsk
olegnsk
-
- Модераторы
-
- 7 702 сообщений
Опытный летчик АС
- Город:Москва, исторически Новосибирск и Камчатка
- Коптер:младшенький Mavic и ещё небольшая эскадрилья
Отправлено 15 Май 2017 — 03:54
Commander, Простите, а с чего вы считаете, что сенсоры VPS не работают? Высота по VPS не отображается?, радар сенсоров в пилотном меню не активен либо не показывает приближение к препятствиям? Симптомы какие? То что, в Ассистенте не калибруются, но с этой прогой откровенно многие не дружат, у многих вкл меня не получилось через неё и прошится, только через GO.
Сообщение отредактировал olegnsk: 15 Май 2017 — 03:54
-
0
#7
![]()
OFFLINE
Olegich
Olegich
-
- Пользователи
-
- 24 сообщений
Начинающий летчик
- Город:Калининград
- Коптер:DJI MAVIK PRO
Отправлено 15 Май 2017 — 04:07
У меня после прошивки версии 700, тоже не калибруется. И с видео что-то, пока не понял. Прошился, два дня назад. А у других, как встала прошивка.
-
0
#8
![]()
OFFLINE
Commander
Commander
-
- Пользователи
-
- 11 сообщений
Начинающий летчик
- Город:Москва
- Коптер:mavic
Отправлено 15 Май 2017 — 05:24
olegnsk, по нескольким причинам:
1. В первую очередь визуально. Очередной раз запустив коптер, он на что-то ругнулся при включении active track, стал его сажать, а он взял и сел) А не завис над землей, сопротивляясь управлению.
2. Раньше он зависал на расстоянии неск метров над землей как вкопанный, а теперь его подколбашивает
3. Нет полос обнаружения препятствий на экране телефона. Нет показателя VPS (только D, H, HS, VS)
4. Ну и дальше уже всякие эксперименты: подношу руку снизу, спереди, приближаю специально к препятствию — ничего не происходит.
Я не уверен, что дело в калибровке. Тогда бы GO сообщила, что надо откалибровать. А она пишет normal. Но при этому ощущение, что сенсоры вообще отсутствуют и даже и не предполагались, иначе бы ошибка какая-нибудь была.
Но допустим надо откалибровать: как это сделать? В GO нет такого пункта.
Хотя в инструкции написано, что можно:
Быстрая калибровка
Используйте быструю калибровку, когда приложение DJI GO уведомляет, что требуется калибровка для датчиков технического зрения. Нажмите через «Aircraft Status» -> «Vision Sensors» для проведения быстрой калибровки.
Добавлено позже (15 Май 2017 — 17:24)
Olegich, у меня эта проблема образовалась без обновления прошивки. Вообще ничего не трогал. Дальнейшая прошивка последней версии не помогла.
А у вас не калибруются, или вообще не работают?
Сообщение отредактировал Commander: 15 Май 2017 — 05:22
-
0
#9
![]()
OFFLINE
Olegich
Olegich
-
- Пользователи
-
- 24 сообщений
Начинающий летчик
- Город:Калининград
- Коптер:DJI MAVIK PRO
Отправлено 16 Май 2017 — 10:52
Раньше не обращал внимания, летал над полями. Обучался и привыкал. Прошился 700, не смог от калиброваться. Взлетел, попробовал сенсоры снизу, спереди. Висит без движения. На (видио) подходишь должен отлетать, снизу, приподниматься. Буду пробывать еще калибровать, на другом компьютере.
-
0
#10
![]()
OFFLINE
Commander
Commander
-
- Пользователи
-
- 11 сообщений
Начинающий летчик
- Город:Москва
- Коптер:mavic
Отправлено 16 Май 2017 — 02:48
Olegich, в одном из видео-уроков говорилось, что после обновления желательно калибровать сенсоры, иначе они хуже начинают работать, с меньшего расстояния начинают видеть препятствия. Но нигде не упоминалось, что они вообще после обновления могут отрубиться. Вполне возможно, что они у вас и раньше не работали. Хотя вы точно должны были обратить внимание вот на что: если они работали, то при посадке он должен был тормозить над землей.
По поводу попробовать откалиброваться на другом компьютере — спасибо за идею. Тоже попробую. Правда у меня все компы маки. Если на другом не получится, то буду винду искать.
Скажите, а GO не предлагает вам откалибровать сенсоры? Какой статус по ним, как и у меня normal?
-
0
#11
![]()
OFFLINE
Olegich
Olegich
-
- Пользователи
-
- 24 сообщений
Начинающий летчик
- Город:Калининград
- Коптер:DJI MAVIK PRO
Отправлено 17 Май 2017 — 11:34
Сенсоры откалибровал на другом компьютере сис. винд. Взлетел, останавливается за метр до стены (видео, после калибровки за три метра) пусть хоть так. Набери в поиске на сайте «версия 700», жаркая дискуссия и много нового. Там и наши проблемы проскакивают. Есть пилоты, которые на старые прошивки откатываются.
-
0
#12
![]()
OFFLINE
Euronymousua
Euronymousua
- Город:Харьков
Отправлено 20 Май 2017 — 12:32
Commander, Cенсоры не калибрует так как у вас стоит Windows 10. Для работы калибровки в Windows 10 надо отключить цифровую проверку подписи драйверов и перезагрузиться
-
1
#13
![]()
OFFLINE
Commander
Commander
-
- Пользователи
-
- 11 сообщений
Начинающий летчик
- Город:Москва
- Коптер:mavic
Отправлено 22 Май 2017 — 02:07
Euronymousua, у меня нет windows, только mac. На двух компьютерах mac одинаковая ошибка. Как раз хочу найти винду и попробовать на ней.
-
0
#14
![]()
OFFLINE
DmitriyOz
DmitriyOz
-
- Пользователи
-
- 14 сообщений
Начинающий летчик
- Город:Екатеринбург
- Коптер:Mavic Pro
Отправлено 12 Июнь 2017 — 12:45
Такая же проблема, не удалось сделать калибровку. Проблема возникла до обновления в меню DJI Go статут Vision Sensor — Normal. При взлёте мавик не зависает на положенном расстоянии, начинает мотать вверх-вниз, немногов тороны Пробовал на Mac , Windows 7,10. При калибровке ошибка калибровки DJI Assistant 2 последней версии, пленок нет.
-
0
#15
![]()
OFFLINE
Commander
Commander
-
- Пользователи
-
- 11 сообщений
Начинающий летчик
- Город:Москва
- Коптер:mavic
Отправлено 13 Июнь 2017 — 11:13
DmitriyOz, я отдал коптер по гарантии официалам. Признали проблему, сделать ничего не смогли. Будут отправлять в Китай.
-
0
#16
![]()
OFFLINE
DmitriyOz
DmitriyOz
-
- Пользователи
-
- 14 сообщений
Начинающий летчик
- Город:Екатеринбург
- Коптер:Mavic Pro
Отправлено 15 Июнь 2017 — 08:52
Commander, печально. Тоже не могу решить эту проблему, заказывал из Китая сейчас пытаюсь связаться напрямую с DJI хотя бы что то узнать в чем может быть проблема
-
0
#17
![]()
OFFLINE
Commander
Commander
-
- Пользователи
-
- 11 сообщений
Начинающий летчик
- Город:Москва
- Коптер:mavic
Отправлено 15 Июнь 2017 — 09:17
DmitriyOz, я в начале подзабыл, что покупал в России у официалов, и поэтому обращался к китайцам. Они мне ответили, что надо отправлять коптер к ним. В чем именно проблема они не написали. Ниже оригинальный текст, если интересно.
Subject: The sensors do not work
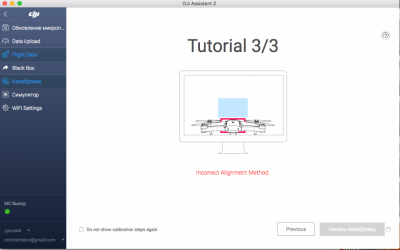
Message: Hello! After the 3-4 flights of my dron the both sensors — bottom and forward — stopped working. The dron did not crash into anything. The sensors are clear, and there is Illumination is quite enough. And I didn’t upgrade the firmware, didn’t calibrate the sensors. I did not do anything. It has happend suddenly. I watched the drone status in DJI GO4, but there was not any errors. And the system doesn’t recommend me to calibrate the sensors (watch the attached picture). What I’ve done: 1. Downloaded Assistant 2 and upgraded the firmware to latest version (macbook mini) 2. Go to Calibration, but the button «Start calibration» is disabled and grey. And there is mistake: Incorrect allignment method. (watch the attached picture) 3. Then I repeated these steps on another computer — macbook pro, and then I’ve make it one more time on PC (windows OS). With the same results. Will you recommend me what should I do?
Regards, Oleg
Support5.DE (DJI)
Hello, Unfortunately we recommend you send the drone in for a repair. In order to this you will need to contact your dealer or a local dealer in order to have it sent in. We apologize for the inconvenience.
Best Regards, Technical Support
DJI GmbH
Сообщение отредактировал Commander: 15 Июнь 2017 — 09:17
-
0
#18
![]()
OFFLINE
pbix
pbix
-
- Пользователи
-
- 5 сообщений
Начинающий летчик
- Город:Казань
- Коптер:DJI Mavic Pro
Отправлено 16 Июнь 2017 — 09:42
Такая же проблема с нижними сенсорами, когда подносишь ладонь — не поднимается, хотя clearance на пульте показывает (на показания VPS на телефоне не обратил внимания, а сейчас погода нелетная). Обновил мавика на последнюю прошивку, пока еще не пробовал летать.
Добавлено позже (16 Июнь 2017 — 22:42)
Проверил сегодня с новой прошивкой, все сенсоры работают адекватно. Когда у земли опускаешь стик до упора, дрон снижается примерно до метра и зависает, а если держишь стик вниз еще около двух секунд, то садится.
-
0
#19
![]()
OFFLINE
Parcifall
Parcifall
- Город:Moscow
- Коптер:Mavic air/pro
Отправлено 17 Июнь 2017 — 12:39
я так понял без сенсоров мавик всегда будет мотать в пространстве? а то я на компас грешу
-
0
#20
![]()
OFFLINE
DmitriyOz
DmitriyOz
-
- Пользователи
-
- 14 сообщений
Начинающий летчик
- Город:Екатеринбург
- Коптер:Mavic Pro
Отправлено 17 Июнь 2017 — 08:23
Parcifall без сенсоров лично у меня мотает, чаще всего опускается вниз при нахождении на мелкой высоте.
-
1

Forward vision sensors are the small camera lens-looking holes located under the drone.
these sensors are used to stabilize the altitude of a drone, they also allow safe landing, which means if they are not functioning properly your drone might crash.
However often times the software won’t even allow you to the lift-off if you have this error in the first place.
The thing is, it is fairly easy to fix in most cases but I see people putting their drones on for years because they are not able to find a solution to this.
You can fix forward vision sensor error by recalibrating the drone and refreshing the firmware with DJI assistant software. Download DJI Assistant 2 from DJI’s website, make sure it is the version that is suitable for your drone. The software will guide you through, and it can take up to 20 minutes.
if recalibrating and refreshing the firmware doesn’t seem to work i will be mentioning 4 other methods you can try.
The first three are pretty sight forward and generic, the last one is a pretty ninja technique, and hopefully it will fix the rest 20%.
1. Clean the vision sensor
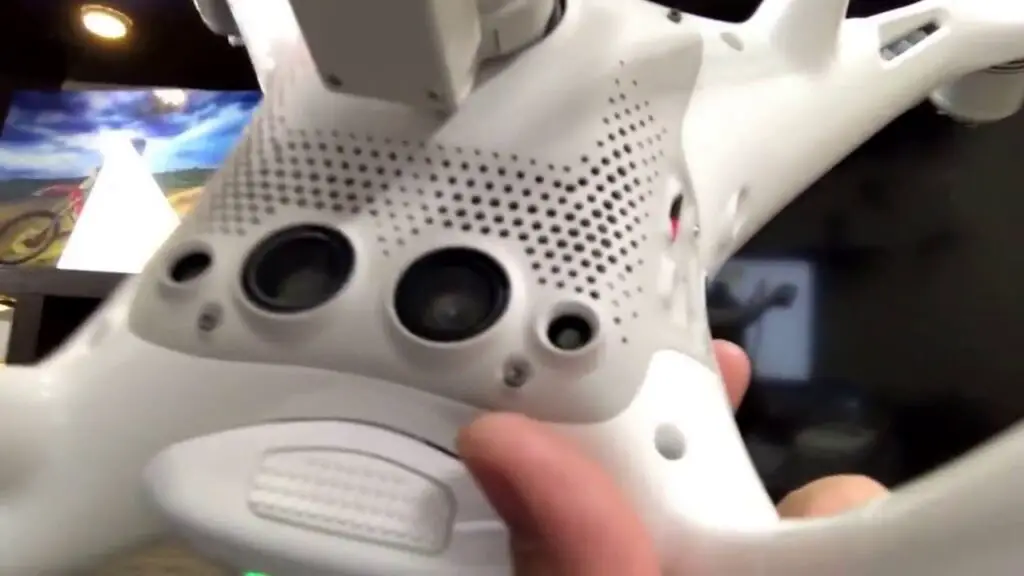
- If you had a crash and there is dirt on the lens
- If you have flown in rain or fog or even in high humidity and there is precipitation inside
- If there some kind of lotion grease or food particles that got transferred from your hand to the lenses
If the sensor is not squeaky clean there is a high chance it is causing the problem.
To clean the sensor you only need a soft cloth, unless there is precipitation inside, in that case the lenses must be removed and cleaned.
Also if your drone has been with DJI for a repair you should also check if there is no plastic covering on the sensor because when you send a drone to DJI to get it fixed they oftentimes send you a refurbished drone which often has plastic coverings on the sensors
2. Recalibrate your drone in DJI assistant 2
If you already have flown your drone, I guess you already have calibrated your drone before so it won’t be that complicated.
So to calibrate your DJI drone-
- Download DJI assistant 2 from the dji.com.
- Use the proper software, every DJI lineup have a different software
- This is for the phantom lineup
- This is for the fpv lineup
- This is for the Mavic lineup
- connect your drone with the provided cable
- Finally, the software will guide you through the process
Now I have seen a lot of people’s calibration process getting stuck mid-calibration and some people will finish the process then it will stop after it reaches %71 of the calibration process.
so if this is happening to you this might be the problem-
- use a flat screen
- Use a bigger screen
- Uninstall the current software you have from your computer and download it again.
- Try it on different screens
If this doesn’t fix the problem it can be because you have outdated firmware or your drone is damaged-
3. Refresh firmware in DJI assistant 2
Outdated firmware can also be the issue, I have seen people use a 2019 version in 2021 which is kind of scary to be honest.
To refresh your drone’s firmware-
- Power on the drone
- Connect it to your computer using the USB cable DJI provides
- Open the DJI Assistant 2 software on your laptop
- Log in to the DJI Assistant 2 app and select your drone
- Next, you will see the firmware version
- Tap update and choose the latest version
- If it is already the latest version click refresh
- Repeat process with other batteries(if you own one)
After updating the firm wear to get rid of the sensor calibration error you might have to recalibrate your drone.
*Note: before firmware update make sure all your drone, controller, and phones battery are fully charged because it can take up to 30 minutes*
4. Turn on the drone mid-air
So the last technique which is pretty awesome and easy to turn your drone on mid-air placing your drone about 12 inches from a straight wall.
- Pick up your drone of the ground at an about 1 foot about 12 inches distance from the ground
- hold the drone stable also about 12 inches from a stight wall
- Then tun it on as you normally would
- Make sure you are not covoring the sensors with your hand
- then restart the drone
What this does is it resets the downward vision sensor error. The problem with the method is that the error might come again after some time.
Final choice
If none of the methods fix it you need to send it to a professional.
If your drone is within a year period from activation or if you have DJI care there is a good chance you can get it fixed without any cost.
If not you might have to pay from fifty dollars up to hundreds of dollars depending on the situation
After you hand it to DJI it can take up to 15 days till they fix it and send it back to you, and it can take longer if you don’t live in the united states
If you are located in Armenia, you may contact the local dealer or DJI’s support via email to start a case and send the unit back.

Let us calibrate. Let us eradicate. Let Us Drone. In a perfect world, we would be able to fly our drones whenever and wherever we felt like it; never getting any errors or malfunctions. But this world isn’s perfect, and we have annoying things like jobs that dictate when we can fly, and the FAA to say where we can fly. When Saturday finally does come around and our location is in the green, we get VPS errors *sigh*. All is not bad though, it’s still Saturday, and I’m going to tell you how to get rid of those vision system errors on your Mavic Pro.
Here are the quick steps on how to calibrate the Mavic Pro Vision System to eradicate errors. First, download/launch DJI Assistant and set your computer screen to 1600×900. Connect your Mavic to the computer and click on “calibration”. Follow the onscreen instructions and restart your drone when the calibration is complete. See below for more detailed instructions.

What is the Vision System
DJI has worked very hard to make their drones user-friendly. The remote control helicopters I would fly as a teenager were incredibly difficult to maneuver compared to any of DJI’s drone lineup. Why is this? The incorporation of GPS and a Vision Positioning System (VPS) to keep the aircraft extremely steady are certainly two of the reasons.
The Vision System on the Mavic Pro is comprised of two ultrasonic sensors (located on the bottom) and four monocular sensors (two on the front and two on the bottom).
Ultrasonic sensors emit high-frequency sound waves that bounce off surfaces back to the drone to provide distances of objects.
Monocular sensors are cameras that feed images to the drones processor, which is then able to identify the depth of objects.
This is a basic description of the VPS. The Mavic Pro and Mavic Pro Platinum have identical Vision Systems, but I should note that sensors have been added to the sides, rear, and top of the Mavic 2 Pro and Mavic 2 Zoom. Be on the lookout for an article that dives deeper into the Vision Systems of the newer Mavics.
Common reasons for Vision System errors
Ever receive one of the following messages while flying your Mavic Pro?
- “Downward Vision Sensor Calibration Error. Precision Landing May Fail”. Well, that’s not good.
- “Vision Sensor Communication Error (10000 or 40000)”
- “Vision System Error”
- “Forward Vision Sensor Calibration Error. Precision Landing and Obstacle Avoidance May Fail”
- “Restart Aircraft. Contact DJI Support if the Problem Persists.”
- “Vision System Error (a00008)”
- “Recalibrate Vision System using DJI Assistant 2”
- “Recalibrate the Vision System. Use DJI Assistant on Mac or PC.”
It may be difficult to ascertain why you are getting errors with the VPS, but I have compiled a list of some common instances where people have gotten errors.
Problem: You may get an error or the drones VPS might just not operate correctly when flying over water. This is clearly stated in the manual: “The performance of the Forward and Downward Vision Systems are affected by the surface being flown over”, and under the types of surfaces listed we see “Flying over water or transparent surfaces”.
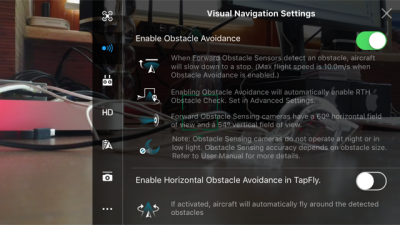
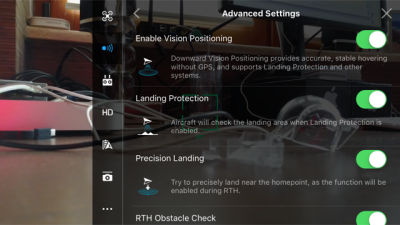
Solution: A lot of people have recommended turning off the VPS when flying over water. I usually don’t (unless I am flying low), but it is worth a shot if you are getting errors or notice erratic behavior while flying over water. To disable vision positioning, go to settings>visual navigation settings>advanced settings>enable vision positioning.

Problem: You receive a vision system error after a firmware update.
Solution: Try calibrating the VPS. If that doesn’t work, try refreshing the firmware. You can refresh the firmware with DJI Assistant 2 or within the DJI GO 4 App.
Problem: You receive a vision system error with your brand new drone.
Solution: Calibrate the VPS. We all know how much of bumpy ride packages go through in the mail, and your Mavic Pro doesn’t love all that jarring action.
Problem: VPS error after a crash.
Solution: Well, we can’t be too surprised if we get a VPS error, along with a few other errors if you crash the drone. Not only should you calibrate the VPS after a crash, but it would also be wise to calibrate the IMU and compass. Do a thorough inspection of the drone to make sure everything is structurally sound as well!

Problem: VPS error after a DJI GO 4 App update.
Solution: Forceclose the app and see if the error is still present upon reopening it. If it’s still there, delete the app and download it again. If none of this works, consider rolling back the app to the previous version. I can’t speak much to this as I have never tried it, but here are YouTube tutorials on how to undertake such a task: click here for Apple, and here for Android.
Problem: VPS error after the drone came into contact with moisture. A guy reported that after landing in the snow he got a VPS error, but the drone wouldn’t calibrate with DJI Assistant 2. Turns out moisture had fogged up one of the downward stereo vision sensors (on a P4 Pro).
Solution: After letting it dry out for a couple of days he was able to calibrate the VPS with no problem.
Problem: You may have a bad VPS module.
Solution: If you’ve tried everything and are still getting vision system errors, there is a chance that the VPS module is bad. DJI offers a 6-month limited warranty for the VPS on the Mavic Pro. In my article Is My DJI Drone or Gimbal Under Warranty? Check Here I explain how to go about initiating a return.

How to calibrate the Vision System on the Mavic Pro
Calibrating the vision system is a relatively simple process, and it takes about five minutes. You will need DJI Assistant 2 for the calibration.
- Make sure that you are on the latest firmware update.
- If you haven’t already, download DJI Assistant 2 from DJI’s website here.
- Set the resolution of your computer screen to 1600×900.
- Ensure that you have at least a 50% charge in your battery.
- Connect your Mavic Pro to a computer with a USB cable.
- Power on the drone.
- Launch DJI Assistant 2.
- Click on Mavic Pro.
- Click on “Calibration” which you should see on the lefthand menu.
- Follow the tutorial that will walk you through the steps of calibrating.
- After you have tilted your drone in every which way, DJI assistant 2 will begin the calibration, which takes about a minute.
- Upon completion of the calibration process, DJI Assistant 2 will ask you to restart the drone.
- Ta-da! You did it, and hopefully, all VPS errors will be gone when you open DJI GO 4.
If you’d prefer, here is a YouTube tutorial video that walks you through each step.
It’s very important to set the screen resolution
In order for the calibration to work, your computers screen resolution should be set to 1600 x 900. I have an older 27″ iMac which has a default screen resolution of 2560 x 1440, and I could not calibrate the VPS. I kept getting a “Frame Alignment Error”, and when I clicked on “calibrate” I was met with a white screen. I kept thinking “where are those darn dots that I see in the tutorial video”. Well, after conducting some research I learned that the resolution needs to be set to 1600 x 900. When I changed the screen resolution under the display settings, the calibration worked flawlessly.

If you have an Apple computer, go to settings>displays>scaled>click 1600 x 900. If you have a PC, the steps may be a bit different, but there should still be a “displays” section under settings where you can adjust the resolution.
Trevor’s Take
I’ll admit it, I can be lazy. I flew for months with a message on the DJI GO 4 App that read “Recalibrate the Vision System. Use DJI Assistant on Mac or PC.” When I went to calibrate the VPS on my iMac, I ran into the issue I mentioned above where the screen resolution was too large. I didn’t know that the screen resolution size was the culprit at the time, and I was too lazy to figure out why because, after all, my drone seemed to be flying just fine. When I realized how simple the remedy was, I frowned at myself for dragging my feet.
If you’re reading this and currently have a VPS error message displaying on your app, I hope that this post provided some value for ya. What’s your experience with the vision positioning system? Have you experienced other errors or problems that weren’t mentioned above? Comment below!

Knowing how to properly calibrate your Mavic Pro vision sensor is essential if you own a drone. If some issues appear during the flight, you need to fly back and perform the calibration process on your Mavic Pro vision sensor.
Other than the calibration system, there are a few tips regarding the Mavic Pro Vision Positioning system. The Mavic Pro automatically stabilizes and navigates the surrounding obstacles using the GPS, Forward, and Downward vision sensor. The flight controller receives essential data from the vision sensor and issues automatic commands depending on the obstacles nearby.
Without proper care for the vision positioning system, there is a serious chance of your Mavic Pro crashing. The Mavic Pro Vision sensor has self-governing work modes like Gesture mode and Tapfly. When it comes to the Gesture mode, the vision system gives the Mavic ability to take selfies or follow just by recognizing gestures.
Therefore, if you have problems with the Mavic vision sensor system, then the Gesture mode won’t work. Keep in mind that DJI’s Forward and Downward Mavic Pro Vision Systems are constructed of vision and ultrasonic sensors.
The instructions below will guide you on how to calibrate the vision sensors on your Mavic Pro, but keep in mind that calibration won’t fix the ultrasonic sensors on the bottom of the Mavic Pro. For more information about the whole Mavic VPS and system error continue to read this article.
Common Reasons For Vision System Errors
Before we explain the calibration process on your DJI Mavic Pro, you need to understand why a vision system error occurs. Here are the most common errors:
- “Vision System Error (a00008)”
- “Recalibrate Vision System using DJI Assistant 2”
- “Recalibrate the Vision System with DJI Assistant on PC or Mac.”
- “Downward Vision Sensor Calibration Error. Precision Landing May Fail”
- “Vision Sensor Communication Error (10000 or 40000)”
- “Restart Aircraft. If the Problem Persists, contact DJI Support.”
- “Forward Vision Sensor Calibration Error. Obstacle Avoidance May Fail”
Let’s start with the calibration process.
Calibrate Mavic Pro Vision Sensor Using DJI Assistant 2
- Download and Install the DJI Assistant 2 software on your PC or tablet.
- Charge the Mavic Pro to at least 50% (the more its charged, the better)
- Remove the propellers from your Mavic Pro.
- Mavic Pro needs to be connected via USB cable to your PC or tablet.
- Turn on the Mavic Pro and open the DJI Assistant 2 program.
- The DJI Assistant 2 should recognize your Mavic Pro as connected.
- Select your Mavic Pro and click on “Calibration”
- You should be shown the next window which has instructions listed on calibrating the Mavic VPS.
- It is recommended to watch the instructions regarding the Mavic Visions sensors.
- Press “Start Calibration” to start the calibration process.
- The Mavic Pro forward facing vision sensors should be positioned towards the screen.
- Next, you should match the red and green squares. You will probably have to move the Mavic Pro forward or backward in order to match the squares.
- When the corners of the square turn blue the Mavic is in correct position.
- The corners of the blue squares need to coincide with the blue boxes, in order to do so you need to move, tilt and rotate the quadcopter.
- It is safe to remove the aircraft away from the screen, once you complete Phase 1.
- To complete the Mavic Pro forward facing vision sensors you will have to follow the squares around the screen again.
- Now tilt your Mavic Pro so that the front of the Mavic is pointing upwards, and the bottom is facing to the screen.
- As in a step listed before, you need to move the Mavic closer or further away from the screen if you do not have all 4 blue corners.
- The blue corners need to be matching with the blue box to calibrate the bottom Mavic Pro vision sensors.
- Again, when correctly matching the corners to the boxes you will be prompted to move the Mavic Pro away.
- The last stage of the calibration is to follow the blue square around the screen again.
- When it gets to a 100% you will receive the message “Calibration Complete”. That means you have successfully calibrated your Mavic Pro.
- The DJI Assistant 2 will automatically calculate, apply and save the VPS calibration settings.
Notes On Mavic Pro Vision Sensor Calibration
- Make sure you installed the latest Mavic Pro firmware before calibrating the vision sensors.
- The propellers should be removed before starting the calibration.
- You should calibrate the Vision Sensors in well-lit spaces and avoid reflective surfaces.
- As mentioned before, it is better to have your laptop and Mavic Pro batteries charged fully or as close to the maximum before you start the process. It will be useful if the calibration takes longer.
- You shouldn’t calibrate the Mavic Pro vision sensors in small spaces.
- The calibration is fairly simple requiring only little wrist movement to swivel, tilt and spin the drone following blue squares on the screen.
- Make sure your fingers aren’t covering the vision sensors while calibrating the Mavic Pro.
- Do not turn the Mavic Pro off during calibration.
Calibrate Mavic Pro Vision Sensor Using Go 4 App
If you feel the obstacle detection system is not working properly or you receive a system error, a quick calibration of the Mavic Pro vision sensors could be a useful solution.
The quick calibration can even be done without a laptop or computer. So, if you have a smartphone you have everything needed to calibrate your Mavic Pro using the DJI Go 4 App.
In order to start the quick Mavic vision calibration do the following:
- Locate & press the Aircraft Status in the app.
- Tap on Vision Sensors to start the quick calibration.
What Is The Vision System?
As stated earlier in this article, the Mavic Pro has a forward and a downward vision system that allows the Mavic Pro to avoid any kind of obstacles by hovering, going over or around.
The Vision Positioning System (VPS) consists of the Forward and Downward Vision systems that are equipped with 4 monocular sensors and 2 ultrasonic sensors. To help the aircraft stay in its current position the Mavic Pro uses its downward vision system with ultrasonic and vision sensors.
It should be noted that the S-Mode, also known as Sports Mode does not use the Mavic Pro visions sensors. You should also know that if the GPS signal is weak, unavailable or the lighting is not good enough on your Mavic Pro, it won’t be able to return to home or avoid obstacles.
Mavic Pro Vision Sensor Light Signals
The Mavic Pro has 2 distinctive light signals to let you know what’s working properly and what’s not.
For example, if your Mavic does 2 green flashes, it means you are in P-Mode and the Forward and Downward Vision Systems are working. But, if your Mavic flashes a slow yellow light, then there is no GPS and the Forward and Downward Vision system is not working.
Ways How To Fix Vision System Error On Mavic Pro

The Mavic vision system error isn’t always connected with the vision sensors. It is possible that the error is caused by the ultrasonic sensor as well. The quick fix showed earlier in the article by calibrating the vision sensors does not work in this situation.
If you notice the Mavic vision system error early on, you should fix the problem as soon as possible. If your drone is new, you can always return it or get it repaired for free if you have a warranty.
But be sure to check how long your warranty is valid. Although, before you decide to take the drone to an authorized center, first check the steps below as the error could be fairly simple and easy to remove.
Here are some helpful tips & steps on what to try if you receive the Mavic Vision system error.
- Try turning the drone off and removing the batteries. After 2 minutes put the batteries back in and turn the Mavic Pro on.
- If your Mavic Pro has been bought recently, check if there is any tape or packaging covering any sensors.
- Make sure your vision sensors aren’t dirty. If they are dirty, clean them thoroughly. To remove dust or debris from the sensors it is best to use a soft cloth.
- Check if any propellers or other parts of the drone are bent or broken. Bent or broken parts send back wrong information to the flight controller, which leads to the system error.
- Make sure you have the latest update installed on your drone. If not, update it straight away.
- Try the quick calibration with the DJI Go 4 Mavic app that we covered above.
- You should also try calibrating the Mavic Pro vision sensors with DJI Assistant 2 software.
- Make sure that you are getting a good GPS signal in P-mode.
- Try calibrating the Mavic compass. If the compass is not calibrated properly, the flight control system is receiving incorrect information, and this could result with the system error.
Other than vision system sensor issues, you could be having issues with your Mavic disconnecting from the DJI Go 4 app or Remote Control.
If you own Mavic Air 2, here is an awsome article about Mavic Air 2 IMU, Compas & Gimbal Calibration.
Mavic Pro Vision System Performance
As said before in the article, the Mavic Vision System is equipped with an ultrasonic sensor on the bottom of the Mavic Pro. The ultrasonic sensor is greatly influenced by the surfaces it flies over.
Listed below are a few tips on which surfaces you should avoid flying over;
- surfaces that don’t have a clear texture pattern
- surfaces with the same identical repeating patterns
- sound wave absorbing surfaces
- avoid flying when the lighting changes frequently
- very low-lit surfaces
- tree branches power lines and other small and fine objects
- inclined surfaces
- objects or surfaces that are moving
- reflective or transparent surfaces
- surfaces with pure colors (monochrome surfaces) such as pure white, black, red, green, etc.
- and of course, do not fly over 22 mph (35km/h)
DJI Mavic Pro Care Refresh
There is an option to purchase a protection plan called the Mavic Care Refresh that works on a yearly base providing two replacement units and covering a wide variety of accidents at a very affordable price. Just like car insurance, you will probably be more relaxed when it comes to your Mavic Pro as well if you purchase this package.
DJI Mavic Pro Care Refresh
Calibrate Mavic Pro Vision Sensor Video
Here you can see a great video with step by step guide on how to calibrate your Mavic Pro vision sensor that we described above.
Knowing how to calibrate the Mavic Pro vision sensor is very important. If the vision system error on your Mavic Pro appears, then calibration may fix the problem.
Also, if you are flying your Mavic Pro and the vision system error occurs, you need to fly the quadcopter back to you straight away.
Below we have instructions on the Mavic Pro vision sensor calibration process, along with notes and videos. There is also terrific information on the Mavic Pro Vision Positioning system.
Very importantly, there are some top tips on how to resolve the vision system error on the Mavic.
The Mavic Pro uses the GPS, Forward and Downward vision sensors to locate itself, automatically stabilize and navigate between obstacles. The vision sensors feed essential data back to the flight controller which then responds by issuing automatic commands to avoid or hover in front of the obstacle.
If the Mavic Vision Positioning System isn’t working correctly or not at all, then there is a real possibility that the Mavic will crash.
The Mavic Pro Vision sensors also work in the autonomous modes such as TapFly and Gesture mode. In Gesture Mode, the Mavic Vision System recognizes gestures, allowing it to follow and capture selfies without the need for a phone or controller. So Gesture mode won’t work if their is problems with the Mavic vision system.
It must be noted that the Forward And Downward Mavic Vision System is made up of both vision and ultrasonic sensors. The steps below show you how to calibrate the vision sensors which are on the front and bottom of the Mavic Pro. This won’t calibrate the ultrasonic sensors which are on the bottom.
However, there is terrific information on troubleshooting the whole Mavic VPS and system error further down this article. Some are very simple steps and you can do these before calibrating the vision sensors on the Mavic.
If you have the latest Mavic 2 Pro or Zoom, then you visit our Mavic 2 vision calibration article as there are differences in the Mavic Pro and Mavic 2 vision system calibration.
Calibrate Mavic Pro Vision Sensor Using DJI Assistant 2
- Install DJI Assistant 2 software on your computer or laptop.
- Make sure your laptop and Mavic Pro batteries have a minimum of 50% charge but better if fully charged.
- Carefully remove the propellers from your Mavic Pro.
- Connect the Mavic Pro to your laptop computer using the USB cable.
- Switch on the Mavic quadcopter and open the DJI Assistant 2 software.
- The DJI Assistant software will recognize that the Mavic Pro is connected.
- Select your Mavic Pro drone and click on “Calibration” on the left hand side.
- The next window shows you the steps involved with calibrating the Mavic VPS.
- Spend a moment and watch the steps involved with calibrating the Mavic Visions sensors.
- Next, click on the “Start Calibration” on the bottom right hand side.
- Point the forward facing Mavic Pro vision sensors towards the screen.
- Now the green and red squares have to match so you may have to move the Mavic Pro forward towards the screen and back towards you to get them to match.
- Once the Mavic is in the correct position, the corners of the square will turn blue.
- You calibrate the vision sensors by moving the quadcopter so as to line up the corners of the blue square to coincide with the blue boxes.
- Tilt and rotate the Mavic Pro following the blue square on screen.
- Once this Phase 1 is complete, you will be prompted to move the aircraft away from the screen.
- Next, you will have to follow the little squares around the screen again.
- This will complete the Mavic Pro forward facing vision sensors.
- The next steps is to calibrate the Mavic Pro downward facing vision sensors.
- Point the under side of the Mavic Pro at the screen with the front of the Mavic pointing upwards.
- Again, you need to have 4 blue corners so you may need to move the Mavic closer or further back from the screen.
- Calibrate the bottom Mavic Pro vision sensors by matching the blue corners with the blue box following it around the screen.
- Again, during this process you will be prompted to move the Mavic Pro away from the screen.
- Then follow the blue square around the screen which is the last stage.
- On completion of the Mavic vision sensor calibration, the DJI Assistant 2 software will automatically calculate, apply and save the VPS calibration settings.
- When calibration is successful, it will show 100% and a message “Calibration Complete”.

Notes On Mavic Pro Vision Sensor Calibration
- Insure that you have the latest Mavic Pro firmware before calibrating the vision sensors.
- Only calibrate the Vision Sensors when the light is good and never calibrate near or over reflective surfaces.
- Remove the propellers before starting the calibration.
- It is best to have batteries full or as close to full on your laptop and Mavic Pro just in case the vision sensor calibration takes longer.
- Give yourself plenty of space and have no interruptions while you calibrate the Mavic Pro vision sensors.
- Calibration the Mavic Pro vision sensors require more or less only wrist movement to pivot, tilt and rotate the drone and following the blue squares on the screen.
- Insure you fingers aren’t covering or close to the vision sensors while calibrating the Mavic Pro.
- Leave the Mavic Pro on during the full process until you see the “Calibration Complete” message.
Mavic Pro Vision Sensor Quick Calibration Using Go 4 App
It is possible to do a quick calibration of the Mavic Pro vision sensors. This could be a quick fix if you receive the DJI Mavic vision system error while out aerial filming or if you feel the obstacle detection system isn’t working correctly.
If you don’t have a laptop with the DJI Assistant 2 app to do a full Mavic vision sensor calibration, then you can do a quick Mavic vision sensor calibration using the DJI Go 4 app.
To do the quick Mavic vision calibration, tap on the Aircraft Status in the DJI Go 4 app. Then click on Vision Sensors and start the quick calibration.
About The Forward And Downward Vision Sensors
The Mavic Pro is equipped with a forward and a downward vision system which constantly scans for obstacles in front of it, allowing the Mavic Pro to avoid collision by going around, over or just hovering.
The forward vision sensor are on the front of the Mavic Pro, almost like eyes.
The downward vision system use both ultrasonic and vision sensors along with image data to help the aircraft maintain its current position.
The main components of the Forward and Downward Vision System include 4 monocular sensors and 2 ultrasonic sensors.
The Mavic Pro visions sensors don’t work in S-Mode (Sports Mode) which is something to be mindful off.
In Failsafe Return-To-Home, the Mavic can avoid obstacles. However, you must remember that the Mavic cannot return to home or avoid obstacles if the GPS signal is weak, unavailable or if the lighting is insufficient.
Here is another terrific article which explains everything about collision avoidance sensors on drone.
Mavic Vision Sensor Light Signals
- 2 Green Flashes – In P-Mode with Forward and Downward Vision Systems working.
- Slow Yellow Flashing – No GPS. Also no Forward and Downward Vision System working.
Tips To Fix Vision System Error On Mavic Pro
The Mavic vision system error does not have to be coming from the vision sensors. It could in fact be caused by the ultrasonic sensors which are part of the whole Mavic Vision Positioning System. So the process of calibrating the vision sensors would not work if the problem is with the ultrasonic sensors.
If you’re quadcopter is only new and you are receiving the Mavic vision system error, it is important to troubleshoot the problem as quickly as possible. With new DJI products, there is always the option to return the quadcopter but this return period is not very long. However, don’t send it straight back without checking the below and following the below steps as it could be something very simple causing the Mavic vision system error.
Here are some instructions on what to try when you receive the DJI Mavic Vision system error.
- If the Mavic is only new, check to make sure there is no tape or packaging covering either the forward and downward vision sensors.
- Switch off the Mavic Pro, take the battery out and leave it off for about 2 minutes.
- If the light is insufficient or flying over certain surfaces can cause the vision sensor system error. See below.
- Ensure the vision sensors are clean. Use a soft cloth to remove any dust or debris from the sensors.
- Check other parts of your Mavic Pro. If the quadcopter isn’t flying correctly because of bent or broken propellers, then incorrect information will be sent back to the flight controller, which could lead to the to the system error.
- Check to make sure you are on the latest firmware and if not, then update immediately.
- Calibrate the Mavic Pro vision sensors using DJI Assistant 2 software described above.
- Try the DJI Go 4 Mavic quick calibration described above.
- Check that you are getting a strong GPS signal in P-Mode.
- Calibrate the Mavic compass. If the compass is not calibrated, the flight control system is not receiving correct information and this may effect the vision system.
As well as vision sensor issues, you may be having issues where the Mavic disconnects from the Remote Control or DJI Go 4 app. If you are experiencing this, then read our article on fixing Mavic Pro disconnects.
Performance Of Mavic Pro Vision System
The Mavic Vision System is affected by its surroundings with the ultrasonic sensor under the Mavic been affected greatly by the surfaces it is being flown over.
Here is some information which can adversely affect your Mavic Vision system. So flying over the following surfaces should be avoided if possible;
- monochrome surfaces such as pure black, white, pure red, pure green.
- reflective surfaces.
- transparent surfaces.
- moving objects or surfaces.
- inclined surfaces that will deflect sound waves away from the Mavic Pro.
- at high speeds of over 22 mph.
- small and fine objects such as power lines or tree branches.
- flying when the lighting changes frequently and drastically.
- extremely dark surfaces.
- which can absorb sound waves.
- surfaces without a clear pattern or texture.
- flying over surfaces with identical repeating patterns.
- Never user other ultrasonic devices, which have a frequency of 40 KHz near the Mavic when the Vision System is on.
Note: If you need any components or accessories for your quadcopter, then check out our DJI Mavic Pro parts, upgrades and accessories page. Also, check out DJI Support if you need further assistance with your quadcopter.
DJI Mavic Pro Care Refresh
The Mavic Care Refresh provides two replacement units for a small additional charge in one year and covers a wide variety of accidents, giving you greater peace of mind. Click on the below link to read the FAQ and pricing.
DJI Mavic Pro Care Refresh
DJI Mavic Pro Platinum Care Refresh
Calibrate Mavic Pro Vision Sensor Video
Here is a terrific video which takes you step by step through the Mavic Pro vision sensor calibration which was described above.
Оглавление
- Как устранить распространенные ошибки и неисправности на дронах DJI Mavic, Phantom или Phantom 4 PRO?
- Ошибка: «Недостаточно силы/ESC» и «Максимальная достигнутая нагрузка»
- Ошибка DJI Mavic: RTH (Return-To-Home) возвращение домой работает неправильно
- Что такое Home Point?
- Советы по полетам на квадрокоптере
- Ошибка: квадрокоптер DJI отключается и теряет связь с пультом управления
- Ошибки управления дроном вызванные смартфоном
- Дрон отключается после обновления прошивки
- Что делать теряется связь квадрокоптером во время полета?
- Приложение DJI Fly отключается при полете
- Пульт дистанционного управления отключается при полете
Квадрокоптеры от DJI — потрясающие дроны. Будь это серия Phantom, Phantom 4 PRO или Mavic и эти беспилотники будут летать годами без каких-либо проблем. Тем не менее в процессе эксплуатации могут возникать разного рода ошибки и неисправности. Среди которых встречаются разъединение, беспорядочный полет, проблемы с приложением, функция возврата (RTH) не работает или получает предупреждения и ошибки.
Всэ эти проблемы с дронами DJI требуют устранения неполадок но для этого необходимо выяснить, что произошло.
Некоторые из наиболее распространенных проблем например с Mavic Mini — это ошибка «Недостаточно силы / ESC» и «Максимальная достигнутая нагрузка». Другие проблемы включают в себя отключение от пульта дистанционного управления или приложения Fly, отлет или неправильная работа функции возврата дрона домой.
Мы рассмотрим возможные ошибки и пути к их исправлению. Некоторые из этих проблем могут быть вызваны многими переменными и зачастую их вполне устранить своими силами. Тогда как другие неисправности могут потребовать ремонта вашего дрона.
Ошибка: «Недостаточно силы/ESC» и «Максимальная достигнутая нагрузка»
Ошибка DJI Mavic: Power Load Reched и Not Enough Force/ESC error или Недостаточно Force/ESC предупреждение или ошибка о максимальной мощности нагрузки может быть довольно опасной.
Mavic Mini может даже сбросить высоту и даже разбиться. Во многих случаях дрон будет падать и восстанавливать свою позицию. Однако если вы летите очень близко от земли, Mavic может резко упасть. Это довольно страшно и вам повезет если ваш дрон не окажется поврежден.
Есть много причин которые могут вызвать эту проблему и на момент написания у DJI не было однозначного ответа или решения на это.
Однако многие владельцы сами решили эту проблему или поняли что может являться причиной.
Предупреждение заключается в том, что дрон не получает достаточного питания и на электронных контроллерах (ESC) генерируется сообщение об ошибке.
Это сообщение указывает на проблему с ESC (электронными регуляторами скорости) и двигателями.
Проблемы с питанием могут также указывать на неисправный аккумулятор. Тем не менее от DJI по этому поводу не получилось узнать ничего определенного.
Эта проблема может быть исправлена различными способами.
Рассмотрим на примере DJI Mavic Mini.
Максимальное сопротивление ветру — это проблема возникающая из-за того что квадрокоптер летает при ветре, превышающем 28,8 км/ч, что является максимальной скоростью ветра для дрона.
28,8 км/ч — это уровень 4 по шкале Бофорта, что означает умеренный ветер. Многие из этих предупреждений недостаточной силы/ESC происходят на приличной высоте. Несмотря на то, что на земле может быть спокойно, на высоте может быть ветер который может стать серьезной помехой для полета.
Читайте: Как летать на квадрокоптере при сильном ветре: Советы
Полет на полной скорости — если вы летите на полной скорости и если есть небольшой встречный ветер, это также может привести к ошибке. Двигатели при такой ситуации работают в максимальных режимах. Ослабьте газ и посмотрите, исчезнет ли предупреждение.

Очень быстрый подъем в P-режиме. Возникает ли проблема при быстром подъеме. Если это так, то это потому, что во время полета вверх дрон сталкивается с высоким сопротивлением и контроллер полета обнаруживает это выдавая всплывающее сообщение ESC о недостаточной мощности.
Максимальная высота полета — полет на максимальной высоте или близко к ней для. По мере набора высоты воздух становиться менее плотным (это связано с тем что гравитация притягивает к себе молекулы воздуха к земле). И на большой высоте двигатели беспилотников должны работать в более интенсивном режиме чтобы удерживать беспилотник в воздухе.
Читайте: На какую максимальную высоту может подняться квадрокоптер?
Защита винтов может вызывать проблему — Снимите защитные кожухи винтов, если они прикреплены. Некоторые пилоты решили эту проблему сняв защитные винты.
Читайте: Может ли квадрокоптер долететь до космоса и прилететь обратно?
Неисправные пропеллеры. Многие дроны Mavic Mini, получившие предупреждение «Недостаточно силы / ESC» и «Достигнута максимальная мощность нагрузки» были исправлены простой заменой пропеллеров. На рынке представлено много разных пропеллеров Mavic Mini.
Изучите пропеллеры. Даже если вы не видите какой-либо ошибки, идите вперед и измените их. Они могут быть небольшим дефектом одного или нескольких пропеллеров, что даже не заметно на глаз. Эта проблема была исправлена для многих владельцев путем перехода на новый комплект пропеллеров.
Некоторые пилоты замечали что лопасть пропеллера слегка трется о дрон. Поэтому, когда Mavic Mini выключен, раскрутите винты и посмотрите, происходит ли это.
Кроме того DJI рекомендует заменять полный набор а не только 1 пропел.
Неисправная батарея — Если у вас есть запасные батареи замените и посмотрите, появляется ли предупреждение Not Enough Force или Not Enough Power / ESC. Если ошибка пропадет то это может указывать на проблемы с аккумулятором.
Полет в режиме S или P — предупреждение появляется только в режиме S или P. Это один из вопросов, который всегда задает служба поддержки DJI и может указывать на то где по их мнению существует проблема. Если это происходит только в одном из режимов это может указывать на проблему с программным обеспечением, а не с оборудованием. Выполните обновление программы.
Обновите приложение DJI Fly — убедитесь, что у вас установлена последняя версия приложения DJI Fly. Как правило с новой прошивкой многие ошибки в программном обеспечении устраняются.
Понижение/обновление прошивки — предупреждение Not Enough Force/ESC неоднократно исправлялось, сначала понижая версию прошивки а затем обновляя ее снова.
Вы можете понизить версию прошивки с помощью приложения DJI Assistant 2 на своем компьютере. Если это устраняет проблему то проблема изначально была в поврежденной прошивке.
Ошибка DJI Mavic: RTH (Return-To-Home) возвращение домой работает неправильно
Существуют различные причины неправильной работы функции Mavic Mini Return-To-Home. Например вместо возвращения в исходную точку дрон совершает аварийную посадку. Вот некоторые из причин по которым это может происходить
Что такое Home Point?
Домашняя точка по умолчанию является первым местом, где дрон получил сильные сигналы GNSS (данные о местоположении). В приложении DJI Fly App белый значок GNSS будет содержать не менее 4 белых полос. Индикатор состояния Mavic Mini быстро мигает зеленым после того, как Home Point была записана.
Домашняя точка может быть записана неправильно — с версиями прошивки, предшествующими v01.00.0400, можно было взлетать и летать со слабым сигналом GPS или при плохом освещении. Если у вас слабый сигнал GPS на взлете, то домашняя точка будет записана неправильно.
Домашняя точка будет записана, когда дрон обнаружит сильный сигнал GPS это будет означать то, что дрон вернется в другую домашнюю точку, чем в ту которую вы хотели.
В версии встроенного ПО v01.00.0400 была добавлена функция отключения взлета при слабом сигнале GPS (GPS <8) и недостаточном освещении окружающей среды. Эту функцию можно отключить вручную (требуется приложение DJI Fly v1.0.4 или новее).
Слабый или недоступный GPS. Несмотря на то что у вас может быть записана домашняя точка при взлете, ваш дрон не сможет вернуться в исходную точку, если сигнал GPS станет слабым или недоступным. Очень важно летать в местах, где сигнал GPS сильный.
Заряд батареи — Батарея разрядилась до уровня, при котором она не может позволить вернуться квадрокоптеру в исходную точку и вместо этого он будет вынужден совершить аварийную посадку.
Полет против ветра — может сильно замедлить работу любого дрона и довольно быстро разрядить аккумулятор.
Откалибруйте компас и IMU — если ваш дрон не возвращается в исходную точку, возможно он не знает своего точного местоположения из-за электромагнитных помех или у него возникают проблемы с правильным поиском глобальных спутников.
Откалибруйте компас. Несмотря на то, что IMU касается позиционирования калибровка IMU (инерциальный измерительный блок)также не является плохой идеей.
Читайте: Как правильно делать калибровку квадрокоптера?
Потерянное соединение с пультом дистанционного управления — Функция отказоустойчивого RTH автоматически активируется на многих моделях после потери сигнала пульта дистанционного управления в течение более 11 секунд. Тем не менее, это зависит от того, была ли домашняя точка была успешно записана в первую очередь.
Сильный ветер — Если дрон летит обратно в исходную точку с определенной скоростью. Если ветрено, дрон не сможет достичь конечной точки вовремя и совершит аварийную посадку.
Читайте: Как не потерять свой квадрокоптер и что делать если это случилось?
Высота над уровнем моря — если вы не летаете на открытой местности, может быть важно установить другую высоту, чем высота по умолчанию 20 метров (65,61). Полеты в местах, где есть деревья, канавы, высокие кусты и т. Д. Вы можете установить другую высоту RTH в приложении DJI Fly.
Советы по полетам на квадрокоптере
Откалибруйте компас — особенно если вы летите в новой области, которая находится на большом расстоянии от последнего места, где вы летали. Также выполните калибровку, если вы получили сообщение в приложении DJI Fly для калибровки. Обязательно откалибруйте компас после жесткой посадки и где нет физического повреждения дрону.
Не летайте — пока у вас слабый сигнал GPS.
Обновление прошивки — проверьте и обновите прошивку для дрона и пульта дистанционного управления. Кроме того, установите последнее приложение DJI Fly, когда оно станет доступным.
Электромагнитные помехи. Многие электромагнитные помехи могут вызвать проблемы с компасом квадрокоптера и возможностями полета, в том числе его точное местоположение в небе. Следите за электромагнитными помехами в той области, где вы будете летать.
Читайте: Как запускать квадрокоптер в городе с электромагнитными помехами?
ЭМП — это помехи, создаваемые одним электрическим устройством другому электромагнитными полями. Электромагнитные помехи (EMI), также называемые радиочастотными помехами (RFI) в радиочастотном спектре, представляют собой помехи, создаваемые внешним источником, который воздействует на другую электрическую цепь.
Примерами EMI являются линии электропередач, мачты сотовых телефонов, здания из армированной стали, электрические кабели, мосты, железнодорожные линии, автомобили и электрические устройства.
Ошибка: квадрокоптер DJI отключается и теряет связь с пультом управления
Существует множество причин, по которым дрон отключается и теряет связь с пультом дистанционного управления или приложением Fly.
Эти разъединения и отлет могут быть вызваны различными источниками такими как: сам квадрокоптер, пульт дистанционного управления, смартфон, планшет или EMI. Поэтому для устранения проблем с полетом необходимо рассмотреть ряд действий:
Вы не вошли в приложение DJI Fly
Когда вы устанавливаете приложение DJI Fly на свой смартфон вам будет предложено войти или зарегистрироваться. Если вы не вошли в систему дальность полета будет ограничена как по высоте, так и по дальности, пока вы не активируете свой логин. Проверьте, возможно вы просто всего вы не вошли в систему.

Если вы пропустили этот шаг после установки приложения DJI Fly, то вы можете войти в систему, нажав на профиль и затем нажав «Войти».
Заполнение Кэш приложения DJI Fly
Файлы кэша могут заполнить память и даже стать причиной ошибки. В приложении DJI Fly есть 2 настройки для настроек кеша.
- Кэш при записи
- Максимальная емкость кеша видео
При отключении полезно отключить функцию «Кэширование при записи». Вы можете найти это в Настройки> Камера> Расширенные настройки камеры. Переместите ползунок влево и выключите его.
В приложении DJI Fly есть 4 кеша, которые можно очистить;
- Видео кеш
- Фото кеш
- Музыкальный кеш
- Авиационный кэш
Вы можете очистить кэш в приложении DJI Fly, нажав «Профиль»> «Настройки»> «Очистить кэш».
Нажмите на каждый, а затем нажмите «подтвердить», чтобы очистить кэш.
Ошибки управления дроном вызванные смартфоном
Многие из проблемы с отключением дронов вызваны смартфоном или планшетом, на котором установлено приложение DJI Fly.
На смартфонах установлено множество приложений, и они постоянно работают, даже когда мы ими не пользуемся. Они постоянно подключены к Интернету, провайдеру сотовых телефонов, извлекают данные, уведомляют и пингуют сеть.
Чтобы летать на дроне без проблем, вы должны убедиться, что ваш смартфон или планшет работает оптимально.
В отношении смартфонов и планшетов рекомендуется оптимизировать использование уведомлений от различных приложений (Facebook, Twitter, Instagram, WhatsApp и т. Д.) Во время полета. Отключите обновления приложений во время полета. Удалите неиспользуемые приложения, так как они занимают пространство, память и мощность процессора.
Существуют программы для оптимизации вашего смартфона и планшета. Используйте их для оптимальной работы смартфона или планшета.
Если ваш смартфон работает неоптимально, то открытие приложения DJI Fly и запись видео во время полета может привести к большей нагрузке на процессор или заполнить его память. Если смартфон работает медленно, он может легко разорвать соединение.
Карты памяти могут быть проблемой потери связи
Отключении дрона от пульта дистанционного управления или приложения DJI Fly может возникнуть от проблем, вызванных картой памяти micro SD.
Эти карты micro SD могут быть повреждены физически или файловая система может быть повреждена на карте. Даже видео или фотография могут испортиться на микро SD-карте.
Читайте: Обзор лучших карт памяти: SD, microSD, XQD и CF как выбрать?
Если вы используете карту памяти micro SD для чего-то другого или на ней есть другие файлы и папки то при установки ее в дрон это может вызвать проблему при попытке записи на нее. Карта micro SD все еще может работать, но ее работа будет не идеальна и может вызывать помехи в работе квадрокоптера.
Выньте карту micro SD и попробуйте летать без нее.
Если вы не отсоединились, значит, проблема в карте памяти micro SD. В настройках камеры приложения DJI Fly вы можете отформатировать карту micro SD.
Перед форматированием карты памяти может потребоваться скопировать существующую информацию (файлы, фотографии и видео) с карты на компьютер.
Если по-прежнему происходят разрывы после форматирования карты SD просто замените ее.
Пульт управления вызывает ошибку соединения
Проверьте свой пульт дистанционного управления. Убедитесь, что порты и кабели чистые. Грязь или пыль могут очень легко попасть в порты.
Один из самых простых способов отключить дрон от пульта дистанционного управления — удерживать его и антенну в неправильном направлении.
Чтобы получить самый сильный сигнал передачи, держите пульт там где дрон находится в небе. Ваша антенна дистанционного управления должна быть направлена правильно.
Слабый сигнал или электромагнитные помехи, приводящие к отключению дрона
Если вы летите на большое расстояние, сигнал передачи будет слабее. Когда сигнал становится слабее, становится вероятным отключение вашего квадрокоптера от приложения DJI Fly или пульта дистанционного управления.
Тем не менее никогда не стоит доводить дальность полета или высоту до предельных значений.
Кроме того, полет в тумане, при дожде, очень пасмурной погоде или плохом освещении может вызвать нарушения связи и проблемы с полетом.
Дрон отключается после обновления прошивки
Проблема так же может быть вызвана неправильной установкой новой прошивки или ошибкой в ней.
Используя приложение DJI Assistant 2, установленное на компьютере подключаете дрон и возвращаетесь к более ранней версии прошивки.
После понижения версии прошивки вы должны запустить свой квадрокоптер, чтобы увидеть, решены ли проблемы с полетом. Если это так, вы можете попробовать обновить еще раз или подождать до нового обновления прошивки.

Все дроны DJI содержат регистратор полета. Информация о полетных данных, включая телеметрию, статус самолета и другие параметры, автоматически сохраняется во внутреннем регистраторе на вашем дроне DJI.
К этим данным можно получить доступ с помощью программного обеспечения DJI Assistant 2. Эта информация также может быть отправлена в DJI для устранения проблем с полетом.
Что делать теряется связь квадрокоптером во время полета?
Если пульт дистанционного управления все еще подключен и это просто приложение DJI Fly которое потеряло сигнал, выполните следующие действия;
Закройте и снова откройте приложение DJI Fly — уберите руки с пульта и дайте вашему квадрокоптеру зависнуть. Закройте приложение DJI Fly и вернитесь к нему. Существует большая вероятность, что приложение Fly снова подключится к дрону.
Приложение DJI Fly отключается при полете
Если дрон находится на достаточном расстоянии, вы можете предпринять некоторые действия для повторного подключения, пока он находится в режиме RTH. Вы можете попробовать следующее:
- Попробуйте приблизиться в направлении Mavic Mini.
- Закройте приложение DJI Fly и снова войдите.
- Остановите и запустите WiFi на вашем смартфоне.
- Перезагрузите телефон или планшет.
Пульт дистанционного управления отключается при полете
Если у вас нет управления вы не сможете управлять своим дроном, даже если сможете его увидеть. Ваш дрон должен запустить режим точки возврата Failsafe Return-To-Home, который он установил сразу после взлета.
Если дрон улетел на большое расстояние, вы можете помочь пульту дистанционного управления подключиться. Вот несколько советов.
Двигайтесь к своему квадрокоптеру, сокращая расстояние между пультом и дроном. Если вы находитесь рядом с работающим двигателем, генератором, линиями электропередачи и т. д., Это может ослабить сигнал, приводящий к отключению. Поэтому отойдите от любых помех в направлении дрона, и он может просто переподключиться.
Проверьте направление антенны пульта дистанционного управления. Направлена ли антенна в правильном направлении. Если дрон находится довольно высоко в воздухе, вам нужно изменить угол наклона пульта дистанционного управления, чтобы антенна была направлена прямо на него. Вам также необходимо изменить угол, на котором вы держите пульт дистанционного управления, если вы стоите на возвышенности и летите на дроне вниз.
Выключите и снова включите пульт — стоит попробовать, так как это займет всего несколько секунд.
Возврат к домашнему безотказному режиму — если вы летите в широком открытом пространстве без каких-либо препятствий на пути. Режим RTH вернет квадрокоптер обратно в исходную точку. Это очень полезная функция особенность.
![]() Загрузка…
Загрузка…