Содержание
- Python import mysql error
- ModuleNotFoundError: No module named ‘mysql’ in Python #
- Conclusion #
- Import error :No module named MYSQLdb
- 8 Answers 8
- Устанавливаем библиотеку PyMySQL вместо mysqlclient в Django
- Библиотеки для работы с MySQL в Python
- pymysql
- mysqlclient
- mysql-connector-python
- Python MySQL Database Connection using MySQL Connector
- Table of contents
- How to connect MySQL database in Python
- Arguments required to connect
- Create MySQL table from Python
- Python MySQL CRUD Operation
- Python MySQL Connection arguments list
- Use the Dictionary to keep MySQL Connection arguments
- Change MySQL Connection Timeout from Python
- Connect to MySQL Using Connector Python C Extension
- Next Steps:
- About Vishal
- Related Tutorial Topics:
- Python Exercises and Quizzes
Python import mysql error
Reading time В· 4 min
ModuleNotFoundError: No module named ‘mysql’ in Python #
The Python «ModuleNotFoundError: No module named ‘mysql’» occurs when we forget to install the mysql-connector-python module before importing it or install it in an incorrect environment. To solve the error, install the module by running the pip install mysql-connector-python command.
Open your terminal in your project’s root directory and install the mysql-connector-python module.
After you install the mysql-connector-python package, try importing it like:
The Python error «ModuleNotFoundError: No module named ‘mysql’» occurs for multiple reasons:
- Not having the mysql-connector-python package installed by running pip install mysql-connector-python .
- Installing the package in a different Python version than the one you’re using.
- Installing the package globally and not in your virtual environment.
- Your IDE running an incorrect version of Python.
- Naming your module mysql.py which would shadow the official module.
- Declaring a variable named mysql which would shadow the imported variable.
If the error persists, get your Python version and make sure you are installing the package using the correct Python version.
For example, my Python version is 3.10.4 , so I would install the mysql-connector-python package with pip3.10 install mysql-connector-python .
Notice that the version number corresponds to the version of pip I’m using.
If the PATH for pip is not set up on your machine, replace pip with python3 -m pip :
If the «No module named ‘mysql’» error persists, try restarting your IDE and development server/script.
You can check if you have the mysql-connector-python package installed by running the pip show mysql-connector-python command.
The pip show mysql-connector-python command will either state that the package is not installed or show a bunch of information about the package, including the location where the package is installed.
If the package is not installed, make sure your IDE is using the correct version of Python.
For example, In VSCode, you can press CTRL + Shift + P or ( вЊ + Shift + P on Mac) to open the command palette.
Then type «Python select interpreter» in the field.
Then select the correct python version from the dropdown menu.
If you are using a virtual environment, make sure you are installing mysql-connector-python in your virtual environment and not globally.
You can try creating a virtual environment if you don’t already have one.
If the python3 -m venv venv command doesn’t work, try the following 2 commands:
- python -m venv venv
- py -m venv venv
Your virtual environment will use the version of Python that was used to create it.
You also shouldn’t be declaring a variable named mysql-connector-python as that would also shadow the original module.
If the error is not resolved, try to uninstall the mysql-connector-python package and then install it.
Try restarting your IDE and development server/script.
You can also try to upgrade the version of the mysql-connector-python package.
This one is for using virtual environments (VENV) on Windows :
This one is for using virtual environments (VENV) on MacOS and Linux :
Conclusion #
The Python «ModuleNotFoundError: No module named ‘mysql’» occurs when we forget to install the mysql-connector-python module before importing it or install it in an incorrect environment. To solve the error, install the module by running the pip install mysql-connector-python command.
Источник
Import error :No module named MYSQLdb
I have a problem so a connection a python to database local of MySQLdb.
Message of error is:
This is a script in python 3.4 to connection my database local MYSQL.
PS: Can you help me please?

8 Answers 8
You have to install the module with:

sudo apt install libmysqlclient-dev then
pip install mysql-python
pip install mysqlclient or pip3 install mysqlclient
I got this issue solved by the following line
Also updated the MySql configuration line to

Unfortunately MySQLdb does not support Python 3.
You basically have two options:
Run your script using python2.7, that way you won’t need to change the MySQL module. The downside is that you’ll probably have to convert some code to python2.x.
Look for python3.x supported modules as explained here: Python 3.4.0 with MySQL database.
As far as I know, MySQLdb does not support Python 3. From the page ‘[MySQL-python]’1 updated on 2013-06-08:
mysqlclient-python (https://github.com/PyMySQL/mysqlclient-python) claims support for python 3 but I have no experience with that product. Personally, I use pyodbc (also requires libmyodbc) which looks very similar from a programming point of view.
The answer by @technodivesh worked for me in debian 9 and python 3.5. But with a little modification.
It was suggested here
The first command returned me-
E: Package ‘libmysqlclient-dev’ has no installation candidate
[I would have added this as a comment to his answer. But, I do not have the required reputation to make comments.]
Источник
Устанавливаем библиотеку PyMySQL вместо mysqlclient в Django
В Django изначально реализована поддержка баз данных MySQL и MariaDB. Общение с этими базами выполняется через разные библиотеки, в том числе mysqlclient. Библиотека mysqlclient является самой быстрой и рекомендуемой при работе с Django и MySQL, но ее установка не всегда очевидна и вы можете столкнуться с рядом проблем.
Навигация по посту
Библиотеки для работы с MySQL в Python
Скорее всего их больше, какие-то библиотеки более не поддерживаются, но обычно выделяют 3 варианта для работы с базами MySQL в Python:
- mysqclient — библиотека написанная на С, которая компилируется при установке. Является форком старого проекта MySQLdb1, который давно не поддерживается. Рекомендуется разработчиками Django и имеет самые высокие показатели производительности из остальных;
- mysql-connector-python — это официальная библиотека от Oracle. На момент написания статьи можно встретить информацию, что разработчики переписали ее на Python 3, но это не так. Библиотека написана на Python 2.7, а поддержка этой версии закончилась в Django 2.0. В документации Django, почему-то, до сих пор можно прочитать о поддержке этого модуля. Библиотека имела самые низкие показатели скорости;
- pymysql — сторонний проект написанные на Python 3. Django официально не поддерживает эту библиотеку. Создана теми же разработчиками, что и mysqlclient.
При установке библиотеки mysqlclient, на любой платформе (особенно на Windows), могут быть проблемы с компиляцией. Часть ошибок, которые у вас могут появиться:
- django.core.exceptions.ImproperlyConfigured: Error loading MySQLdb module. Did you install mysqlclient?
- building ‘_mysql’ extension error: Microsoft Visual C++ 14.0 is required.
- ModuleNotFoundError: No module named ‘MySQLdb’
Если у вас есть похожие проблемы, то я бы рекомендовал использовать mysqlclient на сервере (как самую быструю библиотеку), а pymysql использовать локально. О том как это сделать и как можно исправить ошибки написано далее.
Само собой статья исключает ситуацию, что вы можете использовать PostgreSQL в своем проекте.
pymysql
Самый простой и быстрый способ исправить ошибку — установить библиотеку pymysql:
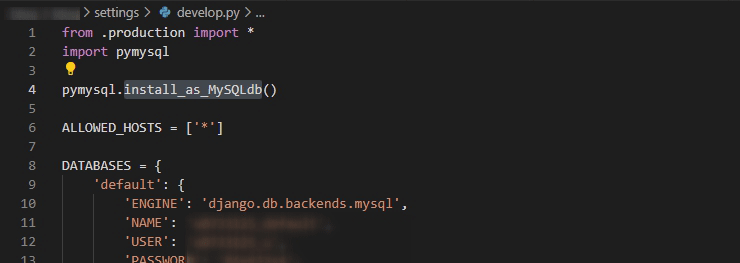
Что бы вы смогли использовать ее в Django, в файле settings.py вам нужно импортировать библиотеку и использовать метод для подключения к API MySQLdb:
Эти настройки может понадобится положить в другие файлы, такие как ‘__init__.py’ или ‘manage.py’. Это зависит от вашего проекта. Суть в том, что мы должны импортировать pymysql до того, как будет выполнен импорт MySQLdb. Обычно это происходит в ‘settings.py’ в DATABASES.
Ниже пример файла настроек, который использую я при локальной разработке:
На странице проекта в github есть уточнение, которое касалось версий Django 2.2+ и следующей ошибкой:
- django.core.exceptions.ImproperlyConfigured: mysqlclient 1.3.13 or newer is required; you have 0.9.3;
Я эту ошибку не встречал, но исправить ее можно вручную заменив версию mysqlclient следующим образом:
Каких либо ошибок при работе с этой библиотекой я не замечал.
mysqlclient
Перед установкой библиотеки mysqclient, в случае Linux, вам понадобится установить целый ряд дополнительных пакетов для компиляции:
В качестве эксперимента я установил чистый Windows 10 и Django 3.2 и ошибок с mysqlclient не было. Возможно разработчики что-то исправили. Если на Windows у вас все равно появляются ошибки, то вы можете скачать скомпилированную версию и установить ее через pip:
В случае Windows этот способ у меня не всегда срабатывал. Поэтому я предпочитаю, если использую MySQL, использовать PyMySQL локально, а mysqlclient на сервере.
Далее устанавливаем саму библиотеку через pip:
mysql-connector-python
Эта официальная библиотека от разработчиков Oracle написанная на Python 2.7. Эта библиотека так же поддерживается разработчиками Django. В более новых версиях Django 3+ можно увидеть следующую ошибку:
- ‘mysql.connector.django’ isn’t an available database backend or couldn’t be imported. Check the above exception. To use one of the built-in backends, use ‘django.db.backends.XXX’, where XXX is one of: ‘mysql’, ‘oracle’, ‘postgresql’, ‘sqlite3’
В Django 2.2 можно увидеть следующую ошибку:
- django.core.exceptions.ImproperlyConfigured: Error loading MySQLdb module. Did you install mysqlclient?
Эти ошибки связаны с отсутствием поддержки Python 2.7 начиная с Django 2.0. В марте 2020 года (прошел год с написания статьи) разработчики отписывались о том что в курсе этой проблемы и решают ее. Вы можете попытать удачу и установить этот модуль следующим образом:
Источник
Python MySQL Database Connection using MySQL Connector
Updated on: March 9, 2021 | 39 Comments
In this lesson, you will learn how to connect the MySQL database in Python using the ‘MySQL Connector Python‘ module. This Python MySQL tutorial demonstrates how to develop and integrate Python applications with a MySQL database server.
In Python, We can use the following modules to communicate with MySQL.
- MySQL Connector Python
- PyMySQL
- MySQLDB
- MySqlClient
- OurSQL
Note: Above all interfaces or modules are adhere to Python Database API Specification v2.0 (PEP 249) that means the syntax, method, and way of access the database is the same in all.
PEP 249 is designed to encourage and maintain similarity between the Python modules that are used to access databases. By doing this, above all modules are following rules defined in Python Database API Specification v2.0 (PEP 249).
You can choose any of the above modules as per your requirements. The way of accessing the MySQL database remains the same. I recommend you to use any of the following two modules:-
- MySQL Connector Python
- PyMySQL
Note: This tutorial focuses on the MySQL Connector Python module. All examples are created using MySQL Connector Python.
Advantages and benefits of MySQL Connector Python: –
- MySQL Connector Python is written in pure Python, and it is self-sufficient to execute database queries through Python.
- It is an official Oracle-supported driver to work with MySQL and Python.
- It is Python 3 compatible, actively maintained.
Table of contents
How to connect MySQL database in Python
Let’s see how to connect the MySQL database in Python using the ‘MySQL Connector Python’ module.
Arguments required to connect
You need to know the following detail of the MySQL server to perform the connection from Python.
| Argument | Description |
|---|---|
| Username | The username that you use to work with MySQL Server. The default username for the MySQL database is a root. |
| Password | Password is given by the user at the time of installing the MySQL server. If you are using root then you won’t need the password. |
| Host name | The server name or Ip address on which MySQL is running. if you are running on localhost, then you can use localhost or its IP 127.0.0.0 |
| Database name | The name of the database to which you want to connect and perform the operations. |
How to Connect to MySQL Database in Python
- Install MySQL connector module
Use the pip command to install MySQL connector Python.
pip install mysql-connector-python
Import MySQL connector module
Import using a import mysql.connector statement so you can use this module’s methods to communicate with the MySQL database.
Use the connect() method
Use the connect() method of the MySQL Connector class with the required arguments to connect MySQL. It would return a MySQLConnection object if the connection established successfully
Use the cursor() method
Use the cursor() method of a MySQLConnection object to create a cursor object to perform various SQL operations.
Use the execute() method
The execute() methods run the SQL query and return the result.
Use cursor.fetchall() or fetchone() or fetchmany() to read query result.
Close cursor and connection objects
use cursor.clsoe() and connection.clsoe() method to close open connections after your work completes
Run the below query on the MySQL console if you have not created any database in MySQL. Otherwise, you can skip the below query.
Create Database in MySQL
Example to connect to MySQL Database in Python
Output.
Points to remember
- Catch exceptions that may occur during this process by importing the Error class from the MySQL connector module using a from mysql.connector import Error statement.
Error class is useful to debug when we failed to connect to MySQL. For example, ACCESS DENIED ERROR when the username or password is wrong. - The connect() method can throw a Database error exception if one of the required parameters is wrong. For example, if you provide a database name that is not present in MySQL.
- The is_connected() is the method of the MySQLConnection class through which we can verify is our Python application connected to MySQL.
- At last, we are closing the MySQL database connection using a close() method of MySQLConnection class.
Create MySQL table from Python
Now you know how to connect to a MySQL server from Python, In this section, we will learn how to create a table in MySQL from Python. Let’s create table ‘Laptop’ under the ‘Electronics’ database.
Output:
Python MySQL CRUD Operation
Also, learn how to execute various MySQL operations from Python by referring to the following articles.
Click on each tutorial to study operations in detail.
- Insert rows into MySQL table from Python: Insert a single and multiple rows into the MySQL table. Also, learn how to use Python variables in the parameterized query to insert dynamic data into a table.
- Select rows from MySQL table using Python: Execute a SQL SELECT query from a Python application to fetch rows from MySQL table. Also, learn how to process SELECT query results, Fetch all rows or single rows from the table, and count total rows of a table.
- Update rows of MySQL table from Python: Update a single row, multiple rows, a single column, and various columns. Additionally, learn how to use python variables in the parameterized query to update table data.
- Delete table rows from Python: Delete a single row, multiple rows, a single column, and various columns. Also, learn to Delete all Rows, Delete tables, and an entire database from MySQL using python.
- Execute MySQL stored procedures from Python and learn how to pass IN and OUT parameters to the MySQL stored procedure.
- Python MySQL Parameterized Query and Prepared Statement: Learn to use Parameterized Queries or Prepared Statement to use Python variables in the SQL query to pass dynamic data to MySQL table.
- Python MySQL Commit and Rollback to Manage Transactions: Manage MySQL database transactions from Python to maintain the ACID property of MySQL transactions using the commit() and rollback() methods.
- Python Database Connection Pooling With MySQL: Learn to create and use a connection pool to increase the performance of your Python MySQL applications.
- Python MySQL BLOB Insert and Retrieve digital data: Learn to insert or fetch any digital information such as a file, image, video, or song as blob data into MySQL table from Python.
Python MySQL Connection arguments list
We already discussed the four mandatory arguments required to connect the MySQL Server.
Let see what other connection arguments we can use to communicate with the MySQL server from Python. Below is the list of all other connection arguments and their meaning.
- port : The TCP/IP port of the MySQL server. This value must be an integer. We can specify the different port number if the MySQL server is listening to a different port. The default value for this port argument is 3306.
- use_unicode : Specify whether to use Unicode or not. The default value is True.
- charset : MySQL character set to use, character set variables relate to a client’s interaction with the server. There are almost 30 to 40 charset MySQL server supports. The default value of the charset argument is “utf8″.
- auto-commit : Set it to true if you want to auto-commit transactions. If you wish to manage transactions in MySQL from Python, you need to set this value true or false. The default value is False, i.e., the changes are not committed to the database. You need to explicitly call a commit method to persist your changes in the database.
- get_warnings : To fetch warning, this is helpful to know the connection is established but with warnings. The default value is False.
- raise_on_warnings : Set it when you want to raise an exception on warnings. The Default value is False.
- connection_timeout (connect_timeout*) : Timeout for the TCP and Unix socket connections. The connection terminates after this timeout expired.
- buffered : If true, the cursor objects fetch the results immediately after executing queries. The default value is False.
- raw : If true, MySQL results are returned as-is rather than converting into Python types. The default value is False. You can set it to true if you want a query result in MySQL type.
- force_ipv6 : When setting to True, uses IPv6 when an address resolves to both IPv4 and IPv6. By default, IPv4 is used in such cases. The default value for this argument is false.
- pool_name : It is the Connection pool name that you are creating or using.
- pool_size : Connection pool size that you want to create. The default value is 5.
- pool_reset_session : Reset session variables when the connection is returned to the pool. The default is True.
- use_pure : Specify whether to use pure Python or C Extension. If use_pure=False, then a pure Python module is used; otherwise, it connects MySQL using C extension. Moreover, if C Extension is not available, MySQL Connector Python automatically falls back to the pure Python implementation.
- unix_socket : The location of the Unix socket file. These enable communication between two processes.
- auth_plugin : Authentication plugin to use, Added in 1.2.1.
- collation : MySQL collation to use. You can use the collation that you set while installing MySQL Server. The default value is utf8_generalW_chiich.
- sql_mode : Set the sql_mode session variable at connection time.
Use the Dictionary to keep MySQL Connection arguments
Furthermore, let see how to use a dictionary to store all of these connection arguments.
If you have lots of connection arguments, it’s best to keep them in a dictionary and use the ** operator. for example, you know you require a minimum of four arguments (i.e., username, password, hostname, database name) to connect MySQL.
If you have lots of connection arguments, it’s best to keep them in a dictionary and use the ** operator. In exceptional cases, we need more than four arguments in the connect method to connect the MySQL database. Let’s understand this. For example, below are three more connection arguments we can use in the connect() method.
- connection_timeout – Timeout for the TCP and Unix socket connections
- auto_commit – Whether to auto-commit transactions. The default is false
- pool_size – Connection pool size if you want to use connection pooling.
You can use many other connection arguments as per your need, add them all in a dictionary, and pass a dictionary to connect() method. Let’s demonstrate it in the below example.
Change MySQL Connection Timeout from Python
Sometimes we need to change the connection timeout value if we read or insert extensive data to the MySQL server. Connection terminates if the request takes more time than this value.
Use a connection_timeout argument of MySQL connector Python to manage the timeout issues by increasing the timeout value.
The connection_timeout is the timeout value in second for the TCP and Unix socket connections. This time denotes the number of seconds the MySQL server waits to fulfill the current request.
You can also set the following Parameters of the MySQL server by executing SQL query from Python to handle the connection timeout issue. Change the following parameters’ value only when the connection_timeout argument alone can’t control the timeout issue.
- interactive_timeout : The number of seconds the server should wait for activity on an interactive connection before closing it.
- wait_timeout – Number of seconds the server should wait for activity on a connection before closing it.
Example
As you can see, I have set all connection timeout values to 180 seconds, i.e., 3 min in the above program.
Connect to MySQL Using Connector Python C Extension
Python connector module has a C Extension interface to connect the MySQL database. The use_pure connection argument determines whether to connect to MySQL using a pure Python interface or a C Extension.
The default value of use_pure is False means it uses the pure Python implementation to connect that we already discussed. The below example demonstrates how to connect using a C extension.
Next Steps:
To practice what you learned in this article, Please solve a Python Database Exercise project to Practice and master the Python Database operations.
I have created a Hospital Information System exercise using Python and MySQL. This Exercise has six questions. I have provided the required tables so you can proceed directly to solve the problems of this Exercise.
That’s it, Folks. Let me know your comments in the section below.
Did you find this page helpful? Let others know about it. Sharing helps me continue to create free Python resources.
About Vishal
Founder of PYnative.com I am a Python developer and I love to write articles to help developers. Follow me on Twitter. All the best for your future Python endeavors!
Python Exercises and Quizzes
Free coding exercises and quizzes cover Python basics, data structure, data analytics, and more.
Источник
MySQL connector Python
This is MySQL driver written in Python. Install ( pip ) install MySQL connector from your Command Prompt like this.
C:Usersuser>pip install mysql-connector-pythonWithout this module you will get this error message
ModuleNotFoundError: No module named ‘mysql’
import mysql.connector
my_conn=mysql.connector.connect(
        host='localhost',
        user='root',
        password = 'your_password',
        db='my_database',
        )

my_cursor = my_conn.cursor()
my_cursor.execute("SELECT * FROM student")
my_result = my_cursor.fetchall() # we get a tuple
print(my_result)
py mysql
This driver is written in Python and contains a pure-Python MySQL client library. We can install (pip) from our command prompt.
C:Usersuser>pip install PyMySQLHere is the sample code to connect and show data from our student table using pymysql connect .
import pymysql
my_conn=pymysql.connect(
        host='localhost',
        user='root',
        password = 'password',
        db='my_tutorial',
        )

my_cursor = my_conn.cursor()
my_cursor.execute("SELECT * FROM student")
my_result = my_cursor.fetchall() # we get a tuple
print(my_result)
MySQLdb
MySQLdb, is a C extension module. After MySQLDB2 now it is evolved as mysqlclient. Here is how to install mysqlclient.
C:Usersuser>pip install mysqlclient Connection to MySQL using MySQLdb
import MySQLdb
my_conn=MySQLdb.connect(
        host='localhost',
        user='root',
        password = "your_password",
        db='db_name',
        )

my_cursor = my_conn.cursor()
my_cursor.execute("SELECT * FROM student")
my_result = my_cursor.fetchall() # we get a tuple
print(my_result)
Note the difference in import MySQLdb but we have installed mysqlclient.
pyodbc
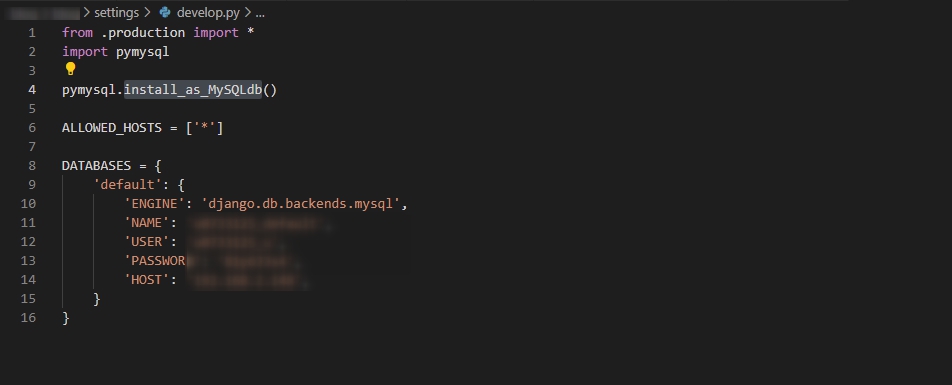
pip install pyodbcIn your system check for the driver name
Administrative tools -> ODBC Data Sources -> Driver tab then copy the river name to the first parameter
import pyodbc
my_conn = pyodbc.connect("DRIVER={MySQL ODBC 8.0 ANSI Driver};
 SERVER=localhost;DATABASE=my_tutorial; UID=root; PASSWORD=your_password;")
my_cursor = my_conn.cursor()
my_cursor.execute("SELECT * FROM student LIMIT 0,10")
my_result = my_cursor.fetchall() # we get a tuple
print(my_result)
Download & Install MySQL with Workbench and creating database with sample student table with records
Database Management using Python
| BLOB | Managing MySQL Blob Data type |
| connection | Python MySQL connection string |
| create | Create table by Query and showing structure |
| rowcount | Number of rows affected due to Query |
| error | Capturing Error in MySQL Query |
| Collect records | Select Query to get records from database table |
| Add record | Using sqlalchemy to Insert record to database table |
| Add record | Insert Query to add record to database table |
| Delete Table | Drop table Query to remove table from MySQL database |
| Update record | Update Query to update records of a database table |
| Delete record | Delete records of a database table |
| read_sql | Using MySql records to create Pandas DataFrame |
| mysqlclient | Using sqlalchemy and create_engine to manage MySQL |
| pickle | How to Pickle MySQL table and restore records. |
Python code for Installing sample student table
Installing MySQL connection from Anaconda
Download & install Anaconda with Python by using mysqlclient to connect to MySQL database server
Before this you must have MySQL database running and keep your connection userid and password with your database name ready.
We need to install MySQL connector to connect from Python to MySQL database.
Inside Anaconda goto Environment at your left side navigational menu
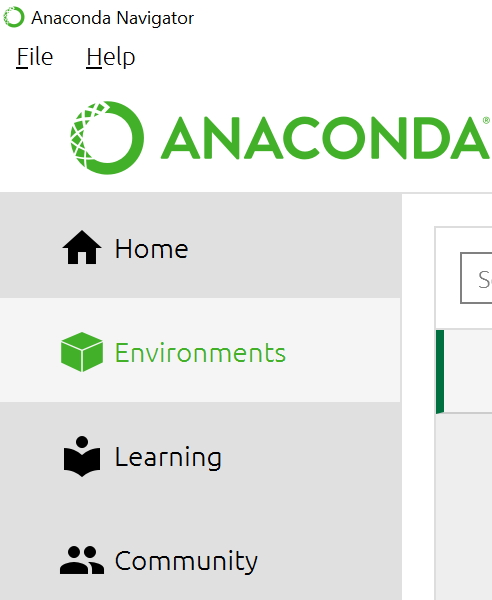
Middle you can see Base root
From Base root select Open Terminal
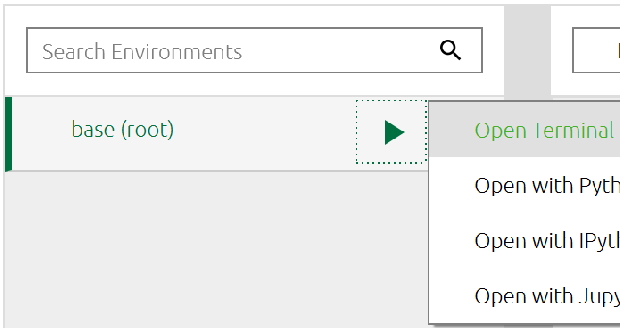
You will reach the Anaconda terminal where you can install any package . Just enter this line at the prompt to install MySQL connector.
conda install -c anaconda mysql-connector-pythonThis will install your MySQL connector by downloading packages from the internet. Now it is time to check the connection.
MySQL Connecting string
MySQL connection using SQLAlchemy
Using SQLAlchemy
For updating the database you need to use sqlalchemy and its create_engine
Here is the code to get the connection by using sqlalchemy
from sqlalchemy import create_engine
engine = create_engine("mysql+mysqldb://userid_here:password_here@localhost/db_name")
my_conect = engine.connect()
If you are getting error message like this.
No module named ‘MySQLdb’
then you need to install mysqlclient.
Open your Anaconda terminal as explained above and then enter
pip install mysqlclient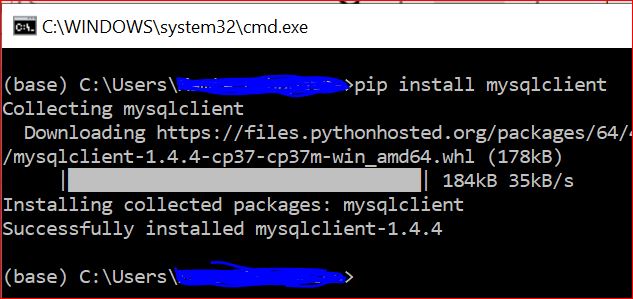
To check the installation
pip show mysqlclient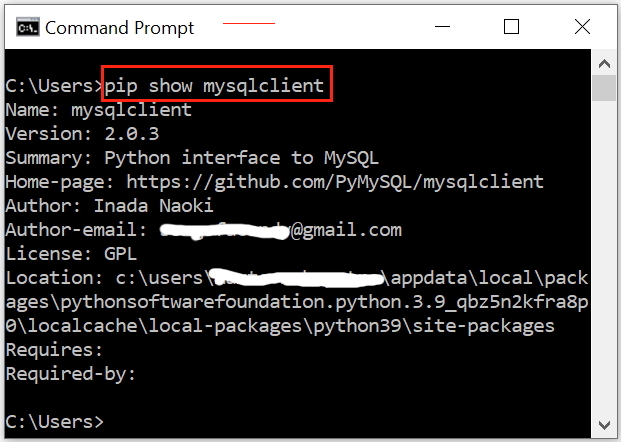
SQLAlchemy
pip install sqlalchemy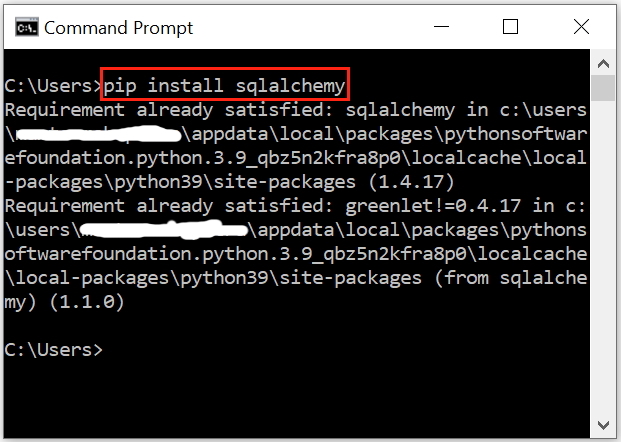
To check the installation
pip show sqlalchemy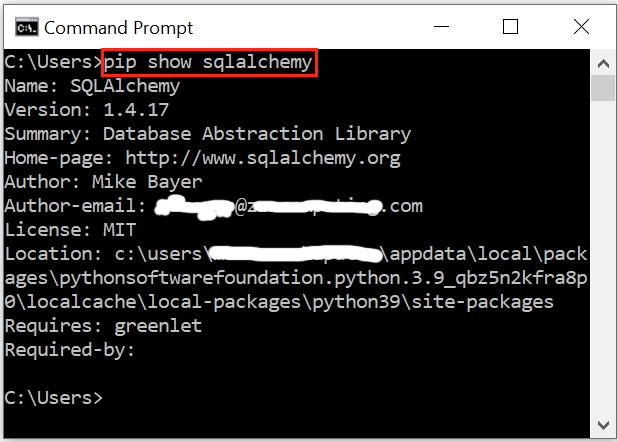
MySQL & SQLAlchemy
Python to MySQL database connection by SQLAlchemy with error handling using try except blocks
MariaDB
This is a open source community developed relational database. To connect to MariaDB from Python installa this .
pip install mariadbUsing SQLALchemy we can create connection string like this.
my_conn = create_engine("mariadb+mariadbconnector://root:pw@localhost/db_name")Google Cloud & MySQL
Using Python we can manage MySQL database of google Cloud.
Managing MySQL database at Google cloud
Download .zip file with SQL dump and .ipynb files
of Video Tutorials

plus2net.com
Hello Guys, How are you all? Hope You all Are Fine. Today I am trying to import mysql.connector But I am facing following error ImportError: No module named ‘mysql’ in Python. So Here I am Explain to you all the possible solutions here.
Without wasting your time, Let’s start This Article to Solve This Error.
Contents
- How ImportError: No module named ‘mysql’ Error Occurs?
- How To Solve ImportError: No module named ‘mysql’ Error?
- Solution 1: install mysql-connector
- Solution 2: install mysql-connector-python-rf
- Summary
How ImportError: No module named ‘mysql’ Error Occurs?
I am trying to import mysql.connector But I am facing following error.
Traceback (most recent call last):
  File "<pyshell#8>", line 1, in <module>
    import mysql.connector
ImportError: No module named 'mysql'
How To Solve ImportError: No module named ‘mysql’ Error?
- How To Solve ImportError: No module named ‘mysql’ Error ?
To Solve ImportError: No module named ‘mysql’ Error You just need to install mysql-connector with this command and then you can import mysql.connector. If You are using Python 3 then run this command: pip3 install mysql-connector. If you are using Python 2.X then use this command: pip install mysql-connector.
Second solution is You just need to simply install from cli pip3 install mysql-connector-python-rf. And then import like this: import mysql.connector. Now your error must be solved. - ImportError: No module named ‘mysql’
To Solve ImportError: No module named ‘mysql’ Error You just need to install mysql-connector with this command and then you can import mysql.connector. If You are using Python 3 then run this command: pip3 install mysql-connector. If you are using Python 2.X then use this command: pip install mysql-connector.
Second solution is You just need to simply install from cli pip3 install mysql-connector-python-rf. And then import like this: import mysql.connector. Now your error must be solved.
Solution 1: install mysql-connector
You just need to install mysql-connector with this command and then you can import mysql.connector.
If You are using Python 3 then run this command.
pip3 install mysql-connectorIf you are using Python 2.X then use this command.
pip install mysql-connectorSolution 2: install mysql-connector-python-rf
You just need to simply install from cli.
pip3 install mysql-connector-python-rfAnd then import like this.
import mysql.connectorNow your error must be solved.
Summary
It’s all About this issue. Hope all solution helped you a lot. Comment below Your thoughts and your queries. Also, Comment below which solution worked for you?
Also, Read
- ImportError: No module named flask
1 answer to this question.
Related Questions In Python
- All categories
-

ChatGPT
(4) -
Apache Kafka
(84) -
Apache Spark
(596) -
Azure
(131) -
Big Data Hadoop
(1,907) -
Blockchain
(1,673) -
C#
(141) -
C++
(271) -
Career Counselling
(1,060) -
Cloud Computing
(3,446) -
Cyber Security & Ethical Hacking
(147) -
Data Analytics
(1,266) -
Database
(855) -
Data Science
(75) -
DevOps & Agile
(3,575) -
Digital Marketing
(111) -
Events & Trending Topics
(28) -
IoT (Internet of Things)
(387) -
Java
(1,247) -
Kotlin
(8) -
Linux Administration
(389) -
Machine Learning
(337) -
MicroStrategy
(6) -
PMP
(423) -
Power BI
(516) -
Python
(3,188) -
RPA
(650) -
SalesForce
(92) -
Selenium
(1,569) -
Software Testing
(56) -
Tableau
(608) -
Talend
(73) -
TypeSript
(124) -
Web Development
(3,002) -
Ask us Anything!
(66) -
Others
(1,929) -
Mobile Development
(263)


Subscribe to our Newsletter, and get personalized recommendations.
Already have an account? Sign in.