When I try to import psycopg2 it show below log for me:
Traceback (most recent call last):
  File "D:/Desktop/learn/python/webcatch/appserver/testpgsql.py", line 2, in <module>
    import psycopg2
  File "D:/Desktop/learn/python/webcatch/appserver/webcatch/lib/site-packages/psycopg2-2.6.1-py3.5-win32.egg/psycopg2/__init__.py", line 50, in <module>
    from psycopg2._psycopg import BINARY, NUMBER, STRING, DATETIME, ROWID
ImportError: No module named 'psycopg2._psycopg'
How can I solve it?
My platform is win10 (64) and version is python 3.5
![]()
asked Mar 19, 2016 at 14:38
![]()
4
Eureka! I pulled my hair out for 2 days trying to get this to work. Enlightenment came from this SO Question. Simply stated, you probably installed psycopg2 x64 version like I did, not realizing your python version was 32-bit. Unistall your current psycopg2, then:
Download: psycopg2-2.6.1.win32-py3.4-pg9.4.4-release.exe from HERE, then run the following in a Terminal:
C:pathtoproject> easy_install /path/to/psycopg2-2.6.1.win32-py3.4-pg9.4.4-release.exe
C:pathtoproject> python manage.py makemigrations
C:pathtoproject> python manage.py migrate
You may also need to (re)create super user with:
C:pathtoproject> python manage.py createsuperuser
![]()
answered Jun 14, 2016 at 18:26
![]()
4
I had the same problem, solved it in this way:
Reinstall the package psycopg2 using pip (by default installed with python 3)
On Linux:
pip uninstall psycopg2
Confirm with (y) and then:
pip install psycopg2
On Windows I add the prefix ('python -m') to the commands above.
I think the problem occurs when you change the version of Python. (Even between minor versions such as Python 3.5 and 3.6).
answered Mar 30, 2018 at 15:27
![]()
JoDavidJoDavid
3632 silver badges8 bronze badges
3
I am using psycopg in an AWS Glue Job, where is harder to follow the instructions listed in the other answers.
What I did is installing psycopg2-binary into a directory and zip up the contents of that directory:
mkdir psycopg2-binary
cd psycopg2-binary
pip install psycopg2-binary -t  .
# in case using python3:
# python3 -m pip install --system psycopg2-binary -t  .
zip -r9 psycopg2.zip *
I then copied psycopg2.zip to an S3 bucket and add it as an extra Python library under «Python library path» in the Glue Spark job.
I then launched the job with the following script to verify if psycopg2 is present (the zip file will be downloaded by Glue into the directory in which the Job script is located)
from awsglue.transforms import *
from awsglue.utils import getResolvedOptions
from pyspark.context import SparkContext
from awsglue.context import GlueContext
from awsglue.job import Job
import sys
import os
import zipfile

## @params: [JOB_NAME]
args = getResolvedOptions(sys.argv, ['JOB_NAME'])

sc = SparkContext()
glueContext = GlueContext(sc)
spark = glueContext.spark_session
job = Job(glueContext)
job.init(args['JOB_NAME'], args)

zip_ref = zipfile.ZipFile('./psycopg2.zip', 'r')
print os.listdir('.')
zip_ref.extractall('/tmp/packages')
zip_ref.close()
sys.path.insert(0, '/tmp/packages')

import psycopg2
print(psycopg2.__version__)

job.commit()
answered Oct 9, 2019 at 13:46
![]()
VzzarrVzzarr
4,2301 gold badge40 silver badges71 bronze badges
1
This also happens to me in new Ubuntu 18.04. It is caused by missing one file _psycopg.py in the /usr/local/lib/python3.7/site-packages/psycopg2.
It is fixed by:
- remove the old psycopg2 from your machine
pip3 uninstall psycopg2. - download new pyscopg2 manually from the official page http://initd.org/psycopg/tarballs/PSYCOPG-2-7/psycopg2-2.7.7.tar.gz
tar xvf psycopg2-2.7.7.tar.gzpython setup.py buildsudo python setup.py install
answered Mar 1, 2019 at 4:58
![]()
Saray ChakSaray Chak
591 silver badge6 bronze badges
1
I had this happen in Linux using Python 3.7. It is caused by missing one file _psycopg.cpython-37m-x86_64-linux-gnu.so in the /usr/local/lib/python3.7/site-packages/psycopg2.
I downloaded _psycopg.cpython-37m-x86_64-linux-gnu.so from https://github.com/jkehler/awslambda-psycopg2/tree/master/psycopg2-3.7, and Copied this file into my anaconda lib.
answered Jul 8, 2021 at 7:05
![]()
I had this happen in Linux using Python 2 because I had accidentally had my PYTHONPATH set to Python 3 libraries, and it was trying to load the python3 version of psycopg2. Solution was to unset PYTHONPATH.
answered Feb 8, 2017 at 2:20
![]()
sudosudo
5,3895 gold badges39 silver badges78 bronze badges
I had the same error on Windows, this worked for me:
pip install -U psycopg2
I had an older version installed, must have depreciated
answered Jun 5, 2019 at 13:46
![]()
Ryan LRyan L
811 silver badge1 bronze badge
I came to know that most times the WINDOWS packaging does not go fine with LAMBDA.
I faced same issue while running LAMBDA with WINDOWS installed 3rd party pscyopg2 packaging.
Solution:
step1>
I installed psycopg2 in Linux.
Copied both the directories psycopg2_binary-2.8.2.dist-info and psycopg2 from Linux to windows.
step2>
Along with source *.py, packaged with copied 3rd party dependencies psycopg2 in windows to *.zip file
step3>
Upload the file to LAMBDA — Here it goes, It runs successfully without any error.
![]()
answered Apr 15, 2019 at 13:30
![]()
0
Windows 10 with conda environment manager (fresh install of Django, wagtail with PostgreSQL), had the same error. Removed psycopg2
conda remove -n myenv psycopg2
it updated some packages, removed others (it also removed django, wagtail…). Then installed psycopg2 back
conda install -n myenv psycopg2
Tested it, import worked
python
>>> import psycopg2
Installed django, wagtail back. python manage.py migrate now populated PostgreSQL.
answered Sep 6, 2022 at 14:19
![]()
frmbelzfrmbelz
1,86924 silver badges24 bronze badges
In my case, it was other site-packages that was exposed by installing pgcli, uninstalling pgcli resolved the issue for the time being.
This somehow penetrated virtualenv too.
answered Sep 24, 2022 at 0:25
![]()
Introduction
This article will provide a brief overview of how you can better handle PostgreSQL Python exceptions while using the psycopg2 adapter in your code. Make sure that the psycopg2 package is installed on your machine using the PIP3 package manager for Python 3 using the following command:
We’ll also be building a function from scratch that prints detailed information about the psycopg2 exceptions by accessing several of its exception library attributes. It should be noted, however, that this is mostly for educational and debugging purposes, and it should be noted that, in the implementation phase your website or application, you may want to handle them less explicitly.
Catching and handling exceptions in Python
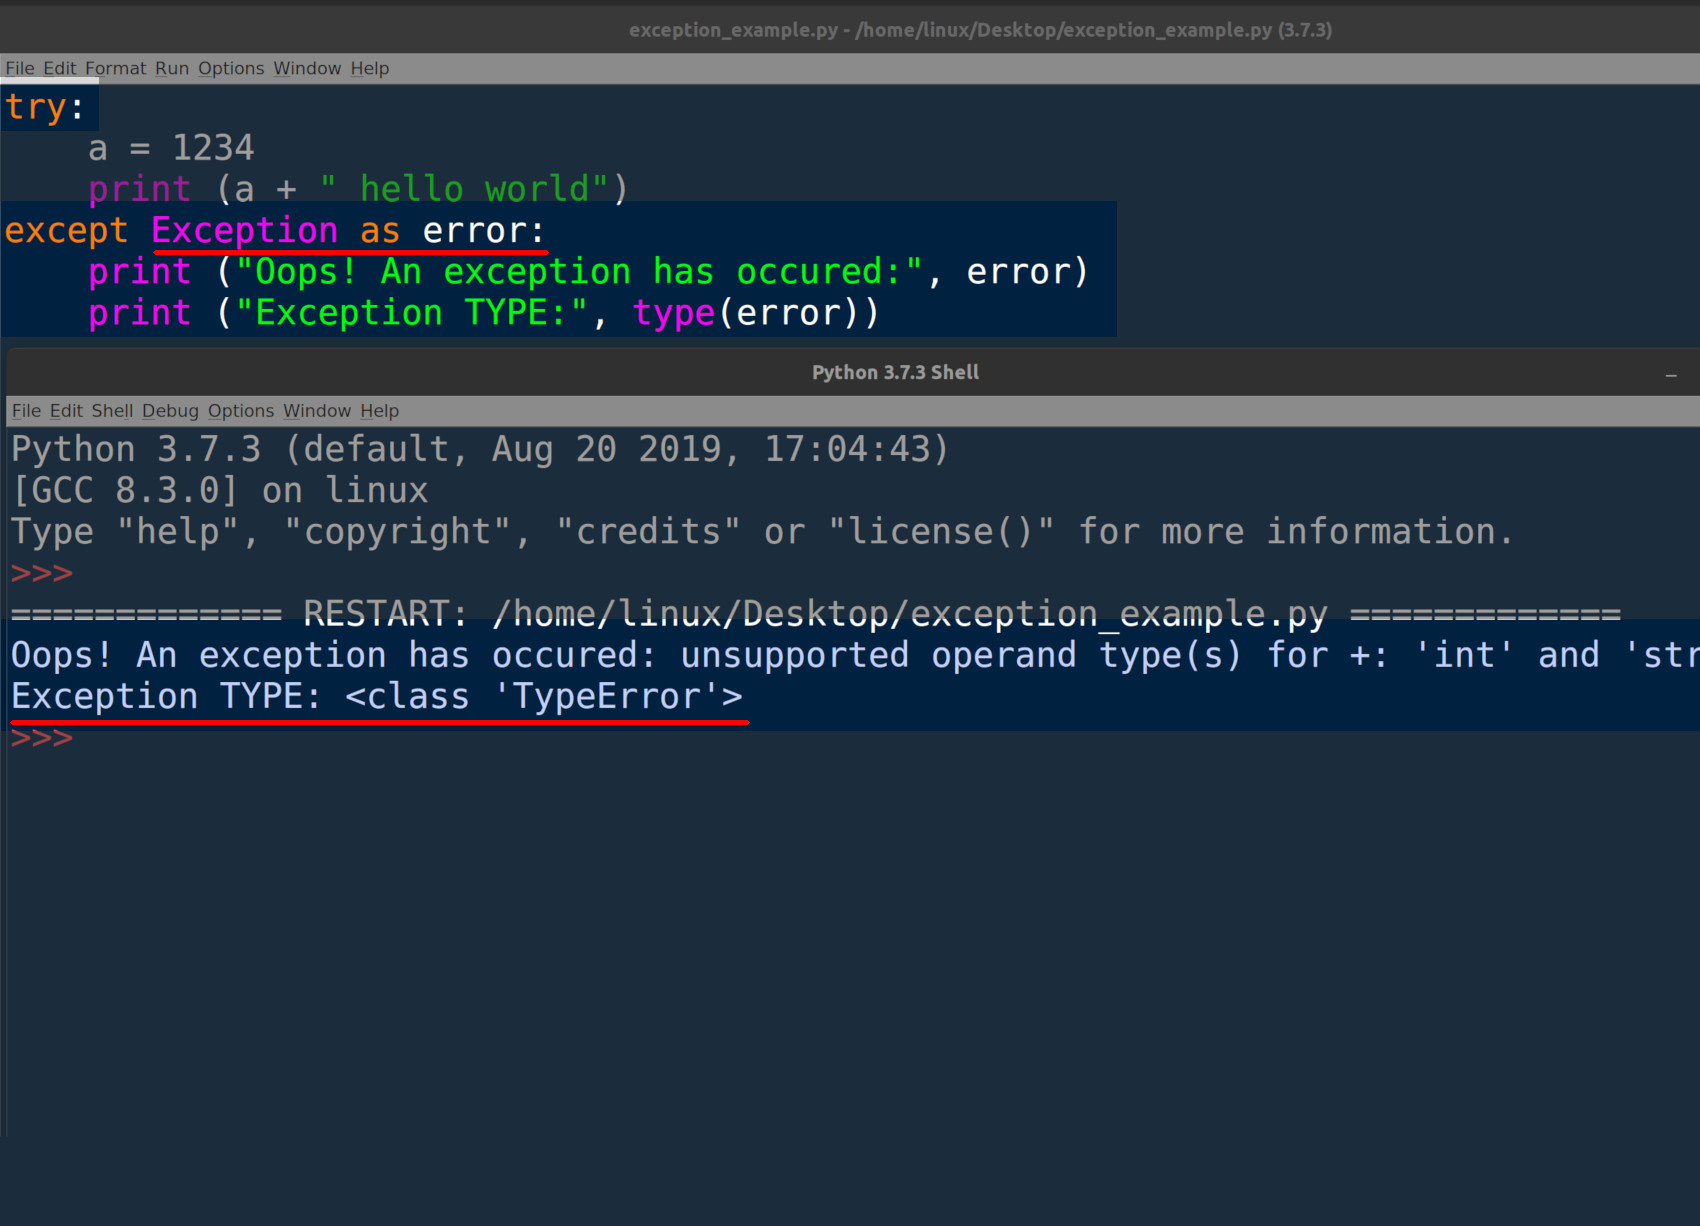
A Python script will terminate as soon as an exception or error is raised, but there is a try-except block (that works in a similar fashion to the try {} catch(err) {} code block in PHP or JavaScript) that will allow you to catch the exception, handle it, and then respond to it with more code within the except: part of the indentation block.
The following code allows you to catch all exceptions, as a wildcard, and print them out without having to explicitly mention the exact exception:
|
1 |
try: |
the except Exception as error: bit will allow you to handle any exception, and return the exception information as a TypeError class object using Python’s as keyword.
Exception libraries for the psycopg2 Python adapter
Some of the two most commonly occurring exceptions in the psycopg2 library are the OperationalError and ProgrammingError exception classes.
An OperationalError typically occurs when the parameters passed to the connect() method are incorrect, or if the server runs out of memory, or if a piece of datum cannot be found, etc.
A ProgrammingError happens when there is a syntax error in the SQL statement string passed to the psycopg2 execute() method, or if a SQL statement is executed to delete a non-existent table, or an attempt is made to create a table that already exists, and exceptions of that nature.
Complete list of the psycopg2 exception classes
Here’s the complete list of all of psycopg2 exception classes:
InterfaceError, DatabaseError, DataError, OperationalError, IntegrityError, InternalError, ProgrammingError, and NotSupportedError.
Brief overview of PostgreSQL Error Codes
There is an extensive list of over 200 error codes on the postgresql.org website that describes, in detail, each five-character SQL exception.
In the psycopg2 adapter library you can return the code by accessing the exception’s pgcode attribute. It should be an alpha-numeric string, five characters in length, that corresponds to an exception in the PostgreSQL Error Codes table.
Here’s some example code showing how one can access the attribute for the PostgreSQL error code:
|
1 |
try: |
Import the exception libraries for the psycopg2 Python adapter
You’ll need to import the following libraries at the beginning of your Python script:
|
1 |
# import sys to get more detailed Python exception info # import the connect library for psycopg2 # import the error handling libraries for psycopg2 |
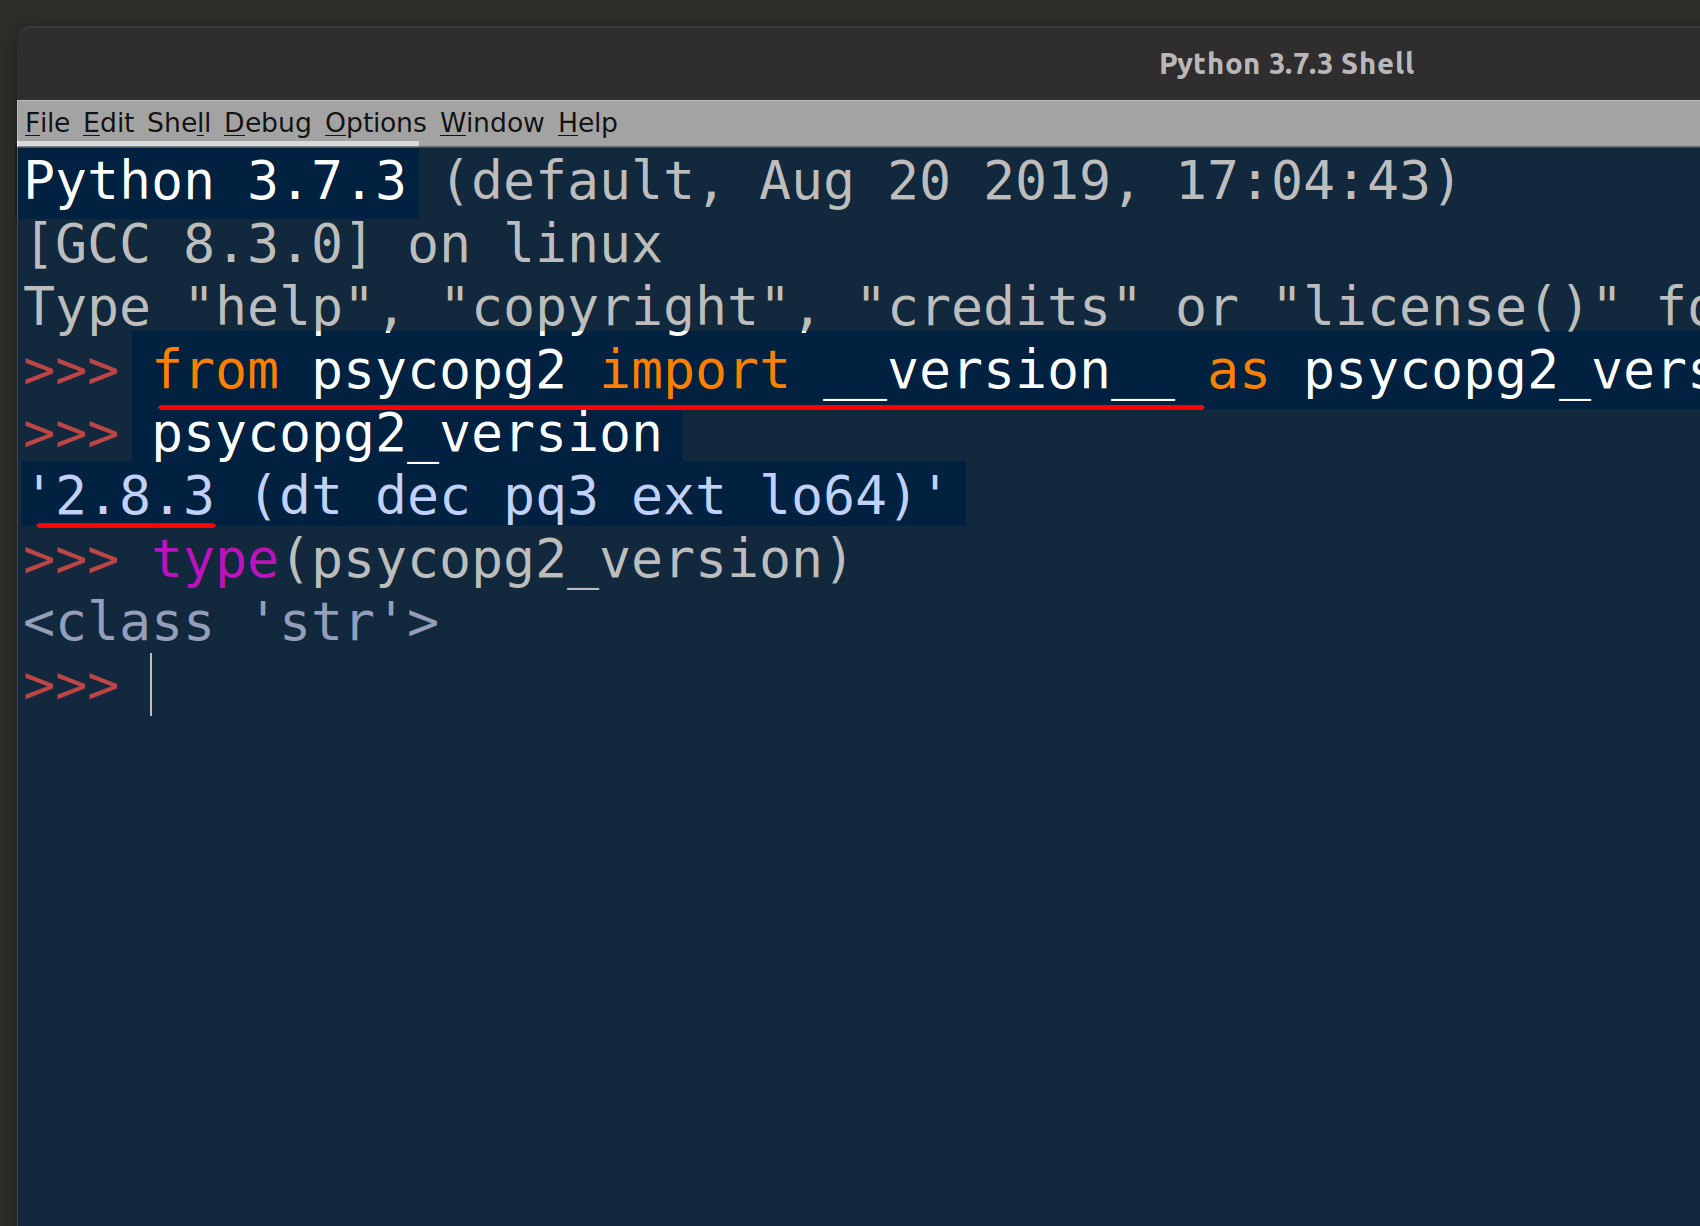
Get the psycopg2 version string
Older versions of the psycopg2 adapter may handle some exceptions differently. Here’s some code that imports the __version__ attribute string for the psycopg2 library and prints it:
|
1 |
# import the psycopg2 library’s __version__ string # print the version string for psycopg2 |
Define a Python function to handle and print psycopg2 SQL exceptions
The code in this section will define a Python function that will take a Python TypeError object class and parse, both the psycopg2 and native Python, exception attributes from it in order to print the details of the exception:
Define the ‘print_psycopg2_exception()’ Python function
Use Python’s def keyword to define a new function and make it accept a TypeError Python object class as its only parameter:
|
1 |
# define a function that handles and parses psycopg2 exceptions |
Use Python’s built-in ‘sys’ library to get more detailed exception information
The next bit of code grabs the traceback information for the exception, including the line number in the code that the error occurred on, by calling the sys library’s exc_info() method:
|
1 |
# get details about the exception # get the line number when exception occured |
Print the details for the psycopg2 exception
Use Python’s print() function to print the details of the psycopg2 exception that was passed to the function call:
|
1 |
# print the connect() error # psycopg2 extensions.Diagnostics object attribute # print the pgcode and pgerror exceptions |
Handle psycopg2 exceptions that occur while connecting to PostgreSQL
Now that the function has been defined it’s time to test it out by running some psycopg2 code. The following Python code attempts to make a connection to PostgreSQL in a try-except indentation block, and, in the case of an exception, passes the TypeError Python object to the print_psycopg2_exception() function defined earlier:
|
1 |
# declare a new PostgreSQL connection object # set the connection to ‘None’ in case of error |
NOTE: The above code will give the connection object a value of None in the case of an exception.
If the username string, passed to the user parameter, doesn’t match any of the users for the PostgreSQL server then the function should print something that closely resembles the following:
|
1 |
psycopg2 ERROR: FATAL: password authentication failed for user «WRONG_USER» extensions.Diagnostics: <psycopg2.extensions.Diagnostics object at 0x7fa3646e1558> |
Handle psycopg2 exceptions that occur while executing SQL statements
If the code to connect to PostgreSQL didn’t have any problems, and no exceptions were raised, then test out the function again. The following code purposely attempts to use a cursor object to execute() a SQL statement with bad syntax:
|
1 |
# if the connection was successful # declare a cursor object from the connection # catch exception for invalid SQL statement # rollback the previous transaction before starting another |
The print_psycopg2_exception() function should print a response that resembles the following:
|
1 |
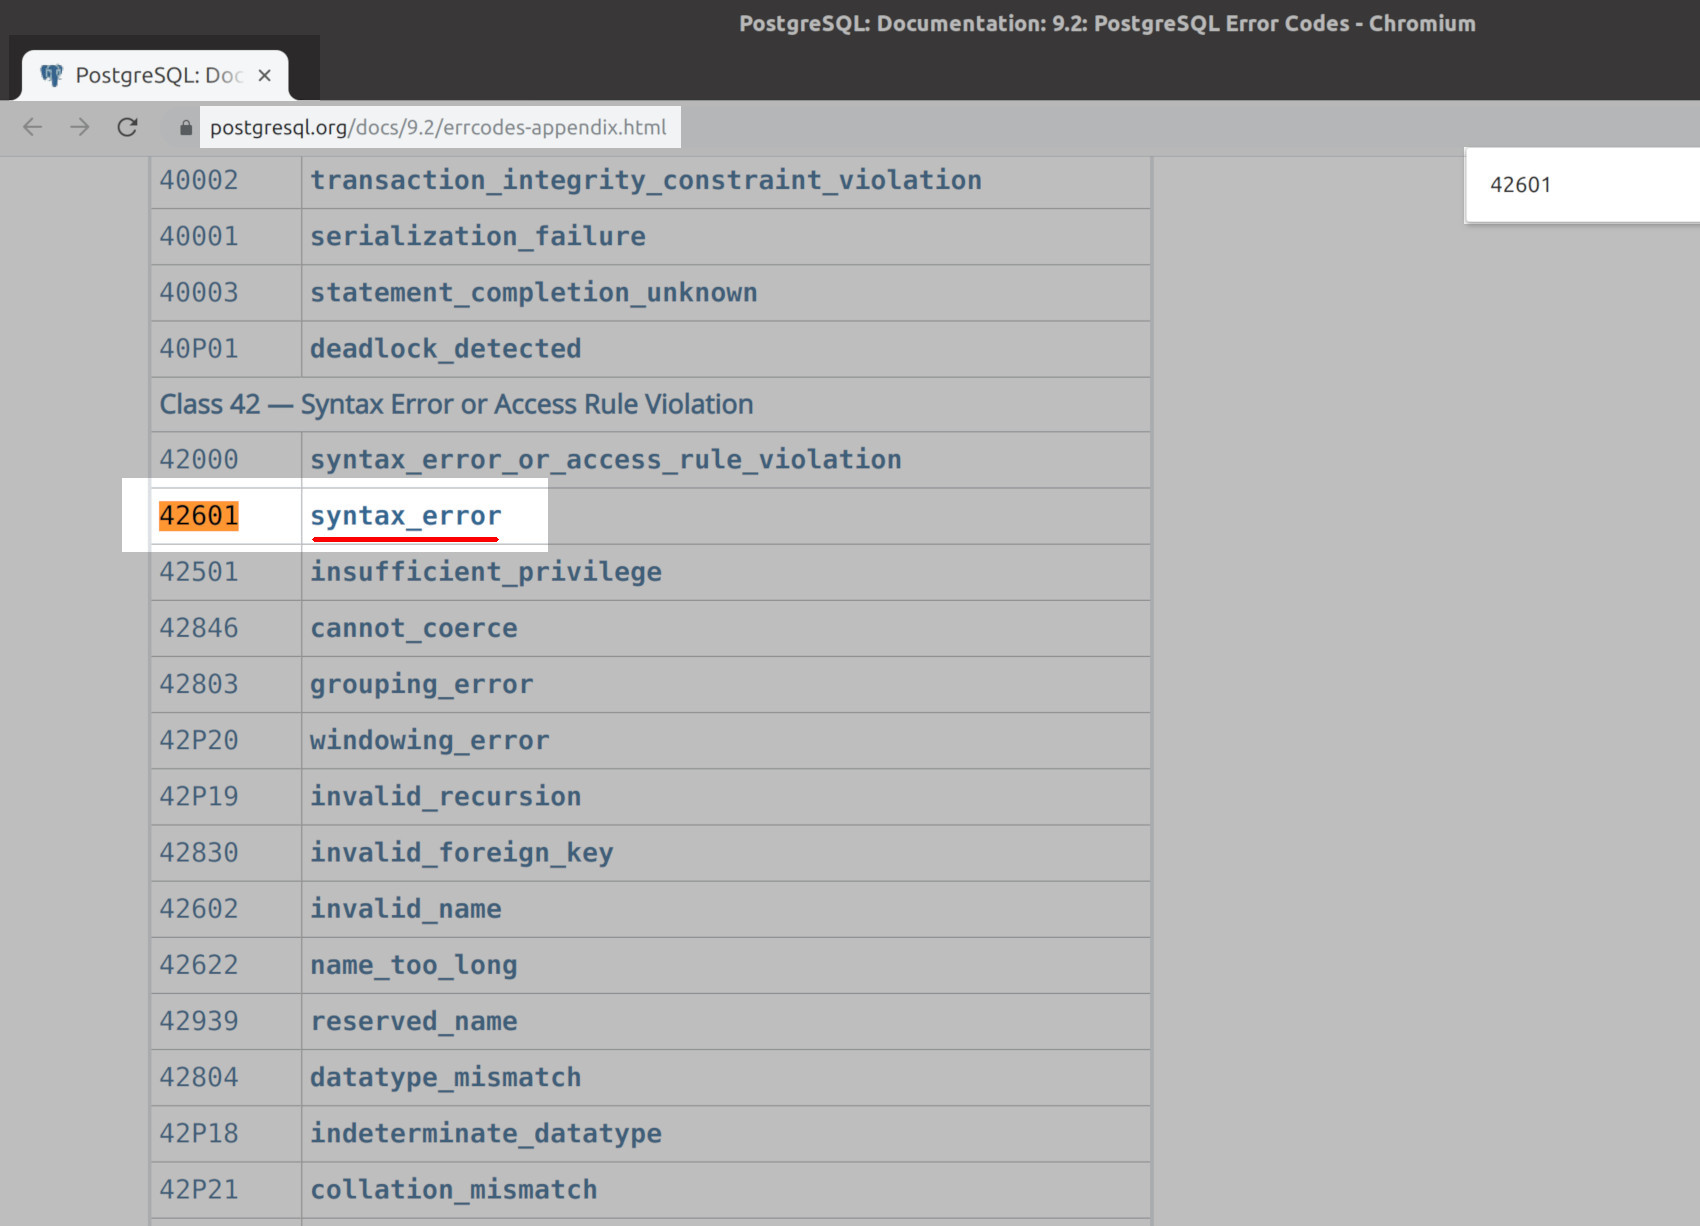
psycopg2 ERROR: syntax error at or near «INVALID» extensions.Diagnostics: <psycopg2.extensions.Diagnostics object at 0x7f58e0018558> pgcode: 42601 |
The 42601 PostgreSQL code indicates that the exception resulted from a syntax error in the SQL statement:
Catch ‘InFailedSqlTransaction’ psycopg2 exceptions
This last bit of Python code will raise a InFailedSqlTransaction exception if the last PostgreSQL transaction, with the bad SQL statement, wasn’t rolled back using the connection object’s rollback() method:
|
1 |
# returns ‘psycopg2.errors.InFailedSqlTransaction’ if rollback() not called |
Conclusion
The psycopg2 library adapter for PostgreSQL has an extensive list of exception Python classes, and this article only covered a few of them just to give a general idea of how you can handle such exceptions in your own Python script.
Just the Code
|
1 |
# import sys to get more detailed Python exception info # import the connect library for psycopg2 # import the error handling libraries for psycopg2 # import the psycopg2 library’s __version__ string # import sys to get more detailed Python exception info # import the connect library for psycopg2 # import the error handling libraries for psycopg2 # import the psycopg2 library’s __version__ string # print the version string for psycopg2 # define a function that handles and parses psycopg2 exceptions # get the line number when exception occured # print the connect() error # psycopg2 extensions.Diagnostics object attribute # print the pgcode and pgerror exceptions try: # set the connection to ‘None’ in case of error # if the connection was successful # declare a cursor object from the connection # catch exception for invalid SQL statement # rollback the previous transaction before starting another # execute a PostgreSQL command to get all rows in a table # close the cursor object to avoid memory leaks # close the connection object also |
Pilot the ObjectRocket Platform Free!
Try Fully-Managed CockroachDB, Elasticsearch, MongoDB, PostgreSQL (Beta) or Redis.
Get Started
New in version 2.8.
Changed in version 2.8.4: added errors introduced in PostgreSQL 12
Changed in version 2.8.6: added errors introduced in PostgreSQL 13
Changed in version 2.9.2: added errors introduced in PostgreSQL 14
Changed in version 2.9.4: added errors introduced in PostgreSQL 15
This module exposes the classes psycopg raises upon receiving an error from
the database with a SQLSTATE value attached (available in the
pgcode attribute). The content of the module is generated
from the PostgreSQL source code and includes classes for every error defined
by PostgreSQL in versions between 9.1 and 15.
Every class in the module is named after what referred as “condition name” in
the documentation, converted to CamelCase: e.g. the error 22012,
division_by_zero is exposed by this module as the class DivisionByZero.
Every exception class is a subclass of one of the standard DB-API
exception and expose the Error interface.
Each class’ superclass is what used to be raised by psycopg in versions before
the introduction of this module, so everything should be compatible with
previously written code catching one the DB-API class: if your code used to
catch IntegrityError to detect a duplicate entry, it will keep on working
even if a more specialised subclass such as UniqueViolation is raised.
The new classes allow a more idiomatic way to check and process a specific
error among the many the database may return. For instance, in order to check
that a table is locked, the following code could have been used previously:
try:
    cur.execute("LOCK TABLE mytable IN ACCESS EXCLUSIVE MODE NOWAIT")
except psycopg2.OperationalError as e:
    if e.pgcode == psycopg2.errorcodes.LOCK_NOT_AVAILABLE:
        locked = True
    else:
        raise
While this method is still available, the specialised class allows for a more
idiomatic error handler:
try:
    cur.execute("LOCK TABLE mytable IN ACCESS EXCLUSIVE MODE NOWAIT")
except psycopg2.errors.LockNotAvailable:
    locked = True
- psycopg2.errors.lookup(code)
-
Lookup an error code and return its exception class.
Raise
KeyErrorif the code is not found.try: cur.execute("LOCK TABLE mytable IN ACCESS EXCLUSIVE MODE NOWAIT") except psycopg2.errors.lookup("55P03"): locked = True
SQLSTATE exception classes
The following table contains the list of all the SQLSTATE classes exposed by
the module.
Note that, for completeness, the module also exposes all the
DB-API-defined exceptions and a few
psycopg-specific ones exposed by the extensions
module, which are not listed here.
|
SQLSTATE |
Exception |
Base exception |
|---|---|---|
|
Class 02: No Data (this is also a warning class per the SQL standard) |
||
|
|
|
|
|
|
|
|
|
Class 03: SQL Statement Not Yet Complete |
||
|
|
|
|
|
Class 08: Connection Exception |
||
|
|
|
|
|
|
|
|
|
|
|
|
|
|
|
|
|
|
|
|
|
|
|
|
|
|
|
|
|
Class 09: Triggered Action Exception |
||
|
|
|
|
|
Class 0A: Feature Not Supported |
||
|
|
|
|
|
Class 0B: Invalid Transaction Initiation |
||
|
|
|
|
|
Class 0F: Locator Exception |
||
|
|
|
|
|
|
|
|
|
Class 0L: Invalid Grantor |
||
|
|
|
|
|
|
|
|
|
Class 0P: Invalid Role Specification |
||
|
|
|
|
|
Class 0Z: Diagnostics Exception |
||
|
|
|
|
|
|
|
|
|
Class 20: Case Not Found |
||
|
|
|
|
|
Class 21: Cardinality Violation |
||
|
|
|
|
|
Class 22: Data Exception |
||
|
|
|
|
|
|
|
|
|
|
|
|
|
|
|
|
|
|
|
|
|
|
|
|
|
|
|
|
|
|
|
|
|
|
|
|
|
|
|
|
|
|
|
|
|
|
|
|
|
|
|
|
|
|
|
|
|
|
|
|
|
|
|
|
|
|
|
|
|
|
|
|
|
|
|
|
|
|
|
|
|
|
|
|
|
|
|
|
|
|
|
|
|
|
|
|
|
|
|
|
|
|
|
|
|
|
|
|
|
|
|
|
|
|
|
|
|
|
|
|
|
|
|
|
|
|
|
|
|
|
|
|
|
|
|
|
|
|
|
|
|
|
|
|
|
|
|
|
|
|
|
|
|
|
|
|
|
|
|
|
|
|
|
|
|
|
|
|
|
|
|
|
|
|
|
|
|
|
|
|
|
|
|
|
|
|
|
|
|
|
|
|
|
|
|
|
|
|
|
|
|
|
|
|
|
|
|
|
|
|
|
|
|
|
|
|
|
|
|
|
|
|
|
|
|
|
|
|
|
|
|
|
|
|
|
|
|
|
|
|
|
|
|
|
|
|
|
|
|
|
|
|
|
|
|
|
|
|
|
|
|
|
|
|
|
|
|
|
|
|
|
|
|
Class 23: Integrity Constraint Violation |
||
|
|
|
|
|
|
|
|
|
|
|
|
|
|
|
|
|
|
|
|
|
|
|
|
|
|
|
|
|
Class 24: Invalid Cursor State |
||
|
|
|
|
|
Class 25: Invalid Transaction State |
||
|
|
|
|
|
|
|
|
|
|
|
|
|
|
|
|
|
|
|
|
|
|
|
|
|
|
|
|
|
|
|
|
|
|
|
|
|
|
|
|
|
|
|
|
|
|
|
|
|
Class 26: Invalid SQL Statement Name |
||
|
|
|
|
|
Class 27: Triggered Data Change Violation |
||
|
|
|
|
|
Class 28: Invalid Authorization Specification |
||
|
|
|
|
|
|
|
|
|
Class 2B: Dependent Privilege Descriptors Still Exist |
||
|
|
|
|
|
|
|
|
|
Class 2D: Invalid Transaction Termination |
||
|
|
|
|
|
Class 2F: SQL Routine Exception |
||
|
|
|
|
|
|
|
|
|
|
|
|
|
|
|
|
|
|
|
|
|
Class 34: Invalid Cursor Name |
||
|
|
|
|
|
Class 38: External Routine Exception |
||
|
|
|
|
|
|
|
|
|
|
|
|
|
|
|
|
|
|
|
|
|
Class 39: External Routine Invocation Exception |
||
|
|
|
|
|
|
|
|
|
|
|
|
|
|
|
|
|
|
|
|
|
|
|
|
|
Class 3B: Savepoint Exception |
||
|
|
|
|
|
|
|
|
|
Class 3D: Invalid Catalog Name |
||
|
|
|
|
|
Class 3F: Invalid Schema Name |
||
|
|
|
|
|
Class 40: Transaction Rollback |
||
|
|
|
|
|
|
|
|
|
|
|
|
|
|
|
|
|
|
|
|
|
Class 42: Syntax Error or Access Rule Violation |
||
|
|
|
|
|
|
|
|
|
|
|
|
|
|
|
|
|
|
|
|
|
|
|
|
|
|
|
|
|
|
|
|
|
|
|
|
|
|
|
|
|
|
|
|
|
|
|
|
|
|
|
|
|
|
|
|
|
|
|
|
|
|
|
|
|
|
|
|
|
|
|
|
|
|
|
|
|
|
|
|
|
|
|
|
|
|
|
|
|
|
|
|
|
|
|
|
|
|
|
|
|
|
|
|
|
|
|
|
|
|
|
|
|
|
|
|
|
|
|
|
|
|
|
|
|
|
|
|
|
|
|
|
|
|
|
|
|
|
|
|
|
|
|
|
|
|
|
|
|
|
|
|
|
|
|
|
|
|
|
|
|
|
|
|
|
|
|
|
|
|
|
|
|
|
|
|
|
Class 44: WITH CHECK OPTION Violation |
||
|
|
|
|
|
Class 53: Insufficient Resources |
||
|
|
|
|
|
|
|
|
|
|
|
|
|
|
|
|
|
|
|
|
|
Class 54: Program Limit Exceeded |
||
|
|
|
|
|
|
|
|
|
|
|
|
|
|
|
|
|
Class 55: Object Not In Prerequisite State |
||
|
|
|
|
|
|
|
|
|
|
|
|
|
|
|
|
|
|
|
|
|
Class 57: Operator Intervention |
||
|
|
|
|
|
|
|
|
|
|
|
|
|
|
|
|
|
|
|
|
|
|
|
|
|
|
|
|
|
Class 58: System Error (errors external to PostgreSQL itself) |
||
|
|
|
|
|
|
|
|
|
|
|
|
|
|
|
|
|
Class 72: Snapshot Failure |
||
|
|
|
|
|
Class F0: Configuration File Error |
||
|
|
|
|
|
|
|
|
|
Class HV: Foreign Data Wrapper Error (SQL/MED) |
||
|
|
|
|
|
|
|
|
|
|
|
|
|
|
|
|
|
|
|
|
|
|
|
|
|
|
|
|
|
|
|
|
|
|
|
|
|
|
|
|
|
|
|
|
|
|
|
|
|
|
|
|
|
|
|
|
|
|
|
|
|
|
|
|
|
|
|
|
|
|
|
|
|
|
|
|
|
|
|
|
|
|
|
|
|
|
|
|
|
|
|
|
|
|
|
|
|
|
|
|
|
|
|
|
|
|
|
|
|
Class P0: PL/pgSQL Error |
||
|
|
|
|
|
|
|
|
|
|
|
|
|
|
|
|
|
|
|
|
|
Class XX: Internal Error |
||
|
|
|
|
|
|
|
|
|
|
|
|
Это руководство по PostgreSQL в Python описывает, как использовать модуль Psycopg2 для подключения к PostgreSQL, выполнения SQL-запросов и других операций с базой данных.
Здесь не инструкции по установки локального сервера, так как это не касается python. Скачайте и установите PostgreSQL с официального сайта https://www.postgresql.org/download/. Подойдут версии 10+, 11+, 12+.
Вот список разных модулей Python для работы с сервером базы данных PostgreSQL:
- Psycopg2,
- pg8000,
- py-postgreql,
- PyGreSQL,
- ocpgdb,
- bpsql,
- SQLAlchemy. Для работы SQLAlchemy нужно, чтобы хотя бы одно из перечисленных выше решений было установлено.
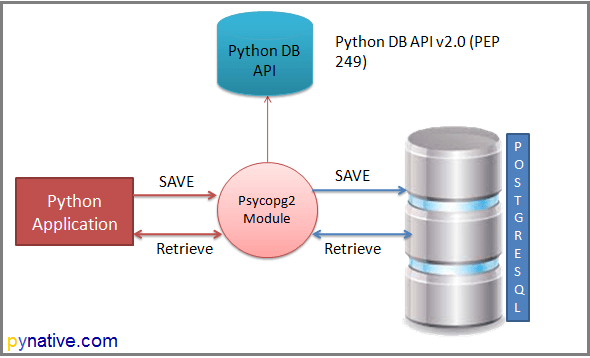
Примечание: все модули придерживаются спецификации Python Database API Specification v2.0 (PEP 249). Этот API разработан с целью обеспечить сходство разных модулей для доступа к базам данных из Python. Другими словами, синтаксис, методы и прочее очень похожи во всех этих модулях.
В этом руководстве будем использовать Psycopg2, потому что это один из самых популярных и стабильных модулей для работы с PostgreSQL:
- Он используется в большинстве фреймворков Python и Postgres;
- Он активно поддерживается и работает как с Python 3, так и с Python 2;
- Он потокобезопасен и спроектирован для работы в многопоточных приложениях. Несколько потоков могут работать с одним подключением.
В этом руководстве пройдемся по следующим пунктам:
- Установка Psycopg2 и использование его API для доступа к базе данных PostgreSQL;
- Вставка, получение, обновление и удаление данных в базе данных из приложения Python;
- Дальше рассмотрим управление транзакциями PostgreSQL, пул соединений и методы обработки исключений, что понадобится для разработки сложных программ на Python с помощью PostgreSQL.
Установка Psycopg2 с помощью pip
Для начала нужно установить текущую версию Psycopg2 для использования PostgreSQL в Python. С помощью команды pip можно установить модуль в любую операцию систему: Windows, macOS, Linux:
pip install psycopg2Также можно установить конкретную версию программы с помощью такой команды:
pip install psycopg2=2.8.6Если возникает ошибка установки, например «connection error: [SSL: CERTIFICATE_VERIFY_FAILED] certificate verify failed (_ssl.c:598)», то ее можно решить, сделав files.pythonhosted.org доверенным хостом:
python -m pip install --trusted-host pypi.org --trusted-host files.pythonhosted.org --trusted-host pypi.python.org psycopg2
Модуль psycopg2 поддерживает:
- Python 2.7 и Python 3, начиная с версии 3.4.
- Сервер PostgreSQL от 7.4 до 12.
- Клиентскую библиотеку PostgreSQL от 9.1.
Проверка установки Psycopg2
После запуска команды должны появиться следующие сообщения:
- Collecting psycopg2
- Downloading psycopg2-2.8.6
- Installing collected packages: psycopg2
- Successfully installed psycopg2-2.8.6
При использовании anaconda подойдет следующая команда.
conda install -c anaconda psycopg2В этом разделе рассмотрим, как подключиться к PostgreSQL из Python с помощью модуля Psycopg2.
Вот какие аргументы потребуются для подключения:
- Имя пользователя: значение по умолчанию для базы данных PostgreSQL – postgres.
- Пароль: пользователь получает пароль при установке PostgreSQL.
- Имя хоста: имя сервера или IP-адрес, на котором работает база данных. Если она запущена локально, то нужно использовать localhost или 127.0.0.0.
- Имя базы данных: в этом руководстве будем использовать базу
postgres_db.
Шаги для подключения:
- Использовать метод
connect()с обязательными параметрами для подключения базы данных. - Создать объект cursor с помощью объекта соединения, который возвращает метод
connect. Он нужен для выполнения запросов. - Закрыть объект cursor и соединение с базой данных после завершения работы.
- Перехватить исключения, которые могут возникнуть в процессе.
Создание базы данных PostgreSQL с Psycopg2
Для начала создадим базу данных на сервере. Во время установки PostgreSQL вы указывали пароль, его нужно использовать при подключении.
import psycopg2

from psycopg2 import Error

from psycopg2.extensions import ISOLATION_LEVEL_AUTOCOMMIT
try:

    # Подключение к существующей базе данных

    connection = psycopg2.connect(user="postgres",

                                  # пароль, который указали при установке PostgreSQL

                                  password="1111",

                                  host="127.0.0.1",

                                  port="5432")

    connection.set_isolation_level(ISOLATION_LEVEL_AUTOCOMMIT)

    # Курсор для выполнения операций с базой данных

    cursor = connection.cursor()

    sql_create_database = 'create database postgres_db'

    cursor.execute(sql_create_database)
except (Exception, Error) as error:

    print("Ошибка при работе с PostgreSQL", error)

finally:

    if connection:

        cursor.close()

        connection.close()

        print("Соединение с PostgreSQL закрыто")
Пример кода для подключения к базе данных PostgreSQL из Python
Для подключения к базе данных PostgreSQL и выполнения SQL-запросов нужно знать название базы данных. Ее нужно создать прежде чем пытаться выполнить подключение.
import psycopg2

from psycopg2 import Error

try:

    # Подключение к существующей базе данных

    connection = psycopg2.connect(user="postgres",

                                  # пароль, который указали при установке PostgreSQL

                                  password="1111",

                                  host="127.0.0.1",

                                  port="5432",

                                  database="postgres_db")

    # Курсор для выполнения операций с базой данных

    cursor = connection.cursor()

    # Распечатать сведения о PostgreSQL

    print("Информация о сервере PostgreSQL")

    print(connection.get_dsn_parameters(), "n")

    # Выполнение SQL-запроса

    cursor.execute("SELECT version();")

    # Получить результат

    record = cursor.fetchone()

    print("Вы подключены к - ", record, "n")

except (Exception, Error) as error:

    print("Ошибка при работе с PostgreSQL", error)

finally:

    if connection:

        cursor.close()

        connection.close()

        print("Соединение с PostgreSQL закрыто")
После подключения появится следующий вывод:
Информация о сервере PostgreSQL
{'user': 'postgres', 'dbname': 'postgres_db', 'host': '127.0.0.1', 'port': '5432', 'tty': '', 'options': '', 'sslmode': 'prefer', 'sslcompression': '0', 'krbsrvname': 'postgres', 'target_session_attrs': 'any'}

Вы подключены к -  ('PostgreSQL 10.13, compiled by Visual C++ build 1800, 64-bit',)

Соединение с PostgreSQL закрыто
Разбор процесса подключения в деталях
import psycopg2 — Эта строка импортирует модуль Psycopg2 в программу. С помощью классов и методов модуля можно взаимодействовать с базой.
from psycopg2 import Error — С помощью класса Error можно обрабатывать любые ошибки и исключения базы данных. Это сделает приложение более отказоустойчивым. Этот класс также поможет понять ошибку в подробностях. Он возвращает сообщение об ошибке и ее код.
psycopg2.connect() — С помощью метода connect() создается подключение к экземпляру базы данных PostgreSQL. Он возвращает объект подключения. Этот объект является потокобезопасным и может быть использован на разных потоках.
Метод connect() принимает разные аргументы, рассмотренные выше. В этом примере в метод были переданы следующие аргументы: user = "postgres", password = "1111", host = "127.0.0.1", port = "5432", database = "postgres_db".
cursor = connection.cursor() — С базой данных можно взаимодействовать с помощью класса cursor. Его можно получить из метода cursor(), который есть у объекта соединения. Он поможет выполнять SQL-команды из Python.
Из одного объекта соединения можно создавать неограниченное количество объектов cursor. Они не изолированы, поэтому любые изменения, сделанные в базе данных с помощью одного объекта, будут видны остальным. Объекты cursor не являются потокобезопасными.
После этого выведем свойства соединения с помощью connection.get_dsn_parameters().
cursor.execute() — С помощью метода execute объекта cursor можно выполнить любую операцию или запрос к базе данных. В качестве параметра этот метод принимает SQL-запрос. Результаты запроса можно получить с помощью fetchone(), fetchmany(), fetchall().
В этом примере выполняем SELECT version(); для получения сведений о версии PosgreSQL.
Блок try-except-finally — Разместим код в блоке try-except для перехвата исключений и ошибок базы данных.
cursor.close() и connection.close() — Правильно всегда закрывать объекты cursor и connection после завершения работы, чтобы избежать проблем с базой данных.
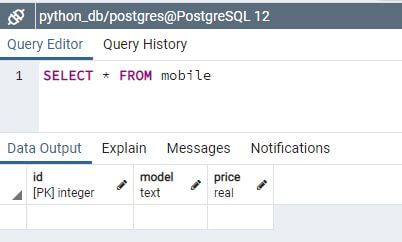
Создание таблицы PostgreSQL из Python
В этом разделе разберем, как создавать таблицу в PostgreSQL из Python. В качестве примера создадим таблицу Mobile.
Выполним следующие шаги:
- Подготовим запрос для базы данных
- Подключимся к PosgreSQL с помощью
psycopg2.connect(). - Выполним запрос с помощью
cursor.execute(). - Закроем соединение с базой данных и объект
cursor.
Теперь рассмотрим пример.
import psycopg2

from psycopg2 import Error

try:

    # Подключиться к существующей базе данных

    connection = psycopg2.connect(user="postgres",

                                  # пароль, который указали при установке PostgreSQL

                                  password="1111",

                                  host="127.0.0.1",

                                  port="5432",

                                  database="postgres_db")

    # Создайте курсор для выполнения операций с базой данных

    cursor = connection.cursor()

    # SQL-запрос для создания новой таблицы

    create_table_query = '''CREATE TABLE mobile

                          (ID INT PRIMARY KEY     NOT NULL,

                          MODEL           TEXT    NOT NULL,

                          PRICE         REAL); '''

    # Выполнение команды: это создает новую таблицу

    cursor.execute(create_table_query)

    connection.commit()

    print("Таблица успешно создана в PostgreSQL")

except (Exception, Error) as error:

    print("Ошибка при работе с PostgreSQL", error)

finally:

    if connection:

        cursor.close()

        connection.close()

        print("Соединение с PostgreSQL закрыто")
Вывод:
Таблица успешно создана в PostgreSQL
Соединение с PostgreSQL закрыто
Примечание: наконец, коммитим изменения с помощью метода commit().
Соответствие типов данных Python и PostgreSQL
Есть стандартный маппер для конвертации типов Python в их эквиваленты в PosgreSQL и наоборот. Каждый раз при выполнении запроса PostgreSQL из Python с помощью psycopg2 результат возвращается в виде объектов Python.
| Python | PostgreSQL |
|---|---|
| None | NULL |
| bool | bool |
| float | real double |
| int long |
smallint integer bigint |
| Decimal | numeric |
| str unicode |
varchar text |
| date | date |
| time | time timetz |
| datetime | timestamp timestamptz |
| timedelta | interval |
| list | ARRAY |
| tuple namedtuple |
Composite types IN syntax |
| dict | hstore |
Константы и числовые преобразования
При попытке вставить значения None и boolean (True, False) из Python в PostgreSQL, они конвертируются в соответствующие литералы SQL. То же происходит и с числовыми типами. Они конвертируются в соответствующие типы PostgreSQL.
Например, при выполнении запроса на вставку числовые объекты, такие как int, long, float и Decimal, конвертируются в числовые представления из PostgreSQL. При чтении из таблицы целые числа конвертируются в int, числа с плавающей точкой — во float, а десятичные — в Decimal.
Выполнение CRUD-операций из Python
Таблица mobile уже есть. Теперь рассмотрим, как выполнять запросы для вставки, обновления, удаления или получения данных из таблицы в Python.
import psycopg2

from psycopg2 import Error

try:

    # Подключиться к существующей базе данных

    connection = psycopg2.connect(user="postgres",

                                  # пароль, который указали при установке PostgreSQL

                                  password="1111",

                                  host="127.0.0.1",

                                  port="5432",

                                  database="postgres_db")

    cursor = connection.cursor()

    # Выполнение SQL-запроса для вставки данных в таблицу

    insert_query = """ INSERT INTO mobile (ID, MODEL, PRICE) VALUES (1, 'Iphone12', 1100)"""

    cursor.execute(insert_query)

    connection.commit()

    print("1 запись успешно вставлена")

    # Получить результат

    cursor.execute("SELECT * from mobile")

    record = cursor.fetchall()

    print("Результат", record)

    # Выполнение SQL-запроса для обновления таблицы

    update_query = """Update mobile set price = 1500 where id = 1"""

    cursor.execute(update_query)

    connection.commit()

    count = cursor.rowcount

    print(count, "Запись успешно удалена")

    # Получить результат

    cursor.execute("SELECT * from mobile")

    print("Результат", cursor.fetchall())

    # Выполнение SQL-запроса для удаления таблицы

    delete_query = """Delete from mobile where id = 1"""

    cursor.execute(delete_query)

    connection.commit()

    count = cursor.rowcount

    print(count, "Запись успешно удалена")

    # Получить результат

    cursor.execute("SELECT * from mobile")

    print("Результат", cursor.fetchall())

except (Exception, Error) as error:

    print("Ошибка при работе с PostgreSQL", error)

finally:

    if connection:

        cursor.close()

        connection.close()

        print("Соединение с PostgreSQL закрыто")
Вывод:
1 запись успешно вставлена
Результат [(1, 'Iphone12', 1100.0)]
1 Запись успешно удалена
Результат [(1, 'Iphone12', 1500.0)]
1 Запись успешно удалена
Результат []
Соединение с PostgreSQL закрыто
Примечание: не забывайте сохранять изменения в базу данных с помощью
connection.commit()после успешного выполнения операции базы данных.
Работа с датой и временем из PostgreSQL
В этом разделе рассмотрим, как работать с типами date и timestamp из PostgreSQL в Python и наоборот.
Обычно при выполнении вставки объекта datetime модуль psycopg2 конвертирует его в формат timestamp PostgreSQL.
По аналогии при чтении значений timestamp из таблицы PostgreSQL модуль psycopg2 конвертирует их в объекты datetime Python.
Для этого примера используем таблицу Item. Выполните следующий код, чтобы подготовить таблицу.
import psycopg2

from psycopg2 import Error

try:

    # Подключиться к существующей базе данных

    connection = psycopg2.connect(user="postgres",

                                  # пароль, который указали при установке PostgreSQL

                                  password="1111",

                                  host="127.0.0.1",

                                  port="5432",

                                  database="postgres_db")

    # Создайте курсор для выполнения операций с базой данных

    cursor = connection.cursor()

    # SQL-запрос для создания новой таблицы

    create_table_query = '''CREATE TABLE item (

	    item_id serial NOT NULL PRIMARY KEY,

	    item_name VARCHAR (100) NOT NULL,

    	    purchase_time timestamp NOT NULL,

	    price INTEGER NOT NULL

    );'''

    # Выполнение команды: это создает новую таблицу

    cursor.execute(create_table_query)

    connection.commit()

    print("Таблица успешно создана в PostgreSQL")

except (Exception, Error) as error:

    print("Ошибка при работе с PostgreSQL", error)

finally:

    if connection:

        cursor.close()

        connection.close()

        print("Соединение с PostgreSQL закрыто")
Рассмотрим сценарий на простом примере. Здесь мы читаем колонку purchase_time из таблицы и конвертируем значение в объект datetime Python.
import psycopg2

import datetime

from psycopg2 import Error

try:

    # Подключиться к существующей базе данных

    connection = psycopg2.connect(user="postgres",

                                  # пароль, который указали при установке PostgreSQL

                                  password="1111",

                                  host="127.0.0.1",

                                  port="5432",

                                  database="postgres_db")

    cursor = connection.cursor()

    # Выполнение SQL-запроса для вставки даты и времени в таблицу

    insert_query = """ INSERT INTO item (item_Id, item_name, purchase_time, price)

                              VALUES (%s, %s, %s, %s)"""

    item_purchase_time = datetime.datetime.now()

    item_tuple = (12, "Keyboard", item_purchase_time, 150)

    cursor.execute(insert_query, item_tuple)

    connection.commit()

    print("1 элемент успешно добавлен")

    # Считать значение времени покупки PostgreSQL в Python datetime

    cursor.execute("SELECT purchase_time from item where item_id = 12")

    purchase_datetime = cursor.fetchone()

    print("Дата покупки товара", purchase_datetime[0].date())

    print("Время покупки товара", purchase_datetime[0].time())

except (Exception, Error) as error:

    print("Ошибка при работе с PostgreSQL", error)

finally:

    if connection:

        cursor.close()

        connection.close()

        print("Соединение с PostgreSQL закрыто")
Вывод:
1 элемент успешно добавлен
Дата покупки товара 2021-01-16
Время покупки товара 20:16:23.166867
Соединение с PostgreSQL закрытоThis Python PostgreSQL tutorial demonstrates how to use the Psycopg2 module to connect to PostgreSQL and perform SQL queries, database operations. There are many ways we can connect to a PostgreSQL database from Python, and in this tutorial, we’re going to explore several options to see how to achieve this.
Below is the list of available Python modules to work with the PostgreSQL database server.
Psycopg2pg8000py-postgresqlPyGreSQLocpgdbbpgsqlSQLAlchemy. SQLAlchemy needs any of the above to be installed separately.
Note: Above all modules adhere to Python Database API Specification v2.0 (PEP 249). This API is designed to encourage and maintain the similarity between the Python database modules to access databases. In other words, the syntax, method, and way of access the database are the same in all the above modules.
We stick to the Psycopg2 because it is arguably the most popular and stable module to work with PostgreSQL. Also, We are using Psycopg2 to work with PostgreSQL because of the following reasons.
- It is used in most of the Python and Postgres frameworks.
- It is also actively maintained and supports Python’s primary version, i.e., Python 3 and Python 2.
- It is thread-safe and designed for heavily multi-threaded applications. Note, threads can share the connections.
This Python PostgreSQL guide mainly focuses on the followings
- Installing Psycopg2 and use its API to access the PostgreSQL database
- Perform data insertion, data retrieval, data update, and data deletion through Python application.
- Next, it will cover PostgreSQL transaction management, connection pooling, and error-handling techniques to develop robust Python programs with PostgreSQL.
Let’s dive right in.
Table of contents
- Install Psycopg2 using the pip command
- Verify Psycopg2 installation
- Python PostgreSQL database connection
- Python example to connect PostgreSQL database
- Important points
- Create a PostgreSQL table from Python
- The mapping between Python and PostgreSQL types
- Constants and numeric conversion
- Perform PostgreSQL CRUD operations from Python
- Working with PostgreSQL date and time in Python
- Call PostgreSQL Function and Stored Procedure from Python
- Python PostgreSQL Transaction management
- Python PostgreSQL Connection Pooling
- Python PostgreSQL Exercise Project
Install Psycopg2 using the pip command
You need to install the current version of Psycopg2 (2.8.6) on your machine to use PostgreSQL from Python. This module is available on pypi.org.
Using the following pip command, you can install Psycopg2 on any operating system, including Windows, macOS, Linux, Unix, and Ubuntu.
pip install psycopg2You can also install a specific version using the following command.
pip install psycopg2=2.8.6If you are facing pip install error like “connection error: [SSL: CERTIFICATE_VERIFY_FAILED] certificate verify failed (_ssl.c:598)”. You can resolve this error by setting pypi.org and files.pythonhosted.org as trusted hosts. If you are facing a pip install error Please try following the command.
python -m pip install --trusted-host pypi.org --trusted-host files.pythonhosted.org --trusted-host pypi.python.org psycopg2The current psycopg2 module supports:
- Python version 2.7, and Python 3 versions from 3.4 to 3.8
- PostgreSQL server versions from 7.4 to 12
- PostgreSQL client library version from 9.1
Verify Psycopg2 installation
You should get the following messages after running the above command.
- Collecting psycopg2
- Downloading psycopg2-2.8.6
- Installing collected packages: psycopg2
- Successfully installed psycopg2-2.8.6
Please use the following command to install Psycopg2 If you are using anaconda.
conda install -c anaconda psycopg2Python PostgreSQL database connection
In this section, we will learn how to connect to PostgreSQL through Python using Psycopg2.
Arguments required to connect PostgreSQL database from Python
You need to know the following detail of the PostgreSQL server to perform the connection.
- Username: The username you use to work with PostgreSQL, The default username for the PostgreSQL database is Postgres.
- Password: Password is given by the user at the time of installing the PostgreSQL.
- Host Name: This is the server name or Ip address on which PostgreSQL is running. if you are running on localhost, then you can use localhost, or its IP, i.e., 127.0.0.0
- Database Name: Database name to which you want to connect. Here we are using Database named “postgres_db“.
How to Connect to PostgreSQL in Python
- Install Psycopg2 module
Install and import psycopg2 module. Import using a
import psycopg2statement so you can use this module’s methods to communicate with the PostgreSQL database. - Use the connect() method
Use the
psycopg2.connect()method with the required arguments to connect MySQL. It would return anConnectionobject if the connection established successfully - Use the cursor() method
Create a cursor object using the connection object returned by the connect method to execute PostgreSQL queries from Python.
- Use the execute() method
The
execute()methods run the SQL query and return the result. - Extract result using fetchall()
Use
cursor.fetchall()orfetchone()orfetchmany()to read query result. - Close cursor and connection objects
use
cursor.clsoe()andconnection.clsoe()method to close PostgreSQL connections after your work completes
Python example to connect PostgreSQL database
To connect the PostgreSQL database and perform SQL queries, you must know the database name you want to connect to, and if you have not created any database, I advise you to create one before proceeding further.
import psycopg2
from psycopg2 import Error

try:
    # Connect to an existing database
    connection = psycopg2.connect(user="postgres",
                                  password="pynative@#29",
                                  host="127.0.0.1",
                                  port="5432",
                                  database="postgres_db")

    # Create a cursor to perform database operations
    cursor = connection.cursor()
    # Print PostgreSQL details
    print("PostgreSQL server information")
    print(connection.get_dsn_parameters(), "n")
    # Executing a SQL query
    cursor.execute("SELECT version();")
    # Fetch result
    record = cursor.fetchone()
    print("You are connected to - ", record, "n")

except (Exception, Error) as error:
    print("Error while connecting to PostgreSQL", error)
finally:
    if (connection):
        cursor.close()
        connection.close()
        print("PostgreSQL connection is closed")
You should get the following output after connecting to PostgreSQL from Python
PostgreSQL server information
{'user': 'postgres', 'dbname': 'python_db', 'host': '127.0.0.1', 'port': '5432', 'tty': '', 'options': '', 'sslmode': 'prefer', 'sslcompression': '0', 'krbsrvname': 'postgres', 'target_session_attrs': 'any'}

You are connected to -  ('PostgreSQL 12.2)
PostgreSQL connection is closed
Important points
- In our example, we are executing a
SELECT version();query to fetch the PostgreSQL version. - Using the
Errorclass of Psycopg2, we can handle any database error and exception while working with PostgreSQL from Python. Using this approach, we can make our application robust. - The error class helps us to understand the error in detail. It returns an error message and error code if any.
- We can create as many cursors as we want from a single connection object. Cursors created from the same connection are not isolated, i.e., any changes done to the database by a cursor are immediately visible by the other cursors.
- Cursors are not thread-safe.
- We can retrieve query result using cursor methods such as
fetchone(),fetchmany(),fetcthall().
try-except-finally block
- We placed all our code in the try-except block to catch the database exceptions and errors that may occur during this process.
cursor.close() and connection.close()
- It is always good practice to close the cursor and connection object once your work gets completed to avoid database issues.
Create a PostgreSQL table from Python
This section will learn how to create a table in PostgreSQL from Python. In this example, we will create a “Mobile” table in PostgreSQL.
import psycopg2
from psycopg2 import Error

try:
    connection = psycopg2.connect(user="postgres",
                                  password="pynative@#29",
                                  host="127.0.0.1",
                                  port="5432",
                                  database="postgres_db")

    cursor = connection.cursor()
    # SQL query to create a new table
    create_table_query = '''CREATE TABLE mobile
          (ID INT PRIMARY KEY     NOT NULL,
          MODEL           TEXT    NOT NULL,
          PRICE         REAL); '''
    # Execute a command: this creates a new table
    cursor.execute(create_table_query)
    connection.commit()
    print("Table created successfully in PostgreSQL ")

except (Exception, Error) as error:
    print("Error while connecting to PostgreSQL", error)
finally:
    if connection:
        cursor.close()
        connection.close()
        print("PostgreSQL connection is closed")
Output
Table created successfully in PostgreSQL PostgreSQL connection is closed
Note: Note: In the end, we are committing our changes to the database using the commit() method.
The mapping between Python and PostgreSQL types
There is default mapping specified to convert Python types into PostgreSQL equivalent, and vice versa. Whenever you execute a PostgreSQL query using Python following table is used by psycopg2 to return the result in the form of Python objects.
| Python | PostgreSQL |
|---|---|
None |
NULL |
bool |
bool |
float |
real or double |
int |
smallintintegerbigint |
Decimal |
numeric |
str |
varchartext |
date |
date |
time |
timetimetz |
datetime |
timestamptimestamptz |
timedelta |
interval |
list |
ARRAY |
tuple |
Composite types IN syntax |
dict |
hstore |
Constants and numeric conversion
When you try to insert Python None and boolean values such as True and False into PostgreSQL, it gets converted into the proper SQL literals. The same case is with Python numerical types. It gets converted into equivalent PostgreSQL types.
For example, When you execute an insert query, Python numeric objects such as int, long, float, Decimal are converted into a PostgreSQL numerical representation. When you read from the PostgreSQL table, integer types are converted into an int, floating-point types are converted into a float, numeric/Decimal are converted into Decimal.
Perform PostgreSQL CRUD operations from Python
Now, we created a “mobile” table. Now let’ see how to perform insert, select, update, and delete PostgreSQL queries from Python.
In this section, We will learn how to perform PostgreSQL CRUD operations from Python.
Now, Let’s see the example.
import psycopg2

try:
    connection = psycopg2.connect(user="postgres",
                                  password="pynative@#29",
                                  host="127.0.0.1",
                                  port="5432",
                                  database="postgres_db")

    cursor = connection.cursor()
    # Executing a SQL query to insert data into  table
    insert_query = """ INSERT INTO mobile (ID, MODEL, PRICE) VALUES (1, 'Iphone12', 1100)"""
    cursor.execute(insert_query)
    connection.commit()
    print("1 Record inserted successfully")
    # Fetch result
    cursor.execute("SELECT * from mobile")
    record = cursor.fetchall()
    print("Result ", record)

    # Executing a SQL query to update table
    update_query = """Update mobile set price = 1500 where id = 1"""
    cursor.execute(update_query)
    connection.commit()
    count = cursor.rowcount
    print(count, "Record updated successfully ")
    # Fetch result
    cursor.execute("SELECT * from mobile")
    print("Result ", cursor.fetchall())

    # Executing a SQL query to delete table
    delete_query = """Delete from mobile where id = 1"""
    cursor.execute(delete_query)
    connection.commit()
    count = cursor.rowcount
    print(count, "Record deleted successfully ")
    # Fetch result
    cursor.execute("SELECT * from mobile")
    print("Result ", cursor.fetchall())


except (Exception, psycopg2.Error) as error:
    print("Error while connecting to PostgreSQL", error)
finally:
    if connection:
        cursor.close()
        connection.close()
print("PostgreSQL connection is closed")Output:
1 Record inserted successfully
Result  [(1, 'Iphone12', 1100.0)]
1 Record updated successfully
Result  [(1, 'Iphone12', 1500.0)]
1 Record deleted successfully
Result  []
PostgreSQL connection is closed
Please refer to the following tutorials to have more information on insert, update, and delete data from the PostgreSQL table using Python.
In the following tutorial, we will teach you how to pass parameters to SQL queries. We will learn how to use a parameterized query to pass Python variables and dynamic data into SQL queries.
- Insert data into the PostgreSQL Table from Python: Learn how to execute the SQL insert query from a Python application to add a record to the PostgreSQL table.
- Select data from PostgreSQL Table from Python: Learn how to execute a SQL select query from a Python application to fetch rows from the database table. We will also learn how to use fetchall(),
fetchmany()andfetchone()methods to read a limited number of rows from the table. - Update data of PostgreSQL table from Python: Learn how to execute SQL update query from Python application to modify a PostgreSQL table’s records.
- Delete data from PostgreSQL table from Python: Learn how to execute SQL delete query from Python application to delete records from a PostgreSQL table.
Working with PostgreSQL date and time in Python
This section will demonstrate how to work with PostgreSQL date and timestamp data types in Python and vice-versa. Most of the time, we work with date and time data. We insert date and time into the table and also read from it in our application whenever required.
In a usual scenario, when you execute the insert query with the datetime object, the Python psycopg2 module converts it into a PostgreSQL timestamp format to insert it in the table.
And when you execute a SELECT query from Python to read timestamp values from the PostgreSQL table, the psycopg2 module converts it into a datetime object.
We are using the “Item” table for this demo. Please copy and execute the below query on your PostgreSQL query tool to have adequate data for this operation.
CREATE TABLE item (
	item_id serial NOT NULL PRIMARY KEY,
	item_name VARCHAR (100) NOT NULL,
	purchase_time timestamp NOT NULL,
	price INTEGER NOT NULL
);
Let’s understand this scenario with a simple example. Here we will read purchase_time column from the PostgreSQL table and convert it into a Python datetime object.
import datetime

import psycopg2

try:
    connection = psycopg2.connect(user="postgres",
                                  password="pynative@#29",
                                  host="127.0.0.1",
                                  port="5432",
                                  database="postgres_db")

    cursor = connection.cursor()
    # Executing a SQL query to insert datetime into table
    insert_query = """ INSERT INTO item (item_Id, item_name, purchase_time, price) VALUES (%s, %s, %s, %s)"""
    item_purchase_time = datetime.datetime.now()
    item_tuple = (12, "Keyboard", item_purchase_time, 150)
    cursor.execute(insert_query, item_tuple)
    connection.commit()
    print("1 item inserted successfully")

    # Read PostgreSQL purchase timestamp value into Python datetime
    cursor.execute("SELECT purchase_time from item where item_id = 12")
    purchase_datetime = cursor.fetchone()
    print("Item Purchase date is  ", purchase_datetime[0].date())
    print("Item Purchase time is  ", purchase_datetime[0].time())

except (Exception, psycopg2.Error) as error:
    print("Error while connecting to PostgreSQL", error)
finally:
    if connection:
        cursor.close()
        connection.close()
print("PostgreSQL connection is closed")Output:
1 item inserted successfully
Item Purchase date is   2020-12-14
Item Purchase time is   12:47:45.854942
PostgreSQL connection is closed
Call PostgreSQL Function and Stored Procedure from Python
PostgreSQL function and the Stored procedure can perform different operations, such as data manipulation or data retrieval. We can execute such functions from Python.
Learn how to execute the PostgreSQL function and Stored procedure in Python.
Python PostgreSQL Transaction management
In this article, we will see how to manage PostgreSQL transactions from Python using psycopg2.
- Learn how to use the
commit()and therollback()method of aconnectionclass to manage database transactions and maintain the ACID properties. - Also, learn how to change the PostgreSQL transaction isolation level from Python.
Python PostgreSQL Connection Pooling
This section will let you know what a connection pool is and how to implement a PostgreSQL database connection pool using Psycopg2 in Python. Using Psycopg2, we can implement a connection pool for simple as well as multithreaded applications.
Use the Connection pool to increase the speed and performance of database-centric applications.
Python PostgreSQL Exercise Project
Solve our free Python database exercise project to practice and master the PostgreSQL database operations using Python.
In this exercise project, We will implement the Hospital Information System, which covers all database operations. In this Python database exercise, we will do database CRUD operations From Python. This practice exercise also covers transaction management and error-handling techniques.
Reference:
- Psycopg2
- PostgreSQL
- PEP 249
Many developers face the issue of the No module named ‘psycopg2’ when they try to take their project to the production level. With the help of this article, we will understand the cause of the error and the possible solutions to avoid them. Let’s dive in.
What is ‘psycopg2’?
‘psycopg2’ is the most popular database adapter dealing in PostgreSQL. Its core is to completely implement the Python DB API 2.0 specification and the thread-safety. That means it can allow several threads to share a standard connection. It can easily handle concurrent insertion and deletion in an application. It can create or destroy lots of connections simultaneously.
Architechture behind ‘psycopg2’
‘psycopg2’ uses a libpq wrapper, which implements the C programming language interface. It consists of a set of library functions that allow client programs to receive the results of the queries passed to the PostgreSQL backend server.
Cause behind the error: No module named ‘psycopg2’
To execute the program smoothly, some pre-requisites should be met. Failing to meet these requirements will trigger import errors during the compilation.
Pre-requisites are :
- Python Version
- 3.6 to 3.9
- PostgreSQL server versions
- 7.4 to 13
- PostgreSQL client library version
- from 9.1
- C compiler
- Package such as python-dev or python3-dev to install python header files.
- libpq-dev package containing libpq header files.
- pg-config file should be present in the PATH file. It compiles ‘psycopg2‘
If the system does not meet the above requirements, the ‘psycopg2’ module will not be installed, leading to no modules name ‘psycopg2’ error. This error is often viewed by programmers who don’t have a C compiler in their system. As the binaries fail to install, the module will not work.
Resolving the issue: No module named ‘psycopg2’
To resolve the issue, we must satisfy all the pre-requisites laid by the ‘psycopg2’ to meet its build requirements. However, pyscopg2 also provides us with a binary package with its versions of C libraries, libpq, and libssl, which will be used regardless of other libraries available to the client.
Perform these commands to resolve the issue:
pip uninstall psycopg2
pip install psycopg2-binary
Running the above commands will solve the problem, but the installation may fail in a few cases due to a non-supportive environment. Follow these steps to install the precompiled library –
- Go to the Precompiled Library Packages list.
- Then download the wheel file (.whl) for the psycopg module.
- Then use the command
pip install <file>.whlto install the library using downloaded wheel file.
Using the above steps will guarantee installing psycopg2 on your computer.
Working On Incorrect Virtual Enviornment?
Many “No module named psycopg2” errors occur due to working on incorrect virtual environments and installing the ‘psycopg2’ on a different environment. Suppose you have two versions of python3 installed, and how will you install ‘psycopg2’ to a specific python?
Use the following command to call your python and install the package in your respective environment –
python3 -m pip install psycopg2
This will ensure that you install the psycopg2 module in the working environment. Hopefully, this resolves the issue. Moreover, if you face the C Compiler issues in this method, use the precompiled method as mentioned last way.
Recommended Reading | [Solved] No Module Named Numpy in Python
Resolving No module named ‘psycopg2’ in AWS EC2 lambda/ Linux OS
However, one cannot rely on binary packages if they are using them in production, and we should build the ‘psycopg2’ from the source. Because upgrading the system libraries will not upgrade the libraries used by ‘psycopg2'. Hence, there might be a dependencies error.
One can perform these commands to solve the problem
sudo apt install gcc g++ build-essential
sudo apt install python3-dev
sudo apt install libpq-dev
python -m pip install psycopg2
How to solve the No module named ‘psycopg2’ Error in Conda/Anaconda?
Conda or Anaconda has its virtual environment. So to work ‘psycopg2’, you have to install psycopg2 on Conda Environment. Use conda install psycopg2 to install psycopg2.
How to solve the No module named ‘psycopg2’ Error in Jupyter?
In most cases, Jupyter Notebook works in the anaconda environment. Use the conda install psycopg2 command to install the package in Jupyter. If it’s not working on Anaconda Environment, you have to find the location of the working environment and install the package there.
Conclusion
So, in this way, one can resolve the import error related to the PostgreSQL connection. A quick tip is to keep in mind the requisites we should follow before executing any program. We can permanently activate a python virtual window and maintain that virtual window according to the project’s needs. Now it’s your time to leverage the DB connection and create fantastic projects with ‘psycopg2’ and PostgreSQL.
Bon Codage!
Other Errors You Might Get
-

“Other Commands Don’t Work After on_message” in Discord Bots
●February 5, 2023
-
Botocore.Exceptions.NoCredentialsError: Unable to Locate Credentials
by Rahul Kumar Yadav●February 5, 2023
-
[Resolved] NameError: Name _mysql is Not Defined
by Rahul Kumar Yadav●February 5, 2023
-
Best Ways to Implement Regex New Line in Python
by Rahul Kumar Yadav●February 5, 2023


![[Resolved] NameError: Name _mysql is Not Defined](https://www.pythonpool.com/wp-content/uploads/2023/01/nameerror-name-_mysql-is-not-defined-300x157.webp)

Quick Fix: Python raises the ImportError: No module named 'psycopg2' when it cannot find the library psycopg2. The most frequent source of this error is that you haven’t installed psycopg2 explicitly with pip install psycopg2. Alternatively, you may have different Python versions on your computer, and psycopg2 is not installed for the particular version you’re using.
Problem Formulation
You’ve just learned about the awesome capabilities of the psycopg2 library and you want to try it out, so you start your code with the following statement:
import psycopg2
This is supposed to import the Pandas library into your (virtual) environment. However, it only throws the following ImportError: No module named psycopg2:
>>> import psycopg2
Traceback (most recent call last):
  File "<pyshell#6>", line 1, in <module>
    import psycopg2
ModuleNotFoundError: No module named 'psycopg2'
Solution Idea 1: Install Library psycopg2
The most likely reason is that Python doesn’t provide psycopg2 in its standard library. You need to install it first!
Before being able to import the Pandas module, you need to install it using Python’s package manager pip. Make sure pip is installed on your machine.
To fix this error, you can run the following command in your Windows shell:
$ pip install psycopg2
This simple command installs psycopg2 in your virtual environment on Windows, Linux, and MacOS. It assumes that your pip version is updated. If it isn’t, use the following two commands in your terminal, command line, or shell (there’s no harm in doing it anyways):
$ python -m pip install --upgrade pip
$ pip install pandas
💡 Note: Don’t copy and paste the $ symbol. This is just to illustrate that you run it in your shell/terminal/command line.
Solution Idea 2: Fix the Path
The error might persist even after you have installed the psycopg2 library. This likely happens because pip is installed but doesn’t reside in the path you can use. Although pip may be installed on your system the script is unable to locate it. Therefore, it is unable to install the library using pip in the correct path.
To fix the problem with the path in Windows follow the steps given next.
Step 1: Open the folder where you installed Python by opening the command prompt and typing where python
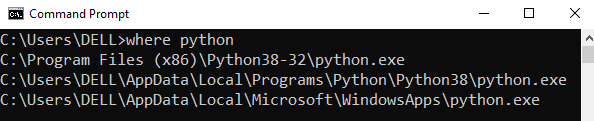
Step 2: Once you have opened the Python folder, browse and open the Scripts folder and copy its location. Also verify that the folder contains the pip file.
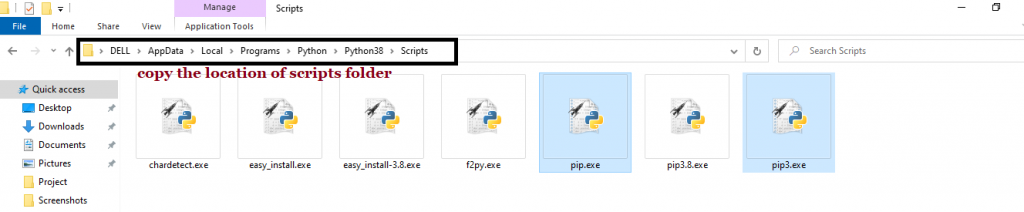
Step 3: Now open the Scripts directory in the command prompt using the cd command and the location that you copied previously.

Step 4: Now install the library using pip install psycopg2 command. Here’s an analogous example:
After having followed the above steps, execute our script once again. And you should get the desired output.
Other Solution Ideas
- The
ModuleNotFoundErrormay appear due to relative imports. You can learn everything about relative imports and how to create your own module in this article. - You may have mixed up Python and pip versions on your machine. In this case, to install
psycopg2for Python 3, you may want to trypython3 -m pip install psycopg2or evenpip3 install psycopg2instead ofpip install psycopg2 - If you face this issue server-side, you may want to try the command
pip install --user psycopg2 - If you’re using Ubuntu, you may want to try this command:
sudo apt install psycopg2 - You can check out our in-depth guide on installing
psycopg2here. - You can also check out this article to learn more about possible problems that may lead to an error when importing a library.
Understanding the “import” Statement
import psycopg2
In Python, the import statement serves two main purposes:
- Search the module by its name, load it, and initialize it.
- Define a name in the local namespace within the scope of the
importstatement. This local name is then used to reference the accessed module throughout the code.
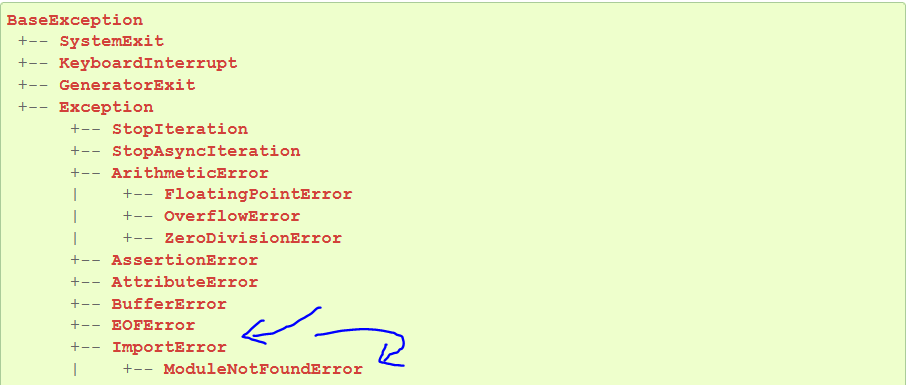
What’s the Difference Between ImportError and ModuleNotFoundError?
What’s the difference between ImportError and ModuleNotFoundError?
Python defines an error hierarchy, so some error classes inherit from other error classes. In our case, the ModuleNotFoundError is a subclass of the ImportError class.
You can see this in this screenshot from the docs:
You can also check this relationship using the issubclass() built-in function:
>>> issubclass(ModuleNotFoundError, ImportError)
True
Specifically, Python raises the ModuleNotFoundError if the module (e.g., psycopg2) cannot be found. If it can be found, there may be a problem loading the module or some specific files within the module. In those cases, Python would raise an ImportError.
If an import statement cannot import a module, it raises an ImportError. This may occur because of a faulty installation or an invalid path. In Python 3.6 or newer, this will usually raise a ModuleNotFoundError.
Related Videos
The following video shows you how to resolve the ImportError:
How to Fix : “ImportError: Cannot import name X” in Python?
The following video shows you how to import a function from another folder—doing it the wrong way often results in the ModuleNotFoundError:
How to Call a Function from Another File in Python?
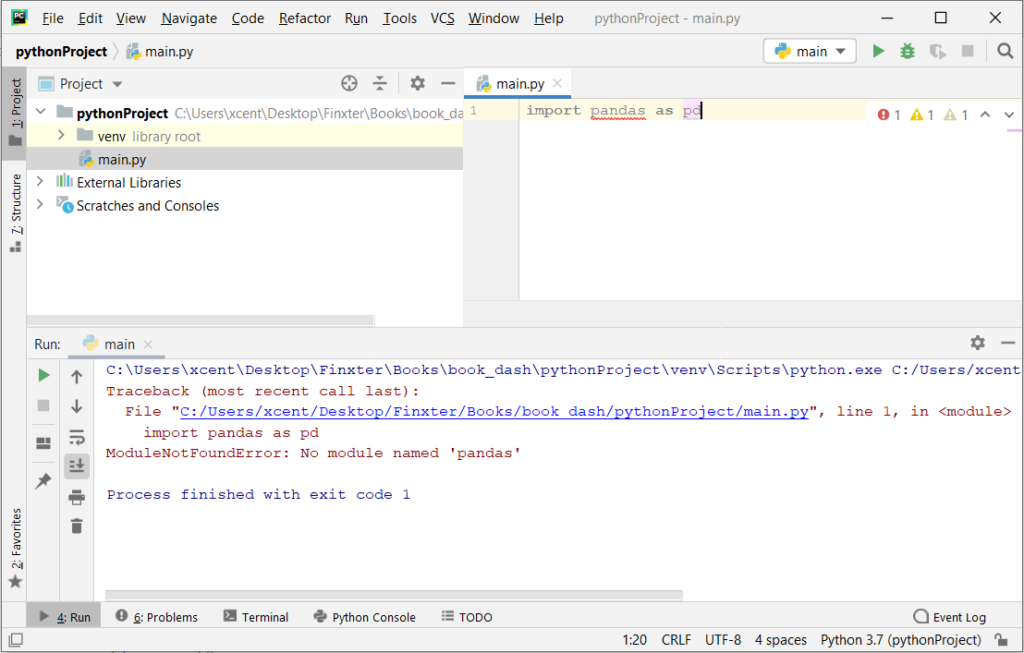
How to Fix “ModuleNotFoundError: No module named ‘psycopg2′” in PyCharm
If you create a new Python project in PyCharm and try to import the psycopg2 library, it’ll raise the following error message:
Traceback (most recent call last):
  File "C:/Users/.../main.py", line 1, in <module>
    import psycopg2
ModuleNotFoundError: No module named 'psycopg2'

Process finished with exit code 1
The reason is that each PyCharm project, per default, creates a virtual environment in which you can install custom Python modules. But the virtual environment is initially empty—even if you’ve already installed psycopg2 on your computer!
Here’s a screenshot exemplifying this for the pandas library. It’ll look similar for psycopg2.
The fix is simple: Use the PyCharm installation tooltips to install Pandas in your virtual environment—two clicks and you’re good to go!
First, right-click on the pandas text in your editor:

Second, click “Show Context Actions” in your context menu. In the new menu that arises, click “Install Pandas” and wait for PyCharm to finish the installation.
The code will run after your installation completes successfully.
As an alternative, you can also open the Terminal tool at the bottom and type:
$ pip install psycopg2
If this doesn’t work, you may want to set the Python interpreter to another version using the following tutorial: https://www.jetbrains.com/help/pycharm/2016.1/configuring-python-interpreter-for-a-project.html
You can also manually install a new library such as psycopg2 in PyCharm using the following procedure:
- Open
File > Settings > Projectfrom the PyCharm menu. - Select your current project.
- Click the
Python Interpretertab within your project tab. - Click the small
+symbol to add a new library to the project. - Now type in the library to be installed, in your example Pandas, and click
Install Package. - Wait for the installation to terminate and close all popup windows.
Here’s an analogous example:
Here’s a full guide on how to install a library on PyCharm.
- How to Install a Library on PyCharm

While working as a researcher in distributed systems, Dr. Christian Mayer found his love for teaching computer science students.
To help students reach higher levels of Python success, he founded the programming education website Finxter.com. He’s author of the popular programming book Python One-Liners (NoStarch 2020), coauthor of the Coffee Break Python series of self-published books, computer science enthusiast, freelancer, and owner of one of the top 10 largest Python blogs worldwide.
His passions are writing, reading, and coding. But his greatest passion is to serve aspiring coders through Finxter and help them to boost their skills. You can join his free email academy here.
A common error you may encounter when using Python is modulenotfounderror: no module named ‘psycopg2’.
This error occurs when the Python interpreter cannot detect the Psycopg library in your current environment.
You can install Psycopg2 in Python 3 with python3 -m pip install psycopg2-binary.
This tutorial goes through the exact steps to troubleshoot this error for the Windows, Mac and Linux operating systems.
Table of contents
- ModuleNotFoundError: no module named ‘psycopg2’
- What is ModuleNotFoundError?
- What is Psycopg2?
- Always Use a Virtual Environment to Install Packages
- How to Install Psycopg2 on Windows Operating System
- Psycopg2 installation on Windows Using pip
- How to Install Psycopg2 on Mac Operating System using pip
- How to Install Psycopg2 on Linux Operating Systems
- Installing pip for Ubuntu, Debian, and Linux Mint
- Installing pip for CentOS 8 (and newer), Fedora, and Red Hat
- Installing pip for CentOS 6 and 7, and older versions of Red Hat
- Installing pip for Arch Linux and Manjaro
- Installing pip for OpenSUSE
- Psycopg2 installation on Linux with Pip
- How to Install Psycopg2 on Windows Operating System
- Installing Psycopg2 Using Anaconda
- Check Psycopg2 Version
- Summary
ModuleNotFoundError: no module named ‘psycopg2’
What is ModuleNotFoundError?
The ModuleNotFoundError occurs when the module you want to use is not present in your Python environment. There are several causes of the modulenotfounderror:
The module’s name is incorrect, in which case you have to check the name of the module you tried to import. Let’s try to import the re module with a double e to see what happens:
import ree---------------------------------------------------------------------------
ModuleNotFoundError Traceback (most recent call last)
1 import ree
ModuleNotFoundError: No module named 'ree'To solve this error, ensure the module name is correct. Let’s look at the revised code:
import re

print(re.__version__)2.2.1You may want to import a local module file, but the module is not in the same directory. Let’s look at an example package with a script and a local module to import. Let’s look at the following steps to perform from your terminal:
mkdir example_package

cd example_package

mkdir folder_1

cd folder_1

vi module.py
Note that we use Vim to create the module.py file in this example. You can use your preferred file editor, such as Emacs or Atom. In module.py, we will import the re module and define a simple function that prints the re version:
import re

def print_re_version():

    print(re.__version__)
Close the module.py, then complete the following commands from your terminal:
cd ../

vi script.py
Inside script.py, we will try to import the module we created.
import module

if __name__ == '__main__':

    mod.print_re_version()
Let’s run python script.py from the terminal to see what happens:
Traceback (most recent call last):
  File "script.py", line 1, in ≺module≻
    import module
ModuleNotFoundError: No module named 'module'
To solve this error, we need to point to the correct path to module.py, which is inside folder_1. Let’s look at the revised code:
import folder_1.module as mod

if __name__ == '__main__':

    mod.print_re_version()
When we run python script.py, we will get the following result:
2.2.1Lastly, you can encounter the modulenotfounderror when you import a module that is not installed in your Python environment.
What is Psycopg2?
Psycopg2 is a PostgreSQL database adapter for Python. It provides an API to connect to an external database.
The simplest way to install psycopg2 is to use the package manager for Python called pip. The following installation instructions are for the major Python version 3.
Always Use a Virtual Environment to Install Packages
It is always best to install new libraries within a virtual environment. You should not install anything into your global Python interpreter when you develop locally. You may introduce incompatibilities between packages, or you may break your system if you install an incompatible version of a library that your operating system needs. Using a virtual environment helps compartmentalize your projects and their dependencies. Each project will have its environment with everything the code needs to run. Most ImportErrors and ModuleNotFoundErrors occur due to installing a library for one interpreter and trying to use the library with another interpreter. Using a virtual environment avoids this. In Python, you can use virtual environments and conda environments. We will go through how to install psycopg2 with both.
How to Install Psycopg2 on Windows Operating System
First, you need to download and install Python on your PC. Ensure you select the install launcher for all users and Add Python to PATH checkboxes. The latter ensures the interpreter is in the execution path. Pip is automatically on Windows for Python versions 2.7.9+ and 3.4+.
You can check your Python version with the following command:
python3 --versionYou can install pip on Windows by downloading the installation package, opening the command line and launching the installer. You can install pip via the CMD prompt by running the following command.
python get-pip.pyYou may need to run the command prompt as administrator. Check whether the installation has been successful by typing.
pip --versionPsycopg2 installation on Windows Using pip
To install psycopg2, first create the virtual environment. The environment can be any name, in this we choose “env”:
virtualenv envYou can activate the environment by typing the command:
envScriptsactivateYou will see “env” in parenthesis next to the command line prompt. You can install psycopg2 within the environment by running the following command from the command prompt.
python3 -m pip install psycopg2-binaryWe use python -m pip to execute pip using the Python interpreter we specify as Python. Doing this helps avoid ImportError when we try to use a package installed with one version of Python interpreter with a different version. You can use the command which python to determine which Python interpreter you are using.
How to Install Psycopg2 on Mac Operating System using pip
Open a terminal by pressing command (⌘) + Space Bar to open the Spotlight search. Type in terminal and press enter. To get pip, first ensure you have installed Python3:
python3 --versionPython 3.8.8Download pip by running the following curl command:
curl https://bootstrap.pypa.io/get-pip.py -o get-pip.pyThe curl command allows you to specify a direct download link. Using the -o option sets the name of the downloaded file.
Install pip by running:
python3 get-pip.pyTo install psycopg2, first create the virtual environment:
python3 -m venv envThen activate the environment using:
source env/bin/activate You will see “env” in parenthesis next to the command line prompt. You can install psycopg2 within the environment by running the following command from the command prompt.
python3 -m pip install psycopg2-binaryHow to Install Psycopg2 on Linux Operating Systems
All major Linux distributions have Python installed by default. However, you will need to install pip. You can install pip from the terminal, but the installation instructions depend on the Linux distribution you are using. You will need root privileges to install pip. Open a terminal and use the commands relevant to your Linux distribution to install pip.
Installing pip for Ubuntu, Debian, and Linux Mint
sudo apt install python-pip3Installing pip for CentOS 8 (and newer), Fedora, and Red Hat
sudo dnf install python-pip3Installing pip for CentOS 6 and 7, and older versions of Red Hat
sudo yum install epel-release

sudo yum install python-pip3
Installing pip for Arch Linux and Manjaro
sudo pacman -S python-pipInstalling pip for OpenSUSE
sudo zypper python3-pipPsycopg2 installation on Linux with Pip
To install psycopg2, first create the virtual environment:
python3 -m venv envThen activate the environment using:
source env/bin/activate You will see “env” in parenthesis next to the command line prompt. You can install psycopg2 within the environment by running the following command from the command prompt.
Once you have activated your virtual environment, you can install psycopg2 using:
python3 -m pip install psycopg2-binaryInstalling Psycopg2 Using Anaconda
Anaconda is a distribution of Python and R for scientific computing and data science. You can install Anaconda by going to the installation instructions. Once you have installed Anaconda, you can create a virtual environment and install psycopg2.
To create a conda environment you can use the following command:
conda create -n psycopg2 python=3.8You can specify a different Python 3 version if you like. Ideally, choose the latest version of Python. Next, you will activate the project container. You will see “psycopg2” in parentheses next to the command line prompt.
source activate psycopg2Now you’re ready to install psycopg2 using conda.
Once you have activated your conda environment, you can install psycopg2 using the following command:
conda install -c anaconda psycopg2Check Psycopg2 Version
Once you have successfully installed psycopg2, you can check its version. If you used pip to install psycopg2, you can use pip show from your terminal.
python3 -m pip show psycopg2-binaryName: psycopg2-binary
Version: 2.9.3
Summary: psycopg2 - Python-PostgreSQL Database AdapterSecond, within your python program, you can import psycopg2 and then reference the __version__ attribute:
import psycopg2
print(psycopg2.__version__)2.9.3If you used conda to install psycopg2, you could check the version using the following command:
conda list -f psycopg2# Name Version Build Channel
psycopg2 2.8.5 py38hddc9c9b_0 anacondaSummary
Congratulations on reading to the end of this tutorial. The modulenotfounderror occurs if you misspell the module name, incorrectly point to the module path or do not have the module installed in your Python environment. If you do not have the module installed in your Python environment, you can use pip to install the package. However, you must ensure you have pip installed on your system. You can also install Anaconda on your system and use the conda install command to install psycopg2.
Go to the online courses page on Python to learn more about Python for data science and machine learning.
For further reading on missing modules in Python, go to the article:
- How to Solve Python ModuleNotFoundError: no module named ‘urllib2’.
- How to Solve ModuleNotFoundError: no module named ‘plotly’.
- How to Solve Python ModuleNotFoundError: no module named ‘boto3’.
Have fun and happy researching!
Introduction
This is an article with a specific topic about how to solve error message as it exists in the title of the article. It occurs when a django application runs. It happens after adding the following content in the settings.py script inside the project folder :
DATABASES = {
    'default': {
        'ENGINE': 'django.db.backends.postgresql',
        'NAME': 'xxxx',
        'USER': 'postgres',
        'PASSWORD' : '',
        'HOST' : 'xxx.xxx.xxx.xxx',
        'PORT' : 'xxxx',
    }
}
The above line configurations is a specific script for connecting the django application to PostgreSQL database server. Suddenly, after saving the file, the runserver application execution is generating error. The error message is ModuleNotFoundError: No module named ‘psycopg2’. The following is the complete output error message :
user@hostname:~/python/my-django/users$ python3 manage.py makemigrations
Traceback (most recent call last):e
  File "/home/user/python/django-env/lib/python3.6/site-packages/django/db/backends/postgresql/base.py", line 20, in
    import psycopg2 as Database
ModuleNotFoundError: No module named 'psycopg2'

During handling of the above exception, another exception occurred:

Traceback (most recent call last):
  File "manage.py", line 21, in
    main()
  File "manage.py", line 17, in main
    execute_from_command_line(sys.argv)
  File "/home/user/python/django-env/lib/python3.6/site-packages/django/core/management/__init__.py", line 381, in execute_from_command_line
    utility.execute()
  File "/home/user/python/django-env/lib/python3.6/site-packages/django/core/management/__init__.py", line 357, in execute
    django.setup()
  File "/home/user/python/django-env/lib/python3.6/site-packages/django/__init__.py", line 24, in setup
    apps.populate(settings.INSTALLED_APPS)
  File "/home/user/python/django-env/lib/python3.6/site-packages/django/apps/registry.py", line 114, in populate
    app_config.import_models()
  File "/home/user/python/django-env/lib/python3.6/site-packages/django/apps/config.py", line 211, in import_models
    self.models_module = import_module(models_module_name)
  File "/usr/lib/python3.6/importlib/__init__.py", line 126, in import_module
    return _bootstrap._gcd_import(name[level:], package, level)
  File "", line 994, in _gcd_import
  File "", line 971, in _find_and_load
  File "", line 955, in _find_and_load_unlocked
  File "", line 665, in _load_unlocked
  File "", line 678, in exec_module
  File "", line 219, in _call_with_frames_removed
  File "/home/user/python/django-env/lib/python3.6/site-packages/django/contrib/auth/models.py", line 2, in
    from django.contrib.auth.base_user import AbstractBaseUser, BaseUserManager
  File "/home/user/python/django-env/lib/python3.6/site-packages/django/contrib/auth/base_user.py", line 47, in
    class AbstractBaseUser(models.Model):
  File "/home/user/python/django-env/lib/python3.6/site-packages/django/db/models/base.py", line 117, in __new__
    new_class.add_to_class('_meta', Options(meta, app_label))
  File "/home/user/python/django-env/lib/python3.6/site-packages/django/db/models/base.py", line 321, in add_to_class
    value.contribute_to_class(cls, name)
  File "/home/user/python/django-env/lib/python3.6/site-packages/django/db/models/options.py", line 204, in contribute_to_class
    self.db_table = truncate_name(self.db_table, connection.ops.max_name_length())
  File "v/python/django-env/lib/python3.6/site-packages/django/db/__init__.py", line 28, in __getattr__
    return getattr(connections[DEFAULT_DB_ALIAS], item)
  File "/home/user/python/django-env/lib/python3.6/site-packages/django/db/utils.py", line 201, in __getitem__
    backend = load_backend(db['ENGINE'])
  File "/home/user/python/django-env/lib/python3.6/site-packages/django/db/utils.py", line 110, in load_backend
    return import_module('%s.base' % backend_name)
  File "/usr/lib/python3.6/importlib/__init__.py", line 126, in import_module
    return _bootstrap._gcd_import(name[level:], package, level)
  File "/home/user/python/django-env/lib/python3.6/site-packages/django/db/backends/postgresql/base.py", line 24, in
    raise ImproperlyConfigured("Error loading psycopg2 module: %s" % e)
django.core.exceptions.ImproperlyConfigured: Error loading psycopg2 module: No module named 'psycopg2'
Solving the Problem
To solve the above problem, there are several solutions and those solutions have a connection with one another. But the most important thing is the focus of the solution is in the existance of the ‘psycopg2’. How can the module with the name of ‘psycopg2’ can be available for further usage in the django application. There are several steps or solution to solve the problem. The following is the list of the alternative steps or solution :
1. Installing the psycopg2 package.
2. Install the psycopg2 package to the virtual environment.
In the following section, there will be a further detail explanation about the above steps for solving the problem.
Installing psycopg2 package to the operating system using apt tool
Since it is the Linux Ubuntu distribution, execute the following command to install the ‘psycopg2’ module :
(django-env) (base) user@hostname:~/python/my-django/users$ sudo apt-get -y install python3-psycopg2
[sudo] password for user:
Reading package lists... Done
Building dependency tree
Reading state information... Done
Suggested packages:
  python-psycopg2-doc
The following NEW packages will be installed:
  python3-psycopg2
0 upgraded, 1 newly installed, 0 to remove and 5 not upgraded.
Need to get 152 kB of archives.
After this operation, 838 kB of additional disk space will be used.
Get:1 http://archive.ubuntu.com/ubuntu bionic/main amd64 python3-psycopg2 amd64 2.7.4-1 [152 kB]
Fetched 152 kB in 2s (85.6 kB/s)
Selecting previously unselected package python3-psycopg2.
(Reading database ... 328999 files and directories currently installed.)
Preparing to unpack .../python3-psycopg2_2.7.4-1_amd64.deb ...
Unpacking python3-psycopg2 (2.7.4-1) ...
Setting up python3-psycopg2 (2.7.4-1) ...
(django-env) (base) user@hostname:~/python/my-django/users$
The above command execution is relying on the apt tool program. Just make sure to choose the correct package name since the chosen package for the installation above is using python3. So, the package name for installation is ‘python3-psycopg. Make sure to search the compatible package using ‘apt search’ command.
Apparently, in this case, after executing the above command for installing psycopg2 to the operating system, the error message still occurs. So, if the error message is still occurs, just do the following step as another action to complete the solution.
Installing psycopg2 module in the python virtual environment using pip
The following is the command for executing psycopg2 to the running python virtual environment. The python virtual environment is ‘django-env’. The command for installing psycopg2 module is ‘pip install psycopg2’.
(django-env) (base) user@hostname:~/python/my-django/users$ pip install psycopg2
Collecting psycopg2
Downloading https://files.pythonhosted.org/packages/5c/1c/6997288da181277a0c29bc39a5f9143ff20b8c99f2a7d059cfb55163e165/psycopg2-2.8.3.tar.gz (377kB)
100% |████████████████████████████████| 378kB 1.4MB/s
Building wheels for collected packages: psycopg2
Running setup.py bdist_wheel for psycopg2 ... error
Complete output from command /home/user/python/django-env/bin/python3 -u -c "import setuptools, tokenize;__file__='/tmp/pip-build-nf3652og/psycopg2/setup.py';f=getattr(tokenize, 'open', open)(__file__);code=f.read().replace('rn', 'n');f.close();exec(compile(code, __file__, 'exec'))" bdist_wheel -d /tmp/tmpb8vrk172pip-wheel- --python-tag cp36:
usage: -c [global_opts] cmd1 [cmd1_opts] [cmd2 [cmd2_opts] ...]
or: -c --help [cmd1 cmd2 ...]
or: -c --help-commands
or: -c cmd --help

error: invalid command 'bdist_wheel'

----------------------------------------
Failed building wheel for psycopg2
Running setup.py clean for psycopg2
Failed to build psycopg2
Installing collected packages: psycopg2
Running setup.py install for psycopg2 ... error
Complete output from command /home/user/python/django-env/bin/python3 -u -c "import setuptools, tokenize;__file__='/tmp/pip-build-nf3652og/psycopg2/setup.py';f=getattr(tokenize, 'open', open)(__file__);code=f.read().replace('rn', 'n');f.close();exec(compile(code, __file__, 'exec'))" install --record /tmp/pip-zxhvlzhf-record/install-record.txt --single-version-externally-managed --compile --install-headers /home/user/python/django-env/include/site/python3.6/psycopg2:
running install
running build
running build_py
creating build
creating build/lib.linux-x86_64-3.6
creating build/lib.linux-x86_64-3.6/psycopg2
copying lib/_json.py -> build/lib.linux-x86_64-3.6/psycopg2
copying lib/compat.py -> build/lib.linux-x86_64-3.6/psycopg2
copying lib/_ipaddress.py -> build/lib.linux-x86_64-3.6/psycopg2
copying lib/tz.py -> build/lib.linux-x86_64-3.6/psycopg2
copying lib/_range.py -> build/lib.linux-x86_64-3.6/psycopg2
copying lib/extras.py -> build/lib.linux-x86_64-3.6/psycopg2
copying lib/errorcodes.py -> build/lib.linux-x86_64-3.6/psycopg2
copying lib/extensions.py -> build/lib.linux-x86_64-3.6/psycopg2
copying lib/__init__.py -> build/lib.linux-x86_64-3.6/psycopg2
copying lib/sql.py -> build/lib.linux-x86_64-3.6/psycopg2
copying lib/pool.py -> build/lib.linux-x86_64-3.6/psycopg2
copying lib/_lru_cache.py -> build/lib.linux-x86_64-3.6/psycopg2
copying lib/errors.py -> build/lib.linux-x86_64-3.6/psycopg2
running build_ext
building 'psycopg2._psycopg' extension
creating build/temp.linux-x86_64-3.6
creating build/temp.linux-x86_64-3.6/psycopg
x86_64-linux-gnu-gcc -pthread -DNDEBUG -g -fwrapv -O2 -Wall -g -fstack-protector-strong -Wformat -Werror=format-security -Wdate-time -D_FORTIFY_SOURCE=2 -fPIC -DPSYCOPG_VERSION=2.8.3 (dt dec pq3 ext lo64) -DPG_VERSION_NUM=100009 -DHAVE_LO64=1 -I/home/user/python/django-env/include -I/usr/include/python3.6m -I. -I/usr/include/postgresql -I/usr/include/postgresql/10/server -c psycopg/psycopgmodule.c -o build/temp.linux-x86_64-3.6/psycopg/psycopgmodule.o -Wdeclaration-after-statement
In file included from psycopg/psycopgmodule.c:27:0:
./psycopg/psycopg.h:34:10: fatal error: Python.h: No such file or directory
#include
^~~~~~~~~~
compilation terminated.

It appears you are missing some prerequisite to build the package from source.

You may install a binary package by installing 'psycopg2-binary' from PyPI.
If you want to install psycopg2 from source, please install the packages
required for the build and try again.

For further information please check the 'doc/src/install.rst' file (also at
<http://initd.org/psycopg/docs/install.html>).
error: command 'x86_64-linux-gnu-gcc' failed with exit status 1

----------------------------------------
Command "/home/user/python/django-env/bin/python3 -u -c "import setuptools, tokenize;__file__='/tmp/pip-build-nf3652og/psycopg2/setup.py';f=getattr(tokenize, 'open', open)(__file__);code=f.read().replace('rn', 'n');f.close();exec(compile(code, __file__, 'exec'))" install --record /tmp/pip-zxhvlzhf-record/install-record.txt --single-version-externally-managed --compile --install-headers /home/user/python/django-env/include/site/python3.6/psycopg2" failed with error code 1 in /tmp/pip-build-nf3652og/psycopg2/
(django-env) (base) user@hostname:~/python/my-django/users$
Installation of psycopg2-binary module in the python virtual environment using pip
Apparently, the solution in the previous step failed. There is an information about how to proceed the installation. It gives a solution to install a binary package with the name of ‘psycopg2-binary’. The following is the command execution :
(django-env) (base) user@hostname:~/python/my-django/users$ pip install psycopg2-binary==2.7.4
Collecting psycopg2-binary==2.7.4
Downloading https://files.pythonhosted.org/packages/5f/0b/aa7078d3f6d27d951c38b6a1f4b99b71b2caecebb2921b2d808b5bf0e2e0/psycopg2_binary-2.7.4-cp36-cp36m-manylinux1_x86_64.whl (2.7MB)
100% |████████████████████████████████| 2.7MB 194kB/s
Installing collected packages: psycopg2-binary
Successfully installed psycopg2-binary-2.7.4
(django-env) (base) user@hostname:~/python/my-django/users$
In the output above, the python virtual environment is ‘django-env’. According to the output message of the running django web server, after the execution of the above step ends in a success, the error message disappear and the problem solved.