Недавно мне понадобился текстовый редактор Geany. Я его установил, настроил и решил написать небольшой гайд, шпаргалку по изменению темы отдельного приложения. Я использую дистрибутив Fedora 31, но эта инструкция подойдет практически для любого дистрибутива с рабочим окружением GNOME. Как мы знаем гном имеет «спартанский» выбор настроек. Хорошо это или плохо я рассуждать не буду, а разберусь как это исправить.
Разработчики GNOME и многих дистрибутивов, каждый по своему настраивают тему приложений. Весной разработчики GNOME даже написали открытое письмо с просьбой к дистростроителям, не изменять дефолтные настройки приложений GNOME. Также в интернете можно скачать и установить любые темы и значки на свой вкус.
В рабочем окружении GNOME я использую светлую тему Adwaita. У вас, в зависимости от дистрибутива и личных предпочтений может быть любая другая тема. Как видим из заголовка статьи, я хочу поменять тему одного (или нескольких) приложений GTK.
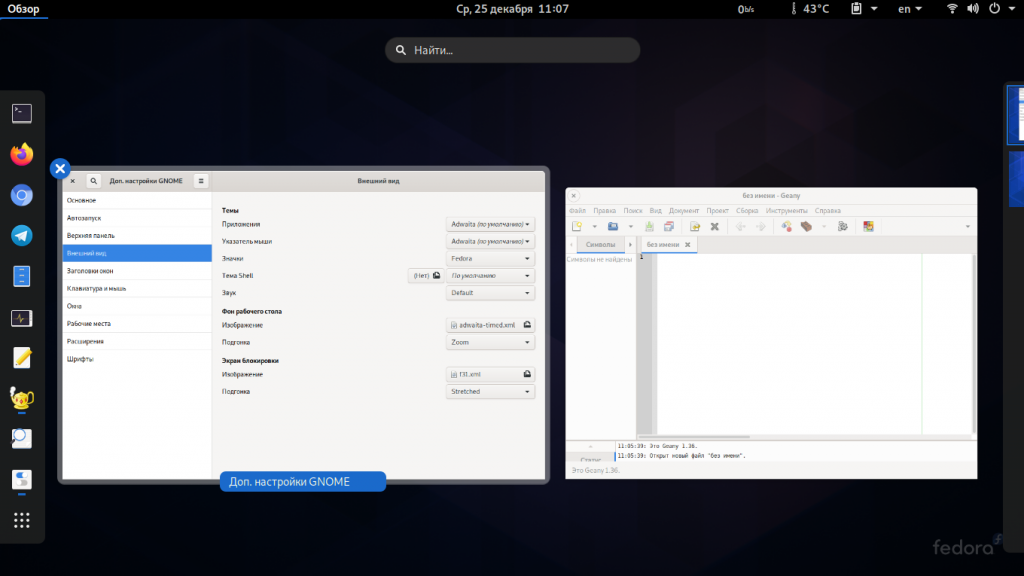
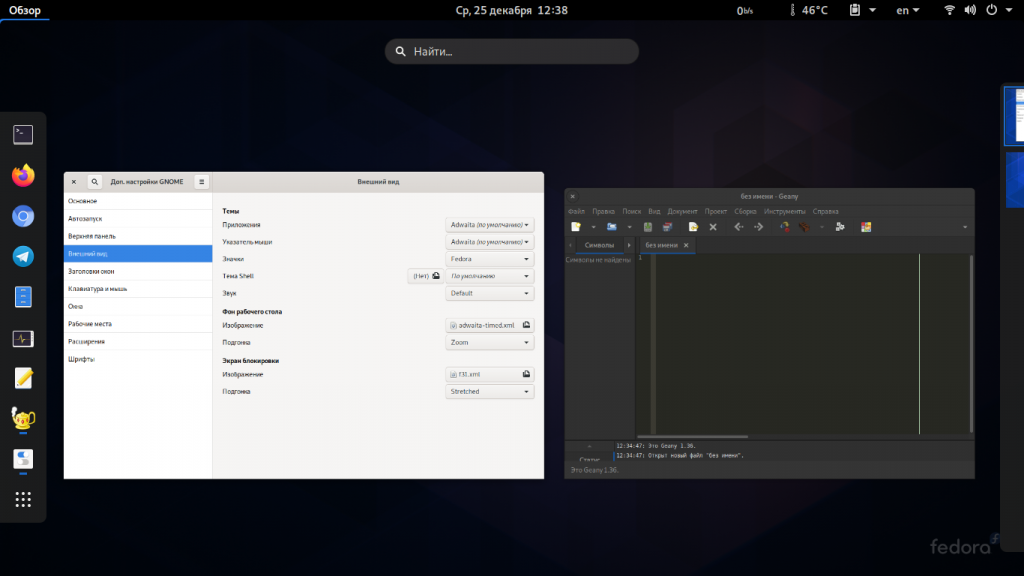
Итак начнем. Как мы знаем приложение Gnome-tweak изменяет тему всех приложений в системе.
Например светлая:
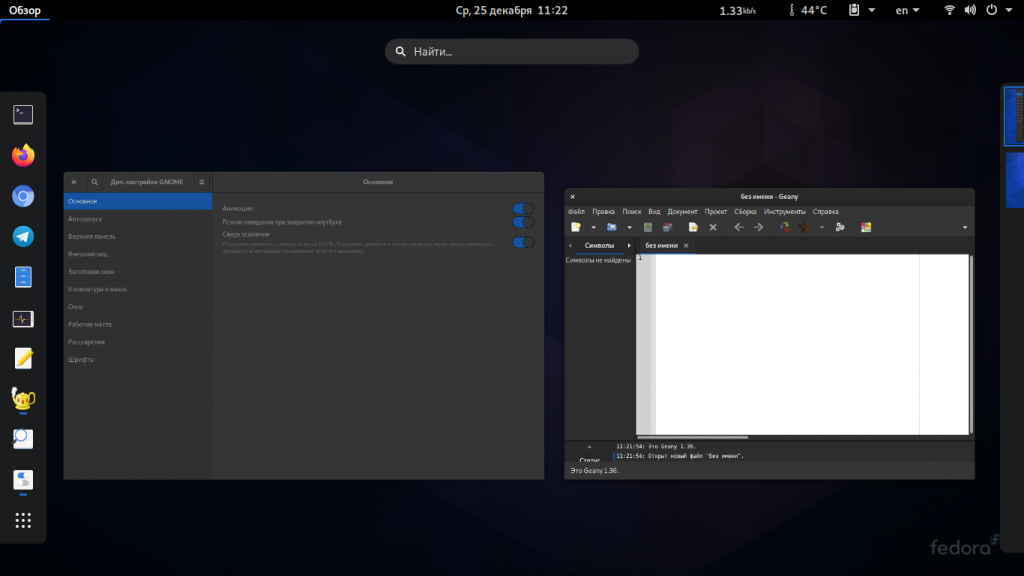
Или темная:
Также есть исключения дистростроителей или разработчиков GNOME. Например у меня в светлой Adwaita приложения Eye of GNOME (eog) и Totem отображаются в темной теме:
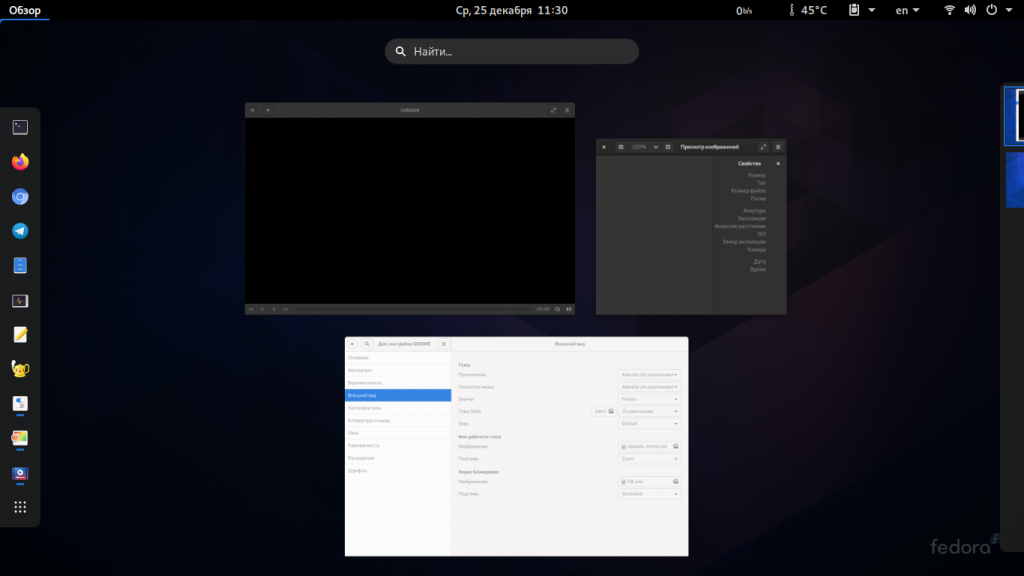
Также на скрине я вставил видеоплеер Celluloid, он не входит в стандартный набор гномовских приложений, но тоже поставляется с темной темой. Хотя в настройках приложения ее можно поменять на светлую.
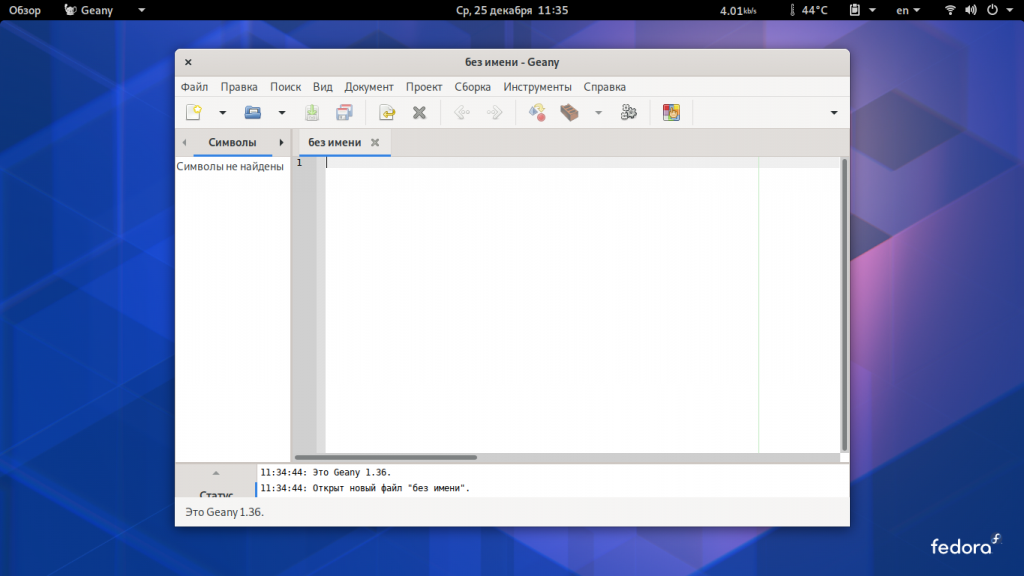
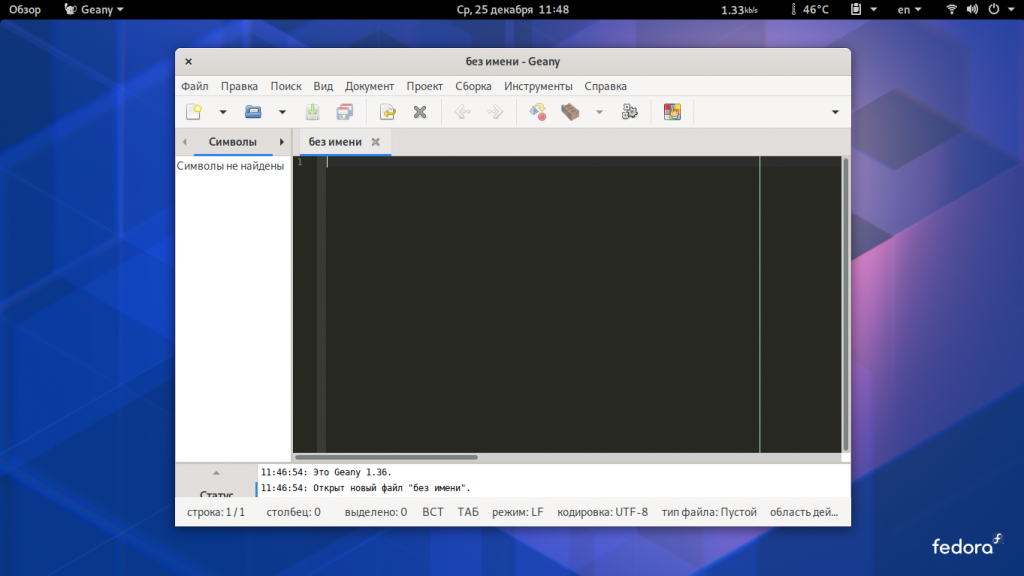
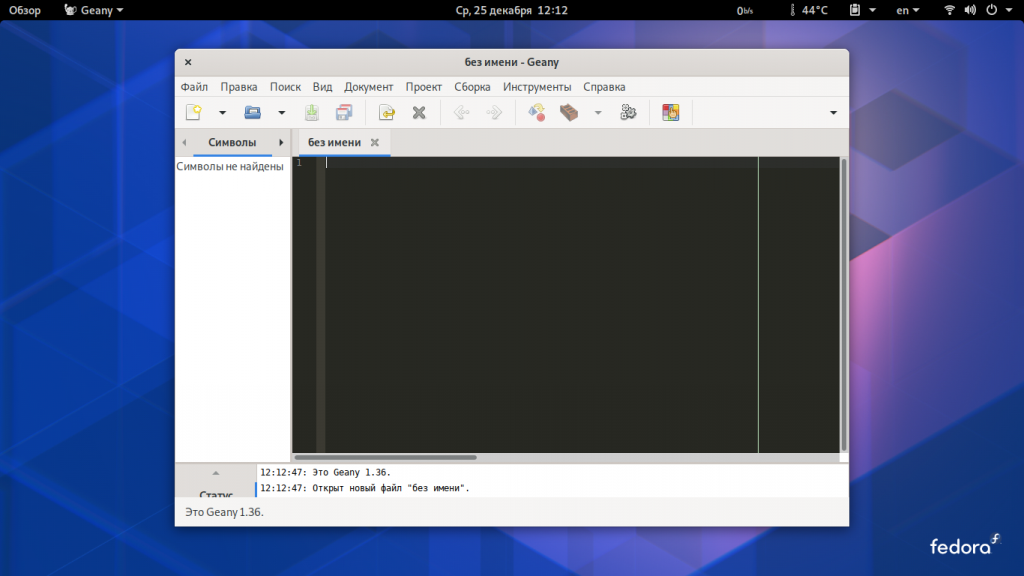
Примерно тоже хочу сделать и я с нужным мне приложением. Для примера я беру текстовый редактор Geany. По дефолту у меня он выглядит так:
Я же хочу, чтобы он выглядел примерно так, как на официальном сайте Geany:
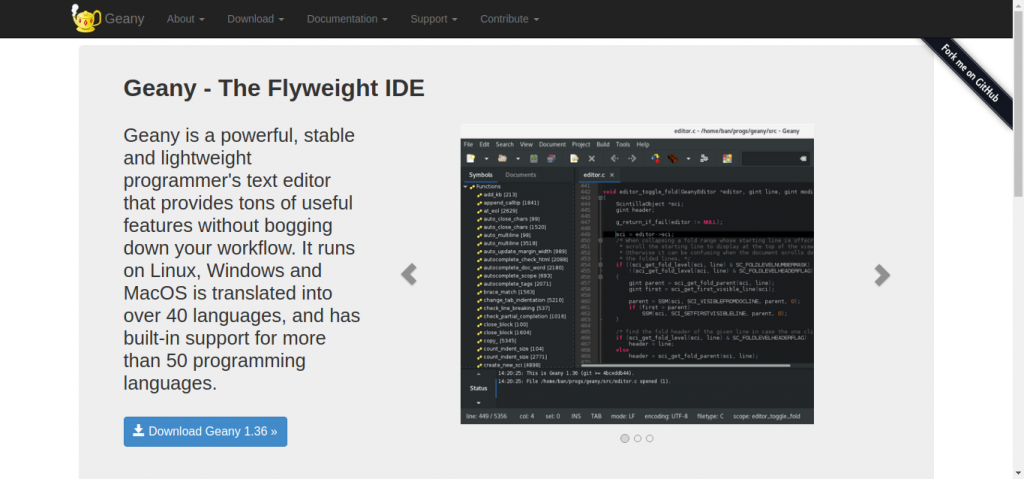
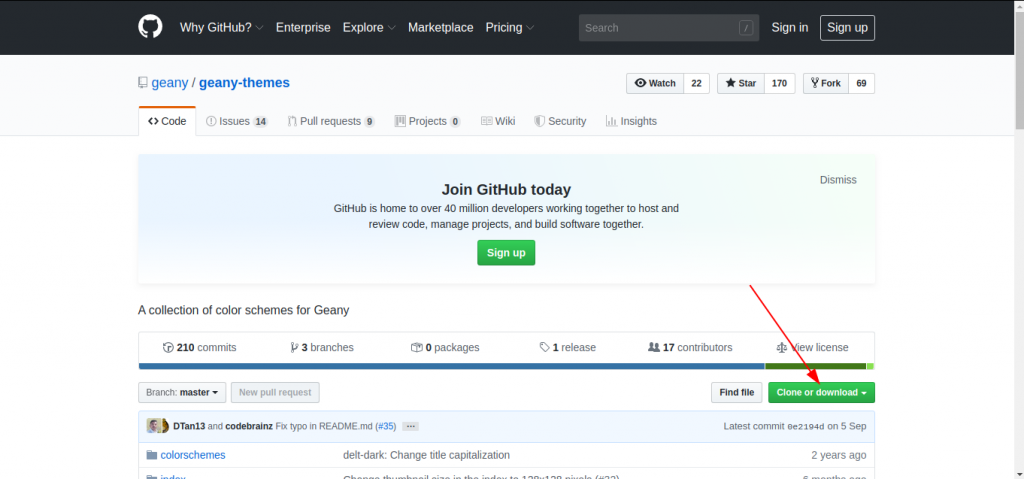
Идем на сайт Geany: https://www.geany.org/ . Далее по ссылке : https://github.com/geany/geany-themes скачаем ZIP-файл с темами, распакуем и установим (скриптом install.sh или копированием тем в каталог ~/.config/geany/colorschemes/).
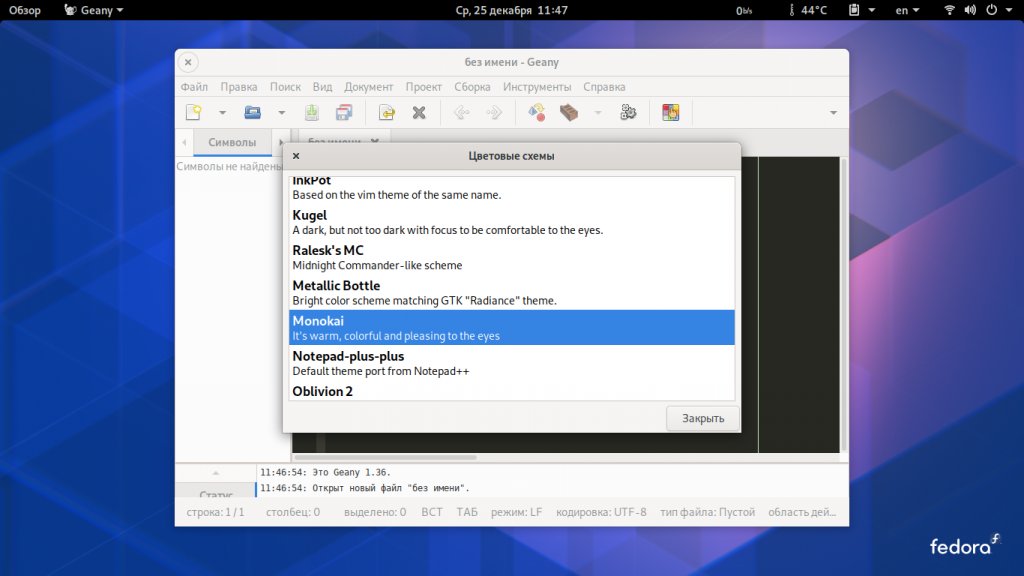
Включим в настройках Geany любую темную тему на свой вкус Вид => Цветовые схемы.
Здесь мы видим темный терминал внутри светлого приложения. Немного не так, как хотелось бы.
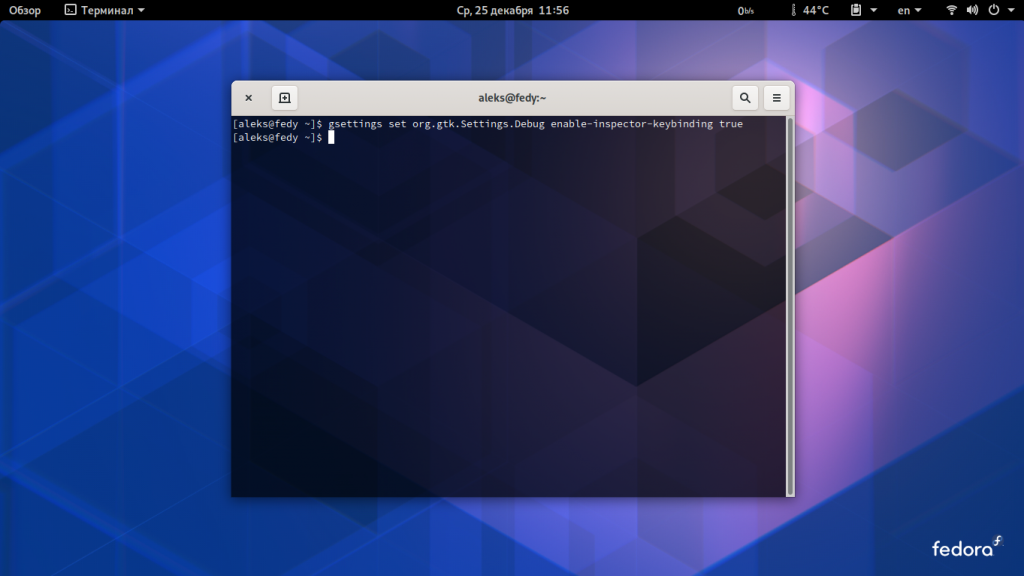
Идем дальше. Попробуем включить GtkInspector. Это приложение-инструмент для проверки, изменения и понимания приложений GTK+ на лету. В Debian, Ubuntu предварительно убедитесь, что у вас установлен пакет libgtk-3-dev. Наберем в терминале:
gsettings set org.gtk.Settings.Debug enable-inspector-keybinding true
Мы включили GtkInspector. Чтобы запустить GTKInspector, сфокусируйте свое приложение GTK и нажмите Control-Shift-D. Или переместите курсор мыши на нужный виджет и нажмите Control-Shift-I, чтобы специально проверить виджет под курсором мыши.
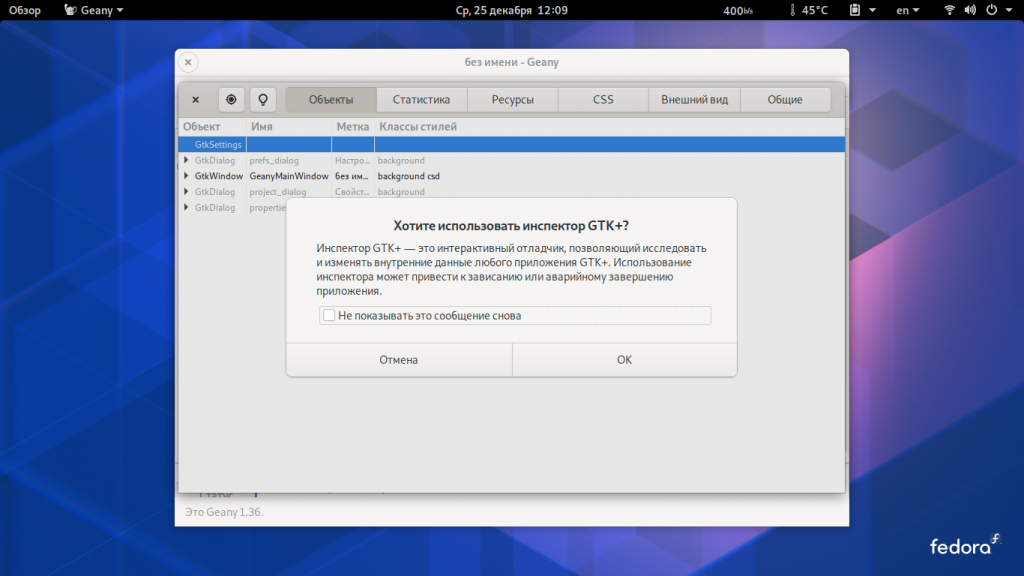
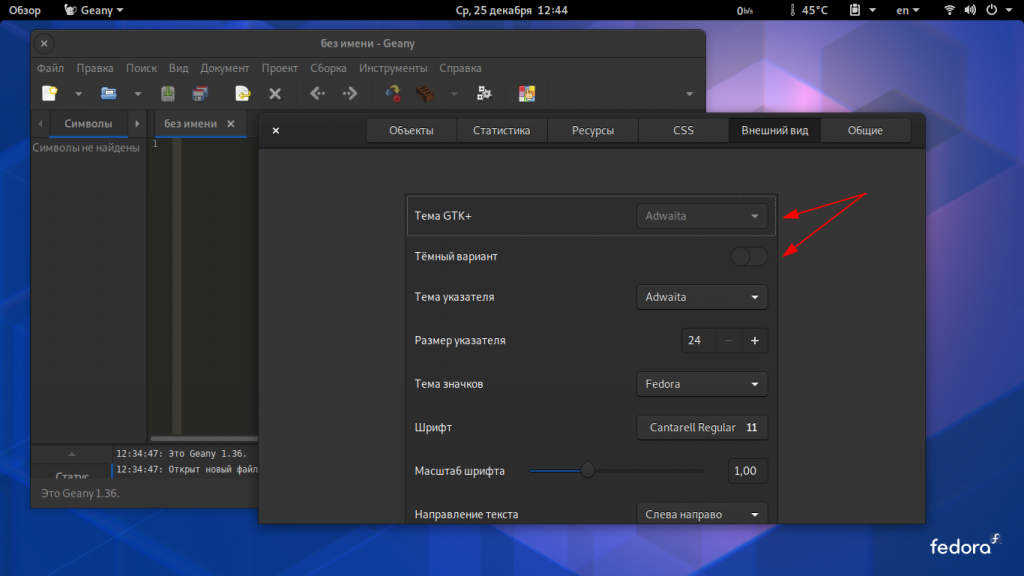
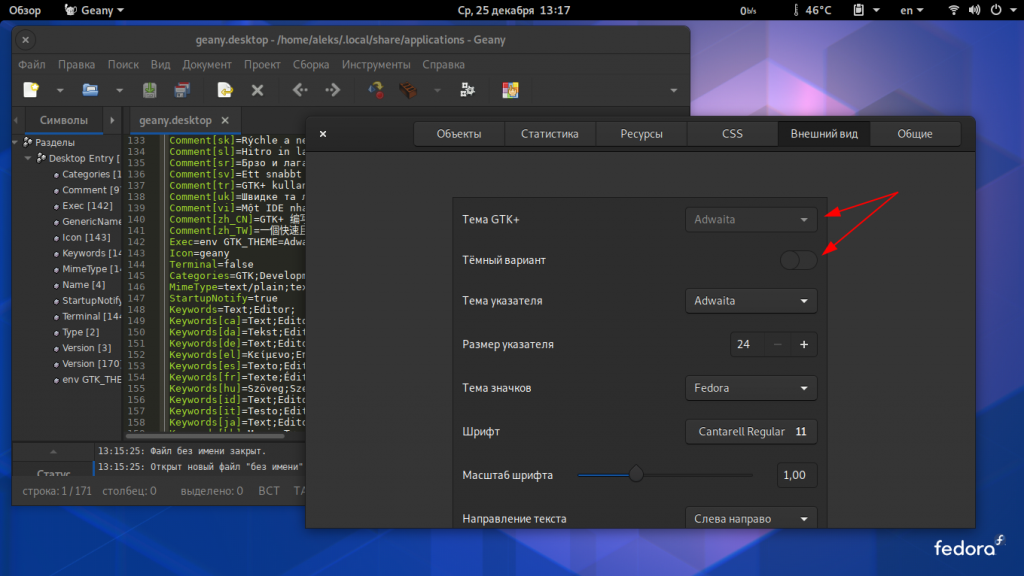
Запустим GtkInspector. Он включается только в окне с запущенным приложением.
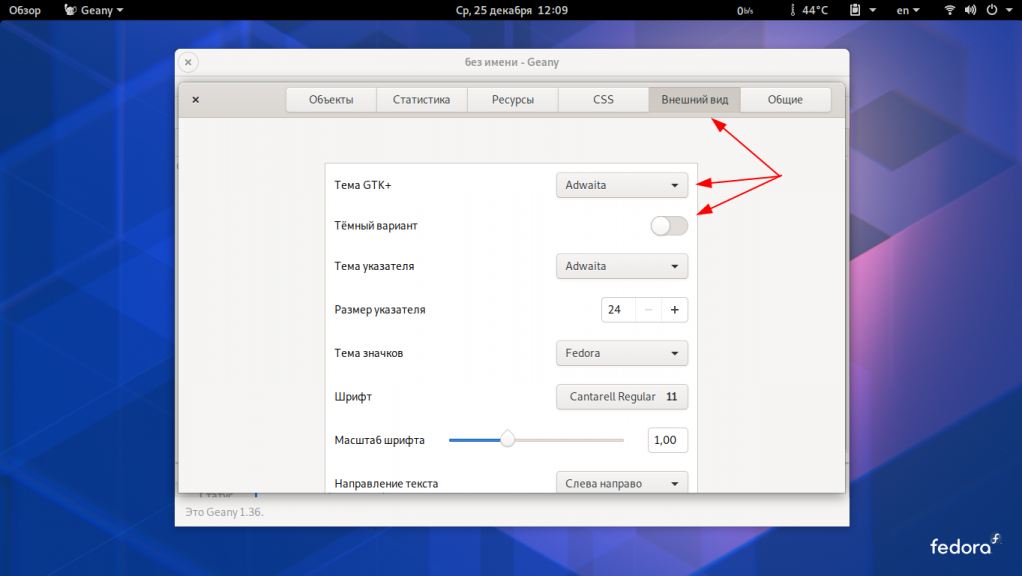
Перейдем на вкладку Внешний вид и включим Темный вариант (или тему Adwaita-dark):
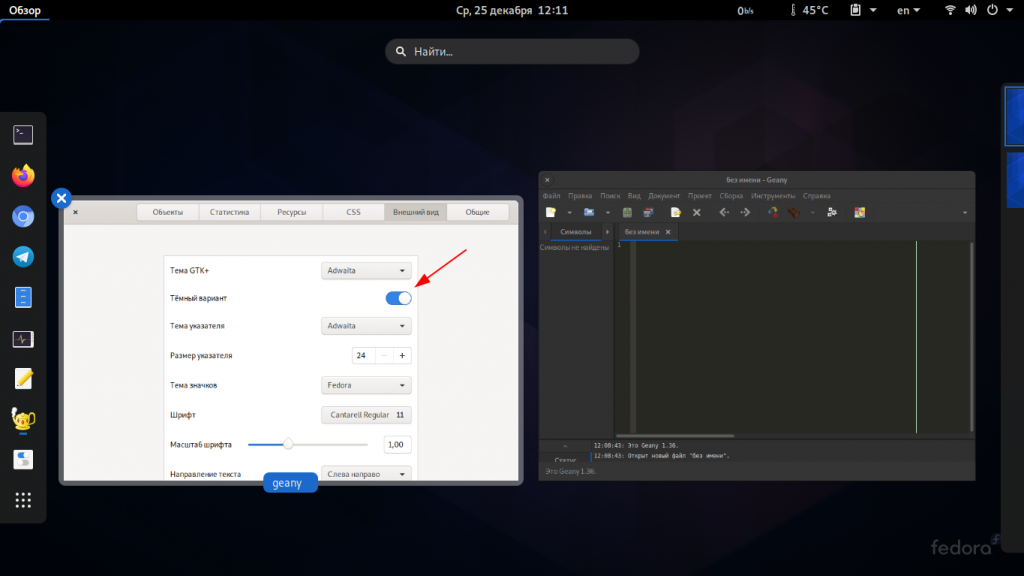
Как видим мы получили желаемый результат, в приложении Geany тема поменялась на темную. Закрываем GtkInspector. Он пока мне не нужен (далее он понадобится для проверки изменений). Вы же можете самостоятельно посмотреть здесь и поиграть с ним. Это довольно таки интересный инструмент и достоин отдельного изучения.
Попробуем перезапустить приложение Geany:
И что мы видим? Темная тема не сохранилась. Geany снова открылся в светлой теме. Нужно искать другое решение, но ничего «Нормальные герои всегда идут в обход» — Айболит — 66 к/ф.
Теперь мы попробуем жестко привязать Geany к темной теме. Согласно руководству GTK+, вы можете загрузить определенную тему и ее вариант (темный, светлый) для каждого приложения через переменную среды: GTK_THEME=theme:variant . И добавить в файл по адресу:
/usr/share/applications/"name application".desktop
команду env (позволяет модифицировать список переменных окружения перед исполнением пользовательской команды) в строке Exec. Где «name application» — имя приложения. В моем случае строка файла:
/usr/share/applications/geany.desktop
должна выглядеть так:
Exec=env GTK_THEME=Adwaita:dark geany %F
Если нам нужна светлая тема строка должна выглядеть так:
Exec=env GTK_THEME=Adwaita:ligh geany %F
Тему можно жестко привязать двумя способами. Первый вариант привязать в корне системы по адресу:
/usr/share/applications/geany.desktop
Для всех пользователей, или второй вариант привязать в домашний каталог по адресу:
~/.local/share/applications
Для текущего пользователя. Я предпочитаю и рекомендую хранить различные пользовательские настройки в домашнем каталоге, но рассмотрю оба варианта.
Изменение темы для текущего пользователя
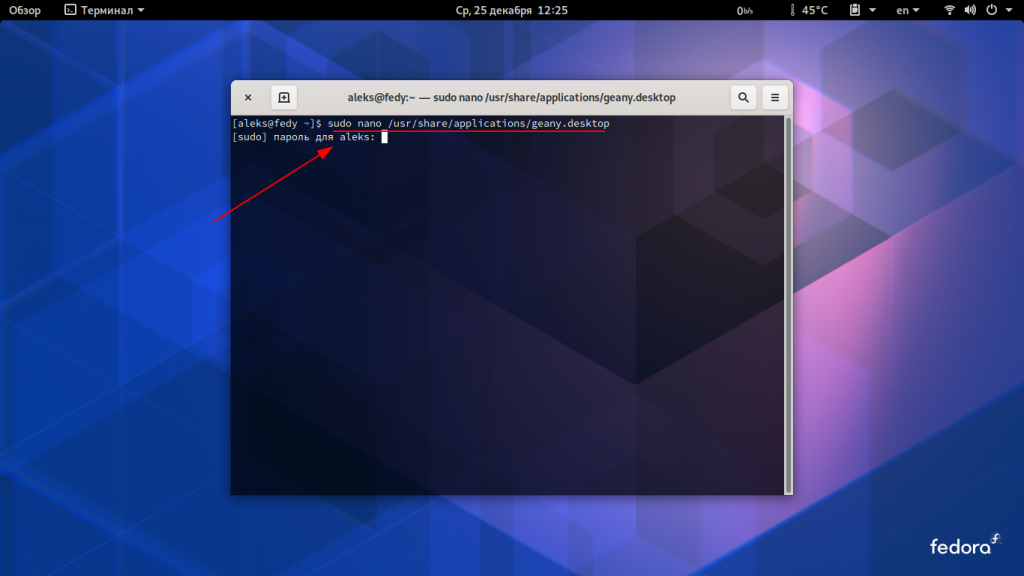
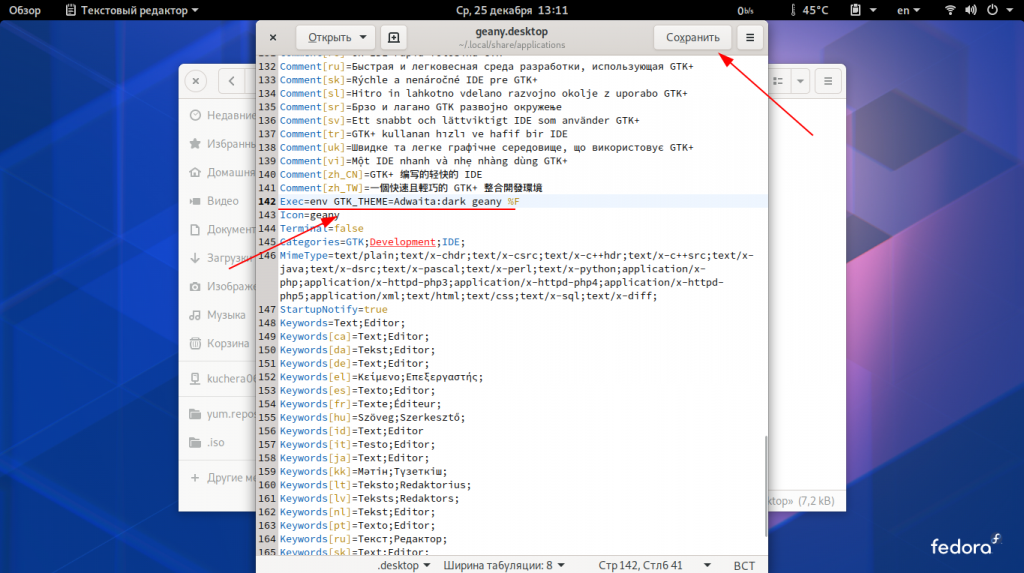
Откроем и отредактируем наш файл запуска:
sudo nano /usr/share/applications/geany.desktop
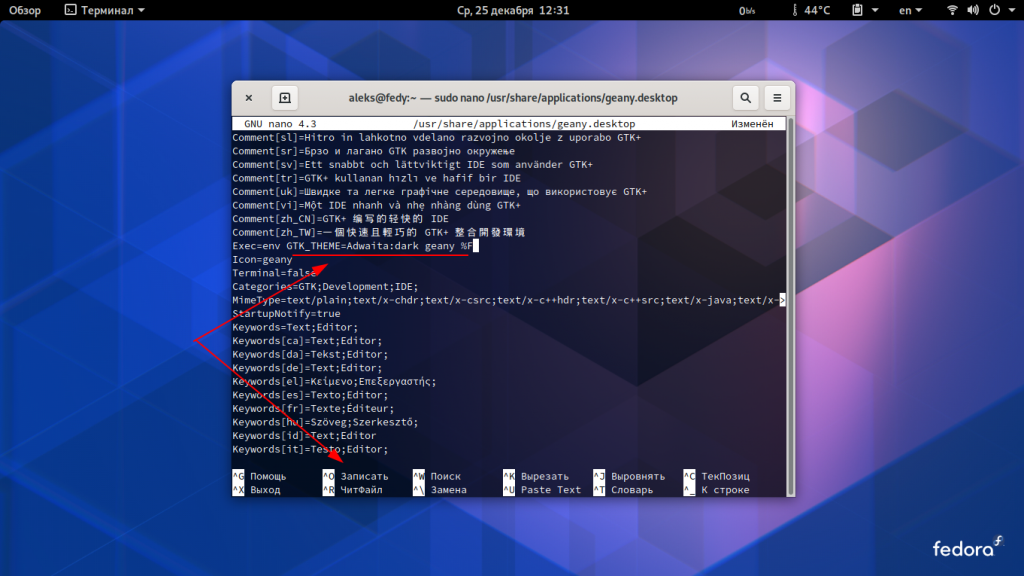
Найдем строку:
Exec=geany %F

добавим в нее запись env GTK_THEME=Adwaita:dark и приведем к виду :
Exec=env GTK_THEME=Adwaita:dark geany %F
Сохраним и запустим Geany:
Как видим все работает.
Снова запустим GtkInspector, перейдем на вкладку Внешний вид, попробуем переключить тему. Смена темы заблокирована (затемнена и неактивна), при наведении мыши на переключатель появляется окно с надписью «Тема жестко задана с помощью GTK_THEME» (к сожалению технически я не могу показать всплывающее окно на скриншоте). Как видим мы жестко привязали темную тему к приложению Geany, и сменить тему не получится.
Изменение темы для всех пользователей
Скопируем файл geany.desktop в домашний каталог .local/share/applications через терминал:
cp -r /usr/share/applications/geany.desktop ~/.local/share/applications
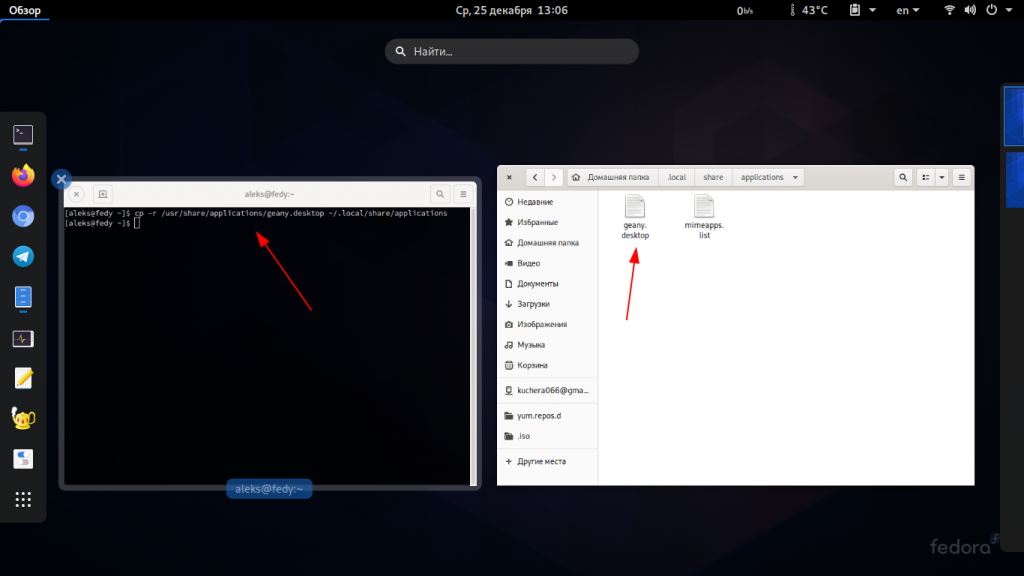
Или можно воспользоваться файловым менджером Nautilus. Далее откроем скопированный файл по адресу:
~/.local/share/applications/geany.desktop.
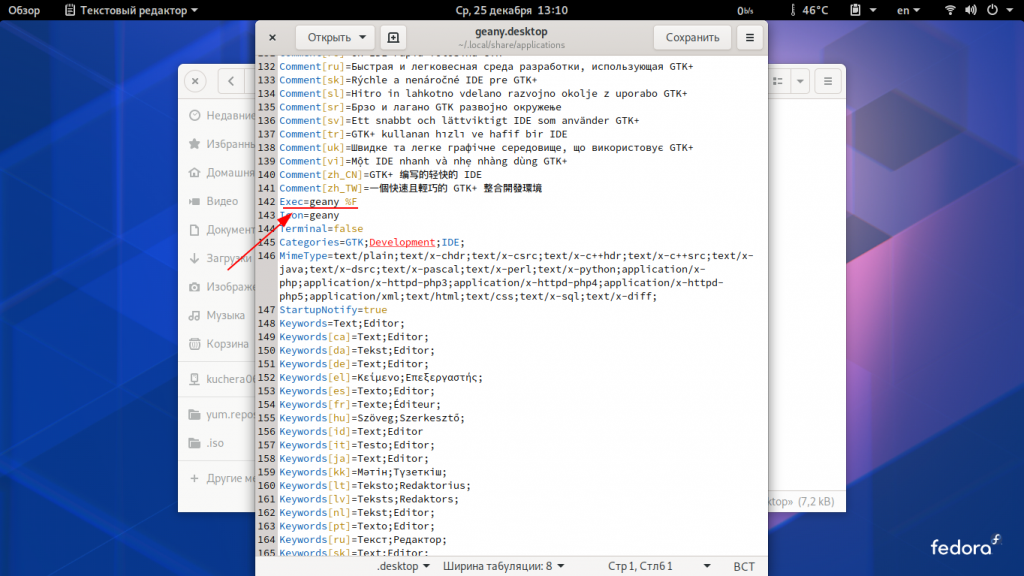
Как и в первом случае найдем строку:
Exec=geany %F
Отредактируем, и приведем к виду:
Exec=env GTK_THEME=Adwaita:dark geany %F
И также проверим:


Как видим и здесь все работает. Вернуть в исходное состояние тему можно редактированием файла в корне или редактированием (или удалением) файла в домашнем каталоге.
Таким образом можно изменить тему одного или нескольких приложений на свой вкус. Стоит отметить, что согласно решению разработчиков Gnome-terminal имеет свое меню настроек и игнорирует темы. Кроме того, некоторые приложения GTK могут не соблюдать переменную: env GTK_THEME. Но это всегда можно проверить программой GtkInspector.

Статья распространяется под лицензией Creative Commons ShareAlike 4.0 при копировании материала ссылка на источник обязательна .
Geany-Themes is a collection of color schemes for Geany, either written originally by the Geany community or ported from color schemes for other editors.
These schemes are compatible with Geany 1.22 and greater.
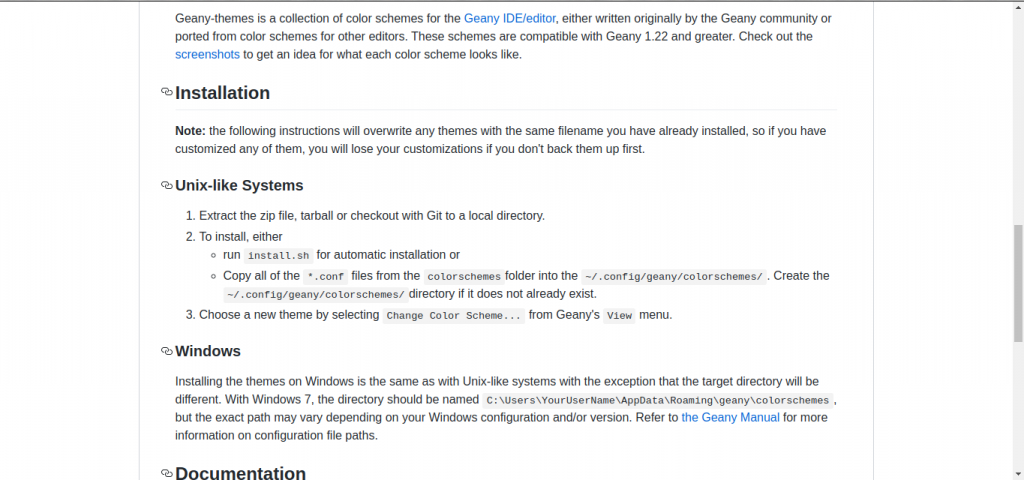
To use one the themes below, download the configuration file and save it to the folder colorschemes in your Geany configuration directory (usually ~/.config/geany/colorschemes/).
For more information and detailed configuration instructions, see https://github.com/geany/geany-themes.
Available Themes
A port of the Bespin theme.
Black background, other colours
A soft dark theme based on the IntelliJ Darcula theme.
Dark syntax colouring theme
A dark theme utilising warm colors
Low contrast theme ported from the set_geany_colors utility
A dark-blueish theme, good for many programming languages
A simple light theme for Geany.
A soft and downy color scheme.
A port of Gedit’s default theme.
Similar to GitHub.com’s highlighting colors.
A dark theme with raspberry colors.
Based on the vim theme of the same name.
A dark, but not too dark with focus to be comfortable to the eyes.
Bright color scheme matching GTK «Radiance» theme.
It’s warm, colorful and pleasing to the eyes
Default theme port from Notepad++
Based on the Gedit color scheme Oblivion and the Dark Color Scheme with rearranged colors.
Port of atom one dark theme.
Default Pygments theme for Geany
A port of railscasts2 from gedit-themes.
Midnight Commander-like scheme
Inspired by old green screen terminals.
Dark theme inspired by Tango
A port of Slush and Poppies from gedit-themes.
Dark Solarized theme for Geany
Light Solarized theme for Geany
A colorscheme inspired by Xubuntu 12.04, and the Spyder IDE.
A dark brown and shiny brass theme for the 19th century developer.
Loosely based on the Dark theme, but Tangofied.
A light theme using Tango colors.
A tinge more tanginess
A theme for Ubuntu fanboys and fangirls.
Vibrant Ink Theme for Geany
A port of Zenburn from gedit-themes.
Adding a Theme to Geany-Themes Project
This document is meant to describe the steps needed to successfully
add a theme to the Geany-Themes project. This is the stuff I have to
do when someone contributes just a .conf file in order to integrate
it into the repository/project.
If you want to perform these steps yourself and contribute the complete
work as a pull request on Github as some have done before, that makes
my life a little easier (and gets your scheme in quicker), but even
just the bare (tested) .conf files are a fine contribution.
Style Guide
While there’s no strict style guide for how the .conf file is formatted,
here’s some notes about preferred style:
- It’s easiest to start by using an existing colour scheme that is
similar to the one you want to create/port. - Use HTML-style colours starting with a pound symbol (
#), in
lower-case hex notation, compressing to 3 digits if possible. Examples:- #ff0
- #e4b211
- Use
[named_colors](see Geany Manual) where appropriate, if you want. - Most import is just to make it styled like most other schemes.
Adding the .conf file to the tree
The name of the file should be similar to the name of the scheme,
unique amongst all other schemes, be lower-case, have words separated
by dashes (-) and end with the .conf extension.
Some examples:
bespin.conf
inkpot.conf
solarized-dark.conf
solarized-light.conf
dark-fruit-salad.conf
The file goes into the colorschemes directory.
Testing the .conf file
The most basic test needed is to run Geany from the command line
with the -v option and then load your color scheme. If Geany’s
color scheme parser encounters any problems it will spit out some
debugging info onto the console. You should fix these warnings. You
can also access the same info by running Geany normally from a
shortcut/launcher and looking at Help->Debug Messages.
You should check out what the scheme looks like in a few different
language styles. For example, C++, Python, and XML. Using one
statically typed, one dynamically typed, and one tag/structured markup
language and you can find some weird differences that you might not
have noticed by just checking one or two very similar languages.
Some other important, not-obvious things to check:
- View->Show Whitespace
- View->Show Markers Margin
- View->Show Line Numbers
- View->Show Indentation Guides
Ensuring License and Credits
The top of the .conf file should contain any copyright and license
info that pertains to the scheme in a comment. If you ported from
another editor’s colour scheme, try and keep the same license and
credit the original authors. If you create the scheme yourself or are
otherwise able to choose a license, it is recommended to use GPL v2
as a default.
You should add yourself and anyone else who have contributed or
originally authored the scheme to the AUTHORS file. There’s a note
at the top of that file which explains how to use it. If you don’t
wish to maintain the scheme (fix bugs, tweak colours, etc) then add
me (Matthew Brush) as the current maintainer like many of the plugins
have.
Please use your real name and a human-readable version of an email
address where you can be reached.
Adding a Screenshot
This is the stupidest part since it’s fully manual. I’ll just
describe the way I do it, but it may be easier for others to do it
differently.
The screenshots are in PNG format. The file should be named the same as
the .conf file (obviously except for the .png extensions instead of
.conf). The filename should be all lower-case.
The font used in the screenshots is Andale Mono (don’t ask why, it just is).
The font size is 10pt. If you can’t get Andale Mono font (I think it might
be a non-free MS core font), use an existing font that looks similar.
The contents of the file in the screenshot are a «Hello World»
program in the C programming language, and are exactly this:
#include <stdlib.h>
#include <stdio.h>

#define MESSAGE "Hello World"

/* Prints a message to standard output */
void print_message(const char *msg) {
	printf("%sn", msg);
}

int main(int argc, char *argv[]) {
	print_message(MESSAGE);
	return 0;
}
You should turn off View->Show Whitespace and
View->Show Indentation Guides. The tab mode should be set to 4
character width real/hard tabs. Turn on markers and line number margin
under View menu. Place the caret on the 3rd line (which is an empty line)
and click on line four’s marker margin to add a mark on that line. Just
look at existing screenshots and make it look the same/similar.
I just use the screenshooter tool that comes with my distro (Xubuntu)
but many tools could be used to grab a screenshot. I look at existing
screenshots and try to select the same region of the screen to capture
so that it looks roughly the same size/area as the existing screenshots.
It’s really not scientific at this point, the key is to just make them
all look the same except for the color scheme.
If you’re on MS Windows, you could get the Geany instance all ready
and then press the Print Screen key to copy the screen contents into
the clipboard and then go into a drawing program like MS Paint or GIMP
or whatever program you like and crop out the similar region as the
existing screenshots.
I would really like to somehow automate this whole step, suggestions
and ideas are most welcome.
Updating Meta-Data
There are some meta-data files in the repository that (are not yet)
used by some plugin to list/update geany schemes. It’s simple to update
these files by running make index command in the root directory
of the tree.
If you don’t have GNU make (ex. on Windows), don’t worry about doing
this step, it’s entirely trivial for me to do it.
Making a Pull Request
The pull request to add the scheme should ideally be a single commit with
all of the required changes made.
Here’s a pretty good example of a commit to the repo:
https://github.com/codebrainz/geany-themes/commit/d81d7b5142034f89e9e19eac58bd43ed54121888
This is the actual commit I made while writing this guide:
https://github.com/codebrainz/geany-themes/commit/f9043abdd7247b742176df5d0d867656f24f9f88
I find it easiest to clone the geany-themes repo, checkout a new branch
(ex. git checkout -b my-new-theme) and then keep adding changes to
that until it’s all ready. From there you can use git rebase --interactive to
squash the commits into a single commit and add your nice descriptive
commit message for the whole lot. With your branch having a single commit
difference from Geany-Themes master branch, create a pull request on
Github to get me to add it into the master branch.
These are just recommendations, however you provide the scheme, I’ll try
and get it integrated into the repo. Just don’t expect fast response time
unless you’ve done most of the work for me 
I have found that one of my favorite text editors for programming is Geany, however the default color scheme is very bright and hurts my eyes when programming for awhile. There are other color schemes available for Geany but no clear way for installing and using them. Anyone have an idea?
asked Jan 19, 2014 at 0:09
![]()
4
You can get theme files from https://github.com/codebrainz/geany-themes (I prefer Spyder Dark and InkPot). The easiest way is to click «Clone or download» and then «Download ZIP».
Just copy the .conf files directly into ~/.config/geany/colorschemes/. (Not wrapped in another subfolder as a result of downloading, archive extraction or Git.)
They will immediately be available from the menu bar under View → Change Color Scheme...
Note: These work for Geany 1.22 and above. For older versions you may need to:
- download different files (links provided in the README above or at http://wiki.geany.org/themes/start)
- navigate to
View → Editor → Change Color Schemeinstead - restart Geany before the themes appear as new options
![]()
lofidevops
20.1k29 gold badges100 silver badges165 bronze badges
answered Mar 21, 2015 at 22:50
![]()
4
-
You can invert the scheme:
Edit → Preferences → Editor → Display → Check: Invert highlighter color scheme.
-
The alt scheme is in (You may test if can add other one or just modify this one)
/usr/share/geany/colorschemes/alt.confNote: How did I found this?
I check for geany packages using
synaptic. Looking in their Installed Files tab then it was found ingeany-commonpackage.
answered Jan 19, 2014 at 1:40
![]()
user.dzuser.dz
46.5k13 gold badges140 silver badges255 bronze badges
3
Even as this thread is quite old, I think I can provide a simpler solution to change Geany to a dark theme if you don’t mind change your theme to dark system-wide. Actually it has to done in two steps:
-
Change the style of the editor window, in order to do so, just follow the instructions in Geany Darkthemes
-
Change the system theme to dark. At least in Ubuntu you might do that in the Settings Manager, for XUbuntu, I follow the instructions here: XUbuntu 20.04 Release Notes (at the Greybird Dark Theme), note that you have to change both the Appearance and the Window Manager. I suppose that in other distribution there will be similar tools to change to dark theme.
answered Sep 2, 2021 at 11:49
![]()
You can download the github page from https://github.com/codebrainz/geany-themes.
then what you do is extract that file somewhere, then run the install.sh file located directly inside the geany-themes file and it will put all the new themes in the correct place for you.
answered Feb 21, 2019 at 20:12
![]()
geany-dark-scheme

This is a dark syntax colouring theme for the Geany text editor.

Please help us extend the geany-dark theme to support new languages! Please extend the current theme by using the colours from one of the existing syntax files — that way they all play nice together.
Language Support
The scheme currently supports highlighting for these languages:
- .c — C languages files (contributed by Paulo Cabido)
- .cs — C# language files (contributed by Duncan Lock)
- .cpp — C++ (contributed by gtk.monkey)
- .conf — Apache (and Geany) style .conf files (contributed by Duncan Lock)
- .css — Cascading Stylesheet files (contributed by Roman Snitko)
- .d — d language files (contributed by gtk.monkey)
- .docbook — Docbook mark-up files (contributed by gmunkhbaatarmn)
- .haskel — Haskel code (contributed by Dave.Sarman)
- .html — Hypertext Markup Language file — web pages (contributed by Roman Snitko, Javascript support added by Daniel Mlodecki)
- .java — Java language files (contributed by Paulo Cabido)
- .javascript — Javascript scripts (Duncan Lock, partially based on GeanyDarkTango?)
- .latex — Latex files (contributed by Enrico Tröger)
- .lua — Lua script files (contributed by curtstrangward)
- .markdown — Markdown text files (contributed by pho3nixf1re84)
- .NSIS — Nullsoft Scriptable Installer System scripts (contributed by mr.soup12, modified by Duncan Lock)
- .pascal — Pascal code (contributed by gtk.monkey)
- .perl — Perl language files (contributed by Roman Snitko)
- .php (contributed by Roman Snitko, improved by s5n43K3s)
- .py — Python language files (contributed by Nicolas Hainaux)
- .r — R stats language (contributed by weibullguy)
- .rb — Ruby language files (contributed by Roman Snitko)
- .sh — Bash shell scripts (contributed by Duncan Lock)
- .sql — SQL database query files (contributed by Duncan Lock)
- .yaml — YAML files (contributed by pho3nixf1re84)
- .vala — Vala language files (contributed by boromil)
- .xml — Extensible Markup Language files (contributed by Roman Snitko)
How to Install the Theme
Linux: (Ubuntu)
Local User (just for you):
The simplest way to do this is to copy the contents of the filedefs folder into the ~/.config/geany/filedefs/ folder. This means that you can only have one theme installed at a time, though.
A better way, is to copy the contents filedefs folder into a ~/.config/geany/geany_dark_filedefs/ folder, creating the folder if it doesn’t already exist. Then create a symlink to that folder:
ln -s ~/.config/geany/geany_dark_filedefs/ ~/.config/geany/filedefs
This allows you to have several themes stored in your ~/.config/geany/ folder, and to change which one you’re using by changing where the ~/.config/geany/filedefs symlink points.
System Wide:
BE SURE TO BACK UP THE EXISTING FILEDEFS IF YOU DON’T WANT TO LOSE THEM!
Copy the filedefs folder into /usr/share/geany/
NOTE: Geany may be installed in /usr/local/geany/ or /opt/geany/ depending on your OS or your installation method. Be sure to choose the correct directory. This method means that your filedef files will get overwritten when you upgrade Geany and also means that you can only have one theme installed at a time.
Windows:
Copy the contents of the filedefs folder to…
Current User only:
%APPDATA%geanyfiledefs
System Wide:
BE SURE TO BACK UP THE EXISTING FILEDEFS IF YOU DON’T WANT TO LOSE THEM!
C:Program FilesGeanydata
NOTE: This method means that your filedef files will get overwritten when you upgrade Geany and also means that you can only have one theme installed at a time.
geany-dark-scheme
This is a dark syntax colouring theme for the Geany text editor.
Please help us extend the geany-dark theme to support new languages! Please extend the current theme by using the colours from one of the existing syntax files — that way they all play nice together.
Language Support
The scheme currently supports highlighting for these languages:
- .c — C languages files (contributed by Paulo Cabido)
- .cs — C# language files (contributed by Duncan Lock)
- .cpp — C++ (contributed by gtk.monkey)
- .conf — Apache (and Geany) style .conf files (contributed by Duncan Lock)
- .css — Cascading Stylesheet files (contributed by Roman Snitko)
- .d — d language files (contributed by gtk.monkey)
- .docbook — Docbook mark-up files (contributed by gmunkhbaatarmn)
- .haskel — Haskel code (contributed by Dave.Sarman)
- .html — Hypertext Markup Language file — web pages (contributed by Roman Snitko, Javascript support added by Daniel Mlodecki)
- .java — Java language files (contributed by Paulo Cabido)
- .javascript — Javascript scripts (Duncan Lock, partially based on GeanyDarkTango?)
- .latex — Latex files (contributed by Enrico Tröger)
- .lua — Lua script files (contributed by curtstrangward)
- .markdown — Markdown text files (contributed by pho3nixf1re84)
- .NSIS — Nullsoft Scriptable Installer System scripts (contributed by mr.soup12, modified by Duncan Lock)
- .pascal — Pascal code (contributed by gtk.monkey)
- .perl — Perl language files (contributed by Roman Snitko)
- .php (contributed by Roman Snitko, improved by s5n43K3s)
- .py — Python language files (contributed by Nicolas Hainaux)
- .r — R stats language (contributed by weibullguy)
- .rb — Ruby language files (contributed by Roman Snitko)
- .sh — Bash shell scripts (contributed by Duncan Lock)
- .sql — SQL database query files (contributed by Duncan Lock)
- .yaml — YAML files (contributed by pho3nixf1re84)
- .vala — Vala language files (contributed by boromil)
- .xml — Extensible Markup Language files (contributed by Roman Snitko)
How to Install the Theme
Linux: (Ubuntu)
Local User (just for you):
The simplest way to do this is to copy the contents of the filedefs folder into the ~/.config/geany/filedefs/ folder. This means that you can only have one theme installed at a time, though.
A better way, is to copy the contents filedefs folder into a ~/.config/geany/geany_dark_filedefs/ folder, creating the folder if it doesn’t already exist. Then create a symlink to that folder:
ln -s ~/.config/geany/geany_dark_filedefs/ ~/.config/geany/filedefs
This allows you to have several themes stored in your ~/.config/geany/ folder, and to change which one you’re using by changing where the ~/.config/geany/filedefs symlink points.
System Wide:
BE SURE TO BACK UP THE EXISTING FILEDEFS IF YOU DON’T WANT TO LOSE THEM!
Copy the filedefs folder into /usr/share/geany/
NOTE: Geany may be installed in /usr/local/geany/ or /opt/geany/ depending on your OS or your installation method. Be sure to choose the correct directory. This method means that your filedef files will get overwritten when you upgrade Geany and also means that you can only have one theme installed at a time.
Windows:
Copy the contents of the filedefs folder to…
Current User only:
%APPDATA%geanyfiledefs
System Wide:
BE SURE TO BACK UP THE EXISTING FILEDEFS IF YOU DON’T WANT TO LOSE THEM!
C:Program FilesGeanydata
NOTE: This method means that your filedef files will get overwritten when you upgrade Geany and also means that you can only have one theme installed at a time.