Содержание
- error opening the file как исправить
- 1- Очистите мусорные файлы, чтобы исправить file open error.exe, которое перестало работать из-за ошибки.
- 2- Очистите реестр, чтобы исправить file open error.exe, которое перестало работать из-за ошибки.
- 3- Настройка Windows для исправления критических ошибок file open error.exe:
- Как вы поступите с файлом file open error.exe?
- Некоторые сообщения об ошибках, которые вы можете получить в связи с file open error.exe файлом
- FILE OPEN ERROR.EXE
- процессов:
- Unable to Proceed with Installation
- Fix: Error Opening File For Writing
- Solution 1: Run the installer for the program with administrative privileges
- Solution 2: Run the compatibility troubleshooter
- Solution 3: Change the security permissions for the installation location
- Solution 4: Change advanced security permissions for the installation location
- Solution 5: Disable User Account Control
- Solution 6: Create a new user account and try installation the affected application on it
error opening the file как исправить
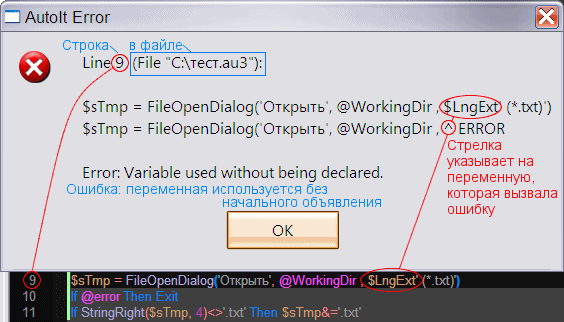
Обычно сообщение об ошибке достаточно информативно, чтобы исправить эту ошибку. Если сообщение указывает на строку, в которой нет ошибки, то скорее всего не закрыт цикл или условие.
Нашли строку, но не знаете что с ней делать? Поставьте перед сбойной строкой MsgBox с выводом значения переменной, чтоб увидеть, являются ли данные тем, что необходимо получить. И если переменная является массивом, то используйте _ArrayDisplay, добавив в начало скрипта #include
Если скрипт был найден на форуме, то попытайтесь выяснить версию AutoIt3, с которой использовался скрипт, например по дате поста. Проверьте чтобы все необходимые скрипту #include добавлены в папку AutoIt3Include или рядом со скриптом.
Одна из трудно выявляемых ошибок — одинаковая переменная счётчика $i для двух циклов For. Next, один из которых является вложенным в другой. Вполне понятно, что это нарушит работу циклов, иногда даже выдавая близкий к ожидаемому результат.
Если окно ошибки указывает на переменную являющуюся элементом массива, даже если вы уверены что с массивом всё в порядке, то очень вероятно, что цикл использует индекс превышающий существующие индексы в массиве. Используйте UBound ( $array ) — 1 или, если количество элементов хранится в $array [ 0 ] , то проверьте, что это значение соответствует действительности.
Ниже приведен полный список фатальных ошибок AutoIt, возникающих при неправильном написании скриптов пользователем. Всего 74
Файл file open error.exe из unknown company является частью unknown product. file open error.exe, расположенный в c:usersg4sappdatalocalempveribrowsefile open error.exe с размером файла 1603721 байт, версия файла Unknown version, подпись ec57aed7c5966831273121e02a44bbed.
В вашей системе запущено много процессов, которые потребляют ресурсы процессора и памяти. Некоторые из этих процессов, кажется, являются вредоносными файлами, атакующими ваш компьютер.
Чтобы исправить критические ошибки file open error.exe,скачайте программу Asmwsoft PC Optimizer и установите ее на своем компьютере
1- Очистите мусорные файлы, чтобы исправить file open error.exe, которое перестало работать из-за ошибки.
- Запустите приложение Asmwsoft Pc Optimizer.
- Потом из главного окна выберите пункт «Clean Junk Files».
- Когда появится новое окно, нажмите на кнопку «start» и дождитесь окончания поиска.
- потом нажмите на кнопку «Select All».
- нажмите на кнопку «start cleaning».
2- Очистите реестр, чтобы исправить file open error.exe, которое перестало работать из-за ошибки.

3- Настройка Windows для исправления критических ошибок file open error.exe:

- Нажмите правой кнопкой мыши на «Мой компьютер» на рабочем столе и выберите пункт «Свойства».
- В меню слева выберите » Advanced system settings».
- В разделе «Быстродействие» нажмите на кнопку «Параметры».
- Нажмите на вкладку «data Execution prevention».
- Выберите опцию » Turn on DEP for all programs and services . » .
- Нажмите на кнопку «add» и выберите файл file open error.exe, а затем нажмите на кнопку «open».
- Нажмите на кнопку «ok» и перезагрузите свой компьютер.
Всего голосов ( 12 ), 6 говорят, что не будут удалять, а 6 говорят, что удалят его с компьютера.
Как вы поступите с файлом file open error.exe?
Некоторые сообщения об ошибках, которые вы можете получить в связи с file open error.exe файлом
(file open error.exe) столкнулся с проблемой и должен быть закрыт. Просим прощения за неудобство.
(file open error.exe) перестал работать.
file open error.exe. Эта программа не отвечает.
(file open error.exe) — Ошибка приложения: the instruction at 0xXXXXXX referenced memory error, the memory could not be read. Нажмитие OK, чтобы завершить программу.
(file open error.exe) не является ошибкой действительного windows-приложения.
(file open error.exe) отсутствует или не обнаружен.
FILE OPEN ERROR.EXE
Проверьте процессы, запущенные на вашем ПК, используя базу данных онлайн-безопасности. Можно использовать любой тип сканирования для проверки вашего ПК на вирусы, трояны, шпионские и другие вредоносные программы.
процессов:
Cookies help us deliver our services. By using our services, you agree to our use of cookies.
Unable to Proceed with Installation
The following error will occur when a file that needs to be overwritten is still in use by another application or process:
Most commonly, this happens if you have an Image-Line product, using these files, open at some point prior to running an installer. In this case the application has not closed correctly, and the Operating System locks them as in use, in the background.
Fix this problem by either:
1. Restarting your computer and then install the application
2. Open the Windows Task Manager (Ctrl + Shift + Esc) and close all Image-Line related processes that are still visible in the list.
Источник
Fix: Error Opening File For Writing
When installing a third-party application on a Windows computer, there are a lot of things that can go wrong. One of the most common problems faced by Windows users while trying to install third-party programs is an issue where the installation fails because Windows, for some reason, fails to open a file it needs to write in order to install the program in question. When this issue occurs, the user is informed that the installation was unsuccessful and Windows spits out the following error message:

“Error opening file for writing“
This specific problem is not bound to any specific version of the Windows Operating System – every single version of the Windows Operating System that is currently supported by Microsoft is prone to this problem. In addition, this issue is also not bound to any specific program or set of programs designed for Windows – it can basically affect any third-party Windows application and prevent it from being successfully installed. Not being able to install an application you want or need on your computer is most definitely a significant problem, but, thankfully, it is not an unfixable one. The following are some of the most effective solutions that any Windows user affected by this problem can use to try and resolve it and successfully install the affected application:
Solution 1: Run the installer for the program with administrative privileges
If you’re having trouble installing any third-party application designed for the Windows Operating System, the most commonly recommended course of action is to perform the installation as an administrator and see if doing so gets the job done. To run the installer for the third-party Windows application you are trying to install as an administrator, you need to:
- Navigate to where the .EXE file for the installer of the program is stored.
- Locate the installer and right-click on it.
- Click on Run as administrator in the resulting context menu.

- Go through the installation wizard by following the onscreen instructions and see if the “Error opening file for writing” error message rears its ugly head while the installation is being performed with administrative privileges.

Solution 2: Run the compatibility troubleshooter
If you are trying to install a third-party program that is not entirely compatible with the version and iteration of the Windows Operating System that your computer is running on, the installation might fail and you might end up being seeing the “Error opening file for writing” error message. Thankfully, though, Windows has the compatibility troubleshooter to check for and try to repair compatibility problems with files. To run the compatibility troubleshooter, you need to:
- Navigate to where the .EXE file for the installer of the affected program is stored.
- Locate the installer and right-click on it.
- Click on Properties in the resulting context menu.
- Navigate to the Compatibility tab.
- Click on Run compatibility troubleshooter.
- Click on Try recommended settings.
- Follow the onscreen instructions and bear with the compatibility troubleshooter all the way to the very end.
- Once the compatibility troubleshooter is done working its magic, try installing the affected application to see whether the problem has been resolved.


Solution 3: Change the security permissions for the installation location
You might be seeing the “Error opening file for writing” error message while trying to install a specific application because the security permissions for the installation location you have chosen for it do not allow files located in it to be written by your user account. If that is the case, you should be able to resolve the problem by fixing the security permissions for the directory you are trying to install the affected application to. To apply this solution, you need to:
- Navigate to the installation location for the affected third-party program.
- Right-click on the folder you are trying to install the affected third-party program to, and click on Properties.
- Navigate to the Security tab.
- Click on Edit….
- Click on Users under the Group or user names section to select it.
- Check the checkbox for Allow next to Write under Permissions for users.
- Click on Apply and then on OK.
- Restart your computer.


When the computer boots up, try running the installer and see if the “Error opening file for writing” error message still persists.
Solution 4: Change advanced security permissions for the installation location
If simply changing the regular security permissions for the installation location isn’t enough to get the job done, you take another step forward and change the advanced security permissions for the installation location. To change the advanced security permissions for the installation location, you need to:
- Navigate to the installation location for the affected third-party program.
- Right-click on the folder you are trying to install the affected third-party program to, and click on Properties.
- Navigate to the Security tab.
- Click on Advanced.
- Click on Change permissions and then click on Add.
- Click on Select a principal.
- In the Enter an object name to select: field, type Everyone, click on Check Names and then click on OK.
- Under Basic permissions:, check the checkbox beside Full control and click on OK.
- In the list located directly under the Permission entries: section, click on the Everyone listing to select it and enable the Replace all child object permission entries with inheritable permission entries from this object option.
- Click on Apply and then on OK.
- Restart your computer.


Wait for the computer to boot up and then try installing the third-party application your were previously having trouble installing to see if the problem has been resolved.
Solution 5: Disable User Account Control
The User Account Control feature, although a security feature built in to the Windows Operating System to protect users, can sometimes cause more harm than it does good, and causing the installations of certain third-party programs to fail with the “Error opening file for writing” error message is an example of such an instance. Thankfully, though, User Access Control can be disabled. To disable User Account Control, you need to:
- Open the Start Menu.
- Search for “user accounts“.
- Click on the search result titled User Accounts.
- Click on Change User Account Control settings.
- Move the slider all the way down to Never notify.
- Click on OK and, if required to do so, confirm the action.
- Restart your computer.
- When the computer boots up, try installing the affected application to see if the installation now goes through successfully.


Solution 6: Create a new user account and try installation the affected application on it
If absolutely none of the solutions listed and described above have managed to work for you, the problem might just lie with your user account itself. And if that’s the case, you should be able to successfully install the affected third-party program on a different, brand new user account on your computer. To create a new administrator account on your computer, you need to:
- Open the Start Menu.
- Click on Settings.
- Click on Accounts.
- Click on Family & other users in the left pane.
- In the right pane of the window, under the Other users section, click on Add someone else to this PC.
- Click on I don’t have this person’s sign-in information.
- Click on Add a user without a Microsoft account.
- Type in a user name and a password for the new user account and click on Next.
- The new user account you created should now show up under Other users. Click on it to select it and click on Change account type.
- Open the dropdown menu and click on Administrator to select it, and then click on OK.
- Switch to your newly created user account and try installation the affected third-party application on it.


If the program is successfully installed on the new user account, your old user account itself was the problem. That being the case, you should simply move all of your data and files from your old user account to the new one and delete the old user account.
Источник
Revo Uninstaller Pro 5.0.8 Full Terbaru kembali merillis versi baru nya dengan perbaikan beberapa bug – Ketika sebuah program yang terinstall di windows. mereka pasti akan menyimpan sebuah registry dan file file yang dapat menjadi sampah dan ketika kita melakukan Uninstall menggunakan program remover default dari windows. Registry dan file file tersebut akan mengendap karena secara default, uninstall menggunakan Program remover dari windows tidak sempurna, terutama Program program besar.
Hal yang kerap di abaikan tersebut akan membuat windows kita semakin banyak penumpukan file dari sisa sisa serpihan program yang kita uninstall sehingga membuat windows kita terasa semakin melambat.
Namun, kini kita tidak perlu risau akan hal tersebut, terutama baut kita yang kerap melakukan Install dan uninstall program. Revo Uninstaller Pro Full ini sangat membantu melakukan uninstall program sampai ke akar-akarnya.
Menyandang salah satu software populer kategori Uninstaller Tools. Revo Uninstaller tentu tidak di ragukan lagi kemampuanya. Revo Uninstaller Pro benar benar membantu kita saat melakukan uninstall program di banding dengan Program remover default dari windows.

Software Terkait Lainnya
- 3DP Net 19.11 Final terbaru
- WINDOWS 7 TOOLKIT 1.4.0.77 FREE
- SpeedConnect Internet Accelerator 8.0
- AusLogics BoostSpeed 13.0.0.3 Full Terbaru
- CISCO IT ESSENTIALS – Software Simulasi merakit komputer
Langkah Install
- Download, kemudian Extract, Wajib !!
- kemudian langkah install nya
Doubleclick”Silent Install“, pilih yes ( jika ada )
- lalu akan muncul command promt hitam, tunggu sampai menutup sendiri
- done full version
Jika bukan bahasa inggris, jalankan installer Revo Uninstaller Pro .exe saja, nanti pada pilihan language program, pilih ENG ya
- salam luar biasa
Size: 15 Mb
=> Revo Uninstaller Pro 5.0.8 terbaru | via bAy
=> Revo Uninstaller Pro 5.0.8 terbaru | via kFile
================== Yang masih support Windows Xp
Size : 11 Mb
=> Revo Uninstaller Pro 3.2.1 | via zippyshare
Penting : Untuk menghindari salah download ! pastikan Size sesuai/mirip dengan Info
Password : Lihat Password | Extract Error: Update Winrar | Info : FAQ | Howto? : Cara Download | Or
- Sedia KOPI => Traktir Kopi
- Block FAKE SITE kuyhAa ! => List Fake Site
- Butuh Key Original dan JASA ? Contact Us
- Jika via OD minta password dan username Lihat Disini Caranya
- Untuk mengetahui password, silahkan klik link Lihat Password di atas
- Untuk extract file Part, silahkan klik link FAQ di atas
- Jika Extract file Error or Damage, silahkan klik link Update Winrar di atas
- Langkah Setting Firewall Mudah
- Langkah Setting Firewall Dengan Kaspersky
GENERAL QUESTIONS
The best approach is to decline the reboot request, search for leftovers with Revo Uninstaller Pro, delete any leftovers you deem unnecessary, then finally reboot your computer. If you were unable to decline the reboot request, and the computer restarts, the next time you start Revo Uninstaller Pro it will prompt you to continue the uninstallation process.
Our support team will contact you within 24 hours of receiving your message! Usually, the response time is between a few minutes and several hours depending on the load of the support team! If after 24 hours you still haven’t received a reply then please send your query again and be sure that your e-mail address is correctly written!
We do not recommend you uninstall version 3 or 4 before installing the new version 5 because you will lose your current settings and other user data. The best approach is to install the new version over the existing version, as it will overwrite it, and you will keep your data and settings, just as it happens with minor updates.
The main differences between the standard (installable) and Portable versions of Revo Uninstaller Pro are the licensing type and the portability of the Portable version. The licensing of the standard version is per computer, whereas for the Portable version it is per user. The standard version has a license that is per computer. This means that a license is purchased for a certain amount of computers but any user who uses those computers is also allowed to use Revo Uninstaller Pro. The portable version has a license per user. This means that one user is allowed to use Revo Uninstaller Pro on an unlimited number of computers (just not simultaneously). The portable version is designed to be run directly from an external USB device (like a thumb drive), without leaving any traces on the computer’s hard drive or Registry, on which it is run. That way you can have a copy of the program with you.
Both versions of Revo Uninstaller – Freeware and Pro – are installed in different folders, and are completely independent. They do not share common components or modules. So it is not a problem if you have installed the Pro version while the Freeware is still on your system, but the Pro version is superior, so you will not need the Freeware version anymore.
The reason for this is that Windows 7 does not allow pinning programs containing the word «install» in their name. You can solve the problem by creating a shortcut on your Desktop of Revo Uninstaller, and renaming it to just «Revo», or anything else that does not contain «install» as a word or part of a word.
Yes, Revo Uninstaller Pro is fully compatible, and natively supports all 64-bit versions of Windows, starting with Windows Vista and up to the latest Windows 11.
There are tens of thousands of applications that leave a lot of unused data, such as registry entries, files, and folders in your computer. Not all registry keys left in your computer are errors, and third-party registry cleaners cannot detect them. Leftover registry keys in combination with leftover files make registry cleaners’ job impossible. Revo Uninstaller Pro helps you remove the leftover registry keys, files, and folders after uninstalling an application.
To close the small blue target window, which appears in the upper right corner of the screen when you are in «Hunter Mode«, you have to click with the right click and choose Exit, or Open Main Window. To move it, you have to click and hold it with the middle (scroll) mouse button, then you can drag it to the desired position on your screen.
If you see such a message or request for a reboot, our advice is to stop the tracing process, and save the log with Revo Uninstaller Pro (on a system restart if the tracing of Revo Uninstaller Pro is active it will save the log with a default name automatically), and to restart your computer. For most programs, you will have a reliable log file, as in such cases all the program data is already installed, and the program needs a reboot in order to start its services or modules that are going to be started on every Windows start up.
REGISTRATION AND LICENSING QUESTIONS
Yes, Revo Uninstaller Pro version 5 offers its users the option to deactivate one’s license. To do that, click the Menu button (in the upper right corner), select Deactivate License, then confirm by clicking Deactivate. This will allow you to activate using the same serial number on a different computer.
If you need a more in-depth tutorial, you can find it here.
If you do not have access to the computer, on which you wish to deactivate your license, please contact us via support@revouninstaller.com for further assistance.
When your subscription expires, you will no longer be able to update to a newer version of Revo Uninstaller Pro. However, all versions released prior to the expiration date will remain functional. You can use any and all versions that are released up until the expiration date of your license for as long as you like. Renewing your subscription will be necessary if you wish to be able to update to newer versions. You can download a specific version at any time from the release history page of Revo Uninstaller Pro — here, simply click the version number to download the desired version.
Purchasing a License for Revo Uninstaller Pro 5 or above includes free technical support and free updates while your update subscription is valid (not expired). For example, if your update subscription expires on 1 January 2021, you can install for free any version of Revo Uninstaller Pro released before 1 January 2021. After that date, if you want to install a newer version, released after 1 January 2021, you would have to renew your update subscription. Depending on features in new versions, you can decide to renew your update subscription by purchasing an updated license (significant discounts will be applied), or to continue using your already purchased version. You can continue using your activated version, for which you have purchased a license, for as long as you want.
Licensing of Revo Uninstaller Pro is per computer, so buying a license for one computer allows you to register the program on only one computer. If you want to buy a license for 3 or more computers, or if you already are our customer, you will be able to buy additional licenses at a discount.
You need a license for only one computer as all your Windows installations are on the same computer. You should not have problems registering the program on any of the supported by the program versions of Windows.
If there is a problem with the registration, and you see such a message, it should be followed by a sentence with a reason for the problem or with an error code. Contact our support team with the information about the failed registration, and we will assist you to solve the problem.
We apologize for the inconvenience, but you will have to contact our support team to reset your activation on the server. We treat such requests with priority, so it usually takes from a few minutes to a few hours, and always less than 24 hours.
By default, the Annual Update subscription option is deactivated, it needs to be explicitly enabled by the customer during purchase. You can check if it is enabled in the confirmation e-mail, containing your license details. If you have activated the Annual Update Subscription option, you would receive a reminder 7 days prior to the automatic charge for the updated subscription license.
You can open your activated Revo Uninstaller Pro, navigate to the Main button -> Update subscription, and enter your newly provided serial number to extend your subscription.
Yes, you can extend your subscription at any time. After the new purchase is completed you should use the Update subscription option. This will allow you to extend your current subscription by entering the new serial number that you have received.
Open Revo Uninstaller Pro, and click the Menu button -> About. The About window will display both the expiration date and remaining days of your active subscription.
A new serial number was generated and sent to you after the renewal was completed. You will have to use the Update Subscription option in Revo Uninstaller Pro with your new serial number in order to renew your subscription.
No. The only difference is the intended usage of a license. Any newly purchased license can be used to either activate on a new/additional computer, or to update/extend the subscription period of a previously activated copy of Revo Uninstaller Pro 5.
Yes. Since all licenses are completely independent of each other, you can purchase a new license (renewal) for as many computers as you want. Previous purchases do not limit new purchases in terms of type of license, quantity, and subscription period.
Before uninstalling a program, make sure that it is not running. Check the system tray (in the Taskbar, near the clock) any icons belonging to the program you want to uninstall. If such icons are there, try right clicking them, and look for an option like «Exit», «Quit» or something similar. Select the program in Revo Uninstaller Pro, and click the Uninstall button. Revo Uninstaller Pro will start the uninstalling wizard, which will guide you through the process. During the uninstallation, Revo Uninstaller Pro will try to run the built-in uninstaller of the program you want to uninstall. If it works properly, let it to do its job. If it is not working properly, you should see an error message, and you will have to skip (ignore) it. Then you proceed to the leftover scan by clicking the «Scan«. After the scanning completes, Revo Uninstaller Pro will list all leftover Registry entries, files, and folders to review, verify and, delete.
If you have monitored the installation of a program with Revo Uninstaller Pro, then the best way to uninstall it is to use the created by Revo Uninstaller Pro log. To access it, open the Traced programs module. Before uninstalling a program, make sure that it is not running. Check the system tray (in the Taskbar, near the clock) any icons belonging to the program you want to uninstall. If such icons are there, try right clicking them, and look for an option like «Exit», «Quit» or something similar. Select the program in Revo Uninstaller Pro, and click the Uninstall button. A window will show you the progress of the operation, and when that window disappears, the program will be uninstalled.
Uninstalling a program using a log from the Logs Database is the same as if you uninstall this program using your own log. Just select the program in the Logs Database list, and click the Uninstall button. This will automatically download the selected log, import it in Revo Uninstaller Pro, and start the uninstallation procedure.
Reinstalling the program is the first and easiest solution. Because Revo Uninstaller Pro automatically creates a System Restore Point before uninstalling a program, you can use the System Restore feature to restore your system to a previous state. You can access System Restore in Revo Uninstaller Pro: click Tools -> Windows Tools-> Windows System Restore. By default, Revo Uninstaller Pro moves all leftover files to the Recycle Bin when you delete them, so check there for accidentally deleted files. Also by default, Revo Uninstaller Pro backs up every deleted leftover Registry item, so check the Backup Manager for any backups of deleted Registry entries you want to restore.
Revo Uninstaller Pro has a unique feature called «Hunter Mode: 1. Switch to «Hunter Mode» – a blue window with a crosshair will appear in the upper right corner of the screen. 2. Drag (hold the left mouse button) the blue target window to the system tray, and locate the program you wish to remove 3. Drop (release the left mouse button) on the target – a menu will appear. Then you can select «Kill Process«, and it will disappear from the system tray. There are other options you may want to use such as: Uninstall, Stop Auto Starting, Properties, Open Containing Folder, etc.
You cannot uninstall programs if you do not have administrator privileges because uninstalling programs involves removing files, folders, and Registry entries from various protected system locations on your hard drive and Registry. The standard user account is designed to only have privileges to run/use most programs.
Most likely, this error message is generated by the built-in uninstaller of the program you want to uninstall, which both the Programs and Features applet and Revo Uninstaller Pro try to run during the uninstallation procedure. In most cases, Revo Uninstaller Pro can handle the uninstallation process even if the built-in uninstaller of the program is not functioning properly. In that case, you should start the uninstallation procedure with Revo Uninstaller as usual, and when you see that error message, you can simply skip (ignore) it, click the Scan button to start scanning for the leftovers of the program, and continue forward to review and delete the found leftover data.
If the program is not listed in Revo Uninstaller Pro, you try our Forced Uninstall feature, which does not require a program to be installed or listed properly. Start the Forced Uninstall feature, enter the program’s exact name and/or point to its folder on the hard drive, and proceed with the scan.
If any updates are listed in Revo Uninstaller Pro, you should be able to uninstall them without issue. However, their installation and removal is too critical for the operating system, and it should be handled only by the built-in functionality in Windows.
If the program is not listed in Revo Uninstaller Pro, you can use our Forced Uninstall feature, which does not require a program to be installed or listed properly. Start the Forced Uninstall feature, enter the program’s exact name and/or point to its folder on the hard drive, and proceed with the scan.
Cancel the built-in uninstaller of the program and the uninstall wizard of Revo Uninstaller Pro. Then, in the list of installed programs, right-click the program in question, and select the Forced MSI Uninstall command, which will start the uninstall procedure again, but the built-in uninstaller will try to uninstall the program, instead of repairing it.
LOGS DATABASE MODULE RELATED QUESTIONS
This is a database of logs of traced programs through the monitoring module of Revo Uninstaller Pro. The Logs Database is created and maintained by Revo Uninstaller Pro’s team. The logs are stored on our web server, and you can use them to uninstall programs or to remove leftovers of previously uninstalled program.
Uninstalling a program using a log from the Logs Database is the same as using your own log. Just select the program in the Logs Database list, and click the Uninstall button. This will automatically download the selected log, import it in Revo Uninstaller Pro, and start the uninstallation procedure.
It depends on the program, and how much it has changed across different versions. In most cases, you should be able to properly uninstall a program with a version similar to the one of the log. For example, if you have Skype 5.2 installed on your computer, you should be able to uninstall it properly even using a log for Skype 5.1. That is because of the «Advanced Uninstall» technology applied when a traced program is uninstalled through a log. It searches for data related to the uninstalled program that may not have been recorded in the log.
QUESTIONS RELATED TO OTHER CLEANING OR OPTIMIZATION TOOLS
Go to Menu button -> Options -> Junk Files Cleaner -> General, and check if the specific file type is in the list, and if it is checked. If the file extension is not listed, click the Add button, enter the specific file type in the newly appeared window, and click OK to confirm. Start the Junk Files Cleaner, and click the Scan button to start scanning.
In the Autorun Manager, you have to uncheck the program you want to disable. Conversely, to enable it, simply check it back again.
Hi, I had the same error message. In my case there was a missing IDispatch interface registry key defined as a GUID with the value of {00020400-0000-0000-C000-000000000046}.
I suggest to use indispensable tools for investigation and hopefully fix the problem without reinstalling entire OS. These tools are called FileMon (file system activity) and RegMon (registry activity) by Mark Russinovich (there is also a hybrid tool called Process Monitor but is more «bloated» and OS demaning and as an example for Windows XP it requires SP2 — so I prefer the lighter separate tools.)
Before running one or the other you need to configure them to make all the missing entries highlighted during filesystem/registry monitoring activity. To do this press CTRL+L keys in each and in the «Highlight» box put «NOT FOUND» and click «OK». You will see all the missing registry entries highlighted in red and also missing file entries highlighted in red too.
But you can skip investigating the problem and try to fix it by reinstating the registry key below:
———— Copy everything in between
[Version]
Signature = «$Windows NT$»
ClassGUID={00000000-0000-0000-0000-000000000000}
DriverVer=07/01/2001,5.1.2600.0
[DefaultInstall]
AddReg = IDispatch.Install.Reg
[IDispatch.Install.Reg]
HKCR,»Interface{00020400-0000-0000-C000-000000000046}»,»»,0x00000002,»IDispatch»
HKCR,»Interface{00020400-0000-0000-C000-000000000046}NumMethods»,»»,0x00000002,»7″
HKCR,»Interface{00020400-0000-0000-C000-000000000046}ProxyStubClsid»,»»,0x00000002,»{00020420-0000-0000-C000-000000000046}»
HKCR,»Interface{00020400-0000-0000-C000-000000000046}ProxyStubClsid32″,»»,0x00000002,»{00020420-0000-0000-C000-000000000046}»
———— Copy everything in between
and paste copied lines into a newly created file in notepad and save it as «IDispatch.addreg.inf» in your Windows «INF» folder (be sure that option «Show hidden files and folders» in Folder Options is ticked).
After that, right click on that file and choose «Install» from explorer context menu or invoke from command prompt or Start Menu/Run the following:
rundll32.exe SETUPAPI.DLL,InstallHinfSection DefaultInstall 132 IDispatch.addreg.inf
Registry files created by Windows Registry Editor have a bit different structure than the above keys pulled from HIVECLS.INF file(this one and few others are used to create the registry hives(fundamental keys, subkeys & values) for the installation of OS) and so these keys will not be imported by Windows Registry Editor without applying modifications.
Because I want to preserve the original structure I usually create small inf files (like the above one) and install them with either of the two methods described. Hope that helps!
—
Regards,
Robert Martin Konopka