Содержание
- Get smart log directory error
- OPTIONS
- EXAMPLES
- RETURN VALUES
Get smart log directory error
smartctl is a command line utility designed to perform SMART tasks such as printing the SMART self-test and error logs, enabling and disabling SMART automatic testing, and initiating device self-tests. Note: if the user issues a SMART command that is (apparently) not implemented by the device, smartctl will print a warning message but issue the command anyway (see the -T, —tolerance option below). This should not cause problems: on most devices, unimplemented SMART commands issued to a drive are ignored and/or return an error.
smartctl also provides support for polling TapeAlert messages from SCSI tape drives and changers.
The user must specify the device to be controlled or interrogated as the final argument to smartctl . Device paths are as follows: LINUX : Use the forms «/dev/hd[a-t]» for IDE/ATA devices, and «/dev/sd[a-z]» for SCSI devices. For SCSI Tape Drives and Changers with TapeAlert support use the devices «/dev/nst*» and «/dev/sg*» . For SATA disks accessed with libata, use «/dev/sd[a-z]» and append «-d ata» . For disks behind 3ware controllers you may need «/dev/sd[a-z]» or «/dev/twe[0-9]» or «/dev/twa[0-9]» : see details below. More general paths (such as devfs ones) may also be specified. DARWIN : Use the forms /dev/disk[0-9] or equivalently disk[0-9] or equivalently /dev/rdisk[0-9] . Long forms are also available: please use ‘-h’ to see some examples. Note that there is currently no Darwin SCSI support. FREEBSD : Use the forms «/dev/ad[0-9]+» for IDE/ATA devices and «/dev/da[0-9]+» for SCSI devices. NETBSD/OPENBSD : Use the form «/dev/wd[0-9]+c» for IDE/ATA devices. For SCSI disk and tape devices, use the device names «/dev/sd[0-9]+c» and «/dev/st[0-9]+c» respectively. Be sure to specify the correct «whole disk» partition letter for your architecture. SOLARIS : Use the forms «/dev/rdsk/c?t?d?s?» for IDE/ATA and SCSI disk devices, and «/dev/rmt/*» for SCSI tape devices. WINDOWS : Use the forms «/dev/hd[a-j]» for IDE/ATA devices «\.PhysicalDrive[0-9]» on WinNT4/2000/XP, «/dev/hd[a-d]» for standard IDE/ATA devices on Win95/98/98SE/ME, and «/dev/scsi[0-9][0-f]» for SCSI devices on ASPI adapter 0-9, ID 0-15. The prefix «/dev/» is optional. CYGWIN : See «WINDOWS» above. OS/2,eComStation : Use the form «/dev/hd[a-z]» for IDE/ATA devices.
Based on the device path, smartctl will guess the device type (ATA or SCSI). If necessary, the ‘-d’ option can be used to over-ride this guess
Note that the printed output of smartctl displays most numerical values in base 10 (decimal), but some values are displayed in base 16 (hexidecimal). To distinguish them, the base 16 values are always displayed with a leading «0x» , for example: «0xff». This man page follows the same convention.
OPTIONS
The options are grouped below into several categories. smartctl will execute the corresponding commands in the order: INFORMATION, ENABLE/DISABLE, DISPLAY DATA, RUN/ABORT TESTS.
SCSI devices only accept the options -h, -V, -i, -a, -A, -d, -s, -S,-H, -t, -C, -l selftest, -l error, -r, and -X . TapeAlert devices only accept the options -h, -V, -i, -a, -A, -d, -s, -S, -t, -l selftest, -l error, -r, and -H .
Long options are not supported on all systems. Use ‘smartctl -h’ to see the available options.
SHOW INFORMATION OPTIONS: -h, —help, —usage Prints a usage message to STDOUT and exits. -V, —version, —copyright, —license Prints version, copyright, license, home page and CVS-id information for your copy of smartctl to STDOUT and then exits. Please include this information if you are reporting bugs or problems. -i, —info Prints the device model number, serial number, firmware version, and ATA Standard version/revision information. Says if the device supports SMART, and if so, whether SMART support is currently enabled or disabled. If the device supports Logical Block Address mode (LBA mode) print current user drive capacity in bytes. (If drive is has a user protected area reserved, or is «clipped», this may be smaller than the potential maximum drive capacity.) Indicates if the drive is in the smartmontools database (see ‘-v’ options below). If so, the drive model family may also be printed. -a, —all Prints all SMART information about the disk, or TapeAlert information about the tape drive or changer. For ATA devices this is equivalent to and for SCSI, this is equivalent to Note that for ATA disks this does not enable the ‘-l directory’ option.
RUN-TIME BEHAVIOR OPTIONS: -q TYPE, —quietmode=TYPE Specifies that smartctl should run in one of the two quiet modes described here. The valid arguments to this option are:
errorsonly — only print: For the ‘-l error’ option, if nonzero, the number of errors recorded in the SMART error log and the power-on time when they occurred; For the ‘-l selftest’ option, errors recorded in the device self-test log; For the ‘-H’ option, SMART «disk failing» status or device Attributes (pre-failure or usage) which failed either now or in the past; For the ‘-A’ option, device Attributes (pre-failure or usage) which failed either now or in the past.
silent — print no output. The only way to learn about what was found is to use the exit status of smartctl (see RETURN VALUES below). -d TYPE, —device=TYPE Specifies the type of the device. The valid arguments to this option are ata , scsi , marvell , cciss,N and 3ware,N . If this option is not used then smartctl will attempt to guess the device type from the device name.
Under Linux, to look at SATA disks behind Marvell SATA controllers (using Marvell’s ‘linuxIAL’ driver rather than libata driver) use ‘-d marvell’. Such controllers show up as Marvell Technology Group Ltd. SATA I or II controllers using lspci, or using lspci -n show a vendor ID 0x11ab and a device ID of either 0x5040, 0x5041, 0x5080, 0x5081, 0x6041 or 0x6081. The ‘linuxIAL’ driver seems not (yet?) available in the Linux kernel source tree, but should be available from system vendors (ftp://ftp.aslab.com/ is known to provide a patch with the driver).
To look at ATA disks behind 3ware SCSI RAID controllers, use syntax such as: where in the argument 3ware,N , the integer N is the disk number (3ware ‘port’) within the 3ware ATA RAID controller. The allowed values of N are from 0 to 15 inclusive. The first two forms, which refer to devices /dev/sda-z and /dev/twe0-15, may be used with 3ware series 6000, 7000, and 8000 series controllers that use the 3x-xxxx driver. Note that the /dev/sda-z form is deprecated starting with the Linux 2.6 kernel series and may not be supported by the Linux kernel in the near future. The final form, which refers to devices /dev/twa0-15, must be used with 3ware 9000 series controllers, which use the 3w-9xxx driver.
Note that if the special character device nodes /dev/twa? and /dev/twe? do not exist, or exist with the incorrect major or minor numbers, smartctl will recreate them on the fly. Typically /dev/twa0 refers to the first 9000-series controller, /dev/twa1 refers to the second 9000 series controller, and so on. Likewise /dev/twe0 refers to the first 6/7/8000-series controller, /dev/twa1 refers to the second 6/7/8000 series controller, and so on.
Note that for the 6/7/8000 controllers, any of the physical disks can be queried or examined using any of the 3ware’s SCSI logical device /dev/sd? entries. Thus, if logical device /dev/sda is made up of two physical disks (3ware ports zero and one) and logical device /dev/sdb is made up of two other physical disks (3ware ports two and three) then you can examine the SMART data on any of the four physical disks using either SCSI device /dev/sda or /dev/sdb. If you need to know which logical SCSI device a particular physical disk (3ware port) is associated with, use the dmesg or SYSLOG output to show which SCSI ID corresponds to a particular 3ware unit, and then use the 3ware CLI or 3dm tool to determine which ports (physical disks) correspond to particular 3ware units.
If the value of N corresponds to a port that does not exist on the 3ware controller, or to a port that does not physically have a disk attached to it, the behavior of smartctl depends upon the specific controller model, firmware, Linux kernel and platform. In some cases you will get a warning message that the device does not exist. In other cases you will be presented with ‘void’ data for a non-existent device.
Note that if the /dev/sd? addressing form is used, then older 3w-xxxx drivers do not pass the «Enable Autosave» (‘ -S on ‘) and «Enable Automatic Offline» (‘ -o on ‘) commands to the disk, and produce these types of harmless syslog error messages instead: » 3w-xxxx: tw_ioctl(): Passthru size (123392) too big «. This can be fixed by upgrading to version 1.02.00.037 or later of the 3w-xxxx driver, or by applying a patch to older versions. See http://smartmontools.sourceforge.net/ for instructions. Alternatively, use the character device /dev/twe0-15 interface.
The selective self-test functions (‘-t select,A-B’) are only supported using the character device interface /dev/twa0-15 and /dev/twe0-15. The necessary WRITE LOG commands can not be passed through the SCSI interface.
3ware controllers are currently ONLY supported under Linux and FreeBSD.
cciss controllers are currently ONLY supported under Linux.
-T TYPE, —tolerance=TYPE Specifies how tolerant smartctl should be of ATA and SMART command failures.
The behavior of smartctl depends upon whether the command is » optional » or » mandatory «. Here » mandatory » means «required by the ATA/ATAPI-5 Specification if the device implements the SMART command set» and » optional » means «not required by the ATA/ATAPI-5 Specification even if the device implements the SMART command set.» The » mandatory » ATA and SMART commands are: (1) ATA IDENTIFY DEVICE, (2) SMART ENABLE/DISABLE ATTRIBUTE AUTOSAVE, (3) SMART ENABLE/DISABLE, and (4) SMART RETURN STATUS.
The valid arguments to this option are:
normal — exit on failure of any mandatory SMART command, and ignore all failures of optional SMART commands. This is the default. Note that on some devices, issuing unimplemented optional SMART commands doesn’t cause an error. This can result in misleading smartctl messages such as «Feature X not implemented», followed shortly by «Feature X: enabled». In most such cases, contrary to the final message, Feature X is not enabled.
conservative — exit on failure of any optional SMART command.
permissive — ignore failure(s) of mandatory SMART commands. This option may be given more than once. Each additional use of this option will cause one more additional failure to be ignored. Note that the use of this option can lead to messages like «Feature X not implemented», followed shortly by «Error: unable to enable Feature X». In a few such cases, contrary to the final message, Feature X is enabled.
verypermissive — equivalent to giving a large number of ‘-T permissive’ options: ignore failures of any number of mandatory SMART commands. Please see the note above.
-b TYPE, —badsum=TYPE Specifies the action smartctl should take if a checksum error is detected in the: (1) Device Identity Structure, (2) SMART Self-Test Log Structure, (3) SMART Attribute Value Structure, (4) SMART Attribute Threshold Structure, or (5) ATA Error Log Structure.
The valid arguments to this option are:
warn — report the incorrect checksum but carry on in spite of it. This is the default.
exit — exit smartctl .
ignore — continue silently without issuing a warning.
-r TYPE, —report=TYPE Intended primarily to help smartmontools developers understand the behavior of smartmontools on non-conforming or poorly conforming hardware. This option reports details of smartctl transactions with the device. The option can be used multiple times. When used just once, it shows a record of the ioctl() transactions with the device. When used more than once, the detail of these ioctl() transactions are reported in greater detail. The valid arguments to this option are:
ioctl — report all ioctl() transactions.
ataioctl — report only ioctl() transactions with ATA devices.
scsiioctl — report only ioctl() transactions with SCSI devices. Invoking this once shows the SCSI commands in hex and the corresponding status. Invoking it a second time adds a hex listing of the first 64 bytes of data send to, or received from the device.
Any argument may include a positive integer to specify the level of detail that should be reported. The argument should be followed by a comma then the integer with no spaces. For example, ataioctl,2 The default level is 1, so ‘-r ataioctl,1’ and ‘-r ataioctl’ are equivalent.
SMART FEATURE ENABLE/DISABLE COMMANDS: Note: if multiple options are used to both enable and disable a feature, then both the enable and disable commands will be issued. The enable command will always be issued before the corresponding disable command. -s VALUE, —smart=VALUE Enables or disables SMART on device. The valid arguments to this option are on and off . Note that the command ‘-s on’ (perhaps used with with the ‘-o on’ and ‘-S on’ options) should be placed in a start-up script for your machine, for example in rc.local or rc.sysinit. In principle the SMART feature settings are preserved over power-cycling, but it doesn’t hurt to be sure. It is not necessary (or useful) to enable SMART to see the TapeAlert messages. -o VALUE, —offlineauto=VALUE Enables or disables SMART automatic offline test, which scans the drive every four hours for disk defects. This command can be given during normal system operation. The valid arguments to this option are on and off .
Note that the SMART automatic offline test command is listed as «Obsolete» in every version of the ATA and ATA/ATAPI Specifications. It was originally part of the SFF-8035i Revision 2.0 specification, but was never part of any ATA specification. However it is implemented and used by many vendors. [Good documentation can be found in IBM’s Official Published Disk Specifications. For example the IBM Travelstar 40GNX Hard Disk Drive Specifications (Revision 1.1, 22 April 2002, Publication # 1541, Document S07N-7715-02) page 164. You can also read the SFF-8035i Specification — see REFERENCES below.] You can tell if automatic offline testing is supported by seeing if this command enables and disables it, as indicated by the ‘Auto Offline Data Collection’ part of the SMART capabilities report (displayed with ‘-c’).
SMART provides three basic categories of testing. The first category, called «online» testing, has no effect on the performance of the device. It is turned on by the ‘-s on’ option.
The second category of testing is called «offline» testing. This type of test can, in principle, degrade the device performance. The ‘-o on’ option causes this offline testing to be carried out, automatically, on a regular scheduled basis. Normally, the disk will suspend offline testing while disk accesses are taking place, and then automatically resume it when the disk would otherwise be idle, so in practice it has little effect. Note that a one-time offline test can also be carried out immediately upon receipt of a user command. See the ‘-t offline’ option below, which causes a one-time offline test to be carried out immediately.
The choice (made by the SFF-8035i and ATA specification authors) of the word testing for these first two categories is unfortunate, and often leads to confusion. In fact these first two categories of online and offline testing could have been more accurately described as online and offline data collection .
The results of this automatic or immediate offline testing (data collection) are reflected in the values of the SMART Attributes. Thus, if problems or errors are detected, the values of these Attributes will go below their failure thresholds; some types of errors may also appear in the SMART error log. These are visible with the ‘-A’ and ‘-l error’ options respectively.
Some SMART attribute values are updated only during off-line data collection activities; the rest are updated during normal operation of the device or during both normal operation and off-line testing. The Attribute value table produced by the ‘-A’ option indicates this in the UPDATED column. Attributes of the first type are labeled «Offline» and Attributes of the second type are labeled «Always».
The third category of testing (and the only category for which the word ‘testing’ is really an appropriate choice) is «self» testing. This third type of test is only performed (immediately) when a command to run it is issued. The ‘-t’ and ‘-X’ options can be used to carry out and abort such self-tests; please see below for further details.
Any errors detected in the self testing will be shown in the SMART self-test log, which can be examined using the ‘-l selftest’ option.
Note: in this manual page, the word «Test» is used in connection with the second category just described, e.g. for the «offline» testing. The words «Self-test» are used in connection with the third category. -S VALUE, —saveauto=VALUE Enables or disables SMART autosave of device vendor-specific Attributes. The valid arguments to this option are on and off . Note that this feature is preserved across disk power cycles, so you should only need to issue it once.
For SCSI devices this toggles the value of the Global Logging Target Save Disabled (GLTSD) bit in the Control Mode Page. Some disk manufacturers set this bit by default. This prevents error counters, power-up hours and other useful data from being placed in non-volatile storage, so these values may be reset to zero the next time the device is power-cycled. If the GLTSD bit is set then ‘smartctl -a’ will issue a warning. Use on to clear the GLTSD bit and thus enable saving counters to non-volatile storage. For extreme streaming-video type applications you might consider using off to set the GLTSD bit.
SMART READ AND DISPLAY DATA OPTIONS: -H, —health Check: Ask the device to report its SMART health status or pending TapeAlert messages. SMART status is based on information that it has gathered from online and offline tests, which were used to determine/update its SMART vendor-specific Attribute values. TapeAlert status is obtained by reading the TapeAlert log page.
If the device reports failing health status, this means either that the device has already failed, or that it is predicting its own failure within the next 24 hours. If this happens, use the ‘-a’ option to get more information, and get your data off the disk and someplace safe as soon as you can. -c, —capabilities Prints only the generic SMART capabilities. These show what SMART features are implemented and how the device will respond to some of the different SMART commands. For example it shows if the device logs errors, if it supports offline surface scanning, and so on. If the device can carry out self-tests, this option also shows the estimated time required to run those tests.
Note that the time required to run the Self-tests (listed in minutes) are fixed. However the time required to run the Immediate Offline Test (listed in seconds) is variable. This means that if you issue a command to perform an Immediate Offline test with the ‘-t offline’ option, then the time may jump to a larger value and then count down as the Immediate Offline Test is carried out. Please see REFERENCES below for further information about the the flags and capabilities described by this option. -A, —attributes Prints only the vendor specific SMART Attributes. The Attributes are numbered from 1 to 253 and have specific names and ID numbers. For example Attribute 12 is «power cycle count»: how many times has the disk been powered up.
Each Attribute has a «Raw» value, printed under the heading «RAW_VALUE», and a «Normalized» value printed under the heading «VALUE». [Note: smartctl prints these values in base-10.] In the example just given, the «Raw Value» for Attribute 12 would be the actual number of times that the disk has been power-cycled, for example 365 if the disk has been turned on once per day for exactly one year. Each vendor uses their own algorithm to convert this «Raw» value to a «Normalized» value in the range from 1 to 254. Please keep in mind that smartctl only reports the different Attribute types, values, and thresholds as read from the device. It does not carry out the conversion between «Raw» and «Normalized» values: this is done by the disk’s firmware.
The conversion from Raw value to a quantity with physical units is not specified by the SMART standard. In most cases, the values printed by smartctl are sensible. For example the temperature Attribute generally has its raw value equal to the temperature in Celsius. However in some cases vendors use unusual conventions. For example the Hitachi disk on my laptop reports its power-on hours in minutes, not hours. Some IBM disks track three temperatures rather than one, in their raw values. And so on.
Each Attribute also has a Threshold value (whose range is 0 to 255) which is printed under the heading «THRESH». If the Normalized value is less than or equal to the Threshold value, then the Attribute is said to have failed. If the Attribute is a pre-failure Attribute, then disk failure is imminent.
Each Attribute also has a «Worst» value shown under the heading «WORST». This is the smallest (closest to failure) value that the disk has recorded at any time during its lifetime when SMART was enabled. [Note however that some vendors firmware may actually increase the «Worst» value for some «rate-type» Attributes.]
The Attribute table printed out by smartctl also shows the «TYPE» of the Attribute. Attributes are one of two possible types: Pre-failure or Old age. Pre-failure Attributes are ones which, if less than or equal to their threshold values, indicate pending disk failure. Old age, or usage Attributes, are ones which indicate end-of-product life from old-age or normal aging and wearout, if the Attribute value is less than or equal to the threshold. Please note : the fact that an Attribute is of type ‘Pre-fail’ does not mean that your disk is about to fail! It only has this meaning if the Attribute’s current Normalized value is less than or equal to the threshold value.
If the Attribute’s current Normalized value is less than or equal to the threshold value, then the «WHEN_FAILED» column will display «FAILING_NOW». If not, but the worst recorded value is less than or equal to the threshold value, then this column will display «In_the_past». If the «WHEN_FAILED» column has no entry (indicated by a dash: ‘-‘) then this Attribute is OK now (not failing) and has also never failed in the past.
The table column labeled «UPDATED» shows if the SMART Attribute values are updated during both normal operation and off-line testing, or only during offline testing. The former are labeled «Always» and the latter are labeled «Offline».
So to summarize: the Raw Attribute values are the ones that might have a real physical interpretation, such as «Temperature Celsius», «Hours», or «Start-Stop Cycles». Each manufacturer converts these, using their detailed knowledge of the disk’s operations and failure modes, to Normalized Attribute values in the range 1-254. The current and worst (lowest measured) of these Normalized Attribute values are stored on the disk, along with a Threshold value that the manufacturer has determined will indicate that the disk is going to fail, or that it has exceeded its design age or aging limit. smartctl does not calculate any of the Attribute values, thresholds, or types, it merely reports them from the SMART data on the device.
Note that starting with ATA/ATAPI-4, revision 4, the meaning of these Attribute fields has been made entirely vendor-specific. However most ATA/ATAPI-5 disks seem to respect their meaning, so we have retained the option of printing the Attribute values.
For SCSI devices the «attributes» are obtained from the temperature and start-stop cycle counter log pages. Certain vendor specific attributes are listed if recognised. The attributes are output in a relatively free format (compared with ATA disk attributes). -l TYPE, —log=TYPE Prints either the SMART Error Log, the SMART Self-Test Log, the SMART Selective Self-Test Log [ATA only], or the Log Directory [ATA only]. The valid arguments to this option are:
error — prints only the SMART error log. SMART disks maintain a log of the most recent five non-trivial errors. For each of these errors, the disk power-on lifetime at which the error occurred is recorded, as is the device status (idle, standby, etc) at the time of the error. For some common types of errors, the Error Register (ER) and Status Register (SR) values are decoded and printed as text. The meanings of these are: In addition, up to the last five commands that preceded the error are listed, along with a timestamp measured from the start of the corresponding power cycle. This is displayed in the form Dd+HH:MM:SS.msec where D is the number of days, HH is hours, MM is minutes, SS is seconds and msec is milliseconds. [Note: this time stamp wraps after 2^32 milliseconds, or 49 days 17 hours 2 minutes and 47.296 seconds.] The key ATA disk registers are also recorded in the log. The final column of the error log is a text-string description of the ATA command defined by the Command Register (CR) and Feature Register (FR) values. Commands that are obsolete in the most current (ATA-7) spec are listed like this: READ LONG (w/ retry) [OBS-4] , indicating that the command became obsolete with or in the ATA-4 specification. Similarly, the notation [RET- N ] is used to indicate that a command was retired in the ATA- N specification. Some commands are not defined in any version of the ATA specification but are in common use nonetheless; these are marked [NS] , meaning non-standard.
The ATA Specification (ATA-5 Revision 1c, Section 8.41.6.8.2) says: «Error log structures shall include UNC errors, IDNF errors for which the address requested was valid, servo errors, write fault errors, etc. Error log data structures shall not include errors attributed to the receipt of faulty commands such as command codes not implemented by the device or requests with invalid parameters or invalid addresses.» The definitions of these terms are:
UNC ( UNC orrectable): data is uncorrectable. This refers to data which has been read from the disk, but for which the Error Checking and Correction (ECC) codes are inconsistent. In effect, this means that the data can not be read.
IDNF ( ID N ot F ound): user-accessible address could not be found. For READ LOG type commands, IDNF can also indicate that a device data log structure checksum was incorrect.
If the command that caused the error was a READ or WRITE command, then the Logical Block Address (LBA) at which the error occurred will be printed in base 10 and base 16. The LBA is a linear address, which counts 512-byte sectors on the disk, starting from zero. (Because of the limitations of the SMART error log, if the LBA is greater than 0xfffffff, then either no error log entry will be made, or the error log entry will have an incorrect LBA. This may happen for drives with a capacity greater than 128 GiB or 137 GB.) On Linux systems the smartmontools web page has instructions about how to convert the LBA address to the name of the disk file containing the erroneous disk sector.
Please note that some manufacturers ignore the ATA specifications, and make entries in the error log if the device receives a command which is not implemented or is not valid.
error [SCSI] — prints the error counter log pages for reads, write and verifies. The verify row is only output if it has an element other than zero.
selftest — prints the SMART self-test log. The disk maintains a self-test log showing the results of the self tests, which can be run using the ‘-t’ option described below. For each of the most recent twenty-one self-tests, the log shows the type of test (short or extended, off-line or captive) and the final status of the test. If the test did not complete successfully, then the percentage of the test remaining is shown. The time at which the test took place, measured in hours of disk lifetime, is also printed. If any errors were detected, the Logical Block Address (LBA) of the first error is printed in decimal notation. On Linux systems the smartmontools web page has instructions about how to convert this LBA address to the name of the disk file containing the erroneous block.
selftest [SCSI] — the self-test log for a SCSI device has a slightly different format than for an ATA device. For each of the most recent twenty self-tests, it shows the type of test and the status (final or in progress) of the test. SCSI standards use the terms «foreground» and «background» (rather than ATA’s corresponding «captive» and «off-line») and «short» and «long» (rather than ATA’s corresponding «short» and «extended») to describe the type of the test. The printed segment number is only relevant when a test fails in the third or later test segment. It identifies the test that failed and consists of either the number of the segment that failed during the test, or the number of the test that failed and the number of the segment in which the test was run, using a vendor-specific method of putting both numbers into a single byte. The Logical Block Address (LBA) of the first error is printed in hexadecimal notation. On Linux systems the smartmontools web page has instructions about how to convert this LBA address to the name of the disk file containing the erroneous block. If provided, the SCSI Sense Key (SK), Additional Sense Code (ASC) and Additional Sense Code Qualifier (ASQ) are also printed. The self tests can be run using the ‘-t’ option described below (using the ATA test terminology).
selective [ATA] — Some ATA-7 disks (example: Maxtor) also maintain a selective self-test log. Please see the ‘-t select’ option below for a description of selective self-tests. The selective self-test log shows the start/end Logical Block Addresses (LBA) of each of the five test spans, and their current test status. If the span is being tested or the remainder of the disk is being read-scanned, the current 65536-sector block of LBAs being tested is also displayed. The selective self-test log also shows if a read-scan of the remainder of the disk will be carried out after the selective self-test has completed (see ‘-t afterselect’ option) and the time delay before restarting this read-scan if it is interrupted (see ‘-t pending’ option). This is a new smartmontools feature; please report unusual or incorrect behavior to the smartmontools-support mailing list.
directory — if the device supports the General Purpose Logging feature set (ATA-6 and ATA-7 only) then this prints the Log Directory (the log at address 0). The Log Directory shows what logs are available and their length in sectors (512 bytes). The contents of the logs at address 1 [Summary SMART error log] and at address 6 [SMART self-test log] may be printed using the previously-described error and selftest arguments to this option. [Please note: this is a new, experimental feature. We would like to add support for printing the contents of extended and comprehensive SMART self-test and error logs. If your disk supports these, and you would like to assist, please contact the smartmontools developers.]
-v N,OPTION, —vendorattribute=N,OPTION Sets a vendor-specific display OPTION for Attribute N. This option may be used multiple times. Valid arguments to this option are:
help — Prints (to STDOUT) a list of all valid arguments to this option, then exits.
9,minutes — Raw Attribute number 9 is power-on time in minutes. Its raw value will be displayed in the form «Xh+Ym». Here X is hours, and Y is minutes in the range 0-59 inclusive. Y is always printed with two digits, for example «06» or «31» or «00».
9,seconds — Raw Attribute number 9 is power-on time in seconds. Its raw value will be displayed in the form «Xh+Ym+Zs». Here X is hours, Y is minutes in the range 0-59 inclusive, and Z is seconds in the range 0-59 inclusive. Y and Z are always printed with two digits, for example «06» or «31» or «00».
9,halfminutes — Raw Attribute number 9 is power-on time, measured in units of 30 seconds. This format is used by some Samsung disks. Its raw value will be displayed in the form «Xh+Ym». Here X is hours, and Y is minutes in the range 0-59 inclusive. Y is always printed with two digits, for example «06» or «31» or «00».
9,temp — Raw Attribute number 9 is the disk temperature in Celsius.
192,emergencyretractcyclect — Raw Attribute number 192 is the Emergency Retract Cycle Count.
193,loadunload — Raw Attribute number 193 contains two values. The first is the number of load cycles. The second is the number of unload cycles. The difference between these two values is the number of times that the drive was unexpectedly powered off (also called an emergency unload). As a rule of thumb, the mechanical stress created by one emergency unload is equivalent to that created by one hundred normal unloads.
194,10xCelsius — Raw Attribute number 194 is ten times the disk temperature in Celsius. This is used by some Samsung disks (example: model SV1204H with RK100-13 firmware).
194,unknown — Raw Attribute number 194 is NOT the disk temperature, and its interpretation is unknown. This is primarily useful for the -P (presets) option.
198,offlinescanuncsectorct — Raw Attribute number 198 is the Offline Scan UNC Sector Count.
200,writeerrorcount — Raw Attribute number 200 is the Write Error Count.
201,detectedtacount — Raw Attribute number 201 is the Detected TA Count.
220,temp — Raw Attribute number 220 is the disk temperature in Celsius.
Note: a table of hard drive models, listing which Attribute corresponds to temperature, can be found at: http://www.guzu.net/linux/hddtemp.db
N,raw8 — Print the Raw value of Attribute N as six 8-bit unsigned base-10 integers. This may be useful for decoding the meaning of the Raw value. The form ‘N,raw8’ prints Raw values for ALL Attributes in this form. The form (for example) ‘123,raw8’ only prints the Raw value for Attribute 123 in this form.
N,raw16 — Print the Raw value of Attribute N as three 16-bit unsigned base-10 integers. This may be useful for decoding the meaning of the Raw value. The form ‘N,raw16’ prints Raw values for ALL Attributes in this form. The form (for example) ‘123,raw16’ only prints the Raw value for Attribute 123 in this form.
N,raw48 — Print the Raw value of Attribute N as a 48-bit unsigned base-10 integer. This may be useful for decoding the meaning of the Raw value. The form ‘N,raw48’ prints Raw values for ALL Attributes in this form. The form (for example) ‘123,raw48’ only prints the Raw value for Attribute 123 in this form.
-F TYPE, —firmwarebug=TYPE Modifies the behavior of smartctl to compensate for some known and understood device firmware bug. The arguments to this option are exclusive, so that only the final option given is used. The valid values are:
none — Assume that the device firmware obeys the ATA specifications. This is the default, unless the device has presets for ‘-F’ in the device database (see note below).
samsung — In some Samsung disks (example: model SV4012H Firmware Version: RM100-08) some of the two- and four-byte quantities in the SMART data structures are byte-swapped (relative to the ATA specification). Enabling this option tells smartctl to evaluate these quantities in byte-reversed order. Some signs that your disk needs this option are (1) no self-test log printed, even though you have run self-tests; (2) very large numbers of ATA errors reported in the ATA error log; (3) strange and impossible values for the ATA error log timestamps.
samsung2 — In more recent Samsung disks (firmware revisions ending in «-23») the number of ATA errors reported is byte swapped. Enabling this option tells smartctl to evaluate this quantity in byte-reversed order. An indication that your Samsung disk needs this option is that the self-test log is printed correctly, but there are a very large number of errors in the SMART error log. This is because the error count is byte swapped. Thus a disk with five errors (0x0005) will appear to have 20480 errors (0x5000).
Note that an explicit ‘-F’ option on the command line will over-ride any preset values for ‘-F’ (see the ‘-P’ option below).
-P TYPE, —presets=TYPE Specifies whether smartctl should use any preset options that are available for this drive. By default, if the drive is recognized in the smartmontools database, then the presets are used.
smartctl can automatically set appropriate options for known drives. For example, the Maxtor 4D080H4 uses Attribute 9 to stores power-on time in minutes whereas most drives use that Attribute to store the power-on time in hours. The command-line option ‘-v 9,minutes’ ensures that smartctl correctly interprets Attribute 9 in this case, but that option is preset for the Maxtor 4D080H4 and so need not be specified by the user on the smartctl command line.
The argument show will show any preset options for your drive and the argument showall will show all known drives in the smartmontools database, along with their preset options. If there are no presets for your drive and you think there should be (for example, a -v or -F option is needed to get smartctl to display correct values) then please contact the smartmontools developers so that this information can be added to the smartmontools database. Contact information is at the end of this man page.
The valid arguments to this option are:
use — if a drive is recognized, then use the stored presets for it. This is the default. Note that presets will NOT over-ride additional Attribute interpretation (‘-v N,something’) command-line options or explicit ‘-F’ command-line options..
ignore — do not use presets.
show — show if the drive is recognized in the database, and if so, its presets, then exit.
showall — list all recognized drives, and the presets that are set for them, then exit.
The ‘-P showall’ option takes up to two optional arguments to match a specific drive type and firmware version. The command: lists all entries, the command: lists all entries matching MODEL, and the command: lists all entries for this MODEL and a specific FIRMWARE version.
SMART RUN/ABORT OFFLINE TEST AND SELF-TEST OPTIONS: -t TEST, —test=TEST Executes TEST immediately. The ‘-C’ option can be used in conjunction with this option to run the short or long (and also for ATA devices, selective or conveyance) self-tests in captive mode (known as «foreground mode» for SCSI devices). Note that only one test type can be run at a time, so only one test type should be specified per command line. Note also that if a computer is shutdown or power cycled during a self-test, no harm should result. The self-test will either be aborted or will resume automatically.
The valid arguments to this option are:
offline — runs SMART Immediate Offline Test. This immediately starts the test described above. This command can be given during normal system operation. The effects of this test are visible only in that it updates the SMART Attribute values, and if errors are found they will appear in the SMART error log, visible with the ‘-l error’ option. [In the case of SCSI devices runs the default self test in foreground. No entry is placed in the self test log.]
If the ‘-c’ option to smartctl shows that the device has the «Suspend Offline collection upon new command» capability then you can track the progress of the Immediate Offline test using the ‘-c’ option to smartctl . If the ‘-c’ option show that the device has the «Abort Offline collection upon new command» capability then most commands will abort the Immediate Offline Test, so you should not try to track the progress of the test with ‘-c’, as it will abort the test.
short — runs SMART Short Self Test (usually under ten minutes). [Note: in the case of SCSI devices, this command option runs the «Background short» self-test.] This command can be given during normal system operation (unless run in captive mode — see the ‘-C’ option below). This is a test in a different category than the immediate or automatic offline tests. The «Self» tests check the electrical and mechanical performance as well as the read performance of the disk. Their results are reported in the Self Test Error Log, readable with the ‘-l selftest’ option. Note that on some disks the progress of the self-test can be monitored by watching this log during the self-test; with other disks use the ‘-c’ option to monitor progress.
long — runs SMART Extended Self Test (tens of minutes). [Note: in the case of SCSI devices, this command option runs the «Background long» self-test.] This is a longer and more thorough version of the Short Self Test described above. Note that this command can be given during normal system operation (unless run in captive mode — see the ‘-C’ option below).
conveyance — [ATA ONLY] runs a SMART Conveyance Self Test (minutes). This self-test routine is intended to identify damage incurred during transporting of the device. This self-test routine should take on the order of minutes to complete. Note that this command can be given during normal system operation (unless run in captive mode — see the ‘-C’ option below).
select,N-M — [ATA ONLY] [NEW EXPERIMENTAL SMARTCTL FEATURE] runs a SMART Selective Self Test, to test a range of disk Logical Block Addresses (LBAs), rather than the entire disk. Each range of LBAs that is checked is called a «span» and is specified by a starting LBA (N) and an ending LBA (M) with N less than or equal to M. For example the command: runs a self test on one span consisting of LBAs ten to twenty (inclusive). The ‘-t’ option can be given up to five times, to test up to five spans. For example the command: runs a self test on two spans. The first span consists of 101 LBAs and the second span consists of 1001 LBAs. Note that the spans can overlap partially or completely, for example: The results of the selective self-test can be obtained (both during and after the test) by printing the SMART self-test log, using the ‘-l selftest’ option to smartctl.
Selective self tests are particularly useful as disk capacities increase: an extended self test (smartctl -t long) can take several hours. Selective self-tests are helpful if (based on SYSLOG error messages, previous failed self-tests, or SMART error log entries) you suspect that a disk is having problems at a particular range of Logical Block Addresses (LBAs).
Selective self-tests can be run during normal system operation (unless done in captive mode — see the ‘-C’ option below).
[Note: this new experimental smartmontools feature is currently only available under Linux. The Linux kernel must be compiled with the configuration option CONFIG_IDE_TASKFILE_IO enabled. Please report unusual or incorrect behavior to the smartmontools-support mailing list.]
afterselect,on — [ATA ONLY] perform an offline read scan after a Selective Self-test has completed. This option must be used together with one or more of the select,N-M options above. If the LBAs that have been specified in the Selective self-test pass the test with no errors found, then read scan the remainder of the disk. If the device is powered-cycled while this read scan is in progress, the read scan will be automatically resumed after a time specified by the pending timer (see below). The value of this option is preserved between selective self-tests.
afterselect,off — [ATA ONLY] do not read scan the remainder of the disk after a Selective self-test has completed. This option must be use together with one or more of the select,N-M options above. The value of this option is preserved between selective self-tests.
pending,N — [ATA ONLY] set the pending offline read scan timer to N minutes. Here N is an integer in the range from 0 to 65535 inclusive. If the device is powered off during a read scan after a Selective self-test, then resume the test automatically N minutes after power-up. This option must be use together with one or more of the select,N-M options above. The value of this option is preserved between selective self-tests.
-C, —captive Runs self-tests in captive mode. This has no effect with ‘-t offline’ or if the ‘-t’ option is not used. [Note: in the case of SCSI devices, this command option runs the self-test in «Foreground» mode.]
WARNING: Tests run in captive mode may busy out the drive for the length of the test. Only run captive tests on drives without any mounted partitions!
-X, —abort Aborts non-captive SMART Self Tests. Note that this command will abort the Offline Immediate Test routine only if your disk has the «Abort Offline collection upon new command» capability.
EXAMPLES
Disable SMART on drive /dev/hdd (Secondary Slave).
Enable SMART on drive /dev/hda, enable automatic offline testing every four hours, and enable autosaving of SMART Attributes. This is a good start-up line for your system’s init files. You can issue this command on a running system.
Begin an extended self-test of drive /dev/hdc. You can issue this command on a running system. The results can be seen in the self-test log visible with the ‘-l selftest’ option after it has completed.
Enable SMART on the disk, and begin an immediate offline test of drive /dev/hda. You can issue this command on a running system. The results are only used to update the SMART Attributes, visible with the ‘-A’ option. If any device errors occur, they are logged to the SMART error log, which can be seen with the ‘-l error’ option.
Shows the vendor Attributes, when the disk stores its power-on time internally in minutes rather than hours.
Produces output only if the device returns failing SMART status, or if some of the logged self-tests ended with errors.
Examine all SMART data for device /dev/hda, but produce no printed output. You must use the exit status (the $? shell variable) to learn if any Attributes are out of bound, if the SMART status is failing, if there are errors recorded in the self-test log, or if there are errors recorded in the disk error log.
Examine all SMART data for the first ATA disk connected to a 3ware RAID controller card.
Examine all SMART data for the first ATA disk connected to a 3ware RAID 6000/7000/8000 controller card.
Examine all SMART data for the first ATA disk connected to a 3ware RAID 9000 controller card.
Start a short self-test on the fourth ATA disk connected to the 3ware RAID controller card which is the second SCSI device /dev/sdb. Run a selective self-test on LBAs 10 to 100 and 30 to 300. After the these LBAs have been tested, read-scan the remainder of the disk. If the disk is power-cycled during the read-scan, resume the scan 45 minutes after power to the device is restored.
Examine all SMART data for the first SCSI disk connected to a cciss RAID controller card.
RETURN VALUES
To test within the shell for whether or not the different bits are turned on or off, you can use the following type of construction (this is bash syntax): This looks at only at bit 3 of the exit status $? (since 8=2^3). The shell variable $smartstat will be nonzero if SMART status check returned «disk failing» and zero otherwise.
Источник
В далёкие времена конца 20-го века, разработчики дисковых накопителей сообразили, что имея на борту процессор, память и хранилище данных, можно не только выполнять чтение/запись данных пользователя, но ещё и заниматься самоанализом. Во многом этому способствовала производственная необходимость. Из-за возросшей сложности изготовления, частой смены модельного ряда и расширения функционала жестких дисков — стало важным быстро разбираться в причинах возникающих отказов.
Винчестеры постепенно стали обзаводиться способностью вести протоколы событий, и хранить их внутри себя. Поначалу это были специальные модули в микрокоде, в которые накопители регулярно сбрасывали различные параметры с датчиков: ошибки позиционирования, уровни сигналов, температуру, напряжение, и т.д.. Содержимое этих логов было недоступно ни пользователю, ни массовому прикладному ПО.
Однако, когда винчестеры выходили из строя, и возвращались на завод-изготовитель, то могли быть направлены в отдел анализа отказов при конструкторском бюро — лабораторию Failure Analysis, или сокращённо — FA-отдел. Их сотрудники переводили накопитель в технологический режим, считывали FA-журналы, интерпретировали их, и это облегчало устранение недостатков продукции.
Анализ отказов может спасти деньги, жизни и ресурсы, если его выполнить правильно. Это важная дисциплина во многих отраслях производства, таких как электронная промышленность, где она является жизненно важным инструментом, используемым при разработке новых продуктов и для улучшения существующих продуктовhttps://en.wikipedia.org/wiki/Failure_analysis
Появившаяся в середине 90-х годов технология S.M.A.R.T. (self-monitoring, analysis and reporting technology), по сути, была просто официально стандартизированной частью системы самодиагностики накопителя, использующей часть данных с датчиков и FA-журналов. Ей же она и осталась до настоящего времени. Цель стандартизации — привести показания накопителей разных систем, производителей и возраста, к единому виду, позволяющему интерпретировать их универсальными программами.
У подавляющего большинства пользователей, аббревиатура S.M.A.R.T. ассоциируется со смарт-атрибутами — набором числовых параметров, характеризующих степень физического износа и исправности накопителя. Выглядит это примерно так:

Но на самом деле система SMART включает ещё как минимум, две важных составляющих. Это встроенные в накопитель SMART-тесты и… «те самые» журналы.
И если со SMART-тестами всё относительно понятно, возможность их запуска проста в реализации, многократно описана и встроена во многие популярные программы, то с журналами всё гораздо более туманно… Попытки поиска нужной информации по ключевым фразам в поисковиках — оканчиваются неудачей. А значит…
Пришло время немного приоткрыть тайну, и рассказать, что же всё-таки это такое.
Возможность работать с журналами накопителей появилась, начиная с 2000 г, в стандарте ATA/ATAPI-5 от комитета t13. Стандарт носил в основном, рекомендательный характер, и предлагал во всех новых разработках использовать 4 вида журналов:
- SMART error log или его более распространённый вариант — Comprehensive SMART Error log: журнал ошибок, найденных системой самодиагностики накопителя в процессе обычной работы.
- SMART self-test log: журнал результатов самотестов накопителя, искусственно запускаемых пользователем.
- Host vendor specific: журнал, открытый на запись, в котором пользователи или программы могут хранить какие-то свои данные, например результаты работы тестирующего диск ПО.
- Device vendor specific: специальный журнал, который используется изготовителем винчестера на своё усмотрение как расширение стандарта, но при этом доступен для получения всем желающим.
В первой половине 2000-х годов ёмкости накопителей перешагнули рубеж 128 Гб, и получили 48-битную адресацию. В результате чего в стандарте были пересмотрены форматы журналов, которые получили приставку Ext — от слова Extended, т.е. расширенные.
 Наибольший практический интерес в настоящее время представляет журнал с названием «Ext Comprehensive SMART Error log». Именно в него большинство накопителей складывают информацию о том, когда, и на каких адресах у них возникли проблемы с чтением-записью, а попросту — бэд-блоки.
 Наибольший практический интерес в настоящее время представляет журнал с названием «Ext Comprehensive SMART Error log». Именно в него большинство накопителей складывают информацию о том, когда, и на каких адресах у них возникли проблемы с чтением-записью, а попросту — бэд-блоки.
Таким образом, посмотрев в этот журнал, можно увидеть, есть ли вообще дефекты на накопителе, где и как они локализованы, без запуска каких-либо тестов и затрат времени. Это может быть особенно полезно перед восстановлением данных, где важна скорость предварительной диагностики и максимально бережное обращение с накопителем.
Рассмотрим работу с Extended Comprehensive SMART Error log в программе Victoria версии 4.75. Для проведения эксперимента важно, чтобы накопитель был НЕ новым, иначе все его логи будут пустыми, и ничего интересного мы в них не увидим. В качестве подопытного кролика был взят изрядно потрёпанный жизнью винчестер USB 3.0 фирмы ADATA. Программа Victoria определила, что на самом деле это накопитель HGST с интерфейсом SATA III, подключенный через USB-SATA мост. А значит, он поддерживает технологию SMART, и всё, что с ней связано.
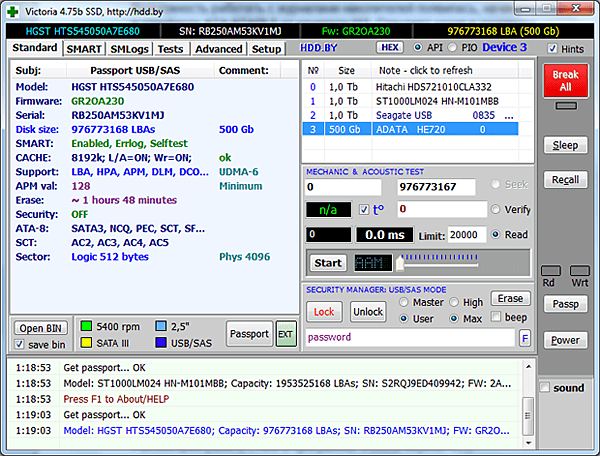
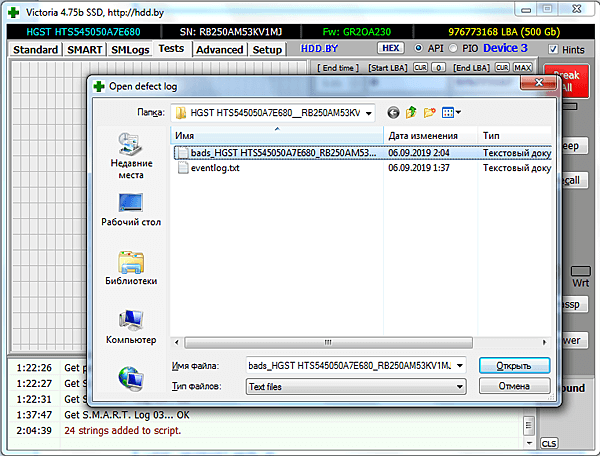
Переходим на вкладку SMLogs и щёлкаем по заголовку левого окна (или по кнопке Get directory, что равнозначно). Мы получим оглавление журналов — список всех SMART-журналов, которые имеются в накопителе.
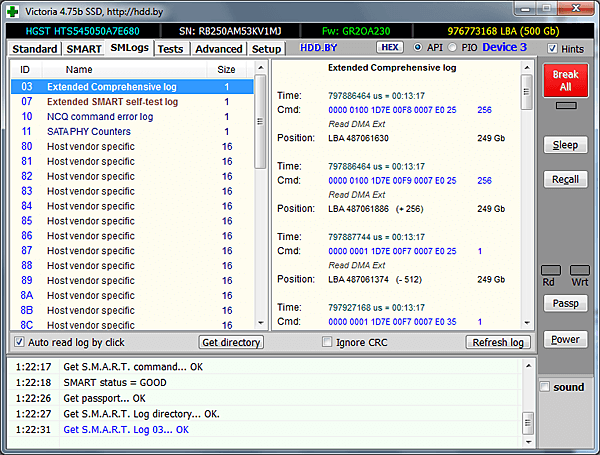
Затем находим журнал под номером 03 с нужным нам названием — Extended Comprehensive log, и щёлкаем по нему. Программа начнёт чтение журнала из накопителя (иногда это может занять несколько секунд). После чего в правом окне появится интерпретация содержимого журнала.
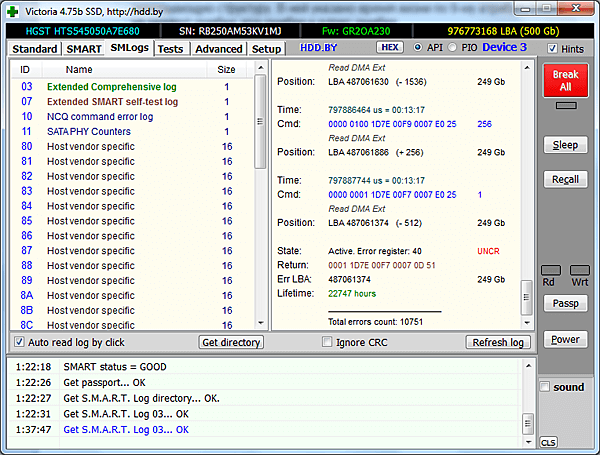
Мы видим список из одинаковых структур, сгруппированных по 5 штук. Это 5 команд, которые принял накопитель перед той командой, что предшествовала ошибке. Если прокрутить список немного вниз, то мы увидим шестую, завершающую структуру. В ней указано время жизни по 9-му атрибуту SMART на момент ошибки, код ошибки и адрес ошибки.
И наконец, в самом конце списка находится суммарное количество ошибок, которые пережил накопитель.
К сожалению, не у всех накопителей журнал заполняется корректно. В частности, у некоторых экземпляров HDD Seagate вместо адресов могут быть числа, многократно превосходящие объём диска. Причина этого мне пока неизвестна уже известна. Ждите обновление версии до 4.76 =)
Журнал может состоять из множества секторов, а количество записей достигать нескольких тысяч. В таком случае, просматривать его вручную довольно утомительно. Для практического применения его содержимого — в меню, вызываемом по правой кнопке мыши, есть пункт «генерировать скрипт для тестов».
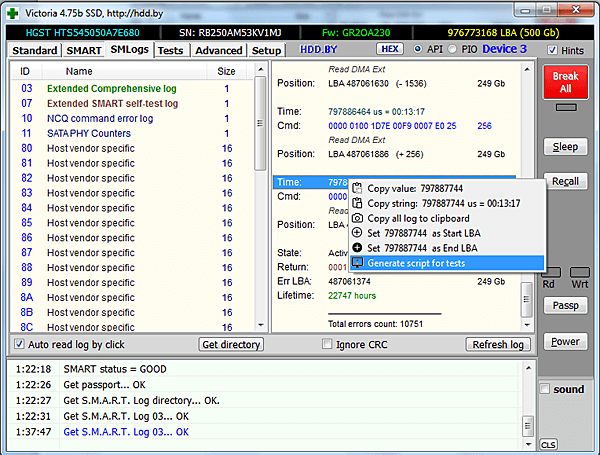
Выполнив это действие, мы получим список диапазонов в виде текстового лог-скрипта. Файл сохраняется в папке с названием модели накопителя, с учетом настроек путей к логам, заданных в Setup.
Указанные в файле участки диска могут быть автоматически проверены сканом поверхности.
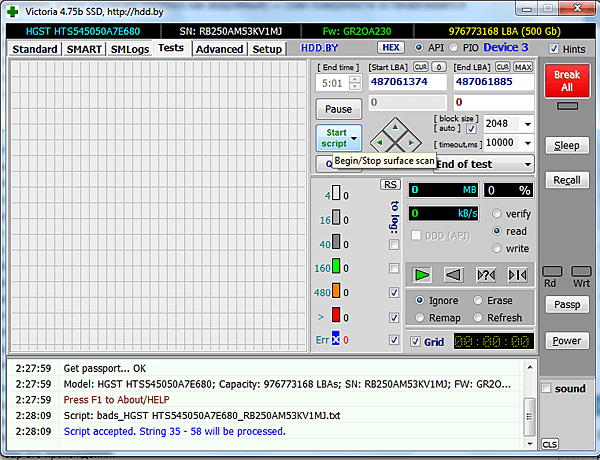
- Открываем Tests, и на кнопке Scan вызываем меню.
- В меню выбираем «Open defect log as script» и открываем файл.
- Надпись на кнопке заменится на «Start script»
- Запускаем скрипт, нажав кнопку.
Будут автоматически проверены те места, которые были занесены в SMART-журнал.
Если во время проверки будут найдены ошибки, то по ним будет построен еще один список, который допишется в конец того же файла. И его можно снова подгрузить в скан, включить опции ремонта (например remap), и попытаться вылечить дефектные места. При каждом запуске скрипта будет использована лишь последняя его сессия, а вышестоящие и пустые проигнорированы.
Файл текстовый, и при необходимости его сессии можно подправить в блокноте.

Формат скрипта следующий:
— 1-я строка: обязательный заголовок «Victoria defects log 1.0».
— Затем через произвольное количество пустых строк — разделительная строка с датой и временем вида «Start: 30.08.2019 17:16:52» (слово «Start» — обязательно).
— Далее идут подряд строки заданий вида: [адрес], [количество секторов], необязательный комментарий.
Несколько идущих подряд строк образуют сессию. Пустая строка означает конец сессии.
В следующих статьях будут рассмотрены другие журналы SMART и их практическое применение.
Сергей Казанский, 06.09.2019г.
Что такое S.M.A.R.T.? Почему возникают SMART ошибки и о чем это говорит? Ниже мы детально расскажем про причины и методы устранения подобных проблем.

Содержание
- Что такое SMART и что он показывает?
- Ошибки S.M.A.R.T.
- Примеры ошибок SMART
- Ошибка «SMART failure predicted»
- Ошибка «S.M.A.R.T. status BAD»
- Ошибка «the smart hard disk check has detected»
- Как исправить SMART ошибку?
- Как отключить проверку SMART?
- Что делать если данные были утеряны?
Средство S.M.A.R.T., показывающее ошибки жесткого диска (HDD или SSD) является сигналом того, что с накопителем случились какие-то неполадки, влияющие на стабильность и работу компьютера.
Помимо этого, такая ошибка – серьезный повод задуматься о сохранности своих важных данных, поскольку из-за проблемного накопителя можно попросту лишиться всей информации, которую практически невозможно восстановить.
Что такое SMART и что он показывает?
«S.M.A.R.T.» расшифровывается как «self-monitoring, analysis and reporting technology», что в переводе означает «технология самодиагностики, анализа и отчетности».
Каждый жесткий диск, подключённый через интерфейс SATA или ATA, имеет встроенную систему S.M.A.R.T., которая позволяет выполнять следующие функции:
- Проводить анализ накопителя.
- Исправлять программные проблемы с HDD.
- Сканировать поверхность жесткого диска.
- Проводить программное исправление, очистку или замену поврежденных блоков.
- Выставлять оценки жизненноважным характеристикам диска.
- Вести отчётность о всех параметрах жесткого диска.
Система S.M.A.R.T. позволяет давать пользователю полную информацию о физическом состоянии жесткого диска методом выставления оценок, при помощи которых можно рассчитать примерное время выхода HDD из строя. С данной системой можно лично ознакомиться, воспользовавшись программой Victoria или другими аналогами.
С тем, как работать, проверять и исправлять ошибки жесткого диска в программе Victoria, Вы можете ознакомиться в статье «Как протестировать и исправить жесткий диск используя бесплатную программу Victoria».
Ошибки S.M.A.R.T.
Как правило, в нормально работающем накопителе система S.M.A.R.T. не выдает никаких ошибок даже при невысоких оценках. Это обусловлено тем, что появление ошибок является сигналом возможной скорой поломки диска.
Ошибки S.M.A.R.T. всегда свидетельствуют о какой-либо неисправности или о том, что некоторые элементы диска практически исчерпали свой ресурс. Если пользователю стали демонстрироваться подобные сообщения, следует задуматься о сохранности своих данных, поскольку теперь они могут исчезнуть в любой момент!
Примеры ошибок SMART
Ошибка «SMART failure predicted»

В данном случае S.M.A.R.T. оповещает пользователя о скором выходе диска из строя. Важно: если Вы увидели такое сообщение на своем компьютере, срочно скопируйте всю важную информацию и файлы на другой носитель, поскольку данный жесткий диск может прийти в негодность в любой момент!
Ошибка «S.M.A.R.T. status BAD»

Данная ошибка говорит о том, что некоторые параметры жесткого диска находятся в плохом состоянии (практически выработали свой ресурс). Как и в первом случае, следует сразу сделать бекап важных данных.
Ошибка «the smart hard disk check has detected»

Как и в двух предыдущих ошибках, система S.M.A.R.T. говорит о скорой поломке HDD.
Коды и названия ошибок могут различаться в разных жестких дисках, материнских платах или версиях BIOS, тем не менее, каждая из них является сигналом для того, чтобы сделать резервную копию своих файлов.
Как исправить SMART ошибку?
Ошибки S.M.A.R.T. свидетельствуют о скорой поломке жесткого диска, поэтому исправление ошибок, как правило, не приносит должного результата, и ошибка остается. Помимо критических ошибок, существуют еще и другие проблемы, которые могут вызывать сообщения такого рода. Одной из таких проблем является повышенная температура носителя.
Ее можно посмотреть в программе Victoria во вкладке SMART под пунктом 190 «Airflow temperature» для HDD. Или под пунктом 194 «Controller temperature» для SDD.

Если данный показатель будет завышен, следует принять меры по охлаждению системного блока:
- Проверить работоспособность кулеров.
- Очистить пыль.
- Поставить дополнительный кулер для лучшей вентиляции.
Другим способом исправления ошибок SMART является проверка накопителя на наличие ошибок.
Это можно сделать, зайдя в папку «Мой компьютер», кликнув правой клавишей мыши по диску или его разделу, выбрав пункт «Сервис» и запустив проверку.

Если ошибка не была исправлена в ходе проверки, следует прибегнуть к дефрагментации диска.
Чтобы это сделать, находясь в свойствах диска, следует нажать на кнопку «Оптимизировать», выбрать необходимый диск и нажать «Оптимизировать».

Если ошибка не пропадет после этого, скорее всего, диск просто исчерпал свой ресурс, и в скором времени он станет нечитаемым, а пользователю останется только приобрести новый HDD или SSD.
Как отключить проверку SMART?
Диск с ошибкой S.M.A.R.T. может выйти из строя в любой момент, но это не означает, что им нельзя продолжать пользоваться.
Стоит понимать, что использование такого диска не должно подразумевать в себе хранение на нем сколько-либо стоящей информации. Зная это, можно провести сброс smart настроек, которые помогут замаскировать надоедливые ошибки.
Для этого:
Шаг 1. Заходим в BIOS или UEFI (кнопка F2 или Delete во время загрузки), переходим в пункт «Advanced», выбираем строку «IDE Configuration» и нажимаем Enter. Для навигации следует использовать стрелочки на клавиатуре.

Шаг 2. На открывшемся экране следует найти свой диск и нажать Enter (жесткие диски подписаны «Hard Disc»).

Шаг 3. Опускаемся вниз списка и выбираем параметр SMART, нажимаем Enter и выбираем пункт «Disabled».

Шаг 4. Выходим из BIOS, применяя и сохраняя настройки.
Стоит отметить, на некоторых системах данная процедура может выполняться немного по-другому, но сам принцип отключения остается прежним.
После отключения SMART ошибки перестанут появляться, и система будет загружаться в штатном порядке до тех пор, пока HDD окончательно не выйдет из строя. В некоторых ситуациях ошибки могут показываться в самой ОС, тогда достаточно несколько раз отклонить их, после чего появится кнопка «Больше не показывать».
Что делать если данные были утеряны?
При случайном форматировании, удалении вирусами или утере любых важных данных следует быстро вернуть утерянную информацию самым эффективным методом.
Шаг 1. Установите и запустите программу RS Partition Recovery.
Шаг 2. Выберите носитель или раздел диска, с которого необходимо восстановить данные.

Шаг 3. Выберите тип анализа.

Быстрый анализ стоит использовать, если файлы были удалены недавно. Программа проведет анализ и отобразит данные доступные для восстановления.
Полный анализ позволяет найти утерянные данные после форматирования, перераспределения диска или повреждения файловой структуры (RAW).
Шаг 4. Просмотр и выбор файлов для восстановления.

Шаг 5. Добавление файлов для сохранения в «Список Восстановления» или выбор всего раздела для восстановления.


Стоит отметить, что в качестве места для записи восстановленного файла лучше всего выбрать другой диск или раздел чтобы избежать перезаписи файла.
Часто задаваемые вопросы
S.M.A.R.T (Self-Monitoring, Analysis and Reporting Technology) – это специальная технология, разработанная для дисков, подключённых через SATA интерфейс, которая позволяет проводить анализ накопителя, исправлять программные проблемы HDD дисков, сканировать поверхность накопителя и автоматически исправлять поврежденные блоки информации, следить за состоянием накопителя и многое другое.
Эта ошибка предупреждает пользователя о скорой поломке накопителя. Если вы увидели эту ошибку – НЕМЕДЛЕННО скопируйте важные данные на другой накопитель, в противном случае важная информация может быть безвозвратно утеряна.
Воспользуйтесь программой RS Partition Recovery. Программа проста в использовании и позволяет восстановить утерянные данные после случайного удаления, форматирования диска, повреждений файловой структуры накопителя и во многих других случаях.
Исправлять SMART ошибки не имеет смысла, так как обычно они сигнализируют о ближайшем выходе накопителя из строя. Конечно вы можете отключить SMART технологию, но это только уберет сообщение об ошибке. Проблема же останется. Поэтому вместо отключения SMART – лучше заняться переносом данных в безопасное место.
Чтобы отключить SMART технологию войдите в настройки BIOS, затем откройте пункт «Advanced» —> «IDE Configuration». Выберите нужный диск из списка и нажмите «Enter». После этого, возле пункта «SMART» установите значение «Disabled».
smartctl is a command line utility designed to perform SMART
tasks such as printing the SMART self-test and error logs, enabling
and disabling SMART automatic testing, and initiating device
self-tests. Note: if the user issues a SMART command that is
(apparently) not implemented by the device, smartctl will print
a warning message but issue the command anyway (see the -T,
—tolerance option below). This should not cause problems: on
most devices, unimplemented SMART commands issued to a drive are
ignored and/or return an error.
smartctl also provides support for polling TapeAlert messages
from SCSI tape drives and changers.
The user must specify the device to be controlled or interrogated as
the final argument to smartctl. Device paths are as follows:
Based on the device path, smartctl will guess the device type
(ATA or SCSI). If necessary, the ‘-d’ option can be used to over-ride
this guess
Note that the printed output of smartctl displays most numerical
values in base 10 (decimal), but some values are displayed in base 16
(hexidecimal). To distinguish them, the base 16 values are always
displayed with a leading «0x», for example: «0xff». This man
page follows the same convention.
The options are grouped below into several categories. smartctl
will execute the corresponding commands in the order: INFORMATION,
ENABLE/DISABLE, DISPLAY DATA, RUN/ABORT TESTS.
SCSI devices only accept the options -h, -V, -i, -a, -A, -d,
-s, -S,-H, -t, -C, -l selftest, -l error, -r, and
-X. TapeAlert devices only accept the options -h, -V,
-i, -a, -A, -d, -s, -S, -t, -l selftest, -l error, -r,
and -H.
Long options are not supported on all systems. Use
‘smartctl -h’
to see the available options.
for your copy of smartctl to STDOUT and then exits. Please
include this information if you are reporting bugs or problems.
ATA Standard version/revision information. Says if the device
supports SMART, and if so, whether SMART support is currently enabled
or disabled. If the device supports Logical Block Address mode (LBA
mode) print current user drive capacity in bytes. (If drive is has a
user protected area reserved, or is «clipped», this may be smaller
than the potential maximum drive capacity.) Indicates if the drive is
in the smartmontools database (see ‘-v’ options below). If so, the
drive model family may also be printed.
about the tape drive or changer. For ATA devices this is equivalent
to
'-H -i -c -A -l error -l selftest -l selective'
and for SCSI, this is equivalent to
'-H -i -A -l error -l selftest'.
Note that for ATA disks this does not enable the ‘-l
directory’ option.
described here. The valid arguments to this option are:
errorsonly
— only print: For the ‘-l error’ option, if nonzero, the number
of errors recorded in the SMART error log and the power-on time when
they occurred; For the ‘-l selftest’ option, errors recorded in the device
self-test log; For the ‘-H’ option, SMART «disk failing» status or device
Attributes (pre-failure or usage) which failed either now or in the
past; For the ‘-A’ option, device Attributes (pre-failure or usage)
which failed either now or in the past.
silent
— print no output. The only way to learn about what was found is to
use the exit status of smartctl (see RETURN VALUES below).
are ata, scsi, marvell, cciss,N and 3ware,N. If this option is not
used then smartctl will attempt to guess the device type from
the device name.
Under Linux, to look at SATA disks behind Marvell SATA controllers
(using Marvell’s ‘linuxIAL’ driver rather than libata driver) use ‘-d marvell’. Such
controllers show up as Marvell Technology Group Ltd. SATA I or II controllers
using lspci, or using lspci -n show a vendor ID 0x11ab and a device ID of
either 0x5040, 0x5041, 0x5080, 0x5081, 0x6041 or 0x6081. The ‘linuxIAL’ driver
seems not (yet?) available in the Linux kernel source tree, but should be available
from system vendors (ftp://ftp.aslab.com/ is known to provide a patch with the driver).
To look at ATA disks behind 3ware SCSI RAID controllers, use syntax
such as:
smartctl -a -d 3ware,2 /dev/sda
smartctl -a -d 3ware,0 /dev/twe0
smartctl -a -d 3ware,1 /dev/twa0
where in the argument 3ware,N, the integer N is the disk number
(3ware ‘port’) within the 3ware ATA RAID controller. The allowed
values of N are from 0 to 15 inclusive. The first two forms, which
refer to devices /dev/sda-z and /dev/twe0-15, may be used with 3ware
series 6000, 7000, and 8000 series controllers that use the 3x-xxxx
driver. Note that the /dev/sda-z form is deprecated starting
with the Linux 2.6 kernel series and may not be supported by the Linux
kernel in the near future. The final form, which refers to devices
/dev/twa0-15, must be used with 3ware 9000 series controllers, which
use the 3w-9xxx driver.
Note that if the special character device nodes /dev/twa? and
/dev/twe? do not exist, or exist with the incorrect major or minor
numbers, smartctl will recreate them on the fly. Typically /dev/twa0
refers to the first 9000-series controller, /dev/twa1 refers to the
second 9000 series controller, and so on. Likewise /dev/twe0 refers to
the first 6/7/8000-series controller, /dev/twa1 refers to the second
6/7/8000 series controller, and so on.
Note that for the 6/7/8000 controllers, any of the physical
disks can be queried or examined using any of the 3ware’s SCSI
logical device /dev/sd? entries. Thus, if logical device /dev/sda is
made up of two physical disks (3ware ports zero and one) and logical
device /dev/sdb is made up of two other physical disks (3ware ports
two and three) then you can examine the SMART data on any of the
four physical disks using either SCSI device /dev/sda or
/dev/sdb. If you need to know which logical SCSI device a particular
physical disk (3ware port) is associated with, use the dmesg or SYSLOG
output to show which SCSI ID corresponds to a particular 3ware unit,
and then use the 3ware CLI or 3dm tool to determine which ports
(physical disks) correspond to particular 3ware units.
If the value of N corresponds to a port that does not exist on
the 3ware controller, or to a port that does not physically have a
disk attached to it, the behavior of smartctl depends upon the
specific controller model, firmware, Linux kernel and platform. In
some cases you will get a warning message that the device does not
exist. In other cases you will be presented with ‘void’ data for a
non-existent device.
Note that if the /dev/sd? addressing form is used, then older 3w-xxxx
drivers do not pass the «Enable Autosave»
(‘-S on‘) and «Enable Automatic Offline» (‘-o on‘)
commands to the disk, and produce these types of harmless syslog error
messages instead: «3w-xxxx: tw_ioctl(): Passthru size (123392) too
big«. This can be fixed by upgrading to version 1.02.00.037 or
later of the 3w-xxxx driver, or by applying a patch to older
versions. See http://smartmontools.sourceforge.net/ for
instructions. Alternatively, use the character device /dev/twe0-15 interface.
The selective self-test functions (‘-t select,A-B’) are only supported
using the character device interface /dev/twa0-15 and /dev/twe0-15.
The necessary WRITE LOG commands can not be passed through the SCSI
interface.
3ware controllers are currently ONLY supported under Linux and FreeBSD.
cciss controllers are currently ONLY supported under Linux.
failures.
The behavior of smartctl depends upon whether the command is
«optional» or «mandatory«. Here «mandatory» means
«required by the ATA/ATAPI-5 Specification if the device implements
the SMART command set» and «optional» means «not required by the
ATA/ATAPI-5 Specification even if the device implements the SMART
command set.» The «mandatory» ATA and SMART commands are: (1)
ATA IDENTIFY DEVICE, (2) SMART ENABLE/DISABLE ATTRIBUTE AUTOSAVE, (3)
SMART ENABLE/DISABLE, and (4) SMART RETURN STATUS.
The valid arguments to this option are:
normal
— exit on failure of any mandatory SMART command, and ignore
all failures of optional SMART commands. This is the default.
Note that on some devices, issuing unimplemented optional SMART
commands doesn’t cause an error. This can result in misleading
smartctl messages such as «Feature X not implemented», followed
shortly by «Feature X: enabled». In most such cases, contrary to the
final message, Feature X is not enabled.
conservative
— exit on failure of any optional SMART command.
permissive
— ignore failure(s) of mandatory SMART commands. This option
may be given more than once. Each additional use of this option will
cause one more additional failure to be ignored. Note that the use of
this option can lead to messages like «Feature X not implemented»,
followed shortly by «Error: unable to enable Feature X». In a few
such cases, contrary to the final message, Feature X is enabled.
verypermissive
— equivalent to giving a large number of ‘-T permissive’ options:
ignore failures of any number of mandatory SMART commands.
Please see the note above.
detected in the: (1) Device Identity Structure, (2) SMART Self-Test
Log Structure, (3) SMART Attribute Value Structure, (4) SMART
Attribute Threshold Structure, or (5) ATA Error Log Structure.
The valid arguments to this option are:
warn
— report the incorrect checksum but carry on in spite of it. This is the
default.
exit
— exit smartctl.
ignore
— continue silently without issuing a warning.
the behavior of smartmontools on non-conforming or poorly
conforming hardware. This option reports details of smartctl
transactions with the device. The option can be used multiple times.
When used just once, it shows a record of the ioctl() transactions
with the device. When used more than once, the detail of these
ioctl() transactions are reported in greater detail. The valid
arguments to this option are:
ioctl
— report all ioctl() transactions.
ataioctl
— report only ioctl() transactions with ATA devices.
scsiioctl
— report only ioctl() transactions with SCSI devices. Invoking this once
shows the SCSI commands in hex and the corresponding status. Invoking
it a second time adds a hex listing of the first 64 bytes of data send to,
or received from the device.
Any argument may include a positive integer to specify the level of detail
that should be reported. The argument should be followed by a comma then
the integer with no spaces. For example,
ataioctl,2
The default
level is 1, so ‘-r ataioctl,1’ and ‘-r ataioctl’ are equivalent.
if multiple options are used to both enable and disable a
feature, then
both
the enable and disable commands will be issued. The enable command
will always be issued
before
the corresponding disable command.
this option are on and off. Note that the command ‘-s on’
(perhaps used with with the ‘-o on’ and ‘-S on’ options) should be placed
in a start-up script for your machine, for example in rc.local or rc.sysinit.
In principle the SMART feature settings are preserved over
power-cycling, but it doesn’t hurt to be sure. It is not necessary (or
useful) to enable SMART to see the TapeAlert messages.
every four hours for disk defects. This command can be given during normal
system operation. The valid arguments to this option are on
and off.
Note that the SMART automatic offline test command is listed as
«Obsolete» in every version of the ATA and ATA/ATAPI Specifications.
It was originally part of the SFF-8035i Revision 2.0 specification,
but was never part of any ATA specification. However it is
implemented and used by many vendors. [Good documentation can be found
in IBM’s Official Published Disk Specifications. For example the IBM
Travelstar 40GNX Hard Disk Drive Specifications (Revision 1.1, 22
April 2002, Publication # 1541, Document S07N-7715-02) page 164. You
can also read the SFF-8035i Specification — see REFERENCES below.]
You can tell if automatic offline testing is supported by seeing if
this command enables and disables it, as indicated by the ‘Auto
Offline Data Collection’ part of the SMART capabilities report
(displayed with ‘-c’).
SMART provides three basic categories of testing. The
first category, called «online» testing, has no effect on the
performance of the device. It is turned on by the ‘-s on’ option.
The second category of testing is called «offline» testing. This
type of test can, in principle, degrade the device performance. The
‘-o on’ option causes this offline testing to be carried out,
automatically, on a regular scheduled basis. Normally, the disk will
suspend offline testing while disk accesses are taking place, and then
automatically resume it when the disk would otherwise be idle, so in
practice it has little effect. Note that a one-time offline test can
also be carried out immediately upon receipt of a user command. See
the ‘-t offline’ option below, which causes a one-time offline test
to be carried out immediately.
The choice (made by the SFF-8035i and ATA specification authors) of
the word testing for these first two categories is unfortunate,
and often leads to confusion. In fact these first two categories of
online and offline testing could have been more accurately described
as online and offline data collection.
The results of this automatic or immediate offline testing (data
collection) are reflected in the values of the SMART Attributes.
Thus, if problems or errors are detected, the values of these
Attributes will go below their failure thresholds; some types of
errors may also appear in the SMART error log. These are visible with
the ‘-A’ and ‘-l error’ options respectively.
Some SMART attribute values are updated only during off-line data
collection activities; the rest are updated during normal operation of
the device or during both normal operation and off-line testing. The
Attribute value table produced by the ‘-A’ option indicates this in
the UPDATED column. Attributes of the first type are labeled
«Offline» and Attributes of the second type are labeled «Always».
The third category of testing (and the only category for
which the word ‘testing’ is really an appropriate choice) is «self»
testing. This third type of test is only performed (immediately) when
a command to run it is issued. The ‘-t’ and ‘-X’ options can be
used to carry out and abort such self-tests; please see below for
further details.
Any errors detected in the self testing will be shown in the
SMART self-test log, which can be examined using the ‘-l selftest’
option.
Note: in this manual page, the word «Test» is used in
connection with the second category just described, e.g. for the
«offline» testing. The words «Self-test» are used in
connection with the third category.
Attributes. The valid arguments to this option are on
and off. Note that this feature is preserved across disk power
cycles, so you should only need to issue it once.
For SCSI devices this toggles the value of the Global Logging Target
Save Disabled (GLTSD) bit in the Control Mode Page. Some disk
manufacturers set this bit by default. This prevents error counters,
power-up hours and other useful data from being placed in non-volatile
storage, so these values may be reset to zero the next time the device
is power-cycled. If the GLTSD bit is set then ‘smartctl -a’ will
issue a warning. Use on to clear the GLTSD bit and thus enable
saving counters to non-volatile storage. For extreme streaming-video
type applications you might consider using off to set the GLTSD
bit.
TapeAlert messages. SMART status is based on
information that it has gathered from online and offline
tests, which were used to determine/update its
SMART vendor-specific Attribute values. TapeAlert status is obtained
by reading the TapeAlert log page.
If the device reports failing health status, this means
either
that the device has already failed,
or
that it is predicting its own failure within the next 24 hours. If
this happens, use the ‘-a’ option to get more information, and
get your data off the disk and someplace safe as soon as you can.
what SMART features are implemented and how the device will
respond to some of the different SMART commands. For example it
shows if the device logs errors, if it supports offline surface
scanning, and so on. If the device can carry out self-tests, this
option also shows the estimated time required to run those tests.
Note that the time required to run the Self-tests (listed in minutes)
are fixed. However the time required to run the Immediate Offline
Test (listed in seconds) is variable. This means that if you issue a
command to perform an Immediate Offline test with the ‘-t offline’ option,
then the time may jump to a larger value and then count down as the
Immediate Offline Test is carried out. Please see REFERENCES below
for further information about the the flags and capabilities described
by this option.
numbered from 1 to 253 and have specific names and ID numbers. For
example Attribute 12 is «power cycle count»: how many times has the
disk been powered up.
Each Attribute has a «Raw» value, printed under the heading
«RAW_VALUE», and a «Normalized» value printed under the heading
«VALUE». [Note: smartctl prints these values in base-10.] In
the example just given, the «Raw Value» for Attribute 12 would be the
actual number of times that the disk has been power-cycled, for
example 365 if the disk has been turned on once per day for exactly
one year. Each vendor uses their own algorithm to convert this «Raw»
value to a «Normalized» value in the range from 1 to 254. Please keep
in mind that smartctl only reports the different Attribute
types, values, and thresholds as read from the device. It does
not carry out the conversion between «Raw» and «Normalized»
values: this is done by the disk’s firmware.
The conversion from Raw value to a quantity with physical units is
not specified by the SMART standard. In most cases, the values printed
by smartctl are sensible. For example the temperature Attribute
generally has its raw value equal to the temperature in Celsius.
However in some cases vendors use unusual conventions. For example
the Hitachi disk on my laptop reports its power-on hours in minutes,
not hours. Some IBM disks track three temperatures rather than one, in
their raw values. And so on.
Each Attribute also has a Threshold value (whose range is 0 to 255)
which is printed under the heading «THRESH». If the Normalized value
is less than or equal to the Threshold value, then the Attribute
is said to have failed. If the Attribute is a pre-failure Attribute,
then disk failure is imminent.
Each Attribute also has a «Worst» value shown under the heading
«WORST». This is the smallest (closest to failure) value that the
disk has recorded at any time during its lifetime when SMART was
enabled. [Note however that some vendors firmware may actually
increase the «Worst» value for some «rate-type» Attributes.]
The Attribute table printed out by smartctl also shows the
«TYPE» of the Attribute. Attributes are one of two possible types:
Pre-failure or Old age. Pre-failure Attributes are ones which, if
less than or equal to their threshold values, indicate pending disk
failure. Old age, or usage Attributes, are ones which indicate
end-of-product life from old-age or normal aging and wearout, if
the Attribute value is less than or equal to the threshold. Please
note: the fact that an Attribute is of type ‘Pre-fail’ does
not mean that your disk is about to fail! It only has this
meaning if the Attribute’s current Normalized value is less than or
equal to the threshold value.
If the Attribute’s current Normalized value is less than or equal to
the threshold value, then the «WHEN_FAILED» column will display
«FAILING_NOW». If not, but the worst recorded value is less than or
equal to the threshold value, then this column will display
«In_the_past». If the «WHEN_FAILED» column has no entry (indicated by
a dash: ‘-‘) then this Attribute is OK now (not failing) and has
also never failed in the past.
The table column labeled «UPDATED» shows if the SMART Attribute values
are updated during both normal operation and off-line testing, or
only during offline testing. The former are labeled «Always» and the
latter are labeled «Offline».
So to summarize: the Raw Attribute values are the ones that might have
a real physical interpretation, such as «Temperature Celsius»,
«Hours», or «Start-Stop Cycles». Each manufacturer converts these,
using their detailed knowledge of the disk’s operations and failure
modes, to Normalized Attribute values in the range 1-254. The
current and worst (lowest measured) of these Normalized Attribute
values are stored on the disk, along with a Threshold value that the
manufacturer has determined will indicate that the disk is going to
fail, or that it has exceeded its design age or aging limit.
smartctl does not calculate any of the Attribute values,
thresholds, or types, it merely reports them from the SMART data on
the device.
Note that starting with ATA/ATAPI-4, revision 4, the meaning of these
Attribute fields has been made entirely vendor-specific. However most
ATA/ATAPI-5 disks seem to respect their meaning, so we have retained
the option of printing the Attribute values.
For SCSI devices the «attributes» are obtained from the temperature
and start-stop cycle counter log pages. Certain vendor specific
attributes are listed if recognised. The attributes are output in a
relatively free format (compared with ATA disk attributes).
Selective Self-Test Log [ATA only], or the Log Directory [ATA only].
The valid arguments to this option are:
error
— prints only the SMART error log. SMART disks maintain a log of the
most recent five non-trivial errors. For each of these errors, the
disk power-on lifetime at which the error occurred is recorded, as is
the device status (idle, standby, etc) at the time of the error. For
some common types of errors, the Error Register (ER) and Status
Register (SR) values are decoded and printed as text. The meanings of these
are:
   ABRT:  Command ABoRTed
   AMNF:  Address Mark Not Found
   CCTO:  Command Completion Timed Out
   EOM:   End Of Media
   ICRC:  Interface Cyclic Redundancy Code (CRC) error
   IDNF:  IDentity Not Found
   ILI:   (packet command-set specific)
   MC:    Media Changed
   MCR:   Media Change Request
   NM:    No Media
   obs:   obsolete
   TK0NF: TracK 0 Not Found
   UNC:   UNCorrectable Error in Data
   WP:    Media is Write Protected
In addition, up to the last five commands that preceded the error are
listed, along with a timestamp measured from the start of the
corresponding power cycle. This is displayed in the form
Dd+HH:MM:SS.msec where D is the number of days, HH is hours, MM is
minutes, SS is seconds and msec is milliseconds. [Note: this time
stamp wraps after 2^32 milliseconds, or 49 days 17 hours 2 minutes and
47.296 seconds.] The key ATA disk registers are also recorded in the
log. The final column of the error log is a text-string description
of the ATA command defined by the Command Register (CR) and Feature
Register (FR) values. Commands that are obsolete in the most current
(ATA-7) spec are listed like this: READ LONG (w/ retry) [OBS-4],
indicating that the command became obsolete with or in the ATA-4
specification. Similarly, the notation [RET-N] is
used to indicate that a command was retired in the ATA-N
specification. Some commands are not defined in any version of the
ATA specification but are in common use nonetheless; these are marked
[NS], meaning non-standard.
The ATA Specification (ATA-5 Revision 1c, Section 8.41.6.8.2) says:
«Error log structures shall include UNC errors, IDNF errors for
which the address requested was valid, servo errors, write fault
errors, etc. Error log data structures shall not include errors
attributed to the receipt of faulty commands such as command codes not
implemented by the device or requests with invalid parameters or
invalid addresses.» The definitions of these terms are:
UNC (UNCorrectable): data is uncorrectable. This refers
to data which has been read from the disk, but for which the Error
Checking and Correction (ECC) codes are inconsistent. In effect, this
means that the data can not be read.
IDNF (ID Not Found): user-accessible address could
not be found. For READ LOG type commands, IDNF can also indicate
that a device data log structure checksum was incorrect.
If the command that caused the error was a READ or WRITE command, then
the Logical Block Address (LBA) at which the error occurred will be
printed in base 10 and base 16. The LBA is a linear address, which
counts 512-byte sectors on the disk, starting from zero. (Because of
the limitations of the SMART error log, if the LBA is greater than
0xfffffff, then either no error log entry will be made, or the error
log entry will have an incorrect LBA. This may happen for drives with
a capacity greater than 128 GiB or 137 GB.) On Linux systems the
smartmontools web page has instructions about how to convert the LBA
address to the name of the disk file containing the erroneous disk
sector.
Please note that some manufacturers ignore the ATA
specifications, and make entries in the error log if the device
receives a command which is not implemented or is not valid.
error [SCSI]
— prints the error counter log pages for reads, write and verifies.
The verify row is only output if it has an element other than zero.
selftest
— prints the SMART self-test log. The disk maintains a self-test log
showing the results of the self tests, which can be run using the
‘-t’ option described below. For each of the most recent
twenty-one self-tests, the log shows the type of test (short or
extended, off-line or captive) and the final status of the test. If
the test did not complete successfully, then the percentage of the
test remaining is shown. The time at which the test took place,
measured in hours of disk lifetime, is also printed. If any errors
were detected, the Logical Block Address (LBA) of the first error is
printed in decimal notation. On Linux systems the smartmontools
web page has instructions about how to convert this LBA address to the
name of the disk file containing the erroneous block.
selftest [SCSI]
— the self-test log for a SCSI device has a slightly different format
than for an ATA device. For each of the most recent twenty
self-tests, it shows the type of test and the status (final or in
progress) of the test. SCSI standards use the terms «foreground» and
«background» (rather than ATA’s corresponding «captive» and
«off-line») and «short» and «long» (rather than ATA’s corresponding
«short» and «extended») to describe the type of the test. The printed
segment number is only relevant when a test fails in the third or
later test segment. It identifies the test that failed and consists
of either the number of the segment that failed during the test, or
the number of the test that failed and the number of the segment in
which the test was run, using a vendor-specific method of putting both
numbers into a single byte. The Logical Block Address (LBA) of the
first error is printed in hexadecimal notation. On Linux systems the
smartmontools web page has instructions about how to convert this LBA
address to the name of the disk file containing the erroneous block.
If provided, the SCSI Sense Key (SK), Additional Sense Code (ASC) and
Additional Sense Code Qualifier (ASQ) are also printed. The self tests
can be run using the ‘-t’ option described below (using the ATA
test terminology).
selective [ATA]
— Some ATA-7 disks (example: Maxtor) also maintain a selective
self-test log. Please see the ‘-t select’ option below for a
description of selective self-tests. The selective self-test log
shows the start/end Logical Block Addresses (LBA) of each of the five
test spans, and their current test status. If the span is being
tested or the remainder of the disk is being read-scanned, the
current 65536-sector block of LBAs being tested is also displayed.
The selective self-test log also shows if a read-scan of the
remainder of the disk will be carried out after the selective
self-test has completed (see ‘-t afterselect’ option) and the time
delay before restarting this read-scan if it is interrupted (see
‘-t pending’ option). This is a new smartmontools feature; please
report unusual or incorrect behavior to the smartmontools-support
mailing list.
directory
— if the device supports the General Purpose Logging feature set
(ATA-6 and ATA-7 only) then this prints the Log Directory (the log at
address 0). The Log Directory shows what logs are available and their
length in sectors (512 bytes). The contents of the logs at address 1
[Summary SMART error log] and at address 6 [SMART self-test log] may
be printed using the previously-described
error
and
selftest
arguments to this option. [Please note: this is a new, experimental
feature. We would like to add support for printing the contents of
extended and comprehensive SMART self-test and error logs. If your
disk supports these, and you would like to assist, please contact the
smartmontools developers.]
may be used multiple times. Valid arguments to this option are:
help
— Prints (to STDOUT) a list of all valid arguments to this option,
then exits.
9,minutes
— Raw Attribute number 9 is power-on time in minutes. Its raw value
will be displayed in the form «Xh+Ym». Here X is hours, and Y is
minutes in the range 0-59 inclusive. Y is always printed with two
digits, for example «06» or «31» or «00».
9,seconds
— Raw Attribute number 9 is power-on time in seconds. Its raw value
will be displayed in the form «Xh+Ym+Zs». Here X is hours, Y is
minutes in the range 0-59 inclusive, and Z is seconds in the range
0-59 inclusive. Y and Z are always printed with two digits, for
example «06» or «31» or «00».
9,halfminutes
— Raw Attribute number 9 is power-on time, measured in units of 30
seconds. This format is used by some Samsung disks. Its raw value
will be displayed in the form «Xh+Ym». Here X is hours, and Y is
minutes in the range 0-59 inclusive. Y is always printed with two
digits, for example «06» or «31» or «00».
9,temp
— Raw Attribute number 9 is the disk temperature in Celsius.
192,emergencyretractcyclect
— Raw Attribute number 192 is the Emergency Retract Cycle Count.
193,loadunload
— Raw Attribute number 193 contains two values. The first is the
number of load cycles. The second is the number of unload cycles.
The difference between these two values is the number of times that
the drive was unexpectedly powered off (also called an emergency
unload). As a rule of thumb, the mechanical stress created by one
emergency unload is equivalent to that created by one hundred normal
unloads.
194,10xCelsius
— Raw Attribute number 194 is ten times the disk temperature in
Celsius. This is used by some Samsung disks (example: model SV1204H
with RK100-13 firmware).
194,unknown
— Raw Attribute number 194 is NOT the disk temperature, and its
interpretation is unknown. This is primarily useful for the -P
(presets) option.
198,offlinescanuncsectorct
— Raw Attribute number 198 is the Offline Scan UNC Sector Count.
200,writeerrorcount
— Raw Attribute number 200 is the Write Error Count.
201,detectedtacount
— Raw Attribute number 201 is the Detected TA Count.
220,temp
— Raw Attribute number 220 is the disk temperature in Celsius.
Note: a table of hard drive models, listing which Attribute
corresponds to temperature, can be found at:
http://www.guzu.net/linux/hddtemp.db
N,raw8
— Print the Raw value of Attribute N as six 8-bit unsigned base-10
integers. This may be useful for decoding the meaning of the Raw
value. The form ‘N,raw8’ prints Raw values for ALL Attributes in this
form. The form (for example) ‘123,raw8’ only prints the Raw value for
Attribute 123 in this form.
N,raw16
— Print the Raw value of Attribute N as three 16-bit unsigned base-10
integers. This may be useful for decoding the meaning of the Raw
value. The form ‘N,raw16’ prints Raw values for ALL Attributes in this
form. The form (for example) ‘123,raw16’ only prints the Raw value for
Attribute 123 in this form.
N,raw48
— Print the Raw value of Attribute N as a 48-bit unsigned base-10
integer. This may be useful for decoding the meaning of the Raw
value. The form ‘N,raw48’ prints Raw values for ALL Attributes in
this form. The form (for example) ‘123,raw48’ only prints the Raw
value for Attribute 123 in this form.
and understood device firmware bug. The arguments to this option are
exclusive, so that only the final option given is used. The valid
values are:
none
— Assume that the device firmware obeys the ATA specifications. This
is the default, unless the device has presets for ‘-F’ in the
device database (see note below).
samsung
— In some Samsung disks (example: model SV4012H Firmware Version:
RM100-08) some of the two- and four-byte quantities in the SMART data
structures are byte-swapped (relative to the ATA specification).
Enabling this option tells smartctl to evaluate these quantities
in byte-reversed order. Some signs that your disk needs this option
are (1) no self-test log printed, even though you have run self-tests;
(2) very large numbers of ATA errors reported in the ATA error log;
(3) strange and impossible values for the ATA error log timestamps.
samsung2
— In more recent Samsung disks (firmware revisions ending in «-23»)
the number of ATA errors reported is byte swapped. Enabling this
option tells smartctl to evaluate this quantity in
byte-reversed order. An indication that your Samsung disk needs this
option is that the self-test log is printed correctly, but there are a
very large number of errors in the SMART error log. This is because
the error count is byte swapped. Thus a disk with five errors
(0x0005) will appear to have 20480 errors (0x5000).
Note that an explicit ‘-F’ option on the command line will
over-ride any preset values for ‘-F’ (see the ‘-P’ option
below).
are available for this drive. By default, if the drive is recognized
in the smartmontools database, then the presets are used.
smartctl can automatically set appropriate options for known
drives. For example, the Maxtor 4D080H4 uses Attribute 9 to stores
power-on time in minutes whereas most drives use that Attribute to
store the power-on time in hours. The command-line option ‘-v
9,minutes’ ensures that smartctl correctly interprets Attribute
9 in this case, but that option is preset for the Maxtor 4D080H4 and
so need not be specified by the user on the smartctl command
line.
The argument
show
will show any preset options for your drive and the argument
showall
will show all known drives in the smartmontools database, along
with their preset options. If there are no presets for your drive and
you think there should be (for example, a -v or -F option is needed
to get smartctl to display correct values) then please contact
the smartmontools developers so that this information can be
added to the smartmontools database. Contact information is at the
end of this man page.
The valid arguments to this option are:
use
— if a drive is recognized, then use the stored presets for it. This
is the default. Note that presets will NOT over-ride additional
Attribute interpretation (‘-v N,something’) command-line options or
explicit ‘-F’ command-line options..
ignore
— do not use presets.
show
— show if the drive is recognized in the database, and if so, its
presets, then exit.
showall
— list all recognized drives, and the presets that are set for them,
then exit.
The ‘-P showall’ option takes up to two optional arguments to
match a specific drive type and firmware version. The command:
smartctl -P showall
lists all entries, the command:
smartctl -P showall 'MODEL'
lists all entries matching MODEL, and the command:
smartctl -P showall 'MODEL' 'FIRMWARE'
lists all entries for this MODEL and a specific FIRMWARE version.
conjunction with this option to run the short or long (and also for
ATA devices, selective or conveyance) self-tests in captive mode
(known as «foreground mode» for SCSI devices). Note that only one
test type can be run at a time, so only one test type should be
specified per command line. Note also that if a computer is shutdown
or power cycled during a self-test, no harm should result. The
self-test will either be aborted or will resume automatically.
The valid arguments to this option are:
offline
— runs SMART Immediate Offline Test. This immediately
starts the test described above. This command can be given during
normal system operation. The effects of this test are visible only in
that it updates the SMART Attribute values, and if errors are
found they will appear in the SMART error log, visible with the ‘-l error’
option. [In the case of SCSI devices runs the default self test in
foreground. No entry is placed in the self test log.]
If the ‘-c’ option to smartctl shows that the device has the
«Suspend Offline collection upon new command» capability then you can
track the progress of the Immediate Offline test using the ‘-c’
option to smartctl. If the ‘-c’ option show that the device
has the «Abort Offline collection upon new command» capability then
most commands will abort the Immediate Offline Test, so you should not
try to track the progress of the test with ‘-c’, as it will abort
the test.
short
— runs SMART Short Self Test (usually under ten minutes).
[Note: in the case of SCSI devices,
this command option runs the «Background short» self-test.]
This command can be given during normal system operation (unless run in
captive mode — see the ‘-C’ option below). This is a
test in a different category than the immediate or automatic offline
tests. The «Self» tests check the electrical and mechanical
performance as well as the read performance of the disk. Their
results are reported in the Self Test Error Log, readable with
the ‘-l selftest’ option. Note that on some disks the progress of the
self-test can be monitored by watching this log during the self-test; with other disks
use the ‘-c’ option to monitor progress.
long
— runs SMART Extended Self Test (tens of minutes).
[Note: in the case of SCSI devices,
this command option runs the «Background long» self-test.]
This is a
longer and more thorough version of the Short Self Test described
above. Note that this command can be given during normal
system operation (unless run in captive mode — see the ‘-C’ option below).
conveyance
— [ATA ONLY] runs a SMART Conveyance Self Test (minutes). This
self-test routine is intended to identify damage incurred during
transporting of the device. This self-test routine should take on the
order of minutes to complete. Note that this command can be given
during normal system operation (unless run in captive mode — see the
‘-C’ option below).
select,N-M
— [ATA ONLY] [NEW EXPERIMENTAL SMARTCTL FEATURE] runs a SMART
Selective Self Test, to test a range of disk Logical Block
Addresses (LBAs), rather than the entire disk. Each range of LBAs
that is checked is called a «span» and is specified by a starting LBA
(N) and an ending LBA (M) with N less than or equal to M. For example
the command:
smartctl -t select,10-20 /dev/hda
runs a self test on one span consisting of LBAs ten to twenty
(inclusive). The ‘-t’ option can be given up to five times, to test
up to five spans. For example the command:
smartctl -t select,0-100 -t select,1000-2000 /dev/hda
runs a self test on two spans. The first span consists of 101 LBAs
and the second span consists of 1001 LBAs. Note that the spans can
overlap partially or completely, for example:
smartctl -t select,0-10 -t select,5-15 -t select,10-20 /dev/hda
The results of the selective self-test can be obtained (both during
and after the test) by printing the SMART self-test log, using the
‘-l selftest’ option to smartctl.
Selective self tests are particularly useful as disk capacities
increase: an extended self test (smartctl -t long) can take several
hours. Selective self-tests are helpful if (based on SYSLOG error
messages, previous failed self-tests, or SMART error log entries) you
suspect that a disk is having problems at a particular range of
Logical Block Addresses (LBAs).
Selective self-tests can be run during normal system operation (unless
done in captive mode — see the ‘-C’ option below).
[Note: this new experimental smartmontools feature is currently only
available under Linux. The Linux kernel must be compiled with the
configuration option CONFIG_IDE_TASKFILE_IO enabled. Please report
unusual or incorrect behavior to the smartmontools-support mailing
list.]
afterselect,on
— [ATA ONLY] perform an offline read scan after a Selective Self-test
has completed. This option must be used together with one or more of
the select,N-M options above. If the LBAs that have been
specified in the Selective self-test pass the test with no errors
found, then read scan the remainder of the disk. If the device
is powered-cycled while this read scan is in progress, the read scan
will be automatically resumed after a time specified by the pending
timer (see below). The value of this option is preserved between
selective self-tests.
afterselect,off
— [ATA ONLY] do not read scan the remainder of the disk after a
Selective self-test has completed. This option must be use together
with one or more of the select,N-M options above. The value of this
option is preserved between selective self-tests.
pending,N
— [ATA ONLY] set the pending offline read scan timer to N minutes.
Here N is an integer in the range from 0 to 65535 inclusive. If the
device is powered off during a read scan after a Selective self-test,
then resume the test automatically N minutes after power-up. This
option must be use together with one or more of the select,N-M
options above. The value of this option is preserved between selective
self-tests.
offline’ or if the ‘-t’ option is not used. [Note: in the case of
SCSI devices, this command option runs the self-test in «Foreground»
mode.]
WARNING: Tests run in captive mode may busy out the drive for the
length of the test. Only run captive tests on drives without any
mounted partitions!
command will abort the Offline Immediate Test routine only if your
disk has the «Abort Offline collection upon new command» capability.
If you would like to understand better how SMART works, and what it
does, a good place to start is with Sections 4.8 and 6.54 of the first
volume of the ‘AT Attachment with Packet Interface-7’ (ATA/ATAPI-7)
specification. This documents the SMART functionality which the
smartmontools utilities provide access to. You can find
Revision 4b of this document at
http://www.t13.org/docs2004/d1532v1r4b-ATA-ATAPI-7.pdf .
Earlier and later versions of this Specification are available from
the T13 web site http://www.t13.org/ .
The functioning of SMART was originally defined by the SFF-8035i
revision 2 and the SFF-8055i revision 1.4 specifications. These are
publications of the Small Form Factors (SFF) Committee. Links to
these documents may be found in the References section of the
smartmontools home page at
http://smartmontools.sourceforge.net/ .
I have this drive attached to a raspi that, all of the sudden, became extremely slow. On another site, someone recommended to run smartctl -a /dev/sdc but I don’t know what I’m looking at and how to fix it (if possible at all)
$ sudo smartctl -a /dev/sdc
smartctl 6.6 2016-05-31 r4324 [armv7l-linux-4.14.62-v7+] (local build)
Copyright (C) 2002-16, Bruce Allen, Christian Franke, www.smartmontools.org

=== START OF INFORMATION SECTION ===
Model Family:     Seagate Barracuda 7200.14 (AF)
Device Model:     ST2000DM001-1E6164
Serial Number:    W1E66VJ8
LU WWN Device Id: 5 000c50 03d263f01
Firmware Version: SC48
User Capacity:    2,000,398,934,016 bytes [2.00 TB]
Sector Sizes:     512 bytes logical, 4096 bytes physical
Rotation Rate:    7200 rpm
Form Factor:      3.5 inches
Device is:        In smartctl database [for details use: -P show]
ATA Version is:   ATA8-ACS T13/1699-D revision 4
SATA Version is:  SATA 3.0, 6.0 Gb/s (current: 3.0 Gb/s)
Local Time is:    Wed Sep 12 23:34:28 2018 CEST
SMART support is: Available - device has SMART capability.
SMART support is: Enabled

Read SMART Data failed: Connection timed out

=== START OF READ SMART DATA SECTION ===
SMART Status command failed: Connection timed out
SMART overall-health self-assessment test result: UNKNOWN!
SMART Status, Attributes and Thresholds cannot be read.

SMART Error Log Version: 1
ATA Error Count: 620 (device log contains only the most recent five errors)
        CR = Command Register [HEX]
        FR = Features Register [HEX]
        SC = Sector Count Register [HEX]
        SN = Sector Number Register [HEX]
        CL = Cylinder Low Register [HEX]
        CH = Cylinder High Register [HEX]
        DH = Device/Head Register [HEX]
        DC = Device Command Register [HEX]
        ER = Error register [HEX]
        ST = Status register [HEX]
Powered_Up_Time is measured from power on, and printed as
DDd+hh:mm:SS.sss where DD=days, hh=hours, mm=minutes,
SS=sec, and sss=millisec. It "wraps" after 49.710 days.

Error 620 occurred at disk power-on lifetime: 37859 hours (1577 days + 11 hours)
  When the command that caused the error occurred, the device was active or idle.

  After command completion occurred, registers were:
  ER ST SC SN CL CH DH
  -- -- -- -- -- -- --
  40 51 00 ff ff ff 0f  Error: UNC at LBA = 0x0fffffff = 268435455

  Commands leading to the command that caused the error were:
  CR FR SC SN CL CH DH DC   Powered_Up_Time  Command/Feature_Name
  -- -- -- -- -- -- -- --  ----------------  --------------------
  25 00 08 ff ff ff 4f 00      00:28:57.935  READ DMA EXT
  25 00 08 ff ff ff 4f 00      00:28:49.641  READ DMA EXT
  25 00 08 ff ff ff 4f 00      00:28:49.021  READ DMA EXT
  25 00 08 ff ff ff 4f 00      00:28:48.238  READ DMA EXT
  25 00 08 ff ff ff 4f 00      00:28:48.084  READ DMA EXT

Error 619 occurred at disk power-on lifetime: 37859 hours (1577 days + 11 hours)
  When the command that caused the error occurred, the device was active or idle.

  After command completion occurred, registers were:
  ER ST SC SN CL CH DH
  -- -- -- -- -- -- --
  40 51 00 ff ff ff 0f  Error: UNC at LBA = 0x0fffffff = 268435455

  Commands leading to the command that caused the error were:
  CR FR SC SN CL CH DH DC   Powered_Up_Time  Command/Feature_Name
  -- -- -- -- -- -- -- --  ----------------  --------------------
  25 00 08 ff ff ff 4f 00      00:28:57.935  READ DMA EXT
  25 00 08 ff ff ff 4f 00      00:28:49.641  READ DMA EXT
  25 00 08 ff ff ff 4f 00      00:28:49.021  READ DMA EXT
  25 00 08 ff ff ff 4f 00      00:28:48.238  READ DMA EXT
  25 00 08 ff ff ff 4f 00      00:28:48.084  READ DMA EXT

Error 618 occurred at disk power-on lifetime: 37859 hours (1577 days + 11 hours)
  When the command that caused the error occurred, the device was active or idle.

  After command completion occurred, registers were:
  ER ST SC SN CL CH DH
  -- -- -- -- -- -- --
  40 51 00 ff ff ff 0f  Error: UNC at LBA = 0x0fffffff = 268435455

  Commands leading to the command that caused the error were:
  CR FR SC SN CL CH DH DC   Powered_Up_Time  Command/Feature_Name
  -- -- -- -- -- -- -- --  ----------------  --------------------
  25 00 08 ff ff ff 4f 00      00:28:49.641  READ DMA EXT
  25 00 08 ff ff ff 4f 00      00:28:49.021  READ DMA EXT
  25 00 08 ff ff ff 4f 00      00:28:48.238  READ DMA EXT
  25 00 08 ff ff ff 4f 00      00:28:48.084  READ DMA EXT
  25 00 08 ff ff ff 4f 00      00:28:48.083  READ DMA EXT

Error 617 occurred at disk power-on lifetime: 37859 hours (1577 days + 11 hours)
  When the command that caused the error occurred, the device was active or idle.

  After command completion occurred, registers were:
  ER ST SC SN CL CH DH
  -- -- -- -- -- -- --
  40 51 00 ff ff ff 0f  Error: UNC at LBA = 0x0fffffff = 268435455

  Commands leading to the command that caused the error were:
  CR FR SC SN CL CH DH DC   Powered_Up_Time  Command/Feature_Name
  -- -- -- -- -- -- -- --  ----------------  --------------------
  25 00 08 ff ff ff 4f 00      00:28:49.641  READ DMA EXT
  25 00 08 ff ff ff 4f 00      00:28:49.021  READ DMA EXT
  25 00 08 ff ff ff 4f 00      00:28:48.238  READ DMA EXT
  25 00 08 ff ff ff 4f 00      00:28:48.084  READ DMA EXT
  25 00 08 ff ff ff 4f 00      00:28:48.083  READ DMA EXT

Error 616 occurred at disk power-on lifetime: 37859 hours (1577 days + 11 hours)
  When the command that caused the error occurred, the device was active or idle.

  After command completion occurred, registers were:
  ER ST SC SN CL CH DH
  -- -- -- -- -- -- --
  40 51 00 ff ff ff 0f  Error: UNC at LBA = 0x0fffffff = 268435455

  Commands leading to the command that caused the error were:
  CR FR SC SN CL CH DH DC   Powered_Up_Time  Command/Feature_Name
  -- -- -- -- -- -- -- --  ----------------  --------------------
  25 00 08 ff ff ff 4f 00      00:27:28.523  READ DMA EXT
  25 00 08 ff ff ff 4f 00      00:27:25.103  READ DMA EXT
  25 00 08 ff ff ff 4f 00      00:27:25.102  READ DMA EXT
  25 00 08 ff ff ff 4f 00      00:27:25.102  READ DMA EXT
  25 00 08 ff ff ff 4f 00      00:27:25.101  READ DMA EXT

SMART Self-test log structure revision number 1
No self-tests have been logged.  [To run self-tests, use: smartctl -t]

Selective Self-tests/Logging not supported

pi@soul:/media/d $ sudo smartctl -t /dev/sdc
smartctl 6.6 2016-05-31 r4324 [armv7l-linux-4.14.62-v7+] (local build)
Copyright (C) 2002-16, Bruce Allen, Christian Franke, www.smartmontools.org

=======> INVALID ARGUMENT TO -t: /dev/sdc
=======> VALID ARGUMENTS ARE: offline, short, long, conveyance, force, vendor,N, select,M-N, pending,N, afterselect,[on|off] <=======

Use smartctl -h to get a usage summary
sudo smartctl -x /dev/sdc
smartctl 6.6 2016-05-31 r4324 [armv7l-linux-4.14.62-v7+] (local build)
Copyright (C) 2002-16, Bruce Allen, Christian Franke, www.smartmontools.org

=== START OF INFORMATION SECTION ===
Model Family:     Seagate Barracuda 7200.14 (AF)
Device Model:     ST2000DM001-1E6164
Serial Number:    W1E66VJ8
LU WWN Device Id: 5 000c50 03d263f01
Firmware Version: SC48
User Capacity:    2,000,398,934,016 bytes [2.00 TB]
Sector Sizes:     512 bytes logical, 4096 bytes physical
Rotation Rate:    7200 rpm
Form Factor:      3.5 inches
Device is:        In smartctl database [for details use: -P show]
ATA Version is:   ATA8-ACS T13/1699-D revision 4
SATA Version is:  SATA 3.0, 6.0 Gb/s (current: 3.0 Gb/s)
Local Time is:    Wed Sep 12 23:39:37 2018 CEST
SMART support is: Available - device has SMART capability.
SMART support is: Enabled
AAM feature is:   Unavailable
APM level is:     128 (minimum power consumption without standby)
Rd look-ahead is: Enabled
Write cache is:   Enabled
ATA Security is:  Disabled, NOT FROZEN [SEC1]
Wt Cache Reorder: Unavailable

Read SMART Data failed: Connection timed out

=== START OF READ SMART DATA SECTION ===
SMART Status command failed: Connection timed out
SMART overall-health self-assessment test result: UNKNOWN!
SMART Status, Attributes and Thresholds cannot be read.

General Purpose Log Directory Version 1
SMART           Log Directory Version 1 [multi-sector log support]
Address    Access  R/W   Size  Description
0x00       GPL,SL  R/O      1  Log Directory
0x01           SL  R/O      1  Summary SMART error log
0x02           SL  R/O      5  Comprehensive SMART error log
0x03       GPL     R/O      5  Ext. Comprehensive SMART error log
0x06           SL  R/O      1  SMART self-test log
0x07       GPL     R/O      1  Extended self-test log
0x09           SL  R/W      1  Selective self-test log
0x11       GPL     R/O      1  SATA Phy Event Counters log
0x21       GPL     R/O      1  Write stream error log
0x22       GPL     R/O      1  Read stream error log
0x80-0x9f  GPL,SL  R/W     16  Host vendor specific log
0xa1       GPL,SL  VS      20  Device vendor specific log
0xa2       GPL     VS    4496  Device vendor specific log
0xa8       GPL,SL  VS     129  Device vendor specific log
0xa9       GPL,SL  VS       1  Device vendor specific log
0xab       GPL     VS       1  Device vendor specific log
0xb0       GPL     VS    5176  Device vendor specific log
0xbd       GPL     VS     512  Device vendor specific log
0xbe-0xbf  GPL     VS   65535  Device vendor specific log
0xc0       GPL,SL  VS       1  Device vendor specific log
0xc1       GPL,SL  VS      10  Device vendor specific log
0xe0       GPL,SL  R/W      1  SCT Command/Status
0xe1       GPL,SL  R/W      1  SCT Data Transfer

SMART Extended Comprehensive Error Log Version: 1 (5 sectors)
Device Error Count: 620 (device log contains only the most recent 20 errors)
        CR     = Command Register
        FEATR  = Features Register
        COUNT  = Count (was: Sector Count) Register
        LBA_48 = Upper bytes of LBA High/Mid/Low Registers ]  ATA-8
        LH     = LBA High (was: Cylinder High) Register    ]   LBA
        LM     = LBA Mid (was: Cylinder Low) Register      ] Register
        LL     = LBA Low (was: Sector Number) Register     ]
        DV     = Device (was: Device/Head) Register
        DC     = Device Control Register
        ER     = Error register
        ST     = Status register
Powered_Up_Time is measured from power on, and printed as
DDd+hh:mm:SS.sss where DD=days, hh=hours, mm=minutes,
SS=sec, and sss=millisec. It "wraps" after 49.710 days.

Error 620 [19] occurred at disk power-on lifetime: 37859 hours (1577 days + 11 hours)
  When the command that caused the error occurred, the device was active or idle.

  After command completion occurred, registers were:
  ER -- ST COUNT  LBA_48  LH LM LL DV DC
  -- -- -- == -- == == == -- -- -- -- --
  40 -- 51 00 00 00 00 3c 6c 41 40 00 00  Error: UNC at LBA = 0x3c6c4140 = 1013727552

  Commands leading to the command that caused the error were:
  CR FEATR COUNT  LBA_48  LH LM LL DV DC  Powered_Up_Time  Command/Feature_Name
  -- == -- == -- == == == -- -- -- -- --  ---------------  --------------------
  25 00 00 00 08 00 00 3c 6c 41 40 40 00     00:28:57.935  READ DMA EXT
  25 00 00 00 08 00 00 3c 6c 41 40 40 00     00:28:49.641  READ DMA EXT
  25 00 00 00 08 00 00 3c 6c 41 38 40 00     00:28:49.021  READ DMA EXT
  25 00 00 00 08 00 00 3c 6c 40 68 40 00     00:28:48.238  READ DMA EXT
  25 00 00 00 08 00 00 3c 6c 40 60 40 00     00:28:48.084  READ DMA EXT

Error 619 [18] occurred at disk power-on lifetime: 37859 hours (1577 days + 11 hours)
  When the command that caused the error occurred, the device was active or idle.

  After command completion occurred, registers were:
  ER -- ST COUNT  LBA_48  LH LM LL DV DC
  -- -- -- == -- == == == -- -- -- -- --
  40 -- 51 00 00 00 00 3c 6c 41 40 00 00  Error: UNC at LBA = 0x3c6c4140 = 1013727552

  Commands leading to the command that caused the error were:
  CR FEATR COUNT  LBA_48  LH LM LL DV DC  Powered_Up_Time  Command/Feature_Name
  -- == -- == -- == == == -- -- -- -- --  ---------------  --------------------
  25 00 00 00 08 00 00 3c 6c 41 40 40 00     00:28:57.935  READ DMA EXT
  25 00 00 00 08 00 00 3c 6c 41 40 40 00     00:28:49.641  READ DMA EXT
  25 00 00 00 08 00 00 3c 6c 41 38 40 00     00:28:49.021  READ DMA EXT
  25 00 00 00 08 00 00 3c 6c 40 68 40 00     00:28:48.238  READ DMA EXT
  25 00 00 00 08 00 00 3c 6c 40 60 40 00     00:28:48.084  READ DMA EXT

Error 618 [17] occurred at disk power-on lifetime: 37859 hours (1577 days + 11 hours)
  When the command that caused the error occurred, the device was active or idle.

  After command completion occurred, registers were:
  ER -- ST COUNT  LBA_48  LH LM LL DV DC
  -- -- -- == -- == == == -- -- -- -- --
  40 -- 51 00 00 00 00 3c 6c 41 40 00 00  Error: UNC at LBA = 0x3c6c4140 = 1013727552

  Commands leading to the command that caused the error were:
  CR FEATR COUNT  LBA_48  LH LM LL DV DC  Powered_Up_Time  Command/Feature_Name
  -- == -- == -- == == == -- -- -- -- --  ---------------  --------------------
  25 00 00 00 08 00 00 3c 6c 41 40 40 00     00:28:49.641  READ DMA EXT
  25 00 00 00 08 00 00 3c 6c 41 38 40 00     00:28:49.021  READ DMA EXT
  25 00 00 00 08 00 00 3c 6c 40 68 40 00     00:28:48.238  READ DMA EXT
  25 00 00 00 08 00 00 3c 6c 40 60 40 00     00:28:48.084  READ DMA EXT
  25 00 00 00 08 00 00 3c 6c 40 58 40 00     00:28:48.083  READ DMA EXT

Error 617 [16] occurred at disk power-on lifetime: 37859 hours (1577 days + 11 hours)
  When the command that caused the error occurred, the device was active or idle.

  After command completion occurred, registers were:
  ER -- ST COUNT  LBA_48  LH LM LL DV DC
  -- -- -- == -- == == == -- -- -- -- --
  40 -- 51 00 00 00 00 3c 6c 41 40 00 00  Error: UNC at LBA = 0x3c6c4140 = 1013727552

  Commands leading to the command that caused the error were:
  CR FEATR COUNT  LBA_48  LH LM LL DV DC  Powered_Up_Time  Command/Feature_Name
  -- == -- == -- == == == -- -- -- -- --  ---------------  --------------------
  25 00 00 00 08 00 00 3c 6c 41 40 40 00     00:28:49.641  READ DMA EXT
  25 00 00 00 08 00 00 3c 6c 41 38 40 00     00:28:49.021  READ DMA EXT
  25 00 00 00 08 00 00 3c 6c 40 68 40 00     00:28:48.238  READ DMA EXT
  25 00 00 00 08 00 00 3c 6c 40 60 40 00     00:28:48.084  READ DMA EXT
  25 00 00 00 08 00 00 3c 6c 40 58 40 00     00:28:48.083  READ DMA EXT

Error 616 [15] occurred at disk power-on lifetime: 37859 hours (1577 days + 11 hours)
  When the command that caused the error occurred, the device was active or idle.

  After command completion occurred, registers were:
  ER -- ST COUNT  LBA_48  LH LM LL DV DC
  -- -- -- == -- == == == -- -- -- -- --
  40 -- 51 00 00 00 00 3c 69 fa 70 00 00  Error: UNC at LBA = 0x3c69fa70 = 1013578352

  Commands leading to the command that caused the error were:
  CR FEATR COUNT  LBA_48  LH LM LL DV DC  Powered_Up_Time  Command/Feature_Name
  -- == -- == -- == == == -- -- -- -- --  ---------------  --------------------
  25 00 00 00 08 00 00 3c 69 fa 70 40 00     00:27:28.523  READ DMA EXT
  25 00 00 00 08 00 00 3c 69 fa 70 40 00     00:27:25.103  READ DMA EXT
  25 00 00 00 08 00 00 3c 69 fa 68 40 00     00:27:25.102  READ DMA EXT
  25 00 00 00 08 00 00 3c 69 fa 60 40 00     00:27:25.102  READ DMA EXT
  25 00 00 00 08 00 00 3c 69 fa 58 40 00     00:27:25.101  READ DMA EXT

Error 615 [14] occurred at disk power-on lifetime: 37859 hours (1577 days + 11 hours)
  When the command that caused the error occurred, the device was active or idle.

  After command completion occurred, registers were:
  ER -- ST COUNT  LBA_48  LH LM LL DV DC
  -- -- -- == -- == == == -- -- -- -- --
  40 -- 51 00 00 00 00 3c 69 fa 70 00 00  Error: UNC at LBA = 0x3c69fa70 = 1013578352

  Commands leading to the command that caused the error were:
  CR FEATR COUNT  LBA_48  LH LM LL DV DC  Powered_Up_Time  Command/Feature_Name
  -- == -- == -- == == == -- -- -- -- --  ---------------  --------------------
  25 00 00 00 08 00 00 3c 69 fa 70 40 00     00:27:28.523  READ DMA EXT
  25 00 00 00 08 00 00 3c 69 fa 70 40 00     00:27:25.103  READ DMA EXT
  25 00 00 00 08 00 00 3c 69 fa 68 40 00     00:27:25.102  READ DMA EXT
  25 00 00 00 08 00 00 3c 69 fa 60 40 00     00:27:25.102  READ DMA EXT
  25 00 00 00 08 00 00 3c 69 fa 58 40 00     00:27:25.101  READ DMA EXT

Error 614 [13] occurred at disk power-on lifetime: 37859 hours (1577 days + 11 hours)
  When the command that caused the error occurred, the device was active or idle.

  After command completion occurred, registers were:
  ER -- ST COUNT  LBA_48  LH LM LL DV DC
  -- -- -- == -- == == == -- -- -- -- --
  40 -- 51 00 00 00 00 3c 69 fa 70 00 00  Error: UNC at LBA = 0x3c69fa70 = 1013578352

  Commands leading to the command that caused the error were:
  CR FEATR COUNT  LBA_48  LH LM LL DV DC  Powered_Up_Time  Command/Feature_Name
  -- == -- == -- == == == -- -- -- -- --  ---------------  --------------------
  25 00 00 00 08 00 00 3c 69 fa 70 40 00     00:27:25.103  READ DMA EXT
  25 00 00 00 08 00 00 3c 69 fa 68 40 00     00:27:25.102  READ DMA EXT
  25 00 00 00 08 00 00 3c 69 fa 60 40 00     00:27:25.102  READ DMA EXT
  25 00 00 00 08 00 00 3c 69 fa 58 40 00     00:27:25.101  READ DMA EXT
  25 00 00 00 08 00 00 3c 69 fa 50 40 00     00:27:25.100  READ DMA EXT

Error 613 [12] occurred at disk power-on lifetime: 37859 hours (1577 days + 11 hours)
  When the command that caused the error occurred, the device was active or idle.

  After command completion occurred, registers were:
  ER -- ST COUNT  LBA_48  LH LM LL DV DC
  -- -- -- == -- == == == -- -- -- -- --
  40 -- 51 00 00 00 00 3c 69 fa 70 00 00  Error: UNC at LBA = 0x3c69fa70 = 1013578352

  Commands leading to the command that caused the error were:
  CR FEATR COUNT  LBA_48  LH LM LL DV DC  Powered_Up_Time  Command/Feature_Name
  -- == -- == -- == == == -- -- -- -- --  ---------------  --------------------
  25 00 00 00 08 00 00 3c 69 fa 70 40 00     00:27:25.103  READ DMA EXT
  25 00 00 00 08 00 00 3c 69 fa 68 40 00     00:27:25.102  READ DMA EXT
  25 00 00 00 08 00 00 3c 69 fa 60 40 00     00:27:25.102  READ DMA EXT
  25 00 00 00 08 00 00 3c 69 fa 58 40 00     00:27:25.101  READ DMA EXT
  25 00 00 00 08 00 00 3c 69 fa 50 40 00     00:27:25.100  READ DMA EXT

SMART Extended Self-test Log Version: 1 (1 sectors)
No self-tests have been logged.  [To run self-tests, use: smartctl -t]

Selective Self-tests/Logging not supported

SCT Status Version:                  3
SCT Version (vendor specific):       522 (0x020a)
SCT Support Level:                   1
Device State:                        Active (0)
Current Temperature:                    45 Celsius
Power Cycle Min/Max Temperature:     40/47 Celsius
Lifetime    Min/Max Temperature:     18/58 Celsius
Under/Over Temperature Limit Count:   0/0

SCT Data Table command not supported

SCT Error Recovery Control command not supported

Device Statistics (GP/SMART Log 0x04) not supported

SATA Phy Event Counters (GP Log 0x11)
ID      Size     Value  Description
0x000a  2          911  Device-to-host register FISes sent due to a COMRESET
0x0001  2            0  Command failed due to ICRC error
0x0003  2            0  R_ERR response for device-to-host data FIS
0x0004  2            0  R_ERR response for host-to-device data FIS
0x0006  2            0  R_ERR response for device-to-host non-data FIS
0x0007  2            0  R_ERR response for host-to-device non-data FIS