When performing a Git rebase, I often find myself in the situation where I have one or more merge conflicts. This is how I resolve these merge conflicts.
Note: When resolving a git rebase merge conflict, Git will open your text editor to modify your commit message. By default, Git uses Vim which is not the most user friendly editor. I suggest you set Git to use your preferred editor (see how to set your Git commit message editor).
What is a Merge Conflict
In Git Rebase with Blocks, we looked at how rebasing:
- finds the most recent common commit between the two branches
- temporarily removes any newer commit(s) from our branch
- updates our branch to match the branch the other branch
- then re-applies our temporarily removed commit(s)
When we re-apply our temporarily removed commits, they are being re-applied to code that may have changed.
Imagine if the commit being re-applied renamed a function but due to the rebase that function no longer exists. Git can not automatically determine how to apply this commit, so a merge conflict is created.
Example of a Merge Conflict
We create a text file (letters.txt) with letters in alphabetical order. We add the letter “A” in a commit and then we add the letter “B” in another commit.
(main)
B
A
We decide to create a new branch (called feat/d) in order to introduce our new feature (the letter “D”).
(main)     (feat/d*)
           D
B          B
A          A
Based on this we could do a fast-forward merge of feat/d into main (because main is an ancestor of feat/d).
Unfortunately, someone has already added another commit to main while we were working on our branch.
(main)     (feat/d*)
C          D
B          B
A          A
Rebasing our Feature Branch
Now we can’t do a fast-forward merge (because the latest commit on main, D does not appear in our feat/d branch), so we run git rebase main on our feat/d branch to bring it up to date.
(main)     (feat/d*)
           D

C          C
B          B
A          A
but when we try to re-apply our D commit, Git doesn’t know if the letter “D” goes before or after “C”.
CONFLICT (content): Merge conflict in letters.txt
error: could not apply 163fe29... D
Resolve all conflicts manually, mark them as resolved with
"git add/rm <conflicted_files>", then run "git rebase --continue".
You can instead skip this commit: run "git rebase --skip".
To abort and get back to the state before "git rebase", run "git rebase --abort".
Could not apply 163fe29... D
Now if we look inside letters.txt, we’ll see a section that looks like this
<<<<<<< HEAD
C
=======
D
>>>>>>> 163fe29... D
Note: Some browsers (e.g. Visual Studio Code) provide additional UI options to assist with resolving merge conflicts.

Branches During our Merge Conflict
Our merge conflict occurred at this moment where we’ve added commit C to our feat/d branch but we’ve not yet re-applied our commit D.
(main)     (feat/d*)
           D

C          C
B          B
A          A
Looking again at the merge conflict in our file, we can see our two different versions. In the top half (labeled HEAD) we can see how this code appears in commit the branch thus far (at the moment of commit C).
In the bottom half, we see how the code appears in our temporarily removed commit D (which has a commit hash of 163fe29).
<<<<<<< HEAD
C
=======
D
>>>>>>> 163fe29... D
Fixing Our Code
Using these two different versions of the code, it is our job to modify the code as needed. Sometimes this involves keeping one block and discarding the other block. In our case, we need the information from both blocks put in the correct order (and removing the Git marker lines).
C
D
Resolving Our Merge Conflict
Stage Our Changes
Once our code is fixed, we add it to our staged changes with
git add letters.txt
Review Our Changes
We can review our changes with
git diff --staged
Remember we are trying to re-apply our commit C but it didn’t apply cleanly (Git couldn’t figure out how to apply it). Now we’ve made changes to D, we are previewing this new version of our commit D.
Note: A single commit can have multiple merge conflicts and they all must be resolved before we move on. Previewing the commit (with git diff --staged) allows us to verify there are no unresolved merge conflicts.
Apply Our Updated Commit
We apply our updated commit with
git rebase --continue
Now our feat/d branch has our updated D' commit, which contains the code after our merge conflict was resolved.
(main)     (feat/D*)
           D'
C          C
B          B
A          A
Multiple Commits with Merge Conflicts
If our branch has multiple commits that need to be temporarily removed and then re-applied during the rebase, we may have to resolve multiple merge conflicts (one each time a commit is re-applied). The secret to rebasing multiple commits is viewing the current commit message during the rebase conflict.
One advantage a merge commit has over performing a rebase is you only have to resolve the merge commit one time (rather than once for each commit).
Update Remote
By default, the git push command only adds new commits to a remote branch (e.g. on GitHub).
Because we have rewritten history, we need to overwrite the remote branch (rather than just add commits). To do this we add --force-with-lease to our git push.
git push --force-with-lease
Merge Conflict
Often you will encounter merge conflicts while doing rebase operation as described above.
Here, is a example merge conflict error:
$ git rebase -i --onto remotes/m/release-stable  a62bcf1  remotes/xyz/dev-stable-topic

error: could not apply 0f783bb... Fixing issues with to xyz ioctls for data transfer.

When you have resolved this problem, run "git rebase --continue".

If you prefer to skip this patch, run "git rebase --skip" instead. To check out the original branch and stop rebasing, run "git rebase --abort".

Recorded preimage for 'abc_xyz.c'

Could not apply 0f748bb638803d23c34a0b63e3d83f81e4d81ea9... Fixing issues with to xyz ioctls for data transfer.
The above lines above are saying the below:
- While applying the patch with hash 0f783bb there were merge conflicts. The headline of the patch can be seen as “Fixing issues with to xyz ioctls for data transfer.”
- Manually resolve the conflict.
- After resolving the merge conflict run the command git rebase –continue.
- Alternatively you can skip this patch with “git rebase –skip”.
- You can also, abort the whole rebase operation with “git rebase –abort”.
Merge Conflict Resolution
To handle this we will now do the below:
See which file has the conflict
$ git status

interactive rebase in progress; onto fca9ecc

Last command done (1 command done): pick 0f783bb Fixing issues with to xyz ioctls for data transfer.

Next commands to do (6 remaining commands):
pick 7c51caa Fixing audio broken issue
pick ef652d4 Example patch for demonstration purposes.

(use "git rebase --edit-todo" to view and edit)

You are currently rebasing.

(fix conflicts and then run "git rebase --continue")
(use "git rebase --skip" to skip this patch)
(use "git rebase --abort" to check out the original branch)

Unmerged paths:
(use "git reset HEAD ..." to unstage)
(use "git add ..." to mark resolution)
both modified: xyz_abc.c
no changes added to commit (use "git add" and/or "git commit -a")
Most important line is the below:
both modified: xyz_abc.c
This says the file which has got into the merge conflict is xyz_abc.c. Now let’s open the file and see what the conflict is.
I prefer vim edit for viewing you can use any other edit of your choice.
Git indicates a conflict with the below marker called conflict marker:
<<<<<<< HEAD : file.c
I am a reason for merge conflict.
=======
I am another reason for merge conflict.
>>>>>>> xyzabc:file.c
The lines between <<<<<<< and ====== is what you already had locally and the lines between ======= and >>>>>>> is what is in the remote.
Now, all you have to do is to decide which part of the code is desirable after the merge. Sometimes it maybe as simple as just removing what is already in the old file and taking the ones from the new file. For example, if I am merging file A, version X into version Y, then ideally version X should override whatever in version Y. But life is not that simple and the situation can much more worse than that. So decide what you want in the final version and modify the file accordingly. There should be no conflict marker left in the final version (once the conflict has been resolved).
Once, you have resolved the merge conflict, save and exit the VIM editor.
git add

git commit -m "Commit message."
In the previous article, I explain how to merge branches. In this article, I explain how git rebase works.
What is rebase
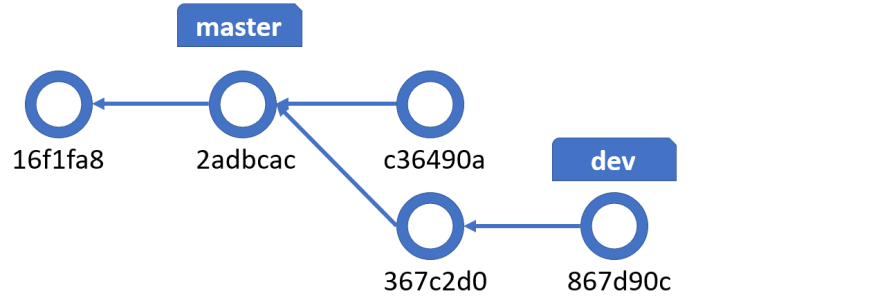
Rebase is restart branching from certain point. For example, If I create dev branch from master right now, it looks like below.

Then I create commits in dev branch.

But someone introduced change in master.
Now I want to rebase from the latest commit of the master.

The reason I put ??????? to commit id is that we already know the id should be different now as commit file contains different data.
Check the current log and prepare for test
At the moment, my git log looks like below.
gitDeepDive> git log --oneline --graph
*   a3d0879 (HEAD -> master) Merge branch 'dev'
|
| * 867d90c (dev) update hello.txt
| * 367c2d0 Update news
* | c36490a update docs
|/
* 2adbcac (test) Add doc folder and files
* 16f1fa8 commit hello.txt
Let’s reset master branch to previous commit.
gitDeepDive> git switch master
Already on 'master'
gitDeepDive> git reset --hard c36490a
HEAD is now at c36490a update docs
gitDeepDive> git log --oneline --graph --all
* c36490a (HEAD -> master) update docs
| * 867d90c (dev) update hello.txt
| * 367c2d0 Update news
|/
* 2adbcac (test) Add doc folder and files
* 16f1fa8 commit hello.txt
Rebase
I rebase the dev branch. So I need to go to dev branch first.
Then I run git rebase command. As I rebase from the last commit of master, I can do git rebase master but I explicitly specify the commit id instead to illustrate that we can rebase from certain commit.
I see conflict error. Let’s a closer look now.
gitDeepDive> git rebase c36490a
error: could not apply 367c2d0... Update news
Resolve all conflicts manually, mark them as resolved with
"git add/rm <conflicted_files>", then run "git rebase --continue".
You can instead skip this commit: run "git rebase --skip".
To abort and get back to the state before "git rebase", run "git rebase --abort".
Could not apply 367c2d0... Update news
Auto-merging docs/news.txt
CONFLICT (content): Merge conflict in docs/news.txt
It says «could not apply 367c2d0… Update news». This means git try to apply the changes of commit 367c2d0 to create new commit. Let’s resolve the conflict. I simply take both changes here.

Once I resolved news.txt conflict, continue the rebase. I can edit the commit message. I simply accept default message and completed but I have another conflict.
gitDeepDive> git rebase --continue                                                        [detached HEAD 8bd3445] Update news
 1 file changed, 1 insertion(+)
error: could not apply 867d90c... update hello.txt
Resolve all conflicts manually, mark them as resolved with
"git add/rm <conflicted_files>", then run "git rebase --continue".
You can instead skip this commit: run "git rebase --skip".
To abort and get back to the state before "git rebase", run "git rebase --abort".
Could not apply 867d90c... update hello.txt
Auto-merging hello.txt
CONFLICT (content): Merge conflict in hello.txt
It says «could not apply 867d90c… update hello.txt». git apply next commit 867d90c on top of current commit. Simply resolve the conflict and continue.
gitDeepDive> git rebase --continue                                                        [detached HEAD 43df8ff] update hello.txt
 1 file changed, 2 insertions(+)
Successfully rebased and updated refs/heads/dev.
Let’s check the log now.
gitDeepDive> git log --oneline --graph --all
* 43df8ff (HEAD -> dev) update hello.txt
* 8bd3445 Update news
* c36490a (master) update docs
* 2adbcac (test) Add doc folder and files
* 16f1fa8 commit hello.txt

So this is exactly what I wanted.
How to redo the rebase
I sometimes need to «redo» the rebase if I mistake on conflict resolution. As git doesn’t delete objects items immediately, I still can go back to original state. Simply reset to original commit id will do the undo.
gitDeepDive> git reset 867d90c
Unstaged changes after reset:
M       docs/news.txt
M       hello.txt
gitDeepDive> git log --oneline --graph --all
* c36490a (master) update docs                                                            | * 867d90c (HEAD -> dev) update hello.txt
| * 367c2d0 Update news
|/
* 2adbcac (test) Add doc folder and files
* 16f1fa8 commit hello.txt
As you can see, it simply updates the commit id information in ..gitrefsheadsdev.
From here, I can do rebase again. If you really want to remove any orphaned objects, do git prune afterward but I usually don’t.
Why people confuse rebase
This time, it was easy as there are only two commits to apply and each commit has different conflict. However, in real world scenario, I may need to keep resolving the same file again and again, as I keep updating the same file for each commit.
The reason why git have to apply each commit one by one, rather than apply the latest commit is to keep the history.
Squash commits
If you don’t need all the commit history, you can «squash» commits. By squashing, I can create another commit which has all the changes in certain ranges.
I will create new commit which contains both 367c2d0 and 867d90c.

Make sure to reset to commit 867d90c on dev branch.
gitDeepDive> git switch dev
Switched to branch 'dev'
gitDeepDive> git reset --hard 867d90c
HEAD is now at 867d90c update hello.txt
gitDeepDive> git log --oneline --graph --all
* c36490a (master) update docs
| * 867d90c (HEAD -> dev) update hello.txt
| * 367c2d0 Update news
|/
* 2adbcac (test) Add doc folder and files
* 16f1fa8 commit hello.txt
gitDeepDive>
Now run rebase with -i parameter and specify 2adbcac as rebase commit id.
git opens an editor to let me decide how I want to treat each commit. I have many options here.

I mark «squash» for the commit 867d90c so that I can combine this into 367c2d0.

Once I save the file, git open another editor so that I can edit commit message. I just accept the default one. Once rebase completed, check the log.
gitDeepDive> git log --oneline --graph --all
* 6a695b7 (HEAD -> dev) Update news                                                       | * c36490a (master) update docs                                                          |/
* 2adbcac (test) Add doc folder and files
* 16f1fa8 commit hello.txt
As I explained new commit is created. When I dig into commit file, I can see newly created commit and original commit reference same blob. I only check hello.txt here but you can check news.txt and article.txt
gitDeepDive> git cat-file -p edbfe82
040000 tree 2baf027b74c551817c2a5ef6a3472ccc8e99738c    docs
100644 blob 7a218e826670e77d05c1c244b514a7f449056752    hello.txt
gitDeepDive> git cat-file -p 867d90c
tree edbfe822158fb3be005aca22897a0395fa2c9252
parent 367c2d000be0ffbb640252384c820ce472fe32a4
author Kenichiro Nakamura <kenakamu@microsoft.com> 1588842488 +0900
committer Kenichiro Nakamura <kenakamu@microsoft.com> 1588842488 +0900

update hello.txt
gitDeepDive> git cat-file -p edbfe82
040000 tree 2baf027b74c551817c2a5ef6a3472ccc8e99738c    docs
100644 blob 7a218e826670e77d05c1c244b514a7f449056752    hello.txt
Now my commit chain looks like this.

Of course we can do rebase from c36490a rather than 2adbcac. Try it by yourself to see how it works.
Summary
Rebase is nothing special from git point of view, but as it may apply multiple commits one by one, it maybe a bit confusing. I explain cherry-pick in the next article.
Go to next article
Chapter 4. Undoing and Editing Commits
In Chapter 3, we discussed staging changes in the index for inclusion in the next commit. This chapter is about undoing or correcting changes once youâve committed them.
With centralized version control, committing and publishing a change are the same thing: as soon as you commit to the shared repository, others can see and start using your changes. This makes undoing a commit problematic; how do you retract a commit others have already checked out or merged?
With Git, however, this is not a problem, since you are committing to your own private repository. You are free to delete or change your local commits as you please, and Git gives you the tools to do that; publishing those commits is a separate action, via pushing to shared repository or asking others to pull from yours.
Changing already published commits is awkward, of course, since it would cause others to lose history they already have; Git will warn people pulling from you of that, and you might not even be allowed to push such changes to a shared repository. The extra step afforded by Git is crucial, though: by separating committing and publishing, it allows you to use version control freely for your own purposes as you work, then clean up your commits for public consumption before publishing them.
Note that most of the techniques discussed in this chapter only make sense when the portion of history involved is linear; that is, contains no merge commits. We will discuss techniques for editing a branched history in Chapter 10.
Note
Technically, you canât âchangeâ a commit. Because of content-based addressing, if you change anything about a commit, it becomes a different commit, since it now has a different object ID. So when we speak of changing a commit, we really mean replacing it with one having corrected attributes or contents. But since the intention is to change the history, itâs convenient to use this phrasing, and weâll do so.
Changing the Last Commit
The most common correction to make is to the previous commit: you run git commit, and then realize you made a mistakeâperhaps you forgot to include a new file, or left out some comments. This common situation is also the easiest one to address. Thereâs no preparatory step; just make whatever corrections you need, adding these to the index as usual. Then use this command:
$ git commit --amend
Git will present you with the previous commit message to edit if you like; then, it simply discards the previous commit and puts a new one in its place, with your corrections. You can add -C HEAD if you want to reuse the previous commit message as-is.
The --amend feature is a good example of how Gitâs internal organization makes many operations very easy, both to implement and to understand. The tip commit on the current branch has a pointer to the previous commit, its parent; that is all that links it to the rest of the branch. In particular, no commits point to this one, so no other commits are affected (recall that commits point to their parents, but not to their children). Thus, discarding the tip commit consists only of moving the branch pointer backward to the previous one; nothing else need be done. Eventually, if the discarded commit remains disconnected from the commit graph, Git will delete it from the object database as part of periodic garbage collection.
Having dropped the previous commit, the repository state you want to change and re-commit would appear to be lostâ¦but no: thereâs another copy of it in the index, since that commit was made from the current index. So you simply modify the index as desired, and commit again.
Although we described it in terms of a linear history, git commit --amend works with merge commits as well; then there are multiple parents and branches involved instead of just one, but it operates analogously.
Fixing a Commit Message
If you use git commit --amend without making any changes to the index, Git still allows you to edit the commit message if you like, or you can give the new message with the -m option. This still requires replacing the last commit, since the message text is part of the commit; the new commit will just have the same content (point to the same tree) as the previous one.
Double Oops!
Suppose youâre having an off day and, having committed and then amended that commit, you suddenly realize that you just lost some information from the first commit that you didnât mean to. You would appear to be out of luck: that commit has been discarded, and unless you happen to have its object ID, you have no way to refer to it, even though itâs still in the object database. Git has a feature to save you, though, called the reflog:
$ git log -g
The git log command, which we will discuss in Chapter 9, normally shows the history of your project via portions of the commit graph. The -g option shows something entirely different, however. For each branch, Git maintains a log of operations performed while on that branch, called its âreflog.â Recall that a branch is just a ref pointing to the tip commit of the branch; each ref can have a log recording its referents over time. git log -g displays a composite reflog, starting with the current branch and chaining back through commands that switch branches, such as git checkout. For example:
$ git log -g
e674ab77 HEAD@{0}: commit (amend): Digital Restrictioâ¦
965dfda4 HEAD@{1}: commit: Digital Rights Management
dd31deb3 HEAD@{2}: commit: Mozart
3307465c HEAD@{3}: commit: Beethoven
6273a3b0 HEAD@{4}: merge topic: Fast-forward
d77b78fa HEAD@{5}: checkout: moving from sol to master
6273a3b0 HEAD@{6}: commit: amalthea
2ee20b94 HEAD@{7}: pull: Merge made by the 'recursiveâ¦
d77b78fa HEAD@{8}: checkout: moving from master to sol
1ad385f2 HEAD@{9}: commit (initial): Anfang
The reflog shows the sequence of operations performed: commit, pull, checkout, merge, etc. The notation branch@{n} refers to a numbered entry in the reflog for branch; in this case HEAD, the current branch. The crucial thing for us, though, is the first column of object IDs: each one names the commit that was the branch tip after the operation on that line was completed. Thus, when I made the commit for entry #1 in this reflog, with the comment âDigital Rights Management,â the branch moved to commit 965dfda4, which means this is the ID for that commit. After I used git commit --amend to fix the commit message, the branch looked like this:
$ git log
e674ab77 Digital Restrictions Management
dd31deb3 Mozart
3307465c Beethoven
...
Commit 965dfda4 is absent, removed from the history, but the reflog retains a record of it. You can use git show 965dfda4 to view the diff for that commit and recover the missing information, or git checkout 965dfda4 to move your working tree to that state, if thatâs more convenient.
See Names Relative to the Reflog for more about the reflog.
Discarding the Last Commit
Suppose you make a commit, but then decide that you werenât ready to do that. You donât have a specific fix to make, as with git commit --amend; you just want to âuncommitâ and continue working. This is simple; just do:
$ git reset HEAD~
Unstaged changes after reset:
M       Zeus
M       Adonis
git reset is a versatile command, with several modes and actions. It always moves the head of the current branch to a given commit, but differs in how it treats the working tree and index; in this usage, it updates the index but leaves the working tree alone. The HEAD ref refers to the tip of current branch as always, and the trailing tilde names the commit prior to that one (see Chapter 8). Thus, the effect of this command is to move the branch back one commit, discarding the latest one (but you can still recover it via reflog, as before). Since it also resets the index to match, any corresponding changes in your working tree are now unstaged again, which Git reports as shown along with any other outstanding changes (the M is for âmodifiedâ; it may also show A for âadded,â D for âdeleted,â and so on).
Discarding Any Number of Commits
In the foregoing description, the only thing limiting the action to âthe last commitâ is the expression HEAD~; it works just as well to discard any number of consecutive commits at the end of a branch. This action is sometimes called ârewinding the branch.â For example, to discard three commits resetting the branch tip to the fourth commit back, do:
$ git reset HEAD~3
HEAD~3 refers to the fourth commit back, because this numbering syntax starts at zero; HEAD and HEAD~0 are equivalent.
When discarding more than one commit, some further options to git reset become useful:
--mixed
- The default: makes the index match the given commit, but does not change the working files. Changes made since the last commit appear unstaged.
--soft
- This resets the branch tip only, and does not change the index; the discarded commitâs changes remain staged. You might use this to stage all the changes from several previous commits, and then reapply them as a single commit.
--merge
- Tries to keep your outstanding file changes while rewinding the branch, where this makes sense: files with unstaged changes are kept, while files differing between HEAD and the given commit are updated. If there is overlap between those sets, the reset fails.
--hard
-
Resets your working files to match the given commit, as well as the index. Any changes youâve made since the discarded commit are permanently lost, so be careful with this option! Resist the urge to make an alias or shortcut for using
git reset --hard; you will probably regret it.
Undoing a Commit
Suppose you want to undo the effect of an earlier commitâyou donât want to edit the history to do this, but rather make a new commit undoing the earlier commitâs changes. The command git revert makes this easy; just give it the commit you want to undo:
$ git revert 9c6a1fad
This will compute the diff between that commit and the previous one, reverse it, and then attempt to apply that to your working tree (you may have merge conflicts to resolve if intervening changes complicate doing that automatically). Git will prepare a commit message indicating the commit being reverted and its subject, which you can edit.
Partial Undo
If you only want to undo some of the changes from an earlier commit, you can use a combination of commands weâve seen before:
$ git revert -n commit
$ git reset
$ git add -p
$ git commit
$ git checkout .
The -n option to git revert tells Git to apply and stage the reverted changes, but stop short of making a commit. You then unstage all the changes with git reset, and restage only those you want using the interactive git add -p. Finally, after committing the subset of changes you want, you discard the rest by checking out the contents of the index, overwriting the remaining applied changes from git revert.
Plain git revert will complain if you have staged changes in the index (that is, the index does not match the HEAD commit), since its purpose is to make a new commit based on the one to be reverted, and it would lose your changes if it reset the index in order to do that. git revert -n, though, will not complain about that, since it is not making a commit.
Note that if the commit youâre reverting deleted a file, then this will add it back. After git reset though, the recovered file will appear as âuntrackedâ to Git, and git add -p will not see it; youâll have to add it again separately, if itâs one of the changes you want to make (git add --interactive (-i) can help with that; itâs more general, and git add -p is actually a commonly used subcommand of it). Similarly, the final checkout will not remove a restored file that you chose not to add; youâll have to remove it yourself. You can use git reset --hard or git clean, but be careful not to accidentally remove other untracked files or revert other working tree changes you may have.
Editing a Series of Commits
git commit --amend is nice, but what if you want to change a commit that is now a few steps back in your history? Since each commit refers to the one preceding it, changing one means all the following commits must be replaced, even if you donât need to make any other changes to them. The --amend feature works as simply as it does precisely because there are no following commits to consider.
In fact, Git allows you to edit any linear sequence of commits leading up to a branch tipânot only with regard to their messages and contents, but also to rearrange them, remove some, collapse some together or split some into further commits. The feature to use is git rebase. Rebasing is a general technique intended to move a branch from one location to another, and we will consider it more fully in Rebasing. While moving a branch, however, it also lets you use a very general âsequence editorâ to transform the branch at the same time (with the option --interactive (-i)), and that is the feature we want here. This command:
$ git rebase -i HEAD~n
rewrites the last n commits on the current branch. It does in fact ask Git to âmoveâ the branch, but the destination is the same as the starting point, so the branch location does not actually change, and you get to use the sequence editor to alter commits as you like in the process.
In response to this command, Git starts your editor and presents a one-line description of each commit in the range indicated, like so:
# action commit-ID subject
pick 51090ce fix bug #1234
pick 15f4720 edit man pages for spelling and grammar
pick 9b0e3dc add prototypes for the 'frobnitz' module
pick 583bb4e fix null pointer (We are not strong.)
pick 45a9484 update README
Watch out: the order here is that in which the commits were made (and in which they will be remade), which is generally the opposite of what you would see from git log, which uses reverse chronological order (most recent commit first).
Now edit the first column, the action, to tell Git what you want to do with each commit. The available actions are:
pick
- Use the commit as-is. Git will not stop for this commit unless there is a conflict.
reword
- Change just the commit message. Git allows you to edit the message before reapplying this commit.
edit
-
Change the commit contents (and message, if you want). Here, Git stops after remaking this commit and allows you to do whatever you want. The usual thing is to use
gitcommit --amendto replace the commit, thengit rebase--continueto let Git continue with the rebase operation. However, you could also insert further commits, perhaps splitting the original changes up into several smaller commits. Git simply picks up from where you leave off, with the next change you asked it to make.
squash
-
Make this commitâs changes part of the preceding one. To meld several consecutive commits into one, leave the first one marked
pickand mark the remaining ones withsquash. Git concatenates all the commit messages for you to edit.
fixup
-
Like
squash, but discard the message of this commit when composing the composite message.
You can abbreviate an action to just its initial letter, such as r for reword. You can also reorder the lines to make the new commits in a different order, or remove a commit entirely by deleting its line. If you want to cancel the rebase, just save a file with no action lines; Git will abort if it finds nothing to do. It will not abort if you just leave the directions as you found them, but the result will be the same in this simple case, since Git will find it does not need to remake any commits in order to follow the directions (which say to use each commit as-is with pick). At any point when Git stops, you can abort the entire process and return to your previous state with git rebase --abort.
Conflicts
Itâs possible to ask for changes that invalidate the existing commits. For example: if one commit adds a file and a later commit changes that file, and you reverse the order of these commits, then Git cannot apply the new first patch, since it says to alter a file that doesnât yet exist. Also, patches to existing files rely on context, which may change if you edit the contents of earlier commits. In this case, Git will stop, indicate the problem, and ask you to resolve the conflict before proceeding. For example:
error: could not apply fcff9f72... (commit message)

When you have resolved this problem, run "git rebase
--continue".  If you prefer to skip this patch, run
"git rebase --skip" instead.  To check out the
original branch and stop rebasing, run "git rebase
--abort".

Could not apply fcff9f7... (commit message)
Here, Git uses the same mechanism for indicating conflicts as when performing a merge; see Merge Conflicts for details on how to examine and resolve them. When youâre done, as indicated above, just run git rebase --continue to make the now-repaired commit, and move on to the next edit.
Tip
When you ask to edit a commit, Git stops after making the commit, and you use git commit --amend to replace it before going on. When thereâs a conflict, however, Git cannot make all the requested changes, so it stops before making the commit (having made and staged whatever changes it can, and marked the conflicts for you to resolve). When you continue after resolving the conflicts, Git will then make the current commit. You do not commit yourself or use the --amend feature when fixing a conflict.
The exec Action
There is actually another action, exec, but you would not edit an existing line in the rebase instructions to use it as with the other actions, since it does not say to do anything with a commit; rather, the rest of the line is a just shell command for Git to run. A typical use for this is to test the preceding commit in some way, to make sure you havenât accidentally broken the content; you might add exec make test, for example, to run an automated software test. Git will stop if an exec command exits with a nonzero status. You can also give a single command with the git rebase --exec option, which will be run after every commit; this is a shortcut for inserting that same exec line after every commit in the sequencer directions.