Merge conflicts occur when competing changes are made to the same line of a file, or when one person edits a file and another person deletes the same file. For more information, see «About merge conflicts.»
Tip: You can use the conflict editor on GitHub to resolve competing line change merge conflicts between branches that are part of a pull request. For more information, see «Resolving a merge conflict on GitHub.»
Competing line change merge conflicts
To resolve a merge conflict caused by competing line changes, you must choose which changes to incorporate from the different branches in a new commit.
For example, if you and another person both edited the file styleguide.md on the same lines in different branches of the same Git repository, you’ll get a merge conflict error when you try to merge these branches. You must resolve this merge conflict with a new commit before you can merge these branches.
-
Open TerminalTerminalGit Bash.
-
Navigate into the local Git repository that has the merge conflict.
cd REPOSITORY-NAME -
Generate a list of the files affected by the merge conflict. In this example, the file styleguide.md has a merge conflict.
$ git status > # On branch branch-b > # You have unmerged paths. > # (fix conflicts and run "git commit") > # > # Unmerged paths: > # (use "git add ..." to mark resolution) > # > # both modified: styleguide.md > # > no changes added to commit (use "git add" and/or "git commit -a") -
Open your favorite text editor, such as Visual Studio Code, and navigate to the file that has merge conflicts.
-
To see the beginning of the merge conflict in your file, search the file for the conflict marker
<<<<<<<. When you open the file in your text editor, you’ll see the changes from the HEAD or base branch after the line<<<<<<< HEAD. Next, you’ll see=======, which divides your changes from the changes in the other branch, followed by>>>>>>> BRANCH-NAME. In this example, one person wrote «open an issue» in the base or HEAD branch and another person wrote «ask your question in IRC» in the compare branch orbranch-a.If you have questions, please <<<<<<< HEAD open an issue ======= ask your question in IRC. >>>>>>> branch-a -
Decide if you want to keep only your branch’s changes, keep only the other branch’s changes, or make a brand new change, which may incorporate changes from both branches. Delete the conflict markers
<<<<<<<,=======,>>>>>>>and make the changes you want in the final merge. In this example, both changes are incorporated into the final merge:If you have questions, please open an issue or ask in our IRC channel if it's more urgent. -
Add or stage your changes.
$ git add . -
Commit your changes with a comment.
$ git commit -m "Resolved merge conflict by incorporating both suggestions."
You can now merge the branches on the command line or push your changes to your remote repository on GitHub and merge your changes in a pull request.
Removed file merge conflicts
To resolve a merge conflict caused by competing changes to a file, where a person deletes a file in one branch and another person edits the same file, you must choose whether to delete or keep the removed file in a new commit.
For example, if you edited a file, such as README.md, and another person removed the same file in another branch in the same Git repository, you’ll get a merge conflict error when you try to merge these branches. You must resolve this merge conflict with a new commit before you can merge these branches.
-
Open TerminalTerminalGit Bash.
-
Navigate into the local Git repository that has the merge conflict.
cd REPOSITORY-NAME -
Generate a list of the files affected by the merge conflict. In this example, the file README.md has a merge conflict.
$ git status > # On branch main > # Your branch and 'origin/main' have diverged, > # and have 1 and 2 different commits each, respectively. > # (use "git pull" to merge the remote branch into yours) > # You have unmerged paths. > # (fix conflicts and run "git commit") > # > # Unmerged paths: > # (use "git add/rm ..." as appropriate to mark resolution) > # > # deleted by us: README.md > # > # no changes added to commit (use "git add" and/or "git commit -a") -
Open your favorite text editor, such as Visual Studio Code, and navigate to the file that has merge conflicts.
-
Decide if you want keep the removed file. You may want to view the latest changes made to the removed file in your text editor.
To add the removed file back to your repository:
$ git add README.mdTo remove this file from your repository:
$ git rm README.md > README.md: needs merge > rm 'README.md' -
Commit your changes with a comment.
$ git commit -m "Resolved merge conflict by keeping README.md file."
> [branch-d 6f89e49] Merge branch 'branch-c' into branch-d
You can now merge the branches on the command line or push your changes to your remote repository on GitHub and merge your changes in a pull request.
Further reading
- «About merge conflicts»
- «Checking out pull requests locally»
Обычно выполнять слияния в Git довольно легко.
Git упрощает повторные слияния с одной и той же веткой, таким образом, позволяя вам иметь очень долго живущую ветку, и вы можете сохранять ее всё это время в актуальном состоянии, часто разрешая маленькие конфликты, а не доводить дело до одного большого конфликта по завершению всех изменений.
Однако, иногда всё же будут возникать сложные конфликты.
В отличие от других систем управления версиями, Git не пытается быть слишком умным при разрешении конфликтов слияния.
Философия Git заключается в том, чтобы быть умным, когда слияние разрешается однозначно, но если возникает конфликт, он не пытается сумничать и разрешить его автоматически.
Поэтому, если вы слишком долго откладываете слияние двух быстрорастущих веток, вы можете столкнуться с некоторыми проблемами.
В этом разделе мы рассмотрим некоторые из возможных проблем и инструменты, которые предоставляет Git, чтобы помочь вам справиться с этими более сложными ситуациями.
Мы также рассмотрим некоторые другие нестандартные типы слияний, которые вы можете выполнять, и вы узнаете как можно откатить уже выполненные слияния.
Конфликты слияния
Мы рассказали некоторые основы разрешения конфликтов слияния в Основные конфликты слияния, для работы с более сложными конфликтами Git предоставляет несколько инструментов, которые помогут вам понять, что произошло и как лучше обойтись с конфликтом.
Во-первых, если есть возможность, перед слиянием, в котором может возникнуть конфликт, позаботьтесь о том, чтобы ваша рабочая копия была без локальных изменений.
Если у вас есть несохранённые наработки, либо припрячьте их, либо сохраните их во временной ветке.
Таким образом, вы сможете легко отменить любые изменения, которые сделаете в рабочем каталоге.
Если при выполнении слияния вы не сохраните сделанные изменения, то некоторые из описанных ниже приёмов могут привести к утрате этих наработок.
Давайте рассмотрим очень простой пример.
Допустим, у нас есть файл с исходниками на Ruby, выводящими на экран строку ‘hello world’.
#! /usr/bin/env ruby

def hello
  puts 'hello world'
end

hello()
В нашем репозитории, мы создадим новую ветку по имени whitespace и выполним замену всех окончаний строк в стиле Unix на окончания строк в стиле DOS.
Фактически, изменения будут внесены в каждую строку, но изменятся только пробельные символы.
Затем мы заменим строку «hello world» на «hello mundo».
$ git checkout -b whitespace
Switched to a new branch 'whitespace'

$ unix2dos hello.rb
unix2dos: converting file hello.rb to DOS format ...
$ git commit -am 'Convert hello.rb to DOS'
[whitespace 3270f76] Convert hello.rb to DOS
 1 file changed, 7 insertions(+), 7 deletions(-)

$ vim hello.rb
$ git diff -b
diff --git a/hello.rb b/hello.rb
index ac51efd..e85207e 100755
--- a/hello.rb
+++ b/hello.rb
@@ -1,7 +1,7 @@
 #! /usr/bin/env ruby

 def hello
-  puts 'hello world'
+  puts 'hello mundo'^M
 end

 hello()

$ git commit -am 'Use Spanish instead of English'
[whitespace 6d338d2] Use Spanish instead of English
 1 file changed, 1 insertion(+), 1 deletion(-)
Теперь мы переключимся обратно на ветку master и добавим к функции некоторую документацию.
$ git checkout master
Switched to branch 'master'

$ vim hello.rb
$ git diff
diff --git a/hello.rb b/hello.rb
index ac51efd..36c06c8 100755
--- a/hello.rb
+++ b/hello.rb
@@ -1,5 +1,6 @@
 #! /usr/bin/env ruby

+# prints out a greeting
 def hello
   puts 'hello world'
 end

$ git commit -am 'Add comment documenting the function'
[master bec6336] Add comment documenting the function
 1 file changed, 1 insertion(+)
Теперь мы попытаемся слить в текущую ветку whitespace и в результате получим конфликты, так как изменились пробельные символы.
$ git merge whitespace
Auto-merging hello.rb
CONFLICT (content): Merge conflict in hello.rb
Automatic merge failed; fix conflicts and then commit the result.
Прерывание слияния
В данный момент у нас есть несколько вариантов дальнейших действий.
Во-первых, давайте рассмотрим как выйти из этой ситуации.
Если вы, возможно, не были готовы к конфликтам и на самом деле не хотите связываться с ними, вы можете просто отменить попытку слияния, используя команду git merge --abort.
$ git status -sb
## master
UU hello.rb

$ git merge --abort

$ git status -sb
## master
Эта команда пытается откатить ваше состояние до того, что было до запуска слияния.
Завершиться неудачно она может только в случаях, если перед запуском слияния у вас были не припрятанные или не зафиксированные изменения в рабочем каталоге, во всех остальных случаях всё будет хорошо.
Если по каким-то причинам вы обнаружили себя в ужасном состоянии и хотите просто начать всё сначала, вы можете также выполнить git reset --hard HEAD (либо вместо HEAD указав то, куда вы хотите откатиться).
Но помните, что это откатит все изменения в рабочем каталоге, поэтому удостоверьтесь, что никакие из них вам не нужны.
Игнорирование пробельных символов
В данном конкретном случае конфликты связаны с пробельными символами.
Мы знаем это, так как это простой пример, но в реальных ситуациях это также легко определить при изучении конфликта, так как каждая строка в нем будет удалена и добавлена снова.
По умолчанию Git считает все эти строки изменёнными и поэтому не может слить файлы.
Стратегии слияния, используемой по умолчанию, можно передать аргументы, и некоторые из них предназначены для соответствующей настройки игнорирования изменений пробельных символов.
Если вы видите, что множество конфликтов слияния вызваны пробельными символами, то вы можете прервать слияние и запустить его снова, но на этот раз с опцией -Xignore-all-space или -Xignore-space-change.
Первая опция игнорирует изменения в любом количестве существующих пробельных символов, вторая игнорирует вообще все изменения пробельных символов.
$ git merge -Xignore-space-change whitespace
Auto-merging hello.rb
Merge made by the 'recursive' strategy.
 hello.rb | 2 +-
 1 file changed, 1 insertion(+), 1 deletion(-)
Поскольку в этом примере реальные изменения файлов не конфликтуют, то при игнорировании изменений пробельных символов всё сольётся хорошо.
Это значительно облегчает жизнь, если кто-то в вашей команде любит временами заменять все пробелы на табуляции или наоборот.
Ручное слияние файлов
Хотя Git довольно хорошо обрабатывает пробельные символы, с другими типами изменений он не может справиться автоматически, но существуют другие варианты исправления.
Например, представим, что Git не умеет обрабатывать изменения пробельных символов и нам нужно сделать это вручную.
То что нам действительно нужно — это перед выполнением самого слияния прогнать сливаемый файл через программу dos2unix.
Как мы будем делать это?
Во-первых, мы перейдём в состояние конфликта слияния.
Затем нам необходимо получить копии нашей версии файла, их версии файла (из ветки, которую мы сливаем) и общей версии (от которой ответвились первые две).
Затем мы исправим либо их версию, либо нашу и повторим слияние только для этого файла.
Получить эти три версии файла, на самом деле, довольно легко.
Git хранит все эти версии в индексе в разных «состояниях», каждое из которых имеет ассоциированный с ним номер.
Состояние 1 — это общий предок, состояние 2 — ваша версия и состояния 3 взято из MERGE_HEAD — версия, которую вы сливаете («их» версия).
Вы можете извлечь копию каждой из этих версий конфликтующего файла с помощью команды git show и специального синтаксиса.
$ git show :1:hello.rb > hello.common.rb
$ git show :2:hello.rb > hello.ours.rb
$ git show :3:hello.rb > hello.theirs.rb
Если вы хотите что-то более суровое, то можете также воспользоваться служебной командой ls-files -u для получения SHA-1 хешей для каждого из этих файлов.
$ git ls-files -u
100755 ac51efdc3df4f4fd328d1a02ad05331d8e2c9111 1	hello.rb
100755 36c06c8752c78d2aff89571132f3bf7841a7b5c3 2	hello.rb
100755 e85207e04dfdd5eb0a1e9febbc67fd837c44a1cd 3	hello.rb
Выражение :1:hello.rb является просто сокращением для поиска такого SHA-1 хеша.
Теперь, когда в нашем рабочем каталоге присутствует содержимое всех трёх состояний, мы можем вручную исправить их, чтобы устранить проблемы с пробельными символами и повторно выполнить слияние с помощью малоизвестной команды git merge-file, которая делает именно это.
$ dos2unix hello.theirs.rb
dos2unix: converting file hello.theirs.rb to Unix format ...

$ git merge-file -p
    hello.ours.rb hello.common.rb hello.theirs.rb > hello.rb

$ git diff -b
diff --cc hello.rb
index 36c06c8,e85207e..0000000
--- a/hello.rb
+++ b/hello.rb
@@@ -1,8 -1,7 +1,8 @@@
  #! /usr/bin/env ruby

 +# prints out a greeting
  def hello
-   puts 'hello world'
+   puts 'hello mundo'
  end

  hello()
Теперь у нас есть корректно слитый файл.
На самом деле, данный способ лучше, чем использование опции ignore-all-space, так как в его рамках вместо игнорирования изменений пробельных символов перед слиянием выполняется корректное исправление таких изменений.
При слиянии с ignore-all-space мы в результате получим несколько строк с окончаниями в стиле DOS, то есть в одном файле смешаются разные стили окончания строк.
Если перед коммитом изменений вы хотите посмотреть какие в действительности были различия между состояниями, то можете воспользоваться командой git diff, сравнивающей содержимое вашего рабочего каталога, которое будет зафиксировано как результат слияния, с любым из трёх состояний.
Давайте посмотрим на все эти сравнения.
Чтобы сравнить результат слияния с тем, что было в вашей ветке до слияния, или другими словами увидеть, что привнесло данное слияние, вы можете выполнить git diff --ours
$ git diff --ours
* Unmerged path hello.rb
diff --git a/hello.rb b/hello.rb
index 36c06c8..44d0a25 100755
--- a/hello.rb
+++ b/hello.rb
@@ -2,7 +2,7 @@

 # prints out a greeting
 def hello
-  puts 'hello world'
+  puts 'hello mundo'
 end

 hello()
Итак, здесь мы можем легко увидеть что же произошло с нашей веткой, какие изменения в действительности внесло слияние в данный файл — изменение только одной строки.
Если вы хотите узнать чем результат слияния отличается от сливаемой ветки, то можете выполнить команду git diff --theirs.
В этом и следующем примере мы используем опцию -w для того, чтобы не учитывать изменения в пробельных символах, так как мы сравниваем результат с тем, что есть в Git, а не с нашим исправленным файлом hello.theirs.rb.
$ git diff --theirs -b
* Unmerged path hello.rb
diff --git a/hello.rb b/hello.rb
index e85207e..44d0a25 100755
--- a/hello.rb
+++ b/hello.rb
@@ -1,5 +1,6 @@
 #! /usr/bin/env ruby

+# prints out a greeting
 def hello
   puts 'hello mundo'
 end
И, наконец, вы можете узнать как изменился файл по сравнению сразу с обеими ветками с помощью команды git diff --base.
$ git diff --base -b
* Unmerged path hello.rb
diff --git a/hello.rb b/hello.rb
index ac51efd..44d0a25 100755
--- a/hello.rb
+++ b/hello.rb
@@ -1,7 +1,8 @@
 #! /usr/bin/env ruby

+# prints out a greeting
 def hello
-  puts 'hello world'
+  puts 'hello mundo'
 end

 hello()
В данный момент мы можем использовать команду git clean для того, чтобы удалить не нужные более дополнительные файлы, созданные нами для выполнения слияния.
$ git clean -f
Removing hello.common.rb
Removing hello.ours.rb
Removing hello.theirs.rb
Использование команды checkout в конфликтах
Возможно, нас по каким-то причинам не устраивает необходимость выполнения слияния в текущий момент, или мы не можем хорошо исправить конфликт и нам необходимо больше информации.
Давайте немного изменим пример.
Предположим, что у нас есть две долгоживущих ветки, каждая из которых имеет несколько коммитов, что при слиянии приводит к справедливому конфликту.
$ git log --graph --oneline --decorate --all
* f1270f7 (HEAD, master) Update README
* 9af9d3b Create README
* 694971d Update phrase to 'hola world'
| * e3eb223 (mundo) Add more tests
| * 7cff591 Create initial testing script
| * c3ffff1 Change text to 'hello mundo'
|/
* b7dcc89 Initial hello world code
У нас есть три уникальных коммита, которые присутствуют только в ветке master и три других, которые присутствуют в ветке mundo.
Если мы попытаемся слить ветку mundo, то получим конфликт.
$ git merge mundo
Auto-merging hello.rb
CONFLICT (content): Merge conflict in hello.rb
Automatic merge failed; fix conflicts and then commit the result.
Мы хотели бы увидеть в чем состоит данный конфликт.
Если мы откроем конфликтующий файл, то увидим нечто подобное:
#! /usr/bin/env ruby

def hello
<<<<<<< HEAD
  puts 'hola world'
=======
  puts 'hello mundo'
>>>>>>> mundo
end

hello()
В обеих сливаемых ветках в этот файл было добавлено содержимое, но в некоторых коммитах изменялись одни и те же строки, что и привело к конфликту.
Давайте рассмотрим несколько находящихся в вашем распоряжении инструментов, которые позволяют определить как возник этот конфликт.
Возможно, не понятно как именно вы должны исправить конфликт и вам требуется больше информации.
Полезным в данном случае инструментом является команда git checkout с опцией --conflict.
Она заново выкачает файл и заменит маркеры конфликта.
Это может быть полезно, если вы хотите восстановить маркеры конфликта и попробовать разрешить его снова.
В качестве значения опции --conflict вы можете указывать diff3 или merge (последнее значение используется по умолчанию).
Если вы укажете diff3, Git будет использовать немного другую версию маркеров конфликта — помимо «нашей» и «их» версий файлов будет также отображена «базовая» версия, и таким образом вы получите больше информации.
$ git checkout --conflict=diff3 hello.rbПосле того, как вы выполните эту команду, файл будет выглядеть так:
#! /usr/bin/env ruby

def hello
<<<<<<< ours
  puts 'hola world'
||||||| base
  puts 'hello world'
=======
  puts 'hello mundo'
>>>>>>> theirs
end

hello()
Если вам нравится такой формат вывода, то вы можете использовать его по умолчанию для будущих конфликтов слияния, установив параметру merge.conflictstyle значение diff3.
$ git config --global merge.conflictstyle diff3Команде git checkout также можно передать опции --ours и --theirs, которые позволяют действительно быстро выбрать одну из версий файлов, не выполняя слияния совсем.
Это может быть действительно полезным при возникновении конфликтов в бинарных файлах (в этом случае вы можете просто выбрать одну из версий), или при необходимости слить из другой ветки только некоторые файлы (в этом случае вы можете выполнить слияние, а затем перед коммитом переключить нужные файлы на требуемые версии).
История при слиянии
Другой полезный инструмент при разрешении конфликтов слияния — это команда git log.
Она поможет вам получить информацию о том, что могло привести к возникновению конфликтов.
Временами может быть очень полезным просмотреть историю, чтобы понять почему в двух ветках разработки изменялась одна и та же область кода.
Для получения полного списка всех уникальных коммитов, которые были сделаны в любой из сливаемых веток, мы можем использовать синтаксис «трёх точек», который мы изучили в Три точки.
$ git log --oneline --left-right HEAD...MERGE_HEAD
< f1270f7 Update README
< 9af9d3b Create README
< 694971d Update phrase to 'hola world'
> e3eb223 Add more tests
> 7cff591 Create initial testing script
> c3ffff1 Change text to 'hello mundo'
Это список всех шести коммитов, включённых в слияние, с указанием также ветки разработки, в которой находится каждый из коммитов.
Мы также можем сократить его, попросив предоставить нам более специализированную информацию.
Если мы добавим опцию --merge к команде git log, то она покажет нам только те коммиты, в которых изменялся конфликтующий в данный момент файл.
$ git log --oneline --left-right --merge
< 694971d Update phrase to 'hola world'
> c3ffff1 Change text to 'hello mundo'
Если вы выполните эту команду с опцией -p, то получите только список изменений файла, на котором возник конфликт.
Это может быть действительно полезным для быстрого получения информации, которая необходима, чтобы понять почему что-либо конфликтует и как наиболее правильно это разрешить.
Комбинированный формат изменений
Так как Git добавляет в индекс все успешные результаты слияния, то при вызове git diff в состоянии конфликта слияния будет отображено только то, что сейчас конфликтует.
Это может быть полезно, так как вы сможете увидеть какие ещё конфликты нужно разрешить.
Если вы выполните git diff сразу после конфликта слияния, то получите информацию в довольно своеобразном формате.
$ git diff
diff --cc hello.rb
index 0399cd5,59727f0..0000000
--- a/hello.rb
+++ b/hello.rb
@@@ -1,7 -1,7 +1,11 @@@
  #! /usr/bin/env ruby

  def hello
++<<<<<<< HEAD
 +  puts 'hola world'
++=======
+   puts 'hello mundo'
++>>>>>>> mundo
  end

  hello()
Такой формат называется «комбинированным» («Combined Diff»), для каждого различия в нем содержится два раздела с информацией.
В первом разделе отображены различия строки (добавлена она или удалена) между «вашей» веткой и содержимым вашего рабочего каталога, а во втором разделе содержится то же самое, но между «их» веткой и рабочим каталогом.
Таким образом, в данном примере вы можете увидеть строки <<<<<<< и >>>>>>> в файле в вашем рабочем каталоге, хотя они отсутствовали в сливаемых ветках.
Это вполне оправдано, потому что, добавляя их, инструмент слияния предоставляет вам дополнительную информацию, но предполагается, что мы удалим их.
Если мы разрешим конфликт и снова выполним команду git diff, то получим ту же информацию, но в немного более полезном представлении.
$ vim hello.rb
$ git diff
diff --cc hello.rb
index 0399cd5,59727f0..0000000
--- a/hello.rb
+++ b/hello.rb
@@@ -1,7 -1,7 +1,7 @@@
  #! /usr/bin/env ruby

  def hello
-   puts 'hola world'
 -  puts 'hello mundo'
++  puts 'hola mundo'
  end

  hello()
В этом выводе указано, что строка «hola world» при слиянии присутствовала в «нашей» ветке, но отсутствовала в рабочей копии, строка «hello mundo» была в «их» ветке, но не в рабочей копии, и, наконец, «hola mundo» не была ни в одной из сливаемых веток, но сейчас присутствует в рабочей копии.
Это бывает полезно просмотреть перед коммитом разрешения конфликта.
Такую же информацию вы можете получить и после выполнения слияния с помощью команды git log, узнав таким образом как был разрешён конфликт.
Git выводит информацию в таком формате, если вы выполните git show для коммита слияния или вызовете команду git log -p с опцией --cc (без неё данная команда не показывает изменения для коммитов слияния).
$ git log --cc -p -1
commit 14f41939956d80b9e17bb8721354c33f8d5b5a79
Merge: f1270f7 e3eb223
Author: Scott Chacon <schacon@gmail.com>
Date:   Fri Sep 19 18:14:49 2014 +0200

    Merge branch 'mundo'

    Conflicts:
        hello.rb

diff --cc hello.rb
index 0399cd5,59727f0..e1d0799
--- a/hello.rb
+++ b/hello.rb
@@@ -1,7 -1,7 +1,7 @@@
  #! /usr/bin/env ruby

  def hello
-   puts 'hola world'
 -  puts 'hello mundo'
++  puts 'hola mundo'
  end

  hello()
Отмена слияний
Теперь когда вы знаете как создать коммит слияния, вы можете сделать его по ошибке.
Одна из замечательных вещей в работе с Git — это то, что ошибки совершать не страшно, так как есть возможность исправить их (и в большинстве случаев сделать это просто).
Коммит слияния не исключение.
Допустим, вы начали работать в тематической ветке, случайно слили ее в master, и теперь ваша история коммитов выглядит следующим образом:
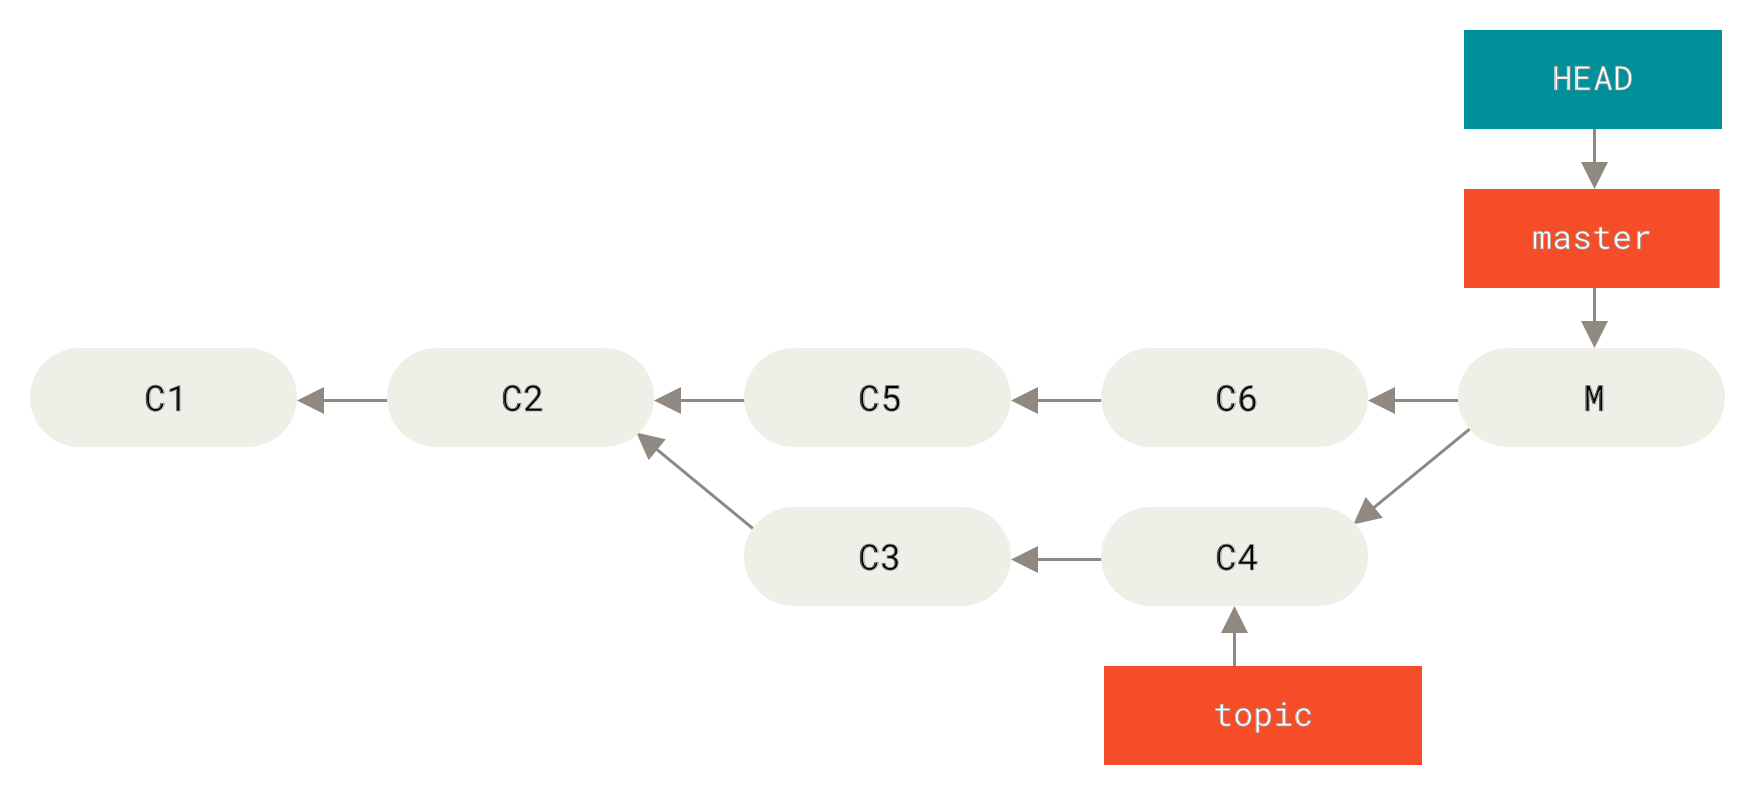
Рисунок 137. Случайный коммит слияния
Есть два подхода к решению этой проблемы, в зависимости от того, какой результат вы хотите получить.
Исправление ссылок
Если нежелаемый коммит слияния существует только в вашем локальном репозитории, то простейшее и лучшее решение состоит в перемещении веток так, чтобы они указывали туда куда вам нужно.
В большинстве случаев, если вы после случайного git merge выполните команду git reset --hard HEAD~, то указатели веток восстановятся так, что будут выглядеть следующим образом:
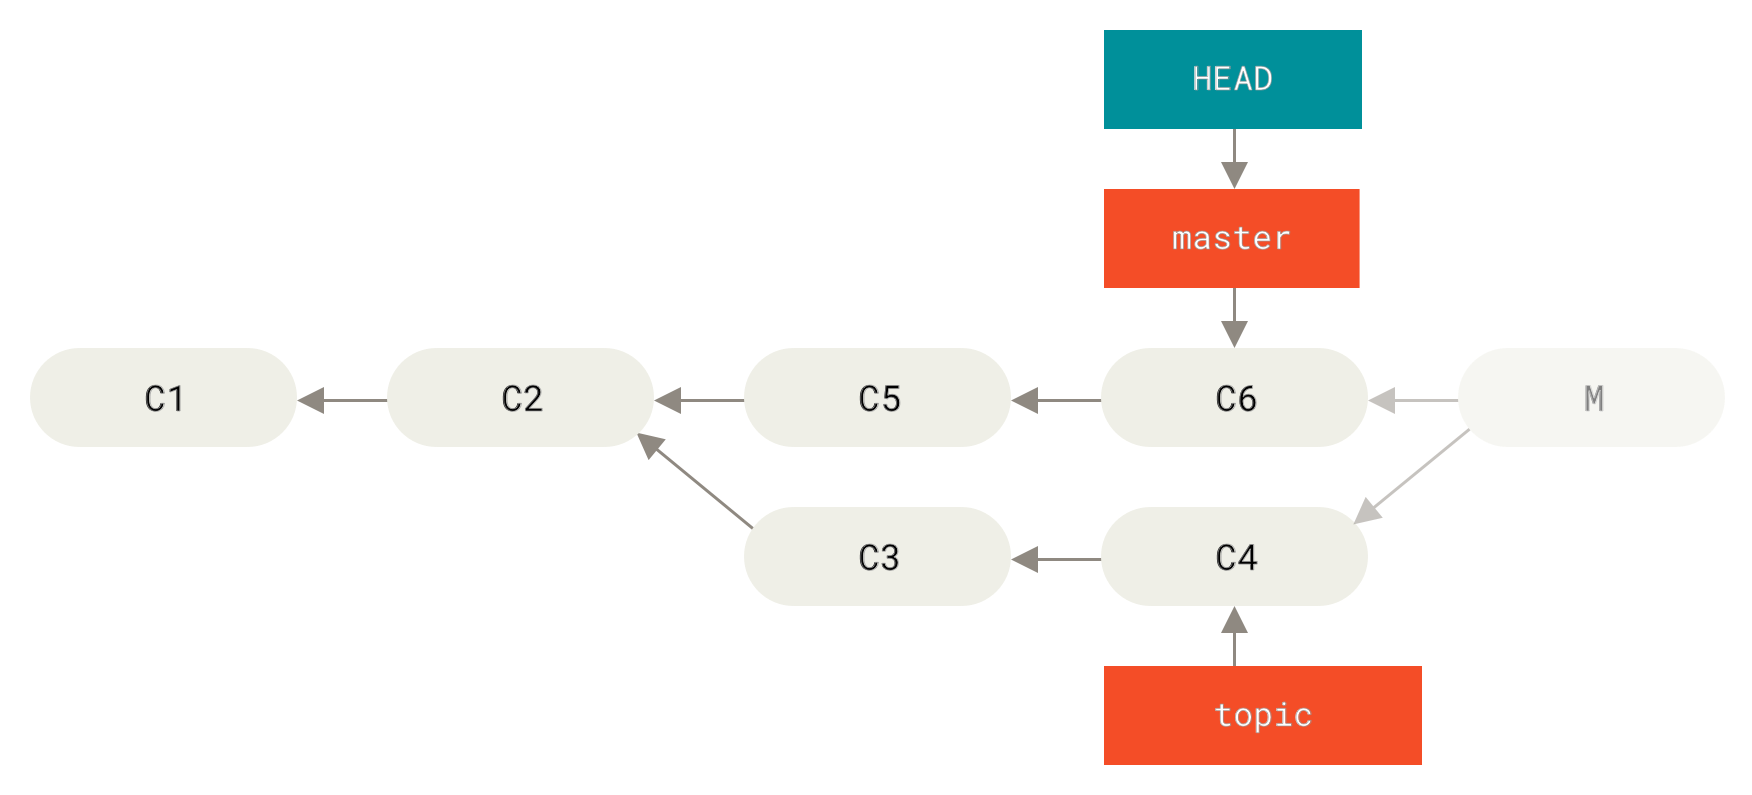
Рисунок 138. История после git reset --hard HEAD~
Мы рассматривали команду reset ранее в Раскрытие тайн reset, поэтому вам должно быть не сложно разобраться с тем, что здесь происходит.
Здесь небольшое напоминание: reset --hard обычно выполняет три шага:
-
Перемещает ветку, на которую указывает HEAD.
В данном случае мы хотим переместитьmasterтуда, где она была до коммита слияния (C6). -
Приводит индекс к такому же виду что и HEAD.
-
Приводит рабочий каталог к такому же виду, что и индекс.
Недостаток этого подхода состоит в изменении истории, что может привести к проблемам в случае совместно используемого репозитория.
Загляните в Опасности перемещения, чтобы узнать что именно может произойти; кратко говоря, если у других людей уже есть какие-то из изменяемых вами коммитов, вы должны отказаться от использования reset.
Этот подход также не будет работать, если после слияния уже был сделан хотя бы один коммит; перемещение ссылки фактически приведёт к потере этих изменений.
Отмена коммита
Если перемещение указателей ветки вам не подходит, Git предоставляет возможность сделать новый коммит, который откатывает все изменения, сделанные в другом.
Git называет эту операцию «восстановлением» («revert»), в данном примере вы можете вызвать её следующим образом:
$ git revert -m 1 HEAD
[master b1d8379] Revert "Merge branch 'topic'"
Опция -m 1 указывает какой родитель является «основной веткой» и должен быть сохранен.
Когда вы выполняете слияние в HEAD (git merge topic), новый коммит будет иметь двух родителей: первый из них HEAD (C6), а второй — вершина ветки, которую сливают с текущей (C4).
В данном случае, мы хотим отменить все изменения, внесённые слиянием родителя #2 (C4), и сохранить при этом всё содержимое из родителя #1 (C6).
История с коммитом восстановления (отменой коммита слияния) выглядит следующим образом:

Рисунок 139. История после git revert -m 1
Новый коммит ^M имеет точно такое же содержимое как C6, таким образом, начиная с нее всё выглядит так, как будто слияние никогда не выполнялось, за тем лишь исключением, что «теперь уже не слитые» коммиты всё также присутствуют в истории HEAD.
Git придет в замешательство, если вы вновь попытаетесь слить topic в ветку master:
$ git merge topic
Already up-to-date.
В ветке topic нет ничего, что ещё недоступно из ветки master.
Плохо, что в случае добавления новых наработок в topic, при повторении слияния Git добавит только те изменения, которые были сделаны после отмены слияния:
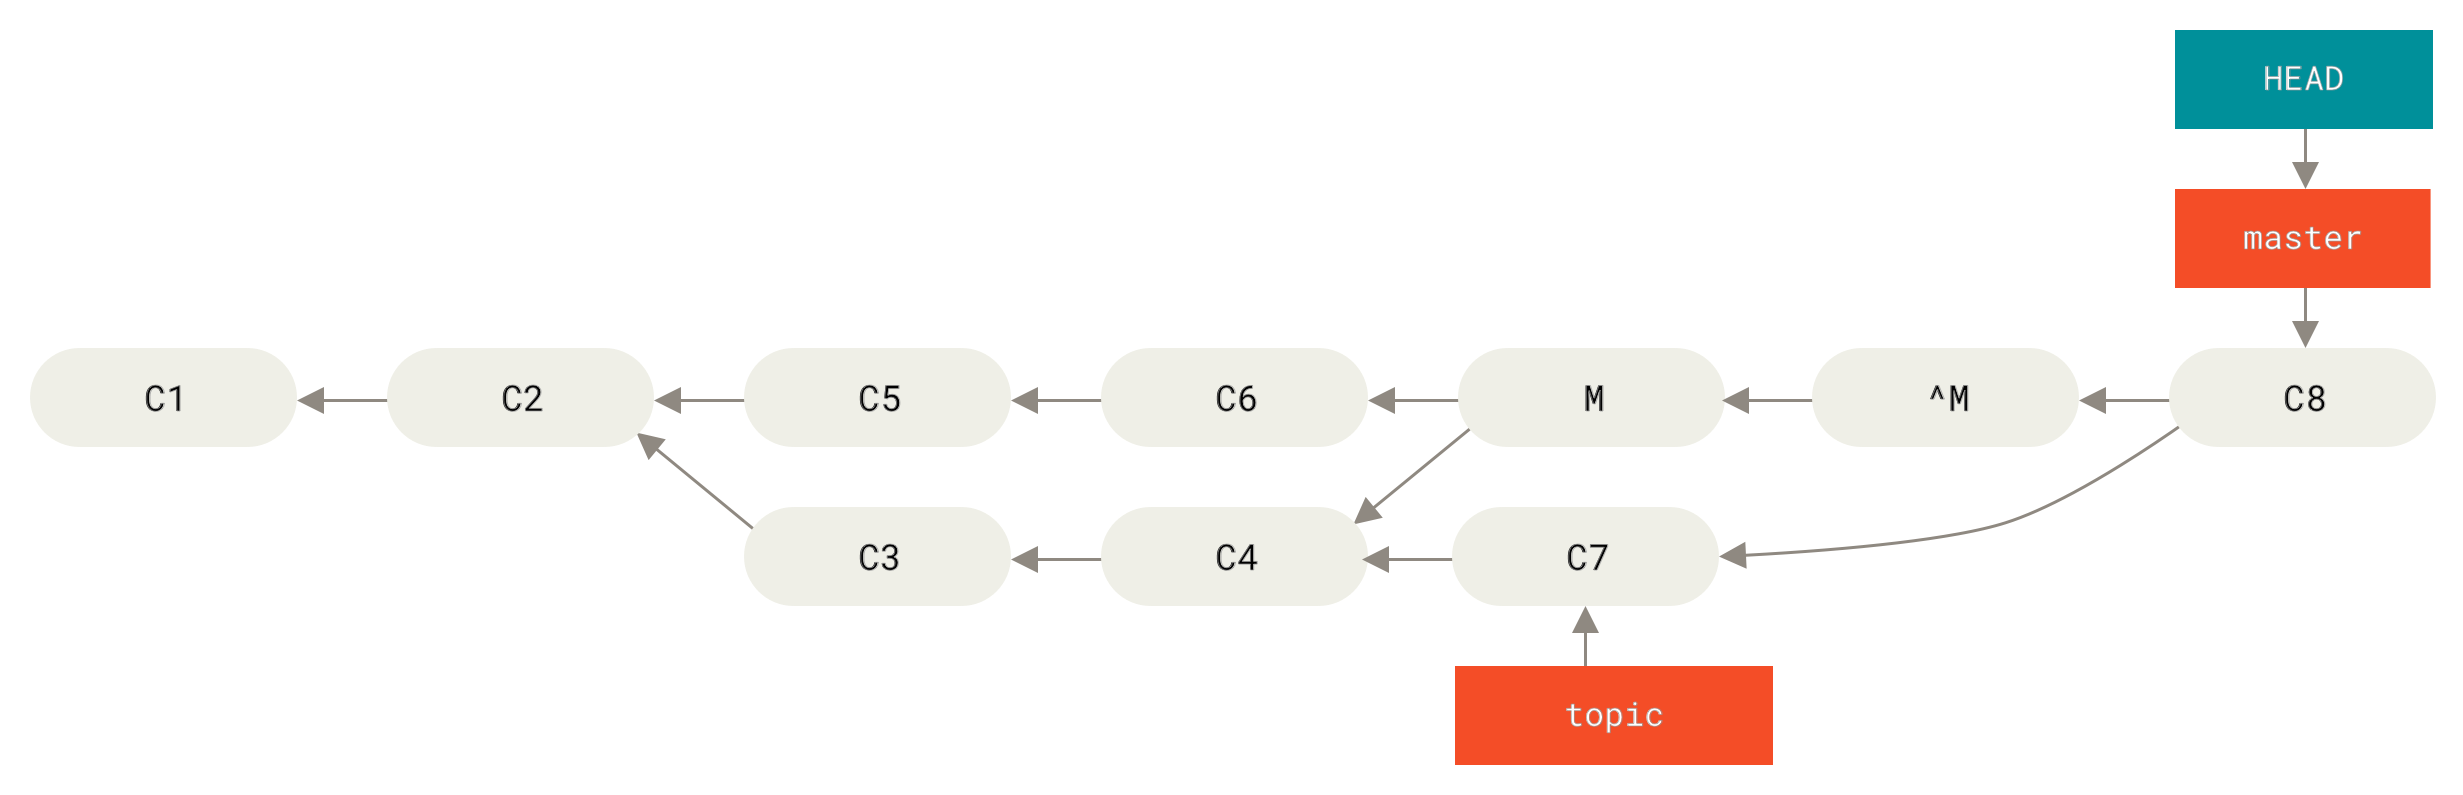
Рисунок 140. История с плохим слиянием
Лучшим решением данной проблемы является откат коммита отмены слияния, так как теперь вы хотите внести изменения, которые были отменены, а затем создание нового коммита слияния:
$ git revert ^M
[master 09f0126] Revert "Revert "Merge branch 'topic'""
$ git merge topic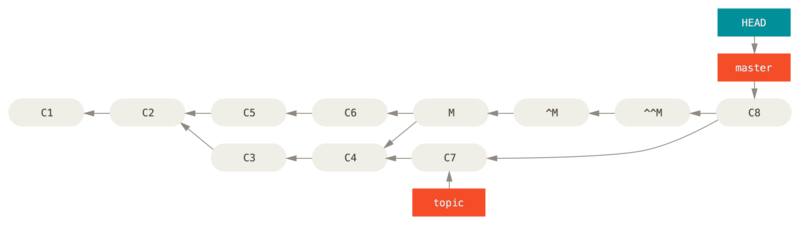
Рисунок 141. История после повторения отменённого слияния
В этом примере, M и ^M отменены.
В коммите ^^M, фактически, сливаются изменения из C3 и C4, а в C8 — изменения из C7, таким образом, ветка topic полностью слита.
Другие типы слияний
До этого момента мы рассматривали типичные слияния двух веток, которые обычно выполняются с использованием стратегии слияния, называемой «рекурсивной».
Но существуют и другие типы слияния веток.
Давайте кратко рассмотрим некоторые из них.
Выбор «нашей» или «их» версий
Во-первых, существует ещё один полезный приём, который мы можем использовать в обычном «рекурсивном» режиме слияния.
Мы уже видели опции ignore-all-space и ignore-space-change, которые передаются с префиксом -X, но мы можем также попросить Git при возникновении конфликта использовать ту или иную версию файлов.
По умолчанию, когда Git при слиянии веток замечает конфликт, он добавляет в код маркеры конфликта, отмечает файл как конфликтующий и позволяет вам разрешить его.
Если же вместо ручного разрешения конфликта вы хотите, чтобы Git просто использовал какую-то определённую версию файла, а другую игнорировал, то вы можете передать команде merge одну из двух опций -Xours или -Xtheirs.
В этом случае Git не будет добавлять маркеры конфликта.
Все неконфликтующие изменения он сольёт, а для конфликтующих он целиком возьмёт ту версию, которую вы указали (это относится и к бинарным файлам).
Если мы вернёмся к примеру «hello world», который использовали раньше, то увидим, что попытка слияния в нашу ветку приведёт к конфликту.
$ git merge mundo
Auto-merging hello.rb
CONFLICT (content): Merge conflict in hello.rb
Resolved 'hello.rb' using previous resolution.
Automatic merge failed; fix conflicts and then commit the result.
Однако, если мы выполним слияние с опцией -Xours или -Xtheirs, конфликта не будет.
$ git merge -Xours mundo
Auto-merging hello.rb
Merge made by the 'recursive' strategy.
 hello.rb | 2 +-
 test.sh  | 2 ++
 2 files changed, 3 insertions(+), 1 deletion(-)
 create mode 100644 test.sh
В этом случае, вместо добавления в файл маркеров конфликта с «hello mundo» в качестве одной версии и с «hola world» в качестве другой, Git просто выберет «hola world».
Однако, все другие неконфликтующие изменения будут слиты успешно.
Такая же опция может быть передана команде git merge-file, которую мы обсуждали ранее, то есть для слияния отдельных файлов можно использовать команду git merge-file --ours.
На случай если вам нужно нечто подобное, но вы хотите, чтобы Git даже не пытался сливать изменения из другой версии, существует более суровый вариант — стратегия слияния «ours».
Важно отметить, что это не то же самое что опция «ours» рекурсивной стратегии слияния.
Фактически, эта стратегия выполнит ненастоящее слияние.
Она создаст новый коммит слияния, у которого родителями будут обе ветки, но при этом данная стратегия даже не взглянет на ветку, которую вы сливаете.
В качестве результата слияния она просто оставляет тот код, который находится в вашей текущей ветке.
$ git merge -s ours mundo
Merge made by the 'ours' strategy.
$ git diff HEAD HEAD~
$
Вы можете видеть, что между веткой, в которой мы были, и результатом слияния нет никаких отличий.
Это часто бывает полезно, когда нужно заставить Git считать, что ветка уже слита, а реальное слияние отложить на потом.
Для примера предположим, что вы создали ветку release и проделали в ней некоторую работу, которую когда-то впоследствии захотите слить обратно в master.
Тем временем в master были сделаны некоторые исправления, которые необходимо перенести также в вашу ветку release.
Вы можете слить ветку с исправлениями в release, а затем выполнить merge -s ours этой ветки в master (хотя исправления в ней уже присутствуют), так что позже, когда вы будете снова сливать ветку release, не возникнет конфликтов, связанных с этими исправлениями.
Слияние поддеревьев
Идея слияния поддеревьев состоит в том, что у вас есть два проекта и один из проектов отображается в подкаталог другого.
Когда вы выполняете слияние поддеревьев, Git в большинстве случаев способен понять, что одно из них является поддеревом другого и выполнить слияние подходящим способом.
Далее мы рассмотрим пример добавления в существующий проект другого проекта и последующее слияние кода второго проекта в подкаталог первого.
Первым делом мы добавим в наш проект приложение Rack.
Мы добавим Rack в наш собственный проект, как удалённый репозиторий, а затем выгрузим его в отдельную ветку.
$ git remote add rack_remote https://github.com/rack/rack
$ git fetch rack_remote --no-tags
warning: no common commits
remote: Counting objects: 3184, done.
remote: Compressing objects: 100% (1465/1465), done.
remote: Total 3184 (delta 1952), reused 2770 (delta 1675)
Receiving objects: 100% (3184/3184), 677.42 KiB | 4 KiB/s, done.
Resolving deltas: 100% (1952/1952), done.
From https://github.com/rack/rack
 * [new branch]      build      -> rack_remote/build
 * [new branch]      master     -> rack_remote/master
 * [new branch]      rack-0.4   -> rack_remote/rack-0.4
 * [new branch]      rack-0.9   -> rack_remote/rack-0.9
$ git checkout -b rack_branch rack_remote/master
Branch rack_branch set up to track remote branch refs/remotes/rack_remote/master.
Switched to a new branch "rack_branch"
Таким образом, теперь у нас в ветке rack_branch находится основная ветка проекта Rack, а в ветке master — наш собственный проект.
Если вы переключитесь сначала на одну ветку, а затем на другую, то увидите, что они имеют абсолютно разное содержимое:
$ ls
AUTHORS         KNOWN-ISSUES   Rakefile      contrib         lib
COPYING         README         bin           example         test
$ git checkout master
Switched to branch "master"
$ ls
README
Может показаться странным, но, на самом деле, ветки в вашем репозитории не обязаны быть ветками одного проекта.
Это мало распространено, так как редко бывает полезным, но иметь ветки, имеющие абсолютно разные истории, довольно легко.
В данном примере, мы хотим выгрузить проект Rack в подкаталог нашего основного проекта.
В Git мы можем выполнить это с помощью команды git read-tree.
Вы узнаете больше о команде read-tree и её друзьях в главе Git изнутри, сейчас же вам достаточно знать, что она считывает содержимое некоторой ветки в ваш текущий индекс и рабочий каталог.
Мы просто переключимся обратно на ветку master и выгрузим ветку rack_branch в подкаталог rack ветки master нашего основного проекта:
$ git read-tree --prefix=rack/ -u rack_branchКогда мы будем выполнять коммит, он будет выглядеть так, как будто все файлы проекта Rack были добавлены в этот подкаталог — например, мы скопировали их из архива.
Важно отметить, что слить изменения одной из веток в другую довольно легко.
Таким образом, если проект Rack обновился, мы можем получить изменения из его репозитория просто переключившись на соответствующую ветку и выполнив операцию git pull:
$ git checkout rack_branch
$ git pull
Затем мы можем слить эти изменения обратно в нашу ветку master.
Для того, чтобы получить изменения и заполнить сообщение коммита используйте параметр --squash, вместе с опцией -Xsubtree рекурсивной стратегии слияния.
Вообще-то, по умолчанию используется именно рекурсивная стратегия слияния, но мы указали и её тоже для пущей ясности.
$ git checkout master
$ git merge --squash -s recursive -Xsubtree=rack rack_branch
Squash commit -- not updating HEAD
Automatic merge went well; stopped before committing as requested
Все изменения из проекта Rack слиты и подготовлены для локального коммита.
Вы также можете поступить наоборот — сделать изменения в подкаталоге rack вашей основной ветки и затем слить их в вашу ветку rack_branch, чтобы позже передать их ответственным за проекты или отправить их в вышестоящий репозиторий проекта Rack.
Таким образом, слияние поддеревьев даёт нам возможность использовать рабочий процесс в некоторой степени похожий на рабочий процесс с подмодулями, но при этом без использования подмодулей (которые мы рассмотрим в Подмодули).
Мы можем держать ветки с другими связанными проектами в нашем репозитории и периодически сливать их как поддеревья в наш проект.
С одной стороны это удобно, например, тем, что весь код хранится в одном месте.
Однако, при этом есть и некоторые недостатки — поддеревья немного сложнее, проще допустить ошибки при повторной интеграции изменений или случайно отправить ветку не в тот репозиторий.
Другая небольшая странность состоит в том, что для получения различий между содержимым подкаталога rack и содержимого ветки rack_branch — для того, чтобы увидеть необходимо ли выполнять слияния между ними — вы не можете использовать обычную команду diff.
Вместо этого следует выполнить команду git diff-tree, указав ветку, с которой производится сравнение:
$ git diff-tree -p rack_branchВот как выглядит процедура сравнения содержимого подкаталога rack с содержимым ветки master на сервере после последнего скачивания изменений:
$ git diff-tree -p rack_remote/masterI find merge tools rarely help me understand the conflict or the resolution. I’m usually more successful looking at the conflict markers in a text editor and using git log as a supplement.
Here are a few tips:
Tip One
The best thing I have found is to use the «diff3» merge conflict style:
git config merge.conflictstyle diff3
This produces conflict markers like this:
<<<<<<<
Changes made on the branch that is being merged into. In most cases,
this is the branch that I have currently checked out (i.e. HEAD).
|||||||
The common ancestor version.
=======
Changes made on the branch that is being merged in. This is often a
feature/topic branch.
>>>>>>>
The middle section is what the common ancestor looked like. This is useful because you can compare it to the top and bottom versions to get a better sense of what was changed on each branch, which gives you a better idea for what the purpose of each change was.
If the conflict is only a few lines, this generally makes the conflict very obvious. (Knowing how to fix a conflict is very different; you need to be aware of what other people are working on. If you’re confused, it’s probably best to just call that person into your room so they can see what you’re looking at.)
If the conflict is longer, then I will cut and paste each of the three sections into three separate files, such as «mine», «common» and «theirs».
Then I can run the following commands to see the two diff hunks that caused the conflict:
diff common mine
diff common theirs
This is not the same as using a merge tool, since a merge tool will include all of the non-conflicting diff hunks too. I find that to be distracting.
Tip Two
Somebody already mentioned this, but understanding the intention behind each diff hunk is generally very helpful for understanding where a conflict came from and how to handle it.
git log --merge -p <name of file>
This shows all of the commits that touched that file in between the common ancestor and the two heads you are merging. (So it doesn’t include commits that already exist in both branches before merging.) This helps you ignore diff hunks that clearly are not a factor in your current conflict.
Tip Three
Verify your changes with automated tools.
If you have automated tests, run those. If you have a lint, run that. If it’s a buildable project, then build it before you commit, etc. In all cases, you need to do a bit of testing to make sure your changes didn’t break anything. (Heck, even a merge without conflicts can break working code.)
Tip Four
Plan ahead; communicate with co-workers.
Planning ahead and being aware of what others are working on can help prevent merge conflicts and/or help resolve them earlier — while the details are still fresh in mind.
For example, if you know that you and another person are both working on different refactoring that will both affect the same set of files, you should talk to each other ahead of time and get a better sense for what types of changes each of you is making. You might save considerable time and effort if you conduct your planned changes serially rather than in parallel.
For major refactorings that cut across a large swath of code, you should strongly consider working serially: everybody stops working on that area of the code while one person performs the complete refactoring.
If you can’t work serially (due to time pressure, maybe), then communicating about expected merge conflicts at least helps you solve the problems sooner while the details are still fresh in mind. For example, if a co-worker is making a disruptive series of commits over the course of a one-week period, you may choose to merge/rebase on that co-workers branch once or twice each day during that week. That way, if you do find merge/rebase conflicts, you can solve them more quickly than if you wait a few weeks to merge everything together in one big lump.
Tip Five
If you’re unsure of a merge, don’t force it.
Merging can feel overwhelming, especially when there are a lot of conflicting files and the conflict markers cover hundreds of lines. Often times when estimating software projects we don’t include enough time for overhead items like handling a gnarly merge, so it feels like a real drag to spend several hours dissecting each conflict.
In the long run, planning ahead and being aware of what others are working on are the best tools for anticipating merge conflicts and prepare yourself to resolve them correctly in less time.
Системы контроля версий предназначены для управления дополнениями, вносимыми в проект множеством распределенных авторов (обычно разработчиков). Иногда один и тот же контент могут редактировать сразу несколько разработчиков. Если разработчик A попытается изменить код, который редактирует разработчик B, может произойти конфликт. Для предотвращения конфликтов разработчики работают в отдельных изолированных ветках. Основная задача команды git merge заключается в слиянии отдельных веток и разрешении любых конфликтующих правок.
Общие сведения о конфликтах слияния
Слияние и конфликты являются неотъемлемой частью работы с Git. В других инструментах управления версиями, например SVN, работа с конфликтами может быть дорогой и времязатратной. Git позволяет выполнять слияния очень просто. В большинстве случаев Git самостоятельно решает, как автоматически интегрировать новые изменения.
Обычно конфликты возникают, когда два человека изменяют одни и те же строки в файле или один разработчик удаляет файл, который в это время изменяет другой разработчик. В таких случаях Git не может автоматически определить, какое изменение является правильным. Конфликты затрагивают только того разработчика, который выполняет слияние, остальная часть команды о конфликте не знает. Git помечает файл как конфликтующий и останавливает процесс слияния. В этом случае ответственность за разрешение конфликта несут разработчики.
Типы конфликтов слияния
Конфликт во время слияния может произойти в двух отдельных точках — при запуске и во время процесса слияния. Далее рассмотрим, как разрешать каждый из этих конфликтных сценариев.
Git прерывает работу в самом начале слияния
Выполнение команды слияния прерывается в самом начале, если Git обнаруживает изменения в рабочем каталоге или разделе проиндексированных файлов текущего проекта. Git не может выполнить слияние, поскольку иначе эти ожидающие изменения будут перезаписаны новыми коммитами. Такое случается из-за конфликтов не с другими разработчиками, а с ожидающими локальными изменениями. Локальное состояние необходимо стабилизировать с помощью команд git stash, git checkout, git commit или git reset. Если команда слияния прерывается в самом начале, выдается следующее сообщение об ошибке:
error: Entry '<fileName>' not uptodate. Cannot merge. (Changes in working directory) Git прерывает работу во время слияния
Сбой В ПРОЦЕССЕ слияния говорит о наличии конфликта между текущей локальной веткой и веткой, с которой выполняется слияние. Это свидетельствует о конфликте с кодом другого разработчика. Git сделает все возможное, чтобы объединить файлы, но оставит конфликтующие участки, чтобы вы разрешили их вручную. При сбое во время выполнения слияния выдается следующее сообщение об ошибке:
error: Entry '<fileName>' would be overwritten by merge. Cannot merge. (Changes in staging area) Создание конфликта слияния
Чтобы лучше разобраться в конфликтах слияния, в следующем разделе мы смоделируем конфликт для дальнейшего изучения и разрешения. Для запуска моделируемого примера будет использоваться интерфейс Git c Unix-подобной командной строкой.
$ mkdir git-merge-test
$ cd git-merge-test
$ git init .
$ echo "this is some content to mess with" > merge.txt
$ git add merge.txt
$ git commit -am"we are commiting the inital content"
[main (root-commit) d48e74c] we are commiting the inital content
1 file changed, 1 insertion(+)
create mode 100644 merge.txt
С помощью приведенной в этом примере последовательности команд выполняются следующие действия.
- Создается новый каталог с именем
git-merge-test, выполняется переход в этот каталог и инициализация его как нового репозитория Git. - Создается новый текстовый файл
merge.txtс некоторым содержимым. - В репозиторий добавляется файл
merge.txtи выполняется коммит.
Теперь у нас есть новый репозиторий с одной веткой main и непустым файлом merge.txt. Далее создадим новую ветку, которая будет использоваться как конфликтующая при слиянии.
$ git checkout -b new_branch_to_merge_later
$ echo "totally different content to merge later" > merge.txt
$ git commit -am"edited the content of merge.txt to cause a conflict"
[new_branch_to_merge_later 6282319] edited the content of merge.txt to cause a conflict
1 file changed, 1 insertion(+), 1 deletion(-)
Представленная выше последовательность команд выполняет следующие действия.
- Создает новую ветку с именем
new_branch_to_merge_laterи выполняет переход в нее. - Перезаписывает содержимое файла
merge.txt. - Выполняет коммит нового содержимого.
В этой новой ветке new_branch_to_merge_later мы создали коммит, который переопределил содержимое файла merge.txt.
git checkout main
Switched to branch 'main'
echo "content to append" >> merge.txt
git commit -am"appended content to merge.txt"
[main 24fbe3c] appended content to merge.tx
1 file changed, 1 insertion(+)
Эта последовательность команд выполняет переключение на ветку main, добавляет содержимое в файл merge.txt и делает коммит. После этого в нашем экспериментальном репозитории находятся два новых коммита, первый — в ветке main, а второй — в ветке new_branch_to_merge_later. Теперь запустим команду git merge new_branch_to_merge_later и посмотрим, что из этого выйдет!
$ git merge new_branch_to_merge_later
Auto-merging merge.txt
CONFLICT (content): Merge conflict in merge.txt
Automatic merge failed; fix conflicts and then commit the result.
БАХ! 💥 Возник конфликт. Хорошо, что система Git сообщила нам об этом.
Выявление конфликтов слияния
Как мы убедились на выполняемом примере, Git выводит небольшое описательное сообщение о возникновении КОНФЛИКТА. Чтобы получить более глубокое понимание проблемы, можно запустить команду git status.
$ git status
On branch main
You have unmerged paths.
(fix conflicts and run "git commit")
(use "git merge --abort" to abort the merge)Unmerged paths:
(use "git add <file>..." to mark resolution)
both modified: merge.txt
Вывод команды git status говорит о том, что из-за конфликта не удалось слить пути. Теперь файл merge.text отображается как измененный. Давайте изучим этот файл и посмотрим, что изменилось.
$ cat merge.txt
<<<<<<< HEAD
this is some content to mess with
content to append
=======
totally different content to merge later
>>>>>>> new_branch_to_merge_later
Для просмотра содержимого файла merge.txt воспользуемся командой cat. Видно, что в файле появились новые странные дополнения:
<<<<<<< HEAD=======>>>>>>> new_branch_to_merge_later
Эти новые строки можно рассматривать как «разделители конфликта». Строка ======= является «центром» конфликта. Все содержимое между этим центром и строкой <<<<<<< HEAD находится в текущей ветке main, на которую ссылается указатель HEAD. А все содержимое между центром и строкой >>>>>>> new_branch_to_merge_later является содержимым ветки для слияния.
Разрешение конфликтов слияния с помощью командной строки
Самый простой способ разрешить конфликт — отредактировать конфликтующий файл. Откройте файл merge.txt в привычном редакторе. В нашем примере просто удалим все разделители конфликта. Измененное содержимое файла merge.txt будет выглядеть следующим образом:
this is some content to mess with
content to append
totally different content to merge later
После редактирования файла выполните команду git add merge.txt, чтобы добавить новое объединенное содержимое в раздел проиндексированных файлов. Для завершения слияния создайте новый коммит, выполнив следующую команду:
git commit -m "merged and resolved the conflict in merge.txt"Git обнаружит, что конфликт разрешен, и создаст новый коммит слияния для завершения процедуры слияния.
Команды Git, с помощью которых можно разрешить конфликты слияния
Общие инструменты
Команда status часто используется во время работы с Git и помогает идентифицировать конфликтующие во время слияния файлы.
При передаче аргумента --merge для команды git log будет создан журнал со списком конфликтов коммитов между ветками, для которых выполняется слияние.
Команда diff помогает найти различия между состояниями репозитория/файлов. Она полезна для выявления и предупреждения конфликтов слияния.
Инструменты для случаев, когда Git прерывает работу в самом начале слияния
Команда checkout может использоваться для отмены изменений в файлах или для изменения веток.
Команда reset может использоваться для отмены изменений в рабочем каталоге или в разделе проиндексированных файлов.
Инструменты для случаев, когда конфликты Git возникают во время слияния
При выполнении команды git merge с опцией --abort процесс слияния будет прерван, а ветка вернется к состоянию, в котором она находилась до начала слияния.
Команду git reset можно использовать для разрешения конфликтов, возникающих во время выполнения слияния, чтобы восстановить заведомо удовлетворительное состояние конфликтующих файлов.
Резюме
Конфликты слияния могут пугать. К счастью, Git предлагает мощные инструменты их поиска и разрешения. Большую часть слияний система Git способна обрабатывать самостоятельно с помощью функций автоматического слияния. Конфликт возникает, когда в двух ветках была изменена одна и та же строка в файле или когда некий файл удален в одной ветке и отредактирован в другой. Как правило, конфликты возникают при работе в команде.
Существует множество способов разрешения конфликтов слияния. В этой статье мы рассмотрели немалое количество инструментов командной строки, которые предоставляет Git. Более подробную информацию об этих инструментах см. на отдельных страницах для команд git log, git reset, git status, git checkout и git reset. Помимо этого многие сторонние инструменты также предлагают оптимизированные функции, поддерживающие работу с конфликтами слияния.

There it is, the word that every developer hates to see: conflict. 😱 There’s just no way around the occasional merge conflict when working with Git (or other version control systems).
But when speaking with developers, I often hear that there’s a sense of anxiety or discomfort around the topic of merge conflicts.
Handling conflicts often remains a dark, mysterious place: a situation where things are badly broken and it’s unclear how to get out of it (without making things worse).
While it’s true that merge conflicts are an unavoidable part of a developer’s life, the discomfort in these situations is fully optional.
My intention with this article is to bring some clarity to this topic: how and when conflicts typically occur, what they actually are, and how to solve — or undo — them.
When you properly understand these things, you’ll be able to deal with merge conflicts in a much more relaxed and confident way. 😍
How and When Conflicts Occur
The name already says it: «merge conflicts» can occur in the process of integrating commits from a different source.
Keep in mind, though, that «integration» is not limited to only «merging branches». It can also happen when rebasing or interactive rebasing, when performing a cherry-pick or a pull, or even when reapplying a Stash.
All of these actions perform some kind of integration — and that’s when merge conflicts can happen.
But of course, these actions don’t result in a merge conflict every time (thank God!). Ideally, you should find yourself in these situations only rarely. But when exactly do conflicts occur?
Actually, Git’s merging capabilities are one of its greatest advantages: merging branches works effortlessly most of the time, because Git is usually able to figure things out on its own.
But there are situations where contradictory changes were made — and where technology simply cannot decide what’s right or wrong. These situations simply require a decision from a human being.
The true classic is when the exact same line of code was changed in two commits, on two different branches. Git has no way of knowing which change you prefer! 🤔
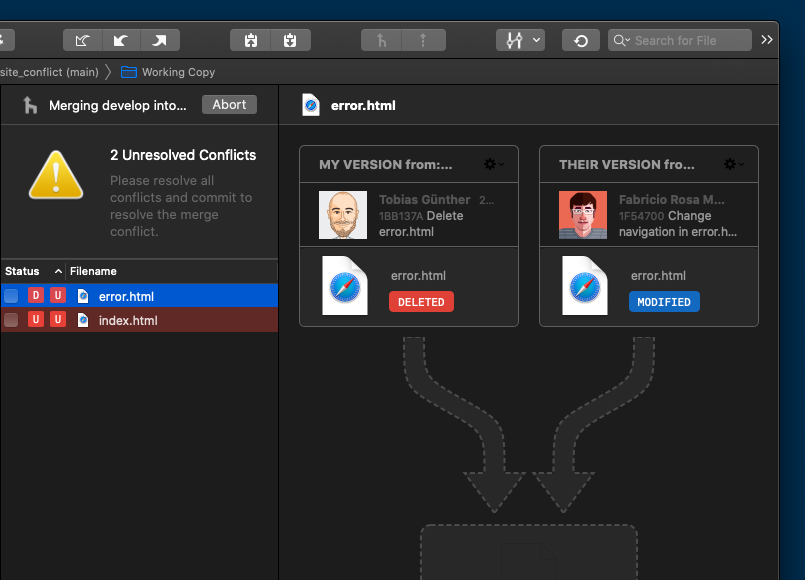
There are some other, similar situations — for example when a file was modified in one branch and deleted in another one — but they are a bit less common.
The «Tower» Git desktop GUI, for example, has a nice way of visualizing these kinds of situations:
How to Know When a Conflict Has Occurred
Don’t worry: Git will tell you very clearly when a conflict has happened. 😉
First, it will let you know immediately in the situation, for example when a merge or rebase fails due to a conflict:
$ git merge develop
Auto-merging index.html
CONFLICT (content): Merge conflict in index.html
CONFLICT (modify/delete): error.html deleted in HEAD and modified in develop. Version develop of error.html left in tree.
Automatic merge failed; fix conflicts and then commit the result.
As you can see from the above example, when I tried to perform a merge, I created a merge conflict — and Git communicates the problem very clearly and promptly:
- A conflict in the file «index.html» occurred.
- Another conflict in the file «error.html» occurred.
- And finally, because of the conflicts, the merge operation failed.
These are the situations where we have to dig into the code and see what has to be done.
In the unlikely event that you have overlooked these warning messages when the conflict happened, Git additionally informs you whenever you run git status:
$ git status
On branch main
You have unmerged paths.
  (fix conflicts and run "git commit")
  (use "git merge --abort" to abort the merge)

Unmerged paths:
  (use "git add/rm <file>..." as appropriate to mark resolution)
	deleted by us:   error.html
	both modified:   index.html
In other words: don’t worry about not noticing merge conflicts. Git makes sure you can’t overlook them.
How to Undo a Conflict in Git and Start Over
Merge conflicts come with a certain air of urgency. And rightfully so: you’ll have to deal with them before you can go on with your work.
But although ignoring them is not an option, «dealing with merge conflicts» doesn’t necessarily mean you have to resolve them. Undoing them is also possible!
This might be worth repeating: you always have the option to undo a merge conflict and return to the state before. This is true even when you’ve already started resolving the conflicted files and find yourself in a dead end.
In these situations, it’s great to keep in mind that you can always start over and return to a clean state before the conflict even happened.
For this purpose, most commands come with an --abort option, for example git merge --abort and git rebase --abort:
$ git merge --abort
$ git status
On branch main
nothing to commit, working tree clean
This should give you the confidence that you really cannot mess up. You can always abort, return to a clean state, and start over.
What Conflicts Really Look Like in Git
Now, safe in the knowledge that nothing can break, let’s see what a conflict really looks like under the hood. This will demystify those little buggers and, at the same time, help you lose respect for them and gain confidence in yourself.
As an example, let’s look at the contents of the (currently conflicted) «index.html» file in an editor:
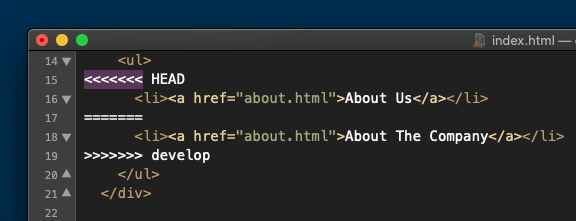
Git was kind enough to mark the problem area in the file, enclosing it in <<<<<<< HEAD and >>>>>>> [other/branch/name]. The content that comes after the first marker originates from our current working branch. Finally, a line with ======= characters separates the two conflicting changes.
How to Solve a Conflict in Git
Our job as developers now is to clean up these lines: after we’re finished, the file has to look exactly as we want it to look.
It might be necessary to talk to the teammate who wrote the «other» changes and decide which code is actually correct. Maybe it’s ours, maybe it’s theirs — or maybe a mixture between the two.
This process — cleaning up the file and making sure it contains what we actually want — doesn’t have to involve any magic. You can do this simply by opening your text editor or IDE and starting to making your changes.
Often, however, you’ll find that this is not the most efficient way. That’s when dedicated tools can save time and effort:
- Git GUI Tools: Some of the graphical user interfaces for Git can be helpful when solving conflicts. The Tower Git GUI, for example, offers a dedicated «Conflict Wizard» that helps visualize and solve the situation:
- Dedicated Merge Tools: For more complicated conflicts, it can be great to have a dedicated «Diff & Merge Tool» at hand. You can configure your tool of choice using the «git config» command. (Consult your tool’s documentation for detailed instructions.) Then, in case of a conflict, you can invoke it by simply typing
git mergetool. As an example, here’s a screenshot of «Kaleidoscope» on macOS:

After cleaning up the file — either manually or in a Git GUI or Merge Tool — we have to commit this like any other change:
- By using
git add <filename>on the (previously) conflicted file, we inform Git that the conflict has been solved. - When all conflicts have been solved and added to the Staging Area, you need to complete the resolution by creating a regular commit.
How to Become More Confident and Productive
Many years ago, when I started using version control, merge conflicts regularly freaked me out: I was afraid that, finally, I had managed to break things for good. 😩
Only when I took the time to truly understand what was going on under the hood was I able to deal with conflicts confidently and efficiently.
The same was true, for example, when dealing with mistakes: only once I learned how to undo mistakes with Git was I able to become more confident and productive in my work.
I highly recommend taking a look at the free «First Aid Kit for Git«, a collection of short videos about how to undo and recover from mistakes with Git.
Have fun becoming a better programmer!
About the Author
Tobias Günther is the CEO of Tower, the popular Git desktop client that helps more than 100,000 developers around the world to be more productive with Git.
Learn to code for free. freeCodeCamp’s open source curriculum has helped more than 40,000 people get jobs as developers. Get started
There it is, the word that every developer hates to see: conflict. 😱 There’s just no way around the occasional merge conflict when working with Git (or other version control systems).
But when speaking with developers, I often hear that there’s a sense of anxiety or discomfort around the topic of merge conflicts.
Handling conflicts often remains a dark, mysterious place: a situation where things are badly broken and it’s unclear how to get out of it (without making things worse).
While it’s true that merge conflicts are an unavoidable part of a developer’s life, the discomfort in these situations is fully optional.
My intention with this article is to bring some clarity to this topic: how and when conflicts typically occur, what they actually are, and how to solve — or undo — them.
When you properly understand these things, you’ll be able to deal with merge conflicts in a much more relaxed and confident way. 😍
How and When Conflicts Occur
The name already says it: «merge conflicts» can occur in the process of integrating commits from a different source.
Keep in mind, though, that «integration» is not limited to only «merging branches». It can also happen when rebasing or interactive rebasing, when performing a cherry-pick or a pull, or even when reapplying a Stash.
All of these actions perform some kind of integration — and that’s when merge conflicts can happen.
But of course, these actions don’t result in a merge conflict every time (thank God!). Ideally, you should find yourself in these situations only rarely. But when exactly do conflicts occur?
Actually, Git’s merging capabilities are one of its greatest advantages: merging branches works effortlessly most of the time, because Git is usually able to figure things out on its own.
But there are situations where contradictory changes were made — and where technology simply cannot decide what’s right or wrong. These situations simply require a decision from a human being.
The true classic is when the exact same line of code was changed in two commits, on two different branches. Git has no way of knowing which change you prefer! 🤔
There are some other, similar situations — for example when a file was modified in one branch and deleted in another one — but they are a bit less common.
The «Tower» Git desktop GUI, for example, has a nice way of visualizing these kinds of situations:
How to Know When a Conflict Has Occurred
Don’t worry: Git will tell you very clearly when a conflict has happened. 😉
First, it will let you know immediately in the situation, for example when a merge or rebase fails due to a conflict:
$ git merge develop
Auto-merging index.html
CONFLICT (content): Merge conflict in index.html
CONFLICT (modify/delete): error.html deleted in HEAD and modified in develop. Version develop of error.html left in tree.
Automatic merge failed; fix conflicts and then commit the result.
As you can see from the above example, when I tried to perform a merge, I created a merge conflict — and Git communicates the problem very clearly and promptly:
- A conflict in the file «index.html» occurred.
- Another conflict in the file «error.html» occurred.
- And finally, because of the conflicts, the merge operation failed.
These are the situations where we have to dig into the code and see what has to be done.
In the unlikely event that you have overlooked these warning messages when the conflict happened, Git additionally informs you whenever you run git status:
$ git status
On branch main
You have unmerged paths.
  (fix conflicts and run "git commit")
  (use "git merge --abort" to abort the merge)

Unmerged paths:
  (use "git add/rm <file>..." as appropriate to mark resolution)
	deleted by us:   error.html
	both modified:   index.html
In other words: don’t worry about not noticing merge conflicts. Git makes sure you can’t overlook them.
How to Undo a Conflict in Git and Start Over
Merge conflicts come with a certain air of urgency. And rightfully so: you’ll have to deal with them before you can go on with your work.
But although ignoring them is not an option, «dealing with merge conflicts» doesn’t necessarily mean you have to resolve them. Undoing them is also possible!
This might be worth repeating: you always have the option to undo a merge conflict and return to the state before. This is true even when you’ve already started resolving the conflicted files and find yourself in a dead end.
In these situations, it’s great to keep in mind that you can always start over and return to a clean state before the conflict even happened.
For this purpose, most commands come with an --abort option, for example git merge --abort and git rebase --abort:
$ git merge --abort
$ git status
On branch main
nothing to commit, working tree clean
This should give you the confidence that you really cannot mess up. You can always abort, return to a clean state, and start over.
What Conflicts Really Look Like in Git
Now, safe in the knowledge that nothing can break, let’s see what a conflict really looks like under the hood. This will demystify those little buggers and, at the same time, help you lose respect for them and gain confidence in yourself.
As an example, let’s look at the contents of the (currently conflicted) «index.html» file in an editor:
Git was kind enough to mark the problem area in the file, enclosing it in <<<<<<< HEAD and >>>>>>> [other/branch/name]. The content that comes after the first marker originates from our current working branch. Finally, a line with ======= characters separates the two conflicting changes.
How to Solve a Conflict in Git
Our job as developers now is to clean up these lines: after we’re finished, the file has to look exactly as we want it to look.
It might be necessary to talk to the teammate who wrote the «other» changes and decide which code is actually correct. Maybe it’s ours, maybe it’s theirs — or maybe a mixture between the two.
This process — cleaning up the file and making sure it contains what we actually want — doesn’t have to involve any magic. You can do this simply by opening your text editor or IDE and starting to making your changes.
Often, however, you’ll find that this is not the most efficient way. That’s when dedicated tools can save time and effort:
- Git GUI Tools: Some of the graphical user interfaces for Git can be helpful when solving conflicts. The Tower Git GUI, for example, offers a dedicated «Conflict Wizard» that helps visualize and solve the situation:
- Dedicated Merge Tools: For more complicated conflicts, it can be great to have a dedicated «Diff & Merge Tool» at hand. You can configure your tool of choice using the «git config» command. (Consult your tool’s documentation for detailed instructions.) Then, in case of a conflict, you can invoke it by simply typing
git mergetool. As an example, here’s a screenshot of «Kaleidoscope» on macOS:
After cleaning up the file — either manually or in a Git GUI or Merge Tool — we have to commit this like any other change:
- By using
git add <filename>on the (previously) conflicted file, we inform Git that the conflict has been solved. - When all conflicts have been solved and added to the Staging Area, you need to complete the resolution by creating a regular commit.
How to Become More Confident and Productive
Many years ago, when I started using version control, merge conflicts regularly freaked me out: I was afraid that, finally, I had managed to break things for good. 😩
Only when I took the time to truly understand what was going on under the hood was I able to deal with conflicts confidently and efficiently.
The same was true, for example, when dealing with mistakes: only once I learned how to undo mistakes with Git was I able to become more confident and productive in my work.
I highly recommend taking a look at the free «First Aid Kit for Git«, a collection of short videos about how to undo and recover from mistakes with Git.
Have fun becoming a better programmer!
About the Author
Tobias Günther is the CEO of Tower, the popular Git desktop client that helps more than 100,000 developers around the world to be more productive with Git.
Learn to code for free. freeCodeCamp’s open source curriculum has helped more than 40,000 people get jobs as developers. Get started
Git is an open-source distributed version control system. It helps you manage your project files easily using local branching, staging, and workflows.
Many developers use Git today. And they’re usually familiar with basic Git concepts like:
- How to initiate a repository.
- How to create branches.
- How to stage/unstage changes.
- How to commit changes.
- How to push commits to remote.
However, many developers are confused about concepts like merging and resolving merge conflicts. In this article, we will learn how to resolve merge conflicts in a practical way. This means you will read, understand, and try it out while going through this article.
If you like to learn from video content as well, this article is also available as a video tutorial here: 🙂
If you are new to Git and want to learn all the basic concepts, here is a helpful crash course.
What are Devs Saying about «Merge Conflicts»?
Recently I conducted a poll on Twitter, LinkedIn, and YouTube, asking if developers are comfortable with resolving merge conflicts in Git. Guess what I found?
70%-80% of developers shared that they find it challenging to resolve a merge conflict in Git. So this means that «Resolving Merge Conflicts» is an important topic of discussion.

What is Git Merge and What are Merge Conflicts?
Git is a version control system that keeps a history of all your file versions. You can go back to any of the versions at any time and retrieve an older version.
Suppose you have created a file called abc.txt and pushed it to a Git repository. At this point, the file has its current version associated with it. Now, if your co-worker changed the same file and pushed it back to the repository, the file has a new version associated.
Git Merge is a feature that allows you to keep the file’s current content in sync with other previous versions. This is essential because anyone at any point in time should be working on the most recent content of the file without overriding any changes from the previous versions.
Git merge helps you merge changes from other developers before pushing a new change to the same file.
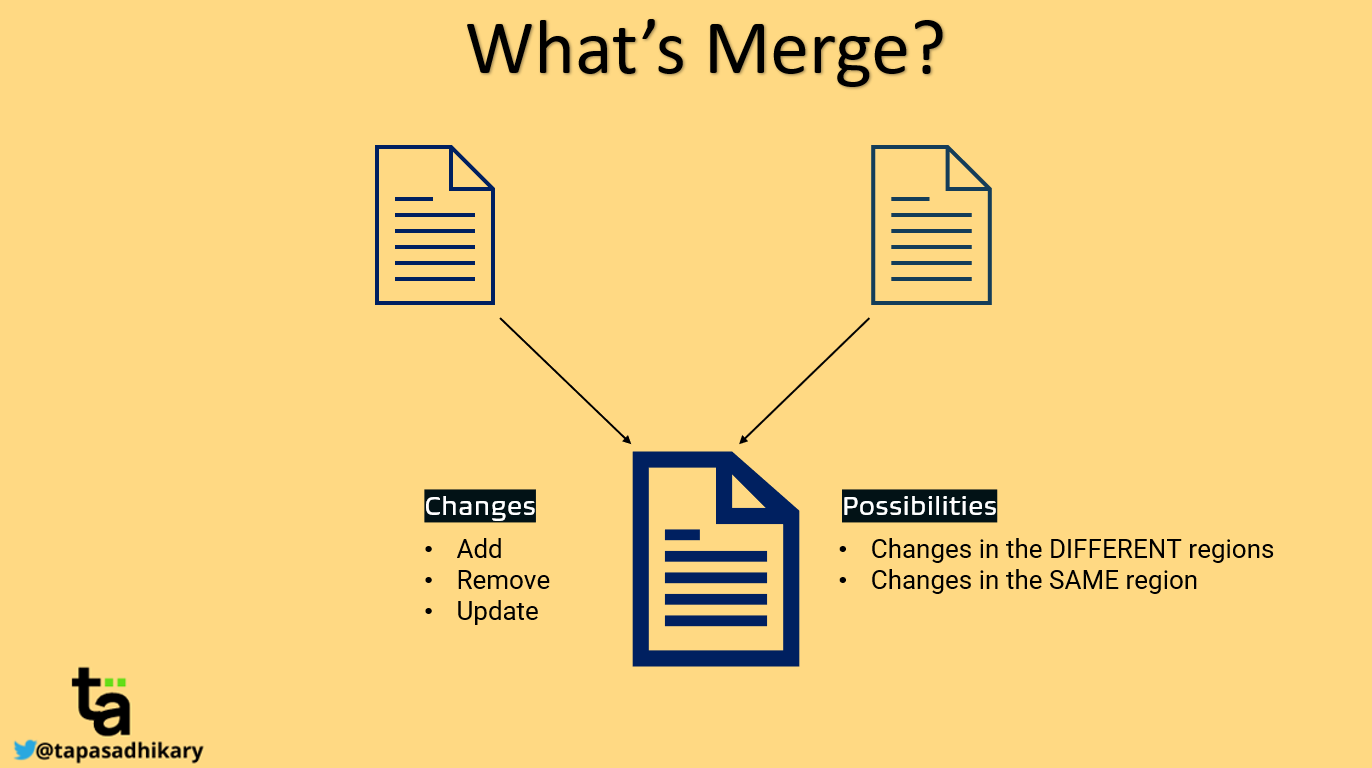
In the case of Git merge, we need to be aware of two things:
- Changes: What type of operations occurred between two versions of a file? New content is added or removed, or existing content is updated.
- Possibilities: There are two possibilities. The changes happened in the
different regionsof the file or the changes happened in thesame regionof the file. Same region means that developers have made changes around the same place (for example, paragraphs, lines, and so on) of a file.
Fortunately, Git automatically takes care of most of these cases using the auto-merge strategy. But when the changes have occurred in the same region of the file, Git won’t perform an auto-merge. Instead, it leaves it to you to Resolve the Merge Conflicts.
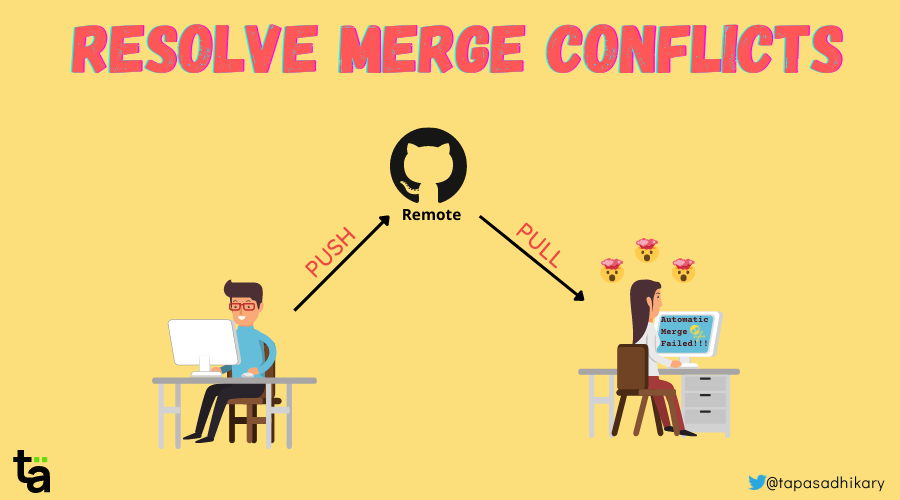
Git Merge Conflicts: A Horror Story
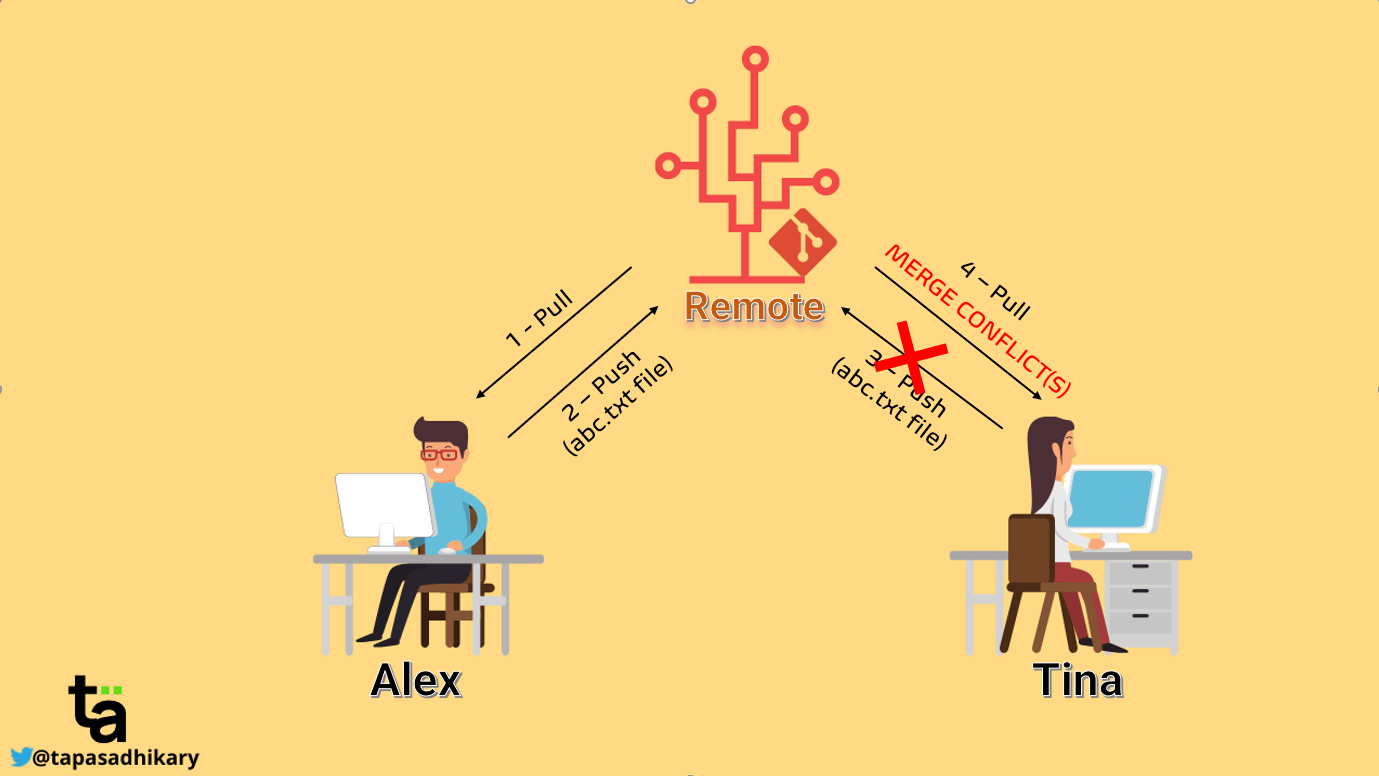
Let’s understand the above situations with a story of two developers, Alex and Tina.
One fine day,
- Alex pulled changes from the remote repository to his local repository.
- He changed the file called
abc.txt, staged it, committed it, and finally pushed it back to the remote repository. - In the meantime, Tina, unaware of Alex’s changes in the
abc.txtfile, made some changes in thesame regionof the file and tried pushing it to the remote repository. Gitis a version control system, so it warned Tina that she had changed the version older than what it was in the remote (as Alex’s changes were already in the remote).- Now, Tina needs to first pull the changes from the remote, update the file, and then try pushing again.
- Tina did this. However, in her wildest nightmare, she got the warning that
auto-mergefailed, and so she needs to nowResolve the merge conflicts.
Does this story ring any bells? Is the above story related to you? There’s a chance that you’ve been in Tina’s shoes in the past. If not, you will get there eventually! So, let’s understand how Tina has to deal with this situation efficiently.
Resolving merge conflicts is not as tricky as it may sound. In 90% of cases, it is easier once you have a clear understanding of the changes and a peaceful mind.
Thought Process
Once Tina pulls the changes, Tina’s local file has her changes plus Alex’s changes. Now Tina can do one of these four things:
- She can keep Alex’s changes and remove hers.
- She can remove Alex’s changes and keep hers.
- She can keep both Alex’s and her changes.
- She can remove both Alex’s and her changes.
Alright, but which one she should be doing? That is entirely dependent on the project’s needs and the use-cases. Tina will understand the incoming changes and do whatever is relevant to the situation.
So, what are incoming changes? How’s Tina going to identify that? How does Tina make the changes? I know you have got many such questions. Let’s get the answers to all of them by taking a couple of real-life examples in the section below.
Steps to Resolve Merge Conflicts in Git
Let’s take a couple of real-life examples of merge conflicts, and learn how to resolve them.
At any point in time, if you want to learn these concepts interactively, please check out this section of the video I have mentioned at the beginning of this article.
Example 1: Changes are in the Same Region of the File
When Git cannot perform an auto-merge because changes are in the same region, it indicates the conflicting regions with special characters. The character sequences are like this:
<<<<<<<=======>>>>>>>
Everything between <<<<<<< and ======= are your local changes. These changes are not in the remote repository yet. All the lines between ======= and >>>>>>> are the changes from the remote repository or another branch. Now you need to look into these two sections and make a decision.
The image below shows the content of a file indicating that auto-merge didn’t occur and there is a conflict. The conflict is in the line where we have modified the file locally by adding a line - Sleep. But in the meantime, someone else pushed a change by adding the line - Gym in the same region.
So, the line - Sleep is marked as the local change and - Gym as the incoming changes from the remote repository or another branch.

Based on your use case and project needs, you will make the call to resolve the conflict. If you need to keep only the line with - Sleep, you will keep that and remove the rest of the conflicting texts. In that case, the file content becomes:
- Eat
- Read
- Sleep
On the contrary, you can keep the line - Gym and remove the - Sleep changes:
- Eat
- Read
- Gym
If you need to keep both lines, remove the lines related to the conflict indicators:
- Eat
- Read
- Sleep
- Gym
If you think none of the changes are required, remove them all.
- Eat
- Read
It is entirely up to you to decide what changes are relevant to the situation. After your changes, you need to make sure that none of the conflict-indicating characters exist (<<<<<<<, =======, >>>>>>>) in the file. Once you settle with the changes, do the following:
Stage the changes:
git add <files>Commit the changes with a message:
git commit -m "Message"Finally, push the changes to the remote:
git pushThat’s all there is to it to resolve the merge conflict in this scenario.
Example 2: The File is Removed at the Remote/Other Branch
In removed file merge conflicts, a dev deletes a file in one branch while another dev edits the same file in another branch. In this case, you need to decide if you want to keep the file or if it was right to delete it.
To add the deleted file back to your branch, do this:
git add <file-name>To go ahead with the deletion of the file, do this:
git rm <file-name>Then commit your changes with a message:
git commit -m "Message"Finally, push it:
git pushWhat’s Next?
If you learn from the above two examples and practice them, you will be able to take care of most scenarios and resolve your merge conflicts. So, I recommend practicing them a couple of times.
If you face any new scenarios or get stuck in resolving a merge conflict, feel free to post a comment about it in the comment section of this video. I’ll try my best to respond back!
Before we wrap up, a few tips for you:
- All the examples shown in this article assumes that you’re using GitBash or any other Git CLI to resolve merge conflicts. You can use any other GUI tool to do the same.
- Always pull from remote/other related branches before you start any new logical work on your code. It will keep your branch up-to-date as much as possible and reduce the chances of conflicts.
- Always pull before a push to make sure you will not face any rejections from Git.
- Talk to your peers/co-developers when you are unable to make a call on what to keep vs. what to remove. Pair up to resolve any difficult merge conflicts.
That’s all for now. I hope you found this article informative and insightful to help you with merge conflicts in Git.
Let’s connect.
- Give a Follow on Twitter if you don’t want to miss the daily dose of Web Development and Programming Tips.
- Check out my Opensource projects on GitHub.
- You can SUBSCRIBE to my YouTube channel if you want to learn JavaScript, ReactJS, Node.js, Git, and all about Web Development in a practical way.
See you soon with my next article. Until then, please take care of yourself, and stay happy.
Learn to code for free. freeCodeCamp’s open source curriculum has helped more than 40,000 people get jobs as developers. Get started
На ранних этапах моей карьеры конфликт слияния был для меня настоящим кошмаром. Думаю, я не одна такая.
Я закончила курсы программирования в 2018 году. В те времена, столкнувшись с проблемой с git, с которой не могла справиться, я просто создавала новый репозиторий и начинала все сначала.
В 2019 году я начала работать в команде с другими разработчиками и уже не могла избегать проблем, просто создавая новые репозитории. Мне пришлось посмотреть в лицо своему страху и научиться разрешать конфликты слияния.
Это было непросто. К счастью, сегодня я чувствую себя более уверенно. Конфликты по-прежнему раздражают, но теперь у меня в арсенале есть пара приемов для исправления ситуации.
Предварительные условия для разрешения конфликта слияния
Дышите глубже
Все в порядке. Конфликты случаются. Вы не первый человек, столкнувшийся с конфликтом слияния. С ними сталкиваются все разработчики, а частота инцидентов зависит от опыта. Конфликты — распространенное явление в контроле версий.
Разберитесь, почему возник конфликт слияния
Системы контроля версий вроде Git автомагически управляют контрибуциями кода. Они идентифицируют изменение, момент его появления, автора и то, в какой строке это изменение появилось. Благодаря этому разработчики могут легко отследить историю своей кодовой базы.
Но иногда Git бывает сбит с толку. Например, в следующих ситуациях:
- Двое или больше людей изменили одну и ту же строку в файле и пытаются смержить изменения в одну и ту же ветку
- Один разработчик удалил файл, а другой его отредактировал, и оба пытаются смержить свои изменения в одну ветку
- Один разработчик удалил строку, а другой ее отредактировал, и оба пытаются смержить свои изменения в одну ветку
- Разработчик взял изменения из одного коммита в ветке и попытался применить их в виде нового коммита (
cherry-pick) - Разработчик сделал rebase ветки: переместил последовательность коммитов в базовый коммит.
Git не уверен, какие изменения нужно применить, поэтому обращается за помощью к разработчику — посылает уведомление о конфликте слияния. Ваша задача — помочь Git определить, какие из изменений наиболее точны.
Разрешение конфликтов слияния
В редакторе кода или IDE
Загляните в логи
Если вы запустили git merge и возник конфликт слияния, ваш терминал или командная строка ответит вам сообщением:
CONFLICT (content): Merge conflict in [filename]
Это сообщение говорит нам, в каком конкретно файле возник конфликт.
Найдите конфликт
Откройте файл, на который указал Git, и прокрутите его, пока не найдете конфликт. Ваша IDE может подсказать вам нужное место при помощи подсветки. В примере ниже показано, как это выглядит в VS Code. Редактор подсвечивает текущее изменение и входящее.
- Текущее изменение (англ. current change) также иногда называют исходящим. Оно представляет изменения в коде, которые вы сделали в вашей локальной ветке.
- Входящее изменение (англ. incoming change) представляет изменения в коде, которые вы вытягиваете (pull) из базовой ветки, или изменения, внесенные другими разработчиками.

Решите, какие изменения нужно применить
То, хотите ли вы принять текущие изменения, входящие изменения или все изменения, зависит от ваших целей. При принятии решения вы ориентируетесь на свое понимание этих изменений.
Если вы не знаете, как поступить, лучше всего посоветоваться с командой или тем разработчиком, который написал входящие изменения.
Вы можете принять изменения, не делая коммит, и локально протестировать программу на работоспособность.
Удалите все длинные последовательности символов ==== , <<<< или >>>>
Эти символы используются для того, чтобы помочь вам определить, где возник конфликт слияния. При принятии выбранных изменений они обычно исчезают, но порой случаются сбои. Проследите за тем, чтобы случайно не включить их в коммит: это может привести к багам в программе.
Что, если я ошибся?
Если вы допустили ошибку или не уверены в том, какие изменения нужно принять, вы можете остановить процесс слияния, запустив следующую команду:
git merge --abort
После этого не надо сидеть и смотреть в пустоту. Обратитесь к коллегам (желательно, к тому, чей код конфликтует с вашим, или к тому, кому больше доверяете). Объясните ситуацию: «Слушай, у меня возник конфликт слияния. Я не знаю, какие изменения принять. У тебя есть пара минут, чтобы мне помочь?»
Если вы уверены, что конфликт разрешен, сделайте коммит изменений
После принятия нужных изменений вы можете сделать коммит. Проделайте следующие шаги:
- Сохраните файлы, в которые были внесены изменения
- Запустите
git statusи проверьте, что изменения коснулись правильных файлов - Добавьте выбранные файлы в стейджинг:
git add [имя файла] - Сделайте коммит изменений:
git commit -m «[ваше сообщение коммита]» - Запустите
git push
На GitHub
Определите, в каких файлах возник конфликт
При открытии пул-реквеста на GitHub в случае конфликта вы получите уведомление об этом. В нем также будет информация о соответствующих файлах.

Найдите конфликт
Чтобы найти конфликты, нажмите «Resolve conflicts». Это приведет вас к нужным файлам.
Определите, какие изменения нужно принять
Веб-интерфейс GitHub подсвечивает конфликтующие изменения желтым цветом и выделяет символами <<<<<, ====, >>>>.
GitHub также указывает на ветки, из которых происходят эти изменения. Это должно помочь вам решить, какие изменения следует принять. Будут это изменения из вашей ветки, из базовой или обеих — зависит от вас. При выборе опирайтесь на свои знания и мнение коллег.

Удалите строки, которые не нужны. Также удалите все лишние последовательности символов ====, <<<< или >>>>.
Когда будете уверены, что конфликт разрешен, сделайте коммит изменений
Удалив конфликтующие изменения и все символы, которые использовались для их выделения, нажмите «Mark as Resolved» и затем «Commit merge».

Больше о конфликтах слияния и их разрешении можно почитать в официальной документации GitHub.
Перевод статьи «How Do I Resolve Merge Conflicts?».