About commit email addresses
GitHub uses your commit email address to associate commits with your account on GitHub.com. You can choose the email address that will be associated with the commits you push from the command line as well as web-based Git operations you make.
For web-based Git operations, you can set your commit email address on GitHub.com. For commits you push from the command line, you can set your commit email address in Git.
Any commits you made prior to changing your commit email address are still associated with your previous email address.
Note: You cannot verify email addresses from disposable email address services (services that allow you to receive email at a temporary address that expires after a certain time). If you’d like to keep your email address private, you can use a GitHub-provided noreply email address. For more information, see «Setting your commit email address on GitHub.»
If you’d like to keep your personal email address private, you can use a noreply email address from GitHub as your commit email address. To use your noreply email address for commits you push from the command line, use that email address when you set your commit email address in Git. To use your noreply address for web-based Git operations, set your commit email address on GitHub and choose to Keep my email address private.
You can also choose to block commits you push from the command line that expose your personal email address. For more information, see «Blocking command line pushes that expose your personal email.»
To ensure that commits are attributed to you and appear in your contributions graph, use an email address that is connected to your account on GitHub.com, or the noreply email address provided to you in your email settings. For more information, see «Adding an email address to your GitHub account.»
Note: If you created your account on GitHub.com after July 18, 2017, your noreply email address for GitHub is an ID number and your username in the form of ID+USERNAME@users.noreply.github.com. If you created your account on GitHub.com prior to July 18, 2017, your noreply email address from GitHub is USERNAME@users.noreply.github.com. You can get an ID-based noreply email address for GitHub by selecting (or deselecting and reselecting) Keep my email address private in your email settings.
If you use your noreply email address for GitHub to make commits and then change your username, those commits will not be associated with your account on GitHub.com. This does not apply if you’re using the ID-based noreply address from GitHub. For more information, see «Changing your GitHub username.»
Setting your commit email address on GitHub
If you haven’t enabled email address privacy, you can choose which verified email address to author changes with when you edit, delete, or create files or merge a pull request on GitHub. If you enabled email address privacy, then the commit author email address cannot be changed and is <username>@users.noreply.github.com by default.
-
In the upper-right corner of any page, click your profile photo, then click Settings.

-
In the «Access» section of the sidebar, click Emails.
-
In «Add email address», type your email address and click Add.
-
Verify your email address.
-
In the «Primary email address» list, select the email address you’d like to associate with your web-based Git operations.
-
To keep your email address private when performing web-based Git operations, click Keep my email addresses private.


Setting your commit email address in Git
You can use the git config command to change the email address you associate with your Git commits. The new email address you set will be visible in any future commits you push to GitHub.com from the command line. Any commits you made prior to changing your commit email address are still associated with your previous email address.
Setting your email address for every repository on your computer
- Open TerminalTerminalGit Bash.
- Set an email address in Git. You can use your GitHub-provided
noreplyemail address or any email address.$ git config --global user.email "YOUR_EMAIL" - Confirm that you have set the email address correctly in Git:
$ git config --global user.email email@example.com - Add the email address to your account on GitHub, so that your commits are attributed to you and appear in your contributions graph. For more information, see «Adding an email address to your GitHub account.»
Setting your email address for a single repository
GitHub uses the email address set in your local Git configuration to associate commits pushed from the command line with your account on GitHub.com.
You can change the email address associated with commits you make in a single repository. This will override your global Git configuration settings in this one repository, but will not affect any other repositories.
- Open TerminalTerminalGit Bash.
- Change the current working directory to the local repository where you want to configure the email address that you associate with your Git commits.
- Set an email address in Git. You can use your GitHub-provided
noreplyemail address or any email address.$ git config user.email "YOUR_EMAIL" - Confirm that you have set the email address correctly in Git:
$ git config user.email email@example.com - Add the email address to your account on GitHub, so that your commits are attributed to you and appear in your contributions graph. For more information, see «Adding an email address to your GitHub account.»
I have a project hosted in Git stash (now rebranded as Bitbucket Server). It is built using Jenkins.
Now I made a typo while installing my Git locally.
Like @ab.example instead of @abc.example
After every build, Jenkins sends email notifications and it picks up my incorrect email address from Git commit and tries to send it.
Even after I have changed the email address in my local Git, I still see Jenkins sending the emails to the old incorrect address.
How can I fix this?
![]()
asked Jun 14, 2016 at 7:29
![]()
2
Locally set email-address (separately for each repository)
-
Open Git Bash.
-
Change the current working directory to the local repository in which you want to set your Git config email.
-
Set your email address with the following command:
git config user.email "your_email@abc.example"
- Confirm that you have set your email address correctly with the following command.
git config user.email
Globally set email-address (only used when nothing is set locally)
-
Open Git Bash.
-
Set your email address with the following command:
git config --global user.email "your_email@abc.example"
- Confirm that you have set your email address:
git config --global user.email
Or using environment variables
GIT_COMMITTER_EMAIL=your_email@abc.exampleGIT_AUTHOR_EMAIL=your_email@abc.example
PD: Info from GitHub official guide
![]()
answered Jun 14, 2016 at 7:39
![]()
MarcMarc
5,4541 gold badge15 silver badges10 bronze badges
5
According to the git documentation, all you should have to do is re-run
$ git config --global user.name "John Doe"
$ git config --global user.email johndoe@example.com
Then just check to make sure the change took effect
$ git config --list
This is listed in the Pro Git book, written by Scott Chacon and Ben Straub
1.6 Getting Started — First-Time Git Setup
answered Aug 4, 2018 at 4:23
![]()
use
«git -c user.name=»your name» -c user.email=youremail@email.com
commit —amend —reset-author»
answered Mar 1, 2019 at 9:23
![]()
user3143487user3143487
2253 silver badges6 bronze badges
To set your global username/email configuration:
-
Open the command line.
-
Set your username:
git config --global user.name "FIRST_NAME LAST_NAME" -
Set your email address:
git config --global user.email "MY_NAME@example.com"
To set repository-specific username/email configuration:
-
From the command line, change into the repository directory.
-
Set your username:
git config user.name "FIRST_NAME LAST_NAME" -
Set your email address:
git config user.email "MY_NAME@example.com" -
Verify your configuration by displaying your configuration file:
cat .gitconfig
For more information and for other version control systems .. => SeeThis
![]()
awgtek
1,27115 silver badges23 bronze badges
answered May 1, 2020 at 6:52
![]()
EndriyasEndriyas
5166 silver badges12 bronze badges
Edit your email directly in the JENKINS_HOME/users/YOUR_NAME/config.xml configuration file and restart the Jenkins server
![]()
answered Nov 9, 2018 at 13:49
![]()
The commands explained set the email in the .git/config locally:
[core]
    repositoryformatversion = 0
    filemode = true
    bare = false
    logallrefupdates = true
[remote "origin"]
        url = https://username:password@git.mydomain.io/username/repo.git
        fetch = +refs/heads/*:refs/remotes/origin/*
[branch "master"]
        remote = origin
        merge = refs/heads/master
[branch "beta"]
        remote = origin
        merge = refs/heads/beta
[user]
        email = pippo.caio@sempronio.io
answered Jul 6, 2022 at 9:51
![]()
gdmgdm
7,5313 gold badges40 silver badges70 bronze badges
Первоначальная настройка Git
Теперь, когда Git установлен в вашей системе, самое время настроить среду для работы с Git под себя.
Это нужно сделать только один раз — при обновлении версии Git настройки сохранятся.
Но, при необходимости, вы можете поменять их в любой момент, выполнив те же команды снова.
В состав Git входит утилита git config, которая позволяет просматривать и настраивать параметры, контролирующие все аспекты работы Git, а также его внешний вид.
Эти параметры могут быть сохранены в трёх местах:
-
Файл
[path]/etc/gitconfigсодержит значения, общие для всех пользователей системы и для всех их репозиториев.
Если при запускеgit configуказать параметр--system, то параметры будут читаться и сохраняться именно в этот файл.
Так как этот файл является системным, то вам потребуются права суперпользователя для внесения изменений в него. -
Файл
~/.gitconfigили~/.config/git/configхранит настройки конкретного пользователя.
Этот файл используется при указании параметра--globalи применяется ко всем репозиториям, с которыми вы работаете в текущей системе. -
Файл
configв каталоге Git (т. е..git/config) репозитория, который вы используете в данный момент, хранит настройки конкретного репозитория.
Вы можете заставить Git читать и писать в этот файл с помощью параметра--local, но на самом деле это значение по умолчанию.
Неудивительно, что вам нужно находиться где-то в репозитории Git, чтобы эта опция работала правильно.
Настройки на каждом следующем уровне подменяют настройки из предыдущих уровней, то есть значения в .git/config перекрывают соответствующие значения в [path]/etc/gitconfig.
В системах семейства Windows Git ищет файл .gitconfig в каталоге $HOME (C:Users$USER для большинства пользователей).
Кроме того, Git ищет файл [path]/etc/gitconfig, но уже относительно корневого каталога MSys, который находится там, куда вы решили установить Git при запуске инсталлятора.
Если вы используете Git для Windows версии 2.х или новее, то так же обрабатывается файл конфигурации уровня системы, который имеет путь C:Documents and SettingsAll UsersApplication DataGitconfig в Windows XP или C:ProgramDataGitconfig в Windows Vista и новее.
Этот файл может быть изменён только командой git config -f <file>, запущенной с правами администратора.
Чтобы посмотреть все установленные настройки и узнать где именно они заданы, используйте команду:
$ git config --list --show-originИмя пользователя
Первое, что вам следует сделать после установки Git — указать ваше имя и адрес электронной почты.
Это важно, потому что каждый коммит в Git содержит эту информацию, и она включена в коммиты, передаваемые вами, и не может быть далее изменена:
$ git config --global user.name "John Doe"
$ git config --global user.email johndoe@example.com
Опять же, если указана опция --global, то эти настройки достаточно сделать только один раз, поскольку в этом случае Git будет использовать эти данные для всего, что вы делаете в этой системе.
Если для каких-то отдельных проектов вы хотите указать другое имя или электронную почту, можно выполнить эту же команду без параметра --global в каталоге с нужным проектом.
Многие GUI-инструменты предлагают сделать это при первом запуске.
Выбор редактора
Теперь, когда вы указали своё имя, самое время выбрать текстовый редактор, который будет использоваться, если будет нужно набрать сообщение в Git.
По умолчанию Git использует стандартный редактор вашей системы, которым обычно является Vim.
Если вы хотите использовать другой текстовый редактор, например, Emacs, можно проделать следующее:
$ git config --global core.editor emacsВ системе Windows следует указывать полный путь к исполняемому файлу при установке другого текстового редактора по умолчанию.
Пути могут отличаться в зависимости от того, как работает инсталлятор.
В случае с Notepad++, популярным редактором, скорее всего вы захотите установить 32-битную версию, так как 64-битная версия ещё не поддерживает все плагины.
Если у вас 32-битная Windows или 64-битный редактор с 64-битной системой, то выполните следующее:
$ git config --global core.editor "'C:/Program Files/Notepad++/notepad++.exe' -multiInst -notabbar -nosession -noPlugin"|
Примечание |
Vim, Emacs и Notepad++ — популярные текстовые редакторы, которые часто используются разработчиками как в Unix-подобных системах, таких как Linux и Mac, так и в Windows. |
|
Предупреждение |
В случае, если вы не установили свой редактор и не знакомы с Vim или Emacs, вы можете попасть в затруднительное положение, когда какой-либо из них будет запущен. |
Настройка ветки по умолчанию
Когда вы инициализируете репозиторий командой git init, Git создаёт ветку с именем master по умолчанию.
Начиная с версии 2.28, вы можете задать другое имя для создания ветки по умолчанию.
Например, чтобы установить имя main для вашей ветки по умолчанию, выполните следующую команду:
$ git config --global init.defaultBranch mainПроверка настроек
Если вы хотите проверить используемую конфигурацию, можете использовать команду git config --list, чтобы показать все настройки, которые Git найдёт:
$ git config --list
user.name=John Doe
user.email=johndoe@example.com
color.status=auto
color.branch=auto
color.interactive=auto
color.diff=auto
...
Некоторые ключи (названия) настроек могут отображаться несколько раз, потому что Git читает настройки из разных файлов (например, из /etc/gitconfig и ~/.gitconfig).
В таком случае Git использует последнее значение для каждого ключа.
Также вы можете проверить значение конкретного ключа, выполнив git config <key>:
$ git config user.name
John Doe|
Примечание |
Так как Git читает значение настроек из нескольких файлов, возможна ситуация когда Git использует не то значение что вы ожидали. |
As a basic refresher for most working on multiple coding projects or git-scm hosted accounts changing from one git account to another begs the question:
How do I see or change my Git (or github) username (usually email address)?
How to show your Git username – the basics
Use one of these methods:
- git config -get [user.name | user.email]
- git config –list
- or, open your git config file directly
Let’s examine each of these show your git username basics:
#1 – Use the command, git config -get [user.name | user.email]
git config user.nameThis returns
Christian ScreenAnd if you enter git config user.email from the terminal from anywhere with your git initiated directory such as
git config user.emailthis will return
cscreen@aiteamsuperstars.com#2 – Use the command, ‘git config –list’
This approach shows all of the key configurations from your git config file, so entering the command from the terminal:
git config --listwill return the following:
credential.helper=osxkeychain
user.name=Christian Screen
user.email=cscreen@aiteamsuperstars.com

core.repositoryformatversion=0
core.filemode=true
core.bare=false
core.logallrefupdates=true
core.ignorecase=true
core.precomposeunicode=true
remote.origin.url=https://github.com/aicglabs/datalakehouse.git
#3 – Use the ‘open your git config file directly’ approach via the terminal
If the above approaches for some reason did not work then open the file for reading/editing in your terminal window or favorite editor. Terminal window review and editing is recommended to avoid issues. Use the following command to view the global git settings:
vi ~/.gitconfigThis will open the VimEditor and your .gitconfig file should look something like this:
[user]
        name = Christian Screen
        email = cscreen@aiteamsuperstars.com
Since this is your ‘global’ git user information (using the user home director path, ~/) you could have a different settings in other projects you might be working on.
NB: I find it best that if you have a specific project you are contributing to and need to use different credentials for the contribution, you should clone the project and then within the project use the command line to change your user.name and user.email just for that local git repository clone project to not impact your global settings. This would look like this from the command line (notice the –global is missing):
git config user.name "Christian Contribution Project"
git config user.email "christian@personalemail.com"
Read below if you’d like to see how to change your global Git username or email address.
How to change your Git username – the basics
Changing your Git username is fairly straightforward. In your terminal window enter the following:
git config --global user.name "Christian The Architect"You can then view the change directly in the ~/.gitconfig file or just use the ~/.gitconfig file to edit the user.name key/value pair directly in the Vim Editor as you see here:
vi ~/.gitconfigSince this is again your global Git config file, be sure edit it carefully. Remember in the Vi(m) Editor, use the ‘Esc’ key and then type ‘wq’ and then press the ‘Return’ or ‘Enter’ key to write/save the file and exit.
How to change your Git email address – the basics
You can change your email address with the same process and command as you would your username using these commands from the terminal:
git config --global user.email "cscreen@aiteamsuperstars.com"View any of your global changes (those made with the –global flag) using either command below:
cat ~/.gitconfig
vi ~/.gitconfig
Hopefully you’ll have success remembering these basic Git commands.
Before we jump into solutions, let’s find out what exactly it is you want to accomplish:
a) Change the author information before making a commit
b) Change the author information after making a commit (i.e. for historical commits)
Let’s look at both cases in detail.

The Git Cheat Sheet
No need to remember all those commands and parameters: get our popular «Git Cheat Sheet» — for free!
Changing Your Git Author Identity
There are three ways to change your committer identity in Git. All of these methods only affect future commits, not past ones!
Changing Your Committer Name & Email Globally
You can run the «git config» command with the —global flag; this will make sure all of your future commits use the given information:
$ git config --global user.name "John Doe"
$ git config --global user.email "john@doe.org"
Changing Your Committer Name & Email per Repository
If you want to use special settings only when working in a certain repository, you can simply omit the —global flag. This makes the configuration valid only in that repository:
$ git config user.name "John Doe"
$ git config user.email "john@doe.org"
Tip
Changing Committer Information in Tower
In case you are using the Tower Git client, you can create and manage multiple «Committer Identities» — one for work, one for side projects, one for Open Source… You can then choose which profile you want to use on a per-repository or even a per-commit basis!

Finally, with the —author flag, you can also overwrite the author information for just the next commit:
git commit --author="John Doe <john@doe.org>"Editing the Author of Past Commits
Note
Editing Past Commits Rewrites History!
No matter how exactly we change the information of past commits, there’s one thing to always keep in mind: if we do this, we are effectively rewriting commit history.
This is nothing to take lightly: you will create new commit objects in this process, which can become a serious problem for your collaborators — because they might have already based new work on some of the original commits.
Therefore, think twice before you rewrite your commit history!
There are three basic ways to edit your past commits:
Using —amend for the Very Last Commit
In case you want to change just the very last commit, Git offers a very easy way to do this:
git commit --amend --author="John Doe <john@doe.org>"This effectively replaces the last commit with your «edited» version, correcting the wrong author information.
Using Interactive Rebase
Interactive Rebase is the Swiss Army Knife of tools in Git: it allows you to do and change almost anything. However, being as powerful as it is, this also means you can very easily shoot yourself in the foot. Use it with care (and possibly read up on it)!
The first step is to identify the last «good» commit and provide its hash to the rebase command:
$ git rebase -i -p 0ad14fa5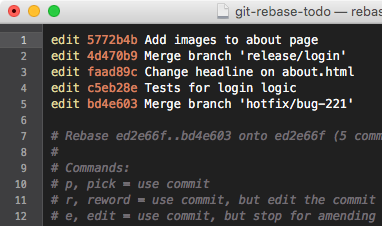
Your editor will open, requesting you to mark all the commits you want to change with the «edit» keyword.
Git will now walk you through each commit, giving you the chance to mold it as you desire:
Stopped at 5772b4bf2... Add images to about page
You can amend the commit now, with

    git commit --amend

Once you are satisfied with your changes, run

    git rebase --continue
Your job, now, is to correct the author information and then continue to the next concerned commit object until you’ve edited all the commits you just marked:
$ git commit --amend --author="John Doe <john@doe.org>" --no-edit
$ git rebase --continue
Using git filter-branch
Another way is to use Git’s «filter-branch» command. It allows you to batch-process a (potentially large) number of commits with a script.
You can run the below sample script in your repository (filling in real values for the old and new email and name):
$ git filter-branch --env-filter '
WRONG_EMAIL="wrong@example.com"
NEW_NAME="New Name Value"
NEW_EMAIL="correct@example.com"

if [ "$GIT_COMMITTER_EMAIL" = "$WRONG_EMAIL" ]
then
    export GIT_COMMITTER_NAME="$NEW_NAME"
    export GIT_COMMITTER_EMAIL="$NEW_EMAIL"
fi
if [ "$GIT_AUTHOR_EMAIL" = "$WRONG_EMAIL" ]
then
    export GIT_AUTHOR_NAME="$NEW_NAME"
    export GIT_AUTHOR_EMAIL="$NEW_EMAIL"
fi
' --tag-name-filter cat -- --branches --tags
The same warning applies to this method as to the others mentioned: you are rewriting history with this command, creating new commit objects along the way!
Preferably, you should only do this in repositories that haven’t been published / shared, yet. In any other case you should use it with extreme care — and only if you’re aware of the side effects!
Learn More
- Check out the chapters Getting Ready and Undoing Things in our free online book
- More frequently asked questions about Git & version control
Git — это распределенная система контроля версий, которая сегодня используется большинством команд разработчиков программного обеспечения. Первое, что вам нужно сделать после установки Git в вашей системе, — это настроить ваше имя пользователя и адрес электронной почты git. Git связывает вашу личность с каждой сделанной вами фиксацией.
Git позволяет вам установить глобальное имя пользователя и адрес электронной почты для каждого проекта. Вы можете установить или изменить свой идентификатор git с помощью команды git config . Изменения влияют только на будущие коммиты. Имя и адрес электронной почты, связанные с коммитами, которые вы сделали до изменения, не затронуты.
Установка глобального имени пользователя и пароля Git
Глобальное имя пользователя и пароль git связаны с коммитами во всех репозиториях вашей системы, которые не имеют значений, специфичных для репозитория.
Чтобы установить глобальное имя фиксации и адрес электронной почты, выполните команду git config с параметром --global :
git config --global user.name "Your Name"git config --global user.email "[email protected]"
После этого вы можете подтвердить, что информация установлена, запустив:
git config --listuser.name=Your Name
[email protected]
Команда сохраняет значения в глобальном файле конфигурации ~/.gitconfig :
~/.gitconfig
[user]
    name = Your Name
    email = [email protected]
Вы также можете редактировать файл в текстовом редакторе, но рекомендуется использовать команду git config .
Установка имени пользователя и пароля Git для одного репозитория
Если вы хотите использовать другое имя пользователя или адрес электронной почты для определенного репозитория, запустите команду git config без параметра --global из каталога репозитория.
Допустим, вы хотите установить имя пользователя и адрес электронной почты для конкретного репозитория для файла, хранящегося в каталоге ~/Code/myapp . Сначала переключите корневой каталог репозитория:
cd ~/Code/myappЗадайте имя пользователя и адрес электронной почты Git:
git config user.name "Your Name"git config user.email "[email protected]"
Убедитесь, что изменения были внесены правильно:
git config --listuser.name=Your Name
[email protected]
Параметры репозитория хранятся в файле .git/config в корневом каталоге репозитория.
Выводы
Имя пользователя и адрес электронной почты Git можно установить с помощью команды git config . Значения связаны с вашими коммитами.
Если вы новичок в Git, прочтите книгу Pro Git , которая является отличным ресурсом для изучения того, как использовать Git.
Оставьте комментарий ниже, если столкнетесь с проблемой или у вас есть отзыв.