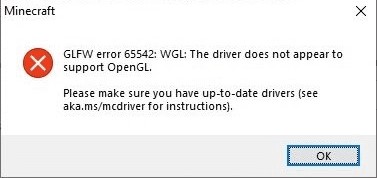
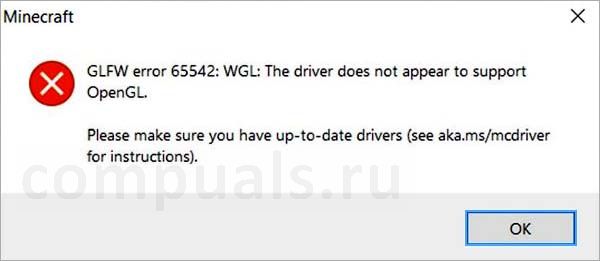
Ошибка GLFW error 65542 WGL: The driver does not appear to support OpenGL возникает при запуске лаунчера игры Micnecraft на ПК с Windows 11 и 10. Кроме того, с данной проблемой можно столкнуться и при запуске других игр и программ для видеомонтажа, 3D графики.
OpenGL (Open Graphics Library) — это кросс-платформенный API интерфейс программирования для обработки 2 и 3D графики, чтобы снизить нагрузку на систему.
Если касаясь самой игры Minecraft, то произошло в игре обновление шейдеров и ошибка возникает у пользователей, которые имеют встроенную видеокарту и данная видеокарта не поддерживает шейдеры. В этой ситуации вы ничего не сделайте, но можно переключиться на внешнюю видеокарту, если у вас их две. Кроме того, ошибка 65542 OpenGL может быть из-за повреждения графического драйвера.
Как исправить ошибку OpenGL GLFW 65542 в Windows 11/10
В данной инструкции разберем, как исправить ошибку «GLFW error 65542 WGL The driver does not appear to support OpenGL» при запуске таких игр как Minecraft в Windows 11/10.
1. Правильно обновить видеодрайвер
Исключим сразу две проблемы — это устаревшие графические драйвера и поврежденные. По этой причине, нужно следовать поэтапно для правильного обновления GPU драйверов. Обратитесь ниже к полным руководствам.
- Удалите текущие видеодрайвера Intel, AMD или Nvidia при помощи DDU
- Установите GPU драйвера с официальных сайтов Intel, AMD или Nvidia
2. Удалить DisplayLink
Если у вас установлен драйвер DisplayLink USB Graphics, то было установлено на форуме игры, что данное ПО конфликтует с Minecraft Java. Сам DisplayLink нужен для подключения нескольких мониторов.
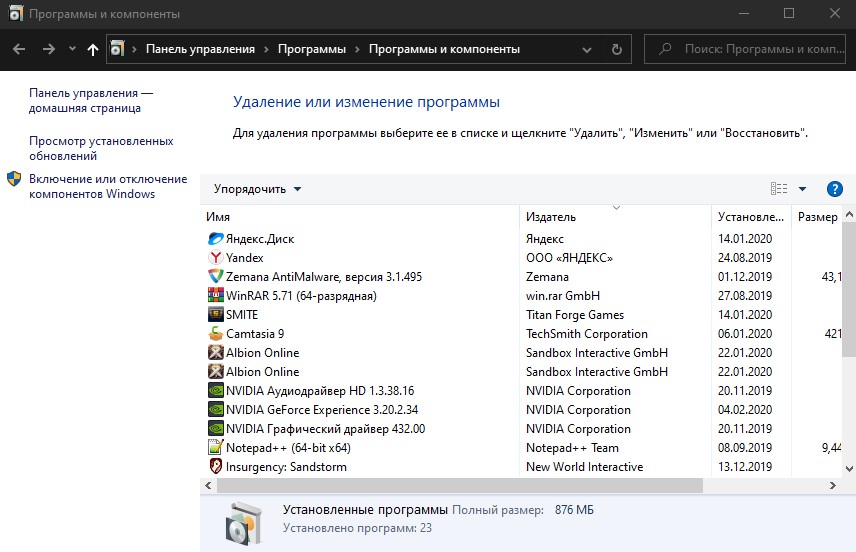
- Откройте удаление программ
- Удалите DisplayLink, если он есть в списке
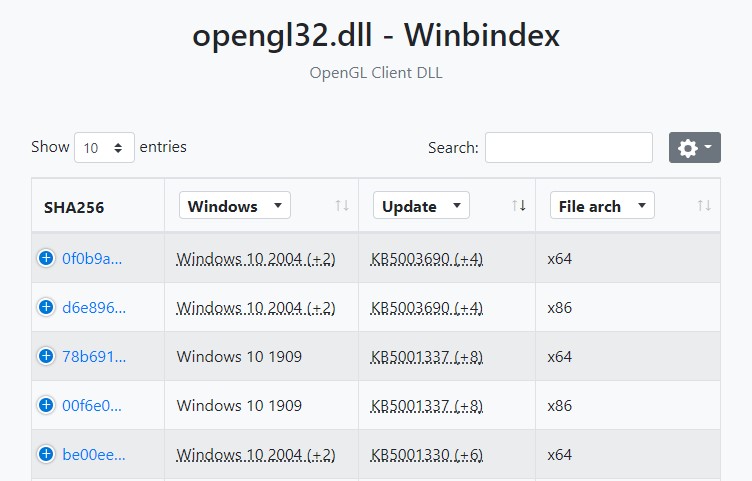
3. Скачать оригинальный OpenGL32.dll, DirectX и Java
Скачайте оригинальный файл OpenGL32.dll через winbindex и скопируйте его к себе по пути:
- C:WindowsSystem32
- C:WindowsSysWOW64
! Если не помогла вставка файла OpenGL32.dll, то обновите DirectX и Java
4. Отключить встроенную видеокарту
Если у вас две видеокарты на ноутбуке или компьютере, то стоит отключить работу встроенной видеокарты, так как шейдеры могут быть не поддерживать в ней, и включить работу внешней карты.
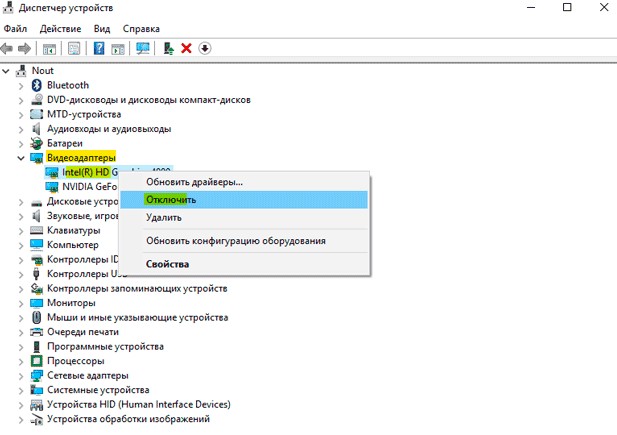
- Нажмите Win+X и выберите Диспетчер устройств
- Разверните гафу Видеоадаптеры
- Нажмите правой кнопкой мыши по встроенной видеокарте
- Выберите Отключить и перезагрузитесь
5. Попробуйте другую версию Minecraft
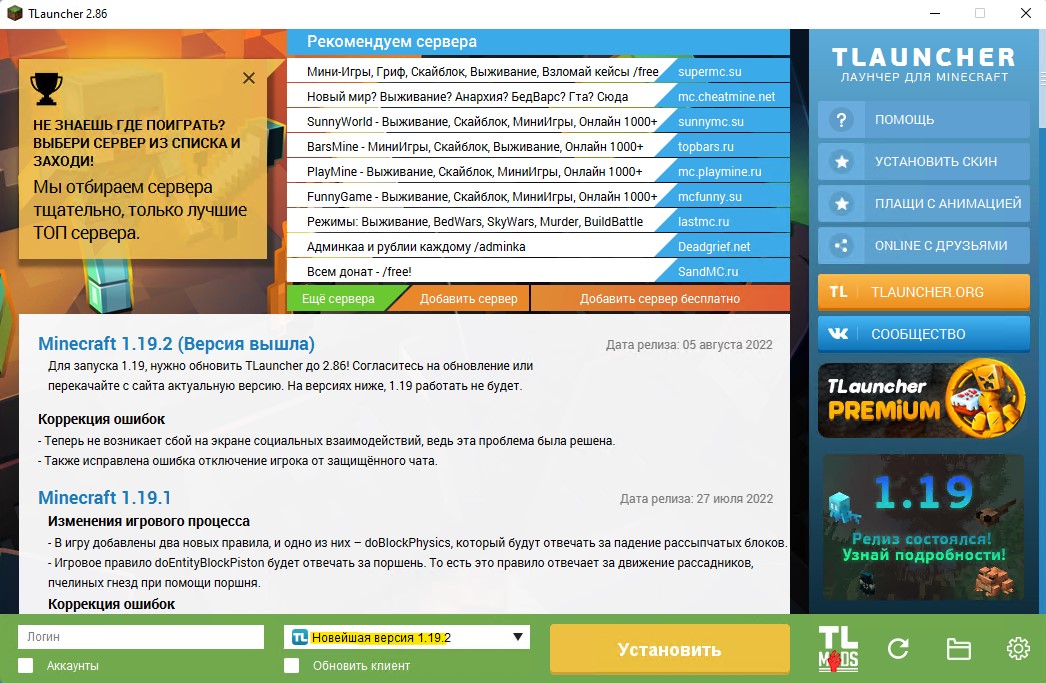
Если ни один выше способ не помог, то можно понизить версию Minecraft в TL Launcher.
Смотрите еще:
- Отсутствует OpenGl32.dll в Windows 11/10 — Как исправить?
- Файл Opencl.dll отсутствует в Windows 10 — Как исправить?
- Видеодрайвер Nvidia перестал отвечать и был успешно восстановлен
- Приложению заблокирован доступ к графическому оборудованию
- A D3D11 compatible GPU Feature Level 11.0 — Решение
[ Telegram | Поддержать ]
Некоторые игроки Minecraft сталкиваются с ошибкой GLFW 65542 каждый раз, когда пытаются запустить игру. Эта проблема чаще всего возникает в Windows 10 с версией Minecraft на базе Java.
Большинство пользователей, которые боролись с этим кодом ошибки, смогли исправить ошибку GLFW 65542, скопировав отсутствующий файл opengl32.dll вручную в JRE (каталог Java). Если это не работает или вы хотите избежать каких-либо ручных изменений в каталоге JAVA, вы также можете переустановить каждый драйвер графического процессора, чтобы убедиться, что файл opengl32.dll будет переустановлен.
Однако, если вы столкнулись с этой проблемой в Java-версии Minecraft, эта проблема также может быть облегчена конфликтом с драйвером DisplayLink. В этом случае вы можете решить проблему, удалив конфликтующий драйвер и перезапустив игру.
Способ 1: добавление OpenGL.DLL вручную
Несмотря на то, что каждый необходимый файл библиотеки динамической компоновки обычно включается вашим драйвером графического процессора, это не всегда так. Более того, вы могли по ошибке удалить opengl32.dll или opengl64.dll, что в конечном итоге вызовет ошибку GLFW 65542.
Если этот сценарий применим, один из способов решить проблему — вручную скопировать отсутствующий файл .DLL в папку Java и JRE, чтобы позволить Minecraft использовать OpenGL. Это исправление было подтверждено множеством пользователей, которые в настоящее время сталкиваются с ошибкой 65542 в Minecraft.
Чтобы вручную добавить файл OpenGL.dll в путь Java, следуйте инструкциям ниже:
-
-
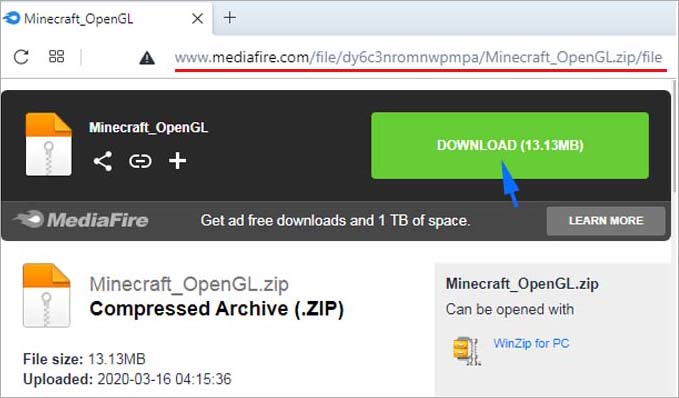
- Откройте эту ссылку ( здесь ), загрузите файл Minecraft_OpenGL.zip и дождитесь завершения загрузки. После завершения загрузки извлеките содержимое архива с помощью такой утилиты, как 7zip или WinZip .
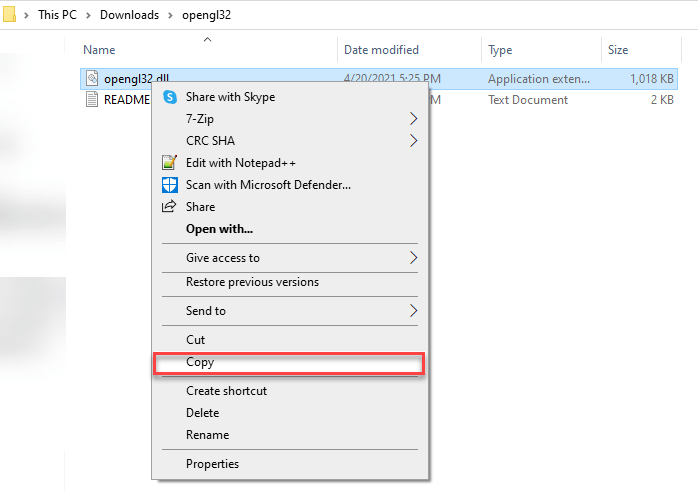
- После извлечения содержимого этой утилиты скопируйте файл, совместимый с архитектурой вашей ОС, в буфер обмена, щелкнув его правой кнопкой мыши и выбрав « Копировать» или « Вырезать» .
Примечание. Если вы не знаете, какую архитектуру ОС вы используете, щелкните правой кнопкой мыши « Мой компьютер» (этот компьютер) и выберите « Свойства» в контекстном меню. На экране « Свойства» проверьте список в разделе « Тип системы» — это архитектура вашей ОС.
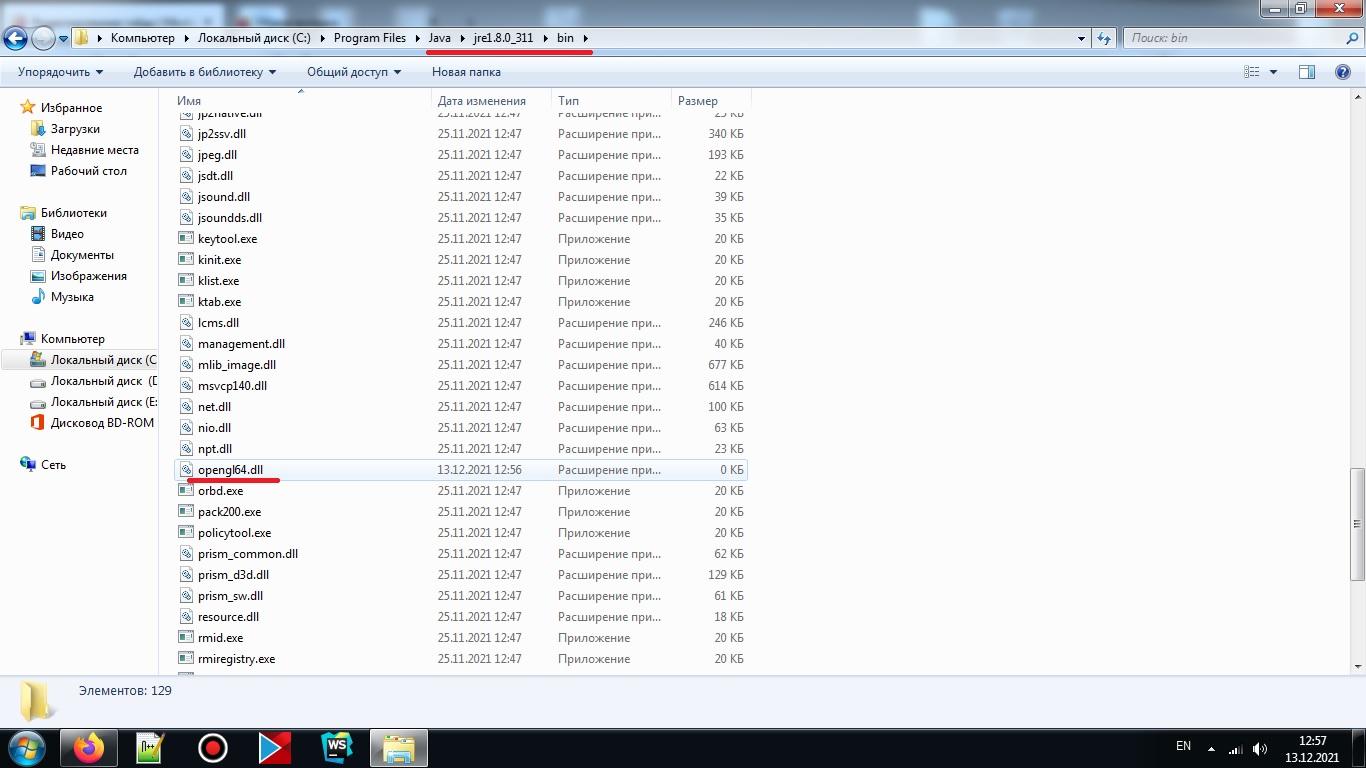
- Затем перейдите в следующее место и вставьте файл opengl32.dll, который вы ранее скопировали в буфер обмена:
C: Program Files Java * Версия JRE * bin
Примечание. Имейте в виду, что * JRE Version * — это просто заполнитель. Вам нужно будет заменить его своей версией JRE. Кроме того, если вы установили среду Java в произвольном месте, перейдите туда.
- Когда вам будет предложено UAC (Контроль учетных записей пользователей) , нажмите Да, чтобы предоставить доступ администратора.
- После того, как файл opengl32.dll был скопирован в правильную среду, запустите Minecraft еще раз и посмотрите, устранена ли проблема.
Если проблема не устранена, перейдите к следующему потенциальному исправлению ниже.
-
Способ 2: удаление DisplayLink (если применимо)
Если вы активно используете драйвер DisplayLink, имейте в виду, что эта технология может конфликтовать с версией Minecraft на Java.
Некоторые пользователи, с которыми мы сталкиваемся с ошибкой GLFW Error 65542 всякий раз, когда они пытались запустить Minecraft, подтвердили, что его проблема исчезла навсегда, как только они закончили удаление графического программного обеспечения USB DisplayLink.
Если этот сценарий применим к вам, следуйте приведенным ниже инструкциям, чтобы удалить программное обеспечение DisplayLink USB Graphics с вашего компьютера, чтобы устранить конфликт с Minecraft:
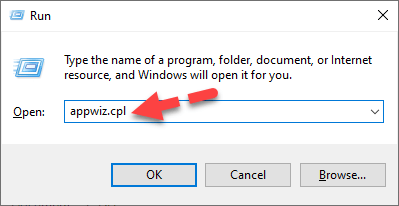
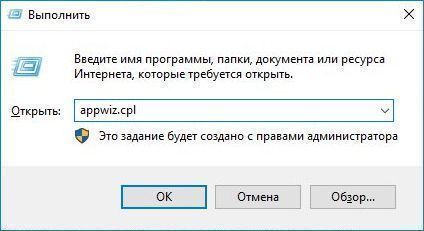
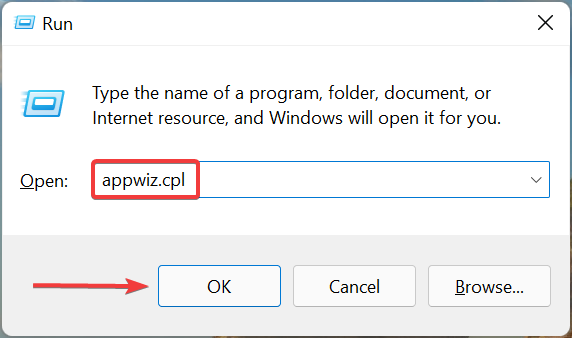
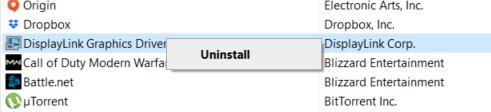
- Нажмите клавишу Win + R, чтобы открыть диалоговое окно «Выполнить». Затем введите appwiz.cpl и нажмите Enter, чтобы открыть меню «Программы и компоненты» .
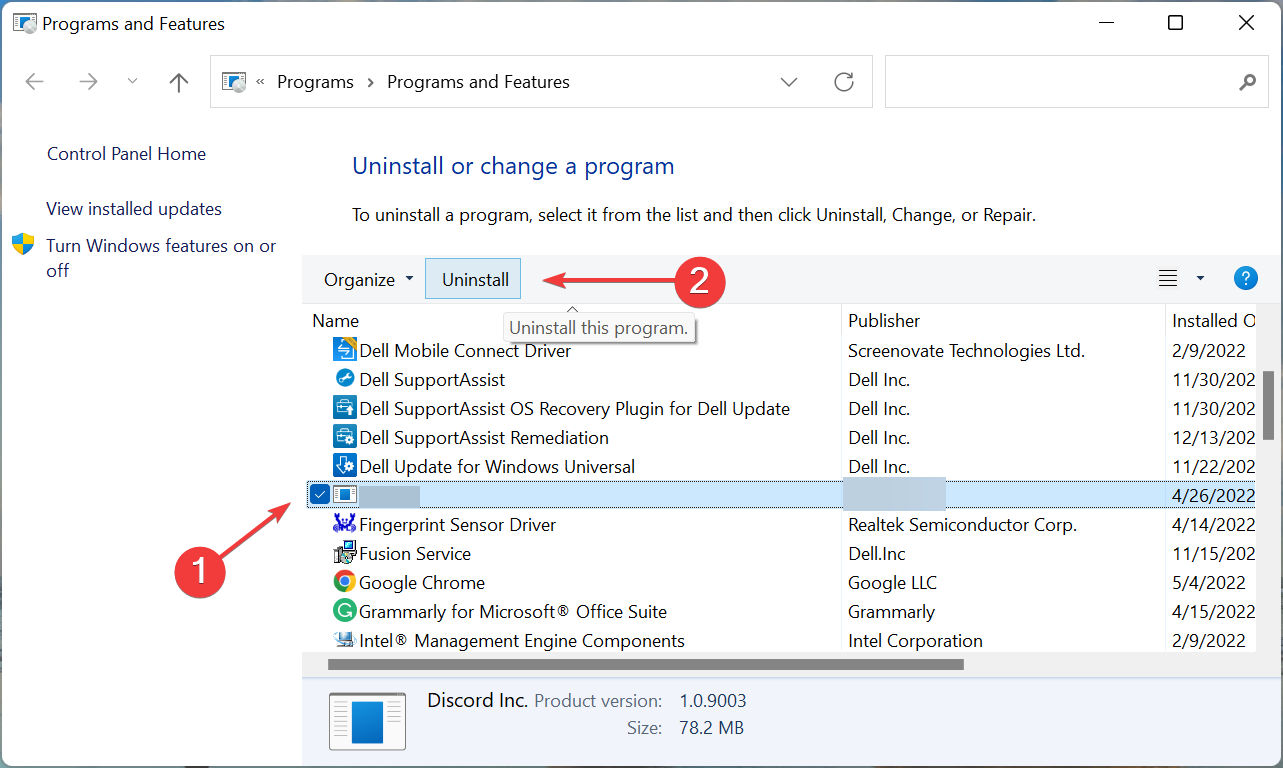
Введите appwiz.cpl и нажмите Enter, чтобы открыть список установленных программ. - Зайдя в меню «Программы и файлы» , прокрутите список установленных приложений вниз и найдите запись с именем DisplayLink Graphics Driver.
- Когда вам удастся найти его, кликните его правой кнопкой мыши и выберите «Удалить» из контекстного меню, чтобы начать процесс удаления.
При появлении запроса на подтверждение нажмите Да, затем следуйте инструкциям на экране, чтобы завершить процесс удаления.
- После завершения операции перезагрузите компьютер и снова запустите Minecraft после завершения следующего запуска, чтобы проверить, устранен ли конфликт.
Если этот сценарий неприменим или вы уже выполнили его безуспешно, перейдите к следующему потенциальному исправлению ниже.
Способ 3: переустановка драйверов видеокарты
Как выясняется, вы также столкнетесь с ошибкой GLFW Error 65542, если используете набор устаревших графических драйверов, которые не знают, как работать с версией OpenGL, которую использует Minecraft.
Однако, если у вас недавно были проблемы с вредоносными программами, эта проблема также может быть связана с проверкой безопасности, если операция в результате изолировала некоторые файлы, необходимые для запуска OpenGL.
Если вы не обновляли драйверы GPU в течение некоторого времени, вероятно, вы сможете исправить проблему, используя Диспетчер устройств и Программы и компоненты, чтобы удалить все, что связано с вашим GPU, а затем переустановить их с официальных каналов.
Если вы не совсем уверены, как это сделать, следуйте приведенным ниже инструкциям:
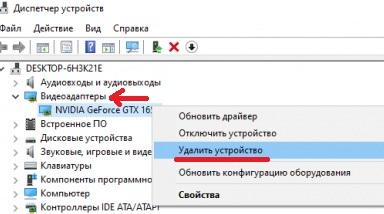
- Нажмите клавишу Win + R, чтобы открыть диалоговое окно «Выполнить». Затем введите devmgmt.msc и нажмите Enter, чтобы открыть диспетчер устройств. Если вам будет предложено UAC, нажмите Да, чтобы предоставить доступ администратора.
Запуск диспетчера устройств
- Как только вы войдете в диспетчер устройств, разверните раскрывающееся меню, связанное с адаптерами дисплея, затем продолжите и удалите все графические драйверы, кликнув их правой кнопкой мыши и выбрав Удалить — сделайте это для каждой записи внутри адаптеров устройств. Если у вас есть как встроенный, так и выделенный графический процессор, удалите оба типа драйверов.
Примечание. После удаления экран может мерцать. Это происходит потому, что ваша ОС вернется к стандартным драйверам.
- После удаления всех драйверов графического процессора из диспетчера устройств закройте утилиту диспетчера устройств.
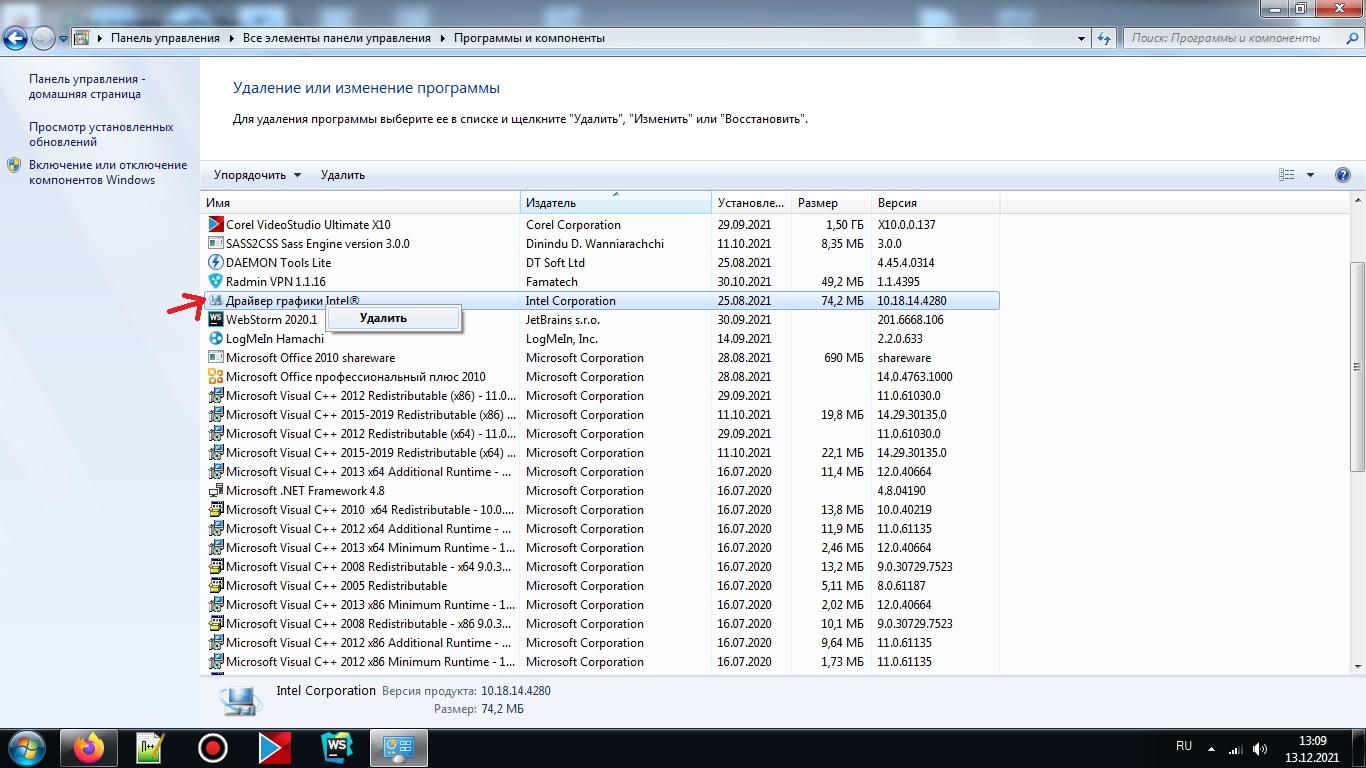
- Еще раз нажмите клавишу Win + R, чтобы открыть другое диалоговое окно «Выполнить». Затем введите appwiz.cpl и нажмите Enter, чтобы открыть экран «Программы и компоненты».
Зайдя в меню «Программы и компоненты», прокрутите список установленных приложений и начните удалять все, что связано с производителем вашего графического процессора (Nvidia AMD или Intel). Вы можете убедиться, что ничего не оставите, кликнув столбец «Издатель», чтобы расположить их один за другим. Просто щелкните правой кнопкой мыши каждый инструмент или драйвер, связанный с графическим процессором, а затем выберите Удалить в контекстном меню.
Удалите все программное обеспечение, связанное с GPU - На экране удаления следуйте инструкциям на экране, чтобы завершить процесс. После удаления всех соответствующих драйверов перезагрузите компьютер и дождитесь завершения следующего запуска.
- После завершения следующего запуска посетите страницу загрузки, связанную с вашим производителем графического процессора, и загрузите последнюю версию драйвера, доступную для вашей конкретной модели графического процессора:
Страница загрузки Nvidia
Страница загрузки AMD
Страница загрузки графики Intel - Загрузите и установите рекомендуемые драйверы в зависимости от модели вашей видеокарты, затем перезагрузите компьютер и запустите Minecraft после завершения следующего запуска, чтобы проверить, устранена ли проблема.
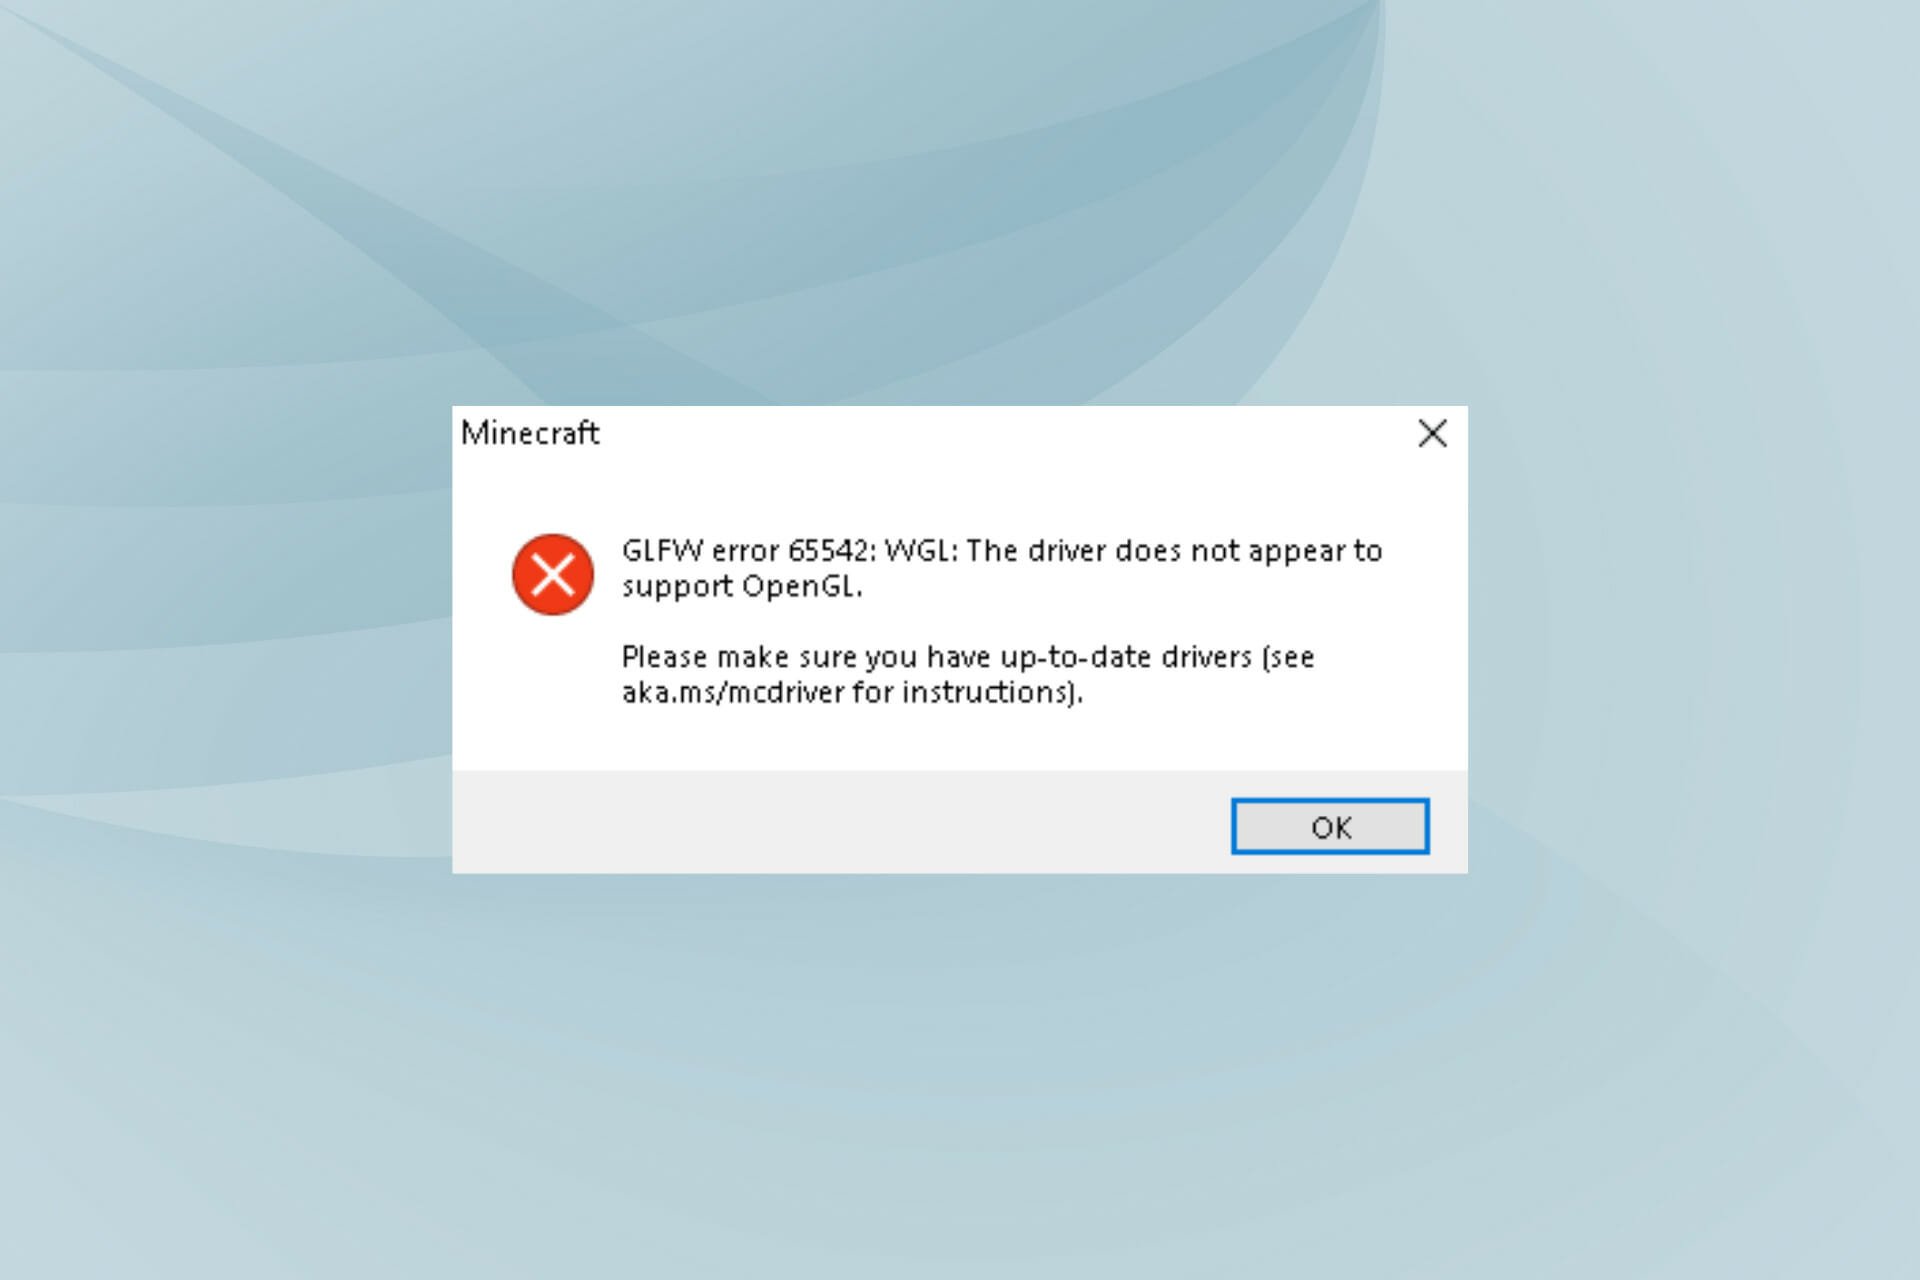
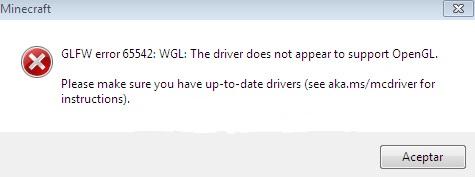
При запуске популярной игры «Minecraft» игра может внезапно прерваться сообщением «GLFW error 65542: WGL the driver does not appear to support OpenGL», и не понятно, что с этим делать. Причиной возникшей проблемы могут являться устаревшие драйвера видеокарты, в полной мере не поддерживающие функционал спецификации OpenGL. Ниже рассмотрим сущность ошибки, а также обозначим эффективные пути её решения.
- Суть ошибки «GLFW error 65542: WGL the driver does not appear to support OpenGL»
- Что делать для замены библиотеки opengl32.dll
- Обновление драйверов для видеокарты при ошибке с кодом 65542
- Установка новой версии Java, если возникают проблемы с OpenGL
- Заключение
Суть ошибки «GLFW error 65542: WGL the driver does not appear to support OpenGL»
Как следует из данного сообщения, появление ошибки 65542 связано с отсутствием поддержки драйвером WGL работы технологии OpenGL. Указанная технология задействуется при выводе различных вариантов 3D графики, активно используемой в игре «Minecraft».
GLFW error может возникнуть по следующим причинам:
- На пользовательском ПК установлены устаревшие драйвера;
На компьютере пользователя могут быть установлены устаревшие драйвера - На компьютере установлены аппаратные компоненты, не поддерживающие (или не поддерживающие не в полной мере) работу технологии OpenGL;
- Пользовательская система работает с устаревшей версией Java.
Система работает с устаревшей версией Java
Давайте рассмотрим способы, позволяющие исправить проблему с уведомлением «WGL the driver does not appear» на вашем ПК.
Это может быть полезным: Ошибка Out of memory — как исправить?
Что делать для замены библиотеки opengl32.dll
Эффективным способом устранить ошибку 65542 является замена dll-библиотеки opengl32.dll на модифицированную.
Процедура замены состоит в следующем:
- Закройте ваш «TLauncher»;
Закройте TLauncher нажав на крестик справа - Перейдите на ресурс mediafire.com;
- Кликните на «Download», и загрузите zip-архив с файлом opengl32.dll на ваш ПК;
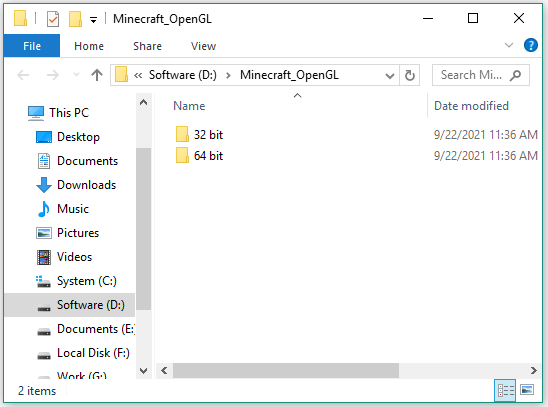
Загрузите архив на ваш ПК нажав на кнопку «Download» - В архиве будут две директории – «32 bit» и «64 bit». В зависимости от версии вашей ОС Виндовс войдите в первую или вторую директорию.
В зависимости от типа разрядности вашей ОС выберите нужную папку - Если вы не осведомлены, какая версия Виндовс установлена на вашем PC, нажмите на сочетание кнопок Win+Pause. В открывшемся окне просмотрите значение параметра «Тип системы»;
Просмотрите значение параметра «Тип системы» - После входа в соответствующую директорию скопируйте файл opengl32.dll;
Скопируйте указанный файл в буфер обмена вашего ПК - Затем перейдите по пути C:Program Files (X86)JavajreXXXXbin. Вставьте туда скопированный ранее в буфер файл opengl32.dll.
Затем подтвердите наложения файлов. Останется запустить игру и наслаждаться геймплеем Minecraft. Это должно помочь устранить ошибку «GLFW error 65542: WGL the driver does not appear to support OpenGL».
Обновление драйверов для видеокарты при ошибке с кодом 65542
Ещё одним способом, позволяющим избавиться от ошибки «GLFW error 65542» является обновление драйверов до самой актуальной версии продукта.
Алгоритм реализации выглядит следующим образом:
- Нажмите на Win+R;
- Введите в открывшемся окне команду devmgmt.msc и нажмите на Энтер;
Введите указанную команду в соответствующую строку и нажмите ввод - В перечне найдите пункт «Видеоадаптеры» и дважды кликните на нём;
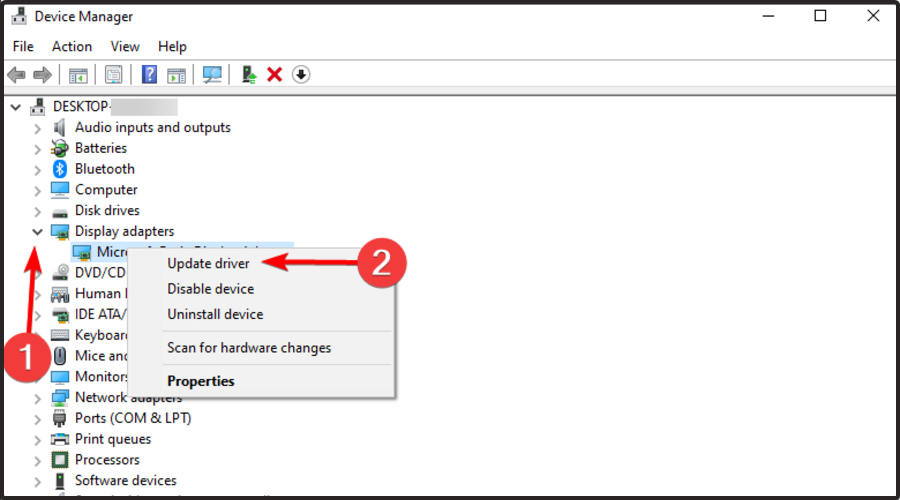
- Наведите курсор на вашу видеокарту, нажмите правую клавишу мыши, и в открывшемся меню выберите «Обновить драйвер».
Также для установки самых актуальных драйверов рекомендуем посетить сайт производителя вашей видеокарты. Найдите и загрузите оттуда самые актуальные драйвера для вашей карты.
Кроме того могут помочь полуавтоматические инструменты для установки драйверов «DriverPack Solution», «Driver Booster Free» и другие аналоги.
Установка новой версии Java, если возникают проблемы с OpenGL
Также мы рекомендуем обновить версию Java, установленную на вашем ПК. Свежую версию программы можно загрузить с java.com/ru/download/. После установки перезагрузите ПК и вновь запустите ваш Майнкрафт.
Читайте также: недопустимая сессия в Майнкрафт. Попробуйте перезапустить игру.
Заключение
Выше мы рассмотрели, почему возникает ошибка «GLFW error 65542: WGL the driver does not appear to support OpenGL» и что же именно нужно сделать для её исправления. Наибольшую эффективность в устранении дисфункции показал способ с заменой файла opengl32.dll. Используйте данный способ для устранения проблемы, что позволит вам в полной мере насладиться увлекательным геймплеем игры «Minecraft».
- The GLFW error message indicates that the game is experiencing problems with the GLFW API.
- The problem usually occurs in the Java version of Minecraft and has several probable causes, such as missing installation files, or a damaged video card.
- Fortunately, this type of Minecraft error can easily be fixed with a few tweaks to your computer.
- In this guide, we show you some methods that you can perform on your computer to fix the Minecraft GLFW 65542 error message.
Aka.ms/mc Driver
As a result of the updated shaders that do not support integrated graphics cards, players with integrated GPUs were experiencing this error after the 1.17 update. The error occurs often if you have an integrated GPU, so you don’t have much control over the situation unless you try the old version. Other reasons include a corrupted OpenGL or Graphics driver.
Aka.mc Driver
—————————————— Invalid driver for GLFW…
GLFW error 65542 follows this error message and occurs most commonly in the Java version of the game.
An error message like the one above indicates that the game is having problems with the OpenGL API. In Minecraft, the OpenGL API renders 2D and 3D graphics. Occasionally, you will see this error if your computer does not support the OpenGL API properly.
Opengl Download Minecraft
Generally, OpenGL errors occur when the GPU is unable to render within Minecraft.
Aka Ms/mc Driver
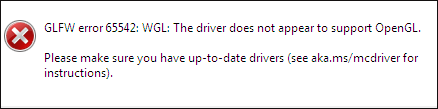
My Minecraft immediately crashed after launching, with the following error message: GLFW error 65542: WGL: The driver does not appear to support OpenGL. Please update your drivers (see aka.mc/mcdriver for instructions).
There are several probable causes of this problem, including missing installation files, a failed installation, or even damage to the video card, which usually occurs in the Java version of Minecraft. Luckily, you can fix this kind of Minecraft error very easily by tweaking your computer a little.
Opengl Is Not Supported
OpenGL.DLL can also trigger this error if it is missing from a Java / JRE folder. If a missing OpenGL.DLL file is the problem, you can copy the DLL into the Java / JRE directory and try again. The driver Does Not Support OpenGL error should now be resolved.
Our guide shows you several methods for fixing Minecraft GLFW 65542 error messages on your computer.
What is the cause of the Minecraft GLFW 65542 error?

- If you experience this error, please download and place the file opengl32.dll in the active JRE folder by visiting the official DLL page and clicking the link provided.
- A compatibility issue can also occur if you use DisplayLink software on your computer. If you uninstall this driver, you won’t see the GLFW 65542 error when playing Minecraft. Make sure your video card is current as well. You can get similar errors if your display driver is outdated.
It is possible the GLFW Error 65542 has something to do with DisplayLink Graphics driver, which may conflict with Minecraft Java.

Reinstall your graphics card drivers
- Run can be opened by pressing Windows + R.
- You can then open Device Manager by typing “devmgmt.msc” and pressing Enter.
- Providing administrator access is as simple as clicking “Yes” when prompted.
- Then, right-click on each graphics driver entry in Device Manager and click Uninstall. Follow these steps for each display adapter listed.
- It is recommended to uninstall the drivers for both dedicated and integrated GPUs if you have both devices.
- Close the Device Manager utility once all GPU drivers have been removed.
- The “Run” dialog box will be opened again if you press Windows + R again.
- Click “AppWiz.cpl” and then enter “Programs and Features.”
- You will need to remove anything related to your GPU manufacturer (Nvidia AMD, Intel) as soon as you reach the “Programs and Features” menu.
- The Editor column can be used to remove items in the correct order so you don’t leave anything behind.
- You can uninstall GPU-related tools or drivers by right-clicking them.
- You will be directed to the uninstall screen upon arriving. Follow the instructions provided on the screen to complete the uninstall.
- You need to restart your computer after you have uninstalled each driver.
- You can download the latest driver version for your specific GPU model by visiting the download page of your GPU manufacturer once the download process is complete.
- Download and install the recommended drivers for your video card model.
- When the next download is complete, reboot your computer and try using Minecraft again.
Manually adding OpenGL.DLL
- You can download Minecraft_OpenGL.zip by clicking here.
- Download the zip file and extract the contents using WinZip once it has been downloaded.
- By right-clicking on the extractable file and selecting Copy or Cut, you can copy it to the clipboard according to the architecture of your operating system.
- After copying the opengl32.dll file to the clipboard, paste it at the following location:
The following entry is in the Java program files of the Java JRE version: - Whenever you are asked if you want administrator access, click Yes.
- In order to resolve this problem, you will need to copy opengl32.dll into the correct environment and restart Minecraft.
Uninstalling DisplayLink
- Run can be opened by pressing Windows + R.
- You can then open the Programs and Features menu by typing “appwiz.cpl”.
- The “DisplayLink Graphics Driver” entry can be found under the “Programs and Features” menu.
- Select Uninstall from the context menu when you find it and right-click it.
- If you are prompted to confirm the uninstallation process, click Yes and follow the on-screen instructions.
- Check if the conflict has been resolved by restarting your computer and then restarting Minecraft after you reboot.
Frequently Asked Questions
- Reboot your computer.
- Update Windows.
- Reinstall the graphics drivers.
- Uninstall the DisplayLink driver.
- Add the OpenGL DLL file manually.
- Update your graphics driver.
- Add OpenGL.DLL manually.
- Uninstall the DisplayLink software.
- Install the latest Windows updates.
- Download and install a third-party driver update program.
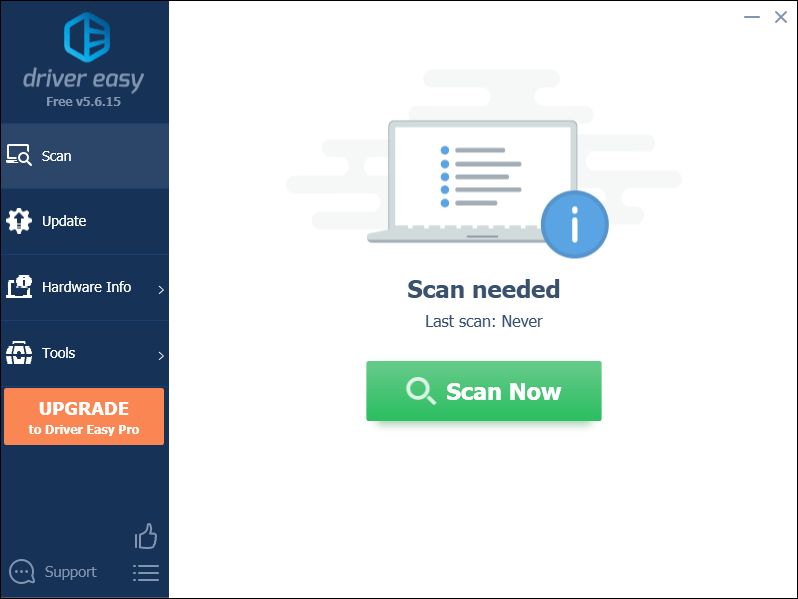
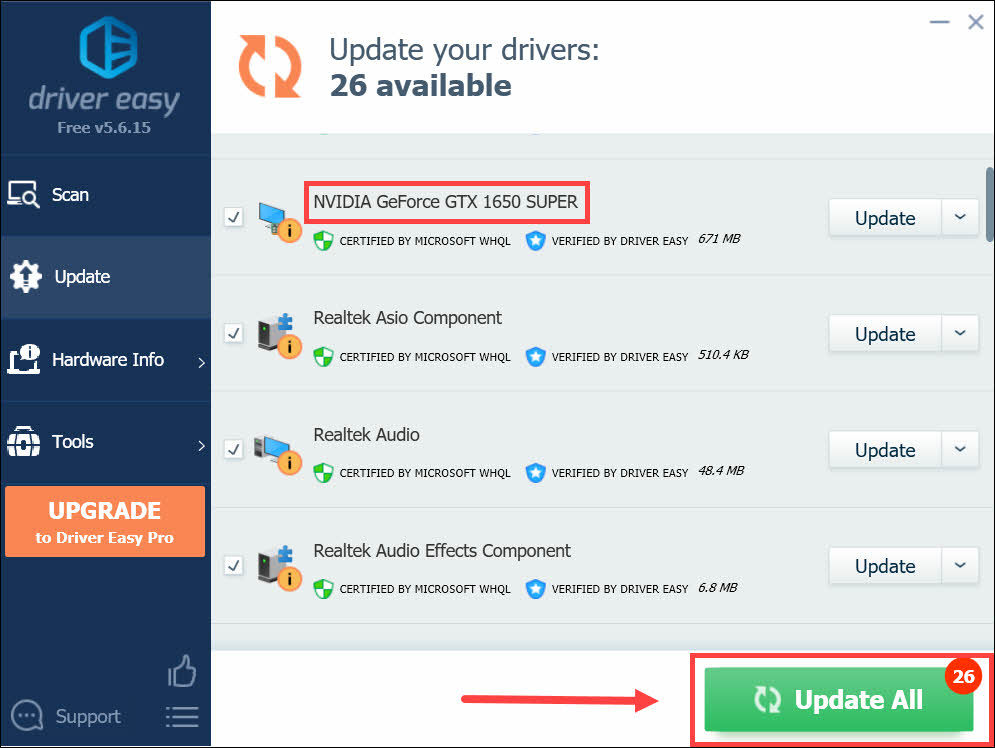
- Run Driver Easy and click the Scan Now button.
- Click the Update All button to automatically download and install the correct version of any missing or outdated drivers on your system.
- Reboot your computer for the changes to take effect.
Start Minecraft and then click on Options. Now go to Video Settings and click on Other. Select Show GL errors and set it to OFF. Save the changes you made and restart Minecraft to see if the OpenGL error appears again.

Mark Ginter
Mark Ginter is a tech blogger with a passion for all things gadgets and gizmos. A self-proclaimed «geek», Mark has been blogging about technology for over 15 years. His blog, techquack.com, covers a wide range of topics including new product releases, industry news, and tips and tricks for getting the most out of your devices. If you’re looking for someone who can keep you up-to-date with all the latest tech news and developments, then be sure to follow him over at Microsoft.
Quite a number of players have run into the GLFW error 65542: WGL: The driver does not appear to support OpenGL error as they try to start Minecraft launcher.
If you’ve encountered the same problem, don’t worry. It can be easily fixed…
How to fix GLFW error 65542 The driver does not appear to support OpenGL
Here are 4 fixes that have helped other players resolve GLFW error 65542. Just work your way down the list until you find that one that solves the problem for you.
- Update your graphics driver
- Manually add the OpenGL.DLL
- Uninstalling DisplayLink
- Install the latest Windows updates
OpenGL, or Open Graphics Library, is a cross-language, cross-platform application programming interface for rendering 2D and 3D graphics. In Minecraft, it is used to reduce the rendering load of the system, allowing the game to run faster and smoother on your PC.
Fix 1: Update your graphics driver
The GLFW Error 65542 error is likely to happen if you have the wrong, corrupt or outdated graphics driver on your computer. So you should update your graphics driver to see if it fixes the problem.
If you don’t have the time, patience or skills to update the driver manually, you can do it automatically with Driver Easy.
Driver Easy will automatically recognize your system and find the correct drivers for it. You don’t need to know exactly what system your computer is running, you don’t need to be troubled by the wrong driver you would be downloading, and you don’t need to worry about making a mistake when installing. Driver Easy handles it all.
- Download and install Driver Easy.
- Run Driver Easy and click the Scan Now button. Driver Easy will then scan your computer and detect any problem drivers.

- Click Update All to automatically download and install the correct version of all the drivers that are missing or out of date on your system. (This requires the Pro version which comes with full support and a 30-day money back guarantee. You’ll be prompted to upgrade when you click Update All.)

Note: You can do it for free if you like, but it’s partly manual. - Restart your computer for the changes to take effect.
- Launch the game again and see if the error is fixed. If yes, then great! If it persists, please try Fix 2, below.
Fix 2: Manually add the OpenGL.DLL
The error may also be triggered by a missing opengl32.dll file. So you can try adding the OpenGL.DLL manually to the Java and JRE folder. Once you have made sure Minecraft can use OpenGL, you can test to see if the The driver Does Not Support OpenGL error is resolved.
Here is how to do it:
- Navigate to dll-files.com to download the latest version of the opengl.dll file.
- Extract the downloaded zip file to a folder.
- On your keyboard, press the Windows logo key and E at the same time, then type C:Program FilesJava*Your JRE Versison*in into the address bar and press Enter.

Please note that *Your JRE Versison* represents the version of JRE. - Open the extracted folder, right-click on opengl32 and click Copy. After that, paste the opengl32 file into the environment.
- Once done, restart your computer.
- Fire up Minecraft to see if the problem is solved. If yes, congrats! If it’s still no joy, please move on to Fix 3, below.
Fix 3: Uninstalling DisplayLink
If you have installed DisplayLink Graphics driver and used it actively, try uninstalling the software. The driver is reported to conflict with Minecraft Java and may be the culprit of the GLFW Error 65542.
To remove DisplayLink driver:
- On your keyboard, press the Windows logo key and R at the same time, then type appwiz.cpl and press Enter to bring up the Programs and Features menu.

- In the list of programs you’ve installed, locate DisplayLink Graphics driver. Then right-click on it and click Uninstall.
- Follow the on-screenn instructions until the software is fully removed from your computer.
- Don’t forget to restart your computer.
- Re-launch Minecraft and see if it runs properly this time.
The driver does not appear to support OpenGL still lingers on? Please try Fix 4, below.
Fix 4: Install the latest Windows updates
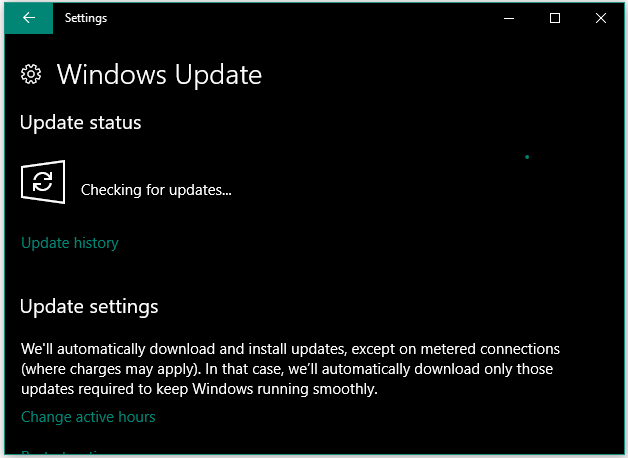
The The driver does not appear to support OpenGL issue can be an unresolved bug of a previous Windows version and may have been solved through a new update. You can check Windows update to see if there are new releases to help with the issue. Here’s how:
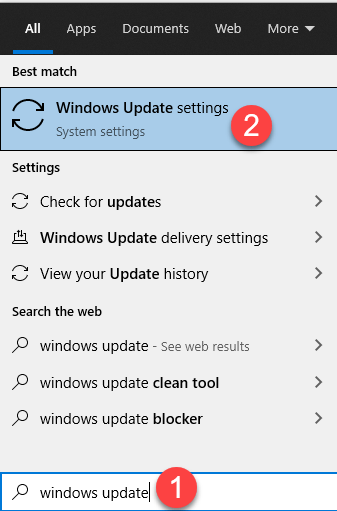
- On your keyboard, press the Windows logo key and type windows update, then click on Windows Update settings as it pops up as a matching result.

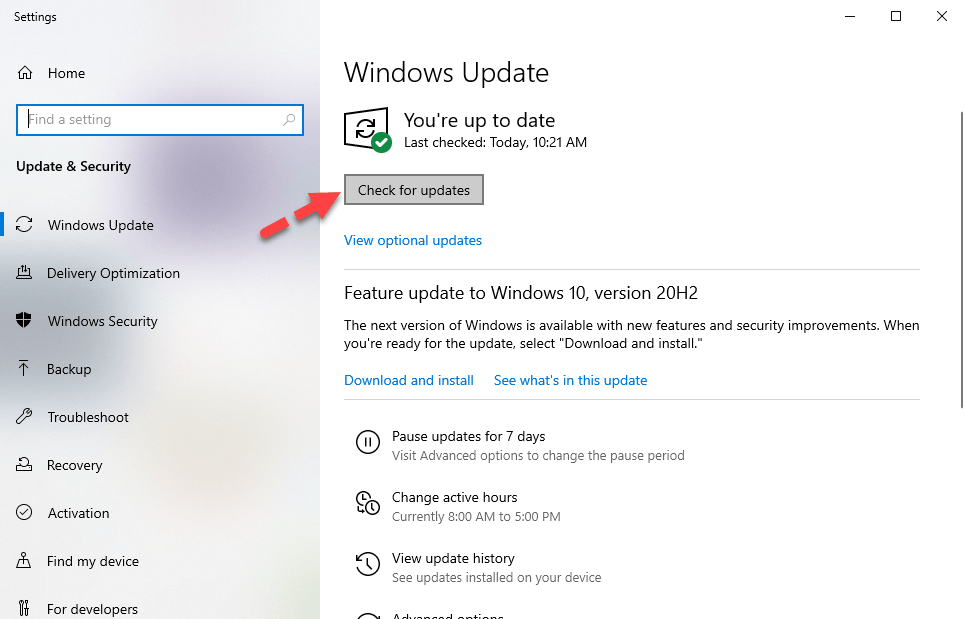
- Click Check for updates. It will automatically start to scan available updates for your computer.

- Wait a while for Windows to check and automatically install the updates for you.
- Restart your computer.
- Check to see if the error is fixed.
That’s it – hopefully this post helped. If you have any questions, ideas or suggestions, you’re more than welcome to leave us a comment below.
139
139 people found this helpful
После установки игры Minecraft многим не удается ее запустить из-за ошибки «GLFW error 65542: WGL the driver does not appear to support OpenGL». Как указано в сообщении, графический драйвер не поддерживается OpenGL, в результате интерфейс WGL не может выполнить привязку Java-скрипта к этому стандарту. Узнаем подробнее, что нужно сделать для ее исправления.
Во многих случаях удается исправить код ошибки «glfw 65542» путем копирования файла библиотеки opengl32.dll в каталог Java. Если этот способ не работает или не хотите вручную модифицировать каталог, попробуйте переустановить драйвер видеокарты, в ходе которого также будет замен файл opengl32.dll. Кроме того, если столкнулись с этой проблемой в Java-версии Minecraft, скорее всего, возник конфликт с программой DisplayLink. В этом случае проблема решается удалением конфликтующего драйвера.
Содержание
- 1 Копирование библиотеки OpenGL.DLL в папку Java
- 2 Переустановка драйвера видеокарты
- 3 Удаление DisplayLink
Копирование библиотеки OpenGL.DLL в папку Java
В состав драйвера графического процессора должны входить все требуемые библиотеки динамической компоновки, но это не всегда так. Кроме того, файл opengl32.dll или opengl64.dll мог быть отправлен на карантин антивирусом при установке Майнкрафт, что в конечном итоге приводит к ошибке GLFW 65542.
Попытайтесь вручную скопировать недостающую библиотеку DLL в папку Java, чтобы Minecraft смог использовать стандарт OpenGL.
Перейдите по ссылке (указанной на рисунке) и загрузите архив Minecraft_OpenGL.zip.
Извлеките его содержимое в удобное место с помощью архиватора 7zip. Щелкните правой кнопкой мыши на файл, совместимый с разрядностью установленной версии Windows, и скопируйте его.

Если не знаете разрядность ОС, откройте Проводник нажатием на Win + E, затем правым щелчком мыши на «Этот компьютер» разверните контекстное меню и выберите Свойства. Искомая информация указана в строке типа системы.
Затем перейдите в следующую папку и вставьте файл opengl32.dll, который скопировали в буфер обмена:
C:Program Files(x86)Java*версия JRE*bin
После копирования (замены) файла запустите Minecraft и проверьте, прерывается ли ее запуск ошибкой GLFW error 65542.
Переустановка драйвера видеокарты
Возможно, не удается запустить Minecraft по причине того, что установлены устаревшие драйверы видеокарты, которые не поддерживаются графическим стандартом OpenGL. Также известны случаи, когда при сканировании компьютера на наличие вредоносных программ, антивирус отправляет некоторые файлы на карантин, которые требуются для запуска OpenGL, что приводит к ошибке GLFW 65542.
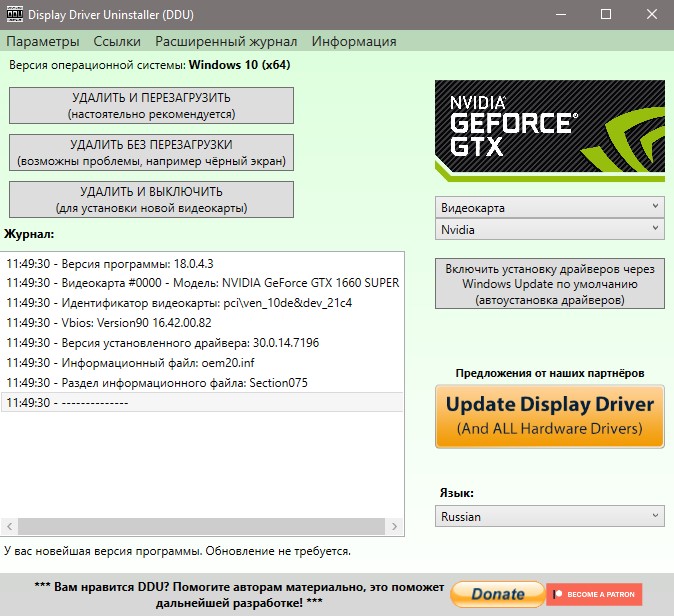
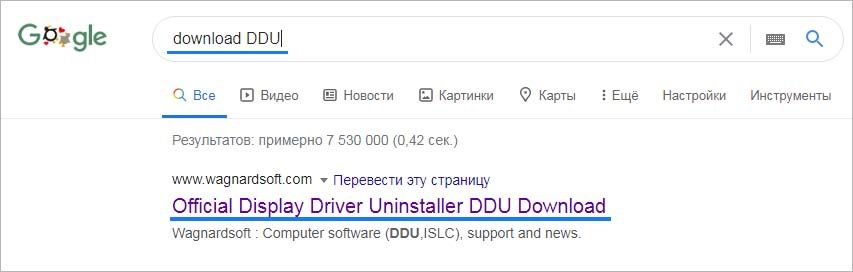
Для удаления графических драйверов предпочтительнее использовать программу DDU. Загрузите утилиту с официального сайта, ссылка на который указана на рисунке.

Затем перезагрузите компьютер в безопасном режиме. Если используете Windows 10, разверните меню Пуск и нажмите на кнопку Питания. Затем удерживая Shift, щелкните на кнопку «Перезагрузка». При отображении окна выбора действия, перейдите по пути: Поиск и устранения неисправностей – Дополнительные параметры. В окне среды восстановления щелкните на Параметры загрузки и нажмите F4 для перезагрузки компьютера в безопасный режим.
После запустите утилиту DDU и укажите графический процессор. Для очистки текущих драйверов щелкните на кнопку «Удалить и перезагрузить».

После завершения операции загрузите последнюю версию программного обеспечения из сайта AMD, NVIDIA или Intel, в соответствии с установленной видеокартой.
Запустите загруженный файл и следуйте инструкциям до завершения установки. После перезагрузки ПК запуск Майнкрафт не должен прерываться ошибкой «GLFW error 65542: WGL the driver does not appear to support OpenGL».
Удаление DisplayLink
Если используете технологию DisplayLink, предназначенную для подключения дополнительных мониторов через USB, то, скорее всего, она вызывает конфликт с Java-версией Minecraft. Для исправления ошибки GLFW 65542 попробуйте удалить это программное обеспечение.
Разверните раздел «Программы и компоненты» командой appwiz.cpl, запущенной из окна Win + R.
В списке найдите приложение DisplayLink Graphics Driver, щелкните по нему правой кнопкой мыши и выберите пункт «Удалить». Следуйте инструкциям на экране, чтобы завершить этот процесс.
Перезагрузите ПК и посмотрите, прерывается запуск игры ошибкой GLFW 65542.
It’s time to solve the GLFW error 65542 WGL
by Kazim Ali Alvi
Kazim has always been fond of technology, be it scrolling through the settings on his iPhone, Android device, or Windows. And at times, unscrewing the device to take… read more
Published on August 30, 2022
Reviewed by
Vlad Turiceanu

Passionate about technology, Windows, and everything that has a power button, he spent most of his time developing new skills and learning more about the tech world. Coming… read more
- The GLFW error 65542 WGL the driver does not appear to support OpenGL is encountered when you try to launch Minecraft.
- It’s generally missing DLL files or outdated and incompatible drivers behind the issue.
- To fix it, manually download the required DLL file and add it to the Java folder, or try the other methods here.
XINSTALL BY CLICKING THE DOWNLOAD FILE
- Download Restoro PC Repair Tool that comes with Patented Technologies (patent available here).
- Click Start Scan to find DLL files that could be causing PC problems.
- Click Repair All to replace broken DLLs with working versions
- Restoro has been downloaded by 0 readers this month.
Minecraft is one of the popular games in the community and offers a refreshing concept. However, it, too, is prone to errors. The most common of these is the GLFW error 65542 WGL when opening the Minecraft launcher.
This error is primarily encountered in the Java edition of the game and is followed by the error message GLFW error 65542: WGL: The driver does not appear to support OpenGL on Minecraft.
Identifying the underlying cause here is tricky, so we recommend you execute the fixes in the listed sequence for a quick solution to GLFW error 65542 WGL on Minecraft.
What does GLFW error 65542 WGL the driver does not appear to support OpenGL mean?
The GLFW error 65542 WGL generally arises when the OpenGL library is missing or there’s a problem with the graphics driver. The installed driver could be outdated, or corrupt, or there might be a bug in the installed version.
Besides, incompatibility or issues with the game itself could also lead to GLFW error 65542 WGL on Minecraft Java. So, verify your computer meets the minimum requirements for Minecraft before downloading the game.
Do you need OpenGL for Minecraft?
No, you don’t necessarily need OpenGL for Minecraft. Though having it will certainly boost the graphics and enhance the whole gaming experience.
In case you are using OpenGL, make sure the graphics card in use supports it to avoid running into errors.
How do I fix GLFW error 65542 WGL when launching Minecraft?
- What does GLFW error 65542 WGL the driver does not appear to support OpenGL mean?
- Do you need OpenGL for Minecraft?
- How do I fix GLFW error 65542 WGL when launching Minecraft?
- 1. Download the OpenGL32.DLL file
- 2. Update the graphics driver
- 3. Uninstall conflicting drivers
- How do I fix OpenGL errors in Minecraft?
- How do I fix the graphics driver error in Minecraft?
1. Download the OpenGL32.DLL file
If it’s the missing OpenGL.dll file behind the error, you would have to download it to fix GLFW 65542 error.
In any case, you can perform this task by using PC repairing software that will replace any missing DLL files in minutes.
With Restoro you can scan your computer and detect missing system files, Windows errors, BSoD issues, and so on.
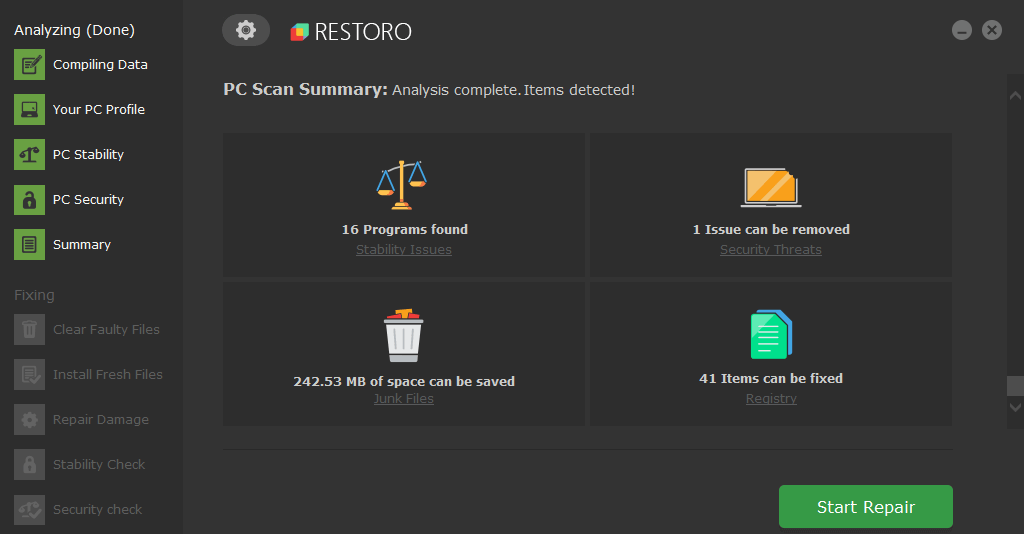
Restoro is a reliable third-party DLL fixer which uses a built-in automated system and an online library full of functional DLLs to replace and repair any files that might be corrupted or damaged on your PC.
All you need to do to resolve your PC’s problems is to launch it, and simply follow the on-screen instructions to start the process, as everything else is covered by the software’s automated processes.
This is how you can fix registry errors using Restoro:
- Download and install Restoro.
- Launch the software.
- Wait for it to scan your PC for any stability issues and possible malware.
- Press Start Repair.
- Restart your PC for all the changes to take effect.
After this process is completed your PC will be as good as new, and you will no longer have to deal with BSoD errors, slow response times, or other similar issues.
⇒ Get Restoro
Disclaimer: This program needs to be upgraded from the free version in order to perform some specific actions.
2. Update the graphics driver
An outdated graphics driver is just as likely to be responsible for GLFW error 65542 WGL in Minecraft on the Nvidia graphics card, and updating it has helped fix the problem for many users. With each update, manufacturers release patches for previously known bugs along with several other improvements.
If the Device Manager method doesn’t work, you can manually install the latest driver version in Windows to fix the GLFW error 65542 WGL on Intel HD Graphics.
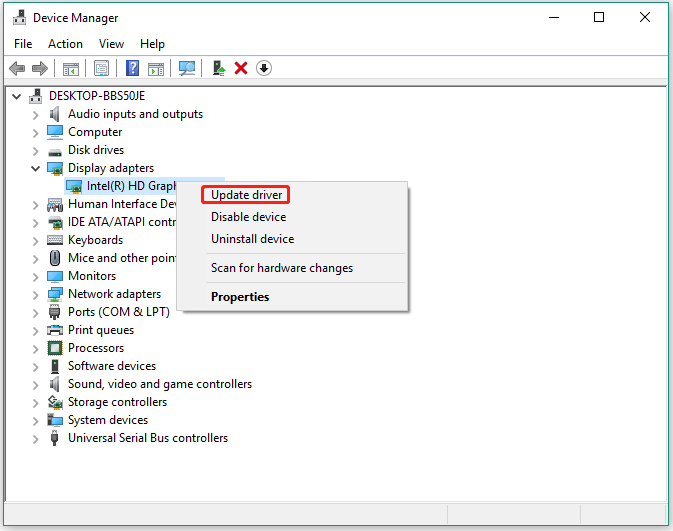
- Press Windows + S to launch the Search menu, enter Device Manager in the text field at the top, and click on the relevant search result.

2. Double-click on the Display adapters entry here.
3. Now, right-click on the installed graphics card, and select Update driver from the context menu.
Some PC issues are hard to tackle, especially when it comes to corrupted repositories or missing Windows files. If you are having troubles fixing an error, your system may be partially broken.
We recommend installing Restoro, a tool that will scan your machine and identify what the fault is.
Click here to download and start repairing.
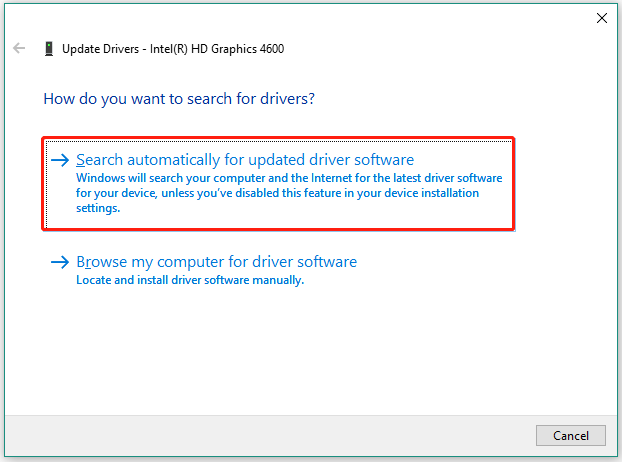
4. Select Search automatically for drivers from the two options here.
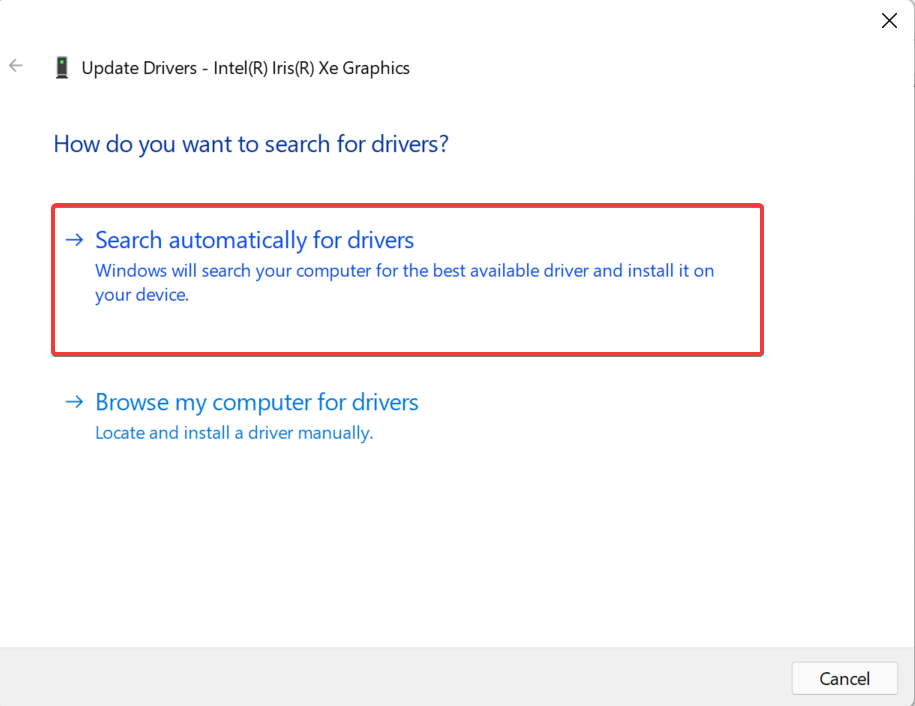
5. Wait for Windows to install the best available driver for the graphics adapter.
There is a more automated method you can utilize to update drivers on your system within a few clicks.
DriverFix software will entirely scan the system for outdated or broken drivers and simply choose which driver you need to update.
Therefore, you can update the graphic drivers accordingly and even create a restore point for any drivers if you need to restore them.
3. Uninstall conflicting drivers
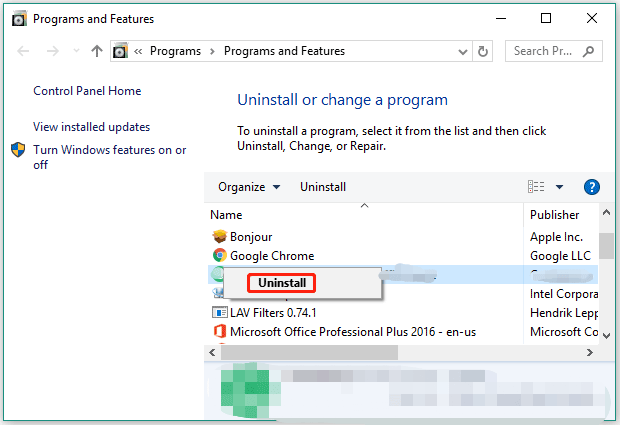
- Press Windows + R to launch the Run command, enter appwiz.cpl in the text field, and either click OK or hit Enter to launch Programs and Features.

- Now, locate any entry here by the name DisplayLink, select it, and click on Uninstall.

- Follow the on-screen instructions to complete the process.
The DisplayLink USB Graphics Software has been found to conflict with the Java-based edition of Minecraft, and it’s recommended that you uninstall it from the PC.
Make sure to restart the computer for the changes to fully come into effect and the GLFW error 65542 TL Launcher should be fixed.
- Play Age of Mythology on Windows 10 With These Simple Steps
- Failed to Load SteamUI.dll: How to Fix This Fatal Error
- 3 Easy Ways to Launch Steam Games in Windowed Mode
- High Ping & Lag in Call of Duty Vanguard: 5 Ways to Fix It
How do I fix OpenGL errors in Minecraft?
OpenGL errors generally have to do with problematic or incompatible drivers and can prevent you from launching games. Though in some cases, it was misconfigured power settings that led to the game not getting the required power.
No matter the underlying cause, you can always easily fix OpenGL errors in Windows, be it with Minecraft or any other game.
How do I fix the graphics driver error in Minecraft?
After updating the game, many users reported getting the Driver outdated error message, which lists that your graphics drivers have a new update available.
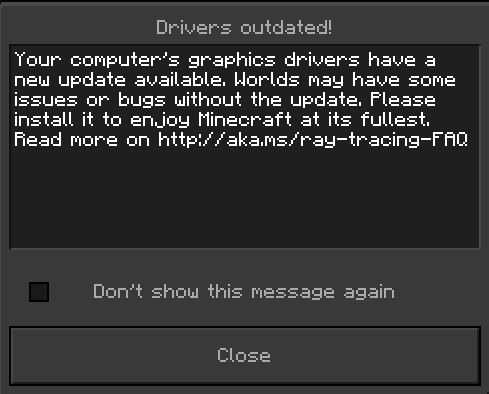
In this case, it’s best to update the graphics driver on your device. Do not forget to check the manufacturer’s website as well for the latest version, because oftentimes, the updates are not released through Windows Update but are directly uploaded to the OEM’s website.
If there are no updates available, check for compatibility issues. And in case everything seems fine, you can safely ignore the error message.
By now, you know all the solutions for GLFW error 65542 WGL when opening Minecraft in Windows 7, 10, and 11. Also, find out how to fix common Minecraft errors on your PC.
Tell us which fix worked and your review of Minecraft in the comments section below.
![]()
Newsletter
Introducing 4th Gen Intel® Xeon® Scalable Processors
Introducing 4th Gen Intel® Xeon® Scalable Processors
The browser version you are using is not recommended for this site.
Please consider upgrading to the latest version of your browser by clicking one of the following links.
- Safari
- Chrome
- Edge
- Firefox
Article ID: 000058790
Content Type: Troubleshooting
Last Reviewed: 04/26/2022
Error: “GLFW error 65542: WGL: The driver does not appear to support OpenGL” When Launching Minecraft
Instructions on how to update driver in order to correct error 65542.
When opening Minecraft, the following error message appears on the screen:
GLFW error 65542: WGL: The driver does not appear to support OpenGL.
On systems with integrated graphics only:
- Download the latest graphics driver. For more information see How to Install an Intel® Graphics Driver in Windows® 10 & Windows 11*.
-
Reboot your device after installing the driver.
If the issue persists, contact the Original Equipment Manufacturer (OEM).
| Note | We recommend that you check first with your computer manufacturer and use the driver software provided by them to avoid potential installation incompatibilities. Intel supplies generic versions of Graphics Drivers for general purposes. Computer manufacturers might have changed the features, incorporated customizations, or made other changes to the graphics driver software or software packaging. |
On systems with dual graphics cards: The expansion graphics card is the one that renders OpenGL for the game. OpenGL is a cross-language, cross-platform application programming interface (API) for rendering 2D and 3D vector graphics.
- Download latest graphics driver from your GPU vendor or manufacturer.
If the issue persists, contact the Original Equipment Manufacturer (OEM).
Related articles
How to Install an Intel® Graphics Driver in Windows® 10 & Windows 11*
Related Products
This article applies to 91 products
Intel® Iris® Plus Graphics
Intel® UHD Graphics for 10th Gen Intel® Processors
Intel® Iris® Xe Graphics
Intel® Iris® Xe MAX Graphics
Intel® UHD Graphics 730
Intel® UHD Graphics 750
Intel® UHD Graphics for 11th Gen Intel® Processors
Intel® Iris® Xe Graphics eligible
Intel® UHD Graphics 710
Intel® UHD Graphics 770
Intel® UHD Graphics for 12th Gen Intel® Processors
Intel® HD Graphics 5300
Intel® HD Graphics 5500
Intel® HD Graphics 6000
Intel® Iris® Graphics 6100
Intel® Iris® Pro Graphics 6200
Intel® HD Graphics 510
Intel® HD Graphics 515
Intel® HD Graphics 520
Intel® HD Graphics 530
Intel® Iris® Graphics 540
Intel® Iris® Graphics 550
Intel® Iris® Pro Graphics 580
Intel® HD Graphics 500
Intel® HD Graphics 505
Intel® HD Graphics 610
Intel® HD Graphics 615
Intel® HD Graphics 620
Intel® HD Graphics 630
Intel® HD Graphics P630
Intel® Iris® Plus Graphics 640
Intel® Iris® Plus Graphics 650
Intel® Iris® Plus Graphics 655
Intel® Iris® Plus Graphics 645
Intel® UHD Graphics 605
Intel® UHD Graphics 610
Intel® UHD Graphics 615
Intel® UHD Graphics 617
Intel® UHD Graphics 620
Intel® UHD Graphics 630
Radeon™ RX Vega M GH Graphics
Radeon™ RX Vega M GL Graphics
Intel® HD Graphics for Previous Generation Intel® Processors
Intel® Arc™ Dedicated Graphics Family
Intel® Arc™ A-Series Graphics
Intel® Arc™ A350M Graphics
Intel® Arc™ A370M Graphics
Intel® UHD Graphics Family
Intel® UHD Graphics P750
Legacy Graphics
Intel® HD Graphics 2000
Intel® HD Graphics 3000
Intel® HD Graphics 2500
Intel® HD Graphics 4000
Intel® HD Graphics 4200
Intel® HD Graphics 4400
Intel® HD Graphics 4600
Intel® HD Graphics 5000
Intel® Iris® Graphics 5100
Intel® Iris® Pro Graphics 5200
Graphics Drivers for Intel® 82810 Graphics and Memory Controller Hub (GMCH)
Graphics Drivers for Intel® 82815 Graphics Controller
Graphics Drivers for Intel® 82830M Graphics and Memory Controller Hub (GMCH)
Graphics Drivers for Intel® 82845G Graphics Controller
Graphics Drivers for Intel® 82852/82855 Graphics Controller Family
Graphics Drivers for Intel® 82865G Graphics and Memory Controller Hub (GMCH)
Graphics Drivers for Intel® 82915G/82910GL Express Chipset Family
Graphics Drivers for Intel® 82945G Express Chipset
Graphics Drivers for Intel® 82946GZ Graphics Controller
Graphics Drivers for Intel® 82G965 Graphics and Memory Controller Hub (GMCH)
Graphics Drivers for Intel® 82Q963 Graphics and Memory Controller Hub (GMCH)
Graphics Drivers for Intel® 82Q965 Graphics and Memory Controller Hub (GMCH)
Graphics Drivers for Intel® B43 Express Chipset
Graphics Drivers for Intel® G31 Express Chipset
Graphics Drivers for Intel® G33 Express Chipset
Graphics Drivers for Intel® G35 Express Chipset
Graphics Drivers for Intel® G41 Express Chipset
Graphics Drivers for Intel® G43 Express Chipset
Graphics Drivers for Intel® G45 Express Chipset
Graphics Drivers for Intel® Q33 Express Chipset
Graphics Drivers for Intel® Q35 Express Chipset
Graphics Drivers for Intel® Q43 Express Chipset
Graphics Drivers for Intel® Q45 Express Chipset
Graphics Drivers for Mobile Intel® 4 Series Express Chipset Family
Graphics Drivers for Mobile Intel® 915GM/GMS, 910GML Express Chipset Family
Graphics Drivers for Mobile Intel® 945GM Express Chipset Family
Graphics Drivers for Mobile Intel® 965 Express Chipset Family
Intel® Graphics Media Accelerator 3150 (Intel® GMA 3150)
Intel® Graphics Media Accelerator 3600 Series
Intel® Graphics Media Accelerator 500 (Intel® GMA 500)
Intel® Graphics Media Accelerator 600 (Intel® GMA 600)
- Summary
- Description
- Resolution
1
Need more help?
Contact support
Give Feedback
Did you find this information useful?
YES
NO
Characters remaining: 500
We appreciate all feedback, but cannot reply or give product support. Please do not enter contact information. If you require a response, contact support.
Thank you
Disclaimer
All postings and use of the content on this site are subject to Intel.com Terms of Use.
Данная ошибка часто возникает у обладателей нового железа или же после переустановки Windows. Ниже рассмотрены основные способы для устранения проблемы. Они представлены в виде логичных шагов, которые идут друг за другом. Если предыдущий способ не помог, то следует переходить к следующему.
Способ 1: Установка новой Java
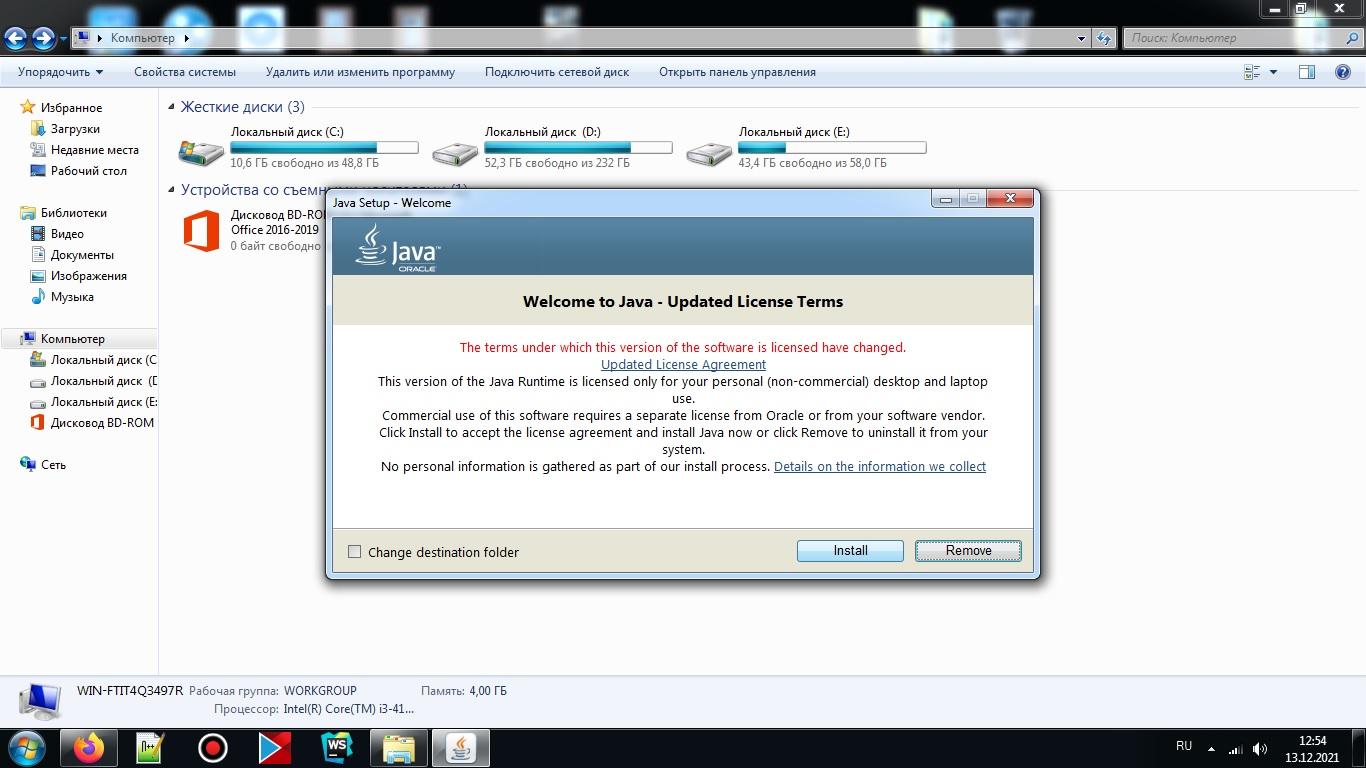
Одно из возможных решений проблемы. Следует перейти на официальный сайт Jav’ы (https://www.oracle.com/java/technologies/downloads/). Далее, там же нужно скачать новейшую доступную версию. Главное, чтобы она была не меньше Java 16 – ведь именно такая версия начинает поддерживаться игрой, начиная с 1.17. Скачиваем, следуем инструкциям инталлятора. Готово! Новая Java установлена.
Способ 2: Добавление OpenGL.dll вручную
Обычно при установке Java-файлов проблем не возникает. Ведь инсталлятор сам автоматически устанавливает opengl32.dll или opengl64.dll. Тем не менее, чаще всего в Windows 10, Java-установщики бывают пропускают этот шаг в установке. Именно отсутствие этого файла в директории Jav’ы вызывает ошибку.
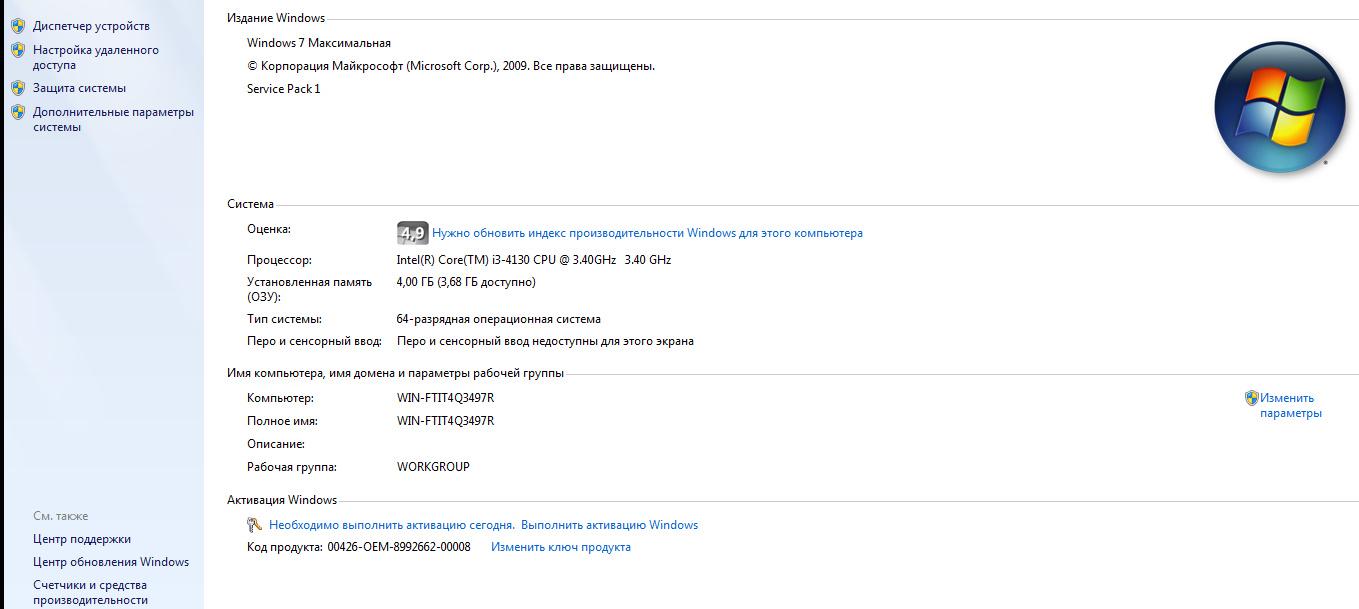
Шаг 1: Переходим на сайт https://ru.dll-files.com/opengl32.dll.html . Качаем файл, подходящий архитектуре нашей операционной системы (64-х или 32-х битная). Чтобы узнать какая стоит на определенном компьютере: нужно на рабочем столе нажать ПКМ (Правой Кнопкой Мыши) на “Мой Компьютер”, затем выбрать свойства. Там будет виден “Тип системы”. Качаем файл такой же архитектуры, как и ОС.
Шаг 2: Находим папку “bin” в JavaJREbin . Если Java установлена по умолчанию, то путь будет следующим:
“C:Program filesJavajrebin”
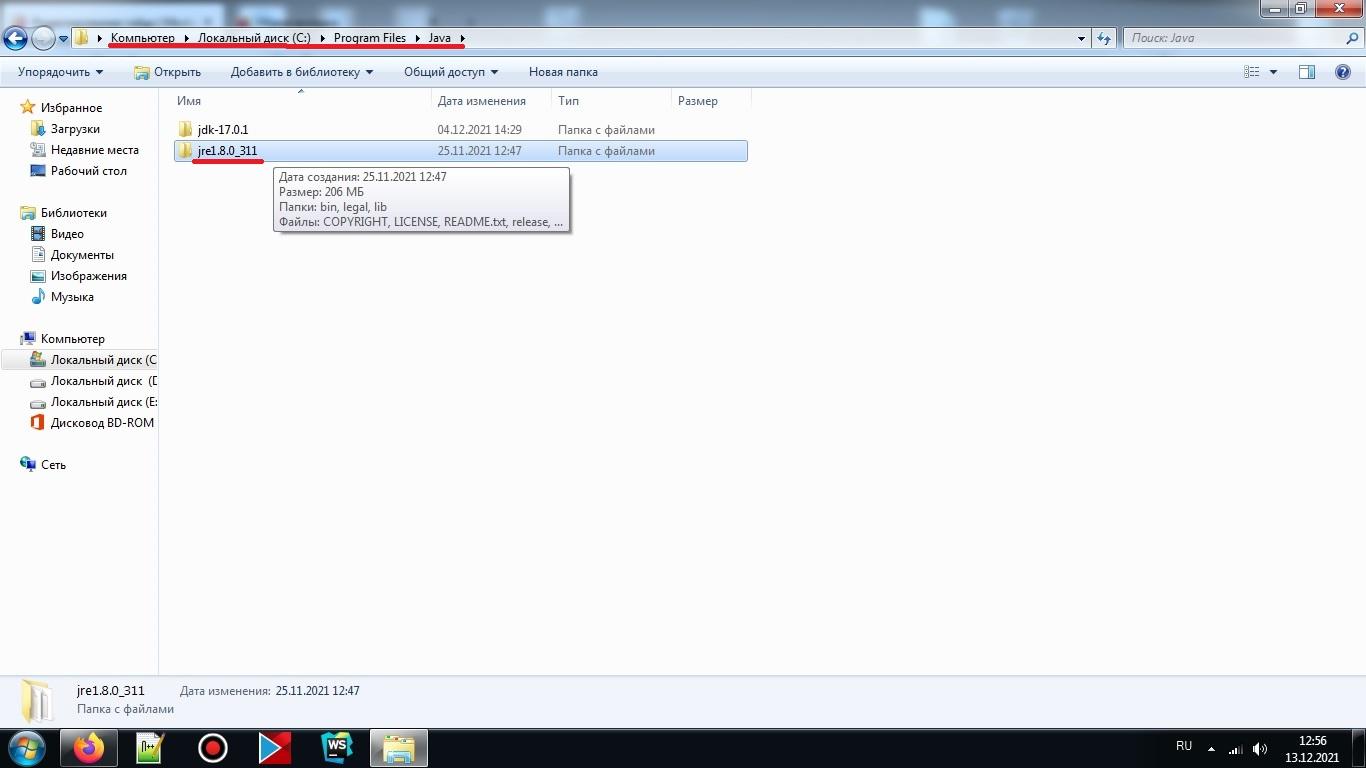
Вставляем в директорию “bin” файл opengl64.dll (или opengl32.dll). Если предлагают предоставить доступ администратору, соглашаемся.
Шаг 3: Вновь запускаем Minecraft. Если проблема не устранена, тогда переходим к следующему методу.
Способ 3: Удаление DisplayLink (выборочно)
Драйвер DisplayLink (если у вас используется именно он) иногда конфликтует с некоторыми Java-файлами. При этом его можно безбоязненно удалить.
Шаг 1: Переходим в “Программы и компоненты”. Для этого можно зайти в “Пуске” в “Панель управления” и там найти нужную нам иконку. Или же можно нажать “Win + R”. Затем, вписать в окно “Выполнить” значение appwiz.cpl .
Шаг 2: Находим в списке DisplayLink Graphics Driver. Удаляем его.
Шаг 3: После завершения удаления перезагружаем компьютер. Открываем Minecraft. Проверяем устранение проблемы.
Способ 4: Переустановка драйверов видеокарты
Проблема может заключаться в слишком старых драйверах для вашего устройства. Они просто могут не понимать: каким образом взаимодействовать с OpenGL.
Шаг 1: Нажимаем “Win + R”. Появляется окно “Выполнить”. Вводим в него devmgmt.msc и переходим на “Диспетчер устройств”.
Шаг 2: Находим “Display adapters” или же “Видеоадаптеры”. Удаляем все драйвера оттуда. ВНИМАНИЕ! Экран может тускнеть, мерцать, глючить. Это все нормальные явления, ведь система возвращается к собственным драйверам по умолчанию.
Шаг 3: Далее заходим в “Программы и компоненты” . Для этого выбираем этот файл в Пуск > Панель управления. Или же нажимаем “Win + R” и вписываем appwiz.cpl , как в прошлом способе.
Шаг 4: Важный момент: у каждого разное железо, в том числе видеокарты. Поэтому необходимо самостоятельно найти компоненты определенного оборудования. Обычно это видеокарты Nvidia, AMD или Intel. Последние две являются встроенными. На определенных компьютерах могут быть сразу как встроенные видеокарты, так и дискретные. Есть еще USB-видеокарты, но для игр они не используются.
Поэтому необходимо найти + удалить ВСЕ файлы, связанные с GPU (видеокартой). При этом: важно не задеть остальные компоненты и утилиты.
Шаг 5: Перезагружаем компьютер. После перезагрузки переходим на сайт производителя оборудования и скачиваем новые драйвера для своей видеокарты. Например: внизу оставлены ссылки на сайты 3-ех уже упомянутых компаний.
Nvidia: https://www.nvidia.com/Downloa…
Intel: https://www.intel.com/content/…
AMD: https://www.amd.com/en/support
Шаг 6: Устанавливаем драйвера для своей видеокарты. Перезагружаем компьютер. Вновь заходим в Minecraft и проверяем.
Способ 5: Замена железа
Если все последующие способы были выполнены правильно и не дали никакого результата, то следует заменить видеокарту. Скорее всего, железо устарело и не поддерживает новую версию Minecraft. Правда, этот способ не касается тех людей, у которых до переустановки системы игра работала нормально.
Тем не менее, стоит еще раз убедиться в правильности предыдущих способов. Особенно, если GLFW error 65543/65542 так и не исчезла. Дополнительно можно поменять игровой лаунчер, ибо проблема порой может скрываться в нем. В любом случае проблему можно устранить. Главное – найти корень проблемы: драйвера, железо или же отсутствие файла opengl.dll .
How to make Minecraft function well after receiving the error message “GLFW error 65542: WGL: The driver does not appear to support OpenGL”? Some tactics are shared with you in this post., and you can try them one by one.
GLFW Error 65542 in Minecraft
Lots of Minecraft players encountered the error “GLFW error 65542: WGL: The driver does not appear to support OpenGL” when they start the Minecraft launcher. Why does the error appear? How to fix the error? Keep reading.
Tip: If you need a professional partition management tool for Windows 10, you can give MiniTool Partition Wizard a try. It is an all-in-one utility that can complete basic disk management tasks and advanced tasks such as data recovery, disk backup, disk health check, and so on.
Free Download
Fix 1: Update the Video Card Driver
When you receive GLFW error 65542, you might notice that a suggestion follows the error and it reads “please make sure you have up-to-date drivers …”.
Therefore, to fix GLFW error 65542, you can try updating your video card driver first, and the steps are displayed below.
Step 1: Right-click the Windows icon on the taskbar and then choose the Device Manager option from the pop-up menu.
Step 2: Once you are inside Device Manager, find and expand the Display adapters entry.
Step 3: Right-click the item listed below Display adapters and then choose the Update driver option.
Step 4: On the “How do you want to search for drivers” window, choose the Search automatically for updated driver software option.
Step 5: Wait patiently until the scanning process comes to an end.
Step 6: View the result once you get it.
If you see the message saying “The best drivers for your device are already installed”, it means the video card driver is not the culprit, and you should try other solutions.
If you see the driver software, you should install it according to the on-screen instructions. Once you finish the driver installation, you can restart Minecraft and see if the error message “GLFW error 65542: WGL: The driver does not appear to support OpenGL” will appear.
Fix 2: Uninstall the DisplayLink Graphics Driver
The DisplayLink Graphics Driver conflicts with the Java-powered version of Minecraft. Therefore, you should remove the software if you are actively using it.
For how to uninstall the software, here are the steps:
- Press Windows + R at the same time to launch the Run dialog box.
- Type cpl into the box and then hit the Enter key.
- Once you are inside the Programs and Features window, find and right-click the software in the list and choose the Uninstall
- Follow the on-screen instructions to complete the uninstallation.
Fix 3: Add the OpenGL.DLL File to File Explorer
Aside from driver issues, missing files like opengl32.dll or opengl64.dll can also trigger GLFW error 65542. So, go to the path C: Program Files Java *JRE VERSION* bin to check if the file is still here (“JRE VERSION* represents the version of JRE). If the file is missing, you can manually get the file back through the following steps:
Step 1: Check your system type.
Right-click the Windows icon on the taskbar, choose the Settings option, choose the System option, choose the About option, and read the information following System type.
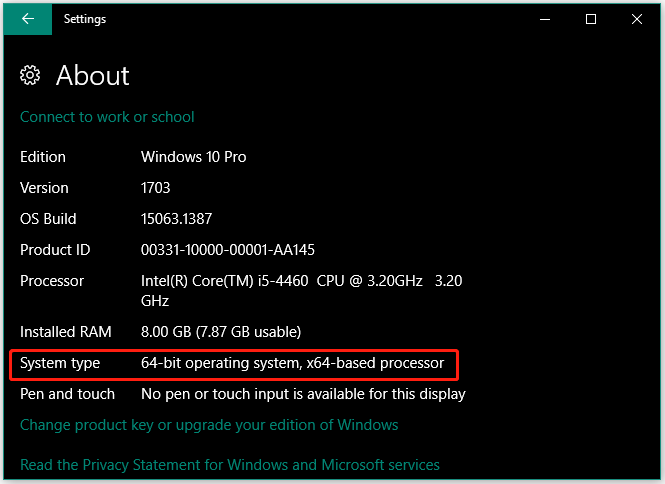
You might be interested in How to Upgrade 32 Bit to 64 Bit in Win10/8/7 without Data Loss.
Step 2: Go to the page to download the OpenGL.DLL file.
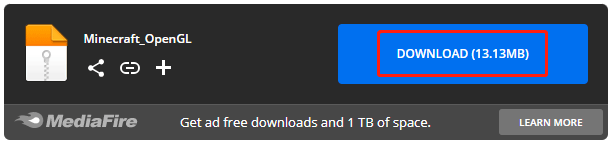
Step 3: Once the file is downloaded, navigate to the save location and extract the zip file to a folder.
Step 4: Open the extracted folder and double-click the 32 bit or 64 bit folder based on your system type.
Step 5: Once you see the opengl.32dll file, right-click it and then choose the Copy or Cut option.
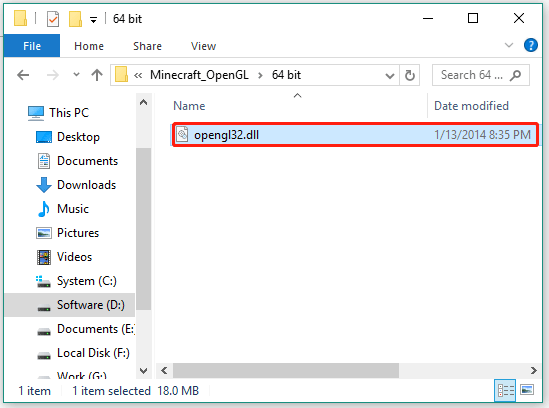
Step 6: Go to the path again: C:Program FilesJava*JRE Version*bin and paste the opengl32.dll file.
Step 7: When the UAC (User Account Control) window appears, click the Yes button to grant admin access.
Step 8: Once the file is added to File Explorer, restart your computer.
When the computer boots, check if you have gotten Minecraft out of the error.
You might be interested in Recover Missing Files On Windows 10.
Fix 4: Update Your Operating System
If none of the above fixing methods helps you get rid of GLFW Error 65542, you can try the last tactic — update your operating system.
Here is how to update Windows 10:
- Press Windows + X and then choose the Settings option from the menu.
- Choose the Update & security
- Click the Check for update button on the right side of the window.
- Wait a while for Windows to check and install the latest updates for you.
- Restart your computer.
Then, check if the error gets solved.