- Login
- Register
- FAQ
- Search
- It is currently Thu Feb 09, 2023 7:25 pm
- Print view
Render job failed — clip could not be processed
- Message
rjwerth
- Posts: 24
- Joined: Fri Mar 27, 2020 12:18 am
- Real Name: Robert Wertheimer
Sun Apr 05, 2020 12:33 am
I get this every now and again as well. AMD 580 graphics using Windows 10. Closing Resolve and then reopening it tends to fix the problem.
oktavia
- Posts: 1
- Joined: Wed Apr 08, 2020 11:44 am
- Real Name: Ronja Jenko
Wed Apr 08, 2020 11:49 am
Hey,
I just had the same problem and found a really simple solution. Maybe it works for someone else too
I just picked all clips on the timeline and moved them some seconds backwards, then I placed the render in/out range at the corners and started rendering. worked fantastically, no idea why
Mike_Molgart
- Posts: 1
- Joined: Thu Apr 09, 2020 7:02 pm
- Real Name: Mike Molgart
Thu Apr 09, 2020 7:39 pm
OnTheRopes wrote:
Lirlox123 wrote:Hey everyone, try going to preferences>user>UI> UN-CHECK «stop renders when a frame or clip cannot be processed» that worked for me.
Hope it helps
Upgraded to 16.1.2 Studio today, I always tend to delay upgrading but thought it was perhaps okay by now.
I had this exact Render issue, but your solution has worked, cheers. Just a shame BMD can’t be bothered to comment on it.
Great! This fixed it for me. Have 16.2.0.055. Built my first Fusion composite for particle dissolving a title. Couldn’t render. Tried another solution from this forum which didn’t do the trick. Happy about this one . However, this issue should be addressed by the developers. It’s like Windoze in the nineties — crashed if you touched the keyboard! Not a suitable tool for production.
Yuke17
- Posts: 19
- Joined: Sat Mar 21, 2020 9:36 pm
- Real Name: Paul Garvey
Sun Apr 12, 2020 5:11 pm
Just started receiving same RENDER JOB FAILED condition on a segment containing a cross dissolve of 2 1080 segments that each have grading and sharpening.
Dropping render speed didn’t help. Neither did relaunching app nor rebooting workstation. Disabling «stop render when clip…» stops the RENDER JOB FAIL message, but now GPU MEMORY IS FULL keeps popping up. The render will finish but the rendered segment is unusable due to repeated and missing frames.
So thinking my root cause of the RENDER FAIL is full GPU memory?
Supporting this theory is that if either the cross dissolve, grading or sharpening are removed, the segment renders fine. All 3 consistently create the GPU MEMORY FULL message, but only during rendering or when played in the DELIVER page. Error message does not display when playing in the EDIT page. Re-rendering cache of the segment then trying to render segment didn’t help.
When playing in DELIVER, GPU memory usage shows it’s running between 85% and 90%. GPU MEMORY IS FULL message occurs when GPU memory usage spikes much over 90%.
GPU processing is set to CUDA manual pointing to GTX 1070. Running the latest NVIDIA Studio drivers.
System:
Win10 Home
GTX 1070 8GB running Studio Driver V442.19
DR Studio 16.2.0.055
Any more hunches?
Yuke17
- Posts: 19
- Joined: Sat Mar 21, 2020 9:36 pm
- Real Name: Paul Garvey
Mon Apr 13, 2020 3:46 pm
Update: original issue reported as RENDER JOB FAILED. Disabling «stop renders when a frame or clip cannot be processed» stops the RENDER JOB FAIL message and completes the render. But GPU MEMORY IS FULL error messages now surface during render and the rendered product is corrupt.
I isolated it to a 3 second segment where 2 1080P clips are cross dissolved. Each clip has equally applied grading and sharpening applied via COLOR page nodes. Sharpening used a shared node. No other effects applied.
The GPU MEMORY IS FULL error started on the DELIVER page then appeared on the EDIT and COLOR pages as well. Monitoring the GPU the memory was peaking around 95%.
Here’s what didn’t fix the problem:
— rebooting DR or the workstation
— reloading latest 1070 Studio drivers
— changing GPU processing mode to CUDA
— changing proxy mode to 1/4 resolution
— changing render speed
— pre-rendering the clips to cache
— removing the color grading or the dissolve
— yelling at the screen
— kicking the workstation
Here’s what fixed the problem:
— deleting the SHARED NODE used for sharpening to a separate node dedicated to sharpening for each clip.
This conversion from a SHARED NODE to non-shared dropped GPU memory consumption from ~95% to a more manageable 60% — all with the desired end result. Now everything renders fine.
Why would this happen? Would like to think my i7 32GB Win10 GTX 1070 8GB DR Studio config would be more than enough horsepower for this simple composition.
Hope this helps others with their own troubleshooting.
Dwaine Maggart
Blackmagic Design
- Posts: 9952
- Joined: Wed Aug 22, 2012 2:53 pm
Fri Apr 17, 2020 5:36 am
@Paul. We can’t reproduce the memory issue.
Can you send us the simplest project export .drp that causes the issue on your system? Along with a Resolve diagnostics log captured while the issue is happening?
Thanks!
Dwaine Maggart
Blackmagic Design DaVinci Support
Fri Apr 17, 2020 3:28 pm
I’ve had the same problem. I was rotoscoping a clip in the Fusion page. I also color corrected that clip on the color page. The Noise reduction was the conflict. When I turned off noise reduction, everything rendered. I’d like to be able to run NR on the clip though.
Resolve Studio 16.2
MacBook Pro (15-inch, 2016)
2.9 GHz Quad-Core Intel Core i7
16 GB 2133 MHz LPDDR3
Radeon Pro 460 4 GB
Intel HD Graphics 530 1536 MB
Fri Apr 17, 2020 3:32 pm
I also have had issues in the past and currently with that renders failed, “clips could not decode properly” etc. And just for video, not fusion. For the video fix, I re-encoded source file as a different type and placed it back in timeline.
Then it rendered out just fine.
Sent from my iPhone using Tapatalk
Ev0Leadr
- Posts: 4
- Joined: Sat Apr 25, 2020 3:57 pm
- Real Name: Daniel Halenko
Mon May 11, 2020 10:02 am
*FIXED*
Hey guys, multiple threads talking about the same issue, be good if we could merge them all.
I tried a few things….
Tried the video workaround someone posted (new project etc etc). This didn’t work for me.
I had NOT tried «Stop renders if a frame fails» option (I thought I had but I just checked and it was on).
But I did notice on the render when it failed, on a Text+ clip, so I removed it, copied the exact same clip from another timeline which also used it, pasted and it rendered fine.
I use like a «master template» timeline as a base for my movies. So they all begin, end the same with sam lower thirds etc. Never had this issue after maybe 30 different renders.
Then all of a sudden I had this issue. No idea what it is, but if you only have one timeline that’s failing, try to see where it stops. I noticed a big black screen on half the render which I could tell was the Text+ clip.
Hope this helps some of you.
SenseiHollywood
- Posts: 5
- Joined: Fri Dec 20, 2019 4:23 pm
- Real Name: Dan Marshall
Wed May 20, 2020 6:43 pm
Lirlox123 wrote:Hey everyone, try going to preferences>user>UI> UN-CHECK «stop renders when a frame or clip cannot be processed» that worked for me.
Or check this video:
Hope it helps
This helped! Also, I just updated to 16.2.2, good so far
Bayou Media
- Posts: 4
- Joined: Sun Apr 26, 2020 9:46 pm
- Real Name: Mike Collins
Fri May 29, 2020 4:45 pm
I was having the same problem. It started after I added a temporal noise reduction node to one of my clips in the color screen. When I disabled the noise reduction node, the issue disappeared. This only happens when I set the «Frames» dropdown to something other than zero. The spatial noise reduction settings don’t seem to affect the issue.
Windows 10
Threadripper 1950x
GTX 1070 Ti
Resolve 16.2.2.011
Uli Plank
- Posts: 16605
- Joined: Fri Feb 08, 2013 2:48 am
- Location: Germany and Indonesia
Sat May 30, 2020 3:16 am
Temporal NR is better for video, but more demanding on the VRAM side.
Don’t approach DR with your preconceptions from another NLE.
Many features are better, some worse, most are different.
Resolve Studio 18.1.2, MacOS 12.6.2
MacBook M1 Pro, 16 GPU cores, 32 GB RAM
and
iMac 2017, Radeon 580, 32 GB RAM
Speed Editor
ptamzz
- Posts: 2
- Joined: Sat Feb 03, 2018 11:23 pm
- Real Name: Pebam Pritam
Thu Jun 11, 2020 3:46 pm
I had the same issue.
Neither Preferences>User>UI> Uncheck «stop renders when a frame or clip cannot be processed» nor instructions from the youtube video someone shared above worked for me.
Than, I realize I didn’t have enough space on the disk. Created enough space on the export destination and it worked fine.
aaronjclegg
- Posts: 5
- Joined: Sat Jun 13, 2020 11:12 pm
- Real Name: Aaron J. Clegg
Sat Jun 20, 2020 6:39 pm
Mike_Molgart wrote:
OnTheRopes wrote:
Lirlox123 wrote:Hey everyone, try going to preferences>user>UI> UN-CHECK «stop renders when a frame or clip cannot be processed» that worked for me.
Hope it helps
Upgraded to 16.1.2 Studio today, I always tend to delay upgrading but thought it was perhaps okay by now.
I had this exact Render issue, but your solution has worked, cheers. Just a shame BMD can’t be bothered to comment on it.Great! This fixed it for me. Have 16.2.0.055. Built my first Fusion composite for particle dissolving a title. Couldn’t render. Tried another solution from this forum which didn’t do the trick. Happy about this one
. However, this issue should be addressed by the developers. It’s like Windoze in the nineties — crashed if you touched the keyboard! Not a suitable tool for production.
This fixed my render issue as well, and we were able to keep rendering! I think there was a glitch in the original clip file, that a number of frames were missing, because there were a couple of words missing in the speaking. That tripped up the render process, but when I unchecked that box, I was able to render it anyway, even with the missing frames.
Robzylian
- Posts: 2
- Joined: Thu Jul 02, 2020 12:30 pm
- Real Name: Dominik Schlenker
Fri Jul 10, 2020 1:34 am
Affinity Harmonics wrote:I was able to render my video after 3 hours of trying to figure out what was wrong… It looked to be where ever the render crashed, is where I included a «Freeze Frame» clip. After I going back and removing them, I was able to render my video. Hope that helps anyone else stuck!
I was running into the same issue and noted the following: The issue was because I used a freeze frame at the very end of a media — and then extended the clip further to the right (where there was actually no media any more, but Davinci allowed to do so in the first place). But this was where the rendering stopped.
After replacing the freeze frame which was extended beyond the end of the media by a freeze frame extended only backwards to the left (i.e. within the actual media) immediately resolved the problem and the material could rendered without issues.
iamjon
- Posts: 13
- Joined: Tue Apr 07, 2020 3:42 pm
- Real Name: Jonathan Jones
Wed Aug 19, 2020 9:27 pm
Rendering at 50% speed worked for me. On the Deliver Page, under File.
Greymole
- Posts: 1
- Joined: Mon Feb 03, 2020 2:13 pm
- Real Name: Dan Molseed
Mon Nov 16, 2020 10:36 pm
Thought I’d add my experience with this issue to the list. I have an older computer, specs below, and I get the error: «Render job 1 failed as the current clip could not be processed. GPU processing on the current clip failed because of an error.» when I output my project to a file.
I tried various fixes found in this forum, but the one that worked for me was going to Preferences -> Memory and GPU -> GPU Configuration -> GPU processing mode, set it to «Auto» and then un-check the «use gpu scopes.»
I can recreate my issue 100% of the time with a simple project with a single video+audio on the timeline. Then, add a 2nd track, where I bring in a jpg file that will show up over the video, for say 10 seconds. When the rendering gets to this jpg file it stops and fails rendering.
My computer specs:
Windows 10 v2004 (OS build 19041.630)
DR 16.2.7.010
Intel i7-3770 3.4 GHz
16 GB Ram
NVIDIA GeForce GTX 555
NVIDIA driver v391.35
Samsung 860 EVO SSD 2TB hard drive (plenty of free space)
bruvajc
- Posts: 2
- Joined: Mon Oct 05, 2020 5:06 pm
- Real Name: John Conley
Mon Nov 23, 2020 2:40 am
For Davinci Resolve 17 Beta 2, I had this problem with the «Background Reveal» Fusion title. I changed it to another title and was able to process the project.
DropThePilot
- Posts: 1
- Joined: Mon Nov 30, 2020 2:42 pm
- Real Name: Jack Candid
Mon Nov 30, 2020 2:51 pm
Would it be possible to have specific error codes?
My first ever edit was a trim at both ends and rendered successfully. My second was eight clips selected from a single source clip. I’ve been trying all day to get this to render but I keep getting the Render job failed — clip could not be processed. Even with the ‘stop on render’ turned off in preferences.
I would like to learn Resolve rather than keep using Premiere. However I’m unable to learn from such general errors that mean nothing. Even after spending all day trying to resolve them using every suggestion I have found. I’m now terrified of using Resolve for an actual job. This problem could end me.
Albiback
- Posts: 27
- Joined: Mon Aug 19, 2019 9:03 pm
- Real Name: Albrecht Bloße
Mon Dec 07, 2020 9:24 am
I have to jump on the train as well.
None of the above mentioned solutions worked for me.
The footage is 360 degree 5.7k Apple prores 422. I tried different fusion scripts :
(transfor, shape 3d, merge 3d, camera 3d und render 3d, as well as viewer equirectangular)
I hope there is a solution to this problem.
Best regards
Albrecht
Processor
AMD Ryzen 9 3950X
GPU
AMD Radeon VII (Driver 10.20.45004.0
OpenGL® 26.20.11000.14757
Vulkan™ Driver 2.0.159)
Memory
64GB (4x16GB) 3600MHz
Motherboard
MSI MEG X570 ACE (MS-7C35) (1.80)
Operating System
Windows 10 Pro (20257)
ThomasSmailus
- Posts: 13
- Joined: Mon Mar 27, 2017 3:17 am
- Location: Pacific Northwest
Fri Dec 25, 2020 1:55 am
Just had this very issue. One of the dozen clips I imported from my iPhone XS caused this ‘render fail’ at the end of one clip. The clip would play just fine in the editor and transition. But the ‘render’ failed at the end every time. I took a second or so off the end of the reported problem clip, and restarted the render.
Things went perfectly fine then.
So my best guess is at least in my case, the Apple produced .mov files had one of them that wasn’t quite clean and compatible with Resolve.
For reference purposes, I was rendering to 1920x1080P 30fps H.265 Quicktime with Linear PCM stereo audio destined for YouTube.
Resolve 16.2.6.005
The source clip was
Format : MPEG-4
Format profile : QuickTime
Codec ID : qt 0000.00 (qt )
File size : 165 MiB
Duration : 18 s 432 ms
Overall bit rate : 75.0 Mb/s
Encoded date : UTC 2020-12-24 06:39:03
Tagged date : UTC 2020-12-24 06:39:21
Writing library : Apple QuickTime
com.apple.quicktime.location.ISO6709 : +47.6270-122.0433/
com.apple.quicktime.publisher : ISO: 965.16925
com.apple.quicktime.software : Created with FiLMiC Pro 6.12.9 build 16197
Thomas
—
Amateur w/ occasional professional product producing aspirations
Terry D
- Posts: 1
- Joined: Mon Jan 25, 2021 4:15 pm
- Real Name: Terry L Dunkle
Mon Jan 25, 2021 4:20 pm
I finally deleted the project and started from scratch. That worked for me. I was simply connecting two files together and it to seemed to be failing at the junction of the two files. Both file rendered properly when unattached.
shadewind
- Posts: 114
- Joined: Tue Jan 19, 2021 3:30 pm
- Real Name: Emil Sahlén
Tue Jan 26, 2021 1:54 pm
I also have this issue when using denoising and have not found a way to fix it.
Wed Jan 27, 2021 12:49 am
I found this can happen if you are rendering back to the same drive as the source media. Especially if its a large resolution file. Even on a USB-C SSD drive I stupidly tried to render back to a folder on the same drive as I was sourcing the video clip I was rendering. First time I got well into it before it failed and then subsequently it would fail within seconds of further attempts.
Uli Plank
- Posts: 16605
- Joined: Fri Feb 08, 2013 2:48 am
- Location: Germany and Indonesia
Wed Jan 27, 2021 2:48 am
ThomasSmailus wrote:So my best guess is at least in my case, the Apple produced .mov files had one of them that wasn’t quite clean and compatible with Resolve.
Not only Apple, most smartphones record video with variable frame rates (even with FiLMiC Pro), which can cause trouble in Resolve. More primitive editing software can normally handle that.
Don’t approach DR with your preconceptions from another NLE.
Many features are better, some worse, most are different.
Resolve Studio 18.1.2, MacOS 12.6.2
MacBook M1 Pro, 16 GPU cores, 32 GB RAM
and
iMac 2017, Radeon 580, 32 GB RAM
Speed Editor
nspusmc
- Posts: 1
- Joined: Sat Feb 06, 2021 2:12 pm
- Real Name: LEVI ZORTMAN
Sat Feb 06, 2021 2:16 pm
I have this issue on 17.1 beta
I am not using fusion or dehaze. The only thing I’m using is color correction and retime. No freeze frames. I tried replacing all of the clips from source. No luck.
The strange thing is, the project renders just fine in quicktime format. It won’t render .mp4
Original source is .mov
StormeNet
- Posts: 36
- Joined: Sun Mar 17, 2019 11:55 pm
- Real Name: Thomas Storme
Sat May 08, 2021 1:43 pm
I also have this on 17.1.1 Build 9 (and had this in the past, very frustrating)
This workaround did work for me:
youtube video: 6eflSIgrkz8 (I’m not allowed to post urls on this forum…)
Basically in playback menu: Render cache on smart, and Fusion memory cache on.
Then in deliver page on advanced settings, check Use render cached images.
The strange thing, after the workaround has worked, and I disable the workaround, it works again as expected.
Davinci Resolve Studio 18.0.4
MSI GS43VR 7RE (Phantom Pro) notebook — NVIDIA GeForce GTX 1060 6GB GDDR5 — Intel® Core™ i7-7700HQ 3.80 GHz- 32 GB DDR4-3000 — ADATA XPG SX8200 Pro NVME 2TB M.2 SSD — Crucial MX500 2TB 3D NAND SATA 2.5-inch — Windows 10 Pro
Uli Plank
- Posts: 16605
- Joined: Fri Feb 08, 2013 2:48 am
- Location: Germany and Indonesia
Mon May 10, 2021 10:02 pm
nspusmc wrote:The strange thing is, the project renders just fine in quicktime format. It won’t render .mp4
Which codec are you using in the MOV container? My observation is that hardware accelerated renders into H.264/265 can stress a GPU and that it works better if you first render a master in a mezzanine format.
Don’t approach DR with your preconceptions from another NLE.
Many features are better, some worse, most are different.
Resolve Studio 18.1.2, MacOS 12.6.2
MacBook M1 Pro, 16 GPU cores, 32 GB RAM
and
iMac 2017, Radeon 580, 32 GB RAM
Speed Editor
CtheProducer
- Posts: 4
- Joined: Wed Apr 28, 2021 11:55 pm
- Location: Florida
- Real Name: Corey Holtgard
Thu Jul 22, 2021 2:46 pm
I started getting this error today on timelines I have been exporting just fine. I tried all of the mentioned workarounds in this thread.
What ended up working for me was choosing a different codec on export. I had it set to DNxHR HQ then switched to DNxHR HQX 10-bit and everything went back to working great.
I am on a PC using Resolve Studio version 17.2.2 Build 4.
Xyphien
- Posts: 4
- Joined: Wed Oct 20, 2021 3:34 am
- Real Name: Chaun Farmer
Wed Oct 20, 2021 6:09 am
Yet another same here. How would anyone ask for a $299 price tag if the same issue since 2019 hasn’t been addressed… All that time wasted…
Fri May 27, 2022 12:52 pm
so i just got this error again and again with some simple fusion titles, some green screen comps, just so tired of it.. it plays back fine in the timeline, just can’t get it out to the client
mac studio m1 ultra 17.4
Uli Plank
- Posts: 16605
- Joined: Fri Feb 08, 2013 2:48 am
- Location: Germany and Indonesia
Fri May 27, 2022 1:33 pm
Do the Fusion work in Fusion standalone and use Fusion Connect.
Much more stable here.
Don’t approach DR with your preconceptions from another NLE.
Many features are better, some worse, most are different.
Resolve Studio 18.1.2, MacOS 12.6.2
MacBook M1 Pro, 16 GPU cores, 32 GB RAM
and
iMac 2017, Radeon 580, 32 GB RAM
Speed Editor
Fri May 27, 2022 1:38 pm
tell me about it….
but that’s a little late for this particular deadline. error after error after error. and after working around these errors i get new errors. trying to render using the render cache is tripping, media offline messages, flickering frames.. it’s getting on my nerves. i’m only busy with attempts to fix errors
Uli Plank
- Posts: 16605
- Joined: Fri Feb 08, 2013 2:48 am
- Location: Germany and Indonesia
Fri May 27, 2022 2:20 pm
Did you try to render into an easier codec?
Don’t approach DR with your preconceptions from another NLE.
Many features are better, some worse, most are different.
Resolve Studio 18.1.2, MacOS 12.6.2
MacBook M1 Pro, 16 GPU cores, 32 GB RAM
and
iMac 2017, Radeon 580, 32 GB RAM
Speed Editor
Fri May 27, 2022 6:46 pm
yes
harryvanlamoen
- Posts: 23
- Joined: Tue Oct 08, 2019 6:03 pm
- Real Name: Harry van Lamoen
Sun Jul 24, 2022 2:32 pm
upgraded to the stable studio version 18 and now I get this error.
An update on this issue. It seems to be the TEXT+ that issues a Media offline !? Hope a bugfix will arrive soon.
second update: user xunile saved my day, set render cache to none for this moment since there is a bug in cache rendering at the moment
Sampenguin
- Posts: 7
- Joined: Sat Mar 27, 2021 8:31 pm
- Real Name: Ryan Seabury
Sun Aug 28, 2022 3:43 pm
Binsfeld wrote:The fusion clip is rendered when I use the «render cache». Then if I check «use rendered media» my job goes through.
So I just had this problem in 18 but the solution this person posted worked oppositely for me. I kept erroring every time I had «use render cached images» turned on. I turned it off, and the clip rendered.
Sun Aug 28, 2022 4:56 pm
I have noticed that Resolve isn’t good at cleaning up partially-written files that it creates.
So if it’s in the middle of making, say, a proxy file and you hit cancel or run out of disk space it’ll leave the file there in its incomplete state.
Clearly this will cause problems later if/when Resolve tries to use the file.
This could easily be causing the behaviors noted here.
Director, Editor, Problem Solver. Been cutting indie features for 20 years. FCP editor from version 2 to 7.
Resolve 18.1.3
macOS 12.6.3
MacBook Pro 16″ M1 Max 64GB RAM
Wed Sep 07, 2022 5:55 am
Partially-written proxy files are still not cleaned up in 18.0.2
Director, Editor, Problem Solver. Been cutting indie features for 20 years. FCP editor from version 2 to 7.
Resolve 18.1.3
macOS 12.6.3
MacBook Pro 16″ M1 Max 64GB RAM
jhwblender
- Posts: 2
- Joined: Sun Oct 02, 2022 5:12 am
- Real Name: Jesse Wood
Sun Oct 02, 2022 5:14 am
saronbrandao wrote:I had this same problem while rendering an animation that contained scripts. I was able to watch that on the viewer, but couldn’t render. My solution was pretty simple, I set my cached files to high quality and then I got back to fusion tab, right clicked the mediaout node and chose «cache to disk«, then I played the animation once till it is cached and once I was back to the deliver page, down in the video options, I selected advanced settings/ use render cached images. Then, send it to render again and the problem was gone
I think it works every time your are in a situation which you can playback your clips but cant render them. I hope it helps.
Oh my gosh! Thank you so much!
This worked. Had been banging my head over this for more than a day.
Sat Jan 07, 2023 7:25 pm
Partially-written proxy files are still not cleaned up in 18.1.2.
Director, Editor, Problem Solver. Been cutting indie features for 20 years. FCP editor from version 2 to 7.
Resolve 18.1.3
macOS 12.6.3
MacBook Pro 16″ M1 Max 64GB RAM
Return to DaVinci Resolve
Who is online
Users browsing this forum: Bing [Bot], robinwn, xunile and 104 guests
Открываю проект в DaVinci Resolve 16.2.8, он открывается, но появляется окошко с сообщением об ошибке:
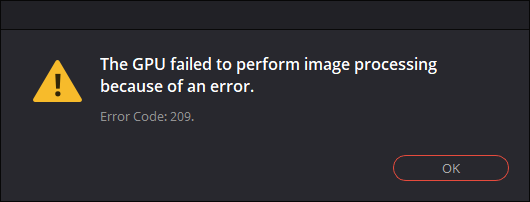
The GPU failed to perform image processing because of an error.
Error Code: 209.
Накануне я обновил DaVinci Resolve. Скорее всего из неё обрали поддержку CUDA (в моём случае минимум Compute Capability of 3.0).
Посмотрел логи:
«C:UsersDenisAppDataRoamingBlackmagic DesignDaVinci ResolveSupportlogsResolveDebug.txt»
Там была такая запись:
[0x0000323c] | GPUManager           | INFO  | 2021-02-04 13:33:04,843 | Flushing GPU memory...
[0x0000323c] | DVIP                 | ERROR | 2021-02-04 13:33:04,845 | C:/jenkins/workspace/dvip/DaVinciIP/DaVinciIP/Unpacker/Unpacker_kernel.cu:226: CUDA error cudaErrorNoKernelImageForDevice (209)
[0x0000323c] | GPUManager           | ERROR | 2021-02-04 13:33:04,851 | Exception caught while running GPU algorithms:
[0x0000323c] | DVIP                 | ERROR | 2021-02-04 13:33:04,851 |
DVIP Exception: At position C:/jenkins/workspace/dvip/DaVinciIP/DaVinciIP/Unpacker/Unpacker_kernel.cu:226
 - API: CUDA
 - API Error Code: cudaErrorNoKernelImageForDevice (209)
Как всегда для решения подобной проблемы у пользователя аж 3 варианта:
1. Купить видео-карту помощнее
2. Установить старую версию DaVinci (16.2.6)
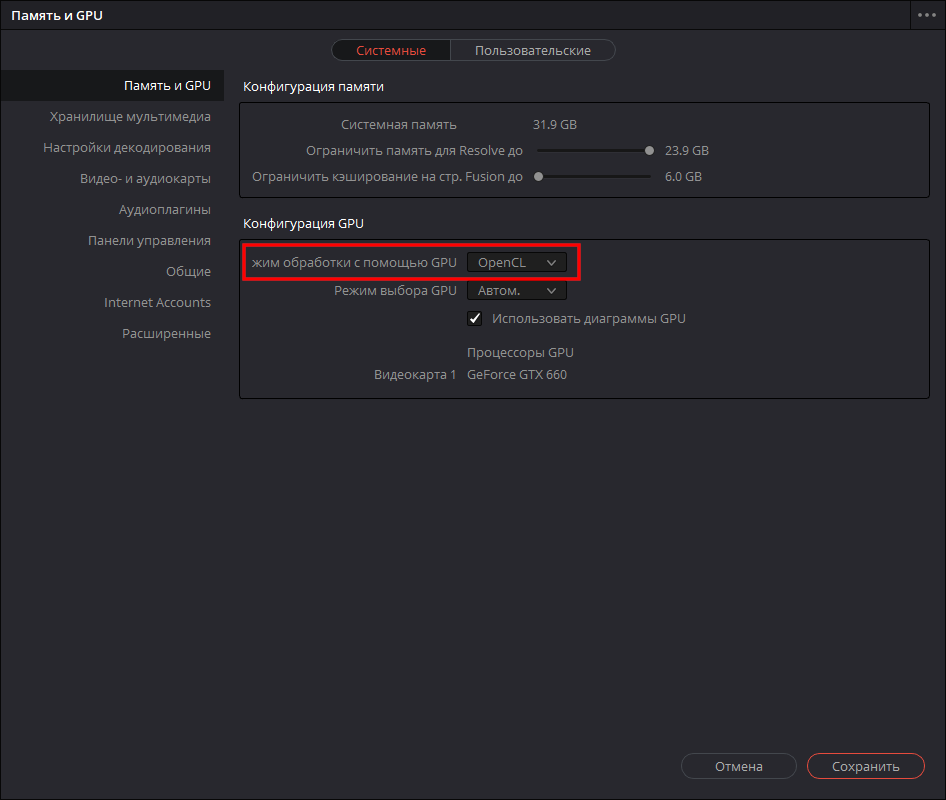
3. Переключить режим работы программы на OpenCL:
▶ ▶
GPU Processing Mode = OpenCL
Придётся воспользоваться вторым вариантом, т.к. вариант (3) почему-то замедляет производительность программы (судя по некоторым отзывам, хотя по идее не должен), а тратить деньги на новую видюху я не хочу. К тому же сейчас из-за ажиотажа вокруг майнинга криптовалют, видео-карты стоят нереальных денег.
Текущий драйвер NVIDIA GeForce: 461.40.
Попробовал драйверы:
461.09 — проблема не решилась
460.89 — аналогично
460.79 — та же ошибка при открытии проекта
457.61 — увы
457.30 — не сработало
457.09 — ошибка осталась
456.71 — нет
456.55 — тоже нет
456.38 — и этот драйвер не сработал.
Таким образом рекомендация с форума, в которой предлагалось попробовать старый драйвер, мне не помогла.
Зато проблема решилась установкой DaVinci Resolve версии 16.2.6.005
- Об авторе
- Недавние публикации
There are many reasons you might receive the “Render Job failed” error when rendering your videos in Davinci Resolve.
However, some of them are more common than others, therefore I’ve gathered the most common ones in this article.
I’ve seen there are two types of errors that occur for most people. The first one is related to rendering fusion composition & the second is a video file that could not be decoded correctly.
However, the solutions shared in this article will work on both error types.
Anyways, let’s solve this problem of yours!
1. Export Rendered Cache Files
This one is actually quite genius, and solved the problem immediately when I was facing this problem.
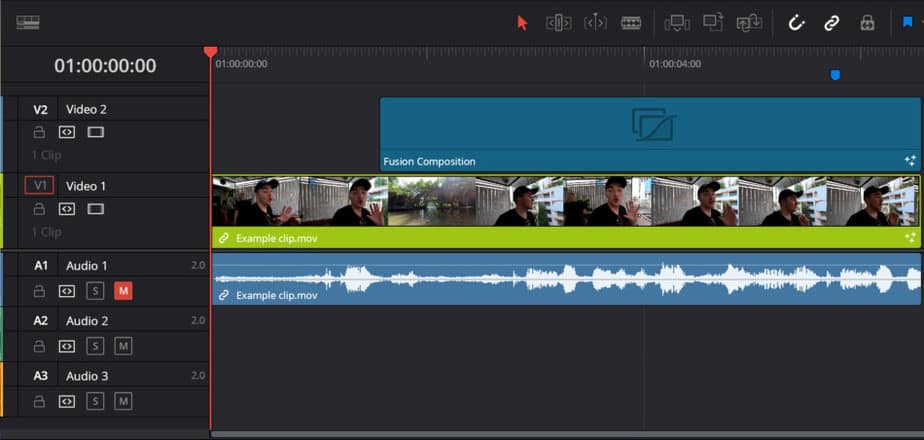
So let’s get to it! Here’s a picture of the two most normal errors to experience:
Here you can see my timeline, just a normal clip and a fusion composition which are causing this error:
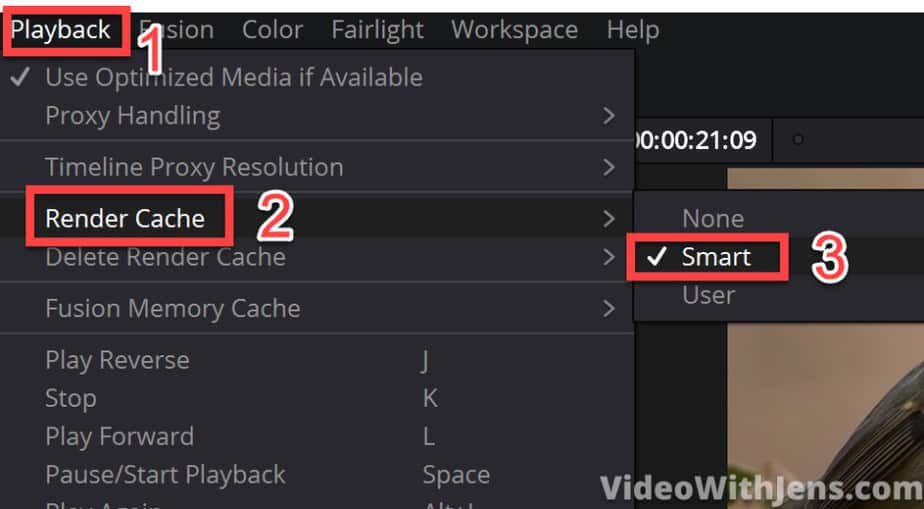
The first thing you want to do is open “Playback > Render Cache > Smart“:
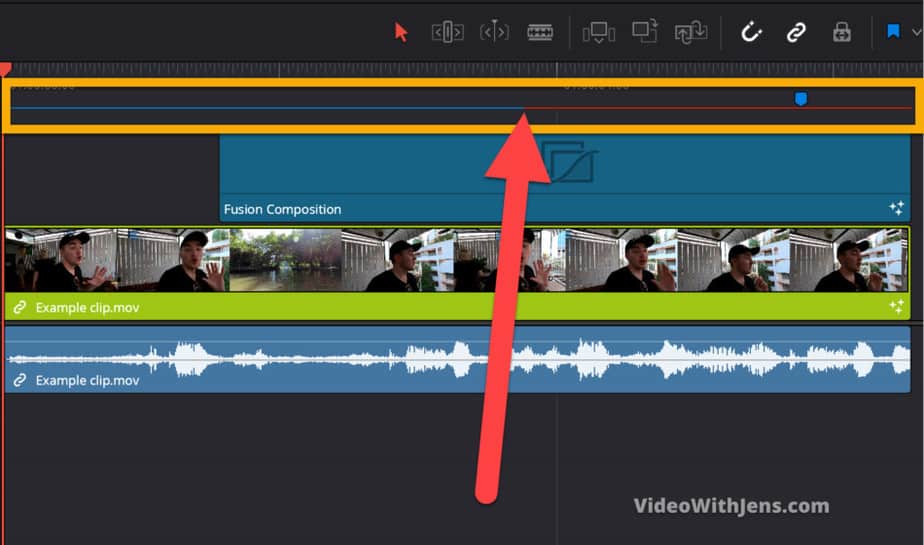
Once that is done you will see a red line, which is slowly turning blue above your clips in the timeline. Let it finish rendering before moving on. At least it should render the clip which is causing you problems (if you know which it is).
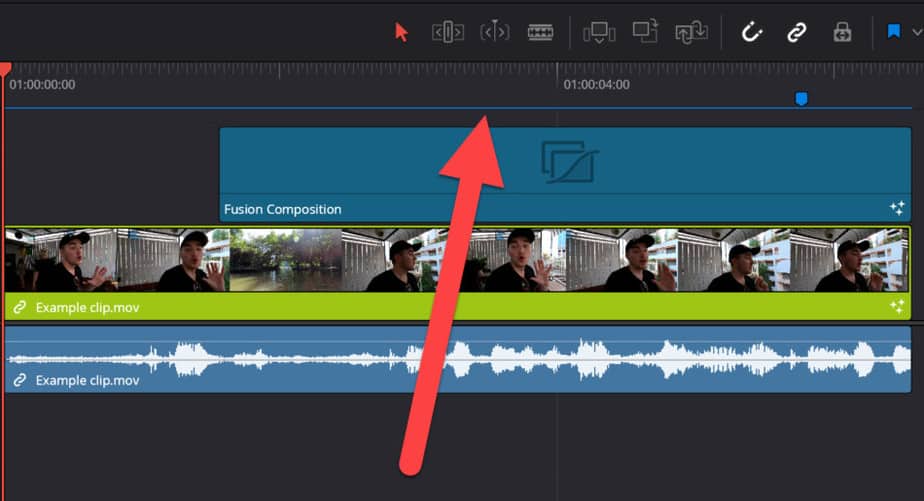
Once it’s done it will be totally blue like this:
Now, go to the “Deliver” page:
Go to the “Render Settings” window:
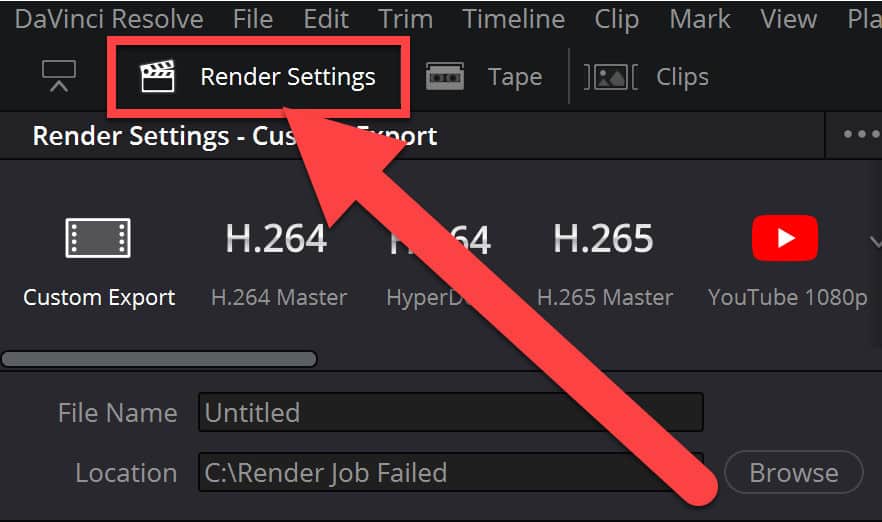
Now we are getting into more uncommon territory for a lot of people.
Go ahead and open the “Advanced Settings“:
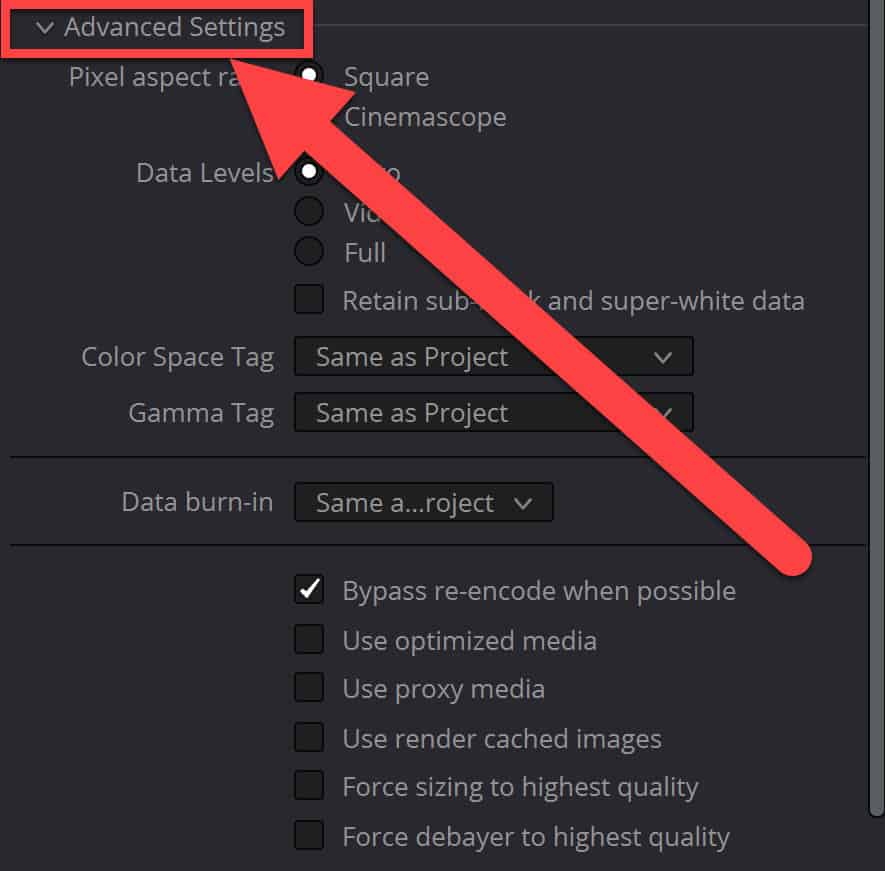
AND finally, we have found the golden nugget!
Now you want to tick off the box next to “Use render cached images“. What this does, is use the cached files we created when that red line turned blue. So it basically renders how the timeline memory created of your timeline and in that memory, all the files worked, thus they work in the rendered file as well!
So tick off the box next to “Use render cached images” and hit “Add to Render Queue“:
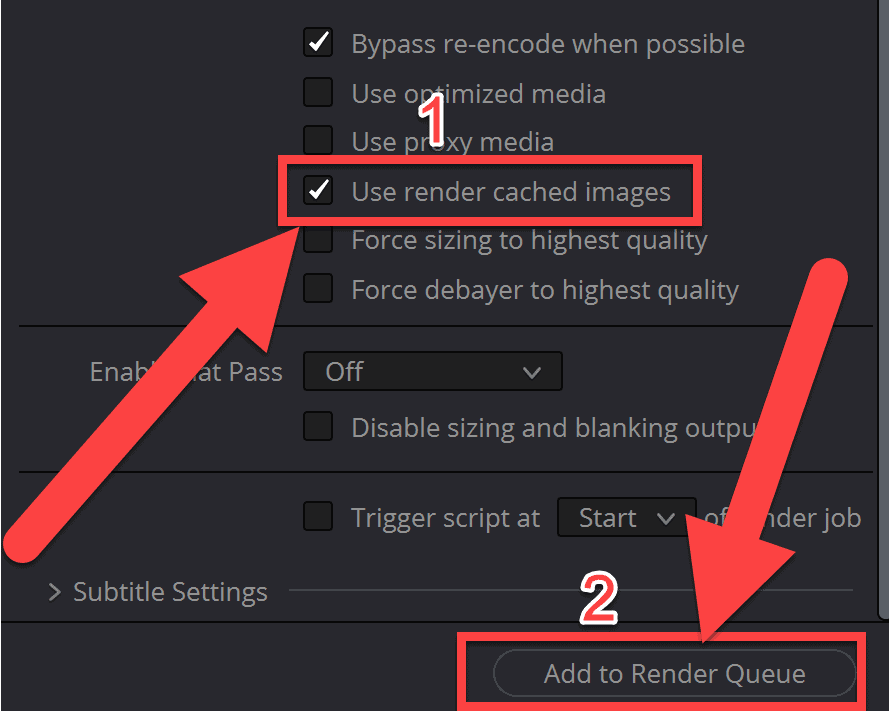
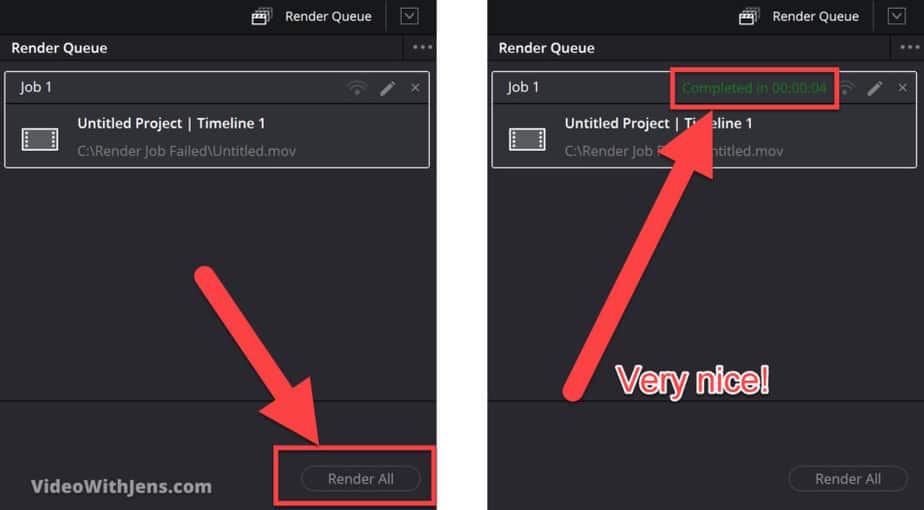
Now head over to the “Render Queue” and start the render job! Hopefully, once it’s done, it looks like the picture below:
2. Copy the Timeline and Create a New Project
This one is very easy, which is the reason I’m placing it as number two on the list!
If it doesn’t work, no big deal just proceed to the next method.
So we are not going to copy the timeline as it sounds. Instead, we are going to copy all the clips in the timeline.
You can do this by simply pressing “CTRL+A” or “Cmd+A”(on a Mac), then press “CTRL+C” or “Cmd+C”(on a Mac) to copy.
If you are not the shortcut kind of person, you can select all your clips by dragging over them and then right-click a clip > Copy.
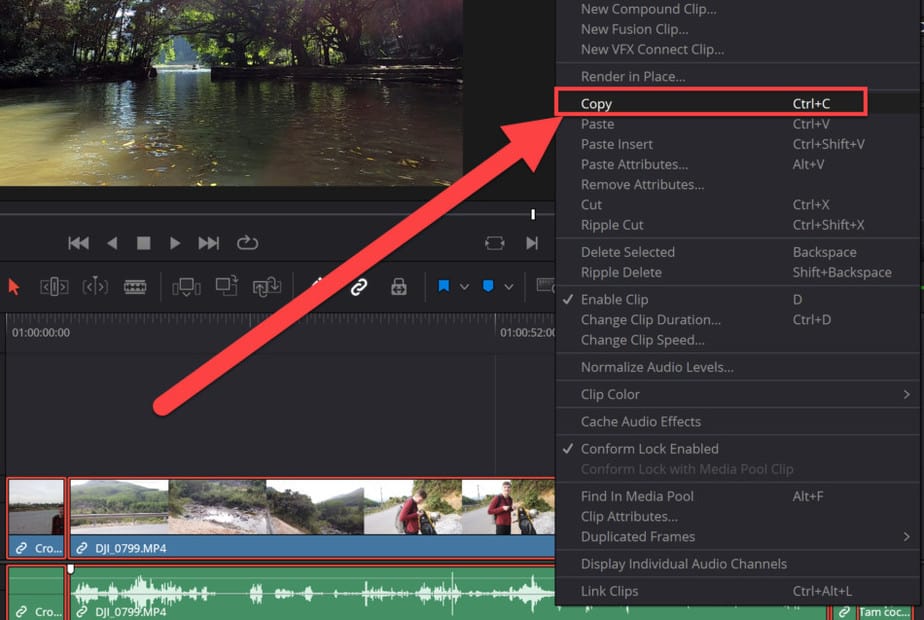
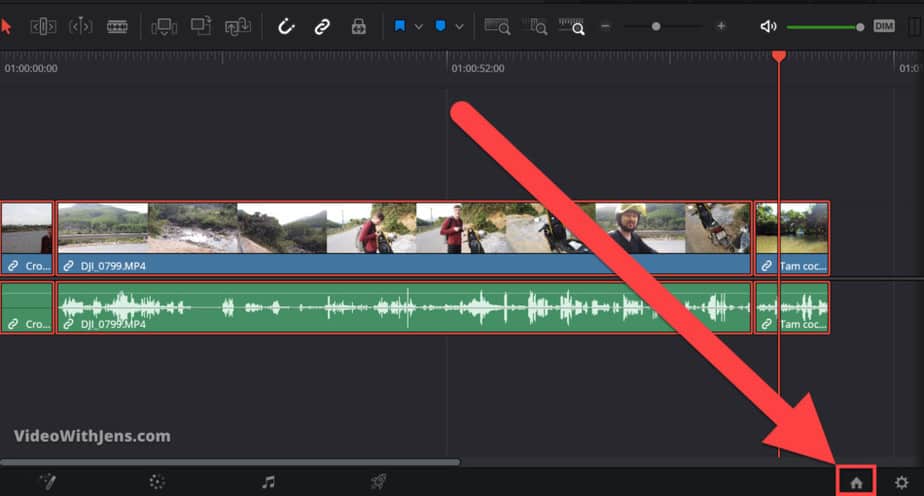
Next, save your current project.
Then, click on this house icon in the bottom right-hand corner:
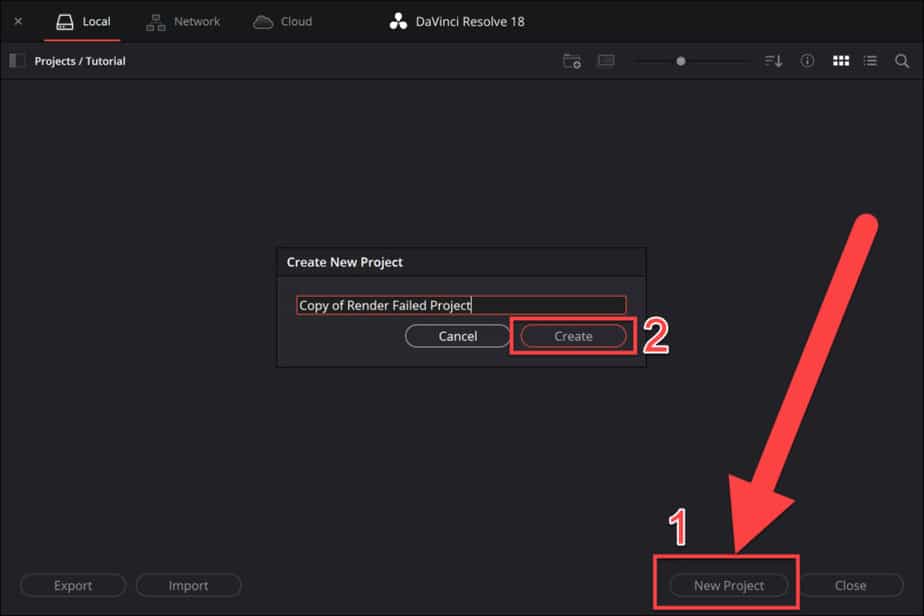
In this window go ahead and click on “New Project“, then call it whatever you want and click on “Create“:
Inside your new project, click once on the timeline and then press “CTRL+V” or “Cmd+V” (on a Mac).
For those who don’t like shortcuts: Right-click on the timeline and click on “Paste“.
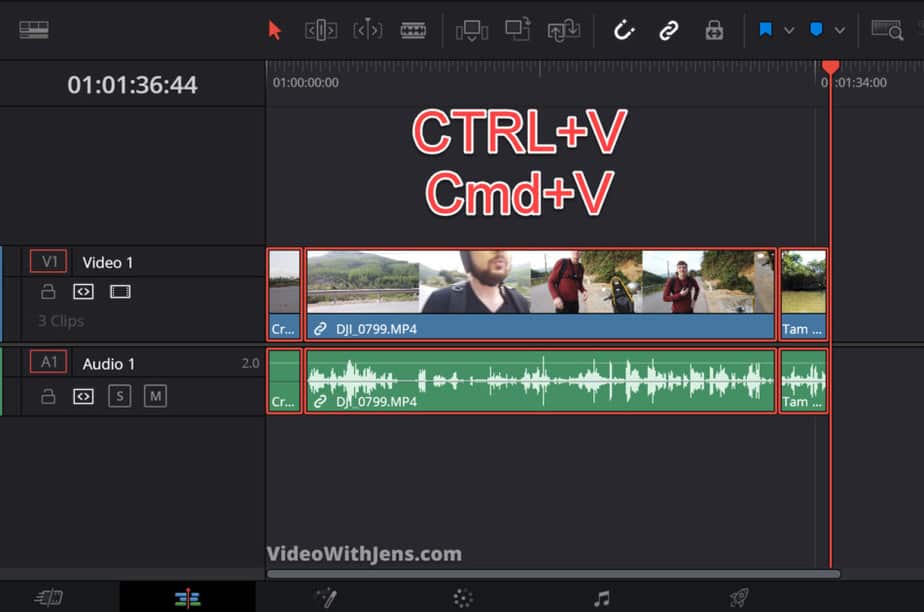
Once you’ve done this, go ahead and try to render!
If it didn’t work. We have other methods which has worked for a bunch of people:
3. Convert Your Videos to DNxHR
- Select the clips in your timeline.
- Right-click and click on “Render in Place…“
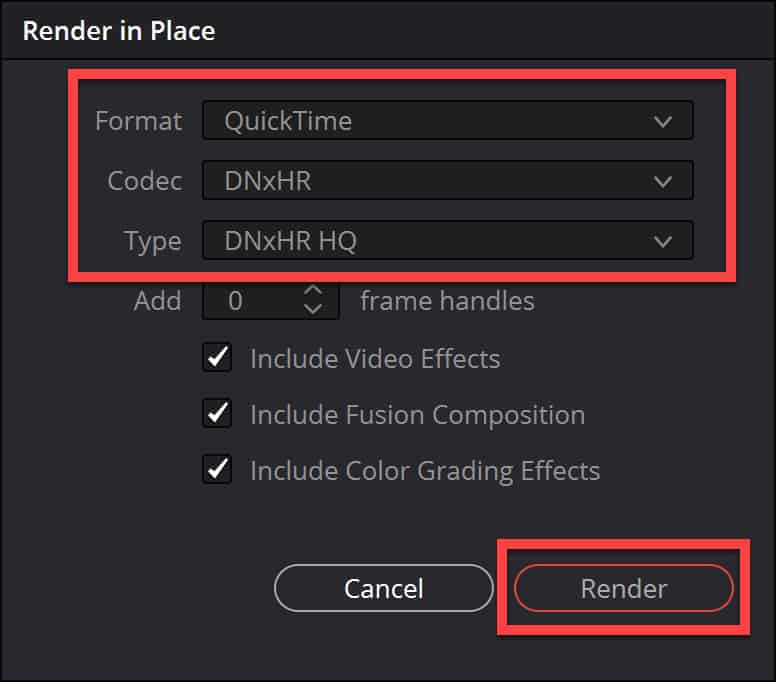
- Set “Format” to “QuickTime“.
- Set “Codec” to “DNxHR” and “Type” to “DNxHR HQ“.
- Click on “Render“.
This solution seems to have worked for some people as well.
If you’re having the fusion composition error, this solution most likely will not work. (All the others work for both errors).
However, let’s go into a bit more in detail on how to do it and some consequences of doing this.
The consequence of converting to the DNxHR codec is that the file size is HUGE. If you are used to handling such as .MP4 and .MOV.
Why is this?
We’ll not go too much into detail on this, however, DNxHR is utilizing something called intraframe compression. These are ALOT less compressed than a .MP4 which is normally paired with an H.264 codec which usually compresses the video a lot.
So by converting your video to DNxHR, it will be a lot less compressed, then it’s a lot easier on your computer when playing it back as well and gives you a better experience while editing.
Here’s how much larger your files will get:
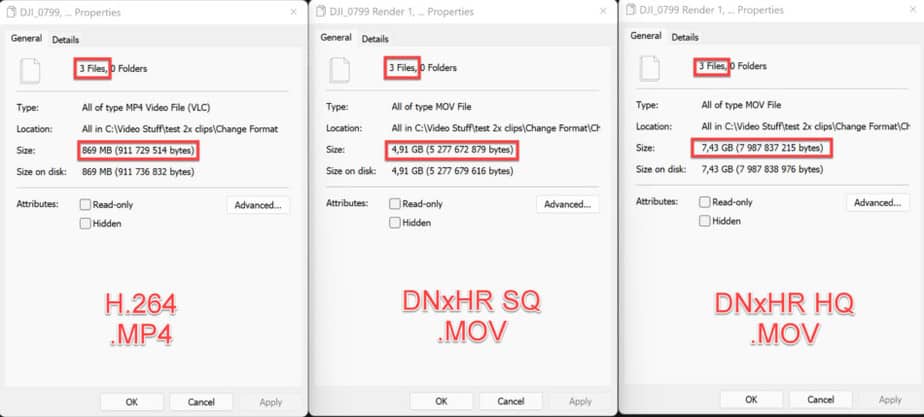
You can see it’s quite a lot, but if you have enough disk space, you can just delete it afterward, as you will still have your original footage.
It’s worth a shot! However, you could try the other solutions first.
Here’s a more detailed description of how to do it:
First, select the clips in your timeline, or if you know which clip is causing the error select that one.
Then click on “Render in Place…“
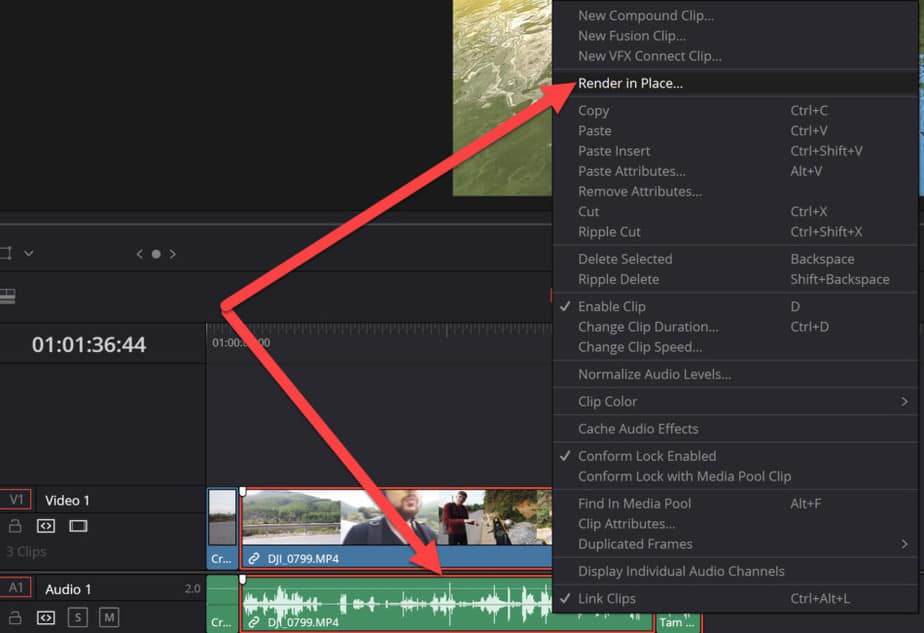
Next, you want to change the following:
- Format – QuickTime
- Codec – DNxHR
- Type – DNxHR HQ
If you want a bit smaller file size you could try changing to DNxHR ‘SQ’ instead of ‘HQ’. As the only difference is that HQ is of higher quality. That said people who have solved this error used ‘HQ’…
Choose one of them, and then click on “Render“:
The rendering takes a little bit of time.
Once it’s done you can see that you have now both your old format and new format in your “Media Pool“:
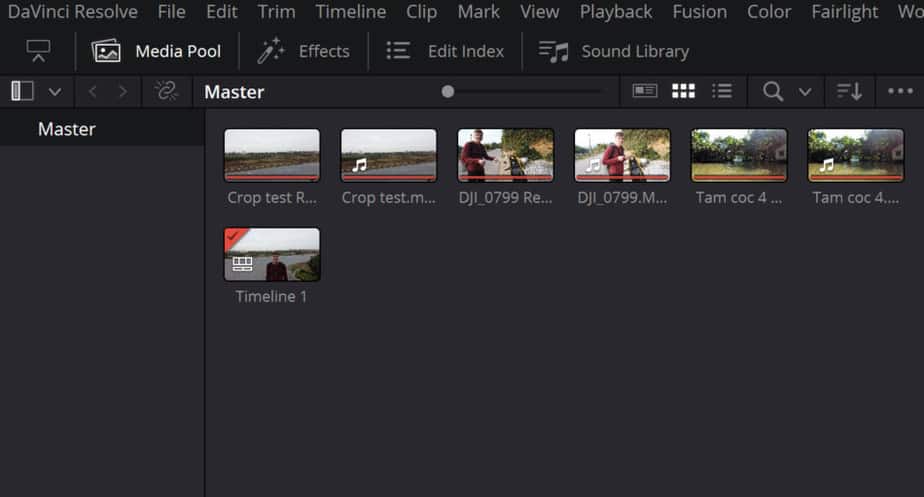
And you don’t have to add the new files to the timeline, as they will have swapped places as part of the render process! You can see in the picture below that it has changed from .mp4 to .mov.
.mov is representing the QuickTime format:
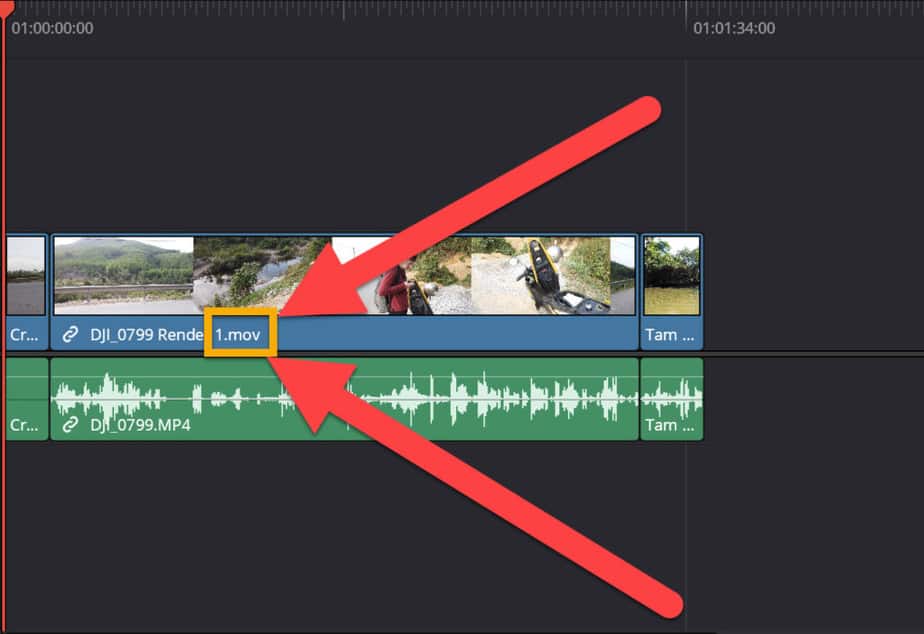
Next, go ahead and render your project! Fingers crossed…
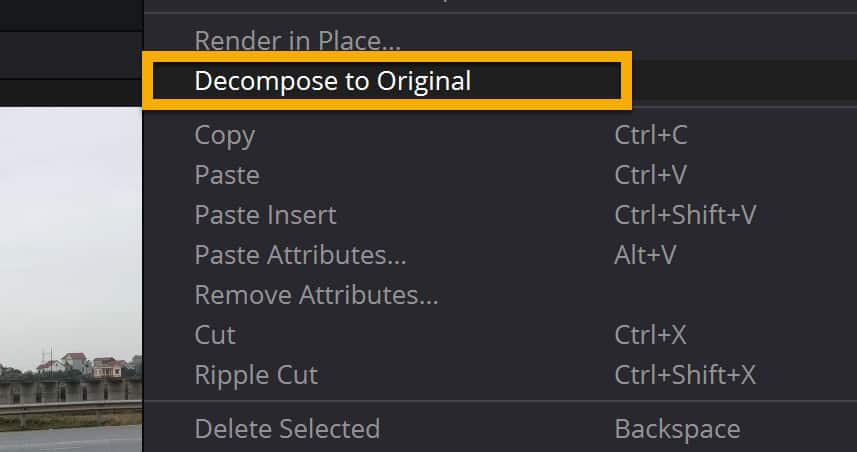
If you want to swap the clips in the timeline back to the original files, “select the clips > right-click > Decompose to Original”: (You will still have them on your computer and in the media pool.)
4. Change Workspace Options
This is the option almost everyone suggests. And my least favorite solution to the problem, which is why it’s the last on the list…
This solution does work, and most of these errors will get solved by using it. The problem with doing this you will render out your project even if there is an error, and then it will be included in your final product.
However, after experimenting a little bit with this solution, I’ve found that sometimes the error is just in the render faze, and I could not see any negative impact on the exported file.
So without further ado, here’s solution number 4:
Click on “Davinci Resolve” in the left-hand top corner of Davinci Resolve. Then click on “Preferences…“.
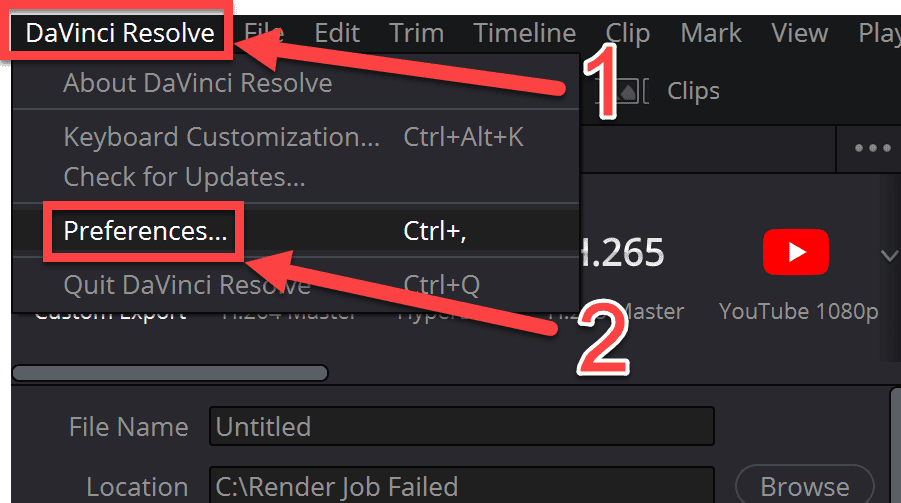
Then in the window that pops up, click on “User“, then “UI Settings“.
Next, uncheck the option called “Stop renders when a frame or clip cannot be processed“.
Watch the picture below:
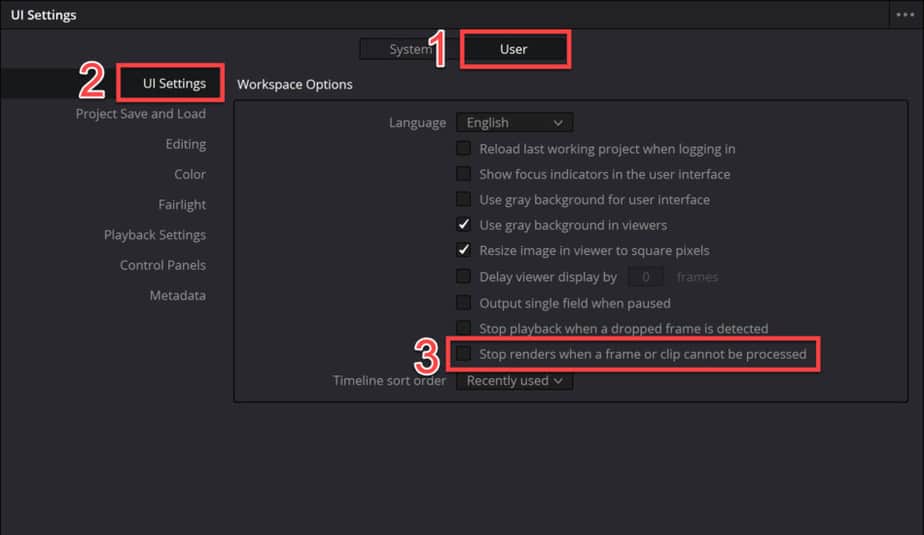
Once you have done this go ahead and click on “Save“, located in the lower right-hand corner of the window:

That’s it!
Now you can go ahead and try to render your video again.
Afterward, watch through your video if there are any errors, etc. A common one to watch out for is this:

There’s a big chance you have seen this one inside Davinci Resolve. However, it’s actually possible to render this one into your final product as well.
That’s it and I really hope one of these solutions solved your problem!
If you are facing problems with the “Add to Render Queue” button turning gray, check out this article.
Best regards,
Your friend, Jens.
Most users get some sort of GPU issue or the other while working on DaVinci Resolve.
Sometimes you might face GPU (graphics card) related issues when…
You update Resolve to the latest version.
Or…
When you update the Nvidia drivers. Or it could be due to other reasons as well.
Today we’ll see how to fix these GPU related issues in DaVinci Resolve.
Without wasting time, let’s get started.
Is DaVinci Resolve GPU Intensive?
DaVinci Resolve is GPU intensive in the sense that the GPU does all the image processing heavy-lifting as per BlackMagic Design. Whereas other video editors rely heavily on CPU.
So DaVinci Resolve will naturally demand a good discrete GPU with a minimum of 2 GB onboard memory (4 GB and above is preferable).
Related Article:
How to Make DaVinci Resolve Use GPU (Helpful Tips!)
Most Commonly Used GPUs in DaVinci Resolve
Both Nvidia (CUDA) and AMD Radeon (OpenCL) are good. But the most commonly used GPUs come under Nvidia, for example:
- GeForce GTX Series like 970, 1080, 1650 Ti. etc, – for Consumers
- Quadro series – for Professionals
- Tesla series – Data Center
Because of a lot of graphics card variants in Nvidia and Radeon, there arises a need to properly update your computer with the right version of drivers (to run the hardware).
Why does DaVinci Resolve Throw GPU Errors?
DaVinci Resolve usually throws GPU errors whenever there are any compatibility issues with the graphics card, video driver and the version of DaVinci Resolve.
Hence it is very important for you to check whether your graphics card is supported, whether you have the latest or reliable version of video driver (like Nvidia Studio driver) and the latest or stable Resolve.
Though you don’t have control over the DaVinci Resolve software, you can make sure you have the right GPU with the correct video driver installed.
Some of the most common GPU issues faced in DaVinci Resolve are:
- GPU Configuration Warning
- Unsupported GPU processing mode
- GPU Error – like “Davinci resolve gpu failed to perform image processing error 702”
- GPU Memory Full
Related Article:
GPU & DaVinci Resolve (9 Things Most Beginners Don’t Know)
GPU Configuration Warning, Unsupported GPU Processing Mode & GPU Failed to Perform Image Processing Error
The GPU configuration warning will say “DaVinci Resolve is using OpenCL for image processing because the installed Nvidia driver does not support CUDA 11.0…“.
Starting from DaVinci Resolve version 16.2.7 and afterwards (including version 17), BlackMagic has come up with a minimum requirement for hardware GPU types and Nvidia drivers (Mac, Windows and Linux).
| OS | GPU Hardware Type | Minimum Nvidia Driver Version |
|---|---|---|
| MacOS 10.14.6 Mojave | Metal or OpenCL 1.2 | |
| Windows 10 Creators Update | CUDA 11.0 or OpenCL 1.2 | 451.82 |
| Linux CentOS 7.3 | CUDA 11.0 or OpenCL 1.2 | 450.51.06 |
The table clearly tells that for Windows, your Nvidia GPU (graphics card like GeForce GTX 1650) should support CUDA 11.0.
In other words…
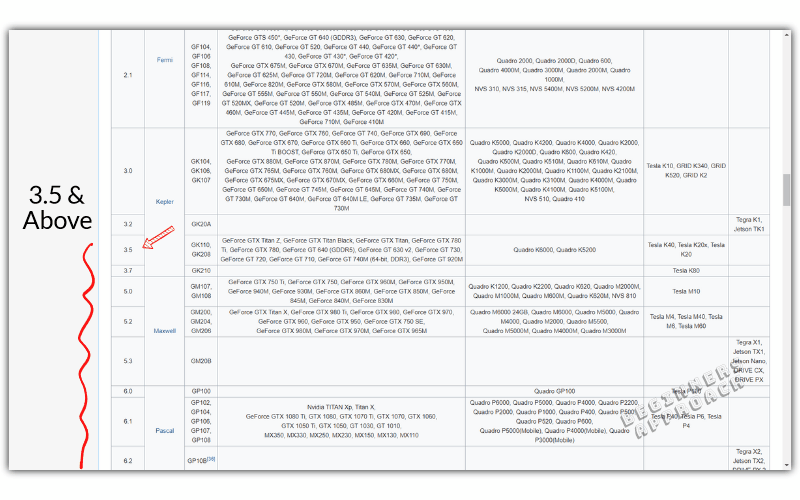
Your Nvidia GPU should have a minimum compute capability of 3.5 and a minimum Nvidia driver version of 451.82.
(If you think it is too technical, just hang on. Just have your GPU name ready for the next step).
How to Check your Nvidia GPU Card is Supported by DaVinci Resolve?
- Navigate to Wikipedia GPU CUDA Support List.
- Search for your GPU card by pressing “Ctrl + F”.
- After locating your card, check the first column “Compute Capability (version)“.
- The Compute capability version should be equal to or greater than 3.5.
- If it is less than 3.5, Resolve won’t support your GPU card for versions after 16.2.7 (including version 17).
You can also check the compute capability from Nvidia website as well.
If the “compute capability” for your card is greater than 3.5, there is nothing for you to do.
But if it is less than 3.5, then you won’t be able to use CUDA in Resolve.
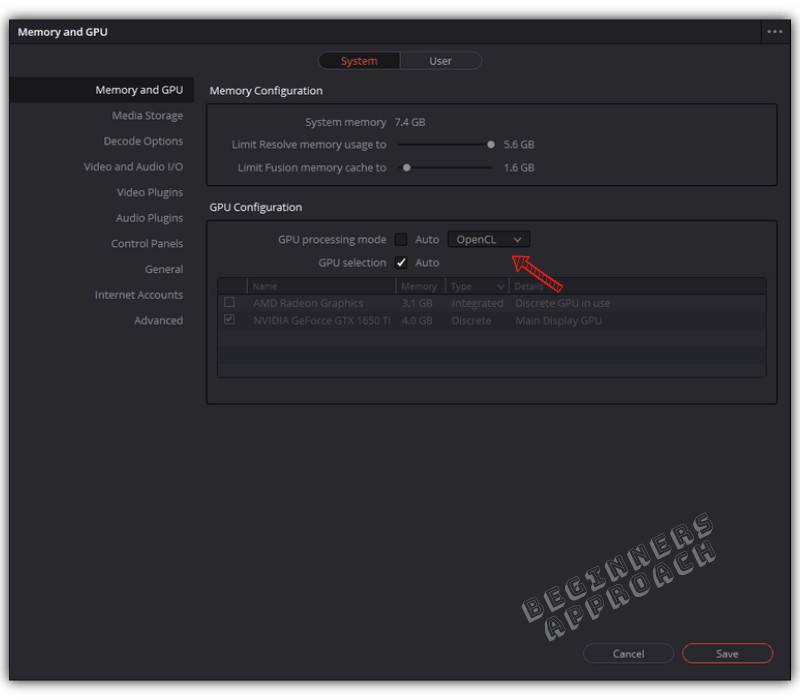
Instead you’ll have to go to the menu “DaVinci Resolve” -> “Preferences” -> “System” -> “Memory and GPU” -> “GPU Configuration” -> against “GPU Processing Mode” uncheck “Auto” and select “OpenCL” instead of CUDA.
If “OpenCL” doesn’t improve the performance, then keep the option as CUDA.
Go to Nvidia Driver Downloads, and select your graphics card from the list, search and download the appropriate driver and install it.
See if this improves your situation.
If you still have issues, then probably you might need to upgrade your graphics card (whose compute capability is more than 3.5).
Or roll back to previous versions of DaVinci Resolve (like 16.2.6) to check your existing card is getting supported in Resolve or not.
My GPU card is Eligible But Still Resolve Says It Is Un-Supported
If your graphics card has a compute capability of over 3.5, and Resolve says it’s unsupported, then you need to update your Nvidia driver version to a newer one.
For Windows, the minimum driver version is 451.82.
For Linux CentOS, the minimum driver version is 450.51.06.
Go to the Nvidia Driver Downloads, select your graphics card from the list, search and download the appropriate driver and install it.
DaVinci Resolve GPU Memory Full
When you work on high resolution footage like 4K UHD in a 4K timeline and do a lot of image processing like color grading, OFX plugins, Fusion effects, etc, Resolve might throw “GPU Memory is Full” error.
I get this error when I click on Fusion tab (after applying effects, transitions to the clips).
There is so much image processing happening that your Nvidia GPU might not have sufficient memory to handle them all.
Or…
When the GPU Processing Mode is set to “Auto” (which results in “OpenCL” being selected instead of “CUDA”).
Here’s how to fix the DaVinci Resolve GPU Memory Full issue in DaVinci Resolve 17:
- Go to the menu “DaVinci Resolve” -> “Preferences” -> “System” -> “Memory and GPU” -> “GPU Configuration” -> against “GPU Processing Mode” uncheck “Auto” and select “CUDA” instead of “OpenCL”.
- Against “GPU Selection”, uncheck “Auto” and manually select the available Nvidia card in your system.
- Restart DaVinci Resolve.
This should get rid of the error.
If the above fix doesn’t work, then try this work-around:
- Try to reduce the timeline resolution to 1920 x 1080p (if you were using 4K UHD = 3840 x 2160), by clicking on the “Project Settings” (bottom right hand corner cog wheel).
- Click on “Master Settings” -> “Timeline Resolution” -> “1920 x 1080 HD” or “1280 x 1080 HD”. (Before delivering, you have the option to render in 4K UHD).
If after doing all the above, if you still have issues with your GPU, then either update Resolve to the latest version or roll back to the previous version.
Most probably the latest version should have bug fixes and could support your GPU without any issues.
Still facing issues?
Then click on this link to generate log files and share it in the BlackMagic forum (scroll to this section “The Last Step – Getting Help from BlackMagic Design Support Staff”)
You may be also interested in the below posts:
- Set up DaVinci Resolve 18 the Right Way (& Fix Issues)
- (How to Troubleshoot): DaVinci Resolve Keeps Crashing!
- Tips to Save Your Precious Work in DaVinci Resolve (IMPORTANT!)
- 6 Ways to Fix DaVinci Resolve Media Offline Issue [NEW]
- 14 Ways to Fix DaVinci Resolve Not Opening Issue
Source:
BlackMagic Forum


