-
Gudzon
- Нуб
- Сообщения: 4
- Зарегистрирован: 14 мар 2019, 12:41
- Поблагодарили: 1 раз
Adobe Premiere вылетает при рендере с включенным аппаратным ускорением GPU Mercury Playback (CUDA)
Здравствуйте!
Столкнулся с такой проблемой, при рендере в Adobe Premiere с включенным аппаратным ускорением GPU Mercury Playback (CUDA) программа крашится и вылетает, может на 1% или после 90% прекратить рендер. Через Adobe Media Encoder тоже самое.
А если только с ЦП рендерить то без проблем и вылетов нет.
Процессор: AMD Ryzen 7 2700X.
Видеокарта: MSI GeForce GTX 1060 GAMING X 6G.
В предыдущей старой сборке такой проблемы не было.
На официальном сайте да, сказано что из 1*** линейки видеокарта официально поддерживается только 1080ti и старые не поддерживают, но на моей старой карте GTX 950 все отлично работало.
Подскажите, кто нибудь сталкивался с такой проблемой, особенной у кого карта GTX 1060?
Код: Выделить всё
------------------------------------------------------------
 - Время кодирования: 00:32:33
03/13/2019 10:41:39 AM : Не удалось выполнить кодирование
------------------------------------------------------------
A low-level exception occurred in: Ускорение GPU с помощью механизма Adobe Mercury Playback (CUDA) (AcceleratedRenderer:10)
Ошибка экспорта
Ошибка компиляции фильма.
Возникло исключение!
Возникло низкоуровневое исключение.
Запись с помощью средства экспорта: H.264
Запись в файл: \?D:videoЭпизод.mp4
Запись типа файла: H264
По тайм-коду: 01;14;38;22
Компонент: Ускорение GPU с помощью механизма Adobe Mercury Playback (CUDA) типа AcceleratedRenderer
Инструмент выбора: 10
Код ошибки: -2147287036
------------------------------------------------------------
-
aeplug
- Санта
- Сообщения: 2801
- Зарегистрирован: 18 мар 2016, 23:20
- Откуда: С Ютуба
- Благодарил (а): 18 раз
- Поблагодарили: 274 раза
- Контактная информация:
Сообщение #2 aeplug » 14 мар 2019, 14:40
Где это такое написано? Я вот нашел только Рекомендованные графические процессоры для Adobe Premiere Pro CC, а это немного другое.
https://helpx.adobe.com/ru/premiere-pro … celeration
Про нее можно много чего почитать в гугле, там и имена секвенций каким-то образом влияют и че только люди не выдумывают.
Последнее время мне часто пишут про какие-нибудь странные ошибки и там всегда оказывается 1060
—
ДА что тут скажешь — все как всегда: обновляй программу, обновляй дрова, обновляй винду или наоборот лучше 7 ставить. С 10 вечно танцы у кого работает у кого нет, потом обновлений и уже ни у кого не работает, жди патча…
-
Gudzon
- Нуб
- Сообщения: 4
- Зарегистрирован: 14 мар 2019, 12:41
- Поблагодарили: 1 раз
Сообщение #3 Gudzon » 14 мар 2019, 15:34
aeplug писал(а):Источник цитаты ДА что тут скажешь — все как всегда: обновляй программу, обновляй дрова, обновляй винду или наоборот лучше 7 ставить.
Драйвера всегда последней версии.
aeplug писал(а):Источник цитаты Где это такое написано? Я вот нашел только Рекомендованные графические процессоры для Adobe Premiere Pro CC, а это немного другое.
Согласен
aeplug писал(а):Источник цитаты Последнее время мне часто пишут про какие-нибудь странные ошибки и там всегда оказывается 1060
Для проверки приносил gtx 1070, все тоже самое(
Я уж начал думать, может как то процессор AMD Ryzen 7 2700x не «дружит с видеокартами» при вкл аппаратным ускорением GPU Mercury Playback (CUDA).
-
aeplug
- Санта
- Сообщения: 2801
- Зарегистрирован: 18 мар 2016, 23:20
- Откуда: С Ютуба
- Благодарил (а): 18 раз
- Поблагодарили: 274 раза
- Контактная информация:
Сообщение #4 aeplug » 14 мар 2019, 15:57
Если просто поискать по коду 2147287036, то там упоминают утечки памяти. Попробуй последи за ресурсами на графиках. Последнее время использую Process Hacker, там и видео загрузку видно и обычную.
-
Gudzon
- Нуб
- Сообщения: 4
- Зарегистрирован: 14 мар 2019, 12:41
- Поблагодарили: 1 раз
Сообщение #5 Gudzon » 17 мар 2019, 12:54
Чаще всего выскакивает окошко как на скрине (рис 1), и если кликнуть показать отчет об ошибке, то там огромный текст похожий на html разметку, вот начала этого текста:
Код: Выделить всё
<?xml version="1.0"?>
<!DOCTYPE AdobeCrashReport SYSTEM "AdobeCrashReporter.dtd">
<crashreport serviceVersion="2.1.1" clientVersion="2.1.1" applicationName="Premiere Pro" applicationVersion="13.0.3" build="9" source="Windows-Client">
<time year="2019" month="3" day="14" hour="21" minute="0" second="17" timeoffset="180" timezone="RTZ 2 (A§A?A¬A*)"/>
<user guid="3fb1f9df-c3de-4b86-bfbc-b4bc503e8f2c"/>
<system platform="Windows 10 Pro" osversion="10.0" osbuild="17763" applicationlanguage="en-us" userlanguage="ru-RU" oslanguage="ru-RU" ram="15835" machine="AMD Ryzen 7 2700X Eight-Core Processor" model="AMD64 Family 23 Model 8 Stepping 2" cpuCount="16" cpuType="8664" cpuFreq="3700 MHz"/>
<crash exception="EXCEPTION_ACCESS_VIOLATION" exceptionCode="0xc0000005" instruction="0x00007FFB397A16FA">
<backtrace crashedThread="0">
<thread index="0">
<stackStatement index="0" address="0x00007FFB397A16FA" symbolname="memset"/>
<stackStatement index="1" address="0x000000000DA3A189" symbolname="VF::TerminateFrameCache"/>
<stackStatement index="2" address="0x000000000DA3AFA5" symbolname="VF::CreateHostMemoryVideoFrame"/>
<stackStatement index="3" address="0x000000000D929BFF" symbolname="VF::GPUFrameManipulators::AllocateHostFrameForUpload"/>
<stackStatement index="4" address="0x000000001238BD0C" symbolname="unknown"/>
<stackStatement index="5" address="0x000000001238F6DA" symbolname="unknown"/>
<stackStatement index="6" address="0x0000000012284BF2" symbolname="unknown"/>
<stackStatement index="7" address="0x000000001235C4A9" symbolname="unknown"/>
<stackStatement index="8" EndlessStack="TRUE"/>
</thread>
</backtrace>
<registerSet>
<register name="RAX" value="0x000000000DA9D340"/>
<register name="RBX" value="0x000000000DA9D340"/>
<register name="RCX" value="0x000000000DA9D340"/>
<register name="RDX" value="0x0000000000000000"/>
<register name="RSI" value="0x000000003E01E040"/>
<register name="RDI" value="0x000000003E01DD60"/>
<register name="RSP" value="0x000000003E01D848"/>
<register name="RBP" value="0x000000003E01D950"/>
<register name="RIP" value="0x00007FFB397A16FA"/>
<register name="EFL" value="0x0000000000010206"/>
<register name="LastExceptionToRip" value="0x0000000000000000"/>
<register name="LastExceptionFromRip" value="0x0000000000000000"/>
</registerSet>
Отправлено спустя 4 минуты 5 секунд:
В console показывает это (рис 2), иногда и такая ошибка выскакивает (рис 3).
-
aeplug
- Санта
- Сообщения: 2801
- Зарегистрирован: 18 мар 2016, 23:20
- Откуда: С Ютуба
- Благодарил (а): 18 раз
- Поблагодарили: 274 раза
- Контактная информация:
Сообщение #6 aeplug » 17 мар 2019, 13:33
Это XML
Поставил бы 7 — проверил
-
Still-Hungry
- Нуб
- Сообщения: 2
- Зарегистрирован: 12 янв 2020, 12:07
- Поблагодарили: 1 раз
Сообщение #7 Still-Hungry » 12 янв 2020, 12:10
Столкнулся с такой же проблемой : не запускается Adobe Premiere 2020 ( EXCEPTION_ACCESS_VIOLATION» exceptionCode=»0xc0000005″ instruction=»0x0000000000000000)
Процессор: AMD Ryzen 7 2700X.
Видеокарта: Gigabyte GeForce GTX 1070
Windows 10×64 1909
Adobe Premiere 2019 — работает
Пробовал на другом пк с видеокартой GeForce GT 710, запустилось , только ругалось на неподдерживаемую видеокарту.
Пока не нашёл выхода из ситуации
-
Gudzon
- Нуб
- Сообщения: 4
- Зарегистрирован: 14 мар 2019, 12:41
- Поблагодарили: 1 раз
Сообщение #9 Gudzon » 20 янв 2020, 22:34
Still-Hungry писал(а):Источник цитаты Запустилась версия Adobe Premiere Pro CC 2020 14.0.1.71
Да, у меня тоже еще с последними обновлениями 2019 и с последующей версий 2020 тоже все отлично!
Хотел я, значит, зарендерить ролик в 1080p и 60 кадров/с, и пока он рендерился, я почуял что-то неладное и проверил нагрузку на процессор с видеокартой. Процессор — 99%, а видеокарта — 0%. Поняв, что премьер-министр не нашел мою GPU, я решил воспользоваться интернетом и пошел гуглить способы, как помочь ее найти. Ни один способ не помог. Ни GPUSniffer, ни Nvidia Control Panel, ни regedit, ничего.(А CUDA я просто не смог включить, если она включается, потому, что не нашел указанный файл.) Какие способы, кроме этих, могут мне помочь?
P.S. После того, как я начал рендер и увидел, что процессор перегружен, я остановил рендер и сразу же начал искать. Но сразу же я заметил, что в некоторых местах экрана курсор будто бы телепортируется. Это выглядит очень странно, будто бы просадка FPS, но я совершенно не могу взаимодействовать с областью, в которой это происходит. Закономерностей я не нашел — в разных местах, в разное время и «поломанная область» разного размера. Соответствие со временем работы я не нашел, так как может появится через 4 минуты, после включения, а может и через 5 часов все еще не появится ни разу. Что это такое? Почему оно у меня появилось? Как это починить?
(Постараюсь заснять, но не уверен, что смогу, так как это длится от 4 до 15 секунд примерно и предугадать где и когда невозможно)
Подробности
CPU — Core i-5 9400KF
GPU — GTX 1650 Super
Монитор — 1440p 144Hz, подключен в видеокарту через Display Port(если это вообще нужно)
Версия Премьера — Adobe Premiere CC 2019
Буду очень признателен за вашу помощь (^_^)
This effect requires GPU acceleration? Here’s how to fix
If you are facing the “This effect requires GPU acceleration” error message, you are probably using Premiere Pro or After Effects to apply certain effects on your video. As it turns out, as per the error message, you do not have GPU acceleration enabled which is why some effects may not work. However, in some scenarios, you might have GPU acceleration enabled from the settings of the application and still face the error message in its red ribbon. This can be due to a number of reasons other than the GPU acceleration that we will go through down below as well as show you how to resolve the problem.
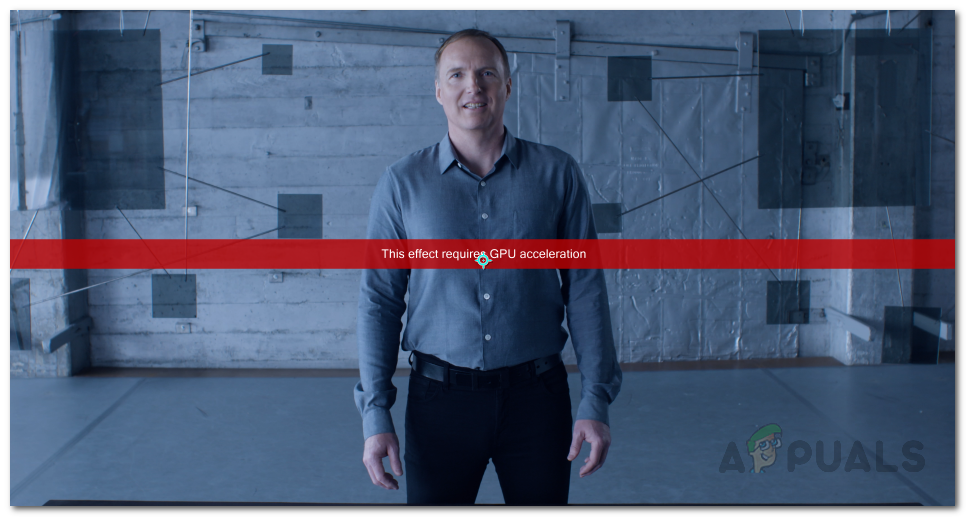
As it turns out, there are other factors that can contribute to the error message in question. First off, the pretty obvious reason would be GPU acceleration. Some effects in Premiere Pro or After Effects require GPU acceleration and when that is disabled, you won’t be able to use them on your clips. However, how about when you have GPU acceleration enabled and are still prompted with this error message? It turns out that the order of the effects in your Effects Control Window can also cause the problem in question. This has been particularly reported when you are using a VR-related effect on your videos. Let us look at the potential causes in more detail before proceeding with the workarounds available to resolve the problem.
- Third-Party Plugins — One of the reasons that you might be encountering the error message in question can be due to the plugins that you have installed in Adobe Premiere Pro. While plugins are helpful, some of them can turn out to be a hurdle as they can interfere with the app to cause problems. Therefore, if you have plugins installed that you no longer use or recently installed, you should try uninstalling them to see if that fixes the problem.
- Order of Effects — As it turns out, another potential reason for the mentioned error message can be the order of the effects. The order in which the effects are stacked can sometimes cause this problem in which case you will have to reorder them by moving the problematic effect to the top to see if that gets rid of the issue.
- Outdated Graphics Drivers — In addition to that, having outdated graphics drivers on your system can also, in some cases, trigger the problem in question. If this case is applicable, you will have to update your drivers to the latest version available via the manufacturer’s website to potentially fix the error message.
- GPU Acceleration in Project Settings — Finally, the settings of the project that you are working on can also factor in causing the problem that you are facing. This can happen when you don’t have GPU acceleration enabled in the project settings which is why you encounter the error message mentioned. To fix this, you will simply have to enable GPU acceleration.
Now that we have gone through the potential causes of the error message in question, you probably have established a better understanding of the problem here. With that out of the way, we can now move on to showing you how to resolve the problem in question via the different methods that are available. So, without further ado, let us get right into it.
Enable Mercury GPU Acceleration in Project Settings
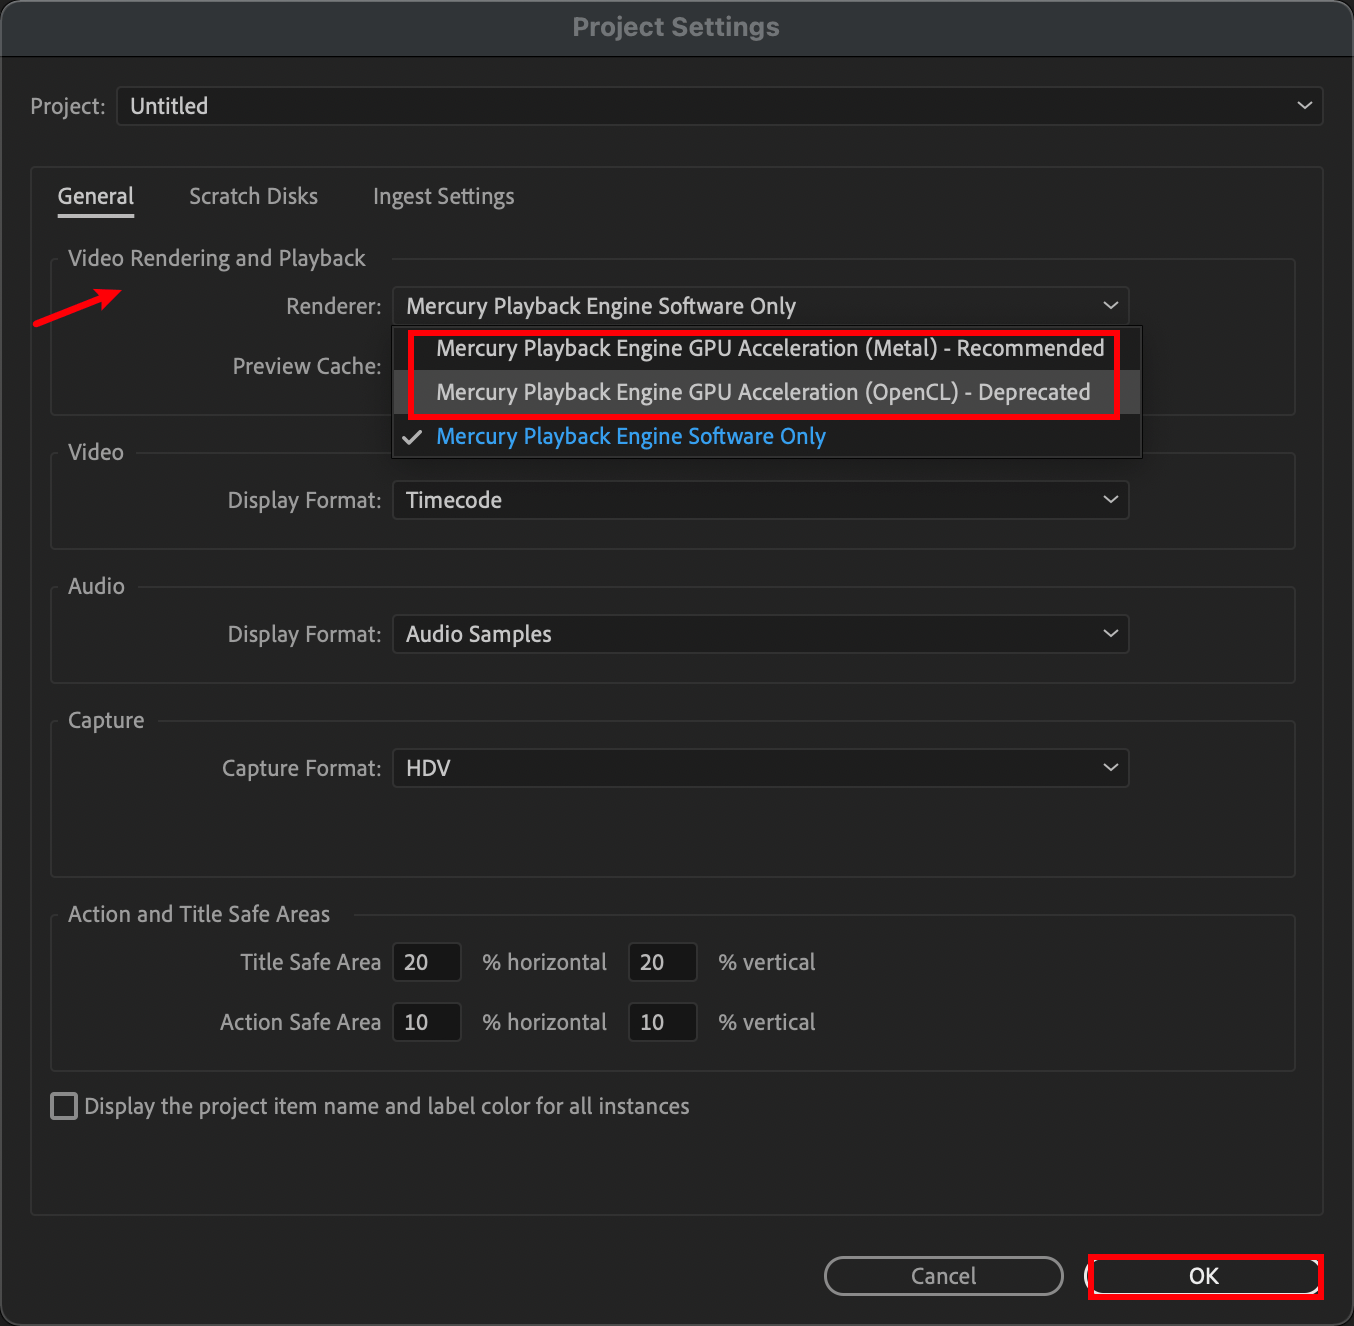
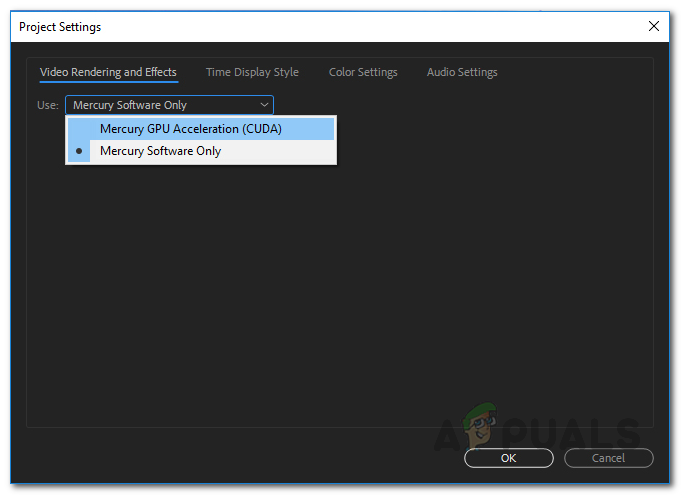
As it turns out, the first thing that you should do after you encounter the error message in question is to make sure that you have GPU acceleration enabled. The error message appears when you have Mercury Software Only selected instead of GPU acceleration under Video Rendering and Effects settings. This can be found in the Project Settings window of the application. Therefore, you will have to enable GPU acceleration to get around the problem. To enable Mercury GPU acceleration, follow the instructions given down below:
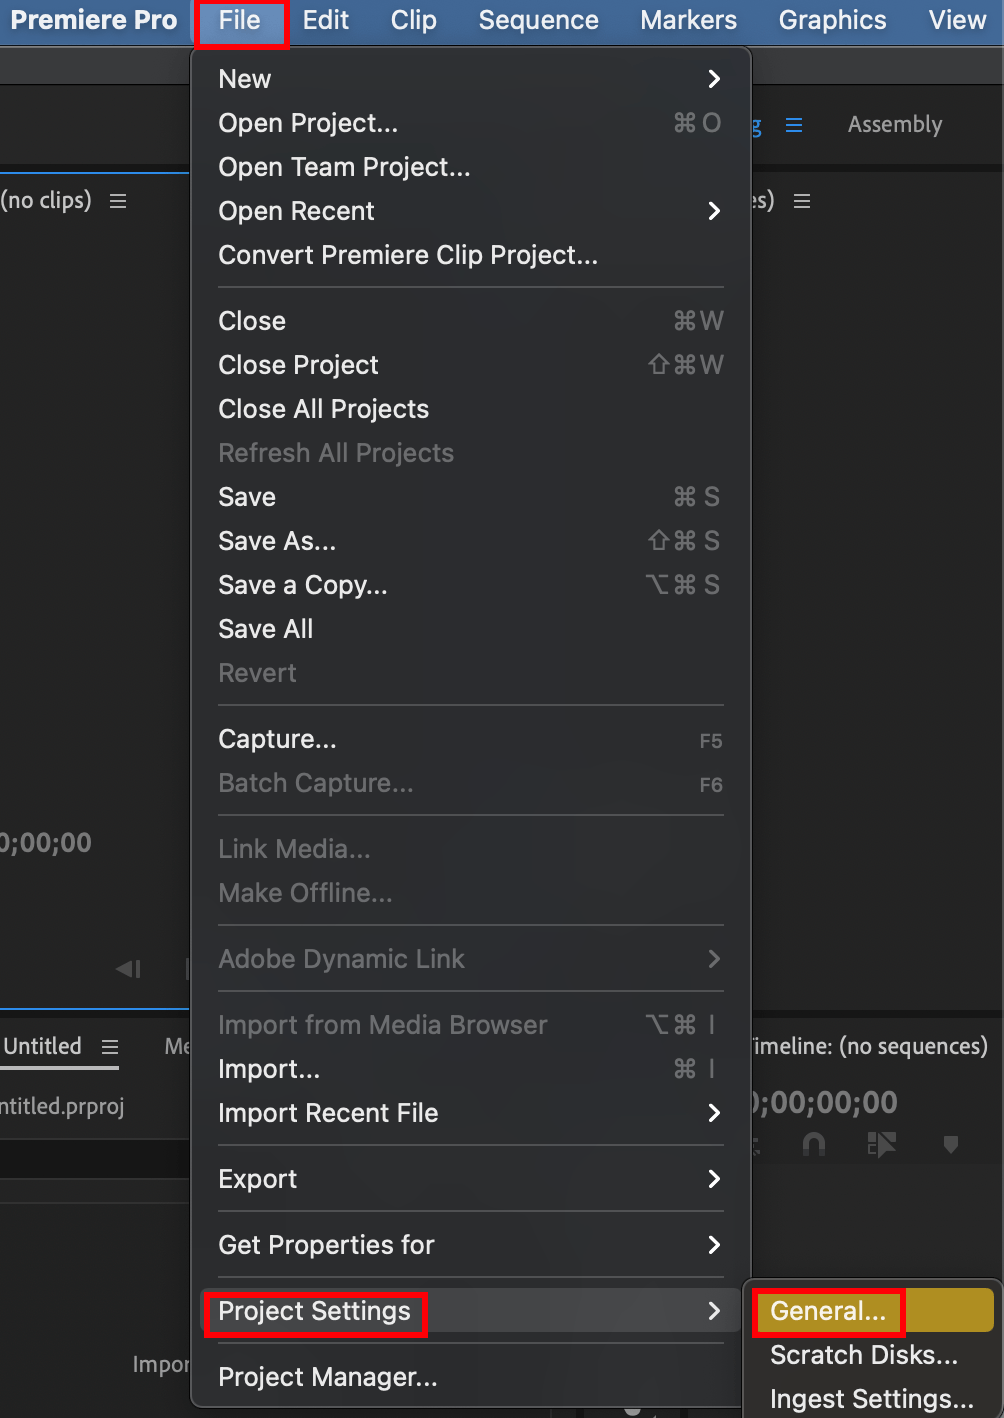
- First of all, on your After Effects or Premiere Pro window, click on the File drop-down menu.
- From there, click on the ProjectSettings option at the bottom. This will bring up a new window on the screen.
Opening Project Settings Window
- On the Project Settings window, on the Video Rendering and Effects tab, choose Mercury GPU Acceleration from the drop-down menu provided.
Enabling Mercury GPU Acceleration in Project Settings
- Once you have done that, go ahead and click OK.
- Then, go ahead and apply your effects again to see if the problem persists.
Change the Order of Effects
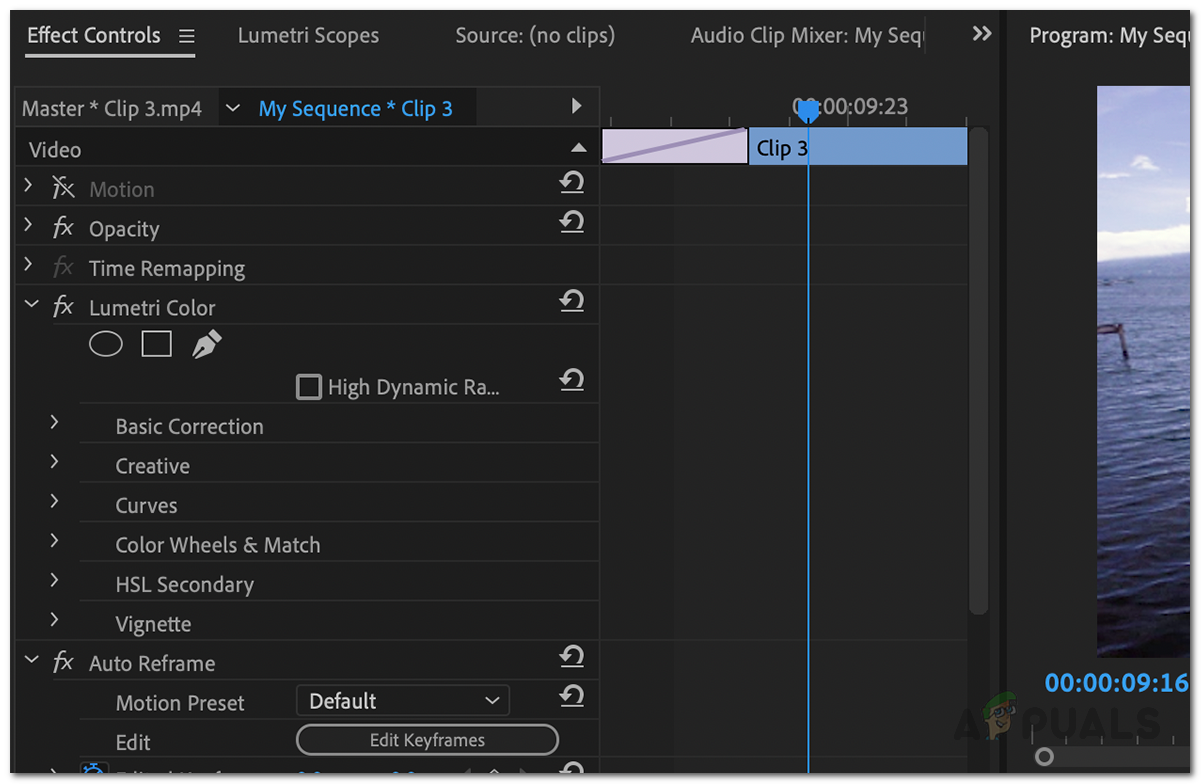
Like we have mentioned above, another reason that you might face the problem in question here can be due to the order of effects on the Effects Control window. To resolve this, what you need to do is simply change the order of the effects that you have applied via the Effects Control Window. You can easily change the order of the effects by dragging and dropping each effect present in the list. To fix the issue, move the effect that is actually causing the issue to the top of the list and then see if that resolves the problem. If that doesn’t work, change the general order of the effects and see if that bears any fruit.
In addition to that, some users have reported that instead of putting the effect that is causing the problem in the Effects Control panel, they put the effect onto the clip directly which resolved the problem for them. Therefore, give that a shot as well if you are not able to fix the problem by changing the order simply and see if it gets rid of the error message.
Uninstall Third-Party Plugins
One of the great features of Premiere Pro is that it lets you install third-party plugins on your application which allows the users to enjoy the additional functionality. While plugins are generally really helpful with several things, they can also sometimes cause issues with your application such as the one you are facing here. This can especially happen if you have an old plugin installed and then you update your Premiere Pro application.
Uninstalling the plugin can depend on how you installed it in the first place. You can install plugins via the Adobe website or using a third-party installer. To install the plugins that you have installed via the Adobe website, simply go ahead and open up this link. Choose your product from the left-hand side and then click the three-dots option next to the installed plugins. From there, simply choose Uninstall to remove the plugin.

Clean Install Graphics Drivers and Adobe Product
Finally, if you are still facing the error message after trying the methods given above, the problem could be very likely due to your graphics drivers or your Adobe product installation files. In such a scenario, you will have to reinstall to perform a clean install of your graphics drivers along with the product that you use. To do this, go ahead and remove the installed programs from your computer i.e. the Adobe product and follow it up by uninstalling the graphics drivers. Once you have done that, go to your manufacturer’s website and download the latest drivers available for your GPU. Install the drivers along with the Adobe product. If you are using encoders like the Media Encoder, make sure to reinstall that completely as well. To uninstall your graphics drivers, follow the instructions given down below:
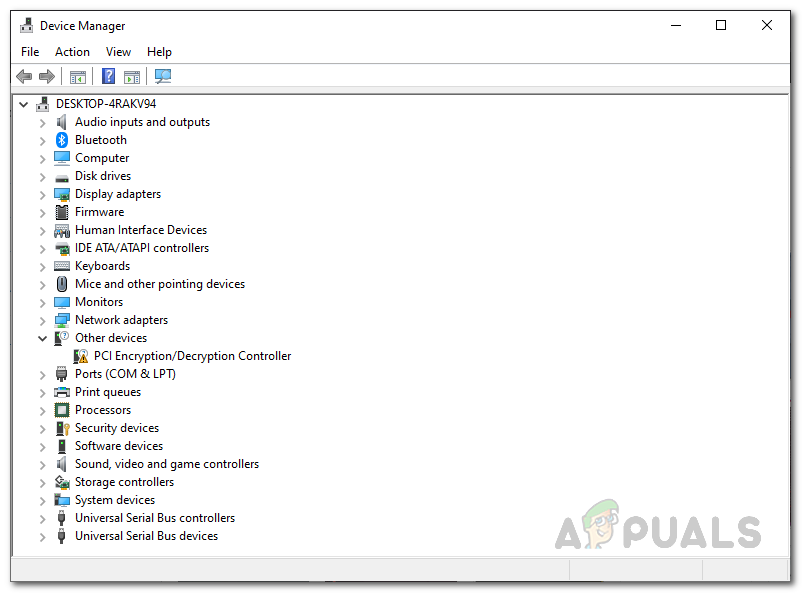
- First of all, open up the Device Manager by searching for it in the StartMenu.
Opening Device Manager
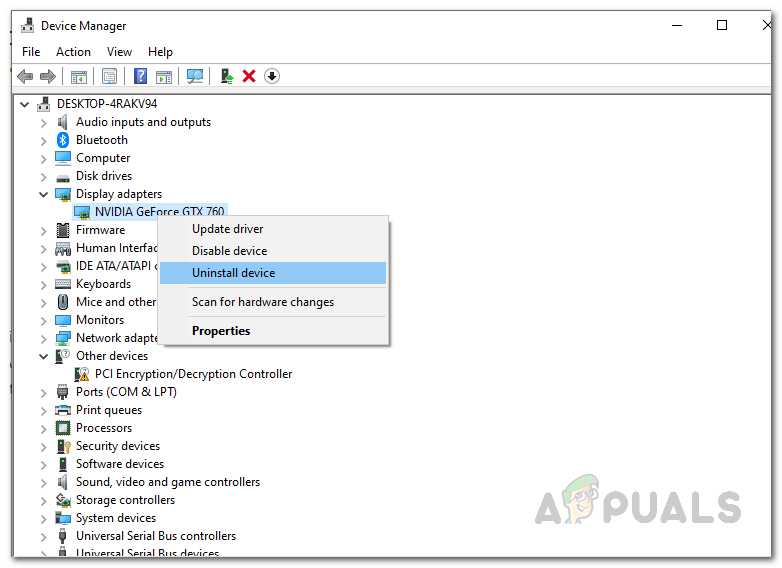
- Once it is open, expand the Display adapters list. Here, you will see your graphics driver.
Device Manager
- Right-click on your graphics card and from the drop-down menu, choose the Uninstalldevice option.
Uninstalling Graphics Drivers
- Follow the on-screen prompts to finish it. This will remove your graphics drivers.
- Once you have done that, go to your manufacturer’s website and download the latest drivers for your card and install them. Also, reinstall Adobe Premiere Pro or After Effects that you are using.
Adobe’s Premiere Pro is arguably the most versatile editing tool available in the industry right now (sorry, Mac users). It allows you to edit your videos with the most excruciating of details and the finest of controls.
And with its ever-growing list of features, it’s become the primary software many people use to edit VR or 360° content.
However, it’s not all roses and daisies out here because the software also often runs into weird bugs and issues, and possibly the most noted one out of all those is the infamous red banner on your screen saying, “This effect requires GPU acceleration.”
This happens when you are editing a video that requires your graphic card’s power to process everything thoroughly, but some obstacles can come in your way to prevent that from happening.
It can be as essential as enabling a toggle or as devastating as accepting the fact that you need to upgrade your graphics card.
How To Solve “This effect Requires GPU Acceleration” In Windows 10.
There are several different culprits behind this error; all of them can be solved, so need not worry. Let’s look at all the possible solutions to fixing the GPU acceleration error in Adobe Premiere Pro in Windows 10.
1- Install The Latest Updates.
It goes without saying, yet I am here saying it, please keep your stuff updated; this goes for everything from applications to even your drivers.
There is a reason developers release updates to their software regularly so that their app, in this case, Adobe Premiere Pro, strays away from any potential bugs or issues that can spoil your editing session.
Updating to the latest version of PP can potentially solve any previous problems or known issues that you were facing. Adobe updates its entire suite of applications pretty regularly to fix bugs and add new features, so make sure you’re running on the latest version of their editing software.
2- Make Sure That The Application Is Installed Correctly.
There is a good chance your installation of Premiere got corrupted, or maybe a fragment of the application is missing from the file directory. This is why you can also get the “Adobe Premiere couldn’t find any valid editing modes” message.
It can happen for various reasons, but to fix this, you have to re-download and then install it again, making sure that the application is installed 100 percent properly. Restart your PC and see if that did the job.
3- Run “GPUSniffer.exe.”
Adobe Premiere utilizes your CPU to run almost all the processes while your graphics card is given minimal work and acts instead as an assistant to your processor.
But that’s not the case all the time; often, the software needs to use your video card to lessen the burden from your processor or hand over tasks that are better suited for a graphics card to perform.
GPU acceleration is the name of this feature where applications call in your video card to work alongside your SoC. Still, sometimes PP fails even to recognize or detect your graphics card.
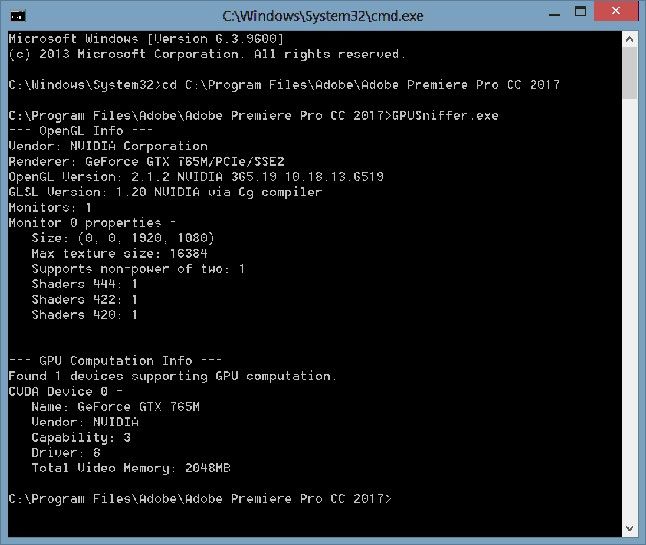
And here is where GPUSniffer.exe comes into its place to ‘sniff’ (hehe) out your video card from the system so that Premiere can use it for GPU accelerated tasks. To do this, close editing software Pro and,
- Navigate over to where Premiere Pro is installed.
- Search for “GPUSniffer” and locate the executable.
- Double click on it and let the command prompt windows do its thing.
- After the window automatically closes, open Premiere again.
If you are still seeing that red banner and it is not detecting your card, you need to upgrade your graphics drivers to the latest version (or roll back to a previous one if there are known compatibility issues in the new update).
Other than this, it will be good practice to disable your integrated graphics that are built into your CPU via either the BIOS or Device Manager.
This should do the trick and allow PP to pick up your graphics card and finally remove that frustrating red banner from your project. However, if it doesn’t and you are still where you started, then you need to follow along and try the steps mentioned above beforehand, too.
4- Check Your Antivirus.
You may have an antivirus installed on your computer to protect it from all sorts of evil and bad things, but do you know that the antivirus itself could be an evil dark lord?! Calm down. I’m just exaggerating.
Even though antiviruses have been known to cause issues and interfere with your system, they generally do a good job of guarding it, until you run into problems using other applications because of your antivirus.
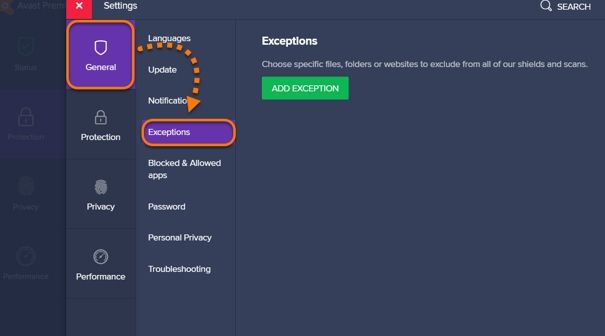
Try disabling certain features or restrictions in your antivirus to allow for Premiere to run correctly. If the problem still pertains, then try disabling the antivirus entirely so that it does not interfere with the editing software at all.
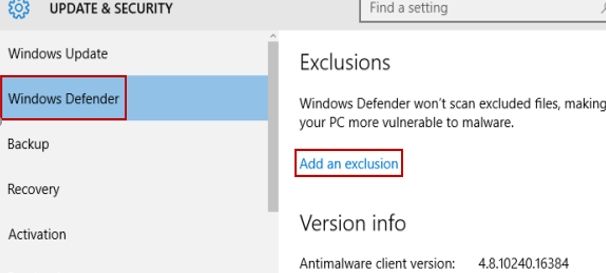
And don’t worry, disabling your antivirus won’t instantly hack your system; Windows Defender will do a good enough job of protecting your PC by itself. Still, I will suggest you also should white-list Adobe Premiere Pro from Windows Defender to stop any interference with the app.
5- Enable GPU Previewing [Mercury Engine]
Premiere Pro uses your processor to render and playback the video in real-time while you are editing it; this limits you to weaker software-based effects as serious or graphics-intensive effects will not work because your CPU has to do all the work here. However, PP can leverage your GPU to preview the video in real-time and essentially reduce the load of your CPU or enable more demanding effects to be pliable in real-time.
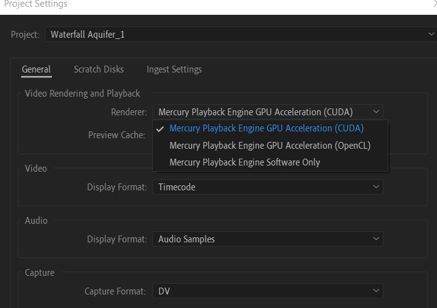
There are three different real-time rendering options available in Premiere, Software Only, CUDA, and OpenCL. You will notice that both CUDA and OpenCL are GPU accelerated options while the Software Only option exclusively utilizes your CPU to render everything making your graphics card sit duck. You want to select either of the GPU accelerated options based on your video card so you can be enabled to preview the most demanding effects in real-time.
- Go to File (located on the top tab of your project).
- Select Project Settings and then General.
- Here, under the “renderer” setting, you will see a drop-down menu.
- Select “Mercury Playback Engine GPU Accelerated (CUDA)” for Nvidia cards and “Mercury Playback Engine GPU Accelerated (OpenCL)” for AMD cards .
- Save your newly applied settings, and now you should be utilizing your video card for rendering alongside your processor.
How To Optimize Performance In Adobe Premiere Pro CC.
There are many ways to get more out of your system, case in point, for editing in Premiere. PP is known for being extremely demanding compared to other editing utilities, and for a good reason.
It offers the most multifaceted set of tools available in editing software (for Windows at least) and happens to include very comfortable integration with Adobe’s Creative Cloud.
So, let’s look at the ways you can make your experience using the editing software even better.
1- GPU Acceleration.
As we discussed above, you can push in your video card’s power to be wielded by the editing software for assisting in the preview or real-time rendering of your project.
This is called the way it is as you are “accelerating” your video card and harnessing its capabilities. You need at least a 1GB graphics card from either AMD or Nvidia to use this feature, the more recent, the better.
Nvidia is generally preferred in productivity based systems as Nvidia cards have “CUDA Cores” inside them that help massively in real-time rendering in editing software.
However, lately, AMD cards have been popping up everywhere because of their incredible price to performance ratio and the value proposition to budget-conscious consumers.
Refer to section 5 for more details on how to enable this feature in your project.
2- Memory Allocation.
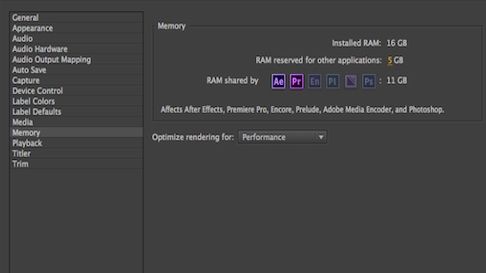
RAM is certainly not a downloadable resource from the internet. You have a limited amount of it inside your system, so it’s good practice to allocate that RAM effectively between all your applications across your entire computer.
Adobe Premiere allows you to set a maximum amount of memory that it can use, shared with other Adobe apps like After Effects and Photoshop, etc.
You should set this number to as high as you can while reserving some RAM for other processes running on your computer, your browser, and maybe a media player, for example.
The general rule is to allocate about 75% of your RAM to Adobe Apps and leave the rest for your computer, but this is highly subjective and based upon your preferences and amount of memory present, of course.
To change the allocated memory, select File, navigate to the Memory section, and adjust accordingly.
3- Optimizing Your System.
This is more of a starting step than anything else, as you should make sure that your system is capable of running Premiere Pro smoothly. Most importantly, it would help if you had a fast and capable CPU; I’d recommend at least a 6-core SoC.
Pair that with a graphics card capable of pushing all the frames it can; generally, the more expensive the video card, the better, and try to go with at least 4GB of VRAM (1 is the bare minimum).
Lastly, it would be best to have about 16GB of DDR4 memory for a smooth experience, even though you CAN work with 8. If you can squeeze in 32 gigs, you will be in a real sweet spot.
Keep in mind that SSDs are miles faster than mechanical hard drivers, so opt for one of those; there are many different types of SSDs, so do a little research before deciding.
Cooling is also something you need to give a thought to as you wouldn’t want your editing rig to heat up and start thermal throttling in the middle of an editing session. And like everything I mentioned above, the more you spend on it, the better parts you’ll get.
4- Point Media Cache To A Different Drive From OS.
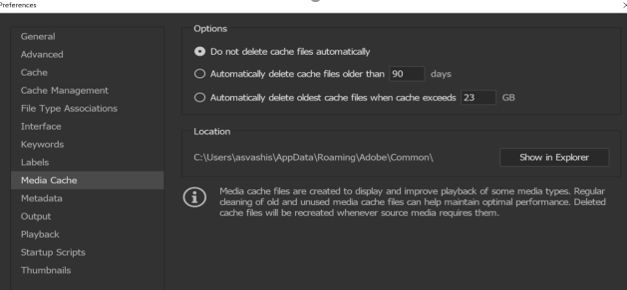
Everyone knows that you install your OS on the fastest drive in your computer, but what about the rest of the stuff? Where does that go? See, Premiere creates cache files of all media that you import in so that it can access those files in a snap.
This can build up many files over time, and it’s going to become unhealthy for those cached files to be stored up inside your drive as it’s going to take up space and slow down your computer.
You want to leave your SSD (or wherever your OS is installed) to be utterly void of any other files so that your SSD can provide the best read/write speeds to your OS and keep everything real snappy. Media Cache files are going to slow that down.
To change this, go to File, navigate over to Media Cache, and set your Media Cache storage location to any drive other than where you have installed your OS to allow for optimal performance.
Final Verdict:
Professionals prefer and use Adobe’s suite of applications daily because they provide the best features available anywhere and allow creators to tailor the perfect video according to their taste. Sometimes, you hit small snags like a graphics acceleration error, but it is relatively easy to resolve this issue and contour your editing.
To get the most out of Adobe Premiere, you will need to follow a couple of straightforward guidelines that will ensure the best experience for you and allow you to make even better videos with the tools that are already readily available in the palm of your hands.
Frequently Asked Questions (FAQs)
1- How do I fix ‘this effect requires GPU acceleration’?
You need to make sure that the editing software is actually detecting your video card and then enable GPU Accelerated real-time preview rendering in the Premiere settings.
2- What does ‘this effect requires GPU acceleration mean’?
Your CPU is sometimes just not enough to handle all the processes that PP is throwing at it, so it needs your graphics card’s assistance, and that’s why you get this specific error.
3- How do I turn on this feature?
Go to File, then General, and under the “Video rendering and playback” settings, change the renderer to “Mercury Playback Engine GPU Accelerated (CUDA)” for Nvidia cards and “Mercury Playback Engine GPU Accelerated (OpenCL)” for AMD cards.
Fix: This Effect Requires GPU Acceleration – Premiere Pro
Adobe Premiere Pro users have been reporting a specific error when they apply effects on the video they’re working on. The error message says “This effect requires GPU acceleration“, and users have been getting it regardless they have enabled GPU acceleration or not. If you’re in the same boat, no worries. We’ve got a few working fixes you can try.
Try these fixes…
Fix 1: Enable GPU Acceleration
First of all, you need to make sure the GPU acceleration feature is actually enabled for your Premiere Pro. Here’s how:
- Run Premiere Pro. Click Files >> Project Settings >> General.
- Under the Video Renderer and Playback section, make sure your Renderer is set to Mercury Playback Engine GPU Acceleration.
- Save the changes and test the issue again.
Fix 2: Update your graphics driver
An outdated or faulty graphics driver could cause trigger random issues in Premiere Pro. You may want to check if your graphics driver is up-to-date and functioning properly.
There are two ways to keep your graphics card driver up-to-date. One is to manually update it via Device Manager. Sometimes Windows may not be able to detect the latest available update, so you would need to search on the manufacturer’s website. Be sure to choose only the driver that is compatible with your Windows version.
Automatic driver update – If you don’t have the time, patience, or computer skills to update your driver manually, you can, instead, do it automatically with Driver Easy. Driver Easy will automatically recognize your system and find the correct driver for your exact graphics card and your Windows version, then it will download and install the driver correctly:
- and install Driver Easy.
- Run Driver Easy and click the Scan Now button. Driver Easy will then scan your computer and detect any problem drivers.
- Click the Update button next to the flagged graphics card driver to automatically download the correct version of the driver, then you can manually install it (you can do this with the FREE version).
Restart your PC for the new driver to take effect. If updating the graphics driver doesn’t solve your problem, try the next fix.
Fix 3: Change the order of effects
This fix only applies when you’re using multiple effects on your video clip, but it has helped many users with this specific error.
If you’re applying multiple effects to your clip, and the error banner pops up after you use a certain effect, then you know that effect could be problematic. You can drag this effect to the top of the list, or change the general order of all the effects to see if it makes a difference.
If it doesn’t help, there’s one more fix you can try.
Fix 4: Update any third-party effect
You may get this error if the problem effect is a third-party one and it’s outdated or faulty. While you might regularly update Premiere Pro and all the default effects, you may forget to update the third-party plugins and effects as well, which could cause compatibility issues and trigger random errors. You can try updating those, if you use any, and test the issue.
Hopefully this article helps! If you have any questions or suggestions, please feel free to leave a comment down below.
На чтение 8 мин. Просмотров 190 Опубликовано 28.04.2021
Ошибка компиляции фильма – одна из наиболее распространенных проблем, связанных с Adobe Premiere . Сообщается, что он появляется в Windows и Mac OS при выполнении различных действий в Premiere Pro. Некоторые пользователи говорят, что они получают эту ошибку при попытке экспортировать аудиопоследовательность, в то время как другие говорят, что ошибка возникает только в отношении клипов из определенного места. Проблема, похоже, не относится к конкретной версии Windows, поскольку, как сообщается, возникает в Windows 7, Windows 8.1 и Windows 10.
Содержание
- Что вызывает ‘Ошибка компиляции фильма‘ в Adobe Premiere Pro?
- Метод 1. Обновите Premiere до последней версии
- Метод 2: изменение средства визуализации видео
- Метод 3: изменение местоположения файла проекта
- Метод 4: Дублирование последовательности
- Метод 5. Определение места сбоя экспорта
- Метод 6: Создание нового проекта
Что вызывает ‘ Ошибка компиляции фильма ‘ в Adobe Premiere Pro?
Мы исследовали эту конкретную проблему, глядя на различных пользователей отчеты и стратегии ремонта, которые являются наиболее успешными в этом сценарии. Как оказалось, существует несколько различных сценариев, в которых может возникнуть эта конкретная проблема:
- Adobe Premiere устарел – согласно различным отчетам. об этой ошибке обычно сообщается в устаревших сборках Premiere. Adobe хорошо поработала над исправлением множества рутинных работ, которые ранее вызывали нестабильность. Если этот сценарий применим, вы сможете решить проблему, обновив программное обеспечение до последней версии.
- GPU не может справиться с нагрузкой – если вы Если вы используете графический процессор от низкого до среднего, скорее всего, вы столкнетесь с этой ошибкой при попытке визуализировать или экспортировать большие файлы. Если этот сценарий применим, вы можете решить проблему с помощью Software Only Playback Engine.
- Местоположение поврежденного проекта . Эта ошибка также связана с экземплярами, в которых Расположение проекта содержит поврежденные файлы или файлы, длина которых превышает ограничение на количество символов. Несколько пользователей, которые также столкнулись с этой проблемой, сообщили, что проблема была решена после изменения местоположения проекта.
- Ошибка проекта – если проблема возникает, когда вы пытаясь экспортировать файл после периода бездействия, вы можете решить проблему, продублировав проект, создав новый проект и импортировав содержимое обратно, или обнаружив, какая часть вызывает сбой при экспорте, и исключив ее из процесса.
Если вы в настоящее время пытаетесь решить именно эту проблему, эта статья предоставит вам несколько шагов по устранению неполадок, которые в конечном итоге помогут вам решить эту проблему. Ниже вы найдете набор методов, эффективность которых была подтверждена хотя бы одним пользователем, затронутым той же проблемой.
Для достижения наилучших результатов мы советуем вам следовать методы в том порядке, в котором они представлены. В конце концов, одно из исправлений должно решить проблему независимо от виновника, который ее вызывает..
Метод 1. Обновите Premiere до последней версии
Если проблема была вызвана ошибкой, скорее всего, проблема будет решена, если вы обновите программное обеспечение до самая последняя доступная версия. Adobe проделала отличную работу по исправлению множества несоответствий, связанных с Windows 10, поэтому обновление может быть единственным исправлением, которое вам нужно применить.
Некоторые затронутые пользователи сообщили, что проблема заключалась в разрешается после обновления до последней доступной версии и перезапуска устройства.
Безусловно, самый простой способ обновить Adobe Premiere до последней версии – использовать Adobe Creative Cloud . Всего за несколько щелчков мышью вы сможете обновить программное обеспечение до последней версии.
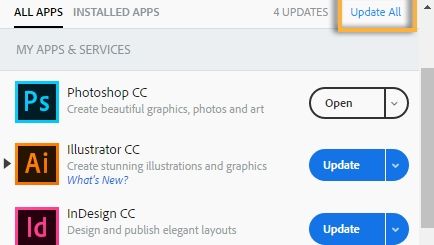
Чтобы проверить наличие обновлений Adobe Premiere, откройте приложение Creative Cloud для настольных ПК и нажмите кнопку действия (вверху- правый угол экрана). Затем в появившемся меню нажмите Проверить обновления приложения .
Затем следуйте инструкциям на экране, чтобы обновить Adobe Premiere до последней версии. Если вам будет предложено выбрать из коллекции различных версий, выберите последнюю и следуйте инструкциям по установке.
Если вы не используете Creative Cloud, следуйте инструкциям ниже, чтобы удалить Adobe Premiere вручную а затем переустановите последнюю версию:
- Нажмите клавишу Windows + R , чтобы открыть диалоговое окно Выполнить коробка. Затем введите «appwiz.cpl» в поле Выполнить и нажмите Enter , чтобы открыть Окно “Программы и компоненты” .
- Как только вы окажетесь внутри В списке «Программы и компоненты» прокрутите список приложений вниз, пока не найдете Adobe Premiere Pro. Увидев его, щелкните его правой кнопкой мыши и выберите Удалить , чтобы начать процесс удаления.
- Следуйте инструкциям на экране, чтобы завершить процесс удаления.
- После удаления приложения перезагрузите компьютер.
- следующую последовательность запуска, перейдите по этой ссылке ( здесь ) и загрузите последнюю версию.
- После завершения загрузки откройте исполняемый файл установки и установите приложение. Когда последовательность установки будет завершена, активируйте загрузку, вставив лицензионный ключ.
- Выполните то же действие, которое ранее вызывало «Ошибка компиляции фильма» , и посмотрите если проблема была решена.
Если этот метод не позволил вам решить проблему, перейдите к следующему методу ниже.
Метод 2: изменение средства визуализации видео
Если вы получаете эту ошибку каждый раз, когда пытаетесь визуализировать видео, возможно, вы сможете устранить проблема с изменением метода рендеринга видео. Это скорее обходной путь, чем надлежащее исправление, но многие затронутые пользователи сообщили, что он эффективен при устранении «Ошибка компиляции фильма».
Как оказалось, существует несколько проблем со стабильностью, которые обычно возникают при определенных конфигурациях, когда средство визуализации настроено на использование Ускорение графического процессора (CUDA) .
Вот краткое руководство по решению этой проблемы, открыв Настройки проекта и изменив значение по умолчанию Обработка видео и вариант воспроизведения :
- Внутри видео, которое вызывает ошибку, нажмите Файл из меню ленты в верхнем левом углу экрана. Затем в меню Файл перейдите в Настройки проекта и нажмите Общие.
- Как только вы попадете в окно Project Settings , убедитесь, что Выбрана вкладка Общие . Затем перейдите в раздел Обработка и воспроизведение видео и убедитесь, что выбрано Только программное обеспечение Mercury Playback Engine . Это можно сделать с помощью раскрывающегося меню.
Примечание. Использование Ускорение графического процессора Mercury Playback Engine , как известно, вызывает несколько проблем со стабильностью на определенных конфигурациях ПК.
- Попытайтесь снова выполнить рендеринг видео и посмотрите, не возникла ли проблема было решено. Если в окне изменений появится запрос, нажмите Сохранить предварительный просмотр .
- Используя ленточную панель вверху, перейдите в Экспорт и еще раз нажмите «Экспорт», чтобы завершить операцию.
Если проблема не исчезла, перейдите к следующему методу ниже.
Метод 3: изменение местоположения файла проекта
Некоторые затронутые пользователи сообщили, что проблема была решена после того, как они изменили местоположение файла проекта. В большинстве случаев затронутые пользователи сообщают, что они заставили его работать, изменив расположение как файла проекта, так и экспортированного видео на рабочий стол.
Вот краткое руководство о том, как это сделать:
- Когда ваш проект будет готов, перейдите в File (в верхнем левом разделе меню ленты) и нажмите Сохранить как.
- На экране Сохранить как укажите местоположение на рабочем столе и назовите свой видеопроект, прежде чем нажимать Сохранить.
- Затем перейдите в Настройки экспорта , выберите вкладку Вывод и нажмите Экспорт.
- Проверьте, прошла ли процедура успешно и завершилась ли процедура без ошибок.
Если этот метод не помог вам решить проблему, перейдите к следующему методу ниже.
Метод 4: Дублирование последовательности
Несколько пользователей сообщили, что дублирование последовательности, которая находится в процессе экспорта, позволило им завершить операцию, не увидев «Ошибка компиляции фильма». Как оказалось, это позволяет обойти сообщение об ошибке и без проблем экспортировать его.
Чтобы скопировать последовательность, просто щелкните правой кнопкой мыши проект, который является не удалось и выберите Экспорт во вновь появившемся контекстном меню.
После этого попробуйте выполнить то же действие, которое ранее вызывало «Ошибка компиляции фильма» , и посмотрите, решена ли проблема. Если появляется такое же сообщение об ошибке, перейдите к следующему потенциальному исправлению.
Метод 5. Определение места сбоя экспорта
Если где-то происходит сбой Adobe Premiere во время процесса экспорта это, вероятно, означает, что что-то происходит в начале последовательности. Паре пользователей, столкнувшихся с этой проблемой, удалось завершить процесс экспорта без ошибок, переместив кадры на несколько кадров назад или на несколько кадров вперед из меню внизу экрана.
После перемещения кадра экспортируйте этот небольшой сегмент и посмотрите, не исчезнет ли ошибка ‘Ошибка компиляции фильма’ . происходит. Если процесс экспорта больше не дает сбоев, можно приступить к экспорту остальной части файла.
Если проблема все еще не решена, перейдите к следующему способу ниже.
Метод 6: Создание нового проекта
Нескольким пользователям, у которых также была эта ошибка, удалось исправить ее, создав новый проект с точно такими же файлами и выполнив часть экспорта из новый. Для этого перейдите в Файл> Новый> Проект . Затем присвойте проекту любое имя и нажмите Ok .
После создания нового проекта импортируйте предыдущий проект. . Вы можете просто перетащить его или использовать мастер Import . После подтверждения импорта и успешного завершения процесса проверьте, устранена ли ошибка «Ошибка компиляции фильма» .
Are you getting this error when exporting video from Adobe Premiere Pro using CUDA with your GPU?
Error compiling movie.
GPU Render Error.
Unable to process frame.
Writing with exporter: H.264
Rendering effect: AE.ADBE Lumetri
Rendering at offset: 643.200 seconds
Component: EffectFilter of type GPUVideoFilter
Selector: 9
Error code: -1609629695
Get a 7-day free trial of VideoBlocks and download as many stock footage clips, motion backgrounds and After Effects templates as you like! https://videoblocks.go2cloud.org/SHCn
RØDE VideoMic Pro+ Microphone
UK: http://amzn.to/2Er1kEA / http://ebay.to/2EsVSRU
US: http://amzn.to/2AO7zjW / http://ebay.to/2qRfTj7
My Pop Filter
UK: http://amzn.to/2D0m6y2 / http://ebay.to/2CYYYRk
US: http://amzn.to/2memvCz / http://ebay.to/2CJUERB
My Desk mount arm
UK: http://amzn.to/2CZOmAQ / http://ebay.to/2EsfA04
US: http://amzn.to/2DfMaTz / http://ebay.to/2EsfOEs
Gmail for Business makes your email look more professional by using your website’s domain name. You can get a 14-day free trial and if you message us privately we can also give you a discount code for your first year.
Click here to get started: https://goo.gl/XZdg2C
*** My Video Editing PC Full Specs ***
(Built in 2012; GPU fitted in 2018.)
# Intel Core i7 3770K 3.5GHz Quad-Core Processor #
UK: http://amzn.to/2ggjEdj / http://ebay.to/2hEDagp
US: http://amzn.to/2xD2F7z / http://ebay.to/2ylaXoo
# Gigabyte Nvidia Geforce GTX 1080 Graphics Card #
UK: http://amzn.to/2CUByvp / http://ebay.to/2DcWc7Q
US: http://amzn.to/2qL9C8v / http://ebay.to/2AKEwgN
# 16GB Corsair Dominator GT RAM #
UK: http://amzn.to/2gBgPjW / http://ebay.to/2hF5WNI
US: http://amzn.to/2z4djpc / http://ebay.to/2xCIzKC
# ASRock Fatal1ty Z77 Professional Motherboard #
UK: http://amzn.to/2i9Litb / http://ebay.to/2xCYHvN
US: http://amzn.to/2xByvGx / http://ebay.to/2xCoLr0
# Intel 240GB SSD #
UK: http://amzn.to/2g6YFpt / http://ebay.to/2wRz8HN
US: http://amzn.to/2yljK9V / http://ebay.to/2wRGNFT
# Samsung 27-Inch LED Monitor #
UK: http://amzn.to/2g6tVFj / http://ebay.to/2yl2TE7
US: http://amzn.to/2zkhOg4 / http://ebay.to/2yHZvoi
# 2x Western Digital Caviar Black 500GB Hard Drives #
UK: http://amzn.to/2i97IKU / http://ebay.to/2g7Ttll
US: http://amzn.to/2xCDaU2 / http://ebay.to/2gBrnje
# Zalman Z11 Plus Case #
UK: http://amzn.to/2g7TwO3 / http://ebay.to/2gg4Xa3
US: http://amzn.to/2yJgdne / http://ebay.to/2i9I0G4
# Zalman CNPS12X CPU Heatsink/Cooler #
UK: http://amzn.to/2i8zEOW / http://ebay.to/2yIExFJ
US: http://amzn.to/2xCe6RS / http://ebay.to/2g7Buvq
# Coolermaster Silent Pro Gold 1000W Power Supply #
UK: http://amzn.to/2kKedVk / http://ebay.to/2yljBmw
US: http://amzn.to/2yl2OQx / http://ebay.to/2i9Josg
# Pioneer BDR-S09XLT Blu-Ray Writer #
UK: http://amzn.to/2kIW9ei / http://ebay.to/2yf8RXO
US: http://amzn.to/2yl0Akd / http://ebay.to/2ggzFju
# USB 3.0 Multi Card Reader #
UK: http://amzn.to/2ygUMXk / http://ebay.to/2yh4hWv
US: http://amzn.to/2xEyPnY / http://ebay.to/2xCV0Le
Facebook – https://www.facebook.com/SwitchedOnNetwork/
Twitter – https://twitter.com/SwitchedOnNet
Instagram – https://www.instagram.com/switchedonnetwork/
Google+ – https://plus.google.com/112924836454795429890
YouTube Channel – https://www.youtube.com/SwitchedOnNetwork?sub_confirmation=1
Visit our website at https://www.switchedonnetwork.com/


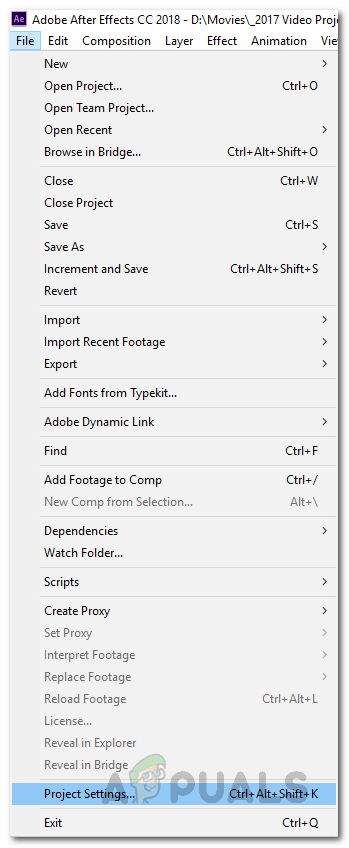 Opening Project Settings Window
 Enabling Mercury GPU Acceleration in Project Settings
 Opening Device Manager
 Device Manager
 Uninstalling Graphics Drivers
