Most WordPress error messages give you an idea of what’s causing problems on your site. The “Warning: cannot modify header information – headers already sent by” error is no exception. If a PHP file cannot be executed due to a problem in its code, you’ll run into this message.
There are several potential causes for the “Cannot modify header information” error. Fortunately, the message itself will tell you which file is causing the problem. It even points to the line of code that contains the issue.
In this article, we’re going to discuss this error and its causes. Then, we’ll go over two ways that you can fix the problem. Let’s get to work!
What Causes the “Cannot Modify Header Information – Headers Already Sent By” Error
As we mentioned before, you’ll run into this error when one of your site’s .php files cannot be executed. WordPress relies on .php files, such as wp-config.php and functions.php, for its core functionality.
If there’s a problem within one of the .php files that your website needs to load, you’ll see an error message that looks like this:
Warning: Cannot modify header information - headers already sent by (output started at /home/public_html/wp-config.php:#) in /home/public_html/wp-includes/file-example.php on line 33Fortunately, the “Cannot modify header information” error provides a lot of information that makes troubleshooting relatively straightforward. The message will point you toward two files – the first one contains the problem, which prevents the second one from executing.
At the end of the error message, you’ll see a section that says “line XX.” It shows the location of the specific code that’s causing the problem.
Usually, the problem in the PHP code is pretty easy to fix. Some common causes that can trigger the error message include:
- Whitespaces before the
<?phpsegment of the code or after the closing?>tag - An HTML block before the PHP header function
printorechostatements added before the PHP header function- Problems with a plugin’s code
Fixing these types of errors requires you to be at least passingly comfortable with modifying PHP code. You won’t need to add any code yourself.
Still, you may need a bit of extra help identifying the problem. This is particularly true if the issue isn’t related to whitespaces or statements before the PHP header function.
The silver lining to seeing this error message- you already know which file is causing the problem and the line of code with the issue! 🤓 Learn how to fix it here 💪Click to Tweet
How To Troubleshoot the “Warning: Cannot Modify Header Information – Headers Already Sent By” Error (2 Methods)
There are two approaches to troubleshooting the “Cannot modify header information – headers already sent by” error. The first method doesn’t require you to exit the WordPress dashboard.
However, the second strategy uses FTP/SFTP if you can’t access the dashboard or use WordPress.
Let’s start with the first troubleshooting method.
1. Fix the Error With the Plugin/Theme Editor or Replace a Plugin
The first thing you need to do when you run into the “Cannot modify header information – headers already sent by” error is to open the file that’s causing the problem. Then, locate the line the message indicates.
For example, if you see an error that reads the following, it means you need to look inside your theme’s functions.php file:
Warning: Cannot modify header information - headers already sent by (output started at /home/public_html/wp-content/themes/twentytwentyone/functions.php:#) in /home/public_html/wp-includes/file-example.php on line 1In this scenario, you can reach the source of the problem using the WordPress theme editor. To access it, go to Appearance > Theme Editor.
Once you’re in, use the menu to the right to select the file you need to access.

If you look closely, you’ll notice several whitespaces before the <?php tag. The error message itself points toward line number one. Therefore, this tells you that the whitespaces are the sources of the problem.
In this example, all you have to do is remove the whitespaces and click on Update File. Now try reloading your website, and the error should be gone.
You can apply the same process using the WordPress plugin editor (Plugins > Plugin Editor). This method is applicable if the error message points toward a faulty plugin file.
Alternatively, you may run into an error that indicates one of the files within your WordPress plugins directory. In this scenario, you can remove and reinstall that plugin. In most cases, that will take care of the issue for you.
However, keep in mind that you might lose that plugin’s configuration, depending on which tool you use. As such, you may need to set up the add-on again.
2. Edit the Problem File via FTP/SFTP
In some cases, the source of the “Cannot modify header information – headers already sent by” error won’t lie in a file that you can access using the WordPress theme or plugin editors. Alternatively, you might be using a non-WordPress site.
In these scenarios, your best option is to access the problem file using FTP/SFTP. To do so, you’ll need to use an FTP or SFTP client such as the FileZilla platform.
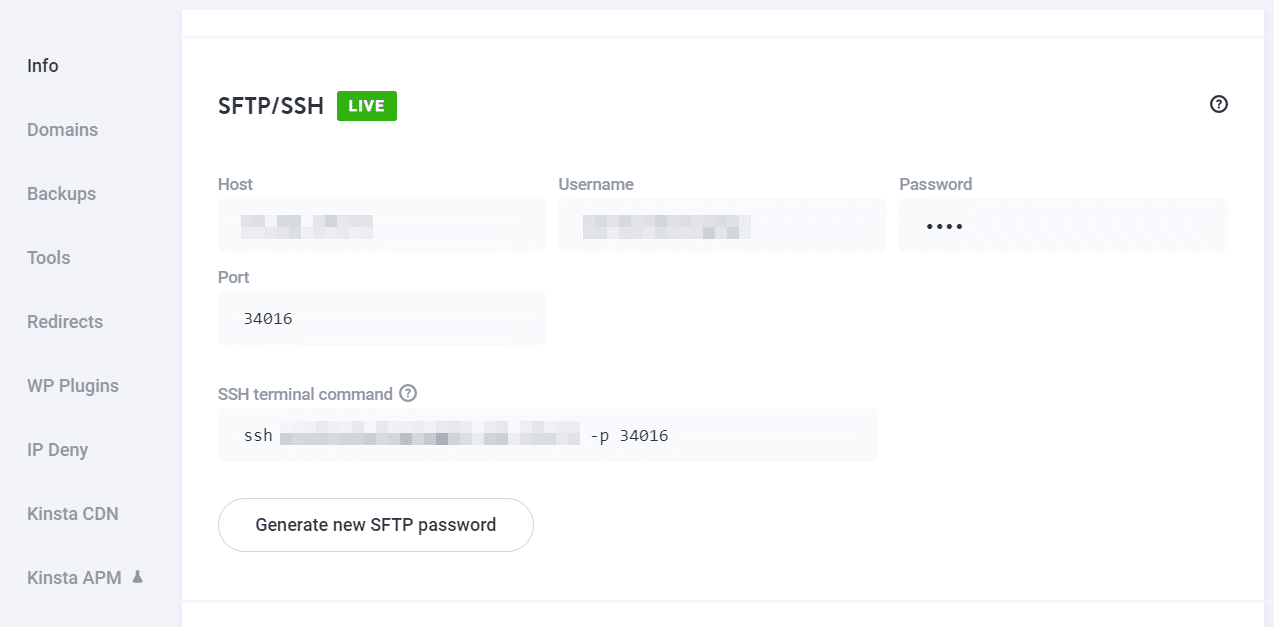
You’ll also need access to your website’s FTP/SFTP credentials. In most cases, you should be able to find them within your hosting panel.
If you use Kinsta, you can access MyKinsta, select your website under Sites and click on its Info tab.
Once you have the credentials, use your FTP or SFTP client to connect to your website. You’ll need to locate the site’s root folder. Usually, its name should be root, public_html, public, or your own site’s name.
Here’s a quick look at what the inside of a WordPress root folder looks like.

Go ahead and locate the file that the “Cannot modify header information – headers already sent by” error indicates. For example, if the issue is public/wp-config.php, right-click on the file and select the View/Edit option.

That option will open the selected file using your default text editor. Once the document is open, locate the problem by navigating to the line the error message pointed you toward.

If you can’t spot the error, you might need to consult with someone who has experience working with PHP files. However, suppose you’re dealing with a whitespace issue or a statement before the PHP header. In that case, you should be able to fix the problem yourself.
Once you’re done, save the changes to the file and close the FTP/SFTP client. Try reaccessing your website, and the error should be gone.
Seeing this error message? 😥 This post has 2 guaranteed ways tod fix it 💪Click to Tweet
Summary
The “Warning: cannot modify header information – headers already sent by” error can be intimidating because it outputs a long message. However, that detailed error message makes this bug relatively simple to troubleshoot. Unlike other problems, this one is polite enough to tell you which file is causing it and which line of code you need to look into.
Depending on the file that’s causing the error, there are two ways that you can go about troubleshooting it:
- Fix the error using the plugin/theme editor or replace a plugin.
- Edit the problem file via an FTP/SFTP client.
Finding the source of this error is simple. However, fixing it can be a problem if you’re not familiar with PHP.
Still having issues fixing this error? Please share your experience with our community in the comments below!
Get all your applications, databases and WordPress sites online and under one roof. Our feature-packed, high-performance cloud platform includes:
- Easy setup and management in the MyKinsta dashboard
- 24/7 expert support
- The best Google Cloud Platform hardware and network, powered by Kubernetes for maximum scalability
- An enterprise-level Cloudflare integration for speed and security
- Global audience reach with up to 35 data centers and 275 PoPs worldwide
Test it yourself with $20 off your first month of Application Hosting or Database Hosting. Explore our plans or talk to sales to find your best fit.
Introduction
Interpreting error messages in WordPress can be a time-consuming process. Finding an adequate solution to the problem is equally as difficult.
To keep your website running like clockwork, you need to prevent long periods of downtime.
Find out how to fix the “Cannot Modify Header Information” error in WordPress and get your site up and running quickly.
What Does “Cannot Modify Header Information – Headers Already Sent By” Mean?
The “Cannot Modify Header Information – Headers Already Sent By” error indicates that a .php file cannot execute because an output is being sent before calling an HTTP header. Headers always need to precede the output.
The most common causes of the «Cannot Modify Header Information» error are:
- Whitespaces before the opening <?php token.
- Whitespaces after the closing ?> tag (if one is present).
- An HTML block is in front of the header within the .php file.
- Statements that produce output, such as print or echo, are being called before the header.
- Issues with an installed plugin.
The warning message tells you which file or files you need to review to fix the issue.
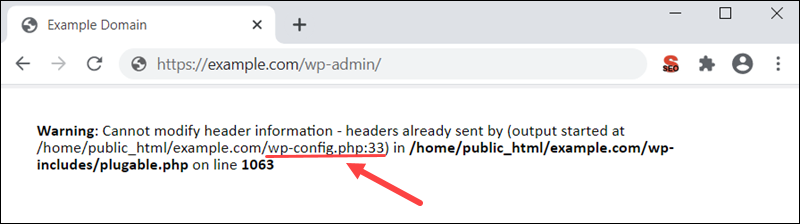
In this example, the warning message indicates that the plugable.php file cannot execute due to an issue within the wp-config.php file.
Warning: Cannot modify header information - headers already sent by (output started at /home/public_html/example.com/wp-config.php:33) in /home/public_html/example.com/wp-includes/plugable.php on line 1063You need to access and check the code within the wp-config.php file.
The message also provides the path to the file /home/public_html/example.com/wp-config.php. The number 33 points out the exact line within the code causing the error.
The file path and the code line number are an excellent starting point when troubleshooting.
Corrupted PHP File
Use cPanel or an FTP client to access the server the website is located on. It is recommended to back up files before editing them.
The examples in this guide are presented using cPanel.
Edit the File
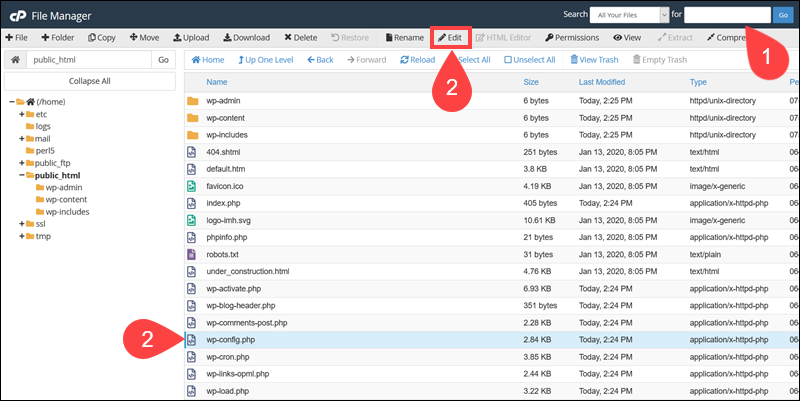
1. Locate the file by using the path from the warning message. You can also use the search bar at the top of the cPanel dashboard.
2. Select the file and click Edit.
3. Find the code line number specified in the warning message. Use the Go To Line option to locate lines in lengthy files quickly.
4. Remove any whitespaces preceding the opening <?php token.
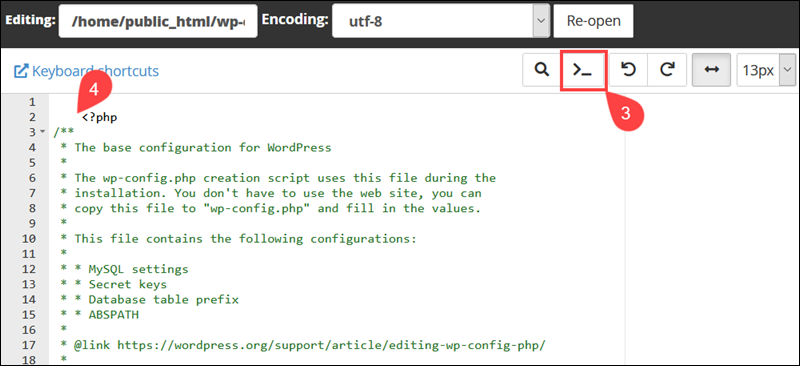
5. If the file contains a ?> closing tag, ensure that there are no whitespaces after the tag.
6. Click the Save Changes tab once you remove all redundant whitespaces.
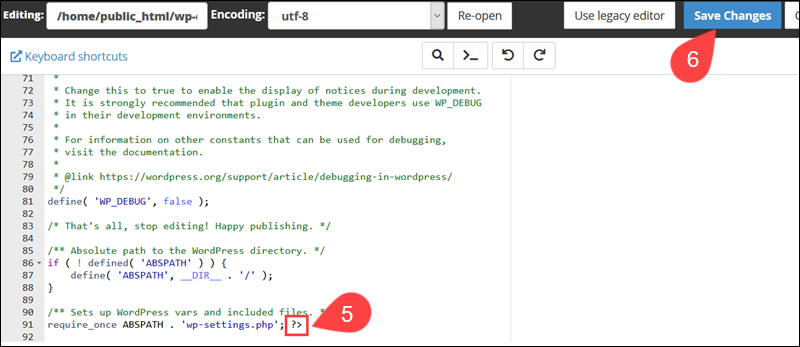
Once you reload your webpage, the error message should disappear.
Move the Header Statement
Raw HTML elements in a .php file are rendered as a direct output. If an HTML element is placed before a header call, it can cause the “Cannot Modify Header Information – Headers Already Sent By” error.
To fix the error, place the HTML block after the header statement.

Functions that produce output such as vprintf, printf, echo, flush, and print statements must follow HTTP header calls.
Review the .php file specified in the error message and correct the code. Always position header calls before the output producing elements and functions.
Replace the File
If you cannot locate the corrupt file or you are hesitant to edit the code, you can replace the entire file instead.
1. Download the latest WordPress version.
2. Use an FTP client or cPanel to upload the new version of the file to your server.
3. Overwrite the existing corrupt file with the new version.
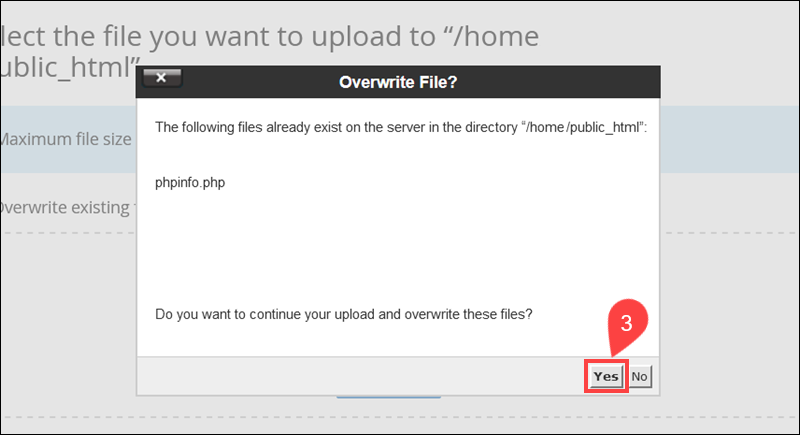
4. Reload the previously unavailable webpage.
You can upload and replace entire WordPress folders if the warning displays issues in multiple files.
Find the Plugin that Causes the Error
A faulty plugin can cause the “Cannot Modify Header Information” error.
1. Access your WordPress dashboard.
2. Deactivate and then Activate each plugin, in turn, to determine if one of them is causing the issue.
3. Refresh the affected webpage after every change you make.

Focus on the recently installed or updated plugins. The error will reappear once you turn on the failing plugin.
Gather as much data as you can during this process and inform the plugin developers of the issues you encountered.
Conclusion
By following the instructions in this guide, you have successfully identified and resolved the “Cannot Modify Header Information” error.
Warning messages that flag similar issues are not uncommon in WordPress. The presented solutions are applicable in most cases with related underlying causes.
Дек 09, 2020
Elena B.
3хв. читання

Удивительно сколь малая ошибка может привести в полностью нерабочее состояние ваш сайт на WordPress. Мы говорим, конечно же, об известной ошибке-предупреждении WordPress Warning: cannot modify header information — headers already sent by pluggable.php (не удаётся изменить информацию заголовка). Если вы один из тех, кто столкнулся с этой ошибкой, тогда вы пришли по адресу. В этом руководстве по WordPress мы обсудим прежде всего причину появления этой ошибки и посмотрим на пути решения, которые позволят окончательно решить проблему.
Обратите внимание, что Hostinger предлагает специальный оптимизированный для WordPress хостинг. Воспользуйтесь предложением и получите WordPress хостинг со скидкой до 82%!
К предложению
Что потребуется
Перед стартом убедитесь в наличии следующего:
- Доступ к вашей панели управления хостингом или FTP доступ
Давайте рассмотрим пример этой ошибки, чтобы лучше понять причины. Ошибка обычно появляется в такой форме:
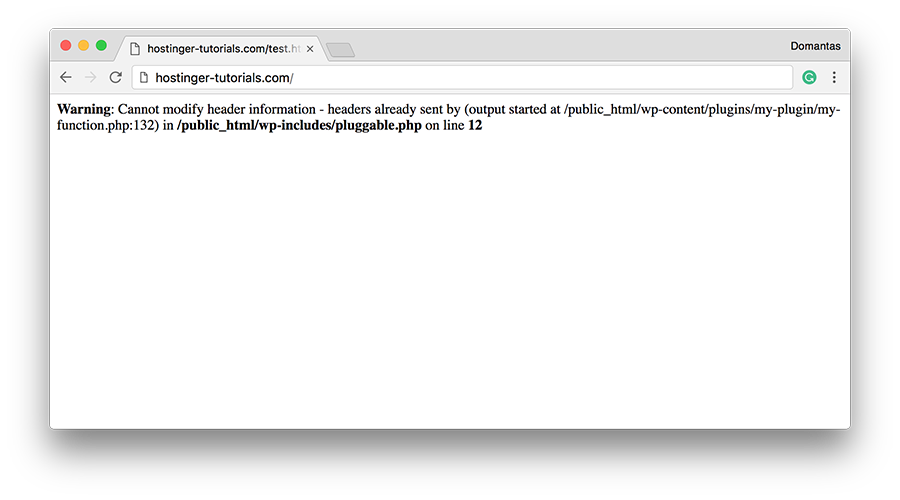
Warning: Cannot modify header information - headers already sent by (output started at /public_html/wp-content/plugins/my-plugin/my-function.php:#) in /public_html/wp-includes/pluggable.php on line #
Как видите, в ошибке упоминается два файла. Первый файл (в нашем случае: my-function.php размещённый в /public_html//wp-content/plugins/my-plugin/) во главе подозреваемых. Это наш пользовательский код, который предназначен для изменения функциональности ядра, обеспечиваемой WordPress. Функциональность ядра находится в файле pluggable.php (файл ядра WordPress, неизменный для любой установки WordPress). Иными словами, проблема в первом файле, который не даёт второму файлу выполняться должным образом.
Основной причиной ошибки являются лишние пробелы в первом файле. Это пробелы вверху или внизу файла, ненужные пробелы где угодно в файле или даже пробелы в PHP-тегах <?php и ?>. К слову, по причине того, что программисты могут (и обычно так и происходит) ошибочно вбивать лишние пробелы в свой код, эта ошибка наиболее часто возникает, чем можно ожидать. Строка #, указанная в сообщении об ошибке, ссылается на место расположения проблемы – это поможет устранить проблему быстрее и без суеты.
Теперь, когда вы знаете, что вызывает ошибку, вы можете перейти к её исправлению. Мы покажем вам два варианта устранения проблемы, которые вы можете попробовать по отдельности или по очереди, если по отдельности не помогло.
Вариант 1 – Редактирования неисправного файла
Первый вариант решения ошибки Warning: cannot modify header information – ручное исправление файла с ошибкой. Вы уже имеете в наличии необходимую информацию, для нахождения проблемы в самом сообщении об ошибке (помним, это первый файл в сообщении). Всё, что потребуется – это открыть этот файл по FTP, используя клиент вроде FileZilla или через файловый менеджер.
По существу, всё, о чём здесь нужно позаботиться – это убрать лишние пробелы/пустые строки в файле. Хорошее место для начала будет строка #, упомянутая в сообщении об ошибке. С этого места вы можете продолжить разбор остального файла в поисках других ненужных пробелов или пустых строк до самого конца документа.
Убедитесь в правильности написания начального и завершающего тегов PHP. Не должно быть пробела до или после тега <?php, также как и тега ?>. Также, последняя строка кода не должна завершаться пробелом или лишнем переводом строки.
На скриншоте ниже вы можете увидеть файл wp-config.php, в котором есть пробелы перед первым тегом PHP.
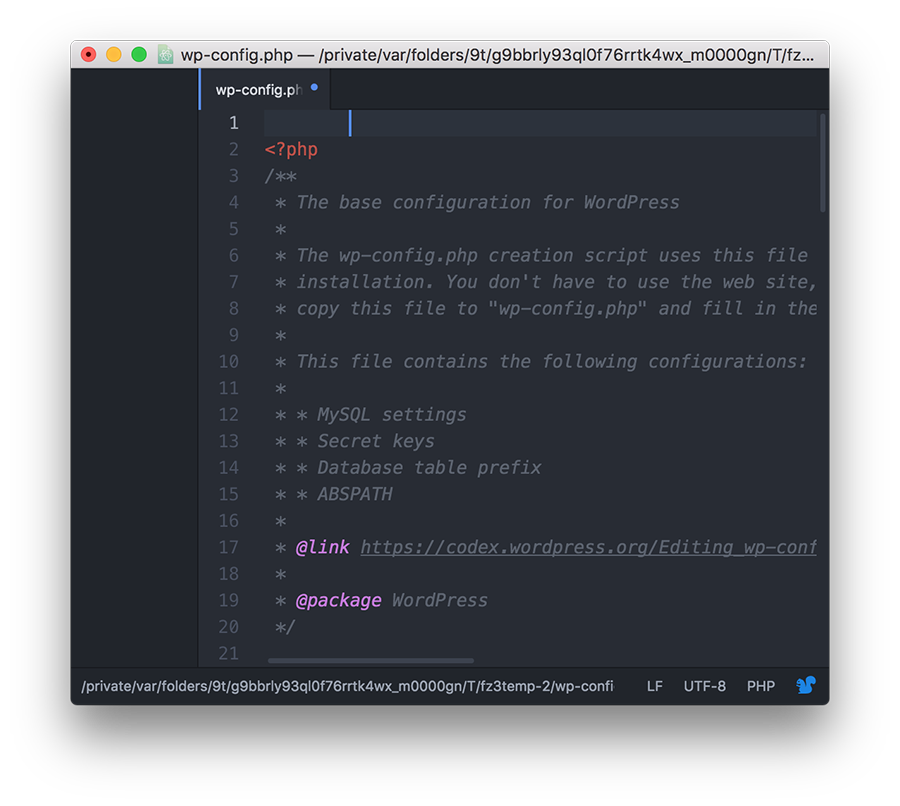
ПОДСКАЗКА: Во многих текстовых редакторах удалить ненужные пробелы можно автоматически. Например, для удаления лишних пробелов в редакторе Atom, выделите весь код и перейдите в Packages -> Whitespace -> Remove Trailing Whitespace.
Вариант 2 – Заменить неисправный файл
Конечно, редактирование целого ряда файлов с ошибками может вызвать затруднение. Файлы могут относиться к плагину или теме, которые вы только что установили на своём сайте или даже могут быть файлами ядра WordPress.
Если ошибка действительно вызвана плагином или темой, всё что потребуется сделать – это переустановить его/её. Это действие в большинстве случаев помогает. С другой стороны, если файл ядра WordPress причина ошибки, лучшим решением взять чистую копию WordPress и заменить файл с ошибкой в вашей установке на такой же в исправной версии. Это будет гарантировать, что неисправный файл восстановлен в исходное состояние, в то время как остальная установка вашего сайта WordPress останется в целости и сохранности. Теперь, просто перезагрузите страницу и убедитесь, что ошибка исправлена.
В завершение
Независимо от того, вставили ли вы фрагмент кода в файл, добавили новый плагин/тему или написали код вручную, существует риск появления лишних пробелов в файле. Эти, казалось бы невинные пробелы, могут обернуться ошибкой WordPress Warning: cannot modify header information — headers already sent by.
В этом руководстве, мы рассмотрели как исправлять такие ошибки, и теперь ваш сайт опять работает как и положено. Больше руководств по WordPress можно найти в разделе руководств WordPress.

Елена имеет профессиональное техническое образование в области информационных технологий и опыт программирования на разных языках под разные платформы и системы. Более 10 лет посвятила сфере веб, работая с разными CMS, такими как: Drupal, Joomla, Magento и конечно же наиболее популярной в наши дни системой управления контентом – WordPress. Её статьи всегда технически выверены и точны, будь то обзор для WordPress или инструкции по настройке вашего VPS сервера.
Сегодня каждый пользователь может сделать свой сайт на любом движке, в т.ч. бесплатном – Joomla, WordPress и других. Освоить азы программирования по имеющейся в сети информации тоже не составит труда. Но иногда даже малейшая ошибка в коде, допущенная при разработке сайта, может привести к его неработоспособности. И сегодня мы рассмотрим проблему Cannot modify header information — headers already sent by. И как исправить её самостоятельно, чтобы все работало без сбоев, а также разберём почему она появляется.
- Что означает выражение Cannot modify?
- Почему выходит ошибка и как её исправить в Вордпресс?
- Замена неисправных файлов
- Заключение

Что означает выражение Cannot modify?
На русский язык полный текст сообщения переводится как “Нет возможности изменить заголовки – они уже были отправлены”. У этого сообщения могут еще быть такие варианты.

Другие вариации ошибки
Почему выходит такая ошибка? Чтобы понять это, необходимо узнать, как браузер отвечает на запросы пользователя. Когда мы открываем страницу, нам в первую очередь присылаются заголовки, в которых содержится следующая информация:
- данные о сервере;
- кодировка;
- куки;
- язык сайта;
- сессия;
- другая служебная информация.
Ошибку Cannot modify header information — headers already sent by вызывают такие PHP-команды, как setcookie, header и другие, влияющие на работу сессий или куки.
Почему выходит ошибка и как её исправить в Вордпресс?
Как мы рассмотрели выше, в первую очередь перед загрузкой страницы нам посылаются заголовки с важной информацией, а потом уже приходят запрошенные данные. По неопытности или невнимательности программисты допускают ошибку в исходном коде. Они пытаются вначале определить другие функции (чаще всего, используя, при этом команду echo), а после этого уже занимаются установкой куки или отправкой заголовков. Чаще всего из-за этого и выскакивает ошибка на WordPress.
Рассмотрим на примерах, как выглядит рассматриваемая нами проблема.
Размещение информации перед заголовками
Сначала изучим один тип ошибки, когда программист действует по неопытности либо невнимательности. Здесь показан некорректный вариант.

А сейчас – верное написание кода.

Посмотрим внимательно на картинки и найдем место, куда закралась ошибка. Как видно в неправильном варианте, перед заголовком header идет строка echo. Вот это и есть причина проблемы – никакую информацию нельзя выводить раньше заголовков. Сначала идут данные строки header и только потом – все остальное.
Появление лишнего пробела
Причиной появления ошибки Cannot modify header information может быть и лишний пробел, который незаметен при первом взгляде. Если он присутствует в коде, то, естественно, и будет загружаться раньше, чем заголовки. В результате пользователь увидит на экране сообщение об ошибке. Пустой пробел может появиться самостоятельно, если документ открывался в стандартном блокноте Windows. Этот редактор может, не уведомляя нас, добавить служебный символ Byte Order Mark, который выставляет лишний пробел перед заголовком. Чтобы проверить, в этом ли дело, документ необходимо открыть в любом другом редакторе и проверить. Возможно, в файле будет такая ситуация, как на картинке ниже.

Как видим, первая строка начинается не с <?PHP, а с пробела перед данной комбинацией. Его необходимо убрать и проблема будет устранена.
Использование команды include
Многие программисты допускают ошибку при использовании команды include. Она применяется для объединения всех файлов и создания одного итогового. И, если попытаться вначале подключить шапку сайта (меню, слайдер и т. п.). А после этого оформить заголовки, то, естественно, появится сообщение об ошибке Cannot modify…

Чтобы решить проблему, необходимо функцию header (setcookie либо session_start) в скрипте разместить первой.
Обычно в сообщении об ошибке содержится информация о том, где её искать.

После output started — путь к файлу с ошибкой
После слов output started следуют сведения о том, в какой строке скрипта появилась ошибка. Необходимо пройти по этому пути и, увидев проблему, решить её – убрать лишний пробел либо поставить функцию header в самом начале.
Замена неисправных файлов
Если ошибка закралась в установленные на WordPress плагины либо темы, то их можно переустановить. Но проблема может быть также в файлах ядра. В этом случае необходимо взять файл из чистой версии движка и инсталлировать его на место проблемного. Остальные (корректные) настройки сайта на WordPress останутся нетронутыми.
Заключение
Мы узнали, что означает сообщение об ошибке с текстом Cannot modify header information — headers already sent by. А также определили пути поиска проблемы и способы её решения – удаление лишнего пробела, установка функции header в самом верху скрипта или замена неисправных файлов.
Are you bogged down by the number of times you see the PHP warning “Cannot modify header information – headers already sent…”? It is not only difficult to resolve these errors but also troublesome and frustrating to debug. Take a look at the primary causes of these errors and how you can fix them quickly.
As we know, a web page is made up of two parts – the page header and the body. When a web developer incorrectly creates or modifies a page header, he may see one of the common PHP errors. The error states “Warning: Cannot modify header information – headers already sent by …” with details of the file and line of code with the error. If the developer is unaware of the cause of this error, he may spend hours to get the issue resolved. Understanding why the error occurs will help you find the solution.
Web Page Headers
When you work on PHP for creating websites, PHP would handle the work of generating web pages for you. The header contains page information and is generally generated automatically without requiring developer intervention. The header information is mostly not seen by the user.
Developers may want to modify parts of the page header. Any incorrect configuration may lead to the “Headers already sent” errors. This error may or may not be the first error message on the page. If it is not the first error, then it may have been caused due to previous errors. Fix the errors before this one and this error message would most likely be resolved.
If the error is the first error on the page then it is likely that the cause is due to some error created by the developer, in the PHP code. Here at Templatetoaster website maker, Let us look at each of the causes and the resolution for each.
Causes and Fixes for Errors in Webpage Headers
- Page body content sent before the header
The header must, as a rule, be sent first in the response from a web server. It is divided from the body by a single blank line. If some section of the body of the web page is sent already before the request to the header, then this error may occur.
Note that the functions that create or modify the headers must be invoked before any other output is shown. Some of the functions used for modifying the HTTP header are:
- header
- header_remove
- session_start
- session_regenerate_id
- setcookie
- setrawcookie
As a first step, find the header statement that is causing the error. The actual error must be at this line or before this line. Next, try to look for statements that could send output before the header statement. If these are present, you need to change the code and move the header statement before such statements.
- Unparsed HTML before the Header
If there are unparsed HTML sections in a PHP file then these are considered as direct output to the browser. Scripts that trigger a header () call must be called before any raw <html> blocks. You also cannot have any HTML tags present before the header function.
Incorrect usage examples:
-
<!DOCTYPE html>
<?php
-
<?php <html> header('Location: http://www.google.com'); ?>
To fix this error you should separate processing code from output generation code. Place the form processing code right at the beginning of the PHP script.
- Extra spaces or lines before <?php or after a closing?> php tag
This error also occurs due to whitespace at the beginning or at the end of a PHP file. Extra whitespace may be added by a bad unpacking program or a non-compliant editor like the Notepad, WordPad or TextEdit.
The fix is to remove that whitespace from the file. It says “output started at … “followed by a filename and a line number. That is the file (and line) that you need to edit. Ignore the second file name – that is only a file that included the file that has the whitespace. The first file is the one you have to edit, not the second one.
- Incorrect PHP Encoding Format
In the last case, we consider the scenario when your code is correct with no white space, HTML tags, and incorrect function calls. However, the PHP code still gives the same error.
This situation is more likely due to how the PHP file was saved. With a text editor like Notepad, you can save PHP file in different encodings like ANSI, Unicode, Unicode big endian, or UTF-8 encoding. If you choose an incorrect encoding format then the PHP script can trigger this error. The best encoding format to save PHP files is the ANSI encoding.
This encoding will not add any hidden whitespaces or characters to the file. Any of the other encodings can actually add extra characters to the PHP file. This can lead to the “headers already sent” error.
Output Buffering as a Workaround
As we have seen above, it is critical to have your code structured properly and ensure that the output is separated from the code. If this cannot be achieved then as a workaround you can try using PHPs Output Buffering.
By default the output buffering is off, the HTML is sent to the browser in pieces as PHP processes the script. If the Output Buffering is on, the HTML is stored in a variable. It is then sent to the browser as one whole at the end of the script.
You can use any of the two methods below to enable output buffering.
- Use the Output Buffering setting to enable output buffering. You can configure it in the php.ini file, in the .htaccess file or the .user.ini files.
- Use a call to the function ob_start() at the start of the invocation script. This is less reliable for following reasons:
- A whitespace or a BOM might get added before the function making it ineffective.
- When attempting to send binary content like a generated image, the buffered unnecessary output causes a problem. This may need an ob_clean() as a further workaround.
- The buffer which is limited in size can be easily overrun if set to default values.
How TemplateToaster helps?
If you are a newbie or a beginner in developing websites, we recommend that you try using TemplateToaster. This WordPress website Builder lets you create websites for multiple Content Management Systems like WordPress, Joomla, Drupal etc. with the flexibility to choose from a range of templates. You would not need to get into the details of the PHP, CSS, and HTML coding which would prevent getting into errors such as the “headers already sent” error.