From your first link, I downloaded the most recent version of the MariaDB driver (3.1.9) and added that to my HeidiSQL setup. On connection with that driver, I get the following (same) error:
SSL connection error: no cipher match. Error 0x80090331(SEC_E_ALGORITHM MISMATCH)

Please select a different library in your session settings. (Current: "libmariadb-3.1.9.dll")
I’ve googled that particular error code and can’t make head nor tail of the responses — I don’t understand the encryption terminology.
The second link refers to either a bug in MariaDB connector or MariaDB itself — I don’t think that there will be valid solutions here for me considering I doubt I should be using the MariaDB connector to connect to a MySQL 8 database.
The third link, to this forum, suggests checking the DLL version numbers.
libmariadb.dll= 3.1.7libmariadb-3.1.9.dll= 3.1.9 (this version I downloaded, installed and copied the DLL into the HeidiSQL folder.libmysql.dll= 5.6.6.0libmysql-6.1.dll= 6.1.11
I’m not sure if its relevant, but the OpenSSL library in use (libssl-1_1-x64.dll) reports version 1.1.1d. I downloaded the most recent version (1.1.1i) and renamed the existing DLL and inserted the new versions. This has not made any difference to the error messages or my inability to connect.
I do want to restate the point that my «SSL Ciphers» option is blank. I don’t know what to fill in. I did run an SQL query from an existing encrypted connections to get a list of the ciphers and the following was returned, but pasting this in has had no effect:
TLS_AES_256_GCM_SHA384:TLS_CHACHA20_POLY1305_SHA256:TLS_AES_128_GCM_SHA256:ECDHE-ECDSA-AES128-GCM-SHA256:ECDHE-ECDSA-AES256-GCM-SHA384:ECDHE-RSA-AES128-GCM-SHA256:ECDHE-ECDSA-AES128-SHA256:ECDHE-RSA-AES128-SHA256:ECDHE-RSA-AES256-GCM-SHA384:ECDHE-ECDSA-AES256-SHA384:ECDHE-RSA-AES256-SHA384:DHE-RSA-AES128-GCM-SHA256:DHE-DSS-AES128-GCM-SHA256:DHE-RSA-AES128-SHA256:DHE-DSS-AES128-SHA256:DHE-DSS-AES256-GCM-SHA384:DHE-RSA-AES256-SHA256:DHE-DSS-AES256-SHA256:DHE-RSA-AES256-GCM-SHA384:ECDHE-RSA-AES128-SHA:ECDHE-ECDSA-AES128-SHA:ECDHE-RSA-AES256-SHA:ECDHE-ECDSA-AES256-SHA:DHE-DSS-AES128-SHA:DHE-RSA-AES128-SHA:DHE-DSS-AES256-SHA:DHE-RSA-AES256-SHA:AES256-SHA:CAMELLIA256-SHA:CAMELLIA128-SHA:AES128-GCM-SHA256:AES256-GCM-SHA384:AES128-SHA256:AES256-SHA256:AES128-SHA
The server that I’m connecting to is an Ubuntu 20.04 LTS machine with an installation of MySQL 8.0 from the default apt repository. The version number (mysql -V) is reported as:
mysql Ver 8.0.22-0ubuntu0.20.04.3 for Linux on x86_64 ((Ubuntu))Attempting from the command line, the following using the mysql client provided by a local install of MariaDB:
mysql -h <hostname> -u <username> -p --ssl --ssl-capath="<path>ca.pem" --ssl-cert="<path>client-cert.pem" --ssl-key="<path>client-key.pem"The error returned was: ERROR 2026 (HY000): SSL connection error: no cipher match (SEC_E_ALGORITHM_MISMATCH , 0x80090331).
(Note that this connection does not access the server via SSH — the server is currently internet facing… IP restrictions will be imposed later, once I get this working).
If I try the login from WSL (Ubuntu) I get the following error:
ERROR 2026 (HY000): SSL connection error: error:00000001:lib(0):func(0):reason(1)The version being reported in WSL is: mysql Ver 14.14 Distrib 5.7.29, for Linux (x86_64) using EditLine wrapper
If I specify this command from a true Ubuntu box (i.e. the one on which my PHP app resides and which can currently connect), it is unsurprising, perhaps that it also works from there.
I really don’t know where to turn next or what else to try. I’d be grateful for any suggestions.
New issue
Have a question about this project? Sign up for a free GitHub account to open an issue and contact its maintainers and the community.
By clicking “Sign up for GitHub”, you agree to our terms of service and
privacy statement. We’ll occasionally send you account related emails.
Already on GitHub?
Sign in
to your account
Closed
sarahg opened this issue
Jun 19, 2018
· 8 comments
Assignees
![]()
Labels
CSE
Contribution from Customer Success Engineers
Comments
![]()
![]()
@sarahg one user reported that this suggestion didn’t work for MySQL Workbench
This seems to work for them: https://www.screencast.com/t/7t16Y7qY
When creating new connection:
- Connection Tab
- Connection method: (TCP/IP) > SSL Tab
- Use SSL : No
Another solution that worked from the command line was adding the --ssl-mode=disabled flag
![]()
@carl-alberto wouldn’t disabling SSL mean that their DB data is being transmitted in clear text? Would we not want to avoid that sort of security risk?
![]()
@alexfornuto That would be correct  maybe this option will be the last resort if all else fails, with a big disclaimer of the risk involved if using this method.
![]()
Copy link
Contributor
Author
@alexfornuto I don’t think we want to officially recommend they bypass SSL, even though it does get people around this error in a pinch. That said, I don’t know how to clear this up yet, and I haven’t been able to reproduce the issue myself, but a few people in CSE have been running into it this week. We’ve had maybe 5-10 reports from customers about it in the last few days.
![]()
![]()
We’re experiencing this issue on all of our site environments except live for our entire organization. It seems to have popped up in the last week or so. The official answer is to add local CA certs for every site, which is not something we’ve had to do in the past.
![]()
Marking as blocked pending BUGS-2075
![]()
![]()
alexfornuto
removed
the
Blocked
Issue or PR is blocked by something out of scope for the Docs team
label
Jul 19, 2018
Labels
CSE
Contribution from Customer Success Engineers
Установим SSL сертификаты на почтовый сервер hMailServer. Используем порты для SSL/TLS:
- SMTP 587
- IMAP 993
- POP3 995
Сами сертификаты будем брать бесплатные — Let’s Encrypt.
Ссылки
IIS — SSL сертификат Let’s Encrypt
hMailServer — большой обзор
Получение сертификатов
web-сайт
Заводим на IIS сайт c адресом почтового сервера. Естественно, делаем всё это на сервере, где крутится hMailServer. Создаём там любую страничку index.html для проверки работы сайта.
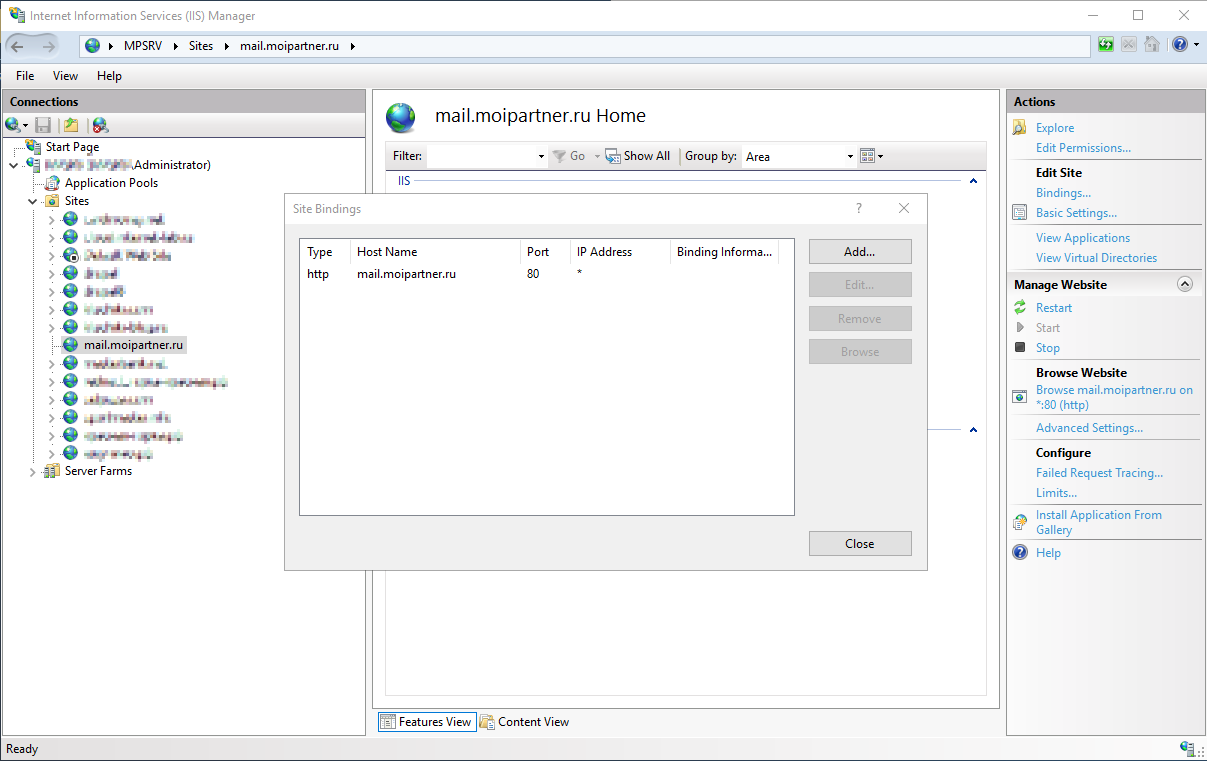
Проверяем, что сайт работает.
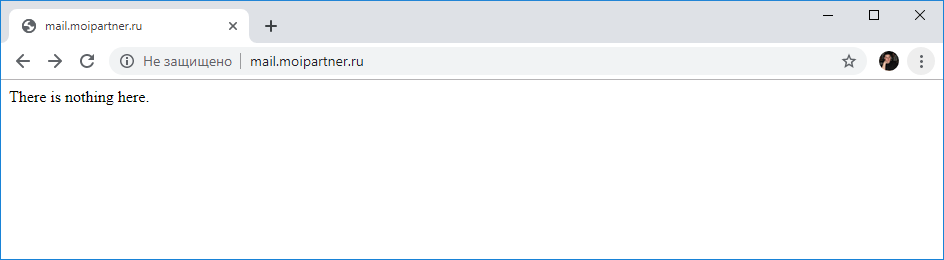
Сайт работает.
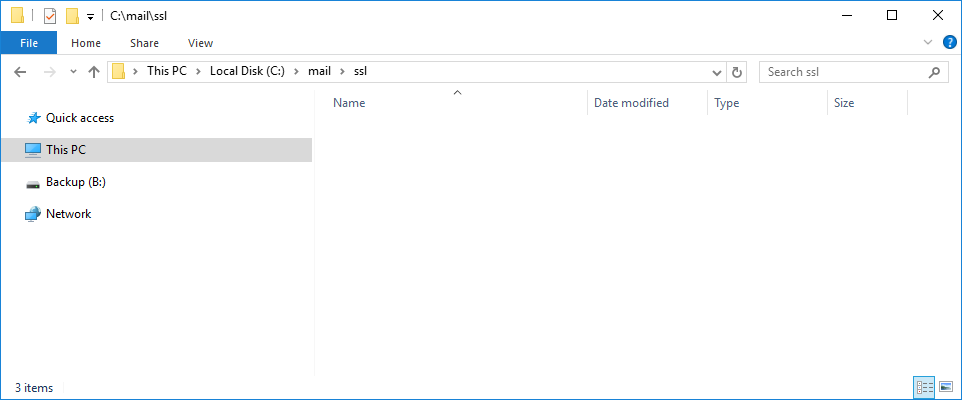
Папка
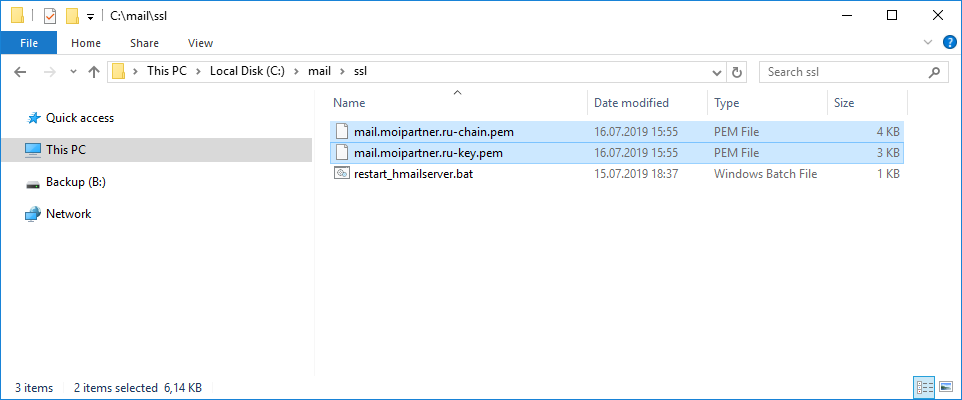
Создаём папку для хранения сертификатов. Я создаю C:mailssl.
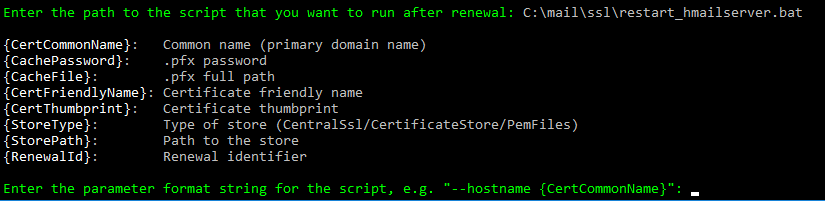
Скрипт для перезапуска hMailServer
Сертификат Let’s Encrypt действует 90 дней. В планировщике добавится ежедневное правило для обновления сертификатов. Когда сертификат для hMailServer обновится через 90 дней, то hMailServer нужно перезагрузить, напишем для этого простой скрипт. Создадим в папке C:mailssl файл restart_hmailserver.bat с содержимым.
@ECHO OFF
NET STOP hmailserver
NET START hmailserver
Выпуск сертификатов
Читаем статью IIS — SSL сертификат Let’s Encrypt и генерируем для нашего сайты SSL сертификаты Let’s Encrypt.
Запускаем wacs.exe под администратором.

Нам нужен пункт «Create new certificate» with advanced option». Пишем «m».
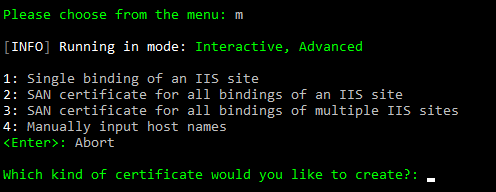
Выбираем «SAN certificate for all bindings of an IIS site». Пишем «2».
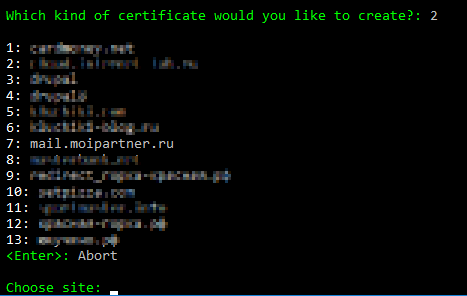
Находим в списке домен своего почтового сервера, пишем его номер, у меня «7».

Выбираем список доменных имён для исключения. Или ввод, если исключений нет. Я нажимаю Enter.

Я нажимаю Enter.
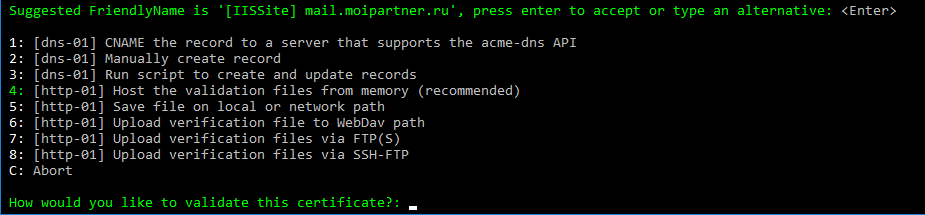
Выбираем способ подтверждения владения доменом. Для IIS это «4».
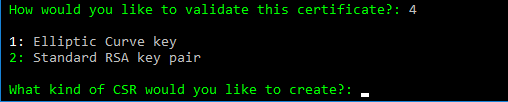
Тип CSR. Пишем «2».

Вот теперь важный пункт, где храним сертификаты. Выбираем «3», чтобы записать их в папку.
Нас спросят, в какую папку записывать сертификаты, указываем C:mailssl.
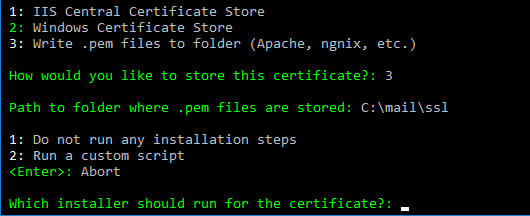
Теперь спрашивают, нужно ли выполнить скрипт после записи сертификатов. Пишем «2», конечно нужно перезапустить hMailServer!

Просят указать путь к скрипту. Пишем C:mailsslrestart_hmailserver.bat.
Enter.

Здесь у меня уже был ранее создана задача перевыпуска этого сертификата, пишу «y».
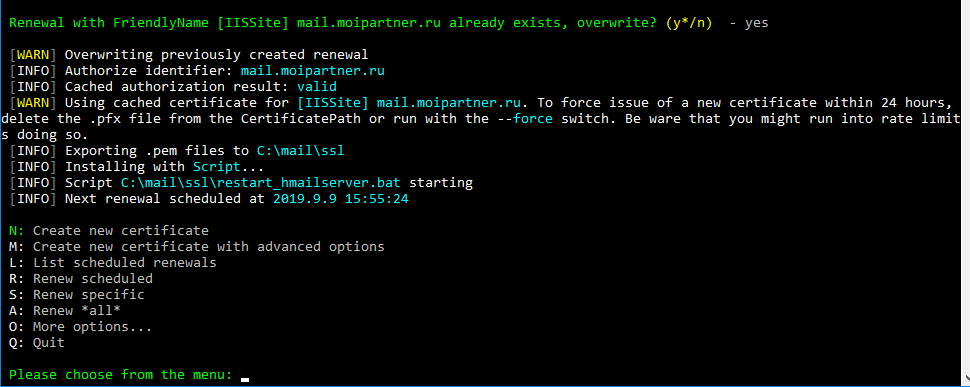
И так, создаётся задача на обновление сертификата.
Происходит процедура проверки владения доменом — успех.
Экспортируются файлы сертификата в C:mailssl.
Выполняется скрипт C:mailsslrestart_hmailserver.bat, это нам пока не нужно, понадобится при выпуске следующих сертификатов.
Проверяем, что файлы созданы:
Настройка SSL в hMailServer
В админке hMailServer в Settings > Advanced > SSL certificates добавляем сертификат.
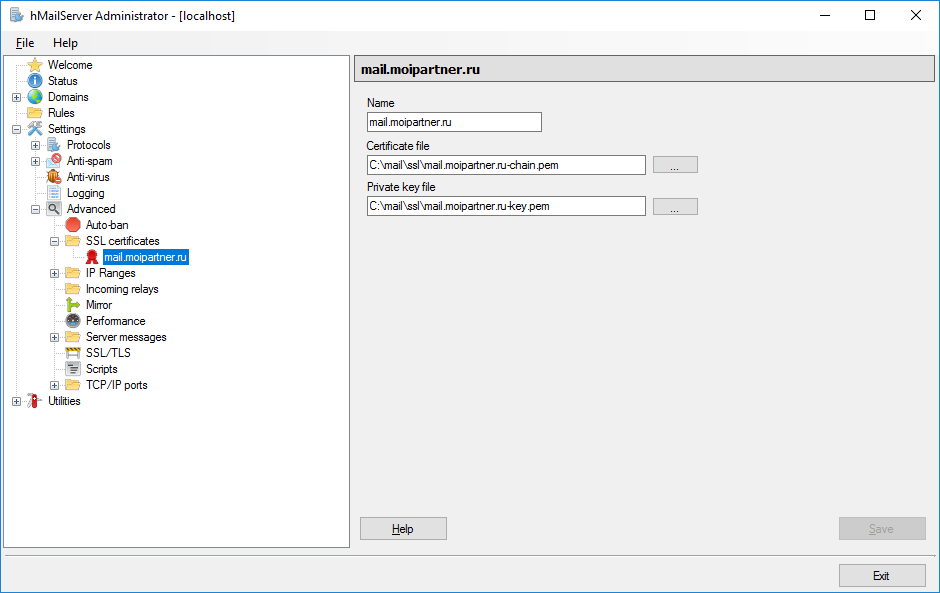
Certificate file — указываем путь к *-chain.PEM файлу.
Private key file — указываем путь к *.key.PEM файлу.
Сохраняем «Save».
В админке hMailServer в Settings > Advanced > TCP/IP ports добавляем 587 SMTP порт.
- Протокол: SMTP
- TCP/IP adress: 0.0.0.0
- TCP/IP port: 587
- Connection security: SSL/TLS
- SSL Certificate: из выпадающего списка выбираем добавленный ранее сертификат.

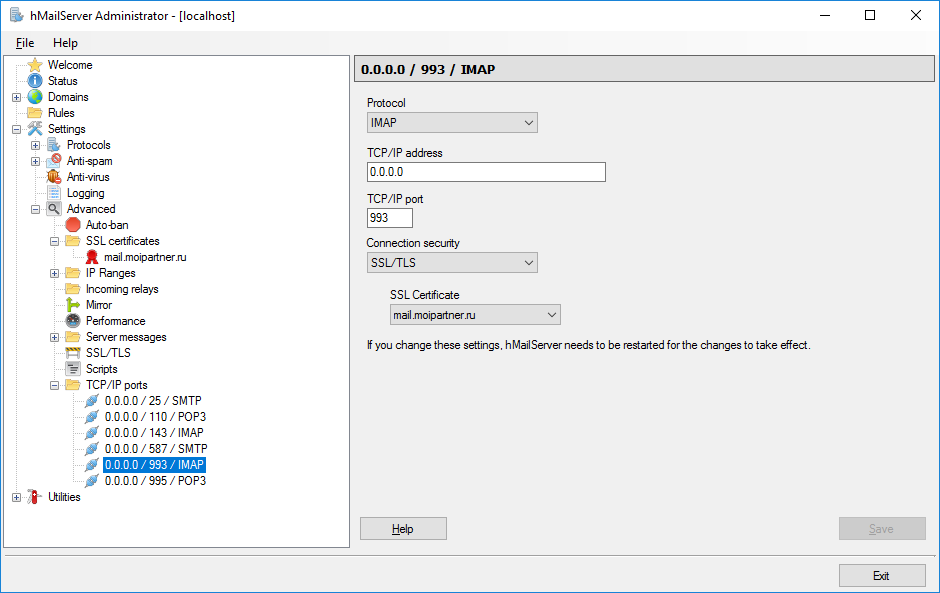
В админке hMailServer в Settings > Advanced > TCP/IP ports добавляем 993 IMAP порт.
- Протокол: IMAP
- TCP/IP adress: 0.0.0.0
- TCP/IP port: 993
- Connection security: SSL/TLS
- SSL Certificate: из выпадающего списка выбираем добавленный ранее сертификат.
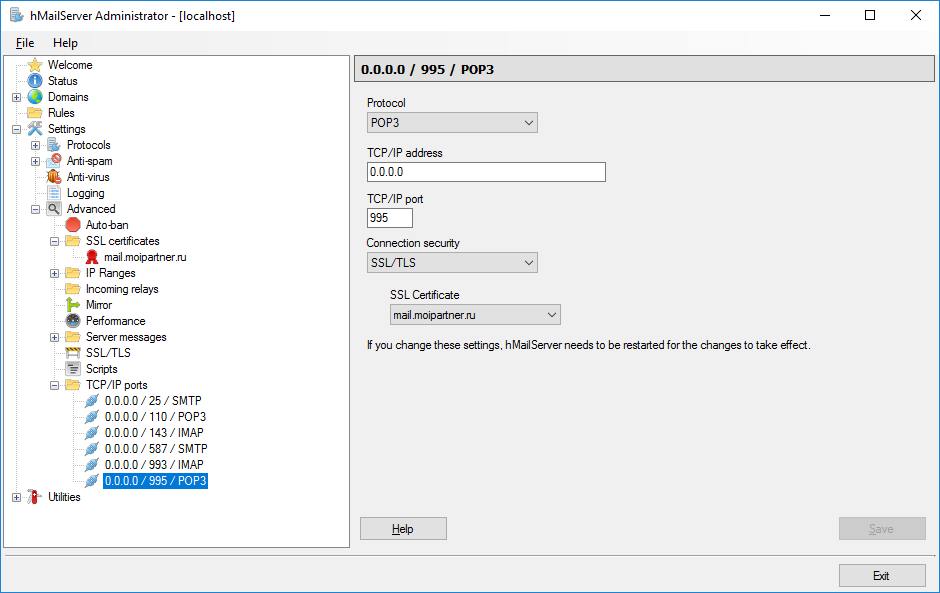
В админке hMailServer в Settings > Advanced > TCP/IP ports добавляем 995 POP3 порт.
- Протокол: POP3
- TCP/IP adress: 0.0.0.0
- TCP/IP port: 995
- Connection security: SSL/TLS
- SSL Certificate: из выпадающего списка выбираем добавленный ранее сертификат.
Перезапускаем hMailServer.
На этом настройка SSL для hMailServer завершена.
Проверка
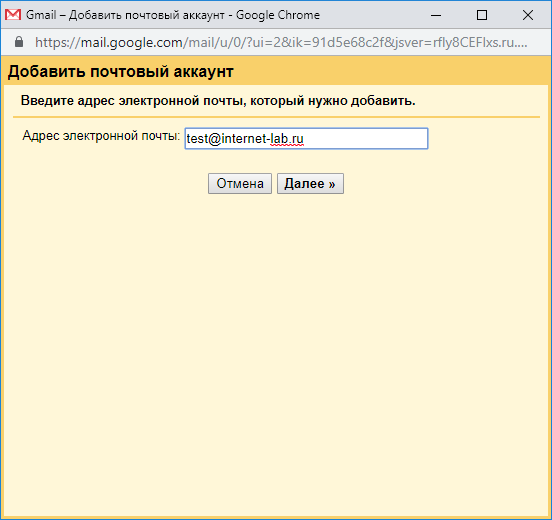
Создадим тестовый ящик. Я создаю test@internet-lab.ru с каким-нибудь паролем.
Проверяем на gmail
Проверяем на gmail как работает SSL на 995 порту POP3.
В настройках gmail в разделе «Аккакунты и импорт» можно закачивать письма из других ящиков. Добавляем почтовый аккаунт test@internet-lab.ru.
Далее.
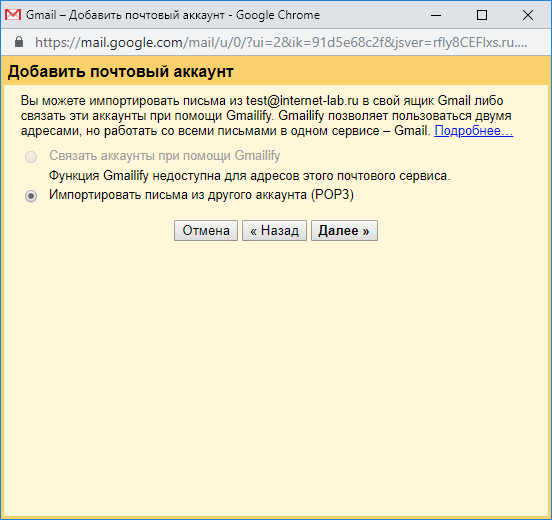
Импортировать письма из другого аккаунта (POP3). Далее.
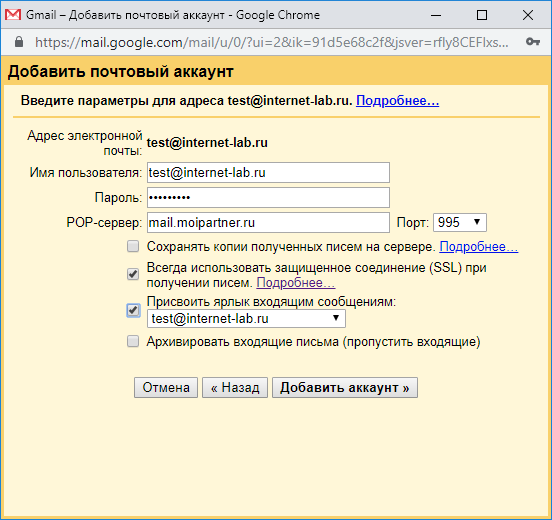
Указываем имя пользователя test@internet-lab.ru, пароль, адрес почтового сервера, порт 995, ставим галку SSL. Добавить аккаунт.
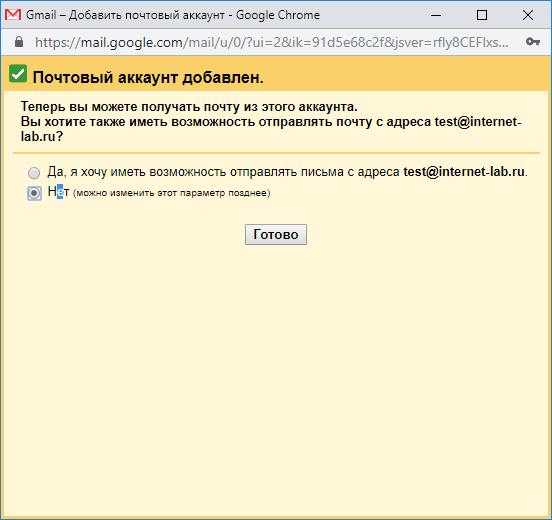
Почтовый аккаунт добавлен. Готово.
Напишем на тестовый ящик письмо и проверим почту.
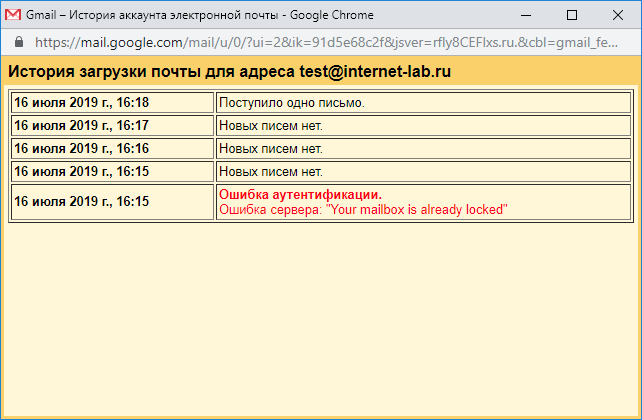
Поступило одно письмо. 995 POP3 через SSL работает.
Проверяем в Outlook
Проверяем в Outlook как работает SSL на 995 порту IMAP и на 578 порту SMTP. Создаём новую учётную запись в Outlook.
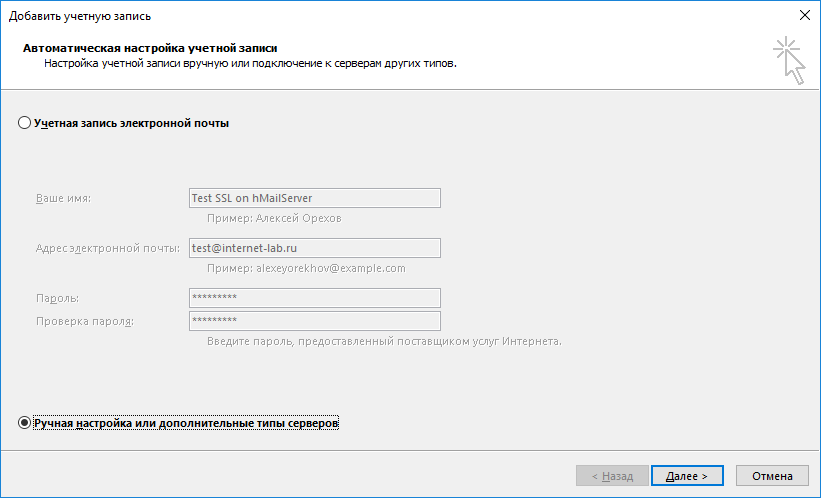
Выбираем «Ручная настройка или дополнительные типы серверов». Далее.
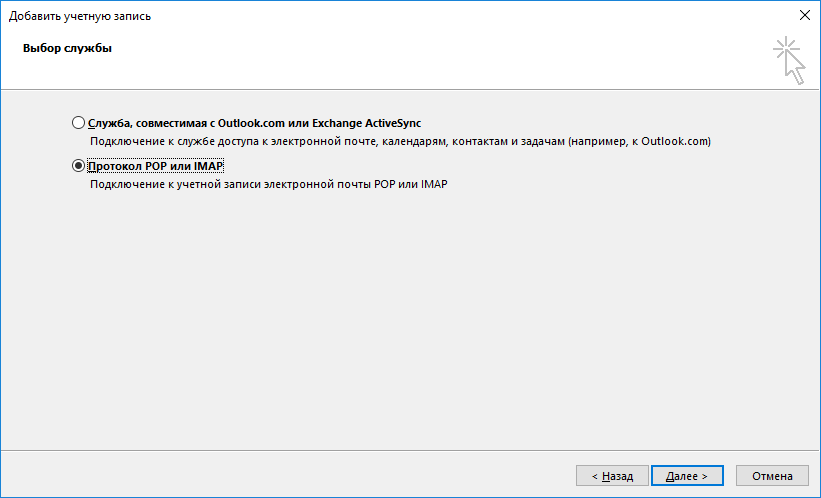
Выбираем «Протокол POP или IMAP». Далее.

Имя пользователя — любое, адрес электронной почты test@internet-lab.ru. Тип учётной записи IMAP.
Указываем сервер входящей и исходящей почты, для которого получали SSL сертификат. Указываем пользователя test@internet-lab.ru и пароль, галку «Запомнить пароль». Нажимаем «Другие настройки».
Вкладка «Сервер исходящей почты»:
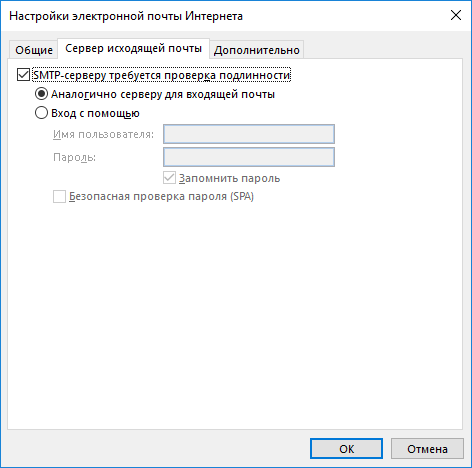
Указываем, что серверу исходящей почты тоже требуется авторизация.
Вкладка «Дополнительно»:
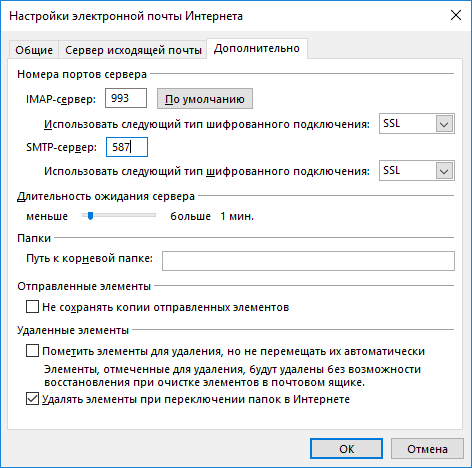
IMAP-сервер, пишем порт 993, тип шифрования SSL.
SMTP-сервер, пишем порт 587, тип шифрования SSL.
Ok. Далее.
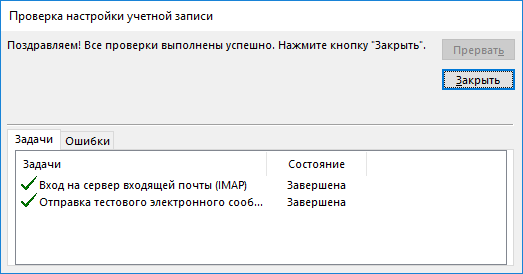
Проверки прошли успешно.
Заключение
Мы с вами успешно настроили и протестировали настройку SSL сертификатов от Let’s Encrypt для почтового сервера hMailServer с помощью IIS. Более того, сертификаты будут автоматически обновляться и перезапускать hMailServer после обновления.
Если вы используете платные SSL сертификаты, то настройка SSL происходит таким же образом, просто пропускаете все шаги для Let’s Encrypt, сохраняете свои сертификаты в любую папку у настраиваете их в админке hMailServer.