READING TIME: 6 MINUTES
In this guide, I’m going to show you how to add some of your internal-facing servers as sidebar items in Home Assistant. This will allow you to manage and use these websites the exact same way as if you were to go to the IP and port directly.
For example, you could add Sonarr, Radarr, Portainer, your Bookstack wiki and much more – all from a Home Assistant sidebar!
Note 1: Not all websites can be loaded into Home Assistant via iFrames.
Note 2: If the site/service has requires a username & password, then the page may fail to load or require you to sign in first.
Note 3: IFrames don’t load from the Home Assistant Companion App (at least for me). A signout/sign back in may be required, but I haven’t tested this yet. Workaround: Accessing Home Assistant via URL from mobile will load iframe panels successfully.
I’ve included a full list of self-hosted applications that either work/don’t work at the end of this article.
Obviously your homelab setup is going to have a lot of different sites and services than what I have, so a lot of this is going to be trial and error for you. I’m making this post just to show you all the ones I have confirmed as working or not working to save you a little bit of time.
Let’s get started!
Add IFrame Panel to Home Assistant
To add your first IFrame, simply copy and paste this code into your configuration.yaml. Give each service a unique panel name, change out the IP and port, choose an icon from https://mdi.bessarabov.com/, and then save and restart Home Assistant.
If adding multiple sites as iframes: Add them into the same panel_iframe block of code (see example code block below. Here is the Home Assistant docs regarding iFrames.
Do not use ‘lovelace’ as a panel or it will overwrite Lovelace causing it to never load.
File Editor > Configuration.yaml.
panel_iframe:
  panel_name_1:
    title: Service 1
    icon: mdi:docker
    url: http://192.168.68.141:9000/
  panel_name_2:
    title: Service 2
    icon: mdi:server
    url: http://192.168.68.137:8989/
Add Sonarr as iFrame to Home Assistant
If Sonarr doesn’t have a username and password setup, the site loads instantly from within the panel. You can disable authentication within Sonarr from Settings > General. If Sonarr is only accessible from within your internal network, then it’s probably fine to change Sonarr authentication to None.

panel_iframe:
  sonarr:
    title: Sonarr
    icon: mdi:plex
    url: http://192.168.68.137:8989/
Add Radarr as iFrame to Home Assistant
Same as Sonarr – authentication is optional and can be disabled from the Radarr settings > General tab.

panel_iframe:
radarr:
title: Radarr
icon: mdi:plex
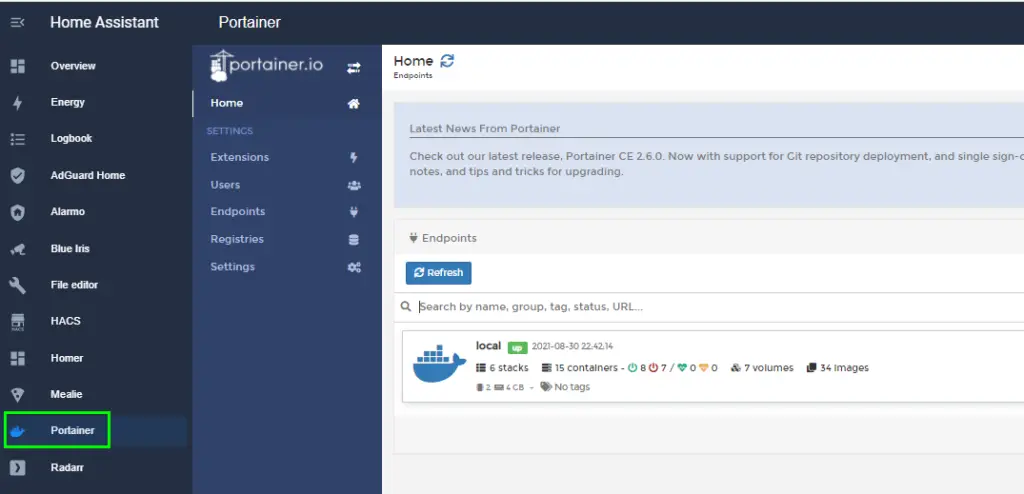
url: http://192.168.68.137:7878/Add Portainer as iFrame to Home Assistant
Portainer requires a username and password, so plan on entering that in before being able to manage your Docker containers. But once you do, it’ll load the standard Portainer web interface.
Note: This is completely different than the Portainer addon for Home Assistant (which allows you manage all of your Home Assistant addons(which ARE docker containers). This is for managing all of your other Docker containers.
panel_iframe:
portainer:
title: Portainer
icon: mdi:docker
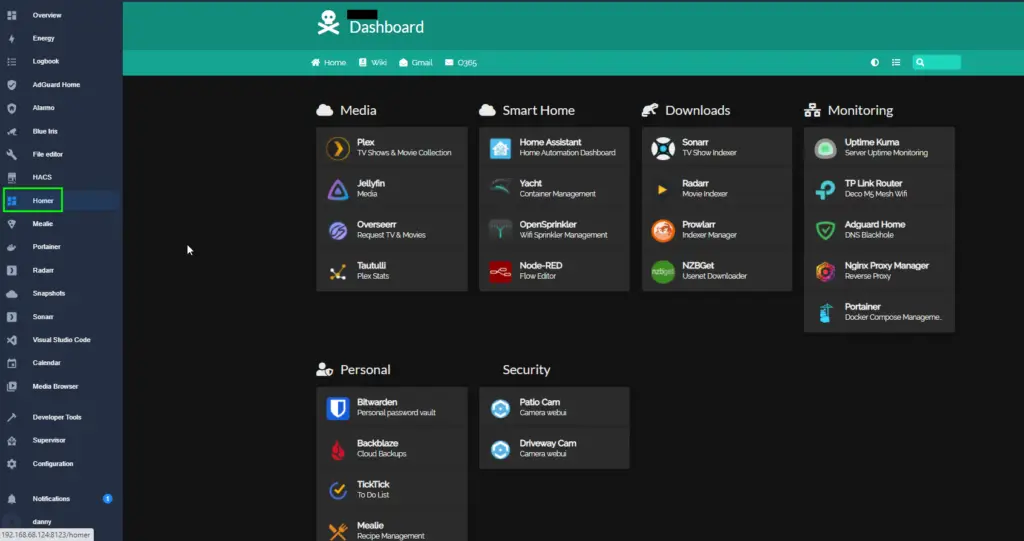
url: http://192.168.68.141:9000/Add Homer Dashboard as iFrame to Home Assistant
I honestly prefer accessing all of my sites and services from a Homer Dashboard (installed via Docker) instead of adding everything to a Home Assistant sidebar, but you can definitely still add it if you’d like. Homer also doesn’t require any authentication.
panel_iframe:
homer:
title: Homer
icon: mdi:view-dashboard
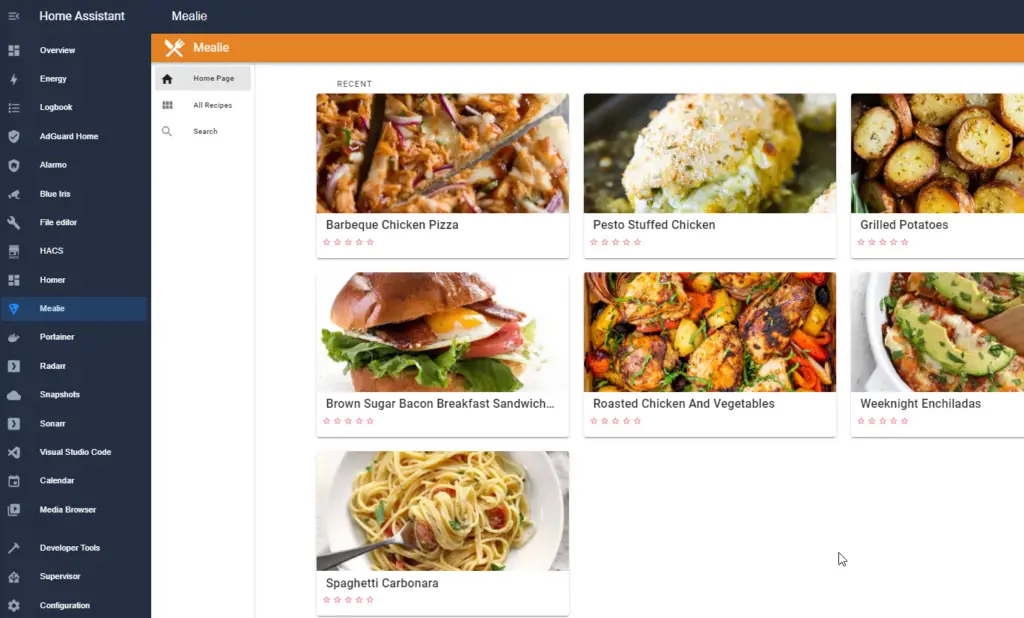
url: http://192.168.68.141:8092/Add Mealie as iFrame to Home Assistant
Mealie also requires a username and password, although you can still seach for your recipes without logging in.
panel_iframe:
  portainer:
    title: Portainer
    icon: mdi:docker
    url: http://192.168.68.141:9925/
Other Sites that load as iFrame Panels
I think you get the point. It’s pretty easy to add as many or as few iframe panels as you’d like. Since the config is basically the same for everything else, here’s some other things I’ve tested and confirmed that they do or don’t load.
I have how to setup and use docs for a lot of these, so I’ll hyperlink them below if you’d like to set them up yourself.
Loads Successfully
- NZBGet (Usenet downloader for Sonarr/Radarr) – Prompts for username and password (if set), but loads after entering.
- OpenSprinkler (wifi sprinkler system)
- Prowlarr (indexer manager) – Prompts for username and password if set, but loads successfully.
- Uptime Kuma (server monitoring)
Doesn’t Load
- Blue Iris webui
- NodeRed (Docker container, not the addon)
- Tautulli web interface – Brings up the login box, but never logs in. (Alternatively, you can follow my add Tautulli sensors to Home Assistant guide instead)
- Yacht (a Portainer alternative) – brings up login box, but when entering in credentials it says “unauthorized”.
- Bookstack (self-hosted wiki)
Final Thoughts
All in all, it’s pretty cool that you can add just about anything as iframe panels to HA. You can almost use it as a dashboard replacement.
Although I’ve tested all of my self-hosted applications, I don’t keep most of them accessible from Home Assistant. I prefer using my Homer Dashboard to access everything from one place.
For remote access, I have the Wireguard VPN addon installed in Home Assistant, and have an Android shortcut on phone that opens the Homer gui. Nothing loads in an iFrame in Homer, so everything loads remotely exactly as if I’m sitting in front of my computer. It’s pretty awesome.
I have a raspberry pi3 with ubuntu and docker running the following containers
- home-assistant
- mosquitto
- zigbee2mqtt
- nodered
this is configured with the following docker-compose yaml:
version: '3.8'

services:
  homeassistant:
    container_name: hass
    image: homeassistant/home-assistant
    volumes:
      - ./hass/configuration.yaml:/config/configuration.yaml
    restart: unless-stopped
    depends_on:
      - mosquitto
    ports:
      - "8123:8123"

  nodered:
    container_name: nodered
    image: nodered/node-red
    ports:
      - "1880:1880"
    volumes:
      - nodered_data:/data
    depends_on:
      - homeassistant
      - mosquitto
    environment:
      TZ: "Europe/Amsterdam"
    restart: unless-stopped

  mosquitto:
    image: eclipse-mosquitto
    container_name: mosquitto
    restart: unless-stopped
    ports:
      - "1883:1883"
    volumes:
      - "./mosquitto/config:/mosquitto/config"
      - "mqtt_data:/mosquitto/data"
      - "./mosquitto/log:/mosquitto/log"
    environment:
      - TZ=Europe/Amsterdam

  zigbee2mqtt:
      container_name: zigbee2mqtt
      image: koenkk/zigbee2mqtt
      restart: unless-stopped
      volumes:
        - "./z2mqtt/data/configuration.yaml:/app/data/configuration.yaml"
        - "z2mqtt:/app/data"
      ports:
        # Frontend port
        - 8080:8080
      environment:
        - TZ=Europe/Amsterdam
      devices:
      #  # Make sure this matched your adapter location
        - "/dev/ttyUSB0:/dev/ttyACM0"
      depends_on:
        - mosquitto

volumes:
  nodered_data:
  mqtt_data:
  z2mqtt:
I have a configuration.yaml for home-assistant with the following content
default_config:

panel_iframe:
  nodered:
    title: Node-Red
    icon: mdi:shuffle-variant
    url: "http://nodered:1880"
    require_admin: true
I can’t get the iframe to connect with nodered for some reason.
I have tried connecting to the nodered container from an external system using the docker host ip and port 1880, and that works properly.
I also tried pinging the ‘nodered’ container from within the ‘hass’ container and that works also.
if I replace the iframe url with the docker host ip and port 1880 the iframe does work, however I would rather like to keep the connection within the internal docker network.
Does anyone know how to fix this?
On the left side of Home Assistant are a number of different panels. Most users are familiar with the default panels, like “Overview,” a.k.a. the Lovelace dashboard — but it’s possible to do a lot more with home assistant custom panels.
For a breakdown of each panel in the screenshot above, see the log cabin -> smart home retrofit.
Multiple Lovelace Dashboards
As of version 1.0.7, Home Assistant supports creating more than one Lovelace dashboard, configurable at /config/lovelace/dashboards. Each panel is essentially an entirely new, stand-alone dashboard.
I like using panels more than tabs because I find it significantly easier to navigate. In the image above, you can see how Security, Temperature, etc. are broken out into separate panels. Hopefully, we’ll soon be able to re-order the panels as well.
Taking it a step further, it’s possible to add iframes as panels. This is useful for embedding other services on the network, like the Iris/Mopidy music player seen in the screenshot above.
[Example] Simple IFrame
The simplest possible example of a custom panel is a single file residing at panels/custom-iframe.html. This custom iframe panel does not render a top bar, and ensures that the iframe fills the entire viewport without overflowing. In short, it makes the embedded webpage take up the entire right half of the screen.
<dom-module id='custom-iframe'>
  <template>
    <style include="ha-style">
        iframe {
          overflow: hidden;
          position: absolute;
          left: 0;
          right: 0;
          top: 0;
          bottom: 0;
          border: 0;
          width: 100%;
          height: calc(100%);
          background-color: var(--primary-background-color);
        }
      </style>
      <iframe
        src="[[panel.config.url]]"
        sandbox="allow-forms allow-popups allow-pointer-lock allow-same-origin allow-scripts"
        allowfullscreen="true"
        webkitallowfullscreen="true"
        mozallowfullscreen="true"
      ></iframe>
  </template>
</dom-module>

<script>
Polymer({
  is: 'custom-iframe',
  properties: {
    hass: {
      type: Object,
    },
    panel: {
      type: Object,
    }
  },
});
</script>
How it Works
To use the above custom IFrame panel, add the following to configuration.yaml:
panel_custom:
  - name: custom-iframe
    sidebar_title: "Custom Iframe"
    url_path: my-custom-iframe
    config:
      url: "http://my-test-site.com"
Replace the URL with the site you wish to view. By default, Home Assistant will infer from the name to load panels/custom-iframe.html (from the last section). If you wish to reuse the panel code, you can explicitly declare the location of the html file with webcomponent_path: "panels/iris.html".
However, the preferred way to build modern custom panels is to use a module.
[Example] Using a Module
Instead of the webcomponent_path (or no path at all), the preferred way to create a custom panel is to use a module. Here is a boilerplate HTMLElement (which could reside at www/custom-panel-example.js):
class CustomPanelExample extends HTMLElement {
  constructor () {
    super()
    this._shadow = this.attachShadow( { mode: 'open' } )
  }

  render() {
    // Sample of changing the HTML contents of the panel.
    this._shadow.innerHTML = '<div>' + JSON.stringify(this._config) + '</div>';
  }

  set panel(panel) {
    // Called once with the exact contents from the YAML definition
    console.log('custom panel config', panel.config);
    this._config = panel.config;
    this.render();
  }

  set hass(hass) {
    // This function is called frequently, containing the HA state.
    console.log('entity states', hass.states);
  }
}

customElements.define('custom-panel-example', CustomPanelExample);
Which could then be used with the following configuration:
panel_custom:
  - name: custom-panel-example.js
    module_url: "/local/custom-panel-example.js"
    sidebar_title: 'Example'
    url_path: example
    config:
      hello: 'world!'
If all goes well, the panel should show {"hello": "world!"}.
[Example] Reusable Full-Screen iFrame Module
This example shows how to create a single module that may be used multiple times. This allows you have just one module file, but create as many custom panels as you need. Each panel will be a full-screen iframe. First, create www/iframe-fullscreen.js:
class IframeFullscreen extends HTMLElement {
  constructor () {
    super()
    this._shadow = this.attachShadow( { mode: 'open' } )
  }
  render() {
    this._shadow.innerHTML = `<style include="ha-style">
        iframe {
          border: 0;
          width: 100%;
          height: calc(100%);
          background-color: var(--primary-background-color);
        }
      </style>
      <iframe
        src="`+this._config.url+`"
        sandbox="allow-forms allow-popups allow-pointer-lock allow-same-origin allow-scripts"
        allowfullscreen="true"
        webkitallowfullscreen="true"
        mozallowfullscreen="true"
      ></iframe>`;
  }
  set panel(panel) {
    this._config = panel.config;
    this.render();
  }

}
customElements.define('iframe-fullscreen', IframeFullscreen);
Then add the configuration:
panel_custom:
  - name: iframe-fullscreen
    module_url: "/local/iframe-fullscreen.js"
    sidebar_title: 'iframe1'
    url_path: iframe1
    config:
      url: "https://node-workshop.snowy-cabin.com/"

  - name: iframe-fullscreen
    module_url: "/local/iframe-fullscreen.js"
    sidebar_title: 'iframe2'
    url_path: iframe2
    config:
      url: "https://node-doorbell.snowy-cabin.com/"
Notice how each of the panels have the same name, which matches the custom element definition in the module. In other words, the name field is used for the name of the component to load (and does not need to be unique). In this screenshot, you can see how this lets me load a tab for two different Node-RED instances:

[Example] Replacing History with Grafana
I like using Grafana much more than the built-in History features because I pipe all of my various metrics through Prometheus. It’s a much more feature-rich graphing application than the built-in History. One simple example: it’s easy to change the time range with Grafana.
It also means I can use a single visualization tool to graph much more than just Home Assistant data. Home Assistant’s Prometheus integration is not spectacular, but it is enough to get the data into Grafana and shut off the default “History” feature.
Looking for help bulidng Grafana charts for Home Assistant to fully replace the History card?
One way to achieve this is to click on any panel in Grafana and choose “share,” and then use that URL in a lovelace iframe card:

However, this is very inflexible. Multiple iframes must be loaded (one for each panel). The panels need to be manually configured, one by one, in lovelace. Instead, it can be convenient to have access to an entire Grafana dashboard.
With the custom iframe panel from the last section created, a custom panel can be added to configuration.yaml:
panel_custom:
  - name: custom-iframe
    sidebar_title: Grafana
    sidebar_icon: mdi:home-analytics
    url_path: grafana
    require_admin: true
    config:
      url: !secret grafana_dashboard
The grafana_dashboard URL can simply be a URL to any dashboard. You can also set the query parameter &kiosk to remove the chrome from Grafana. More tips on running Grafana in Docker/Kubernetes are available if you get stuck.

To remove the default panels (Map, Logbook, and History) from Home Assisstant, first remove the default_config entry from configuration.yaml and then re-add each of the components which it loads (except for those you wish to exclude, of course).