Contents
- Why Does it Say VAC Was Unable to Verify Your Game Session?
- How to Fix VAC Authentication Error in Windows 10
- Fix 1: Reboot Your Computer
- Fix 2: Restart the Steam Client
- Fix 3: Log Out of Steam and Log in Again
- Fix 4: Run Steam as an Administrator
- Fix 5: Repair the Steam Client
- Fix 6: Repair Steam Files
- Fix 7: Verify the Integrity of Your Game Files and Repair the Game Library
- Fix 8: Exclude the Game Directory from Antivirus Scans
- Fix 9: Stop Conflicting Background Tasks/Services
- Fix 10: End Steam’s Service in Task Manager
- Fix 11: Verify DLL File
- Fix 12: Delete Temporary Files
- Fix 13: Update Your Drivers
- Fix 14: Update Windows
- Fix 15: Turn Off Steam Beta
![VAC was unable to verify your game session in CS:GO [Resolved]](https://www.auslogics.com/en/articles/wp-content/uploads/2020/07/fix-vac-was-unable-to-verify-the-game-session.jpg)
Counter-Strike: Global Offensive (CS: GO) is a game enjoyed by many players around the world. But when you try to queue for matchmaking, you might encounter an error message that says, “VAC was unable to verify your game session.” Many online gamers have reported coming across this error when they try to join the Steam community or play a game.
If you are seeking solutions to this problem, you have come to the right place. We will present a handful of fixes that you can try to get rid of the “VAC was unable to verify your game session” error notification on CS: GO.
Why Does it Say VAC Was Unable to Verify Your Game Session?
VAC (Valve Anti-Cheat System) detects anomalies in installation files. It is meant to prevent gamers from making changes to game files in order to gain an unfair advantage over other players.
When VAC fails to verify your gaming session but you have not in any way tampered with your game files, it means that there is something wrong with the configuration of the files. Sometimes also, VAC could generate a false positive error and turn up the “Unable to verify the game session” message.
How to Fix VAC Authentication Error in Windows 10
Perhaps you have tried reinstalling your game but the issue still won’t go away. It is important to note that reinstallation will load the same game files again and, therefore, won’t be of any help. But rest easy: The solutions we now present to you have been found effective and will help you resolve the “VAC was unable to verify your game session” error once and for all.
How to fix VAC unable to verify my game:
- Reboot your computer
- Restart the Steam Client
- Log out of Steam and log in again
- Run Steam as an administrator
- Repair the Steam client
- Repair Steam files
- Verify the integrity of your game files and repair the game library
- Exclude the game directory from antivirus scans
- Stop conflicting background tasks/services
- End the Steam service in Task Manager
- Verify DLL file
- Delete temporary files
- Update your drivers
- Update Windows
- Turn off Steam Beta
Let’s now take the solutions one at a time.
Fix 1: Reboot Your Computer
Some apps and processes (such as disk indexing) that are running on your computer might be accessing your game files, and thus causing VAC to fail in verifying the files. Rebooting your computer can help resolve this. Follow the steps below:
- Close all apps and windows.
- Press the Windows button on your keyboard or click on the icon on the bottom-left corner of your screen.
- Click the Power icon when the Start menu appears. Then click Restart.
- After the restart, try running your game again and see if the error has been resolved.
If restarting doesn’t work, you can power cycle your PC. Power cycling means turning the PC off completely and then turning it on again. This will help the device recover from an unresponsive module and reinitialize its configuration parameters. Power cycling also resets your network configurations.
Follow these steps to get it done:
- Close all open applications and windows.
- Unplug the computer from its power source (laptops).
- Go to the Start menu (press the Windows key on your keyboard) and click on the Power icon. Then click on Shut down.
- Wait for the PC to power off.
- Remove the battery from the device (laptops), and then press and hold the Power button for up to 1 minute.
Note: The reason for removing the battery from the laptop is to properly discharge all the capacitors and ensure that the data stored in the RAM is cleared.
If you use a desktop, unplug it from the power source.
- Wait for a minute or two before putting the battery back into the laptop (you can plug the charger back in if you want) or before plugging your desktop to the power source.
- Power on the PC again and see if the VAC error will still occur in your game.
Fix 2: Restart the Steam Client
Restarting the Steam client can help resolve any corruption that’s causing the ‘VAC was unable to verify the game session’ error. Here’s what you have to do:
- Click on the Steam tab in the top-left corner of the screen and click on Exit from the context menu.
- Open your Steam client again.
- Click on the Steam tab in the top-left corner and click on the ‘Go offline…’ option in the context menu.
- Click the ‘Restart in offline mode’ button.
- Now, click the Steam tab again and click on the ‘Go online…’ option from the context menu.
- Click the ‘Restart and go online’ button.
After you’ve followed the above steps, try queuing for a match again and see if the VAC error message will still appear.
Fix 3: Log Out of Steam and Log in Again
If the fixes above didn’t help, then try logging out of your Steam account and logging in again. Your operating system or file management system might have been responsible for modifying your configuration files, causing the VAC error to appear. Logging out of your Steam account will remove the altered configuration files. The original files will then be recreated when you log in again.
Logging into your Steam account again will give the same (or even better) results as reinstalling your Steam app. Follow the procedure below:
- Open your Steam app.
- Click on your Profile name shown at the top of the window.
- Click on ‘Log out my account’ from the context menu that opens.
- After the log out is successful, enter your credentials and log in again. If you don’t remember your password, click on the “Reset password” option.
Now try your game again. The VAC error will have been resolved. If not, move on to the next fix.
Fix 4: Run Steam as an Administrator
If Steam does not have admin privileges on your computer, that could be the cause of the trouble you’re facing. The client needs full access to function effectively. Giving it admin access means it can change the system configuration files and gain the resources and memory it requires. Follow the steps below:
- Go to the directory where Steam is installed on your computer. This is usually C:Program Files (x86)Steam.
- Now, open the Steam folder and locate the ‘Steam.exe’ file, right-click on it, and then click on Properties from the context menu.
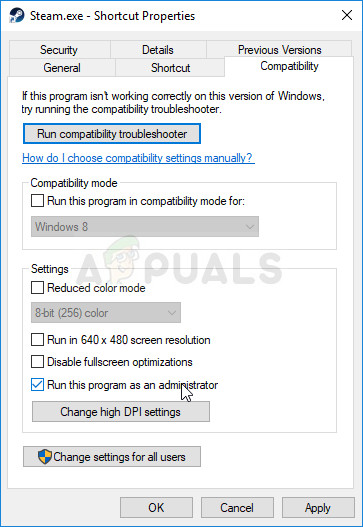
- Switch to the Compatibility tab and mark the ‘Run this program as an administrator’ checkbox.
- Click Apply to effect the change, and then click the OK button.
- Next, locate the ‘GameOverlayUI.exe’ and right-click on it. Select Properties from the context menu.
- Switch to the Compatibility tab and mark the ‘Run this program as an administrator’ checkbox.
- Click the Apply and Ok buttons.
Afterward, we now have to grant admin access to all the Steam folders, not just the two .exe files shown above:
- Go back to the main Steam folder (That is C:Program FilesSteam). Right-click on it and click Properties from the context menu.
- Switch to the Security tab and click the ‘Advanced’ button.
- On the page that opens, the first four rows in the ‘Permission entries’ list are editable, while the last two rows are not.
- Select the first editable row and click the Edit button. On the page that opens, mark the checkbox for the options under ‘Basic permissions,’ including ‘Full Control.’
- Click the Apply button and click Ok to exit.
- Repeat Steps 4 and 5 for the remaining three editable rows.
- Re-launch Steam. It will now run with admin privileges. The VAC error should be resolved. Otherwise, move on to the next fix.
Fix 5: Repair the Steam Client
Your Steam client could be corrupt or contain bad files. Here’s what you have to do:
- Right-click on the Start icon in the lower-left corner of your screen.
- In the Power User menu that opens, click on Command Prompt (Admin).
- Click the ‘Yes’ button when presented with the UAC prompt.
- Copy and paste the line below and hit Enter:
“C:Program Files (x86)SteambinSteamService.exe” /repair
- Wait for the process to complete. It will take a little time.
- Close the Command Prompt window and restart your computer. Now, check if the ‘VAC was unable to verify the game session’ error has been resolved.
Fix 6: Repair Steam Files
Performing a file repair will help fix important Steam library files that are corrupt. These may be causing CS: Go to bring up the VAC error. Follow the steps below:
- Go to the location: “C:Program Files (x86)SteamSteamAppscommonCounter-Strike Global Offensivecsgomapsworkshop” and delete every item inside the folder. To do this, simply press Ctrl + A,and then press Shift + Delete.
- Next, go to “C:Program Files (x86)SteamSteamAppscommonCounter-Strike Global Offensivecsgomapsgraphsworkshop” and, again, delete everything in the folder by pressing Ctrl + A to select the items and Shift + Delete to delete them.
- Launch Steam. It will download fresh copies of the files you deleted.
- Check if the VAC error has been resolved.
If the problem persists, then:
- Press the Win key + X to open the Power User menu.
- Click on Command Prompt (Admin) from the list.
- Click the ‘Yes’ button to continue.
- In the Command Prompt (admin) window that opens, enter the following commands (don’t include the bullets) and press Enter after typing each to execute them:
- start steam://flushconfig
- ipconfig /release
- ipconfig /renew
- If, however, the issue remains, you may want to consider disabling some security features that allow VAC to function. Enter the following line into the Command Prompt (admin) window and hit Enter:
bcdedit.exe /set {current} nx OptIn
Fix 7: Verify the Integrity of Your Game Files and Repair the Game Library
The error can appear on CS: Go due to integrity issues with your game files. There is a feature in your Steam client that can help resolve this:
- Open your Steam client and click on the Library tab.
- Right-click on Counter-Strike: Global Offensive and select Properties.
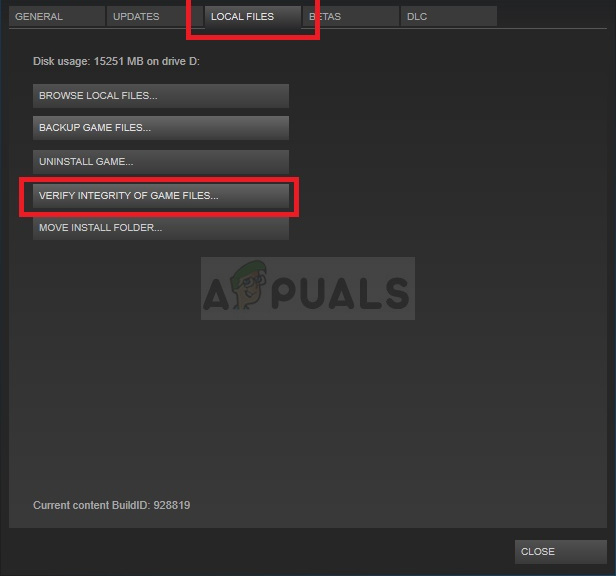
- Switch to the Local Files tab and click on ‘Verify integrity of game files.’
- Wait for the process to complete, and then click the Close button.
- Launch CS: GO and see if the error has been resolved.
Next, you will have to repair the Library folders. It contains the games you installed. Here’s what you have to do:
- Open your Steam client and click on the Steam tab.
- Click on Settings from the context menu that opens.
- Now, click on Downloads from the left pane.
- Click the ‘Steam Library Folders’ button in the right pane.
- In the new window that opens, right-click on the install location that contains your Steam content. A drop-down menu will appear. Click on ‘Repair Library Folder.’
- Confirm the action and click ‘Yes’ when UAC prompts to allow access to Command Prompt. The repair process will commence. Wait for it to complete.
- Afterward, restart the Steam client and try running your game again. See if the problem has been resolved.
Fix 8: Exclude the Game Directory from Antivirus Scans
If the antivirus program on your computer is automatically scanning your game files in the background, it prevents VAC from verifying the files, thereby causing the error you are dealing with to show up. You can stop this from happening by whitelisting the Steam directory and the particular game you are having issues with so that they won’t be automatically scanned. The method for doing this depends on the antivirus program you are using.
Fix 9: Stop Conflicting Background Tasks/Services
If you are running virtualization software and VPN/Proxy, they could be the cause of the ‘Unable to verify the game session’ error you are facing. They could be making VAC to flag you. Here’s how to stop them from running in the background:
- Open the Run accessory (press the Win key + R).
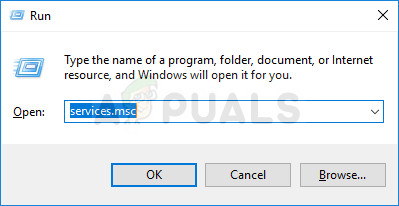
- Type ‘Services.msc’ in the box and hit Enter or press the Ok button to open the Service Management window.
- Locate any of the following services:
- VMnetDHCP
- VMUSBArbService
- VMware NAT Service
- VMwareHostd
- VMAuthdService
- hshld
Right-click on them and click Disable from the context menu.
- Afterward, close the Service Management window, right-click on the Start button in the bottom-left corner of your screen, and then click on Task Manager from the list.
- Go to the Processes tab and locate the following processes:
- hydra.exe
- hsswd.exe
- hsscp.exe
- vmware.exe
Click on each of them and click the End Task button.
You can now check to see if the issue has been resolved. If it remains, don’t worry. Move on to the next solution below.
Fix 10: End Steam’s Service in Task Manager
It could be that there’s a problem with the Steam service running in the background. Ending it can help fix the issue. Follow these steps:
- Press the Windows key + X to open the Power User menu.
- Click on Task Manager from the list.
- Go to the Processes tab and click the Steam service to select it. Then click the End Task button.
- See if the issue has been resolved.
Fix 11: Verify DLL File
You will find a Steam service DLL file in the Program Files folder located in Local Disk C on your computer. The second DLL file is located in the Steam installation directory. If these two files differ, then VAC will not be able to verify your game session. What you have to do to fix the issue is to copy one of the DLL files and use it to replace the second one:
- Go to the Steam installation directory. It is usually in the path: C>Program Files (x86)> Steam > Bin.
- Right-click on the “Steamservice.dll” file and copy it.
- Go to “C>Program Files (x86)>Common Files> Steam” and paste the .dll file you copied. If prompted that the file already exists, opt to replace it by clicking the ‘Replace’ option.
- You can now launch your game and see if the error will still happen.
Fix 12: Delete Temporary Files
Deleting the temporary files that have been stored by your computer over time can help resolve the ‘VAC unable to verify game session’ error. The files might be corrupt. Follow these easy steps:
- Open the Run command by holding the Win key and pressing R.
- Type ‘%temp%’ in the text box and hit Enter or click the Ok button.
- Select all the items in the list by pressing Ctrl + A. Then press Shift + Delete to clear them.
- Click the Yes button to confirm the action if prompted.
- Launch Steam and see if the problem has been resolved.
Fix 13: Update Your Drivers
It could be that you don’t have the correct device drivers installed on your computer. Running an update can help resolve driver issues that could be preventing your game from operating properly. We suggest using Auslogics Driver Updater to perform this task easily. The tool will automatically detect problematic drivers and install the correct versions provided by your device manufacturer. You won’t have to trouble yourself with finding out the specifications of your computer and sourcing the drivers yourself. Driver Updater will handle everything for you. Here’s what you have to do:
- Download and install Auslogics Driver Updater.
- Once the program has been installed, it will open automatically and detect the specifications of your computer, making sure to get the correct drivers.
- Click the ‘Scan Now’ button to begin locating faulty and outdated drivers.
- You can click the Update button beside the problematic drivers you want to update. Or you can click ‘Update All’ to fix all the detected drivers.
- Restart your computer after the update.
Note: You need the Pro version of Auslogics Driver Updater before you can download and install the updated version of your drivers.
Fix 14: Update Windows
Installing Windows updates removes vulnerabilities, updates your drivers, and fixes other issues that could be preventing your system and apps from functioning properly. It may be able to resolve the ‘VAC was unable to verify the game session’ error.
- Open the Settings app. To do this, hold the Windows key and press I.
- Click on Update & Security on the main page of the Settings app.
- Click on Windows Update displayed in the left pane of the new page that opens.
- Click on ‘Check for updates’ in the right pane. Wait for Windows to download and install the new updates, then restart your computer.
Fix 15: Turn Off Steam Beta
Some users reported fixing the issue by opting out of Steam’s Beta mode. Here’s how:
- Open Steam and sign in to your account.
- Click on the Steam tab and click on Settings from the menu that appears.
- Click on Account in the left pane.
- Click the ‘Change’ button under the ‘Beta participation’ section in the right pane.
- Select “NONE – Opt out of all Beta programs.”
- Click Ok to save the change. You can now check whether the problem has been resolved.
We hope you’ve found these tips on how to verify VAC in CSGO useful. You can share your comments, questions, or further suggestions in the comments section below.
Table of Contents
- What does it mean when VAC was unable to verify your game session?
- How to Fix VAC Authentication Error in 2021?
- Verify Integrity of Game Files and Restart PC
- Repair the Steam Client
- Exclude the CSGO Game Directory from Antivirus Scans
- Verify DLL File
- Delete Temporary Files
- Update Your Drivers
- Completely Reinstall CSGO
- Summary
If you are here, it means that you have likely received the VAC error stating that it was unable to verify the game session. Don’t be alarmed, this is a very common issue, and it can be caused by many things, however, fixing it is very easy. Another popular CSGO issue is the CSGO Mic Issue which we have covered in a separate article. Regardless, let’s take a closer look at the VAC matter, what causes it, as well as the potential solutions.
What does it mean when VAC was unable to verify your game session?
This means that the VAC (Valve Anti-Cheat System) has detected some anomalies within the installation file of your game, in our case, CSGO. While this feature is meant to stop players from modifying and messing around with file of the game, however, the system can come to a false tampering report from time to time, even when there was no tampering done, which causes the vac was unable to verify the game session message to appear.
How to Fix VAC Authentication Error in 2021?
Since the widespread of the “vac was unable to verify your game session” message, numerous threads on various websites have suggested different things on how to potentially solve this issue. In order to help you out with this Counter-Strike: Global Offensive VAC error, we have compiled a list of all potential fixes for it, as well as detailed guides for each of them.
Verify Integrity of Game Files and Restart PC
When faced with the “vac was unable to verify your game session” message, the first thing that you can attempt to do in order to fix this game session error is to verify the integrity of game files which may sound complicated, but is in fact extremely easy to do.
The first step in performing this fix is to open up your Steam and head to the Library tab which is located on the left side on top of your Steam window. Once you are in your Steam library, find Counter-Strike Global Offensive, right-click on it and then left-click on “Properties”.
Once you locate the Counter-Strike Global Offensive and select properties, click on the local files tab and then click: “Verify Integrity of Game Files” button. Wait for the popup menu to close, then restart your computer. After the restart, run CSGO again and see if the problem is fixed.
Repair the Steam Client
Another fix that you can attempt if the first one doesn’t work, is to repair the Steam client which is also what Valve officially recommends doing. This is a very easy fix that you can apply and the first thing you need to do when applying it is close your Steam client. To close the Steam client right-click on the Steam icon in your system tray and then click “Exit”.
Once this is done, open your Start menu and type in “run”. Once the run app is selected, press “Enter” to open it and then enter the following command: “C:Program Files x86SteambinSteamService .exe” /repair. This will launch an empty command prompt terminal. Once the command prompt terminal closes, open Steam and check if the fix worked. If the matter still persists and the game session error keeps appearing, try the next fix on the list.
Exclude the CSGO Game Directory from Antivirus Scans
One more thing that could be causing the “vac was unable to verify your game session” message is the antivirus that could be running in the background. If in fact your antivirus software is running in the background and is scanning your CSGO game files, it could be making VAC unable to verify the game files, which would cause you to see the game session error whenever when you try to launch CSGO on your computer. To prevent this, you can whitelist the CSGO local files in your antivirus settings. The exact way of fixing this problem via this method may vary depending on the antivirus that you are using.
Verify DLL File
If any of the previous fixes mentioned above did not solve the issue, fear not because we still have a couple of potential fixes for the problem, so let’s take a look at the next one which will require you to verify the DLL file.
To use this method, first, find and open your Steam installation folder which by default is C>Program Files (x86)> Steam > Bin. When you open it, locate a file called “Steamservice.dll”, right-click it, and click copy. Afterward, go to C>Program Files (x86)>Common Files> Steam, right-click, and then click “Paste” to paste the file that you have just copied. Your windows might prompt you an error message stating that the file already exists. Simply click “Replace”. Once all of this is done, try launching the game and see if the problem persists. If so, see our next CSGO fix.
Delete Temporary Files
During use, the Windows on your PC tends to store files for later use, and sometimes, those files can become corrupt which can cause this problem to occur. An easy fix for this issue is to simply delete temporary files. Start by opening the Run command by pressing “Windows + R” and type in “%temp%”. Press “Enter” or click the OK button. A large list will appear. Select all items on it by pressing Ctrl + A and then remove them by pressing Shift + Delete. Click yes in the pop-up menu. Reboot your windows and launch Steam again to check if the problem is fixed.
Update Your Drivers
Another common reason why CSGO won’t run properly could be the drivers on your computer. To fix this, you are going to need some third-party driver detecting software like Auslogics Driver Updater so the first thing you need to do is download it and install it on your PC. Once this is done, the program will automatically open and scan your PC for drivers and any update that is available. Afterward, you can run a scan for any bad drivers, just press the “Scan now” button. Click the “Update” button next to the faulty drivers to update each of them or simply press the “Update all” button. Restart your computer after the program finishes.
Completely Reinstall CSGO
If the verify game fix, bin steamservice exe repair fix, and every other attempt to fix VAC error fail, then your final option is to completely reinstall CSGO on your computer. To do this, open Steam and head to your game library, right-click on CSGO, and click “Uninstall”.A new window will pop up, click “Delete”. Now you have completely removed CSGO from your computer and you can install it again from your game library, just restart your PC before you do so.
Summary
This article focus on discussing the appearance of the “vac was unable to verify your game session” message upon launching CSGO, as well as potential reasons that could be causing an issue and this error message to appear. Furthermore, the article will also cover numerous things that you can try to fix this game session error, as well as provide you detailed guides on each of them.
Valve’s proprietary anti-cheat, VAC, isn’t meant to stop players from cheating so much as it’s designed to catch a cheater in the act. The program misses hackers all the time, but it almost never accidently bans someone, and it’s almost never wrong when it does. That’s why some users panic when they see the dreaded “VAC Authentication Error” pop up on their screens.
Thankfully, VAC authentication errors happen all the time to clean players. There are a couple of reasons why shows the error after it disconnects a player, but none of them mean the player has been banned. So here are the top fixes for Steam’s most dreaded error.
How to fix VAC authentication errors
Elimating the easy stuff means less guessing at the end. Players should make sure that it isn’t Steam’s beta client causing the VAC errors.
Fix 1: Turn off Steam Beta
It’s worth turning off the Steam Beta first before trying other fixes. It’s quick and simple fix that can save players time if it’s the problem.
With Valve using Steam Beta as a testing ground for new features, sometimes the developer puts a bit of code in the wrong place. As recently as this month, a Valve mishap awarded players Counter-Strike: Global Offensive players $1,000 per death after it left old code in the game’s config files. If Steam’s beta ever has a typo in the right spot or a mislabeled .dll file, VAC will not be happy.
Next up are the three things every Steam user has tried at least once. If not, now is a good time to learn them.
Classic Steam fixes could solve Steam’s VAC Authentication problems.
Trying these classic Steam fixes in the correct order is the trick here.
- Fix 1.1: Turn it off and back on again (Reboot)
- Fix 1.2: Start Steam as an administrator (“as Admin”)
- Fix 1.3: Verify game files for the game giving the VAC error
These are classic fixes for any computer, and it usually only takes one or two of the three to fix the VAC authentication error. They’re quick, too. But if find that they’re still stuck withVAC authentication errors after these three, continue on to fix number two.
What causes VAC Errors? It might be Windows 10
Problem: Windows Search could be bugging out Steam’s VAC anti-cheat. It’s frustrating, but getting a VAC authentication error is sometimes caused by Windows 10. Besides shutting down players’ PCs in the middle of games, the OS has a bad habit of running programs when VAC is trying to do its thing. If VAC happens to check on a game’s files while Microsoft is recording the file names for Windows search, players can be kicked to the main menu with the error.
- Fix 2: Fully power down the PC, down to the power cord.
Power down the PC, flip the switch located on the power supply, and unplug the computer. Players have to make sure their PC is completely disconnected from the wall or battery power and wait 10 minutes before booting back up. That’s enough time to make sure that Windows isn’t storing any hybrid or hibernate settings. Thanks to Windows’ default power setting, “Shut Down” really just means hibernate. If users don’t cut the power, the OS will pick up where it left off.
Can players stop VAC authentication errors before they happen?
If it’s caused by this bug, yes. Players can avoid this issue by adding Steam’s folder or even a specific game folder to Windows exclude lists for both real-time protection and search.
Elminate VAC errors with this networking command
One of the top reasons players are booted from VAC-secured maps comes down to their connection. If the server can’t talk to the VAC module on a player’s PC, then it takes the safe approach and kicks them just in case. This is often caused by built-in firewalls in home routers. But players should try fix number three by repairing Steam and asking the router or modem for a new IP address. It’s a simple three lines that could clear the issues right up.
Problem: VAC authentication failures can start with Steam’s cache and a stale IP
- Fix: Dump the Steam cache and start over with a new IP for Valve’s VAC checks
Exit Steam and head over to the search bar. Users are looking for the command prompt, which can be found by searching “cmd.” Once open, players can type the following three lines in order, making sure to press enter before each new line. Heads up, this will log players out of Steam if they haven’t exited already.
- start steam://flushconfig
- ipconfig /release
- ipconfig/renew
Problem: Network issues might mean that VAC and Valve’s servers can’t talk to each other. If that’s the case, users might need to dive into port forwarding.
- Fix 3: Forward Steam’s ports to your PC (and back again)
Port forwarding always sounds complicated, but it boils down to building a highway between a router and a computer. Players forward a port, or a “range” of ports, from their router to the computer’s network IP address. It allows Steam to talk directly to Valve’s servers without the traffic getting lost, at least not inside the player’s home.
Different parts of Steam use different ports for communicating with Valve’s network, allowing a certain amount of choice when forwarding. For example, Steam’s Remote Play uses a range of ports, but unless players actively use the Remote Play feature, there’s little reason to complicate the fix here. If a user’s connection isn’t dropping out, they might want to try port forwarding these ports specifically that are related to game traffic:
- Game Traffic
- UDP remote port 27000–27100
- UDP local port 27015
- Observing live matches, such as Dota 2’s DPC or a CSGO Major
- UDP local port 27015
- Peer-to-Peer Networking and Steam Voice
- UDP remote port 3478
- UDP remote port 4379
- UDP remote port 4380
Since the process is slightly different for every router, players should consult the router’s manual for exact instructions on how to port forward.
One more thing: if users are having trouble connecting to a dedicated server or are having other network connection issues, Valve has provided a complete list of ports used by Steam on support.steampowered.com to try.
The last tip for fixing Steam’s VAC errors is to simply walk away. VAC and Steam are famous for one second working before suddenly not working at all. After some plugging and unplugging of cables, these issues tend to fix themselves. It’s been happening to CSGO’s map editor, called Hammer, for years.
Valve Anti-Cheat is a software used by Valve games to check your setup to see if you are using any hack or third-party program which might make your gaming experience easier or give you an unfair advantage over other players. However, sometimes it’s this software which disconnects you from Valve games simply because of an “authentication error”.
Plenty of users have had to deal with this problem and their gaming experience becomes pretty much ruined. The game will disconnect you and possibly ban you from servers because of this error so make sure you follow the article in order to solve the problem as soon as possible.
What Cases the Valve Authentication Error
There are many registered causes for the problem. Sometimes the error is caused by a broken or stopped Steam Client Service and the service either needs to be repaired or restarted. Also, your computer’s old network drivers may be preventing the VAC service from operating normally and you should consider updating them.
Other possible culprits include having disabled DEP (Data Execution Prevention) on your computer meaning you might need to enable it. Also, the problem is sometimes caused by Steam Download servers being down so consider switching to a new one.
Solution 1: Repair the Steam Service
Repairing the Steam service should help you solve this problem in the easiest way possible as it did for other users before you. Steam services are the core system behind various things related to Valve and the problem can be solved easily by running a command in Command Prompt which should repair the Steam service.
- Search for “Command Prompt” by typing this text either right in the Start menu or by pressing the search button right next to it. Right-click the first entry which will pop up from the search result and select the “Run as administrator” context menu entry.
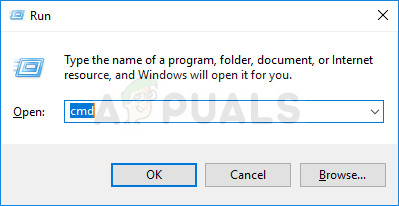
- Additionally, you can also use the Windows Logo Key + R key combination in order to bring up the Run dialog box. Type in “cmd” in the dialog box which appears and use the Ctrl + Shift + Enter key combination in order to run Command Prompt with admin privileges.
- Type in the following command in the CMD window and make sure you press Enter after typing it out correctly. Wait for the “Operation completed successfully” message or something similar to know that the method has worked and you haven’t made any mistakes.
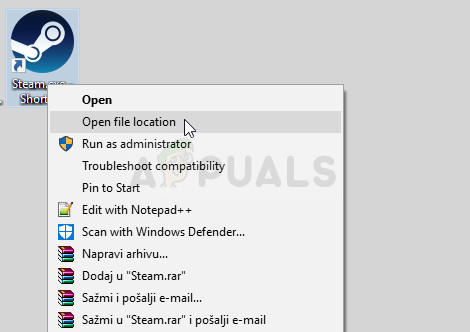
- Before you type command, you should also find out the root folder of your Steam installation which will be necessary to run the command. You can find a full path to the Steam installation folder by right-clicking its shortcut on the Desktop and choosing the Open file location option from the context menu.
- Click the address bar at the top of the folder which should display the path so use the Ctrl + C combination to copy it to the Clipboard. If you haven’t made any changes during the installation, the path should be “C:Program Files (x86)SteambinSteamService.exe”. Let’s use the default path to run the command. Make sure you replace it with your own path when running the command:
"C:Program Files (x86)SteambinSteamService.exe" /repair
- Reopen the problematic game either by double-clicking its icon on your computer or by launching it via Steam and check to see if the VAC error is gone.
Solution 2: Enable DEP on Your Computer
If you computer’s settings are not configured properly to run VAC, you may run into issues such as this one more often than you think, especially with Valve games. Unfortunately, the process of setting up your computer for these changes is not so easy and it even involved BIOS troubleshooting which people fear of the most. However, if you follow the steps below, you shouldn’t run into any problems.
- Turn on your computer and immediately press the BIOS Setup key on your keyboard several times in a row, about once every second, until the Computer Setup Utility or BIOS settings opens. This key will be indicated on your screen as Press _ to run Setup.
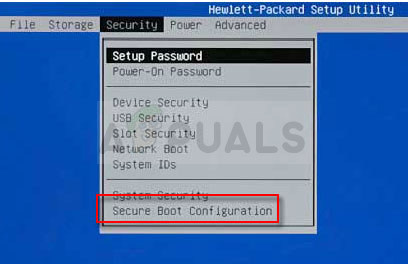
- Use the right arrow key to switch to the Security menu when the BIOS settings window opens, use the down arrow key to select the Secure Boot Configuration from the menu, and press Enter.
- Before you can use this option, a warning will appear. Press F10 to continue to the Secure Boot Configuration menu. Use the down arrow key to select Secure Boot and use the right arrow key to modify this setting to Disable.
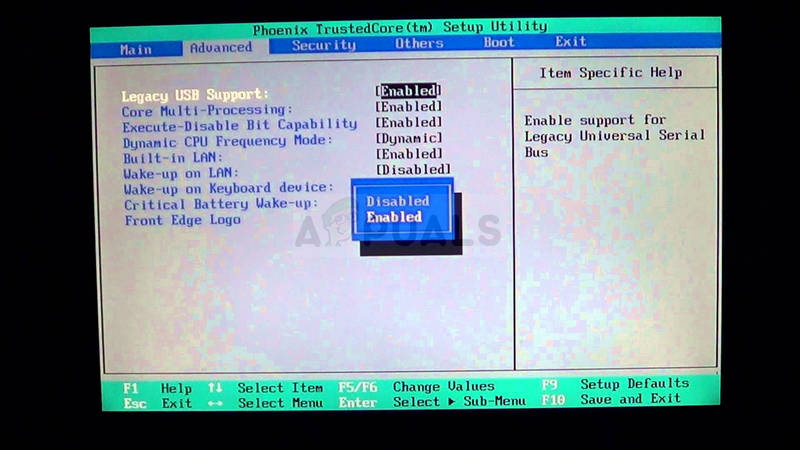
- Use the down arrow key to select Legacy Support, and then use the right arrow key to switch it to Enable.
- Press F10 to save the changes. Use the left arrow key to navigate to the File menu, use the down arrow key to switch to Save Changes and Exit, then press Enter to select Yes.
- The Computer Setup Utility will now shut down and the computer should restart. When the computer has restarted, keep following the steps below to solve the VAC authentication error.
In order to solve the problem completely, you will now have to run a simple command in order to solve the problem properly. This command needs to be executed in an administrative Command Prompt window so make sure you are doing this using an account with admin privileges.
- Search for “Command Prompt” by typing this text either right in the Start menu or by pressing the search button right next to it. Right-click the first entry which will pop up from the search result and select the “Run as administrator” context menu entry.
- If you are running a version of Windows other than Windows 10, the Start menu search might or might not work properly but you can still navigate to C >> Windows >> System32, right-click on the “cmd.exe” entry and choose Run as administrator or type “cmd.exe” in a Run box and use the Ctrl + Shift + Enter key combo.
- Type in the following command in the CMD window and make sure you tap Enter after typing it out. Wait for the “Operation completed successfully” message or something similar to know that the method has worked and you haven’t made any mistakes.
bcdedit /deletevalue nx
or
bcdedit.exe /set {current} nx AlwaysOn
- Either command should work properly. Make sure you restart your computer immediately and reopen the problematic game either by double-clicking its icon on your computer or by launching it via Steam. Check to see if the VAC authentication error is gone.
Note: If you are unsure whether the command above has worked and you don’t whether the command didn’t work or the method is simply not working for you, there is a way to check the current state of DEP on your computer. Use the following command in Command Prompt:
wmic OS Get DataExecutionPrevention_SupportPolicy
If you see that the result is 3, that means that DEP is enabled for all processes and that is the only number which is acceptable as a result.
Solution 3: Check Your Time and Date Settings
Improper time and date on your computer is not recommended at all and it’s not a thing anyone would do on purpose. However, some users restart BIOS or perform some changes which alter time and date and they forget to set it up properly again. This alone is enough to cause the issue so make sure you check to see if everything is okay.
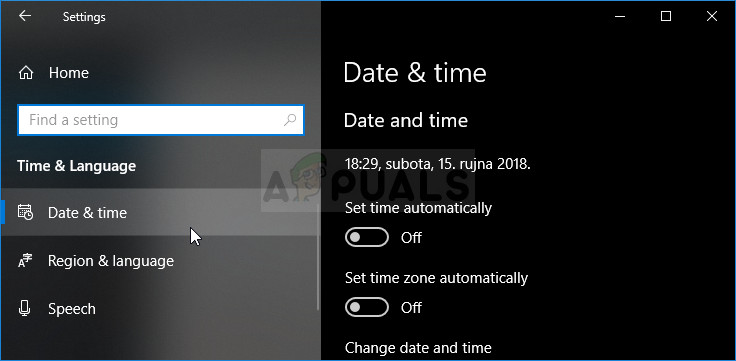
- Open Date and Time settings on your computer by opening the Start menu, and opening the Settings app by clicking the gear icon above the Start menu button and the Power icon, choosing the Time & language option, and navigating to the Date & time tab.
- In the Date and Time tab, make sure that your computer’s date and time settings are aligned with the location you are currently in. If the time is not correct, you can try turning the Set time automatically option on or off depending on previous settings.
- If the “Set time automatically” option is now off, choose the correct time zone from the dropdown list in order to finish the process. After you have finished, restart your computer and try opening Windows Store again.
Alternative: If this doesn’t work out for you or if you are using a version of Windows older than Windows 10, you can also use Control Panel to synchronize with an online time server to always have correct settings.
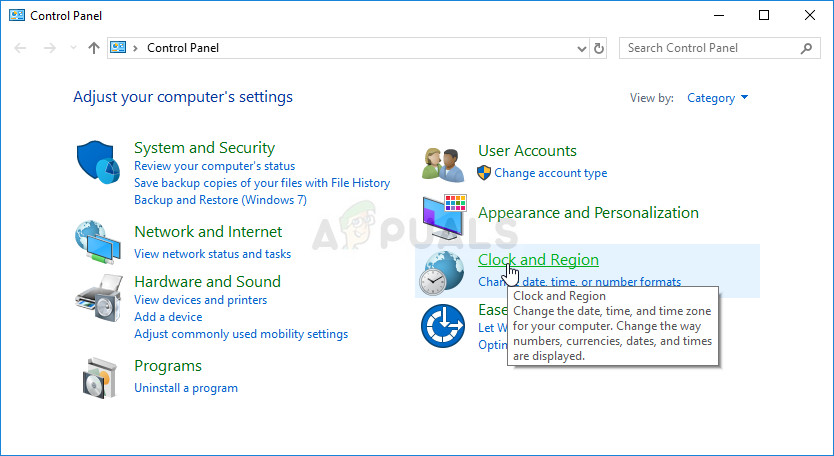
- Open Control Panel by searching for it in the Start menu or by using the Windows Key + R key combination, typing “control.exe” in the Run bar, and clicking OK in order to run Control Panel.
- In Control Panel, select to View as: Category at the top right corner and click on the Clock and Region button to open this section.
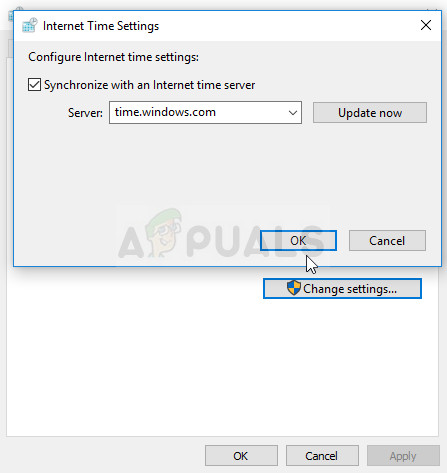
- Click on Set the time and date button under Date and Time in the Clock and Region section and navigate to the Internet Time tab immediately. Click the Change settings button.
- Check the box next to the “Synchronize with an Internet time server” option and choose the “time.windows.com” server before clicking on Update.
- Click the OK button to apply the changes and try running the problematic game to see if the problem with VAC authentication error is gone.
Solution 4: Delete the Steam Cache and Verify the Integrity of Game Files
This method is quite self-explanatory and it’s one of the most basic fixes you should try out when troubleshooting a Steam game. The first part depends on where you have installed Steam but you should have found out that location by now if you followed the solutions above.
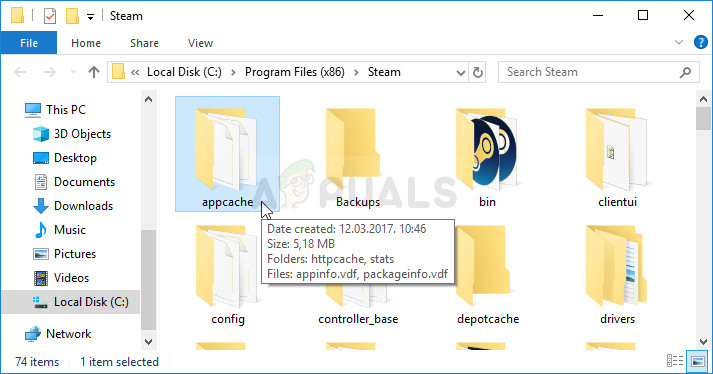
- Navigate to the Steam’s root folder in the File Explorer which can be accessed by opening a folder and clicking This PC or My Computer at the left side pane. Make sure the Steam client is closed completely.
- If you haven’t made any changes during the installation of the Steam client regarding the required installation folder, it should be Local Disk >> Program Files or Program Files (x86) depending on your OS.
- The appcache folder should be available in this folder so make sure you right-click on it and choose the Delete option from the context menu. Confirm any dialogs and reopen Steam to proceed with the solution.
- After the Steam client opens, navigate to the Library tab, right-click the problematic game from your game list, and choose Properties from the menu. Navigate to the Local Files tab and click the Verify Integrity of Game Files button.
- Wait for the process to finish. It should download several missing files. Relaunch the game and check to see if you still receive the VAC authentication error.
Solution 5: Run Steam as an Administrator and Make Sure the Steam Client Service is Started
This method is a lengthy one and it’s composed from two different parts. However, then these parts are put together, you get a powerful method which can be used to solve this problem immediately. We will set Steam to run with administrator privileges and change the startup of the Steam Client Service to be running at all times.
- Locate the Steam shortcut or executable on your computer and open its properties it by right-clicking its entry either on the Desktop or the Start menu or the Search results window and choose Properties from the pop up context menu.
- Navigate to the Compatibility tab in the Properties window and check the box next to the Run this program as an administrator option before saving the changes by clicking OK or Apply.
- Make sure you confirm any dialogs which may appear which should prompt you to confirm the choice with admin privileges and Steam should launch with admin privileges from the next startup. Open Steam by double-clicking its icon and try relaunching the game to see if the VAC authentication error still appears.
If this hasn’t resolved the problem, you may have issues with the Steam Client Service which also deals with when VAC should be launched. This can be solved by visiting this process in Services and configuring its startup type.
- Open the Run dialog box by tapping the Windows Key + R key combination on your keyboard. Type “services.msc” in the Run box without the quotation marks and click OK in order to open Services. You can also just search for Services in Start menu on Windows 10.
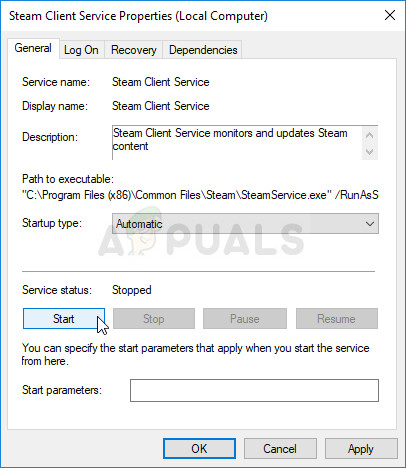
- Locate the Steam Client Service in the services list, right-click on it and select Properties from the context menu which will appear.
- If the service is started (you can check that just next to the Service status message), you should stop it by clicking the Stop button in the middle of the window. If it has already been stopped, leave it as it is (for now).
- Make sure that the option under the Startup type menu in the Steam Client Service’s properties is set to Automatic before you proceed with the instructions. Confirm any dialogue boxes which may appear when you set the startup type. Click on the Start button at the middle of the window before exiting.
You may receive the following error message when you click on Start:
“Windows could not start the Steam Client Service on Local Computer. Error 1079: The account specified for this service differs from the account specified for other services running in the same process.”
If this occurs, follow the instructions below to fix it.
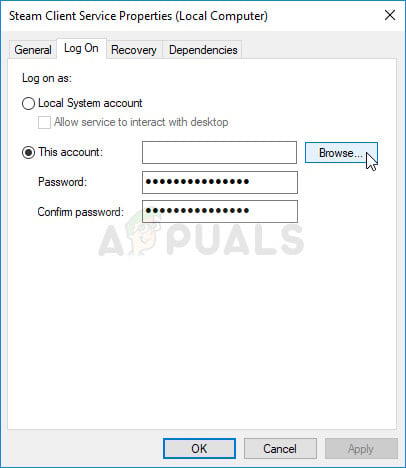
- Follow the steps 1-3 from the instructions above in order to open Cryptographic Service’s properties. Navigate to the Log On tab and click on the Browse… button.
- Under the “Enter the object name to select” box, type in your account’s name, click on Check Names and wait for the name to become recognized.
- Click OK when you are finished and type in the password in the Password box when you are prompted with it, if you have setup a password. It should now start without issues!
Solution 6: Install the Latest Internet Connection Drivers
Even though most gaming problems are directly tied to the graphics card drivers, this is one of the problems which can be fixed by updating Network drivers on your computer. This can be done using a third-party tool or even better, using the built-in tool called Device Manager.
- First of all, you will need to uninstall the driver you currently have installed on your machine.
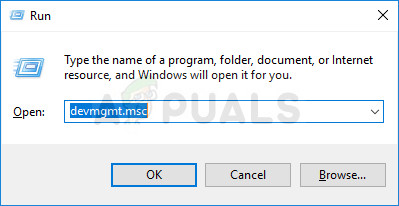
- Type “Device Manager” into the search field next to the Start menu button to open the device manager window. You can also use the Windows Key + R key combination in order to open the Run dialog box. Type devmgmt.msc in the box and click OK or Enter key.
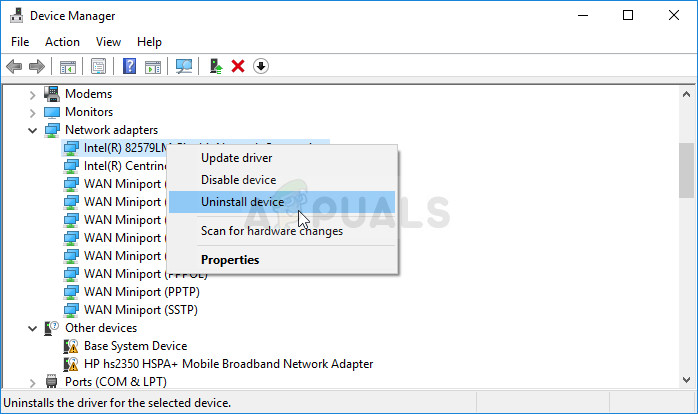
- Expand the “Network Adapters” section. This will display all network adapters that the machine has installed at the moment.
- Right click on the network adapter you want to uninstall and select “Uninstall device”. This will remove the adapter from the list and uninstall the networking device. Click “OK” when prompted to uninstall the device.
- Remove the adapter you are using from your computer and navigate to your manufacturer’s page in order to see the list of available drivers for your operating system. Choose the latest one, download it, and run it from the Downloads folder.
- Follow the instructions on-screen in order to install the driver. If the adapter is external such as a Wi-Fi dongle, make sure it stays disconnected until the wizard prompts you to reconnect it to your computer. Restart the computer and check to see if the problem has disappeared.
Solution 7: Change the Steam Server
If there are problems with the Steam servers at the moment, it might be impossible to solve the problem using any other method than by changing the Steam Download Region inside Steam Settings.
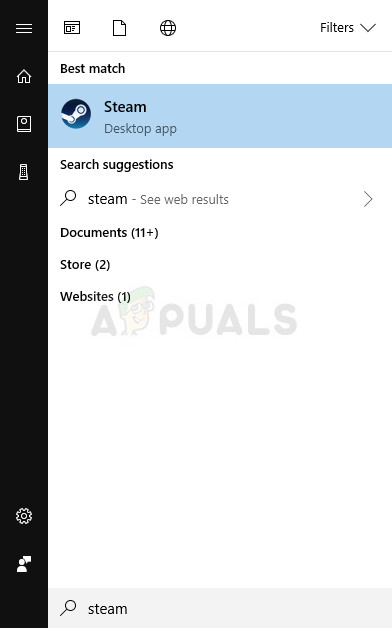
- Open your Steam PC client by double-clicking it on the Desktop or by searching for it in the Start menu and clicking on the first available result.
- After the Steam client opens, click the Steam button at the top right part of the window and choose Settings from the dropdown menu. Navigate to the Downloads tab in the Settings window and click the arrow next to the country under the Download Region section.
- Try several other server locations until you see that the error is resolved.
Kevin Arrows
Kevin is a dynamic and self-motivated information technology professional, with a Thorough knowledge of all facets pertaining to network infrastructure design, implementation and administration. Superior record of delivering simultaneous large-scale mission critical projects on time and under budget.
“VAC was unable to verify your game session” is one of the most common and annoying error that a CS:GO player comes across quite frequently. Most of the CS:GO players go into a state of panic when they come across this particular error due to the presence of VAC (Valve Anti Cheat). But in reality, there is nothing to worry about unless you are running any sort of a script or cheat to give yourself an unfair advantage. “VAC unable to verify” is an error that mostly occurs after a patch update or if you have been tinkering around with the game files, having said that it is also quite easy to fix it and in most cases, the game will be up and running properly within minutes.
Here are some simple ways through which you can fix the “VAC unable to verify your game session” error, as we also try to explain what this error actually means, and the reason behind why do they randomly occur out of the blue. So follow the solutions given below to get rid of the error and resume playing CS:GO.
RELATED: Best CS:GO Launch Options 2021: Boost FPS, Increase Performance, Optimal Settings
What is “VAC unable to verify” CS:GO error?
Despite being one of the most common CS:GO errors, the reason why it occurs is still shrouded in a veil of mystery. Valve has never given a reason as to why it happens and honestly, users do not even know how it occurs, it just randomly strikes a system and locks down matchmaking for that particular user. The fact that there is no proper solution to this problem makes it a very annoying error, that has been impacting players globally for many years.
The only understanding of the error is that it is related to the Valve Anti Cheat (VAC) system, which has been developed by Valve to protect its userbase from cheaters. There seems to be some sort of an unexplained bug due to which this very system at times, locks out legit users and restricts them from CS:GO matchmaking unless the “VAC unable to verify your game session” error is rectified.
Different ways to fix “VAC unable to verify” CS:GO error
As the error in itself is not completely known, there is no proper solution to the problem. So users can follow the steps listed below, in this very order, and it is bound to fix the problem sooner or later.
1. Restart Steam Client
The very first thing that you should do after facing this error is, simply quit CS:GO, log out of your Steam account, close the application, and then open it again. In most cases, this step is enough to fix the error as sometimes there may be some changes in the ‘operating system framework’ which may lead to the “VAC was unable to verify your game session” error.
- Open ‘Steam’.
- Click your profile name at the top right corner of Steam. Then click on log out from the drop-down list of options.
- Click ‘Logout’ when the pop-up window asks for permission.
- Quit ‘Steam’ and close the application from the ‘Taskbar’.
- Double click on ‘Steam’ to restart the application, ‘Login’ to your account, Open ‘CS:GO’.
If the error is gone then this method was a success, otherwise, you can move on to the next solution.
2. Restart The PC
Well, if you have restarted CS:GO and Steam, but the error has still not fixed itself, then the only logical step is to restart the system once. While this may not seem like the ideal solution, simply restarting the PC fixes a lot of issues as all the active and passive programs are closed down during this process, and it may automatically fix the problem.
Launch Steam once again and open CS:GO, if the problem still persists then try out our next solution.
RELATED: How to Set Dot Crosshair in CS:GO 2021 — Settings and Console Commands
3. Verify Game Files
This is the step that almost always solves the “VAC was unable to verify your game session” error, as this method helps retrieve lost game files and replaces any that may have been corrupted. Here is how you can verify your game files via Steam.
- Open ‘Steam’, click on ‘Library’ present on the tool bar above.
- Search for the game ‘CS:GO’ and right-click on the game title. Then click on ‘Properties’.
- Under ‘Properties’ click on the ‘Local Files’ tab present on top, and then click on ‘Verify Integrity Of Game Files’.
- As soon as you press that option, the system will start going through all the game files automatically carry out any necessary procedures requires to fix them. This may take several minutes to complete, after which a new dialogue box will pop-up and you can click ‘Close’.
There’s nothing more frustrating than patching or returning to a game only for an error to prevent you from playing. Returning CS:GO players or frequent players trying to jump back in immediately after a patch can sometimes run into an error that reads: “VAC unable to verify your game session.”
If this message pops up for you, don’t be alarmed, your account hasn’t been banned by the Valve Anti-Cheat (VAC). It just means VAC was unable to properly communicate with your account and verify that the anti-cheat is working. It’s unclear why this happens, but it can happen during server outage periods, after or during Steam or CS:GO maintenance, or a handful of other times.
VAC’s failure to verify doesn’t mean you can start using cheats, though. Matches won’t launch without verification. Thankfully, the solution is relatively easy.
First, completely exit CS:GO and restart Steam. When Steam restarts, check to make sure there isn’t a new update you’re missing out on. If not, go to your Steam library, right-click on Counter-Strike: Global Offensive, and select properties at the bottom of the drop-down menu.


Next, choose Local Files (the third tab to the right) and select Verify Integrity of Game Files. After a minute or two of loading, this should validate your files and kickstart your game. If all goes according to plan, “VAC unable to verify” should now be gone for good.
Before you load up CS:GO again, make sure to restart Steam again to be safe. If the error continues to appear, reinstalling CS:GO is your next best option. It’s tedious and it might take longer than you hoped, but a fresh restart of CS:GO will ensure VAC is re-installed as well, which should clear up any more issues.
Other “VAC unable to verify” fixes
If game file integrity verification and a fresh reinstallation of CS:GO both don’t work, you may have to contact Valve about your account since something on its end might be affecting your account’s ability to get VAC verification.
Сейчас мы разберем еще одну ошибку в CS:GO, которую пользователи могут встретить на своем компе.
Содержание
- Как устранить ошибку связанную с VAC проверкой
- Способ №1: Перезапуск клиента STEAM
- Способ №2: Переустановка CS:GO
- Способ №3: Ручной запуск Сервисов Steam
- Способ №4: Активация DEP
- Способ №5: Очистка кэша загрузки
- Способ №6: Соответствие вашего региона
- Способ №7: Проверка фаерволов и антивирусов
- Способ №8: Перезапуск роутера
- Способ №9: обновление нужных файлов проверки
- Способ №10: проверка целостности файлов
- Что такое VAC в STEAM
Сейчас мы разберем практически все нюансы, которые помогут нам исправить данную проблему. Начнем с самых простых и легких.
ПОЛЕЗНЫЕ СТАТЬИ: Лагает кс го и Не запускается игра!
Способы исправления ошибки связанные с ВАК проверкой в кс го:
Способ №1: Перезапуск клиента STEAM
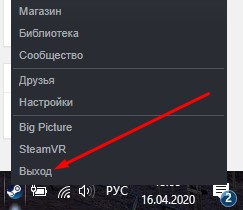
Бывает такое, что банально клиент не успел запустить проверку файлов. Ну, или вариантом также может быть то, что оно запустилось некорректно. В таком случае достаточно будет полностью перезапустить Стим и программа сама перезапустит нужный модуль для проверки файлов. Только выйти нужно полностью. Не просто закрыть, а именно Выйти.
Чтобы выйти и з стима, то в трее системы нужно нажать правой кнопкой мыши и выбрать соответствующий пункт:
После этого запустить заново (от имени Администратора системы Windows).
Учитывайте то, что может быть Стим заблокировал полностью данный аккаунт. В таком случае ни один из перечисляемых способом не поможет. И лучшим решением будет — зарегистрировать новый аккаунт.
РЕКОМЕНДУЕМ ПОЧИТАТЬ: Проблемы с микрофоном и правильная его настройка!
Способ №2: Переустановка CS:GO
Такой способ может помочь в связи с тем, что были нарушены файлы игры, или же заблокированы системой после чего они не могут корректно пройти проверку. Соответственно, лучшим решением будет полностью снести кс го и установить его заново. Перед началом сохраните свой конфиг и ваши настройки.
Инструкцию по переустановке мы разместили в отдельной статье касательно проблем запуска кс го
Способ №3: Ручной запуск Сервисов Steam
Так как система не смогла выполнить проверки каких-то файлов самостоятельно, то сейчас разберем один из методов ручной запуск сервиса. Для этого запускаем строку Выполнить (нажатием клавиш win+r) и прописываем следующие строки:
«E:SteambinSteamService.exe» /repair
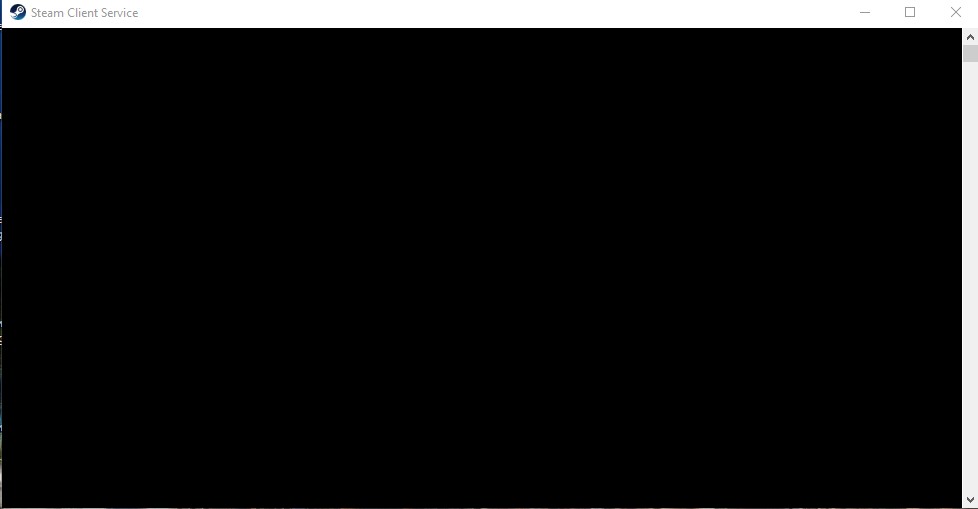
Причем выполнение этой команды производим именно с таким синтаксисом. То есть, адрес стима может меняться в зависимости от того, куда вы его установили. В моем случае у меня диск Е, в вашем это может быть и С и D. Также сама папка стим может находиться не в корне диска (сразу). Как только вы запустите сервис, то будет произведена повторная проверка нужных файлов системой безопасности VAC. Скорость будет зависеть от мощности компьютера. В среднем вы на 2-10 секунды увидите вот такое окно:
После чего повторно перезапускаете клиент и пробуйте запустить игру.
ЧИТАЙТЕ ТАКЖЕ: Убираем отдачу во время стрельбы!
Способ №4: Активация DEP
VAC очень сильно взаимодействует с системой работы процессоров, потому необходимо будет провести его проверку и сделать необходимые шаги, которые помогут вам исправить ситуацию.
Полностью весь этап мы изложили в статье касательно пробемы запуска CS:GO по причине VAC-блокировке.
Способ №5: Очистка кэша загрузки
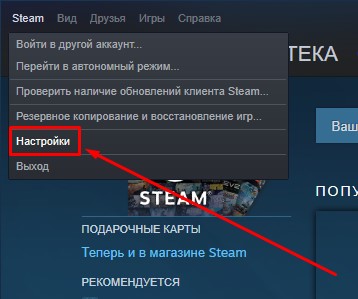
В определенных случаях клиент может закешировать нужные файлы, которые должны были пройти проверку. Для того, чтобы программа смогла заново наполнить свежий кеш, то необходимо очистить старый. Переходим в настройки Стима:
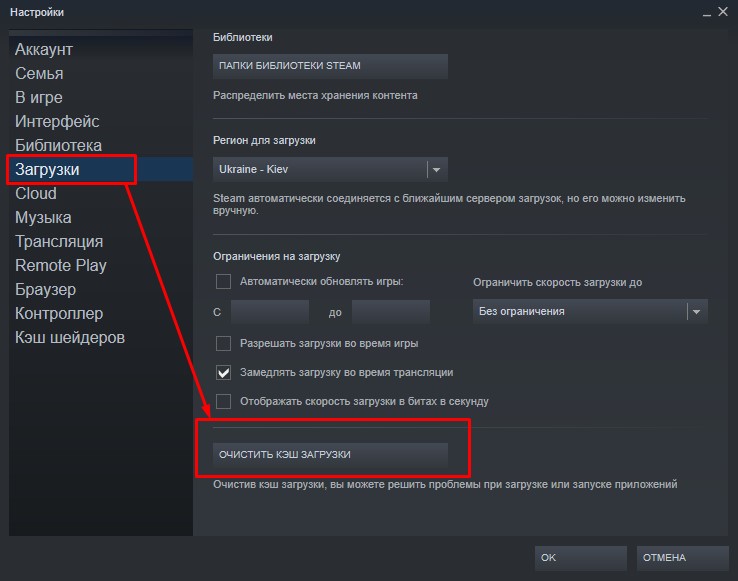
Далее открываем пукнт «Загрузки» и нажимаем кнопку очистки кэша:
Способ №6: Соответствие вашего региона
Вы знаете, что во всех странах мира есть свои ограничения, правила и нюансы касательно того, в каком регионе вы проживаете. Платформа в обязательном порядке привязана ко времени и вашего места расположения. Соответственно, необходимо проверить корректность вашего времени на компьютере, а также выставленного региона. Все должно совпадать с реальными данными. После правильной выставленной даты и времени необходимо перезапустить Стим.
ЧИТАЙТЕ ТАКЖЕ: Переключаем язык в кс го!
Способ №7: Проверка фаерволов и антивирусов
На вашем комьютере могут стоять запрещенные программы или антивирусы блокирующие определенные порты или трафик интернета. Потому и выбивает ошибку «Система VAC не смогла проверить вашу игровую сессию в CS:GO»
Для исправления проблемы необходимо:
- Временно отключить все антивирусы и фаерволы запущенные с системой;
- Отключить Брандмауэр Виндовс;
- Выключить читы или дополнительные программы для игры;
- Перезагрузить компьютер и запустить заново стим.
Способ №8: Перезапуск роутера
В связи с тем, что все компьютеры вашей внутренней сети находятся под одним внешним айпи адресом, то не исключена временная блокировка. Может быть такое, что один из участников получаемых услуг в вашей сети делает мощную файловую нагрузку на сеть. Потому система может временно остановить подачу сигнала и коннекта со Steam серверами. При перезагрузке вы можете получить новый внутренний адрес, что поможет вам заново повторить VAC проверку файлов
ЧИТАЙТЕ ТАКЖЕ: Как говорить и общаться в кс го!
Способ №9: обновление нужных файлов проверки
Главными файлами в платформе, которые отвечают VAC проверку — clientregistry.blob, Steam.dll и SteamUI.dll.
- Нужно выключить полностью Стим и через поиск Виндовса (win+s) найти эти файлы. Желательно уточните место где вы собираетесь их искать. Так как поиск по всему компьютеру и локальным дискам будет только лишняя трата времени;
- Удалите их полностью с компьютера;
- Заново запустите стим и пускай система сама попробует скачать их заново.
Такое решение проблемы в частых случаях помогает. Так как не всегда понятно как система проверки VAC работает.
Способ №10: проверка целостности файлов
Последним и неплохим решением будет проверить целостность файлов всей игры. Может быть такое, что они попросту слетели или удалились какой-то вашей отдельной программой. В платформе есть специальная кнопка, которая может сама в автоматическом режиме сделать всю необходимую работу.
Как это сделать мы описали в статье по проверки файлов
Также мы подготовили для вас видеоматериал, который поможет вам наглядно посмотреть, как ребята избавляются от данной проблемы:
Что такое VAC в STEAM
VAC — стандартная система защиты от вирусов и запрещенного софта (читов) в платформе Steam. Разработчики компании VALVE стараются (к сожалению не так успешно, но все же) бороться с игроками, которые используют сторонние программы, которые создают преимущество против соперников. Большинство сторонних платформ (faceit, esea и другие) стараются дополнительно подключать свои программы, которые проверяют использование читов на их серверах.
ЧИТАЙТЕ ТАКЖЕ: Параметры запуска кс го!
Часто можно встретить такую ошибку «.Система VAC не смогла проверить вашу игровую сессию в CS:GO» (“VAC was unable to verify the game session“ — английская версия ошибки) . Это напрямую связано с тем, что CS:GO разделен частями — так называемыми компонентами. При установке игры система делает свои личные подписи каждому компоненту. И каждый запуск VAC сверяет свои подписи, проставленные ранее, в соответствии. Если что-то не сходится или не соответствует алгоритму данной программы, то она блокирует и запрещает запуск. Таким образом усложняет и создает трудности нечестным игрокам. В другом случае все игроки бы могли использовать и менять полностью все параметры и тонкости игры под свой вкус и лад. Создавая большие проблемы честным игрокам, которые хотят насладиться нашим любимым шутером.
Такая ошибка может появляться не только потому, что вы используете сторонний софт или запрещенные модули. А просто получился банальный сбой в сверке файлов. Самой банальной причиной — изменения и сбой по настройкам операционной системы. Такое может случаться по различным причинам связанными с обновлениями, конфликтом с другим ПО или сбоев кластеров на винчестере (если у вас HDD). У VAC системы есть доступ практически ко всем файлом игрового пространства STAEM. Потому проблемой даже может стать фактически ошибка при загрузке файла из интернета при обновлении. Какую-то часть файла скачало, но получила ошибку. И защита ВАК вас остановит.
БУДЕТ ПОЛЕЗНЫМ: Как правильно стрелять. Тренировка стрельбы
Важно понимать, что это на блокировка вашего аккаунта. Просто есть небольшой сбой, который мы сейчас вместе с вами исправим. Некоторые игроки получают именно VAC-ban — это другое. То есть фактически эта ошибка говорит о том, что есть какие-то файлы, которые мешают вам пройти проверку. Сейчас разберемся какие. А может и не разберемся, но точно исправим проблему.
Подписывайтесь на нас в социальных сетях (ВК, Телеграмм)!
И будьте в теме Киберспорта вместе с GOCSGO.NET
You are here: Home / Software / Computer Is Blocking The VAC System Error On Steam Games!
Are you facing the “Disconnected by VAC. An issue with your computer is blocking the VAC system” error while playing Steam games? VAC is the anti-cheat engine of Valve and any Steam game that uses it can trigger this error. This error stops the user from playing their favorite games online, which is truly a troubling issue.
In this article, I have discussed the causes of this error and the various methods you can use to fix it. After reading this article and performing the troubleshooting methods mentioned here, you should be able to get rid of this error.
What Causes The Disconnected By VAC Error?
Contents
- 1 What Causes The Disconnected By VAC Error?
- 2 How To Fix An Issue With Your Computer Is Blocking The VAC System Error?
- 2.1 Solution 1: Get Rid Of Applications That Conflict With Steam VAC System
- 2.2 Solution 2: Verify Integrity Of Game Files
- 2.3 Solution 3: Restore Boot Settings To Default
- 2.4 Solution 4: Run SFC Scan
- 2.5 Solution 5: Add The Steam Folder To Your Antivirus’s Whitelist
- 2.6 Solution 6: Troubleshoot Network Drivers
- 3 Wrapping Up
According to the Steam official support page, this error is primarily caused by 3rd party software interfering with the game or Steam. But there can be other causes of this error. Here I have mentioned some of the commonly known causes of this error other than the 3rd party application’s interference:
- Corrupted game files are one of the most common causes of this error.
- The antivirus or Firewall can block the Steam VAC system or the game, which can lead to the disconnected by VAC error.
- Problematic or corrupted network drivers are common culprits of network-related issues. They can also be responsible for this error.
- PowerShell running in the background has also been reported by some users to trigger the disconnected by VAC you cannot play on secure servers error.
- Some users have also reported that disabling the Data Execution Prevention, kernel integrity checks, and kernel debugging features can cause this error.
- Corrupted system files are another commonly reported cause of this error.
These are some of the commonly known causes that can trigger this error. Now that you know the causes, let’s move on to the troubleshooting methods for fixing this troublesome error.
How To Fix An Issue With Your Computer Is Blocking The VAC System Error?
Here I have mentioned some troubleshooting methods that you can follow in order to fix this error. Read the solutions carefully before executing them so that you avoid making mistakes.
Solution 1: Get Rid Of Applications That Conflict With Steam VAC System
There are some apps that are known for conflicting with the Steam VAC system. Here is a list of such apps, that you need to either uninstall or keep closed when running Steam games:
- CCleaner
- Powershell
- Sandboxie
- Cheat Engine
- IObit Start Menu 8
- Process Hacker
- DLL Injectors
- Hypervisors
- Steam Idlers
To uninstall these apps you can follow the steps given below:
- Press Windows + R keys to open the Run utility.
- Type appwiz.cpl and press Enter to open the Programs & Features panel.
- Find the apps listed above and right-click on them.
- Select the Uninstall option and follow the on-screen process to complete the process.
You will realize that not every application listed above can be disabled. However, you can at least keep them closed in the background while running Steam games with VAC. For example, to close Windows PowerShell from running in the background, follow the steps given below:
- Press the Ctrl + Shift + Esc keys to open the Task Manager on your screen.
- Select the Processes tab.
- Locate the Windows PowerShell process and right-click on it.
- Select the End Task option.
- Now, run the Steam games that were triggering the An issue with your computer is blocking VAC error.
Solution 2: Verify Integrity Of Game Files
After taking care of the applications that conflict with Steam, if you find the error persisting, then try verifying the integrity of the game files. Verifying the integrity of game files is a feature that can be used to check whether the game files have become corrupted or are missing and automatically redownload them.
To verify the integrity of game files, follow the steps given below:
- Open Steam and select the Library option.
- Right-click on the game that is triggering this error and select the Properties option from the right-click context menu.
- After the Properties dialog opens, select the Local Files tab.
- Click on the Verify Integrity of Game Files option.
- Wait for Steam to verify the game files.
After the process is complete, try playing the game that was triggering the disconnected by VAC error and see if the error persists.
Solution 3: Restore Boot Settings To Default
The Data Execution Prevention, kernel integrity checks, and kernel debugging have to be set to default in your PC to play on VAC secure servers. Otherwise, you will get the An issue with your computer is blocking the VAC system error. To set them to default, follow the steps given below:
- Open the Run utility again.
- Type cmd and press Ctrl + Shift + Enter to open an elevated Command Prompt.
- Now, type the following commands and press Enter after finishing each one:
a) bcdedit /deletevalue nointegritychecks
b) bcdedit /deletevalue loadoptions
c) bcdedit /debug off
d) bcdedit /deletevalue nx - After the above commands finish running, close the command prompt.
- Finally, restart the computer.
Solution 4: Run SFC Scan
There is a chance that this error is caused by corrupted system files. Corrupted system files can interfere with the VAC system and trigger this issue while you play the Steam games. Run the System File Checker tool to locate all corrupted system files and fix them.
To run the SFC scan, follow the steps given below:
- Open an elevated command prompt again.
- Type the following command and press Enter:
sfc/ scannow
- Wait for the scan to finish, it will take 20-30 mins approximately. Do not close the command prompt before the scan finishes.
- After the scan finishes, restart the computer.
Solution 5: Add The Steam Folder To Your Antivirus’s Whitelist
Antiviruses can sometimes become overprotective and interfere with apps that are completely safe to use like Steam. This is also a known cause of this error. One way to fix this is to add the Steam installation folder in the whitelist of your Antivirus. If you are using Avast, then open it and navigate to the following setting:
Home > Settings > General > Exclusions
For AVG, navigate to the following setting after opening it:
Home > Settings > Components > Web Shield > Exceptions
Now, add the following folder in the Exceptions list:
C:/ Program Files/ Steam
Here C: is the drive letter of the folder where Steam is installed.
After whitelisting the Steam folder, An issue with your computer is blocking the VAC system error should not arise again.
Solution 6: Troubleshoot Network Drivers
If none of the above solutions work, then you can try troubleshooting the drivers. Problematic or corrupted network drivers are known to cause a plethora of Network related issues. This error can be one of them. First try updating the drivers, to do it follow the steps given below:
- Open Run utility again.
- Type devmgmt.msc and press Enter to open Device Manager.
- Expand the Network adapters tree and right-click on the problematic network driver.
- Select the Update Driver option.
- Click on the Search automatically for drivers option.
- Follow the on-screen instructions to complete the process.
If you have recently updated the driver before the error started, try rollbacking the update. To do it, follow the steps given below:
- Right-click on the Network drivers.
- Select the Properties option.
- Click on the Driver tab.
- Select the Rollback Driver option.
- Follow the on-screen instructions to complete the process.
Wrapping Up
So, there you have it. Now you know how to fix An issue with your computer is blocking the VAC system error. The above solutions should help you fix this issue. If you have any further questions related to this article, ask them in the comment section below.


