Обновлено 19.02.2020

Ошибка ERR_CONNECTION_REFUSED при открытия сайта
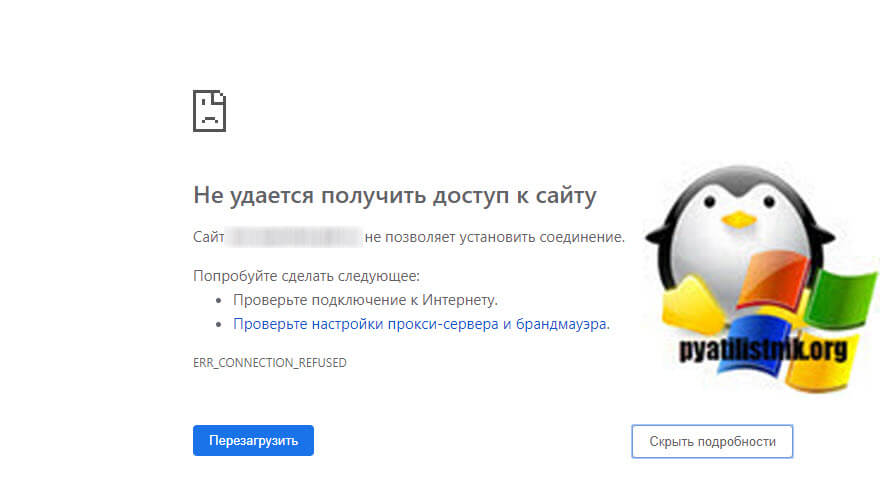
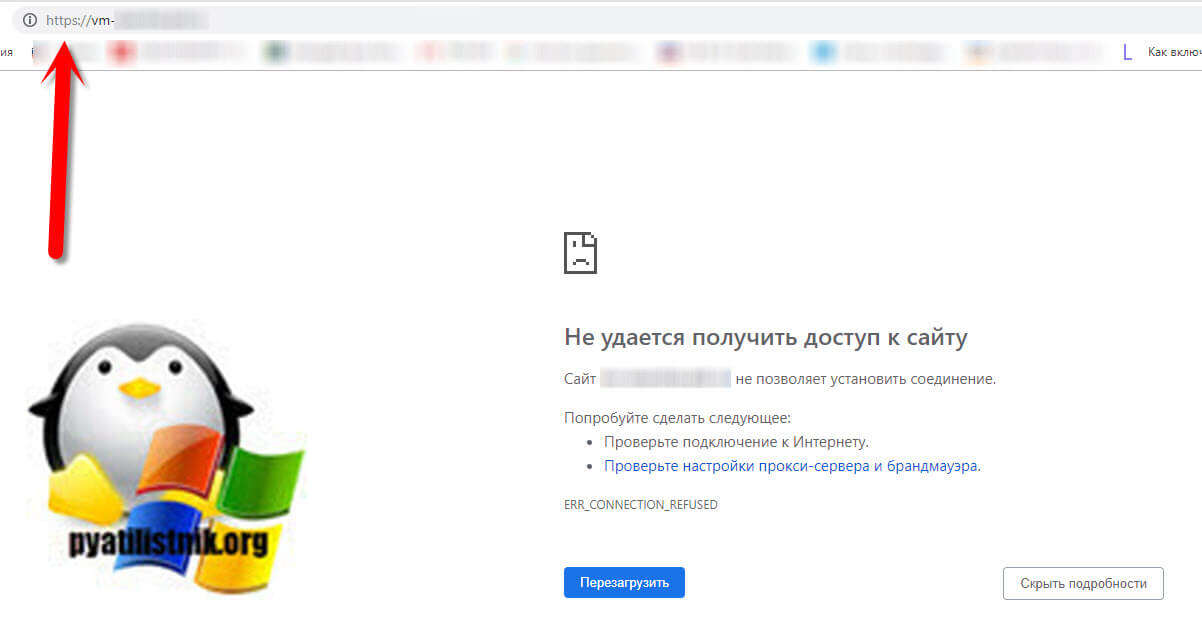
Захотелось мне по работе открыть один из сайтов и вместо привычной мне картины я увидел ошибку «Сайт не позволяет установить соединение ERR_CONNECTION_REFUSED«. Я сначала подумал, что сам сайт не работает, но команда Ping и проверка портов показывала, что он живой.
Я попытался открыть данный сайт в другом браузере и он заработал. На этом можно было заканчивать статью, но мне то нужно чтобы он открывался в Chrome, так как я его использую по умолчанию. Дальнейшее разбирательство показало, что по какой-то причине Chrome стал открывать адрес сайта не по протоколу http:\, а стал его перенаправлять, причем в принудительном виде на https:\. В результате я провел целое исследование и нашел причину, ей оказалась технология HSTS. Ниже мы и поговорим, что такое HSTS и как его отключить.
Что такое HSTS?
HSTS расшифровывается как HTTP Strict Transport Security. HSTS — это механизм веб-безопасности, который помогает браузерам устанавливать соединения через HTTPS и ограничивать небезопасные HTTP-соединения. Механизм заставляет веб-браузеры взаимодействовать с веб-сайтами только через безопасные соединения HTTPS (и никогда через HTTP). Преимущество HSTS заключается в том, что он предотвращает захват файлов cookie и помогает предотвратить атаки на более ранние версии протоколов. Механизм HSTS был разработан для борьбы с атаками SSL Strip, способными понизить безопасные HTTPS-соединения до менее безопасных HTTP-соединений. HSTS работает как мера безопасности, передавая политику в заголовок веб-страницы, которая заставляет браузер создавать безопасное соединение HTTPS, даже в момент атаки «Человек посередине (Man in the middle)»
Стандарт HSTS можно почитать на сайте RFC https://tools.ietf.org/html/rfc6797
По большей части, создание HSTS приветствовалось разработчиками и обычными пользователями благодаря его способности усиливать меры безопасности в Интернете. HSTS обеспечивает дополнительный уровень безопасности, который лучше защищает ваш сайт от взлома и снижает риск повреждения ваших личных данных. Однако реализация HSTS может иногда вызывать ошибки браузера. Эта проблема может быть легко решена путем эффективной очистки настроек HSTS в большинстве основных браузеров, таких как Chrome, Mozilla, Edge, Explorer. Три самых частых ошибок в данной ситуации:
- Privacy error: Your connection is not private” (NET::ERR_CERT_AUTHORITY_INVALID)
- ERR_CONNECTION_REFUSED
- ERR_CONNECTION_TIMED_OUT
Если вы получаете сообщение об ошибке конфиденциальности при попытке посетить определенный веб-сайт, и этот же сайт доступен из другого браузера или устройства (Прямо как у меня), то существует большая вероятность того, что у вас возникла проблема с настройкой параметров HSTS. Если это так, решением будет либо очистить, либо отключить HSTS для вашего веб-браузера. Ниже я приведу набор руководств, которые помогут вам очистить или отключить настройки HSTS.
Должен ли я внедрить HSTS на моем сайте?
Настоятельно рекомендуется использовать настройки HSTS на своем веб-сайте. Настройки HSTS укрепят безопасность вашего сайта и защитят ваши личные данные. Даже если у вас есть доверенный SSL-сертификат, хакеры все равно могут потенциально использовать ваш сайт. Если вы решите не использовать настройки HSTS на своем веб-сайте, вы повышаете вероятность того, что ваша хранимая информация будет запятнана в результате кибератак.
Что следует учитывать перед внедрением HSTS?
Перед внедрением настроек HSTS на вашем веб-сайте важно учесть несколько моментов, прежде чем вы сможете включить соответствующий заголовок:
- Перво-наперво, вам необходимо успешно установить SSL сертификат на вашем сайте.
- Если у вас есть субдомены, важно использовать подстановочный знак. Это будет дополнительно защищать каждый из ваших доменов.
- Используйте 301 редирект. Он будет действовать для перенаправления всех страниц HTTP на страницы HTTPS.
- На основании информации от Google рекомендуется установить максимальный возраст в два года.
- Наконец, убедитесь, что реализованы заголовки Sub Domain и Preload. Имейте в виду, что простое добавление предварительной загрузки не является эффективным способом попадания в список предварительной загрузки HSTS.
Как очистить или отключить HSTS в Google Chrome
Первым делом я хочу решить вопрос форсированного перенеправления адресов http на https в Chrome. В настройках HSTS есть опция «max-age», которая сообщает браузеру, как долго кэшировать и запоминать настройки перед повторной проверкой. Чтобы немедленно продолжить работу без ошибки, вам необходимо удалить локальные настройки HSTS вашего браузера для этого домена.
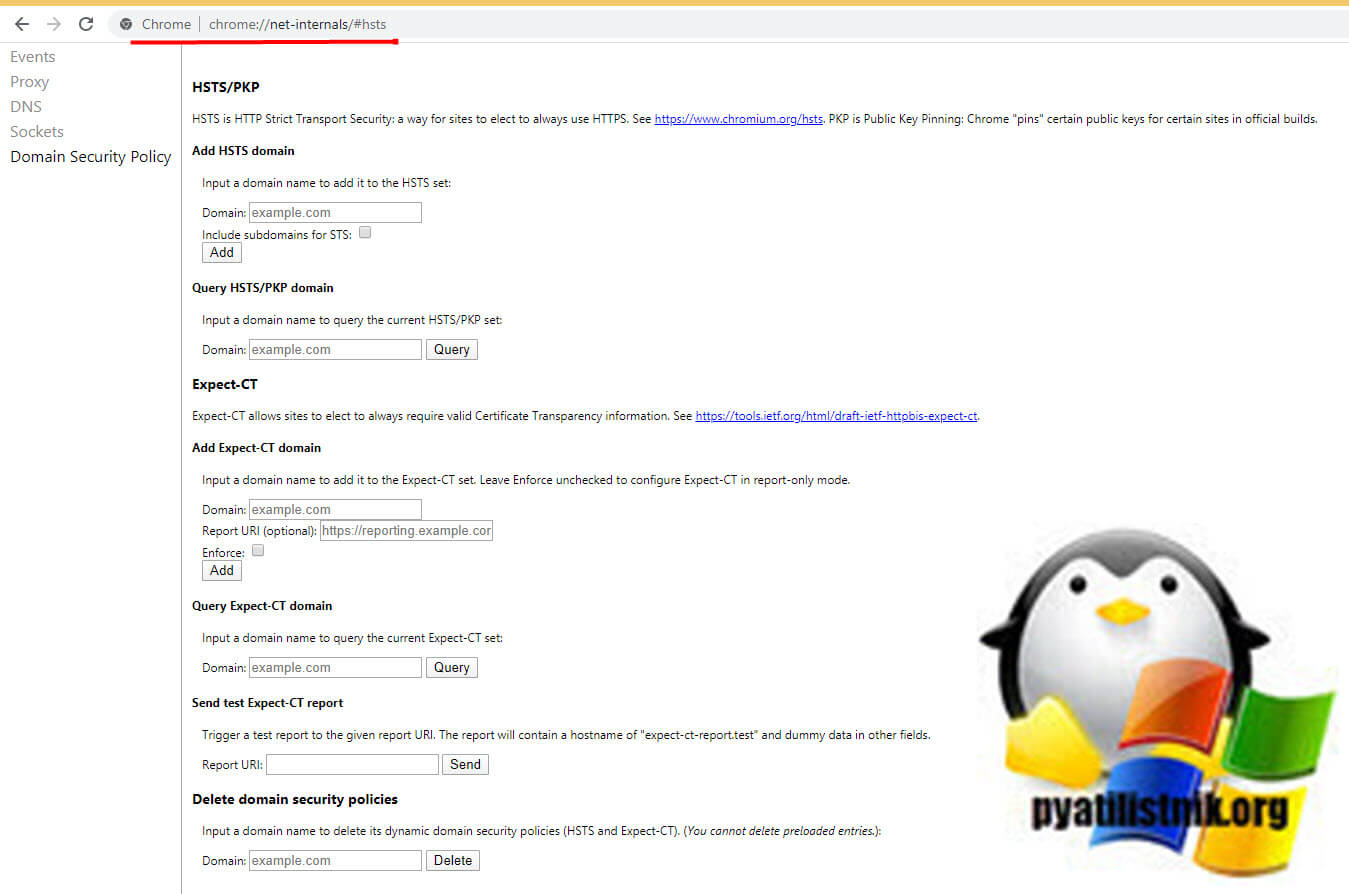
Чтобы удалить настройки HSTS в Chrome вам необходимо посетить специальную техническую страницу по адресу:
chrome://net-internals/#hsts
Это пользовательский интерфейс Chrome для управления локальными настройками HSTS вашего браузера.
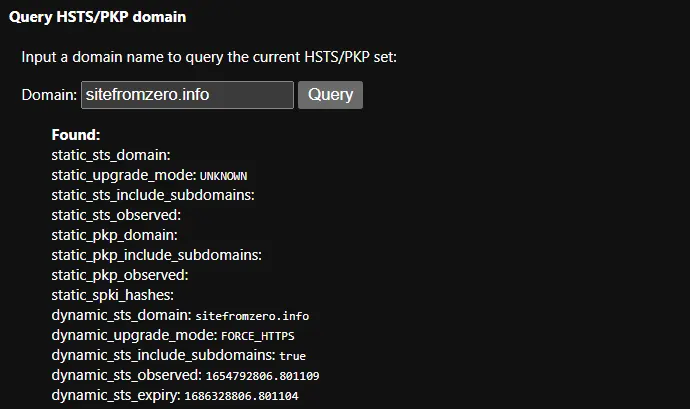
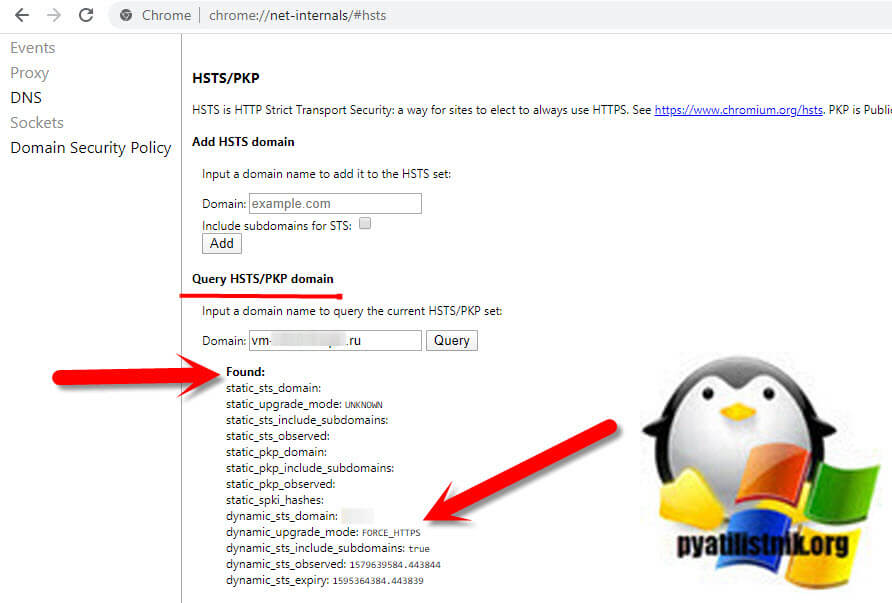
Во-первых, чтобы подтвердить, что настройки HSTS применяются к нужному домену (адресу сайта) и записаны в Chrome, введите адрес домена в разделе «Query Domain» в нижней части страницы. Нажмите «Query«. Если поле «Query» возвращает значение «Found» с приведенной ниже информацией о настройках, то настройки HSTS домена сохраняются в вашем браузере и их нужно удалять. В моем случае адрес был найден в кэше Chrome и обратите внимание, что стоит флаг FORCE_HTTPS.
Обратите внимание, что это очень чувствительный поиск. Введите только имя хоста, например, pyatilistnik.org или google.com без протокола или пути.
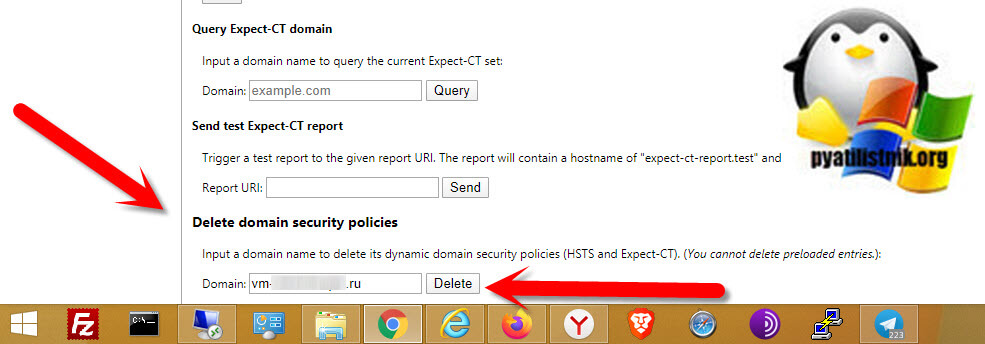
Далее чтобы очистить данные HSTS для нужного сайта вам необходимо на этой странице найти в самом низу раздел «Delete domain security policies». Далее вы вставляете тот же адрес сайта, без всяких http, просто адрес домена, что проверяли выше и нажимаете кнопку «Delete».
Перезапустите Chrome и посмотрите, есть ли у вас доступ к домену, для которого вы ранее очистили настройки HSTS. Если проблема была связана с настройками HSTS, веб-сайт должен быть доступен.
Как удалить настройки HSTS для Яндекс браузера, Edge Chromium, Opera, Амиго
Большинство браузеров построены на движке Chromium, среди них можно выделить:
- Microsoft Edge Chromium, который появился в январе 2020 года
- Яндекс браузер
- Opera
- Амиго
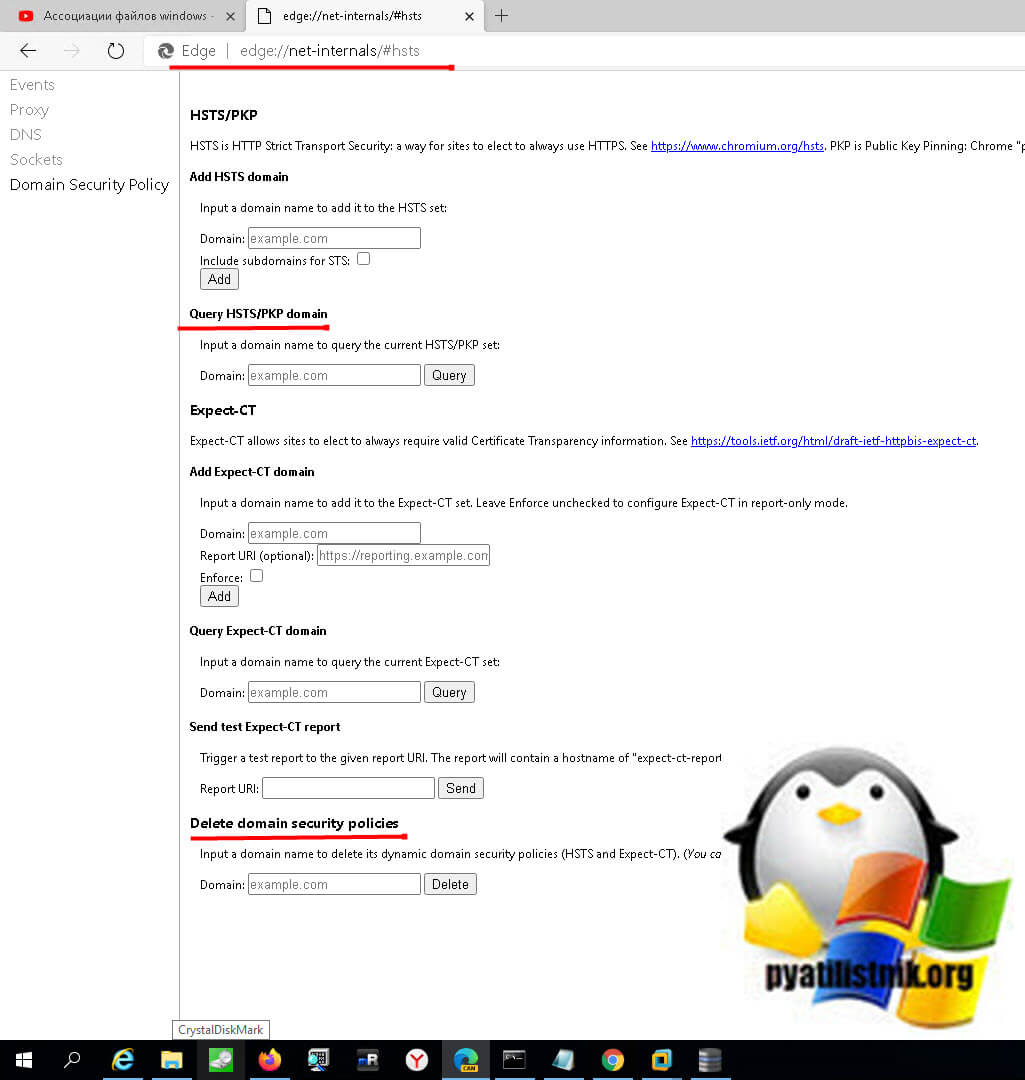
Так как у них движок такой же .как и у Google Chrome, то к ним будет применен и актуален такой же метод, что мы делали выше, а именно через удаление домена на специальной странице:
chrome://net-internals/#hsts
Вот вам пример из Microsoft Edge Chromium
Как очистить или отключить HSTS в Firefox
По сравнению с Chrome, Firefox имеет несколько способов очистки или отключения настроек. Для начала я рассмотрю автоматический метод.
Автоматический метод отключения HSTS в Mozilla
- Откройте Firefox и убедитесь, что все открытые вкладки или всплывающие окна закрыты.
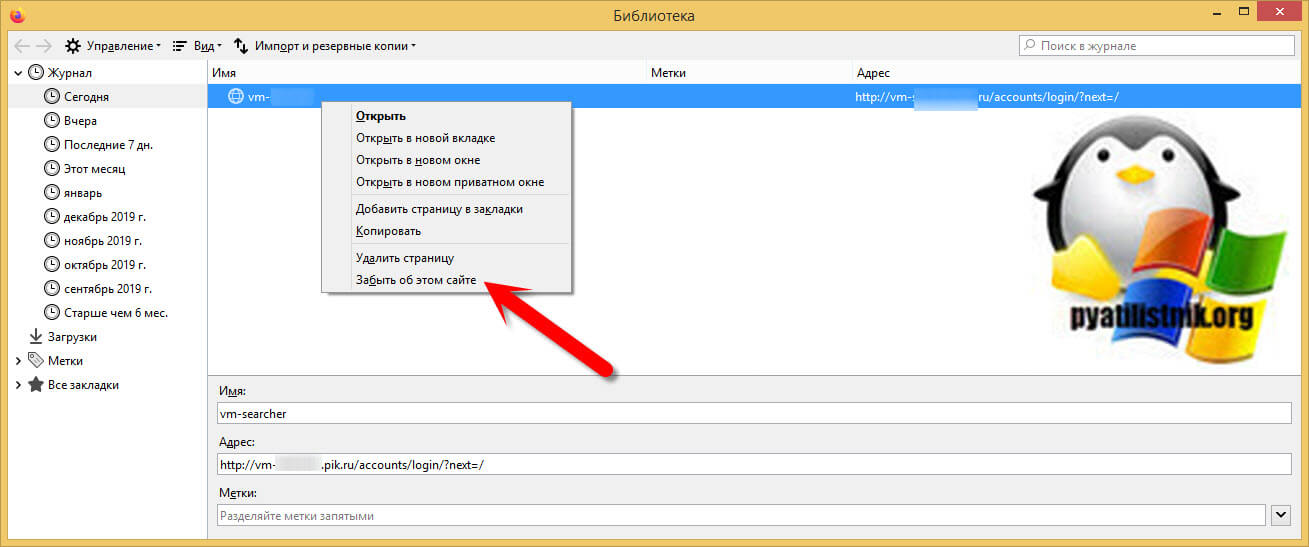
- Нажмите Ctrl + Shift + H (или Cmd + Shift + H на Mac), чтобы открыть меню библиотеки .
- Найдите сайт, для которого вы хотите удалить настройки HSTS. Вы можете упростить для себя, используя панель поиска в верхнем правом углу.
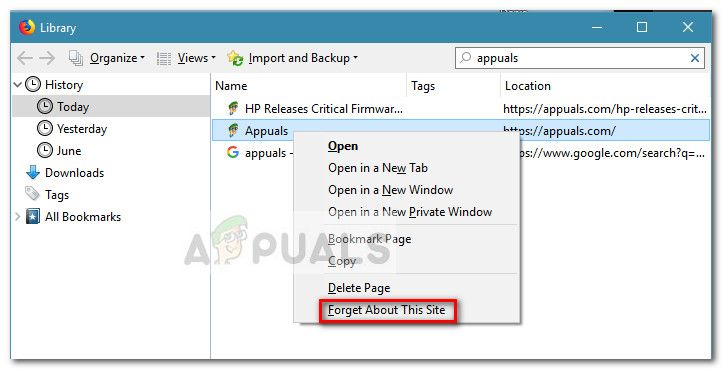
- Как только вам удастся найти веб-сайт, для которого вы пытаетесь очистить настройки HSTS, щелкните по нему правой кнопкой мыши и выберите Забыть об этом сайте . Это очистит настройки HSTS и другие кэшированные данные для этого конкретного домена.
- Перезапустите Firefox и посмотрите, была ли проблема решена. Если это была проблема HSTS, то теперь вы сможете нормально просматривать веб-сайт и Firefox не будет производить принудительный переброс http на https.
Ручной метод для Firefox
Данный метод можно еще назвать методом очистки HSTS путем очистки настроек сайта.
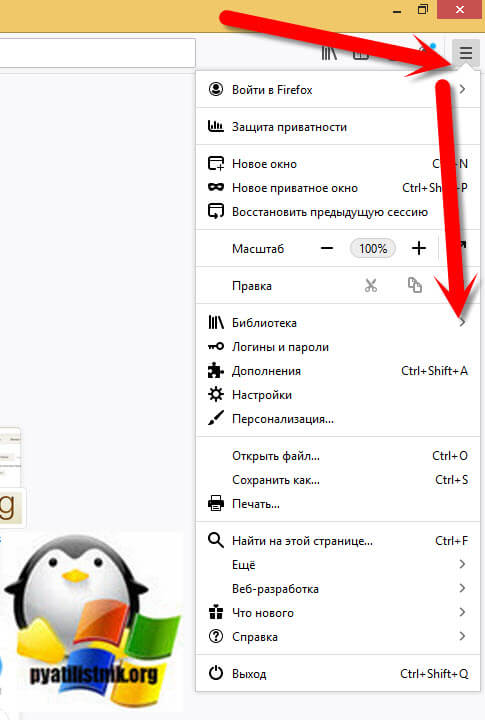
- Откройте Firefox, нажмите на значок «Библиотека» и выберите «Журнал«
- Далее выберите пункт «Удалить историю»
- В окне «Удаление всей истории» установите в раскрывающемся меню «Диапазон времени» значение «Все». Затем разверните меню «Данные» и снимите все флажки, кроме «Настройки сайта» и нажмите «Удалить сейчас», чтобы очистить все настройки сайта, включая настройки HSTS . Далее перезагрузите Firefox и посмотрите, была ли проблема решена при следующем запуске.
3 Способ: очистка настроек HSTS путем редактирования профиля пользователя
Еще одним методом очистки или отключения HSTS в Firefox можно выделить редактирования профиля пользователя.
- Полностью закройте Firefox и все связанные всплывающие окна и значки в трее.
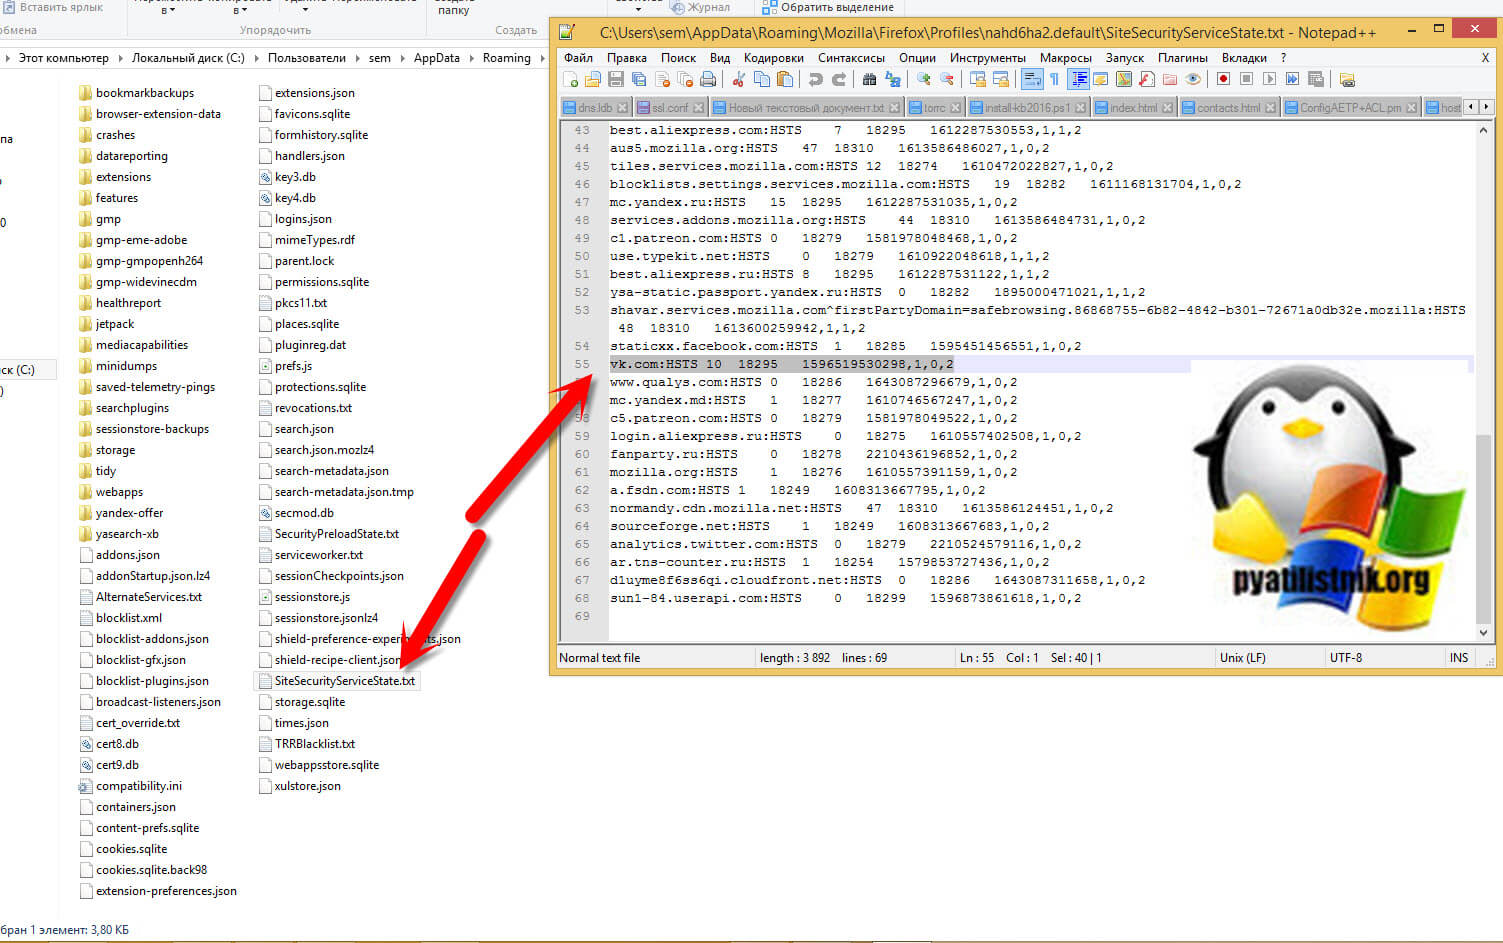
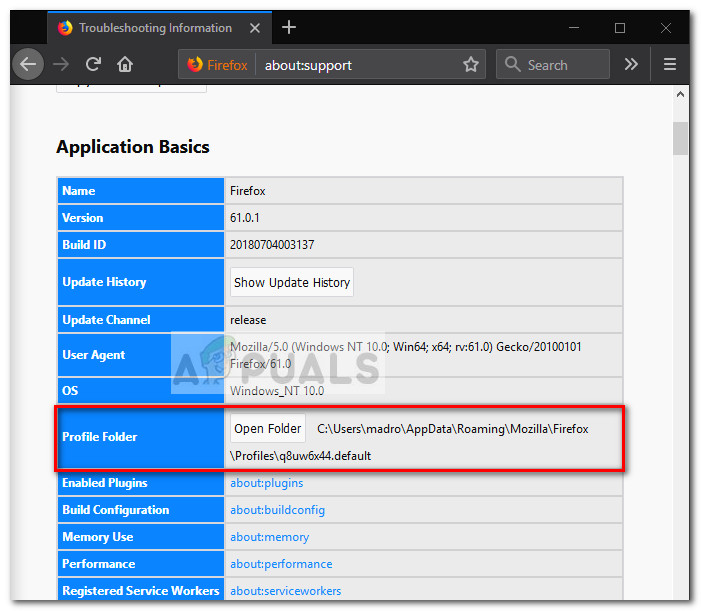
- Перейдите к местоположению профиля пользователя вашего Firefox. Найти свой профиль пользователя, вставив «about:support» в навигационную панель вверху и нажав Enter. Вы найдете расположение папки профиля в разделе Основы приложения . Просто нажмите Открыть папку, чтобы перейти в папку профиля. Но как только вы это сделаете, убедитесь, что вы полностью закрыли Firefox.
- В папке профиля Firefox откройте SiteSecurityServiceState.txt в любой текстовом редакторе. Этот файл содержит кэшированные настройки HSTS и HPKP (закрепление ключей) для доменов, которые вы посещали ранее. Чтобы очистить настройки HSTS для определенного домена, просто удалите всю запись и сохраните документ .txt .
Примечание: Вы также можете переименовать файл из .txt в .bak, чтобы сохранить существующий файл на всякий случай. Это заставит Firefox создать новый файл и начать с нуля, удаляя все ранее сохраненные настройки HSTS.
После удаления записи и сохранения файла закройте SiteSecurityServiceState.txt и перезапустите Firefox, чтобы увидеть, была ли проблема решена. По идее ошибки:
-
- Privacy error: Your connection is not private” (NET::ERR_CERT_AUTHORITY_INVALID)
- ERR_CONNECTION_REFUSED
- ERR_CONNECTION_TIMED_OUT
должны быть устранены, по крайней мере в 99% случаев, это работает для Mozilla Firefox.
4 Способ отключить HSTS в Firefox
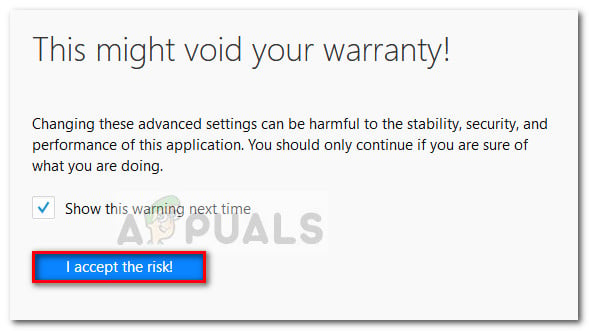
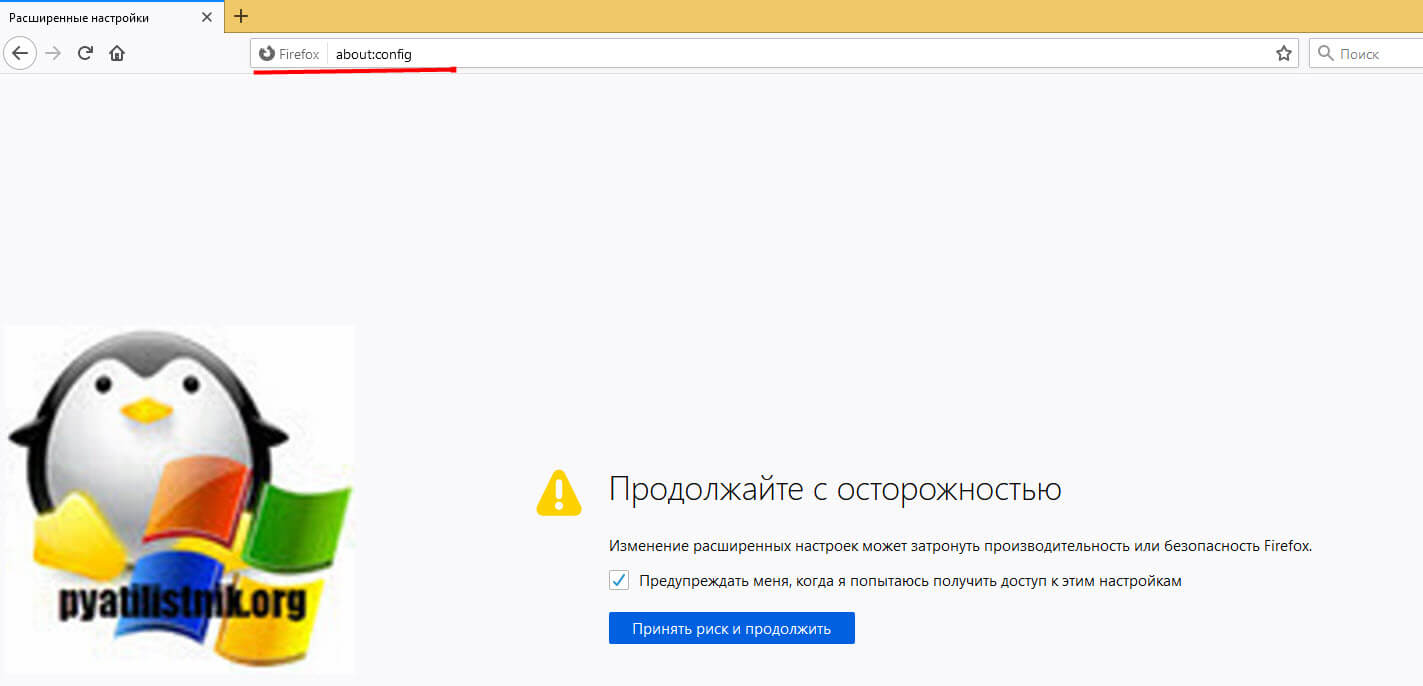
- Запустите Firefox и введите about:config в адресной строке вверху. Далее, нажмите «Принять риск и продолжить»! Кнопка для входа в меню расширенных настроек .
Далее через поиск найдите security.mixed_content.use_hstsc или security.mixed_content.block_active_content и выключите его. Обязательно перезапустите браузер.
Очистка или отключение настроек HSTS в Internet Explorer
Поскольку это важное улучшение безопасности, HSTS по умолчанию включен в Internet Explorer. Хотя не рекомендуется отключать HSTS в браузерах Microsoft, вы можете отключить эту функцию для Internet Explorer. Вот краткое руководство о том, как это сделать с помощью редактора реестра. Откройте окно выполнить и введите там regedit, чтобы запустить редактор реестра Windows.
Перейдите в раздел:
HKEY_LOCAL_MACHINESOFTWARE MicrosoftInternet Explorer MainFeatureControl
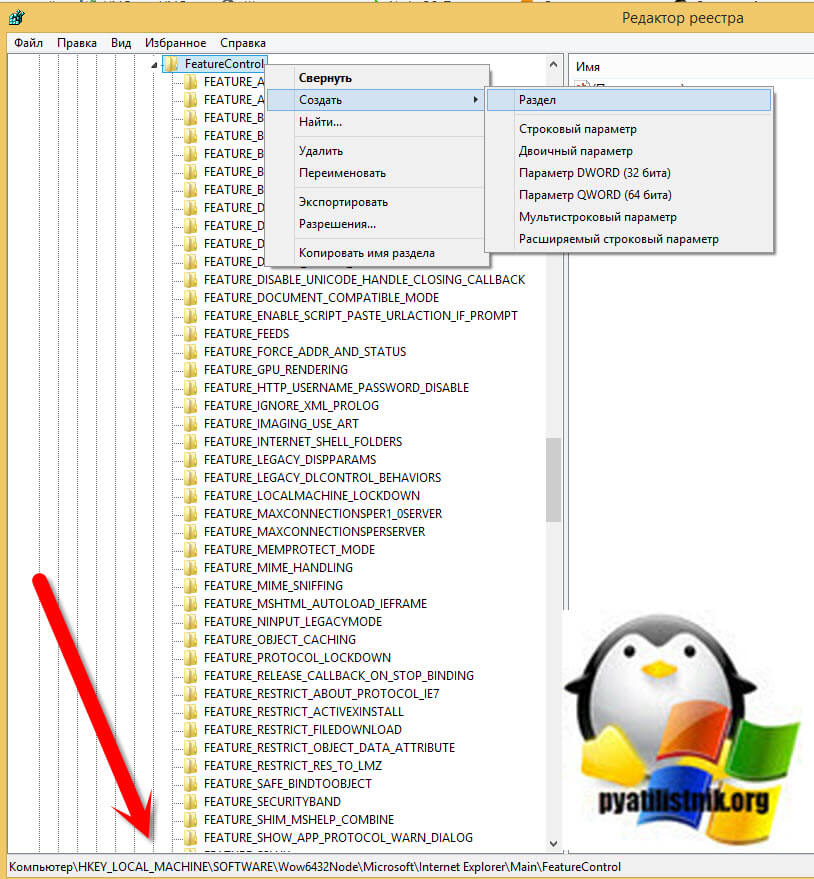
Щелкните правой кнопкой мыши по FeatureControl и выберите «Создать — Раздел» . Назовите его FEATURE_DISABLE_HSTS и нажмите Enter.
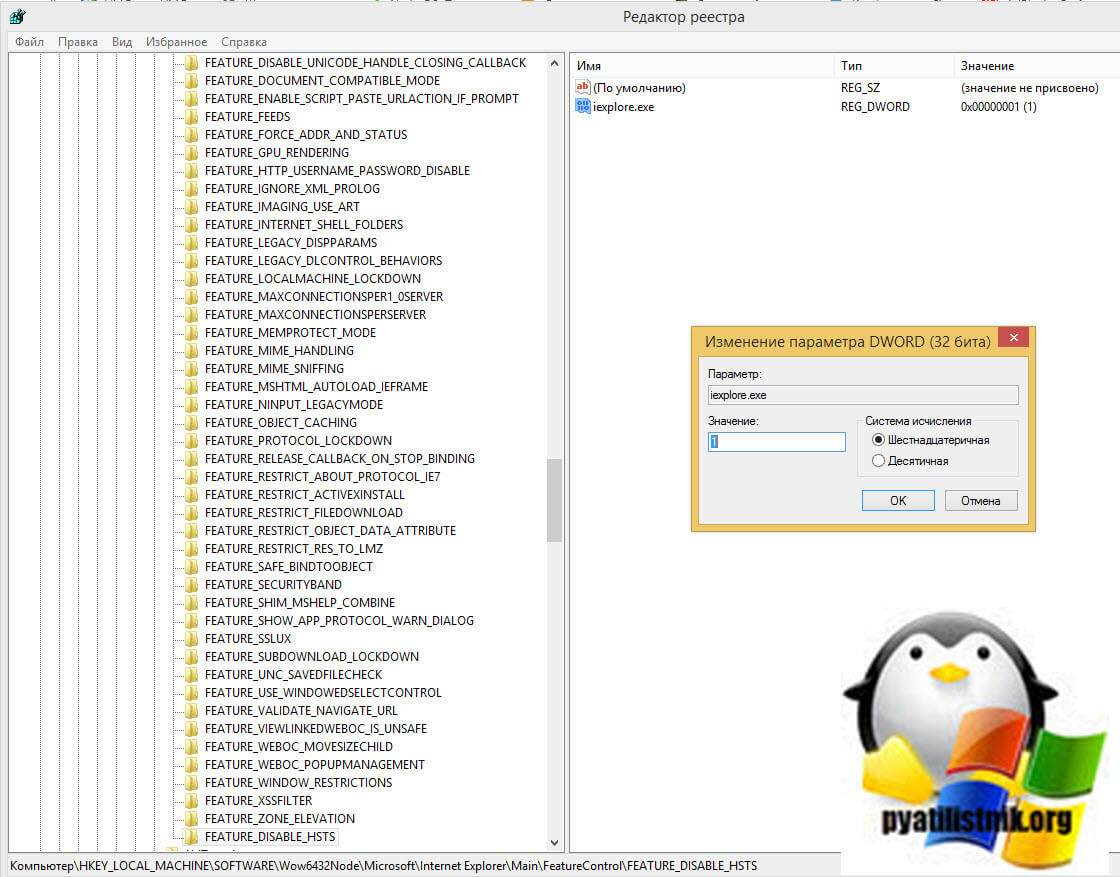
Щелкните в данном разделе правым кликом и создайте новый ключ «Параметр DWORD (32 бита)» и назовите его iexplore.exe со значением 1.
У меня получилось вот так.
Примечание. Если вы работаете в системе на базе x86, то вы можете сохранить изменения, перезагрузить компьютер и посмотреть, удается ли теперь открыть сайт. Если вы делаете это в 64-разрядной системе, перейдите к следующим шагам ниже.
- Снова используйте левую панель, чтобы перейти к следующему подразделу реестра:
HKEY_LOCAL_MACHINESOFTWAREWow6432Node MicrosoftInternet ExplorerMain FeatureControl
- Щелкните правой кнопкой мыши FeatureControl и выберите «Создать — Раздел» , назовите его FEATURE_DISABLE_HSTS и нажмите Enter, чтобы сохранить изменения.
- Щелкните правой кнопкой мыши FEATURE_DISABLE_HSTS и выберите «Создать — «DWORD (32-разрядное) значение» и назовите его «iexplore.exe», задайте ему значение «1»
- Перезагрузите компьютер и посмотрите, были ли отключены настройки HSTS для Internet Explorer при следующем запуске.
На этом у меня все, я попытался вам написать обобщенную статью по которой вы легко сможете отключить принудительное перенаправление адресов сайта с http на https из-за технологии HSTS. С вами был Иван Семин, автор и создатель IT портала Pyatilistnik.org.
It’s widely accepted that HTTPS is far more secure than HTTP. However, if you’re encountering the “HSTS missing from HTTPS server” message, then this protocol could be putting your site at risk.
Fortunately, it is possible to close this serious security loophole. Even if you haven’t encountered this error message, any site that redirects from HTTP to HTTPS is vulnerable to this exploit. Therefore, it’s still wise to take a proactive approach and fix this flaw.
In this post, we’ll explore what the “HSTS missing from HTTP server” error is and why it’s such a huge concern for any website that uses HTTPS redirects. We’ll then show you how to fix this problem and foil the hackers, in five easy steps.
Check Out Our Video Guide to Fixing the “HSTS Missing From HTTP Server” Error
An Introduction to the “HSTS Missing From HTTP Server” Error
To help keep visitors safe, it’s not uncommon for sites to perform HTTPS redirection. This redirection forwards visitors from an HTTP to an HTTPS version of the website.
A user may explicitly enter HTTP into their browser’s address bar, or follow a link that points to an HTTP version of the site. In these scenarios, a redirect can prevent malicious third parties from stealing the visitor’s data.
However, no technology is perfect. If your site does use HTTPS redirects, then you may be susceptible to a Man-In-The-Middle (MITM) attack known as Secure Sockets Layer (SSL) Stripping. As part of this attack, the hacker will block the redirection request and prevent the browser from loading your site over the HTTPS protocol. As a result, the visitor will access your website via HTTP, which makes it much easier for hackers to steal data.
Alternatively, the attacker might intercept the redirect and forward visitors to a clone version of your site. At this point, the hacker can steal any data that the user shares, including passwords and payment information. Some hackers might also try to trick visitors into downloading malicious software.
It’s also possible for hackers to steal a session cookie over an unsecured connection, in an attack known as cookie hijacking. These cookies can contain a wealth of information, including usernames, passwords, and even credit card details.
To protect your visitors against these attacks, we recommend enabling HTTP Strict Transport Security (HSTS). This protocol forces the browser to ignore any direct requests and load your site over HTTPS.
Any site that redirects from HTTP to HTTPS is vulnerable to this exploit… which means it’s wise to take a proactive approach and fix this flaw. 💪Click to Tweet
The HSTS Protocol (and Why You May Want to Use It)
HSTS is a server directive and web security policy. Specified by the Internet Engineering Task Force (IETF) in RFC 6797, HSTS sets regulations for how user agents and web browsers should handle their connections for a site running over HTTPS.
Sometimes, an IT security scan might report that your site is “missing HSTS” or “HTTP Strict Transport Security” headers. If you encounter this error, then your site isn’t using HSTS, which means your HTTPS redirects may be putting your visitors at risk.
This is classed as a medium-risk vulnerability. However, it’s incredibly common and represents low hanging fruit for attackers. If you encounter this error, then it’s crucial you address it.
By adding the HSTS security header to your server, you can force your site to load on the HTTPS protocol. This can help protect your site against cookie hijacking and protocol attacks. Since you’re potentially removing a redirect from the loading procedure, your site may also load faster.
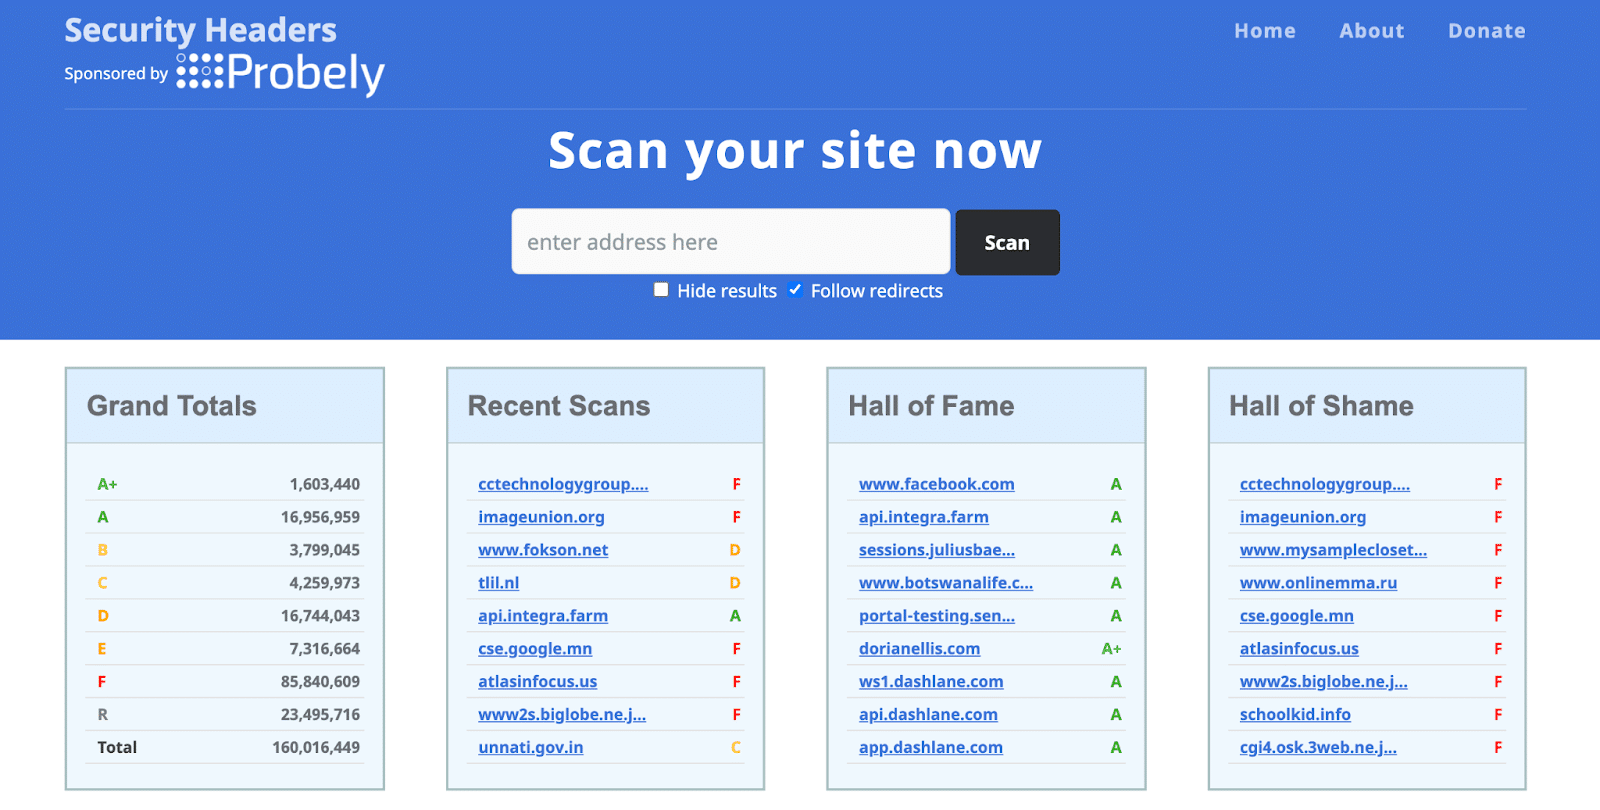
There’s a chance you may not have encountered this error but are still concerned about HSTS. If you’re unsure whether you have HSTS enabled, you can scan your site using a tool such as Security Headers. Simply enter your website’s URL, and then click on Scan.
Security Headers will check your site and display all of the applied headers in the Headers section. If Strict-Transport-Security makes an appearance, then your site is protected. However, if this header isn’t listed, then we have some work to do.
How To Fix the “HSTS Missing From HTTP Server” Error (In 5 Steps)
For hackers, the HSTS vulnerability is the perfect opportunity to steal data or trick your visitors into performing dangerous actions. Here’s how to enable the HSTS policy and keep your site safe.
Step 1: Create a Manual Backup
Enabling the HSTS policy represents a significant change to your website. For this reason, we recommend creating an on-demand backup before proceeding. This gives you the option to restore your site in the unlikely event that you encounter any issues when enabling HSTS.
At Kinsta, we provide daily automatic WordPress backups. However, it’s still smart to create a manual backup before making any major changes. To create this safety net, log into your MyKinsta dashboard and select the website in question. Then, click on the Backups tab.
Next, select the Manual tab. Find the Backup now button, and give it a click.
You can now add a short note to your backup. This can help you identify it in your MyKinsta dashboard.
Finally, click on Create backup. We’ll now generate your backup and add it to your dashboard.
Step 2: Set Up an HTTP to HTTPS Redirect
Before enabling the HSTS policy, you’ll need to deploy an SSL certificate to your website. At Kinsta, we automatically protect all verified domains with our Cloudflare integration. This includes free SSL certificates with wildcard support. Unless you specifically require a custom certificate, you won’t have to worry about configuring SSL manually.
Next, you’ll need to set up an HTTP to HTTPS redirect, if you haven’t already. To create this redirection, simply log into your MyKinsta dashboard and select your website. Next, click on Tools.
In the Force HTTPS section, click on the Enable button. You can now choose to use your primary domain as the destination, or request to use an alternative domain. After making this decision, select Force HTTPS.
Just be aware that if you use any third-party proxies or set up any custom HTTPS rules, then forcing HTTPS may result in errors or other strange behavior. If you do encounter any issues, you can always contact our support team who will be happy to help.
If your web server is running Nginx, then you can redirect all of your HTTP traffic to HTTPS. Simply add the following code to your Nginx configuration file:
server {

listen 80;

server_name domain.com www.domain.com;

return 301 https://domain.com$request_uri;

}
Alternatively, if you’re a Kinsta customer, then we can make this change for you. Just open a support ticket and let us know which domain needs to be directed, and we’ll handle the rest.
Step 3: Add the HSTS Header
There are various types of directives and levels of security that you can apply to your HSTS header. However, we recommend adding the max-age directive, as this defines the time in seconds for which the web server should deliver via HTTPS. This blocks access to pages or subdomains that can only be served over HTTP.
If you’re using an Apache server, you’ll need to open your virtual hosts file. You can then add the following:
Header always set Strict-Transport-Security max-age=31536000At Kinsta, we run Nginx servers. If you’re a Kinsta customer, then you can add the following to your Nginx configuration file:
add_header Strict-Transport-Security: max-age=31536000; includeSubDomains; preloadAs always, we can do all of the hard work for you. Simply open up a support ticket requesting that we add an HSTS header to your site. Our team will be happy to make this change to your Nginx file.
Step 4: Submit Your Site To the HSTS Preload List
There is one major downside to the HSTS policy. A browser has to encounter the HSTS header at least once before it can use it for future visits. This means your audience will need to complete the HTTP to HTTPS redirection process at least once. During this time, they will be vulnerable to protocol-based attacks.
In an attempt to close this security loophole, Google created the HSTS preload list. This lists all of the websites that support HSTS, which is then hardcoded into Chrome. By adding your site to this list, visitors will no longer have to complete an initial HTTPS redirection.
Most of the major internet browsers have their own HSTS preload lists, which are based on Chrome’s list. To be eligible for this list, your site must meet the submission criteria. The good news is that we’ve already covered all of these requirements, so you can go ahead and submit your site to the HSTS preload list.
Once you make it onto this list, some Search Engine Optimization (SEO) tools may warn you about 307 redirects. These redirects occur when someone attempts to access your site via an unsecured HTTP protocol. This triggers a 307 redirect instead of a permanent 301 redirect. If you’re concerned about this, you can use httpstatus to scan your site and verify whether a 301 redirect is occurring.
Step 5. Verify Your Strict-Transport-Security Header
After adding the HSTS header, it’s a good idea to test that it’s functioning correctly. You can perform this check using your browser’s built-in web tools.
The steps will vary depending on your chosen web browser. To perform this, check in Google Chrome DevTools, navigate to the webpage that you want to test. You can then click on any blank area, and select Inspect.
In the subsequent panel, select the Network tab. You can then check the headers section, which should contain the following:
strict-transport-security: max-age=31536000Alternatively, you can scan your site using the Security Headers tool. As before, simply enter your website’s URL, and then click on Scan. This will return a Security Report, which should contain a strict-transport-security tag. If this tag is present, then your HSTS header is now set up correctly, and you’ve successfully closed the HTTPS redirect loophole.
Close this serious security loophole with help from this guide 💪🔒Click to Tweet
Summary
Redirecting from HTTP to HTTPS is a security best practice. However, no technology is perfect and this redirect may make your site more susceptible to SSL attacks.
With this in mind, let’s recap how to fix the “HSTS missing from HTTP server” error:
- Create a manual backup of your site.
- Set up an HTTP to HTTPS redirect.
- Add the HSTS header.
- Submit your site to the HSTS preload list.
- Verify your strict-transport-security header.
Resolving error messages can be a time-consuming and frustrating process. However, our team of experts is here to help! Around-the-clock support is included in all of our Kinsta plans, so you can focus on what really matters: growing your website.
Get all your applications, databases and WordPress sites online and under one roof. Our feature-packed, high-performance cloud platform includes:
- Easy setup and management in the MyKinsta dashboard
- 24/7 expert support
- The best Google Cloud Platform hardware and network, powered by Kubernetes for maximum scalability
- An enterprise-level Cloudflare integration for speed and security
- Global audience reach with up to 35 data centers and 275 PoPs worldwide
Test it yourself with $20 off your first month of Application Hosting or Database Hosting. Explore our plans or talk to sales to find your best fit.
На чтение 7 мин. Просмотров 515 Опубликовано 25.04.2021
Несмотря на все преимущества безопасности, вы можете легко заблокировать себя на веб-сайте, если вам удастся настроить параметры HSTS неправильно. Ошибки браузера, такие как NET :: ERR_CERT_AUTHORITY_INVALID , являются причиной номер один, по которой пользователи ищут способ обойти HSTS, либо очищая настройки HSTS, либо отключая их.
Содержание
- Что такое HSTS?
- Очистка настроек HSTS в Chrome
- Очистка или отключение настроек HSTS в Firefox
- Метод 1: очистка настроек, забыв о веб-сайте
- Метод 2: Очистка HSTS путем очистки настроек сайта
- Метод 3: Очистка настроек HSTS путем редактирования профиля пользователя
- Метод 4: отключить HSTS из браузера Firefox
- Очистка или отключение настроек HSTS в Internet Explorer
Что такое HSTS?
HSTS (HTTP Strict Transport Security) – это механизм веб-безопасности, который помогает браузерам устанавливать соединения. через HTTPS и ограничить небезопасные HTTP-соединения. Механизм HSTS был в основном разработан для борьбы с атаками SSL Strip, способными понизить безопасные HTTPS-соединения до менее безопасных HTTP-соединений.
Однако некоторые настройки HSTS вызовут ошибки браузера, которые сделают ваш просмотр намного менее приятным. Вот ошибка Chrome, которая часто вызывается неправильной конфигурацией HSTS:
«Ошибка конфиденциальности: ваше соединение не является частным» (NET :: ERR_CERT_AUTHORITY_INVALID)
Если вы получаете сообщение об ошибке конфиденциальности при попытке посетить определенный веб-сайт, и тот же сайт доступен из другого браузера или устройства, есть большая вероятность, что у вас возникла проблема с настройкой параметров HSTS. В этом случае решением будет либо очистить, либо отключить HSTS для вашего веб-браузера.
Ниже у вас есть набор руководств, которые помогут вам очистить или отключить настройки HSTS. Следуйте руководствам, связанным с вашим конкретным браузером, и не стесняйтесь следовать тому решению, которое наиболее подходит для вашего конкретного сценария.
Очистка настроек HSTS в Chrome
Проблема с настройками HSTS в Chrome обычно отображает ошибку типа « Ваше соединение не защищено » в Chrome. Если бы вы развернули меню Advanced (связанное с ошибкой), вы, вероятно, увидите небольшое упоминание о HSTS (« Вы не можете посетить * название веб-сайта *, потому что веб-сайт использует HSTS. Сетевые ошибки и атаки обычно носят временный характер, поэтому эта страница, вероятно, будет работать позже. «)
Если вы столкнулись с таким же поведением, выполните следующие действия, чтобы удалить кеш HSTS из вашего браузера Chrome:
- Откройте Google Chrome и вставьте в омнибар следующее:
chrome://net-internals/# hsts
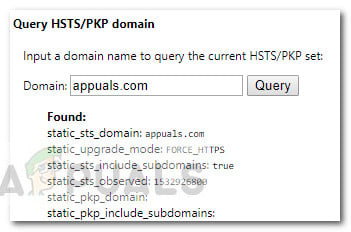
- Убедитесь, что домен Политика безопасности раскрывается, затем используйте поле Домен (под доменом Query HSTS/PKP ), чтобы войти в домен, который вы пытаетесь очистить от HSTS. настройки для. Вам будет возвращен список значений.
- После возврата значений прокрутите вниз до Удалить политики безопасности домена. введите то же имя домена и нажмите кнопку Удалить , чтобы очистить настройки HSTS.
- Перезапустите Chrome и посмотрите, сможете ли вы получить доступ к домену, для которого вы ранее очистили настройки HSTS. Если проблема связана с настройками HSTS, веб-сайт должен быть доступен.
Очистка или отключение настроек HSTS в Firefox
По сравнению с Chrome, Firefox имеет несколько способов очистки или отключения настроек HSTS. Сначала мы собираемся начать с автоматических методов, но мы также включили несколько ручных подходов.
Метод 1: очистка настроек, забыв о веб-сайте
- Откройте Firefox и убедитесь, что все открытые вкладки или всплывающие окна закрыты.
- Нажмите Ctrl + Shift + H (или Cmd + Shift + H на Mac), чтобы открыть меню Библиотека .
- Найдите сайт, который вы хотите удалить настройки HSTS для. Вы можете упростить себе задачу, используя панель поиска в правом верхнем углу.
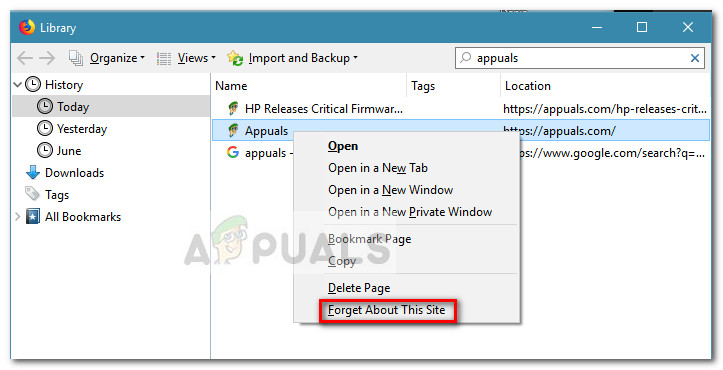
- Как только вам удастся найти веб-сайт, для которого вы пытаетесь очистить настройки HSTS, щелкните правой кнопкой мыши на его и выберите Забыть об этом сайте . Это очистит настройки HSTS и другие кэшированные данные для этого конкретного домена.
- Перезапустите Firefox и посмотрите, решена ли проблема. Если это была проблема HSTS, теперь вы сможете просматривать веб-сайт в обычном режиме.
Если этот метод оказался неэффективным или вы ищете способ очистить HSTS настройки, не очищая остальные кэшированные данные, перейдите к другим методам, указанным ниже.
Метод 2: Очистка HSTS путем очистки настроек сайта
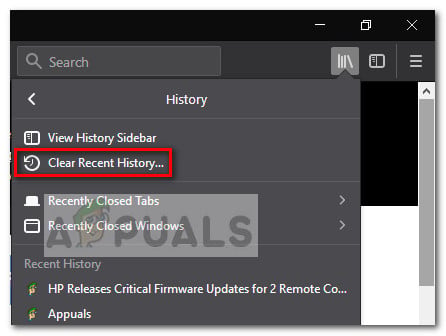
- Откройте Firefox, щелкните Библиотеку и выберите История> Очистить недавнюю историю .
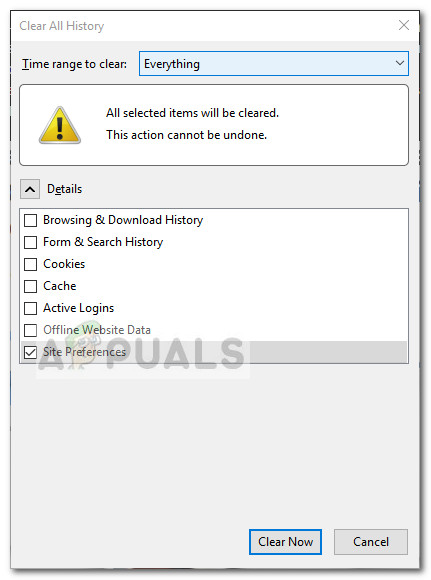
- В окне Очистить всю историю установите для раскрывающегося меню Временной диапазон для очистки значение Все .
- Затем разверните меню Подробности и снимите флажки со всех параметров, кроме Настройки сайта .
- Нажмите кнопку Очистить сейчас , чтобы очистить все настройки сайта изменения, включая настройки HSTS .
- Перезагрузите Firefox и посмотрите, будет ли проблема решена при следующем запуске.
Метод 3: Очистка настроек HSTS путем редактирования профиля пользователя
- Полностью закройте Firefox и все связанные всплывающие окна и значки на панели задач.
- Перейдите к местоположению профиля пользователя вашего Firefox.. Вот список возможных местоположений:
C: Users * AppData Local Mozilla Firefox ProfilesC: Users * AppData Roaming Mozilla Firefox Profiles/Users/*/Library/Application Support /Firefox/Profiles - Mac
Примечание. Вы также можете найти свой профиль пользователя, вставив « about: support » на панели навигации вверху и нажав Enter . Вы найдете папку профиля в разделе Основные сведения о приложении . Просто нажмите «Открыть папку», чтобы перейти к папке профиля. Но как только вы это сделаете, убедитесь, что вы полностью закрыли Firefox.
- В папке профиля Firefox откройте SiteSecurityServiceState.txt в любом текстовом редакторе. Этот файл содержит кэшированные настройки HSTS и HPKP (закрепление ключей) для доменов, которые вы ранее посещали.
- Чтобы очистить настройки HSTS для определенного домена, просто удалите всю запись и сохраните .txt документ. Имейте в виду, что формат запутан, поэтому будьте осторожны, чтобы не удалить информацию из других записей. Вот пример листинга HSTS:
appual.disqus.com:HSTS 0 17750 1533629194689,1,1,2
Примечание. Вы также можете переименовать весь файл из .txt в .bak, чтобы на всякий случай сохранить существующий файл. Это заставит Firefox создать новый файл и начать с нуля, удалив все ранее сохраненные настройки HSTS.
- После удаления записи и сохранения файла закройте SiteSecurityServiceState.txt и перезапустите Firefox, чтобы проверить, решена ли проблема.
Метод 4: отключить HSTS из браузера Firefox
- Запустите Firefox и введите « about: config » в адресной строке вверху. Затем нажмите «Я принимаю риск»! кнопку, чтобы войти в меню Расширенные настройки .
- Найдите «hsts» с помощью строки поиска в правом верхнем углу экрана.
- Дважды щелкните security.mixed_content.use_hstsc , чтобы переключить параметр для отключения HSTS в Firefox.
Очистка или отключение настроек HSTS в Internet Explorer
Поскольку это важное улучшение безопасности, HSTS включен по умолчанию как в Internet Explorer, так и в Microsoft Edge. Хотя не рекомендуется отключать HSTS в браузерах Microsoft, вы можете отключить эту функцию для Internet Explorer. Вот краткое руководство о том, как это сделать с помощью редактора реестра:
Примечание. Имейте в виду, что процедура длиннее, если у вас система на базе x64, чем если у вас система на базе x86.
- Нажмите клавишу Windows + R , чтобы открыть окно “Выполнить”. Затем введите « regedit » и нажмите Enter , чтобы открыть редактор реестра.
- Используя левую панель редактора реестра, перейдите к следующему подразделу реестра:
HKEY_LOCAL_MACHINE SOFTWARE Microsoft Internet Explorer Main FeatureControl
- Щелкните правой кнопкой мыши FeatureControl и выберите Создать> Ключ . Назовите его FEATURE_DISABLE_HSTS и нажмите Enter , чтобы создать новый ключ.
- Щелкните правой кнопкой мыши FEATURE_DISABLE_HSTS и выберите Создать> DWORD (32 -bit) значение .
- Назовите вновь созданный DWORD iexplore.exe и нажмите Enter , чтобы Подтвердить .
- Щелкните правой кнопкой мыши iexplore.exe и выберите Изменить . В поле Значение введите 1 и нажмите ОК , чтобы сохранить изменения.
Примечание. Если вы используете систему на базе x86, вы можете сохранить изменения, перезагрузить компьютер и посмотреть, был ли метод успешным. Если вы делаете это в системе на базе x64, перейдите к следующим шагам, приведенным ниже. - Снова используйте левую панель, чтобы перейти к следующему подразделу реестра:
HKEY_LOCAL_MACHINE SOFTWARE Wow6432Node Microsoft Internet Explorer Main FeatureControl
- Щелкните правой кнопкой мыши FeatureControl и выберите New> Key , назовите его FEATURE_DISABLE_HSTS и нажмите Enter , чтобы сохранить изменения.
- Щелкните правой кнопкой мыши FEATURE_DISABLE_HSTS и выберите Создать> DWORD (32-битное) значение и назовите его iexplore.exe . .
- Дважды щелкните файл iexplore.exe и измените Установите для поля данных значение 1 и нажмите Ok , чтобы сохранить изменения.
- Перезагрузите компьютер и посмотрите если настройки HSTS были отключены для Internet Explorer при следующем запуске вверх.
Просмотров 1.1к. Опубликовано 10.06.2022 Обновлено 25.10.2022
Безопасность — одна из наивысших ценностей современного существования и сайты здесь не исключение. HSTS — герой сегодняшнего обзора. Вы узнаете, как добиться, чтобы браузеры открывали страницы только по HTTPS-защищённому протоколу, даже если пользователь намеренно введёт адрес с http://.
Содержание
- Что такое HSTS
- Поддержка браузерами
- Настройка
- В панели управления хостингом
- С помощью файла .htaccess
- Preload list
- Проверка
- hstspreload.org
- ssllabs.com
- net-internals
- Влияние на SEO
- Скорость загрузки
- Mixed content
- Недостатки
- NTP-атаки
- Удаление
HTTPS-протокол уже стал стандартным требованием для любого проекта. За этим тщательно следят поисковые системы, а Яндекс даже награждает сайт специальным знаком.

Многие начинающие вебмастера настраивают 301 редирект с http:// на https:// и на этом успокаиваются. Однако аудит сайта в Serpstat выдаёт серьёзную ошибку: не поддерживается протокол HTTP Strict Transport Security (HSTS).
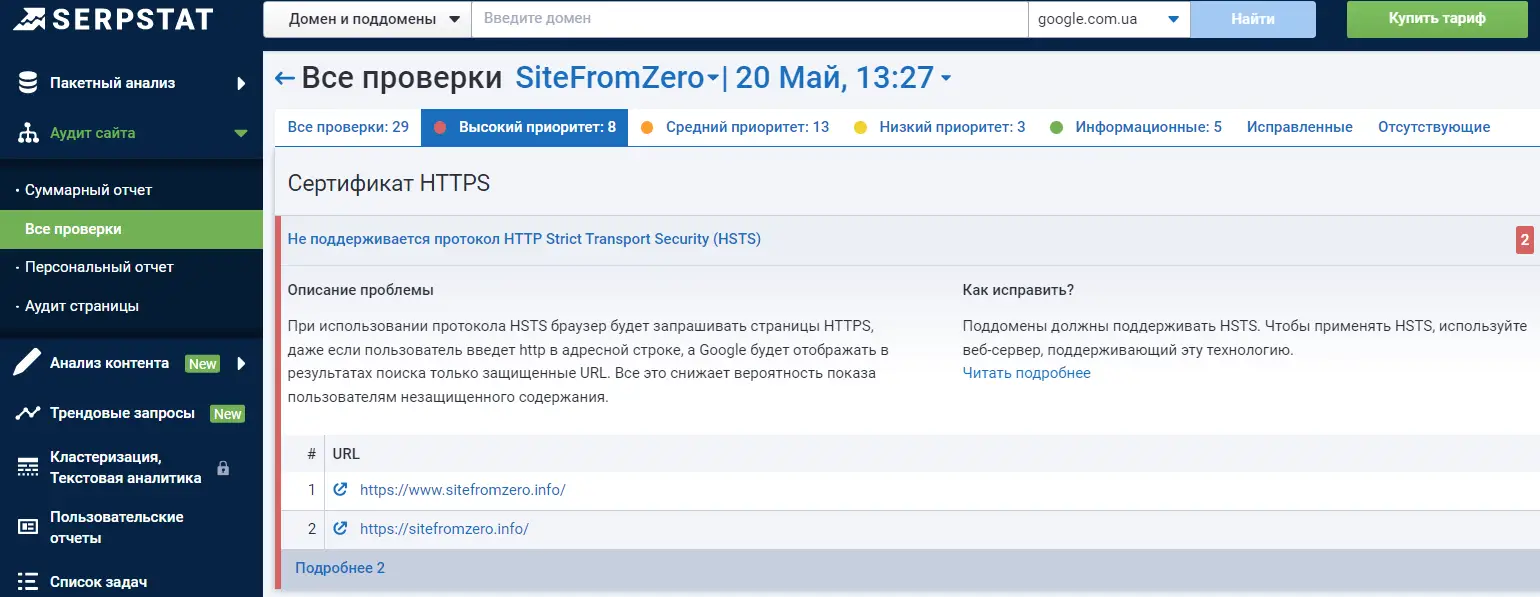
Как видите, этого недостаточно. Давайте разберёмся в чём проблема, как её исправить а также плюсы и минусы такого подхода.
Что такое HSTS
Даже если выпущен SSL-сертификат и настроено перенаправление на https:// всё равно в ряде случаев может произойти небезопасное соединение.
- Пользователь ввёл в строку адреса домен вместо полного URL (sitefromzero.info вместо https://sitefromzero.info/). В этом случае, браузеры по умолчанию используют http://.
- Непосредственный переход по ссылке или адресу страницы с http://, что может быть случайным или намеренным с целью перехвата данных.
- Сеть пользователя может враждебно относиться к https:// и автоматически менять их на http://.
Чтобы повысить степень безопасности в 2012 году был разработан специальный механизм работы сайта, который сообщает браузеру, что он открывается только по защищённому протоколу.
HTTP Strict Transport Security — алгоритм принудительного взаимодействия с сайтом только посредством HTTPS-соединения.
Это означает, что если ваш ресурс использует политику безопасности HSTS, то пользовательский браузер обязан автоматически заменять все http-ссылки на https://.
Другими словами, HSTS — это аналог 301-го редиректа, но на уровне браузера, а не страниц. Зачем же тогда было мучиться, спросите вы… Дело в том, что при 301-редиректе первая загрузка сайта обычно происходит по незащищённому соединению. А в случае с HSTS продуман механизм защиты даже для первого «свидания». Но обо всём по порядку.
HSTS следует использовать только убедившись, что HTTPS работает корректно.
Также важно понять, что HSTS это перенаправление, но не истинный редирект. Его видят только браузеры, а вот Googlebot его не заметит. Это дополнительный инструмент, который применяется совместно с настоящими редиректами.
В случае, если сайт не может обеспечить зашифрованное соединение (например, закончился срок действия SSL-сертификата), то доступ к нему будет закрыт.
Поддержка браузерами
На сегодняшний день Strict Transport Security поддерживают все современные браузеры. По данным Caniuse 96.77% пользователей используют браузеры с поддержкой HSTS.
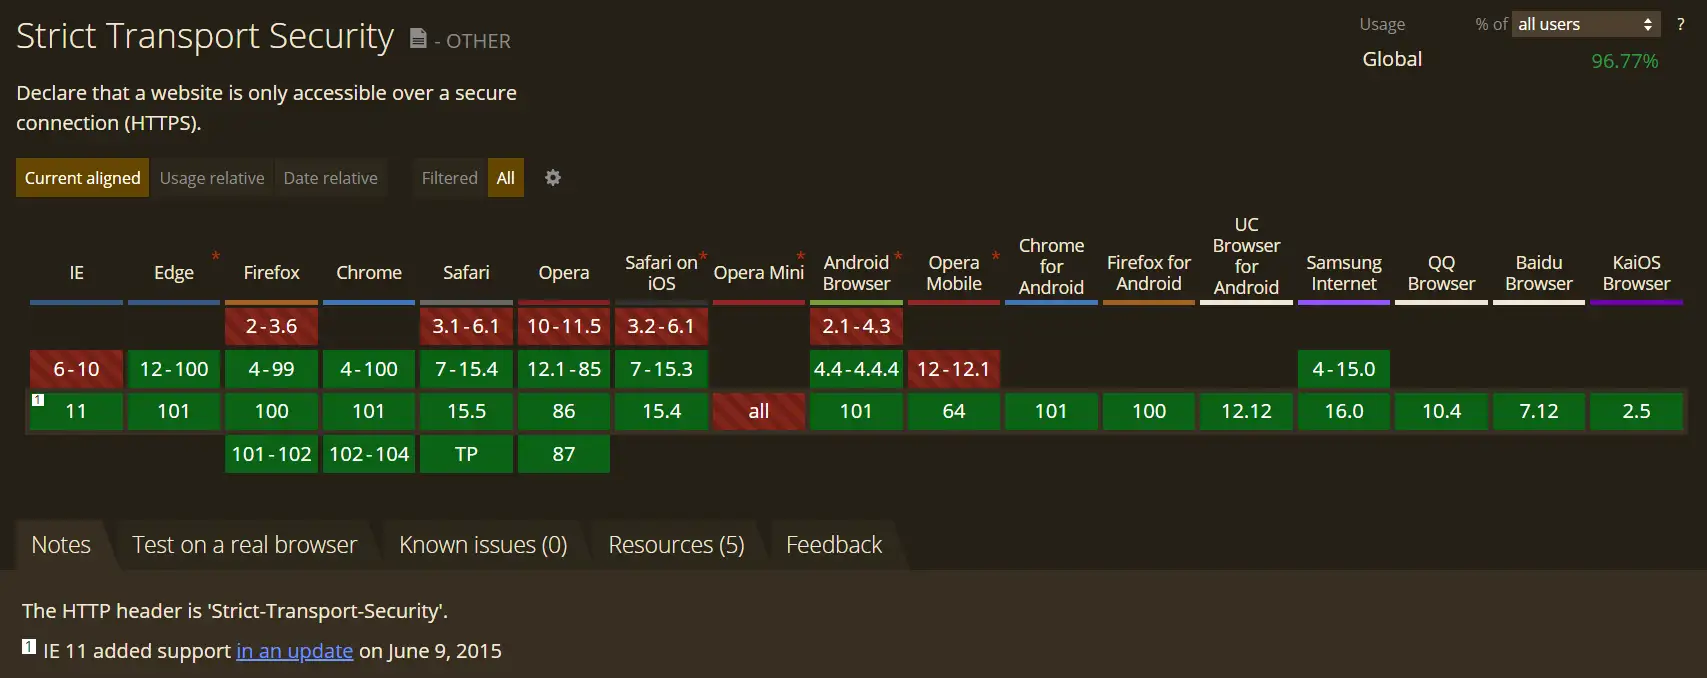
Настройка
Внедрение HSTS производится либо активацией в личном кабинете хостинг-провайдера, либо самостоятельным прописанием заголовка HTTP Strict Transport Security, который будет добавляться ко всем ответам вашего сервера..
В панели управления хостингом
Для начала выясните: есть ли такая функция на вашем хостинге. Например, если вы пользуетесь панелью ISPmanager, то достаточно установить галочку после того, как будет выпущен SSL-сертификат.
С помощью файла .htaccess
Откройте файл .htaccess с помощью FileZilla и добавьте код. Заголовок может содержать разный набор переменных, для своего блога я выбрала самый полный вариант:
Header set Strict-Transport-Security "max-age=31536000; includeSubDomains; preload" env=HTTPS- Strict-Transport-Security — заголовок принудительного использования HTTPS-протокола;
- параметр max-age показывает браузеру время в секундах (31536000с примерно соответствует году), когда сайт доступен только по https:// соединению;
- includeSubDomains указывает, что это правило распространяется также на все поддомены;
- preload — такая директива считается запросом на включение сайта в Preload list.
О необходимости создания списка мы подробно поговорим ниже, а сейчас я только отмечу, что удаление директивы preload расценивается как запрос на удаление из него.
Preload list
Рассмотренный механизм всё же имеет недостаток: HSTS-политика не способна защитить первое соединение с сайтом и утечка данных всё ещё остаётся актуальной. А ведь клиент может переустановить систему, зайти с другого браузера или устройства а также просто очистить кэш.
Получается, что все эти ситуации не могут гарантировать 100%-безопасное соединение. Особенно это важно на ресурсах, производящих транзакции.
Поэтому Google Chrome в 2010 году стал дополнительно составлять список сайтов, которые при первом посещении пользователем в браузере Chrome открываются исключительно по HTTPS-протоколу.
Позднее на основе этого HSTS preload list стали формировать списки для Microsoft, Safari, Mozilla Firefox.
Чтобы попасть в список воспользуйтесь сервисом HSTS Preload. Сначала он проверяет сайт на соответствие требований.
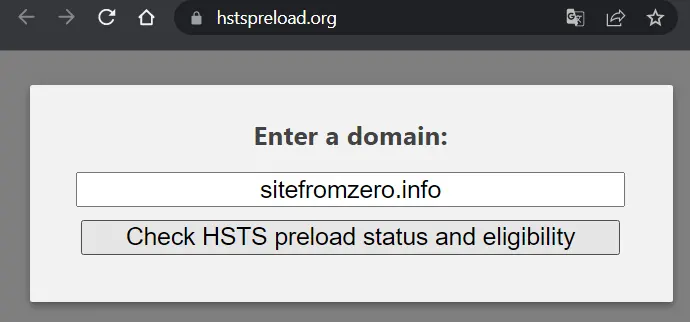
Если результат отрицательный, то увидите красный или жёлтый экран и ошибки, которые нужно исправить.
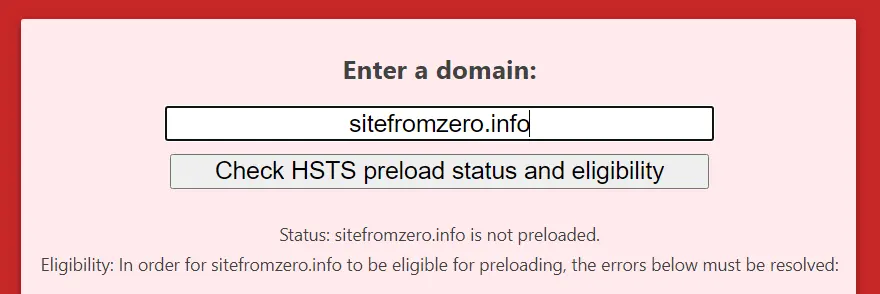
При положительном результате выйдет сообщение, что протестированный сайт может быть добавлен в preload list.
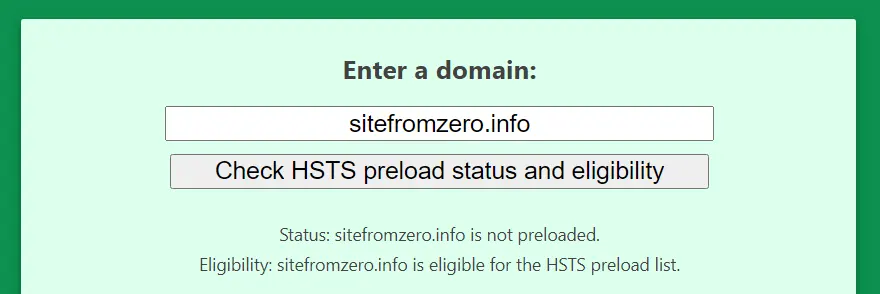
Если вы уверены, что HTTPS-протокол работает корректно, то отправьте заявку. Если есть сомнения, то для начала проведите тестирование указав небольшой временной промежуток.
Требования к добавлению сайта в Preload list:
- наличие SSL-сертификата;
- перенаправление всех страниц с http:// на https://;
- все субдомены (включая www, если для него есть DNS-запись) работают по HTTPS-протоколу;
- директива max-age больше года;
- указание директивы includeSubDomains;
- наличие директивы preload.
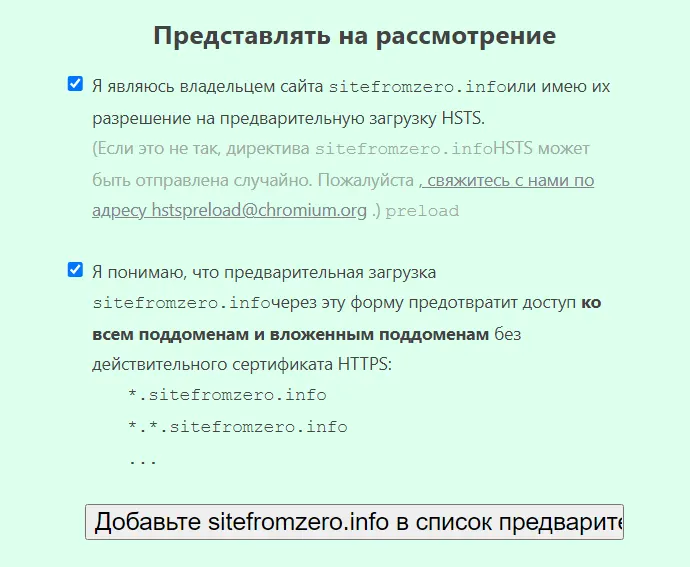
Я решила отправить заявку, проставила галочки и попросила добавить sitefromzero.info в HSTS список Google, откуда потом попадут данные и в другие браузеры.
Проверка
Новые записи жёстко кодируются в исходном коде Chrome, потребуется несколько месяцев прежде, чем сайт будет стабильно отображаться в списке. Проверить текущий статус можно с помощью специальных сервисов.
hstspreload.org
HSTS Preload рекомендует зайти через несколько дней и проверить статус сайта. В случае, если он не соответствует требованиям безопасного соединения, то будет исключён из списка.

ssllabs.com
Проверить попал ли проект в Preload List можно и с помощью сервиса ssllabs.com.
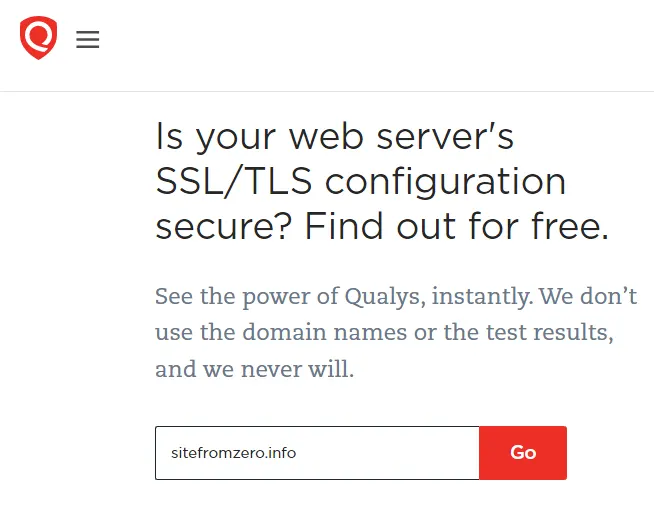
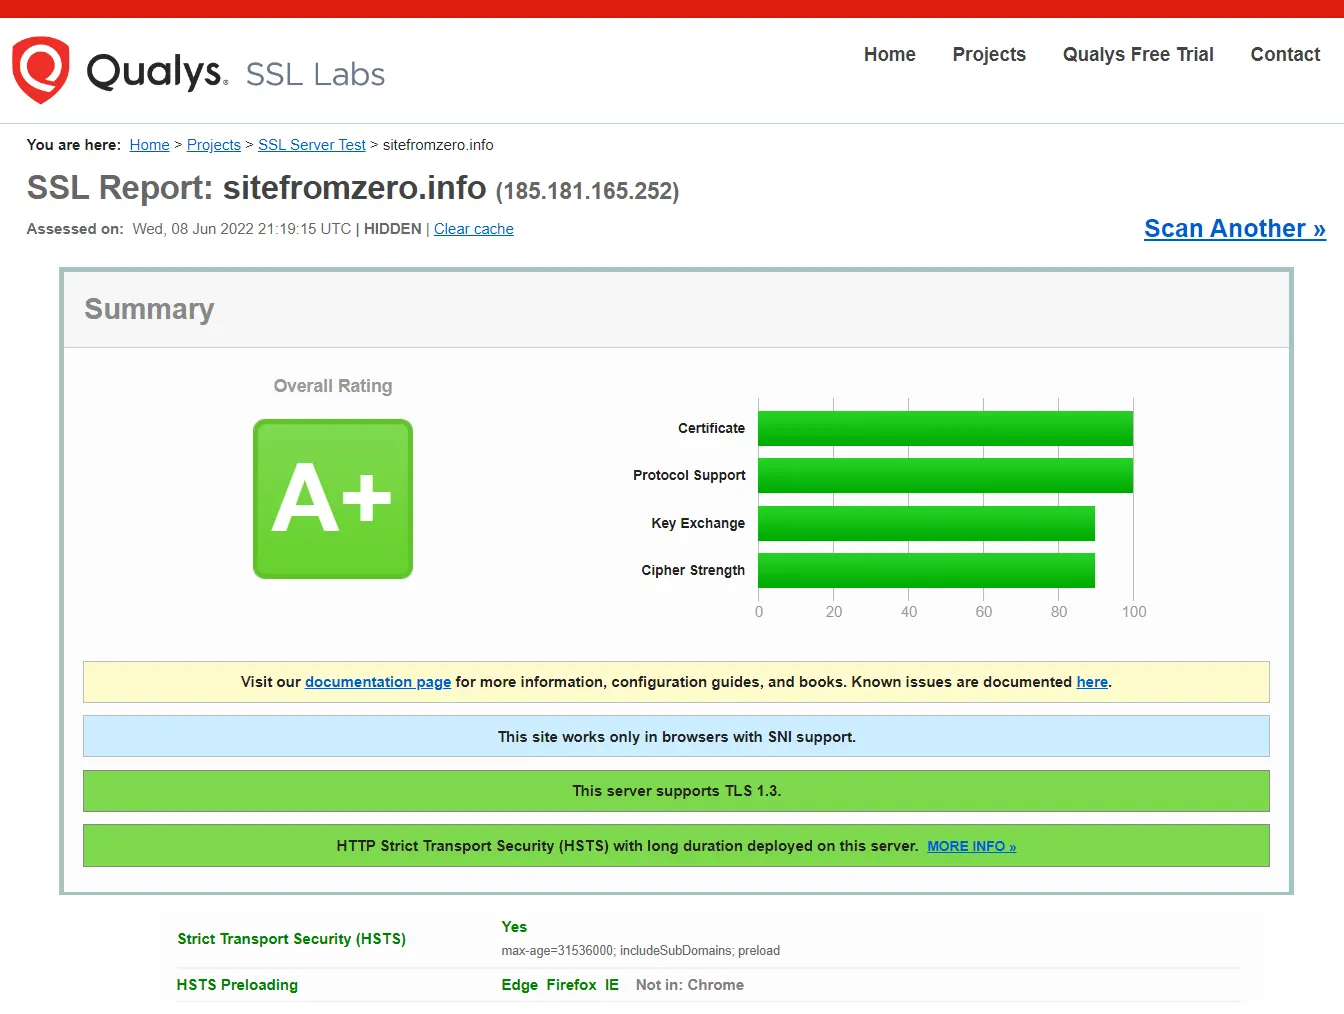
Как видно из скриншота, мой блог уже попал в списки трёх браузеров (Edge, Firefox, Internet Explorer), но ещё не включён в Chrome.
Оценка «A+» означает, что сайт работает по HSTS.
net-internals
Проверить правильно ли работает HSTS можно перейдя по ссылке chrome://net-internals/#hsts и указав свой домен. Если алгоритм работает, увидите подобный результат.
Влияние на SEO
Как я уже писала выше, механизм HSTS разработан и внедрён с целью дополнительной защиты сайтов. Но это не единственное преимущество.
Скорость загрузки
Поскольку проект теперь работает исключительно по HTTPS-протоколу и не требуется выполнять перенаправление, цепочка запросов к серверу укорачивается, что уменьшает нагрузку и ускоряет загрузку страницы. Это положительно влияет в целом на SEO и на ранжирование в частности.
Mixed content
Страницы открываются по https://, но для их оформления мы пользуемся javascript и iframe, ссылающиеся по http://. Это могут быть блоки подписки, видео с Youtube.
Т.е. до настройки HSTS мы сталкивались с проблемой смешанного контента, которая автоматически решается заменой всех ссылок на защищённые https://.
Недостатки
Теперь ещё раз проговорю негативную сторону вопроса. Самый большой минус заключается в том, что процедура исключения из списка достаточно длительная, может занять несколько месяцев. А это значит, что в случае сбоя сайт будет недоступен.
Каждый субдомен также должен иметь свой сертификат и работать по HTTPS.
Именно поэтому рекомендуется проходить процедуру поэтапно, выставляя время сначала на 5 минут, потом неделю, месяц и проверять трафик. Только когда вы будете уверены, что сайт и сертификат работают стабильно, посетители не исчезают, подавайте заявку на включение в Preload list.
NTP-атаки
К сожалению, даже на HSTS злоумышленники могут осуществлять атаки, воздействуя на сетевой протокол времени (NTP). Смысл заключается в изменении срока действия: если удалось обмануть браузер, что срок записи истёк, то открывается доступ к http://.
Таким атакам могут подвергаться и другие технологии безопасности, например SSL/TLS, Kerberos и Active Directory.
Удаление
Если всё же возникла необходимость покинуть список предварительной загрузки, то заполните заявку на удаление, предварительно удалив директиву preload. Как заявляет сам сервис, процесс исключения занимает 6-12 недель.
Полностью отключить HSTS поможет нокаутная запись:
Strict-Transport-Security: max-age=0Она является доминирующей над записью в списке предварительной загрузки и браузер будет вести себя, как будто сайта нет в Preload list.
Интересно, что субдомены по-прежнему будут работать по HSTS-механизму.
Сегодня мы разобрались со всеми главными вопросами, связанными с работой HTTP Strict Transport Security. Если информация была интересной, ставьте лайки и вподобайки. До новых встреч!
For all of its security advantages, you can easily lock yourself out of a website if you manage to configure the HSTS settings improperly. Browser errors such as NET::ERR_CERT_AUTHORITY_INVALID are the number one reason why users search for a way to get around HSTS by either clearing the HSTS settings or by disabling them.
What is HSTS?
HSTS (HTTP Strict Transport Security) is a web security mechanism that helps browsers establish connections via HTTPS and limit insecure HTTP connections. The HSTS mechanism was mostly developed to tackle SSL Strip attacks capable of downgrading secure HTTPS connections to less secure HTTP connections.
However, some HSTS settings will cause browser errors that will make your browsing experience a lot less enjoyable. Here’s a Chrome error that is often triggered by an improper HSTS configuration:
“Privacy error: Your connection is not private” (NET::ERR_CERT_AUTHORITY_INVALID)
If you are receiving a privacy error when trying to visit a particular website and the same site is accessible from another browser or device, there’s a strong chance that you have a problem with how the HSTS settings are configured. If that’s the case, the solution would be to either clear or disable HSTS for your web browser.
Below you have a collection of guides that will help you clear or disable your HSTS settings. Please follow the guides associated with your particular browser and feel free to follow whichever solution is most applicable to your particular scenario.
Clearing HSTS settings in Chrome
A problem with the HSTS settings in Chrome will usually display a “Your connection is not private” type error in Chrome. If you were to expand the Advanced menu (associated with the error) you’ll likely see a small mention about HSTS ( “You cannot visit *website name* because the website uses HSTS. Network errors and attacks are usually temporary, so this page will probably work later.“)
If you’re experiencing the same behavior, follow the steps down below to delete the HSTS cache from your Chrome browser:
- Open Google Chrome and paste the following in the omnibar.
chrome://net-internals/#hsts
- Make sure the Domain Security Policy is expanded, then use the Domain box (under Query HSTS/PKP domain) to enter to the domain that you’re trying to clear the HSTS settings for. You will be returned a list of values.
- Once the values are returned, scroll down to Delete domain security policies. enter the same domain name and click the Delete button to clear the HSTS settings.
- Restart Chrome and see if you are able to access the domain that you previously cleared the HSTS settings for. If the issue was related to the HSTS settings, the website should be accessible.
Clearing or Disabling HSTS settings in Firefox
When compared to Chrome, Firefox has multiple ways of clearing or disabling the HSTS settings. We are going to start with the automatic methods first but we also included a couple of manual approaches.
Method 1: Clearing the Settings by Forgetting the Website
- Open Firefox and make sure every open tab or pop-up is closed.
- Press Ctrl + Shift + H (or Cmd + Shift + H on Mac) to open the Library menu.
- Search for the site that you wish to delete the HSTS settings for. You can make it easier for yourself by using the search bar in the top-right corner.
- Once you manage to find the website you’re trying to clear the HSTS settings for, right-click on it and select Forget About this Site. This will clear the HSTS settings and other cached data for this particular domain.
- Restart Firefox and see if the issue has been resolved. If this was an HSTS issue, you should now be able to browse the website normally.
If this method wasn’t effective or you’re looking for a way to clear the HSTS settings without clearing the rest of your cached data, move over to the other methods below.
Method 2: Clearing HSTS by clearing Site Preferences
- Open Firefox, click the Library icon and select History > Clear Recent History.
- In the Clear All History window, set the Time range to clear drop-down menu to Everything.
- Next, expand the Details menu and uncheck every option except for Site Preferences.
- Click the Clear Now button to clear all site preferences including the HSTS settings.
- Reboot Firefox and see if the issue has been resolved at the next startup.
Method 3: Clearing the HSTS settings by editing the user profile
- Close Firefox completely and all associated pop-ups and tray icons.
- Navigate to the location of the user profile of your Firefox. Here’s a list with potential locations:
C: Users* AppData  Local  Mozilla  Firefox  Profiles

C: Users*  AppData  Roaming  Mozilla  Firefox  Profiles

/ Users / * /Library / Application Support / Firefox / Profiles - Mac
Note: You can also locate your user profile by pasting “about:support” in the navigation bar at the top and hitting Enter. You will find the Profile Folder location under Application Basics. Simply Click on Open Folder to get to the Profile Folder. But once you do so, make sure you close Firefox completely.
- In the Profile Folder of Firefox, open SiteSecurityServiceState.txt in any text editor program. This file contains cached HSTS and HPKP (Key Pinning) settings for domains that you have previously visited.
- To clear the HSTS settings for a particular domain, simply delete the entire entry and save the .txt document. Keep in mind that the format is messy, so be careful not to delete information from other entries. Here’s an example of an HSTS listing:
appual.disqus.com:HSTS 0 17750 1533629194689,1,1,2
Note: You can also rename the entire file from .txt to .bak in order to keep the existing file just in case. This will force Firefox to create e new file and start from scratch, eliminating any HSTS settings that you previously saved.
- With the entry deleted and the file saved, close SiteSecurityServiceState.txt and restart Firefox to see if the issue has been resolved.
Method 4: Disable HSTS from inside the Firefox Browser
- Launch Firefox and type “about:config” in the address bar at the top. Next, click on I accept the risk! button to enter the Advanced settings menu.
- Search for “hsts” using the search bar in the top-right corner of the screen.
- Double-click on security.mixed_content.use_hstsc to toggle the setting in order to Disable HSTS on Firefox.
Clearing or Disabling HSTS settings in Internet Explorer
Since it’s an important security improvement, HSTS is enabled by default on both Internet Explorer and Microsoft Edge. Although it’s not recommended to disable HSTS inside Microsoft’s browsers, you can turn the feature off for Internet Explorer. Here’s a quick guide on how to do this via Registry Editor:
Note: Keep in mind that the procedure is longer if you have an x64-based system than if you have an x86-based system.
- Press Windows key + R to open up a Run box. Then, type “regedit” and hit Enter to open Registry Editor.
- Using the left-pane of Registry Editor, navigate to the following registry subkey:
HKEY_LOCAL_MACHINE SOFTWARE Microsoft Internet Explorer Main FeatureControl
- Right-click on FeatureControl and choose New > Key. Name it FEATURE_DISABLE_HSTS and press Enter to create the new key.
- Right-click on FEATURE_DISABLE_HSTS and choose New > DWORD (32-bit) value.
- Name the newly created DWORD to iexplore.exe and hit Enter to Confirm.
- Right-click on iexplore.exe and choose Modify. In the Value data box, type 1 and click Ok to save the changes.
Note: If you’re on an x86-based system, you can save the changes, reboot your computer and see if the method has been successful. If you’re doing this on an x64-based system, continue with the next steps below. - Use the left pane again to navigate to the following registry subkey:
HKEY_LOCAL_MACHINE SOFTWARE Wow6432Node Microsoft Internet Explorer Main FeatureControl
- Right-click on FeatureControl and choose New > Key, name it FEATURE_DISABLE_HSTS and hit Enter to save the changes.
- Right-click on FEATURE_DISABLE_HSTS and choose New > DWORD (32-bit) value and name it iexplore.exe.
- Double-click on iexplore.exe and change the Value data box to 1 and hit Ok to save the changes.
- Reboot your computer and see if the HSTS settings have been disabled for Internet Explorer at the next startup.
Kamil Anwar
Kamil is a certified MCITP, CCNA (W), CCNA (S) and a former British Computer Society Member with over 9 years of experience Configuring, Deploying and Managing Switches, Firewalls and Domain Controllers also an old-school still active on FreeNode.
Сейчас стало модно посылать специальный запрос для браузера, который принудительно будет перебрасывать вас на версию сайта с шифрованием (https). Из-за этого многие пользователи страдают недоступностью сайтов. Ранее, такое происходило с некоторыми, достаточно известными сайтами, из-за промашки веб-разработчиков.
Такой запрос называется Http Strict Transport Security.
Как выяснилось, эта штука работает так: если я как-то раз зашёл на https версию этого сайта и получил при этом заголовок Strict-Transport-Security, то браузер запоминает этот домен, и начинает редиректить на него все обращения по http автоматически. Что у меня и происходило. Когда я поставил сертификат на сайт, нужно было как то заставить сайт принудительно работать на https, мой выбор пал на способ Http Strict Transport Security, конечно, был еще выбор использовать обычный редирект через htaccess, но это было слишком легко для меня. Плохо почитав документацию, по данному заголовку, я упустил момент с установкой времени, как потом оказалось, я установил принудительный редирект на целый год…
Все работало хорошо, можно даже было забыть про столь долгий срок установки заголовка, до одного момента… Мне нужно было срочно отключить сертификат для проведения тех. работ на сайте. И вот тут появилась большая проблема: все, кто ранее заходил на сайт, получают данное уведомление
При чистке cookie браузера, такой заголовок не очищается. Но как же все таки избавиться от этого принудительного редиректа и вернуть доступ к сайту? Сейчас я об этом расскажу.
Немного покопавшись во внутренностях различных популярных браузеров, я нашел функции для очистки HSTS.
И так, делаем следующее:
1. Закрываем все вкладки в браузере
2. Очищаем историю (желательно)
3. Заходим на специальную страницу для вашего браузера (Ссылки ниже).
- Для Яндекс.Браузер: about:net-internals#hsts
- Для Google Chrome, Opera: chrome://net-internals/#hsts
- * Для Mozilla Firefox: about:permissions. Найти сайт, нажать на кнопку «Forget About This Site»
- * Для Safari: Удалить файл ~/Library/Cookies/HSTS.plist
4. Находим поле ввода, с именем «Delete domain».
Подробный скрин

5. Вписываем в него домен сайта, на котором хотите убрать редирект. (Формат: example.ru )
6. Нажимаем на кнопку, которая рядом с полем.
Все, браузер удалил заголовок, сайт доступен.









 Примечание. Вы также можете переименовать весь файл из .txt в .bak, чтобы на всякий случай сохранить существующий файл. Это заставит Firefox создать новый файл и начать с нуля, удалив все ранее сохраненные настройки HSTS.



 Note: You can also rename the entire file from .txt to .bak in order to keep the existing file just in case. This will force Firefox to create e new file and start from scratch, eliminating any HSTS settings that you previously saved.