In this article we’ll show you how to set a custom 404 page via a .htaccess file. This will allow you to set the error message that visitors to your site receive when they request a page that doesn’t exist on the server.
If you read our previous article about 404 error not found pages it was discussed that handling 404 errors dynamically can be problematic if done very frequently. If you’re running WordPress on your website, you might want to think about installing the W3 Total Cache plugin which has the ability to serve static 404 errors for WordPress.
It’s typically recommended to handle 404 errors with a custom static HTML 404 error page instead of handling them dynamically. If you don’t already have one you can learn about creating a custom 404 error page, and if you’re looking to add advanced functionality to your 404 error page you can even learn about using Google’s custom 404 page widget.
The easiest way to modify your .htaccess file would be using cPanel’s file manager with the instructions below, although you can also upload a .htaccess file via FTP as well.
Create or Modify a Custom 404 Page via .htaccess
- Login to your cPanel.
- Under the Files section click on File Manager.
- Navigate to the document root folder for the site.
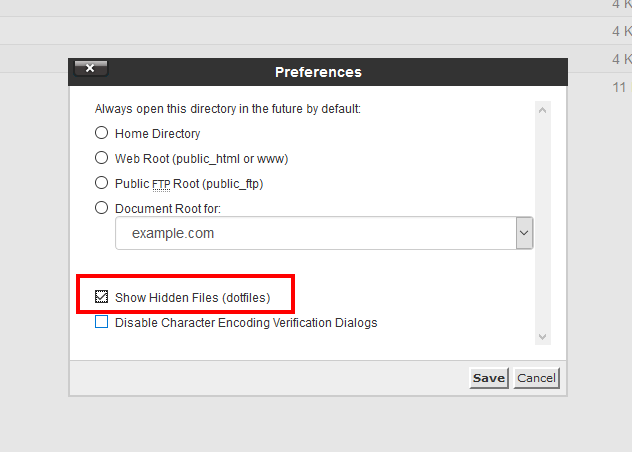
- Click on Settings.
- Ensure Show Hidden Files is selected.
- Then click Save.
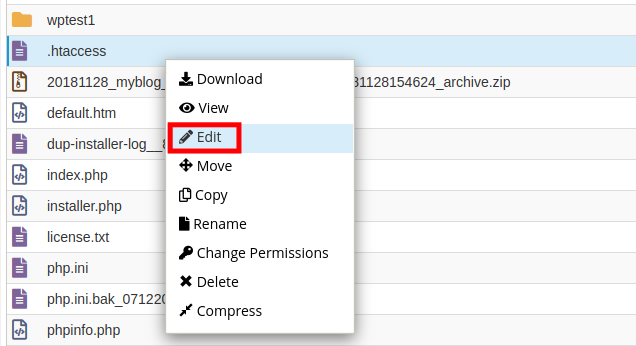
- Right-click on the .htaccess file and select Edit.
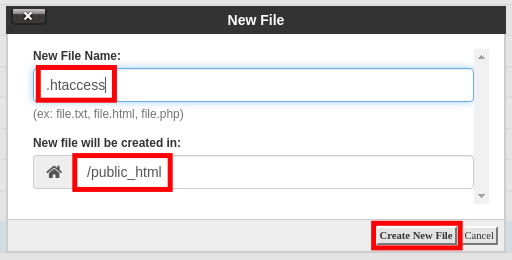
- If the .htaccess file didn’t exist in the previous step, click on the +File link on the top left, name the file .htaccess, and set the directory for creation to /public_html/ or the document root of your site.
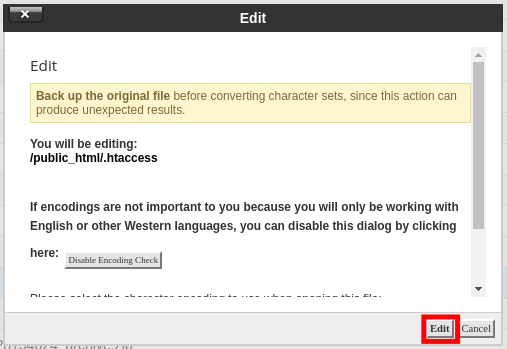
- You might have a text editor encoding dialog box pop-up, go ahead and just click Edit.
- Now that you are ready to edit the .htaccess file, the simplest way to set a 404 error page is by directly setting a 404 error message in the .htaccess file itself:
ErrorDocument 404 "<H1>Page not found</H1>"
If you already have a static HTML page that you’d like to use for 404 errors you can also directly point to that file with the .htaccess file as well. In this example, we have a 404.html page we want to serve up. Be sure to replace “404.html” with your actual page name:
ErrorDocument 404 /404.html
- After you’ve made your edits to the .htaccess file, click on Save Changes.
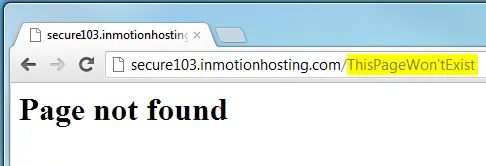
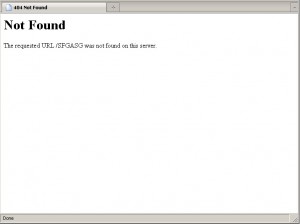
You should see a green Success pop-up - Now if you try to pull up a page that won’t exist on the server such as /ThisPageWon’tExist you should see the custom 404 error message that we’ve configured. This first image below is the default 404 error page when a custom one is not set:
The second one is the custom 404 page that we just created:
You should now understand how to control how 404 errors are handled for your website, by either setting the error directly or pointing to a custom 404 error page. If you need help on actually creating your custom 404 error page you would want to review our article on creating a custom 404 error page. Check out our Website section for more helpful tutorials to lead you toward success.
Get better performance and security with our NVMe VPS Hosting plans.
John-Paul Briones Content Writer II
John-Paul is an Electronics Engineer that spent most of his career in IT. He has been a Technical Writer for InMotion since 2013.
More Articles by John-Paul
Посетители сайта видят 404 ошибку, если страница, на которую они пытаются перейти, не существует или по какой-то причине сервер не может её найти. В статье рассмотрим, что это за ошибка и какое влияние она оказывает на поведенческие факторы пользователей и SEO. А также разберем, как настроить редирект 404 ошибки через .htaccess.
Что такое ошибка 404
Ошибка 404 (File not found) возникает, когда сервер не может найти запрашиваемую пользователем страницу. От ее появления не застрахован ни один сайт. Достаточно ввести в адресной строке после домена рандомный набор символов. Например:
http://site.ru/asdfjkl;
Сервер не сможет найти страницу, и отобразится ошибка:
Ошибка 404 на сайте reg.ru
Также с ошибкой 404 можно столкнуться в следующих случаях:
- Администратор сайта удалил или переместил страницу, но не сделал редирект на актуальный материал.
- Изменилась структура сайта, а у страниц остались старые URL.
- Посетитель опечатался в адресе, когда вводил его вручную.
- Посетитель перешел по «битой» ссылке, которая ведет на несуществующую (удаленную или перемещенную) страницу.
Технически ошибка 404 связана с тем, что при открытии страницы браузер пользователя отправляет серверу запрос на контент, а сервер не находит запрашиваемой страницы и возвращает соответствующий ответ: не найдено.
Код 404 не стоит путать с другими похожими ошибками. Например, 403-й, которая означает, что доступ к ресурсу ограничен или запрещен. Подробнее о том, как ее исправить в статье.
Иногда при загрузке несуществующей страницы браузер получает ответ 200 вместо 404. Такой случай называют Ложной ошибкой (Soft 404). Он означает, что со страницей всё в порядке, хотя пользователь видит ошибку. Также проблема заключается в том, что Яндекс и Google показывают эту страницу в результатах поиска. Чтобы проверить код ошибки, воспользуйтесь проверкой URL от Google.
Наличие ложных ошибок негативно сказывается на SEO-продвижении и затрудняет видимость основного контента сайта. Чтобы это исправить, нужно вручную настроить редирект на страницу с ошибкой 404 для всех несуществующих страниц.
Возможные последствия для сайта
В самом наличии ошибок 404 на сайте нет ничего страшного. Как уже говорилось выше, посетитель может просто опечататься в адресе. Однако разработчику сайта стоит уделить внимание созданию и отладке страницы ошибки 404. О том, как это сделать, мы расскажем ниже.
Также важно следить за тем, чтобы на сайте было как можно меньше несуществующих страниц, битых ссылок и т. п. Чтобы отыскать их, можно воспользоваться веб-инструментами Яндекс и Google или другими сервисами. Найдите все, что нужно поправить, настройте 301-й редирект на актуальные материалы и замените некорректные ссылки.
Если на сайте регулярно встречается ошибка 404, это может повлиять на поведение посетителей. Пользователи, которые многократно видят сообщение о том, что страница не существует/не найдена, с большой вероятностью покинут сайт и уйдут к конкурентам.
Рекомендации по созданию страницы 404
Если сайт создавался в CMS WordPress, Joomla, Drupal и т. п., в нем, скорее всего, предусмотрена страница ошибки 404. Но она может быть неинформативной или отличаться от дизайна остальных страниц вашего веб-ресурса.
Лучше всего — создать свою страницу для ошибки 404. Если вы владеете навыками верстки и дизайна, можно сделать эту страницу красивой, шуточной и необычной. Это хорошо воспринимается пользователями и снижает негативный эффект.
Важно, чтобы страница была информативной и полезной:
- Объясните, что случилось и почему пользователю попалась ошибка;
- Посоветуйте, что пользователю стоит сделать, чтобы найти интересующий его контент;
- Оставьте каналы для связи и возможность связаться с поддержкой сайта.
Яндекс рекомендует оформлять страницу ошибки 404 так, чтобы она отличалась от остальных страниц сайта и содержала ссылку на главную страницу, поисковую строку и инструкцию с дальнейшими действиями.
Примеры страниц с ошибкой 404
СберМаркет предлагает познать мудрость котов и цены на сайте
404 ошибка в разделе «Помощь» на сайте REG.RU
Как создать страницу ошибки 404 и настроить редирект на нее в .htaccess
-
1.
Создайте страницу одним из следующих способов:
-
Если вы знаете HTML и CSS, напишите код страницы самостоятельно и загрузите файл с названием 404.html в корневую папку сайта.
-
Если навыков верстки нет, в интернете можно найти бесплатные шаблоны со страницами ошибки. Скачайте файл и добавьте его в корневую папку.
-
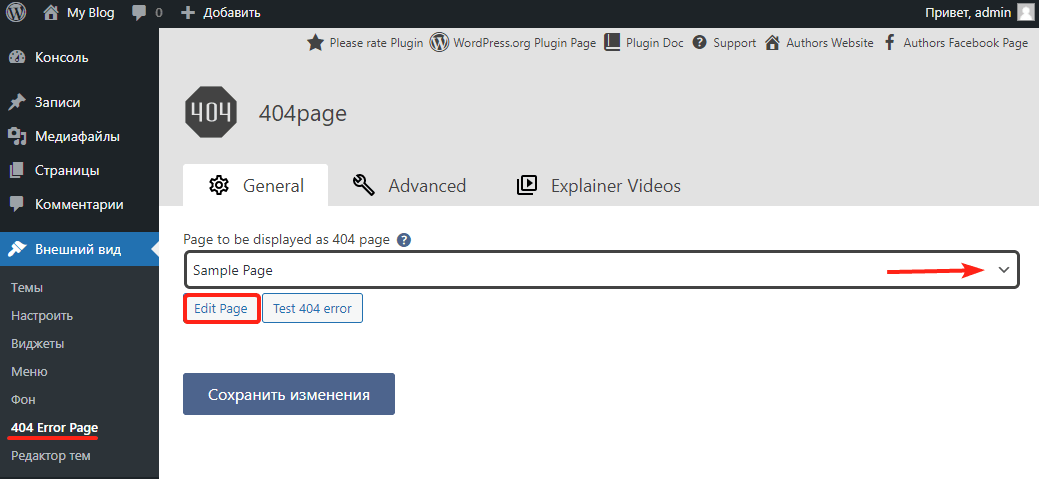
Если вы используете WordPress, воспользуйтесь плагином 404page — your smart custom 404 error page по инструкции ниже. Обратите внимание! Если вы воспользовались плагином, вам не нужно прописывать путь к файлу в .htaccess.
Как настроить страницу в плагине WordPress1) Откройте админку вашего сайта в WordPress.
2) Перейдите в раздел «Плагины» и нажмите Добавить новый.
3) В строке поиска введите название 404page — your smart custom 404 error page.
4) Нажмите Установить → Активировать:
5) Перейдите в раздел Внешний вид → 404 Error Page.
6) Выберите в списке Sample Page, чтобы сменить стандартную страницу ошибки, и нажмите Edit Page:
7) Создайте страницу в открывшемся визуальном редакторе и нажмите Обновить:
Готово! После обновления страница будет использоваться автоматически.
-
-
2.
Откройте конфигурационный файл .htaccess в корневой папке вашего сайта и добавьте в него строку:
ErrorDocument 404 https://site.ru/404.htmlГде вместо site.ru — домен вашего сайта.
-
3.
Сохраните изменения.
Готово! Теперь при возникновении 404 ошибки, в браузере пользователей будет открываться созданная вами кастомная страница.
Также рекомендуется закрыть служебную страницу 404 от индексации, чтобы она не возникала в поисковой выдаче вместе с остальными страницами сайта. Для этого откройте файл robots.txt в корневой папке сайта, добавьте соответствующую команду и сохраните изменения:
Редирект с 404 на главную (не рекомендуется)
Чтобы не создавать отдельную страницу ошибки 404, некоторые веб-разработчики прописывают в .htaccess редирект на главную страницу сайта. Это нежелательно делать с точки зрения SEO-оптимизации.
Также редирект на главную страницу может ввести пользователей в заблуждение. Представьте, что вместо искомой страницы у посетителя открывается главный экран сайта. Будет непонятно, почему это произошло, ведь пользователь искал какой-то конкретный контент и не узнает, что не сможет найти его.
Рекомендуется использовать специальные страницы для ошибки 404.
Проверка редиректа 404
Проверить, корректно ли все настроено можно в Яндекс.Вебмастер и Google Search Console.
Яндекс.Вебмастер
Если вы используете его впервые, укажите домен вашего сайта и пройдите проверку валидации, добавив файл в корневую папку сайта. Это займет несколько минут.
- 1.
-
2.
Перейдите в раздел Инструменты → Проверка ответа сервера.
-
3.
Введите название страницы ошибки и нажмите Проверить.
-
4.
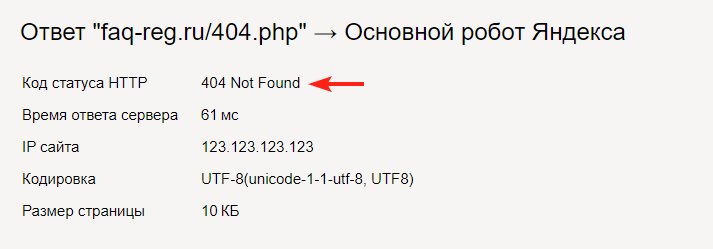
В коде статуса HTTP должно отображаться 404 Not Found:
Google Search Console
Если вы используете этот инструмент впервые, укажите свой домен и пройдите валидацию, добавив TXT-запись/загрузив файл в корневую папку сайта или с помощью других способов.
- 1.
-
2.
Перейдите в раздел «Покрытие» в меню справа. Здесь будет отображаться информация о страницах ошибок.
На сайте небольшого объема можно самостоятельно следить за наличием ошибок и постараться не допускать того, чтобы на нём было много страниц, утративших актуальность. Своевременно настраивайте 301 редиректы, когда статья в справке, страница или товар теряют актуальность.
Если сайт многораздельный и многостраничный, вручную мониторить его будет сложно. Рекомендуется использовать для поиска страниц ошибки 404 онлайн-сервисы (Serpstat, BadLincs.ru и другие). Также можно воспользоваться плагинами в CMS. Замените ссылки и настройте редиректы. А также создайте понятную красочную страницу ошибки с объяснением причины, ссылками на основные разделы и строкой поиска.
We all know how important it is to deliver sensible, helpful 404 error pages to our visitors. There are many ways of achieving this functionality, including the well-known htaccess trick used to locally redirect users to custom error pages:
# htaccess custom error pages
ErrorDocument 400 /errors/400.html
ErrorDocument 401 /errors/401.html
ErrorDocument 403 /errors/403.html
ErrorDocument 404 /errors/404.html
ErrorDocument 500 /errors/500.html
..and so on. These directives basically tell Apache to deliver the designated documents for their associated error types. Many webmasters and developers employ this trick to ensure that visitors receive customized error pages that are generally more user-friendly or design-specific than the rather unfriendly Apache defaults. Serving custom error pages is an excellent way to enhance overall site usability and accessibility, but there are several other useful techniques to consider as well.
Change the default error message
You don’t need to design a complete set of customized error documents just to get your point across. Simply changing the default error message to something more useful is a great way to spice things up with minimal fuss:
# htaccess custom error messages
ErrorDocument 400 "Ooops - Bad request!
ErrorDocument 401 "Speak friend and enter
ErrorDocument 403 "Strictly fabidden..
ErrorDocument 404 "Missing in action..
ErrorDocument 500 "Server gone wild..
..or whatever. You can change the custom message to anything you want, but it must be plain text. This technique is ideal for hardcore sites with an audience that is a bit more “error-savvy” than the typical visitor. Note that the initial quotation mark ( " ) specifies the character string as text and is not included in the message itself. No closing quotation mark is required.
Redirect to a script
Moving in the other direction, you may wish to incorporate some dynamic functionality into your error messages. For example, if you had a script that customized the error message by employing, say, referrer, client, and query data, you could redirect your error pages like so:
# htaccess custom error scripts
ErrorDocument 400 /errors/redirection.php
ErrorDocument 401 /errors/authentication.php
ErrorDocument 403 /errors/explanation.php
ErrorDocument 404 /cgi-bin/not_found.pl
ErrorDocument 500 /cgi-bin/server_error.pl
Redirect to an external URL
Returning to the most common error-page customization-method, it should be noted that the custom error pages do not need to be located on the same domain. In fact, you can redirect your HTTP errors to virtually any URL:
# htaccess custom error redirects
ErrorDocument 400 http://domain.tld/400_information.html
ErrorDocument 401 http://domain.tld/401_information.html
ErrorDocument 403 http://domain.tld/403_information.html
ErrorDocument 404 http://domain.tld/404_information.html
ErrorDocument 500 http://domain.tld/500_information.html
Keep in mind that any environmental variables or other request-specific information will not survive the external redirect.
Well, that about does it for this fun and exciting round of htaccess madness. One last note about serving custom error error pages: make sure that they are greater than 512 bytes in size or Internet Explorer will ignore them.
Next up: we jump back into the realm of standards-based design with an in-depth tutorial on creating an accessible “hovering” jump menu using (X)HTML and CSS. Stay tuned!
About the Author
Jeff Starr = Web Developer. Book Author. Secretly Important.
Did you know that Apache web server allows you to configure custom 404 error page for your website? Using ErrorDocument directive you can easily configure custom error page in Apache, without any coding. In this article, we will look at how to create custom 404 page in Apache. You can also use these steps to configure custom error pages for other error codes such as 403, 500, 502, etc.
Here are the steps to configure custom 404 error page for your website. We will use the ErrorDocument directive to setup custom 404 page. Please make sure that you have your error page file ready, before you proceed further. We have assumed that our error file error404.html is located at website root folder /var/www/html/.
You can add ErrorDocument directive in .htaccess file, virtual host configuration file or your main server configuration file, as per your requirement.
1. Open .htaccess file
You will typically find .htaccess file in your site’s root folder (e.g /var/www/html/). You can open it using vi editor
$ sudo vim /var/www/html/.htaccess
If you have not setup .htaccess but have setup virtual hosts, then you can also open your virtual host configuration file (e.g /etc/apache2/sites-enabled/example.com for your domain example.com)
$ sudo vim /etc/apache2/sites-enabled/example.com
Alternatively, you can also open the default virtual host configuration file
$ sudo vim /etc/apache2/sites-enabled/000-default.com
Also read : How to Create Self-Signed Certificate for Apache
2. Configure 404 Error Page
Add the following line to .htaccess file
ErrorDocument 404 /error404.html
In the above line, we specify the error response code 404 and the custom page error404.html to be served for it. You can also configure error pages for other response codes such as 500, 502, 403, etc.
If you are using Virtual host file, add the above line inside VirtualHost tag
<VirtualHost>
   ...
   ErrorDocument 404 /error404.html
   ...
</VirtualHost>
Also read : How to Use Apache bench for Load Testing
3. Create 404 Error page
Create custom error file error404.html using text editor, or a page builder like Squarespace, WordPress, or Wix.
4. Restart Apache Server
Restart Apache Server to apply changes
$ sudo service apache2 restart
Hopefully, this article will help you create custom 404 pages for your website. You can use these steps to configure custom pages for other error codes such as 500, 502, 403, etc.
Ubiq makes it easy to visualize data, and monitor them in real-time dashboards. Try Ubiq for free.
Related posts:
- About Author
Error messages aren’t generally considered good for Search Engine Optimization (SEO). In fact, they’re not usually a positive in any respect. However, no matter how carefully you maintain your site, you’re likely to encounter them from time to time.
When errors do show up, there are some ways you can limit their potential effect on your site’s Search Engine Optimization (SEO). Perhaps the best way to do that is by redirecting users to a custom error page using the .htaccess file. This page can include links to popular articles, and even a sitemap to help users return to a working part of your site.
In this article, we’ll talk about what the .htaccess file is, and some of the things it can do. We’ll then explain how this file can be used to set up custom error pages and improve SEO. Let’s take a look!
An Introduction to the .htaccess File
.htaccess is short for “Hypertext Access”. It’s a configuration file that affects how a server responds to requests, and is supported by Apache-based web servers. In a nutshell, it controls the directory that it ‘lives’ in.
You can think of the .htaccess file as the doorman to an apartment building (which would be the folder or directory that contains it). When you open the door and tell the doorman (.htaccess) where you want to go, he directs you through the building (the directory) and to the proper apartment unit (the file you asked for).
Traditionally, the .htaccess file is used to control access to individual folders. A system administrator can use the file to password-protect specific directories without having to restrict everything else. In other words, if you don’t have the password, the doorman won’t let you in.
How to Redirect Users to a Custom Error Page Using .htaccess
When a request is made to the web server and it is unable to respond, it sends back an error message. If you don’t specify any type of error handling, the server will likely display a generic message like this one:
Getting one of these can be frustrating for end users, and doesn’t offer them much help. On the other hand, custom error pages can include fun images and links back to your site that help to keep visitors engaged. This can ease the annoyance they may naturally feel when encountering such an error.
To set a custom error page up, you’ll first need a way to redirect the normal process, and replace the generic error message with your customized one. This is where the .htaccess file comes in.
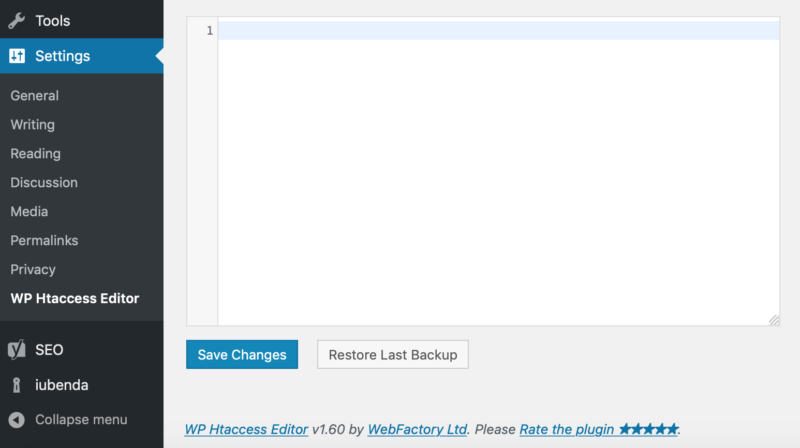
There are a couple of ways you can access this file. You can do so with a File Transfer Protocol (FTP) client like FileZilla, from your hosting cPanel, or by using a free plugin such as WP Htaccess Editor:
If you choose to use the latter method, you can start by installing and activating the plugin on your site. Then go to Settings > WP Htaccess Editor:
You can insert the HTML file for your custom error page here. All you need to do is specify which document to use with the error, like this:
ErrorDocument 404 /errors/not-found.html
In this example, “not-found.html” is the file for your custom error page. You can make and insert similar files for each of the other common errors as well, such as 400 bad requests and 403 forbidden messages.
4 Ways to Improve SEO Using a Custom Error Page
By using custom error pages, you may be able to improve your SEO rather than hurting it the next time a visitor encounters an issue. Now, let’s talk about some of the ways you can do that.
1. Link to Top Articles
Adding internal links to your error pages gives users a place to go other than clicking away from your site. You may be able to entice them with some of your other content, which is likely why they are on your site in the first place.
For example, take a look at this error page from Amazon:
Here, Amazon piques our interest with a picture of a dog and a link to Meet the dogs of Amazon. If you’re curious and you like dogs, you may click the link and find yourself re-engaged on the site.
This type of linking is also a smart way to increase the number of pages being indexed by Google. In that way, these additional internal links can benefit visitors and improve your SEO.
2. Display a Sitemap
If one or two links isn’t enough, you can go even further and include a sitemap on your custom error page. A sitemap gives visitors a concise summary of your site’s major sections, much like the table of contents in a book.
One website that uses this technique effectively is Starbucks:
When visitors encounter this error, instead of being lost and unsure what to do next, Starbucks has provided them with a guide to help them find what they’re looking for. This works especially well for complex sites with lots of moving parts.
Using this technique helps to keep visitors on your site, improving engagement. A sitemap gives them a choice of where they would like to go next, and can hopefully steer them towards the content that is most interesting to them.
3. Feature Product Links
Another approach to improving your error pages is to include links to popular products or services you offer. This enables visitors to navigate to what they are looking for, rather than giving up and clicking away.
The Land’s End clothing company has an error page that uses this technique:
Links to the company’s various apparel departments are included on its error pages. By doing this, the site is giving visitors options. They can each choose a link that’s relevant to their needs, and they may even encounter new products they wouldn’t have otherwise considered.
Plus, product links are a great opportunity for e-commerce sites to improve their SEO. They provide yet another opportunity for internal links, and offer search engines more information about your site’s structure.
4. Add a Search Bar
If you prefer to keep things simple, you may opt to include a search bar on your custom error pages. By doing this, you are giving visitors the exact tool they need to find just about anything on your website.
A good example of a site that does this is GitHub:
A search bar gives visitors the power to simply look up whatever interests them. Rather than causing them to leave annoyed, you can hopefully provide the information they are looking for.
In addition, search bars are naturally engaging. They increase your odds of keeping visitors around for longer, which in turn can have a beneficial effect on your site’s optimization.
Conclusion
It’s important to keep your website as error-free as possible. When something does inevitably go wrong, however, customizing your error pages can help you retain user engagement and improve SEO.
Fortunately, .htaccess is a handy file you can use to redirect site visitors to the right place. When creating your custom error page via .htaccess, you can improve it by:
- Linking to top articles.
- Displaying a sitemap.
- Featuring product links.
- Adding a search bar.
Image credit: Stevepd.
Web Designing can be fun and interesting. Using the current cutting edge of web programming courtesy HTML5, CSS3 and jquery a beginner can easily create mind blowing web templates that look cool and refreshing. But all the hours of work to decorate the face of your site is wasted if the user encounters a bland looking error page containing technical jargon that leaves visitors scratching their heads. So custom error pages are the order of the day!!!
Advantages of custom error pages
- You can create an error page using the template you used to create your website. Thus even when someone encounters an error he/she will feel at home (or at your site)
- Custom error pages boost your search engine ranking.
- Since the error page is at your control you can write stuff that tells the user in plain English what caused the error.
So lets take a look on creating custom error pages on the mostly widely used open source web server software Apache HTTP server.
Step 1: Design the error page
I say design instead of create because you should use the same theme/template which the website uses for the error. The next man thing is that it should contain both technical and non technical information about the error. For example if you’re designing a “404 page not found” error page tell the user all the possibilities of arriving at this error. It could be due to an outdated link or a misspelt word or using a different case (lowercase or uppercase) for the web page name.
Use the php code $_SERVER[‘REQUEST_URI’] to display the name of the non existing page/directory. Include a search box and tell users to search for what they were looking for. Tell them to also take a look at your Sitemap. Save the file as 404.html or any name that best describes the error. Pages can be created for the following common error codes
| Error Code | Reason |
|---|---|
| 401 | Authentication Required This error occurs if you are prompted to enter a valid username and password to view a page and you press cancel i.e. if you try to view a htpasswd or htdigest protected directory/file |
| 403 | Forbidden This error occurs if you try to view a file/directory that doesn’t have permissions to be viewed to the world. This includes htaccess, htpasswd files and directories forbidden from listing out their contents |
| 404 | Page Not Found If a non existing file or directory is requested this error is displayed |
| 500 | Internal Server Error Occurs when wrong syntax is used in htaccess file |
Step 2: Edit the .htaccess file
Now that you’ve created the error page you should tell the web server to display it whenever an error is encountered instead of displaying its own default. So you need to create/edit your htaccess file. Search for it inside the public_html or www or htdocs folder. Don’t fret if it isn’t there just create a file named .htaccess (the dot at the beginning of the file is very important) Add the following line to that file.
ErrorDocument [error code] /[path to error page]
Example:-
ErrorDocument 404 /errors/404.html
Don’t forget to save the htaccess file.
Step 3: Testing the error page
Now for the fun part starts. Type your website’s url followed by some rubbish e.g. https://websistent.com/something Now if you’ve done everything correctly you should see your custom 404 error page. If you get a 500 Internal server error check for any syntax errors in the .htaccess file. If you see the error page file name, then its because you’ve omitted the slash in front of the file name path.
Bad practices for custom error pages
I’ve come across some websites which use their home page as an error page. Now this might seem simpler but just imagine the plight of a newbie who clicks an outdated link on that website and lands up on the home page. Such a person would be clueless on what has happened. Another bad practice is to show the website’s Sitemap.


