Сен 28, 2022
Elena B.
7хв. читання
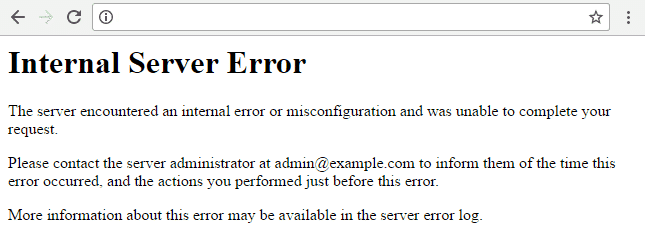
Столкнулись с ошибкой 500 Internal Server Error в WordPress? Ну что же, вы не одни! Ошибка 500 Internal Server Error — одна из самых распространённых ошибок с которой сталкиваются пользователи WordPress. Среди возможных причин появления ошибки: повреждённые файлы .htaccess, неправильно установленные права, задержки скрипта, неправильная версия PHP или неудачное обновление WordPress.
Однако выявить истинную причину не так просто, как, например, в случае ошибки 404, которую могут вызвать либо неработающие постоянные ссылки, либо изменённые URL-адреса страниц.
Вот краткое руководство по исправлению ошибки 500 в WordPress с помощью 9 различных способов. Давайте не будем терять время и начнём данное руководство по WordPress.
Обратите внимание, что Hostinger предлагает специальный оптимизированный для WordPress хостинг. Воспользуйтесь предложением и получите WordPress хостинг со скидкой до 82%!
К предложению
Что вам понадобится
Перед тем, как вы начнёте это руководство, вам понадобится следующее:
- Доступ к панели управления вашим хостингом
- Доступ к панели управления WordPress
ВАЖНО! Безопасность прежде всего. Перед началом данного руководства, мы рекомендуем произвести резервное копирование вашего сайта для предотвращения потери данных.
Способ 1 — Ошибка 500 в WordPress из-за плагинов или тем
В большинстве случаев, ошибка 500 Internal Server Error возникает из-за установки или обновления плагинов или тем. Если вы уже знаете какой из плагинов мог вызвать данную проблему, вы уже на пол пути к её решению.
Способ 1.1 — Ошибка 500 в WordPress из-за обновления или установки плагина
Если страница перестала работать после установки или обновления плагина, вы можете починить её, просто отключив или удалив плагин. В зависимости от ситуации, существует два пути для достижения цели.
Отключение плагинов через панель управления WordPress
Если вы можете войти в вашу панель управления WordPress, следуйте данным этапам:
- Войдите в вашу панель управления WordPress.
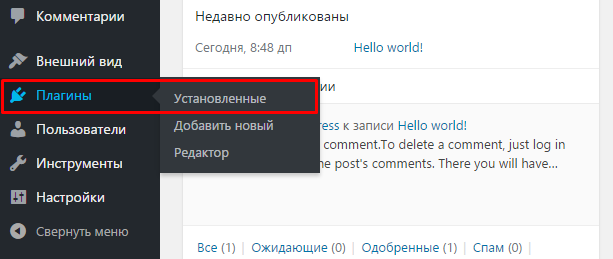
- Нажмите на Плагины → Установленные в левом меню навигации.
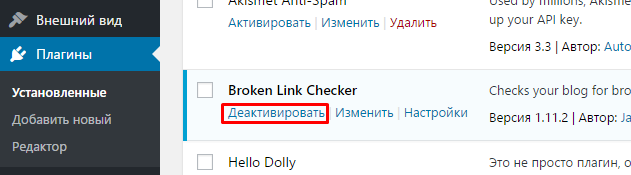
- Отключите проблемный плагин.
- Обновите сайт в браузере, чтобы проверить решена ли проблема.
- Если нет, отключите другой плагин и повторяйте данный процесс, пока все плагины не будут отключены (или сайт не заработает).
- Как только вы найдёте плагин, ответственный за появление ошибки, попробуйте переустановить его заново. Вы также можете поискать другие плагины на его замену или связаться с разработчиками плагина для уточнения информации о его работе на вашем WordPress.
Отключение плагинов WordPress через Файловый Менеджер или FTP
Существуют ситуации, когда ошибка не позволяет получить доступ к панели управления WordPress. В этом случае, вам придётся отключить или удалить плагин с помощью Файлового Менеджера в панели управления вашим хостингом или FTP-клиентом вроде FileZilla.
- Пройдите в корневой каталог вашего WordPress и войдите в папку wp-content/plugins.
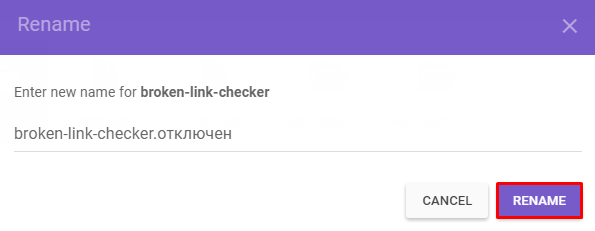
- Найдите проблемный плагин и переименуйте его для отключения. К примеру, вы можете добавить .отключён в конец файла, чтобы не забыть об этом плагине. Если вы хотите удалить его полностью, просто удалите папку с плагином.
- После этого, обновите ваш сайт. В случае, если проблема остаётся, произведите данные действия для оставшихся плагинов до их полного отключения (или пока ваш сайт не заработает).
- Как только вы найдёте сломанный плагин, вы можете попытаться переустановить его, найти замену или связаться с разработчиками плагина для получения консультации.
Способ 1.2 — Ошибка 500 в WordPress из-за установки или обновления темы
Если ваш сайт перестал работать после установки или обновления темы, вы можете решить проблему изменив тему вашего сайта. Для этого существует два пути:
Изменение темы с помощью панели управления WordPress
Если вы можете получить доступ к вашей панели управления, вот что вы должны предпринять:
- Перейдите в раздел Внешний вид → Темы.
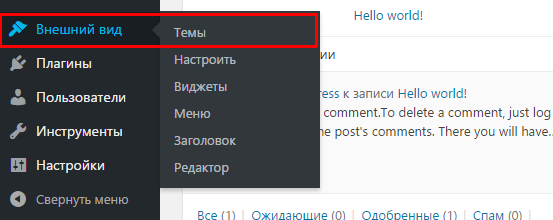
- Выберите любую другую тему и нажмите кнопку Активировать.
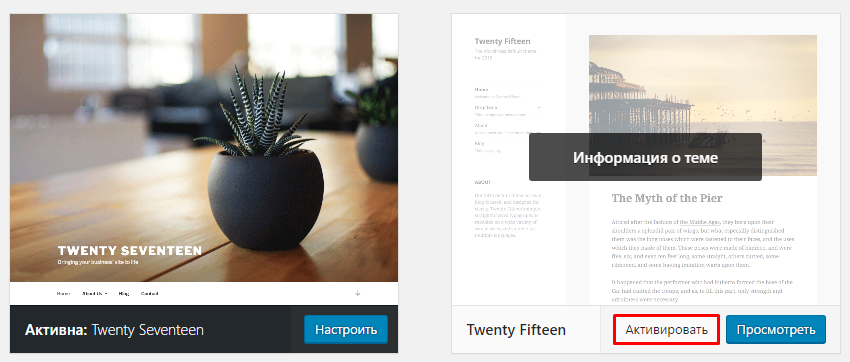
- Как только вы закончите изменение темы, вы увидите подтверждающее сообщение со ссылкой на ваш сайт.

Изменение темы с помощью phpMyAdmin
Другой способ для изменения темы, это редактирование значений вашей базы данных MySQL через phpMyadmin, в панели управления вашим хостингом. Этот способ может быть полезен, если ваша панель управления WordPress не работает. Вот, что вы должны сделать:
- Найдите таблицу wp_options и откройте её.
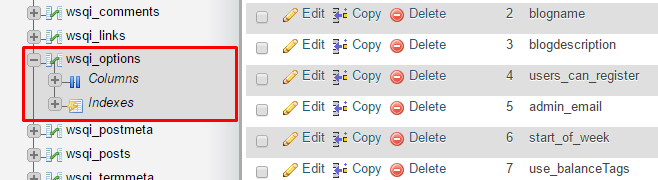
ЗАМЕТКА! В зависимости от значений таблицы, выбранных вами в процессе установки, префикс таблиц не всегда будет wp_.
- Перейдите на Страницу 2.

- Найдите раздел template и stylesheet

- Узнайте название темы на которую вы хотите её поменять. Для этого перейдите в каталог wp-content/themes с помощью Файлового Менеджера.

- Скопируйте название темы, которую вы хотели бы использовать. Далее, измените значения template и stylesheet в базе данных на название вашей новой темы. В данном примере, мы изменим тему twentyfifteen на twentysixteen

Теперь вы снова можете перезагрузить ваш сайт в браузере, и он загрузится с новой темой. Если ошибка 500 была связана с вашей старой темой, то это должно решить проблему. Вы можете попытаться переустановить вашу старую тему или связаться с разработчиком для получения информации о правильной установке темы для вашего WordPress.
Способ 2 — Проверка файла .htaccess
Ещё одним способом для избавления от ошибки internal server error, является проверка состояния вашего файла .htaccess. Вероятность того, что ваш нынешний файл .htaccess был повреждён, весьма высока. Это могло случиться из-за огромного количества причин; самые распространённые из них это установка нового плагина или другие изменения на вашем сайте.
Лучшим методом для проверки состояния вашего файла .htaccess является создание нового. Всё, что вам нужно сделать это:
- Войти в панель управления вашим хостингом, далее в Файловый Менеджер в разделе Файлы. Альтернативный способ, это использовать FTP-клиент вроде FileZilla.
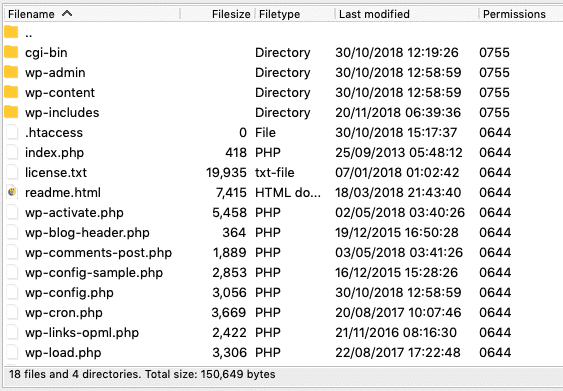
- Перейдите в корневой каталог вашего WordPress сайта (если вы видите файлы вроде wp-content и wp-includes, вы в правильном месте).
- Найдите здесь файл .htaccess и отключите его. Это можно сделать задав ему другое имя. К примеру, .htaccess1.
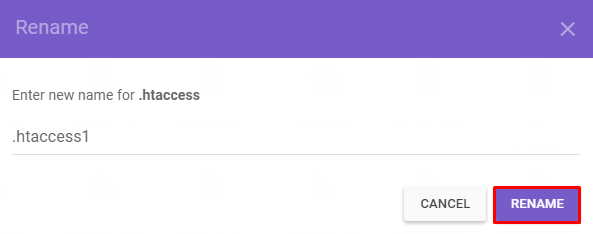
- После этого, создайте новый файл .htaccess и вставьте в него стандартный код .htaccess:
# BEGIN WordPress
<IfModule mod_rewrite.c>
RewriteEngine On
RewriteBase /
RewriteRule ^index.php$ - [L]
RewriteCond %{REQUEST_FILENAME} !-f
RewriteCond %{REQUEST_FILENAME} !-d
RewriteRule . /index.php [L]
</IfModule>
# END WordPress
- Убедитесь, что сохранили файл.
Теперь, откройте ваш сайт в браузере и посмотрите исправлена ли ошибка. Если нет, продолжите чтение руководства.
Способ 3 — Увеличение лимитов PHP
Если два способа описанных выше не принесли никакого результата, то неправильные значения PHP или нехватка памяти могли стать причиной появления ошибки 500. Это происходит из-за того, что скрипты и плагины требуют определённое количество памяти для своей правильной работы. В дополнение к этому, когда загружается ваш сайт, браузер делает огромное количество запросов для загрузки скриптов, плагинов и контента. Когда количество памяти для загрузки скриптов и плагинов не хватает, WordPress, скорее всего, выдаст ошибку 500 Internal Server Error. Именно поэтому, важно увеличить значение памяти вашего сайта и других PHP настроек. Вы можете это сделать с помощью файла .htaccess. Вот несколько строк, которые мы рекомендуем вам добавить:
php_value upload_max_filesize 128M
php_value post_max_size 128M
php_value max_execution_time 300
php_value max_input_time 300
php_value memory_limit 256M
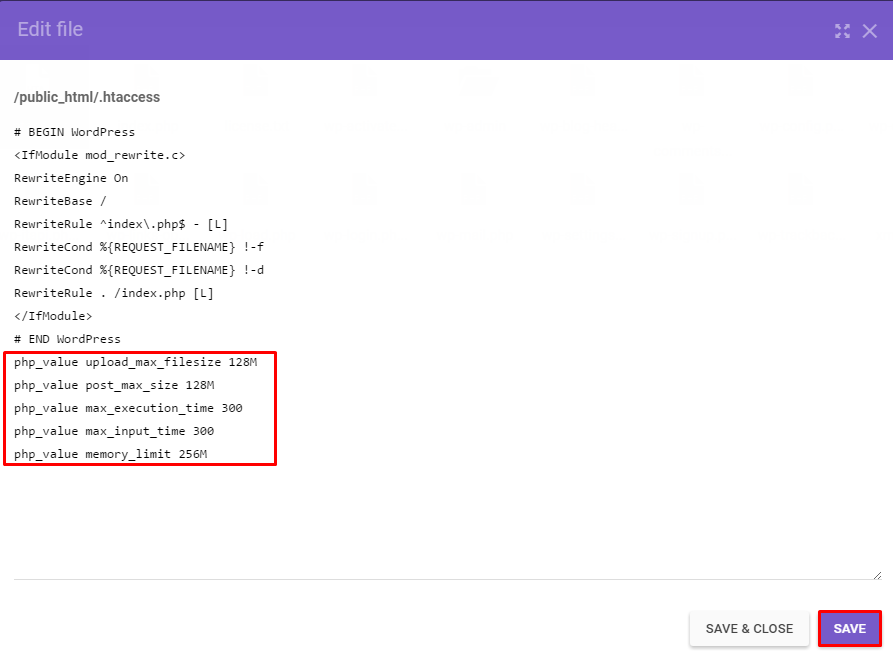
Не забудьте Сохранить изменения. Теперь, обновите ваш сайт. Если проблема возникала из-за недостаточных лимитов PHP, то этот способ должен помочь с её решением.
Способ 4 — Изменение версии PHP
Некоторые скрипты или плагины для WordPress требуют определённую версию PHP. Если рекомендуемые требования для них не выполнены, то в следствии этого может появиться ошибка 500. Вы можете проверить вызвана ли она версией PHP, изменив её. Это можно сделать через панель управления хостингом в разделе Дополнительно → Выбор PHP версии.
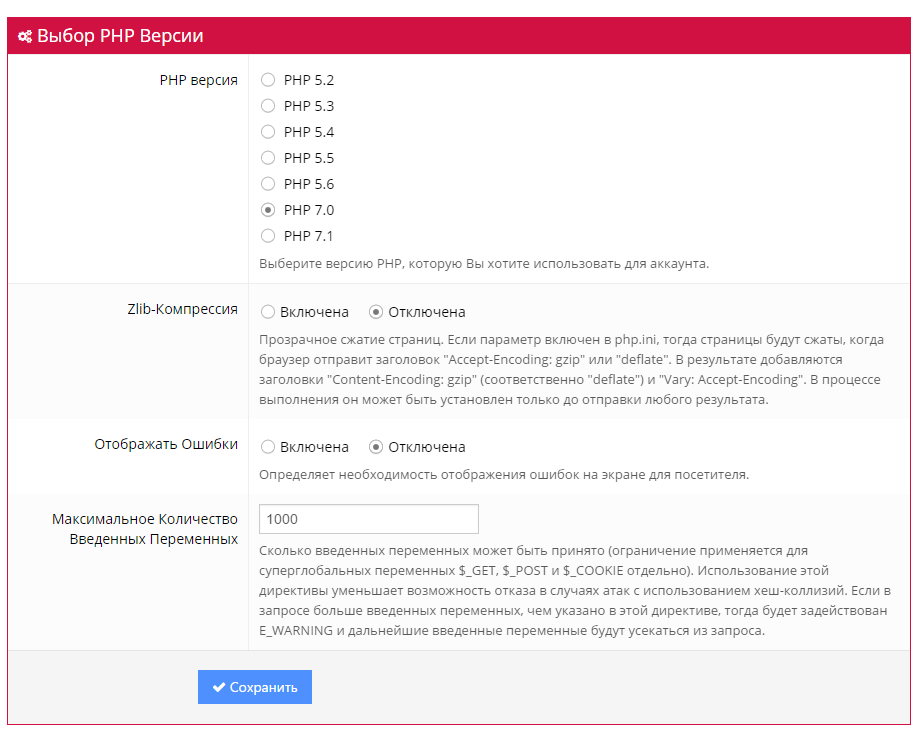
В случае, если вы не знаете какая версия PHP вам необходима, попробуйте поочередно включать каждую из них. Не забудьте Сохранять ваши настройки и обновлять сайт при каждом изменении. Если ни одна из данных версий не помогла в решении ошибки 500, то верните вашу прошлую версию PHP и перейдите к следующем способу.
Способ 5 — Включение отображений ошибок
Поиск причины возникновения ошибки WordPress 500 Internal Server Error — это самая сложная часть в процессе её исправления. Если ни один из предыдущих способов вам не помог, значит вам необходимо начать поиски поглубже — проверив ваши ошибки. Существует несколько способов для этого:
Включение отображение ошибок
Включив отображение ошибок, вы сможете найти определённый код вашего сайта, который её вызывает. Это можно сделать в том же разделе, где мы меняли версию PHP. Дополнительно → Выбор PHP версии. Установите значение Отображать Ошибки на Включена и нажмите кнопку Сохранить.
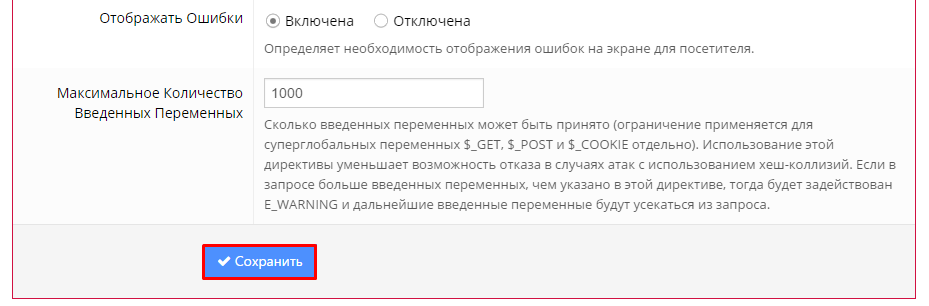
Теперь, вы должны перезагрузить ваш сайт. Все ошибки кода будет отображены на экране, как на картинке ниже:

Как только вы найдёте ошибку, откройте указанный в ней файл и посмотрите нужную строку. Вы можете использовать Google, Stackoverflow, WordPress Форум, или связаться с вашим разработчиком для получения информации о решении данной проблемы.
Способ 6 — Использование отладки WordPress
WordPress имеет свою собственную систему отладки, которую вы можете использовать для решения проблем с вашим кодом. Это также может помочь решить проблему ошибки 500. Для начала её использования, вам необходимо сделать несколько изменений в вашем файле wp-config.php.
- Найдите следующую строчку в файле wp-config.php:
define('WP_DEBUG', false);
- Удалите и вставьте на её место следующий код:
 // Enable WP_DEBUG mode
define( 'WP_DEBUG', true );

// Enable Debug logging to the /wp-content/debug.log file
define( 'WP_DEBUG_LOG', true );

// Disable display of errors and warnings
define( 'WP_DEBUG_DISPLAY', false );
@ini_set( 'display_errors', 0 );

// Use dev versions of core JS and CSS files (only needed if you are modifying these core files)
define( 'SCRIPT_DEBUG', true );
- Обновите ваш сайт и откройте Файловый Менеджер. Перейдите в каталог wp-content и найдите файл debug.log. Откройте редактирование данного файла для просмотра его значений.

- Теперь вы знаете, что является причиной возникновения ошибки и сможете решить её, обратившись к разработчику или Google, Stackoverflow, WordPress Форуму. Более детальная информации о системе отладки может быть найдена здесь.
Способ 7 — Восстановление резервной копии
Если вы сделали бэкап WordPress до его поломки, восстановление резервное копии тоже может стать решением. Для начала, удалите все файлы WordPress. Затем, загрузите ваш бэкап, перепроверьте, работает ли ваш сайт.
Ручной способ восстановления WordPress может подойти не всем. Если вам кажется это слишком сложным, то мы можем подсказать вам другой способ. К сожалению, это не поможет вам, если ваш сайт не работает, но он точно поможет вам избежать подобных проблем в будущем.
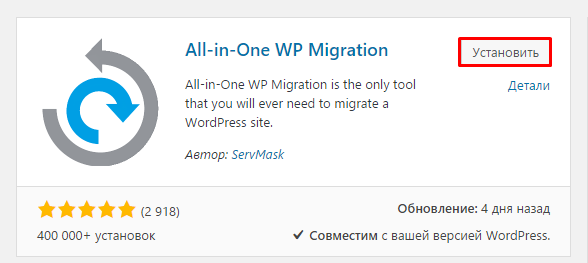
- Установите и активируйте плагин All-in-One WP Migration.
- Найдите его в панели управления вашим WordPress и нажмите кнопку Export.
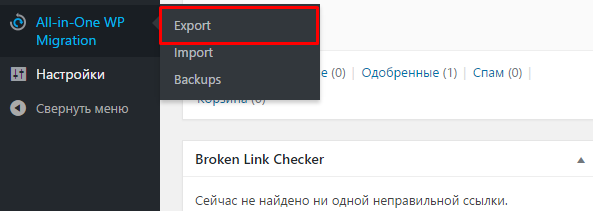
- Выберите опцию File (Файл), если вы хотите скачать резервную копию на ваш компьютер.
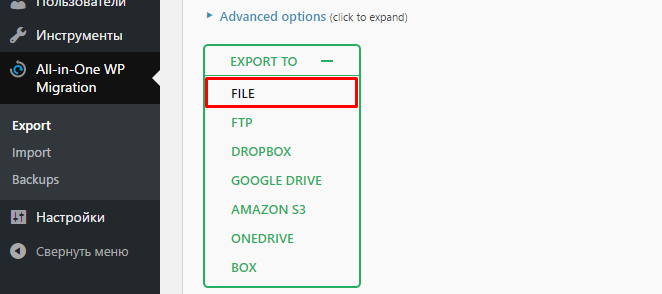
- Скачайте сгенерированную резервную копию на ваш компьютер. Она содержит файлы вашего сайта и базы данных.
- Теперь в случае появления ошибки 500 Internal Server Error (или любой другой проблемы) и невозможности её решения, вы можете просто восстановить ваш сайт с помощью резервной копии.
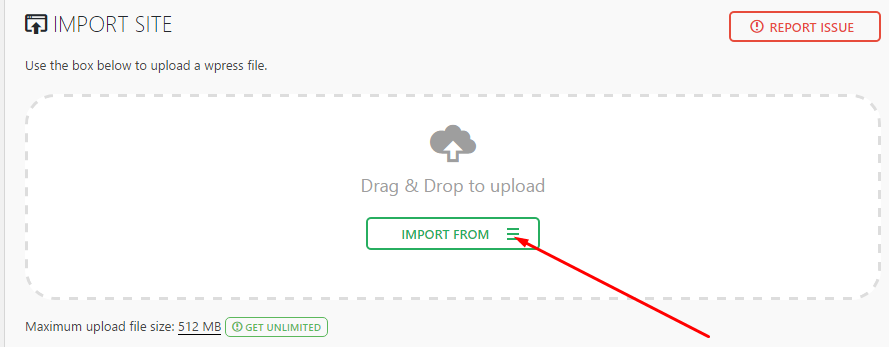
- Для восстановления сайта с помощью сгенерированной резервной копии, вам необходимо полностью удалить ваш сайт и установить новый WordPress, вместе с плагином All-in-One. После этого, выберите функцию Import (Импорт), выберите сгенерированный бэкап и продолжите процедуру восстановления.
Способ 8 — Переустановка файлов WordPress
Если ошибка ещё появляется, есть кардинальное средство для её решения. Всё, что вам нужно сделать это:
- Скачать последнюю версию WordPress.
- Сохранить и распаковать её на вашем компьютере.
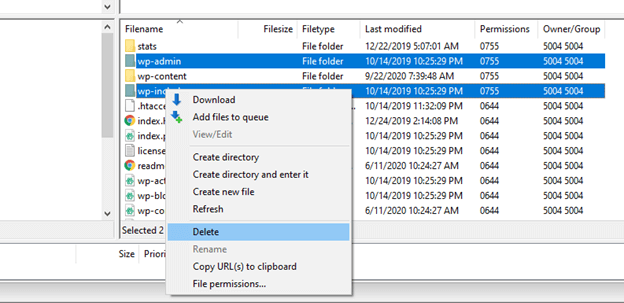
- Удалить файл wp-config-sample.php и папку wp-content для избежания перезаписи важной информации.
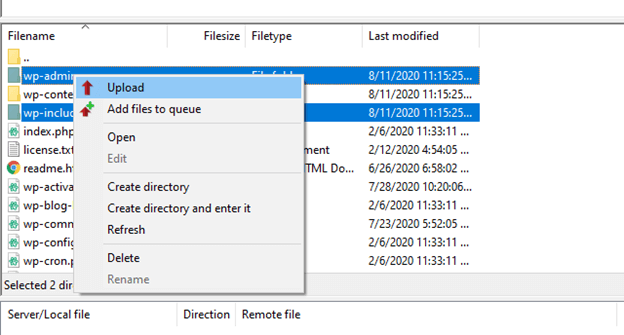
- Переместить все корневые файлы на ваш хостинг аккаунт и перезаписать их. Это можно сделать с помощью FTP-клиента FileZilla.
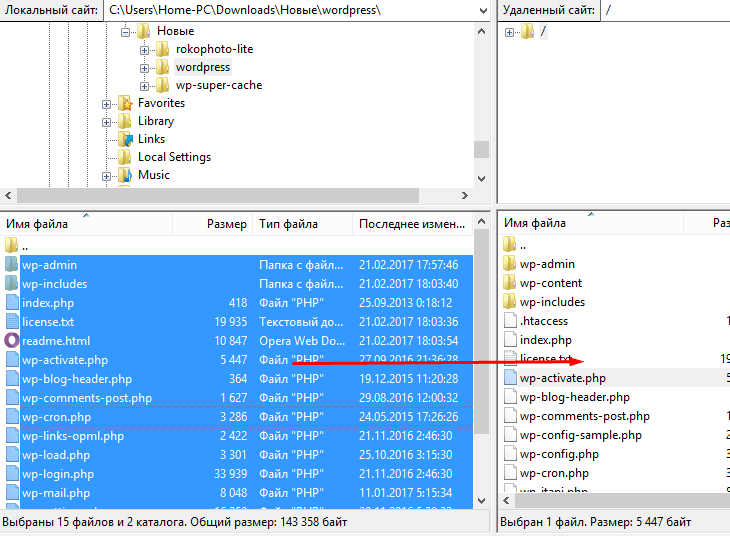
- Далее, должно появиться окно с разрешением на перезапись файлов. Поставьте значения как на изображении для автоматизации процесса.
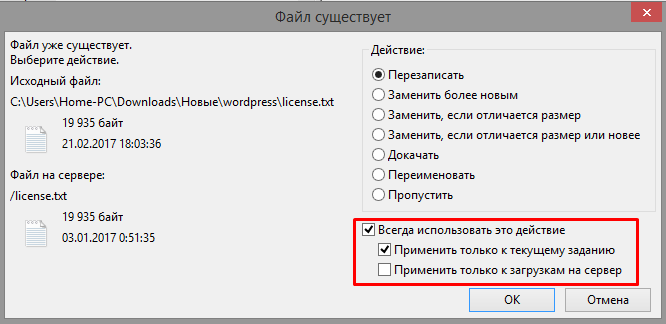
ЗАМЕТКА! Убедитесь, что вы сделали резервное копирование вашего сайта перед началом данного процесса. Это позволит избежать потери важной информации.
Процесс загрузки может занять от 10 до 20 минут. После завершения, попробуйте вновь обновить ваш сайт в браузере. Если ошибка 500 Internal Server Error была связана с корневыми файлами WordPress, этот способ должен помочь решить проблему.
Способ 9 — Начать всё заново
Если все из приведённых способов вам не помогли, вам придется начать создание вашего сайта с нуля. Хорошей новостью является то, что вы можете восстановить ваш сайт даже с помощью резервной копии базы данных. Загляните в данное руководство для пошаговой инструкции по восстановлению вашего сайта только с помощью базы данных MySQL.
Заключение
Все, кто используют WordPress хотя бы раз сталкивались с ошибкой internal server error. Являетесь ли вы продвинутым разработчиком или начинающим пользователем, исправление ошибки 500 является довольно простым процессом, если вы знаете, где искать её причину. Как и в реальной жизни, для решения проблемы нужно сначала найти её источник. После этого, вы можете использовать онлайн ресурсы или это руководство для решения данной проблемы.
У вас есть чем с нами поделиться? Расскажите о ваших идеях или советах в комментариях!

Елена имеет профессиональное техническое образование в области информационных технологий и опыт программирования на разных языках под разные платформы и системы. Более 10 лет посвятила сфере веб, работая с разными CMS, такими как: Drupal, Joomla, Magento и конечно же наиболее популярной в наши дни системой управления контентом – WordPress. Её статьи всегда технически выверены и точны, будь то обзор для WordPress или инструкции по настройке вашего VPS сервера.
Сообщение об ошибке сервера 500 на стороне клиента или в панели администрирования может стать источником серьезных проблем и причиной потери посетителей. Устранить внутреннюю ошибку сервера HTTP 500 особенно сложно, потому что причины возникновения подобной неполадки могут быть самыми разными.
Формат сообщения о внутренней ошибке сервера 500 не предполагает никаких пояснений о возможном источнике проблемы, и на поиск причины возникновения неполадки могут уйти часы терпеливой работы. В это время сайт теряет посетителей и возможные продажи, страдает репутация компании.

Если на вашем сайте появилось сообщение о внутренней ошибке сервера HTTP 500, понадобятся все возможные способы устранения возникшей проблемы, которые рассмотрены в этой статье. Надеюсь, это руководство поможет вернуть сайт в рабочее состояние в кратчайшие сроки.
- Краткая справка: внутренняя ошибка сервера 500 в WordPress
- Создайте резервную копию сайта
- Перезагрузите страницу
- Проверьте журнал сервера
- Очистите кэш браузера
- Проверьте доступность панели администратора
- Отключите тему оформления или плагин, вызывающие ошибку
- Проверьте файл .htaccess
- Увеличьте лимит памяти для PHP
- Проверьте права доступа
- Переустановите WordPress
- Обратитесь в техподдержку
- Обратитесь к специалисту по отладке
- Заключение

Подобное сообщение уведомляет пользователей о том, что неполадка в работе WordPress-сайта возникла на стороне сервера. В браузерах посетителей сайт не отображается. Эта ошибка особенно опасна тем, что может помешать входу в панель администрирования.
Вопреки распространенному мнению, подобная ошибка не связана с неполадками в работе сервера. Она указывает на проблему с корневым каталогом WordPress-сайта. Это означает, что для обнаружения истинной причины возникшей проблемы понадобится немало проб и ошибок. В зависимости от используемого браузера, сообщение об ошибке выглядит по-разному:
- 500 internal server error (500 внутренняя ошибка сервера);
- Internal server error (внутренняя ошибка сервера);
- Error 500 (ошибка 500);
- HTTP error 500 (HTTP ошибка 500);
- HTTP error 500-internal server error (HTTP ошибка 500 – внутренняя ошибка сервера);
- Temporary error (500) (временная ошибка 500);
- Error code: 500 (код ошибки: 500).
Независимо от формата сообщения, ошибка 500 возникшая на WordPress, негативно повлияет на индексирование в поисковиках, репутацию, трафик, и, конечно же – продажи. Ниже приведена инструкция с перечнем наиболее эффективных методов решения проблемы.

До начала каких-либо действий по поиску причин возникновения ошибки 500 следует провести резервное копирование сайта, если бекапа у вас нет или он уже устарел. Процесс решения подобной проблемы может вызвать серьезные изменения в корневом каталоге, где хранятся все файлы WordPress. При наличии резервной копии сайта можно не опасаться любых изменений. Используйте плагин для автоматического создания резервной копии, затем сохраните бекап на внешнем носителе или в облачном хранилище.
Это самое первое, что стоит сделать – возможно, серверу просто понадобилось очистить кэш или удалить временные файлы. Внутренние ошибки сервера часто возникают после обновления сайта, активации новой темы, добавления плагинов. Сервер может быть перегружен, и сообщение об ошибке просто исчезнет после перезагрузки сайта. Если такое случается часто – это повод подыскать более надежный хостинг для WordPress.
Также стоит проверить работоспособность сайта с помощью сервиса downforeveryoneorjustforme.com – он покажет, если интернет-ресурс полностью недоступен всем посетителям, либо проблема находится на вашей стороне.
Содержимое лога сервера может пролить свет на причины возникновения проблемы. Журналы сервера предоставляют ценную информацию, и помогут выяснить многие причины возникновения неполадки. Среди возможных причин может оказаться установка некорректной темы оформления, плагина; ошибки при установлении соединения с базой данных.
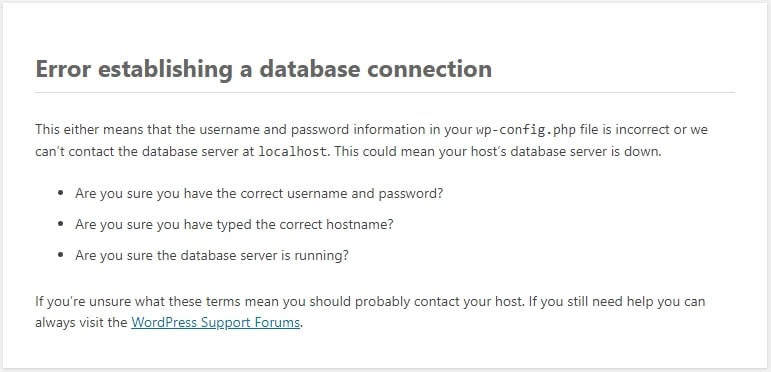
При ошибках, связанных с базами данных, браузер обычно показывает пустую страницу, которую иногда называют «белым экраном смерти». Вследствие отсутствия соединения с базой на экране не будет никаких данных. Эта неполадка не только уничтожает клиентскую часть сайта, но и лишает администратора доступа в панель управления.
Основные причины подобной проблемы следующие:
- Поврежденный файл базы данных WordPress.
- Повреждение файлов движка WordPress злоумышленниками или вирусами.
- Перегрузка базы данных запросами при большом объеме трафика – такое чаще всего происходит на общих хостингах.
Для решения возникшей проблемы, прежде всего, проверьте корректность параметров конфигурации базы данных, или восстановите базу данных из резервной копии. WordPress также предоставляет встроенный метод исправления нерабочей базы данных следующей командой:
Define(‘WP_ALLOW_REPAIR’, true);

Очистка кэша улучшает производительность браузера и решает многие проблемы с неправильной загрузкой сайтов. Существует множество эффективных и бесплатных утилит для полной очистки кэша.
Попробуйте зайти в панель управления по стандартной ссылке. Если попытка не удалась, сообщение о внутренней ошибке сервера 500 может указывать на проблему с недавно установленными темами оформления и плагинами.

Если вам не удается войти в панель администрирования WordPress для отключения некорректной темы оформления или плагина, придется действовать обходным путем. Способ прост, хотя и займет некоторое время. Понадобится FTP-клиент для прямого доступа к файлам сайт. Скачайте, например, FileZilla, введите в параметрах соединения адрес сайта, логин и пароль, подключитесь к серверу – файлы вашего сайта будут в окне справа.
Найдите папку под названием plugins и переименуйте ее в plugins_deactivate. Все плагины будут отключены. Перезагрузите сайт – если ошибка исчезла, значит, причина была в плагине. Теперь вы можете войти в панель администрирования. Войдите и начните активировать плагины по одному. Перезагружайте сайт после активации каждого плагина – так вы обнаружите проблемный. Удалите его, найдите ему замену или уведомите разработчика о проблеме, с которой вы столкнулись. Не забудьте вернуться в FTP-клиент и переименовать директорию обратно, чтобы исправные плагины стали активными.
Если окажется, что ошибку вызывают не плагины, проделайте эти же самые шаги, последовательно проверяя все темы оформления в папке themes. Удалите проблемную тему оформления и перезагрузите сайт.

Установка новой темы оформления или плагина могут вызвать изменения в файле .htaccess, что также может стать причиной сообщения о внутренней ошибке сервера. Эту проблему легко решить с помощью FTP-клиента.
Найдите файл .htaccess, кликните по нему правой кнопкой мыши и переименуйте в .htaccess_old. Перезагрузите файл – если сообщение об ошибке исчезло, значит, проблема действительно была связана с файлом .htaccess. Войдите в панель администрирования, выберите раздел «Постоянные ссылки» в меню «Настройки», затем нажмите кнопку «Сохранить изменения». Эта процедура восстановит оригинальный файл .htaccess и избавит вас от ошибки 500.
Если ваш WordPress-сайт использует множество скриптов, перегружающих доступный объем памяти, это также может стать причиной возникновения ошибки 500. Объем памяти регулируется настройками хостинга и движком WordPress. Увеличить объем памяти для PHP можно несколькими способами.
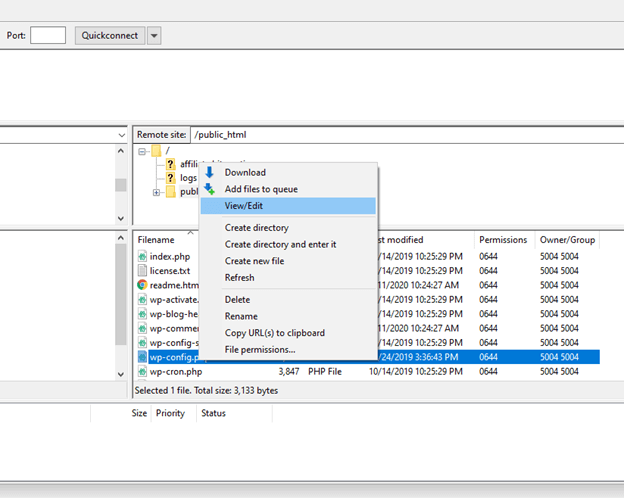
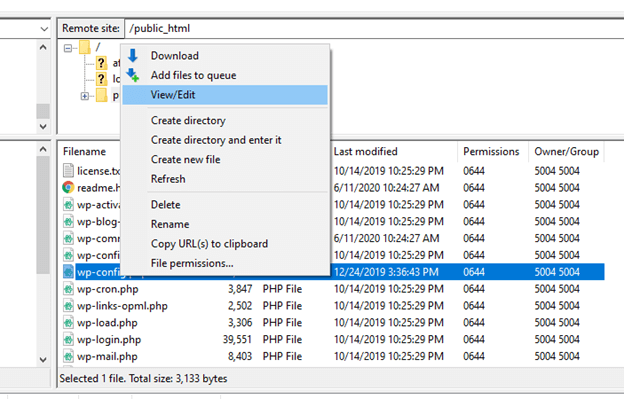
- Изменить параметры в файле wp-config.php. Зайдите в папку сайта с помощью FTP-клиента, найдите файл wp-config.php, кликните по нему правой кнопкой мыши и выберите в контекстном меню пункт «Просмотр/Редактирование». В качестве редактора по умолчанию можно использовать «Блокнот». Перед строкой «Happy Blogging» добавьте следующий фрагмент кода:
define(‘WP_MEMORY_LIMIT’,’64’);
Сохраните отредактированный в «Блокноте» файл на своем жестком диске, найдите его в левом окне FTP-клиента, кликните по нему правой кнопкой мыши и выберите в контекстном меню пункт «Загрузить». Если после перезагрузки сайта ошибка 500 исчезла – проблема была в доступном объеме памяти.
- Отредактировать файл php.ini. Чтобы найти этот файл, активируйте опцию «Показывать скрытые файлы»; файл php.ini расположен в подкаталоге wp-admin корневой директории. Откройте файл php.ini, найдите строку, начинающуюся с «memory_limit». Если указанное значение составляет 64 Мб и менее, замените его новым параметром:
Если вам не удалось найти файл php.ini, создайте его самостоятельно с помощью программы «Блокнот». Вставьте в созданный файл приведенный выше код и загрузите его на хостинг, в папку wp-admin.
- Изменить файл .htaccess. С помощью FTP-клиента найдите файл на хостинге и добавьте в него следующую строку:
php_value memory_limit 256M
Это увеличит лимит памяти до 256 Мб. Если вы не смогли найти файл .htaccess – активируйте опцию «Показывать скрытые файлы» или создайте подобный файл самостоятельно, после чего загрузите его в папку wp-admin.
Чтобы избежать повторного появления ошибки 500, придется выяснить, какой именно компонент сайта перегружает память. Это может быть некорректно написанный плагин или тема оформления. Можно обратиться за помощью в техподдержку хостинга – специалисты смогут выявить проблемный компонент с помощью журнала сервера.
В соответствии с правилами безопасности WordPress, протокол назначения прав доступа выглядит следующим образом:
- Все директории должны иметь права 755 или 750.
- Для файлов назначают права 644 или 640, кроме файла wp-config.php, который должен иметь права 400 или 440 с целью обеспечения защиты от несанкционированного доступа.
- Ни в коем случае не назначайте права 777 для директорий.
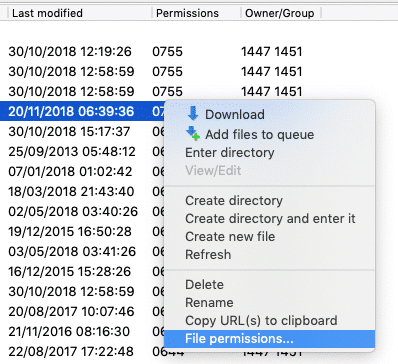
Если права доступа имеют какие-либо другие параметры, возможно появление ошибки 500. Параметры можно проверить с помощью FTP-клиента – они указаны в «Разрешениях». Если вы обнаружите файл или папку с правами доступа, отличающимися от регламентированных – кликните правой кнопкой и измените соответствующий параметр на правильный.

Системные файлы могут повреждаться со временем, в таком случае понадобится переустановка WordPress. Такие повреждения случаются редко, но если все рассмотренные выше методы не помогли, это единственный оставшийся вариант. Переустановка ничем не отличается от первоначальной установки WordPress – скачайте свежий установочный файл с www.wordpress.org и установите WordPress на свой хостинг.
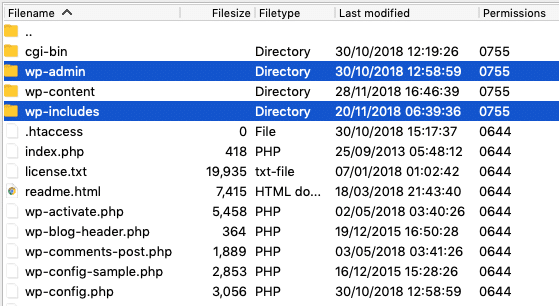
Установочные файлы находятся в папке WordPress. Подключитесь к серверу с помощью FTP-клиента, найдите папки wp-admin и wp-includes, начните загрузку файлов. Когда появится запрос о действиях с существующими файлами, выберите «Переписать». Эта операция заменит все старые файлы в директориях wp-admin и wp-includes новыми. Если после перезагрузки сайта все заработает правильно – проблема была в поврежденных файлах WordPress.
Если все приведенные выше способы не решили проблему, обратитесь в техподдержку хостинга. При выборе надежного хостинга для WordPress всегда важно учитывать наличие в штате специалистов, имеющих опыт в решении проблем с внутренней ошибкой сервера 500. Специалисты исправят подобную ошибку самостоятельно или проведут владельца сайта шаг за шагом через все этапы, необходимые для решения проблемы.
WordPress включает в себя инструмент для тестирования и отладки. Он пригодится, если источник возникшей проблемы остается неясным. В ходе отладки в файл wp-config.php вставляют фрагменты кода, который поможет определить причины неполадок. Результаты тестов записываются в файл, расположенный в корневом каталоге. Для интерпретации и последующей настройки лучше обратиться к опытному профессионалу: новичку сложно отличить незначительную ошибку от серьезной. Кроме того, в процессе тестирования фрагменты кода могут быть видны посетителям сайта.
Внутренняя ошибка сервера 500 досадна – особенно потому, что причины ее появления часто неясны, а единственного простого решения не существует. Приведенные в этой статье методы не требуют навыков программирования, но в большинстве случаев помогут решить возникшую проблему.
Если сайт расположен на бюджетном общем хостинге, лучше сменить тарифный план или выбрать хостинг-провайдера, который возьмет на себя обязательства по обеспечению стабильной работы вашего интернет-ресурса.
Содержание
- How to Fix a 500 Internal Server Error on a WordPress Site
- Introduction
- Step 1 — Identifying and Replicating the Issue
- Deactivating WordPress Plugins
- Auditing Web Server Logs
- Step 2 — Updating Your Installation
- Updating WordPress
- Updating PHP
- Step 3 — Testing for Errors
- Conclusion
- Tutorial Series: Common WordPress Errors
- Как исправить внутреннюю ошибку сервера 500 на WordPress — сайте
- Краткая справка: внутренняя ошибка сервера 500 в WordPress
- Создайте резервную копию сайта
- Перезагрузите страницу
- Проверьте журнал сервера
- Очистите кэш браузера
- Проверьте доступность панели администратора
- Отключите тему оформления или плагин, вызывающие ошибку
- Проверьте файл .htaccess
- Увеличьте лимит памяти для PHP
- Проверьте права доступа
- Переустановите WordPress
- Обратитесь в техподдержку
- Обратитесь к специалисту по отладке
- Заключение
How to Fix a 500 Internal Server Error on a WordPress Site
![]()

Introduction
The 500 Internal Server Error code can be an ambiguous one when maintaining a WordPress installation, and issues in PHP or the web server) could likely be the culprit. If you are receiving a 500 error on your WordPress installation, this tutorial will share solutions to help you identify, solve, and verify that the changes you made were successful in getting your WordPress site running smoothly again.
Step 1 — Identifying and Replicating the Issue
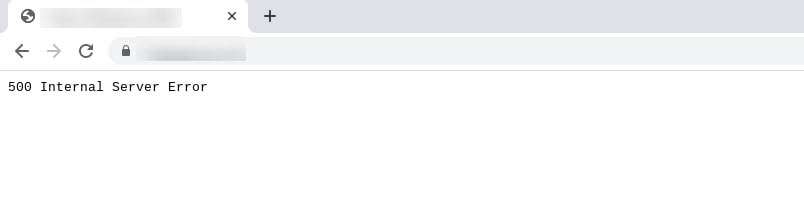
An Internal Server Error HTTP code indicates that the server is having an issue, but cannot be specific about what sort of issue it’s having. Using this knowledge about the 500 Internal Server Error code, let’s take a look at the error message:
To solve this problem, the first step is to replicate and monitor the error. If you recently enabled, changed settings, or upgraded a plugin, there is a chance the plugin is the culprit of your issues.
Deactivating WordPress Plugins
You may want to start your audit by disabling your plugins one by one and seeing if this changes anything.
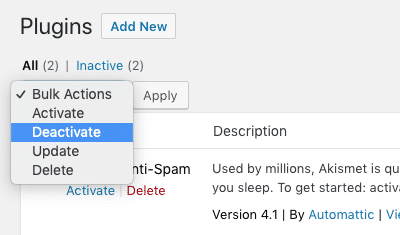
To deactivate your plugins temporarily, navigate to your WordPress dashboard and select Plugins. In your list of plugins, locate the Deactivate button and select it to start the process of disabling your plugin. Repeat this process for each plugin you have activated.

Auditing Web Server Logs
As mentioned before, the 500 Internal Server Error on WordPress sites can happen for a wide variety of reasons, all related to the back end server. Auditing your web server logs can be a helpful practice to identify the issue or what may have caused it in the first place.
To audit your server log, enter the following in the command line:
After entering, reload your current WordPress page to see if more information on the error is shown.
If you still can’t identify the specific code that is triggering this error, the issue might come from an incompatible or damaged installation of either WordPress or PHP on the server. In the next step, you’ll see how to upgrade WordPress and PHP to make sure this is not what’s causing your error.
Step 2 — Updating Your Installation
To make sure the 500 Internal Server Error encountered on your WordPress installation doesn’t come from a damaged or incompatible installation of either WordPress or PHP, you’ll need to check your currently installed versions and update them accordingly. Keeping your web server and your WordPress installation up to date is a good security practice and should be incorporated as a regular maintenance task.
Updating WordPress
When you’re experiencing a 500 Internal Server Error, you may have limited access to your site, to update WordPress automatically. If the error is not preventing you from accessing your WordPress admin panel, log in to your /wp-admin dashboard. Because WordPress automatically sends notifications on new updates available, there may be a notification at the top of your dashboard:

If there is no notification, you can update your WordPress installation by visiting the Updates section, and selecting Update when prompted to update your WordPress site.
After the update, move to Step 3 to test for the 500 error. If you are still experiencing the error, return to this step to update your version of PHP.
If you aren’t able to log into your dashboard because of the 500 error, you’ll need to perform a manual WordPress update via the command line.
Updating PHP
To update your version of PHP on your WordPress installation, you’ll need to check your hosting provider’s steps to accessing and updating the PHP version on your installation. Some providers allow for updates via cpanel, while others require updates on their platform. Consult with your hosting provider’s documentation to learn more about how to update the PHP on your WordPress installation.
You can also manually update your installation — learn more about this process and why updating PHP for WordPress sites is important on WordPress’ official documentation.
After you’ve successfully updated your WordPress installation and/or version of PHP, it’s time to move to Step 3 to test for errors.
Step 3 — Testing for Errors
To test for errors after updating your WordPress installation and/or PHP version, try accessing your domain.
If you encounter the 500 error again and have successfully updated your version of PHP as well as your WordPress installation, you’ll need to check with your hosting provider to dive deeper into issues with your server that may exist beyond your site.
If you’ve successfully resolved the 500 error, you’ll have also updated your installation to ward against commonly experienced bugs and security vulnerabilities. It’s a good practice to keep both your WordPress installation and PHP versions updated for this reason, and can prevent 500 errors from occurring in the future.
Conclusion
In this tutorial, we successfully performed troubleshooting a 500 error on a WordPress installation, commonly experienced when either the WordPress installation or PHP version is damaged or outdated.
For more information on error codes and how to solve them, visit our tutorial, “How to Troubleshoot Common HTTP Codes”.
If you’ve enjoyed this tutorial and our broader community, consider checking out our DigitalOcean products which can also help you achieve your development goals.
Tutorial Series: Common WordPress Errors
This tutorial series explains how to troubleshoot and fix common errors that you may encounter when deploying, maintaining, and updating your WordPress installation.
Each tutorial in this series includes descriptions of common deployment, maintenance, or update errors, and explores ways to fix and optimize your installation to scale.
Источник
Как исправить внутреннюю ошибку сервера 500 на WordPress — сайте
Сообщение об ошибке сервера 500 на стороне клиента или в панели администрирования может стать источником серьезных проблем и причиной потери посетителей. Устранить внутреннюю ошибку сервера HTTP 500 особенно сложно, потому что причины возникновения подобной неполадки могут быть самыми разными.
Формат сообщения о внутренней ошибке сервера 500 не предполагает никаких пояснений о возможном источнике проблемы, и на поиск причины возникновения неполадки могут уйти часы терпеливой работы. В это время сайт теряет посетителей и возможные продажи, страдает репутация компании.
Если на вашем сайте появилось сообщение о внутренней ошибке сервера HTTP 500, понадобятся все возможные способы устранения возникшей проблемы, которые рассмотрены в этой статье. Надеюсь, это руководство поможет вернуть сайт в рабочее состояние в кратчайшие сроки.
Краткая справка: внутренняя ошибка сервера 500 в WordPress
Подобное сообщение уведомляет пользователей о том, что неполадка в работе WordPress-сайта возникла на стороне сервера. В браузерах посетителей сайт не отображается. Эта ошибка особенно опасна тем, что может помешать входу в панель администрирования.
Вопреки распространенному мнению, подобная ошибка не связана с неполадками в работе сервера. Она указывает на проблему с корневым каталогом WordPress-сайта. Это означает, что для обнаружения истинной причины возникшей проблемы понадобится немало проб и ошибок. В зависимости от используемого браузера, сообщение об ошибке выглядит по-разному:
- 500 internal server error (500 внутренняя ошибка сервера);
- Internal server error (внутренняя ошибка сервера);
- Error 500 (ошибка 500);
- HTTP error 500 (HTTP ошибка 500);
- HTTP error 500-internal server error (HTTP ошибка 500 – внутренняя ошибка сервера);
- Temporary error (500) (временная ошибка 500);
- Error code: 500 (код ошибки: 500).
Независимо от формата сообщения, ошибка 500 возникшая на WordPress, негативно повлияет на индексирование в поисковиках, репутацию, трафик, и, конечно же – продажи. Ниже приведена инструкция с перечнем наиболее эффективных методов решения проблемы.
Создайте резервную копию сайта
До начала каких-либо действий по поиску причин возникновения ошибки 500 следует провести резервное копирование сайта, если бекапа у вас нет или он уже устарел. Процесс решения подобной проблемы может вызвать серьезные изменения в корневом каталоге, где хранятся все файлы WordPress. При наличии резервной копии сайта можно не опасаться любых изменений. Используйте плагин для автоматического создания резервной копии, затем сохраните бекап на внешнем носителе или в облачном хранилище.
Перезагрузите страницу
Это самое первое, что стоит сделать – возможно, серверу просто понадобилось очистить кэш или удалить временные файлы. Внутренние ошибки сервера часто возникают после обновления сайта, активации новой темы, добавления плагинов. Сервер может быть перегружен, и сообщение об ошибке просто исчезнет после перезагрузки сайта. Если такое случается часто – это повод подыскать более надежный хостинг для WordPress.
Также стоит проверить работоспособность сайта с помощью сервиса downforeveryoneorjustforme.com – он покажет, если интернет-ресурс полностью недоступен всем посетителям, либо проблема находится на вашей стороне.
Проверьте журнал сервера
Содержимое лога сервера может пролить свет на причины возникновения проблемы. Журналы сервера предоставляют ценную информацию, и помогут выяснить многие причины возникновения неполадки. Среди возможных причин может оказаться установка некорректной темы оформления, плагина; ошибки при установлении соединения с базой данных.
При ошибках, связанных с базами данных, браузер обычно показывает пустую страницу, которую иногда называют «белым экраном смерти». Вследствие отсутствия соединения с базой на экране не будет никаких данных. Эта неполадка не только уничтожает клиентскую часть сайта, но и лишает администратора доступа в панель управления.
Основные причины подобной проблемы следующие:
- Поврежденный файл базы данных WordPress.
- Повреждение файлов движка WordPress злоумышленниками или вирусами.
- Перегрузка базы данных запросами при большом объеме трафика – такое чаще всего происходит на общих хостингах.
Для решения возникшей проблемы, прежде всего, проверьте корректность параметров конфигурации базы данных, или восстановите базу данных из резервной копии. WordPress также предоставляет встроенный метод исправления нерабочей базы данных следующей командой:
Очистите кэш браузера
Очистка кэша улучшает производительность браузера и решает многие проблемы с неправильной загрузкой сайтов. Существует множество эффективных и бесплатных утилит для полной очистки кэша.
Проверьте доступность панели администратора
Попробуйте зайти в панель управления по стандартной ссылке. Если попытка не удалась, сообщение о внутренней ошибке сервера 500 может указывать на проблему с недавно установленными темами оформления и плагинами.
Отключите тему оформления или плагин, вызывающие ошибку
Если вам не удается войти в панель администрирования WordPress для отключения некорректной темы оформления или плагина, придется действовать обходным путем. Способ прост, хотя и займет некоторое время. Понадобится FTP-клиент для прямого доступа к файлам сайт. Скачайте, например, FileZilla, введите в параметрах соединения адрес сайта, логин и пароль, подключитесь к серверу – файлы вашего сайта будут в окне справа.
Найдите папку под названием plugins и переименуйте ее в plugins_deactivate . Все плагины будут отключены. Перезагрузите сайт – если ошибка исчезла, значит, причина была в плагине. Теперь вы можете войти в панель администрирования. Войдите и начните активировать плагины по одному. Перезагружайте сайт после активации каждого плагина – так вы обнаружите проблемный. Удалите его, найдите ему замену или уведомите разработчика о проблеме, с которой вы столкнулись. Не забудьте вернуться в FTP-клиент и переименовать директорию обратно, чтобы исправные плагины стали активными.
Если окажется, что ошибку вызывают не плагины, проделайте эти же самые шаги, последовательно проверяя все темы оформления в папке themes . Удалите проблемную тему оформления и перезагрузите сайт.
Проверьте файл .htaccess
Установка новой темы оформления или плагина могут вызвать изменения в файле .htaccess , что также может стать причиной сообщения о внутренней ошибке сервера. Эту проблему легко решить с помощью FTP-клиента.
Найдите файл .htaccess , кликните по нему правой кнопкой мыши и переименуйте в .htaccess_old . Перезагрузите файл – если сообщение об ошибке исчезло, значит, проблема действительно была связана с файлом .htaccess . Войдите в панель администрирования, выберите раздел « Постоянные ссылки » в меню « Настройки », затем нажмите кнопку « Сохранить изменения ». Эта процедура восстановит оригинальный файл .htaccess и избавит вас от ошибки 500.
Увеличьте лимит памяти для PHP
Если ваш WordPress-сайт использует множество скриптов, перегружающих доступный объем памяти, это также может стать причиной возникновения ошибки 500. Объем памяти регулируется настройками хостинга и движком WordPress. Увеличить объем памяти для PHP можно несколькими способами.
- Изменить параметры в файле wp-config.php . Зайдите в папку сайта с помощью FTP-клиента, найдите файл wp-config.php , кликните по нему правой кнопкой мыши и выберите в контекстном меню пункт « Просмотр/Редактирование ». В качестве редактора по умолчанию можно использовать « Блокнот ». Перед строкой «Happy Blogging» добавьте следующий фрагмент кода:
Сохраните отредактированный в « Блокноте » файл на своем жестком диске, найдите его в левом окне FTP-клиента, кликните по нему правой кнопкой мыши и выберите в контекстном меню пункт « Загрузить ». Если после перезагрузки сайта ошибка 500 исчезла – проблема была в доступном объеме памяти.
- Отредактировать файл php.ini . Чтобы найти этот файл, активируйте опцию « Показывать скрытые файлы »; файл php.ini расположен в подкаталоге wp-admin корневой директории. Откройте файл php.ini , найдите строку, начинающуюся с «memory_limit». Если указанное значение составляет 64 Мб и менее, замените его новым параметром:
Если вам не удалось найти файл php.ini , создайте его самостоятельно с помощью программы « Блокнот ». Вставьте в созданный файл приведенный выше код и загрузите его на хостинг, в папку wp-admin .
- Изменить файл .htaccess . С помощью FTP-клиента найдите файл на хостинге и добавьте в него следующую строку:
Это увеличит лимит памяти до 256 Мб. Если вы не смогли найти файл .htaccess – активируйте опцию « Показывать скрытые файлы » или создайте подобный файл самостоятельно, после чего загрузите его в папку wp-admin .
Чтобы избежать повторного появления ошибки 500, придется выяснить, какой именно компонент сайта перегружает память. Это может быть некорректно написанный плагин или тема оформления. Можно обратиться за помощью в техподдержку хостинга – специалисты смогут выявить проблемный компонент с помощью журнала сервера.
Проверьте права доступа
В соответствии с правилами безопасности WordPress, протокол назначения прав доступа выглядит следующим образом:
- Все директории должны иметь права 755 или 750.
- Для файлов назначают права 644 или 640, кроме файла wp-config.php , который должен иметь права 400 или 440 с целью обеспечения защиты от несанкционированного доступа.
- Ни в коем случае не назначайте права 777 для директорий.
Если права доступа имеют какие-либо другие параметры, возможно появление ошибки 500. Параметры можно проверить с помощью FTP-клиента – они указаны в « Разрешениях ». Если вы обнаружите файл или папку с правами доступа, отличающимися от регламентированных – кликните правой кнопкой и измените соответствующий параметр на правильный.
Переустановите WordPress
Системные файлы могут повреждаться со временем, в таком случае понадобится переустановка WordPress. Такие повреждения случаются редко, но если все рассмотренные выше методы не помогли, это единственный оставшийся вариант. Переустановка ничем не отличается от первоначальной установки WordPress – скачайте свежий установочный файл с www.wordpress.org и установите WordPress на свой хостинг.
Установочные файлы находятся в папке WordPress. Подключитесь к серверу с помощью FTP-клиента, найдите папки wp-admin и wp-includes , начните загрузку файлов. Когда появится запрос о действиях с существующими файлами, выберите « Переписать ». Эта операция заменит все старые файлы в директориях wp-admin и wp-includes новыми. Если после перезагрузки сайта все заработает правильно – проблема была в поврежденных файлах WordPress.
Обратитесь в техподдержку
Если все приведенные выше способы не решили проблему, обратитесь в техподдержку хостинга. При выборе надежного хостинга для WordPress всегда важно учитывать наличие в штате специалистов, имеющих опыт в решении проблем с внутренней ошибкой сервера 500. Специалисты исправят подобную ошибку самостоятельно или проведут владельца сайта шаг за шагом через все этапы, необходимые для решения проблемы.
Обратитесь к специалисту по отладке
WordPress включает в себя инструмент для тестирования и отладки. Он пригодится, если источник возникшей проблемы остается неясным. В ходе отладки в файл wp-config.php вставляют фрагменты кода, который поможет определить причины неполадок. Результаты тестов записываются в файл, расположенный в корневом каталоге. Для интерпретации и последующей настройки лучше обратиться к опытному профессионалу: новичку сложно отличить незначительную ошибку от серьезной. Кроме того, в процессе тестирования фрагменты кода могут быть видны посетителям сайта.
Заключение
Внутренняя ошибка сервера 500 досадна – особенно потому, что причины ее появления часто неясны, а единственного простого решения не существует. Приведенные в этой статье методы не требуют навыков программирования, но в большинстве случаев помогут решить возникшую проблему.
Если сайт расположен на бюджетном общем хостинге, лучше сменить тарифный план или выбрать хостинг-провайдера, который возьмет на себя обязательства по обеспечению стабильной работы вашего интернет-ресурса.
Наталья Кайда автор-переводчик статьи « How To Fix The 500 Internal Server Error On Your WordPress Site? »
Источник
In WordPress, the Internal Server Error or Error 500 is one of the most annoying errors because it does not return actual data about the underlying issue. It’s hard for beginners to eliminate it. There are many different reasons for Internal Server Errors.
Download WP STAGING to avoid this and other errors in the future. The WP STAGING plugin allows you to create a copy of your WordPress site in seconds. You can test new plugins, designs, and other updates in a secure environment on that staging site.
This error is a very dreaded kind of error. It seems to always come out at a very inopportune time. An error 500 means your site is offline completely and will not be available anymore, meaning you will start losing your customers. If your site is down for more than a few hours, Google might think there is something wrong with your site. This can lead to a loss of your site’s search engine rankings.
Contents
- 1 What is the Internal Server Error in WordPress?
- 2 Reason Behind the occurrence of Internal Server Error in WordPress
- 3 How to fix Internal Server Error in WordPress
- 3.1 Reload the Page
- 3.2 Delete the Browser Cache
- 3.2.1 Clear Cache In Google Chrome
- 3.2.2 Clear the Cache in Firefox
- 3.2.3 Clear the Cache in Apple Safari
- 3.2.4 Clear the Cache in Microsoft Edge (Internet Explorer)
- 3.3 Check Server Log Files
- 3.4 Check .htaccess File
- 3.5 Increase the Server Memory limit.
- 3.6 Check Installed Plugins and Themes
- 3.7 Repair WordPress Core Files
- 3.8 Contact Your Hosting Provider
In this article, we will try to resolve this error in simple steps. But first, we need to know what the Internal Server Error is to fix it properly.
The proper definition of Internal Server Error is unclear or undefined. An Internal Server Error or Error 500 is generic. It occurs when you visit a website, and your program sends a request over to the server where the site is hosted. The server receives the request, measures it, and sends back the resources (CSS, HTML, PHP, etc.) along with a header. If the status code is 200, then it means “Everything is Ok,” but if the status code is 500 (that’s why the name Error 500), there is an error. That error is caused because some code that went wrong on the website end.
The error may look like this:
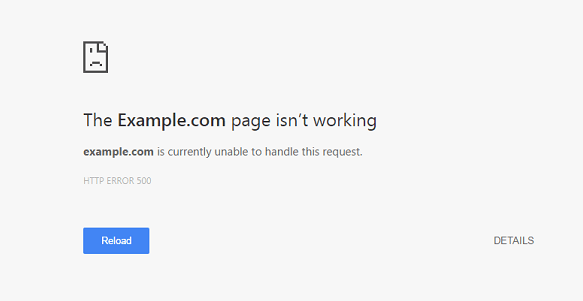
Or it may look like this.
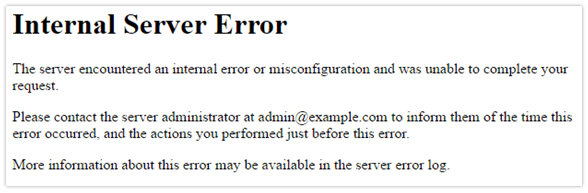
There are many different types of internal server errors with other status codes (500, 501, 501, 502, 503, etc.), but all these status codes are different but similar, so your site ends up not working as expected.
Reason Behind the occurrence of Internal Server Error in WordPress
There are many reasons for this error. In WordPress, mostly, it occurs because of the following issues:
- Outdated or broken Browser Cache
- Low Memory Limit
- Broken code in Plugins and Themes Functions
- Corrupted files in WordPress core folders
- Corrupted .htaccess file
How to fix Internal Server Error in WordPress
We have several steps to resolve this problem:
Reload the Page
When an Internal Server Error is displayed when you are opening a website, the easiest and first thing you should do is reload the page by pressing F5. If that is not successful, press ctrl + F5.
It may be the case that the server is essentially overloaded, and the site will return properly when you refresh it several times.
Delete the Browser Cache
Another good idea is to clear the browser cache. Clearing the browser cache may solve your problem. How to clear the cache on different browsers are given below:
-
Clear Cache In Google Chrome
To clear the Chrome cache, follow the following steps:
- From the top of the Chrome window, click on the right side.
- Then, select more tools and, from there, enter Clear browsing data.
- From the Time range, select All Time.
- Then, checkmark Cookies and other site data & Cached Images and Files.
- Then, click the Clear Data button.
These steps can be performed on any chromium-based browser, i.e., Microsoft Edge, to clear the cache.
-
Clear the Cache in Firefox
Follow the following steps to clear the Firefox browser cache:
- Firstly, open the menu bar and then select Options from the menu.
- Select Privacy & Security from General
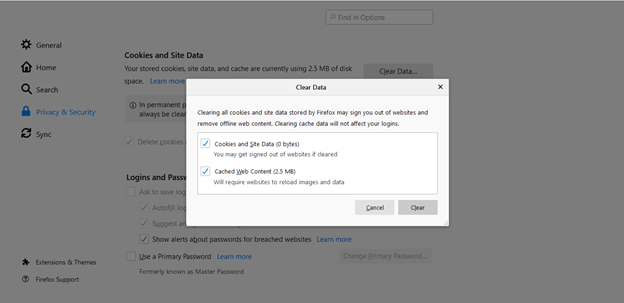
- Then from the Cookies & Site Data section, click Clear Data.
- From the dialogue box, remove the Cookies and Site Data checkmark.
- Clear the data with Cached Web Content checkmark
-
Clear the Cache in Apple Safari
To clear the Safari browser cache, follow the following steps:
- Select Setting from the home screen of Safari
- Select Clear cookies & Data from the bottom of Safari’s Setting screen
- Clear the cache from it
-
Clear the Cache in Microsoft Edge (Internet Explorer)
To clear the Internet Explorer cache, follow the following steps:
- Firstly, Close all the windows of Internal Explorer.
- Open a new one and then click on Tools Box.
- Select Internet Options from the bottom
- From the browsing history, click the Delete button.
- Then, from Delete Browsing History, check-marked the temporary Internet files and website files and Cookies and Website Data and click on the Delete button and then Ok.
The following steps are more complex and affect the database/files on the WordPress website. To not cause any further damage, and if you still have access to the WordPress dashboard, create a staging site with WP STAGING and try to fix the error on the staging page instead of the production site.
You can create a staging site with WP STAGING.
Check Server Log Files
When your website throws a fatal error 500, you can tell your website to write more explicit error messages into a so-called log file for debugging purposes.
You can enable the debug mode in your WordPress by opening the file wp-config.php and adding the following lines of code into it:
define( 'WP_DEBUG', true );

define( 'WP_DEBUG_LOG', true );

define( 'WP_DEBUG_DISPLAY', false );
You can find the wp-config.php file in the root folder of your WordPress installation. You can use your web hosting control file manager or FTP to edit this file.
Check out that article to learn in detail how to activate the WordPress debug.log.
If this works, you will see all the relevant errors in the file debug.log. That will help you to find out what plugin or code causes the error.
You can find the logfile at the location /wp-content/debug.log in your website’s file system.
- Please open the file and check it.
If you see some error messages related to one of your installed plugins, you can disable the plugin by renaming its folder to something like
/wp-content/plugins/plugin-name-temp/
If no results are provided in the debug.log, there is still access to the server error.log file.
Depending upon what kind of web server your hosting provider uses, you can find the server error log file in the paths:
Apache server: /var/log/apache2/error.log
or
Nginx server: /var/log/nginx/error.log
To access these files, you will need to have full access to your hosting. You can use an FTP client and troubleshoot with the help of these files. Some web hosting control panels also have more easy access to these files.
Check .htaccess File
The 500 Internal Server Error may also happen due to some faulty code in the .htaccess file. That file is located in your WordPress site’s root directory and is essential to make your website running properly.
To troubleshoot your .htaccess, we need to disable the current one and create a new one.
First of all, use FTP or the file manager app in your hosting account to connect to your site.
You can find the .htaccess file beside the folders wp-admin, wp-includes, and wp-content.
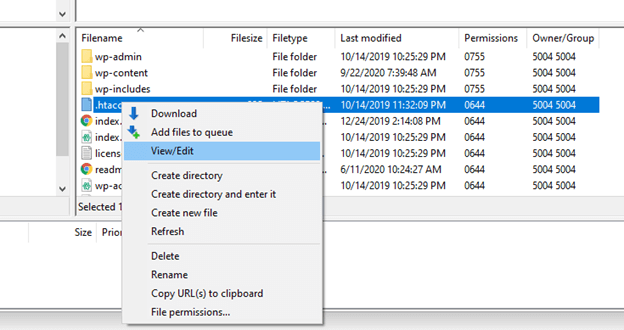
- Rename the file to
.htaccess_backuphave a backup of the file if something goes wrong. - Please create a new file and name it
.htaccess - Add the following lines of code into it:
# BEGIN WordPress

<IfModule mod_rewrite.c>

RewriteEngine On

RewriteBase /

RewriteRule ^index.php$ - [L]

RewriteCond %{REQUEST_FILENAME} !-f

RewriteCond %{REQUEST_FILENAME} !-d

RewriteRule . /index.php [L]

</IfModule>

# END WordPress
If the old .htaccess file were the reason for the error 500, this would fix the Internal Server Error for you.
Increase the Server Memory limit.
Sometimes the error 500 occurs because of the low Memory Limit of PHP in WordPress. To resolve this error, you may have to increase the memory limit. If your host provides cPanel, you can increase your PHP memory limit from the dashboard user interface.
The steps are the following:
After opening the cPanel, click on the link that says, “Select PHP version.”
Then, click on “Switch to PHP Options.”
Then, click on “memory_limit” at the bottom and change its value to something higher, usually in the range of multiplied by 2, i.e., 256, 512 and save it.
Another way is to add the line below into your wp-config.php. You can use your hosting file manager software or an FTP client to edit that file.
Just add the following line on top of your wp-config.php file.
define('WP_MEMORY_LIMIT', '256M');
If a lack of memory was your issue, then this step will fix the Internal Server Error for you.
Check Installed Plugins and Themes
Sometimes, an Internal Server Error occurs due to recently installed WordPress themes or plugins. If you recently installed a plugin or theme and it broke your site, there is a chance that you can deactivate that plugin to fix the error.
You can use the step below only if your WordPress admin dashboard under /wp-admin is still available!
- Select all plugins, click on “Bulk-Actions,” and on “deactivate” to deactivate all plugins.
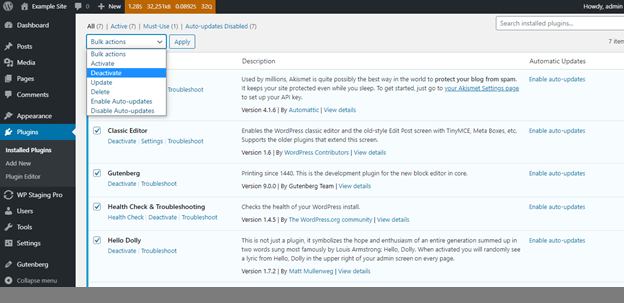
- Activate the Plugins one by one again and reload your site after each plugin activation.
- If you see the error again, deactivate or remove that plugin, which causes the problem.
If your WordPress admin dashboard is not available, you can disable a specific plugin by renaming its plugins folder to something else manually.
To do this, connect to your site via FTP.
For instance, if the woocommerce plugin is responsible for error 500 Internal Server Error, you’ll need to rename the folder from
/wp-content/plugins/woocommerce to
/wp-content/plugins/woocommerce-disabled.
After that step, the woocommerce plugin will be disabled, and you can reaccess your website.
If you want to disable all plugins, rename the folder wp-content/plugins and reload your site.
Then all plugins will be disabled, and your site should be reachable again.
After that step, rename the folder wp-content/plugins-tmp back to the original name wp-content/plugins.
Repair WordPress Core Files
Sometimes, especially in older sites, WordPress files can be corrupt. If the WordPress core system is corrupt, you need to repair the core files by replacing them with the original ones.
One way is to go to wordpress.org and download the latest copy of WordPress from there.
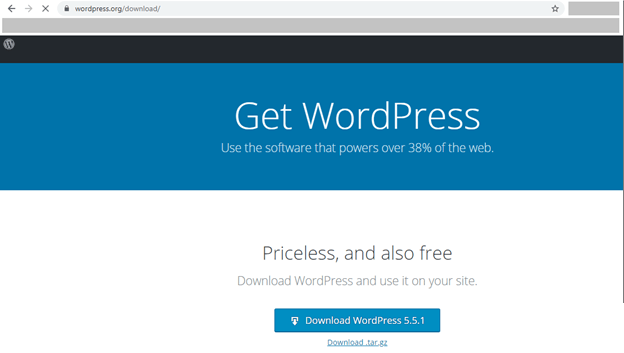
- Once downloading, unzip it.
- After that, connect to your host using your FTP client or using the file manager within your hosting account.
- Replace the entire folders
/wp-adminand/wp-includeswithin your WordPress installation with the ones from the extracted zip file. - To do that, rename the current folders
wp-adminandwp-includestowp-admin-backupandwp-includes-backup. This can be done with the hosting file manager or the FTP client.
- Upload the new directories from the unzipped file to the same location as the old directories.
If your WordPress files were corrupted, this step would fix the 500 Internal Server Error for you.
Contact Your Hosting Provider
There are a few uncommon issues with Internal Server Errors in WordPress. At this point, you have to contact your host. Sometimes, these issues can be resolved by the hosting provider by looking at the file permissions and other settings.
If this still does not solve your issue, You may have to switch to another more optimized host to run your WordPress site.
The 500 Internal Server Error is arguably the most frustrating error you can experience with WordPress because it can literally mean just about anything. That’s not to say you can’t fix it—you can, and one of the solutions below should help you get your site back up and running.
There are a few common causes, such as having a corrupted .htaccess file, exceeding your PHP memory limit, and having improper file permissions. There are less common causes, too, including issues with your plugins or server.
Unfortunately, there’s no straightforward, 5-minute fix. Solving your 500 internal server error will require troubleshooting that will take time and patience. Typically, fixing this cryptic error will help you determine what actually caused it.
To help you, I’ve put together this troubleshooting guide. Start with the first potential fix—creating a new .htaccess file—and work through each solution before moving onto the next possible fix.
What is a 500 Internal Server Error?
When you visit a site, your browser sends a request to the site’s server. The server processes the request and sends back the resources to display the page, along with an HTTP header, which includes an HTTP status code.
The status code tells your browser the status of the request. For example, a 200 status code means smooth sailing—everything is OK. But if you get a 500 status code, it means something went wrong, and the server isn’t quite sure what went wrong.
Basically, the 500 internal server error code is a generic “catch-all” that means the server encountered an unexpected condition that prevented it from fulfilling the request.
There are several different types of 500 status error codes, which all mean something different, such as 501 Not Implemented, 502 Bad Gateway, 503 Service Unavailable, and 504 Gateway Timeout.
Naming Variations for 500 Internal Server Errors
There are many variations of the 500 internal server error message, depending on the many web servers and browsers available. The website you’re visiting might also have its own custom page for these errors.
Here are several variations of what you might see:
- 500 Internal Server Error
- Internal Server Error
- 500 Internal server error
- Error 500
- HTTP Error 500
- HTTP Error 500 – Internal Server Error
- Temporary Error (500)
No matter which of these (or other variations) you see, they all mean the same thing—something has gone wrong and the server doesn’t know what’s happened.
How to Fix the 500 Internal Server Error
Like I mentioned above, this error indicates that something went wrong, but what the cause is a mystery. With resolving these errors, you essentially need to work backward—find the fix first and then you’ll know what caused the error.
Generally, 500 errors happen due to an issue on the server, but they can also happen due to some kind of client-side issue. So we’ll work through a number of different solutions below that involve both.
Create a Backup First
The fixes below involve tinkering with your site under the hood, i.e. making changes to your site’s root directory. So it’s critical you run a backup.
And if you don’t already have a backup plugin or some other solution in place, it’s high time you got one!
Some of my favorite tools include BackUpWordPress, VaultPress, and BackupBuddy. If you’re interested in database backups, check out WP Migrate DB Pro or simply use WP-CLI to run quick exports.
If you’re with a web host that offers backups, that’s great. But I’d recommend having your own solution that you can quickly access in an emergency without having to go through your host.
1. Check Your .htaccess File
If your site is hosted on a server running Apache, there’s a chance your .htaccess file is corrupted. This can happen after installing plugins or making other changes to your site.
It’s an easy fix. All you need to do is replace your corrupted .htaccess file with a new one.
Usually, all you need to do to create a new .htaccess file is to re-save your permalinks settings in the WordPress dashboard. But if your site is down, it’s likely you can’t log in to your site, ruling out this option.
So you’ll need to use FTP or cPanel to access your site’s files and locate your .htaccess file. For a step-by-step walkthrough on how to do this with FTP and cPanel, check out What is .htaccess and How to Use it With WordPress.
Before you go replacing your old .htaccess file with a new one, create a backup of your name. To do this, simply rename your existing file something like .htaccess-old. WordPress will then stop recognizing this file.
Refresh your site and if it loads properly, you know your .htaccess file has caused the 500 error. Now, revert your .htaccess file to its proper name—the issue will return, but now we’re going to fix it.
For WP Rocket users, you’ll need to be especially careful of what you do next with your .htaccess file because it contains performance optimization rules that you shouldn’t mess around with. So check out Resolve 500 Internal Server Error for what to do next.
If you’re not a WP Rocket user (what’s going on!?), create a new .htaccess file that includes the following, and then upload it to your site’s root directory:
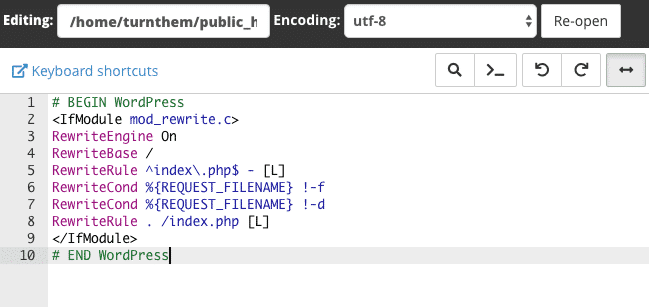
These are the rules shown in the image above:
#BEGIN WordPress

RewriteEngine On

RewriteBase /

RewriteRule ^index.php$ - [L]

RewriteCond %{REQUEST_FILENAME} !-f

RewriteCond %{REQUEST_FILENAME} !-d

RewriteRule . /index.php [L]

#END WordPress
2. Increase PHP Memory limit
The cause of your 500 error could be that you’re hitting your PHP memory limit. This often happens due to poorly-coded plugins, when a site is using a lot of plugins, or when a site is using resource-intensive plugins.
All you need to do to fix this issue is increase the PHP memory limit for your site. There are a few different ways you can do this that involve updating your .htaccess file, php.ini file, or wp-config.php file.
For each of the three memory fixes below, don’t forget to refresh your site to check if it’s working so you know what’s causing your 500 internal server error.
1. Increase PHP Memory Limit in .htaccess File
Find your .htaccess file in the root directory of your site and add the following line:php_value memory_limit 256M
This will increase your memory limit to 256 MB. If you can’t find your .htaccess, make sure you’re able to view hidden files. And if you don’t have an .htaccess file, create a new one and paste in the line above.
2. Increase PHP Memory Limit in php.ini File
You’ll find your php.ini file in the wp-admin folder in your root directory. Open it up and look for the line that starts with “memory_limit.” If it shows 64 MB or lower, replace it with this line:
memory_limit = 256M
If you can’t find your php.ini file (make sure you’ve got “show hidden files” enabled), then you’ll need to create a new file, paste in the line above, name it php.ini and save it to your wp-admin folder.
3. Increase PHP Memory Limit in wp-config.php File
If updating your .htaccess and php.ini files didn’t work, you can try increasing the memory limit in your wp-config.php file.
Add the following line to your wp-config.php file just before the “happy blogging” line:
define('WP_MEMORY_LIMIT', '256M');
Save the file and refresh your site. If it still isn’t working and you have a sneaking suspicion your plugins could be pushing your PHP memory limits, get in touch with your web host about increasing your memory on the server side.
3. Audit Your Plugins
Plugins can also cause 500 internal server errors. This includes outdated plugins causing compatibility issues and even new plugins that have been coded poorly. You might even find that you get the 500 error immediately after installing a new plugin.
To find out which, if any, of your plugins is causing your error, you’ll need to bulk deactivate your plugins and reactivate them one at a time.
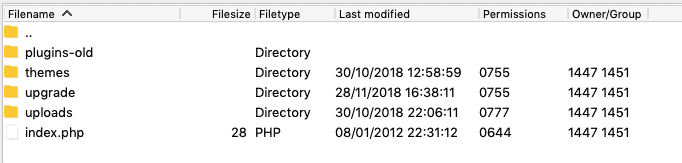
If you’re unable to access your WordPress dashboard, FTP into your server and open your wp-content folder, find your plugins folder and rename it something like plugins-old—this will effectively deactivate all of your plugins.
Then refresh your site. If it starts working, the cause of your 500 error is one of your plugins.
The next step is identifying which plugin is the culprit. To do this, rename your plugins folder back to “plugins” and then go into the folder and rename each individual plugin folder, one-by-one until you’re able to refresh your site and it works again.
When you find the offending plugin, get in touch with the plugin developer for help.
4. Check File Permissions
If none of the above has worked, you could have an issue with file permissions. Files in your WordPress directory should be set to 755 or 644 and when they’re mistakenly or accidentally set to anything else it can set off a 500 error.
To check your file permissions, FTP into your server and check your site’s directory. Here, I’m using Filezilla to access my test site and as you can see my permissions are set to 755 for folders and 644 for everything else.
The WordPress Codex recommends the following file permissions:
- All directories should be 755 or 750.
- All files should be 644 or 640. (The exception being wp-config.php, which you can set to 440 or 400 to prevent other users on the server from reading it.)
- Directories should never be set to 777.
If you find that a certain file has the wrong permission, just right-click it in your FTP program to access file permissions and update it to the appropriate number.
Check out How to make system files (.htaccess, wp-config.php) writeable to learn more about updating file permissions.
5. Reinstall WordPress Core Files
It’s not unusual for WordPress core files to become corrupted, especially on older sites that have been customized and updated many times.
To fix this issues, you’ll need to replace your core WordPress files with fresh ones. There’s no need to re-install WordPress—simply download the latest version of WordPress and unzip the file. FTP into your site’s root directory and upload the wp-admin and wp-includes folders from the zip file you just downloaded, overwriting the older versions.
Doing it this way, you won’t overwrite your plugins and themes.
Refresh your site. If the 500 error has disappeared, you’ve pinpointed the cause—corrupted core files.
6. Contact Your Web Host
If you’re still getting the 500 internal server error after working through each of the fixes above, it’s time to contact your web host. Your host’s server logs might be able to shed some light on what’s causing the error so it can be resolved.
Rather than skip the above and go straight to your host for help, it’s a good idea to investigate the cause of your error first. This way, you can provide your host with a rundown of what you’ve tried, so your error isn’t simply dismissed as an issue with your site’s files.
This is particularly true if you’re on cheaper shared hosting. If you’re on managed WordPress hosting, it’s usually the case that your host will help you pinpoint and fix you 500 internal server error.
Wrapping Up
This is by no means an exhaustive list of 500 internal server error fixes. What’s causing your particular issue could be just about anything. But this list will give you a head start on fixing and finding the cause (in that order!).
Lastly, don’t forget to back up your site before updating files in your root directory. If you make a change that impacts your site, you’ll be able to quickly revert to a previous backup.
Have you experienced a 500 internal server error? How did you fix it? Let us know in the comments below!
Seeing a 500 internal server error where your website should be is enough to throw anyone into a panic. When your website goes down, you lose out on potential traffic and sales. If it’s offline for a while, it can also negatively impact your Search Engine Optimization (SEO) efforts.
Fortunately, there are plenty of ways to go about fixing this error. Many of these solutions are fairly straightforward, and you don’t need a lot of technical know-how to start troubleshooting.
In this guide, we’ll cover what the 500 internal server error in WordPress is and discuss some potential causes. Then we’ll give you 10 tips to help you get your website back in working order.
- Back up your website.
- Try reloading the page.
- Clear your browser cache.
- Access your error logs.
- Check for the “Error Establishing a Database Connection.”
- Look for permission errors.
- Increase your PHP memory limit.
- Check for problems with your .htaccess file.
- Look for coding or syntax errors in your CGI/Perl script.
- Ask your web host about potential server issues.
Let’s get started!
Dealing with the WordPress Internal Server Error?
Avoid troubleshooting when you sign up for DreamPress. Our friendly WordPress experts are available 24/7 to help solve website problems — big or small.

What Is the 500 Internal Server Error?
The 500 internal server error is frustratingly nonspecific. When the error occurs, you usually don’t get many details about it. In fact, you might not receive any information at all.
The 500 error is a generic issue that isn’t specific to WordPress. Chances are you’ve seen it before during your internet explorations. Despite the name, it doesn’t necessarily mean that something is wrong with your server. It could be an issue with your website or browser.
If you do see this error on your site, you’ll want to get it fixed as quickly as possible. A 500 error can impact your SEO if allowed to linger. If your site is crawled while it’s offline, there’s a chance that Google may interpret the error as an issue with your website.
This error can also hurt your User Experience (UX) and give visitors the impression that you’re unprofessional. Not only can a poor UX affect the way Google ranks your site, but it can cause you to lose customers as well. After all, you can’t do business if your site isn’t accessible.
A wide variety of situations can result in the 500 error, making it a bit of a chore to sort out. Potential causes of the 500 internal server error in WordPress include:
- Plugin compatibility issues
- Exhausted PHP memory limit
- Corrupted files
- Coding or syntax errors
The fact that the error message itself tends to be vague doesn’t help. Fortunately, you can solve many of these issues on your own with a bit of know-how.
Variations on the 500 Internal Server Error
Depending on your operating system, browser, and the cause of the error, there are variations in how it will appear. For example, if a database connection can’t be established, you might see something like this:
A plain white screen, sometimes referred to as the White Screen of Death (WSoD), can indicate a 500 internal server error.

Also, many site owners have the option to customize their 500 error messages. So you might see this error in many different forms.
How to Fix the 500 Internal Server Error in WordPress (10 Tips)
Now that you’ve had an introduction to the 500 internal server error, it’s time to discuss how to resolve it. Let’s take a look at ten tips you can use to fix this issue in WordPress.
1. Back up your website.
Before tinkering under the hood, it’s always smart to make a backup of your website. If DreamHost hosts your site, you can take advantage of our one-click backup feature. You can also create a manual backup if you prefer.
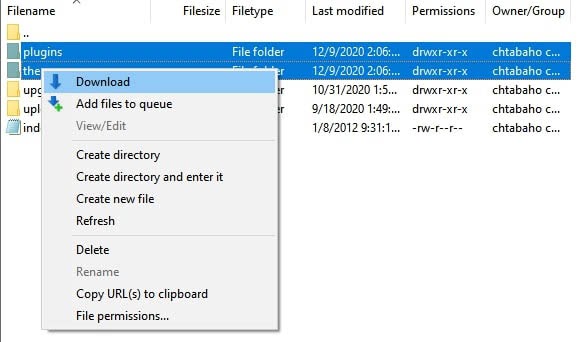
To make a complete backup, you’ll need to save copies of your WordPress files as well as your databases. You can back up your site’s files using a Secure File Transfer Protocol (SFTP) client such as FileZilla.
Once you’re connected to your server, navigate to the WordPress files you want to save. These files include the WordPress core installation, plugins, themes, images, and more. To save the files, simply right-click on them and select Download.
Now you’ll need to back up your database, which you can do by logging into phpMyAdmin. Select the database you want to download from the left-hand panel, and then click on the Export tab.
You’ll then need to choose between a “Quick” or a “Custom” export. The Quick export will likely work just fine unless you need to manage more advanced options.
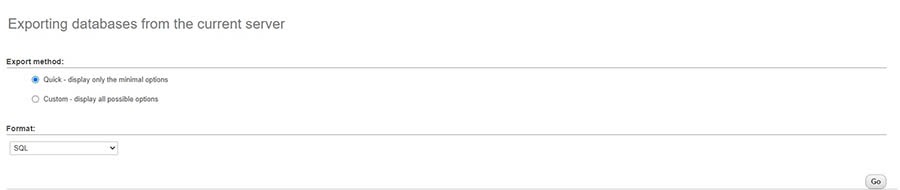
Click on the Go button, and your download should start. Once your website is safely backed up, you can get to work on fixing that 500 error.
2. Try reloading the page.
Let’s start with the best-case scenario. Some situations that cause a 500 internal error clear up on their own within a few minutes. For example, if you’ve just made changes to a plugin or theme, or if your host is experiencing unusually heavy traffic, you may see a server error. If this is true in your case, you’re in luck, as a simple page reload should get things back to normal.
Therefore, the first thing to try is simply waiting a minute or two, during which the error will hopefully resolve itself. Then you can try reloading the page by pressing F5 or (command + R if you’re using a Mac).
3. Clear your browser cache.
Another potential server error fix that’s quick and easy is clearing your browser cache. It’s possible the cache became corrupted, which would cause problems when attempting to access websites.
First, you might check Down For Everyone Or Just Me. This will determine whether there’s a widespread problem or you’re the only one experiencing difficulties.

If you’re alone in your 500 error frustration, the problem may be your browser. Try accessing your site from a different browser. If an alternative works, it’s a sign that the issue is with your cache.
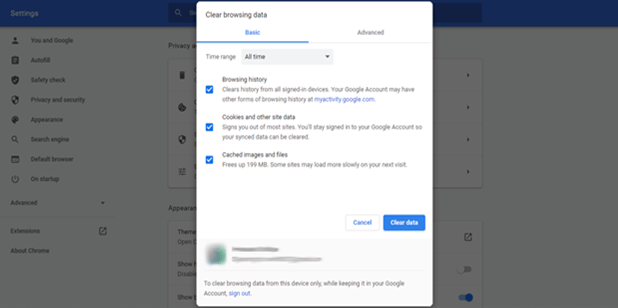
In Google Chrome, you can clear your cache by pressing Ctrl + Shift + Delete. Alternatively, you can click on the three vertical dots in the top-right corner, followed by More tools > Clear browsing data.
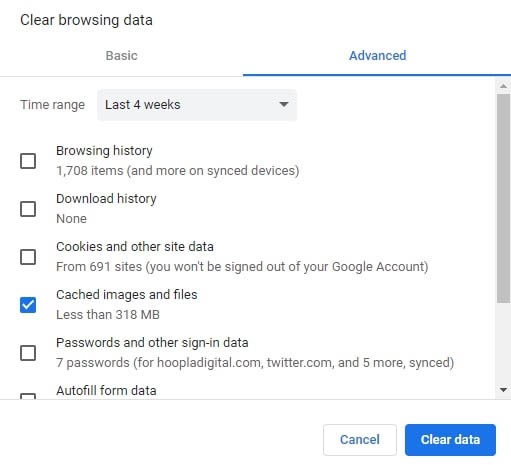
Be sure to check the Cached images and files box. Then click on the Clear data button.
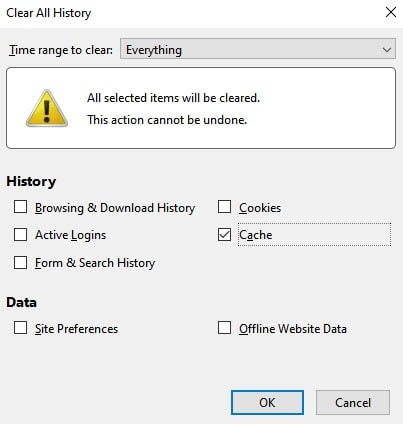
In Firefox, you can clear the cache using the Ctrl + Shift + Delete keyboard shortcut. This will open the Clear Recent History window. In the Time range to clear drop-down menu, select Everything. Check the Cache box, and then click on OK.
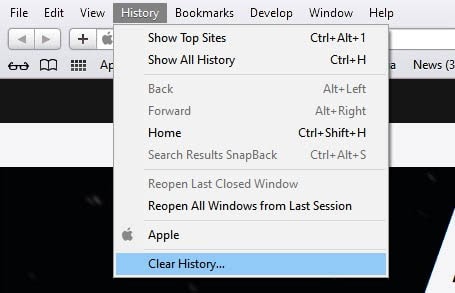
In Safari, you can navigate to the History menu item and choose Clear History. Keep in mind that this will delete everything, including cookies and visited pages.
Once you’ve cleared your browser cache, you can attempt to access your website again. If you’re still seeing the 500 internal server error, it’s time to move on to more involved fixes.
4. Access your error logs.
Your site’s error logs may provide insight into what’s causing the 500 error. Depending on your host, these logs may be cycled quite often, so you’ll want to take a look as soon as possible.
You can check your error logs by accessing your site’s files via SFTP and looking for the /logs directory. Next, select the site that’s experiencing the error. You may see several directories at this point. You’ll want to check the one with the most recent date.
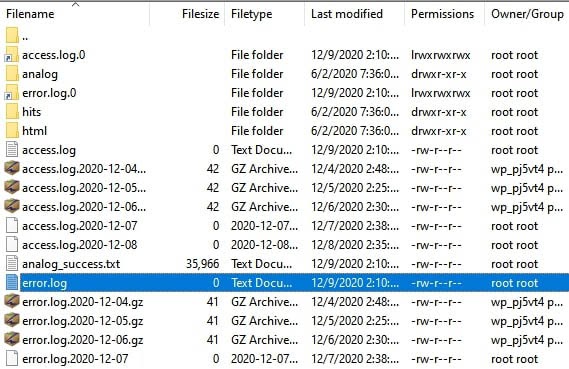
You can view the log by downloading it and opening it with your preferred text editor. Hopefully, your error logs will provide you with some additional context for the 500 error.
Another option is to enable the WordPress debug log. You can do this by connecting to your site via SFTP and opening your wp-config.php file. Within it, look for the following line:
define('WP_DEBUG', false);
Once you find it, replace it with the following:
define( 'WP_DEBUG', true );

define( 'WP_DEBUG_DISPLAY', false );

define( 'WP_DEBUG_LOG', true );
This will create a debug.log file, which you can find under the /wp-content/ directory. Just be sure to change the WP_DEBUG value back to “false” when you’re done troubleshooting.
5. Check for the ‘Error Establishing a Database Connection.’
If there’s been a problem establishing a database connection, not only will your site be offline for visitors, but you won’t be able to access the WordPress admin dashboard either. There are a few possible causes of this:
- Incorrect database login credentials
- A corrupted WordPress database
- A corrupted WordPress installation file
Let’s start with incorrect login credentials, as this is a common cause of the database connection error. If you’re a DreamHost user, you can find your database credentials in your panel. However, if you use a different host, you’ll likely follow a similar procedure.
Navigate to MySQL Databases and find the one that corresponds to your website under the Database(s) on this server section. Here, you’ll find your database name under the Database heading. The username is listed under the Users Access column.

Alt-text: Where to find your MySQL username in DreamPanel.
To find the password, click on the username. On the next screen, scroll down and click on the Show button next to the password field.

Next, you’ll compare these credentials to those in your wp-config.php file. You can access this file in your site’s main directory via SFTP. Once you have the file downloaded, open it and verify that the information under MySQL Settings matches what you found in your panel.
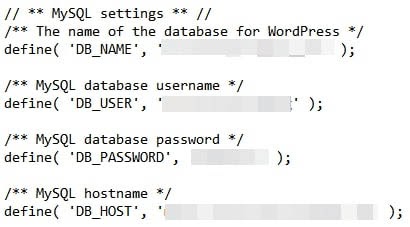
Next, if your database is corrupted, you can quickly repair it through phpMyAdmin. Log in and click on your database in the left panel. Select all of the tables in the database, and then choose the Repair table option from the drop-down menu.
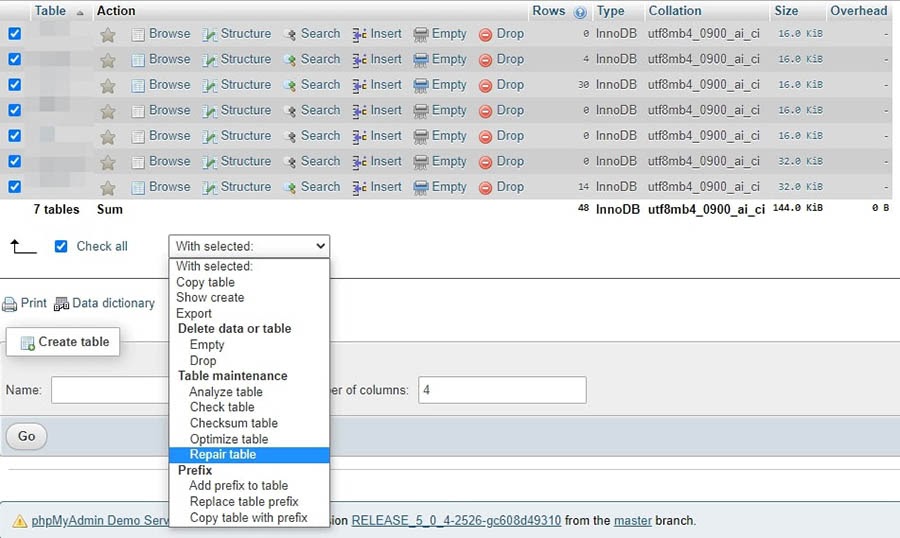
Finally, let’s look at how to handle a corrupted WordPress installation file. Start by downloading a new copy of WordPress and unzipping the file. You’ll need to delete the wp-content folder and the wp-config-sample.php file.
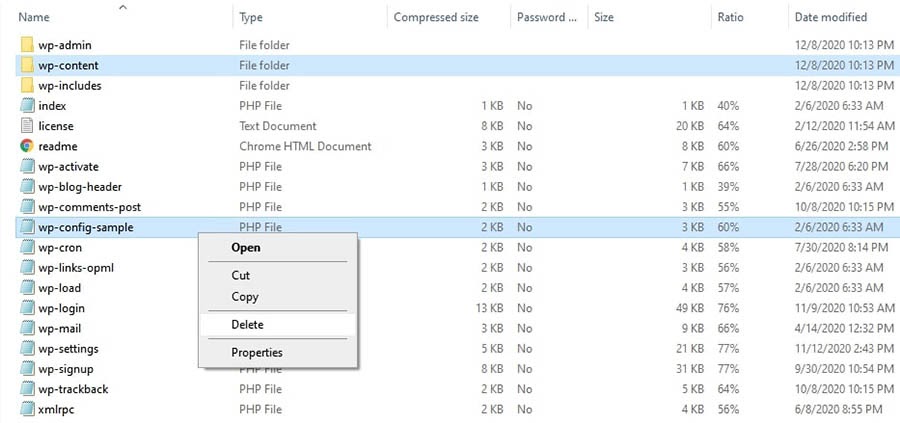
Upload the rest of the files to your site via SFTP, overwriting any existing ones. You now have a brand new, uncorrupted WordPress installation. You’ll also want to clear your browser cache before checking your website again.
6. Look for permission errors.
If any of your files have permissions set incorrectly, you may see the 500 internal server error as a result. Again, you can check and change these permissions using SFTP.
Right-click on any file and select File permissions to open a new dialogue window. In this window, you can check and, if necessary, set new permissions for the file.
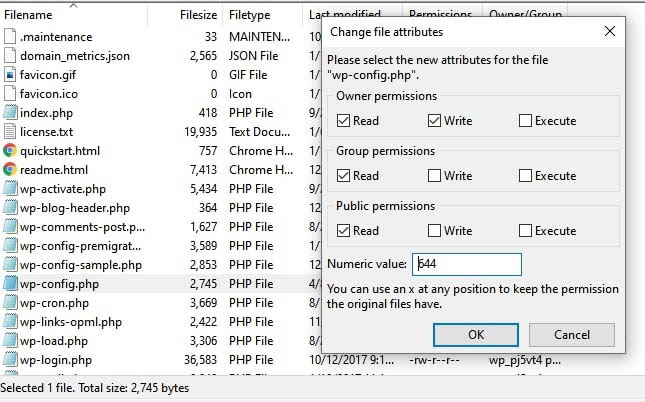
Typically, you’ll want to set files to “644” and directories and executables to “755”. However, you may want to check with your host if you’re unsure about the correct values.
7. Increase your PHP memory limit.
Another reason you might see the 500 internal server error is if you’ve exceeded your server’s PHP memory limit. There are several ways to increase your limit, and they all involve using SFTP.
Before you try increasing your memory limit, you may want to start by seeing what it’s currently set to. You can do this through the WordPress admin dashboard. Keep in mind that, with some variations of the 500 error, you won’t be able to access the dashboard. If that’s the case, you may have to skip this step.
From your WordPress dashboard, navigate to Tools > Site Health. Click on Info at the top of the screen, and scroll down to the Server section. You should see your PHP memory limit there.
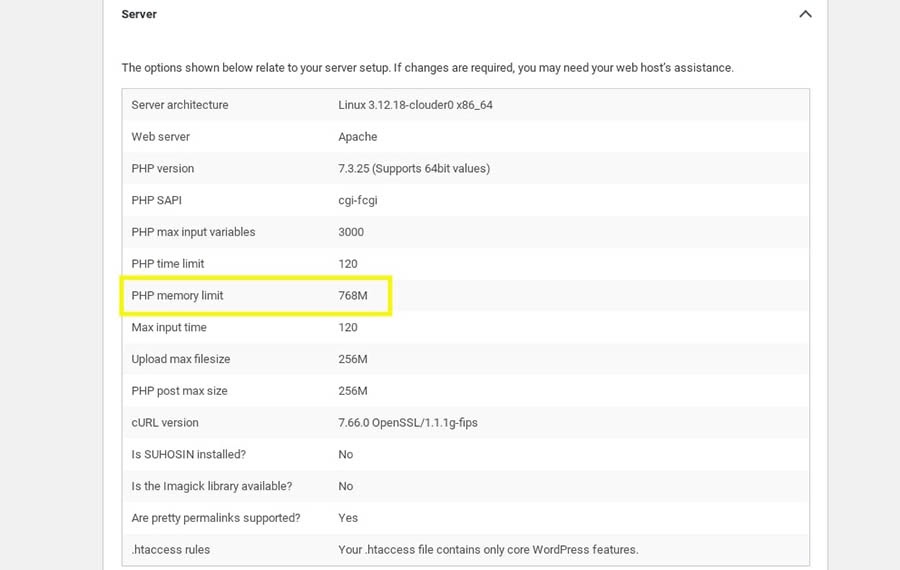
To increase the PHP memory limit, there are a few files you can edit. One is your .htaccess file, typically located in your site’s root directory. Open the file and add the following code:
php_value memory_limit xxxM
You can replace the “xxx” with your desired amount of memory. Usually, 256M is plenty.
You can also increase your memory limit by editing your php.ini file. You should be able to find this file in your root directory. If not, you can go ahead and create one. Add or update its code to the following:
memory_limit = xxxM
Another option is to add in the following code at the top of your wp-config.php file:
define('WP_MEMORY_LIMIT', 'xxxM');
If this resolves the 500 error, your next task will be to figure out what is causing the memory limit exhaustion. It could be a problematic plugin or theme. You might consider reaching out to your host for help on finding the exact server diagnostics.
8. Check for problems with your .htaccess file.
Your .htaccess file is one of the core WordPress files. It contains rules for your server, so it could contribute to a 500 internal server error.
If your .htaccess file has become corrupted, you’ll want to go ahead and create a fresh one. Start by logging into your site via SFTP and finding your .htaccess file. Rename the file to .htaccess_old.
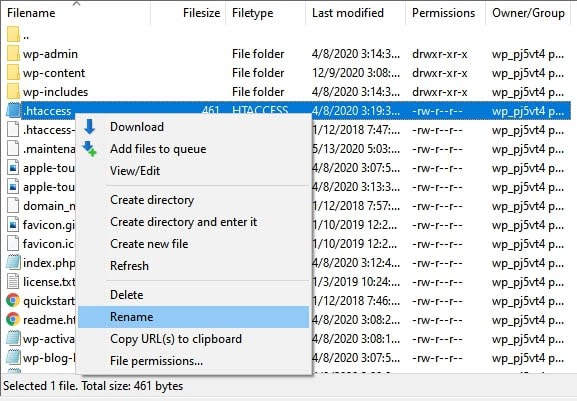
Now, create a new .htaccess file in your text editor and paste in the following:
# BEGIN WordPress

RewriteEngine On

RewriteRule .* - [E=HTTP_AUTHORIZATION:%{HTTP:Authorization}]

RewriteBase /

RewriteRule ^index.php$ - [L]

RewriteCond %{REQUEST_FILENAME} !-f

RewriteCond %{REQUEST_FILENAME} !-d

RewriteRule . /index.php [L]

# END WordPress
Go ahead and upload your newly created .htaccess file. Then refresh your site in your browser, and check to see whether the error message is showing.
9. Look for coding or syntax errors in your CGI/Perl script.
If you’re running Common Gateway Interface (CGI) scripts, any coding errors you’ve made could result in a 500 error. To unearth potential issues with your CGI scripts, log into your site using Secure Shell Access (SSH).
Once you’ve logged in, you can troubleshoot your CGI with this command:
[server]$ ./cgi_name.cgi
The terminal should return a general error message and the line number the culprit is located on. From there, you can work your coding magic!
When working with CGI, there are a few best practices to keep in mind to avoid problems. First, it’s wise to use a plain text editor to ensure that you maintain ASCII format. When you upload scripts, you should also be able to select ASCII mode in your FTP client.
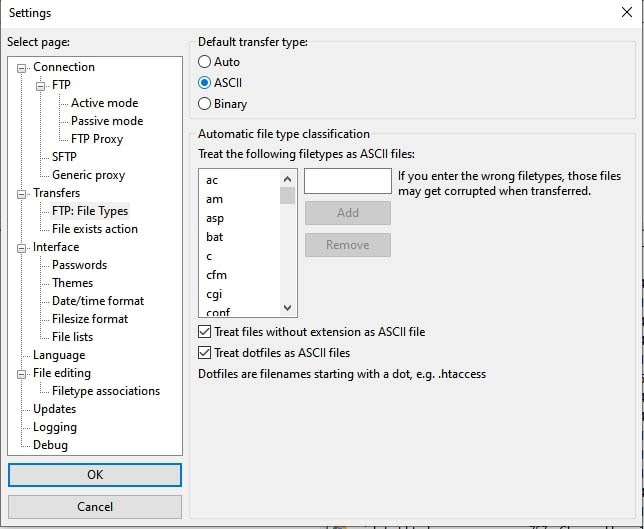
Finally, if necessary, upload to the cgi-bin directory on your server. Then you can double-check your files’ permissions once you have them uploaded.
10. Ask your web host about potential server issues.
If all else fails, there may be a server issue, which only your host can confirm. Unfortunately, if your host’s server is experiencing a problem, you may have to wait out some website downtime.
If you’re a DreamHost client, you can check the DreamHost Status page. This resource provides you with information on all of our services.
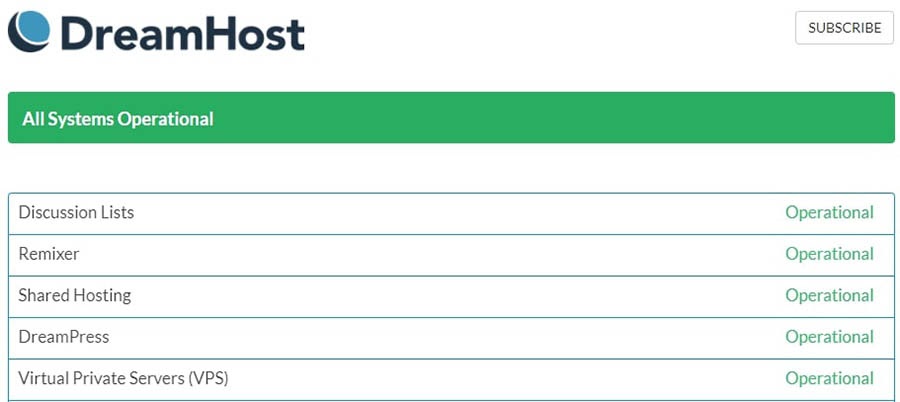
If you run into any problems while trying to repair the 500 internal server error, you can always reach out to our tech support team. They’re ready and waiting to lend you a hand! If you’ve followed the tips in this guide, you’ll have plenty of valuable information for the technician.
Get Content Delivered Straight to Your Inbox
Subscribe to our blog and receive great content just like this delivered straight to your inbox.
Additional WordPress Error Reading
Want to learn more about fixing common WordPress errors? We’ve put together several tutorials to help you if you encounter any other issues.
- How to Fix Syntax Errors in WordPress
- How to Fix the WordPress Not Sending Email Issue
- How to Fix the Error Establishing Database Connection in WordPress
- How to Fix WordPress Error 404 Not Found
- How to Fix the Sidebar Below Content Error in WordPress
Let’s Get Your WordPress Website Back on Track
While having to sort out a 500 internal server error isn’t exactly fun, it’s also not as painful as you might imagine. With a little patience and the tips we’ve provided, you should be able to make some progress on getting your website back online.
You can start small by refreshing your page and clearing your browser cache. Then you might want to move onto more involved fixes, such as increasing your PHP memory limit. If you’re not able to resolve the error on your own, DreamHost’s award-winning tech support is just a click away.
When you do run into errors, it’s easier to get back up and running when you have a reliable hosting provider. DreamPress is fast, secure WordPress hosting with powerful features to help make your site a success!
At some point in time, you must have encountered a 500 Internal Server Error while trying to access a particular website. As a visitor, you may ignore it, but as a website administrator, you cannot afford to ignore it and get rid of it as soon as possible.
Not only the website frontend but also the WordPress administrator dashboard might not be available to access. In this article, we will walk you through some of the reasons why this error occurs, how to avoid it, and why it is important to invest in a reliable web hosting server to avoid this error and improve website uptime.
The frequent occurrence of 500 internal server errors is bad for the reputation of your business and will lead to visitors losing trust in your brand. Besides the reputation, it will also hurt your search engine rankings. Hence it is advised to avoid this error, and deeply understand what it is all about and how to troubleshoot.
Sometimes it could be due to the problem in website configuration, while sometimes it has something to do with issues at the server, which might be beyond your control.
What is a 500 Internal Server Error?

In one of our previous articles about HTTP Status codes, we have covered in detail the type of errors website users might encounter. The 3-digit error status code that starts with ‘5’ and looks like 5XX indicates that there is no problem with the request made by the user agent.
But due to some other reasons, the server is not able to process the request due to incorrect configuration of the website or due to some issue encountered within the server.
While 500 specifically indicates that the webserver is facing some kind of Internal issue due to which the request made by the user agent could not be processed at that moment. Sometimes this kind of error is momentary, which lasts for a few minutes and sometimes just a few seconds.
But if the problem persists, chances are that there is a problem with the website. Also, it is found that often the issue arises due to incorrect configuration of the website, which you can fix at your end.
But if this is very frequent you should discuss the problem with the web server tech support team to help you troubleshoot the issue. Some other popular 5XX error codes are 502 Bad Gateway error, 504 Gateway timeout error
For a more specific kind of issue, you need to look into the specific error code using tools like MS IIS. Some of the most commonly occurring codes are as shown below:
Code List of 500 Internal Server Errors
| Code | Explanation |
| 500.11 | The application crashes down on the webserver when a request is made by a user agent. |
| 500.12 | The application is under the restart process on the webserver. |
| 500.13 | The web server is too busy with other requests. In other words, it is overloaded with a large number of requests, which is more than its capacity. |
| 500.14 | Invalid application configuration on the server. The WordPress website installation is incorrect or corrupt. |
| 500.15 | Direct requests for GLOBAL.ASA is not allowed. |
| 500.16 | UNC authorization credentials are incorrect. |
| 500.17 | URL authorization store cannot be found. |
| 500.18 | URL authorization store cannot be opened. |
| 500.19 | Data for this file is configured improperly in the Metabase. |
| 500.2 | URL authorization scope cannot be found. |
| 500.21 | Module not recognized. |
| 500.5 | A rewrite error occurred during RQ_BEGIN_REQUEST notification handling. A configuration or inbound rule execution error occurred. |
What are the reasons that cause 500 Internal Server Error in WordPress?

If there is a 500 internal server error on your WordPress website the users will not be able to access any of its pages, which indicates that there could be a problem at the root directory. Here are some of the most common issues due to which your WordPress website has an HTTP 500 Internal Server Error.
- corrupt .htaccess file
- Exceeding PHP Memory Limit
- Faulty Plugin or theme Issue
- Corrupted Core Files
- Check File Permissions
- Unsupported PHP Version
- Incorrect DNS entries
- Problem with Server itself
- Inode Limitation Reached
#1 – Corrupt .htaccess file
One of the most common causes of WordPress 500 error is a corrupted .htaccess file (found in the root directory) that might arise due to a plugin update, theme update, etc., or during the migration from one server to another. To fix this error you can replace the current .htaccess file with another one.
Sometimes you might not be able to see the .htaccess file, in such cases check the hidden files in the root directory as well. Also, make sure that the file is correctly named.
#2 – Exceeding PHP Memory Limit
This could happen due to some plugin or theme consuming a lot of processing memory, or if you are using too many plugins. If your WordPress website is consuming a lot of memory to process a request you might run out of memory limit.
You can increase the memory limit to troubleshoot this problem. This could be done by making some modifications to the wp-config file or php.ini file.
Add this code to the wp-config file:
<?php
define('WP_MEMORY_LIMIT','64M');
You can increase the memory limit by changing 64M to 128M, 256M, and so on.
Alternatively, you can increase the memory limit through php.ini. Edit your php.ini, find out the line of code that defines the memory limit which will look like this:
memory_limit = 32M ;
You can increase it to 64M, 128M, 256M, and so on.
Another related issue is with Maximum Execution Time. If a request made by the user agent takes more than the time limit set for the website process request. You can increase the max execution time limit either through the wp-config file, .htaccess file, or php.ini file.
To define the Max Execution Time using wp-config, add the following code or if the code already exists increase its value:
set_time_limit(300);
To increase the time limit using the .htaccess file, add or edit the following code:
php_value max_execution_time 300
You can edit php.ini as well to increase the execution time using this code:
max_execution_time = 300
#3 – Faulty Plugin or theme Issue
If you have recently installed or updated a plugin you might need to investigate if that is causing an issue. If you can access the admin dashboard, you can deactivate all the plugins at once, and then refresh the website to check if it works now.
If it works reactivate the plugins one after the other and check after activating each of the plugins. That way you will be able to identify which plugin is causing the issue. If after deactivating the plugins the website is still not working then the issue is obviously not due to any of the plugins.
If you are not able to access the admin backend you can rename the directory of each of the plugins, and while doing so you can check the website after renaming each of these and see if the problem resolves. Also, it is recommended to keep all the plugins updated.
Try updating or switching the theme of your WordPress website and see if the internal server error is gone. Sometimes outdated or corrupt scripts and codes within the theme files can lead to an internal server error. If you have encountered this error after a theme update, report this to the theme developer, and restore it to a previous version.
That is why it is recommended to take regular backups of your website, especially before making themes, plugins, or core installation updates. Some hosting providers also provide you with Error logs that might help you further identify the cause of the error.

Hosting providers like WPOven provide you with a console within your hosting console to update the plugins, themes, core files, and many other management tools for better performance and control over your website along with regular backup and restore options.
#4 – Corrupted Core Files
You can upload the updated files through an FTP server to troubleshoot the internal server error on your WordPress website. You can upload the updated files from WordPress.com and upload them to the server using FTP software like FileZilla etc.
#5 – Check File Permissions
To make the WordPress website work perfectly fine, it is essential to have all the directory and file permissions correctly configured. The recommended file permission settings are as follows:
- 755 for all folders and sub-folders.
- 644 for all files.
Incorrect permission settings will lead to the blocking of some plugins, themes, and scripts to work.
At WPOven you can use the “Fix Permissions” tool for fixing file permissions in Sites->Tools in the dashboard.
#6 – Unsupported PHP Version
There are outdated PHP versions that are not supported by the latest WordPress version anymore. One of the latest versions 7.0, 7.1, 7.2, 7.3, and 7.4 are highly recommended. You can refer to our article on PHP Versions as well for more details.
Also, you can find the latest PHP 8 version here. WPOVen – Managed WordPress Hosting Comes with the latest PHP Updates.
#7 Incorrect DNS entries
If your DNS is pointing to a server other than your hosting server, the visitors will not be able to access it. Make sure that the DNS entries are accurate.
#8 – Problem with Server itself
If none of them work you should immediately contact the tech support team of your web hosting provider to troubleshoot. There might be a problem with either the server hardware or the software. If there are frequent outage reports at the server end you should consider switching to another company.
#9 – Inode Limitation Reached
Each hosting account has a certain limitation on the number of inodes it can support, meaning the total number of files and directories you can create.
As your site keeps on growing, it will use more inodes. That is why you need to be more mindful about your inode usage.
So one of the ways you can resolve this issue is by starting to delete all the unnecessary files on your server. Here is an in-depth tutorial that will walk you through the entire process of deleting your inodes.
Check out our article on WordPress Security here
Tips to avoid 500 Internal Server Error and Quick Troubleshoot
- First and foremost, keep all the plugins, themes, and WordPress Core updated. The outdated versions tend to create more problems and are more prone to security threats like malware and hacking.
- Always take regular backups of your WordPress website files and database. Use a good plugin that takes regular backup and can easily restore the website to the desired version.
- Turn on ‘Debugging’. It is a small trick that will help you easily debug the website, by giving you vital information about the cause of the issue. It can be enabled by adding the following line of code in your wp-config file: “define( “WP_DEBUG”, true );”
- Increase your PHP Memory Limit (as explained above).
- Use a highly reliable server.
- Use security plugins to scan and audit your website regularly.
- Use reliable and trusted plugins and themes only, that provide good support.
Some of the top web server hosting companies like WPOven have a system in place to keep a close watch on the hosted WordPress websites and send out a notification to the website administrator. There are some free web-based website monitoring tools like UptimeRobot, that also send notifications in case the website is not working for any reason.

Step 1: Reload the page, sometimes there is a momentary issue with the server, so a simple reload of the page will get you to the page.
Step 2: Clear Browser Cache: Using Hard Refresh (Ctrl + F5) you can clear the cache, moreover you can go to browser history and clear the browser cache.
Step 3: Try accessing the wp-admin backend of your WordPress installation.
Step 4: If you can access the admin dashboard, deactivate all the plugins to see if it resolves the problem. If it does, start reactivating the plugins one by one to identify the one creating the problem. You have to get rid of that plugin. Before doing this make sure that all the plugins are updated to the latest version.
Step 5: If you are unable to resolve the issue, switch the theme to the default one, if it resolves the issue you will have to update the theme or change the theme. Probably some of the theme files could get corrupted, hence you can re-upload the files.
Step 6: If the problem persists, check the .htaccess file, file permissions, as well as (as explained above),
Step 7: You can also check out your error logs and find out the possible causes that trigger 500 internal server errors. All you need to do is log in to the FTP client and then navigate to the Error log Directory and either download it or directly open it in an editor.
This will help you to narrow down the issue so that you easily figure out the exact problem and you can immediately fix it. You can also read our complete guide on How to access and set up WordPress error logs?
Step 8: It is also highly possible that the 500 internal server error can generate due to corrupt WordPress core files, especially if you are running an old website. To fix this, the easiest thing you can do is to completely replace the old WordPress core files with the new ones without affecting your WordPress theme and plugin.
To reinstall WordPress core files, you can refer to our detailed and comprehensive post on How to reinstall WordPress using the 4 best methods?
Step 9: If the problem persists, immediately contact the tech support team to help you resolve the issue and make your website live.
Where can you see a 500 Internal Server Error?
- HTTP 500 Error on a WordPress Website:
- 500 Error on Linux:
- 500 internal server error in NGINX
HTTP 500 internal server Error on a WordPress Website:
If your website has encountered an internal server error, you will not be able to access the website. In extreme cases, you might not be able to access even the wp-admin backend.
Typically, your browser will show any of the following messages:
- “500 Internal Server Error”
- “HTTP 500”
- “Internal Server Error”
- “HTTP 500 – Internal Server Error”
- “500 Error”
- “HTTP Error 500”
- “500 – Internal Server Error”
- “500 Internal Server Error. Sorry, something went wrong.”
- “500. That’s an error. There was an error. Please try again later. That’s all we know.”
- “The website cannot display the page – HTTP 500.”
- “Is currently unable to handle this request. HTTP ERROR 500.”
500 internal server Error on Linux:
If your website visitors are getting the 500 HTML error status you can troubleshoot it using Linux as well, especially if the error arises due to any of the CGI or PERL scripts.
Also, the error can be due to the non-compatible versions of PHP and Apache. In such a case you need to upgrade PHP or recompile Apache. In Apache you can go through the error logs in the following locations:
/usr/local/apache/logs/error_log/usr/local/apache/logs/suphp_log
You can use Linux commands to fix the errors, for example, to change the file and folder permissions you have to use the following commands:
cd public_html find . -type d -exec chmod 755 {} ; find . -type f -exec chmod 644 {} ;
500 Server Error on some Popular Websites:
Though there are lesser instances of 500 internal server errors on the world’s most visited website, even then they have encountered the error at some point in time. Some websites have very creatively designed error pages as well. Some of the examples are shown below:
- FitBit.com:

- Amazon

- Disney

- GitHub

Some of the leading Content Delivery Network providers like Amazon’s AWS offer to create a custom page when there is a 500 internal server error.
How to Fix 500 Internal Server Error in NGINX?
When there is an issue that happens on the server side, due to which NGINX is unable to return a proper response, it starts showing a 500 internal server error. The issue can happen due to multiple reasons some of the most common are, limited file permissions and errors in the script.
However, you can easily fix this error by following these simple methods:
- Force refresh or restart your webpage.
- Check out your Error logs.
- Check out the Scripts.
- Check whether adequate permission is granted to folders and files.
- Check all your redirections.
How does 500 Internal Server Error Effects your Search Engine Ranking?
Non-availability of websites, or in other terms longer and frequent downtime of the website can negatively impact your search engine rankings. Google always strives to provide a good user experience to the visitors, and hence if many visitors encounter the problem at different points in time it will downgrade the ranking of the website for sure.
Hence it is important to take these errors seriously and keep monitoring the websites. Using Google Analytics as well as Search Console you can see how many visitors faced the error. Besides the user experience, Google crawler also crawls the website regularly, and while crawling it found that the website is not available consistently which will negatively affect the rankings.
Conclusion
The seriousness of the 500 Internal Server Error depends on how frequently the error occurs, and the cause of the error. If the error lies with the website files or configuration then you need to fix it or get professional help.
But if errors frequently occur due to some problem with the server’s hardware or software then you need to immediately migrate to a more reliable and trusted hosting company.
Overwhelmed with too many server issues!! Choose a more reliable server instead. Host your website on WPOven now and save your time, money, and resources. Give your website a mammoth growth with WPOven’s Fastest, and Fully managed Dedicated Servers.
- Fastest Private Servers
- Fully WordPress optimized Servers
- Upto 100% server uptime
- Server stack
- Hardened Servers with high-end security
- 24X7 WordPress Expert support
- Datacentres around the world, etc.
You can have all these features and much more. Plans start at $16.61 per month with unlimited Free migrations, unlimited staging, and a 14-day risk-free guarantee. Check out our plans or Contact our support team that assists you to choose the right plan.
General FAQ
What does 500 internal server error mean?
The Hypertext Transfer Protocol (HTTP) 500 Internal Server Error response code represents that the server is unable to fulfill a particular request that was made by a user at the front end of the website.
How do I fix internal server error?
The best and quickest ways to fix the internal server errors are
- Try reloading your web pages. Do it with F2 or Ctrl+F5
- Clear the cache of your browsers.
- Delete all browser cookies.
- You can also contact the website admin to let them know
What causes internal server error?
500 Internal Server errors are caused due to server errors where the server may not be able to fulfill any particular request at that time. It may also cause due to some policy issues with your APIs.
Have you encountered an HTTP 500 Internal Server Error on your website? For most webmasters, this can be a frustrating situation.
If you don’t manage to catch the problem early enough, your site’s search engine visibility might take a hit. You might also lose some customers and sustain long-lasting reputational damage.
If spotted and corrected early enough, there may be little to no harm done. The real problem with 500 Internal Server Error is that you often have no clue what the root cause is.
The good news is that It is generally not a serious problem and 500 internal server errors can be easily fixed once you uncover the root cause.
If you follow all the steps we’ll show you in this guide, you will have your website back up and running in no time!
Table Of Contents
- What Does 500 Internal Server Error Mean?
- How to Resolve a 500 Internal Server Error (Without Coding)
- How to Backup Your Website
- How to Fix the 500 Internal Server Error in WordPress Step by Step (Advanced Troubleshooting)
- How to Prevent a 500 Internal Server Error
- Final Thoughts
What Does 500 Internal Server Error Mean?
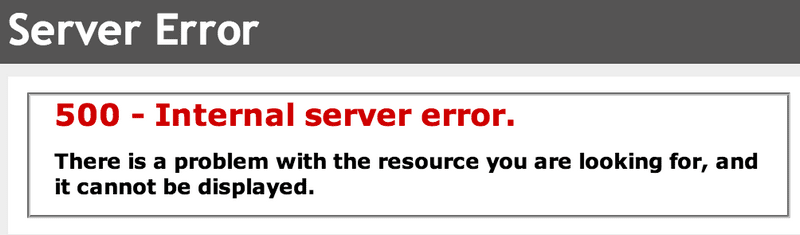
The 500 Internal Server Error means that the server has been unable to fulfill the request due to an unexpected condition.
As a result, the page will not load and you will see a browser page outlining the error.
Chances are, if it’s down for you, it could be down for your visitors too, making this a vital error to tackle!
When you navigate to a website, you are accessing web files and content that are stored on a remote server. Your browser communicates with this server, requesting the content that you need.
In response, the server sends a HTTP response status code back to your browser, informing it of the status of the request. If successful, the code returned to the browser will be a HTTP code: 200 OK.
The server will then execute the commands, providing a copy of the relevant content to your browser.
If unsuccessful, the server might return one of two classes of codes: a HTTP 400 or 500. Broadly speaking, these aren’t single types of errors, rather, they are classes of errors.
For example, the range of HTTP 500 errors includes codes such as:
- 501 Not Implemented
- 502 Bad Gateway
- 503 Service Unavailable
Each of which indicates a different challenge to address.
How to Resolve a 500 Internal Server Error (Without Coding)
Before you get started with more technical troubleshooting, try these two basic fixes:
- Reload the page to resolve a 500 internal server error
- Clear the cache to troubleshoot a 500 server error
While a 500 Internal Server error can be annoying, it is typically easy to fix.
These errors can sometimes be caused by temporary, minor situations such as issues with your device, network, router or hosting service.

Hello! My name is Sujay and I’m CEO of Astra.
We’re on a mission to help small businesses grow online with affordable software products and the education you need to succeed.
Leave a comment below if you want to join the conversation, or click here if you would like personal help or to engage with our team privately.
1. Reload the Page to fix HTTP Error 500
500 Internal Server errors can often be resolved with no need for complex troubleshooting.
Sometimes the problem is a temporary situation with your hosting service, ISP or local network. Simply refreshing the web page could be enough to load the site correctly.
If that doesn’t work, perhaps try a forced refresh. This ‘forces’ the browser to request a new page from the server rather than showing you its cached version. This is the best way to assess the current situation with any website.
You can use keyboard shortcuts to force-refresh your web pages. The combinations are slightly different depending on the browser and device you are working in.
Here are the combinations to try.
In Chrome, Firefox, or Edge on a Windows powered device, hold down Ctrl+F5 or Shift+F5 or Ctrl+Shift+R.
If you’re using Chrome or Firefox on a Mac device hold down Shift+Command+R.
2. Clear the Cache to Resolve an HTTP 500 Internal Server Error
Clearing the browser cache is a fundamental part of website troubleshooting. Browser caches help to speed up the browsing experience by storing bits of data from websites you have visited in the past.
Sometimes that cached data can become corrupted and communication between the browser and the website you’re looking at is interrupted. One symptom of this is the 500 error.
Clearing the cache is a straightforward procedure. The steps might differ slightly depending on the browser in use.
Here are the steps to clear your cache in Firefox, Safari, Chrome and Edge:
Firefox
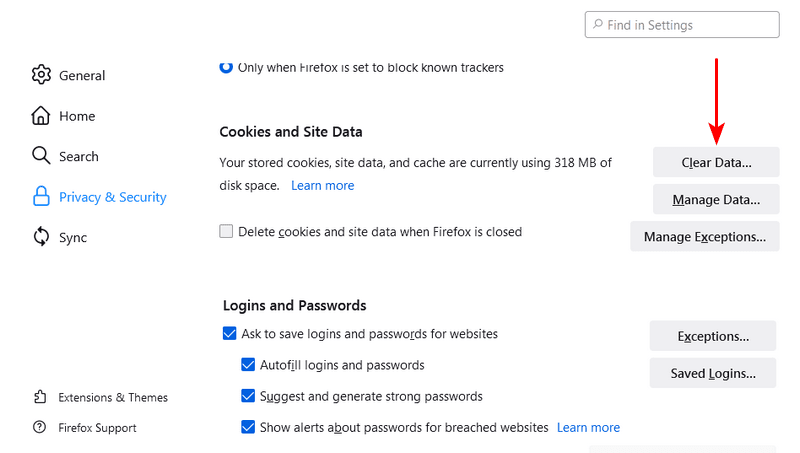
Open up Firefox and click on the menu button.
Select Settings, then on the left hand side panel, select Privacy and Security > Cookies and Site Data and click clear data.
A popup will appear offering the option to check/uncheck Cookies and Site Data, and Cached Web Content.
What you’re after is cached content so tick this box and leave the Cookies and Site Data box unchecked. Click on Clear Data and the cache will be cleared automatically.
Safari
The process is even simpler in Safari.
To clear the cache in Safari click on the Safari menu > Empty Cache > Empty.
Chrome

To clear the cache in Chrome, open the browser and click on the three-dots icon in the topmost right hand corner.
On the dropdown menu, click on more Tools > Clear browsing data.
This will open up a new page where you will be presented with the options of clearing Browsing History, Cookies and Other Site Data, and Cached Images and Files.
Check the box to clear Cached images and files, click on Clear data, and that’s it.
Edge
Open the browser and click on the three-dot menu at the top right hand corner. Navigate to Settings > Privacy & Services.
You will see options for clearing different classes of browsing data. Choose Cached images and files and select Clear now.
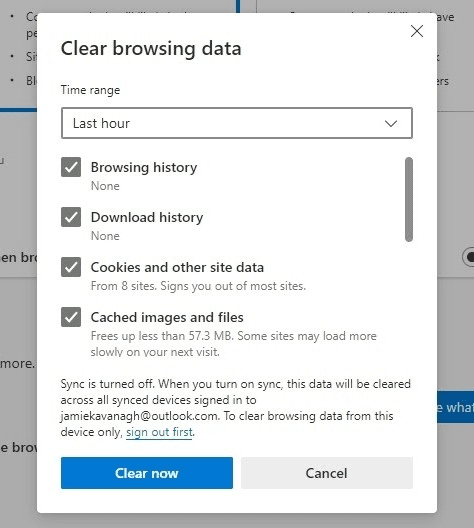
Note that the precise steps may vary based on the version of the browser you are using.
If neither of these two simple fixes work, then you’re going to have to apply some more technical troubleshooting methods. Some of these may require making changes to your website or your web server.
Now would be a good time to make a backup.
Troubleshooting can be a risky process and people have been known to completely lose their data.
To avoid this, back up your data safely before you get started. Most hosting providers will keep a backup of your files, but you may not want to rely solely on this.
Read on for a complete step by step-by-step guide on how to back up your WordPress website.
How to Backup Your Website
There are several methods to back up a website. You can do this by installing a plugin, by downloading the files through FTP, or by creating a backup in cPanel.
Each method has its pros and cons and may be more or less suitable depending on your skill level.
Using a Plugin
There are a few plugins you can use to create a backup of your WordPress website. One that we recommend is Updraft.
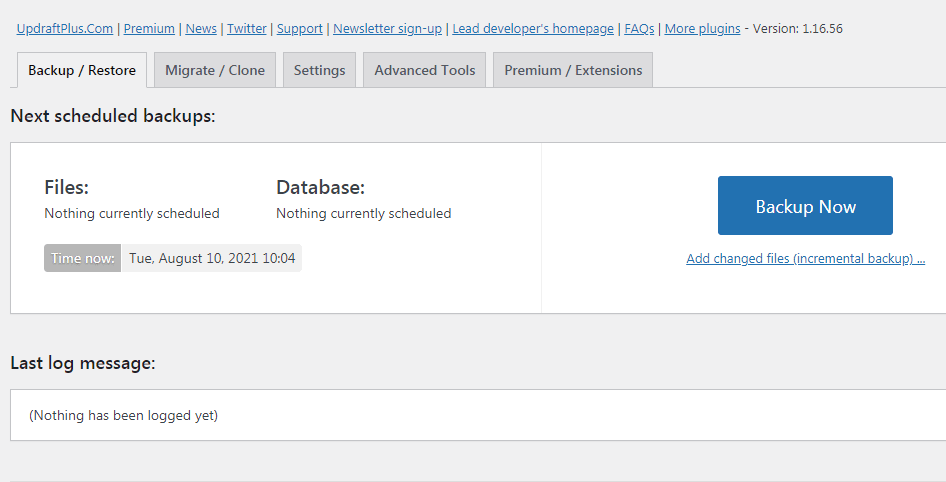
Log in into the WordPress backend using the wp-admin path. Navigate to Plugins > Add new and search for Updraft.
Install and activate the plugin.
Once activated, a popup will appear, prompting you to ‘Press here to start’. You can also click on Settings under Updraft.
There are quite a few options under Settings which allow you to determine things like backup frequency, which files to include in a backup, how to save your backup, and so on. Set them up as you need.
Once you have made your choices, it’s time to put the plugin to work!
Still on the Updraft Settings page, click on the Backup/restore tab and then on Backup Now.
That’s it! Your website will be backed up.
For more detailed guidance, checkout our step-by-step guide on how to back up your WordPress website.
Backing Up Manually Using FTP/SFTP
File Transfer Protocol (FTP), is the traditional way of uploading and downloading data or content to or from your website. Secure File Transfer Protocol (SFTP) does the same thing but using extra layers of security.
To use this method, you will begin by connecting to your FTP server through an FTP client. The most popular one is Filezilla.
FTP allows for a transfer of files between two computers over a network. In this case, you will be uploading your data from your web server to your computer.
Begin by downloading the Filezilla Client and installing it on your desktop.
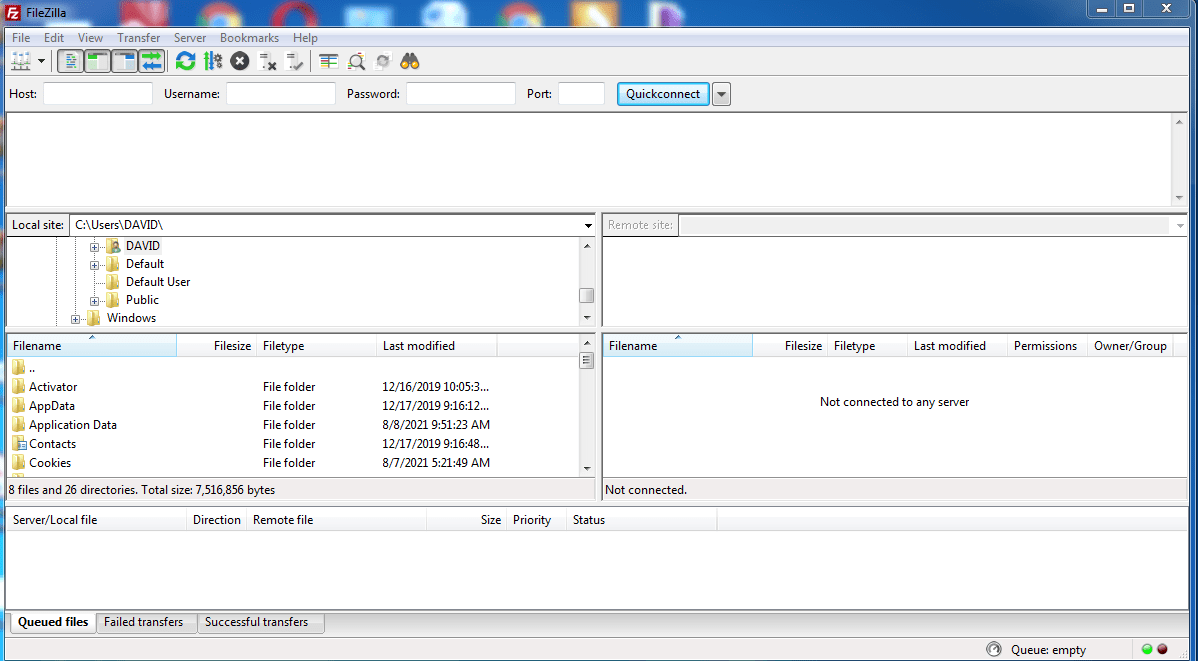
Next, you will need to have the FTP server address, along with your username and password. These details are usually provided by your hosting service.
You will then need to set the port to port 21 if you are using FTP, and port 22 if you are using SFTP.
Once your FTP client is all set up, the files and folders that make up your WordPress website will be visible for download.
All you will then have to do is drag and drop them into folders on your computer.
Use cPanel/Ask your Host
Most hosts provide default backup tools in cPanel. If you know your way around cPanel, this is a good option.
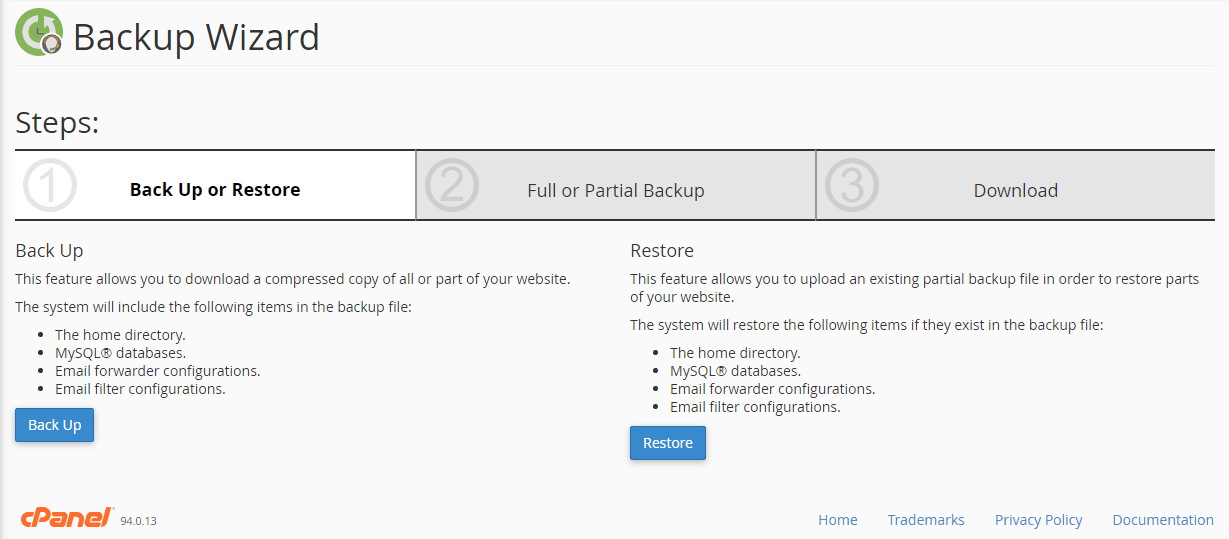
Login into cPanel and navigate to Files > Backup Wizard > cPanel Backup > Backup > Full Backup > Download a Full Account Backup > Generate Backup.
How to Fix the 500 Internal Server Error in WordPress Step by Step (Advanced Troubleshooting)
Once you have created a backup of your files, it will be time to turn to serious WordPress troubleshooting.
Here are the steps to follow, along with different methods for troubleshooting an internal 500 error on your WordPress website.
- Turn On Debugging
- Switch Themes
- Deactivate All Plugins
- Check the .htaccess File
- Increase the PHP Memory Limit
- Check File Permissions
- Ask Your Host (Report it to your hosting provider)
- Check the Database Connection
- Reinstall WordPress
Turn On Debugging
Once you’ve gotten your web files safely backed up, it’s time to get into the nitty gritty of resolving the 500 Internal Server Error.
As there could be a wide range of causes for this error message, the first step is to turn on debugging mode.
In debugging mode, WordPress will provide more specific warnings and error messages that help to clarify the cause of the 500 Internal Server Error.
Turning on debugging mode will require a tiny bit of coding. Before you begin, you’ll want to have a fail-safe if things go wrong.
When editing a WordPress core file like the wp-config file, the best practice is to create a backup version.
To do this, first create a copy of the wp-config file.
To find the file, enter cPanel and navigate to Files > File Manager > public_html > wp-config.php.
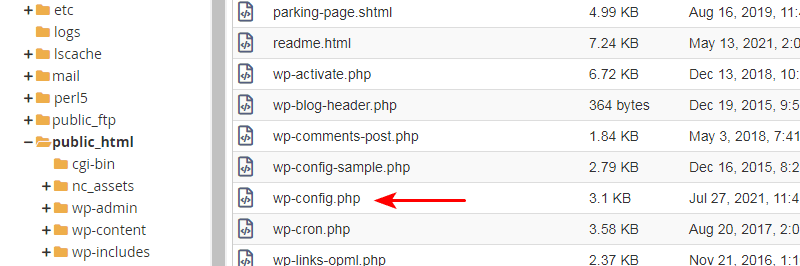
Next, rename the file by changing its extension. In this case, you would be changing .php to .anything.
Most webmasters like to use .old but it doesn’t matter what you choose.
If things go wrong for any reason, all you have to do is first delete the modified file, then rename the copied file. In this case, that would mean turning your new wp-config.old file back to the default wp-config.php.
Once you have safely created a backup wp-config file, you’ll be ready to turn on debugging mode in WordPress.
Right click on the wp-config folder, to edit it within cPanel.
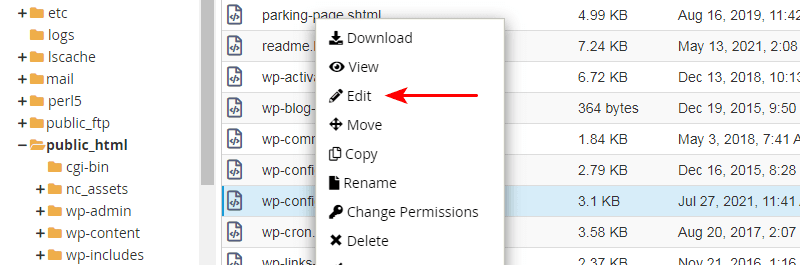
When the file opens up, scroll to the bottom of the page, where you can add the following line of code:
define('WP_DEBUG', true);
define('WP_DEBUG_LOG', TRUE);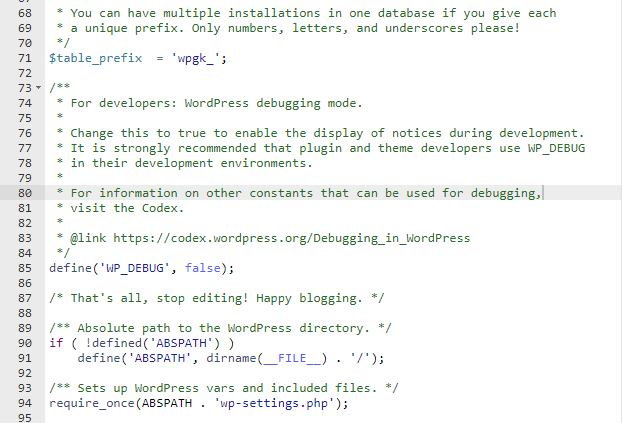
Once done, don’t forget to save the change.
Once you’re done debugging, you will need to reverse this. No need to delete the code. Just replace true with false like so:
define('WP_DEBUG', false);Again, remember to save the change.
Switch Themes
A lot of the time, when things go wrong with a WordPress website, it is down to plugin/theme upgrade issues or compatibility issues. The first step in troubleshooting a 500 internal server error will usually start by changing your theme to one of the default WordPress themes like Twenty Twenty-One.
To do this, navigate over to Appearance > Themes. Click on the theme you would like to install, in this case, Twenty Twenty-One, and activate it.
If the problem persists, you will progress to troubleshooting your plugins.
Deactivate All Plugins
To check if the problem is with your plugins, follow a similar process. In your WordPress backend, navigate to Plugins on the side menu.
Deactivate all plugins and reactivate them one after the other to see which one triggers the problem. Test between each activation to see which plugin causes the 500 error to reappear.
As soon as the error reappears, deactivate the plugin you just activated and test again. If the error disappears, you have found the cause of the error.
If neither changing your theme or plugin resolves the situation, the problem might lie a little deeper under the hood.
Check the .htaccess File
The .htaccess file is a file that controls much of how your users interact with your website. Web servers generally run on two types of software. These are NGINX and Apache, with Apache being the more commonly used.
If your web server runs on Apache, your website will need a .htaccess file that provides instructions to Apache on how access to your site should be granted.
Errors in .htaccess configuration are a common cause of 500 internal server errors.
To check if the error is caused by the .htaccess file, change its name from .htaccess to something else to prevent the server from recognizing and loading it. If this resolves the error message, then you should repair the file or create another.
The .htaccess file can be found in the public_html folder.
To find and edit it, you can either use cPanel or FTP. If you’re using cPanel, you will need to navigate to File Manager > public_html.
Right click on the .htaccess file and select Edit.
Below is what a .htaccess file should look like. If yours is in need of repair, simply paste in this code via FTP/SFTP or access it through the cPanel File Manager.
# BEGIN WordPress
<IfModule mod_rewrite.c>
RewriteEngine On
RewriteBase /
RewriteRule ^index.php$ - [L]
RewriteCond %{REQUEST_FILENAME} !-f
RewriteCond %{REQUEST_FILENAME} !-d
RewriteRule . /index.php [L]
</IfModule>
# END WordPress
If you cannot find a .htaccess file in your public_html folder, you may need to create a new one. This is easy to do.
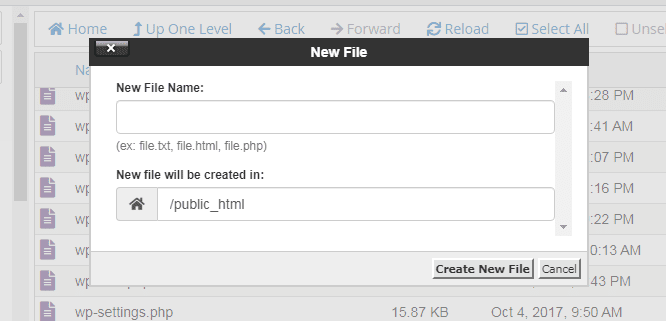
At the top left-hand corner of your screen, click on + File. In the pop up that appears, enter .htaccess as the New File Name.
Once created, copy and paste in the code above and save the file as .htaccess..
Increase the PHP Memory Limit
When browsers send requests to a web server, some PHP memory is required to execute this process. Sometimes, a 500 Internal Server error occurs because of scripts that use up too much memory before they complete.
To fix this, you can increase the amount of PHP memory available for processing requests while you contact your web hosting service to help with finding and fixing the troublesome scripts.
There are a number of ways to increase PHP memory for a WordPress website as you will see below. By now, you will have learned how to work in these files. All you’ll have to do is add in little bits of code here and there.
Edit the .htaccess file
You’ve already learned how to work with .htaccess earlier. To increase the PHP memory allocation for your website, simply open the .htaccess file in a text editor, and add the following code:
php_value upload_max_filesize 64M
php_value post_max_size 64M
Then save the change.
You can also use 128M or 256M if required. There is no guarantee that this will work as some web hosts limit memory from the server side, which ignores the setting you’re changing. Not all hosts do this, which is why we suggest it here.
Edit the Wp-Config File
You can find the wp-config file for your website in cPanel or using FTP. Download the wp-config file from your root directory, open it in a text editor, and add the following code:
define(‘WP_MEMORY_LIMIT’, ’64M’);
ini_set(‘post_max_size’, ’64M’);
ini_set(‘upload_max_filesize’, ’64M’);
And save the change.
Increase Memory Allocation in PHP.ini
A final method of increasing your WordPress websites’s PHP memory allocation is by increasing the memory allocation from the PHP.ini file. The PHP.ini file is a PHP configuration file that controls things like execution time, memory and much more.
If you’re using shared hosting you won’t be able to edit your PHP.ini file. If you have dedicated hosting or a virtual hosting plan, you might be able to edit your PHP.ini file in cPanel.
Ordinarily, you will find the PHP.ini file stored in your root folder. You can also edit this file manually.
In both cases, first find the PHP.ini file in the root directory of your WordPress installation. As we advised earlier, to create a safety net in case things go wrong, copy a new version of the PHP.ini file and save the old one with a different extension such as .old.
Next, download the file and open it in a text editor. Paste in the configuration values you would like to use on your website–in this case, if you’re trying to set the memory limit at 128 megabytes, you would include a line of code like this:
memory_limit = 128MIf you’re working in cPanel, simply save this file and delete the backup. If you’re working with FTP, upload the file and that should fix the issue.
Check File Permissions
Another possible cause of an internal 500 error is a file permissions error. File permissions determine who can read, write and execute functions within your WordPress code.
Incorrect permissions are a security threat but they can also lead to 500 Internal Server error messages.
If things have gone awry on your WordPress website, check your permissions files to see if the the following WordPress recommended settings are still in place:
- wp-admin: 755
- wp-content: 755
- wp-content/themes: 755
- wp-content/plugins: 755
- wp-content/uploads: 755
- wp-config.php: 644
- .htaccess: 644
- All other files – 644
To check these, you can simply right click on each file in the public_html folder in cPanel or in your FTP client, and click on change permissions.
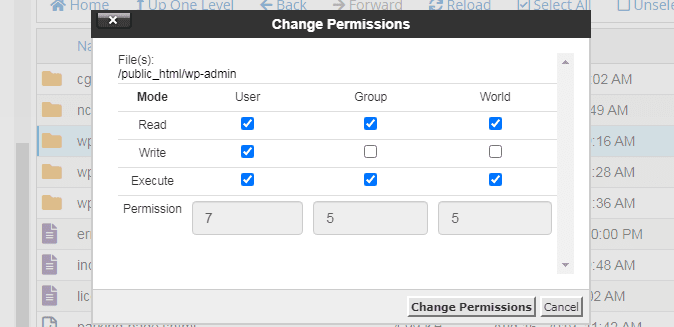
If the contents of your version of this file look different, update it with these settings. As always, don’t forget to save your changes.
Ask Your Host
If you have tried all the previous steps and nothing has worked, you may need to report the error to your hosting service provider. They will usually be able to accurately troubleshoot any errors, and in many cases, will carry out fixes themselves.
Be sure to provide as many details as you can including what actions you suspect may have triggered the 500 Internal Server Error, as well as the steps you have taken to resolve it.
There are a couple more steps you may take if you would like to complete the troubleshooting process on your own.
Check the Database Connection
An error in establishing a database connection is another potential cause of an internal 500 server error. This can happen for a number of reasons. For example, incorrect database login credentials, a corruption of your WordPress database, or a problem with the server.
A broken database connection will be a little more challenging to resolve as you will not have access to either the front or back end of your WordPress installation.
To resolve this, you will need to access your WordPress files via FTP/SFTP or cPanel.
Next, check the php.ini file to confirm that your database login credentials are correct. As we mentioned earlier, you won’t be able to access this file if you’re using a shared hosting plan. If you are, you may need to ask your hosting service for some help.
If you aren’t, you can find the php.ini file in your cPanel, in the public_html folder.
These credentials include:
- MySQL name
- MySQL database surname
- MySQL database password
- My SQL hostname
You should have these credentials recorded somewhere from when you first set up WordPress.
If these are in order, the problem may lie with a corrupted database.
Fixing a corrupt database is straightforward. Be aware, though, that in rare circumstances, this process can cause you to lose data.
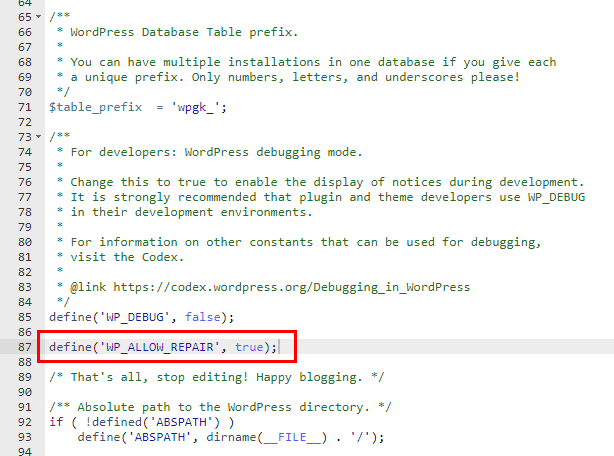
You will have to enable database repair mode by adding a bit of code into the wp-config.php file:
define('WP_ALLOW_REPAIR', true);You can do this from your cPanel or via FTP.
Navigate to the public_html folder in file manager, right click on the wp_config file and click Edit.
Scroll down to the bottom of the page–right before the line that says “That’s all, stop editing! Happy blogging.”, and paste in the code above.
Once this is done, visit the following address in your browser:
https://yourdomain.com/wp-admin/maint/repair.php
Once here, you will have the options of enabling a WordPress repair, or optimizing the database.
We recommend that you choose the repair option.
Reinstall WordPress
Reinstalling WordPress or reverting to an error-free version of your WordPress installation is a method that will help you get around the problem without really solving it.
If you have gone through all the previous methods without success, you may want to priorities getting your site back online and this method is the quickest way of doing it.
If you opt for this path, then be sure to build your website the right way from the beginning. Properly configured websites are less likely to run into 500 Internal Server errors, at least, not frequently!
How to Prevent a 500 Internal Server Error

There isn’t an exhaustive list of things that could cause a 500 Internal Server error but the following tips should help you avoid the majority of them
These are our top three tips:
Use a Reliable Hosting Service
As you might have realized by now, a lot of what could go wrong with a 500 Internal Server error may happen on your web server, out of your control.
Simply choosing a web hosting provider that provides faster servers and more bandwidth can help. You should also choose a web host that offers responsive and technically skilled customer support.
Use Properly Coded Themes and Plugins
Not all WordPress themes and plugins are built using high-quality code or industry best practices. Astra is, which is why it is so popular with web developers around the world. For a smooth WordPress experience, try Astra!
Use a Staging Environment
Major changes to your website should be tested in a staging environment before being implemented on your live site.
This will allow you to catch any issues with themes of plugins before they have a chance to cause a 500 Internal Server error on your live site.
Final Thoughts
The 500 Internal Server error can cause much distress but now you know what to do when it happens.
Like most technical troubleshooting, it’s largely a case of a process of elimination, trying a fix, testing it and then moving on to another. It’s slow and steady but it works!
Remember to create regular backups of your WordPress website and don’t wait for issues to crop up before you do!
With the steps we’ve shown you, you will overcome any instances of this frustrating error like a pro.
If you have had to deal with a 500 Internal Server error in the past, let us know which of these solutions worked for you. We’d love to hear what tips you might have!