Ошибка 504 — что это значит и как исправить
Ошибка 504 Gateway Timeout – это код состояния HTTP, который означает, что один сервер не получил своевременный ответ от другого сервера, к которому он обращался, при попытке загрузить веб-страницу или выполнить другой запрос браузером.
Другими словами, ошибка 504 обычно указывают на то, что другой компьютер, на котором веб-сайт, на котором вы получаете сообщение 504, не контролирует, а полагается на него и недостаточно быстро связывается с ним.
Вы вебмастер? Обратитесь к разделу « Исправление ошибок 504 на вашем собственном сайте » далее по странице, чтобы узнать о некоторых вещах, которые стоит попробовать.
Ошибка 504 Gateway Timeout может появиться в любом интернет-браузере, в любой операционной системе и на любом устройстве. Это означает, что возможно получить ошибку 504 Gateway Timeout на вашем телефоне или планшете на Android или iPhone, в Safari на Mac, в Chrome на Windows 10 (или 8, или 7, …) и т. д.
Как вы могли увидеть ошибку 504
Отдельные веб-сайты могут настраивать отображение ошибок «тайм-аут шлюза», но вот наиболее распространенные ошибки, которые вы увидите:
- Ошибка 504 Время ответа сервера истекло
- HTTP 504
- 504 ОШИБКА
- Время ожидания шлюза (504)
- Ошибка HTTP 504 – Тайм-аут шлюза
- Ошибка тайм-аута шлюза
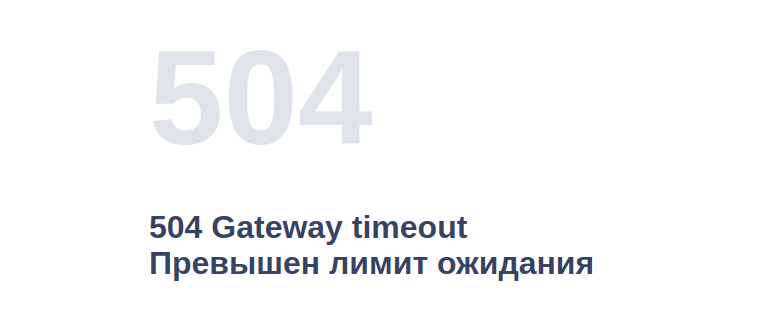
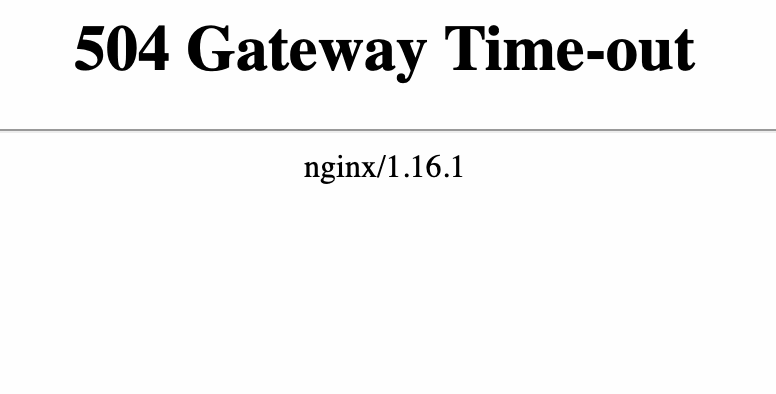
В окне интернет-браузера ошибка 504 Gateway Timeout отображается как и обычная веб-страница. На странице могут быть знакомые верхние и нижние колонтитулы сайта и сообщение на английском, или он может отображаться на полностью белой странице с большой цифрой 504 вверху. Это все одно и то же сообщение, независимо от того, как его показывает веб-сайт.
Причины ошибок 504 Gateway Timeout
В большинстве случаев ошибка 504 Gateway Timeout означает, что «тайм-аут» сервера вероятно не работает или работает неправильно.
Поскольку эта ошибка обычно является сетевой ошибкой между серверами в Интернете или проблемой с реальным сервером, проблема не в вашем компьютере, устройстве или подключении к Интернету.
Тем не менее, есть несколько способов исправления 504 ошибки, которые вы можете попробовать:
- Попробуйте перезагрузить страницу нажав кнопку обновления / перезагрузки, или нажав клавишу F5 или еще раз попробовав ввести URL в адресную строку браузера.
Даже несмотря на то, что ошибка 504 Gateway Timeout сообщает об ошибке вне вашего контроля, эта ошибка может быть только временной.
Перезагрузите все ваши сетевые устройства. Временные проблемы с вашим роутером или другим сетевым оборудованием могут быть причиной проблемы 504 Gateway Timeout, которую вы видите. Перезагрузка этих устройств может помочь.
Больше способов увидеть ошибку 504
Ошибка тайм-аута шлюза при получении в Центре обновления Windows создает код ошибки 0x80244023 или сообщение WU_E_PT_HTTP_STATUS_GATEWAY_TIMEOUT .
В программах на базе Windows, которые имеют непосредственный доступ к Интернету, ошибка 504 может отображаться в небольшом диалоговом окне или окне с ошибкой HTTP_STATUS_GATEWAY_TIMEOUT и / или с запросом истекло время ожидания сообщения шлюза .
Менее распространенная ошибка 504 – время ожидания шлюза: прокси-сервер не получил своевременного ответа от вышестоящего сервера , но устранение неполадок (см. Выше) остается тем же.
Ошибки типа 504 Gateway Timeout
Ряд сообщений об ошибках аналогичен ошибке 504 Gateway Timeout, поскольку все они появляются на стороне сервера. Некоторые включают в себя Ошибку 500 Internal Server, в Bad Gateway 502 ошибку, и Unavailable 503 Service ошибку, среди нескольких других.
Существуют также коды состояния HTTP, которые не на стороне сервера, а на стороне клиента , как обычно встречающаяся ошибка 404 Not Found .
Источник
Horizon Dashboard times out with a 504 Gateway time out error
Environment
Issue
- Horizon Dashboard fails to load page with HTTP 504 error ( Gateway timeout Error ) .
Resolution
If using a LDAP back-end for authentication, add the following clause in /etc/openldap/ldap.conf :
Otherwise, please increase HAProxy timeouts as per Solution 1595673 and/or Solution 1465753.
Root Cause
- This error indicates issue with haproxy reaching the backend server .
- This can be cause due to considerable amount of time taken to reach the backend server .
- If the backend server response is expected to take longer time that server timeout configured , server timeout can be increased in haproxy.conf .
- Another possibility is that the maxconn limit is reached due to which all further connections to haproxy backend server fails .
- This can be fixed by increasing maxconn in defaults/global section .
Diagnostic Steps
- The issue is temporarily fixed by haproxy service restart .
- Enable haproxy logging to confirm if timeout limit is hit by haproxy .
- Product(s)
- Red Hat OpenStack Platform
- Component
- cluster
- horizon
- keystone
- Category
- Troubleshoot
- Tags
- http
- keystone
- pacemaker
This solution is part of Red Hat’s fast-track publication program, providing a huge library of solutions that Red Hat engineers have created while supporting our customers. To give you the knowledge you need the instant it becomes available, these articles may be presented in a raw and unedited form.
Источник
Http error 504 vmware horizon
This sections describes error messages that users can encounter during desktop connections.
If a user receives Error 500 in the Horizon Client, look in the tenant log and make a note of the exception before contacting support. The exception to look for will mention the ViewClientServlet.
Common Error Messages
The following table lists the most common error messages users can receive and the causes when using the using the Horizon Client to connect to their desktop. The Error Details portion of the message provides information needed by customer support to troubleshoot the connection problem.
Unable to Connect to Desktop. Please wait a few minutes and try again. If problem persists, please contact your Administrator
Unable to Connect to Desktop. Desktop has been allocated to a different user. Please Contact your Administrator. Error Details: Desktop Already in Allocated State.
Login Failure. Please contact your Administrator. Error Details: Unable to lookup user GUID using credentials
Unable to Connect to Desktop. Please wait a few minutes and try again. If problem persists, please contact your Administrator. Error Details: Unknown IP Address
Unable to Connect to Desktop. Please contact your Administrator. Error Details: Invalid IP Address
Unable to Connect to Desktop. Please contact your Administrator. Error Details: Unable to retrieve Tenant Domain information
Login Failure: Unknown user name or bad password. Please try again.
Unable to Allocate Desktop, No Desktops Available. All desktops in pool are currently in use.
Unable to Connect to Desktop (current connected protocol incompatible). Please log off previous session and try again.
Unable to complete log off. If problem persists, please contact your Administrator. Error Details: Invalid session id
Unable to complete log off. If problem persists, please contact your Administrator. Error Details: Unable to Associate Session Id with Active Sessions
Unable to complete log off. If problem persists, please contact your Administrator. Error Details: Error communicating with Desktop Manager
The desktop , is not in the list of entitled desktops
This message indicates that you may be using an incompatible Horizon Client and should reference the client’s release notes to confirm it supports Remote Application functionality.
| View Agent Login Failed. Error Details: | The View Agent failed the login request sent. |
| Session has Expired, Please Restart Horizon Client to Connect | Session timeout has occurred. The timeout is based on a policy (userportal.session.timeout) set at the service provider, but may be overridden by a setting in the administration console. |
| Unable to allocate a desktop — pool refresh is in progress. | Wait a few minutes and try again. Dynamic pool refresh is underway. This means that desktops are being destroyed and recreated based on a new or altered Gold Pattern. Once the refresh completes, users will be able to log into their desktop. |
| Error communicating with desktop. Please contact your Administrator. Error Details: Desktop Agent Communication Error | Unable to parse error from Authentication Error Response due to interrupted communication between the Horizon Client, Tenant and View Agent Connect. There might be a warning or error in the desktone.log file related to ViewClientServlet. |
| Could not parse XML | Data Horizon Client or Agent returned XML which could not be read by the DaaS platform. |
| Desktop is not ready for connection (DaaS Agent may be starting up). Please wait a few minutes or try again. If problem persists, please contact your Administrator. | DaaS Agent is reported as offline. Reboot the desktop if the problem persists and console access is too long. The DaaS Agent should come up when the desktop comes up (within a few minutes). |
| Desktop is not ready for connection (may be shutting down or rebooting). Please wait a few minutes or try again. If problem persists, please contact your Administrator. | OS state is not running. Wait until it is running or reboot from administration console. |
| Desktop is not ready for connection (currently in maintenance mode). Please wait a few minutes or try again. If problem persists, please contact your Administrator. | Domain rejoin maintenance is occurring for a dynamic desktop. This can also occur during dynamic pool refresh. |
| Unable to Connect to Desktop. Please contact your Administrator. Error Details: View Agent is not running | The DaaS Agent has reported that the View Agent service is not running or listening on the require ports. Make sure that the View Agent is installed and that the firewall ports are open (4172, 32111, 443). Reboot machine or check service «View Agent Connect» through RDP (User Portal) if possible. |
| Unable to Connect to Desktop. Please contact your Administrator. Error Details: VMware Tools is not running | VMware Tools are offline. See troubleshooting/solution on VMware tools. |
| Unable to Connect to Desktop. Please contact your Administrator. Error Details: VMware Tools is not installed | VMware Tools are not installed. See troubleshooting/solution on VMware tools. |
| Desktop Unavailable. This is a generic message from the Allocator Service. Try checking the state of the machine and the tenant system to see if there are other issues. | |
| Another user has been allocated this desktop. A session exists with a GUID different from the current user. | |
| An exception was raised by the Horizon DaaS software during a GUID lookup. Possible reasons include: Domain controller is offline; the Fabric node had failures; general tenant problems. | |
| IP Address is null or invalid. The IP address can be null if the DaaS Agent is in the middle of logging in or the VM is starting up. | |
| The IP address is listed only if it is known. | |
| There is no Domain information logged in the database. The DaaS platform cannot associate the tenant with any Domain. | |
| User name or password are invalid for the given domain. | |
| Dynamic pool has no desktops that are available to the user. | |
| The Allocator Service is indicating the current session is using a non-compatible protocol. | |
| This error occurs if the DaaS platform cannot parse the XML, the session-id key returned in the XML is null, or if the key is malformed. | |
| There are no active sessions for the current user. | |
| This error occurs if when the DaaS platform throws an exception. | |
Error Messages Associated with Password Changes
The following table lists the error messages a user can receive and the causes when attempting to change their password in the Horizon Client.
Please Enter the Old Password and the New Password.
Some or all of the password fields are blank.
Provided Old Password is invalid, please try again.
If the password you logged in with is different from the «Old Password».
Provided New Passwords do not match, please try again.
The user mistyped the password.
Please Enter a New Password that is different from the Old Password .
The new password the user entered is the same as their old password
Unable to Change Password. Please restart Horizon Client and try again. Error Detail
After the user selected desktop, completing password change screen, and clicked connect, the View Agent was unable to change the Domain password.
Источник
Environment
- Red Hat OpenStack 7.0 (RHOS)
Issue
- Horizon Dashboard fails to load page with HTTP 504 error ( Gateway timeout Error ) .
Resolution
-
If using a LDAP back-end for authentication, add the following clause in
/etc/openldap/ldap.conf:NETWORK_TIMEOUT 2 -
Otherwise, please increase HAProxy timeouts as per Solution 1595673 and/or Solution 1465753.
Root Cause
- This error indicates issue with haproxy reaching the backend server .
- This can be cause due to considerable amount of time taken to reach the backend server .
- If the backend server response is expected to take longer time that server timeout configured , server timeout can be increased in haproxy.conf .
- Another possibility is that the maxconn limit is reached due to which all further connections to haproxy backend server fails .
- This can be fixed by increasing maxconn in defaults/global section .
Diagnostic Steps
- The issue is temporarily fixed by haproxy service restart .
- Enable haproxy logging to confirm if timeout limit is hit by haproxy .
-
Product(s)
- Red Hat OpenStack Platform
-
Component
- cluster
- horizon
- keystone
-
Category
- Troubleshoot
-
Tags
- http
- keystone
- pacemaker
This solution is part of Red Hat’s fast-track publication program, providing a huge library of solutions that Red Hat engineers have created while supporting our customers. To give you the knowledge you need the instant it becomes available, these articles may be presented in a raw and unedited form.
Перейти к содержанию
Ошибка 504 Gateway Timeout – это код состояния HTTP, который означает, что один сервер не получил своевременный ответ от другого сервера, к которому он обращался, при попытке загрузить веб-страницу или выполнить другой запрос браузером.
Другими словами, ошибка 504 обычно указывают на то, что другой компьютер, на котором веб-сайт, на котором вы получаете сообщение 504, не контролирует, а полагается на него и недостаточно быстро связывается с ним.
Вы вебмастер? Обратитесь к разделу « Исправление ошибок 504 на вашем собственном сайте » далее по странице, чтобы узнать о некоторых вещах, которые стоит попробовать.
Ошибка 504 Gateway Timeout может появиться в любом интернет-браузере, в любой операционной системе и на любом устройстве. Это означает, что возможно получить ошибку 504 Gateway Timeout на вашем телефоне или планшете на Android или iPhone, в Safari на Mac, в Chrome на Windows 10 (или 8, или 7, …) и т. д.
Содержание
- Как вы могли увидеть ошибку 504
- Причины ошибок 504 Gateway Timeout
- Больше способов увидеть ошибку 504
- Ошибки типа 504 Gateway Timeout
Как вы могли увидеть ошибку 504
Отдельные веб-сайты могут настраивать отображение ошибок «тайм-аут шлюза», но вот наиболее распространенные ошибки, которые вы увидите:
- Ошибка 504 Время ответа сервера истекло
- HTTP 504
- 504 ОШИБКА
- Время ожидания шлюза (504)
- Ошибка HTTP 504 – Тайм-аут шлюза
- Ошибка тайм-аута шлюза
В окне интернет-браузера ошибка 504 Gateway Timeout отображается как и обычная веб-страница. На странице могут быть знакомые верхние и нижние колонтитулы сайта и сообщение на английском, или он может отображаться на полностью белой странице с большой цифрой 504 вверху. Это все одно и то же сообщение, независимо от того, как его показывает веб-сайт.
Причины ошибок 504 Gateway Timeout
В большинстве случаев ошибка 504 Gateway Timeout означает, что «тайм-аут» сервера вероятно не работает или работает неправильно.
Поскольку эта ошибка обычно является сетевой ошибкой между серверами в Интернете или проблемой с реальным сервером, проблема не в вашем компьютере, устройстве или подключении к Интернету.
Тем не менее, есть несколько способов исправления 504 ошибки, которые вы можете попробовать:
- Попробуйте перезагрузить страницу нажав кнопку обновления / перезагрузки, или нажав клавишу F5 или еще раз попробовав ввести URL в адресную строку браузера.
Даже несмотря на то, что ошибка 504 Gateway Timeout сообщает об ошибке вне вашего контроля, эта ошибка может быть только временной.
Перезагрузите все ваши сетевые устройства. Временные проблемы с вашим роутером или другим сетевым оборудованием могут быть причиной проблемы 504 Gateway Timeout, которую вы видите. Перезагрузка этих устройств может помочь.
Больше способов увидеть ошибку 504
Ошибка тайм-аута шлюза при получении в Центре обновления Windows создает код ошибки 0x80244023 или сообщение WU_E_PT_HTTP_STATUS_GATEWAY_TIMEOUT .
В программах на базе Windows, которые имеют непосредственный доступ к Интернету, ошибка 504 может отображаться в небольшом диалоговом окне или окне с ошибкой HTTP_STATUS_GATEWAY_TIMEOUT и / или с запросом истекло время ожидания сообщения шлюза .
Менее распространенная ошибка 504 – время ожидания шлюза: прокси-сервер не получил своевременного ответа от вышестоящего сервера , но устранение неполадок (см. Выше) остается тем же.
Ошибки типа 504 Gateway Timeout
Ряд сообщений об ошибках аналогичен ошибке 504 Gateway Timeout, поскольку все они появляются на стороне сервера. Некоторые включают в себя Ошибку 500 Internal Server, в Bad Gateway 502 ошибку, и Unavailable 503 Service ошибку, среди нескольких других.
Существуют также коды состояния HTTP, которые не на стороне сервера, а на стороне клиента , как обычно встречающаяся ошибка 404 Not Found .
Просмотров 4.6к.
Обновлено 29.03.2020
Код ошибки в формате 5хх говорит о том, что на стороне сервера есть проблема: сервер не может обработать запрос от клиента. Клиентом в данном случае выступает браузер.
Ошибка 504 Gateway Time Out возникает, когда в заданный промежуток времени сервер не получает ответ от другого сервера, при этом другой сервер выполняет роль прокси или шлюза.
Ошибка 504 что значит
Какие ещё бывают варианты отображения ошибки:
- HTTP Error 504,
- Gateway Timeout Error,
- HTTP Error 504 – Gateway Timeout,
- 504 Gateway Timeout nginx,
- 504 Gateway Time-out – The server didn’t respond in time,
- Ошибка 504 Время ответа сервера истекло,
- Время ожидания шлюза (504),
- Ошибка тайм-аута шлюза,
- HTTP 504,
- 504 Ошибка.
В этой статье мы расскажем, как устранить код ошибки 504.
Как исправить ошибку 504 посетителю сайта
Итак, вы перешли на сайт, но вместо веб-страницы видите сообщение с кодом 504.
Что такое тайм аут шлюза
Проблема может быть как со стороны сайта, так и со стороны устройства, например настроек браузера.
Чтобы убедиться в том, что настройки браузера в порядке:
1) Обновите страницу. Но обновите не клавишей F5, а выделите содержимое адресной строки и нажмите Enter. Если после этих действий ошибка 504 не возникает ни на текущем, ни на любом другом сайте – её можно проигнорировать.
2) Зайдите на тот же ресурс через другой браузер. Если в этом случае сайт открылся корректно, перейдите к следующему пункту.
3) Очистите кэш браузера и удалите файлы cookie. После этого браузер будет работать быстрее.
Воспользуйтесь инструкцией Как очистить кэш браузера.
4) Перезагрузите роутер или модем. Отключите устройство от сети примерно на 10 минут.
5) Очистите кэш DNS. Для этого воспользуйтесь инструкцией ниже.
Как очистить кэш DNS
В зависимости от вашей операционной системы очистите кэш по одной из инструкций.
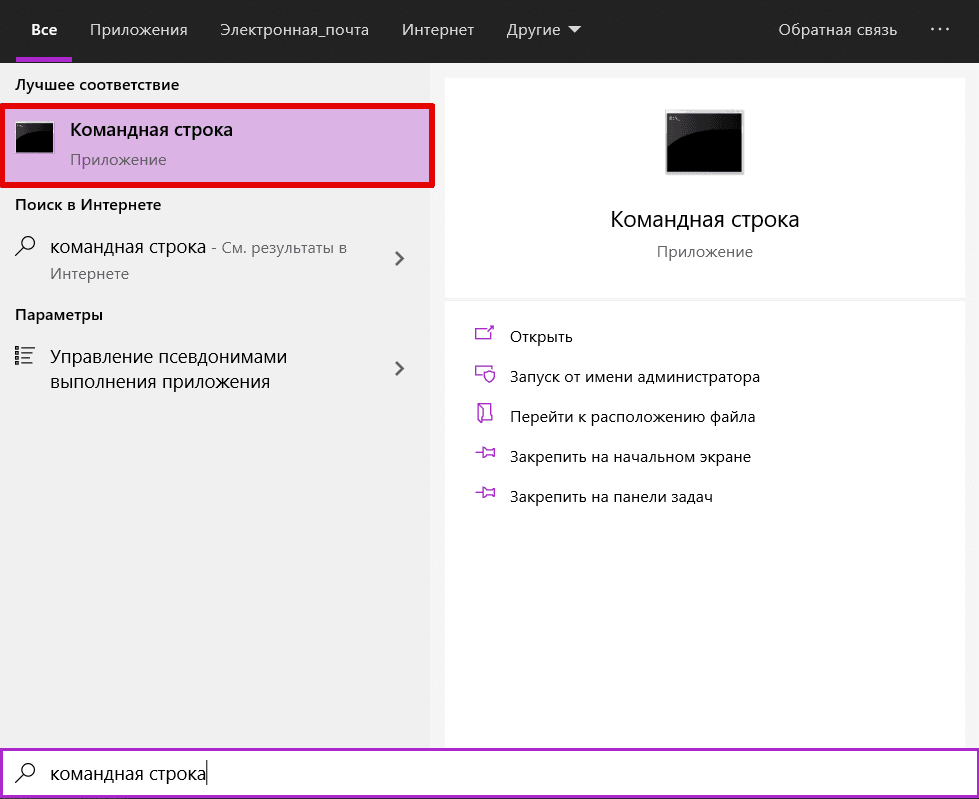
1) Откройте командную строку. Для этого введите в поисковую строку «Командная строка» и выберите появившееся приложение:
2) Введите команду:
3) Дождитесь сообщения об очистке кэша:
1) Откройте терминал клавишами Ctrl+Alt+T.
2) Введите команду:
Для Ubuntu:
sudo service network-manager restartДля других дистрибутивов:
sudo /etc/init.d/nscd restart1) Войдите в терминал. Для этого нажмите клавиши Command + Space. Введите Терминал и нажмите на найденное приложение.
2) Введите команду:
sudo killall -HUP mDNSResponderГотово, вы очистили кэш DNS.
6) Обратитесь в техподдержку вашего интернет-провайдера. Возможно, это проблема сети, за которую отвечает провайдер.
Если эти действия не принесли результата – обратитесь в техническую поддержку сайта.
Если вы владелец сайта
Как исправить ошибку 504 на виртуальном хостинге
1 способ
Эта ошибка может возникнуть в случае, если для Nginx был превышен лимит на время ответа сайта. По умолчанию это 30 секунд, при этом среднее время загрузки сайта не должно превышать 1-3 секунды.
Если скрипты вашего сайта должны исполняться дольше 30 секунд, вы можете миновать Nginx и обратиться к сайту по другим портам. Если ваша панель управления хостингом:
- ISPManager – используйте порт 8081
- cPanel или Plesk – используйте порт 8080.
2 способ
Если этот вариант вам не подходит, рекомендуем перенести ваш сайт на Облачный сервер, на котором доступна гибкая настройка сервера, в том числе и лимитов. Для этого закажите услугу «Облачные серверы» и перенесите сайт по инструкции Как перенести сайты между услугами REG.RU.
3 способ
Также вы можете изменить директиву max_execution_time в файле php.ini. Она указывает на время, за которое должен отрабатываться скрипт. Для этого:
- 1.
-
2.
Укажите нужное значение в строке:
Где 30 – время выполнения скрипта в секундах.
4 способ
Если вы используете CDN, проблема может быть связана с ней.
Что такое CDN
CDN – это сетевая инфраструктура, которая распределена географически. Она обеспечивает быструю загрузку контента пользователям веб-сервисов и сайтов. Серверы, которые входят в состав CDN, географически расположены так, чтобы сделать время ответа сайта или сервиса минимальным для пользователей.
Пользователь ищет ресурс и тем самым посылает запрос. Запрос идентифицируется и направляется на PoP – на ближайший к пользователю кэширующий сервер в этой инфраструктуре. Возможны два варианта:
- Если в кэше PoP есть данные об этом запросе, он отвечает браузеру, а тот отображает контент.
- Если в кэше этого сервера нет данных, запрос переадресовывается к ориджину – центральному серверу, на котором хранятся все данные. Когда ориджин отвечает на запрос, PoP кэширует его и передаёт ответ браузеру. После этого контент отображается в браузере.
Ошибку 504 может вернуть кэширующий сервер, если превышено время ожидания от центрального сервера.
Если ошибку исправить не удалось, обратитесь в техническую поддержку.
Как исправить ошибку 504 на VPS
1 способ
Эта ошибка может возникнуть в случае, если для Nginx был превышен лимит на время ответа сайта. По умолчанию это 30 секунд, при этом среднее время загрузки сайта не должно превышать 1-3 секунды.
Чтобы избавиться от этой ошибки, попробуйте повысить время ожидания веб-сервера Nginx.
2 способ
Также ошибка 504 может возникать, когда Nginx используется как прокси-сервер для Apache. В этом случае нужно настроить параметры времени ожидания при проксировании. Максимальное время исполнения скрипта в настройках веб-сервера — 300 секунд.
Изменить параметры ожидания можно в конфигурационном файле nginx.conf. Для этого:
-
1.
Подключитесь к серверу по SSH.
-
2.
Откройте конфигурационный файл с помощью команды:
sudo nano /etc/nginx/nginx.conf -
3.
Добавьте строки в блоке server:
#server {

#...

proxy_connect_timeout 600;
proxy_send_timeout 600;
proxy_read_timeout 600;
send_timeout 600;

#...
#}
Где 600 — время в секундах.
-
4.
Перезапустите Nginx с помощью команды:
Если решить проблему не удалось, обратитесь в техническую поддержку или на тематические форумы по Nginx.
Navigation
- Change Log
- Overview
- Firewall
- PowerShell Deploy Script Method – both upgrade and new
- vSphere Web Client Deploy OVF method – Upgrade Existing, or Deploy New
- Web-based Admin Interface
- Add UAG to Horizon Console
- Monitor Sessions
- Logs and Troubleshooting
- Load Balancing
- UAG Authentication – SAML, RADIUS
- Other UAG Configurations – High Availability, Network Settings, System Settings
💡 = Recently Updated
Change Log
- 2023 Jan 10 – updated Import OVF section for UAG 2212
- 2022 Oct 21 – updated Import OVF section for UAG 2209
- 2022 July 15 – updated Import OVF section for UAG 2207
- 2022 Mar 29 – updated Import OVF section for UAG 2203
- 2022 Jan 25 – updated Import OVF section for UAG 2111.2
- 2021 Dec 21 – updated Import OVF section for UAG 2111.1
- 2021 Dec 2 – updated Import OVF section for UAG 2111
- 2021 Sep 30 – Horizon Edge configuration – added instructions to disable CORS to fix HTML Access in Horizon 2106 and newer.
- 2021 Aug 31 – updated Import OVF section for UAG 2106.2 – deadlock fix
- 2021 Aug 3 – updated Import OVF section for UAG 2106.1 – security fix
- 2021 July 6 – updated Import OVF section for UAG 2106
- 2021 Apr 7 – updated Import OVF section for UAG 2103.1
- 2021 Mar 23 – updated Import OVF section for UAG 2103
- 2020 Dec 27 – updated Import OVF section for UAG 20.12 (2012)
- 2020 Sep 30 – updated Import OVF section for UAG 20.09
- 2020 July 11 – updated Import OVF section for UAG 3.10
Overview
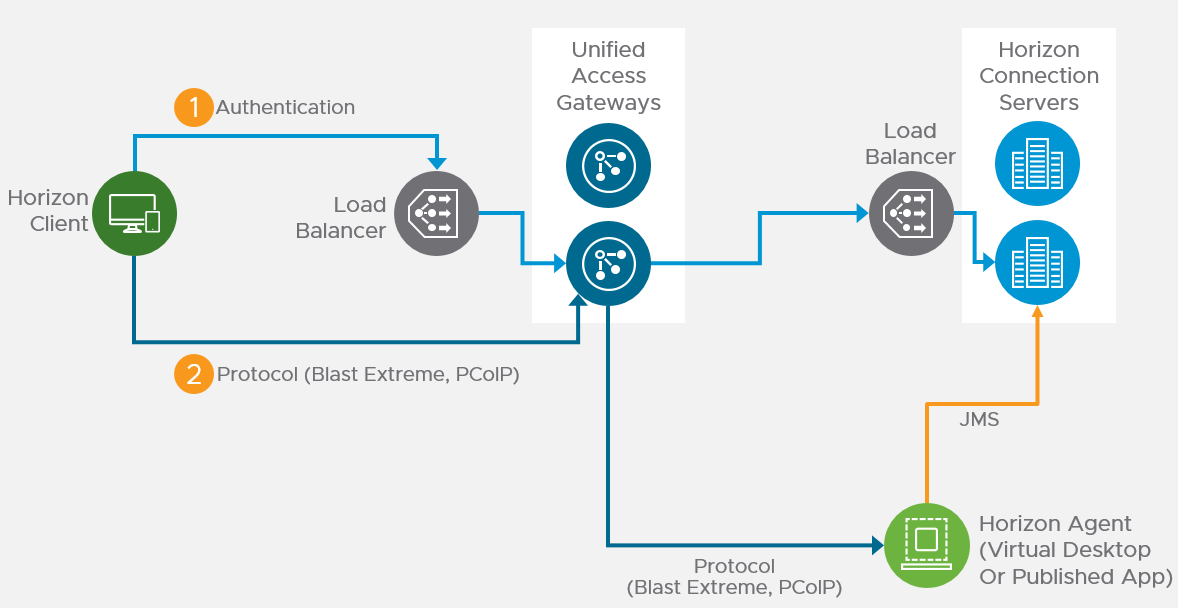
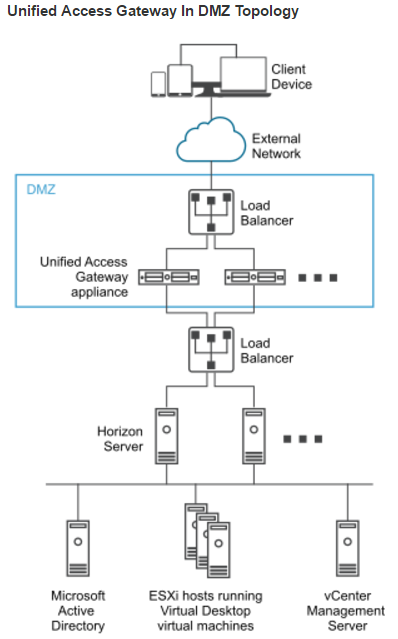
Unified Access Gateway provides remote connectivity to internal Horizon Agent machines. For an explanation of how this works (i.e. traffic flow), see Understanding Horizon Connections at VMware Tech Zone.
Unified Access Gateway (formerly known as Access Point) is a replacement for Horizon Security Servers. Advantages include:
- You don’t need to build extra Connection Servers just for pairing. However, you might want extra Horizon Connection Servers so you can filter pools based on tags.
- Between Unified Access Gateway and Horizon Connection Servers you only need TCP 443. No need for IPSec or 4001 or the other ports. You still need 4172, 22443, etc. to the View Agents.
- No need to enable Gateway/Tunnel on the internal Horizon Connection Servers.
- Additional security with DMZ authentication. Some of the Authentication methods supported on Unified Access Gateway are RSA SecurID, RADIUS, CAC/certificates, etc.
However:
- It’s Linux. You can deploy and configure the appliance without any Linux skills. But you might need some Linux skills during troubleshooting.
Horizon View Security Server has been removed from Horizon 2006 (aka Horizon 8).
- Some of the newer Blast Extreme functionality only works in Unified Access Gateway. See Configure the Blast Secure Gateway at VMware Docs.
More information at VMware Blog Post Technical Introduction to VMware Unified Access Gateway for Horizon Secure Remote Access.
Horizon Compatibility – Refer to the interoperability matrix to determine which version of Unified Access Gateway is compatible with your version of Horizon.
Firewall
VMware Technical White Paper Blast Extreme Display Protocol in Horizon, and Firewall Rules for DMZ-Based Unified Access Gateway Appliances at VMware Docs.
Open these ports from any device on the Internet to the Unified Access Gateway Load Balancer VIP:
- TCP and UDP 443
- TCP and UDP 4172. UDP 4172 must be opened in both directions. (PCoIP)
- TCP and UDP 8443 (for HTML Blast)
Open these ports from the Unified Access Gateways to internal:
- TCP 443 to internal Connection Servers (through a load balancer)
- TCP and UDP 4172 (PCoIP) to all internal Horizon View Agents. UDP 4172 must be opened in both directions.
- TCP 32111 (USB Redirection) to all internal Horizon View Agents.
- TCP and UDP 22443 (Blast Extreme) to all internal Horizon View Agents.
- TCP 9427 (MMR and CDR) to all internal Horizon View Agents.
Open these ports from any internal administrator workstations to the Unified Access Gateway appliance IPs:
- TCP 9443 (REST API)
- TCP 80/443 (Edge Gateway)
PowerShell Deploy Script
Mark Benson at VMware Communities Using PowerShell to Deploy VMware Unified Access Gateway has a PowerShell script that runs OVF Tool to deploy and configure Unified Access Gateway. The PowerShell script is updated as newer versions of Unified Access Gateways are released. This is the recommended method of deploying Unified Access Gateway.
If you prefer to use vSphere Client to Deploy the OVF file, skip ahead to Upgrade or Deploy.
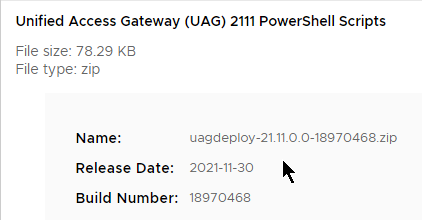
In UAG 3.3.1.0 and newer, the PowerShell deployment script is downloadable from the UAG download page.
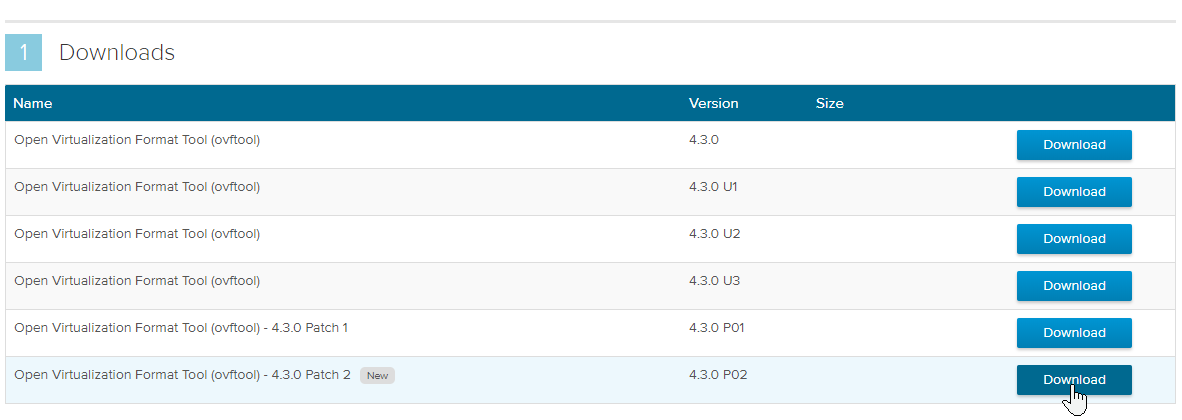
The PowerShell deploy script requires the OVF Tool:
- There’s ovftool 4.4.3 for vSphere 7.
- For vSphere 6.7, go to Open Virtualization Format Tool (ovftool) on VMware {code}. The latest release for vSphere 6.7 is 4.3.0 P02. Patch 2 is newer than Update 3.
- For vSphere 6.7, go to Open Virtualization Format Tool (ovftool) on VMware {code}. The latest release for vSphere 6.7 is 4.3.0 P02. Patch 2 is newer than Update 3.
- Download the VMware OVF Tool for Windows 64-bit.
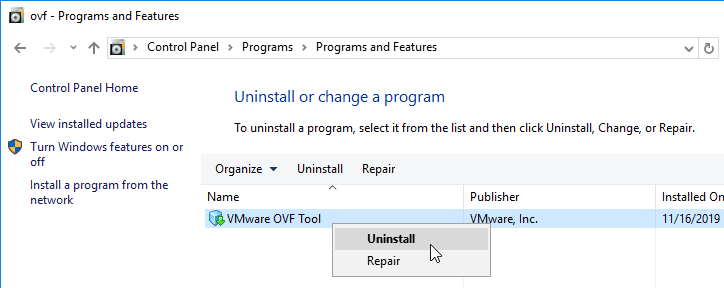
- If OVF Tool is already installed, then you’ll have to uninstall the old version before you can upgrade it.
- On the machine where you will run the UAG Deploy script, install VMware-ovftool-4.4.3-…-win.x86_64.msi.
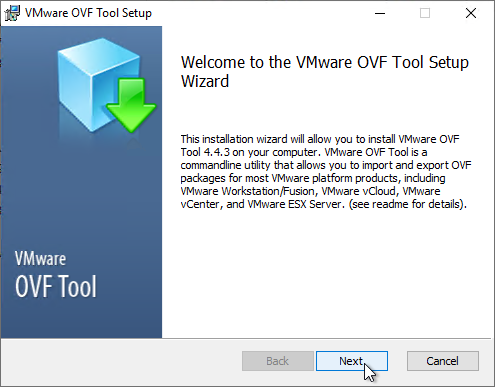
- In the Welcome to the VMware OVF Tool Setup Wizard page, click Next.
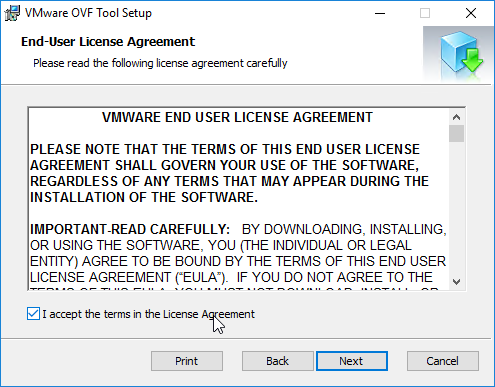
- In the End-User License Agreement page, check the box next to I accept the terms and click Next.
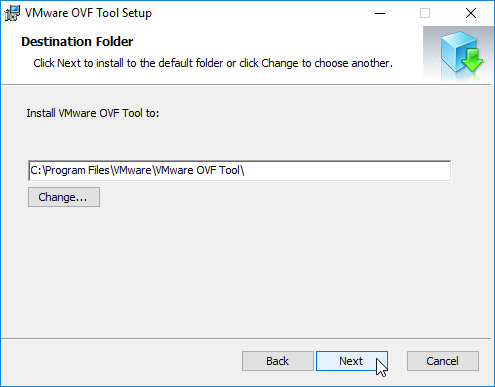
- In the Destination Folder page, click Next.
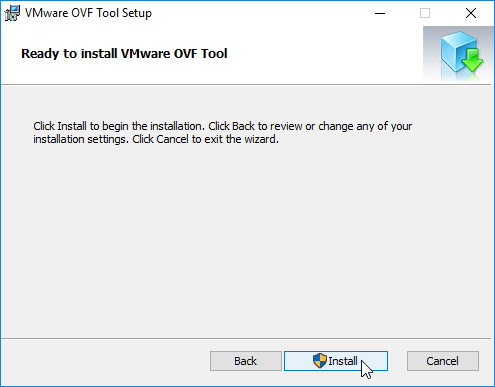
- In the Ready to install VMware OVF Tool page, click Install.
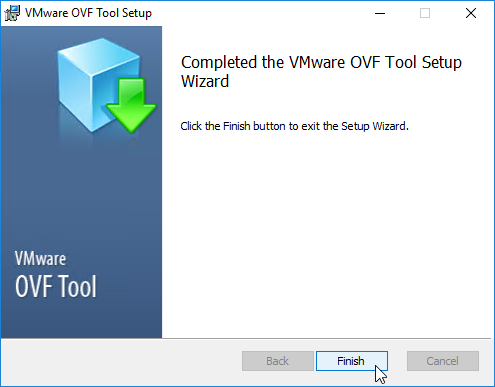
- In the Completed the VMware OVF Tool Setup Wizard page, click Finish.
Create or Edit a UAG .ini configuration file:
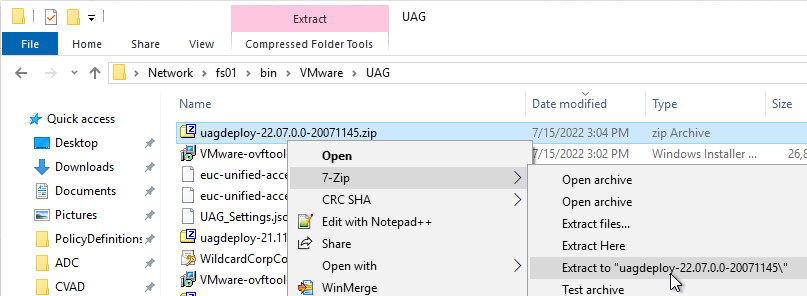
- Extract the downloaded uagdeploy PowerShell scripts for your version of Unified Access Gateway.
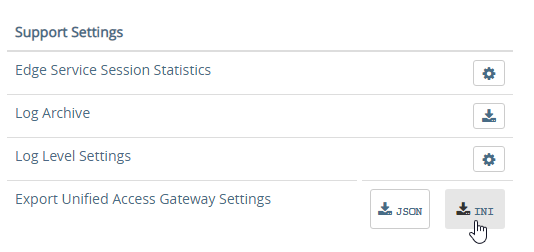
- If you have an existing UAG appliance, then you can download an INI of the configuration from the UAG Administrator page.
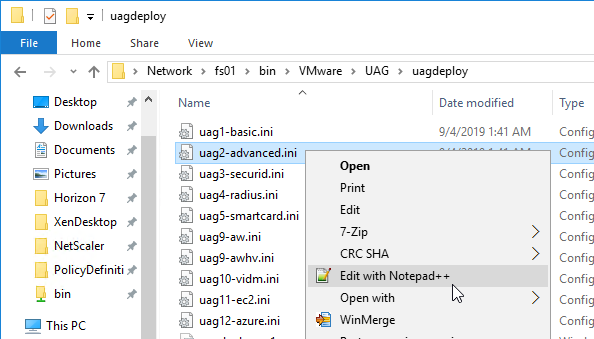
- Or copy and edit one of the downloaded .ini files, like uag2-advanced.ini.
- Or copy and edit one of the downloaded .ini files, like uag2-advanced.ini.
- A full explanation of all configuration settings can be found at Using PowerShell to Deploy VMware Unified Access Gateway at VMware Communities.
- For any value that has spaces, do not include quotes in the .ini file. The script adds the quotes automatically.
- The name setting specifies the name of the virtual machine in vCenter. If this VM name already exists in vCenter, then OVF Tool will delete the existing VM and replace it.
- Add a uagName setting and specify a friendly name. You’ll later add this name to Horizon Console so you can view the health of the UAG appliance in Horizon Console.
- You can optionally enable SSH on the appliance by adding sshEnabled=true.
- For the source setting, enter the full path to the UAG .ova file.
- For the target setting, leave PASSWORD in upper case. Don’t enter an actual password. OVF Tool will instead prompt you for the password.
- For the target setting, specify a cluster name instead of a host. If spaces, there’s no need for quotes. For example:
target=vi://admin@corp.local:PASSWORD@vcenter02.corp.local/Datacenter/host/Cluster 1
- Specify the exact datastore name for the UAG appliance.
- Optionally uncomment the diskMode setting.
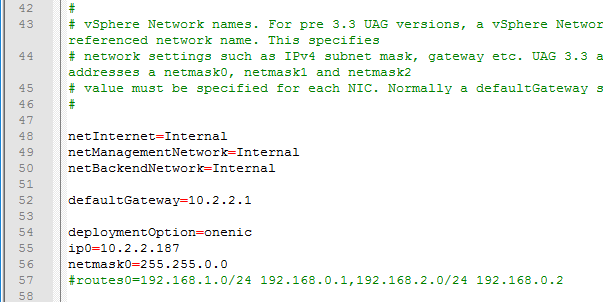
- For a onenic configuration (recommended), set the netInternet, netManagementNetwork, and netBackendNetwork settings to the same port group name.
- Multiple dns servers are space delimited.
- For pfxCerts, UNC paths don’t work. Make sure you enter a local path (e.g. C:). OVA Source File can be UNC, but the .pfx file must be local.
- There’s no need to enter the .pfx password in the .ini file since the uagdeploy.ps1 script will prompt you for the password.
- proxyDestinationUrl should point to the internal load balancer for the Horizon Connection Servers. If the DNS name ends in .local, then see 78611 DNS Related Troubleshooting With Unified Access Gateway 3.7 and newer which is based on Photon 3 and Roderik de Block VMware UAG not using DNS.
- For proxyDestinationUrlThumbprints, paste in the thumbprint of the Horizon Connection Server certificate in the format shown.
- If your Horizon Connection Servers each have different certificates, then you can include multiple thumbprints (comma separated).
- Make sure there’s no hidden character between sha1 and the beginning of the thumbprint.
- Change the ExternalUrl entries to an externally-resolvable DNS name and a public IP address. For multiple UAGs, the FQDNs and public IP address should resolve to the load balancer. Note: your load balancer must support persistence across multiple port numbers (443, 8443, 4172).
When you run the PowerShell script, if the UAG appliance already exists, then the PowerShell script will replace the existing appliance. There’s no need to power off the old appliance since the OVF tool will do that for you.
- Open an elevated PowerShell prompt.
- Paste in the path to the uagdeploy.ps1 file. If there are quotes around the path, then add a & to the beginning of the line so PowerShell executes the path instead of just echoing the string.
- Add the -iniFile argument and enter the path to the .ini file that you modified. Press <Enter> to run the script.
- You’ll be prompted to enter the root password for the UAG appliance. Make sure the password meets password complexity requirements.
- You’ll be prompted to enter the admin password for the UAG appliance. Make sure the password meets password complexity requirements.
- For CEIP, enter yes or no.
- For .pfx files, you’ll be prompted to enter the password for the .pfx file. Note: the .pfx file must be local, not UNC.
- OVF Tool will prompt you for the vCenter password. Special characters in the vCenter password must be encoded. Use a URL encoder tool (e.g., https://www.urlencoder.org/) to encode the password. Then paste the encoded password when prompted by the ovftool. The UAG passwords do not need encoding, but the vCenter password does.
- The deploy script will display the IP address of the powered on UAG appliance.
- Review settings in the UAG admin interface.
- Add the new UAG appliance to Horizon Console.
Upgrade
To upgrade from an older appliance, you delete the old appliance and import the new one. Before deleting the older appliance, export your settings:
- Login to the UAG at https://<Your_UAG_IP>:9443/admin/index.html.
- In the Configure Manually section, click Select.
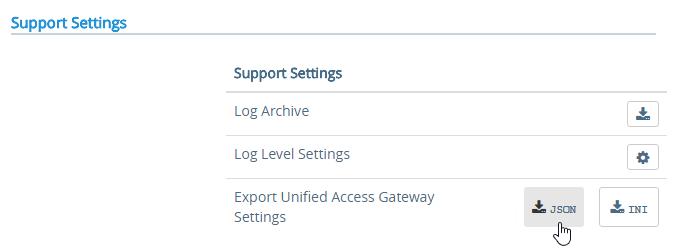
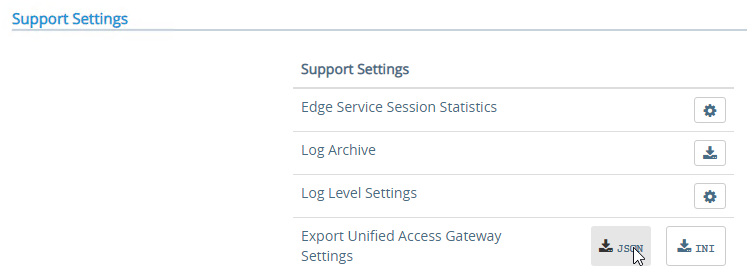
- Scroll down to the Support Settings section, and then click the JSON button next to Export Unified Access Gateway Settings.
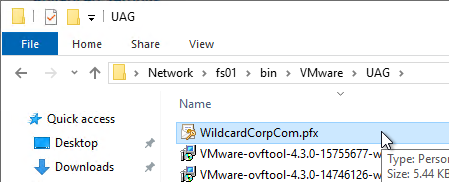
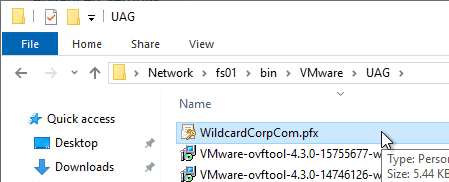
- Note: the exported JSON file does not include the UAG certificate so you’ll also need the .pfx file.
Deploy New
Horizon Compatibility – Refer to the interoperability matrix to determine which version of Unified Access Gateway is compatible with your version of Horizon.
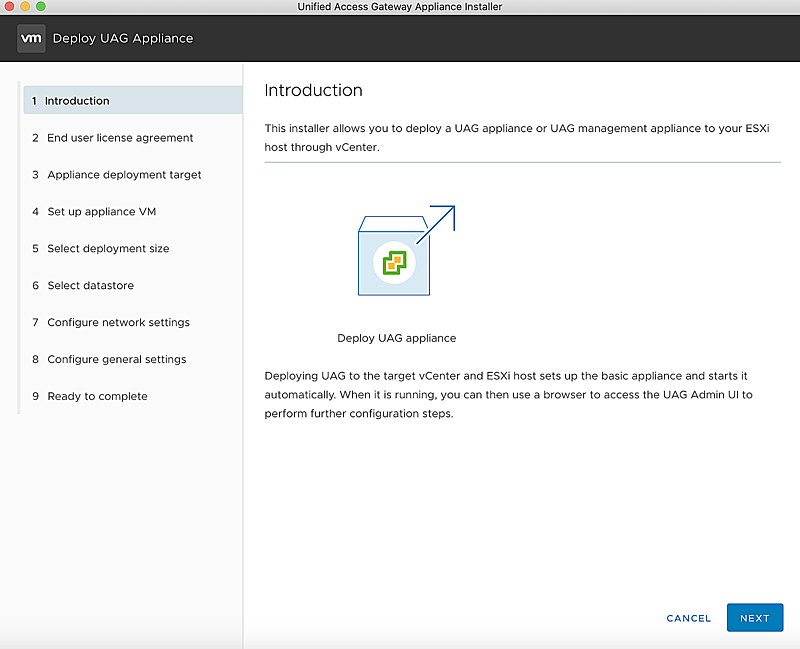
To deploy the Unified Access Gateway using VMware vSphere Client:
- Unified Access Gateway Deployment Utility fling can be used instead of vSphere Client Deploy OVF.
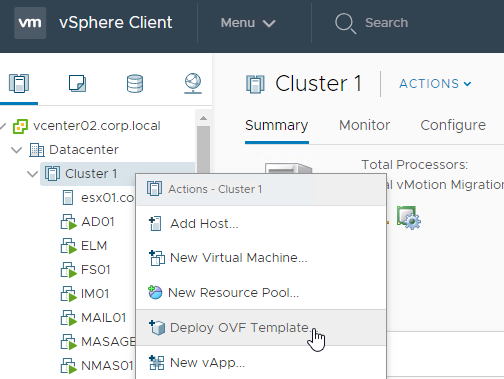
- If vSphere Client, right-click a cluster, and click Deploy OVF Template.
- Select Local File and click Upload Files. In the Open window, browse to the downloaded euc-unified-access-gateway.ova file, and click Next.
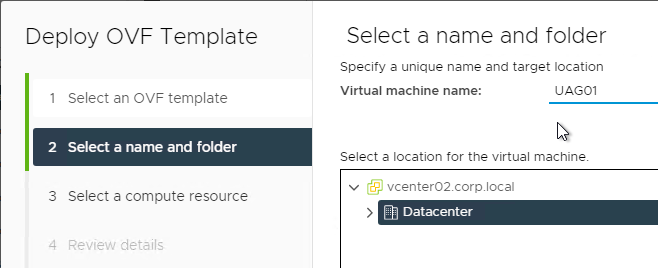
- In the Select a name and folder page, give the machine a name, and click Next.
- In the Review Details page, click Next.
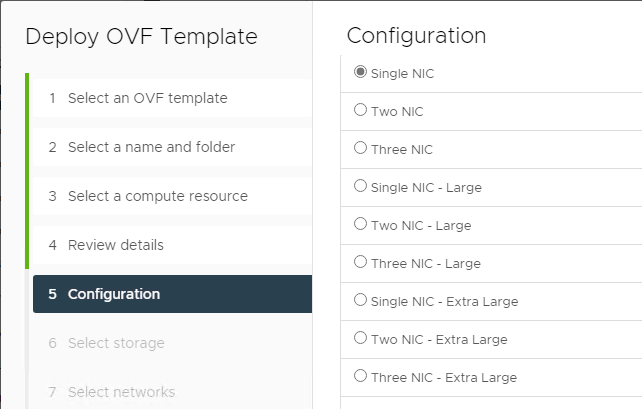
- In the Select configuration page, select a Deployment Configuration. See DMZ Design for VMware Unified Access Gateway and the use of Multiple NICs at VMware Communities. Click Next.
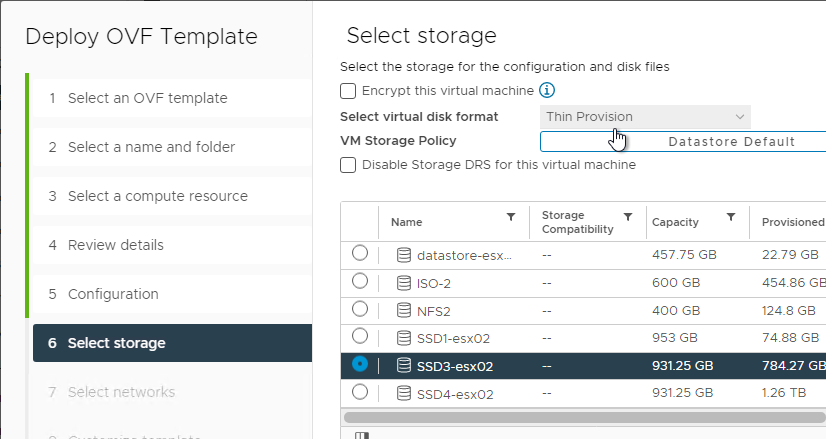
- In the Select storage page, select a datastore, select a disk format, and click Next.
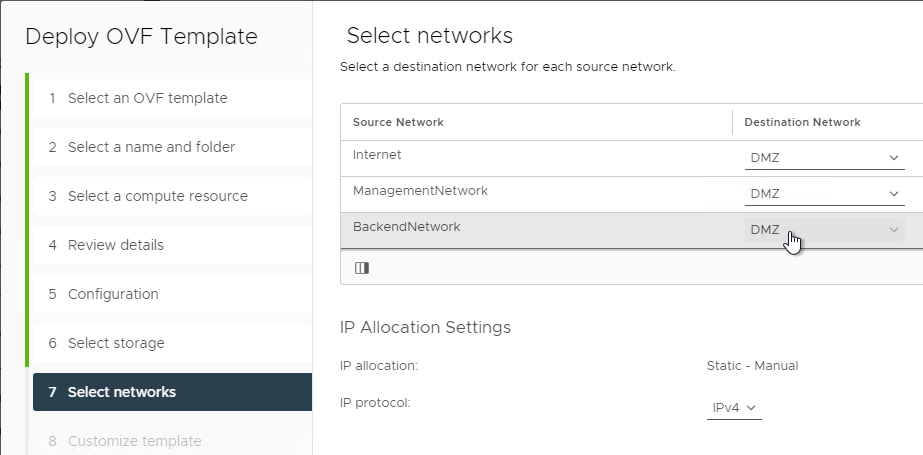
- In the Select networks page, even if you select Single NIC, the OVF deployment wizard asks you for multiple NICs. UAG typically goes in the DMZ.
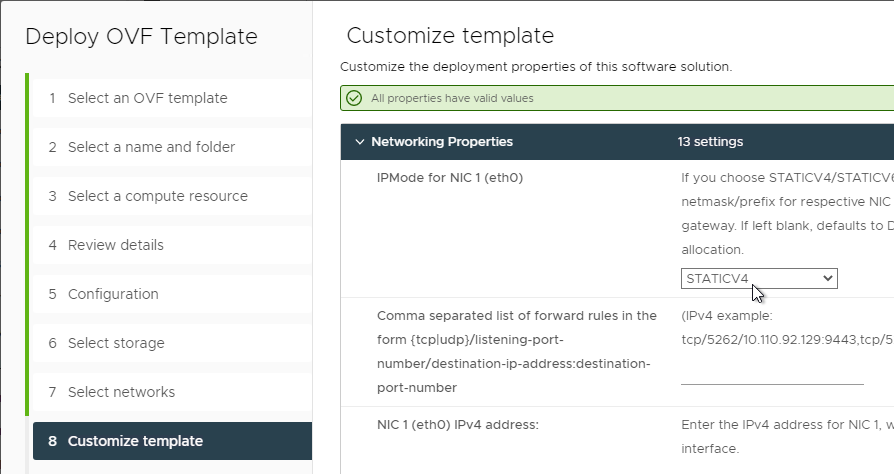
- In the Customize template page, select STATICV4, and scroll down.
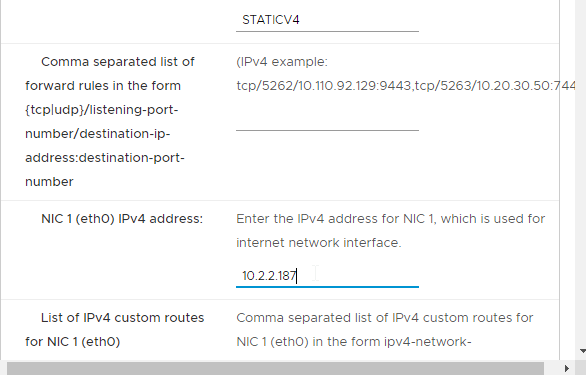
- In the NIC1 (eth0) IPv4 address field, enter the NIC1 (eth0) IPv4 address. Scroll down.
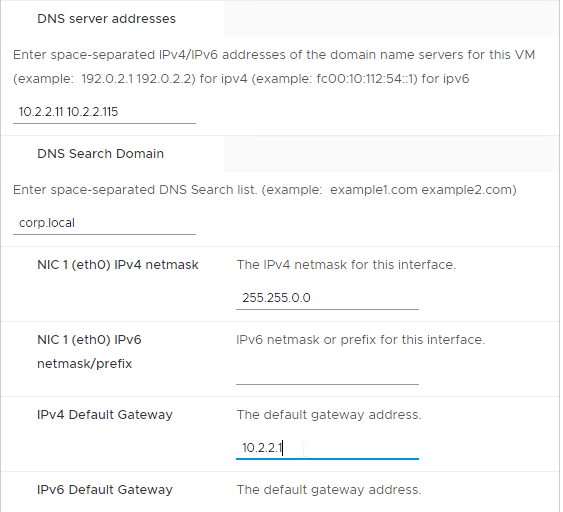
- Enter DNS addresses, Gateway, and Subnet Mask. Scroll down.
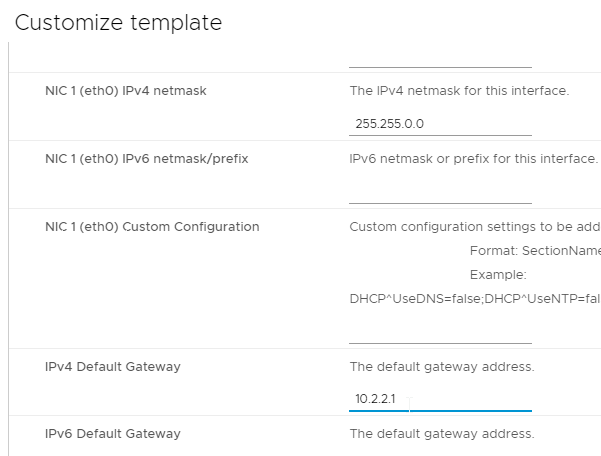
- Scroll down and enter more IP info.
- Scroll down.
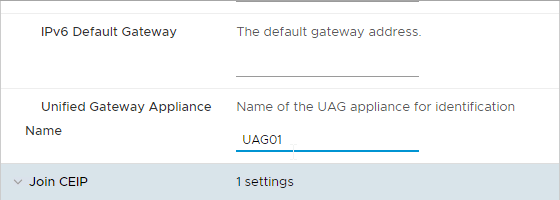
- Enter a Unified Gateway Appliance Name.
- Scroll down.
- UAG 2207 and newer let you specify the local root username.
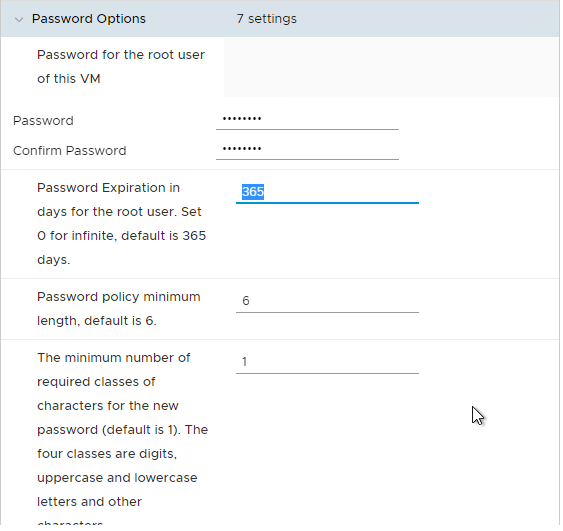
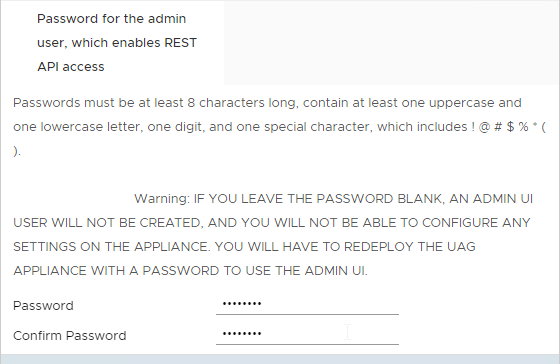
- Enter passwords.
- UAG 20.12 (2012) and newer let you specify Password Policy settings when deploying the OVF.
- UAG 20.12 (2012) and newer let you specify Password Policy settings when deploying the OVF.
- Scroll down and enter the password for the admin user.
- UAG 2207 and newer have an adminreset command if you mess up the admin interface login. There’s also an adminpwd command to reset the password.
- UAG 2207 and newer have an option to enable DISA STIG compliance, usually on the FIPS version of UAG.
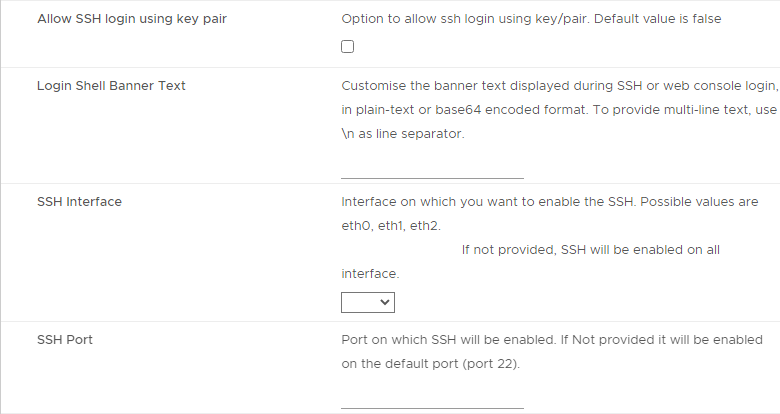
- In UAG 3.5 and newer, there’s a new checkbox for Enable SSH.
- In UAG 3.9 and newer, there’s an option to login using a SSH key/pair instead of a password.
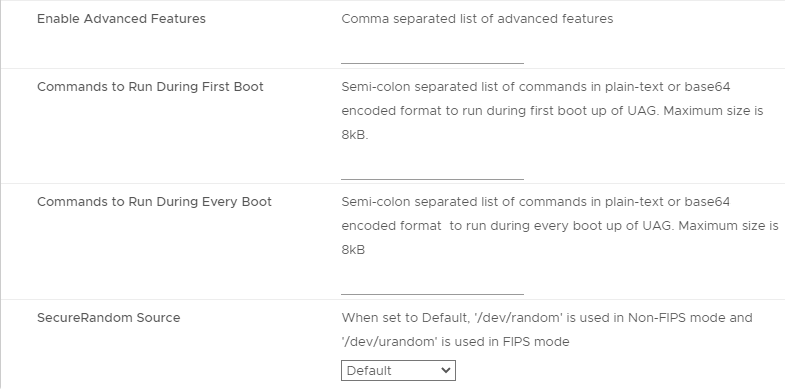
- Newer versions of UAG have more SSH options.
- UAG 2207 adds Commands to Run on First Boot or Every Boot.
- Click Next.
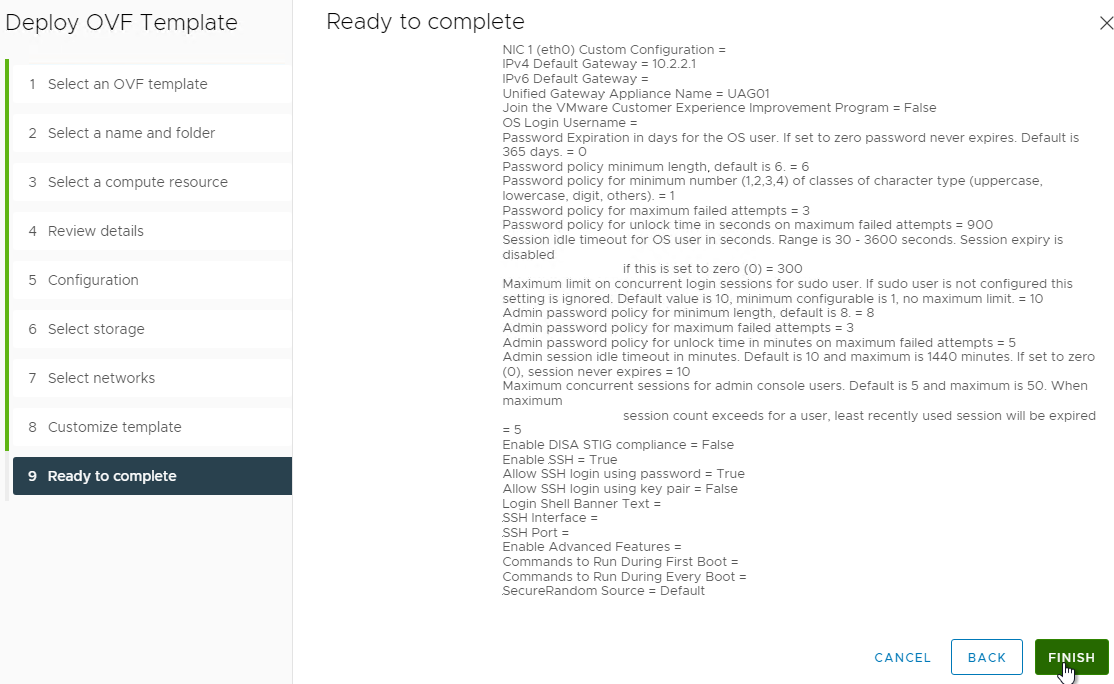
- In the Ready to complete page, click Finish.
UAG Admin Interface
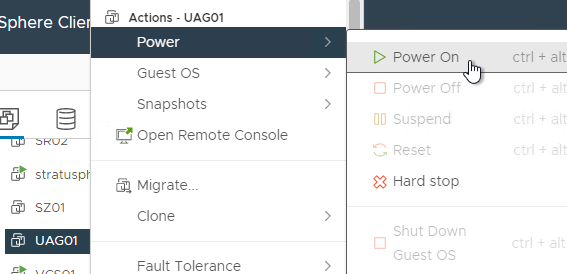
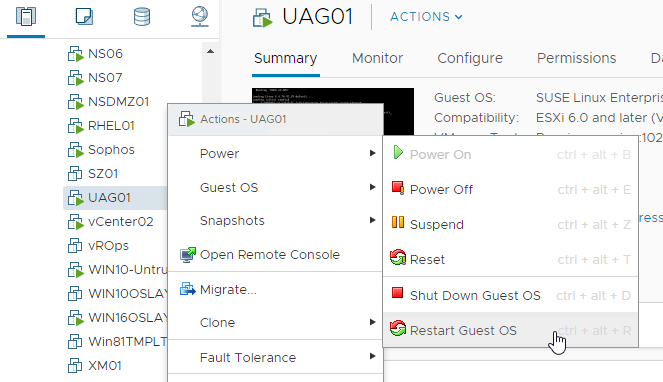
- Power on the Unified Access Gateway appliance.
- If the appliance initially boots with the wrong IP, then a reboot might fix it.
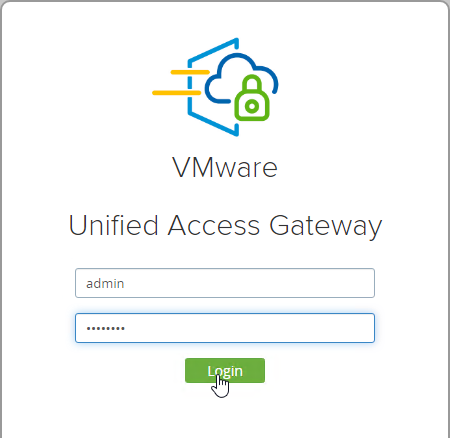
- Point your browser to https://My_UAG_IP:9443/admin/index.html and login as admin. It might take a few minutes before the admin page is accessible.
- UAG 2207 and newer have an adminreset command if you mess up the admin interface login. There’s also an adminpwd command to reset the password.
Import Settings
- If you have previously exported settings, you can import it now by clicking Select in the Import Settings section.
- Browse to the previously exported UAG_Settings.json file and then click Import. Note that this json file might have old settings, like old ciphers. Review the file to ensure you’re not importing legacy configurations.
- It should say UAG settings imported successfully.
- Press <F5> on your keyboard to refresh the browser.
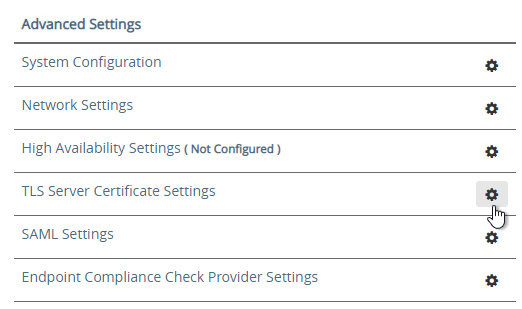
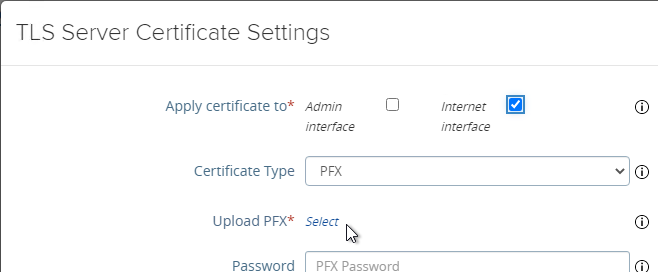
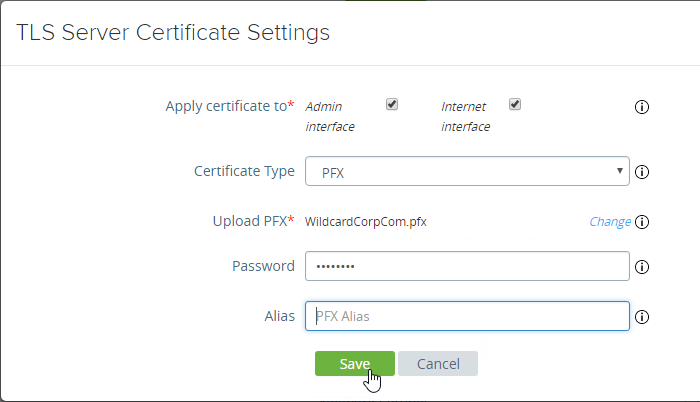
- The .json file does not include the certificate so you’ll have to do that separately. In the Admin console, in the Advanced Settings section, click TLS Server Certificate Settings.
- In the top row labelled Apply certificate to, select Internet interface.
- Change the drop-down for Certificate Type to PFX.
- In the row Upload PFX, click Select and browse to your PFX file.
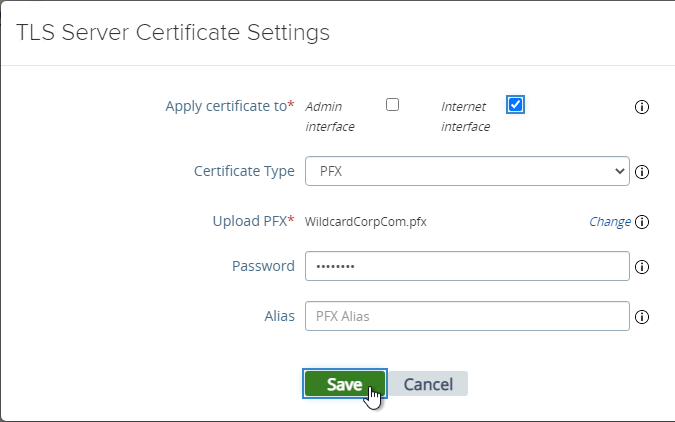
- In the Password field, enter the PFX password and then click Save.
Configure Horizon Settings
- To manually configure the appliance, under Configure Manually, click Select.
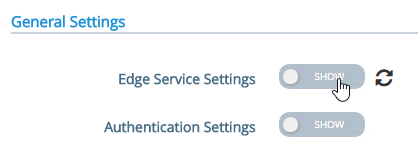
- Next to Edge Service Settings, click Show.
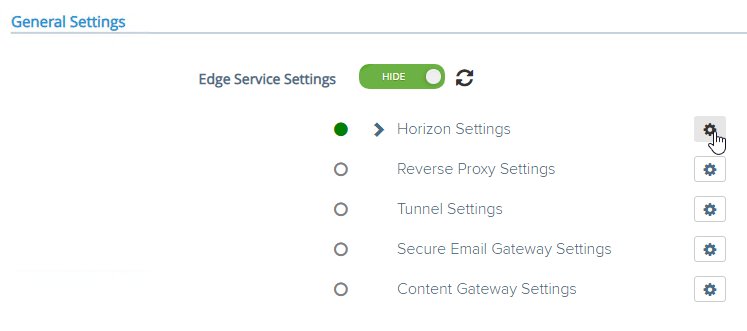
- Next to Horizon Settings, click the gear icon.
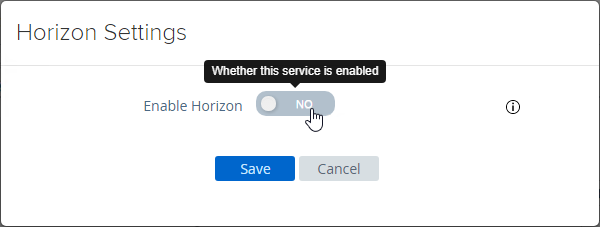
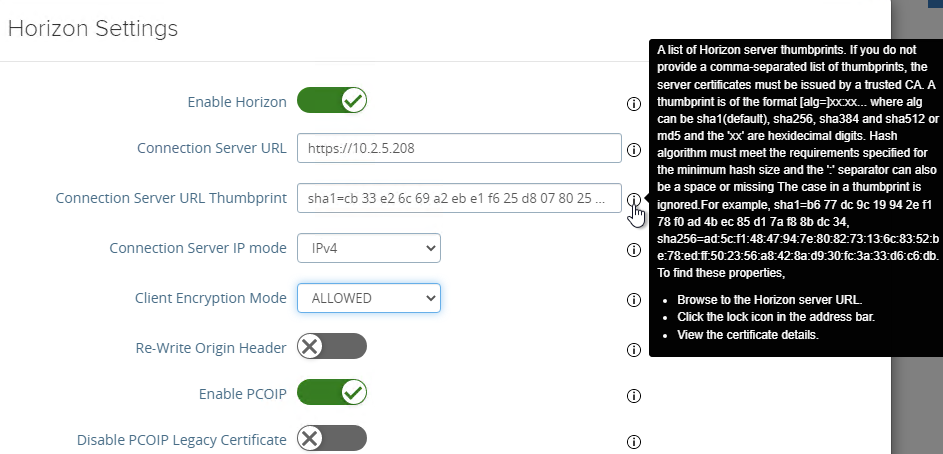
- Change Enable Horizon to Yes.
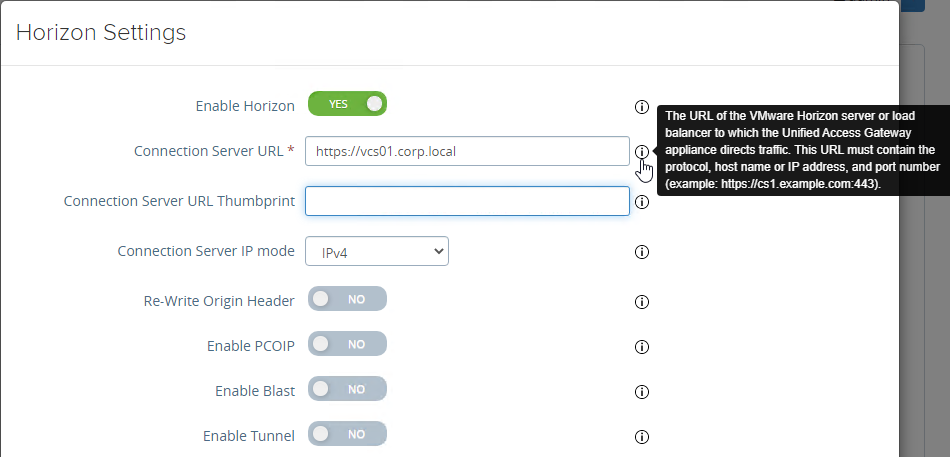
- As you fill in these fields, hover over the information icon to see the syntax.
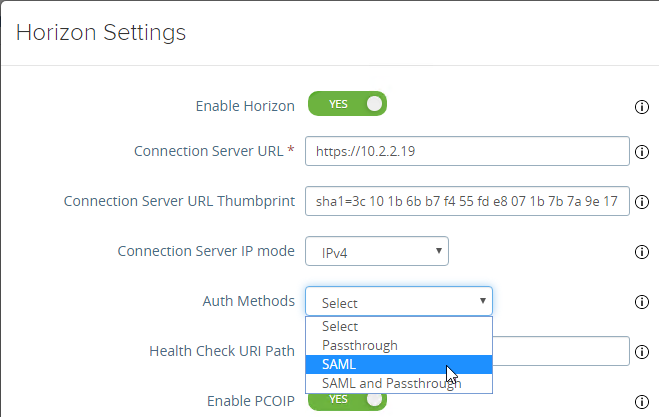
- The Connection Server URL should point to the internal load balanced DNS name (URL) for your internal Connection Servers. If the DNS name ends in .local, then see 78611 DNS Related Troubleshooting With Unified Access Gateway 3.7 and newer which is based on Photon 3 and Roderik de Block VMware UAG not using DNS.
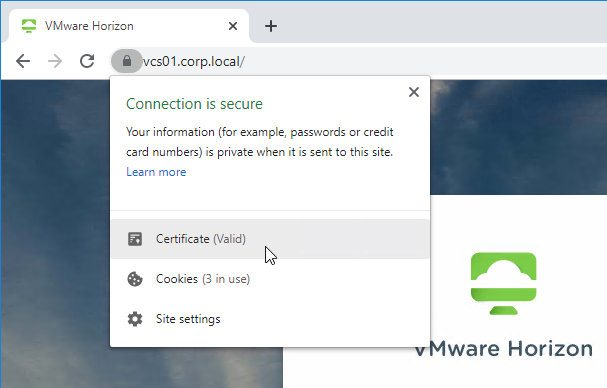
- For the Connection Server URL Thumbprint, get the thumbprint from the internal Horizon View certificate. Point your browser to the internal Horizon View Connection Server FQDN (load balanced) and click the padlock icon to open the certificate.
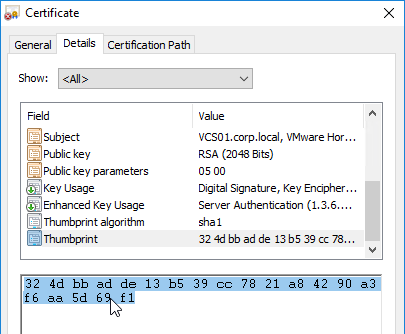
- On the Details tab, copy the Thumbprint.
- For the Connection Server URL Thumbprint, get the thumbprint from the internal Horizon View certificate. Point your browser to the internal Horizon View Connection Server FQDN (load balanced) and click the padlock icon to open the certificate.
- In the Proxy Destination URL Thumb Prints field, type in
sha1=and paste the certificate thumbprint. - At the beginning of the Thumbprint field, immediately after the equals sign, there might be a hidden character. Press the arrow keys on the keyboard to find it. Then delete the hidden character.
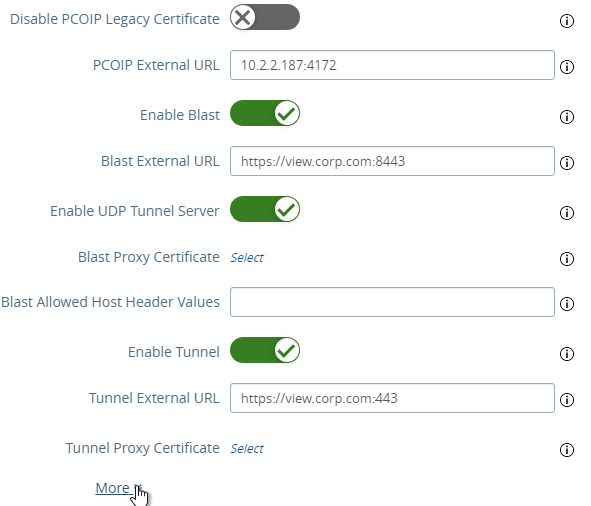
- Enable the three PCOIP, Blast, and Tunnel Gateways and perform the following configurations:
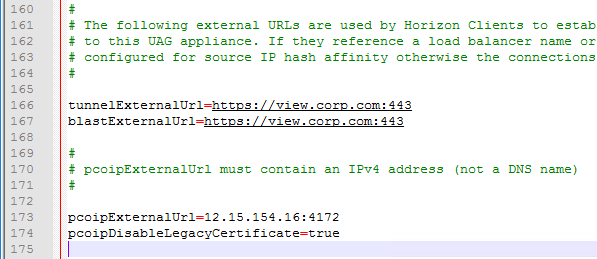
- For PCOIP External URL, enter the external IP and
:4172. The IP should point to your external load balancer that’s load balancing UDP 4172 and TCP 4172 to multiple Unified Access Gateways. - For Blast External URL, enter https://<FQDN>:8443 (e.g. https://view.corp.com:8443). This FQDN should resolve to your external load balancer that’s load balancing UDP 8443 and TCP 8443 to multiple Unified Access Gateways.
- You could change the Blast port to 443 but this would increase CPU utilization on UAG. See VMware 78419 Unified Access Gateway (UAG) high CPU utilization.
- Link: Troubleshooting Blast through UAG at VMware Discussions
- For Tunnel External URL, enter https://<FQDN>:443 (e.g., https://view.corp.com:443). This FQDN should resolve to your external load balancer that’s load balancing TCP 443 to multiple Unified Access Gateways.
- The external load balancer must be capable of using the same persistence across multiple port numbers. On NetScaler, this feature is called Persistency Group. On F5, the feature is called Match Across.
- For PCOIP External URL, enter the external IP and
- Then click More.
- Unified Access Gateway has a default list of paths it will forward to the Horizon Connection Server. You can edit the Proxy Pattern and add
|/downloads(.*)to the list so users can also download Horizon Clients that are stored on your Horizon Connection Servers. Make sure you click Save at least once so it saves the default Proxy Pattern. Then go back in and add|/downloads(.*)to the end of the Proxy Pattern but inside the last parentheses.
- Scroll down and click Save when done.
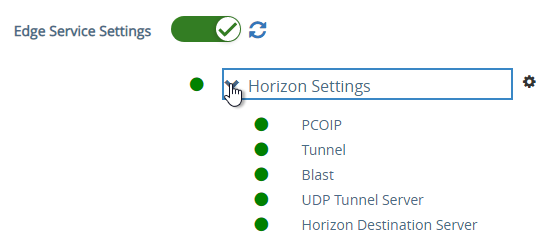
- If you click the arrow next to Horizon Settings, then it shows you the status of the Edge services.
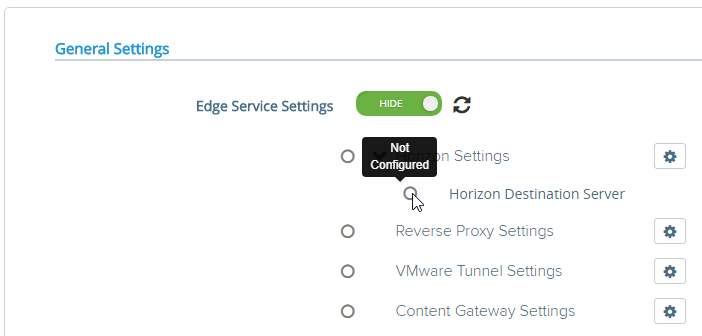
- If all you see is Not Configured, then refresh your browser and then click the Refresh Status icon.
- If all you see is Not Configured, then refresh your browser and then click the Refresh Status icon.
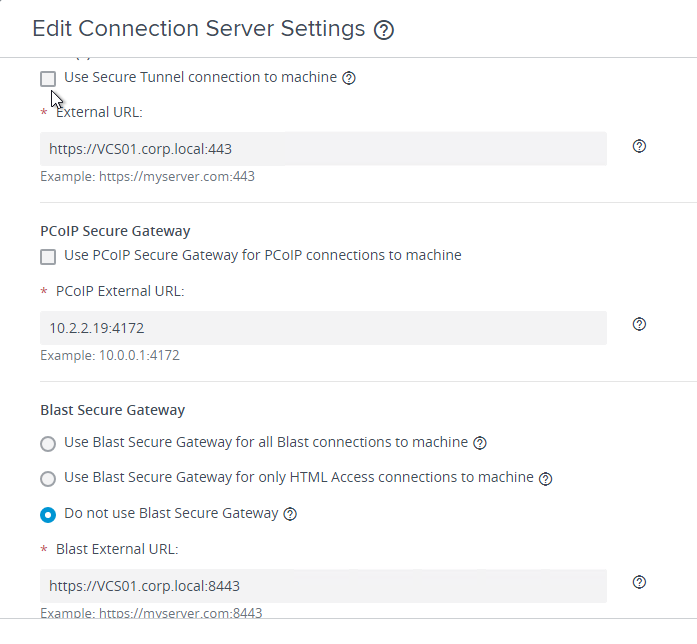
- In your Horizon Connection Servers, the Secure Gateways (e.g. PCoIP Gateway) should be disabled.
- Go to Horizon Console.
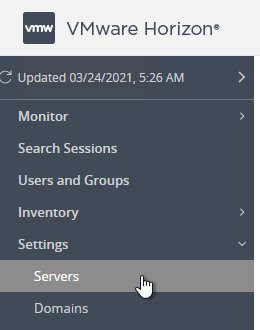
- Expand Settings and click Servers.
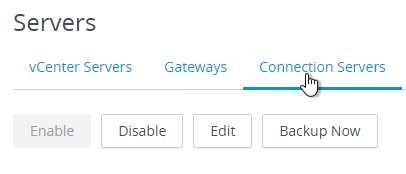
- On the right, switch to the tab named Connection Servers.
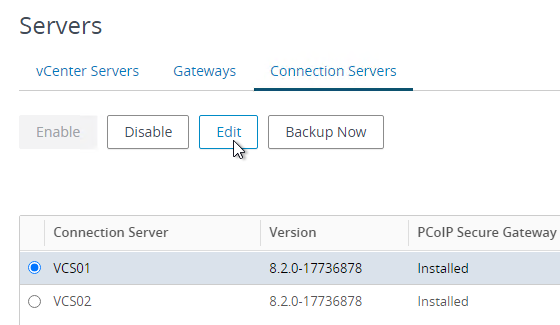
- Highlight your Connection Servers, and click Edit.
- Then uncheck or disable all three Tunnels/Gateways.
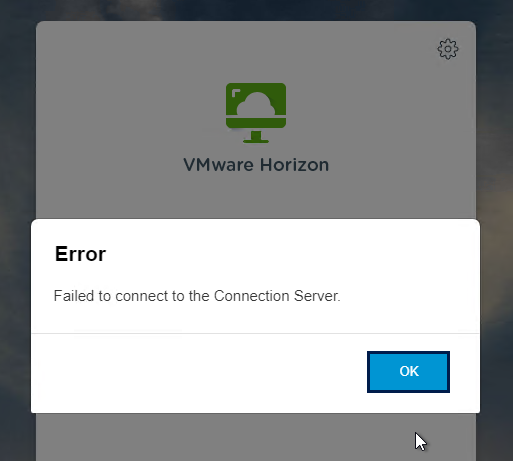
- HTML Access probably won’t work through Unified Access Gateway. You’ll probably see the message Failed to connect to the Connection Server.
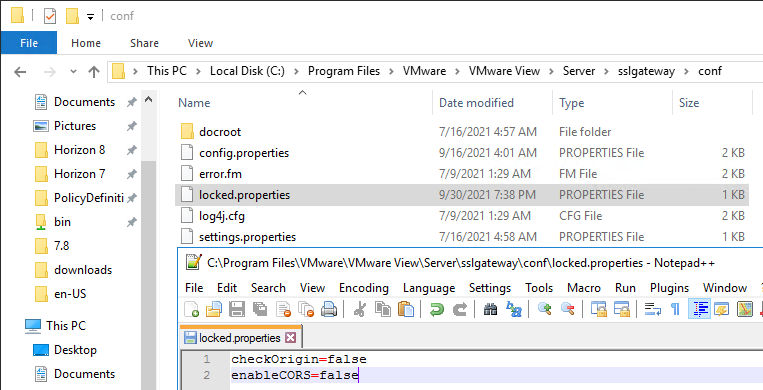
- To fix this, configure on each Connection Server the file C:Program FilesVMwareVMware ViewServersslgatewayconflocked.properties to disable Origin Check (checkOrigin=false) or configure the Connection Server’s locked.properties with the UAG addresses. Also see 2144768 Accessing the Horizon View Administrator page displays a blank error window in Horizon 7.
- Horizon 2106 and newer enable CORS by default so you’ll need to either disable CORS by adding enableCORS=false to C:Program FilesVMwareVMware ViewServersslgatewayconflocked.properties, or configure the portalHost entries in locked.properties as detailed at 85801 Cross-Origin Resource Sharing (CORS) with Horizon 8 and loadbalanced HTML5 access.
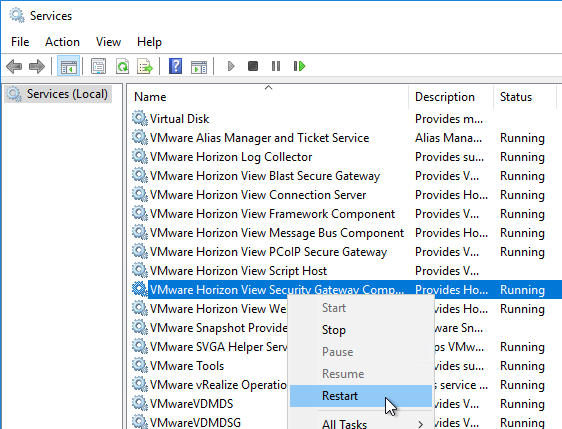
- After modifying the locked.properties file, restart the VMware Horizon View Security Gateway Component service.
Add UAG to Horizon Console
In Horizon 7.7 and newer, you can add UAG 3.4 and newer to Horizon Console so you can check its status in the Dashboard.
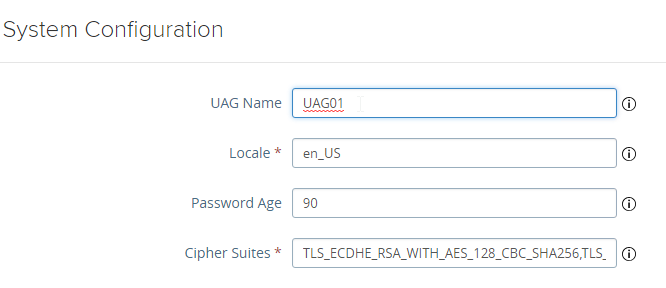
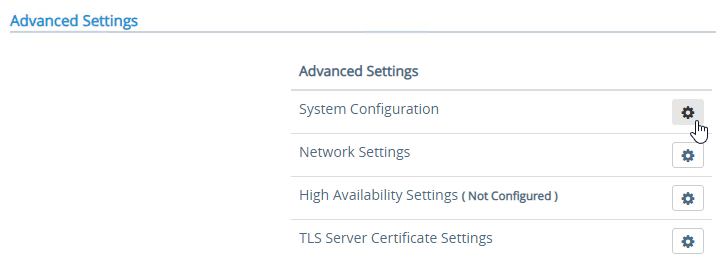
- In UAG Admin console, under Advanced Settings, click the gear icon next to System Configuration.
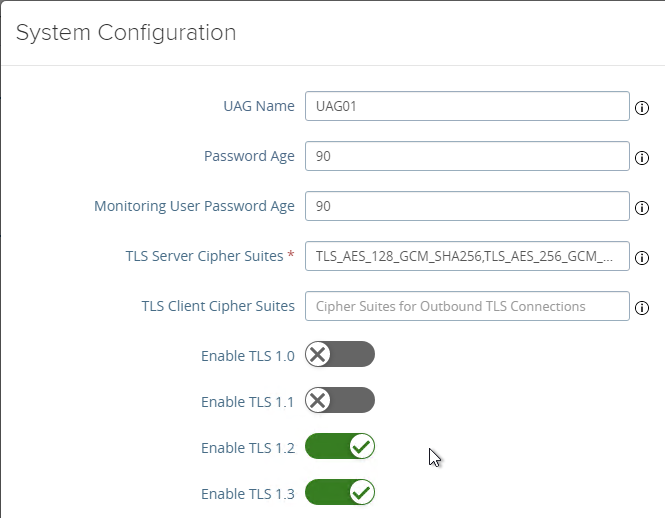
- At the top of the page, change the UAG Name to a friendly name. You’ll use this case-sensitive name later.
- Click Save at the bottom of the page.
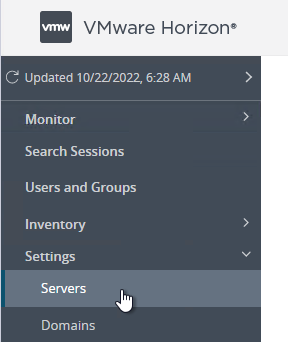
- In Horizon Console, on the left, expand Settings and click Servers.
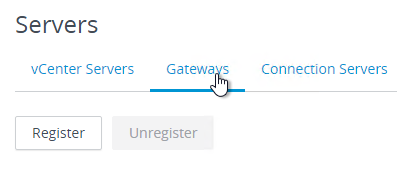
- On the right, switch to the tab named Gateways.
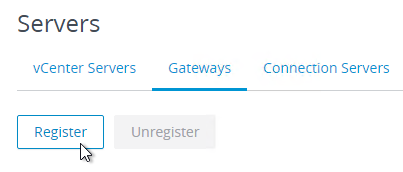
- Click the Register button.
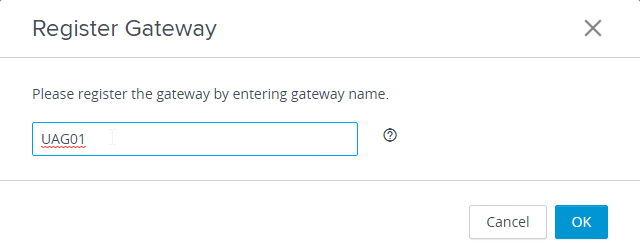
- In the Gateway Name field, enter the case-sensitive friendly name you specified earlier, and then click OK.
See status of UAG appliances:
- Use a Horizon Client to connect through a Unified Access Gateway. Horizon Console only detects the UAG status for active sessions.
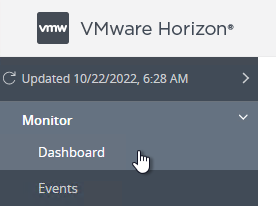
- In Horizon Console 7.10 and newer, to see the status of the UAG appliances, on the top left, expand Monitor and click Dashboard.
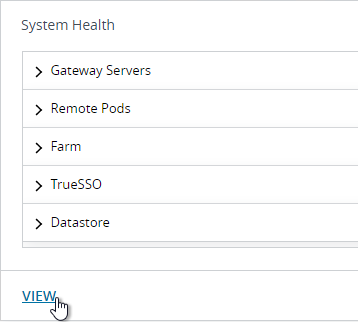
- In the top-left block named System Health, click VIEW.
- With Components highlighted on the left, on the right, switch to the tab named Gateway Servers.
- This tab shows the status of the UAG appliances, including its version. If you don’t see this info, then make sure you launch a session through the UAG.
To see the Gateway that users are connected to:
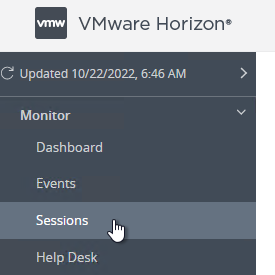
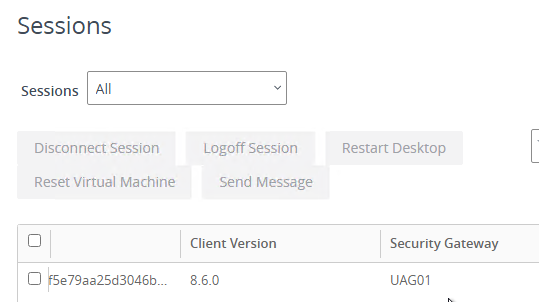
- In Horizon Console 7.10 or newer, go to Monitor > Sessions.
- Search for a session and notice the Security Gateway column. It might take a few minutes for it to fill in.
UAG Authentication
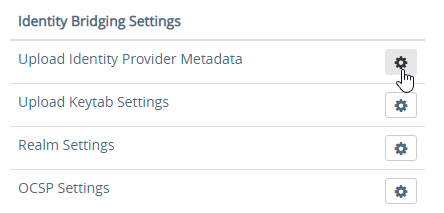
SAML is configured in UAG 3.8 and newer in the Identity Bridging Settings section.
- Upload Identity Provider Metadata.
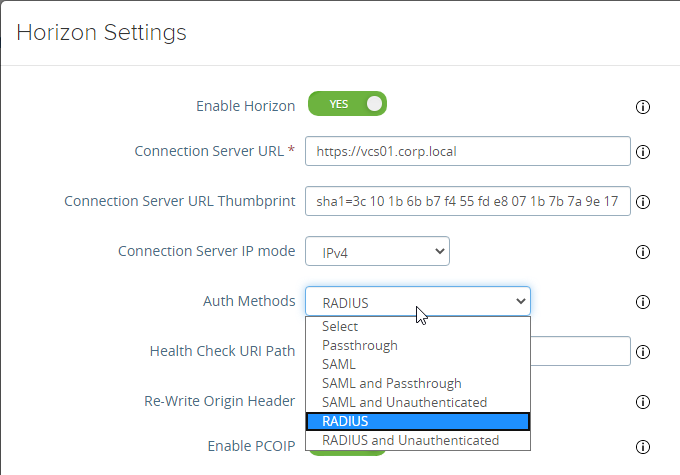
- Then in UAG Admin > Edge Service Settings > Horizon Settings > More (bottom of page), you can set Auth Methods (near top of page) to SAML only, which requires True SSO implementation, or SAML and Passthrough, which requires two logins: one to IdP, and one to Horizon.
- For complete True SSO instructions, see https://www.carlstalhood.com/vmware-horizon-true-sso-uag-saml/.
- For Okta and True SSO, see Enabling SAML 2.0 Authentication for Horizon with Unified Access Gateway and Okta: VMware Horizon Operational Tutorial at VMware Tech Zone.
- For Azure MFA, see Sean Massey Integrating Microsoft Azure MFA with VMware Unified Access Gateway 3.8.
For RADIUS authentication:
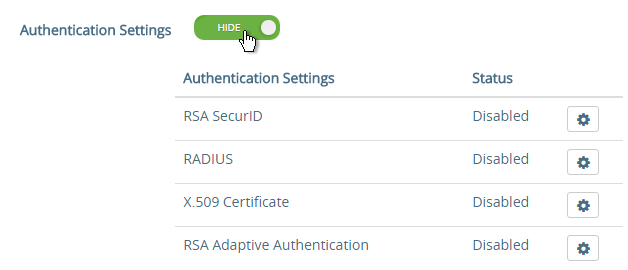
- Enable the Authentication Settings section and configure the settings as appropriate for your requirements. See Configuring Authentication in DMZ at VMware Docs.
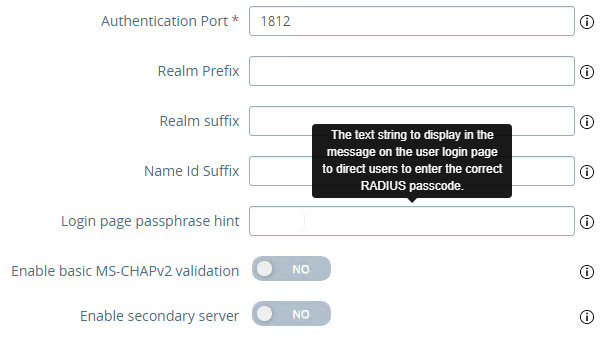
- When configuring RADIUS, if you click More, there’s a field for Login page passphrase hint.
- When configuring RADIUS, if you click More, there’s a field for Login page passphrase hint.
- Then in Edge Service Settings > Horizon Settings > More (bottom of page), you can set Auth Methods (near top of page) to RADIUS.
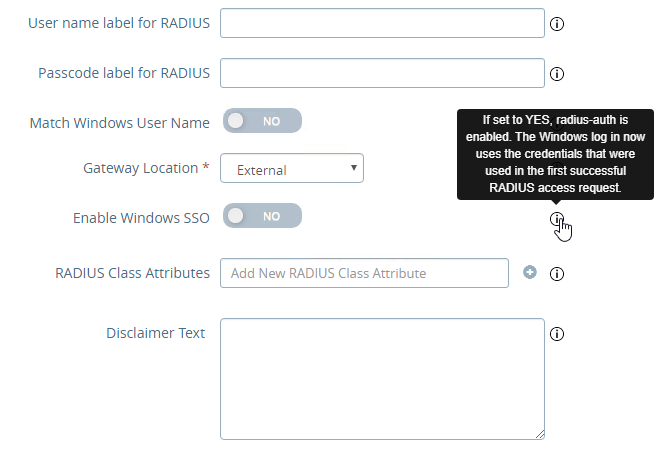
- If you scroll down the Horizon Settings page you’ll see additional fields for RADIUS.
- In UAG 3.8 and newer, Passcode label field can be customized for MFA providers like Duo.
- If your RADIUS is doing Active Directory authentication (e.g. Microsoft Network Policy Server with Azure MFA), then Enable Windows SSO so the user isn’t prompted twice for the password.
Other UAG Configurations
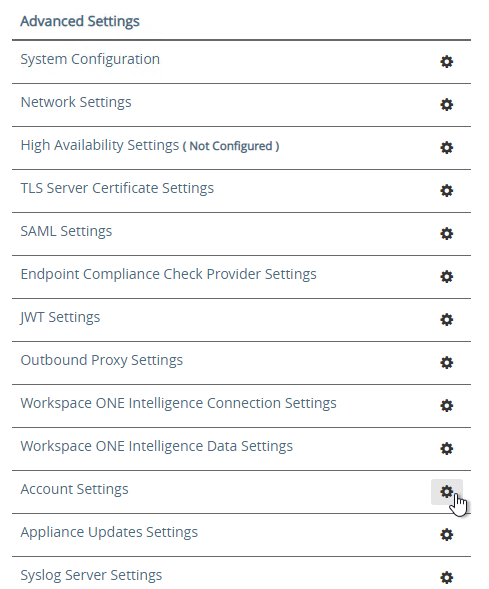
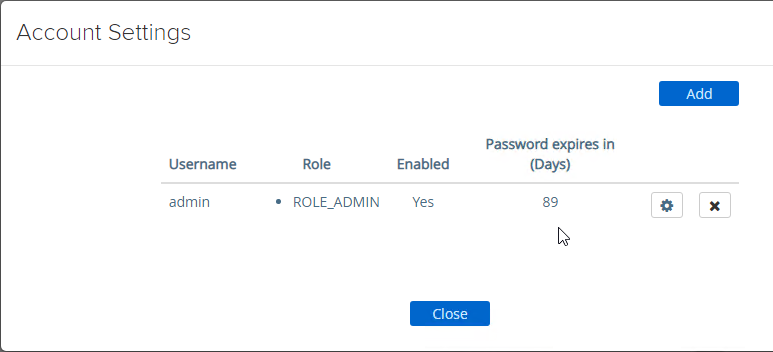
- UAG 3.8 and newer shows when the admin password expires in Account Settings in the Advanced Settings section.
- Ciphers are configured under Advanced Settings > System Configuration.
- The default ciphers in UAG 2212 are the following and include support for TLS 1.3.
TLS_AES_128_GCM_SHA256,TLS_AES_256_GCM_SHA384,TLS_CHACHA20_POLY1305_SHA256,TLS_ECDHE_RSA_WITH_AES_128_GCM_SHA256,TLS_ECDHE_RSA_WITH_AES_256_GCM_SHA384,TLS_ECDHE_RSA_WITH_AES_128_CBC_SHA256,TLS_ECDHE_RSA_WITH_AES_256_CBC_SHA384
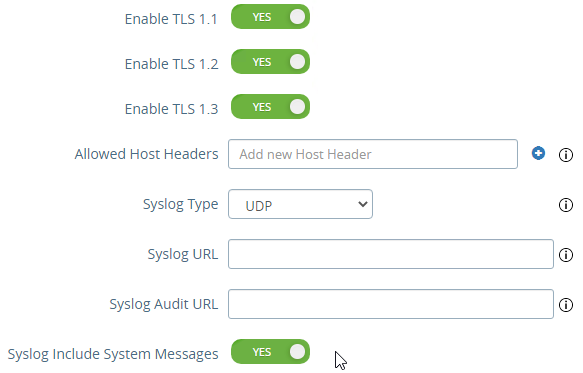
- In UAG older than 2103, Syslog is also configured here. In UAG 2103 and newer, Syslog is in a different menu as described below.
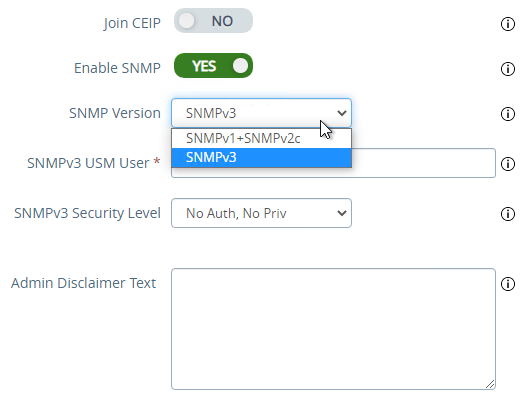
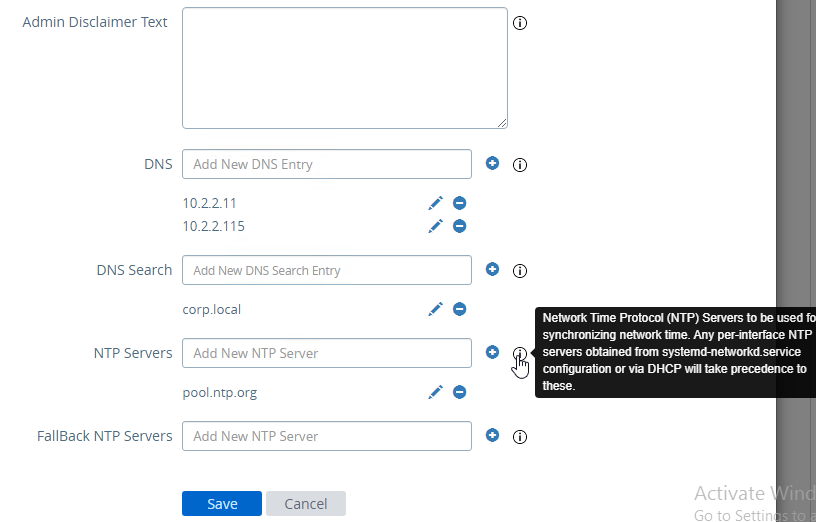
- At the bottom of the System Configuration page are several settings for SNMP, DNS, and NTP.
- UAG 20.12 (2012) and newer support SNMPv3.
- UAG 3.10 and newer have Admin Disclaimer Text.
- You can add NTP Servers.
- The default ciphers in UAG 2212 are the following and include support for TLS 1.3.
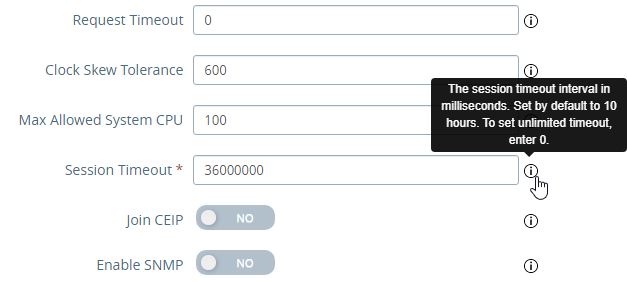
- Session Timeout is configured in System Configuration. It defaults to 10 hours.
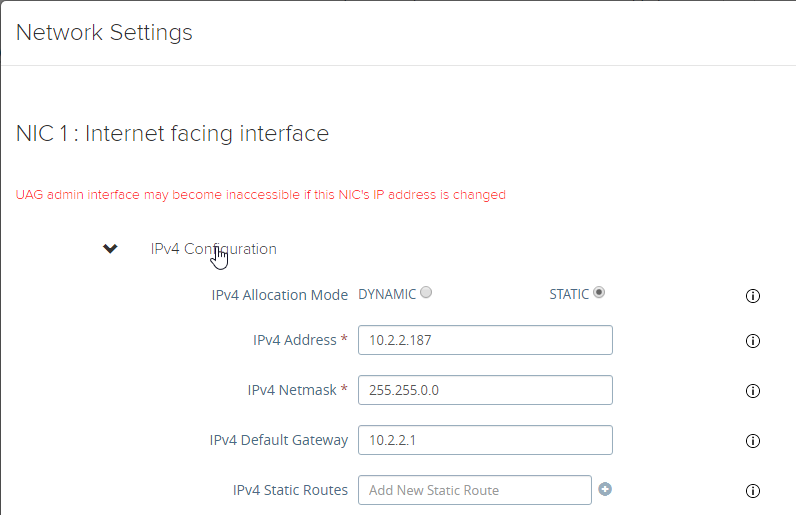
- UAG 3.6 and newer let you add static routes to each NIC.
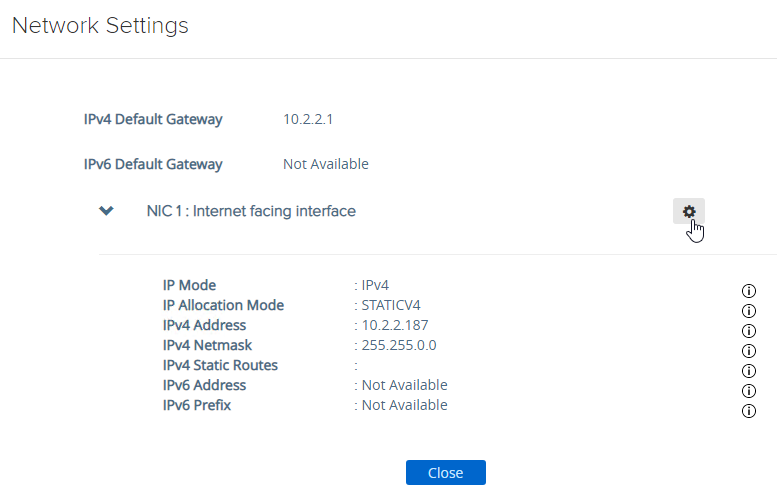
- Click Network Settings.
- Click the gear icon next to a NIC.
- Click IPv4 Configuration to expand it and then configure IPv4 Static Routes.
- Click Network Settings.
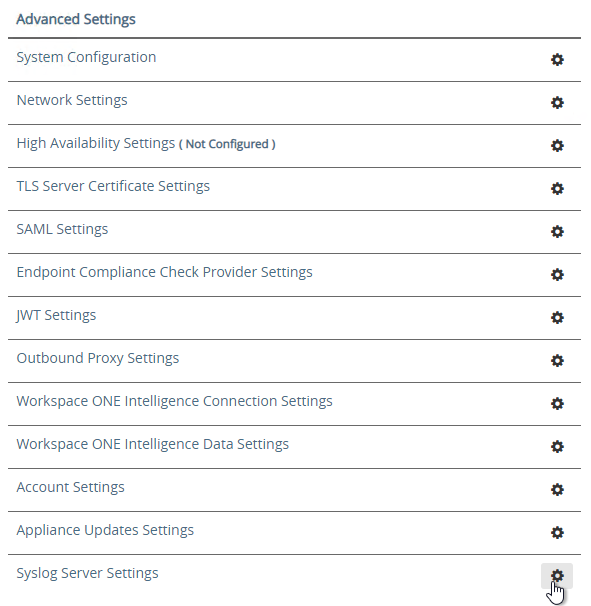
- UAG 2103 and newer have a different menu item for Syslog Server Settings.
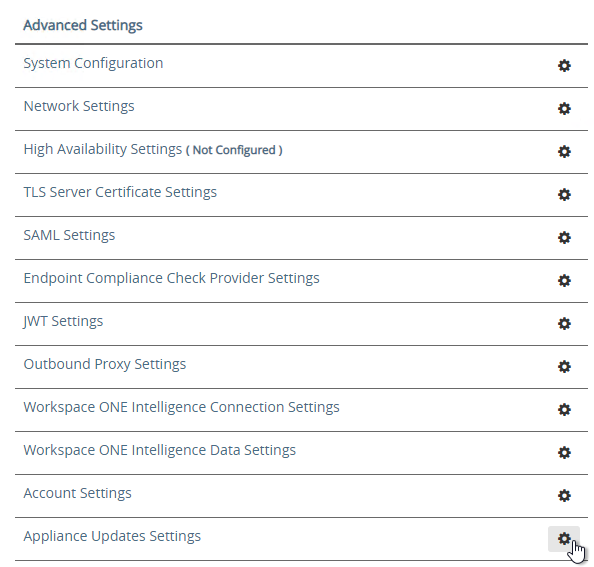
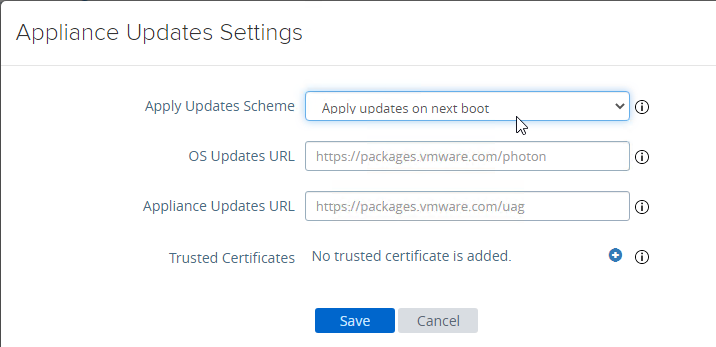
- UAG 20.09 (2009) and newer can automatically install patches/updates when the appliance reboots.
- In the Advanced Settings section, click Appliance Updates Settings.
- For Apply Updates Scheme, select an option. Click Save.
- In the Advanced Settings section, click Appliance Updates Settings.
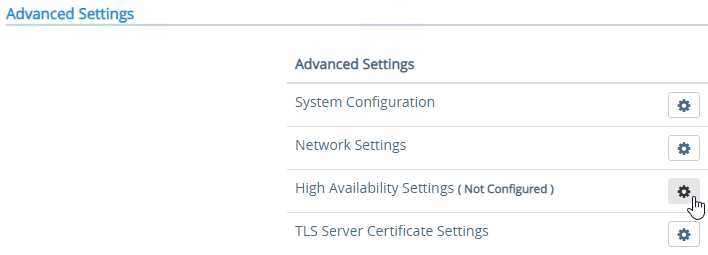
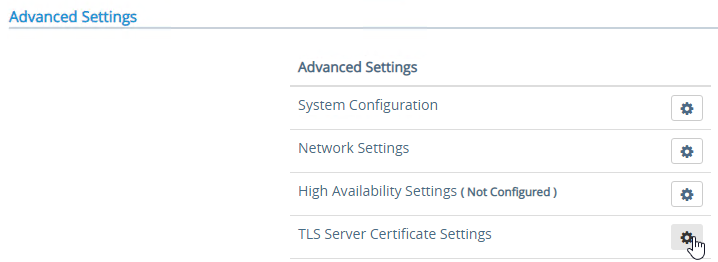
- UAG supports High Availability Settings.
- With the High Availability Virtual IP address, you might not need load balancing of the UAG appliances. See Unified Access Gateway High Availability at VMware Docs.
- The High Availability feature requires three IP addresses and three DNS names:
- One IP/FQDN for the High Availability Virtual IP.
- And one IP/FQDN for each appliance/node.
- The Horizon Edge Gateways should be set to node-specific IP addresses and node-specific DNS names. Each appliance is set to a different IP/FQDN.
- The Virtual IP (and its DNS name) is only used for the High Availability configuration.
- The YouTube videos What’s New Unified Access Gateway 3 4 and High Availability on VMware Unified Access Gateway Feature Walk-through explain the High Availability architecture.
- The High Availability feature requires three IP addresses and three DNS names:
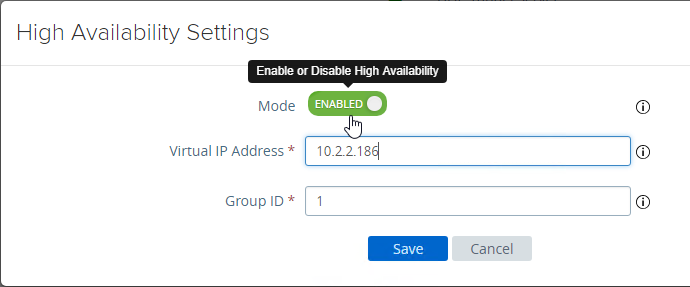
- Set the Mode to ENABLED.
- Enter a new Virtual IP Address which is active on both appliances.
- Enter a unique Group ID between 1 and 255 for the subnet.
- Click Save.
- On the second appliance, configure the exact same High Availability Settings.
- With the High Availability Virtual IP address, you might not need load balancing of the UAG appliances. See Unified Access Gateway High Availability at VMware Docs.
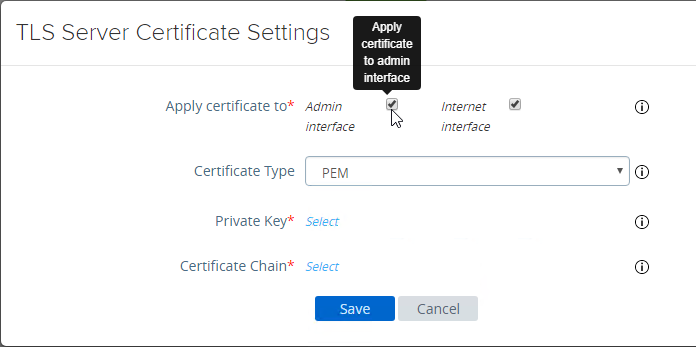
- To upload a valid certificate, scroll down to the Advanced Settings section, and next to TLS Server Certificate Settings, click the gear icon.
- In Unified Access Gateway 3.2 and newer, you can apply the uploaded certificate to Internet Interface, Admin Interface, or both.
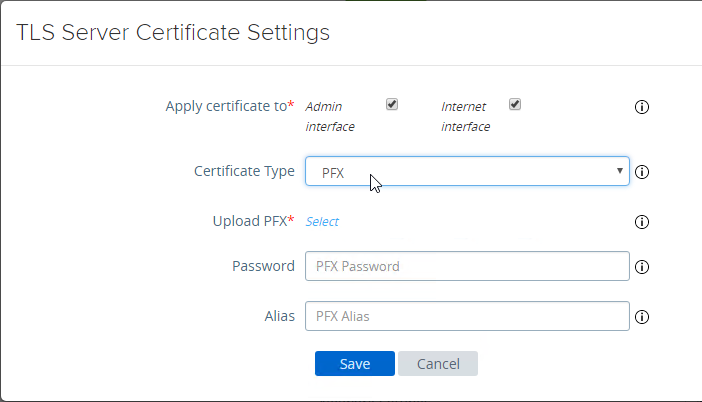
- In Unified Access Gateway 3.0 and newer, change the Certificate Type to PFX, browse to a PFX file, and then enter the password. This PFX file certificate must match the Public FQDN (load balanced) for Unified Access Gateway. If your load balancer is terminating SSL, then the certificate on the UAG must be identical to the certificate on the load balancer.
- Leave the Alias field blank.
- Click Save.
- If you changed the Admin Interface certificate, then you will be prompted to close the browser window and re-open it.
- In Unified Access Gateway 3.2 and newer, you can apply the uploaded certificate to Internet Interface, Admin Interface, or both.
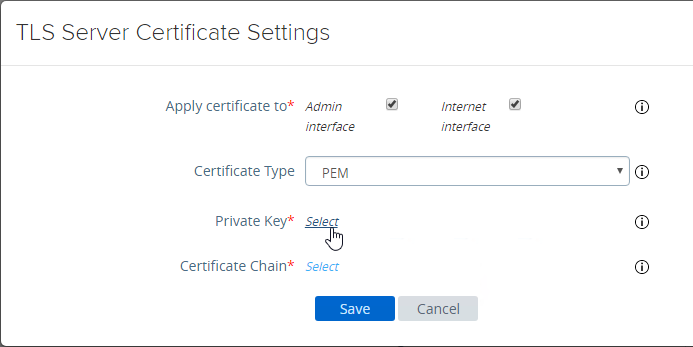
- Or, you can upload a PEM certificate/key (this is the only option in older UAG). Next to Private Key, click the Select link.
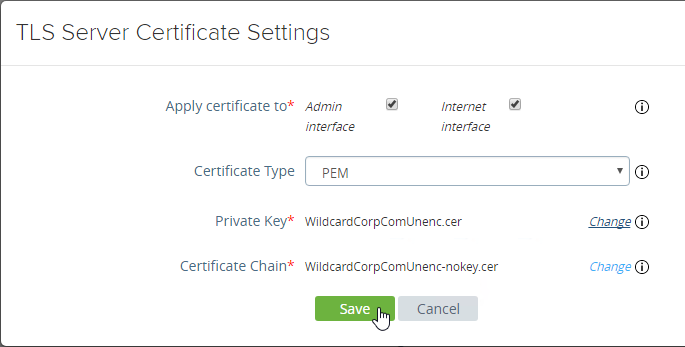
- Browse to a PEM keyfile. If not running Unified Access Gateway 3.0 or newer, then certificates created on Windows (PFX files) must be converted to PEM before they can be used with Unified Access Gateway. You can use openssl commands to perform this conversion. The private key should be unencrypted.
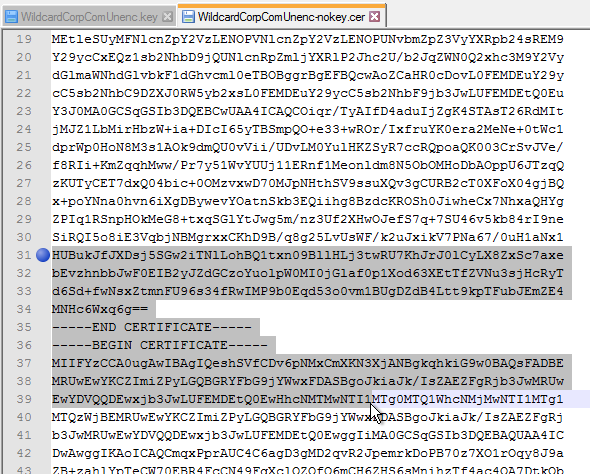
- Browse to a PEM certificate file (Base-64) that contains the server certificate, and any intermediate certificates. The server certificate is on top, the intermediate certificates are below it. The server certificate must match the public FQDN (load balanced) for the Unified Access Gateway.
- Click Save when done.
- Browse to a PEM keyfile. If not running Unified Access Gateway 3.0 or newer, then certificates created on Windows (PFX files) must be converted to PEM before they can be used with Unified Access Gateway. You can use openssl commands to perform this conversion. The private key should be unencrypted.
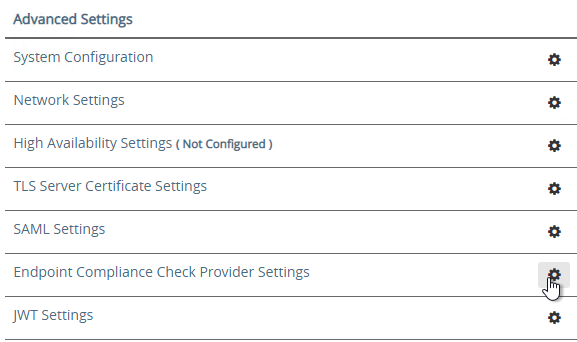
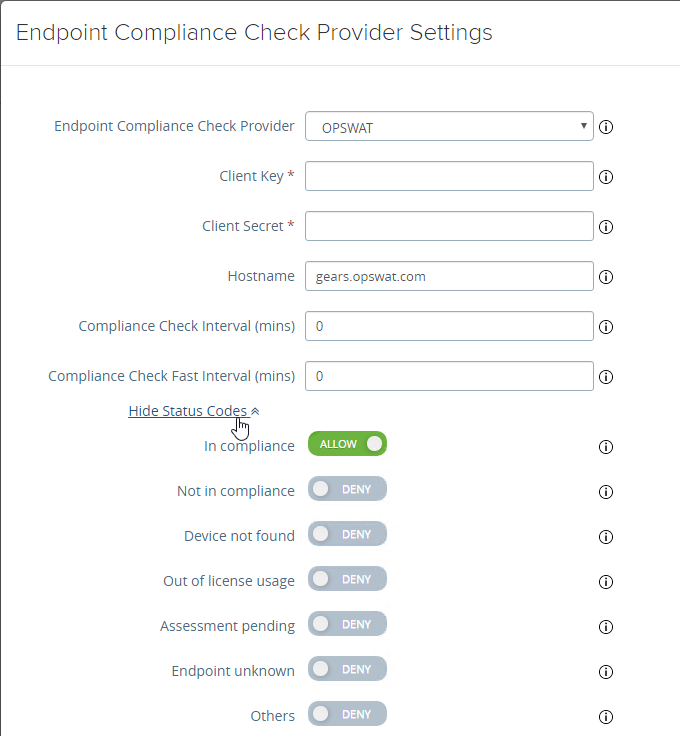
- UAG 3.1 and newer have an Endpoint Compliance Check feature. The feature requires an OPSWAT subscription. Newer versions of UAG can deploy the OPSWAT agent. It’s pass/fail. See Configure OPSWAT as the Endpoint Compliance Check Provider for Horizon at VMware Docs.
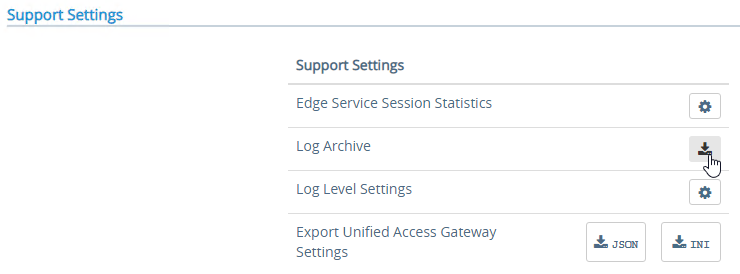
- Scroll down to Support Settings and click the icon next to Export Unified Access Gateway Settings to save the settings to a JSON file. If you need to rebuild your Unified Access Gateway, simply import the the JSON file.
- The exported JSON file does not include the UAG certificate, so you’ll also need the .pfx file.
- The exported JSON file does not include the UAG certificate, so you’ll also need the .pfx file.
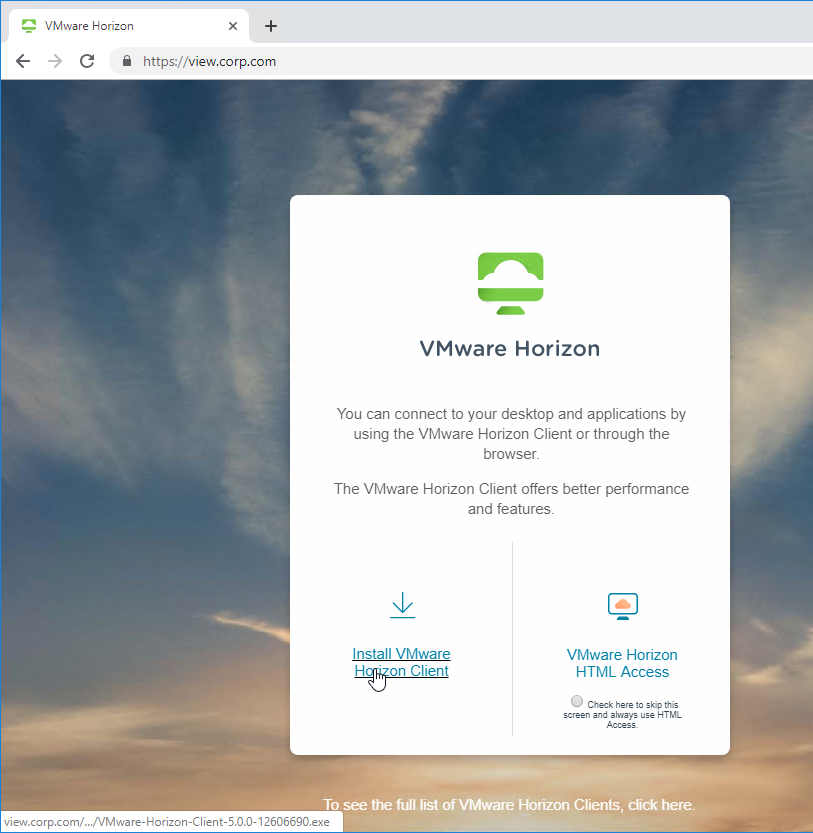
- If you point your browser to the Unified Access Gateway external URL, you should see the Horizon Connection Server portal page. Horizon Clients should also work to the Unified Access Gateway URL.
Monitor Sessions
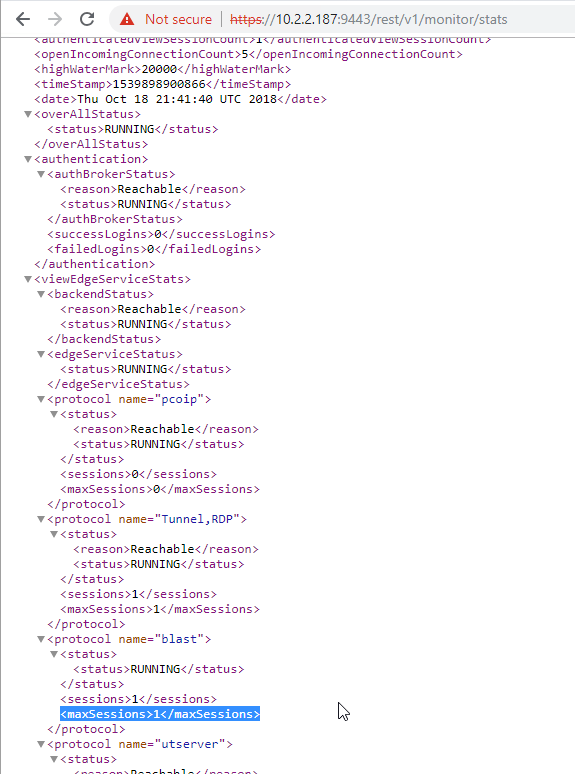
In UAG 3.4 and newer, in the UAG Admin interface,
In older versions of UAG, to see existing Horizon connections going through UAG, point your browser to https://uag-hostname-or-ip-addr:9443/rest/v1/monitor/stats.
Logs and Troubleshooting
You can download logs from the Admin Interface by clicking the icon next to Log Archive.
You can also review the logs at /opt/vmware/gateway/logs. You can less these logs from the appliance console.
Or you can point your browser to https://MyApplianceIP:9443/rest/v1/monitor/support-archive. This will download a .zip file with all of the logfiles. Much easier to read in a GUI text editor.
For initial configuration problems, check out admin.log.
For Horizon View brokering problems, check out esmanager.log.
By default, tcpdump is not installed on UAG. To install it, login to the console and run /etc/vmware/gss-support/install.sh
- More info at Justin Johnson Troubleshooting Port Connectivity For Horizon’s Unified Access Gateway 3.2 Using Curl And Tcpdump
Load Balancing
If NetScaler, see https://www.carlstalhood.com/vmware-horizon-unified-access-gateway-load-balancing-netscaler-12/ load balance Unified Access Gateways.
For VMware NSX load balancing of Unified Access Gateways, see the VMware® NSX for vSphere End-User Computing Design Guide 1.2.
To help with load balancing affinity, UAG 3.8 and newer can redirect the load balanced DNS name to a node-specific DNS name. This is configured in Edge Service Settings > Horizon Settings > More (bottom of page).
Related Pages
- Back to VMware Horizon 8
- Back to VMware Horizon 7
Ошибка 504 Gateway Timeout (от англ. «тайм-аут шлюза») — это код состояния HTTP, который указывает на то, что веб-сервер не получил своевременного ответа от вышестоящего сервера при попытке загрузить страницу. Простыми словами, ошибка 504 Gateway Timeout — это свидетельство о сбое на сервере, когда он выступает шлюзом или в качестве прокси.
В нашей статье клиент — браузер, а сервер — специализированная или выделенная машина.
Как выглядит ошибка 504
В зависимости от конфигурации у ошибки 504 есть различные формы написания:
- 504 Error.
- «Время ответа сервера истекло».
- HTTP Error 504.
- «Ошибка таймаута шлюза».
- Gateway timeout.
- The server didn’t respond in time.
Точный текст ошибки зависит от того, какой именно сервер используется в качестве фронта и какой в качестве бэка. Самые частые сценарии — Nginx и Apache, соответственно.
Почему возникает ошибка 504
Самая популярная причина — перегрузка сервера. Давайте посмотрим, почему она происходит и какие источники встречаются наиболее часто.
Источник перегрузки может быть связан как с непрогнозируемым наплывом трафика, так и с ошибками, которые возникают на самом сайте. Так что даже источник сбоя на сервере может относится к внутренним сбоям сайта.
Ошибки от плагинов
Многие веб-мастера устанавливают большое количество разнообразных плагинов для расширения функционала сайта. Например, для внедрения кеширования страниц или добавления на сайт CDN (сеть доставки контента). Подобные плагины могут загружать данные со сторонних источников — например, удаленных серверов. Если на таком сервере возникает сбой, определенная страница или сайт целиком может начать отдавать 504-ю ошибку.
Ошибки от скриптов
Это то же самое, что и ошибки от плагинов, так как плагин представляет из себя один или несколько скриптов. Если скрипт загружает данные с удаленного сервера, но возникает сбой или задержка при выполнении, может появиться ошибка Gateway Timeout. Когда один или несколько скриптов выполняются слишком долго, это приводит к таймауту.
Аномальное увеличение посещаемости
Если на сайте резко увеличивается трафик, сервер может работать медленнее. Чем больше трафика, тем больше запросов к серверу. Со временем количество неотвеченных запросов только увеличивается, в итоге взаимодействие с сервером прекращается и отправляется код состояния 504 Bad Gateway.
Израсходование лимитов тарифного плана хостинга
Начальные тарифы не предназначены для сайтов с высокой посещаемостью. В панели управления хостингом убедитесь, что статическая нагрузка, оперативная память, дисковая квота и другие ресурсы сервера не превышаются.
Загрузка на сайт файлов
Каждый раз, когда вы обращаетесь к сайту через административную панель, статическая нагрузка на сервер повышается. Например, вы загружаете видео или большое количество изображений либо импортируете длинный список товаров в интернет-магазин XML-файлом.
Во всех вышеуказанных сценариях статическая нагрузка на сервер будет заметно увеличиваться, так как каждый переданный мегабайт требует дополнительных вычислительных ресурсов от серверной машины.
Хакерские атаки
504 ошибку могут вызывать различные атаки на сайт — например, распределенная атака типа «отказ в обслуживании». Чтобы диагностировать эту причину — обратитесь в поддержку хостинга. Если атака подтвердится — установите на сайт защитный экран, например Cloudflare.
Вредоносный код в файлах сайта
Вирусы, шелы, бэкдоры и другие уязвимости сайта могут привести к тому, что он будет заражен вредоносным кодом. В этом случае можно ожидать самое непредсказуемое поведение ресурса, включая появление разнообразных кодов состояния HTTP и других негативных последствий, например, утечки данных. Это зависит от того, какую цель преследует хакер, пытаясь воздействовать на ваш сайт.
Ошибка в браузере
В редких случаях код ответа 504 может свидетельствовать о некорректной работе браузера. Например, у вас отключен JavaScript или в кэше накопилось большое количество ошибок. Все это может привести к тому, что страница не будет загружаться корректно. Попробуйте сменить браузер или устройство и откройте проблемную страницу. Если получилось, то это именно ваш сценарий.
Как исправить ошибку 504 вебмастеру
Теперь рассмотрим, как решить ошибку самостоятельно. Отдельно пользователю и отдельно вебмастеру.
У вебмастера есть гораздо больше возможностей, чтобы повлиять на ошибку.
- Во первых: нужно обратиться в саппорт используемого хостинга и уточнить, не превышены ли лимиты по использованию ресурсов серверного железа на вашем аккаунте. Если вы укладываетесь в ограничения выбранного тарифного плана, то нужно искать другой источник появления 504-й.
- Во вторых: вспомните, какие глобальные изменения вы делали на сайте в последнюю неделю или две. Возможно вы меняли тему (дизайн) сайта, глобальный вид URL или устанавливали какие-либо плагины.
Если вы вспомнили конкретное изменение, просто откатитесь к предыдущей версии: например, удалите плагин или верните старую тему сайта.
«У меня VPS с Nginx / Apache»
С такой конфигурацией сервера возникновение 504 ошибки встречается довольно часто. Чтобы устранить ее, найдите конфигурационный файл сервера, который называется httpd.conf. Находится он в дистрибутиве Apache, соответственно. Что нужно сделать:
- Устанавливаем значение тайм-аута на 700 секунд и сохраняем файл. Перезагружаем бэкенд (для этого используем команду service nginx reload) и проверяем, ушла ошибка или нет.
- Находим файл php.ini. Открываем его и изменяем значение максимального времени исполнения на 300 секунд. Опять перезагружаем backend (используем команду service nginx reload) и проверяем, ушла ошибка или нет.
В некоторых случаях изменить время максимального исполнения файла не удастся, так как это может быть запрещено конфигурацией сервера.
Изменение портов в панели управления хостингом
Также попробуйте изменить порты для обращения к сайту. Так вы решите проблему в случаях, когда выполнение скрипта занимает продолжительное время (более 30 секунд). В разных панелях управления хостингом нужно устанавливать разные порты. Например в Plesk — это 8080, в ISPManager — 8081.
«У меня на сайте используются CDN: что делать»
Выше мы уже говорили о том, что кэширующий сервер может стать причиной длительного ожидания ответа от главного сервера. Чтобы решить эту проблему, отключите сеть доставки содержимого на своем сайте. После этого очистите кэш сайта и попробуйте открыть проблемную страницу. Если ошибку 504 вызывал CDN, то страница сразу откроется.
Перенос сайта на другую сетевую конфигурацию
Если изменить значение максимального времени исполнения в php.ini для вас затруднительно, вы можете просто перейти на облачный тариф хостинга. В облачной инфраструктуре доступно тонкое управление параметрами сервера, включая регулировку технических ограничений.
Включите журналирование ошибок
Этот способ поможет точно установить, в каком именно месте происходит ошибка, не позволяющая открыть страницу. В CMS журналирование может активироваться разными способами. Например, на WordPress необходимо открыть файл wpconfig.php и добавить в него три PHP-константы для установки отладки:
define( ‘wp_debug’, true );
define( ‘wp_debug_log’, true );
define( ‘wp_debug_display’, false );
Сохраняем wpconfig.php. Все, теперь логирование ошибок включено и вы сможете посмотреть источник ошибки в журнале.
«У меня веб-сервер nginx: что делать»
В дистрибутиве сервера найдите конфигурационный файл тайм-аута и измените значения для времени:
- таймаута для отправки прокси;
- тайм-аута для чтения прокси;
- времени отправки тайм-аута.
Обычно конфигурационный файл тайм-аута находится в следующей директории:
Важно: перед открытием конфигурационного файла обязательно подключитесь по протоколу SSH.
Если вы используете VPS, необязательно вручную искать конфигурационный файл, чтобы изменить значение параметров. Просто откройте административную панель сервера, найдите настройки сервера и добавьте необходимые значения. Как правило, настройки php.ini и параметры httpd всегда разнесены по разным вкладкам. Справедливо это для ISPmanager, Ajenti, Vesta Control Panel и других популярных панелей управления сервером, например, CentOS Web Panel.
Неполадки сервера
Создайте тикет в саппорте хостинга и уточните, существуют ли на данный момент какие-либо неполадки с сервером. Это довольно редкий сценарий, но проверить его также необходимо, если ошибку не удалось устранить вообще никакими из вышеописанных способов.
Как исправить ошибку 504 пользователю
Попробуйте открыть проблемную страницу из другого браузера. Если причина сбоя в некорректных настройках обозревателя, этот способ позволит подтвердить такой источник ошибки.
Очистка DNS
Очистите кэш DNS в используемой операционной системе:
- На macOS необходимо открыть «Терминал» и указать команду sudo killall -HUP mDNSResponder.
- На Windows нужно открыть командную строку и ввести команду: ipconfig /flushdns.
Другие способы
Если очистка DNS-кэша не помогла, попробуйте выполнить следующие действия
- Обновите страницу с очисткой ее кэша. Для этого используется сочетание горячих клавиш Control + F5. В редких случаях в кэше могут накапливаться ошибки, особенно если вы часто посещали сайт, на котором теперь возникает ошибка.
- Попробуйте открыть проблемную страницу с другого устройства. В редких случаях в системе могут накапливаться ошибки, которые препятствуют открытию всего сайта или конкретной страницы. Диагностировать эту причину и поможет смена устройства.
- Удалите временные файлы браузера, включая кэш-файлы и файлы-куки.
Заключение: профилактика появления Gateway timeout для вебмастера
Прежде чем выбирать тариф хостинга, обязательно поинтересуйтесь в поддержке, какой тарифный план подойдет для вашего сайта. При этом вы должны будете предоставить данные по текущему трафику, размеру сайта, а также:
- Какие ресурсы серверного железа вы планируете использовать.
- Что хотите настраивать.
- Наличие каких технологий для вас является критически важным.
Так вы сможете выбрать максимально подходящий и быстрый сервер под свои задачи. Ну а 504 ошибка точно не будет появляться на сайте.

