New issue
Have a question about this project? Sign up for a free GitHub account to open an issue and contact its maintainers and the community.
By clicking “Sign up for GitHub”, you agree to our terms of service and
privacy statement. We’ll occasionally send you account related emails.
Already on GitHub?
Sign in
to your account
Closed
abhinavkgrd opened this issue
Jul 21, 2021
· 27 comments
Comments
![]()
Committing from vs-code Source control returns this error but the command line works fine
vscode version — 1.58.2
Command output
husky - pre-commit hook exited with code 1 (error)
pre-commit
#!/bin/sh
. "$(dirname "$0")/_/husky.sh"

yarn lint-staged
package json
{
"scripts": {
    "lint-staged": "lint-staged",
    "postinstall": "husky install"
  },
"devDependencies":{
    "husky": "^7.0.0",
    "lint-staged": "^11.0.0",
}

 "lint-staged": {
    "src/**/*.{js,jsx,ts,tsx}": "eslint"
  },

"husky": {
    "hooks": {
      "pre-commit": "yarn run lint-staged"
    }
  }
}
![]()
Similar issues with VS Code Version: 1.59.0
![]()
Having same issue with VS code version 1.60.2
![]()
It looks like this is actually a lint-staged issue, specifically broken dependencies in version 11.2.4.
See if you can reproduce this:
-
git commitfrom command line also fails:$ git commit --allow-empty-message husky - pre-commit hook exited with code 1 (error)
-
yarn lint-stagedis in fact silently failing and returning exit code 1:$ yarn lint-staged $ echo $? 1
If so, the problem should be fixed soon: okonet/lint-staged#1032
In the meantime, pinning lint-staged to 11.1.4 should resolve the problem for now.
thyoondev, mariia-slobozhan, and jbvouma reacted with rocket emoji
![]()
Husky can prevent you from bad git commit, git push and more. If you are getting this error check your code syntax, in case if you are getting this error even your code is valid. Please use the below command.
git commit -m "message" --no-verify
from: here
ThomasSalty, iamdevlinph, DavySz, kevalsavani, Florian-crg, Jesus123780, chenfaxiang, juvinaojesus, AndreVarandas, hakula139, and 12 more reacted with thumbs down emoji
a1473838623 and saiRameshsai reacted with laugh emoji
a1473838623 reacted with confused emoji
a1473838623, fabiofa87, mvn-tinhle-dn, sajin-sadanandan-db, tafphil, striver-69, saiRameshsai, cesarherreras, mohammadim48, and kuldeepAppboxer reacted with heart emoji
a1473838623 and saiRameshsai reacted with rocket emoji
![]()
same with vscode for me
> git -c user.useConfigOnly=true commit --quiet --allow-empty-message --file - -S
C:...commitlint.config.js:1
��m


SyntaxError: Invalid or unexpected token
    at wrapSafe (internal/modules/cjs/loader.js:988:16)
    at Module._compile (internal/modules/cjs/loader.js:1036:27)
    at Object.Module._extensions..js (internal/modules/cjs/loader.js:1101:10)
    at Module.load (internal/modules/cjs/loader.js:937:32)
    at Function.Module._load (internal/modules/cjs/loader.js:778:12)
    at Module.require (internal/modules/cjs/loader.js:961:19)
    at module.exports (C:Usersolivenode_modulesimport-freshindex.js:32:59)
    at loadJs (C:Usersolivenode_modulescosmiconfigdistloaders.js:16:18)
    at Explorer.loadFileContent (C:Usersolivenode_modulescosmiconfigdistExplorer.js:84:32)
    at Explorer.createCosmiconfigResult (C:Usersolivenode_modulescosmiconfigdistExplorer.js:89:36)
husky - commit-msg hook exited with code 1 (error)
// commitlint.config.js
module.exports = {
    extends: ["@commitlint/config-conventional"]
};
![]()
randomly closed, it was the encoding was utf-16
maybe dont close without a comment
![]()
try to restart your vscode
QQhuan, Harizriz, fermeaux, gabriel-jcpm, danipishinin, ChromeQ, llyzmp, SigmaVX, MartinSchere, saba-phoenix, and 47 more reacted with thumbs down emoji
![]()
Husky can prevent you from bad git commit, git push and more. If you are getting this error check your code syntax, in case if you are getting this error even your code is valid. Please use the below command.
git commit -m "message" --no-verifyfrom: here
or git config --unset core.hooksPath
amirsalaar, kenchoong, ooliver1, jeremyabraham7, esabalza, kimmerchen, buryo, kowalus23, salman286, alexmensak, and 23 more reacted with thumbs down emoji
Zerzavot, fadeomar, aaayumi, anorudes, and Jasonchang6435 reacted with laugh emoji
Dmitry-White, prapurnakumariTR, AngAven, VodeniZeko, XuXiaowen, fadeomar, DylanGiesberts, violigon, pangpangSD, ayoubaayoub, and 5 more reacted with heart emoji
![]()
yarn lint-staged and git commit work fine, the only occasion in which it doesn’t work is when I commit from VS Code Source Control (VSC’s GUI for git commands). After editing ./.huskyrc the output console reads
> git ls-files --stage -- /home/genesis/Documents/unigraph/unigraph-dev/.huskyrc
> git cat-file -s fdac8cc646628741017ad104f503ebc3507a6e29
> git show --textconv :.huskyrc
Unexpected identifier
![]()
For me, this issue is not because of husky, but because of lint-staged. I resolved it by removing lint-staged. I use eslint --cache instead
![]()
Hi people, a have a similar issue to run commands in pre-push hook. Via command-line it works without problems.
I’m using nvm with a specific version to the project path.
My VS Code version is:
Version: 1.64.0
Commit: 5554b12acf27056905806867f251c859323ff7e9
Date: 2022-02-03T04:20:17.224Z
Electron: 13.5.2
Chromium: 91.0.4472.164
Node.js: 14.16.0
V8: 9.1.269.39-electron.0
OS: Darwin x64 20.6.0
Output error:
.husky/pre-push: line 4: npm: command not found
Inside file I have a npm command:
npm run test:ci
![]()
In my case «lint-staged» configuration was missing from package.json after a merge conflict was resolved. Added it back and no more issues.
![]()
git config —unset core.hooksPath
This worked for me
magnus-bakke, AndrewTotsky, and ankitch29 reacted with thumbs down emoji
danielcnascimento, samuel-ferreira-dotcodingbr, WebVaishali, g-mayer, and margaridalsemedo reacted with heart emoji
danielcnascimento, samuel-ferreira-dotcodingbr, and WebVaishali reacted with rocket emoji
![]()
In my case when trying to commit from my IDE it would give the non-descriptive error Unexpected identifier, while committing from command line worked fine.
It turned out my IDE used an earlier node version (6.14.4 vs 7.19.1 from my terminal), upping the version fixed this for me.
![]()
it seems from this thread that husky can have a lot of issues that cause the same vague error, this might need to be addressed
![]()
git config —unset core.hooksPath
这对我有用
git config —unset core.hooksPath
This worked for me
Me too, greate~
![]()
git config —unset core.hooksPath
This worked for me
This just disables husky for me.
sh977218 and RaufR reacted with thumbs down emoji
douglasdnzcarvalho, sh977218, and gabriels-silva reacted with confused emoji
![]()
Husky can prevent you from bad git commit, git push and more. If you are getting this error check your code syntax, in case if you are getting this error even your code is valid. Please use the below command.
git commit -m "message" --no-verify
from: hereor
git config --unset core.hooksPath
This does NOT resolve the issue, but a work around to ignore the issue.
![]()
I was able to resolve this error by running each precommit command individually. Turns out my test command (jest) was causing the error due to an obsolete snapshot.
Note that Jest seems to hide that this actually causes an error code 🤦 and instead makes it look like a warning, so if this is your problem you’ll never actually see an error code directly from Jest. That’s probably why this only appeared as an error through Husky for me, and I imagine there could be many other situations where an individual command is swallowing the error code to make it look like Husky’s fault.
![]()
I was able to resolve this error by running each precommit command individually. Turns out my test command (
jest) was causing the error due to an obsolete snapshot.Note that Jest seems to hide that this actually causes an error code 🤦 and instead makes it look like a warning, so if this is your problem you’ll never actually see an error code directly from Jest. That’s probably why this only appeared as an error through Husky for me, and I imagine there could be many other situations where an individual command is swallowing the error code to make it look like Husky’s fault.
This was my issue. Thank you for your comment.
![]()
I just renamed from commitlint.config.js to commitlint.config.cjs
It worked without any error.
![]()
Got the same error.
My issue might be that hooks that should be run before committing or pushing have an error.
eg., in my .husky/pre-commit
it will run yarn lint before I commit.
so after solving the error in yarn lint, mine commit works.
![]()
Maybe it will help someone, everything worked out for me after changing single quotes to double ones in package.json

![]()
I got the same error as well.
Turns out I was running Node v10 when trying to commit, a quick swap over to v16 and all was good.
![]()
git config —unset core.hooksPath
This worked for me
You must to verify this because with this command you’re disabling commit checks
![]()
I checked mine and saw that my lint-stages config
  "lint-staged": {
    "**/*.{js,jsx,ts,tsx}": [
      "npm run lint"
    ]
  }
was not directly in the root of the package.json
![]()
git config —unset core.hooksPath
This worked for me
Thanks, you saved my time.
git commit -m «feat: testing the commitlint library»
@commitlint/cli@16.2.3 — Lint your commit messages
[input] reads from stdin if —edit, —env, —from and —to are omitted
Options:
  -c, --color          toggle colored output           [boolean] [default: true]
  -g, --config         path to the config file                          [string]
      --print-config   print resolved config          [boolean] [default: false]
  -d, --cwd            directory to execute in
                                         [string] [default: (Working Directory)]
  -e, --edit           read last commit message from the specified file or
                       fallbacks to ./.git/COMMIT_EDITMSG               [string]
  -E, --env            check message in the file at path given by environment
                       variable value                                   [string]
  -x, --extends        array of shareable configurations to extend       [array]
  -H, --help-url       help url in error message                        [string]
  -f, --from           lower end of the commit range to lint; applies if
                       edit=false                                       [string]
  -o, --format         output format of the results                     [string]
  -p, --parser-preset  configuration preset to use for
                       conventional-commits-parser                      [string]
  -q, --quiet          toggle console output          [boolean] [default: false]
  -t, --to             upper end of the commit range to lint; applies if
                       edit=false                                       [string]
  -V, --verbose        enable verbose output for reports without problems
                                                                       [boolean]
  -v, --version        display version information                     [boolean]
  -h, --help           Show help                                       [boolean]

Unknown argument: edit
husky - commit-msg hook exited with code 1 (error)

![]()
In this guide I will be showing you how to enforce the use of Conventional Commit messages in Git. If you don’t know what Conventional Commits are, you can read my other post here. Let’s get right into it.
Go ahead and open up your repo in Terminal. Let’s install husky, commitlint cli & config-conventional as development dependencies:
npm install --save-dev husky @commitlint/cli @commitlint/config-conventional
Enter fullscreen mode
Exit fullscreen mode
Next, we will enable Git hooks using Husky and add the commit-msg by entering the following commands:
npx husky install
npx husky add .husky/commit-msg 'npx commitlint --edit $1'
Enter fullscreen mode
Exit fullscreen mode
Create the following files in the root of your repo to configure commitlint
.commitlintrc.json
{
  "extends": ["@commitlint/config-conventional"]
}
Enter fullscreen mode
Exit fullscreen mode
commitlint.config.js
module.exports = {
  extends: ['@commitlint/config-conventional'],
};
Enter fullscreen mode
Exit fullscreen mode
And we’re done! A quick and painless method of enforcing conventional commit messages. Give it a go by trying to commit to Git with a non-conventional messages.
git commit -a -m "Set up Conventional Commits using Husky and commitlint"
Enter fullscreen mode
Exit fullscreen mode
You should get the below error
⧗   input: Set up Conventional Commits using Husky and commitlint
✖   subject may not be empty [subject-empty]
✖   type may not be empty [type-empty]

✖   found 2 problems, 0 warnings
ⓘ   Get help: https://github.com/conventional-changelog/commitlint/#what-is-commitlint

husky - commit-msg hook exited with code 1 (error)
Enter fullscreen mode
Exit fullscreen mode
Let’s now change this to be a conventional commit:
git commit -m 'feat: enforce conventional commits using husky and commitlint'
Enter fullscreen mode
Exit fullscreen mode
Now that we are using lerna to determine package versions, we need to ensure that all commits follow the proper syntax. We can utilize Husky to add a git hook to the commit command. Head over to your command-line interface, make sure you navigate to the root of the project’s monorepo and install husky as a development dependency as follows:
npm install husky --save-dev
Next, you also need to install commitlint to lint commits:
npm install @commitlint/cli --save-dev
npm install @commitlint/config-conventional --save-dev
Next, enable Git hooks using the following command:
Then, add the commit-msg hook using the following command:
npx husky add .husky/commit-msg 'npx commitlint --edit $1'
Next, create the .commitlintrc.json file and add the following configuration:
{
  "extends": ["@commitlint/config-conventional"]
}
Then, create the commitlint.config.js file and the add:
 module.exports = {
  extends: ['@commitlint/config-conventional'],
};
Finally, add a Git commit that doesn’t follow the convention:
git commit -a -m "Set up Husky and commitlint"
The operation should be failed with the following message:
⧗   input: Add Husky and commitlint
✖   subject may not be empty [subject-empty]
✖   type may not be empty [type-empty]

✖   found 2 problems, 0 warnings
ⓘ   Get help: https://github.com/conventional-changelog/commitlint/#what-is-commitlint

husky - commit-msg hook exited with code 1 (error)
If you run the following commit instead it should work:
git commit -m 'feat: set up husky and commitlint'
Conclusion
We can enhance the releasing process by combining lerna with a few additional utilities and conventions. Thanks to using git hooks with husky and commitlint to ensure that all commits follow the proper syntax.
-
Author:
Ahmed Bouchefra
Follow @ahmedbouchefra -
Date:
07 May 2022
✋If you have any questions about this article, ask them in our GitHub Discussions 👈
community. You can also

✋ Want to master Angular 14?
Read our angular tutorial and join our#DailyAngularChallengewhere we learn to build
components, directives, services, pipes and complete web, mobile, and desktop applications with latest Angular version.
✋ Make sure to join our Angular 14
Dev Community 👈 to discuss anything related to Angular development.
❤️ Like our page and subscribe to
our feed for updates!Find a list of emojis to copy and paste
A changelog is a detailed record of any changes you’ve made to your project over a period of time. Not only does a changelog serve as a starting point for fixing bugs and errors, but it is also a valuable educational resource when introducing new developers to your project.
In this tutorial, we’ll explore a method for automatically generating and releasing a changelog that uses git hooks and Node.js. We’ll create a conventional commit message using a specific commit format called Conventional Commits and a tool called Commitizen. Then, we’ll use a library called standard-version to automatically generate a changelog and a new release version that follows semantic versioning.
Finally, we’ll make our changelog shareable across the development team so that everyone follows the same conventions in the project. You can find the final code in this GitHub repository if you wish to follow along.
Let’s get started!
Structuring commit messages in Conventional Commits
The Conventional Commits specification improves commit messages by providing rules for creating a specific commit history. Conventional Commits makes generating a changelog easy by creating a release that uses semantic versioning.
According to convention, the commit message should be structured as follows:
<type>[optional scope]: <description>

[optional body]

[optional footer(s)]
Let’s examine the detail of the structure:
<type> is a type of commit that affects the version number of the release. In semantic versioning, the fix type affects PATCH and the feat type affects MINOR. There are other types, however, these don’t affect the version number of the release.
scope is an optional noun that describes the part of the codebase that is changed or updated by the commit. For example, in feat(pages), pages is the scope.
In semantic versioning, ! correlates with MAJOR. When used after the scope, ! indicates that there are breaking changes in the commit.
<description> is a brief, written explanation of the changes made to the code. For example, if we wrote a description for feat(pages), it could look like the following: feat(pages): add contact page in the side menu.
body is an optional field that you can use to describe the commit in more detail. body must begin one line after the description. footer is also an optional field. For example, one footer is BREAKING CHANGE, which would correlate with MAJOR in semantic versioning.
Commit message examples
Let’s look at some examples of different commit messages:
Commit message with just type and description:
feat: add the charging option for cars
Commit message with type, scope, and description:
fix(homepage): change title width of title
Commit message with BREAKING CHANGE:
refactor(api): remove the get api from reservations

BREAKING CHANGE: refactor to use the trip api instead of reservations api
Creating our project
Let’s start our project by adding the necessary tools to automate our changelog and release. First, create a command prompt, where we’ll add the following code blocks.
Let’s create an npm-based project and make it a git repository. If you want to automate an existing repository, you can skip this step:
# create project directory
mkdir changelog

# cd into project
cd changelog

# initialize npm project
npm init -y

# initialize git
git init
The code block above will create a git repository and an npm package with v1.0.0.
Add standard-version to our project
Now, let’s begin creating releases for our project! You’ll need to install the standard-version npm package into your project as follows:
npm install --save-dev standard-version
You’ll also need to add it into npm scripts:
...
"scripts": {
  "release": "standard-version"
}
...
Creating a release
Create a dummy file called new-feature and commit it as follows:
touch new-feature
git add new-feature
git commit
Add the following git commit message:
feat(new-feature): add a new-feature to our project
Finally, let’s create a release in our project by running our newly added script:
npm run release
Running the command above will show the following message on the screen:
> [email protected] release /home/imsingh/Develop/inder/changelog
> standard-version

✔ bumping version in package.json from 1.0.0 to 1.1.0
✔ bumping version in package-lock.json from 1.0.0 to 1.1.0
✔ created CHANGELOG.md
✔ outputting changes to CHANGELOG.md
✔ committing package-lock.json and package.json and CHANGELOG.md
✔ tagging release v1.1.0
ℹ Run `git push --follow-tags origin master && npm publish` to publish
The message above does the following:
- Increases the SemVer version number from
1.0.0to1.1.0We added one feature, therefore, MINOR was updated from0to1 - Creates a
CHANGELOG.mdfile, adding the required content to it - Commits the changes above, creating a
v1.1.0tag - Prints out a message to push tags and publish our package to npm, if needed
CHANGELOG.md
Now, if you open CHANGELOG.md, you’ll see the following code block, which includes the changes made above:
# Changelog

All notable changes to this project will be documented in this file. See [standard-version](https://github.com/conventional-changelog/standard-version) for commit guidelines.

## 1.1.0 (2021-07-12)


### Features

* **new-feature:** add a new-feature to our project 11c0322
You’ll also see the commit message standard-version created, which used the git log -1 command to make a release:
commit  #COMMIT_HASH (HEAD -> master, tag: v1.1.0)
Author: #AUTHOR_NAME <#AUTHOR_EMAIL>
Date:   #COMMIT_DATE

    chore(release): 1.1.0
The type of commit message is chore, the scope is release, and the description is 1.1.0.
Now, you have everything you need to automate your changelog and release! However, manually writing the commit is tedious and error-prone. Let’s bring in some tools to smooth the process!
Adding Commitizen
Instead of writing conventional commits yourself, you can use Commitizen to auto-generate them. Commitizen asks you questions in the command prompt and generates the commits based on your answers.
Install the Commitizen package as follows:
npm install --save-dev commitizen
Now, initialize Commitizen to use the conventional changelog adapter:
npx commitizen init cz-conventional-changelog --save-dev --save-exact
An adapter is a configuration that tells Commitizen to display different kinds of commits in a prompt. Currently, there are a variety of adapters available, but you can create your own adapter if you wish.
Now, to use Commitizen, we’ll add an npm script:
...
"scripts": {
    "commit": "cz"
}
...
At this point, you should create a .gitignore file and ignore the node_modules directory.
Add package.json and package-lock.json to the git staging area using git add. We’ll make a commit by running the code block below:
npm run commit
The code block above will also prompt you to answer the directives that follow.
type shows the list of types from which you can select. The list below came from the adapter that we installed earlier:
? Select the type of change that you're committing:
  feat:     A new feature
  fix:      A bug fix
  docs:     Documentation only changes
❯ style:    Changes that do not affect the meaning of the code (white-space, formatting, missing semi-col
ons, etc)
  refactor: A code change that neither fixes a bug nor adds a feature
  perf:     A code change that improves performance
(Move up and down to reveal more choices)
scope, in the code block below, refers to the scope of the conventional commit:
? What is the scope of this change (e.g. component or file name): (press enter to skip)
For short description, write a brief explanation of the conventional commit:
? Write a short, imperative tense description of the change (max 82 chars):
In longer description, describe the body of the conventional commit:
? Provide a longer description of the change: (press enter to skip)
The two questions in the code block below generate a commit with breaking changes:
? Are there any breaking changes?
? Describe the breaking changes:
In the section for issues related to commit, you can reference issues from GitHub, JIRA, or other similar tools:
? Does this change affect any open issues?
? Add issue references (e.g. "fix #123", "re #123".):
Once you’ve answered these prompts according to your needs, you’ll have a commit like the one shown below:
Author: #AUTHOR_NAME <#AUTHOR_EMAIL>
Date:   Mon Jul 12 21:10:17 2021 +0200

    feat(some-scope): a short description

    a long description

    BREAKING CHANGE: it breaks

    123
Adding commitlint to enforce rules
To ensure that all the developers on our project follow the same conventions, we’ll use git hooks with Husky and commitlint.
Installing required tools
First, let’s install commitlint and Husky by running the code block below:
# Install commitlint cli and conventional config
npm install --save-dev @commitlint/config-conventional @commitlint/cli

# Install Husky
npm install husky --save-dev
Configure commitlint
To configure commitlint, we’ll need to create a config file named commitlint.config.js and add the following code:
module.exports = {extends: ['@commitlint/config-conventional']}
To lint messages before they are committed, we need to use the commit-msg hook from Husky by running the following commands:
# Activate hooks
npx husky install

# Add hook
npx husky add .husky/commit-msg 'npx --no-install commitlint --edit "$1"'
You can add husky install as an npm prepare script, however, this step is optional. husky install will ensure that every developer using this repo will install Husky Hooks before using the project:
...
"scripts": {
...
  "prepare": "husky install"
}
We’ll still use git commit to make our commits follow the convention described earlier. If there is a mistake in the git message, commitlint will raise the following errors:
git commit -m "This is a commit"
⧗   input: This is a commit
✖   subject may not be empty [subject-empty]
✖   type may not be empty [type-empty]

✖   found 2 problems, 0 warnings
ⓘ   Get help: [https://github.com/conventional-changelog/commitlint/#what-is-commitlint](https://github.com/conventional-changelog/commitlint/#what-is-commitlint)

husky - commit-msg hook exited with code 1 (error)
Final workflow for managing releases
To manage your releases, you can follow the workflow listed below:
- Create your features and commit them. If commit messages aren’t following convention, commitlint will raise errors
- Execute the
npm run commitin the command line to make a commit with Commitizen - Run
npm run releaseto create a changelog and a semantic versioning-based release
To create a release using CI/CD, look at the semantic release.
Summary
In this post, you learned how to create an automatic changelog and a semantic versioning-based release using git hooks and Node.js. We created our commit message using the Conventional Commits specification, then released it using commitizen and standard-version. Next, we used commitlint and Husky to automatically write our commit.
200’s only  Monitor failed and slow network requests in production
 Monitor failed and slow network requests in production
 Deploying a Node-based web app or website is the easy part. Making sure your Node instance continues to serve resources to your app is where things get tougher. If you’re interested in ensuring requests to the backend or third party services are successful, try LogRocket.  https://logrocket.com/signup/
LogRocket is like a DVR for web and mobile apps, recording literally everything that happens while a user interacts with your app. Instead of guessing why problems happen, you can aggregate and report on problematic network requests to quickly understand the root cause.
LogRocket instruments your app to record baseline performance timings such as page load time, time to first byte, slow network requests, and also logs Redux, NgRx, and Vuex actions/state. Start monitoring for free.
Committing from vs-code Source control returns this error but the command line works fine
vscode version — 1.58.2
Command output
husky - pre-commit hook exited with code 1 (error)
pre-commit
#!/bin/sh
. "$(dirname "$0")/_/husky.sh"

yarn lint-staged
package json
{
"scripts": {
    "lint-staged": "lint-staged",
    "postinstall": "husky install"
  },
"devDependencies":{
    "husky": "^7.0.0",
    "lint-staged": "^11.0.0",
}

 "lint-staged": {
    "src/**/*.{js,jsx,ts,tsx}": "eslint"
  },

"husky": {
    "hooks": {
      "pre-commit": "yarn run lint-staged"
    }
  }
}
Similar issues with VS Code Version: 1.59.0
Having same issue with VS code version 1.60.2
It looks like this is actually a lint-staged issue, specifically broken dependencies in version 11.2.4.
See if you can reproduce this:
-
git commitfrom command line also fails:$ git commit --allow-empty-message husky - pre-commit hook exited with code 1 (error)
-
yarn lint-stagedis in fact silently failing and returning exit code 1:$ yarn lint-staged $ echo $? 1
If so, the problem should be fixed soon: okonet/lint-staged#1032
In the meantime, pinning lint-staged to 11.1.4 should resolve the problem for now.
Husky can prevent you from bad git commit, git push and more. If you are getting this error check your code syntax, in case if you are getting this error even your code is valid. Please use the below command.
git commit -m "message" --no-verify
from: here
same with vscode for me
> git -c user.useConfigOnly=true commit --quiet --allow-empty-message --file - -S
C:...commitlint.config.js:1
��m


SyntaxError: Invalid or unexpected token
    at wrapSafe (internal/modules/cjs/loader.js:988:16)
    at Module._compile (internal/modules/cjs/loader.js:1036:27)
    at Object.Module._extensions..js (internal/modules/cjs/loader.js:1101:10)
    at Module.load (internal/modules/cjs/loader.js:937:32)
    at Function.Module._load (internal/modules/cjs/loader.js:778:12)
    at Module.require (internal/modules/cjs/loader.js:961:19)
    at module.exports (C:Usersolivenode_modulesimport-freshindex.js:32:59)
    at loadJs (C:Usersolivenode_modulescosmiconfigdistloaders.js:16:18)
    at Explorer.loadFileContent (C:Usersolivenode_modulescosmiconfigdistExplorer.js:84:32)
    at Explorer.createCosmiconfigResult (C:Usersolivenode_modulescosmiconfigdistExplorer.js:89:36)
husky - commit-msg hook exited with code 1 (error)
// commitlint.config.js
module.exports = {
    extends: ["@commitlint/config-conventional"]
};
randomly closed, it was the encoding was utf-16
maybe dont close without a comment
try to restart your vscode
I changed pre-commit file like that
#!/bin/sh

# ~/.huskyrc
# This loads nvm.sh and sets the correct PATH before running hook
export NVM_DIR="$HOME/.nvm"
[ -s "$NVM_DIR/nvm.sh" ] && . "$NVM_DIR/nvm.sh"
pre-commit file:

my reference: here
Husky can prevent you from bad git commit, git push and more. If you are getting this error check your code syntax, in case if you are getting this error even your code is valid. Please use the below command.
git commit -m "message" --no-verifyfrom: here
or git config --unset core.hooksPath
yarn lint-staged and git commit work fine, the only occasion in which it doesn’t work is when I commit from VS Code Source Control (VSC’s GUI for git commands). After editing ./.huskyrc the output console reads
> git ls-files --stage -- /home/genesis/Documents/unigraph/unigraph-dev/.huskyrc
> git cat-file -s fdac8cc646628741017ad104f503ebc3507a6e29
> git show --textconv :.huskyrc
Unexpected identifier
For me, this issue is not because of husky, but because of lint-staged. I resolved it by removing lint-staged. I use eslint --cache instead
Hi people, a have a similar issue to run commands in pre-push hook. Via command-line it works without problems.
I’m using nvm with a specific version to the project path.
My VS Code version is:
Version: 1.64.0
Commit: 5554b12acf27056905806867f251c859323ff7e9
Date: 2022-02-03T04:20:17.224Z
Electron: 13.5.2
Chromium: 91.0.4472.164
Node.js: 14.16.0
V8: 9.1.269.39-electron.0
OS: Darwin x64 20.6.0
Output error:
.husky/pre-push: line 4: npm: command not found
Inside file I have a npm command:
npm run test:ci
In my case «lint-staged» configuration was missing from package.json after a merge conflict was resolved. Added it back and no more issues.
git config —unset core.hooksPath
This worked for me
In my case when trying to commit from my IDE it would give the non-descriptive error Unexpected identifier, while committing from command line worked fine.
It turned out my IDE used an earlier node version (6.14.4 vs 7.19.1 from my terminal), upping the version fixed this for me.
it seems from this thread that husky can have a lot of issues that cause the same vague error, this might need to be addressed
git config —unset core.hooksPath
这对我有用
git config —unset core.hooksPath
This worked for me
Me too, greate~
git config —unset core.hooksPath
This worked for me
This just disables husky for me.
Husky can prevent you from bad git commit, git push and more. If you are getting this error check your code syntax, in case if you are getting this error even your code is valid. Please use the below command.
git commit -m "message" --no-verify
from: hereor
git config --unset core.hooksPath
This does NOT resolve the issue, but a work around to ignore the issue.
I was able to resolve this error by running each precommit command individually. Turns out my test command (jest) was causing the error due to an obsolete snapshot.
Note that Jest seems to hide that this actually causes an error code 🤦 and instead makes it look like a warning, so if this is your problem you’ll never actually see an error code directly from Jest. That’s probably why this only appeared as an error through Husky for me, and I imagine there could be many other situations where an individual command is swallowing the error code to make it look like Husky’s fault.
I was able to resolve this error by running each precommit command individually. Turns out my test command (
jest) was causing the error due to an obsolete snapshot.Note that Jest seems to hide that this actually causes an error code 🤦 and instead makes it look like a warning, so if this is your problem you’ll never actually see an error code directly from Jest. That’s probably why this only appeared as an error through Husky for me, and I imagine there could be many other situations where an individual command is swallowing the error code to make it look like Husky’s fault.
This was my issue. Thank you for your comment.
I just renamed from commitlint.config.js to commitlint.config.cjs
It worked without any error.
Got the same error.
My issue might be that hooks that should be run before committing or pushing have an error.
eg., in my .husky/pre-commit
it will run yarn lint before I commit.
so after solving the error in yarn lint, mine commit works.
Maybe it will help someone, everything worked out for me after changing single quotes to double ones in package.json
I got the same error as well.
Turns out I was running Node v10 when trying to commit, a quick swap over to v16 and all was good.
git config —unset core.hooksPath
This worked for me
You must to verify this because with this command you’re disabling commit checks
I checked mine and saw that my lint-stages config
  "lint-staged": {
    "**/*.{js,jsx,ts,tsx}": [
      "npm run lint"
    ]
  }
was not directly in the root of the package.json
Recently, I noticed that there were repetitive tasks that I was doing for all the new projects. So, I decided to document them so as not to repeat the mistakes. This article is about setting up Prettier, ESLint, Husky in your project.
This article can help you with:
- Keeping your code clean.
- Following standard practices in your code.
- Ensuring that all the tests pass before commit.
- Improving commit quality by adhering to the conventional commit format.
Steps to setup
- Create a React app any way you like. I prefer to do it with
NPX.For TypeScript project:
npx create-react-app my-app --template typescript
For JavaScript project:
npx create-react-app my-app
You can also use
YarnorNPM. You can check out CRA docs for more details. - Open the project:
cd my-app. - Installing dependencies:
With TypeScript:
yarn add -D eslint eslint-plugin-react prettier prettier-eslint eslint-plugin-jest eslint-plugin-react-hooks @typescript-eslint/eslint-plugin @typescript-eslint/parser husky @commitlint/{config-conventional,cli}
The versions of packages at the time of writing are:
"@commitlint/cli": "^13.1.0",
"@commitlint/config-conventional": "^13.1.0",
"@typescript-eslint/eslint-plugin": "^4.29.0",
"@typescript-eslint/parser": "^4.29.0",
"eslint-plugin-jest": "^24.4.0",
"eslint-plugin-react": "^7.24.0",
"eslint-plugin-react-hooks": "^4.2.0",
"prettier-eslint": "^13.0.0"
With JavaScript:
yarn add -D eslint eslint-plugin-react prettier prettier-eslint eslint-plugin-jest eslint-plugin-react-hooks husky @commitlint/{config-conventional,cli}
The versions of dependencies at the time of writing are:
"@commitlint/cli": "^13.1.0",
"@commitlint/config-conventional": "^13.1.0",
"eslint-plugin-jest": "^24.4.0",
"eslint-plugin-react": "^7.24.0",
"eslint-plugin-react-hooks": "^4.2.0",
"prettier-eslint": "^13.0.0"
- Add Prettier config: create
.prettierrcwith this content. Also, install the Prettier plugin in VSCode."jsxBracketSameLine": false,
"eslintIntegration": false,
"tslintIntegration": true,
"stylelintIntegration": false,
"embeddedLanguageFormatting": "auto",
"htmlWhitespaceSensitivity": "css",
"quoteProps": "as-needed",
Note: I prefer this config, you can use Playground and choose what works for you. You can check out the rationale and the options to understand the rules better.
- Add ESLint config: create
.eslintrc.jsonwith this config. Also, install the ESLint plugin in VSCode.For TypeScript:
"plugin:react/recommended",
"plugin:@typescript-eslint/recommended",
"plugin:react-hooks/recommended"
"parser": "@typescript-eslint/parser",
"react/react-in-jsx-scope": "off",
"react-hooks/rules-of-hooks": "error",
"react-hooks/exhaustive-deps": "warn",
"@typescript-eslint/ban-ts-comment": "off",
"@typescript-eslint/explicit-module-boundary-types": "off",
"@typescript-eslint/no-explicit-any": "off"
For JavaScript:
"plugin:react/recommended",
"plugin:react-hooks/recommended"
"react/react-in-jsx-scope": "off",
"react-hooks/rules-of-hooks": "error",
"react-hooks/exhaustive-deps": "warn"
The rules I have used are basically to override the recommended settings. The only addition being the rules of hooks.
Note: Again, these are rules that I prefer, you can add the ones that work for you. You can check ESLint configuration docs to create your rules.
- Add scripts to
package.jsonFor TypeScript:
"lint": "eslint "**/*.{ts,tsx,js,jsx}"",
"prepare": "husky install",
"test": "react-scripts test"
For JavaScript:
"lint": "eslint "**/*.{js,jsx}"",
"prepare": "husky install",
"test": "react-scripts test"
- Resolve lint errors: run
yarn lintand resolve all warnings and errors (if any). You might see warnings and errors like this:warning 'temp' is assigned a value but never used @typescript-eslint/no-unused-vars
✖ 1 problem (0 errors, 1 warning)
- Add Commitlint config:
echo "module.exports = {extends: ['@commitlint/config-conventional']};" > commitlint.config.js
Conventional config is used here, you can also define your config with different rules.
- Install git hooks
yarn prepare / npm prepare
Note: Using Husky with Yarn 2 requires different steps.
- Add hooks: you can add any number of hooks you need. In this case, we are adding a pre-commit hook that will check the linting and run tests. We are also adding a Commitlint hook.
npx husky add .husky/pre-commit 'yarn lint && yarn test --watchAll=false'
npx husky add .husky/commit-msg 'npx --no-install commitlint --edit $1'
For more specific use cases for Husky, you can check the recipes.
Et voila, this is all you needed to do. You can test the hooks by simply committing.
git commit -m "foo: this will fail"
You should see this in the terminal.
⧗ input: foo: this will fail
✖ type must be one of [build, chore, ci, docs, feat, fix, perf, refactor, revert, style, test] [type-enum]
✖ found 1 problems, 0 warnings
ⓘ Get help: https://github.com/conventional-changelog/commitlint/
husky - commit-msg hook exited with code 1 (error)
Note: If you want to skip these hooks, you can commit directly with
-n/--no-verifyoption likegit commit -m "yolo!" --no-verify
If you are starting with a new project, you can clone these repos with all the steps already done.
theankurkedia/react-starter-ts-template
A React TypeScript starter project with basic optimal configuration for development
github.com
theankurkedia/react-starter-template
A React starter project with basic optimal configuration for development
github.com
How you use hooks is largely up to you, but there are a few popular use cases worth highlighting in this post. Let’s have a look at five of them.
In this guide, you’ll learn how to:
- Validate branch names.
- Run a linter to check commit messages.
- Run a linter to style/format committed code.
- Compress any images added to the project.
- Run Jest tests to ensure that nothing will break.
For this fun project, we’ll be using a fresh installation of Gatsby, but any JavaScript project would do. Let’s get started!
Getting Started with Husky
Like any node package, you can install Husky with npm or yarn:
$ npm install husky --save-devOnce installed, you will also need to run this command to enable Git hooks:
$ npx husky installFinally, let’s edit the package.json file so that it automatically runs this last command after installation:
// package.json
{
  "scripts": {
    "prepare": "husky install"
  }
}
That’s it! Husky is ready to be used on the command line, but we should also make sure everything is set up nicely in Tower, our Git client, as well.
We make Tower, the best Git client.
Not a Tower user yet?
Download our 30-day free trial and experience a better way to work with Git!
Husky and Tower
When you have some Git hooks configured in Husky, you will get an error message in Tower when you attempt to add a commit. Something like:
.husky/pre-commit: line 4: npx: command not found
husky - pre-commit hook exited with code 127 (error)
husky - command not found in PATH=/Library/Developer/CommandLineTools/usr/libexec/git-core:/Applications/Tower.app/Contents/Resources/git-flow:/Applications/Tower.app/Contents/Resources/git-lfs:/usr/local/bin:/usr/local/sbin:/usr/bin:/usr/sbin:/bin:/sbin
Let’s fix that!
As described here, this happens because GUI apps don’t know the environment set up by your shell. To fix this, we will need to add an environment.plist file in ~/Library/Application Support/com.fournova.Tower3/ and define the PATH environment.
The location will vary depending on your environment. I’m using asdf-nodejs to manage my Node.js versions, so my environment.plist file looks like this:
<?xml version="1.0" encoding="UTF-8"?>
<!DOCTYPE plist PUBLIC "-//Apple//DTD PLIST 1.0//EN" "http://www.apple.com/DTDs/PropertyList-1.0.dtd">
<plist version="1.0">
  <dict>
    <key>PATH</key>
        <string>/usr/local/bin:/usr/local/sbin:/usr/bin:/usr/sbin:/bin:/sbin:/Users/brunobrito/.asdf/shims</string>
  </dict>
</plist>
After saving this file and restarting Tower, everything looks good to go.
Back to the command line — time for our first hook!
1. Validating Branch Names
This hook can be handy when you want to make sure that every branch name follows a specific pattern, such as starting with feature, fix, or release.
There’s a little npm package that can help us in this process: validate-branch-name. It comes with nice defaults out of the box, that you can further customize with some regex knowledge.
First, let’s install this package:
$ npm install validate-branch-name --save-devNow, let’s add it to Husky as a «pre-commit» hook by running the following command:
$ npx husky add .husky/pre-commit "npx validate-branch-name"You’ll notice that the npx validate-branch-name has been added to Husky’s pre-commit file inside Husky’s hidden folder (.husky/pre-commit).
Let’s try it! Start by creating a branch that does not follow this naming convention, like «test». As soon as you add a commit, you will be presented with the following error message:
Result: "failed"
Error Msg: Branch name validate failed please rename your current branch
Branch Name: "test"
Pattern:"/^(master|main|develop){1}$|^(feature|fix|hotfix|release)/.+$/g"
husky - pre-commit hook exited with code 1 (error)
Great! It’s working as intended. Let’s shift gears to commit messages.
2. Linting Commit Messages
If you already follow the guidelines from the Angular team, you’re in luck: we’ll use commit-msg-linter, a package that enforces them.
Setting it up is similar to the previous example. First we run the usual installation command…
$ npm install git-commit-msg-linter --save-devAnd now we’ll add it to Husky (as a «commit-msg» hook this time):
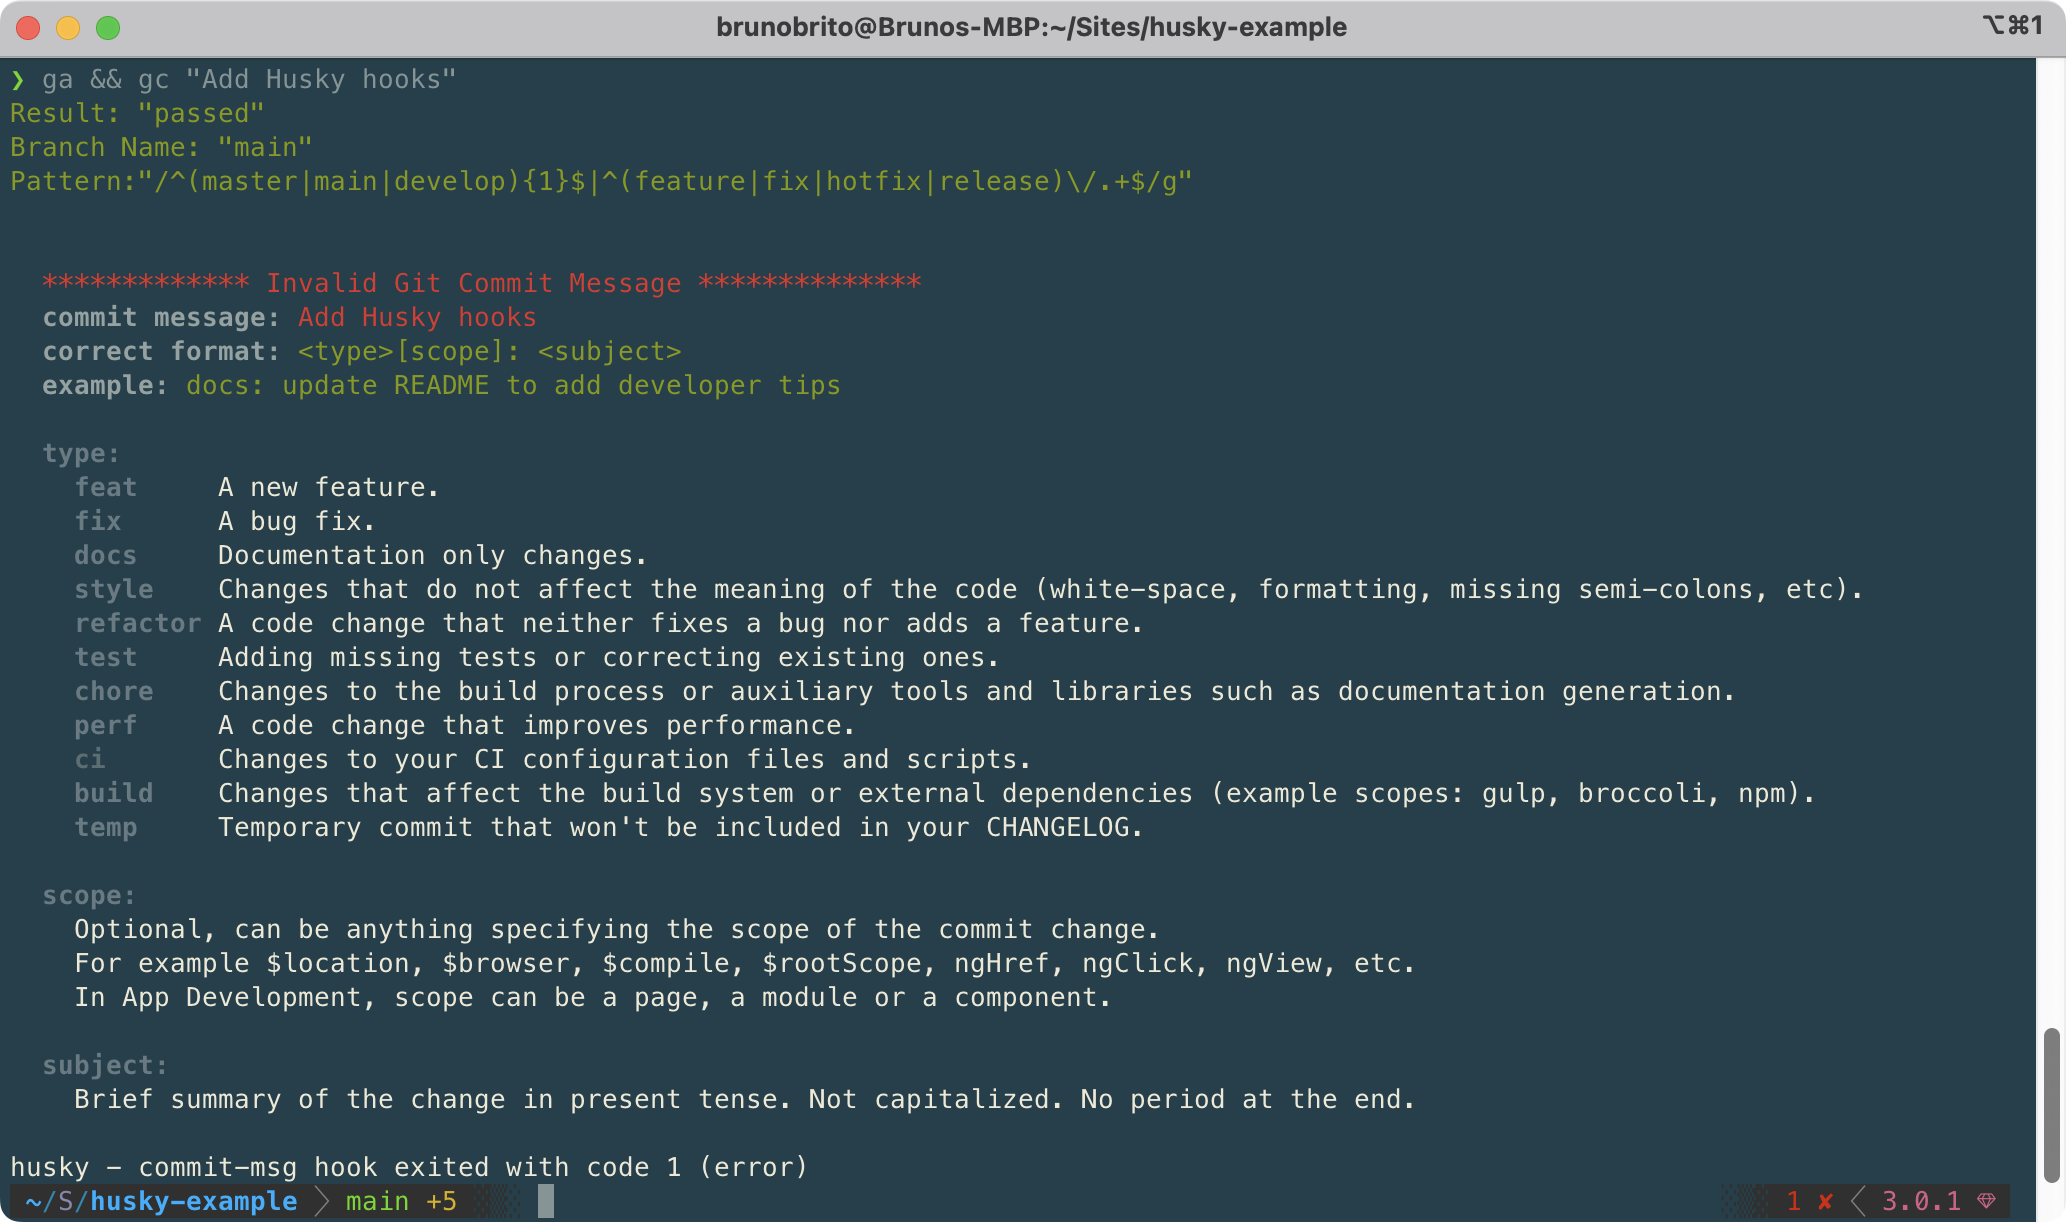
$ npx husky add .husky/commit-msg ".git/hooks/commit-msg $1"To try it out, let’s add a commit message that does not follow Angular’s guidelines, such as «Add Husky hooks». The branch’s name, main, is accepted, but the commit message isn’t, so the commit is aborted:
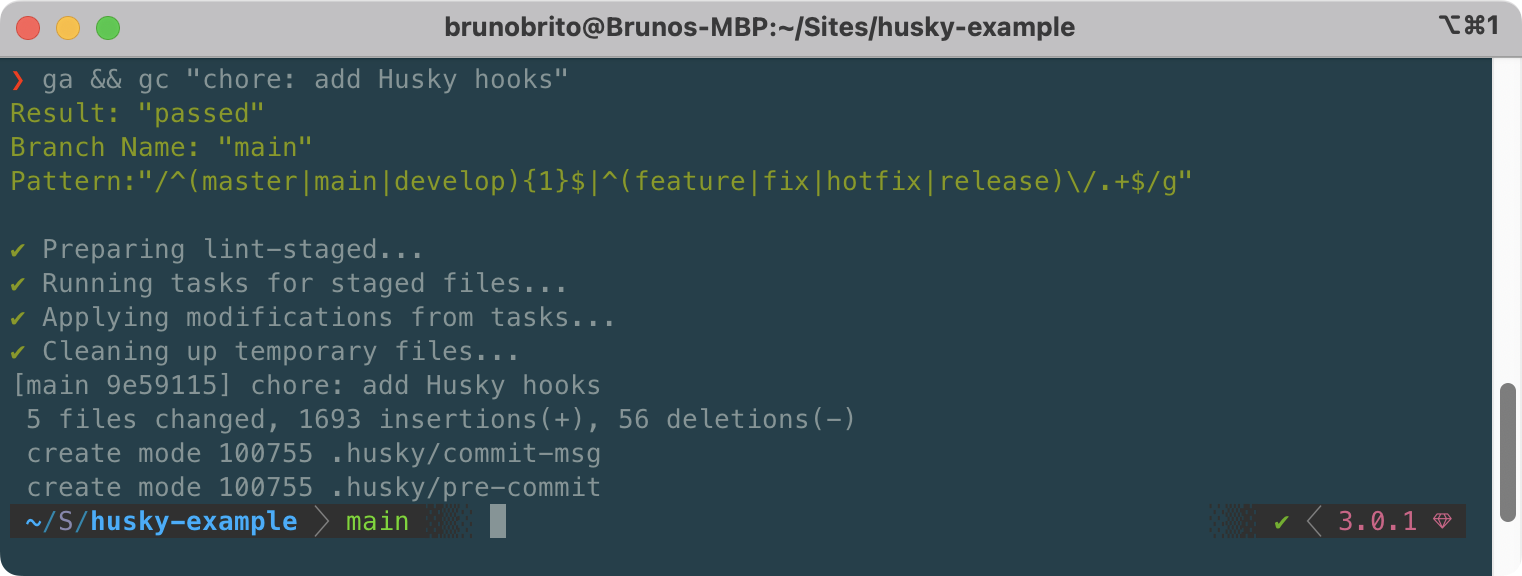
If we actually follow the Angular conventions, the commit will go through. Two down, three to go!
3. Linting Code
We’re big believers that linters boost developer productivity, so let’s make sure that any code submitted to the repository is properly linted.
We will use not one, but two node packages to achieve this task: lint-staged and Prettier.
lint-staged will be used to run checks on staged files (instead of checking the entire project). Then, Prettier will be responsible for the actual formatting and linting (you could definitely go for ESLint instead!).
Let’s install both packages:
$ npm install lint-staged prettier --save-devNow, let’s add the npx lint-staged command as a new line to the «pre-commit» hook:
$ npx husky add .husky/pre-commit "npx lint-staged"Finally, let’s set up lint-staged in the `package.json file so that it runs Prettier on JS files:
// package.json
{
  "scripts": {
    "prepare": "husky install"
  },
  "lint-staged": {
    "**/*.js": "prettier --write --ignore-unknown"
  },
  ...
}
Done! Our JS code will be properly formatted before our commit is added.
We make Tower, the best Git client.
Not a Tower user yet?
Download our 30-day free trial and experience a better way to work with Git!
4. Compressing Staged Images
While Gatsby does a great job at delivering the best possible images to the user, that’s not always the case with other frameworks — and running tools like ImageOptim every time can be tedious and easy to forget.
Let’s add a little script that automatically compresses any images added to the project. We’ll use ImageOptim-CLI to accomplish this task. You can, of course, use squoosh or imagemin instead.
Let’s first install it (globally):
$ npm install -g imageoptim-cliSince we only want to compress staged files, let’s add the imageoptim command to lint-staged (ImageOptim is smart enough to only look for image file formats):
// package.json
{
  "scripts": {
    "prepare": "husky install"
  },
  "lint-staged": {
    "**/*.js": "prettier --write --ignore-unknown",
    "**/*": "imageoptim"
  },
  ...
}
That’s all there is to it! ImageOptim will automatically launch, compress any images you had in the staging area, and close.
5. Running Tests
Last one! Let’s install Jest to run tests by typing a command I’m sure you already know by heart:
$ npm install --save-dev jestNow, let’s add a «test» script to our package.json file:
// package.json
{
  "scripts": {
    "prepare": "husky install",
    "test": "jest"
  },
  "lint-staged": {
    "**/*.js": "prettier --write --ignore-unknown",
    "**/*": "imageoptim"
  },
  ...
}
After adding a new JS file and a .test.js file with the actual test, we can run npm test to run Jest.
The output should look similar to this:
> jest
PASS ./sum.test.js
✓ adds 1 + 2 to equal 3 (1 ms)
Test Suites: 1 passed, 1 total
Tests: 1 passed, 1 total
Snapshots: 0 total
Time: 0.213 s
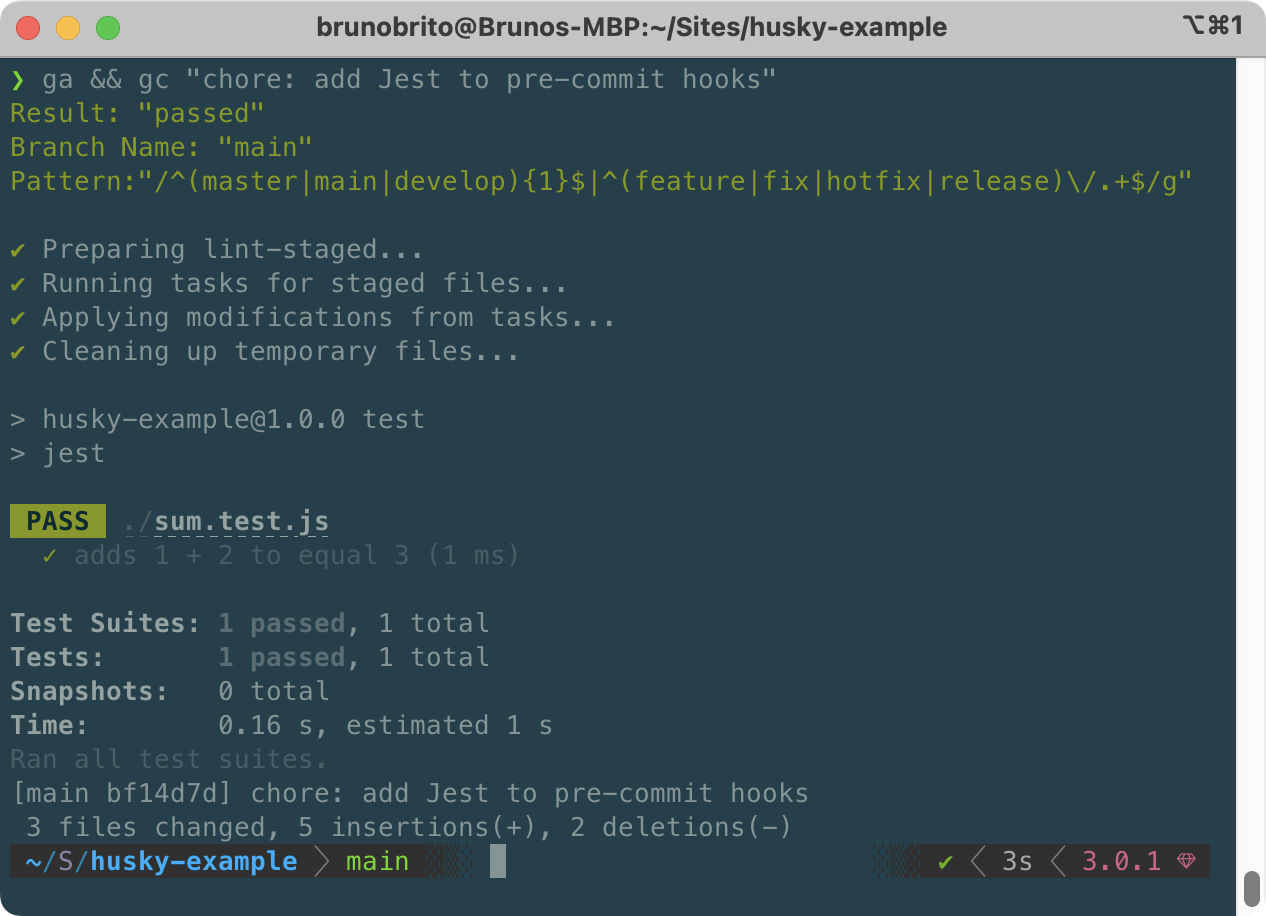
Ran all test suites.Finally, let’s add our npm test script to our «pre-commit» hook by following the steps mentioned previously:
$ npx husky add .husky/pre-commit "npm test"Now, when we add a commit, all five hooks will run. A thing of beauty!
Hurray! We have successfully set up five different Git hooks! 🥳
While hooks can be helpful, there will be times where skipping the execution of these scripts can make sense. While it should be the exception, not the norm, let’s figure out how we can bypass them.
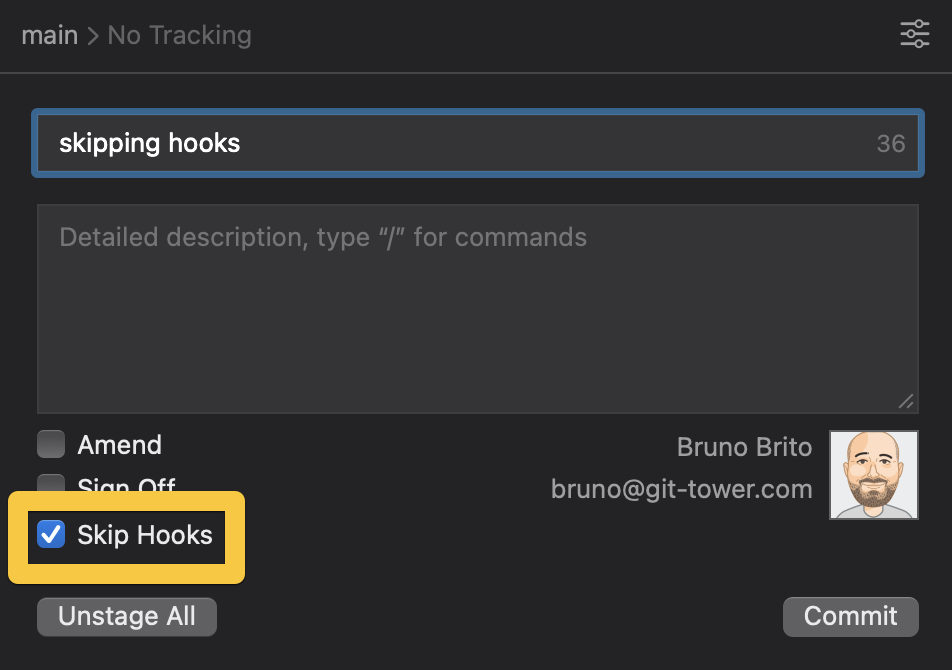
Skipping Hooks
In the terminal, you can bypass hooks by adding the --no-verify option, like in this example:
$ git commit -m "skipping hooks" --no-verifyIn Tower, you can easily skip the execution of hooks by checking the «Skip Hooks» checkbox in the «Commit Composing» window. The option will automatically be displayed if you have any «pre-commit» hooks configured.
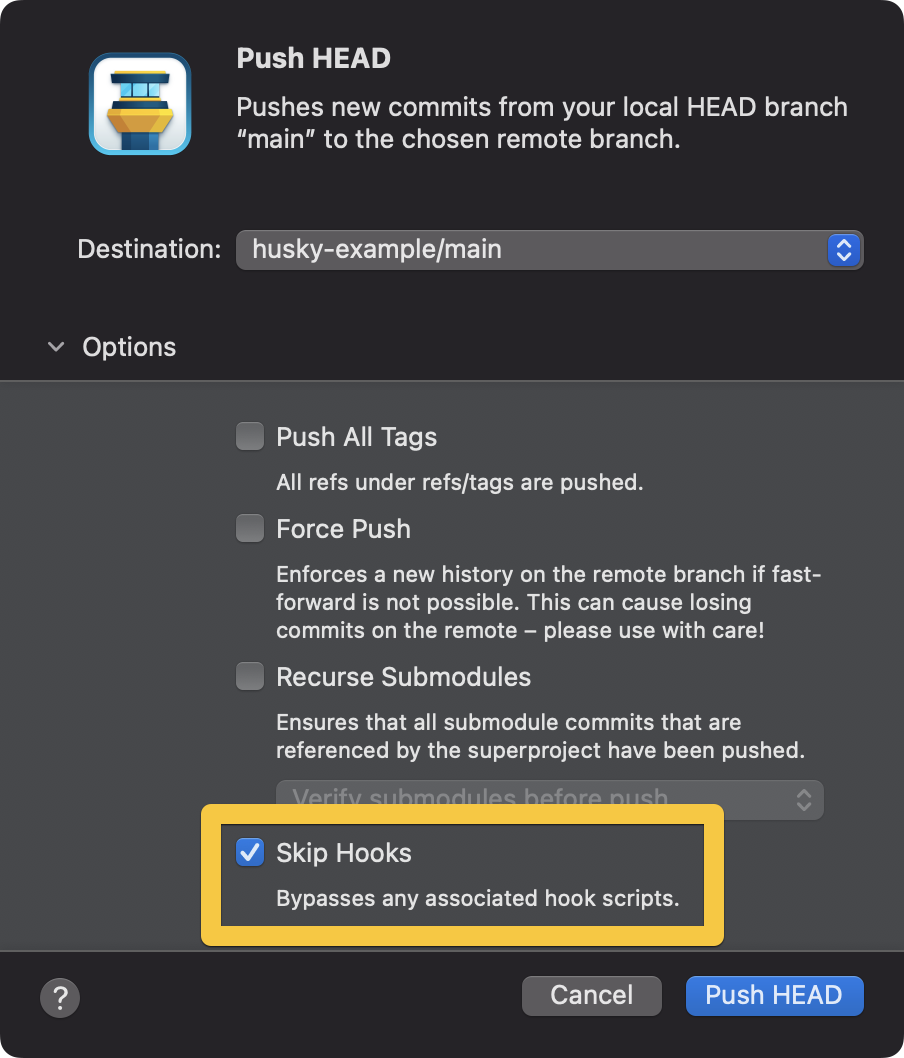
To skip the execution of hooks for push, pull, merge, rebase, and apply operations, click on «Options» to access the list of additional options.
Final Words
When it comes to automation, each case is unique, and the sky is the limit — hooks are no exception. We hope you found this post useful to get started with Husky!
For more tips, don’t forget to sign up for our newsletter below and follow Tower on Twitter!
Join Over 100,000 Developers & Designers
Be the first to know about new content from the Tower blog as well as giveaways and freebies via email.