New issue
Have a question about this project? Sign up for a free GitHub account to open an issue and contact its maintainers and the community.
By clicking “Sign up for GitHub”, you agree to our terms of service and
privacy statement. We’ll occasionally send you account related emails.
Already on GitHub?
Sign in
to your account
Closed
dopoto opened this issue
Sep 8, 2021
· 8 comments
Closed
Code 127 error
#1038
dopoto opened this issue
Sep 8, 2021
· 8 comments
Comments
![]()
Troubleshoot
- [ x ] Before creating an issue, please check:
https://typicode.github.io/husky/#/?id=troubleshoot
Context
We had husky 7.0.1 working fine in our repo. But a few days ago it stopped working in Visual Studio, throwing this error:
/usr/bin/env: 'bash': No such file or directory. husky - pre-commit hook exited with code 127 (error)
The problem persists even after re-running the husky prepare npm script.
Commits work fine in the same repo if done from Visual Studio Code or by using the git command line.
![]()
Hi @dopoto,
It seems to be an issue with Visual Studio, probably related to PATH and environment. You can check if it’s related to husky’s code by changing .husky/pre-commit to:
#!/bin/sh
# exit 1 will prevent commit to happen, so you can more easily debug things
echo "it's working" && exit 1
If you see «it’s working» then it’s not related to husky’s script.
Hope it helps.
![]()
@typicode Thank you! Tried it and saw the «it’s working message».
I’m still stuck with the problem, though — the line that is crashing is: npx pretty-quick --staged. If I run that command I get a success message:
PS C:MyApp> npx pretty-quick —staged
🔍 Finding changed files since git revision 0….
🎯 Found 0 changed files.
✅ Everything is awesome!
![]()
Hi all,
You need to update your PATH on Windows to properly target cygpath executable, which was in my case, the main problem.
Just add C:Program FilesGitusrbincygpath.exe to you PATH environment variable and it should work perfectly 😉
Try and let us know.
greathiago, przemyslawszafranski-ttc, ChristianNextia, dungmt8, Aayushd18, Hck3r1, Alik1604, and OASHAH reacted with thumbs down emoji
rlkissinger reacted with hooray emoji
mdarefull, brcls, Maheshbabu28, alefduarte, 8lad, Veylkh, Dzmitryi25, hitmain13, guru-uppalapati, and rlkissinger reacted with rocket emoji
![]()
![]()
Boom! 💥
Thanks for the feedback, you can now safely close this issue 😉
Have a nice day!
![]()
cygpath
and how can that be done on linux ?
![]()
cygpath
and how can that be done on linux ?
Yes ! Linux too please !
![]()
Adding C:Program FilesGitbin to System Variables worked for me
Environment
- Node installed in
~/node-v14.15.3-linux-x64/bin/nodeand already setup in thePATHvariable. - VSCode 1.55.2
Problem
every time when i try to commit the changes in my code i get:
.husky/pre-commit: 4: npx: not found
husky — pre-commit hook exited with code 127 (error)
Code
- husky.sh
#!/bin/sh
if [ -z "$husky_skip_init" ]; then
  debug () {
    [ "$HUSKY_DEBUG" = "1" ] && echo "husky (debug) - $1"
  }

  readonly hook_name="$(basename "$0")"
  debug "starting $hook_name..."

  if [ "$HUSKY" = "0" ]; then
    debug "HUSKY env variable is set to 0, skipping hook"
    exit 0
  fi

  if [ -f ~/.huskyrc ]; then
    debug "sourcing ~/.huskyrc"
    . ~/.huskyrc
  fi

  export readonly husky_skip_init=1
  sh -e "$0" "$@"
  exitCode="$?"

  if [ $exitCode != 0 ]; then
    echo "husky - $hook_name hook exited with code $exitCode (error)"
    exit $exitCode
  fi

  exit 0
fi
- pre-commit file
#!/bin/sh
. "$(dirname "$0")/_/husky.sh"

npx lint-staged
npx lint-staged
What i tried
- adding this
"terminal.integrated.inheritEnv": false,insettings.json - exporting node & npx in
.huskyrclike so:
export NODEJS_HOME="$HOME/node-v14.15.3-linux-x64/bin"
export NPX_Dir="$HOME/node-v14.15.3-linux-x64/bin/npx"
But none worked
Note
when commiting the changes from the terminal of vscode usinggit commit, the pre-commit script runs normally.
The docs states that:
You can echo $PATH in your terminal and configure your app to use the same value.
So, How can i do that?
asked Apr 19, 2021 at 13:14
![]()
My .zshrc contained
export PATH="/opt/homebrew/opt/node@16/bin:$PATH"
which adds add my node to my PATH as a part of the zsh configuration process.
So I just copied and placed the same line into a .huskyrc file
$ echo 'export PATH="/usr/local/opt/node@10/bin:$PATH"' >> ~/.huskyrc
answered Aug 3, 2022 at 19:42
![]()
Содержание
- Husky pre-commit hook not working #1106
- Comments
- Discussion on: [2021] Setting up Husky pre-commit hook with ESLint, Prettier and lint-staged for React and React Native.
- Husky pre commit hook exited with code 127 error
- husky — pre-commit hook exited with code 3 (error) #1176
- Comments
- Footer
Husky pre-commit hook not working #1106
Version info
- OS: macOS Big Sur 11.2.3
- Build: 2049
Description
My repo has a pre-commit hook and is not working only in Sublime Merge.

I already have the 2.5.5 version of ruby . I think it’s trying to use my global gems instead of my local gems.
If I create a commit from my terminal, I have no problems. There’s no issue with the repo and ruby; this only happens when trying to create a commit from Sublime Merge.
The text was updated successfully, but these errors were encountered:
Thanks for reaching out to the Sublime Merge team — I will be investigating this further.
When you have a spare moment, could you:
- Try switching Sublime Merge to use system Git and see if this resolves the issue
- Open Sublime Merge
- Navigate to Preferences > Preferences. > Advanced
- Set Git Binary to system
- Share your Sublime Merge git version debug information
- Open Sublime Merge
- Navigate to Help > Debug Information
- Share the section of the debug information labelled === Git Version Information === here
- Confirm which shell you are using on the terminal e.g. zsh (if you’re unsure, it should say in the title of the terminal window)
Changing Git Binary to system didn’t fix the issue 😢
=== App Version Information ===
Build: 2049
=== Git Version Information ===
Using Git: git (system)
git version 2.24.3 (Apple Git-128)
PATH: /Users/micaelawolman/.rvm/gems/ruby-2.7.1/bin:/Users/micaelawolman/.rvm/gems/ruby-2.7.1@global/bin:/Users/micaelawolman/.rvm/rubies/ruby-2.7.1/bin:/usr/local/bin:/usr/bin:/bin:/usr/sbin:/sbin:/Applications/Postgres.app/Contents/Versions/latest/bin:/Users/micaelawolman/.rvm/bin (from shell)
environment variables loaded using: /bin/zsh -l
=== Browse Page Information ===
HEAD: 223c7d0b06f7d7fc3e77a4c41f21cddc81678908
Is in merge: 0
Is in cherry_pick: 0
Is in rebase: 0
Is in revert: 0
=== Git Status Information ===
M spec/models/document_spec.rb
=== Our Status Information ===
M spec/models/document_spec.rb
=== Git Config Information ===
branch.i18n-locale-in-documents.merge=refs/heads/i18n-locale-in-documents
branch.i18n-locale-in-documents.remote=origin
branch.master.merge=refs/heads/master
branch.master.remote=origin
core.bare=false
core.filemode=true
core.ignorecase=true
core.logallrefupdates=true
core.precomposeunicode=true
core.repositoryformatversion=0
credential.helper=osxkeychain
remote.origin.fetch=+refs/heads/:refs/remotes/origin/
remote.origin.url=https://github.com/yankaindustries/masterclass.git
user.email=micaelawolman@gmail.com
user.name=Micaela Wolman
=== Our Config Information ===
Git Config Path Information
Using config path: /etc/gitconfig
Using config path: /Users/micaelawolman/.config/git/config
Using config path: /Users/micaelawolman/.gitconfig
Using config path: /Users/micaelawolman/Documents/masterclass/.git/config
Our config output is identical to the Git config output
=== Git Attributes Information ===
git check_attr —all output
=== Our Modified Files Newline Normalisation and EOL Information ===
=== Our Modified Files Flag Information ===
Ignoring symlinks: 0
I’m using zsh , didn’t understand where I should see it
Источник
Discussion on: [2021] Setting up Husky pre-commit hook with ESLint, Prettier and lint-staged for React and React Native.

i am getting this error, did the same procedure
.husky/pre-commit: 4: npx: not found
husky — pre-commit hook exited with code 127 (error)

Install npx first and then follow the same.
command to install npx ?
1 like Like Thread
1 like Like Thread
Some comments have been hidden by the post’s author — find out more
For further actions, you may consider blocking this person and/or reporting abuse
DEV Community 👩💻👨💻 — A constructive and inclusive social network for software developers. With you every step of your journey.
Built on Forem — the open source software that powers DEV and other inclusive communities.
Made with love and Ruby on Rails. DEV Community 👩💻👨💻 © 2016 — 2023.
We’re a place where coders share, stay up-to-date and grow their careers.
Источник
Husky pre commit hook exited with code 127 error
After upgrade to husky v5, git commit from vscode always fail (via terminal is ok).

npm version: 7.5.1
node version: 15.8.0
Hooks
Created at 2 weeks ago
Created at 1 year ago
The same issue with Webstorm and npm:
.husky/pre-push: 4: npm: not found
I have tried to run npm run lint on pre-commit.
Everything is fine when I use a terminal for commit but not the Webstorm commit dialog.
Created at 1 year ago
@RigottiG I also had the issue with VSCode.
I’m using nvm, and creating an
/.huskyrc file as the Typicode recommended fixed it.
Created at 1 year ago
Having the same issue, but the suggestion by typicode doesn’t work:
I guess the issue can be resolved by updating the $PATH used by VSCode’s Git process, but not sure where to find that.
Created at 1 year ago
Hi @typicode I have the same issue.
Created at 1 year ago
Hi @typicode
There are too many such problems. May I suggest that this step should be implemented by the package itself(husky.sh).
In this way, most users do not need to set up the .huskyrc file. Although more work needs to be done, I think it is worth it.
I can provide the code I have used(pre-commit)
/.huskyrc» to «.huskyrc». It is convenient for a third party to help modify it.
For the great library, cheers!
Created at 1 year ago
In the meantime, I was able to resolve my issue by setting the right PATH variables via source
/.profile in the pre-commit file
Created at 1 year ago
In the meantime, I was able to resolve my issue by setting the right PATH variables via source
/.profile in the pre-commit file
I ended in the following post which recommends the same approach in intellij apps
https://ntsim.uk/posts/running-git-hooks-with-environment-variables-in-intellij
Created at 1 year ago
Is there any way I can solve this within the project folder ? we have a large group of developers (and it’s growing), I cannot tell everyone to create a husky config file on their computer to solve the issue.
This problem may trouble most of developers who use vscode’s git to commit, cause it might not resolve the correct path, at least in the version 1.58.0
you found any solution?
Created at 1 year ago
I use VS Code and husky 7. Yesterday everything was working, today I tried to commit and got the same error
.husky/pre-commit: line 4: npm: command not found
Created at 1 year ago
Met the same problem, I wonder what command did VS Code use to run the git command? It seem to have ignored my .bashrc , .profile and nvm.fish , which shell does it use?
Created at 1 year ago
I downgraded VS Code to the previous version and it fixed the problem.
Created at 1 year ago
FYI for those using brew to determine paths, apparently that can cause issues, too.
This definitely seems like a bug in VSCode. In the meantime, you’ll probably need to just reference the exact path needed for anything relying on brew —prefix whatever .
For example, I use asdf for versioning npm . asdf has a setup script that gets all the shims set properly in your path, and that script is usually loaded by running . «$(brew —prefix asdf)/asdf.sh» in your .zshrc file. So in my case, I needed to just hardcode the path returned from brew and put the resulting command in my
Created at 1 year ago
I use VS Code and Husky v6.
I ran echo $PATH from the root of my project.
Then I copied the output to the pre-commit file in the .husky directory.
My pre-commit file looks like this:
Solved the issue for me.
Created at 1 year ago
Is there any way I can solve this within the project folder ? we have a large group of developers (and it’s growing), I cannot tell everyone to create a husky config file on their computer to solve the issue.
This problem may trouble most of developers who use vscode’s git to commit, cause it might not resolve the correct path, at least in the version 1.58.0
you found any solution?
same here. Did you find a way to fix this?
Created at 1 year ago
It’s not ideal to have to tell all our devs to go and add this PATH, is there any way that this can be done inside the library itself? I might just go back to husky v4 using package.json which was actually a bit more straightforward.
Created at 1 year ago
export NVM_DIR=»$HOME/.nvm/nvm.sh»
. «$(dirname $NVM_DIR)/nvm.sh»
This worked for me and at least it can be checked into source control so it’s a fix for all devs.
Источник
husky — pre-commit hook exited with code 3 (error) #1176
I have an issue with husky and the pre-commits on a project. I have husky set up on other projects and it is working. On this specific project I can not commit anymore but my colleagues can. No matter the commit, even empty, I have this error: husky — pre-commit hook exited with code 3 (error)
I have tried a bunch of things, and deleting the node_modules, husky.sh and .git/hooks and trying to find information on the error code 3 online but could not find anything. Would you know what code 3 matches to please?
I have the version 8.0.1 in a node project, using yarn.
The pre-commit file:
#!/usr/bin/env sh
. «$(dirname — «$0″)/_/husky.sh»
export NVM_DIR=»$HOME/.nvm»
[ -s «$NVM_DIR/nvm.sh» ] && . «$NVM_DIR/nvm.sh»
The husky.sh file:
#!/usr/bin/env sh
if [ -z «$husky_skip_init» ]; then
debug () <
if [ «$HUSKY_DEBUG» = «1» ]; then
echo «husky (debug) — $1»
fi
>
readonly hook_name=»$(basename — «$0″)»
debug «starting $hook_name. «
if [ «$HUSKY» = «0» ]; then
debug «HUSKY env variable is set to 0, skipping hook»
exit 0
fi
/.huskyrc ]; then
debug «sourcing
readonly husky_skip_init=1
export husky_skip_init
sh -e «$0» «$@»
exitCode=»$?»
if [ $exitCode != 0 ]; then
echo «husky — $hook_name hook exited with code $exitCode (error)»
fi
if [ $exitCode = 127 ]; then
echo «husky — command not found in PATH=$PATH»
fi
exit $exitCode
fi
Thanks for your help!
The text was updated successfully, but these errors were encountered:
Make sure you have permissions in all your folders / files from administrator profile- this solved it for me
Try adding -x to the sh -e «$0» «$@» line. This will enable tracing mode.
So make it look like: sh -x -e «$0» «$@»
we had this issue on one of my colleagues and it turned out it was a minor version difference for node. Specifically he was running node 16.17 and the .nvmrc file for the project specified 16.13. So we installed 16.13 on his computer, changed to using that version and problem solved!
- go to the root of your project and check the .nvmrc file for the version of Node that the project requires.
- Install that version using nvm install vXX.XX (the minor version must match)
- That should automatically set that version of node to active, but just to be sure, use nvm use XX.XX for the correct minor version.
- Run your commit again.
Hopefully that will solve it! Step 3 may not even be necessary as it should automatically set the version of node to the version shown in .nvmrc while husky is running once that minor version is, in fact, installed on your machine. On my computer I have node 18.7.0 running and I had no issues since I did have 16.13 installed but not active.
Hi, thanks all for your suggestions. What ended up working for me was to remove 2 lines from my pre-commit file:
export NVM_DIR=»$HOME/.nvm»
[ -s «$NVM_DIR/nvm.sh» ] && . «$NVM_DIR/nvm.sh»
© 2023 GitHub, Inc.
You can’t perform that action at this time.
You signed in with another tab or window. Reload to refresh your session. You signed out in another tab or window. Reload to refresh your session.
Источник
Code 127 error #1038
Comments
dopoto commented Sep 8, 2021
Troubleshoot
Context
We had husky 7.0.1 working fine in our repo. But a few days ago it stopped working in Visual Studio, throwing this error:
/usr/bin/env: ‘bash’: No such file or directory. husky — pre-commit hook exited with code 127 (error)
The problem persists even after re-running the husky prepare npm script.
Commits work fine in the same repo if done from Visual Studio Code or by using the git command line.
The text was updated successfully, but these errors were encountered:
typicode commented Sep 23, 2021
It seems to be an issue with Visual Studio, probably related to PATH and environment. You can check if it’s related to husky’s code by changing .husky/pre-commit to:
If you see «it’s working» then it’s not related to husky’s script.
dopoto commented Sep 23, 2021 •
@typicode Thank you! Tried it and saw the «it’s working message».
I’m still stuck with the problem, though — the line that is crashing is: npx pretty-quick —staged . If I run that command I get a success message:
PS C:MyApp> npx pretty-quick —staged
🔍 Finding changed files since git revision 0.
🎯 Found 0 changed files.
✅ Everything is awesome!
xavierfoucrier commented Oct 11, 2021
You need to update your PATH on Windows to properly target cygpath executable, which was in my case, the main problem.
Just add C:Program FilesGitusrbincygpath.exe to you PATH environment variable and it should work perfectly 😉
Try and let us know.
dopoto commented Oct 11, 2021
@xavierfoucrier That worked, thanks a lot!
xavierfoucrier commented Oct 11, 2021
Boom! 💥
Thanks for the feedback, you can now safely close this issue 😉
Have a nice day!
anaslaham commented Oct 4, 2022
cygpath
and how can that be done on linux ?
mathieu2em commented Dec 3, 2022
cygpath
and how can that be done on linux ?
Yes ! Linux too please !
Footer
© 2023 GitHub, Inc.
You can’t perform that action at this time.
You signed in with another tab or window. Reload to refresh your session. You signed out in another tab or window. Reload to refresh your session.
Источник
Precommit hook fails inside Visual Studio 2019 #673
Comments
lucipacurar commented Feb 19, 2020 •
I have git version 2.24.1.windows.2 , husky 4.2.3 , VS2019 16.4.5 , pretty-quick 2.0.1 and husky fails to run inside VS2019 only with the following message:
But it works perfectly fine from git bash and other git clients like SourceTree and Tortoise. I’m not sure how can I run husky in debug mode from VS so I can provide you with the debug log. With husky 3.1.0 it works just fine. Please let me know if you need more info. Thank you 🙂
The text was updated successfully, but these errors were encountered:
longcui commented Mar 2, 2020
same issue here
volser commented Mar 4, 2020
same issue but for GitHub Desktop for Windows
davidwilliams94 commented Mar 12, 2020 •
I also have this issue. As suggested, downgrading Husky to 3.1.0 appears to fix it
vmo-mgosling commented Mar 16, 2020 •
Also having this issue with GitHub Desktop.
A few of our staff use GitHub Desktop, hopefully this issue gets fixed. 3.1.0 is quite old.
barisusakli commented Apr 25, 2020
Slettan commented Apr 25, 2020
Thanks for the link, this worked for me:
nycgavin commented Aug 14, 2020
Thanks for the link, this worked for me:
Try
«husky»: <
«hooks»: <
«pre-commit»: «npx pretty-quick —staged»
>
>
aminya commented Sep 23, 2020
This is not specific to Visual Studio.
I have the same error with commit lint on GitHub desktop or Atom.
conventional-changelog/commitlint#1665
lloydtao commented Sep 26, 2020
i have this issue on GitHub Desktop.
removing this from my package.json instantly fixes the problem:
the error log gives a small indication of what’s happening.
it incorrectly looks in:
where the real path is:
rlam3 commented Oct 7, 2020
@lloydtao Were you able to find a workaround solution?
jxmejia commented Jan 20, 2021
Hi! A brute solution is removing whatever hook (e.g. husky ) folder located inside your .git folder
aminya commented Jan 20, 2021 •
Hi! A brute solution is removing whatever hook (e.g. husky ) folder located inside your .git folder
Well, I actually do this. Other people use Husky in their projects, and when I want to contribute to their projects, I get rid of the hooks first so I can commit a change! 🙄
You can also remove the husky entry from package.json
typicode commented Jan 26, 2021
Not sure but it seems to be a PATH issue. Could you try logging PATH?
BarakMaozCIQ commented Jan 28, 2021 •
I have an issue here, someone knows how to solve it?
I’m using GitHub desktop and I want to use «pretty-quick», I tried to add it from package.json and I tried to add it on separate js files but it’s still not working
*when I change the husky version to 3.1.0 it’s working, so the issue is in husky probably 

lucipacurar commented Jan 28, 2021
@BarakMaozCIQ you have some workarounds posted above. You can change the script to be run on precommit with npx pretty-quick —staged
viceice commented Apr 9, 2021
It’s a visual studio issue, in the included git version the cygpath.exe is missing.
aminya commented Apr 9, 2021
It is actually a Husky problem. I had the issue with GitHub Desktop, not Visual Studio. Husky v1 works fine for example.
viceice commented Apr 9, 2021 •
Nope, it’s a problem of the used git distribution. cygpath seems also be missing in github desktop.
The included bash sets MSYS env, which causes the npm shell wrapper to use cygpath.
lucksp commented Apr 15, 2021 •
committing on my terminal works fine. Committing on GitHub Desktop results in Error:
.husky/pre-commit: line 4: npx: command not found
husky — pre-commit hook exited with code 127 (error)
aminya commented May 10, 2021 •
@viceice Microsoft has closed your issue meaning this is a Husky issue and it should be fixed independently of the environment that Husky is being used in (Visual Studio, GitHub Desktop, Atom, etc).
Источник
Getting Started with Git Hooks and Husky
Table of Contents
When you’re looking to enforce policies and ensure consistency among team members, Git Hooks can be a helpful solution. By running custom scripts before or after Git operations occur, you can prevent commits from being added to a repository and notify team members that there are changes needed to be made.
Let’s see how this works in practice with Husky, a popular JavaScript package that allows us to add Git Hooks to our JS projects with ease.
How you use hooks is largely up to you, but there are a few popular use cases worth highlighting in this post. Let’s have a look at five of them.
In this guide, you’ll learn how to:
- Validate branch names.
- Run a linter to check commit messages.
- Run a linter to style/format committed code.
- Compress any images added to the project.
- Run Jest tests to ensure that nothing will break.
For this fun project, we’ll be using a fresh installation of Gatsby, but any JavaScript project would do. Let’s get started!
Getting Started with Husky
Like any node package, you can install Husky with npm or yarn :
Once installed, you will also need to run this command to enable Git hooks:
Finally, let’s edit the package.json file so that it automatically runs this last command after installation:
That’s it! Husky is ready to be used on the command line, but we should also make sure everything is set up nicely in Tower, our Git client, as well.
We make Tower, the best Git client.
Not a Tower user yet?
Download our 30-day free trial and experience a better way to work with Git!
Husky and Tower
When you have some Git hooks configured in Husky, you will get an error message in Tower when you attempt to add a commit. Something like:
As described here, this happens because GUI apps don’t know the environment set up by your shell. To fix this, we will need to add an environment.plist file in
/Library/Application Support/com.fournova.Tower3/ and define the PATH environment.
The location will vary depending on your environment. I’m using asdf-nodejs to manage my Node.js versions, so my environment.plist file looks like this:
After saving this file and restarting Tower, everything looks good to go.
Back to the command line — time for our first hook!
1. Validating Branch Names
This hook can be handy when you want to make sure that every branch name follows a specific pattern, such as starting with feature , fix , or release .
There’s a little npm package that can help us in this process: validate-branch-name. It comes with nice defaults out of the box, that you can further customize with some regex knowledge.
First, let’s install this package:
Now, let’s add it to Husky as a «pre-commit» hook by running the following command:
You’ll notice that the npx validate-branch-name has been added to Husky’s pre-commit file inside Husky’s hidden folder ( .husky/pre-commit ).
Let’s try it! Start by creating a branch that does not follow this naming convention, like «test». As soon as you add a commit, you will be presented with the following error message:
Great! It’s working as intended. Let’s shift gears to commit messages.
2. Linting Commit Messages
If you already follow the guidelines from the Angular team, you’re in luck: we’ll use commit-msg-linter, a package that enforces them.
Setting it up is similar to the previous example. First we run the usual installation command.
And now we’ll add it to Husky (as a «commit-msg» hook this time):
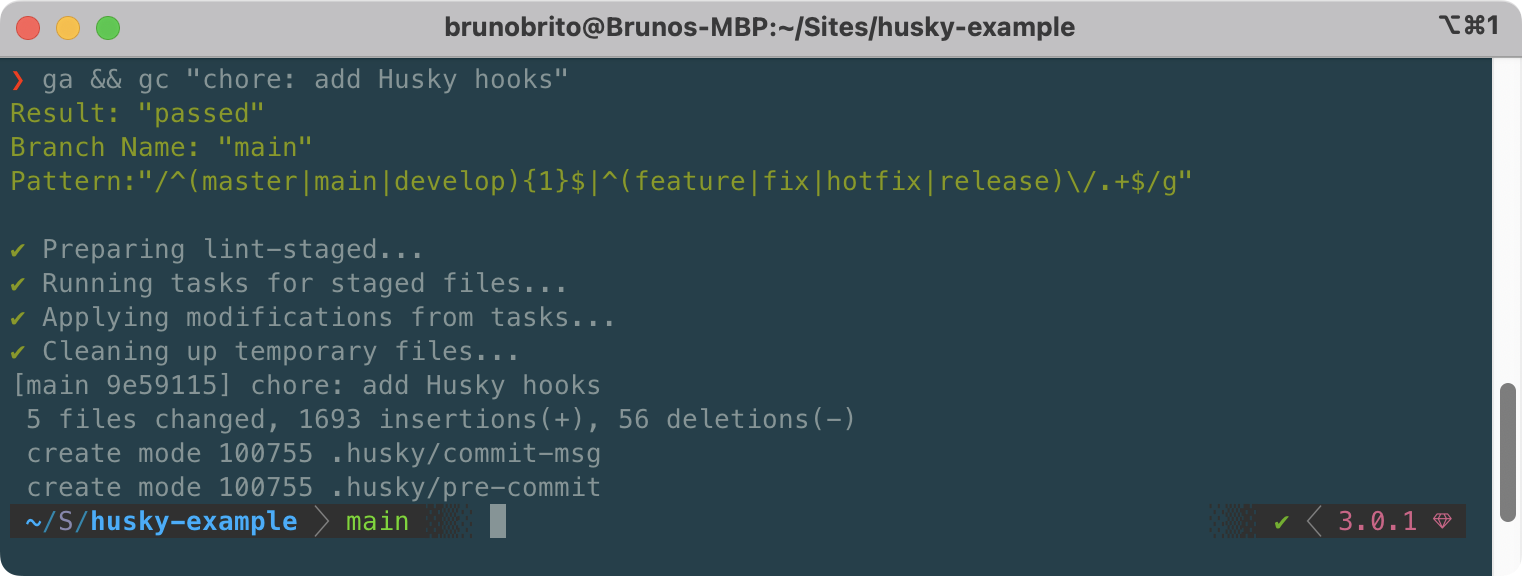
To try it out, let’s add a commit message that does not follow Angular’s guidelines, such as «Add Husky hooks». The branch’s name, main , is accepted, but the commit message isn’t, so the commit is aborted:
 Invalid Git Commit Message
If we actually follow the Angular conventions, the commit will go through. Two down, three to go!
3. Linting Code
We’re big believers that linters boost developer productivity, so let’s make sure that any code submitted to the repository is properly linted.
We will use not one, but two node packages to achieve this task: lint-staged and Prettier.
lint-staged will be used to run checks on staged files (instead of checking the entire project). Then, Prettier will be responsible for the actual formatting and linting (you could definitely go for ESLint instead!).
Let’s install both packages:
Now, let’s add the npx lint-staged command as a new line to the «pre-commit» hook:
Finally, let’s set up lint-staged in the `package.json file so that it runs Prettier on JS files:
Done! Our JS code will be properly formatted before our commit is added.
 Commit successful after running Prettier
We make Tower, the best Git client.
Not a Tower user yet?
Download our 30-day free trial and experience a better way to work with Git!
4. Compressing Staged Images
While Gatsby does a great job at delivering the best possible images to the user, that’s not always the case with other frameworks — and running tools like ImageOptim every time can be tedious and easy to forget.
Let’s add a little script that automatically compresses any images added to the project. We’ll use ImageOptim-CLI to accomplish this task. You can, of course, use squoosh or imagemin instead.
Let’s first install it (globally):
Since we only want to compress staged files, let’s add the imageoptim command to lint-staged (ImageOptim is smart enough to only look for image file formats):
That’s all there is to it! ImageOptim will automatically launch, compress any images you had in the staging area, and close.
5. Running Tests
Last one! Let’s install Jest to run tests by typing a command I’m sure you already know by heart:
Now, let’s add a «test» script to our package.json file:
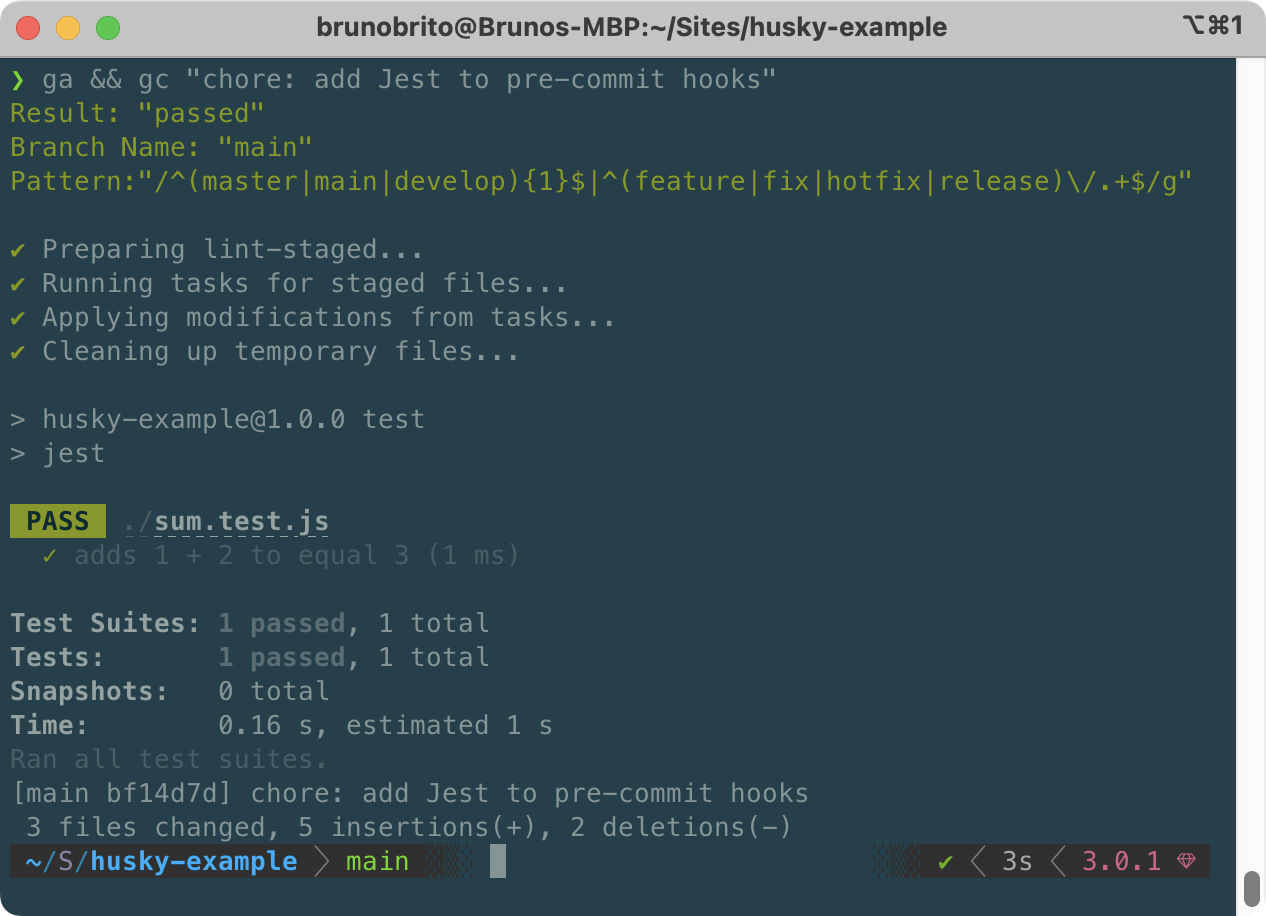
After adding a new JS file and a .test.js file with the actual test, we can run npm test to run Jest.
The output should look similar to this:
Finally, let’s add our npm test script to our «pre-commit» hook by following the steps mentioned previously:
Now, when we add a commit, all five hooks will run. A thing of beauty!
 Commit successful after running Jest
Hurray! We have successfully set up five different Git hooks! 🥳
While hooks can be helpful, there will be times where skipping the execution of these scripts can make sense. While it should be the exception, not the norm, let’s figure out how we can bypass them.
Skipping Hooks
In the terminal, you can bypass hooks by adding the —no-verify option, like in this example:
In Tower, you can easily skip the execution of hooks by checking the «Skip Hooks» checkbox in the «Commit Composing» window. The option will automatically be displayed if you have any «pre-commit» hooks configured.
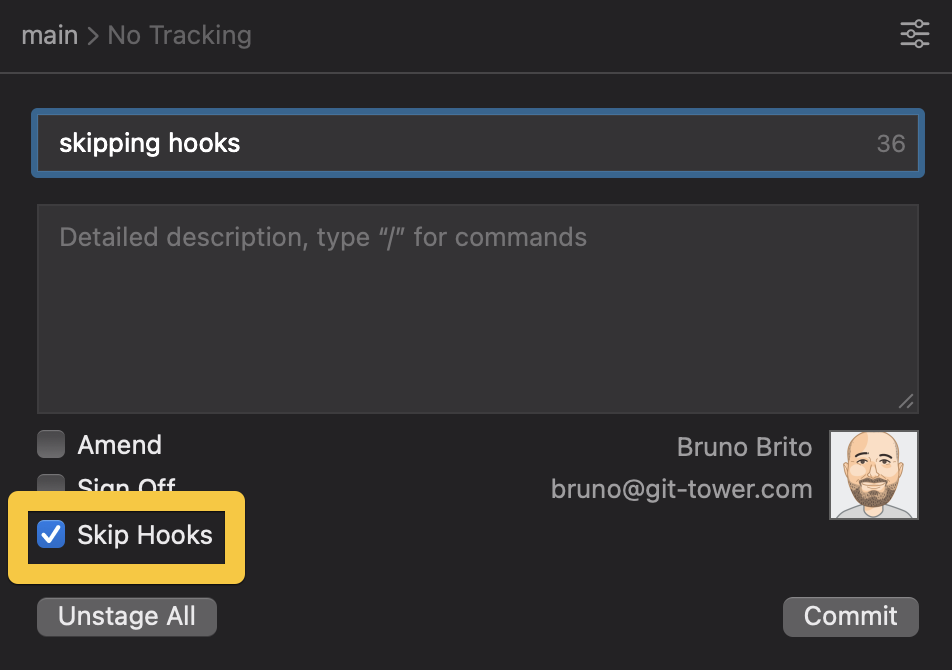 Skipping Hooks in Tower — Commit Composing
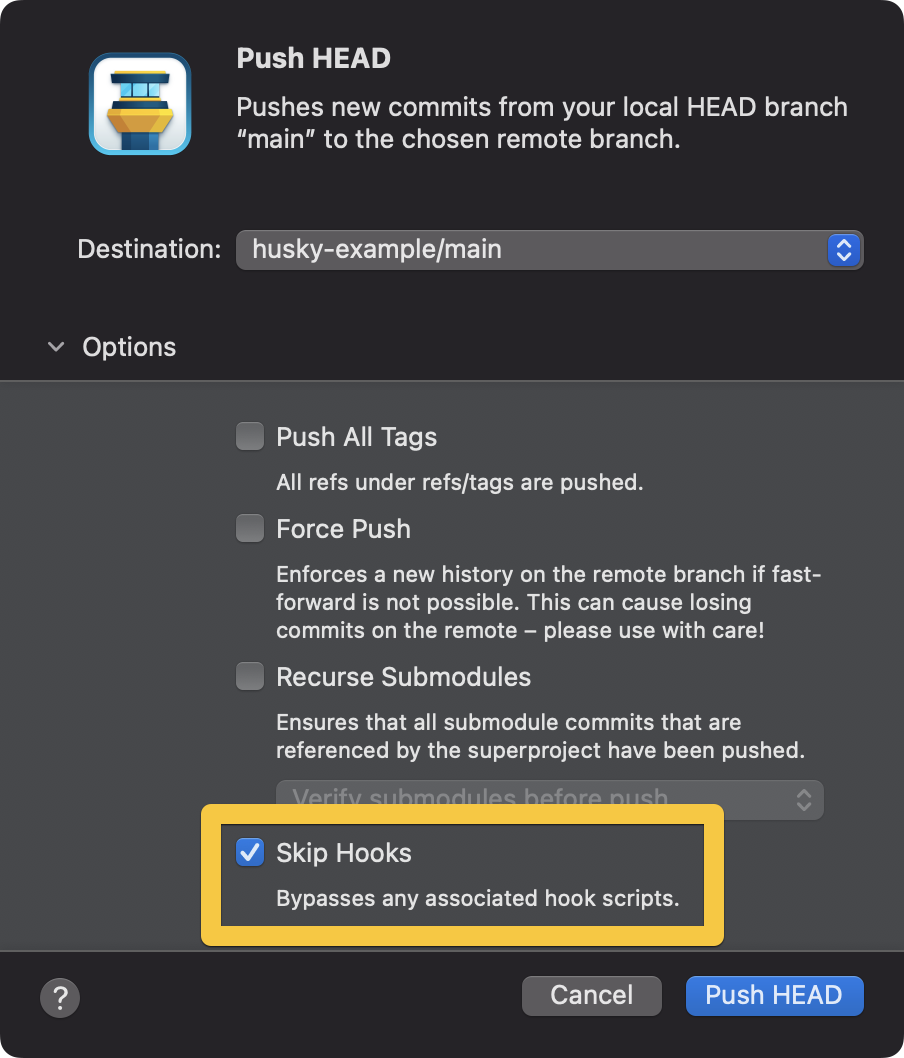
To skip the execution of hooks for push, pull, merge, rebase, and apply operations, click on «Options» to access the list of additional options.
 Skipping Hooks in Tower — Push Operation
Final Words
When it comes to automation, each case is unique, and the sky is the limit — hooks are no exception. We hope you found this post useful to get started with Husky!
For more tips, don’t forget to sign up for our newsletter below and follow Tower on Twitter!
Join Over 100,000 Developers & Designers
Be the first to know about new content from the Tower blog as well as giveaways and freebies via email.
We make Tower
…the best Git client for Mac and Windows.
We help over 100,000 users in companies like Apple, Google, Amazon, Twitter, and Facebook to easily & productively work with the Git version control system.
Источник
How you use hooks is largely up to you, but there are a few popular use cases worth highlighting in this post. Let’s have a look at five of them.
In this guide, you’ll learn how to:
- Validate branch names.
- Run a linter to check commit messages.
- Run a linter to style/format committed code.
- Compress any images added to the project.
- Run Jest tests to ensure that nothing will break.
For this fun project, we’ll be using a fresh installation of Gatsby, but any JavaScript project would do. Let’s get started!
Getting Started with Husky
Like any node package, you can install Husky with npm or yarn:
$ npm install husky --save-devOnce installed, you will also need to run this command to enable Git hooks:
$ npx husky installFinally, let’s edit the package.json file so that it automatically runs this last command after installation:
// package.json
{
  "scripts": {
    "prepare": "husky install"
  }
}
That’s it! Husky is ready to be used on the command line, but we should also make sure everything is set up nicely in Tower, our Git client, as well.
We make Tower, the best Git client.
Not a Tower user yet?
Download our 30-day free trial and experience a better way to work with Git!
Husky and Tower
When you have some Git hooks configured in Husky, you will get an error message in Tower when you attempt to add a commit. Something like:
.husky/pre-commit: line 4: npx: command not found
husky - pre-commit hook exited with code 127 (error)
husky - command not found in PATH=/Library/Developer/CommandLineTools/usr/libexec/git-core:/Applications/Tower.app/Contents/Resources/git-flow:/Applications/Tower.app/Contents/Resources/git-lfs:/usr/local/bin:/usr/local/sbin:/usr/bin:/usr/sbin:/bin:/sbin
Let’s fix that!
As described here, this happens because GUI apps don’t know the environment set up by your shell. To fix this, we will need to add an environment.plist file in ~/Library/Application Support/com.fournova.Tower3/ and define the PATH environment.
The location will vary depending on your environment. I’m using asdf-nodejs to manage my Node.js versions, so my environment.plist file looks like this:
<?xml version="1.0" encoding="UTF-8"?>
<!DOCTYPE plist PUBLIC "-//Apple//DTD PLIST 1.0//EN" "http://www.apple.com/DTDs/PropertyList-1.0.dtd">
<plist version="1.0">
  <dict>
    <key>PATH</key>
        <string>/usr/local/bin:/usr/local/sbin:/usr/bin:/usr/sbin:/bin:/sbin:/Users/brunobrito/.asdf/shims</string>
  </dict>
</plist>
After saving this file and restarting Tower, everything looks good to go.
Back to the command line — time for our first hook!
1. Validating Branch Names
This hook can be handy when you want to make sure that every branch name follows a specific pattern, such as starting with feature, fix, or release.
There’s a little npm package that can help us in this process: validate-branch-name. It comes with nice defaults out of the box, that you can further customize with some regex knowledge.
First, let’s install this package:
$ npm install validate-branch-name --save-devNow, let’s add it to Husky as a «pre-commit» hook by running the following command:
$ npx husky add .husky/pre-commit "npx validate-branch-name"You’ll notice that the npx validate-branch-name has been added to Husky’s pre-commit file inside Husky’s hidden folder (.husky/pre-commit).
Let’s try it! Start by creating a branch that does not follow this naming convention, like «test». As soon as you add a commit, you will be presented with the following error message:
Result: "failed"
Error Msg: Branch name validate failed please rename your current branch
Branch Name: "test"
Pattern:"/^(master|main|develop){1}$|^(feature|fix|hotfix|release)/.+$/g"
husky - pre-commit hook exited with code 1 (error)
Great! It’s working as intended. Let’s shift gears to commit messages.
2. Linting Commit Messages
If you already follow the guidelines from the Angular team, you’re in luck: we’ll use commit-msg-linter, a package that enforces them.
Setting it up is similar to the previous example. First we run the usual installation command…
$ npm install git-commit-msg-linter --save-devAnd now we’ll add it to Husky (as a «commit-msg» hook this time):
$ npx husky add .husky/commit-msg ".git/hooks/commit-msg $1"To try it out, let’s add a commit message that does not follow Angular’s guidelines, such as «Add Husky hooks». The branch’s name, main, is accepted, but the commit message isn’t, so the commit is aborted:
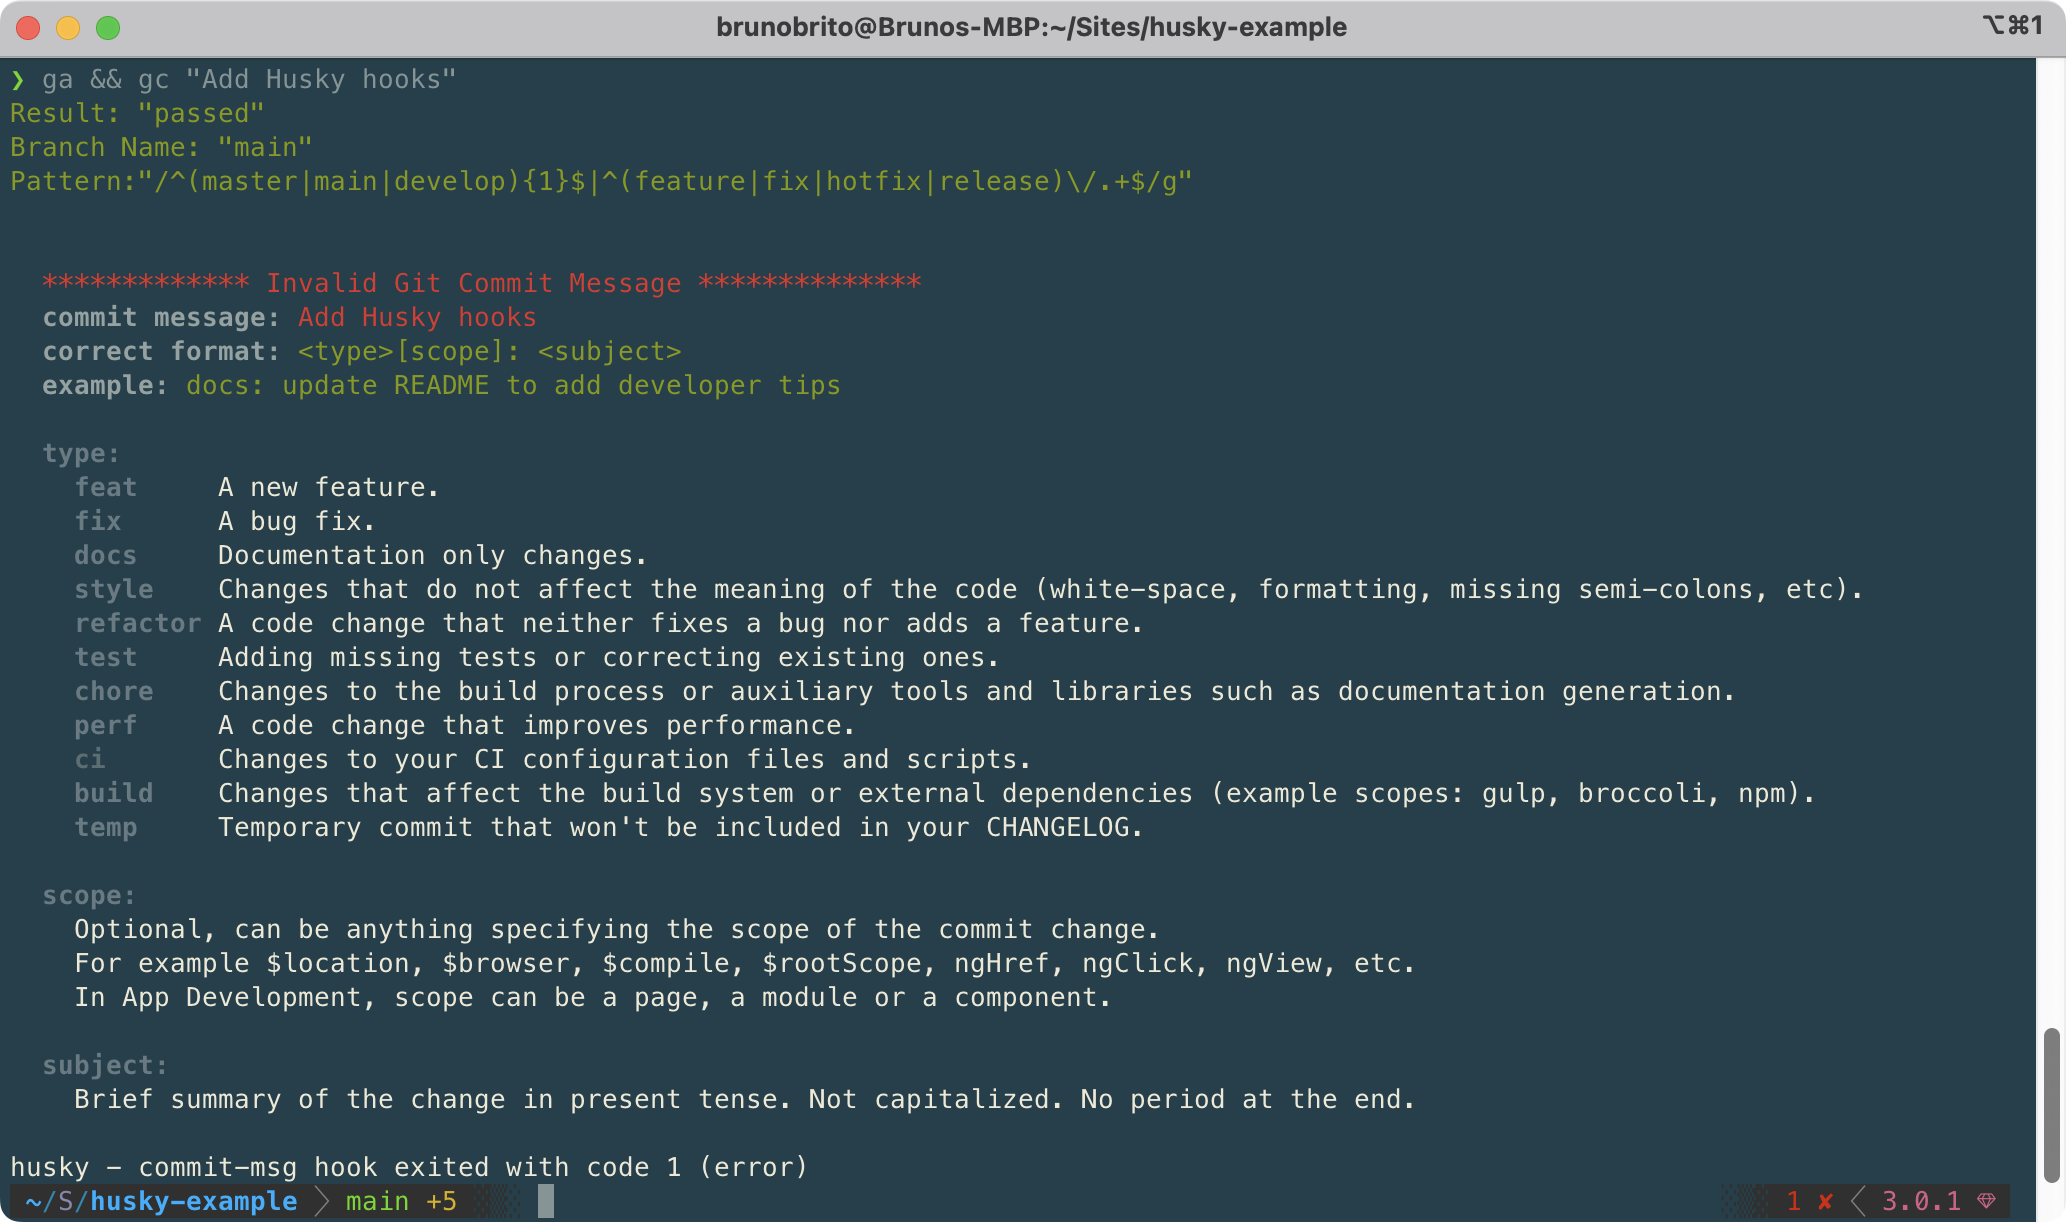
If we actually follow the Angular conventions, the commit will go through. Two down, three to go!
3. Linting Code
We’re big believers that linters boost developer productivity, so let’s make sure that any code submitted to the repository is properly linted.
We will use not one, but two node packages to achieve this task: lint-staged and Prettier.
lint-staged will be used to run checks on staged files (instead of checking the entire project). Then, Prettier will be responsible for the actual formatting and linting (you could definitely go for ESLint instead!).
Let’s install both packages:
$ npm install lint-staged prettier --save-devNow, let’s add the npx lint-staged command as a new line to the «pre-commit» hook:
$ npx husky add .husky/pre-commit "npx lint-staged"Finally, let’s set up lint-staged in the `package.json file so that it runs Prettier on JS files:
// package.json
{
  "scripts": {
    "prepare": "husky install"
  },
  "lint-staged": {
    "**/*.js": "prettier --write --ignore-unknown"
  },
  ...
}
Done! Our JS code will be properly formatted before our commit is added.

We make Tower, the best Git client.
Not a Tower user yet?
Download our 30-day free trial and experience a better way to work with Git!
4. Compressing Staged Images
While Gatsby does a great job at delivering the best possible images to the user, that’s not always the case with other frameworks — and running tools like ImageOptim every time can be tedious and easy to forget.
Let’s add a little script that automatically compresses any images added to the project. We’ll use ImageOptim-CLI to accomplish this task. You can, of course, use squoosh or imagemin instead.
Let’s first install it (globally):
$ npm install -g imageoptim-cliSince we only want to compress staged files, let’s add the imageoptim command to lint-staged (ImageOptim is smart enough to only look for image file formats):
// package.json
{
  "scripts": {
    "prepare": "husky install"
  },
  "lint-staged": {
    "**/*.js": "prettier --write --ignore-unknown",
    "**/*": "imageoptim"
  },
  ...
}
That’s all there is to it! ImageOptim will automatically launch, compress any images you had in the staging area, and close.
5. Running Tests
Last one! Let’s install Jest to run tests by typing a command I’m sure you already know by heart:
$ npm install --save-dev jestNow, let’s add a «test» script to our package.json file:
// package.json
{
  "scripts": {
    "prepare": "husky install",
    "test": "jest"
  },
  "lint-staged": {
    "**/*.js": "prettier --write --ignore-unknown",
    "**/*": "imageoptim"
  },
  ...
}
After adding a new JS file and a .test.js file with the actual test, we can run npm test to run Jest.
The output should look similar to this:
> jest

 PASS  ./sum.test.js
  ✓ adds 1 + 2 to equal 3 (1 ms)

Test Suites: 1 passed, 1 total
Tests:       1 passed, 1 total
Snapshots:   0 total
Time:        0.213 s
Ran all test suites.
Finally, let’s add our npm test script to our «pre-commit» hook by following the steps mentioned previously:
$ npx husky add .husky/pre-commit "npm test"Now, when we add a commit, all five hooks will run. A thing of beauty!
Hurray! We have successfully set up five different Git hooks! 🥳
While hooks can be helpful, there will be times where skipping the execution of these scripts can make sense. While it should be the exception, not the norm, let’s figure out how we can bypass them.
Skipping Hooks
In the terminal, you can bypass hooks by adding the --no-verify option, like in this example:
$ git commit -m "skipping hooks" --no-verifyIn Tower, you can easily skip the execution of hooks by checking the «Skip Hooks» checkbox in the «Commit Composing» window. The option will automatically be displayed if you have any «pre-commit» hooks configured.

To skip the execution of hooks for push, pull, merge, rebase, and apply operations, click on «Options» to access the list of additional options.
Final Words
When it comes to automation, each case is unique, and the sky is the limit — hooks are no exception. We hope you found this post useful to get started with Husky!
For more tips, don’t forget to sign up for our newsletter below and follow Tower on Twitter!
Join Over 100,000 Developers & Designers
Be the first to know about new content from the Tower blog as well as giveaways and freebies via email.
Hello folks. I hope you all are doing well.
In this post, we will talk about how you can setup Husky pre-commit hook with ESLint, Prettier and lint-staged to avoid bad commits and properly format code before committing. So let’s get into it.
What is Husky?
Husky lets us run commands or script before committing or pushing our code to git. There are a lot of other use cases of Husky too but we will only be using pre-commit hook for this article.
What is ESLint?
ESLint is a tool that can analyze our code and find errors in that code using ESLint rules. It can also fix some errors on its own.
What is Prettier?
Prettier is an opinionated code formatter that can format our code with the help of rules that you set or defaults are used.
What is lint-staged?
lint-staged can run multiple linters against staged git files which in our case are ESLint and Pretttier.
Setup new React or React Native project.
For React use
npx create-react-app demo
cd demo
For React Native use
npx react-native init demo
cd demo
Let’s install some necessary libraries.
npm i -D husky lint-staged eslint-config-airbnb prettier
Here we are saving these modules as devDependencies to specify that these are only required in the development and not in runtime. I am using Airbnb’s pre config file for ESLint. You can also go plain if you want to setup all ESLint rules by your self or you can also extend multiple pre configs like this.
Setting up ESLint
Replace or create .eslintrc.js file with the following code. If you have created a React project then remove «eslintConfig» from the package.json file as we have created a separate configuration file for the ESLint.
It is advisable to extend «react-app» for React projects and «@react-native-community» for React Native projects. These files are automatically installed so you don’t need to worry about them. Just append this to the start of the array in the extend option in the file.
Setting up Prettier
Replace or create .prettierrc.js file with the following code.
Setting up Husky pre-commit hook and lint-staged
In the latest versions of Husky we need to enable Git Hooks and then create and add the pre-commit hook. To do that run the following commands in the terminal.
npx husky install
npx husky add .husky/pre-commit "npx --no-install lint-staged"
Make sure to commit the auto-generated husky folder to your Git repo.
The above code will run lint-staged command against the staged files before committing. Make sure to run npx husky install if you clone your Husky configured git repo.
So now let’s add the lint-staged in our package.json file.
Open your package.json file and add the code that I have specified at the same level as dependencies.
The above code will run Prettier and ESLint rules against all js,jsx,ts,tsx staged files. You can also specify more file extensions or you can write a script for a specific folder you want.
Read Also: How React Native Improves Developer Productivity
So yeah that’s it. Now when you will try to commit any changes, ESLint and Prettier rules will execute and it will format your code and give you errors if there are any and stop you from causing any bad commits.
Note: If you get dependency errors for eslint-plugin-jsx-a11y or eslint-plugin-import while commiting, then also install them as devDependencies.
At BoTree Technologies, we build web and mobile applications to add value to our client’s business. We align ourselves to ensure that our client benefits the most out of our engagement.
We work in Ruby on Rails, Python, Java, React, Android, iOS and RPA as well.
Drop us a line to discuss how can we help take your business to the next level. Reach out to learn more about the software development companies in NYC for the various ways to improve or build the quality of projects and across your company.

Bug commit from vscode
After upgrade to husky v5, git commit from vscode always fail (via terminal is ok).
> git -c user.useConfigOnly=true commit --quiet --allow-empty-message --file -
.husky/pre-commit: line 4: npx: command not found
husky - pre-commit hook exited with code 127 (error)
npm version: 7.5.1
node version: 15.8.0
Hooks
// pre-commit
#!/bin/sh
. "$(dirname "$0")/_/husky.sh"

npx lint-staged


The same issue with Webstorm and npm:
.husky/pre-push: 4: npm: not found
I have tried to run npm run lint on pre-commit.
Everything is fine when I use a terminal for commit but not the Webstorm commit dialog.

@RigottiG I also had the issue with VSCode.
I’m using nvm, and creating an ~/.huskyrc file as the Typicode recommended fixed it.

Having the same issue, but the suggestion by typicode doesn’t work:
# .huskyrc
# See https://typicode.github.io/husky/#/?id=command-not-found
# This loads nvm.sh and sets the correct PATH before running hook
export NVM_DIR="$HOME/.nvm"
[ -s "$NVM_DIR/nvm.sh" ] && . "$NVM_DIR/nvm.sh"
I guess the issue can be resolved by updating the $PATH used by VSCode’s Git process, but not sure where to find that.


Hi @typicode
There are too many such problems. May I suggest that this step should be implemented by the package itself(husky.sh).
In this way, most users do not need to set up the .huskyrc file. Although more work needs to be done, I think it is worth it.
I can provide the code I have used(pre-commit)
#!/bin/sh
. "$(dirname "$0")/_/husky.sh"

export NVM_DIR="$HOME/.nvm/nvm.sh"
. "$(dirname $NVM_DIR)/nvm.sh"

export NVM_DIR="$HOME/.nvm"
a=$(nvm ls | grep 'node')
b=${a#*(-> }
v=${b%%[)| ]*}

export PATH="$NVM_DIR/versions/node/$v/bin:$PATH"
yarn lint-staged
Or change «~/.huskyrc» to «.huskyrc». It is convenient for a third party to help modify it.
For the great library, cheers!
In the meantime, I was able to resolve my issue by setting the right PATH variables via source ~/.profile in the pre-commit file


Hi @RigottiG, could you try https://typicode.github.io/husky/#/?id=command-not-found
Is there any way I can solve this within the project folder ? we have a large group of developers (and it’s growing), I cannot tell everyone to create a husky config file on their computer to solve the issue.
This problem may trouble most of developers who use vscode’s git to commit, cause it might not resolve the correct path, at least in the version 1.58.0
you found any solution?

I use VS Code and husky 7. Yesterday everything was working, today I tried to commit and got the same error
.husky/pre-commit: line 4: npm: command not found

Met the same problem, I wonder what command did VS Code use to run the git command? It seem to have ignored my .bashrc, .profile and nvm.fish, which shell does it use?
I downgraded VS Code to the previous version and it fixed the problem.

FYI for those using brew to determine paths, apparently that can cause issues, too.
This definitely seems like a bug in VSCode. In the meantime, you’ll probably need to just reference the exact path needed for anything relying on brew --prefix whatever.
For example, I use asdf for versioning npm. asdf has a setup script that gets all the shims set properly in your path, and that script is usually loaded by running . "$(brew --prefix asdf)/asdf.sh" in your .zshrc file. So in my case, I needed to just hardcode the path returned from brew and put the resulting command in my ~/.huskyrc file:
. /opt/homebrew/opt/asdf/asdf.sh

I use VS Code and Husky v6.
I ran echo $PATH from the root of my project.
Then I copied the output to the pre-commit file in the .husky directory.
My pre-commit file looks like this:
#!/bin/sh
. "$(dirname "$0")/_/husky.sh"

export PATH="/usr/local/bin:/usr/bin:/bin:/usr/sbin:/sbin"
npx lint-staged
Solved the issue for me.

Hi @RigottiG, could you try https://typicode.github.io/husky/#/?id=command-not-found
Is there any way I can solve this within the project folder ? we have a large group of developers (and it’s growing), I cannot tell everyone to create a husky config file on their computer to solve the issue.
This problem may trouble most of developers who use vscode’s git to commit, cause it might not resolve the correct path, at least in the version 1.58.0you found any solution?
same here. Did you find a way to fix this?

It’s not ideal to have to tell all our devs to go and add this PATH, is there any way that this can be done inside the library itself? I might just go back to husky v4 using package.json which was actually a bit more straightforward.
. «$(dirname «$0″)/_/husky.sh»
export NVM_DIR=»$HOME/.nvm/nvm.sh»
. «$(dirname $NVM_DIR)/nvm.sh»export NVM_DIR=»$HOME/.nvm»
a=$(nvm ls | grep ‘node’)
b=${a#(-> }
v=${b%%[)| ]}export PATH=»$NVM_DIR/versions/node/$v/bin:$PATH»
This worked for me and at least it can be checked into source control so it’s a fix for all devs.

I just downgraded to v3.1, otherwise you require devs to install nvm.