Содержание
- Ошибка Hyper-V «Не удаётся запустить виртуальную машину, поскольку не выполняется низкоуровневая оболочка»
- Системные требования
- Хранилище BCD
- AMD Bulldozer
- Технологии виртуализации
- Fix: Hypervisor is not Running Error on Windows 10
- What causes the ‘Virtual Machine could not be started because the Hypervisor is not running’ Error on Windows 10?
- Solution 1: Using the Command Prompt
- Solution 2: Starting the Hyper-V Service
- Solution 3: Enabling Hyper-V Feature
- Fix: Hypervisor is not running on Windows 10/11 [Full Guide]
- How do I fix the Hypervisor not running error on Windows 10?
- 1. Make sure that virtualization is enabled in BIOS
- How to enable virtualization in BIOS:
- 2. Update your BIOS
- 3. Update the drivers to the latest version
- 4. Reinstall the HyperV feature
- 5. Remove problematic updates
- 6. Use the bcdedit command
- 7. Use the DISM command
- 8. Check if your CPU supports virtualization
- 9. Use third-party applications
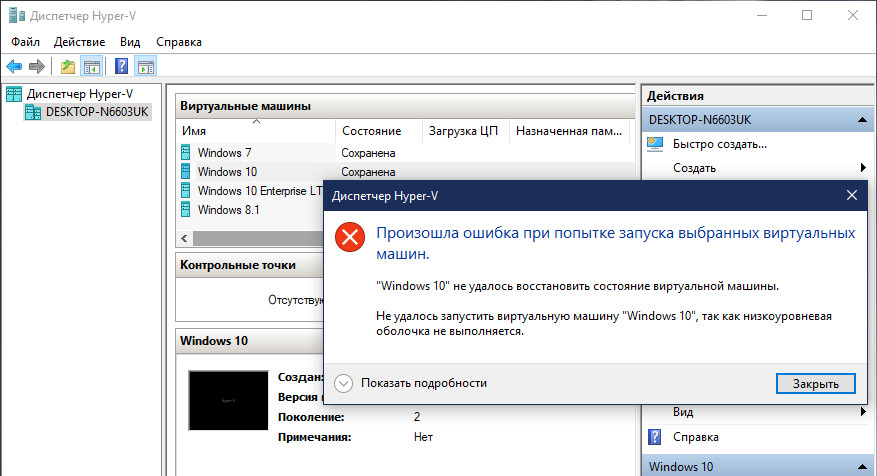
Ошибка Hyper-V «Не удаётся запустить виртуальную машину, поскольку не выполняется низкоуровневая оболочка»

Hyper-V , родная для систем Windows – в её серверных выпусках, а также в некоторых десктопных версиях и редакциях – среда для работы с виртуальными машинами и их гостевыми ОС не всегда работает без проблем. Одной из таких проблем может быть выскакивающее при запуске виртуальной машины уведомление, что, мол, Hyper-V не удаётся её запустить, поскольку не выполняется некая низкоуровневая оболочка.
Что это за ошибка, и как её исправить.
Окно с такой ошибкой является универсальной трактовкой, причина может крыться в нескольких вещах.
Системные требования
Если сама Windows не соответствует требованиям для работы с Hyper-V, а десктопные выпуски не все позволяют работать с этим компонентом, он попросту не активируется в системе. Но есть ещё аппаратные требования. Их несоответствие может не влиять на активацию гипервизора, но в дальнейшем стать причиной появления такой ошибки.
Для работы Hyper-V необходимо:
• Не менее 4 Гб RAM;
• 64-битный процессор с поддержкой SLAT и технологии виртуализации.
Хранилище BCD
Рассматриваемая ошибка может говорить о неверной конфигурации данных хранилища BCD . Компонент Hyper-V глубоко интегрирован в Windows и стартует до запуска ядра системы. Если в хранилище BCD вносились изменения для модификации запуска гипервизора, они могут быть неверными. Либо же запуск Hyper-V и вовсе был ранее намеренно отключён с целью временной оптимизации использования ресурсов компьютера. В таком случае конфигурацию BCD в части запуска гипервизора необходимо либо подкорректировать, либо вернуть дефолтное значение путём установки автозапуска Hyper-V. Для установки автозапуска открываем CMD от имени администратора (обязательно) , вводим:
bcdedit /set hypervisorlaunchtype auto
После этого осуществляем перезагрузку.
AMD Bulldozer
Hyper-V не работает с процессорами компании AMD с архитектурой Bulldozer.
Технологии виртуализации
Для обеспечения жизнедеятельности среды виртуализации посредством любого гипервизора процессор должен быть обустроен технологией, обеспечивающей виртуализацию – Intel Virtualization, либо же AMD-V. О поддержке этих технологий можно узнать на страничке спецификаций процессора на сайтах, соответственно, Intel и AMD . И технология виртуализация, естественно, должна быть включена в BIOS .
Ещё один важный нюанс: для процессоров Intel в BIOS должны быть отключены специфические технологии Intel VT-d и Trusted Execution. С ними встроенный в Windows гипервизор не дружит. Вот примерно так должны выглядеть настройки BIOS для работы с Hyper-V: технология виртуализации включена, а специфические технологии – выключены.
Источник
Fix: Hypervisor is not Running Error on Windows 10
There have been users reports that state that users are not able to launch VirtualBox as they are presented with a message box saying hypervisor is not running. This error is often due to your Hyper-V services not running automatically or disabled Hyper-V feature. Basically, Hypervisor is a software that is used to run or create virtual machines. When users try to open VirtualBox, instead of the user interface, they are prompted with the ‘Virtual Machine could not be started because the hypervisor is not running’ error.
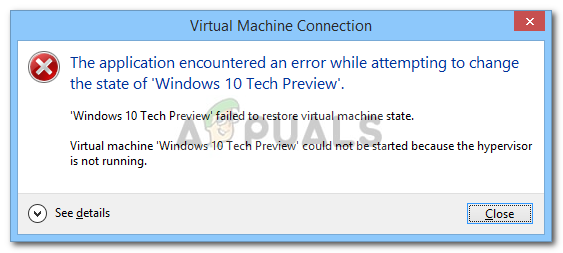 Virtual Machine Could Not be Started Because Hypervisor is not Running Windows 10
We all know about virtual machines and many of us have used it at least once throughout the years, albeit most of us aren’t aware of the responsible tech at play. Nonetheless, the error can be easily resolved by applying a few simple solutions that we have mentioned down below.
What causes the ‘Virtual Machine could not be started because the Hypervisor is not running’ Error on Windows 10?
Well, after looking at the user reports, the error is due to the following factors —
- Hyper-V services: In some cases, the error is popping up because the Hyper-V services on your Windows 10 aren’t starting automatically after abootupp.
- Hyper-V feature: Another thing that can cause the error to appear is the Hyper-V feature. If this feature, located in your Windows features list, is disabled, it will cause the error message to emerge.
To fix your issue, you can follow the few solutions down below. If you want a quick workaround, we recommend following the solutions in the same order as provided.
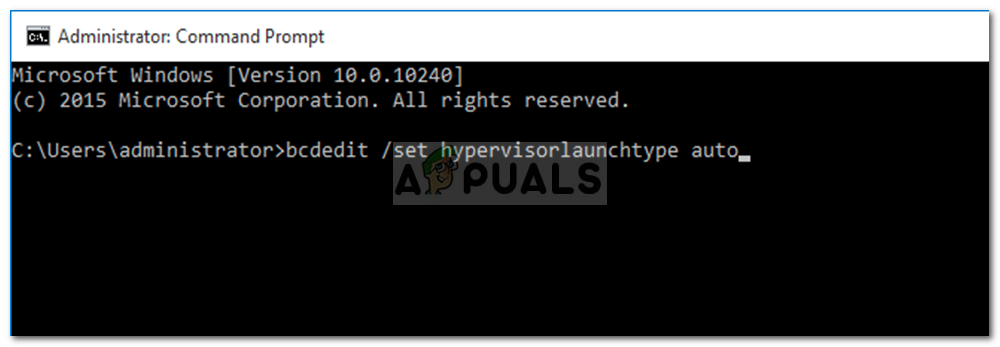
Solution 1: Using the Command Prompt
You can fix your issue by setting the hypervisor to start automatically in your boot configuration data file. This will require an elevated command prompt so make sure you are using an administrator account. Here’s how to do it:
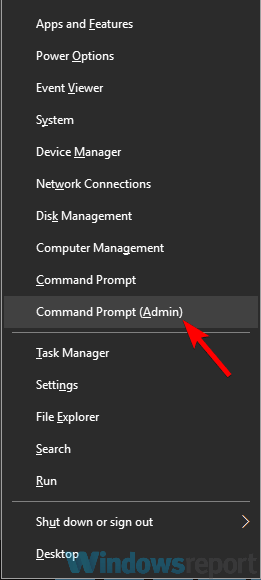
- Press Windows Key + X and select Command Prompt (Admin) from the list to open an elevated command prompt.
- Once the command prompt loads, type in the following command and press enter:
- bcdedit /set HypervisorLaunchType auto
 Setting Hypervisor to Start Automatically in BCD
 - Restart your system and check if it fixes your issue.
 Setting Hypervisor to Start Automatically in BCD
Solution 2: Starting the Hyper-V Service
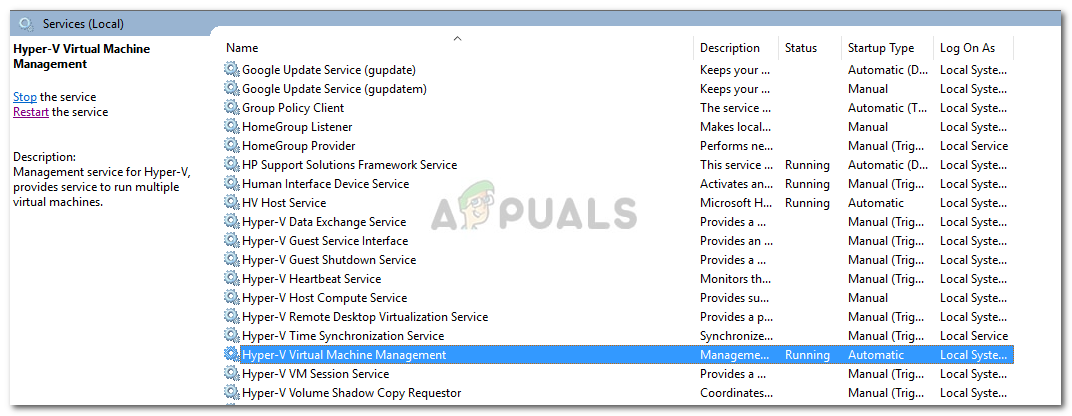
Another fix that you can implement to circumvent the issue would be changing the properties of a Hyper-V service. Sometimes, the service doesn’t start automatically due to which the error is popping up. Therefore, to fix it, you will have to set the service to start automatically. Here’s how to do it:
- Press Windows Key + R to open Run.
- Type in ‘services.msc‘ and press Enter.
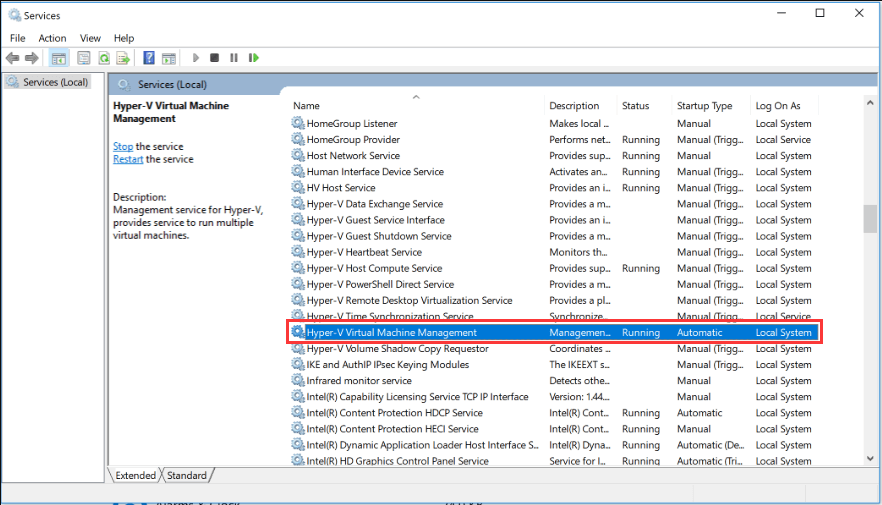
- In the Windows Services list, locate the Hyper-V Virtual Machine Management service. Hyper-V Virtual Machine Management Service
- Double-click it to open Properties.
- Set the Startup type to Automatic and make sure the service is running.
- Restart your system.
 Hyper-V Virtual Machine Management Service
Solution 3: Enabling Hyper-V Feature
Finally, the last thing that can potentially fix your issue would be enabling the disabled Hyper-V feature. This feature is located in the Windows features list which can be found in the Control Panel. To do this, you will have to do the following:
- Go to the Start Menu and open up the Control Panel.
- Go to Programs and Features.
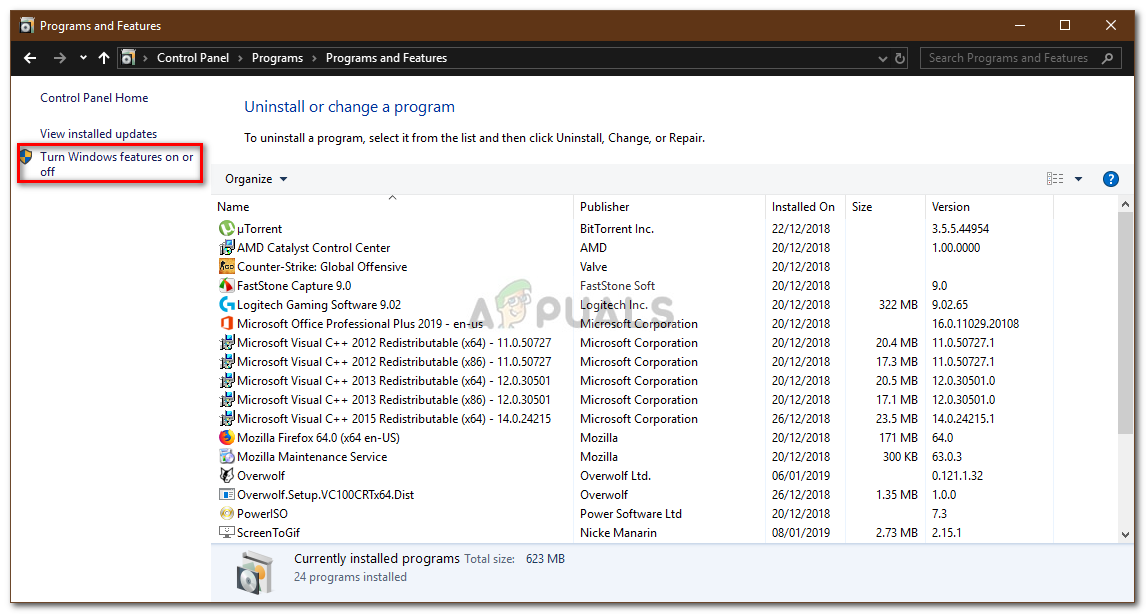
- On the left-hand side, click ‘Turn Windows Features on or off’. Programs and Features – Control Panel
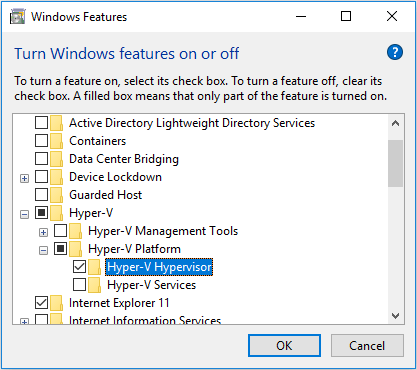
- Scroll down and expand the Hyper-V entry.
- Afterward, expand the Hyper-V Platform list.
- Tick the ‘Hyper-V Hypervisor’ box and then click OK. Enabling Hyper-V Hypervisor Feature
- If it is greyed out, you will have to tweak your BIOS settings a teensy bit. In your BIOS settings, make sure Virtualization setting is enabled.
 Programs and Features – Control Panel
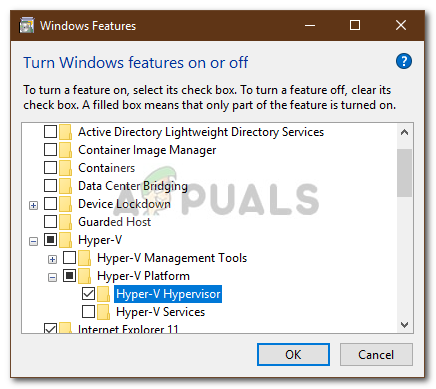 Enabling Hyper-V Hypervisor Feature
Источник
Fix: Hypervisor is not running on Windows 10/11 [Full Guide]

- Some Windows 10 users reported that they get the error message Hypervisor is not running when trying to run multiple operating systems.
- First you need to make sure that virtualization is enabled in the BIOS.
- Use a reliable tool to update the drivers to the latest version.
- Also, check if your CPU supports virtualization in order to use native virtualization.

Many users use virtualization, but sometimes they might encounter Hypervisor is not running message on their PC.
This message will prevent you from using virtualization, but in today’s article, we’ll show you how to properly tackle this issue.
Virtualization is a useful feature, but sometimes problems with it can occur. Speaking of virtualization issues, here are some common problems that users reported:
- Hypervisor is not running Windows 10 Pro, BIOS – This problem can occur if virtualization isn’t enabled in BIOS, so be sure to find this feature and enable it.
- Hypervisor launch has been disabled through the hypervisorlaunchtype bcdedit setting – Sometimes Hyper-V feature can be disabled, but you should be able to start it simply by running a single command in Command Prompt.
- Hyper-V failed to start Hypervisor is not running – This problem can occur if your BIOS is out of date. To fix the issue, update your BIOS and check if that solves the problem.
- Virtual machine error Hypervisor is not running – Sometimes this problem can occur due to problematic updates, and in order to fix the issue, it’s advised to find and remove these updates manually.
- Hypervisor is not enabled, present, working – These are some common problems that can occur with Hyper-V, but you should be able to fix them using one of our solutions.
How do I fix the Hypervisor not running error on Windows 10?
1. Make sure that virtualization is enabled in BIOS
If you’re getting Hypervisor is not running message, perhaps the problem is related to your BIOS settings. As you know, in order to use virtualization, this feature needs to be actually enabled in BIOS.
To check if virtualization is enabled, just enter BIOS and look for this feature.
How to enable virtualization in BIOS:
- Access your BIOS (If you need a hand, here’s how to enter BIOS on a Windows 7, 10 or 11 PC).
- Then, click on Advanced Mode, and go to the Advanced tab.
- Select CPU Configuration and set the Intel Virtualization Technology option (for Intel) or the SVM Mode (for AMD) to Enabled.
- Make sure you save the changes before you exit this screen.
That is how to enable Hyper-V Hypervisor in Windows 10. However, note that enabling virtualization can be different according to your CPU, PC model, chipset, and of course, motherboard.
To see how to properly access BIOS and find this feature, we advise you to check your motherboard manual for more information.
Once you enable this feature, go back to Windows and check if the problem is still there.
2. Update your BIOS
The problem with virtualization can be your BIOS, so if you’re getting the Hypervisor is not running message on your PC, the problem might be an outdated BIOS.
Several users reported that they fixed this problem by updating their BIOS to the latest version.
This is an advanced process, and if you don’t perform it properly you can cause permanent damage to your PC, so we advise you to be extra cautious.
We already wrote a short guide on how to flash your BIOS, but if you know how to properly update BIOS on your motherboard, check your motherboard manual for detailed information.
3. Update the drivers to the latest version
If you’re unable to use virtualization due to Hypervisor is not running message, perhaps the problem is related to your drivers.
If you want to update all drivers on your PC fasts, perhaps using a third-party solution might be the best choice.
Using our recommendation, you can automatically update all your drivers with just a couple of clicks.
⇒ Get DriverFix
4. Reinstall the HyperV feature
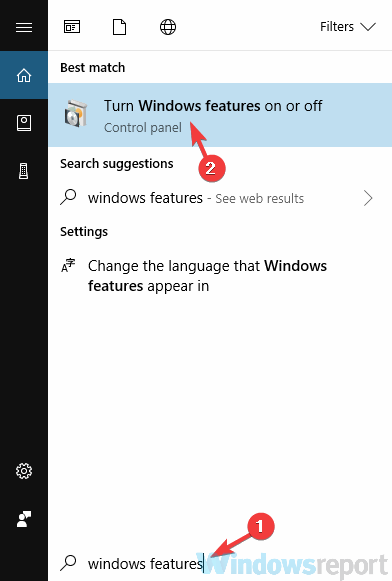
- In the Search bar type windows features, and choose Turn Windows features on or off from the list of results.
- Locate the HyperV feature and uncheck it. Now click OK to save changes. If you’re asked to restart your PC, be sure to do so.
- Once your PC restarts, go back to Windows Features window and enable the Hyper-V feature. You might be asked to restart your PC once again, so be sure to do that.

According to users, if you’re getting this error, perhaps there’s a glitch with HyperV feature.
Sometimes various Windows glitches can occur, but you can fix most problems with HyperV simply by reinstalling it.
Once your system restarts, the problem with Hyper-V should be resolved and everything will start working again.
In addition, the Task Manager can detect if it’s running on a physical or virtual machine. Under the Performance tab, the label Virtual machine: Yes is listed if a hypervisor has been detected.
5. Remove problematic updates
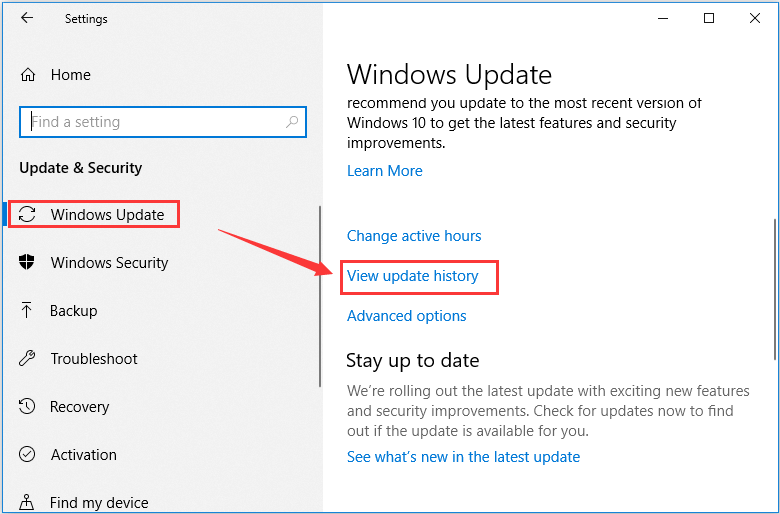
- Press the Windows Key + I to open the Settings app.
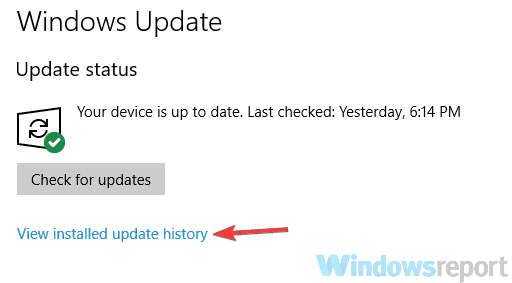
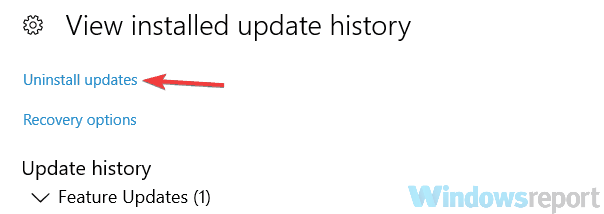
- Navigate to the Update & Security section, and select View update history.
- You should now see a list of recent updates. Pay attention to the recent updates and memorize them or write them down. Now click Uninstall updates.
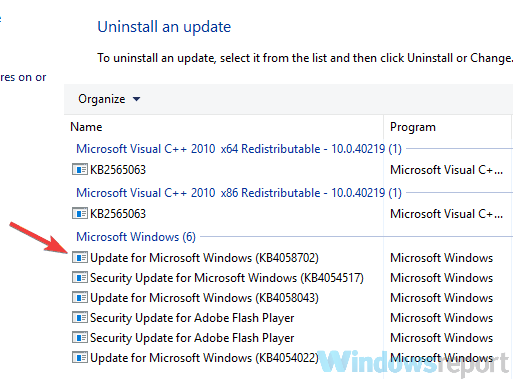
- List of recent updates will appear in the new window. To remove an update, double-click it and follow the instructions on the screen.
Expert tip:
SPONSORED
Some PC issues are hard to tackle, especially when it comes to corrupted repositories or missing Windows files. If you are having troubles fixing an error, your system may be partially broken.
We recommend installing Restoro, a tool that will scan your machine and identify what the fault is.
Click here to download and start repairing.
If the error started appearing recently, the problem might be a problematic Windows update.
As you know, Windows installs updates automatically, and if the problem started appearing recently, it’s possible that the update is causing it.
To fix the problem, it’s advised that you find the problematic update and remove it, by following our above steps.
Once the update is removed, check if the problem is resolved. You might have to repeat this step a couple of times before you find the update that is causing the problem.
Once you find the problematic update, be sure to write its name down.
Windows tends to install the missing updates automatically, so in order to prevent this problem from reappearing, we advise you to block this update from installing automatically.
Read more about this topic
6. Use the bcdedit command
- Press the Windows Key + X, and select Command Prompt (Admin) or PowerShell (Admin) from the menu.
- When Command Prompt opens, run the following command: bcdedit /store c:BootBCD /set hypervisorlaunchtype Auto
After the command is executed, check if the problem with virtualization is resolved. Alternatively, you can also use the bcdedit /set hypervisorlaunchtype auto command.
If you’re having problems with virtualization, perhaps you can fix the problem simply by running a single command in Command Prompt.
7. Use the DISM command
- Start Command Prompt as an administrator.
- When Command Prompt starts, run this command: dism /online /enable-feature /featurename:Microsoft-Hyper-V -All
Sometimes you might get this error because certain components aren’t working properly. To fix this problem, it’s advised that you run the DISM command in order to enable the HyperV feature.
Once the command is executed, Hyper-V feature should be enabled and the problem with virtualization should be resolved.
8. Check if your CPU supports virtualization
In order to use native virtualization in Windows 10, it’s necessary that your processor supports certain features. If it doesn’t have these features, you won’t be able to use the built-in virtualization.
To see if your processor supports virtualization, you’ll need to check its specifications on the manufacturer’s website.
Alternatively, you can use third-party tools in check if your processor supports virtualization.
Many users reported that virtualization won’t work on their PC since the processor doesn’t support SLAT feature.
If your processor doesn’t support the necessary features, you might have to change it in order to use built-in virtualization.
9. Use third-party applications
If you didn’t manage to fix Hypervisor is not running error, perhaps you might want to try using a third-party solution as a workaround.
Even if your processor doesn’t support the virtualization features, you should be able to create a virtual machine in Windows using our recommendation software.
This tool specializes in virtualization, and it offers all the necessary features for both advanced and first-time users alike, so we strongly suggest that you try it out.
The hypervisor is not running error can cause problems, but we hope that you managed to fix it using one of our solutions. For more suggestions, please access the comments section below.
Источник
In this article, we will take a look at how to fix the error when starting virtual machines on a Windows host with the Hyper-V role: Virtual machine could not be started because the hypervisor is not running.
Below is the full text of the error:
Hyper-V Manager
An error occurred while attempting to start the selected virtual machine(s).
VMname failed to start.
Virtual machine VMName could not be started because the hypervisor is not running.

This error means that the Microsoft Hyper-V core service is not running on this host. Check the status of the two primary services that enable Hyper-V virtual machines to run — Hyper-V Host Compute Service and Hyper-V Virtual Machine Management. Open the services.msc console and check the status of the services there. Or open a PowerShell command prompt with administrator permissions and check service status using the command:
Get-Service vmcompute,vmms

In our case, both services are in the Stopped state. Try starting them manually with the PowerShell command:
start-Service vmcompute,vmms
However, the services did not start with the error:
start-Service : Service ‘Hyper-V Host Compute Service (vmcompute)’ cannot be started due to the following error: Cannot start service vmcompute on computer ‘
For Hyper-V services to run on a computer, your device must meet the following requirements:
- Hardware virtualization support must be enabled in BIOS/UEFI settings. This option may have different names depending on the BIOS version and CPU model. For example, Intel Virtualization Technology (VT-X), AMD-V, Virtualization Extensions, Vanderpool. Change the option value to Enable. Also, enable Intel VT-d or AMD IOMMU options if available in your BIOS;
 On AMD devices, you need to additionally check if the SVM mode option is enabled in the BIOS. SVM support (Support Vector Machine) allows you to enable the AMD SVM (Secure Virtual Machine) private group.
 On HP servers, also check if the following BIOS options are enabled: Intel(R) Virtualization Tech and No Execute Memory Protection. The last option provides support for Data Execution Prevention (DEP).
 - Your CPU should be SLAT compatible (Second Level Address Translation). Check your processor’s specification on the vendor’s website and make sure it supports SLAT. On Intel processors, support for SLAT is provided by EPT (Extended Page Table) technology. On AMD CPUs it’s being provided by RVI (Rapid Virtualization Indexing). On Windows, you can check if your computer has SLAT support with the command:
systeminfo|find “Second Level”
It should return the string:
Second Level Address Translation: Yes.
You can also use a free utility to determine the capabilities of the processor Microsoft Sysinternals:
coreinfo.exe –v

- Check if DEP is enabled in BIOS and Windows settings. Data Execution Prevention (DEP) is system-level memory protection. Press Win+Pause > Advanced System Settings > Performance > Settings > Data Execution Prevention tab. Make sure the option Turn on DEP for essential Windows programs and services only is enabled.


To verify if all options required for Hyper-V work are available and enabled, run the systeminfo command. Scroll down to the Hyper-V Requirements section. It should return:
Hyper-V Requirements: VM Monitor Mode Extensions: Yes
Virtualization Enabled In Firmware: Yes
Second Level Address Translation: Yes
Data Execution Prevention Available: Yes

Configure Hyper-V to start automatically with the command:
bcdedit /set HypervisorLaunchType auto
This command adds the hypervisor autostart option to your boot configuration data file.
If all the prerequisites are complete and the Hyper-V virtual machines won’t start, try reinstalling the Hyper-V role.
- Go to the Search bar and type Windows Features > Turn Windows features on or off;

- Go to Hyper-V > Hyper-V Platform section and disable Hyper-V Hypervisor and Hyper-V Services features. Restart your computer and then re-enable these features.


On Windows 10 and Windows 11, you can reinstall Hyper-V services using PowerShell cmdlets. To disable Hyper-V components:
Disable-WindowsOptionalFeature -Online -FeatureName HypervisorPlatform,Microsoft-Hyper-V-All,Microsoft-Hyper-V,Microsoft-Hyper-V-Hypervisor
Restart your computer:
Restart-Computer
Then enable the Hyper-V features:
Enable-WindowsOptionalFeature -Online -FeatureName HypervisorPlatform,Microsoft-Hyper-V-All,Microsoft-Hyper-V,Microsoft-Hyper-V-Hypervisor
![]()
On Windows Server 2019/2016/2012R2, use the following commands to re-install the Hyper-V role:
Remove-WindowsFeature -Name Hyper-V

Install-WindowsFeature -Name Hyper-V
In early 2022, after installing January security updates on Windows Server 2012 R2 hosts with the Hyper-V role, they fail with the error “Virtual machine SVR1 cannot be started because the hypervisor is not running.” The issue only appeared on Hyper-V hosts with Unified Extensible Firmware Interface (UEFI) enabled.
The following errors appeared in the System Event Logs:
Error ID: 80
Hypervisor launch failed; The operating systems boot loader failed with error 0xC00000BB.Error ID: 15350
The virtualization infrastructure driver (VID) is not running.Error ID: 15160
‘MACHINE NAME’ failed to restore virtual machine state.Error ID: 20148
Virtual machine ‘SVR1’ could not be started because the hypervisor is not running The following actions may help you resolve the problem: 1) Verify that the processor of the physical computer has a supported version of hardware-assisted virtualization. 2) Verify that hardware-assisted virtualization and hardware-assisted data execution protection are enabled in the BIOS of the physical computer. (If you edit the BIOS to enable either setting, you must turn off the power to the physical computer and then turn it back on. Resetting the physical computer is not sufficient.) 3) If you have made changes to the Boot Configuration Data store, review these changes to ensure that the hypervisor is configured to launch automatically.

This issue is caused by buggy security updates KB5009624 and KB5009624. To quickly fix the problem, you can simply uninstall the updates using the commands:
wusa /uninstall /kb:5009624

wusa /uninstall /kb:5009595
However, it is better to download and install hotfix KB5010794, which should fix this bug. This update is not distributed through Windows Update, so you must download it manually from the Microsoft Update Catalog.
- Go to https://www.catalog.update.microsoft.com/Search.aspx?q=KB5010794
- Download the MSU update file for your version of Windows;

- Install the MSU update using the Windows Update Standalone Installer by double-clicking on it;
- Restart your Hyper-V host.

- About
- Latest Posts

I enjoy technology and developing websites. Since 2012 I’m running a few of my own websites, and share useful content on gadgets, PC administration and website promotion.
by Milan Stanojevic
Milan has been enthusiastic about technology ever since his childhood days, and this led him to take interest in all PC-related technologies. He’s a PC enthusiast and he… read more
Updated on March 22, 2022
- Some Windows 10 users reported that they get the error message Hypervisor is not running when trying to run multiple operating systems.
- First you need to make sure that virtualization is enabled in the BIOS.
- Use a reliable tool to update the drivers to the latest version.
- Also, check if your CPU supports virtualization in order to use native virtualization.
XINSTALL BY CLICKING THE DOWNLOAD FILE
This software will keep your drivers up and running, thus keeping you safe from common computer errors and hardware failure. Check all your drivers now in 3 easy steps:
- Download DriverFix (verified download file).
- Click Start Scan to find all problematic drivers.
- Click Update Drivers to get new versions and avoid system malfunctionings.
- DriverFix has been downloaded by 0 readers this month.
Many users use virtualization, but sometimes they might encounter Hypervisor is not running message on their PC.
This message will prevent you from using virtualization, but in today’s article, we’ll show you how to properly tackle this issue.
Virtualization is a useful feature, but sometimes problems with it can occur. Speaking of virtualization issues, here are some common problems that users reported:
- Hypervisor is not running Windows 10 Pro, BIOS – This problem can occur if virtualization isn’t enabled in BIOS, so be sure to find this feature and enable it.
- Hypervisor launch has been disabled through the hypervisorlaunchtype bcdedit setting – Sometimes Hyper-V feature can be disabled, but you should be able to start it simply by running a single command in Command Prompt.
- Hyper-V failed to start Hypervisor is not running – This problem can occur if your BIOS is out of date. To fix the issue, update your BIOS and check if that solves the problem.
- Virtual machine error Hypervisor is not running – Sometimes this problem can occur due to problematic updates, and in order to fix the issue, it’s advised to find and remove these updates manually.
- Hypervisor is not enabled, present, working – These are some common problems that can occur with Hyper-V, but you should be able to fix them using one of our solutions.
How do I fix the Hypervisor not running error on Windows 10?
- Make sure that virtualization is enabled in BIOS
- Update your BIOS
- Update the drivers to the latest version
- Reinstall HyperV feature
- Remove problematic updates
- Use bcdedit command
- Use DISM command
- Check if your CPU supports virtualization
- Use third-party applications
1. Make sure that virtualization is enabled in BIOS
If you’re getting Hypervisor is not running message, perhaps the problem is related to your BIOS settings. As you know, in order to use virtualization, this feature needs to be actually enabled in BIOS.
To check if virtualization is enabled, just enter BIOS and look for this feature.
How to enable virtualization in BIOS:
- Access your BIOS (If you need a hand, here’s how to enter BIOS on a Windows 7, 10 or 11 PC).
- Then, click on Advanced Mode, and go to the Advanced tab.
- Select CPU Configuration and set the Intel Virtualization Technology option (for Intel) or the SVM Mode (for AMD) to Enabled.
- Make sure you save the changes before you exit this screen.
That is how to enable Hyper-V Hypervisor in Windows 10. However, note that enabling virtualization can be different according to your CPU, PC model, chipset, and of course, motherboard.
To see how to properly access BIOS and find this feature, we advise you to check your motherboard manual for more information.
Once you enable this feature, go back to Windows and check if the problem is still there.
2. Update your BIOS
The problem with virtualization can be your BIOS, so if you’re getting the Hypervisor is not running message on your PC, the problem might be an outdated BIOS.
Several users reported that they fixed this problem by updating their BIOS to the latest version.
This is an advanced process, and if you don’t perform it properly you can cause permanent damage to your PC, so we advise you to be extra cautious.
We already wrote a short guide on how to flash your BIOS, but if you know how to properly update BIOS on your motherboard, check your motherboard manual for detailed information.
3. Update the drivers to the latest version
If you’re unable to use virtualization due to Hypervisor is not running message, perhaps the problem is related to your drivers.
If you want to update all drivers on your PC fasts, perhaps using a third-party solution might be the best choice.
Using our recommendation, you can automatically update all your drivers with just a couple of clicks.
⇒ Get DriverFix
4. Reinstall the HyperV feature
- In the Search bar type windows features, and choose Turn Windows features on or off from the list of results.

- Locate the HyperV feature and uncheck it. Now click OK to save changes. If you’re asked to restart your PC, be sure to do so.

- Once your PC restarts, go back to Windows Features window and enable the Hyper-V feature. You might be asked to restart your PC once again, so be sure to do that.
According to users, if you’re getting this error, perhaps there’s a glitch with HyperV feature.
Sometimes various Windows glitches can occur, but you can fix most problems with HyperV simply by reinstalling it.
Once your system restarts, the problem with Hyper-V should be resolved and everything will start working again.
In addition, the Task Manager can detect if it’s running on a physical or virtual machine. Under the Performance tab, the label Virtual machine: Yes is listed if a hypervisor has been detected.

Tip
The best virtual machines for Windows 10 are VMware Workstation, VirtualBox, Hyper-V, and Citrix Hypervisor. For more information about each machine, check out our in-depth guide.
5. Remove problematic updates
- Press the Windows Key + I to open the Settings app.
- Navigate to the Update & Security section, and select View update history.

- You should now see a list of recent updates. Pay attention to the recent updates and memorize them or write them down. Now click Uninstall updates.

- List of recent updates will appear in the new window. To remove an update, double-click it and follow the instructions on the screen.

Some PC issues are hard to tackle, especially when it comes to corrupted repositories or missing Windows files. If you are having troubles fixing an error, your system may be partially broken.
We recommend installing Restoro, a tool that will scan your machine and identify what the fault is.
Click here to download and start repairing.
If the error started appearing recently, the problem might be a problematic Windows update.
As you know, Windows installs updates automatically, and if the problem started appearing recently, it’s possible that the update is causing it.
To fix the problem, it’s advised that you find the problematic update and remove it, by following our above steps.
Once the update is removed, check if the problem is resolved. You might have to repeat this step a couple of times before you find the update that is causing the problem.
Once you find the problematic update, be sure to write its name down.
Windows tends to install the missing updates automatically, so in order to prevent this problem from reappearing, we advise you to block this update from installing automatically.
- Fix Hypervisor_Error BSOD in Windows 10/11
- How to disable Hyper-V in Windows 11
- Seeing the Hyper-V Assembly not found error?
- How to fix the Hyper-V ran out of memory error
- Can’t Install Hyper-V in Windows 10
6. Use the bcdedit command
- Press the Windows Key + X, and select Command Prompt (Admin) or PowerShell (Admin) from the menu.

- When Command Prompt opens, run the following command:
bcdedit /store c:BootBCD /set hypervisorlaunchtype Auto
After the command is executed, check if the problem with virtualization is resolved. Alternatively, you can also use the bcdedit /set hypervisorlaunchtype auto command.
If you’re having problems with virtualization, perhaps you can fix the problem simply by running a single command in Command Prompt.
7. Use the DISM command
- Start Command Prompt as an administrator.
- When Command Prompt starts, run this command:
dism /online /enable-feature /featurename:Microsoft-Hyper-V -All
Sometimes you might get this error because certain components aren’t working properly. To fix this problem, it’s advised that you run the DISM command in order to enable the HyperV feature.
Once the command is executed, Hyper-V feature should be enabled and the problem with virtualization should be resolved.
8. Check if your CPU supports virtualization
In order to use native virtualization in Windows 10, it’s necessary that your processor supports certain features. If it doesn’t have these features, you won’t be able to use the built-in virtualization.
To see if your processor supports virtualization, you’ll need to check its specifications on the manufacturer’s website.
Alternatively, you can use third-party tools in check if your processor supports virtualization.
Many users reported that virtualization won’t work on their PC since the processor doesn’t support SLAT feature.
If your processor doesn’t support the necessary features, you might have to change it in order to use built-in virtualization.
9. Use third-party applications
If you didn’t manage to fix Hypervisor is not running error, perhaps you might want to try using a third-party solution as a workaround.
Even if your processor doesn’t support the virtualization features, you should be able to create a virtual machine in Windows using our recommendation software.
This tool specializes in virtualization, and it offers all the necessary features for both advanced and first-time users alike, so we strongly suggest that you try it out.
⇒ Get WMware Workstation 16
The hypervisor is not running error can cause problems, but we hope that you managed to fix it using one of our solutions. For more suggestions, please access the comments section below.
![]()
Newsletter
There have been users reports that state that users are not able to launch VirtualBox as they are presented with a message box saying hypervisor is not running. This error is often due to your Hyper-V services not running automatically or disabled Hyper-V feature. Basically, Hypervisor is a software that is used to run or create virtual machines. When users try to open VirtualBox, instead of the user interface, they are prompted with the ‘Virtual Machine could not be started because the hypervisor is not running’ error.
We all know about virtual machines and many of us have used it at least once throughout the years, albeit most of us aren’t aware of the responsible tech at play. Nonetheless, the error can be easily resolved by applying a few simple solutions that we have mentioned down below.
What causes the ‘Virtual Machine could not be started because the Hypervisor is not running’ Error on Windows 10?
Well, after looking at the user reports, the error is due to the following factors —
- Hyper-V services: In some cases, the error is popping up because the Hyper-V services on your Windows 10 aren’t starting automatically after abootupp.
- Hyper-V feature: Another thing that can cause the error to appear is the Hyper-V feature. If this feature, located in your Windows features list, is disabled, it will cause the error message to emerge.
To fix your issue, you can follow the few solutions down below. If you want a quick workaround, we recommend following the solutions in the same order as provided.
Solution 1: Using the Command Prompt
You can fix your issue by setting the hypervisor to start automatically in your boot configuration data file. This will require an elevated command prompt so make sure you are using an administrator account. Here’s how to do it:
- Press Windows Key + X and select Command Prompt (Admin) from the list to open an elevated command prompt.
- Once the command prompt loads, type in the following command and press enter:
- bcdedit /set HypervisorLaunchType auto

Setting Hypervisor to Start Automatically in BCD - Restart your system and check if it fixes your issue.
Solution 2: Starting the Hyper-V Service
Another fix that you can implement to circumvent the issue would be changing the properties of a Hyper-V service. Sometimes, the service doesn’t start automatically due to which the error is popping up. Therefore, to fix it, you will have to set the service to start automatically. Here’s how to do it:
- Press Windows Key + R to open Run.
- Type in ‘services.msc‘ and press Enter.
- In the Windows Services list, locate the Hyper-V Virtual Machine Management service.

Hyper-V Virtual Machine Management Service - Double-click it to open Properties.
- Set the Startup type to Automatic and make sure the service is running.
- Restart your system.
Solution 3: Enabling Hyper-V Feature
Finally, the last thing that can potentially fix your issue would be enabling the disabled Hyper-V feature. This feature is located in the Windows features list which can be found in the Control Panel. To do this, you will have to do the following:
- Go to the Start Menu and open up the Control Panel.
- Go to Programs and Features.
- On the left-hand side, click ‘Turn Windows Features on or off’.

Programs and Features – Control Panel - Scroll down and expand the Hyper-V entry.
- Afterward, expand the Hyper-V Platform list.
- Tick the ‘Hyper-V Hypervisor’ box and then click OK.

Enabling Hyper-V Hypervisor Feature - If it is greyed out, you will have to tweak your BIOS settings a teensy bit. In your BIOS settings, make sure Virtualization setting is enabled.

Kevin Arrows
Kevin is a dynamic and self-motivated information technology professional, with a Thorough knowledge of all facets pertaining to network infrastructure design, implementation and administration. Superior record of delivering simultaneous large-scale mission critical projects on time and under budget.
- Remove From My Forums
-
Question
-
Hi
I have installed Windows Server 2012 Standard Edition with a GUI. Default configuration, nothing special.
Whenever I want to turn on any machine inside of Hyper-V, the following error message appears:
«Virtual Machine could not be started because the hypervisor is not running»
Whenever this happens, I run the following command:
bcdedit /set hypervisorlaunchtype Auto
and reboot the Server. After a reboot, all Virtual Machines can be started without Problems. However, as soon as I shut down the Server instead of rebooting it, the Problem happens again and I need to enter the command again and reboot.
Now my question is how to solve this Problem. I never had this Issue with Windows Server 2008 R2, maybe there are some differences regarding the Hypervisor in Server 2012. How can I make sure the Hypervisor is always on, even after a Shutdown? Thanks in
Advance
Answers
-
Hi,
Please check whether you have event log with ID 3112.
Hyper-V requires hardware support, including: an x64 CPU; VT (Intel) or AMD-V (AMD) hardware extensions; No eXecute (NX)/eXecute Disable (XD) and full BIOS support for hardware virtualization.
Check if the computer meets the hardware requirements, use the appropriate utility for your CPU manufacturer.
If the computer meets the requirements for Microsoft virtualization software, see the video titled
Hypervisor is not running error: How to fix
, which demonstrates how to change the system BIOS on a computer to enable support for virtualization. Make sure DEP and CPU virtualization is enabled in BIOS. (http://go.microsoft.com/fwlink/?LinkId=163578
).Also, check that
Boot Configuration Data (BCD) store is set to start the hypervisor, and then restart your physical computer.The BCD store contains boot configuration parameters and controls how the operating system is started in Windows Vista and Windows Server 2008 operating systems. These parameters were previously in the Boot.ini file (in BIOS-based operating
systems) or in the nonvolatile RAM (NVRAM) entries (in Extensible Firmware Interface-based operating systems).
You can use the Bcdedit.exe command-line tool to update BCD store with the correct launch options as referenced in the error, and then restart the server. Bcdedit.exe is located in the WindowsSystem32 directory by default.
For more information please refer to following MS articles:
Event ID 3112 — Hypervisor Operation
http://technet.microsoft.com/en-us/library/dd581879(v=ws.10).aspx
You receive the error message «virtual machine could not start because the hypervisor is not running» in Windows Server 2008 or Windows Server 2008 R2
http://support.microsoft.com/kb/2490458
Troubleshooting Event ID 3112 «The virtual machine could not be started because the hypervisor is not running.»
http://social.technet.microsoft.com/wiki/contents/articles/194.hyper-v-troubleshooting-event-id-3112-the-virtual-machine-could-not-be-started-because-the-hypervisor-is-not-running.aspx
Lawrence
TechNet Community Support

-
Marked as answer by
Monday, October 22, 2012 2:45 AM
-
Marked as answer by
-
I found the solution in the meanwhile:
It happens because of an old BIOS Version. The Mainboard Manufacturer has corrected this issue in the latest BIOS. In fact, the oldest available BIOS Version was applied to my Mainboard ASUS P9X79 Deluxe.
After the BIOS has been updated to the latest Version, the Problem is now solved.
-
Marked as answer by
John Muller
Saturday, October 20, 2012 10:13 AM
-
Marked as answer by

The virtual machine is choice of many windows users. However, virtualization is not too far in disappointing users with unknown errors. The virtual machine could not be started because the hypervisor is not running is one of them.
The hypervisor is Microsoft’s program to run virtual machines. As virtualization allows users to have multiple operating systems at once, isolated from each other. This flexible approach to enjoy the personalization has encouraged Hypervisor features as it is required to run this.
The issue often appears, when the systems CPU is incapable of handling virtual machine feature because of the absence of SLAT. There are other instances as well like DEP, which needs to be enabled if it is not, to fix Hypervisor is not running issue. Also, if you have not enabled certain parameters in the BIOS, you will get this error message.
We have included various solutions to fix Hypervisor is not running issue. Just go ahead with us!
Hypervisor is Not Running: Problem Overview
According to the user’s report, when they are trying to launch a virtual machine, a window pops up with an error message. This prevents users from experiencing virtual machine features.
There are plenty of reasons behind this issue as shown below causing issues with Microsoft Hypervisor.
- Conflicting Hyper-V-services
- Conflicting Hyper-V-feature
- Troublesome updates
Hypervisor is Not Running: Related Problems
No error is without related issues encountered by Windows users. Various range of related problems is displayed below for your reference. Like, Hypervisor is not running Windows 10, Hypervisor is not running server 2016, among others. Go for this article to fix the undermentioned issues as well.
To fix Hypervisor is not running while launching a Virtual machine. We have included this basic approach section for those whose cause is not a severe one. Let’s start by enabling some features to get back to the virtualization.
-
Check if Virtualization is allowed in BIOS
Alternation in BIOS settings is required to stop Hypervisor is not running issue. As if the feature is not allowed in your systems BIOS, you can’t launch the Virtual machine via Hypervisor.
Just check on your motherboards manual to get into the BIOS of your windows system. Afterward, change the required configuration. Just enable Virtualization in the configuration. Once it is done check if the issue is fixed or not.
Be careful while doing this as any incorrect operation can lead to damaging your system.
-
Make sure your CPU is SLAT capable
The SLAT capable CPU supports virtualization in the windows system. It is mandatory to know if your CPU is actually allowed for it or not. Many users have reported that they tried fixes and at last, they found that the CPU was not SLAT capable.
To check this just visit your CPU manufacturer’s website to know the specification details. If it is incapable then you can’t launch a virtual platform. To do so you might need to get an upgraded system.
Steps To Fix Hypervisor is Not Running Error
By now you have checked on the essential and minor things. If the above two criteria were okay, that means the issue is with internal features. Various methods like enabling Hyper-V services and features among others are enough to fix Hypervisor is not running Windows 10. Do follow the order of solutions provided below.
- Step-1 : Go with command prompt
- Step-2 : Start the Hyper-V service
- Step-3 : Enable the Hyper-V feature
- Step-4 : Enable Data Execution Prevention
- Step-5 : Uninstall the recent updates
- Step 1
Go with command prompt
If you have not set the hypervisor to open automatically after boot. Then you may lead to a virtual machine could not be started because the hypervisor is not running is one of them. To stop this, you need to re-configure this setting in the boot data file. Many users have fixed this issue by this.
Go with the under given steps to perform this:
- Press on the Windows logo key with “X” to get a list. Find “Command Prompt (Admin)” and tap on it to open. If a UAC prompt appears just allow it by tapping YES.

- Now write or copy-paste the below-given code to alter Hypervisor setting to Start Automatically in BCD:
- bcdedit /set hypervisorlaunchtype auto

- bcdedit /set hypervisorlaunchtype auto
- Now “Restart” your window system.


Once the system turns on, check if the issue “Hypervisor is not running” is fixed or not. If not then go for starting the Hyper-V services in next method.
- Step 2
Start the Hyper-V service
If Hyper-V services are not starting after boot this issue is obvious. Many users have reported that this service is unable to get launched automatically. As per users, this was the real culprit behind Hypervisor is not running issue.
Go with the under given steps to change the Hyper-V services setting:
- Open the RUN box using “Windows key” with alphabet “R”. Then write “services.msc” and press ENTER

- You will get the Windows services list, find the “Hyper-V Virtual Machine Management” service. Double-tap on it to open PROPERTIES.
- Under the opened tap, look for STARTUP TYPE, just change this to “Automatic”. Once done save it and exit.
- now “Restart” your windows system.

Now, you are all done with this feature. Once the system turns on, check if the issue “Hypervisor is not running” got fixed or not. If not then go for enabling the Hyper-V feature in the next method.
We are making this best laptops list after spending hours in research so that you can find the best laptop as per your liking.
- Step 3
Enable the Hyper-V feature
Hyper-V-feature is essential to run the virtual machine comfortably. Many users have found that this feature was not enabled in your windows system. If this your case too just enables the Hyper-V feature as soon as possible. Many users are able to launch their Virtual Machine after performing this method.
Go with the under given steps to change the Hyper-V Feature setting:
- Go to the Start menu in the search bar or tap the windows key with “S” to get it. Look for “Control Panel”, once it appears tap on it to open.
- Once it appears, tap on the “Programs and Features” option available there.

- Look into the left pane, tap on “Turn Windows features on or off”. A screen will open up namely Windows Feature.
- Look for “Hyper-V” in this list and expand it by tapping on it.
- Now find “Hyper-V Platform” and mark it. Afterward, just tap on the “OK” toggle. This will enable the feature.
- At last “Restart” the system.

Once it turns on, check if the issue “Hypervisor is not running” got fixed or not. If not then go for enabling the data execution under Performance tab in the next method.
Note: In case you find the toggle is greyed in step 5. There are chances that the “Virtualization” is not enabled in your systems BIOS. This is a bit risky but it needs to do if you want to launch Virtual Machine.
- Step 4
Enable Data Execution Prevention
Windows operating system includes a Data Execution Prevention (DEP). This is a memory protection tool that works at the system level. This is a minor thing but there are chances that it is turned off in. If so, you will get such error codes while using Hypervisor. Various users have found this basic thing a great fix.
Go with the under given steps to change the DEP setting:
- Press on the windows key with “Q” to get the search box.
- Type SYSTEM SETTINGS in the search bar. And locate “View Advanced System Settings”, tap on this to open.

- You will get a screen named SYSTEM PROPERTIES. Now tap on the “Settings” toggle available there.

- Now switch to the “Data Prevention Execution” section.

- Then, select “Turn on DEP for all programs and services except those I select” option. If you want to add any program you want to exclude, just tap “ADD”. Otherwise, just tap on “APPLY” then “OK” toggle to finish it.
- Once this is done tap on the “Restart” toggle.


Once the system turns on, check if you are able to launch the virtual machine or not. If you are yet not over with Hypervisor is not running issue. Go with the next method and remove the recently installed updates.
Note: If this option is greyed out in your system, that means it is not enabled in BIOS. We advise you to get into bios and enable it according to your systems motherboard’s instruction manual.

You must consider to pick up some accessories for your laptop to get the best out of your laptop & make it power pack.
- Step 5
Uninstall the recent updates
Some users started getting Hypervisor is not running issue after updating their system. This shows that some update has glitched or created an incompatible environment preventing Virtualization. As windows are liable to perform an automatic update. But no need to worry as it is possible to remove the recent updates.
Go with the following set of steps to remove the problematic update:
- Press on the Windows logo key with “I” to get the SETTINGS window on the screen.
- Go for the “Update & Security” option, tap on it to open.

- Locate the “View update history” option and tap on it to get the list of recently installed features.

- Make sure you know the date from you started getting Hypervisor is not running issue. Just uninstall updates you have installed on that day including some previous day updates. To do so, select the update and tap on the “Uninstall updates” toggle. Just follow the guidance available on the screen to finish this.

- Once done “Restart” the windows system.


Note: You can also block that particular update from automatic download and installation in your system.
Once it turns on, check if the Hypervisor is not running issue got fixed or not. If not then you should go for official support. As all these solutions were enough to fix this.
Tips To Avoid Hypervisor is Not Running Error
- It is important that related system files have not malfunctioned. Just scan your system using an authentic malware application.
- It is important to have a system that supports virtualization. As it can’t be done in CPU which doesn’t support certain standards.
- It is required to enable related options in BIOS to run Hypervisor properly. If any feature is not enabled you will encounter this error message.
- Make sure the updates you are installing are correct. As some updates can conflict with other services in long term.
Contact Official Support
Yet not done with the virtual machine could not be started because the hypervisor is not running? Visit online website for help as per the manufacturer of your system like HP, Dell, Acer among others.
Also, we recommend you to get access to the nearest service center to get technical help. You can also get online help before visiting. Make sure you have the required documents if you possess warranty benefits.
Final Words: Conclusion
We hope you are done with the “Hypervisor is not working” issue in the windows system. Do you have any suggestions? If yes, feel free to write us to help your fellow readers.
However, you get any issue while applying steps available in any of the above methods. Do mention us in the comment section below including the feedback, once you are over this.
Keep coming for further troubleshooting!
Table of contents
- Section 1. Why is hypervisor not running?
- Section 2. How to fix hypervisor is not running issue?
- Section 3. Backup your virtual machine in an effective way
- Conclusion

Virtual machines allow people to run multiple systems on one computer. Windows Hyper-V allow users to directly deploy virtual machines on Windows computer. It is convenient, but we have noticed that some users have trouble when using this feature.
“I have enabled Hyper-V to create virtual machine on my computer, Windows 10, which is hosting 4 VMs. Today, I am trying to boot my VMs as usual, but it doesn’t work and I see the error message.
An error occurred while attempting to start the selected virtual machine.
Virtual machine could not be started because the hypervisor is not running.
I haven’t done any changes in Settings. How could I fix this?”
You might have useful data in virtual machine, follow this passage to know what does this error message means and how to solve the problem.
Section 1. Why is hypervisor not running?
Generally speaking, this problem hypervisor not working could be caused by wrong BIOS settings, modified Windows settings, or latest update.
Your BIOS settings might be changed so that virtualization, Hyper-V feature, or DEP has been disabled, you could follow the steps in the next section to correct it.
An outdated bios might also course might course this problem. Don’t know how to update bios? Go to the next section.
In addition, your computer system might have been recently updated, you could navigate to Windows update to check or uninstall the update.

Section 2. How to fix hypervisor is not running issue?
In section 1, you have known the possible causes which could lead to hypervisor not running and virtual machine not starting. In this section, you will know the detailed steps to fix this issue.
Before you try any solutions below, it is suggested to do a restart because you might find your VM works again with the simplest solution.
Solution 1. Enable the EDP Settings in BIOS
The function of DEP (Data Execution Prevention) is to prevent your computer being harmed by malware. To allow hypervisor, Microsoft suggests you enable it.
1. To enter BIOS, you need to know your BIOS key first, it could be F10, F2, F12, F1, or DEL.
2. Reboot your computer and repeatedly press BIOS key to enter BIOS.
3. Navigate to DEP features and enable it. The option depends on your computer. It could be «Data Execution Prevention,» «XD,» «Execute Disable,» or «NX.»
4. Exist the menu and click save changes

You could also enable DEP settings without entering BIOS.
1. Open the Control Panel
2. Click System and Security and then select System
3. Navigate to Advanced System Settings
4. On the Advanced tab, click Settings in Performance section
5. Click the Data Execution Prevention tab
6. Select Turn on DEP for essential Windows programs and services only and then click OK. If are using other products, check
Solution 2. Enable Visualization in BIOS
Visualization feature is necessary for the use of hypervisor so you should make sure it is enabled in BIOS.
1. Reboot your computer and enter BIOS as in solution 1
2. Navigate to CPU Configuration
3. Enter Acceleration Section
4. Find the options VT-x, AMD-V, SVM, or Vanderpool and enable them. If you see Intel VT-d or AMD IOMMU, also enable them.
5. Exist menu and click save changes.
Solution 3. Update BIOS
An out-dated BIOS might cause hypervisor not running problem. An update might fix it. You need to know the motherboard manufacturer, go to its official website to know the information about the motherboard. Some manufacturers offers BIOS-flashing options directly in BIOS, it would be much simpler to update BIOS than usual way.
1. Go to the website of motherboard to download the BIOS update.
2. Unzip and transfer it to a portable storage
3. Reboot your computer and enter UEFI control panel in BOIS
4. Launch the UEFI’s firmware update tool or flashing tool and back up your PC’s existing firmware to your flash drive
5. Use the same UEFI utility to select the new firmware image you saved on the flash drive. After this, reboot computer.
Solution 4. Rollback Windows Update
You might not change Windows settings manually, but the latest Windows update might do something to your computer. Uninstall it might fix hypervisor not running issue.
1. Click Windows icon on desktop and then click the Settings icon
2. Select Update and Security
3. Click View installed update history
4. Click Uninstall updates
5. View recent updates and remove the wrong ones.

Section 3. Backup your virtual machine in an effective way
Your data is very important, and the risk of losing it is very high, if, a virtual machine fails to start properly due to some undiagnosable reasons. Therefore, in order to minimize the loss under the worst scenario, the best way is to make a proper backup and disaster recovery plan for your Hyper-V environment in advance.
With Vinchin Backup & Recovery, the whole process can be greatly simplified. You would enjoy the features including Automatic VM Backup, Agentless Backup, Granular Restore, powerful RCT alternative, BitDetector, file-level recovery, etc., all in one web-based console.
Simply download Vinchin Backup & Recovery to start an easy data protection journey.

Conclusion
Hyper-V users might encounter with the problem that virtual machine could not be started because the hypervisor is not running. If you got this error message, BIOS settings, Windows settings, or Windows update might be the causes. No matter you use Windows 10, Windows 2012 server or other operating system, just use the 4 solutions in this passage to fix the issue.
By the way, you can use Vinchin Backup & Recovery to easily backup Hyper-V VM. Don’t forget to share this passage to help more people.
-
Partition Wizard
-
Partition Magic
- How to Fix: Hypervisor Is Not Running in Windows 10
By Amanda | Follow |
Last Updated February 18, 2020
Some users report that they are unable to launch their virtual machine and receive the error that hypervisor is not running. Focusing on this problem, MiniTool has developed a guide to help you.
Plenty of Windows users are using virtual machine, but some problems related to virtualization have been reported. Sometimes, when they are trying to launch their virtual machine, a window pops up with an error message “virtual machine could not be started because the hypervisor is not running”.
This error prevents users from using virtual machine and the reasons for this error should be related to the Hyper-V service and Hyper-V feature. Luckily, this error is easy to fix. Here are 5 solutions to this error and you can feel free to try them one by one.
Fix 1: Start Hyper-V Service
If you encounter hypervisor not running issue, you should make sure the Hyper-V service is running at first. Here’s how to do it.
Step 1: Press Windows + R to open Run dialog. Input services.msc and click OK to enter Services app.
Step 2: Locate the Hyper-V Virtual Machine Management service. Double-click it to open its Properties.
Step 3: Make sure the status of the service is Running and set its Startup type to Automatic.
Step 4: Click Apply and OK to save the change.
After that, restart your computer and check if your virtual machine can work properly.
Fix 2: Enable Hyper-V Feature
Besides, if the Hyper-V feature is disabled, the virtualization cannot be used definitely. So, you need to go to Control Panel to keep the feature enabled.
Step 1: Open your Control Panel and go to Programs > Programs and Features.
Step 2: Click Turn Windows features on or off on the left pane.
Step 3: When you get the following window, scroll down to locate and expand Hyper-V. Then, double-click Hyper-V Platform to expand the list, check Hyper-V Hypervisor item and click OK.
Step 4: Restart your system to check if the error is resolved.
Note: If the Hyper-V is enabled already, you might need to disable it by unchecking it firstly. Then, restart your computer and repeat the steps above.
Fix 3: Use Command Prompt
You can also fix the problem simply by executing bcdedit command. With this command, you can set the hypervisor to start automatically in your boot configuration data file. Just follow the steps below:
Step 1: After opening Run window, type cmd and press Ctrl + Shift + Enter to run Command Prompt as administrator.
Step 2: Input the following command and press Enter: bcdedit /set HypervisorLaunchType auto. (Also, you can use the command bcdedit /store c:BootBCD /set hypervisorlaunchtype Auto)
Step 3: Restart your computer and check if this virtualization problem is resolved.
Note: Some users have also fixed the issue by executing the command dism /online /enable-feature /featurename:Microsoft-Hyper-V -All. You can have a try if the bcdedit command doesn’t work to fix the problem.
Fix 4: Remove Problematic Updates
According to the reports from Windows users, they get the error message “virtual machine could not be started because the hypervisor is not running” after updating Windows. Thus, perhaps your Windows updates installed recently lead to this error. If you have updated Windows recently, try removing the problematic updates to fix hypervisor not running issue.
Step 1: Press Windows + I to open Settings.
Step 2: Go ahead to Update & Security > Windows Update.
Step 3: In the right pane, click View update history.
Step 4: In the pop-up window, click Uninstall updates to go to Control Panel.
Step 5: Among the listed Windows updates, select the problematic updates and click Uninstall.

After you uninstall the problematic updates, try opening your virtual machine again to see if the error is fixed. To avoid the error message appears again due to Windows update, you can disable Windows 10 Update.
Fix 5: Update Your Drivers
Finally, you can consider updating your drivers to fix this problem. In some cases, the hypervisor not running issue is caused by corrupted Bluetooth driver, and the issue disappears after updating the driver.
To update your drivers, you can either operate in Device Manager, or visit the manufacturer’s website to download the latest version of the driver.
About The Author

Position: Columnist
Amanda has been working as English editor for the MiniTool team since she was graduated from university. She enjoys sharing effective solutions and her own experience to help readers fix various issues with computers, dedicated to make their tech life easier and more enjoyable.
She has published many articles, covering fields of data recovery, partition management, disk backup, and etc. In order to provide more useful tips and information, she is still committed to expand her technical knowledge.