Okay, first some system specs:
Macbook Pro
2.2 GHz Intel Core i7
8 GB RAM
Radeon HD 6750
OSX Lion 10.7.5
Premiere Pro CS6 (updated to lastest available version)
—I remember installing updates a few days ago (maybe last week), but don’t remember if any of them were for Premiere and could possibly be the problem.
The trouble I’m having is with one .MTS clip. I have a timeline about 20 minutes in length. I edited the whole thing and had no problems the whole time, with any clip. All clips originally imported correctly, played back fine, etc.
I exported a copy for client review (from Media Encoder CS6) the other day. One clip (the .MTS clip in question) showed as «Media Offline». It is not offline, I did not move the clip, etc. I unlinked the clip in the project, relinked it, and it did show up in the project and was able to be played back.
Exported another copy, found the same error occured with just this one clip. Now I’m noticing that when I open the project, I receive the error in the topic title (A low level exception occured in: Importer MPEG (Importer). The clip will not play back and shows up as «Media Pending», as if it’s not coming in correctly. Unlinking and relinking doesn’t fix the issue.
I have many other .MTS clips in my timeline. All of them work correctly, play back correctly, and export correctly. There doesn’t seem to be any inherent problem with the clip itself; it plays back smoothly in VLC, and I’ve transcoded it to a .mov to try and just bring that in and get around this stupid issue. This didn’t work either; I unlink the clip, then relink to the transcoded .mov — it actually will play back in the preview monitor, but will not display when trying to view it on my timeline. I have also created a copy of the project, tried this inside of the copy, as well as created a new sequence and pasted over the information; none of that worked either. There are also other sequences this clip is on, and it will not play back in any of them either, but as I mentioned, plays back in the preview.
I did find one other topic with a similar issue; they recommend deactivating Premiere, restarting the computer, and activating it again. I did do a restart initially to try and diagnose the problem, but to no avail. I tried deactivating the program, but the Adobe Application Manager doesn’t load; it has almost never loaded for me whenever I try to use it, which is frustrating in and of itself.
I tried creating an entirely new project and importing the other project. When I did this Premiere just froze; I’m assuming it can’t handle all the pieces (it’s a fairly complex project with hundreds of clips) and they are also coming off an external drive through a USB 3.0 cable.
I’ve temporarily «fixed» this by bringing in the transcoded clip, resyncing it to to the spot I need it in, and cutting it as necessary. I typed this post as I went and tried various things, and while I’ve found my way around the problem, it doesn’t really solve it. I opened another old project that was very similar to this one and also encountered the same error message. I didn’t stick around to find out if there was just one clip causing the issue; the fact that it was there was enough for me.
So, what do I need to be doing here? I’m guessing the stock answer is to uninstall Premiere and reinstall it, which I don’t want to do unless I have to since it’s a pain in the ass. I’m kind of through the problem for this project, but want to be able to deal with it for the future. Hoping someone with knowledge can chime in and tell me whether it’s the update from the other day causing this.
If the answer is to uninstall and reinstall Premiere, do I need to run some cleaner tool? I vaguely remember hearing about that before in regards to uninstalling and reinstalling.
Содержание
- How to Fix “A low-level exception occurred in ImporterMPEG” Error in Adobe Premiere Pro?
- Hi Guys, Today I am Going to Show You How to Fix “A low-level exception occurred in ImporterMPEG” Error in Adobe Premiere Pro?
- Steps For How to Fix “A low-level exception occurred in ImporterMPEG” Error in Adobe Premiere Pro?
- Method 2: Disabling Intel H.264 Decoding Option
- Method 3: Switching the Mercury Playback Engine GPU Acceleration CUDA to Software Only
- Работа над ошибками
- Устранение неполадок при импорте или воспроизведении видеофайлов
- Основные проблемы воспроизведения
- Серьезные проблемы воспроизведения
- Зависания, завершения работы и ошибки
- Устранение неполадок при настройке последовательностей и распознавании файлов
- Решение 1. Работайте с последовательностью, параметры которой подходят для импортированных файлов.
- Решение 2. Создайте миниатюры для предварительного просмотра клипов на временной шкале.
- Решение 3. Настройте масштаб, частоту смены кадров, соотношение сторон в пикселях или параметры полей.
- Диагностика форматов файлов и кодеков
How to Fix “A low-level exception occurred in ImporterMPEG” Error in Adobe Premiere Pro?
Hi Guys, Today I am Going to Show You How to Fix “A low-level exception occurred in ImporterMPEG” Error in Adobe Premiere Pro?
If You’re Looking for the Commonly Searched Term “How to Fix Low-Level exception importer MPEG in Abo Premiere Pro?” (or) “A low-level exception occurred in ImporterMPEG”. You are at the Right Place to Get Your Answers & Solve the Issue/Error.
Adobe Premiere Pro is a top-selling and most often used Video Editing Program in the world. Adobe Premiere is a Non-Linear Video Editing Program launched in 2003 and was developed by Adobe Inc. Adobe Premiere Pro is used for editing videos along with audio editing ability. It can be used for many film projects, Professionals works, and much more. Adobe Premiere Pro is very useful for Individuals who are very much interested in creating and Editing video content. Adobe Premiere Pro can also be used alongside After Effects and Photoshop on many projects. Premiere Pro can be used on any platform like Mac OS or Windows computers. Adobe Premiere Pro has a very good attractive, flexible interface which makes everyone a fan of it.
If You’re a Normal Video Editor or Video Editing Professional, then You must have faced the low-level exception that occurred in ImporterMPEG Error. When You’re Working on Video Projects for a Long time, then This Error Often Appears at some point of time while editing a video. This Errors Can Come and Go Without any Indication. This low-level exception that occurred in ImporterMPEG Error can also be caused on some of the following occasions Like If you’re Using Older Versions without Updating, Accelerated Intel H.264 decoding is Enabled and sometimes it happens when you Didn’t Delete the Media Cache for a long period of time. Usually, a Simple PC Restarting (or) Reinstallation of the Program Can Fix the Issue in Some Cases. But This can’t Work for All Users.You Don’t Need to Worry About the Error, We are Here to Help you to Solve this Issue Easily. We Provide You the Help Guides Below, Just Follow the Below Given Methods One by One Correctly.
Steps For How to Fix “A low-level exception occurred in ImporterMPEG” Error in Adobe Premiere Pro?
Method 1: Update Your Adobe Premiere to Latest Version
Whenever You Face any Issues or any Bugs with it, Try to Update Your Software to the Latest Version ( Not Only Adobe Premiere Pro, Whatever the Software it is).
Method 2: Disabling Intel H.264 Decoding Option
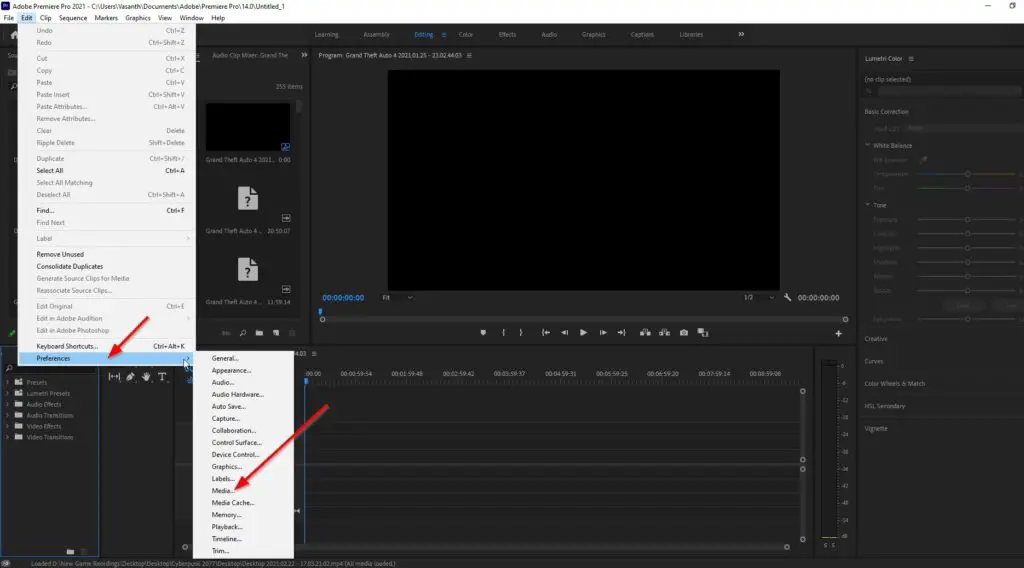
Step 1: First of all Run Adobe Premiere Pro and Navigate to Edit Tab and Select Preferences Option
Step 2: Under Preference Tab, Select the Media Option .
Step 3: Uncheck the Enable accelerated Intel H.264 decoding Option .

Step 4: Restart Adobe Premiere Pro.
Method 3: Switching the Mercury Playback Engine GPU Acceleration CUDA to Software Only
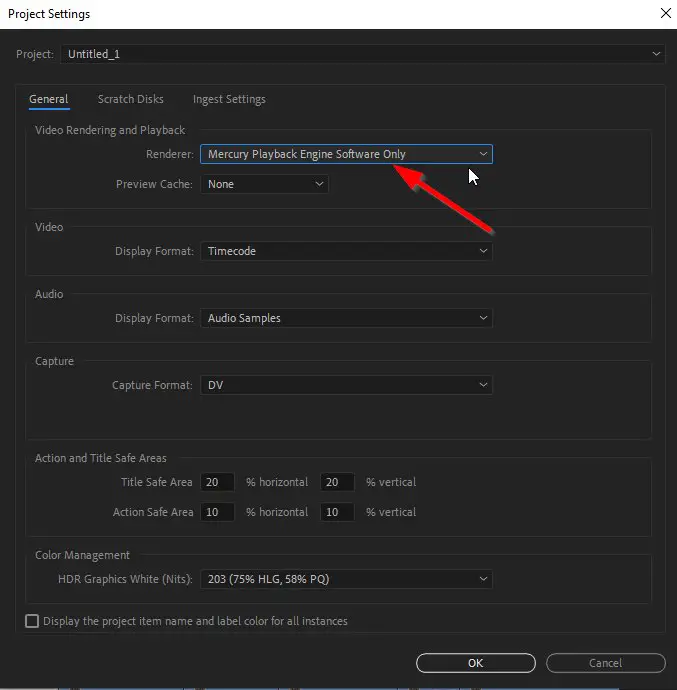
Step 1: First of all Run Adobe Premiere Pro and Navigate to File Tab and Select Project Settings Option
Step 2: In Project Settings, Select the General Option .
Step 3: Under Video Rendering and Playback, Change the Mercury Playback Engine GPU Acceleration CUDA to Mercury Playback Engine Software Only.
Step 4: Click Ok to Save and Restart Adobe Premiere Pro.
Method 4: Deleting the Media Caches
Step 1: First of all Run Adobe Premiere Pro and Navigate to Edit Tab and Select Preferences Option
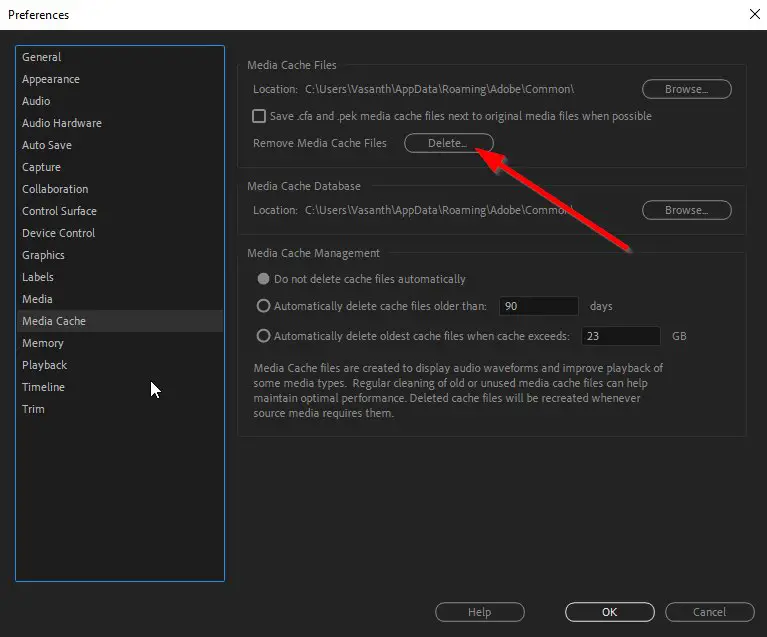
Step 2: Under Preference Tab, Select the Media Cache Option .
Step 3: Click Delete Button to Remove the Media Cache Files.
Step 4: Restart Adobe Premiere Pro.
That’s It! You’re Done Man !
That’s All About this Post. Give Your Reviews / Reactions about this Post and Leave Comments, Ask Your Doubts, We are here to Help You!
Basically an Instrumentation Engineer But Very much Interested in Blogging. I’m a Passionate Blogger and an Intermediate in the Search Engine Optimization And Always Looking Forward to Learn New Things. I always try to Fix the Common Issues Which were Faced By the Users in the World.
Источник
Работа над ошибками
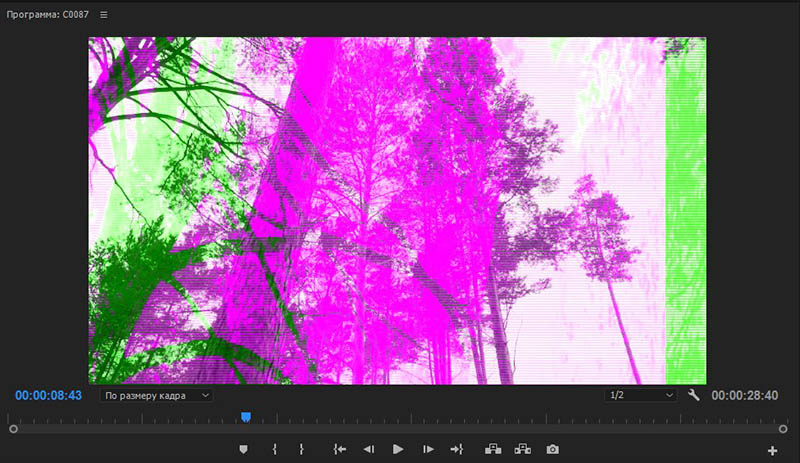
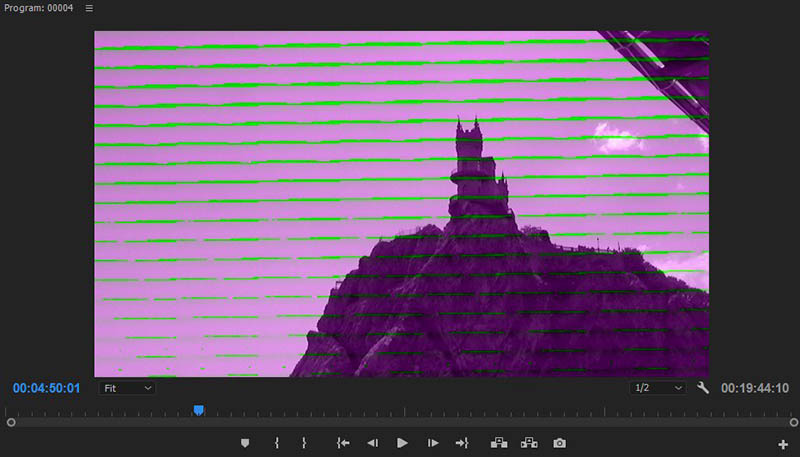
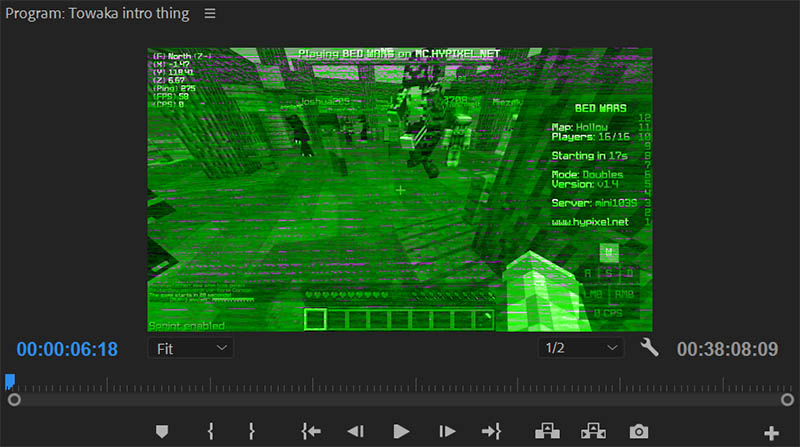
7. Красные или зеленые кадры на таймлайне. При импорте видео, на таймлайне получаем красные или зеленые кадры, и плюс различные артефакты.
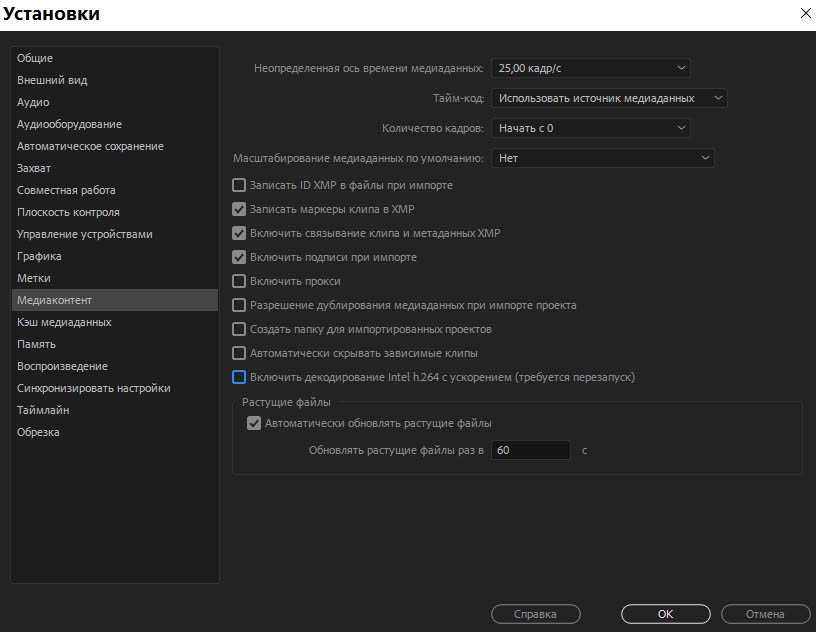
А также в настройках Изменить > Установки > Медиаконтент (Edit > Preferences > Media) не помогает снятие галки перед пунктом: Включить декодирование Intel h.264 с ускорением (требуется перезапуск) / Enable accelerated Intel h.264 decoding (requires restart).
При экспорте такого материала может возникнуть ошибка импортера: ImporterMPEG.prm — Error compiling movie. Import Error. Importer returned bad result.
Решение проблемы: установка предыдущей или более свежей версии драйвера.
В частности такая проблема возникала у пользователей на связке: интегрированная графика Intel HD Graphics 530 Gen 9 (GT2) (процессор Intel Core 6-го поколения) и Microsoft Windows 10 64-разрядная. Операционная система сама обновляла драйвер (причем почему-то не на последний) до версии: 23.20.16.4973.

Опытным путем было выяснено, что работоспособная версия это: «драйвер графики Intel для Windows [15,60] Версия: 15.60.2.4901». Скачать которую можно по прямой ссылке:
https://downloadmirror.intel.com/27412/a08/win64_15.60.2.4901.exe
Driver Version: 23.20.16.4901, Build Date: December 21, 2017. Поддержка операционных систем: Microsoft Windows 10-64 — Aniversary Update, Creators Update и Fall Creators Update.
В этой версии: добавлены усовершенствования в Комплект для разработки Intel Media SDK (SDK), ведущие к лучшему качеству кодирования в зависимых приложениях мультимедиа, таких как PowerDirector, MAGIX и другие (читаем Intel Quick Sync Video). Также улучшена производительность воспроизведения HEVC/H.265 видео (процессоры Intel Core 7-го поколения и выше).
Также нажимаем комбинацию клавиш: Ctrl+Alt+F8 для восстановления параметров графики по умолчанию.
На более свежих версиях драйверов были проблемы с розовыми и зелеными кадрами: 15.65.4.4944 (23.20.16.4944), 23.20.16.4973 (данного драйвера и описания к нему нет на официальном сайте, его удалили видимо из-за проблемности, но данный драйвер можно найти в Каталоге Центра обновления Майкрософт).
*В частности в драйвере 15.65.4.4944 (23.20.16.4944) от 8 февраля 2018 года для Microsoft Windows 10-64 — Creators Update и Fall Creators Update: улучшена производительность графических рабочих нагрузок для процессор Intel Core 6-го поколения и выше, с интеллектуальным управлением питанием при максимальной нагрузке.
Улучшена производительность кодирования видео для всех кодеков. Добавлена оптимизация использования памяти при HEVC кодировании.
Улучшено использование памяти для Vulkan.
Добавлена оптимизация энергосбережения во время воспроизведения видео, для процессоры Intel Core 7-го поколения и выше.
Некоторые пользователи так описывают работу автоапдейта: «я зашел в диспетчер устройств, удалил адаптер Intel HD Graphics 630, указав, что драйверы также должны быть удалены, а затем перезагружены. Через несколько секунд Windows 10 автоматически переустановила версию 4944, а затем через несколько минут Windows Update автоматически загрузила версию 4973 и запросила разрешение на ее установку. Я разрешил установку, и после нее обнаружил, что Device Manager и Intel Control Panel обе показывают версию 4973, Programs and Features (Программы и функции) показывают версию 4944, а Belarc Advisor показывает обе версии».
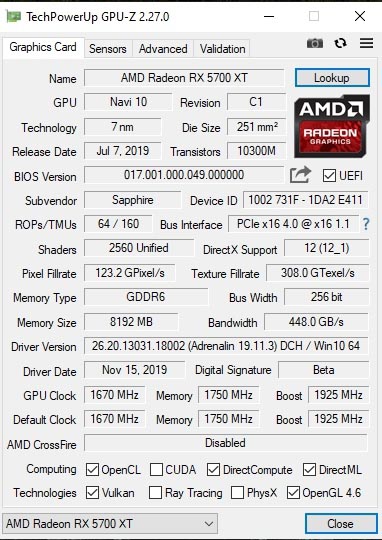
*В версии программы Adobe Premiere Pro CC 2020 на видеокарте AMD Radeon RX 5700 XT вылезла также подобная ошибка. Которая лечится только выбором движка . Это происходит на системе с процессором AMD Ryzen 3000, т.е. интегрированная видеокарта тут не является причиной получения артефактов. Были перепробованы все поддерживаемые версии драйверов, они не помогают решить данную проблему.
8. При запуске программы Adobe Premiere Pro CC 2018 на операционной системе Microsoft Windows 10 получаем следующее сообщение об ошибке: Adobe Premiere Pro Startup Error. Adobe Premiere Pro cannot run on this computer because WMVCORE.DLL is missing. Please install Windows Media Player and start again.
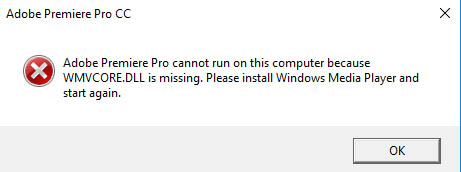
Решение проблемы: копируем файл WMVCORE.DLL из директории C:Windows.oldWindowsSystem32 (если ставили Windows 10 поверх Windows 7).
Или берем из архива, и вставляем его в директорию: C:WindowsSystem32.
Файлообменники с WMVCORE.DLL (проверяйте обязательно антивирусом):
http://www20.zippyshare.com/v/MnRlAmKt/file.html
9. Не импортируется видео с ошибкой: В файле отсутствуют потоки аудио или видео (The file has no audio or video streams) на платформе Windows может быть связана с аппаратным декодированием видео с помощью интегрированной видеокарты.
Сообщение связано с ошибкой импортера: A low-level exception occurred in: ImporterMPEG (Importer:39):

Идем в Изменить > Установки > Медиаконтент (Edit > Preferences > Media) и снимаем галку перед пунктом: Включить декодирование Intel h.264 с ускорением (требуется перезапуск) / Enable accelerated Intel h.264 decoding (requires restart).
* Ошибка A low level exception occurred in: ImporterMPEG (Importer:37) не лечится данным способом. Чаще всего помогает очистка медиа кэша, и после этого переставить программу и т.п. вариации.
10. Нет поддержки HEVC в Adobe Media Encoder CC 2018. В Настройках эспорта в списке Формат: (Format:) у программы Adobe Premiere Pro CC 2018 есть пункт H.265 (HEVC), а в программе Adobe Media Encoder CC 2018 нет. Это связано с лицензией, данных продуктов.
Для лицензионных пользоваталей:
1.Выходим из продуктов Adobe.
2.Завершаем все процессы Adobe в Диспетчере задач (Task Manager).
3.Выходим из Creative Cloud, закроываем приложение (проверяем в Диспетчер задач).
4.Запускаем приложение Creative Cloud, и входим в систему.
5.Запускаем Adobe Media Encoder и проверяем наличие кодеков HEVC.
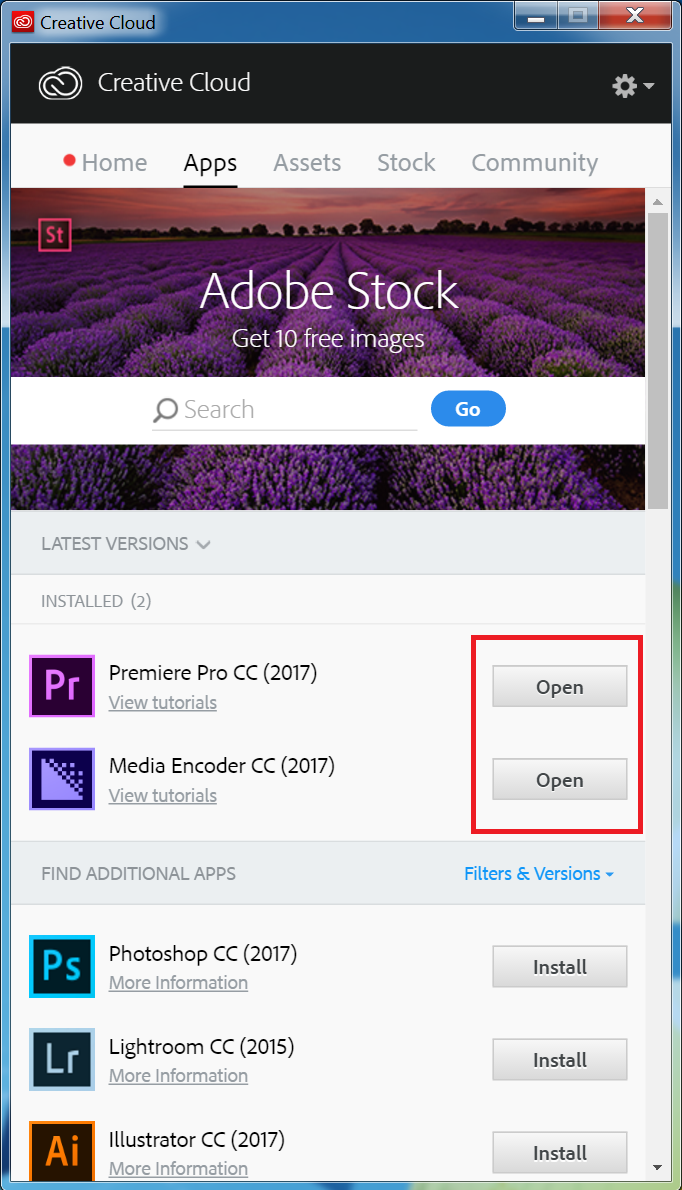
Или пробуем запустить приложение из Creative Cloud app, нажав напротив на кнопку: Open. Если мы не видим кнопки Open, это означает, что Creative Cloud еще не был подключен к серверу лицензий.
*Если проблема не устранена, отключаем Антивирус, Брандмауэр и выполняем еще раз указанные выше действия.
11. Ошибка при загрузке программы: Premiere Pro CC 2018. The application was unable to start correctly (0xc0000005). Click OK to close the application (Ошибка при запуске приложения (0xc0000005). Для выхода из приложения нажмите кнопку ОК).
Решение проблемы: если у нас две видеокарты (ошибка отображается на компьютере Windows, если на нем установлены видеокарты Intel Graphics и NVIDIA/AMD), то идем в Диспетчер устройств в закладку Видеоадаптеры, находим там дискретную видеокарту (AMD/Nvidia) нажимаем на ней правую кнопку мыши и выбираем: Отключить.
12. Фликкер в итоговом материале. Если эффекты применялись к регулирующему слою, попробуйте их применить напрямую.
Источник
Устранение неполадок при импорте или воспроизведении видеофайлов
Информация в этом документе предназначена для решения проблем, которые возникают в Adobe Premiere Pro при попытке импортировать видеофайлы или при необходимости воспроизведения импортированных видеофайлов. (К видеофайлам относятся файлы AVI, Apple QuickTime [MOV], MPEG и т. д.)
Основные проблемы воспроизведения
К базовым проблемам относятся подергивание или мерцание при воспроизведении, тусклое, размытое или мозаичное изображение, а также растянутое или сжатое видео. Эти проблемы могут возникать из-за проблем с настройками эпизода и интерпретации файлов.
Серьезные проблемы воспроизведения
Серьезные проблемы воспроизведения могут включать перевернутое изображение, отсутствие видео или звука, искажение видео с наличием цветовых блоков или полос или преждевременную остановку воспроизведения. Эти неполадки могут возникать из-за проблемных форматов файлов и кодеков.
Зависания, завершения работы и ошибки
Если при попытке импортировать видеофайл или воспроизвести уже импортированный файл Adobe Premiere Pro зависает, закрывается или выводит на экран сообщение об ошибке, например «Неподдерживаемая скорость передачи аудио в файле» или «Формат не поддерживается или файл поврежден», перейдите к разделу устранение проблем, связанных с форматами файлов и кодеками.
Устранение неполадок при настройке последовательностей и распознавании файлов
Выполните следующие действия в указанном порядке. После завершения каждого решения протестируйте воспроизведение всех импортированных видеофайлов в Adobe Premiere Pro. Если импортированные файлы по-прежнему воспроизводятся неправильно, перейдите в раздел Устранение проблем, связанных с форматами файлов и кодеками.
Решение 1. Работайте с последовательностью, параметры которой подходят для импортированных файлов.
Несоответствие между импортированным файлам и параметрами используемой последовательности в Adobe Premiere Pro может вызывать проблемы при воспроизведении. Например, широкоформатные видеоролики могут выглядеть сжатыми, если использовать их в последовательности, не предназначенной для широкоформатных файлов. А файлы высокой четкости могут выглядеть размытыми при их использовании в последовательности для стандартного формата.
Знание основной информации об импортированном файле поможет выбрать подходящие параметры последовательности. Щелкните правой кнопкой мыши файл на панели Проект и выберите Свойства . В окне «Свойства» отображается размер кадра (параметр «Размер изображения»), частота смены кадров и соотношение сторон в пикселях.
Для создания последовательности и выбора ее параметров выполните одно из следующих действий:
Автоматически создается новая последовательность, разрешение и частота смены кадров которой соответствует исходному отснятому материалу.
Для получения дополнительной информации о настройках последовательности см. раздел Создание и изменение последовательностей.
Решение 2. Создайте миниатюры для предварительного просмотра клипов на временной шкале.
Путем создания миниатюр можно повысить качество воспроизведения импортированного видеофайла, помещенного на временную шкалу.
Создайте миниатюры для предварительного просмотра клипов на временной шкале, выберите временную шкалу, а затем выберите Последовательность > Рендеринг точки входа и выхода эффектов или Последовательность > Рендеринг точки входа и выхода .
Дополнительные сведения о создании миниатюр для предварительного просмотра приведены в разделе Рендеринг и предварительный просмотр последовательностей.
Решение 3. Настройте масштаб, частоту смены кадров, соотношение сторон в пикселях или параметры полей.
По необходимости используйте эти дополнительные способы, чтобы исправить проблемы при воспроизведении, которые не удалось устранить с помощью Решений 1 и 2:
- Если импортируемый видеофайл не помещается в кадр или выглядит увеличенным в масштабе, выберите клип на временной шкале. Выберите Клип > Параметры видео > Масштабировать по размеру кадра .
- Если импортируемый видеофайл выглядит непомерно сжатым или растянутым, возможно, в Premiere Pro неправильно распознается соотношение сторон в пикселях. Назначить правильное соотношение сторон в пикселях можно, используя команду «Интерпретировать видеоряд». Инструкции приведены в разделе Работа с соотношением сторон.
- Если импортированный видеофайл воспроизводится слишком быстро или слишком медленно, возможно, в Premiere Pro неправильно распознается его частота смены кадров. Эта проблема также проявляется как подергивание воспроизведения после создания миниатюр для предварительного просмотра. Назначить правильную частоту смены кадров можно, используя команду «Интерпретировать видеоряд». Инструкции приведены в разделе Изменение частоты смены кадров в клипе.
Если видеоролик был записан при низкой частоте кадров (примерно 15 кадров в секунду или ниже), при его воспроизведении в любом случае будет иметь место подергивание. - Если при проигрывании импортированного чересстрочного видеоролика на движущихся объектах отображаются зубчатые края или тонкие горизонтальные линии, возможно, в Premiere Pro неправильно распознается порядок полей файла. Неправильный порядок полей может также вызвать мерцание при проигрывании клипа. Назначить правильный порядок полей можно, используя команду «Интерпретировать видеоряд». Инструкции приведены в разделе Изменение порядка полей в клипе. Дополнительные инструменты для устранения проблем с порядком полей доступны в диалоговом окне «Параметры полей». Инструкции по использованию диалогового окна «Параметры полей» приведены в разделе Создание чересстрочных и построчных видеоклипов.
Диагностика форматов файлов и кодеков
В устройствах для записи видео и приложениях для работы с видеороликами файлы кодируются в особом файловом формате, например AVI, QuickTime (MOV) и Windows Media (WMV).
Источник
Hi Guys, Today I am Going to Show You How to Fix “A low-level exception occurred in ImporterMPEG” Error in Adobe Premiere Pro?
If You’re Looking for the Commonly Searched Term “How to Fix Low-Level exception importer MPEG in Abo Premiere Pro?” (or) “A low-level exception occurred in ImporterMPEG”.You are at the Right Place to Get Your Answers & Solve the Issue/Error.
Adobe Premiere Pro is a top-selling and most often used Video Editing Program in the world. Adobe Premiere is a Non-Linear Video Editing Program launched in 2003 and was developed by Adobe Inc.Adobe Premiere Pro is used for editing videos along with audio editing ability. It can be used for many film projects, Professionals works, and much more. Adobe Premiere Pro is very useful for Individuals who are very much interested in creating and Editing video content. Adobe Premiere Pro can also be used alongside After Effects and Photoshop on many projects. Premiere Pro can be used on any platform like Mac OS or Windows computers. Adobe Premiere Pro has a very good attractive, flexible interface which makes everyone a fan of it.
If You’re a Normal Video Editor or Video Editing Professional, then You must have faced the low-level exception that occurred in ImporterMPEG Error. When You’re Working on Video Projects for a Long time, then This Error Often Appears at some point of time while editing a video. This Errors Can Come and Go Without any Indication. This low-level exception that occurred in ImporterMPEG Error can also be caused on some of the following occasions Like If you’re Using Older Versions without Updating, Accelerated Intel H.264 decoding is Enabled and sometimes it happens when you Didn’t Delete the Media Cache for a long period of time. Usually, a Simple PC Restarting (or) Reinstallation of the Program Can Fix the Issue in Some Cases. But This can’t Work for All Users.You Don’t Need to Worry About the Error, We are Here to Help you to Solve this Issue Easily. We Provide You the Help Guides Below, Just Follow the Below Given Methods One by One Correctly.
Check Out This: How to Transfer a Domain Easily from One Registrar to Another (In 3 Steps)? | Step-By-Step Domain Transfer Tutorial
Steps For How to Fix “A low-level exception occurred in ImporterMPEG” Error in Adobe Premiere Pro?
Method 1: Update Your Adobe Premiere to Latest Version
Whenever You Face any Issues or any Bugs with it, Try to Update Your Software to the Latest Version ( Not Only Adobe Premiere Pro, Whatever the Software it is).
Method 2: Disabling Intel H.264 Decoding Option
Step 1: First of all Run Adobe Premiere Pro and Navigate to Edit Tab and Select Preferences Option
Step 2: Under Preference Tab, Select the Media Option.
Step 3: Uncheck the Enable accelerated Intel H.264 decoding Option.
Step 4: Restart Adobe Premiere Pro.
Method 3: Switching the Mercury Playback Engine GPU Acceleration CUDA to Software Only
Step 1: First of all Run Adobe Premiere Pro and Navigate to File Tab and Select Project Settings Option
Step 2: In Project Settings, Select the General Option.
Step 3: Under Video Rendering and Playback, Change the Mercury Playback Engine GPU Acceleration CUDA to Mercury Playback Engine Software Only.
Step 4: Click Ok to Save and Restart Adobe Premiere Pro.
Method 4: Deleting the Media Caches
Step 1: First of all Run Adobe Premiere Pro and Navigate to Edit Tab and Select Preferences Option
Step 2: Under Preference Tab, Select the Media Cache Option.
Step 3: Click Delete Button to Remove the Media Cache Files.
Step 4: Restart Adobe Premiere Pro.
That’s It! You’re Done Man!
That’s All About this Post. Give Your Reviews / Reactions about this Post and Leave Comments, Ask Your Doubts, We are here to Help You!
Okay, first some system specs:
Macbook Pro
2.2 GHz Intel Core i7
8 GB RAM
Radeon HD 6750
OSX Lion 10.7.5
Premiere Pro CS6 (updated to lastest available version)
—I remember installing updates a few days ago (maybe last week), but don’t remember if any of them were for Premiere and could possibly be the problem.
The trouble I’m having is with one .MTS clip. I have a timeline about 20 minutes in length. I edited the whole thing and had no problems the whole time, with any clip. All clips originally imported correctly, played back fine, etc.
I exported a copy for client review (from Media Encoder CS6) the other day. One clip (the .MTS clip in question) showed as «Media Offline». It is not offline, I did not move the clip, etc. I unlinked the clip in the project, relinked it, and it did show up in the project and was able to be played back.
Exported another copy, found the same error occured with just this one clip. Now I’m noticing that when I open the project, I receive the error in the topic title (A low level exception occured in: Importer MPEG (Importer). The clip will not play back and shows up as «Media Pending», as if it’s not coming in correctly. Unlinking and relinking doesn’t fix the issue.
I have many other .MTS clips in my timeline. All of them work correctly, play back correctly, and export correctly. There doesn’t seem to be any inherent problem with the clip itself; it plays back smoothly in VLC, and I’ve transcoded it to a .mov to try and just bring that in and get around this stupid issue. This didn’t work either; I unlink the clip, then relink to the transcoded .mov — it actually will play back in the preview monitor, but will not display when trying to view it on my timeline. I have also created a copy of the project, tried this inside of the copy, as well as created a new sequence and pasted over the information; none of that worked either. There are also other sequences this clip is on, and it will not play back in any of them either, but as I mentioned, plays back in the preview.
I did find one other topic with a similar issue; they recommend deactivating Premiere, restarting the computer, and activating it again. I did do a restart initially to try and diagnose the problem, but to no avail. I tried deactivating the program, but the Adobe Application Manager doesn’t load; it has almost never loaded for me whenever I try to use it, which is frustrating in and of itself.
I tried creating an entirely new project and importing the other project. When I did this Premiere just froze; I’m assuming it can’t handle all the pieces (it’s a fairly complex project with hundreds of clips) and they are also coming off an external drive through a USB 3.0 cable.
I’ve temporarily «fixed» this by bringing in the transcoded clip, resyncing it to to the spot I need it in, and cutting it as necessary. I typed this post as I went and tried various things, and while I’ve found my way around the problem, it doesn’t really solve it. I opened another old project that was very similar to this one and also encountered the same error message. I didn’t stick around to find out if there was just one clip causing the issue; the fact that it was there was enough for me.
So, what do I need to be doing here? I’m guessing the stock answer is to uninstall Premiere and reinstall it, which I don’t want to do unless I have to since it’s a pain in the ass. I’m kind of through the problem for this project, but want to be able to deal with it for the future. Hoping someone with knowledge can chime in and tell me whether it’s the update from the other day causing this.
If the answer is to uninstall and reinstall Premiere, do I need to run some cleaner tool? I vaguely remember hearing about that before in regards to uninstalling and reinstalling.
On opening the project all media loading normaly and after that program crashes without any error, just gone…
Sometimes it shows this error before closing itself.
I have worked with this project quit a while, all media clips have been imported and edited already without issues, so it can not depend on some demaged videos.
After last Premiere CC 13.1.2 this problem occurs.
But not always, sometimes the project loads normaly, but I would say 90% it crashes..
When the project is laoded and did not crash there is no problem after that with any clip, issues occurs just on loading the project media…!?
And yes I have tried all of this :
— enough space on disk, used different disks
— enough RAM (Windows 10 / i5)
— deleted all media cache, tried different new cache locations
— user preferences deleted
— reboots
— reinstall premiere
— used different devices (ssd, hdd)
— made a new admin user in windows and complete install of premiere
Please help or fix!
I can not work at all at this project!
Thx
Автор:
Roger Morrison
Дата создания:
17 Сентябрь 2021
Дата обновления:
19 Январь 2023

Содержание
- Что вызывает сообщение об ошибке «Импортер сообщил об общей ошибке» в Adobe Premiere?
Adobe Premiere — одно из ведущих программ для редактирования видео. Adobe Premiere Pro является преемником Adobe Premiere. Программа была впервые представлена в 2003 году и вскоре получила известность благодаря удобному интерфейсу, функциям и эффективности. Как и любое другое приложение, оно время от времени вызывает у пользователей несколько ошибок. Один из них — «Импортер сообщил об общей ошибке‘ сообщение об ошибке. Это появляется, когда вы пытаетесь импортировать видео на временную шкалу с помощью импортера. Это может быть связано с множеством причин, например, неподдерживаемым кодеком или форматом видеофайла.

В этой статье мы рассмотрим сообщение об ошибке, обсудив его причины, а затем упомянем решения, которые вы можете применить, чтобы избавиться от сообщения об ошибке; тщательно. Итак, начнем с причин.
Как мы упоминали ранее, сообщение об ошибке появляется, когда вы используете импортер для импорта видеофайлов. Это может быть связано со следующими причинами:
- Неподдерживаемый кодек: Все устройства видеозаписи используют разные кодеки. Если кодек не поддерживается программным обеспечением Adobe Premiere Pro, вы не сможете импортировать его на шкалу времени. В таком случае вам придется изменить кодек видеофайлов.
- Неподдерживаемый формат видеофайлов: Adobe Premiere довольно щедро предлагает формат видеофайлов, однако он не поддерживает все форматы видеофайлов по очевидным причинам. Поэтому, если видео, которое вы пытаетесь импортировать, не поддерживается приложением, вы, в конечном итоге, наткнетесь на сообщение об ошибке.
- Проблемы с активацией: По словам Adobe, проблемы с активацией иногда могут нарушить некоторые функции импортера. Поэтому убедитесь, что программное обеспечение активировано и вы вошли в свою учетную запись Creative Cloud.
- Имя видео файла: В некоторых случаях проблема также может быть вызвана названием видеофайла. В имени файла могут быть символы, которые вызывают всплывающее окно.
С учетом сказанного, давайте перейдем к реальной части и поможем вам пройти через это испытание. Пожалуйста, следуйте всем предложенным решениям, если одно или два из них не работают для вас.
Решение 1. Проверьте формат видеофайла и кодек
Первое, что вам следует сделать, когда вы столкнетесь с сообщением об ошибке, — это убедиться, что формат видео и кодек поддерживается Adobe. Некоторые кодеки не поддерживаются Adobe Premiere, например, Adobe отказалась от поддержки кодека QuickTime. В таком случае вам придется перекодировать отснятый материал в более новый / современный кодек.
Точно так же, если формат видеофайла не поддерживается Adobe, вы не сможете импортировать файл. Точно так же вам придется изменить формат видеофайла, что довольно просто. Пожалуйста, обратитесь к этому ссылка на сайт список поддерживаемых форматов видеофайлов.
Решение 2. Очистка кеша файлов мультимедиа
Еще вы можете попытаться удалить кэш медиафайлов, а затем попытаться импортировать файлы. Когда вы импортируете видео или аудио файлы в Adobe Premiere, он сохраняет версии этих файлов, к которым он может быстро получить доступ снова для повышения производительности. Эти сохраненные версии называются файлами кэша мультимедиа. Вот как удалить файлы:
- близко Adobe Premiere Pro а затем перейдите к Users AppData Roaming Adobe Common каталог. Обратите внимание, что Данные приложения По умолчанию папка скрыта, поэтому убедитесь, что вы ее открыли.
- Если вы используете Mac, пожалуйста, перейдите к / Пользователи // Библиотека / Поддержка приложений / Adobe / Common каталог.
- Удалите файлы а затем запустите Adobe Premiere Pro.
- Если у вас возникли трудности с поиском указанного выше пути, вы также можете просто перейти на Предпочтения а затем перейдите к Медиа-кеш таб.


Решение 3. Переместите файлы в другое место или переименуйте их
В некоторых случаях проблема может быть связана с указанным путем к видео- или аудиофайлам. В таком случае вам придется изменить путь к файлам, то есть переместить их на другой диск или просто в другую папку. Об этом сообщили многие пользователи, и это помогло им решить проблему.
Вы также можете попробовать просто переименовать файлы в том же каталоге, а затем попробовать импортировать файлы. Если не работает, просто переместите их в другое место.
Решение 4. Переустановите Premiere Pro
Если все вышеупомянутые решения не работают для вас, возможно, возникла проблема с установкой программного обеспечения, и вам придется переустановить его. Вот как это сделать:
- Открыть Creative Cloud.
- Удалить Adobe Premiere Pro при сохранении настроек (опция при удалении).
- После этого установите его снова и посмотрите, решит ли он проблему.


Обновлено 2023 января: остановите эти сообщения об ошибках и устраните распространенные проблемы с помощью этого инструмента. Получить сейчас в эту ссылку
- Скачайте и установите программного обеспечения.
- Он просканирует ваш компьютер на наличие проблем.
- Затем инструмент исправить проблемы которые были найдены.
Adobe Premiere Pro, несомненно, является одним из самых популярных и широко используемых программ для редактирования видео. Это программное обеспечение имеет множество расширенных функций, которые позволяют пользователю создавать потрясающие фильмы и высококачественный контент.
Хотя Adobe Premiere Pro очень популярен и широко используется, он иногда характеризуется нестабильностью и необычным поведением из-за постоянных обновлений и новых функций.
Итак, в этой статье мы рассмотрим две наиболее распространенные проблемы с Premiere Pro, а именно сообщение Premiere Pro Importer о распространенной ошибке.
В большинстве случаев проблем с видео нет, это проблема, связанная с тем, что программное обеспечение не может его обработать и обнаружить.
Регулярное развитие и гибкость могут быть важными факторами в этом отношении. Вот почему бета-версии и недоработанные программы так распространены в современном цифровом мире. Это приводит к следующей проблеме: Importer сообщает об общей ошибке, Importer Premiere Pro сообщает об общей ошибке.

Кодек не поддерживается:
Все устройства видеозахвата используют разные кодеки. Если кодек не поддерживается в Adobe Premiere Pro, вы не сможете импортировать его на временную шкалу. В этом случае необходимо изменить кодек видеофайла.
Неподдерживаемый формат видеофайла:
Adobe Premiere довольно щедр на форматы видеофайлов, но по понятным причинам поддерживает не все форматы видеофайлов. Таким образом, если видео, которое вы пытаетесь импортировать, не поддерживается приложением, вы получите сообщение об ошибке.
Проблемы с активацией:
По словам Adobe, проблемы с активацией иногда могут мешать работе некоторых функций импортера. Поэтому убедитесь, что программа активирована и вы вошли в свою учетную запись Creative Cloud.
Имя видеофайла:
В некоторых случаях имя видеофайла также может вызвать проблему. Некоторые символы в имени файла могут быть причиной проблемы.
Как исправить ошибку?
Обновлено: январь 2023 г.
Этот инструмент настоятельно рекомендуется, чтобы помочь вам исправить вашу ошибку. Кроме того, этот инструмент обеспечивает защиту от потери файлов, вредоносных программ и аппаратных сбоев, а также оптимизирует работу вашего устройства для достижения максимальной производительности. Если у вас уже есть проблема с компьютером, это программное обеспечение может помочь вам решить ее и предотвратить повторение других проблем:
- Шаг 1: Установите инструмент восстановления и оптимизации ПК. (Виндовс 10, 8, 7, ХР, Виста).
- Шаг 2: Нажмите Начать сканирование чтобы определить, какие проблемы вы испытываете с вашим компьютером.
- Шаг 3: Нажмите Починить всечтобы решить все проблемы.

Решение 1. Проверьте формат и кодек видеофайла.
Первое, что нужно сделать, когда вы видите сообщение об ошибке, — это проверить, поддерживаются ли формат видео и кодек Adobe. Некоторые кодеки не поддерживаются Adobe Premiere, например, поддержка кодека QuickTime была удалена Adobe. В этом случае вам необходимо перекодировать фильм на более новый/современный кодек.
Кроме того, если формат видеофайла не поддерживается Adobe, вы не сможете импортировать файл. Точно так же вам нужно изменить формат видеофайла, что довольно просто. По этой ссылке приведен список поддерживаемых форматов видеофайлов.
Решение 2. Очистите кеш медиафайлов
Другой вариант — очистить кэш мультимедиа, а затем попытаться импортировать файлы. Когда вы импортируете видео- или аудиофайлы в Adobe Premiere, программа сохраняет версии этих файлов, к которым вы можете быстро получить доступ снова для повышения производительности. Эти сохраненные версии называются файлами кэша мультимедиа. Вот как удалить файлы:
1.) Закройте Adobe Premiere Pro и перейдите в Пользователи AppDataРоумингAdobeОбщие каталог. Обратите внимание, что папка AppData по умолчанию скрыта, поэтому убедитесь, что она не видна.
2.) Если вы используете Mac, перейдите к /Пользователи//Библиотека/Поддержка приложений/Adobe/Общие.
3.) Удалите файлы, а затем запустите Adobe Premiere Pro.
4.) Если у вас возникли проблемы с поиском указанного выше пути, вы также можете просто перейти в «Настройки», а затем в Вкладка «Медиа-кэш».

Решение 3. Переместите файлы в другое место или переименуйте их
В некоторых случаях проблема может быть связана с указанным путем к видео- или аудиофайлам.
В этом случае нужно изменить путь к файлам, т.е. переместить их на другой диск или просто в другую папку.
Многие пользователи сообщили об этом, и это помогло им решить проблему.
Вы также можете попробовать просто переименовать файлы в том же каталоге, а затем попытаться импортировать файлы. Если это не сработает, просто переместите их в другое место.
Решение 4. Переустановите Premiere Pro
Если все вышеперечисленные решения не работают для вас, возможно, возникла проблема с установкой программного обеспечения, и вам может потребоваться его переустановка. Вот как это сделать:
1.) Откройте Creative Cloud.
2.) Удалите Adobe Premiere Pro, сохранив настройки по умолчанию (параметр удаления).

3.) Затем переустановите его и посмотрите, решит ли это проблему.
ОДОБРЕННЫЙ: Чтобы исправить ошибки Windows, нажмите здесь.
Часто задаваемые вопросы
1) Закрыть Premiere Pro и открыть снова. Затем создайте новый проект и попробуйте импортировать MP4 в Premiere Pro.
2) Сохраните другие запущенные проекты и перезагрузите компьютер.
3) Отключите и снова включите аппаратное ускорение.
Если вы видите «Файл имеет неподдерживаемый тип сжатия«, проверьте кэш мультимедиа и базу данных кэша мультимедиа в Premiere Pro. Выберите «Правка» > «Установки» > «База данных кэша мультимедиа» в Windows или Premiere Pro > «Установки» > «База данных кэша мультимедиа» в Mac OS. Запишите это расположение.
Один из них «Импортер сообщил о распространенной ошибке» сообщение об ошибке. Оно появляется при попытке импортировать видео на временную шкалу с помощью средства импорта. Это может быть вызвано многими причинами, например неподдерживаемым кодеком или форматом видеофайла.
Единственный реальный способ открыть файлы, которые не поддерживаются используемым вами программным обеспечением, — преобразовать тип файла в поддерживаемый файл. Преобразование гарантирует, что файл останется целым, и вы всегда сможете открыть его нужной вам программой. Вы можете сделать это с помощью онлайн-конверсионных сайтов.
Сообщение Просмотров: 124
Автор:
Roger Morrison
Дата создания:
17 Сентябрь 2021
Дата обновления:
1 Февраль 2023
Содержание
- Что вызывает сообщение об ошибке «Импортер сообщил об общей ошибке» в Adobe Premiere?
Adobe Premiere — одно из ведущих программ для редактирования видео. Adobe Premiere Pro является преемником Adobe Premiere. Программа была впервые представлена в 2003 году и вскоре получила известность благодаря удобному интерфейсу, функциям и эффективности. Как и любое другое приложение, оно время от времени вызывает у пользователей несколько ошибок. Один из них — «Импортер сообщил об общей ошибке‘ сообщение об ошибке. Это появляется, когда вы пытаетесь импортировать видео на временную шкалу с помощью импортера. Это может быть связано с множеством причин, например, неподдерживаемым кодеком или форматом видеофайла.
В этой статье мы рассмотрим сообщение об ошибке, обсудив его причины, а затем упомянем решения, которые вы можете применить, чтобы избавиться от сообщения об ошибке; тщательно. Итак, начнем с причин.
Как мы упоминали ранее, сообщение об ошибке появляется, когда вы используете импортер для импорта видеофайлов. Это может быть связано со следующими причинами:
- Неподдерживаемый кодек: Все устройства видеозаписи используют разные кодеки. Если кодек не поддерживается программным обеспечением Adobe Premiere Pro, вы не сможете импортировать его на шкалу времени. В таком случае вам придется изменить кодек видеофайлов.
- Неподдерживаемый формат видеофайлов: Adobe Premiere довольно щедро предлагает формат видеофайлов, однако он не поддерживает все форматы видеофайлов по очевидным причинам. Поэтому, если видео, которое вы пытаетесь импортировать, не поддерживается приложением, вы, в конечном итоге, наткнетесь на сообщение об ошибке.
- Проблемы с активацией: По словам Adobe, проблемы с активацией иногда могут нарушить некоторые функции импортера. Поэтому убедитесь, что программное обеспечение активировано и вы вошли в свою учетную запись Creative Cloud.
- Имя видео файла: В некоторых случаях проблема также может быть вызвана названием видеофайла. В имени файла могут быть символы, которые вызывают всплывающее окно.
С учетом сказанного, давайте перейдем к реальной части и поможем вам пройти через это испытание. Пожалуйста, следуйте всем предложенным решениям, если одно или два из них не работают для вас.
Решение 1. Проверьте формат видеофайла и кодек
Первое, что вам следует сделать, когда вы столкнетесь с сообщением об ошибке, — это убедиться, что формат видео и кодек поддерживается Adobe. Некоторые кодеки не поддерживаются Adobe Premiere, например, Adobe отказалась от поддержки кодека QuickTime. В таком случае вам придется перекодировать отснятый материал в более новый / современный кодек.
Точно так же, если формат видеофайла не поддерживается Adobe, вы не сможете импортировать файл. Точно так же вам придется изменить формат видеофайла, что довольно просто. Пожалуйста, обратитесь к этому ссылка на сайт список поддерживаемых форматов видеофайлов.
Решение 2. Очистка кеша файлов мультимедиа
Еще вы можете попытаться удалить кэш медиафайлов, а затем попытаться импортировать файлы. Когда вы импортируете видео или аудио файлы в Adobe Premiere, он сохраняет версии этих файлов, к которым он может быстро получить доступ снова для повышения производительности. Эти сохраненные версии называются файлами кэша мультимедиа. Вот как удалить файлы:
- близко Adobe Premiere Pro а затем перейдите к Users AppData Roaming Adobe Common каталог. Обратите внимание, что Данные приложения По умолчанию папка скрыта, поэтому убедитесь, что вы ее открыли.
- Если вы используете Mac, пожалуйста, перейдите к / Пользователи // Библиотека / Поддержка приложений / Adobe / Common каталог.
- Удалите файлы а затем запустите Adobe Premiere Pro.
- Если у вас возникли трудности с поиском указанного выше пути, вы также можете просто перейти на Предпочтения а затем перейдите к Медиа-кеш таб.
Решение 3. Переместите файлы в другое место или переименуйте их
В некоторых случаях проблема может быть связана с указанным путем к видео- или аудиофайлам. В таком случае вам придется изменить путь к файлам, то есть переместить их на другой диск или просто в другую папку. Об этом сообщили многие пользователи, и это помогло им решить проблему.
Вы также можете попробовать просто переименовать файлы в том же каталоге, а затем попробовать импортировать файлы. Если не работает, просто переместите их в другое место.
Решение 4. Переустановите Premiere Pro
Если все вышеупомянутые решения не работают для вас, возможно, возникла проблема с установкой программного обеспечения, и вам придется переустановить его. Вот как это сделать:
- Открыть Creative Cloud.
- Удалить Adobe Premiere Pro при сохранении настроек (опция при удалении).
- После этого установите его снова и посмотрите, решит ли он проблему.
Adobe’s Premiere Pro is one of the most popular video editing software on the planet with everyone from beginners to professional media houses using it to edit their movies. However, it’s far from perfect given the frequent bugs and crashes it faces.
In this article, we’re taking a look at the “the importer reported a generic error in Adobe Premiere” error in Premiere Pro, its causes and what you can do to solve the problem.
Also read: How to make text more readable in videos using Premiere Pro CC?
What causes this error?
The error generally gets triggered when you’re trying to import corrupt or incompatible video files. Some of the most popular reasons include:
- Unsupported codecs
- Premiere activation issues.
- Incompatible file name
- Unsupported file format
How to fix this?
Here are four fixes you can try out.
Check the video format and codec
The first thing to do is to check and see if the video format and codec that you’re trying to support are actually supported. You can refer to this page for a list of all supported video formats and codecs.
If the video you’re trying to import isn’t compatible with Premiere, you’re going to have to convert it into another format. We recommend using MP4 with H264 encoding as that’s the most hassle-free format and codec in Premiere.
Check the file name or location
The next thing to do is to check the file name or the location. Several characters that may be acceptable as file names in Windows or macOS might not work in Premiere Pro. Additionally, if the file is stored in a location where Premiere doesn’t have read access, you might not be able to import anything from that specific location.
The easiest way to get around this error is to just rename the file to a simpler name (preferably without any special characters) and move it to a more accessible location such as the root folder of a drive partition.
A corrupt media cache is the cause of a lot of different headaches in the program. Try clearing it to see if that makes a difference.
Step 1: Open Premiere Pro and head over to Edit, followed by Preferences and then Media Cache.
![]()
Step 2: Under Media Cache, click the Delete button to clear out your media cache.
![]()
Now restart Premiere and it should work just fine.
Reinstall Premiere
If nothing else works, try reinstalling the software from scratch to fix your issues. Reinstalling Premiere is also rather easy, although we recommend you do it from the Creative Cloud panel and not through Windows settings.
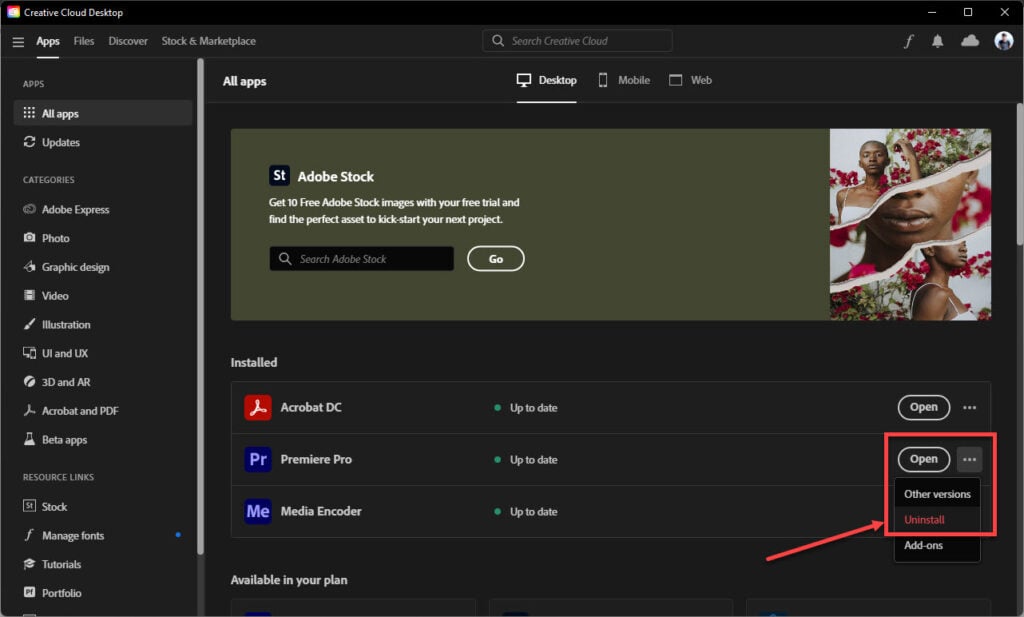
All you have to do is open Creative Cloud. head over to All Apps and you’ll see Premiere listed below. Click the three horizontal dots next to it and select Uninstall. Once the uninstallation is complete, you can use the Creative Cloud panel to install Premiere again and hopefully resolve any issues you’re facing.
Also read: How to make a Screen Mask Transition in Premiere Pro?

Someone who writes/edits/shoots/hosts all things tech and when he’s not, streams himself racing virtual cars.
You can contact him here: [email protected]