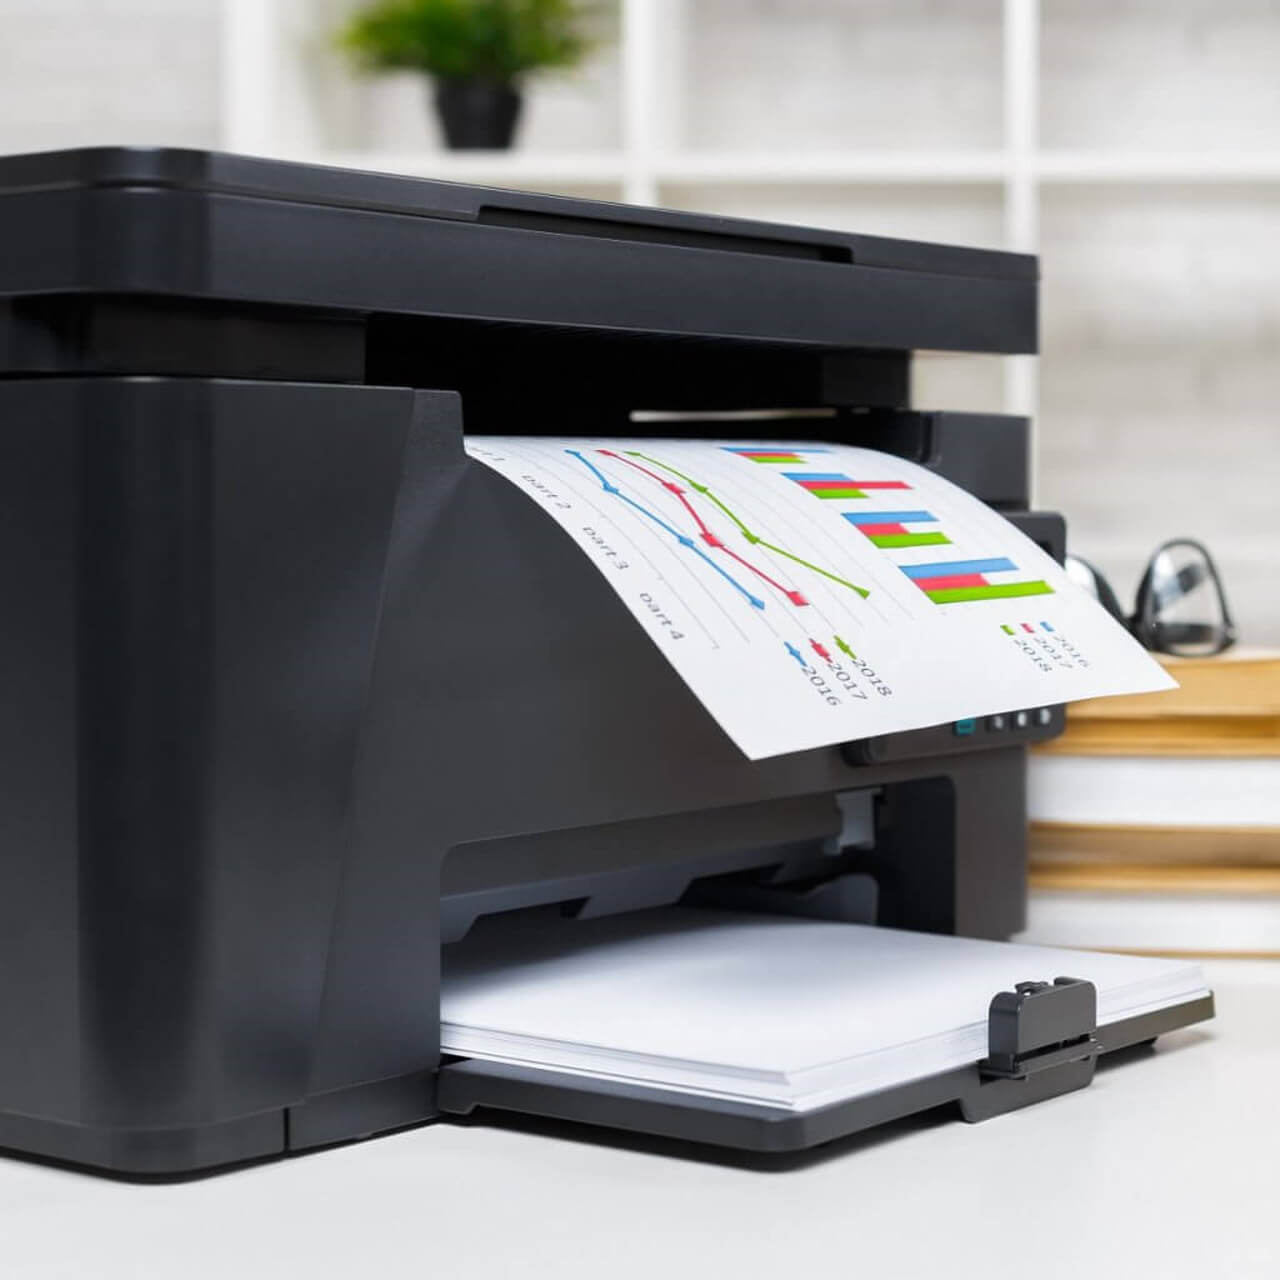
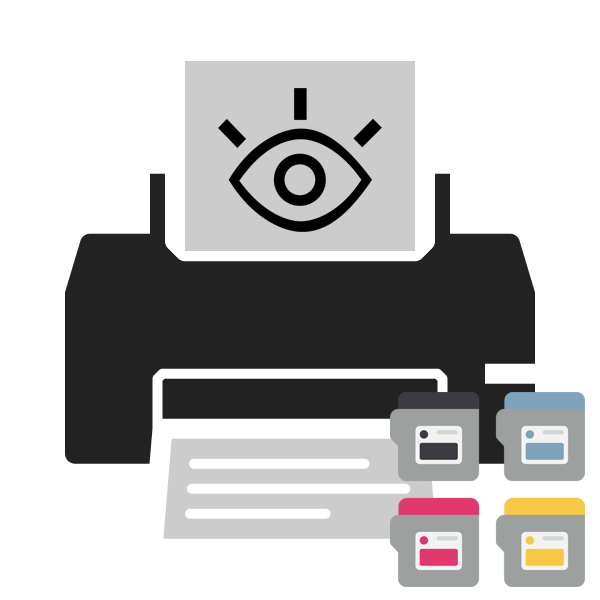
Если принтер Epson не может определить (идентифицировать, “увидеть”, опознать) картриджи СНПЧ, на нем невозможно запустить печать. Идентификация картриджей производится через чипы, поэтому причины этой проблемы – только в них (плохой или отсутствующий контакт или неисправность).
Если у вас не СНПЧ, а ПЗК, вам сюда.

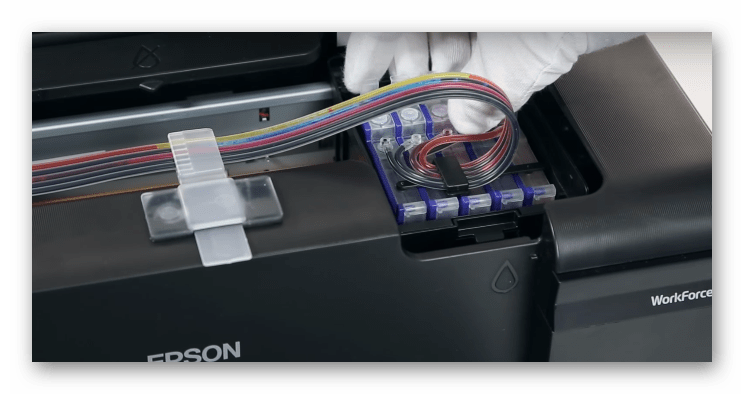
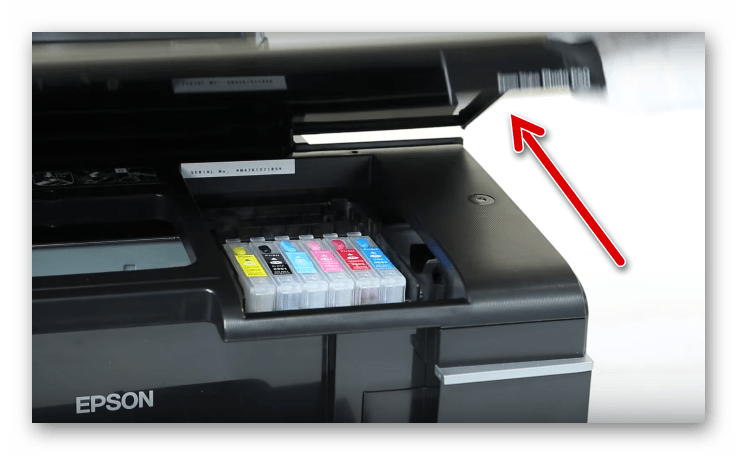
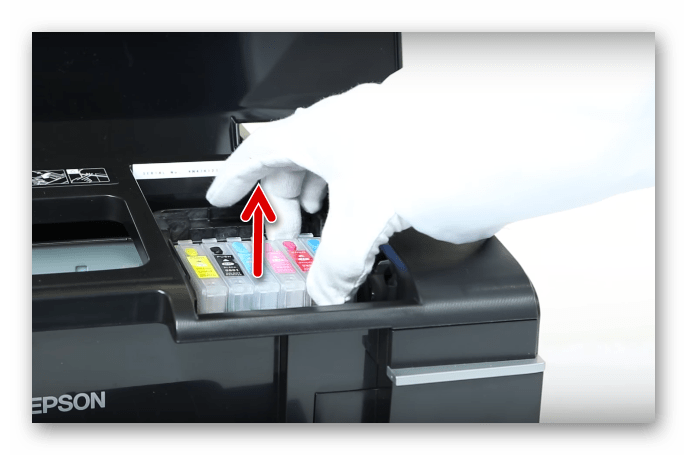
1. Блок картриджей вставлен не до конца
Многие недовставляют картриджный блок в каретку принтера из-за боязни повредить принтер, так как при первой установке нужно надавливать довольно сильно (в этот момент протыкаются пленки одновременно на всех соплах чернильниц). Лучше после установки СНПЧ еще раз убедиться, что они защелкнулись (можно, например, подёргать непосредственно за защелки). Если картриджи не установлены должным образом, контакты чипа и каретки не будут совпадать, и, соответственно, принтер не будет правильно воспринимать сигнал от чипов. Кроме того, из-за недостаточной степени утопленности чипа, кнопка сброса может задевать за корпус принтера при движении каретки.
2. Должным образом не произведена замена картриджей
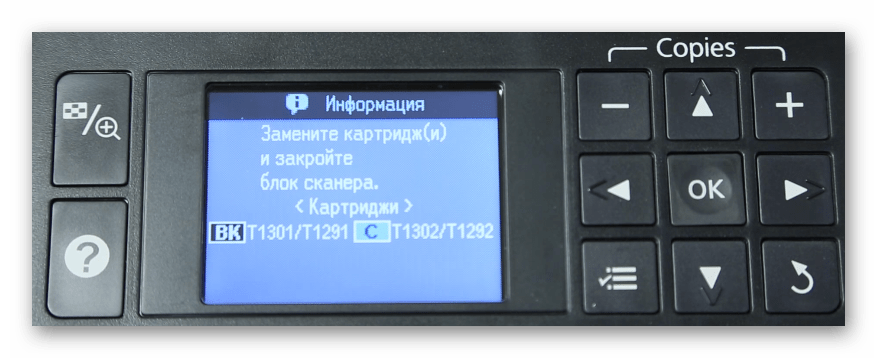
После того как картриджи установлены, нужно сообщить об этом принтеру (нажатием соответствующей клавиши на его панели), далее принтер может выдать ошибку “невозможно распознать черн. картриджи”. Нужно выбрать замену картриджей, и когда принтер установит каретку в “положение замены” (место со специальным вырезом в корпусе) необходимо зажать кнопку на чиповой планке картриджного блока и удерживать её нажатой 8-10 сек. Далее снова нужно сообщить принтеру о (якобы) произведённой замене картриджей.

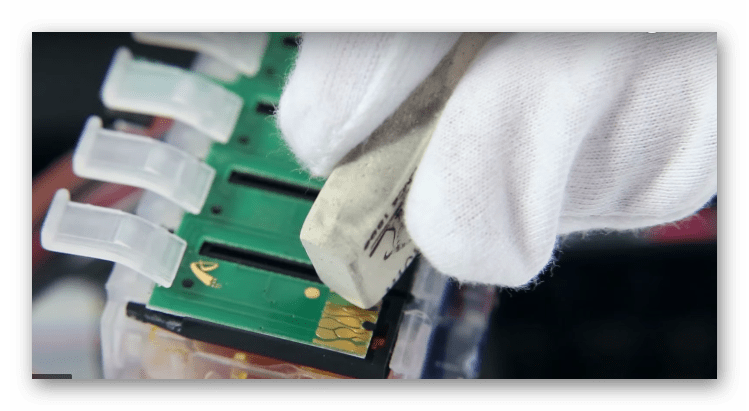
3. Чипы испачканы
Если при установке СНПЧ дотрагиваться до чипов руками или на них попадет жидкость – это будет препятствовать нормальному контакту с принтером. Более того, низковольтное замыкание на облитом чернилами чипе может вывести его из строя. Если чип системы испачкан – протрите его сухой тканью – обычно этого достаточно.

Чип СНПЧ для Epson в чернилах — скорее всего он не будет работать
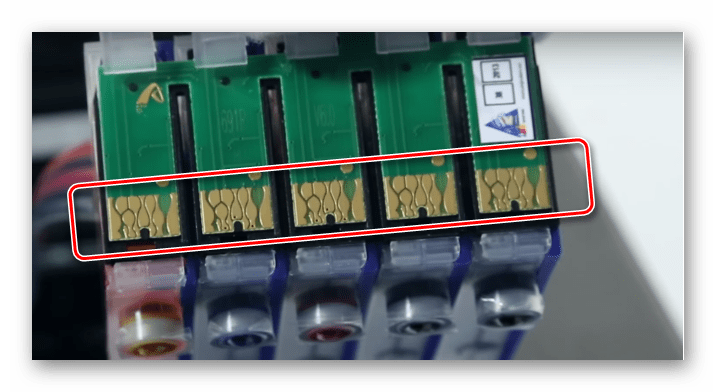
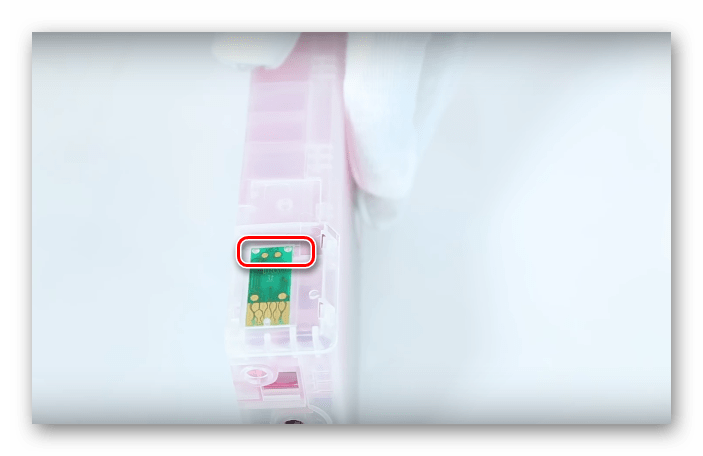
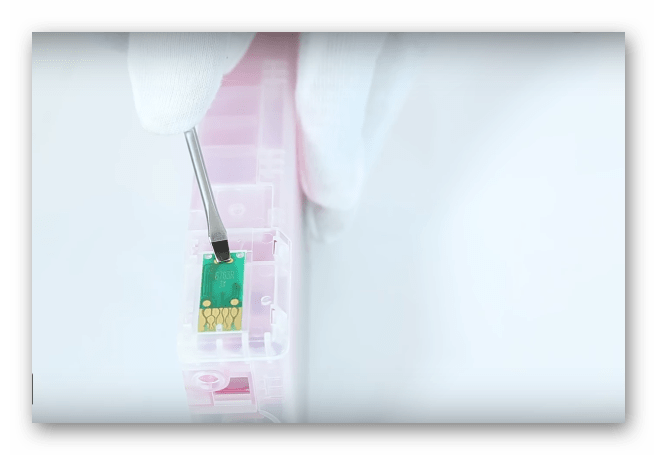
4. Чип установлен не ровно
Иногда чип на блоке картриджей немного перекошен или сдвинут правее или левее своей основной позиции, в результате – система не определяется из-за отсутствия верного контакта. Проверьте корректность его положения и исправьте при необходимости.
Иногда бывает, что каретка в принтере имеет небольшой люфт, из-за этого чип не до конца прижимается к контактам в принтере. Подробнее про этот случай здесь.
5. Села батарейка, питающая чип
На многих чипах СНПЧ для Epson (например, на некоторых версиях чипа для XP-313, 423, 323 и др.) установлена питающая батарея на 3 или 3,6 вольта (чаще всего элемент CR2032). Обычно она работает стабильно около года, иногда – больше, иногда – меньше, но можно ориентироваться примерно на это время. Когда батарея подсядет и начинает подавать пониженное напряжение, СНПЧ может перестать обнулять уровень чернил или вообще определяться. Причем обычно проблема возникает сначала только с одним из цветов. Замените батарейку и всё снова начнет работать стабильно.
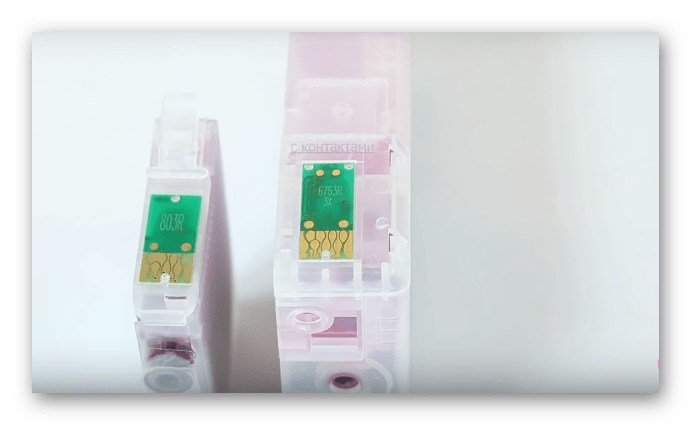
6. Мешают выступы пластика с боков
Иногда пластиковая основа чипа имеет выступы с боков, которые не дают плате чипа плотно прижаться к контактам в принтере. Для решения проблемы нужно ножиком срезать излишки пластмассы. Отметим, что данный случай почти не встречается в современных СНПЧ.
7. Сломаны контакты в каретке принтера
Если неаккуратно устанавливать блок картриджей (и особенно резко вынимать их), можно выступами на держателе чипов выломать контакты в печатающей головке (ПГ). Даже если один металлический усик отломится – принтер не сможет распознать чип. Это поддается ремонту, но только с разбором ПГ, а также нужно найти исправный контакт на замену (его можно взять с аналогичной модели).

Инструкция по замене сломанных контактов Epson. Случай подробно разобран на видео.
8. Чип не совместим c прошивкой принтера
Время от времени компания Epson выпускает обновления микропрограммы (“прошивки”) на принтеры и МФУ (это касается только современных моделей, на старые устройства все обновления уже давно завершены). Новая прошивка начинает работать с чипом по-другому, что не было предусмотрено при создании неоригинального аналога. Вследствие чего чип СНПЧ перестает определяться, а оригинал продолжает работать.
Откатить прошивку назад стандартным ПО Epson невозможно, поэтому решения у этой проблемы два:
- Ждать появления нового чипа на рынке.
- Приобрести специальную самописную программу и откатить прошивку назад, обычно это недорого. Например, когда в 2014 году Epson выпустила новую микропрограмму для XP-313/XP-413, программа для отката стоила 300 рублей.
9. Световые датчики
На некоторых принтерах Epson, например, WorkForce WF-2630 или WF-3620 есть дополнительный световой датчик наличия чернил в картриджах. Он просвечивает картриджи снизу и если внутри – пусто или залито что-то прозрачное (например, неподкрашенная сервисная жидкость InkTec) – сообщает об ошибке. Для решения проблемы нужно заклеить выемки снизу картриджей черной изолентой или чем-то другим непрозрачным.


 для контроля чернил в картриджах на принтере Epson")
Оптопара (световой датчик) для контроля чернил в картриджах на принтере Epson
10. Чип не исправен
Если ничего из вышеперечисленного не помогает, возможно, чип не исправен и требуется его замена. Если вы купили СНПЧ для принтера или МФУ у добросовестного продавца, вам могут сделать замену вышедшего из строя чипа по гарантии (кстати, обычно срок службы любых чипов для Epson – от 3 месяцев до 2 лет, а стандартный процент брака – около 2%). Иногда проще купить новую СНПЧ.
В магазине МногоЧернил.ру все гарантийные случаи обрабатываются службой технической поддержки, решение выносится в течение нескольких часов (для начала нужно оставить запрос здесь).
Обратите внимание: не все системы оборудованы единым чипом с кнопкой сброса, иногда количество чипов равно количеству цветов (например, на СНПЧ для R220/R200) и обнуляются они при выключении принтера или выведении картриджей на замену. Решение проблем – аналогичное.
 Возможные причины:
- несоответствие фактического и электронного уровня чернил;
- картриджи не установлены «до щелчка»;
- проблема в чипе —установленный чип не соответствует рекомендуемому;
- картридж плохо вставлен в каретку принтера;
- чип на картриджах смещен, поврежден или загрязнен;
- батарейка от СНПЧ имеет низкий заряд.
Варианты решения:
- повторить процесс обнуления;
- убедиться в правильности установки картриджей (до щелчка);
- убедиться в соответствии маркировки чипа заводской наклейке принтера (проверить по таблице совместимости);
- вытащить картриджи из каретки и поправить, очистить или заменить чип;
- затем нужно установить картриджи заново до щелчка — замените батарейку на картриджах (если таковая имеется) и повторите действия по сбросу картриджей.
Дополнительные способы решения:
Действия при бесчиповой прошивке:
вывести каретку в положение замены картриджей, отщелкнуть картриджи и извлечь из каретки, установить обратно до характерного щелчка;
перезагрузить ПУ.
На данный момент также появилась возможность перепрошить ваше ПУ на бесчиповый вариант в домашних условиях. Более подробная информация по ССЫЛКЕ.
Невозможно распознать чернильные картриджи
Данная ошибка может возникать по многим причинам. Диагностировать ее легко, так как об этом сообщит драйвер устройства печати. Если на девайсе есть ЖК-дисплей, то данное сообщение высветится и на нем. Поэтому на вопрос: «Что делать, если принтер не распознает картридж?», можно давать вполне однозначные советы — после определения причин возникновения такой ошибки.
Сообщение может появиться, если уровень чернил в емкостях не соответствует уровню, указанному в драйвере. Исправить это можно проведя обнуление уровня краски. Для этого используется два способа — с помощью специальной программы или механически. Также их можно совмещать. Механическим образом это происходит путем извлечения картриджей из принтера, обнуления чипа с помощью металлического предмета и установка их обратно. Программа для обнуления сразу определит все доступные принтеры и обнулит значение уровня. Но для ее адекватной работы требуется подключение к сети Интернет.
Почему не удается распознать картридж? После заправки причиной может быть то, что картриджи не были установлены до характерного щелчка. Здесь решение предельно простое — установить их правильно, пока не услышите щелчок, указывающий на то, что картриджи зафиксированы полностью.
Принтеру не удается распознать картридж определенного цвета, если на нем установлен не тот чип. С этим разобраться сложнее, чем с предыдущей проблемой. Для различных принтеров могут использоваться разные чипы, поэтому необходимо использовать только те, которые предназначены для конкретной модели. Используя таблицу совместимости решений для экономии, вы можете определить, подходит ли чип к вашей модели. Если нет, то следует заменить их на необходимые для адекватной печати. Проверять соответствие с принтером необходимо по его заводской наклейке. Там максимально точно указана информация о том, какие чипы и картриджи использует ваш девайс.
Бывает невозможно распознать картриджи на Epson, Canon и принтерах других производителей после проведения первых простых диагностик. В таком случае необходимо тщательно проверить чипы в картриджах на предмет повреждений, загрязнений или смещений. В этой ситуации можно легко все исправить, применяя следующую последовательность действий — достаньте картриджи из каретки, установите их на место, очистите от грязи ластиком или замените, установите картридж обратно до щелчка.
Принтер выдает сообщение, что невозможно распознать чернильные картриджи и в ситуации, когда батарейка в СНПЧ имеет низкий заряд. Исправить это легко просто заменив ее. Находится она над блоком картриджей внутри устройства печати. Обычно это «таблетка» и ее хорошо видно. После этого причина будет устранена, и печать можно будет продолжить.
Если принтер перестал распознавать картриджи, вы можете последовательно пройти по этим рекомендациям. С высокой вероятностью это поможет решить проблему.
by Sinziana Mihalache
Sînziana loves getting people to better understand products, processes, and experiences beyond a simple user guide, either in writing or making use of images. She joined the team… read more
Published on February 23, 2021
- If you get an Epson printer ink 288 error, some cartridges might not be in the correct position.
- To override the Epson ink Cartridge not recognized error, you can also inspect the cartridges and make sure they’re not clogged.
- On some occasions, an Epson printer won’t recognize the ink cartridge due to power glitches.
- The last resort to fix the error is to replace one or all cartridges.
XINSTALL BY CLICKING THE DOWNLOAD FILE
This software will repair common computer errors, protect you from file loss, malware, hardware failure and optimize your PC for maximum performance. Fix PC issues and remove viruses now in 3 easy steps:
- Download Restoro PC Repair Tool that comes with Patented Technologies (patent available here).
- Click Start Scan to find Windows issues that could be causing PC problems.
- Click Repair All to fix issues affecting your computer’s security and performance
- Restoro has been downloaded by 0 readers this month.
Epson printer errors are quite specific. For instance, when your printer shows a Cartridge not recognized message and then points towards cartridges 288/288XL, you know for sure that the error is about those specific cartridges.
It is true, though, that on some Epson printers you will have to scroll through using the arrows to see what cartridge the error is about.
On the other hand, an error like the one mentioned could mean just about anything – from an incorrect position of the cartridge to it being empty. So you might have to perform several steps to clear the error.
And in this article, we’re trying to cover all the possibilities.
What can I do if the Epson ink cartridge is not recognized?
1. Perform a power cycle
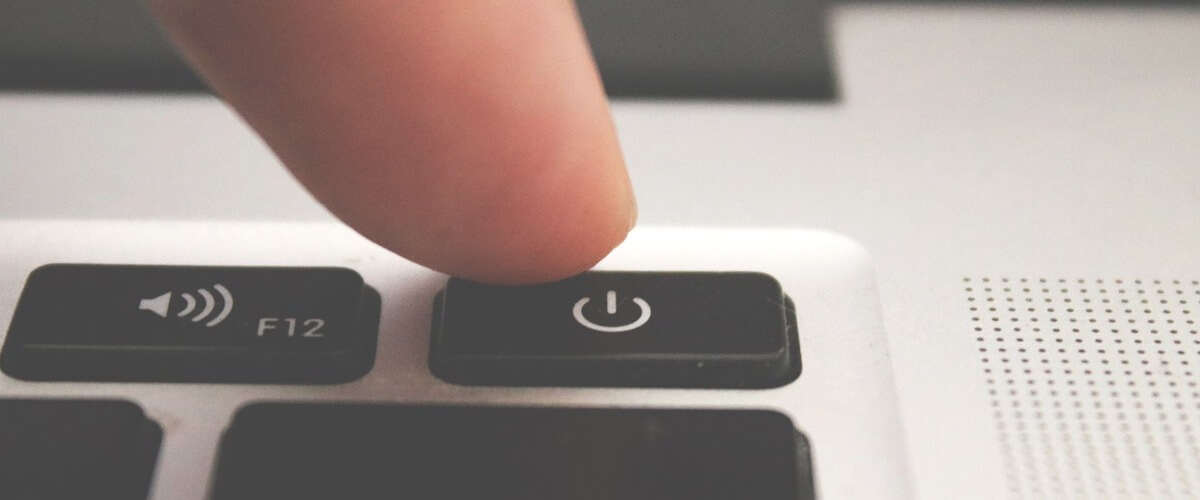
Sometimes, errors can occur due to power failures or similar instances.
In these cases, turning your printer on/off (waiting for a few seconds in between) and also unplugging it for a few seconds often helps.
If the error is still there, move on to the next step.
2. Check the position of the cartridges
Ensure that each ink cartridge is firmly set into its place. It might sound silly, but if you’ve recently tinkered with some of the cartridges, something might not be in order there.
And, while you’re at it, also make sure that you are using the correct cartridges. Namely, the numbers indicated for your particular Epson model. In this particular case, make sure that in the 288/288XL slot you did not insert some alternative models.
Also, at this point, see that all the slots are correctly filed with the adequate numbered cartridges.
3. See which cartridge is the faulty one
- Remove all of the ink cartridges.
- If you have older cartridges that used to be functional, place those instead, and see if the error changes (the printer should tell you that some cartridges are empty).
- Start by replacing cartridges one by one, checking for the error each time.
This process might take a bit longer, but it will tell you exactly which cartridge is the faulty one.
4. Inspect and replace the faulty cartridge
- All-in-one pack
- Long-lasting
- Individual cartridges
- Price tag
If you’ve got this far, you should know which cartridge is trouble.
So remove it and inspect the chip on the bottom of the cartridge. The chip should be mounted firmly, and you should see no cuts or gashes on the micro-chip surface as this may render the cartridge unusable.
Inspect for ink residue on the surface of the microchip; if necessary, clean with a lint-free towel and alcohol.
If you still get the error message after all of these steps, but you know which one doesn’t work, we recommend that you replace it.
As mentioned before, make sure to use only cartridges that are compatible with your Epson printer model.
And that’s about it. We’re sure that at least one solution was helpful. And if so, your feedback is welcome in the comments section below.
Still having issues? Fix them with this tool:
SPONSORED
If the advices above haven’t solved your issue, your PC may experience deeper Windows problems. We recommend downloading this PC Repair tool (rated Great on TrustPilot.com) to easily address them. After installation, simply click the Start Scan button and then press on Repair All.
![]()
Newsletter
by Sinziana Mihalache
Sînziana loves getting people to better understand products, processes, and experiences beyond a simple user guide, either in writing or making use of images. She joined the team… read more
Published on February 23, 2021
- If you get an Epson printer ink 288 error, some cartridges might not be in the correct position.
- To override the Epson ink Cartridge not recognized error, you can also inspect the cartridges and make sure they’re not clogged.
- On some occasions, an Epson printer won’t recognize the ink cartridge due to power glitches.
- The last resort to fix the error is to replace one or all cartridges.
XINSTALL BY CLICKING THE DOWNLOAD FILE
This software will repair common computer errors, protect you from file loss, malware, hardware failure and optimize your PC for maximum performance. Fix PC issues and remove viruses now in 3 easy steps:
- Download Restoro PC Repair Tool that comes with Patented Technologies (patent available here).
- Click Start Scan to find Windows issues that could be causing PC problems.
- Click Repair All to fix issues affecting your computer’s security and performance
- Restoro has been downloaded by 0 readers this month.
Epson printer errors are quite specific. For instance, when your printer shows a Cartridge not recognized message and then points towards cartridges 288/288XL, you know for sure that the error is about those specific cartridges.
It is true, though, that on some Epson printers you will have to scroll through using the arrows to see what cartridge the error is about.
On the other hand, an error like the one mentioned could mean just about anything – from an incorrect position of the cartridge to it being empty. So you might have to perform several steps to clear the error.
And in this article, we’re trying to cover all the possibilities.
What can I do if the Epson ink cartridge is not recognized?
1. Perform a power cycle
Sometimes, errors can occur due to power failures or similar instances.
In these cases, turning your printer on/off (waiting for a few seconds in between) and also unplugging it for a few seconds often helps.
If the error is still there, move on to the next step.
2. Check the position of the cartridges
Ensure that each ink cartridge is firmly set into its place. It might sound silly, but if you’ve recently tinkered with some of the cartridges, something might not be in order there.
And, while you’re at it, also make sure that you are using the correct cartridges. Namely, the numbers indicated for your particular Epson model. In this particular case, make sure that in the 288/288XL slot you did not insert some alternative models.
Also, at this point, see that all the slots are correctly filed with the adequate numbered cartridges.
3. See which cartridge is the faulty one
- Remove all of the ink cartridges.
- If you have older cartridges that used to be functional, place those instead, and see if the error changes (the printer should tell you that some cartridges are empty).
- Start by replacing cartridges one by one, checking for the error each time.
This process might take a bit longer, but it will tell you exactly which cartridge is the faulty one.
4. Inspect and replace the faulty cartridge
- All-in-one pack
- Long-lasting
- Individual cartridges
- Price tag
If you’ve got this far, you should know which cartridge is trouble.
So remove it and inspect the chip on the bottom of the cartridge. The chip should be mounted firmly, and you should see no cuts or gashes on the micro-chip surface as this may render the cartridge unusable.
Inspect for ink residue on the surface of the microchip; if necessary, clean with a lint-free towel and alcohol.
If you still get the error message after all of these steps, but you know which one doesn’t work, we recommend that you replace it.
As mentioned before, make sure to use only cartridges that are compatible with your Epson printer model.
And that’s about it. We’re sure that at least one solution was helpful. And if so, your feedback is welcome in the comments section below.
Still having issues? Fix them with this tool:
SPONSORED
If the advices above haven’t solved your issue, your PC may experience deeper Windows problems. We recommend downloading this PC Repair tool (rated Great on TrustPilot.com) to easily address them. After installation, simply click the Start Scan button and then press on Repair All.
![]()
Newsletter
Картридж для любого принтера — основной расходник, без которого работа печатающей машины не представляется возможной. А неполадки принтера по вине чернильниц это также — основная их «болезнь». Рассмотрим основные причины и способы устранения неисправностей печатающих машин Epson, связанных с картриджами.
Основные неисправности принтера Epson
Современные принтеры Epson любой модели представляют собой компьютеризированное печатающее оборудование с собственной системой диагностики на борту. При возникновении каких-либо неисправностей на встроенном дисплее машины либо на экране компьютера отображается соответствующее сообщение или приводится краткий код ошибки в виде набора букв и цифр. Приводим перечень ошибок, относящихся к неполадкам картриджа.

Код ошибки: W-12
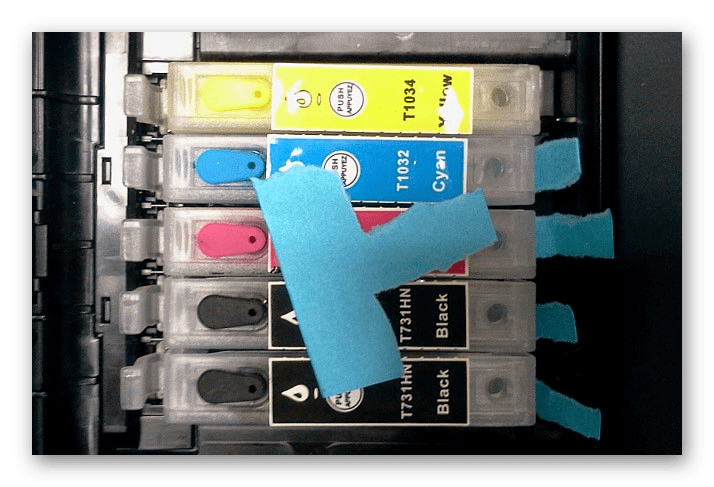
Ошибка сигнализирует о неправильной установке чернильниц. Часто возникает при замене или дозаправке картриджа (только для бескартриджных моделей, поддерживающих дозаправку). Также ошибка может появиться после проведения профилактических работ над печатающей машиной. Причин несколько:
- В случае с новыми чернильницами — перед их установкой следует убедиться в отсутствии защитной пленки, прикрывающей электрические контакты и сопла в нижней части устройства.
- Для правильной установки чернильницы ее следует вставлять в приемную каретку до щелчка.
- После заправки или профилактики на электрических контактах чернильницы может оставаться высохшая краска или приклеиться какой-либо мелкий предмет — кусок бумаги, полиэтилена и т.п. Перед установкой следует убедиться в отсутствии предмета.
- Нередко загрязнению подвергается и контактная площадка каретки для установки чернильницы. Потому и ее следует осмотреть и удалить грязь и посторонние предметы, если они туда попали.
Все причины, вызывающие код ошибки «W-12», устраняются просто:
- Извлеките картриджи из каретки.
- Устранить имеющиеся загрязнения при помощи увлажненной ватной палочки и любые предметы, блокирующие электрический контакт.
- Правильно (до щелчка) установите чернильницы обратно.
В некоторых случаях данных процедур не бывает достаточно. В особенности это касается картриджей, которые не использовались в течение длительного времени (не относится к новым чернильницам). Основная причина неисправности — загрязнение красящих сопел или каналов подачи краски. О том, как выполнить их прочистку, будет сказано ниже.

Код ошибки: W-13
Ошибка может означать одно из трех:
- В принтер устанавливаются неоригинальные (подделка) чернильницы.
- Устанавливаемые картриджи не подходят по техническим характеристикам к имеющейся модели принтера Epson.
- Электрические контакты чернильницы имеют повреждения (отсутствует один из контактов, короткое замыкание и т.д.).
Третью причину вряд ли получится устранить без спецоборудования. Но и ремонт в большинстве случаев — бессмысленное мероприятие, т.к. дешевле и проще приобрести новые картриджи.
Для определения оригинальной продукции Epson по защитной голограмме, присутствующей на каждой упаковке чернильниц. У оригинальных картриджей она переливается цветами под разным углом обзора, у подделки — нет. Также при покупке следует обратить внимание на стоимость. Поддельная продукция значительно дешевле оригинала. Точные цены на картриджи следует уточнять на официальном сайте Epson (epson.ru).
Определить, подходят ли устанавливаемые чернильницы к имеющейся модели принтера, также легко:
- Зайдите на сайт epson.ru.
- В правом верхнем углу страницы найдите поле «Поиск по сайту…» и впишите в него уникальный код картриджа, указанный на упаковке или на корпусе изделия.
- На следующей странице выберите ваш картридж и перейдите по ссылке.
- Под изображением картриджа найдите и перейдите по ссылке «Совместимые продукты».
- Отобразится список с моделями принтеров, которым подходят данные чернильницы.
- Если в списке отсутствует имеющаяся модель принтера, значит, картридж к ней не подходит.
Если устанавливающиеся/заменяющиеся картриджи подходят к имеющейся модели принтера и никакие манипуляции с ними не приводят к должному результату, переходите к следующему разделу.

Капитальная чистка картриджей
К данному способу следует прибегать только в случае, если не помогает чистка при помощи увлажненного ватного тампона. Существует несколько способов капитальной очистки. В домашних условиях без наличия продувочного и другого специального оборудования можно поступить следующим образом:
Вся операция сводится к тому, чтобы очистить от загрязнений и высохшей краски сопел.

- Все, что потребуется — несколько салфеток, неглубокая емкость и чистая вода (желательно бутилированную).
- Уложите на дно емкость салфетки, а затем залейте их водой так. Воды много не нужно — достаточно такого количества, чтобы ей были хорошо пропитаны салфетки.
- Далее положите картридж на смоченные салфетки соплами вниз (изображены на фото выше) и подождать некоторое время. Обычно хватает пары часов.
- Время от времени нужно смотреть на место, куда была установлена чернильница. Если оно хорошо прокрасилось, процедуру можно завершить.
- Дайте картриджу подсохнуть 10-15 минут, а затем установите его обратно в принтер и повторите попытку печати.
Чистка каналов подачи краски
Данная процедура в домашних условиях может быть выполнена лишь при помощи штатных средств, а именно — запуск на принтере специальной функции очистки. Она очищает не только сами каналы, но и печатающую головку. Запустить с компьютера ее просто (на примере ОС Windows):
- Принтер должен быть включен, на встроенном дисплее и на мониторе компьютера не должны отображаться никакие ошибки.
- Загрузите бумагу в лоток (некоторые модели принтеров Epson распечатывают пробную страницу для проверки результатов прочистки).
- Откройте «Панель управления».
- Перейдите в раздел «Оборудование и звук», затем — «Устройства и принтеры».
- В верхней части окна в разделе «Принтеры» найдите значок вашей модели и кликните по нему правой кнопкой мыши.
- Выберите в контекстном меню пункт «Прочистка печатающей головки» (Head Cleaning).
- Откроется новое окно. Следуйте инструкциям на экране — они простые.
Чистка производится несколько минут, после чего автоматически распечатается пробная страница. Если этого не произошло, попробуйте отправить любой документ на печать.

Ошибки со стороны операционной системы
Нередки ситуации, когда причиной рассматриваемой проблемы становятся различные ошибки и сбои операционной системы, связанные с обменом технической информации между принтером и компьютером. Некоторые неисправности можно устранить путем переустановки драйвера. Но сначала рекомендуется удалить из системы имеющееся ПО:
- Перейдите в раздел «Устройства и принтеры» по аналогии с вышеприведенной инструкцией.
- Кликните правой кнопкой мыши по значку принтера, выберите пункт «Удалить устройство».
- Отключите USB-кабель от принтера, а затем вставьте его обратно. На экране должно появиться сообщение об обнаружении нового устройства.
- Если имеется диск, идущий в комплекте с оборудованием, то установить драйвер можно с него. Но лучше воспользоваться наиболее свежей версией ПО.
- Скачать нужный драйвер можно на официальном сайте epson.ru в разделе «Драйверы и руководства» на странице, посвященной имеющейся модели принтера.
- После скачивания запустите установщик и следуйте инструкциям на экране. Автоматически это можно сделать через DriverHub (это бесплатно).

Другие советы
Если ничего из вышесказанного не помогает — это еще не повод обращаться в сервисный центр. Можно попробовать еще несколько вариантов устранения проблемы:
- Попробуйте подключить принтер к другому компьютеру, на котором ранее он точно не использовался, установите драйвер и пробуйте печатать.
- Можно также попробовать установить имеющиеся картриджи на другой принтер, для которого эти чернильницы подходят.
- Если нет возможности приобрести новые картриджи, то можно поступить наоборот — попробовать использовать чернильницы с другого аналогичного принтера.
- Редко, но проблема может заключаться в бытовой/офисной электросети — падение напряжения, скачки частоты тока и т.д. Если принтер не будет получать электроэнергию нужного качества, то он и вовсе может выйти из строя.
Если ничего из сказанного в данной статье не помогает, только тогда обращайтесь к специалистам.
The ink cartridge cannot be recognized is a somewhat standard error encountered by printer users. Whether you have Epson, Canon, Brother, HP, etc; you can get this error.
Getting this message can frustrate you unexpectedly sometimes because it will leave you in the printer not working or printer offline condition. You won’t be able to resume printing jobs until this error is fixed.
The problem could be with your cartridges or the printer’s internal hardware. You need to follow the hit and trial method to find out the root cause. Once recognized, it would be easy for you to fix the problem.
This post will explain six super easy fixes that can get you rid of the Ink Cartridges Not Recognized error. Keep trying all these one by one, until you get your problem fixed.
Method-1: Remove & Replace the Cartridge
Getting Ink Cartridge Cannot Be Recognized errors simply means your printer does not detect your cartridges’ presence. It could be because they are not correctly clicked in their place. Try to remove and install them back correctly. Do the following:
- Turn off the printer and plug out the power cord.
- Open the printer cover.
- Take out the cartridges one by one.
- Place cartridges back correctly, you should hear the “tick” sound.
- Close the printer cover.
- Press the “Ink” button on the printer.
Check if the error is no longer showing and the screen displays Charging ink that means the issue is fixed. If you do not see this message and see the standard home screen, even then the error is fixed.
Method-2: Use Original Cartridges
If you have the original cartridges bundle with you. Try replacing your current installed cartridges with the original one (extra, you have).
The low ink level, displacement of ink-cartridges, or problem in the contact chip can result in the Ink Cartridges Cannot Be Recognized message.
For any reason, if you feel there is a need to replace the cartridges; go for using the original brand cartridges.
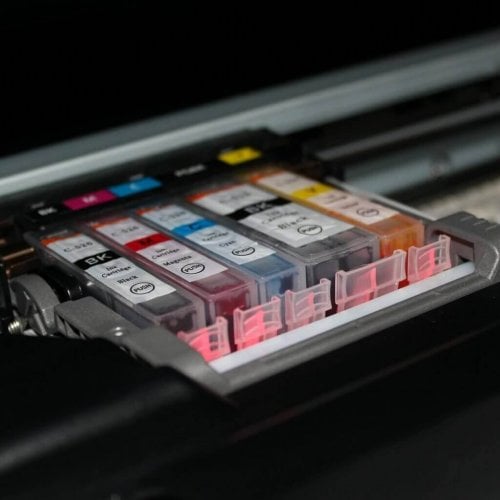
Method-3: Check the Cartridge chip
Another reason for getting his error popped up could be the faulty cartridge chips as well. These contacts chips can corroded due to ink clots, ink contamination, or accumulation of dirt with time.
The wired/metal chips on which cartridges fit inside the printer. Inspect the cartridges do the following:
- Power off the printer.
- Open the printer cover
- Remove all ink cartridges from the printer.
- Inspect the cartridge chips on both sides
- Use any damp cloth to clean any clogged ink or dirt on these.
- Use a dry cloth to polish these afterward.
- Fit cartridges one by one back in the printer.
If cartridge chips were causing a problem, you might not see that error after cleaning cartridge chips.
Method-4: Remove the protective strips from the Cartridges
If you have recently replaced any cartridge in your printer, chances are there that you forgot to remove the protective strips. People tend to make this mistake.
Well, nothing much to worry about it. Take out your cartridge and remove the protective layer. Placing your cartridge with safety shield will definitely won’t let your printer to recognize the cartridge. And as a result, you will get to see Ink Cartridges Cannot Be Recognized error on your screen.
Method-5: Check If Cartridge Protection is Enabled
This mostly happens with HP printers. When you update hp firmware; a Cartridge Protection option automatically gets enabled. This will surely won’t let your printer recognize the attached cartridges.
You need to disable this feature. Do the following:
- Go to the main menu in your printer display.
- Click the Settings option.
- Select the Disable the cartridge protection option.
- Click Apply and Save (if asked)
- Restart your printer, and you wouldn’t see that error again. Resume with your printing jobs.
Method-6: Reset Your Printer
When everything else failed, you can Reset your Printer. The resetting methods vary from every model to brand.
In the Nutshell
For any further technical assistance, you can call the online Printer help-desk. The certified technicians can guide you properly as per your printer issues.
Ink cartridge error message is one of the most frustrating messages that your printer display screen may show you.
Seeing an ink cartridges not recognized error is not what you expected when you tried printing your documents today.
Now, we have good news and bad news for you, printer owners.
The good news is we can help you fix your printer showing ink cartridges not recognized at no cost to you.
The bad news is it may require you to change your ink cartridges.
The worst-case scenario is changing your inks may not be enough that you may have to replace your printer.

No need to be disappointed this early, we can still try and fix your printer.
First, let’s find out how this error happens in the first place.
Ink cartridge error messages can be caused by different reasons. Some of them are the following:
Defective ink cartridges
Since the error message, “ink cartridges not recognized“, clearly states that the issue is your ink cartridges, let’s cross this from the list and assume that the ink cartridges are causing the problem.
To confirm if the ink cartridges are causing the problem check the ink levels.
Once you’ve verified that your cartridges have enough inks in them, then check for your inks’ warranty.
Inks do expire. And the most common cause of ink cartridge errors is expired ink/s.
Printhead Problem
Your printer’s printhead is the most important and expensive part of your machine. Printheads are very sensitive and can be easily damaged if not handled carefully.
If you don’t know where your printhead is, it is the part of your printer where your ink cartridges are housed.
Printheads can accumulate air and debris over time and must be cleaned at least once a month. A dirty printhead may cause print quality issues like being unable to print in black or color and ink system failure.
Printer System Malfunction
The ink cartridge not recognized error message could be a sign of a much bigger problem. A damaged printer system may not show a clear sign, but a problem with your ink cartridges may be an indication.
The bad news is if your printer has a malfunction problem, then the only solution will be to replace your old printer with a new one. Hopefully, the printer’s ink cartridge not recognized error you encounter now is not caused by a damaged printer system.
Basic Printer Checkup
We advise printer owners to do a basic printer checkup, if possible, before doing any troubleshooting steps on their multi-function printer.
To begin with the basic printer checkup.
- Turn on your printer.
- Check your printer display screen. It should not show any display problems. And your button/s should all work.
- Place a single-page document on your scanner glass,
- Click on the copy button, you may copy in black or copy in color.
If you can copy successfully, then you can proceed to the steps below.
If not, then you have a much bigger problem than just your ink cartridges not recognized by your printer.
Recommended Items For Printer Owners
No More Dusts!

Super-Effective Cleaner!

For Longer Printer Lifespan!

Jungda Printer Dust Cover, 600D Waterproof Universal Printer Cover for HP/EPSON/Canon/Brother Printer Protector — 16 x 12 x 8 Inch
Best Printers Printhead Cleaning Kit — HP, Epson,Canon, Brother & Lexmark — Large High Efficiency 20ml Premium Syringe — 100ml Certified
Office Depot OD2537 Printer/Copier/Fax Cleaning Kit, OD2537
To protect your printer from dust and dirt.
To dissolve dry ink and clean the printhead.
To clean the debris caught inside your printer.
No More Dusts!
Jungda Printer Dust Cover, 600D Waterproof Universal Printer Cover for HP/EPSON/Canon/Brother Printer Protector — 16 x 12 x 8 Inch
To protect your printer from dust and dirt.
Super-Effective Cleaner!
Best Printers Printhead Cleaning Kit — HP, Epson,Canon, Brother & Lexmark — Large High Efficiency 20ml Premium Syringe — 100ml Certified
To dissolve dry ink and clean the printhead.
For Longer Printer Lifespan!
Office Depot OD2537 Printer/Copier/Fax Cleaning Kit, OD2537
To clean the debris caught inside your printer.
Basic Troubleshooting for Ink Cartridges Not Recognized Error
To fix a printer ink cartridges not recognized problem, follow these troubleshooting steps.
Time It Takes To Fix Ink Cartridges Not Recognized Error 20 minutes
Hard reset your printer
To start, unplug your printer’s power cable at the back of it while it is still turned on. This is how you do a printer hard reset.
Wait for at least two minutes before you turn it on. And make sure you are connecting your printer’s power cable directly to a wall outlet.
Remove and reinsert your ink cartridges
Once your printer is on, open the ink cartridge access door of your printer to check on your printer’s ink cartridges.
Remove them one by one, and reinsert them back into your printer. But before you put them back, do the next step.
Check your ink cartridges warranty
Look for the warranty on each of your ink cartridges. The warranty shows the expiration date of your ink cartridge.
Yes. Ink cartridges like edible items have an expiration date.
The warranty is often embedded in your ink cartridge. It will usually show the month, date, and year of expiration. Or just the month and the year.
If one or more are already expired, replace them with brand new inks.
Move the printhead manually
After putting all the ink cartridges back in your printer, check if the ink cartridges not recognized error message still appears.
If it still shows, then hard reset your printer again. And while you’re waiting for the two minutes to lapse, open the cartridge access door and manually move your printhead carefully.
If the printhead is on the right of the printer, carefully move it to the left side.
If it’s on the left of the printer, move it to the right side.
When the printhead is at the middle or center part of your printer, carefully move it to the right side.
Hopefully, these steps made the ink not recognized error message disappears on your printer’s screen.
If the issue persists, follow these advanced troubleshooting steps.
Advanced Troubleshooting for Ink Cartridge Error Messages
For those printer owners who still see an ink cartridge not recognized error after doing the basic troubleshooting steps. You can follow these instructions.
The first step is to do another hard reset of your printer. Remove the power cable at the back of your printer for at least two minutes before you turn it back on.
Once the printer is turned on, replace all your ink cartridges if you have replacement inks available.
If not, proceed to the next step.
Assuming that the error message still appears, then our last troubleshooting step is to do a semi-full reset.
Doing a semi-full reset will return your printer’s default settings. It’ll be like you’re getting a brand new printer since you have to set everything up again, much like a printer offline issue since you have to reconnect your wireless printer to your WiFi network.
Various printers have different ways on how to initiate a semi-full reset. You may refer to your printer manual to find out how to do a semi-full reset. Or you may contact us with your printer brand and model, so we can send you the correct instructions on how to do it.
Printer Tips To Prevent Inks Not Recognized Error
If you’re able to fix your printer issue, then you might want to do some of these steps to prevent the error, ink cartridges not recognized, from reoccurring.
Use genuine inks
We highly recommend that you only use genuine ink cartridges on your printer. These are inks produced by your printer manufacturer.
Those cheap inks you see being advertised that are said to be compatible with your printer system may cost you more money in the long run. They may even cause more printer errors. Your printer’s manufacturer can void your printer warranty with them if proven that your ink problem was caused by non-genuine inks.
Clean your printhead
As mentioned earlier, your printhead is very sensitive and is quite expensive to replace. Taking care of it should be your top priority.
Doing printhead cleaning helps in removing debris and air from your printhead that may cause printer problems.
You can do it using your printer display screen or your printer software on your computer or mobile device.
We suggest cleaning the printhead at least once a month or any time you change your ink cartridges or encounter any printing-related issues like not being able to print in color.
Use your printer
Dry inks are caused by a stagnant printer system.
It is recommended that you use your printer at least once a week or every two weeks to prevent inks from drying.
You don’t even have to print several pages every week. A single-page document will do and will help improve ink circulation inside your printer.
Cover your printer
Whenever you are not using your printer, make sure that you cover it. Printer covers are inexpensive and can save you a lot of time and money in the long run.
Covering your printer helps lessen the time you should maintain your printer.
Frequently Asked Questions About Ink Cartridge Errors
What does ink cartridge failure error mean?
An ink cartridge failure error message means there is something wrong with your printer system. It can be caused by a defective ink cartridge or a problem with your printer’s printhead.
Seeing an ink cartridge failure is a complex printer issue that if not fixed successfully will require you to buy a new printer.
Printers that show ink cartridge failure will not let you print any document and may require you to send your printer to a service center.
Hopefully, your printer is still in warranty.
If not, then you may follow our guide on how to fix printer ink cartridge failure to avoid spending on repair costs.
How to fix ink cartridge error message?
We don’t recommend manually cleaning your printhead.
Cleaning your printhead on your own can cause more damage to your printer system than fix your issue.
The printhead is the most expensive and important part of your printer. You don’t want to risk damaging it.
We advise using the automatic printhead cleaning option you can access on your printer’s display screen or your printer software on your computer or mobile device.
If your printer still won’t print properly after several printhead cleaning, then you should isolate which ink cartridge is causing the issue.
Once you’ve identified which ink cartridge is causing the issue. You may replace it with a brand new ink cartridge.
How to hard reset my printer?
If you’re having some printer issues, then hard resetting your printer may help you fix your printer.
To hard reset a printer, you have to unplug the power cord in your printer to turn it off. You don’t have to press the power button to turn it off. Just unplug and leave it that way for at least two minutes.
Afterward, connect the power cord back to your printer and make sure that your printer is connected directly to a wall outlet and not a power extender.
Press the power button to turn your printer on and see if everything’s fixed.
Those are the steps to hard reset your printer successfully.
Printer Still Not Working? Maybe It’s Time To Get A New Printer!
Affordable Home Printer

Great For Home And Office Use

Best For Printing Photos

Canon PIXMA MG3620 Wireless All-in-One Color Inkjet Printer with Mobile and Tablet Printing, White
HP OfficeJet Pro 8035e Wireless Color All-in-One Printer (Oasis) with up to 12 months Instant Ink with HP+ (1L0H7A)
HP Envy Inspire 7955e Wireless Color All-in-One Printer with Bonus 6 Months Instant Ink with HP+ (1W2Y8A)
Budget-friendly wireless printer for home use.
Top-of-the-class wireless printer.
Easily print amazing and high-quality photos.
Affordable Home Printer
Canon PIXMA MG3620 Wireless All-in-One Color Inkjet Printer with Mobile and Tablet Printing, White
Budget-friendly wireless printer for home use.
Great For Home And Office Use
HP OfficeJet Pro 8035e Wireless Color All-in-One Printer (Oasis) with up to 12 months Instant Ink with HP+ (1L0H7A)
Top-of-the-class wireless printer.
Best For Printing Photos
HP Envy Inspire 7955e Wireless Color All-in-One Printer with Bonus 6 Months Instant Ink with HP+ (1W2Y8A)
Easily print amazing and high-quality photos.
Last update on 2023-02-09 / Includes affiliate links / Images from Amazon.com
Hi @JulienO,
Thanks for taking an interest in the HP Support Forums! This is a great location to get resolutions and interact with experts from the community. I came across your post and wanted to assist you. I understand that the printer you are having issues with ink cartridge not recognized after inserting new ink cartridges. Don’t worry as I have a few suggestions which should help you resolve this issue.
To provide you with an accurate solution, I’ll need a few more details:
Which country do you reside in and was the printer purchased from the same country?
Did you replace the cartridge recently?
Did the error appear all of sudden while using an existing cartridge which worked fine earlier on the same printer?
Are you able to make a copy from the printer?
In the meantime, let’s try these steps here:
Please make sure that the printer is connected directly to the wall outlet and not to the surge protector.
Remove all the ink cartridges and then try to perform a hard reset on the printer.
With the printer turned on, disconnect the power cord from the rear of the printer and also unplug the power cord from the wall outlet.
Remove USB cable, if present.
Wait for 2-3 minutes, press and hold the power button on your printer for about 30 seconds to remove any additional charge.
Now plug back the power cable straight to a wall outlet without any surge protector or an extension cord and then plug back the power cord to the printer.
Turn on the printer and wait till warm-up period finishes and the printer is idle.
Now insert the ink cartridges and then try to print a test page and check if it works.
If you have followed the steps suggested and still having the issue, I would personally suggest this could be an issue with the printer hardware as you have already tried replacing the ink cartridges twice. I would recommend you contact our HP phone support for available service related options.
HP Technical Support can be reached by clicking on the following link: http://h22207.www2.hp.com/us-en/?openCLC=true
(1) Once the support page opens please select the country in which you’re located. Next, enter your HP model number on the right.
(2) Next, choose the ‘Contact Support’ tab at the top and scroll down to the bottom of the ‘HP Support- Contact’ page to fill out the form provided with your contact information.
(3) Once completed click the ‘Show Options’ icon on the bottom right.
(4) Lastly, scroll down to the bottom of the page and select ‘Get the phone number.’ A case number and phone number will now populate for you.
If you have any troubles, let me know and I will do my best to help!
Hope this helps, for any further queries reply to the post and feel free to join us again
Feel free to post your query for any other assistance as well,
It’s been a pleasure interacting with you and I hope you have a good day ahead.
If you wish to show appreciation for my efforts, mark my post as Accepted Solution.
And click on the Purple Thumbs up icon at the bottom of my comment.
Regards,
Jeet_Singh
I am an HP Employee
Содержание
- Исправляем ошибку с обнаружением принтерного картриджа
- Способ 1: Проверка контактов
- Способ 2: Обнуление картриджей
- Вопросы и ответы
Иногда пользователи печатного оборудования сталкиваются с тем, что принтер перестает обнаруживать чернильницу, об этом свидетельствует уведомление на компьютере или дисплее самого устройства. Практически всегда причиной возникновения данной проблемы являются сами картриджи, их аппаратные или системные сбои. Решается неисправность разными вариантами, каждый из которых требует от юзера выполнения определенных действий. Давайте детально рассмотрим доступные методы.
Исправляем ошибку с обнаружением принтерного картриджа
Некоторые пользователи сразу попробуют перезагрузить принтер или вытащить и заново вставить чернильницу. Такие действия иногда помогают, однако в большинстве случаев они не приносят никаких результатов, поэтому и следует осуществить более сложные процессы, связанные с очищением контактов и исправлением системных сбоев. Разберемся со всем по порядку.
В случае когда ваш принтер обнаруживает картридж, однако при попытке печати появляется уведомление о том, что закончилась краска, пропускайте первый способ и сразу переходите к выполнению второго.
Способ 1: Проверка контактов
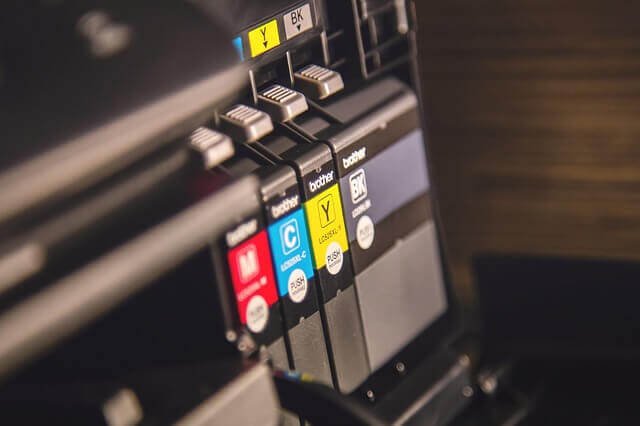
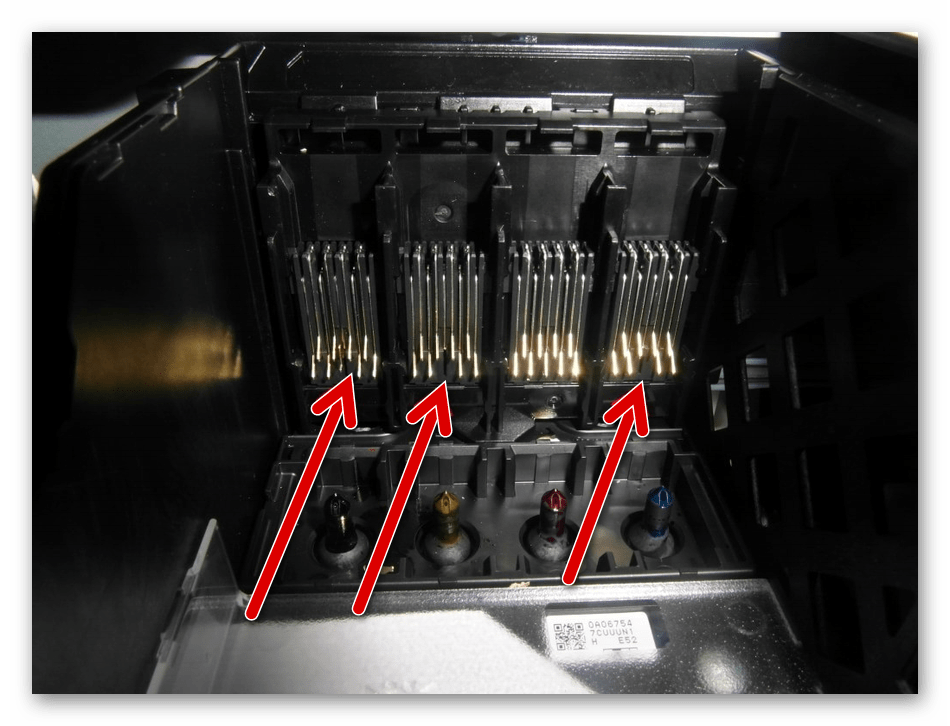
Сразу хочется обратить внимание, что практически всегда ошибка возникает после заправки или замены картриджей. Если вами были приобретены новые чернильницы, сравните их контакты с теми, что расположены на самом устройстве, ведь они обязательно должны совпадать. Сделать это можно достаточно просто:
Читайте также: Замена картриджа в принтере
- Переведите держатель в состояние замены после поднятия крышки и достаньте блок картриджей.
- Переверните их и убедитесь, что контакты совпадают.
Если все нормально, рекомендуется провести очистку контактов, ведь иногда они окисляются или загрязняются после заправки. Лучше всего для этого подойдет обычный ластик или спиртовая салфетка. Просто аккуратно протрите каждый чип, затем вставляйте блок чернильниц обратно в МФУ или принтер до появления характерного щелчка.
Диагностировать следует и электрические элементы в самом девайсе. Доступ к ним вы получите сразу же после того, как достанете картридж. Убедитесь в том, что на них нет посторонних предметов, при необходимости осторожно уберите пыль и другие загрязнения чистой салфеткой.
Проверьте, насколько качественно зафиксирован блок в держателе. Малейший отход контактов может вызывать сбои в процессе печати. Если картриджи закреплены неплотно, возьмите небольшую бумажку, сложите ее в нужное количество раз и подложите между креплением и чернильницей. Таким образом вы надежно зафиксируете детали внутри устройства.
Способ 2: Обнуление картриджей
Иногда на компьютере появляется уведомление об окончании краски в картридже. В большинстве случаев такая проблема возникает после замены или заправки чернильницы, ведь устройство считает расходы не по оставшемуся объему чернил, а по количеству израсходованной бумаги. Для начала мы рекомендуем ознакомиться с уведомлением. Чаще всего там будут написаны инструкции, которые вам необходимо выполнить для продолжения печати.

Читайте также: Правильная калибровка принтера
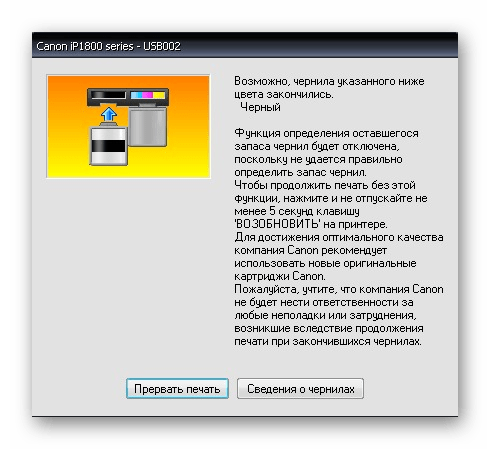
Если приведенная разработчиками инструкция не помогла или она не отображается, ознакомьтесь со следующим руководством.
- Во многих МФУ или принтерах со встроенным дисплеем на картриджах присутствует специальная кнопка обнуления. Зажмите ее на несколько секунд, чтобы произошел автоматический сброс уровня чернил. Конечно, аппарат при этом должен быть обязательно включен.
- Далее прочтите то, что отобразится на дисплее, и выполните инструкции.
Произведите данную процедуру со всеми оставшимися в блоке чернильницами.
В том случае, когда ПЗК нет кнопки сброса, обратите внимание на саму плату соединения. Иногда на ней находится два небольших контакта, расположенных рядом друг с другом.
Возьмите плоскую отвертку и одновременно замкните их, чтобы произошел автоматический сброс уровня краски.
После этого блок можно аккуратно вставить обратно в принтер.
Обратите внимание на фотографию ниже. Там вы видите пример платы со специальными контактами и без них.
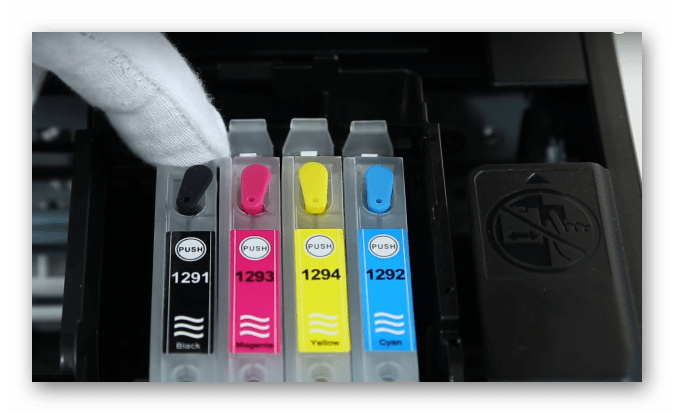
Если они отсутствуют на вашем ПЗК, процедура сброса довольно простая:
- Откройте верхнюю крышку печатающего устройства, чтобы получить доступ к блоку чернильниц.
- Извлеките оттуда необходимую в соответствии с руководством к вашей модели девайса. Последовательность действий часто изображена даже на самой крышке.
- Вставьте картридж обратно до появления характерного щелчка.

Подтвердите замену, выполнив инструкцию, отобразившуюся на дисплее, если таков имеется на вашем продукте.
Сегодня мы разобрали основные способы исправления ошибки с обнаружением картриджа в принтере. Они являются универсальными и подойдут для многих моделей подобного оборудования. Однако рассказать обо всей продукции мы не можем, поэтому если у вас остались вопросы, задавайте их в комментариях, указав свою модель устройства.
Читайте также:
Правильная чистка принтерного картриджа
Решение проблемы с застрявшей в принтере бумагой
Решение проблем с захватом бумаги на принтере