I’ve got the following HTML5 form: http://jsfiddle.net/nfgfP/
<form id="form" onsubmit="return(login())">
<input name="username" placeholder="Username" required />
<input name="pass"  type="password" placeholder="Password" required/>
<br/>Remember me: <input type="checkbox" name="remember" value="true" /><br/>
<input type="submit" name="submit" value="Log In"/>
Currently when I hit enter when they’re both blank, a popup box appears saying «Please fill out this field». How would I change that default message to «This field cannot be left blank»?
EDIT: Also note that the type password field’s error message is simply *****. To recreate this give the username a value and hit submit.
EDIT: I’m using Chrome 10 for testing. Please do the same
![]()
asked Mar 11, 2011 at 11:40
![]()
3
Here is the code to handle custom error message in HTML5:
<input type="text" id="username" required placeholder="Enter Name"
  oninvalid="this.setCustomValidity('Enter User Name Here')"
  oninput="this.setCustomValidity('')"/>
This part is important because it hides the error message when the user inputs new data:
oninput="this.setCustomValidity('')"
![]()
answered Nov 25, 2013 at 9:52
![]()
Somnath KadamSomnath Kadam
5,8216 gold badges21 silver badges37 bronze badges
13
Use setCustomValidity:
document.addEventListener("DOMContentLoaded", function() {
    var elements = document.getElementsByTagName("INPUT");
    for (var i = 0; i < elements.length; i++) {
        elements[i].oninvalid = function(e) {
            e.target.setCustomValidity("");
            if (!e.target.validity.valid) {
                e.target.setCustomValidity("This field cannot be left blank");
            }
        };
        elements[i].oninput = function(e) {
            e.target.setCustomValidity("");
        };
    }
})
I changed to vanilla JavaScript from Mootools as suggested by @itpastorn in the comments, but you should be able to work out the Mootools equivalent if necessary.
Edit
I’ve updated the code here as setCustomValidity works slightly differently to what I understood when I originally answered. If setCustomValidity is set to anything other than the empty string it will cause the field to be considered invalid; therefore you must clear it before testing validity, you can’t just set it and forget.
Further edit
As pointed out in @thomasvdb’s comment below, you need to clear the custom validity in some event outside of invalid otherwise there may be an extra pass through the oninvalid handler to clear it.
![]()
answered Mar 11, 2011 at 18:14
![]()
robertcrobertc
73.7k18 gold badges194 silver badges177 bronze badges
11
It’s very simple to control custom messages with the help of HTML5 event oninvalid
Here is code:
<input id="UserID"  type="text" required="required"
       oninvalid="this.setCustomValidity('Witinnovation')"
       onvalid="this.setCustomValidity('')">
This is most important:
onvalid="this.setCustomValidity('')"
answered Aug 13, 2012 at 12:50
![]()
Ashwini JainAshwini Jain
1,1511 gold badge7 silver badges3 bronze badges
5
Note: This no longer works in Chrome, not tested in other browsers. See edits below. This answer is being left here for historical reference.
If you feel that the validation string really should not be set by code, you can set you input element’s title attribute to read «This field cannot be left blank». (Works in Chrome 10)
title="This field should not be left blank."
See http://jsfiddle.net/kaleb/nfgfP/8/
And in Firefox, you can add this attribute:
x-moz-errormessage="This field should not be left blank."
Edit
This seems to have changed since I originally wrote this answer. Now adding a title does not change the validity message, it just adds an addendum to the message. The fiddle above still applies.
Edit 2
Chrome now does nothing with the title attribute as of Chrome 51. I am not sure in which version this changed.
answered Apr 18, 2011 at 22:47
![]()
kzhkzh
19.4k13 gold badges72 silver badges96 bronze badges
7
It’s very simple to control custom messages with the help of the HTML5 oninvalid event
Here is the code:
User ID
<input id="UserID"  type="text" required
       oninvalid="this.setCustomValidity('User ID is a must')">
![]()
George G
7,25412 gold badges45 silver badges59 bronze badges
answered Jul 20, 2012 at 5:07
![]()
1
By setting and unsetting the setCustomValidity in the right time, the validation message will work flawlessly.
<input name="Username" required
oninvalid="this.setCustomValidity('Username cannot be empty.')"
onchange="this.setCustomValidity('')" type="text" />
I used onchange instead of oninput which is more general and occurs when the value is changed in any condition even through JavaScript.
answered Apr 1, 2014 at 4:56
![]()
SalarSalar
2,07821 silver badges26 bronze badges
10
I have made a small library to ease changing and translating the error messages. You can even change the texts by error type which is currently not available using title in Chrome or x-moz-errormessage in Firefox. Go check it out on GitHub, and give feedback.
It’s used like:
<input type="email" required data-errormessage-value-missing="Please input something">
There’s a demo available at jsFiddle.
answered Apr 2, 2012 at 13:08
![]()
hleinonehleinone
4,4703 gold badges34 silver badges49 bronze badges
2
Try this one, its better and tested:
    function InvalidMsg(textbox) {
        if (textbox.value === '') {
            textbox.setCustomValidity('Required email address');
        } else if (textbox.validity.typeMismatch){
            textbox.setCustomValidity('please enter a valid email address');
        } else {
           textbox.setCustomValidity('');
        }

        return true;
    }
<form id="myform">
<input id="email"
oninvalid="InvalidMsg(this);"
oninput="InvalidMsg(this);"
name="email"
type="email"
required="required" />
<input type="submit" />
</form>Demo:
http://jsfiddle.net/patelriki13/Sqq8e/
![]()
answered Mar 14, 2014 at 2:07
![]()
Rikin PatelRikin Patel
8,7387 gold badges69 silver badges77 bronze badges
2
The easiest and cleanest way I’ve found is to use a data attribute to store your custom error. Test the node for validity and handle the error by using some custom html. 
le javascript
if(node.validity.patternMismatch)
        {
            message = node.dataset.patternError;
        }
and some super HTML5
<input type="text" id="city" name="city" data-pattern-error="Please use only letters for your city." pattern="[A-z ']*" required>
answered Apr 17, 2013 at 19:19
![]()
Collin WhiteCollin White
6301 gold badge11 silver badges27 bronze badges
1
The solution for preventing Google Chrome error messages on input each symbol:
<p>Click the 'Submit' button with empty input field and you will see the custom error message. Then put "-" sign in the same input field.</p>
<form method="post" action="#">
  <label for="text_number_1">Here you will see browser's error validation message on input:</label><br>
  <input id="test_number_1" type="number" min="0" required="true"
         oninput="this.setCustomValidity('')"
         oninvalid="this.setCustomValidity('This is my custom message.')"/>
  <input type="submit"/>
</form>

<form method="post" action="#">
  <p></p>
  <label for="text_number_1">Here you will see no error messages on input:</label><br>
  <input id="test_number_2" type="number" min="0" required="true"
         oninput="(function(e){e.setCustomValidity(''); return !e.validity.valid && e.setCustomValidity(' ')})(this)"
         oninvalid="this.setCustomValidity('This is my custom message.')"/>
  <input type="submit"/>
</form>
answered Feb 19, 2019 at 20:11
![]()
1
I have a simpler vanilla js only solution:
For checkboxes:
document.getElementById("id").oninvalid = function () {
    this.setCustomValidity(this.checked ? '' : 'My message');
};
For inputs:
document.getElementById("id").oninvalid = function () {
    this.setCustomValidity(this.value ? '' : 'My message');
};
answered Aug 18, 2016 at 12:57
![]()
bernhardhbernhardh
3,02710 gold badges40 silver badges73 bronze badges
Okay, oninvalid works well but it shows error even if user entered valid data. So I have used below to tackle it, hope it will work for you as well,
oninvalid="this.setCustomValidity('Your custom message.')" onkeyup="setCustomValidity('')"
answered Aug 28, 2018 at 10:48
![]()
Umesh PatilUmesh Patil
4,42832 silver badges24 bronze badges
If your error message is a single one, then try below.
<input oninvalid="this.setCustomValidity('my error message')"
       oninput="this.setCustomValidity('')">  <!-- 👈 don't forget it. -->
To handle multiple errors, try below
<input oninput="this.setCustomValidity('')">
<script>
inputElem.addEventListener("invalid", ()=>{
    if (inputElem.validity.patternMismatch) {
      return inputElem.setCustomValidity('my error message')
    }
    return inputElem.setCustomValidity('') // default message
})
</script>
Example
You can test valueMissing and valueMissing.
<form>
<input pattern="[^\/:x22*?<>|]+"
       placeholder="input file name"
       oninput="this.setCustomValidity('')"
       required
>
  <input type="submit">
</form>

<script>
  const form = document.querySelector("form")

  const inputElem = document.querySelector(`input`)

  inputElem.addEventListener("invalid", ()=>{
    if (inputElem.validity.patternMismatch) {
      return inputElem.setCustomValidity('Illegal Filename Characters \/:x22?<>|')
    }
    return inputElem.setCustomValidity('') // return default message according inputElem.validity.{badInput, customError, tooLong, valueMissing ...}
  })

  form.onsubmit = () => {
    return false
  }
</script>- ValidityState
answered Nov 10, 2021 at 11:02
![]()
CarsonCarson
5,1682 gold badges33 silver badges40 bronze badges
const username= document.querySelector('#username');
const submit=document.querySelector('#submit');

submit.addEventListener('click',()=>{
    if(username.validity.typeMismatch){
        username.setCustomValidity('Please enter User Name');
    }else{
        username.setCustomValidity('');
    }
if(pass.validity.typeMismatch){
        pass.setCustomValidity('Please enter Password');
    }else{
        pass.setCustomValidity('');
    }
})
answered Apr 7, 2022 at 12:43
![]()
AjayAjay
595 bronze badges
Adapting Salar’s answer to JSX and React, I noticed that React Select doesn’t behave just like an <input/> field regarding validation. Apparently, several workarounds are needed to show only the custom message and to keep it from showing at inconvenient times.
I’ve raised an issue here, if it helps anything. Here is a CodeSandbox with a working example, and the most important code there is reproduced here:
Hello.js
import React, { Component } from "react";
import SelectValid from "./SelectValid";

export default class Hello extends Component {
  render() {
    return (
      <form>
        <SelectValid placeholder="this one is optional" />
        <SelectValid placeholder="this one is required" required />
        <input
          required
          defaultValue="foo"
          onChange={e => e.target.setCustomValidity("")}
          onInvalid={e => e.target.setCustomValidity("foo")}
        />
        <button>button</button>
      </form>
    );
  }
}
SelectValid.js
import React, { Component } from "react";
import Select from "react-select";
import "react-select/dist/react-select.css";

export default class SelectValid extends Component {
  render() {
    this.required = !this.props.required
      ? false
      : this.state && this.state.value ? false : true;
    let inputProps = undefined;
    let onInputChange = undefined;
    if (this.props.required) {
      inputProps = {
        onInvalid: e => e.target.setCustomValidity(this.required ? "foo" : "")
      };
      onInputChange = value => {
        this.selectComponent.input.input.setCustomValidity(
          value
            ? ""
            : this.required
              ? "foo"
              : this.selectComponent.props.value ? "" : "foo"
        );
        return value;
      };
    }
    return (
      <Select
        onChange={value => {
          this.required = !this.props.required ? false : value ? false : true;
          let state = this && this.state ? this.state : { value: null };
          state.value = value;
          this.setState(state);
          if (this.props.onChange) {
            this.props.onChange();
          }
        }}
        value={this && this.state ? this.state.value : null}
        options={[{ label: "yes", value: 1 }, { label: "no", value: 0 }]}
        placeholder={this.props.placeholder}
        required={this.required}
        clearable
        searchable
        inputProps={inputProps}
        ref={input => (this.selectComponent = input)}
        onInputChange={onInputChange}
      />
    );
  }
}
answered May 24, 2018 at 14:23
![]()
GuiRitterGuiRitter
6751 gold badge11 silver badges20 bronze badges
For a totaly custom check logic:
$(document).ready(function() {

  $('#form').on('submit', function(e) {
    if ($('#customCheck').val() != 'apple') {
      $('#customCheck')[0].setCustomValidity('Custom error here! "apple" is the magic word');
      $('#customCheck')[0].reportValidity();
      e.preventDefault();
    }
  });

  $('#customCheck').on('input', function() {
    $('#customCheck')[0].setCustomValidity('');
  });


});
input {
display: block;
margin-top: 15px;
}
input[type="text"] {
min-width: 250px;
}<script src="https://cdnjs.cloudflare.com/ajax/libs/jquery/3.3.1/jquery.min.js"></script>
<form id="form">
<input type="text" placeholder="dafault check with 'required' TAG" required/>
<input type="text" placeholder="custom check for word 'apple'" id="customCheck" />
<input type="submit">
</form>answered Jun 26, 2022 at 14:56
![]()
BaroBaro
5,1562 gold badges17 silver badges38 bronze badges
Can be easily handled by just putting ‘title’ with the field:
<input type="text" id="username" required title="This field can not be empty" />
answered May 16, 2019 at 19:11
![]()
DeeptiDeepti
93612 silver badges18 bronze badges
4
The <input> HTML element is used to create interactive controls for web-based forms in order to accept data from the user; a wide variety of types of input data and control widgets are available, depending on the device and user agent. The <input> element is one of the most powerful and complex in all of HTML due to the sheer number of combinations of input types and attributes.
Try it
<input> types
How an <input> works varies considerably depending on the value of its type attribute, hence the different types are covered in their own separate reference pages. If this attribute is not specified, the default type adopted is text.
The available types are as follows:
| Type | Description | Basic Examples |
|---|---|---|
| button | A push button with no default behavior displaying the value of the value attribute, empty by default. |
|
| checkbox | A check box allowing single values to be selected/deselected. |
|
| color | A control for specifying a color; opening a color picker when active in supporting browsers. |
|
| date |
A control for entering a date (year, month, and day, with no time). Opens a date picker or numeric wheels for year, month, day when active in supporting browsers. |
|
| datetime-local |
A control for entering a date and time, with no time zone. Opens a date picker or numeric wheels for date- and time-components when active in supporting browsers. |
|
A field for editing an email address. Looks like atext input, but has validation parameters and relevantkeyboard in supporting browsers and devices with dynamic keyboards. |
|
|
| file |
A control that lets the user select a file. Use the accept attribute to define the types of files that the control can select.
|
|
| hidden |
A control that is not displayed but whose value is submitted to the server. There is an example in the next column, but it’s hidden! |
|
| image |
A graphical submit button. Displays an image defined by the src attribute.The alt attribute displays if the image src is missing.
|
|
| month | A control for entering a month and year, with no time zone. |
|
| number |
A control for entering a number. Displays a spinner and adds default validation. Displays a numeric keypad in some devices with dynamic keypads. |
|
| password |
A single-line text field whose value is obscured. Will alert user if site is not secure. |
|
| radio | A radio button, allowing a single value to be selected out of multiple choices with the same name value. |
|
| range |
A control for entering a number whose exact value is not important. Displays as a range widget defaulting to the middle value. Used in conjunction min and max to define the range of acceptable values.
|
|
| reset | A button that resets the contents of the form to default values. Not recommended. |
|
| search |
A single-line text field for entering search strings. Line-breaks are automatically removed from the input value. May include a delete icon in supporting browsers that can be used to clear the field. Displays a search icon instead of enter key on some devices with dynamic keypads. |
|
| submit | A button that submits the form. |
|
| tel |
A control for entering a telephone number. Displays a telephone keypad in some devices with dynamic keypads. |
|
| text |
The default value. A single-line text field. Line-breaks are automatically removed from the input value. |
|
| time | A control for entering a time value with no time zone. |
|
| url |
A field for entering a URL. Looks like a text input, buthas validation parameters and relevant keyboard in supporting browsers and devices with dynamic keyboards. |
|
| week | A control for entering a date consisting of a week-year number and a week number with no time zone. |
|
| Obsolete values | ||
datetime Deprecated |
A control for entering a date and time (hour, minute, second, and fraction of a second) based on UTC time zone. |
|
Attributes
The <input> element is so powerful because of its attributes; the type attribute, described with examples above, being the most important. Since every <input> element, regardless of type, is based on the HTMLInputElement interface, they technically share the exact same set of attributes. However, in reality, most attributes have an effect on only a specific subset of input types. In addition, the way some attributes impact an input depends on the input type, impacting different input types in different ways.
This section provides a table listing all the attributes with a brief description. This table is followed by a list describing each attribute in greater detail, along with which input types they are associated with. Those that are common to most or all input types are defined in greater detail below. Attributes that are unique to particular input types—or attributes which are common to all input types but have special behaviors when used on a given input type—are instead documented on those types’ pages.
Attributes for the <input> element include the global HTML attributes and additionally:
| Attribute | Type or Types | Description |
|---|---|---|
accept |
file |
Hint for expected file type in file upload controls |
alt |
image |
alt attribute for the image type. Required for accessibility |
autocomplete |
all except checkbox, radio, and buttons |
Hint for form autofill feature |
capture |
file |
Media capture input method in file upload controls |
checked |
checkbox, radio |
Whether the command or control is checked |
dirname |
search, text |
Name of form field to use for sending the element’s directionality in form submission |
disabled |
all | Whether the form control is disabled |
form |
all | Associates the control with a form element |
formaction |
image, submit |
URL to use for form submission |
formenctype |
image, submit |
Form data set encoding type to use for form submission |
formmethod |
image, submit |
HTTP method to use for form submission |
formnovalidate |
image, submit |
Bypass form control validation for form submission |
formtarget |
image, submit |
Browsing context for form submission |
height |
image |
Same as height attribute for <img>; vertical dimension |
list |
all except hidden, password, checkbox, radio, and buttons |
Value of the id attribute of the <datalist> of autocomplete options |
max |
date, month, week, time, datetime-local, number, range |
Maximum value |
maxlength |
text, search, url, tel, email, password |
Maximum length (number of characters) of value |
min |
date, month, week, time, datetime-local, number, range |
Minimum value |
minlength |
text, search, url, tel, email, password |
Minimum length (number of characters) of value |
multiple |
email, file |
Boolean. Whether to allow multiple values |
name |
all | Name of the form control. Submitted with the form as part of a name/value pair |
pattern |
text, search, url, tel, email, password |
Pattern the value must match to be valid |
placeholder |
text, search, url, tel, email, password, number |
Text that appears in the form control when it has no value set |
readonly |
all except hidden, range, color, checkbox, radio, and buttons |
Boolean. The value is not editable |
required |
all except hidden, range, color, and buttons |
Boolean. A value is required or must be check for the form to be submittable |
size |
text, search, url, tel, email, password |
Size of the control |
src |
image |
Same as src attribute for <img>; address of image resource |
step |
date, month, week, time, datetime-local, number, range |
Incremental values that are valid |
type |
all | Type of form control |
value |
all except image |
The initial value of the control |
width |
image |
Same as width attribute for <img> |
A few additional non-standard attributes are listed following the descriptions of the standard attributes.
Individual attributes
accept-
Valid for the
fileinput type only, theacceptattribute defines which file types are selectable in afileupload control. See the file input type. alt-
Valid for the
imagebutton only, thealtattribute provides alternative text for the image, displaying the value of the attribute if the imagesrcis missing or otherwise fails to load. See the image input type. autocomplete-
(Not a Boolean attribute!) The
autocompleteattribute takes as its value a space-separated string that describes what, if any, type of autocomplete functionality the input should provide. A typical implementation of autocomplete recalls previous values entered in the same input field, but more complex forms of autocomplete can exist. For instance, a browser could integrate with a device’s contacts list to autocompleteemailaddresses in an email input field. Seeautocompletefor permitted values.The
autocompleteattribute is valid onhidden,text,search,url,tel,email,date,month,week,time,datetime-local,number,range,color, andpassword. This attribute has no effect on input types that do not return numeric or text data, being valid for all input types exceptcheckbox,radio,file, or any of the button types.See the
autocompleteattribute for additional information, including information on password security and howautocompleteis slightly different forhiddenthan for other input types. autofocus-
A Boolean attribute which, if present, indicates that the input should automatically have focus when the page has finished loading (or when the
<dialog>containing the element has been displayed).Note: An element with the
autofocusattribute may gain focus before theDOMContentLoadedevent is fired.No more than one element in the document may have the
autofocusattribute. If put on more than one element, the first one with the attribute receives focus.The
autofocusattribute cannot be used on inputs of typehidden, since hidden inputs cannot be focused.Warning: Automatically focusing a form control can confuse visually-impaired people using screen-reading technology and people with cognitive impairments. When
autofocusis assigned, screen-readers «teleport» their user to the form control without warning them beforehand.Use careful consideration for accessibility when applying the
autofocusattribute. Automatically focusing on a control can cause the page to scroll on load. The focus can also cause dynamic keyboards to display on some touch devices. While a screen reader will announce the label of the form control receiving focus, the screen reader will not announce anything before the label, and the sighted user on a small device will equally miss the context created by the preceding content. capture-
Introduced in the HTML Media Capture specification and valid for the
fileinput type only, thecaptureattribute defines which media—microphone, video, or camera—should be used to capture a new file for upload withfileupload control in supporting scenarios. See the file input type. checked-
Valid for both
radioandcheckboxtypes,checkedis a Boolean attribute. If present on aradiotype, it indicates that the radio button is the currently selected one in the group of same-named radio buttons. If present on acheckboxtype, it indicates that the checkbox is checked by default (when the page loads). It does not indicate whether this checkbox is currently checked: if the checkbox’s state is changed, this content attribute does not reflect the change. (Only theHTMLInputElement‘scheckedIDL attribute is updated.)Note: Unlike other input controls, a checkboxes and radio buttons value are only included in the submitted data if they are currently
checked. If they are, the name and the value(s) of the checked controls are submitted.For example, if a checkbox whose
nameisfruithas avalueofcherry, and the checkbox is checked, the form data submitted will includefruit=cherry. If the checkbox isn’t active, it isn’t listed in the form data at all. The defaultvaluefor checkboxes and radio buttons ison. dirname-
Valid for
textandsearchinput types only, thedirnameattribute enables the submission of the directionality of the element. When included, the form control will submit with two name/value pairs: the first being thenameandvalue, the second being the value of thedirnameas the name with the value ofltrorrtlbeing set by the browser.<form action="page.html" method="post"> <label >Fruit: <input type="text" name="fruit" dirname="fruit.dir" value="cherry" /> </label> <input type="submit" /> </form> <!-- page.html?fruit=cherry&fruit.dir=ltr -->When the form above is submitted, the input cause both the
name/valuepair offruit=cherryand thedirname/ direction pair offruit.dir=ltrto be sent. disabled-
A Boolean attribute which, if present, indicates that the user should not be able to interact with the input. Disabled inputs are typically rendered with a dimmer color or using some other form of indication that the field is not available for use.
Specifically, disabled inputs do not receive the
clickevent, and disabled inputs are not submitted with the form.Note: Although not required by the specification, Firefox will by default persist the dynamic disabled state of an
<input>across page loads. Use theautocompleteattribute to control this feature. form-
A string specifying the
<form>element with which the input is associated (that is, its form owner). This string’s value, if present, must match theidof a<form>element in the same document. If this attribute isn’t specified, the<input>element is associated with the nearest containing form, if any.The
formattribute lets you place an input anywhere in the document but have it included with a form elsewhere in the document.Note: An input can only be associated with one form.
formaction-
Valid for the
imageandsubmitinput types only. See the submit input type for more information. formenctype-
Valid for the
imageandsubmitinput types only. See the submit input type for more information. formmethod-
Valid for the
imageandsubmitinput types only. See the submit input type for more information. formnovalidate-
Valid for the
imageandsubmitinput types only. See the submit input type for more information. formtarget-
Valid for the
imageandsubmitinput types only. See the submit input type for more information. height-
Valid for the
imageinput button only, theheightis the height of the image file to display to represent the graphical submit button. See the image input type. id-
Global attribute valid for all elements, including all the input types, it defines a unique identifier (ID) which must be unique in the whole document. Its purpose is to identify the element when linking. The value is used as the value of the
<label>‘sforattribute to link the label with the form control. See<label>. inputmode-
Global value valid for all elements, it provides a hint to browsers as to the type of virtual keyboard configuration to use when editing this element or its contents. Values include
none,text,tel,url,email,numeric,decimal, andsearch. list-
The value given to the
listattribute should be theidof a<datalist>element located in the same document. The<datalist>provides a list of predefined values to suggest to the user for this input. Any values in the list that are not compatible with thetypeare not included in the suggested options. The values provided are suggestions, not requirements: users can select from this predefined list or provide a different value.It is valid on
text,search,url,tel,email,date,month,week,time,datetime-local,number,range, andcolor.Per the specifications, the
listattribute is not supported by thehidden,password,checkbox,radio,file, or any of the button types.Depending on the browser, the user may see a custom color palette suggested, tic marks along a range, or even an input that opens like a
<select>but allows for non-listed values. Check out the browser compatibility table for the other input types.See the
<datalist>element. max-
Valid for
date,month,week,time,datetime-local,number, andrange, it defines the greatest value in the range of permitted values. If thevalueentered into the element exceeds this, the element fails constraint validation. If the value of themaxattribute isn’t a number, then the element has no maximum value.There is a special case: if the data type is periodic (such as for dates or times), the value of
maxmay be lower than the value ofmin, which indicates that the range may wrap around; for example, this allows you to specify a time range from 10 PM to 4 AM. maxlength-
Valid for
text,search,url,tel,email, andpassword, it defines the maximum number of characters (as UTF-16 code units) the user can enter into the field. This must be an integer value0or higher. If nomaxlengthis specified, or an invalid value is specified, the field has no maximum length. This value must also be greater than or equal to the value ofminlength.The input will fail constraint validation if the length of the text entered into the field is greater than
maxlengthUTF-16 code units long. By default, browsers prevent users from entering more characters than allowed by themaxlengthattribute. See Client-side validation for more information. min-
Valid for
date,month,week,time,datetime-local,number, andrange, it defines the most negative value in the range of permitted values. If thevalueentered into the element is less than this, the element fails constraint validation. If the value of theminattribute isn’t a number, then the element has no minimum value.This value must be less than or equal to the value of the
maxattribute. If theminattribute is present but is not specified or is invalid, nominvalue is applied. If theminattribute is valid and a non-empty value is less than the minimum allowed by theminattribute, constraint validation will prevent form submission. See Client-side validation for more information.There is a special case: if the data type is periodic (such as for dates or times), the value of
maxmay be lower than the value ofmin, which indicates that the range may wrap around; for example, this allows you to specify a time range from 10 PM to 4 AM. minlength-
Valid for
text,search,url,tel,email, andpassword, it defines the minimum number of characters (as UTF-16 code units) the user can enter into the entry field. This must be a non-negative integer value smaller than or equal to the value specified bymaxlength. If nominlengthis specified, or an invalid value is specified, the input has no minimum length.The input will fail constraint validation if the length of the text entered into the field is fewer than
minlengthUTF-16 code units long, preventing form submission. See Client-side validation for more information. multiple-
The Boolean
multipleattribute, if set, means the user can enter comma separated email addresses in the email widget or can choose more than one file with thefileinput. See the email and file input type. name-
A string specifying a name for the input control. This name is submitted along with the control’s value when the form data is submitted.
Consider the
namea required attribute (even though it’s not). If an input has nonamespecified, ornameis empty, the input’s value is not submitted with the form! (Disabled controls, unchecked radio buttons, unchecked checkboxes, and reset buttons are also not sent.)There are two special cases:
_charset_: If used as the name of an<input>element of type hidden, the input’svalueis automatically set by the user agent to the character encoding being used to submit the form.isindex: For historical reasons, the nameisindexis not allowed.
The
nameattribute creates a unique behavior for radio buttons.Only one radio button in a same-named group of radio buttons can be checked at a time. Selecting any radio button in that group automatically deselects any currently-selected radio button in the same group. The value of that one checked radio button is sent along with the name if the form is submitted,
When tabbing into a series of same-named group of radio buttons, if one is checked, that one will receive focus. If they aren’t grouped together in source order, if one of the group is checked, tabbing into the group starts when the first one in the group is encountered, skipping all those that aren’t checked. In other words, if one is checked, tabbing skips the unchecked radio buttons in the group. If none are checked, the radio button group receives focus when the first button in the same name group is reached.
Once one of the radio buttons in a group has focus, using the arrow keys will navigate through all the radio buttons of the same name, even if the radio buttons are not grouped together in the source order.
When an input element is given a
name, that name becomes a property of the owning form element’sHTMLFormElement.elementsproperty. If you have an input whosenameis set toguestand another whosenameishat-size, the following code can be used:let form = document.querySelector("form"); let guestName = form.elements.guest; let hatSize = form.elements["hat-size"];When this code has run,
guestNamewill be theHTMLInputElementfor theguestfield, andhatSizethe object for thehat-sizefield.Warning: Avoid giving form elements a
namethat corresponds to a built-in property of the form, since you would then override the predefined property or method with this reference to the corresponding input. pattern-
Valid for
text,search,url,tel,email, andpassword, thepatternattribute defines a regular expression that the input’svaluemust match in order for the value to pass constraint validation. It must be a valid JavaScript regular expression, as used by theRegExptype, and as documented in our guide on regular expressions; the'u'flag is specified when compiling the regular expression, so that the pattern is treated as a sequence of Unicode code points, instead of as ASCII. No forward slashes should be specified around the pattern text.If the
patternattribute is present but is not specified or is invalid, no regular expression is applied and this attribute is ignored completely. If the pattern attribute is valid and a non-empty value does not match the pattern, constraint validation will prevent form submission.Note: If using the
patternattribute, inform the user about the expected format by including explanatory text nearby. You can also include atitleattribute to explain what the requirements are to match the pattern; most browsers will display this title as a tooltip. The visible explanation is required for accessibility. The tooltip is an enhancement.See Client-side validation for more information.
placeholder-
Valid for
text,search,url,tel,email,password, andnumber, theplaceholderattribute provides a brief hint to the user as to what kind of information is expected in the field. It should be a word or short phrase that provides a hint as to the expected type of data, rather than an explanation or prompt. The text must not include carriage returns or line feeds. So for example if a field is expected to capture a user’s first name, and its label is «First Name», a suitable placeholder might be «e.g. Mustafa».Note: The
placeholderattribute is not as semantically useful as other ways to explain your form, and can cause unexpected technical issues with your content. See Labels for more information. readonly-
A Boolean attribute which, if present, indicates that the user should not be able to edit the value of the input. The
readonlyattribute is supported by thetext,search,url,tel,email,date,month,week,time,datetime-local,number, andpasswordinput types.See the HTML attribute:
readonlyfor more information. required-
requiredis a Boolean attribute which, if present, indicates that the user must specify a value for the input before the owning form can be submitted. Therequiredattribute is supported bytext,search,url,tel,email,date,month,week,time,datetime-local,number,password,checkbox,radio, andfileinputs.See Client-side validation and the HTML attribute:
requiredfor more information. size-
Valid for
email,password,tel,url, andtext, thesizeattribute specifies how much of the input is shown. Basically creates same result as setting CSSwidthproperty with a few specialities. The actual unit of the value depends on the input type. Forpasswordandtext, it is a number of characters (oremunits) with a default value of20, and for others, it is pixels (orpxunits). CSSwidthtakes precedence over thesizeattribute. src-
Valid for the
imageinput button only, thesrcis string specifying the URL of the image file to display to represent the graphical submit button. See the image input type. step-
Valid for
date,month,week,time,datetime-local,number, andrange, thestepattribute is a number that specifies the granularity that the value must adhere to.If not explicitly included:
stepdefaults to 1 fornumberandrange.- Each date/time input type has a default
stepvalue appropriate for the type; see the individual input pages:date,datetime-local,month,time, andweek.
The value must be a positive number—integer or float—or the special value
any, which means no stepping is implied, and any value is allowed (barring other constraints, such asminandmax).If
anyis not explicitly set, valid values for thenumber, date/time input types, andrangeinput types are equal to the basis for stepping — theminvalue and increments of the step value, up to themaxvalue, if specified.For example, if you have
<input type="number" min="10" step="2">, then any even integer,10or greater, is valid. If omitted,<input type="number">, any integer is valid, but floats (like4.2) are not valid, becausestepdefaults to1. For4.2to be valid,stepwould have had to be set toany, 0.1, 0.2, or any theminvalue would have had to be a number ending in.2, such as<input type="number" min="-5.2">Note: When the data entered by the user doesn’t adhere to the stepping configuration, the value is considered invalid in constraint validation and will match the
:invalidpseudoclass.See Client-side validation for more information.
tabindex-
Global attribute valid for all elements, including all the input types, an integer attribute indicating if the element can take input focus (is focusable), if it should participate to sequential keyboard navigation. As all input types except for input of type hidden are focusable, this attribute should not be used on form controls, because doing so would require the management of the focus order for all elements within the document with the risk of harming usability and accessibility if done incorrectly.
title-
Global attribute valid for all elements, including all input types, containing a text representing advisory information related to the element it belongs to. Such information can typically, but not necessarily, be presented to the user as a tooltip. The title should NOT be used as the primary explanation of the purpose of the form control. Instead, use the
<label>element with aforattribute set to the form control’sidattribute. See Labels below. type-
A string specifying the type of control to render. For example, to create a checkbox, a value of
checkboxis used. If omitted (or an unknown value is specified), the input typetextis used, creating a plaintext input field.Permitted values are listed in Input types above.
value-
The input control’s value. When specified in the HTML, this is the initial value, and from then on it can be altered or retrieved at any time using JavaScript to access the respective
HTMLInputElementobject’svalueproperty. Thevalueattribute is always optional, though should be considered mandatory forcheckbox,radio, andhidden. width-
Valid for the
imageinput button only, thewidthis the width of the image file to display to represent the graphical submit button. See the image input type.
Non-standard attributes
The following non-standard attributes are also available on some browsers. As a general rule, you should avoid using them unless it can’t be helped.
| Attribute | Description |
|---|---|
autocorrect |
A string indicating whether autocorrect is on or off. Safari only. |
incremental |
Whether or not to send repeated searchevents to allow updating live search results while the user is still editing the value of the field. WebKit and Blink only (Safari, Chrome, Opera, etc.). |
mozactionhint |
A string indicating the type of action that will be taken when the user Deprecated: use |
orient |
Sets the orientation of the range slider. Firefox only. |
results |
The maximum number of items that should be displayed in the drop-down list of previous search queries. Safari only. |
webkitdirectory |
A Boolean indicating whether to only allow the user to choose a directory (or directories, if multiple is also present) |
autocorrect
Non-standard
-
(Safari only). A string which indicates whether to activate automatic correction while the user is editing this field. Permitted values are:
on-
Enable automatic correction of typos, as well as processing of text substitutions if any are configured.
off-
Disable automatic correction and text substitutions.
incremental
Non-standard
-
The Boolean attribute
incrementalis a WebKit and Blink extension (so supported by Safari, Opera, Chrome, etc.) which, if present, tells the user agent to process the input as a live search. As the user edits the value of the field, the user agent sendssearchevents to theHTMLInputElementobject representing the search box. This allows your code to update the search results in real time as the user edits the search.If
incrementalis not specified, thesearchevent is only sent when the user explicitly initiates a search (such as by pressing the Enter or Return key while editing the field).The
searchevent is rate-limited so that it is not sent more frequently than an implementation-defined interval. orient
Non-standard
-
Similar to the -moz-orient non-standard CSS property impacting the
<progress>and<meter>elements, theorientattribute defines the orientation of the range slider. Values includehorizontal, meaning the range is rendered horizontally, andvertical, where the range is rendered vertically. results
Non-standard
-
The
resultsattribute—supported only by Safari—is a numeric value that lets you override the maximum number of entries to be displayed in the<input>element’s natively-provided drop-down menu of previous search queries.The value must be a non-negative decimal number. If not provided, or an invalid value is given, the browser’s default maximum number of entries is used.
webkitdirectory
Non-standard
-
The Boolean
webkitdirectoryattribute, if present, indicates that only directories should be available to be selected by the user in the file picker interface. SeeHTMLInputElement.webkitdirectoryfor additional details and examples.Though originally implemented only for WebKit-based browsers,
webkitdirectoryis also usable in Microsoft Edge as well as Firefox 50 and later. However, even though it has relatively broad support, it is still not standard and should not be used unless you have no alternative.
Methods
The following methods are provided by the HTMLInputElement interface which represents <input> elements in the DOM. Also available are those methods specified by the parent interfaces, HTMLElement, Element, Node, and EventTarget.
checkValidity()-
Returns
trueif the element’s value passes validity checks; otherwise, returnsfalseand fires aninvalidevent at the element. reportValidity()-
Returns
trueif the element’s value passes validity checks; otherwise, returnsfalse, fires aninvalidevent at the element, and (if the event isn’t canceled) reports the problem to the user. select()-
Selects the entire content of the
<input>element, if the element’s content is selectable. For elements with no selectable text content (such as a visual color picker or calendar date input), this method does nothing. setCustomValidity()-
Sets a custom message to display if the input element’s value isn’t valid.
setRangeText()-
Sets the contents of the specified range of characters in the input element to a given string. A
selectModeparameter is available to allow controlling how the existing content is affected. setSelectionRange()-
Selects the specified range of characters within a textual input element. Does nothing for inputs which aren’t presented as text input fields.
stepDown()-
Decrements the value of a numeric input by one, by default, or by the specified number of units.
stepUp()-
Increments the value of a numeric input by one or by the specified number of units.
CSS
Inputs, being replaced elements, have a few features not applicable to non form elements. There are CSS selectors that can specifically target form controls based on their UI features, also known as UI pseudo-classes. The input element can also be targeted by type with attribute selectors. There are some properties that are especially useful as well.
UI pseudo-classes
| Pseudo-class | Description |
|---|---|
:enabled |
Any currently enabled element that can be activated (selected, clicked on, typed into, etc.) or accept focus and also has a disabled state, in which it can’t be activated or accept focus. |
:disabled |
Any currently disabled element that has an enabled state, meaning it otherwise could be activated (selected, clicked on, typed into, etc.) or accept focus were it not disabled. |
:read-only |
Element not editable by the user |
:read-write |
Element that is editable by the user. |
:placeholder-shown |
Element that is currently displaying placeholder text,including <input> and <textarea> elements with the placeholder attribute present that has, as yet, no value.
|
:default |
Form elements that are the default in a group of related elements. Matches checkbox and radio input types that were checked on page load or render. |
:checked |
Matches checkbox and radio input types that are currently checked (and the ( <option> in a<select> that is currently selected).
|
:indeterminate |
checkbox elements whose indeterminate property is set to true by JavaScript, radio elements, when all radio buttons with the same name value in the form are unchecked, and <progress> elements in an indeterminate state
|
:valid |
Form controls that can have constraint validation applied and are currently valid. |
:invalid |
Form controls that have constraint validation applied and are currently not valid. Matches a form control whose value doesn’t match the constraints set on it by its attributes, such as required,pattern,step and max.
|
:in-range |
A non-empty input whose current value is within the range limits specified by the min and max attributes and the step.
|
:out-of-range |
A non-empty input whose current value is NOT within the range limits specified by the minand max attributes ordoes not adhere to the step constraint.
|
:required |
<input>, <select>, or <textarea> element that has the required attribute set on it.Only matches elements that can be required. The attribute included on a non-requirable element will not make for a match. |
:optional |
<input>, <select>, or<textarea> element that does NOT have the required attribute set on it.Does not match elements that can’t be required. |
:blank |
<input> and <textarea> elements that currently have no value. |
:user-invalid |
Similar to :invalid, but is activated on blur. Matchesinvalid input but only after the user interaction, such as by focusing on the control, leaving the control, or attempting to submit the form containing the invalid control. |
Pseudo-classes example
We can style a checkbox label based on whether the checkbox is checked or not. In this example, we are styling the color and font-weight of the <label> that comes immediately after a checked input. We haven’t applied any styles if the input is not checked.
<input id="checkboxInput" type="checkbox" />
<label for="checkboxInput">Toggle the checkbox on and off</label>
input:checked + label {
  color: red;
  font-weight: bold;
}
Attribute selectors
It is possible to target different types of form controls based on their type using attribute selectors. CSS attribute selectors match elements based on either just the presence of an attribute or the value of a given attribute.
/* matches a password input */
input[type="password"] {
}

/* matches a form control whose valid values are limited to a range of values*/
input[min][max] {
}

/* matches a form control with a pattern attribute */
input[pattern] {
}
::placeholder
By default, the appearance of placeholder text is a translucent or light gray. The ::placeholder pseudo-element is the input’s placeholder text. It can be styled with a limited subset of CSS properties.
::placeholder {
  color: blue;
}
Only the subset of CSS properties that apply to the ::first-line pseudo-element can be used in a rule using ::placeholder in its selector.
appearance
The appearance property enables the displaying of (almost) any element as a platform-native style based on the operating system’s theme as well as the removal of any platform-native styling with the none value.
You could make a <div> look like a radio button with div {appearance: radio;} or a radio look like a checkbox with [type="radio"] {appearance: checkbox;}, but don’t.
Setting appearance: none removes platform native borders, but not functionality.
caret-color
A property specific to text entry-related elements is the CSS caret-color property, which lets you set the color used to draw the text input caret:
HTML
<label for="textInput">Note the red caret:</label>
<input id="textInput" class="custom" size="32" />
CSS
input.custom {
  caret-color: red;
  font: 16px "Helvetica", "Arial", "sans-serif";
}
Result
object-position and object-fit
In certain cases (typically involving non-textual inputs and specialized interfaces), the <input> element is a replaced element. When it is, the position and size of the element’s size and positioning within its frame can be adjusted using the CSS object-position and object-fit properties
Styling
Additional features
Labels
Labels are needed to associate assistive text with an <input>. The <label> element provides explanatory information about a form field that is always appropriate (aside from any layout concerns you have). It’s never a bad idea to use a <label> to explain what should be entered into an <input> or <textarea>.
Associated labels
The semantic pairing of <input> and <label> elements is useful for assistive technologies such as screen readers. By pairing them using the <label>‘s for attribute, you bond the label to the input in a way that lets screen readers describe inputs to users more precisely.
It does not suffice to have plain text adjacent to the <input> element. Rather, usability and accessibility requires the inclusion of either implicit or explicit <label>:
<!-- inaccessible -->
<p>Enter your name: <input id="name" type="text" size="30" /></p>

<!-- implicit label -->
<p>
  <label>Enter your name: <input id="name" type="text" size="30" /></label>
</p>

<!-- explicit label -->
<p>
  <label for="name">Enter your name: </label>
  <input id="name" type="text" size="30" />
</p>
The first example is inaccessible: no relationship exists between the prompt and the <input> element.
In addition to an accessible name, the label provides a larger ‘hit’ area for mouse and touch screen users to click on or touch. By pairing a <label> with an <input>, clicking on either one will focus the <input>. If you use plain text to «label» your input, this won’t happen. Having the prompt part of the activation area for the input is helpful for people with motor control conditions.
As web developers, it’s important that we never assume that people will know all the things that we know. The diversity of people using the web—and by extension your website—practically guarantees that some of your site’s visitors will have some variation in thought processes and/or circumstances that leads them to interpret your forms very differently from you without clear and properly-presented labels.
Placeholders are not accessible
The placeholder attribute lets you specify text that appears within the <input> element’s content area itself when it is empty. The placeholder should never be required to understand your forms. It is not a label, and should not be used as a substitute, because it isn’t. The placeholder is used to provide a hint as to what an inputted value should look like, not an explanation or prompt.
Not only is the placeholder not accessible to screen readers, but once the user enters any text into the form control, or if the form control already has a value, the placeholder disappears. Browsers with automatic page translation features may skip over attributes when translating, meaning the placeholder may not get translated.
Note: Don’t use the placeholder attribute if you can avoid it. If you need to label an <input> element, use the <label> element.
Client-side validation
Warning: Client-side validation is useful, but it does not guarantee that the server will receive valid data. If the data must be in a specific format, always verify it also on the server-side, and return a 400 HTTP response if the format is invalid.
In addition to using CSS to style inputs based on the :valid or :invalid UI states based on the current state of each input, as noted in the UI pseudo-classes section above, the browser provides for client-side validation on (attempted) form submission. On form submission, if there is a form control that fails constraint validation, supporting browsers will display an error message on the first invalid form control; displaying a default message based on the error type, or a message set by you.
Some input types and other attributes place limits on what values are valid for a given input. For example, <input type="number" min="2" max="10" step="2"> means only the number 2, 4, 6, 8, or 10 are valid. Several errors could occur, including a rangeUnderflow error if the value is less than 2, rangeOverflow if greater than 10, stepMismatch if the value is a number between 2 and 10, but not an even integer (does not match the requirements of the step attribute), or typeMismatch if the value is not a number.
For the input types whose domain of possible values is periodic (that is, at the highest possible value, the values wrap back around to the beginning rather than ending), it’s possible for the values of the max and min properties to be reversed, which indicates that the range of permitted values starts at min, wraps around to the lowest possible value, then continues on until max is reached. This is particularly useful for dates and times, such as when you want to allow the range to be from 8 PM to 8 AM:
<input type="time" min="20:00" max="08:00" name="overnight" />
Specific attributes and their values can lead to a specific error ValidityState:
| Attribute | Relevant property | Description |
|---|---|---|
max |
validityState.rangeOverflow |
Occurs when the value is greater than the maximum value as defined by the max attribute
|
maxlength |
validityState.tooLong |
Occurs when the number of characters is greater than the number allowed by the maxlength property |
min |
validityState.rangeUnderflow |
Occurs when the value is less than the minimum value as defined by the min attribute |
minlength |
validityState.tooShort |
Occurs when the number of characters is less than the number required by the minlength property |
pattern |
validityState.patternMismatch |
Occurs when a pattern attribute is included with a valid regular expression and the value does not match it. |
required |
validityState.valueMissing |
Occurs when the required attribute is present but the value is null or radio or checkbox is not checked. |
step |
validityState.stepMismatch |
The value doesn’t match the step increment. Increment default is 1, so only integers are valid on type="number"is step is not included. step="any" will never throw this error.
|
type |
validityState.typeMismatch |
Occurs when the value is not of the correct type, for example an email does not contain an @ or a url doesn’t contain a protocol. |
If a form control doesn’t have the required attribute, no value, or an empty string, is not invalid. Even if the above attributes are present, with the exception of required, an empty string will not lead to an error.
We can set limits on what values we accept, and supporting browsers will natively validate these form values and alert the user if there is a mistake when the form is submitted.
In addition to the errors described in the table above, the validityState interface contains the badInput, valid, and customError boolean readonly properties. The validity object includes:
validityState.valueMissingvalidityState.typeMismatchvalidityState.patternMismatchvalidityState.tooLongvalidityState.tooShortvalidityState.rangeUnderflowvalidityState.rangeOverflowvalidityState.stepMismatchvalidityState.badInputvalidityState.validvalidityState.customError
For each of these Boolean properties, a value of true indicates that the specified reason validation may have failed is true, with the exception of the valid property, which is true if the element’s value obeys all constraints.
If there is an error, supporting browsers will both alert the user and prevent the form from being submitted. A word of caution: if a custom error is set to a truthy value (anything other than the empty string or null), the form will be prevented from being submitted. If there is no custom error message, and none of the other properties return true, valid will be true, and the form can be submitted.
function validate(input) {
  let validityState_object = input.validity;
  if (validityState_object.valueMissing) {
    input.setCustomValidity("A value is required");
  } else if (validityState_object.rangeUnderflow) {
    input.setCustomValidity("Your value is too low");
  } else if (validityState_object.rangeOverflow) {
    input.setCustomValidity("Your value is too high");
  } else {
    input.setCustomValidity("");
  }
}
The last line, setting the custom validity message to the empty string is vital. If the user makes an error, and the validity is set, it will fail to submit, even if all the values are valid, until the message is null.
Custom validation error example
If you want to present a custom error message when a field fails to validate, you need to use the Constraint Validation API available on <input> (and related) elements. Take the following form:
<form>
  <label for="name">Enter username (upper and lowercase letters): </label>
  <input type="text" name="name" id="name" required pattern="[A-Za-z]+" />
  <button>Submit</button>
</form>
The basic HTML form validation features will cause this to produce a default error message if you try to submit the form with either no valid filled in, or a value that does not match the pattern.
If you wanted to instead display custom error messages, you could use JavaScript like the following:
const nameInput = document.querySelector("input");

nameInput.addEventListener("input", () => {
  nameInput.setCustomValidity("");
  nameInput.checkValidity();
});

nameInput.addEventListener("invalid", () => {
  if (nameInput.value === "") {
    nameInput.setCustomValidity("Enter your username!");
  } else {
    nameInput.setCustomValidity(
      "Usernames can only contain upper and lowercase letters. Try again!"
    );
  }
});
The example renders like so:
In brief:
- We check the valid state of the input element every time its value is changed by running the
checkValidity()method via theinputevent handler. - If the value is invalid, an
invalidevent is raised, and theinvalidevent handler function is run. Inside this function we work out whether the value is invalid because it is empty, or because it doesn’t match the pattern, using anif ()block, and set a custom validity error message. - As a result, if the input value is invalid when the submit button is pressed, one of the custom error messages will be shown.
- If it is valid, it will submit as you’d expect. For this to happen, the custom validity has to be cancelled, by invoking
setCustomValidity()with an empty string value. We therefore do this every time theinputevent is raised. If you don’t do this, and a custom validity was previously set, the input will register as invalid, even if it currently contains a valid value on submission.
Note: Always validate input constraints both client side and server side. Constraint validation doesn’t remove the need for validation on the server side. Invalid values can still be sent by older browsers or by bad actors.
Note: Firefox supported a proprietary error attribute — x-moz-errormessage — for many versions, which allowed you set custom error messages in a similar way. This has been removed as of version 66 (see bug 1513890).
Localization
The allowed inputs for certain <input> types depend on the locale. In some locales, 1,000.00 is a valid number, while in other locales the valid way to enter this number is 1.000,00.
Firefox uses the following heuristics to determine the locale to validate the user’s input (at least for type="number"):
- Try the language specified by a
lang/xml:langattribute on the element or any of its parents. - Try the language specified by any
Content-LanguageHTTP header. Or, - If none specified, use the browser’s locale.
Technical summary
| Content categories |
Flow content, listed, submittable, resettable, form-associated element, phrasing content. If the type is nothidden, then labelable element, palpable content.
|
|---|---|
| Permitted content | None; it is a void element. |
| Tag omission | Must have a start tag and must not have an end tag. |
| Permitted parents |
Any element that accepts phrasing content. |
| Implicit ARIA role |
|
| Permitted ARIA roles |
|
| DOM interface | HTMLInputElement |
Accessibility concerns
Labels
When including inputs, it is an accessibility requirement to add labels alongside. This is needed so those who use assistive technologies can tell what the input is for. Also, clicking or touching a label gives focus to the label’s associated form control. This improves the accessibility and usability for sighted users, increases the area a user can click or touch to activate the form control. This is especially useful (and even needed) for radio buttons and checkboxes, which are tiny. For more information about labels in general see Labels .
The following is an example of how to associate the <label> with an <input> element in the above style. You need to give the <input> an id attribute. The <label> then needs a for attribute whose value is the same as the input’s id.
<label for="peas">Do you like peas?</label>
<input type="checkbox" name="peas" id="peas" />
Size
Interactive elements such as form input should provide an area large enough that it is easy to activate them. This helps a variety of people, including people with motor control issues and people using non-precise forms of input such as a stylus or fingers. A minimum interactive size of 44×44 CSS pixels is recommended.
- Understanding Success Criterion 2.5.5: Target Size | W3C Understanding WCAG 2.1
- Target Size and 2.5.5 | Adrian Roselli
- Quick test: Large touch targets — The A11Y Project
Specifications
| Specification |
|---|
| HTML Standard # the-input-element |
Browser compatibility
BCD tables only load in the browser
See also
Описание
Элемент HTML <input> используется для создания интерактивных элементов управления в веб-формах для получения данных от пользователя; в зависимости от устройства и user agent, доступен широкий выбор типов входных данных и виджетов управления. Из-за огромного количества возможных сочетаний типов ввода и атрибутов это один из самых мощных и сложных элементов HTML.
-
Content categories (en-US) Flow content (en-US), listed, submittable, resettable, form-associated element, phrasing content (en-US).
If thetypehas not thehiddenvalue, labellable element, palpable content. - Permitted content None, it is an empty element.
- Tag omission Must have a start tag and must not have an end tag.
- Permitted parent elements Any element that accepts phrasing content (en-US).
- DOM interface
HTMLInputElement
Атрибуты
Этот элемент содержит глобальные атрибуты (en-US).
- Расширение файла, начинающееся с символа точки (U+002E). Наприм., ‘.jpg, .png, .doc)
- Валидный тип MIME без расширения
audio/*для аудиофайлов HTML5video/*для видеофайлов HTML5image/*для файлов с изображениями HTML5
type-
Тип элемента для отображения. Если этот атрибут не указан, по умолчанию используется
text. Возможными значениями являются:button: Кнопка без предопределённого поведения.checkbox: Флажок («чекбокс»). Следует использовать атрибут value для определения значения, которое будет отдано этим элементом. Используйте атрибут checked, чтобы указать, должен ли флажок быть выставлен. Можно также использовать атрибут indeterminate, чтобы указать, что флажок находится в неопределённом состоянии (на большинстве платформ при этом рисуется горизонтальная линия поперёк флажка).color: HTML5 Элемент управления цветом. Пользовательский интерфейс выбора цвета не имеет никаких других функций, кроме принятия простых цветов в виде текста (больше информации).date: HTML5 Элемент управления для ввода даты (год, месяц и день, без времени).datetime: HTML5 Элемент управления для ввода даты и времени (час, минута, секунда и доля секунды) в соответствии с часовым поясом UTC.datetime-local: HTML5 Элемент управления для ввода даты и времени без часового пояса.email: HTML5 Поле для редактирования адреса электронной почты. Перед отправкой проверяется, что входное значение содержит либо пустую строку, либо один действительный адрес электронной почты. Соответствуют CSS псевдоклассам:validand:invalid.file: Элемент управления, который позволяет пользователю выбрать файл. Используйте атрибут accept, чтобы определить типы файлов, которые могут быть выбраны.hidden: Элемент управления, которые не отображается, но чьё значение отправлено на сервер.image: Кнопка вставки изображения. Вы должны использовать атрибут src, чтобы определить путь к изображению и атрибут alt — для определения альтернативного текста. Вы можете использовать атрибуты height и width, чтобы определить размер вставки изображения в пикселях.month: HTML5 Элемент управления для ввода месяца и года без часового пояса.number: HTML5 Элемент управления ввода числа(тип float).password: Однострочное текстовое поле, чьё значение скрыто символом «звёздочка». Используйте атрибуты minlength и maxlength, чтобы указать минимальную и максимальную длину значения, которое может быть введено.Примечание: Любые формы, в которых присутствует важная информация(например, пароль), должны быть обработаны через HTTPS; в настоящий момент Firefox реализует составной механизм предупреждения, направленные против небезопасных форм для входа в систему — смотрите Небезопасные пароли (en-US).
radio: Кнопка-переключатель, позволяет выбрать одно значение из множественного выбора.range: HTML5Элемент управления для ввода числа, точное значение которого не имеет значения. Этот тип управления использует следующие значения по умолчанию, если соответствующие атрибуты не указаны:min: 0max: 100value:min+ (max—min)/2, orminifmaxis less thanminstep: 1
reset: Кнопка сброса содержимого формы в состояние по умолчанию.search: HTML5Однострочное текстовое поле для ввода строк поиска; разрывы строк автоматически удаляются из входного значения.submit: Кнопка для отправления формы.-
tel: HTML5 Элемент управления для ввода номера телефона; разрывы строк автоматически удаляются из входного значения, но никакой другой синтаксис не применяется. Можно использовать такие атрибуты как pattern и maxlength, чтобы ограничить вводимое значение.
Псевдоклассы CSS:validand:invalidприменяются при необходимости.. text: Однострочное текстовое поле. Переносы строк автоматически удаляются из входного значения.time: HTML5 Элемент управления для ввода значения времени без часового пояса.url: HTML5 Поле для редактирования URI. Введённое значение должно содержать либо пустую строку, либо допустимый абсолютный URL. В противном случае значение не будет принято. Переводы строк, лидирующие и завершающие пробельные символы будут автоматически удалены из введённого значения. Можно использовать такие атрибуты как pattern или maxlength, чтобы ограничить вводимые значения. Псевдоклассы CSS:validand:invalidприменяются при необходимости.week: HTML5 Элемент управления для ввода даты, содержащей число неделя-год и номер недели без часового пояса.
accept-
В случае, если значением атрибута type является
file, данный атрибут определяет типы файлов, которые сервер может принять. В противном случае файл игнорируется. Значение должно быть списком уникальных спецификаторов типов содержания, разделённым запятыми: accesskeyHTML 4 only, Вышла из употребления с версии HTML5-
Одиночный символ, который пользователь может нажать, чтобы переключить фокус на элемент управления.
mozactionhint
Non-standard
-
Определяет «действие-подсказку», которая используется для определения того, как будет обозначаться клавиша enter на мобильных устройствах с виртуальной клавиатурой. Поддерживаемые значения:
go,done,next,search, иsend; они автоматически сопоставляются с необходимой строкой (являются чувствительными к регистру). autocompleteHTML5-
Этот атрибут указывает, разрешено ли автоматическое заполнение поля браузером. Разрешено по умолчанию, даже если не указано. Данный атрибут игнорируется, если атрибут type равен
hidden, password,checkbox,radio,file, или type кнопка (button,submit,reset,image). Возможные значения:off: Пользователь должен каждый раз полностью вводить значение в поле или документ предусматривает свой собственный метод автозаполнения; браузер не делает автоматического заполнения записи.on: Браузер автоматически заканчивает значение поля, основываясь на значениях, которые вводились пользователем ранее.Если не атрибут autocomplete не указан в<input>, тогда браузер использует атрибут autocomplete формы, которая является родительской для данной формы. The form owner is either theformelement that this<input>element is a descendant of or the form element whose id is specified by the form attribute of the input element. For more information, see theautocompleteattribute in<form>.
autofocusHTML5-
This Boolean attribute lets you specify that a form control should have input focus when the page loads, unless the user overrides it, for example by typing in a different control. Only one form element in a document can have the autofocus attribute, which is a Boolean. It cannot be applied if the type attribute is set to
hidden(that is, you cannot automatically set focus to a hidden control). autosaveHTML5-
This attribute should be defined as a unique value. If the value of the type attribute is
search, previous search term values will persist in the dropdown across page load. checked-
When the value of the type attribute is
radioorcheckbox, the presence of this Boolean attribute indicates that the control is selected by default; otherwise it is ignored. disabled-
This Boolean attribute indicates that the form control is not available for interaction. In particular, the
clickevent will not be dispatched on disabled controls. Also, a disabled control’s value isn’t submitted with the form. formHTML5-
The form element that the input element is associated with (its form owner). The value of the attribute must be an id of a
<form>element in the same document. If this attribute is not specified, this<input>element must be a descendant of a<form>element. This attribute enables you to place<input>elements anywhere within a document, not just as descendants of their form elements. An input can only be associated with one form. formactionHTML5-
The URI of a program that processes the information submitted by the input element, if it is a submit button or image. If specified, it overrides the
actionattribute of the element’s form owner. formenctypeHTML5-
If the input element is a submit button or image, this attribute specifies the type of content that is used to submit the form to the server. Possible values are:
application/x-www-form-urlencoded: The default value if the attribute is not specified.multipart/form-data: Use this value if you are using an<input>element with thetypeattribute set tofile.text/plainIf this attribute is specified, it overrides theenctypeattribute of the element’s form owner.
formmethodHTML5-
If the input element is a submit button or image, this attribute specifies the HTTP method that the browser uses to submit the form. Possible values are:
post: The data from the form is included in the body of the form and is sent to the server.get: The data from the form are appended to the form attribute URI, with a ‘?’ as a separator, and the resulting URI is sent to the server. Use this method when the form has no side-effects and contains only ASCII characters.If specified, this attribute overrides themethodattribute of the element’s form owner.
formnovalidateHTML5-
If the input element is a submit button or image, this Boolean attribute specifies that the form is not to be validated when it is submitted. If this attribute is specified, it overrides the
novalidateattribute of the element’s form owner. formtargetHTML5-
If the input element is a submit button or image, this attribute is a name or keyword indicating where to display the response that is received after submitting the form. This is a name of, or keyword for, a browsing context (for example, tab, window, or inline frame). If this attribute is specified, it overrides the
targetattribute of the elements’s form owner. The following keywords have special meanings:_self: Load the response into the same browsing context as the current one. This value is the default if the attribute is not specified._blank: Load the response into a new unnamed browsing context._parent: Load the response into the parent browsing context of the current one. If there is no parent, this option behaves the same way as_self._top: Load the response into the top-level browsing context (that is, the browsing context that is an ancestor of the current one, and has no parent). If there is no parent, this option behaves the same way as_self.
heightHTML5-
If the value of the type attribute is
image, this attribute defines the height of the image displayed for the button. inputmodeHTML5-
A hint to the browser for which keyboard to display. This attribute applies when the value of the type attribute is text, password, email, or url. Possible values are:
verbatim: Alphanumeric, non-prose content such as usernames and passwords.latin: Latin-script input in the user’s preferred language with typing aids such as text prediction enabled. For human-to-computer communication such as search boxes.latin-name: As latin, but for human names.latin-prose: As latin, but with more aggressive typing aids. For human-to-human communication such as instant messaging for email.full-width-latin: As latin-prose, but for the user’s secondary languages.kana: Kana or romaji input, typically hiragana input, using full-width characters, with support for converting to kanji. Intended for Japanese text input.katakana: Katakana input, using full-width characters, with support for converting to kanji. Intended for Japanese text input.numeric: Numeric input, including keys for the digits 0 to 9, the user’s preferred thousands separator character, and the character for indicating negative numbers. Intended for numeric codes, e.g. credit card numbers. For actual numbers, prefer using <input type=»number»>tel: Telephone input, including asterisk and pound key. Use <input type=»tel»> if possible instead.email: Email input. Use <input type=»email»> if possible instead.url: URL input. Use <input type=»url»> if possible instead.
listHTML5-
В атрибуте указывает
idэлемента<datalist>, в котором находится список предопределённых значений для заполнения. Браузер отображает только те варианты, которые соответствуют введённым символами. Этот атрибут игнорируется, когда атрибут type принимает значенияhidden,checkbox,radio,file, или type в качестве кнопки. maxHTML5-
The maximum (numeric or date-time) value for this item, which must not be less than its minimum (min attribute) value.
maxlength-
If the value of the type attribute is
text,email,search,password,tel, orurl, this attribute specifies the maximum number of characters (in Unicode code points) that the user can enter; for other control types, it is ignored. It can exceed the value of the size attribute. If it is not specified, the user can enter an unlimited number of characters. Specifying a negative number results in the default behavior; that is, the user can enter an unlimited number of characters. The constraint is evaluated only when the value of the attribute has been changed. minHTML5-
The minimum (numeric or date-time) value for this item, which must not be greater than its maximum (max attribute) value.
minlengthHTML5-
If the value of the type attribute is
text,email,search,password,tel, orurl, this attribute specifies the minimum number of characters (in Unicode code points) that the user can enter; for other control types, it is ignored. multipleHTML5-
Этот Boolean атрибут указывает, может ли пользователь вводить несколько значений. Этот атрибут применяется, если для атрибута type задано значение
emailилиfile; в противном случае он игнорируется. name-
The name of the control, which is submitted with the form data.
patternHTML5-
A regular expression that the control’s value is checked against. The pattern must match the entire value, not just some subset. Use the title attribute to describe the pattern to help the user. This attribute applies when the value of the type attribute is
text,search,tel,urloremail; otherwise it is ignored. The regular expression language is the same as JavaScript’s. The pattern is not surrounded by forward slashes. placeholderHTML5-
A hint to the user of what can be entered in the control . The placeholder text must not contain carriage returns or line-feeds. This attribute applies when the value of the type attribute is
text,search,tel,urloremail; otherwise it is ignored.Примечание: Do not use the
placeholderattribute instead of a<label>element. Their purposes are different: the<label>attribute describes the role of the form element; that is, it indicates what kind of information is expected, theplaceholderattribute is a hint about the format the content should take. There are cases in which theplaceholderattribute is never displayed to the user, so the form must be understandable without it. readonly-
This Boolean attribute indicates that the user cannot modify the value of the control.HTML5 This attribute is ignored if the value of the type attribute is
hidden,range,color,checkbox,radio,file, or a button type. requiredHTML5-
This attribute specifies that the user must fill in a value before submitting a form. It cannot be used when the type attribute is
hidden,image, or a button type (submit,reset, orbutton). The:optionaland:requiredCSS pseudo-classes will be applied to the field as appropriate. selectionDirectionHTML5-
The direction in which selection occurred. This is «forward» if the selection was made from left-to-right in an LTR locale or right-to-left in an RTL locale, or «backward» if the selection was made in the opposite direction. This can be «none» if the selection direction is unknown.
size-
The initial size of the control. This value is in pixels unless the value of the type attribute is
textorpassword, in which case, it is an integer number of characters. Starting in HTML5, this attribute applies only when the type attribute is set totext,search,tel,url,email, orpassword; otherwise it is ignored. In addition, the size must be greater than zero. If you don’t specify a size, a default value of 20 is used. spellcheckHTML5-
Setting the value of this attribute to
trueindicates that the element needs to have its spelling and grammar checked. The valuedefaultindicates that the element is to act according to a default behavior, possibly based on the parent element’s ownspellcheckvalue. The valuefalseindicates that the element should not be checked. src-
If the value of the type attribute is
image, this attribute specifies a URI for the location of an image to display on the graphical submit button; otherwise it is ignored. stepHTML5-
Works with the min and max attributes to limit the increments at which a numeric or date-time value can be set. It can be the string
anyor a positive floating point number. If this attribute is not set toany, the control accepts only values at multiples of the step value greater than the minimum. tabindexelement-specific in HTML 4, global in HTML5-
The position of the element in the tabbing navigation order for the current document.
usemapHTML 4 only, Вышла из употребления с версии HTML5-
The name of a
<map>element to as an image map. value-
The initial value of the control. This attribute is optional except when the value of the type attribute is
radioorcheckbox.
Note that when reloading the page, Gecko and IE will ignore the value specified in the HTML source, if the value was changed before the reload. widthHTML5-
If the value of the type attribute is
image, this attribute defines the width of the image displayed for the button. x-moz-errormessage
Non-standard
-
This Mozilla extension allows you to specify the error message to display when a field doesn’t successfully validate.
Notes
File inputs
Примечание: Starting in Gecko 2.0, calling the click() method on an <input> element of type «file» opens the file picker and lets the user select files. See Using files from web applications for an example and more details.
You can’t set the value of a file picker from a script; doing something like the following has no effect:
var e = getElementById("someFileInputElement");
e.value = "foo";
Error messages
If you want Firefox to present a custom error message when a field fails to validate, you can use the x-moz-errormessage attribute to do so:
<input type="email" x-moz-errormessage="Please specify a valid email address.">
Note, however, that this is not standard and will not have an effect on other browsers.
Examples
A simple input box
<!-- A basic input -->
<input type="text" name="input" value="Type here">
A common use-case scenario
<!-- A common form that includes input tags -->
<form action="getform.php" method="get">
    First name: <input type="text" name="first_name" /><br />
     Last name: <input type="text" name="last_name" /><br />
        E-mail: <input type="email" name="user_email" /><br />
<input type="submit" value="Submit" />
</form>
Using mozactionhint on Firefox mobile
You can use the mozactionhint attribute to specify the text for the label of the enter key on the virtual keyboard when your form is rendered on Firefox mobile. For example, to have a «Next» label, you can do this:
<input type="text" mozactionhint="next" name="sometext" />
The result is:

Specifications
Совместимость с браузерами
BCD tables only load in the browser
[1] Распознаётся, но UI отсутствует.
[2] Отсутствует для type="checkbox" и type="radio".
[3] В Safari autocapitalize="words" переводит в верхний регистр каждый второй символ слова.
[4] datetime был удалён из спецификации и браузеров в пользу datetime-local.
[5] См баг 1355389
[6] Ещё не имплементировано. Наблюдать: баг 888320 и TPE DOM/Date time input types.
Gecko notes
Starting in Gecko 9.0 (Firefox 9.0 / Thunderbird 9.0 / SeaMonkey 2.6), Firefox for Android lets users capture images using their camera and upload them, without having to leave the browser. Web developers can implement this feature by simply specifying setting the accept attribute’s value to «image/*» on their file input, like this:
<input type="file" accept="image/*">
Firefox for Android sets a default background-image gradient on all type="text", type="file", type="button", and type="submit" inputs. This can be disabled using background-image: none.
Firefox for Android also sets a default border on all <input type="file"> elements.
See also
- Other form-related elements:
<form>,<button>,<datalist>,<legend>,<label>,<select>,<optgroup>,<option>,<textarea>(en-US),<keygen>(en-US),<fieldset>,<output>,<progress>and<meter>. - Cross-browser HTML5 placeholder text
How to show custom validation error message in HTML5 form?
As we all know that there is no uniformity in the form element validation messages comes in different browsers. To make these error messages uniform, we can set custom error message so that all browser displays the same error message.
This solution is not full proof however it works in most modern browser except Internet Explorere 10.
First we have created a simple form with a textbox, email and url textbox.
 <form action="somepage.html" method="post">
        <fieldset>
            <legend>Login</legend>Name:
            <input type="text" id="myName" name="myName" required
                   placeholder="Please enter your name" data-error="Name is required" />*
            <br />
            Email:
            <input name="myEmail" id="myEmail" type="email" required
                placeholder="Enter email" data-error="Email is required in you@domain.com" />
            <br />
            Url:
            <input type="url" id="myUrl" name="myUrl" />
            <input type="submit" id="mySubmit" name="mySubmit" />
        </fieldset>
    </form>
In the above all other element and its attributes are normal except the data-error attribute. Attribute starts with «data-» is a special type of attribute introduced in HTML 5 that can be used to hold that element specific data. It doesn’t have any meaning to the browser. It is used only for the developer to hold some temporary data.
In this case, we are holding our custom error message into the data-error attribute.
Now write following jQuery code (Do not forget to refer the jQuery file into the page).
<script>
        $(function () {
            var inputs = document.getElementsByTagName("INPUT");
            for (var i = 0; i < inputs.length; i++) {
                inputs[i].oninvalid = function (e) {
                    e.target.setCustomValidity("");
                    if (!e.target.validity.valid) {
                        e.target.setCustomValidity(e.target.getAttribute("data-error"));
                    }
                };
            }
        });
    </script>
In the above jQuery code we are doing following
- getting all input element of the page using getElementsByTagNam function of JavaScript
- looping through all of them
- setting oninvalid event function on each element that executes only when the element is marked as invalid by the browser
- setting its customValidity to empty so that the default error message of the browser is set to empty
- after checking if that element is not valid, setting its customValidity to that particular element’s «data-error» attribute value.
OUTPUT
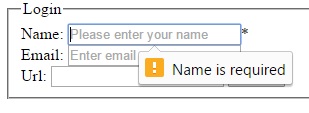
NOTE
If data-error attribute is not specified for a particular element, few browser like Firefox may display «null» is the element is invalid (like in this case, notice that we do not have data-error attribute in the URL textbox). So it is suggested to always set data-error attribute to each input type element.
Views: 16492 | Post Order: 100
Related Posts
I’ve got the following HTML5 form: http://jsfiddle.net/nfgfP/
<form id="form" onsubmit="return(login())">
<input name="username" placeholder="Username" required />
<input name="pass"  type="password" placeholder="Password" required/>
<br/>Remember me: <input type="checkbox" name="remember" value="true" /><br/>
<input type="submit" name="submit" value="Log In"/>
Currently when I hit enter when they’re both blank, a popup box appears saying «Please fill out this field». How would I change that default message to «This field cannot be left blank»?
EDIT: Also note that the type password field’s error message is simply *****. To recreate this give the username a value and hit submit.
EDIT: I’m using Chrome 10 for testing. Please do the same
![]()
asked Mar 11, 2011 at 11:40
![]()
3
Here is the code to handle custom error message in HTML5:
<input type="text" id="username" required placeholder="Enter Name"
  oninvalid="this.setCustomValidity('Enter User Name Here')"
  oninput="this.setCustomValidity('')"/>
This part is important because it hides the error message when the user inputs new data:
oninput="this.setCustomValidity('')"
![]()
answered Nov 25, 2013 at 9:52
![]()
Somnath KadamSomnath Kadam
5,8216 gold badges21 silver badges37 bronze badges
13
Use setCustomValidity:
document.addEventListener("DOMContentLoaded", function() {
    var elements = document.getElementsByTagName("INPUT");
    for (var i = 0; i < elements.length; i++) {
        elements[i].oninvalid = function(e) {
            e.target.setCustomValidity("");
            if (!e.target.validity.valid) {
                e.target.setCustomValidity("This field cannot be left blank");
            }
        };
        elements[i].oninput = function(e) {
            e.target.setCustomValidity("");
        };
    }
})
I changed to vanilla JavaScript from Mootools as suggested by @itpastorn in the comments, but you should be able to work out the Mootools equivalent if necessary.
Edit
I’ve updated the code here as setCustomValidity works slightly differently to what I understood when I originally answered. If setCustomValidity is set to anything other than the empty string it will cause the field to be considered invalid; therefore you must clear it before testing validity, you can’t just set it and forget.
Further edit
As pointed out in @thomasvdb’s comment below, you need to clear the custom validity in some event outside of invalid otherwise there may be an extra pass through the oninvalid handler to clear it.
![]()
answered Mar 11, 2011 at 18:14
![]()
robertcrobertc
73.7k18 gold badges194 silver badges177 bronze badges
11
It’s very simple to control custom messages with the help of HTML5 event oninvalid
Here is code:
<input id="UserID"  type="text" required="required"
       oninvalid="this.setCustomValidity('Witinnovation')"
       onvalid="this.setCustomValidity('')">
This is most important:
onvalid="this.setCustomValidity('')"
answered Aug 13, 2012 at 12:50
![]()
Ashwini JainAshwini Jain
1,1511 gold badge7 silver badges3 bronze badges
5
Note: This no longer works in Chrome, not tested in other browsers. See edits below. This answer is being left here for historical reference.
If you feel that the validation string really should not be set by code, you can set you input element’s title attribute to read «This field cannot be left blank». (Works in Chrome 10)
title="This field should not be left blank."
See http://jsfiddle.net/kaleb/nfgfP/8/
And in Firefox, you can add this attribute:
x-moz-errormessage="This field should not be left blank."
Edit
This seems to have changed since I originally wrote this answer. Now adding a title does not change the validity message, it just adds an addendum to the message. The fiddle above still applies.
Edit 2
Chrome now does nothing with the title attribute as of Chrome 51. I am not sure in which version this changed.
answered Apr 18, 2011 at 22:47
![]()
kzhkzh
19.4k13 gold badges72 silver badges96 bronze badges
7
It’s very simple to control custom messages with the help of the HTML5 oninvalid event
Here is the code:
User ID
<input id="UserID"  type="text" required
       oninvalid="this.setCustomValidity('User ID is a must')">
![]()
George G
7,25412 gold badges45 silver badges59 bronze badges
answered Jul 20, 2012 at 5:07
![]()
1
By setting and unsetting the setCustomValidity in the right time, the validation message will work flawlessly.
<input name="Username" required
oninvalid="this.setCustomValidity('Username cannot be empty.')"
onchange="this.setCustomValidity('')" type="text" />
I used onchange instead of oninput which is more general and occurs when the value is changed in any condition even through JavaScript.
answered Apr 1, 2014 at 4:56
![]()
SalarSalar
2,07821 silver badges26 bronze badges
10
I have made a small library to ease changing and translating the error messages. You can even change the texts by error type which is currently not available using title in Chrome or x-moz-errormessage in Firefox. Go check it out on GitHub, and give feedback.
It’s used like:
<input type="email" required data-errormessage-value-missing="Please input something">
There’s a demo available at jsFiddle.
answered Apr 2, 2012 at 13:08
![]()
hleinonehleinone
4,4703 gold badges34 silver badges49 bronze badges
2
Try this one, its better and tested:
    function InvalidMsg(textbox) {
        if (textbox.value === '') {
            textbox.setCustomValidity('Required email address');
        } else if (textbox.validity.typeMismatch){
            textbox.setCustomValidity('please enter a valid email address');
        } else {
           textbox.setCustomValidity('');
        }

        return true;
    }
<form id="myform">
<input id="email"
oninvalid="InvalidMsg(this);"
oninput="InvalidMsg(this);"
name="email"
type="email"
required="required" />
<input type="submit" />
</form>Demo:
http://jsfiddle.net/patelriki13/Sqq8e/
![]()
answered Mar 14, 2014 at 2:07
![]()
Rikin PatelRikin Patel
8,7387 gold badges69 silver badges77 bronze badges
2
The easiest and cleanest way I’ve found is to use a data attribute to store your custom error. Test the node for validity and handle the error by using some custom html.
le javascript
if(node.validity.patternMismatch)
        {
            message = node.dataset.patternError;
        }
and some super HTML5
<input type="text" id="city" name="city" data-pattern-error="Please use only letters for your city." pattern="[A-z ']*" required>
answered Apr 17, 2013 at 19:19
![]()
Collin WhiteCollin White
6301 gold badge11 silver badges27 bronze badges
1
The solution for preventing Google Chrome error messages on input each symbol:
<p>Click the 'Submit' button with empty input field and you will see the custom error message. Then put "-" sign in the same input field.</p>
<form method="post" action="#">
  <label for="text_number_1">Here you will see browser's error validation message on input:</label><br>
  <input id="test_number_1" type="number" min="0" required="true"
         oninput="this.setCustomValidity('')"
         oninvalid="this.setCustomValidity('This is my custom message.')"/>
  <input type="submit"/>
</form>

<form method="post" action="#">
  <p></p>
  <label for="text_number_1">Here you will see no error messages on input:</label><br>
  <input id="test_number_2" type="number" min="0" required="true"
         oninput="(function(e){e.setCustomValidity(''); return !e.validity.valid && e.setCustomValidity(' ')})(this)"
         oninvalid="this.setCustomValidity('This is my custom message.')"/>
  <input type="submit"/>
</form>
answered Feb 19, 2019 at 20:11
![]()
1
I have a simpler vanilla js only solution:
For checkboxes:
document.getElementById("id").oninvalid = function () {
    this.setCustomValidity(this.checked ? '' : 'My message');
};
For inputs:
document.getElementById("id").oninvalid = function () {
    this.setCustomValidity(this.value ? '' : 'My message');
};
answered Aug 18, 2016 at 12:57
![]()
bernhardhbernhardh
3,02710 gold badges40 silver badges73 bronze badges
Okay, oninvalid works well but it shows error even if user entered valid data. So I have used below to tackle it, hope it will work for you as well,
oninvalid="this.setCustomValidity('Your custom message.')" onkeyup="setCustomValidity('')"
answered Aug 28, 2018 at 10:48
![]()
Umesh PatilUmesh Patil
4,42832 silver badges24 bronze badges
If your error message is a single one, then try below.
<input oninvalid="this.setCustomValidity('my error message')"
       oninput="this.setCustomValidity('')">  <!-- 👈 don't forget it. -->
To handle multiple errors, try below
<input oninput="this.setCustomValidity('')">
<script>
inputElem.addEventListener("invalid", ()=>{
    if (inputElem.validity.patternMismatch) {
      return inputElem.setCustomValidity('my error message')
    }
    return inputElem.setCustomValidity('') // default message
})
</script>
Example
You can test valueMissing and valueMissing.
<form>
<input pattern="[^\/:x22*?<>|]+"
       placeholder="input file name"
       oninput="this.setCustomValidity('')"
       required
>
  <input type="submit">
</form>

<script>
  const form = document.querySelector("form")

  const inputElem = document.querySelector(`input`)

  inputElem.addEventListener("invalid", ()=>{
    if (inputElem.validity.patternMismatch) {
      return inputElem.setCustomValidity('Illegal Filename Characters \/:x22?<>|')
    }
    return inputElem.setCustomValidity('') // return default message according inputElem.validity.{badInput, customError, tooLong, valueMissing ...}
  })

  form.onsubmit = () => {
    return false
  }
</script>- ValidityState
answered Nov 10, 2021 at 11:02
![]()
CarsonCarson
5,1682 gold badges33 silver badges40 bronze badges
const username= document.querySelector('#username');
const submit=document.querySelector('#submit');

submit.addEventListener('click',()=>{
    if(username.validity.typeMismatch){
        username.setCustomValidity('Please enter User Name');
    }else{
        username.setCustomValidity('');
    }
if(pass.validity.typeMismatch){
        pass.setCustomValidity('Please enter Password');
    }else{
        pass.setCustomValidity('');
    }
})
answered Apr 7, 2022 at 12:43
![]()
AjayAjay
595 bronze badges
Adapting Salar’s answer to JSX and React, I noticed that React Select doesn’t behave just like an <input/> field regarding validation. Apparently, several workarounds are needed to show only the custom message and to keep it from showing at inconvenient times.
I’ve raised an issue here, if it helps anything. Here is a CodeSandbox with a working example, and the most important code there is reproduced here:
Hello.js
import React, { Component } from "react";
import SelectValid from "./SelectValid";

export default class Hello extends Component {
  render() {
    return (
      <form>
        <SelectValid placeholder="this one is optional" />
        <SelectValid placeholder="this one is required" required />
        <input
          required
          defaultValue="foo"
          onChange={e => e.target.setCustomValidity("")}
          onInvalid={e => e.target.setCustomValidity("foo")}
        />
        <button>button</button>
      </form>
    );
  }
}
SelectValid.js
import React, { Component } from "react";
import Select from "react-select";
import "react-select/dist/react-select.css";

export default class SelectValid extends Component {
  render() {
    this.required = !this.props.required
      ? false
      : this.state && this.state.value ? false : true;
    let inputProps = undefined;
    let onInputChange = undefined;
    if (this.props.required) {
      inputProps = {
        onInvalid: e => e.target.setCustomValidity(this.required ? "foo" : "")
      };
      onInputChange = value => {
        this.selectComponent.input.input.setCustomValidity(
          value
            ? ""
            : this.required
              ? "foo"
              : this.selectComponent.props.value ? "" : "foo"
        );
        return value;
      };
    }
    return (
      <Select
        onChange={value => {
          this.required = !this.props.required ? false : value ? false : true;
          let state = this && this.state ? this.state : { value: null };
          state.value = value;
          this.setState(state);
          if (this.props.onChange) {
            this.props.onChange();
          }
        }}
        value={this && this.state ? this.state.value : null}
        options={[{ label: "yes", value: 1 }, { label: "no", value: 0 }]}
        placeholder={this.props.placeholder}
        required={this.required}
        clearable
        searchable
        inputProps={inputProps}
        ref={input => (this.selectComponent = input)}
        onInputChange={onInputChange}
      />
    );
  }
}
answered May 24, 2018 at 14:23
![]()
GuiRitterGuiRitter
6751 gold badge11 silver badges20 bronze badges
For a totaly custom check logic:
$(document).ready(function() {

  $('#form').on('submit', function(e) {
    if ($('#customCheck').val() != 'apple') {
      $('#customCheck')[0].setCustomValidity('Custom error here! "apple" is the magic word');
      $('#customCheck')[0].reportValidity();
      e.preventDefault();
    }
  });

  $('#customCheck').on('input', function() {
    $('#customCheck')[0].setCustomValidity('');
  });


});
input {
display: block;
margin-top: 15px;
}
input[type="text"] {
min-width: 250px;
}<script src="https://cdnjs.cloudflare.com/ajax/libs/jquery/3.3.1/jquery.min.js"></script>
<form id="form">
<input type="text" placeholder="dafault check with 'required' TAG" required/>
<input type="text" placeholder="custom check for word 'apple'" id="customCheck" />
<input type="submit">
</form>answered Jun 26, 2022 at 14:56
![]()
BaroBaro
5,1562 gold badges17 silver badges38 bronze badges
Can be easily handled by just putting ‘title’ with the field:
<input type="text" id="username" required title="This field can not be empty" />
answered May 16, 2019 at 19:11
![]()
DeeptiDeepti
93612 silver badges18 bronze badges
4
![]()
A vocabulary and associated APIs for HTML and XHTML
W3C Recommendation 28 October 2014
4.10 Forms
4.10.1 Introduction
This section is non-normative.
A form is a component of a Web page that has form controls, such as text fields, buttons,
checkboxes, range controls, or color pickers. A user can interact with such a form, providing data
that can then be sent to the server for further processing (e.g. returning the results of a search
or calculation). No client-side scripting is needed in many cases, though an API is available so
that scripts can augment the user experience or use forms for purposes other than submitting data
to a server.
Writing a form consists of several steps, which can be performed in any order: writing the user
interface, implementing the server-side processing, and configuring the user interface to
communicate with the server.
4.10.1.1 Writing a form’s user interface
This section is non-normative.
For the purposes of this brief introduction, we will create a pizza ordering form.
Any form starts with a form element, inside which are placed the controls. Most
controls are represented by the input element, which by default provides a one-line
text field. To label a control, the label element is used; the label text and the
control itself go inside the label element. Each part of a form is considered a
paragraph, and is typically separated from other parts using p elements.
Putting this together, here is how one might ask for the customer’s name:
<form>
 <p><label>Customer name: <input></label></p>
</form>
To let the user select the size of the pizza, we can use a set of radio buttons. Radio buttons
also use the input element, this time with a type attribute with the value radio. To make the radio buttons work as a group, they are
given a common name using the name attribute. To group a batch
of controls together, such as, in this case, the radio buttons, one can use the
fieldset element. The title of such a group of controls is given by the first element
in the fieldset, which has to be a legend element.
<form>
 <p><label>Customer name: <input></label></p>
 <fieldset>
  <legend> Pizza Size </legend>
  <p><label> <input type=radio name=size> Small </label></p>
  <p><label> <input type=radio name=size> Medium </label></p>
  <p><label> <input type=radio name=size> Large </label></p>
 </fieldset>
</form>
Changes from the previous step are highlighted.
To pick toppings, we can use checkboxes. These use the input element with a type attribute with the value checkbox:
<form>
 <p><label>Customer name: <input></label></p>
 <fieldset>
  <legend> Pizza Size </legend>
  <p><label> <input type=radio name=size> Small </label></p>
  <p><label> <input type=radio name=size> Medium </label></p>
  <p><label> <input type=radio name=size> Large </label></p>
 </fieldset>
 <fieldset>
  <legend> Pizza Toppings </legend>
  <p><label> <input type=checkbox> Bacon </label></p>
  <p><label> <input type=checkbox> Extra Cheese </label></p>
  <p><label> <input type=checkbox> Onion </label></p>
  <p><label> <input type=checkbox> Mushroom </label></p>
 </fieldset>
</form>
The pizzeria for which this form is being written is always making mistakes, so it needs a way
to contact the customer. For this purpose, we can use form controls specifically for telephone
numbers (input elements with their type
attribute set to tel) and e-mail addresses
(input elements with their type attribute set to
email):
<form>
 <p><label>Customer name: <input></label></p>
 <p><label>Telephone: <input type=tel></label></p>
 <p><label>E-mail address: <input type=email></label></p>
 <fieldset>
  <legend> Pizza Size </legend>
  <p><label> <input type=radio name=size> Small </label></p>
  <p><label> <input type=radio name=size> Medium </label></p>
  <p><label> <input type=radio name=size> Large </label></p>
 </fieldset>
 <fieldset>
  <legend> Pizza Toppings </legend>
  <p><label> <input type=checkbox> Bacon </label></p>
  <p><label> <input type=checkbox> Extra Cheese </label></p>
  <p><label> <input type=checkbox> Onion </label></p>
  <p><label> <input type=checkbox> Mushroom </label></p>
 </fieldset>
</form>
We can use an input element with its type
attribute set to time to ask for a delivery time. Many
of these form controls have attributes to control exactly what values can be specified; in this
case, three attributes of particular interest are min, max, and step. These set the
minimum time, the maximum time, and the interval between allowed values (in seconds). This
pizzeria only delivers between 11am and 9pm, and doesn’t promise anything better than 15 minute
increments, which we can mark up as follows:
<form>
 <p><label>Customer name: <input></label></p>
 <p><label>Telephone: <input type=tel></label></p>
 <p><label>E-mail address: <input type=email></label></p>
 <fieldset>
  <legend> Pizza Size </legend>
  <p><label> <input type=radio name=size> Small </label></p>
  <p><label> <input type=radio name=size> Medium </label></p>
  <p><label> <input type=radio name=size> Large </label></p>
 </fieldset>
 <fieldset>
  <legend> Pizza Toppings </legend>
  <p><label> <input type=checkbox> Bacon </label></p>
  <p><label> <input type=checkbox> Extra Cheese </label></p>
  <p><label> <input type=checkbox> Onion </label></p>
  <p><label> <input type=checkbox> Mushroom </label></p>
 </fieldset>
 <p><label>Preferred delivery time: <input type=time min="11:00" max="21:00" step="900"></label></p>
</form>
The textarea element can be used to provide a free-form text field. In this
instance, we are going to use it to provide a space for the customer to give delivery
instructions:
<form>
 <p><label>Customer name: <input></label></p>
 <p><label>Telephone: <input type=tel></label></p>
 <p><label>E-mail address: <input type=email></label></p>
 <fieldset>
  <legend> Pizza Size </legend>
  <p><label> <input type=radio name=size> Small </label></p>
  <p><label> <input type=radio name=size> Medium </label></p>
  <p><label> <input type=radio name=size> Large </label></p>
 </fieldset>
 <fieldset>
  <legend> Pizza Toppings </legend>
  <p><label> <input type=checkbox> Bacon </label></p>
  <p><label> <input type=checkbox> Extra Cheese </label></p>
  <p><label> <input type=checkbox> Onion </label></p>
  <p><label> <input type=checkbox> Mushroom </label></p>
 </fieldset>
 <p><label>Preferred delivery time: <input type=time min="11:00" max="21:00" step="900"></label></p>
 <p><label>Delivery instructions: <textarea></textarea></label></p>
</form>
Finally, to make the form submittable we use the button element:
<form>
 <p><label>Customer name: <input></label></p>
 <p><label>Telephone: <input type=tel></label></p>
 <p><label>E-mail address: <input type=email></label></p>
 <fieldset>
  <legend> Pizza Size </legend>
  <p><label> <input type=radio name=size> Small </label></p>
  <p><label> <input type=radio name=size> Medium </label></p>
  <p><label> <input type=radio name=size> Large </label></p>
 </fieldset>
 <fieldset>
  <legend> Pizza Toppings </legend>
  <p><label> <input type=checkbox> Bacon </label></p>
  <p><label> <input type=checkbox> Extra Cheese </label></p>
  <p><label> <input type=checkbox> Onion </label></p>
  <p><label> <input type=checkbox> Mushroom </label></p>
 </fieldset>
 <p><label>Preferred delivery time: <input type=time min="11:00" max="21:00" step="900"></label></p>
 <p><label>Delivery instructions: <textarea></textarea></label></p>
 <p><button>Submit order</button></p>
</form>
4.10.1.2 Implementing the server-side processing for a form
This section is non-normative.
The exact details for writing a server-side processor are out of scope for this specification.
For the purposes of this introduction, we will assume that the script at https://pizza.example.com/order.cgi is configured to accept submissions using the
application/x-www-form-urlencoded format,
expecting the following parameters sent in an HTTP POST body:
custname- Customer’s name
custtel- Customer’s telephone number
custemail- Customer’s e-mail address
size- The pizza size, either
small,medium, orlarge topping- A topping, specified once for each selected topping, with the allowed values being
bacon,cheese,onion, andmushroom delivery- The requested delivery time
comments- The delivery instructions
4.10.1.3 Configuring a form to communicate with a server
This section is non-normative.
Form submissions are exposed to servers in a variety of ways, most commonly as HTTP GET or POST
requests. To specify the exact method used, the method
attribute is specified on the form element. This doesn’t specify how the form data is
encoded, though; to specify that, you use the enctype
attribute. You also have to specify the URL of the service that will handle the
submitted data, using the action attribute.
For each form control you want submitted, you then have to give a name that will be used to
refer to the data in the submission. We already specified the name for the group of radio buttons;
the same attribute (name) also specifies the submission name.
Radio buttons can be distinguished from each other in the submission by giving them different
values, using the value attribute.
Multiple controls can have the same name; for example, here we give all the checkboxes the same
name, and the server distinguishes which checkbox was checked by seeing which values are submitted
with that name — like the radio buttons, they are also given unique values with the value attribute.
Given the settings in the previous section, this all becomes:
<form method="post"
      enctype="application/x-www-form-urlencoded"
      action="https://pizza.example.com/order.cgi">
 <p><label>Customer name: <input name="custname"></label></p>
 <p><label>Telephone: <input type=tel name="custtel"></label></p>
 <p><label>E-mail address: <input type=email name="custemail"></label></p>
 <fieldset>
  <legend> Pizza Size </legend>
  <p><label> <input type=radio name=size value="small"> Small </label></p>
  <p><label> <input type=radio name=size value="medium"> Medium </label></p>
  <p><label> <input type=radio name=size value="large"> Large </label></p>
 </fieldset>
 <fieldset>
  <legend> Pizza Toppings </legend>
  <p><label> <input type=checkbox name="topping" value="bacon"> Bacon </label></p>
  <p><label> <input type=checkbox name="topping" value="cheese"> Extra Cheese </label></p>
  <p><label> <input type=checkbox name="topping" value="onion"> Onion </label></p>
  <p><label> <input type=checkbox name="topping" value="mushroom"> Mushroom </label></p>
 </fieldset>
 <p><label>Preferred delivery time: <input type=time min="11:00" max="21:00" step="900" name="delivery"></label></p>
 <p><label>Delivery instructions: <textarea name="comments"></textarea></label></p>
 <p><button>Submit order</button></p>
</form>
There is no particular significance to the way some of the attributes have their
values quoted and others don’t. The HTML syntax allows a variety of equally valid ways to specify
attributes, as discussed in the syntax section.
For example, if the customer entered «Denise Lawrence» as their name, «555-321-8642» as their
telephone number, did not specify an e-mail address, asked for a medium-sized pizza, selected the
Extra Cheese and Mushroom toppings, entered a delivery time of 7pm, and left the delivery
instructions text field blank, the user agent would submit the following to the online Web
service:
custname=Denise+Lawrence&custtel=555-321-8624&custemail=&size=medium&topping=cheese&topping=mushroom&delivery=19%3A00&comments=
4.10.1.4 Client-side form validation
This section is non-normative.
Forms can be annotated in such a way that the user agent will check the user’s input before the
form is submitted. The server still has to verify the input is valid (since hostile users can
easily bypass the form validation), but it allows the user to avoid the wait incurred by having
the server be the sole checker of the user’s input.
The simplest annotation is the required attribute,
which can be specified on input elements to indicate that the form is not to be
submitted until a value is given. By adding this attribute to the customer name, pizza size, and
delivery time fields, we allow the user agent to notify the user when the user submits the form
without filling in those fields:
<form method="post"
      enctype="application/x-www-form-urlencoded"
      action="https://pizza.example.com/order.cgi">
 <p><label>Customer name: <input name="custname" required></label></p>
 <p><label>Telephone: <input type=tel name="custtel"></label></p>
 <p><label>E-mail address: <input type=email name="custemail"></label></p>
 <fieldset>
  <legend> Pizza Size </legend>
  <p><label> <input type=radio name=size required value="small"> Small </label></p>
  <p><label> <input type=radio name=size required value="medium"> Medium </label></p>
  <p><label> <input type=radio name=size required value="large"> Large </label></p>
 </fieldset>
 <fieldset>
  <legend> Pizza Toppings </legend>
  <p><label> <input type=checkbox name="topping" value="bacon"> Bacon </label></p>
  <p><label> <input type=checkbox name="topping" value="cheese"> Extra Cheese </label></p>
  <p><label> <input type=checkbox name="topping" value="onion"> Onion </label></p>
  <p><label> <input type=checkbox name="topping" value="mushroom"> Mushroom </label></p>
 </fieldset>
 <p><label>Preferred delivery time: <input type=time min="11:00" max="21:00" step="900" name="delivery" required></label></p>
 <p><label>Delivery instructions: <textarea name="comments"></textarea></label></p>
 <p><button>Submit order</button></p>
</form>
It is also possible to limit the length of the input, using the maxlength attribute. By adding this to the textarea
element, we can limit users to 1000 characters, preventing them from writing huge essays to the
busy delivery drivers instead of staying focused and to the point:
<form method="post"
      enctype="application/x-www-form-urlencoded"
      action="https://pizza.example.com/order.cgi">
 <p><label>Customer name: <input name="custname" required></label></p>
 <p><label>Telephone: <input type=tel name="custtel"></label></p>
 <p><label>E-mail address: <input type=email name="custemail"></label></p>
 <fieldset>
  <legend> Pizza Size </legend>
  <p><label> <input type=radio name=size required value="small"> Small </label></p>
  <p><label> <input type=radio name=size required value="medium"> Medium </label></p>
  <p><label> <input type=radio name=size required value="large"> Large </label></p>
 </fieldset>
 <fieldset>
  <legend> Pizza Toppings </legend>
  <p><label> <input type=checkbox name="topping" value="bacon"> Bacon </label></p>
  <p><label> <input type=checkbox name="topping" value="cheese"> Extra Cheese </label></p>
  <p><label> <input type=checkbox name="topping" value="onion"> Onion </label></p>
  <p><label> <input type=checkbox name="topping" value="mushroom"> Mushroom </label></p>
 </fieldset>
 <p><label>Preferred delivery time: <input type=time min="11:00" max="21:00" step="900" name="delivery" required></label></p>
 <p><label>Delivery instructions: <textarea name="comments" maxlength=1000></textarea></label></p>
 <p><button>Submit order</button></p>
</form>
When a form is submitted, invalid events are
fired at each form control that is invalid, and then at the form element itself. This
can be useful for displaying a summary of the problems with the form, since typically the browser
itself will only report one problem at a time.
This section is non-normative.
In this pizza delivery example, the times are specified in the format «HH:MM»: two digits for
the hour, in 24-hour format, and two digits for the time. (Seconds could also be specified, though
they are not necessary in this example.)
In some locales, however, times are often expressed differently when presented to users. For
example, in the United States, it is still common to use the 12-hour clock with an am/pm
indicator, as in «2pm». In France, it is common to separate the hours from the minutes using an
«h» character, as in «14h00».
Similar issues exist with dates, with the added complication that even the order of the
components is not always consistent — for example, in Cyprus the first of February 2003
would typically be written «1/2/03», while that same date in Japan would typically be written as
«2003年02月01日» — and even with numbers, where locales differ, for
example, in what punctuation is used as the decimal separator and the thousands separator.
It is therefore important to distinguish the time, date, and number formats used in HTML and in
form submissions, which are always the formats defined in this specification (and based on the
well-established ISO 8601 standard for computer-readable date and time formats), from the time,
date, and number formats presented to the user by the browser and accepted as input from the user
by the browser.
The format used «on the wire», i.e. in HTML markup and in form submissions, is intended to be
computer-readable and consistent irrespective of the user’s locale. Dates, for instance, are
always written in the format «YYYY-MM-DD», as in «2003-02-01». Users are not expected to ever see
this format.
The time, date, or number given by the page in the wire format is then translated to the user’s
preferred presentation (based on user preferences or on the locale of the page itself), before
being displayed to the user. Similarly, after the user inputs a time, date, or number using their
preferred format, the user agent converts it back to the wire format before putting it in the DOM
or submitting it.
This allows scripts in pages and on servers to process times, dates, and numbers in a
consistent manner without needing to support dozens of different formats, while still supporting
the users’ needs.
See also the implementation notes regarding
localization of form controls.
4.10.2 Categories
Mostly for historical reasons, elements in this section fall into several overlapping (but
subtly different) categories in addition to the usual ones like flow content,
phrasing content, and interactive content.
A number of the elements are form-associated
elements, which means they can have a form owner.
buttonfieldsetinputkeygenlabelobjectoutputselecttextareaimg
The form-associated elements fall into several
subcategories:
- Listed elements
-
Denotes elements that are listed in the
form.elementsandfieldset.elementsAPIs.buttonfieldsetinputkeygenobjectoutputselecttextarea
- Submittable elements
-
Denotes elements that can be used for constructing the
form data set when aformelement is submitted.buttoninputkeygenobjectselecttextarea
Some submittable elements can be, depending on their
attributes, buttons. The prose below defines when an element
is a button. Some buttons are specifically submit
buttons. - Resettable elements
-
Denotes elements that can be affected when a
formelement is reset.inputkeygenoutputselecttextarea
- Reassociateable elements
-
Denotes elements that have a
formcontent attribute, and a
matchingformIDL attribute, that allow authors to specify an
explicit form owner.buttonfieldsetinputkeygenlabelobjectoutputselecttextarea
Some elements, not all of them form-associated,
are categorized as labelable elements. These are elements that
can be associated with a label element.
buttoninput(if thetypeattribute is not in the Hidden state)keygenmeteroutputprogressselecttextarea
4.10.3 The form element
- Categories:
- Flow content.
- Palpable content.
- Contexts in which this element can be used:
- Where flow content is expected.
- Content model:
- Flow content, but with no
formelement descendants. - Content attributes:
- Global attributes
accept-charset— Character encodings to use for form submissionaction— URL to use for form submissionautocomplete— Default setting for autofill feature for controls in the formenctype— Form data set encoding type to use for form submissionmethod— HTTP method to use for form submissionname— Name of form to use in thedocument.formsAPInovalidate— Bypass form control validation for form submissiontarget— Browsing context for form submission- Tag omission in text/html:
- Neither tag is omissible.
- Allowed ARIA role attribute values:
- Any role value.
- Allowed ARIA state and property attributes:
- Global aria-* attributes
- Any
aria-*attributes
applicable to the allowed roles. - DOM interface:
-
[OverrideBuiltins]
interface HTMLFormElement : HTMLElement {
           attribute DOMString acceptCharset;
           attribute DOMString action;
           attribute DOMString autocomplete;
           attribute DOMString enctype;
           attribute DOMString encoding;
           attribute DOMString method;
           attribute DOMString name;
           attribute boolean noValidate;
           attribute DOMString target;

  readonly attribute HTMLFormControlsCollection elements;
  readonly attribute long length;
  getter Element (unsigned long index);
  getter (RadioNodeList or Element) (DOMString name);

  void submit();
  void reset();
  boolean checkValidity();
};
The form element represents a collection of form-associated elements, some of which can represent
editable values that can be submitted to a server for processing.
The accept-charset attribute gives the
character encodings that are to be used for the submission. If specified, the value must be an
ordered set of unique space-separated tokens that are ASCII
case-insensitive, and each token must be an ASCII case-insensitive match for
one of the labels of an ASCII-compatible character
encoding. [ENCODING]
The name attribute represents the
form‘s name within the forms collection. The
value must not be the empty string, and the value must be unique amongst the form
elements in the forms collection that it is in, if
any.
The autocomplete attribute is an
enumerated attribute. The attribute has two states. The on keyword maps to the on state, and the off keyword maps to the off state. The attribute may also be omitted. The
missing value default is the on state.
The off state indicates that by default,
form controls in the form will have their autofill field name set to «off«; the on state indicates that by default, form controls
in the form will have their autofill field name set to «on«.
The action, enctype,
method, novalidate,
and target attributes are attributes for form
submission.
- form .
elements -
Returns an
HTMLCollectionof the form controls in the form (excluding image
buttons for historical reasons). - form .
length -
Returns the number of form controls in the form (excluding image buttons for historical
reasons). - form[index]
-
Returns the indexth element in the form (excluding image buttons for
historical reasons). - form[name]
-
Returns the form control (or, if there are several, a
RadioNodeListof the form
controls) in the form with the given ID orname(excluding image buttons for historical reasons); or, if there
are none, returns theimgelement with the given ID.Once an element has been referenced using a particular name, that name will continue being
available as a way to reference that element in this method, even if the element’s actual ID ornamechanges, for as long as
the element remains in theDocument.If there are multiple matching items, then a
RadioNodeListobject containing all
those elements is returned. - form .
submit() -
Submits the form.
- form .
reset() -
Resets the form.
- form .
checkValidity() -
Returns true if the form’s controls are all valid; otherwise, returns false.
The autocomplete IDL attribute must
reflect the content attribute of the same name, limited to only known
values.
The name IDL attribute must reflect
the content attribute of the same name.
The acceptCharset IDL attribute must
reflect the accept-charset content
attribute.
The elements IDL attribute must return an
HTMLFormControlsCollection rooted at the Document node while the
form element is in a Document and rooted at the
form element itself when it is not, whose filter matches listed elements whose form owner is the
form element, with the exception of input elements whose type attribute is in the Image
Button state, which must, for historical reasons, be excluded from this particular
collection.
The length IDL attribute must return the number
of nodes represented by the elements collection.
The supported property indices at any instant are the indices supported by the
object returned by the elements attribute at that
instant.
When a form element is indexed for indexed property
retrieval, the user agent must return the value returned by the item method on the elements collection, when invoked with the given index as its
argument.
Each form element has a mapping of names to elements called the past names
map. It is used to persist names of controls even when they change names.
The supported property names consist of the names obtained from the following
algorithm, in the order obtained from this algorithm:
-
Let sourced names be an initially empty ordered list of tuples
consisting of a string, an element, a source, where the source is either id, name,
or past, and, if the source is past, an age. -
For each listed element candidate
whose form owner is theformelement, with the exception of any
inputelements whosetypeattribute is in the
Image Button state, run these substeps:-
If candidate has an
idattribute, add
an entry to sourced names with thatid
attribute’s value as the string, candidate as the element, and id as
the source. -
If candidate has a
nameattribute,
add an entry to sourced names with thatnameattribute’s value as the string, candidate
as the element, and name as the source.
-
-
For each
imgelement candidate whose form owner
is theformelement, run these substeps:-
If candidate has an
idattribute, add
an entry to sourced names with thatid
attribute’s value as the string, candidate as the element, and id as
the source. -
If candidate has a
nameattribute,
add an entry to sourced names with thatnameattribute’s value as the string, candidate
as the element, and name as the source.
-
-
For each entry past entry in the past names map add an entry
to sourced names with the past entry‘s name as the
string, past entry‘s element as the element, past as the source, and
the length of time past entry has been in the past names map as
the age. -
Sort sourced names by tree order of the element entry of
each tuple, sorting entries with the same element by putting entries whose source is id
first, then entries whose source is name, and finally entries whose source is past,
and sorting entries with the same element and source by their age, oldest first. -
Remove any entries in sourced names that have the empty string as
their name. -
Remove any entries in sourced names that have the same name as an
earlier entry in the map. -
Return the list of names from sourced names, maintaining their
relative order.
The properties exposed in this way must not be enumerable.
When a form element is indexed for named property
retrieval, the user agent must run the following steps:
-
Let candidates be a live
RadioNodeList
object containing all the listed elements whose form
owner is theformelement that have either anid
attribute or anameattribute equal to name, with the exception ofinputelements whosetypeattribute is in the Image
Button state, in tree order. -
If candidates is empty, let candidates be a
liveRadioNodeListobject containing all theimgelements
that are descendants of theformelement and that have either anidattribute or anameattribute equal
to name, in tree order. -
If candidates is empty, name is the name of one of
the entries in theformelement’s past names map: return the object
associated with name in that map. -
If candidates contains more than one node, return candidates and abort these steps.
-
Otherwise, candidates contains exactly one node. Add a mapping from
name to the node in candidates in theform
element’s past names map, replacing the previous entry with the same name, if
any. -
Return the node in candidates.
If an element listed in a form element’s past names map changes
form owner, then its entries must be removed from that map.
The submit() method, when invoked, must submit the form element from the form
element itself, with the submitted from submit() method flag set.
The reset() method, when invoked, must run the
following steps:
-
If the
formelement is marked as locked for reset, then abort these
steps. -
Mark the
formelement as locked for reset. -
Reset the
formelement. -
Unmark the
formelement as locked for reset.
If the checkValidity() method is
invoked, the user agent must statically validate the constraints of the
form element, and return true if the constraint validation return a positive
result, and false if it returned a negative result.
This example shows two search forms:
<form action="http://www.google.com/search" method="get">
 <label>Google: <input type="search" name="q"></label> <input type="submit" value="Search...">
</form>
<form action="http://www.bing.com/search" method="get">
 <label>Bing: <input type="search" name="q"></label> <input type="submit" value="Search...">
</form>
4.10.4 The label element
- Categories:
- Flow content.
- Phrasing content.
- Interactive content.
- Reassociateable form-associated element.
- Palpable content.
- Contexts in which this element can be used:
- Where phrasing content is expected.
- Content model:
- Phrasing content, but with no descendant labelable elements unless it is the element’s labeled control, and no descendant
labelelements. - Content attributes:
- Global attributes
form— Associates the control with aformelementfor— Associate the label with form control- Tag omission in text/html:
- Neither tag is omissable
- Allowed ARIA role attribute values:
- None
- Allowed ARIA state and property attributes:
- Global aria-* attributes
- DOM interface:
-
interface HTMLLabelElement : HTMLElement {
  readonly attribute HTMLFormElement? form;
           attribute DOMString htmlFor;
  readonly attribute HTMLElement? control;
};
The label element represents a caption in a user interface. The
caption can be associated with a specific form control, known as the
label element’s labeled control, either using the for attribute, or by putting the form control inside the
label element itself.
Except where otherwise specified by the following rules, a label element has no
labeled control.
The for attribute may be specified to indicate a
form control with which the caption is to be associated. If the attribute is specified, the
attribute’s value must be the ID of a labelable element in the same Document as the
label element. If the attribute is specified and there is an
element in the Document whose ID is equal to the
value of the for attribute, and the first such element is a
labelable element, then that element is the label
element’s labeled control.
If the for attribute is not specified, but the
label element has a labelable element descendant,
then the first such descendant in tree order is the label element’s
labeled control.
The label element’s exact default presentation and behavior, in particular what
its activation behavior might be, if anything, should match the platform’s label
behavior. The activation behavior of a label element for events targeted
at interactive content descendants of a label element, and any
descendants of those interactive content descendants, must be to do nothing.
For example, on platforms where clicking a checkbox label checks the checkbox, clicking the
label in the following snippet could trigger the user agent to run synthetic
click activation steps on the input element, as if the element itself had
been triggered by the user:
<label><input type=checkbox name=lost> Lost</label>
On other platforms, the behavior might be just to focus the control, or do nothing.
The form attribute is used to explicitly associate the
label element with its form owner.
The following example shows three form controls each with a label, two of which have small
text showing the right format for users to use.
<p><label>Full name: <input name=fn> <small>Format: First Last</small></label></p>
<p><label>Age: <input name=age type=number min=0></label></p>
<p><label>Post code: <input name=pc> <small>Format: AB12 3CD</small></label></p>
- label .
control -
Returns the form control that is associated with this element.
The htmlFor IDL attribute must
reflect the for content attribute.
The control IDL attribute must return the
label element’s labeled control, if any, or null if there isn’t one.
The form IDL attribute is part of the element’s forms
API.
- control .
labels -
Returns a
NodeListof all thelabelelements that the form control
is associated with.
Labelable elements have a NodeList object
associated with them that represents the list of label elements, in tree
order, whose labeled control is the element in question. The labels IDL attribute of labelable elements, on getting, must return that
NodeList object.
4.10.5 The input element
- Categories:
- Flow content.
- Phrasing content.
- If the
typeattribute is not in the Hidden state: Interactive content. - If the
typeattribute is not in the Hidden state: Listed, labelable, submittable, resettable, and reassociateable form-associated element. - If the
typeattribute is in the Hidden state: Listed, submittable, resettable, and reassociateable form-associated element. - If the
typeattribute is not in the Hidden state: Palpable content. - Contexts in which this element can be used:
- Where phrasing content is expected.
- Content model:
- Empty.
- Content attributes:
- Global attributes
accept— Hint for expected file type in file upload controlsalt— Replacement text for use when images are not availableautocomplete— Hint for form autofill featureautofocus— Automatically focus the form control when the page is loadedchecked— Whether the command or control is checkeddirname— Name of form field to use for sending the element’s directionality in form submissiondisabled— Whether the form control is disabledform— Associates the control with aformelementformaction— URL to use for form submissionformenctype— Form data set encoding type to use for form submissionformmethod— HTTP method to use for form submissionformnovalidate— Bypass form control validation for form submissionformtarget— Browsing context for form submissionheight— Vertical dimensioninputmode— Hint for selecting an input modalitylist— List of autocomplete optionsmax— Maximum valuemaxlength— Maximum length of valuemin— Minimum valueminlength— Minimum length of valuemultiple— Whether to allow multiple valuesname— Name of form control to use for form submission and in theform.elementsAPIpattern— Pattern to be matched by the form control’s valueplaceholder— User-visible label to be placed within the form controlreadonly— Whether to allow the value to be edited by the userrequired— Whether the control is required for form submissionsize— Size of the controlsrc— Address of the resourcestep— Granularity to be matched by the form control’s valuetype— Type of form controlvalue— Value of the form controlwidth— Horizontal dimension- Also, the
titleattribute has special semantics on this element when used in conjunction with thepatternattribute. - Tag omission in text/html:
- No end tag
- Allowed ARIA role attribute values:
- Depends upon state of the
typeattribute. - Allowed ARIA state and property attributes:
- Global aria-* attributes
- Any
aria-*attributes
applicable to the allowed roles. - DOM interface:
-
interface HTMLInputElement : HTMLElement {
           attribute DOMString accept;
           attribute DOMString alt;
           attribute DOMString autocomplete;
           attribute boolean autofocus;
           attribute boolean defaultChecked;
           attribute boolean checked;
           attribute DOMString dirName;
           attribute boolean disabled;
  readonly attribute HTMLFormElement? form;
  readonly attribute FileList? files;
           attribute DOMString formAction;
           attribute DOMString formEnctype;
           attribute DOMString formMethod;
           attribute boolean formNoValidate;
           attribute DOMString formTarget;
           attribute unsigned long height;
           attribute boolean indeterminate;
  readonly attribute HTMLElement? list;
           attribute DOMString max;
           attribute long maxLength;
           attribute DOMString min;
           attribute long minLength;
           attribute boolean multiple;
           attribute DOMString name;
           attribute DOMString pattern;
           attribute DOMString placeholder;
           attribute boolean readOnly;
           attribute boolean required;
           attribute unsigned long size;
           attribute DOMString src;
           attribute DOMString step;
           attribute DOMString type;
           attribute DOMString defaultValue;
  [TreatNullAs=EmptyString] attribute DOMString value;
           attribute Date? valueAsDate;
           attribute unrestricted double valueAsNumber;
           attribute unsigned long width;

  void stepUp(optional long n = 1);
  void stepDown(optional long n = 1);

  readonly attribute boolean willValidate;
  readonly attribute ValidityState validity;
  readonly attribute DOMString validationMessage;
  boolean checkValidity();
  void setCustomValidity(DOMString error);

  readonly attribute NodeList labels;

  void select();
           attribute unsigned long selectionStart;
           attribute unsigned long selectionEnd;
           attribute DOMString selectionDirection;
  void setRangeText(DOMString replacement);
  void setRangeText(DOMString replacement, unsigned long start, unsigned long end, optional SelectionMode selectionMode = "preserve");
  void setSelectionRange(unsigned long start, unsigned long end, optional DOMString direction);
};
The input element represents a typed data field, usually with a form
control to allow the user to edit the data.
The type attribute controls the data type (and
associated control) of the element. It is an enumerated attribute. The following
table lists the keywords and states for the attribute — the keywords in the left column map
to the states in the cell in the second column on the same row as the keyword.
| Keyword | State | Data type | Control type |
|---|---|---|---|
hidden
|
Hidden | An arbitrary string | n/a |
text
|
Text | Text with no line breaks | A text field |
search
|
Search | Text with no line breaks | Search field |
tel
|
Telephone | Text with no line breaks | A text field |
url
|
URL | An absolute URL | A text field |
email
|
An e-mail address or list of e-mail addresses | A text field | |
password
|
Password | Text with no line breaks (sensitive information) | A text field that obscures data entry |
date
|
Date | A date (year, month, day) with no time zone | A date control |
time
|
Time | A time (hour, minute, seconds, fractional seconds) with no time zone | A time control |
number
|
Number | A numerical value | A text field or spinner control |
range
|
Range | A numerical value, with the extra semantic that the exact value is not important | A slider control or similar |
color
|
Color | An sRGB color with 8-bit red, green, and blue components | A color well |
checkbox
|
Checkbox | A set of zero or more values from a predefined list | A checkbox |
radio
|
Radio Button | An enumerated value | A radio button |
file
|
File Upload | Zero or more files each with a MIME type and optionally a file name | A label and a button |
submit
|
Submit Button | An enumerated value, with the extra semantic that it must be the last value selected and initiates form submission | A button |
image
|
Image Button | A coordinate, relative to a particular image’s size, with the extra semantic that it must be the last value selected and initiates form submission |
Either a clickable image, or a button |
reset
|
Reset Button | n/a | A button |
button
|
Button | n/a | A button |
The missing value default is the Text state.
Which of the accept, alt, autocomplete, checked, dirname, formaction, formenctype, formmethod, formnovalidate, formtarget, height,
list, max, maxlength, min, minlength, multiple, pattern, placeholder, readonly, required,
size, src, step, and width content
attributes, the checked, files, valueAsDate,
valueAsNumber, and list IDL attributes, the select() method, the selectionStart, selectionEnd, and selectionDirection, IDL attributes, the setRangeText() and setSelectionRange() methods, the stepUp() and stepDown()
methods, and the input and change events apply to an input element depends on
the state of its type attribute. The subsections that define
each type also clearly define in normative «bookkeeping» sections which of these feature apply,
and which do not apply, to each type. The behavior of these features depends on whether
they apply or not, as defined in their various sections (q.v. for content attributes, for APIs, for events).
The following table is non-normative and summarizes which of those
content attributes, IDL attributes, methods, and events apply to each state:
| Hidden | Text, Search |
URL, Telephone |
Password | Date, Time |
Number | Range | Color | Checkbox, Radio Button |
File Upload | Submit Button | Image Button | Reset Button, Button |
||
|---|---|---|---|---|---|---|---|---|---|---|---|---|---|---|
| Content attributes | ||||||||||||||
accept
|
· | · | · | · | · | · | · | · | · | · | Yes | · | · | · |
alt
|
· | · | · | · | · | · | · | · | · | · | · | · | Yes | · |
autocomplete
|
· | Yes | Yes | Yes | Yes | Yes | Yes | Yes | Yes | · | · | · | · | · |
checked
|
· | · | · | · | · | · | · | · | · | Yes | · | · | · | · |
dirname
|
· | Yes | · | · | · | · | · | · | · | · | · | · | · | · |
formaction
|
· | · | · | · | · | · | · | · | · | · | · | Yes | Yes | · |
formenctype
|
· | · | · | · | · | · | · | · | · | · | · | Yes | Yes | · |
formmethod
|
· | · | · | · | · | · | · | · | · | · | · | Yes | Yes | · |
formnovalidate
|
· | · | · | · | · | · | · | · | · | · | · | Yes | Yes | · |
formtarget
|
· | · | · | · | · | · | · | · | · | · | · | Yes | Yes | · |
height
|
· | · | · | · | · | · | · | · | · | · | · | · | Yes | · |
inputmode
|
· | Yes | · | · | Yes | · | · | · | · | · | · | · | · | · |
list
|
· | Yes | Yes | Yes | · | Yes | Yes | Yes | Yes | · | · | · | · | · |
max
|
· | · | · | · | · | Yes | Yes | Yes | · | · | · | · | · | · |
maxlength
|
· | Yes | Yes | Yes | Yes | · | · | · | · | · | · | · | · | · |
min
|
· | · | · | · | · | Yes | Yes | Yes | · | · | · | · | · | · |
minlength
|
· | Yes | Yes | Yes | Yes | · | · | · | · | · | · | · | · | · |
multiple
|
· | · | · | Yes | · | · | · | · | · | · | Yes | · | · | · |
pattern
|
· | Yes | Yes | Yes | Yes | · | · | · | · | · | · | · | · | · |
placeholder
|
· | Yes | Yes | Yes | Yes | · | Yes | · | · | · | · | · | · | · |
readonly
|
· | Yes | Yes | Yes | Yes | Yes | Yes | · | · | · | · | · | · | · |
required
|
· | Yes | Yes | Yes | Yes | Yes | Yes | · | · | Yes | Yes | · | · | · |
size
|
· | Yes | Yes | Yes | Yes | · | · | · | · | · | · | · | · | · |
src
|
· | · | · | · | · | · | · | · | · | · | · | · | Yes | · |
step
|
· | · | · | · | · | Yes | Yes | Yes | · | · | · | · | · | · |
width
|
· | · | · | · | · | · | · | · | · | · | · | · | Yes | · |
| IDL attributes and methods | ||||||||||||||
checked
|
· | · | · | · | · | · | · | · | · | Yes | · | · | · | · |
files
|
· | · | · | · | · | · | · | · | · | · | Yes | · | · | · |
value
|
default | value | value | value | value | value | value | value | value | default/on | filename | default | default | default |
valueAsDate
|
· | · | · | · | · | Yes | · | · | · | · | · | · | · | · |
valueAsNumber
|
· | · | · | · | · | Yes | Yes | Yes | · | · | · | · | · | · |
list
|
· | Yes | Yes | Yes | · | Yes | Yes | Yes | Yes | · | · | · | · | · |
select()
|
· | Yes | Yes | · | Yes | · | · | · | · | · | · | · | · | · |
selectionStart
|
· | Yes | Yes | · | Yes | · | · | · | · | · | · | · | · | · |
selectionEnd
|
· | Yes | Yes | · | Yes | · | · | · | · | · | · | · | · | · |
selectionDirection
|
· | Yes | Yes | · | Yes | · | · | · | · | · | · | · | · | · |
setRangeText()
|
· | Yes | Yes | · | Yes | · | · | · | · | · | · | · | · | · |
setSelectionRange()
|
· | Yes | Yes | · | Yes | · | · | · | · | · | · | · | · | · |
stepDown()
|
· | · | · | · | · | Yes | Yes | Yes | · | · | · | · | · | · |
stepUp()
|
· | · | · | · | · | Yes | Yes | Yes | · | · | · | · | · | · |
| Events | ||||||||||||||
input event
|
· | Yes | Yes | Yes | Yes | Yes | Yes | Yes | Yes | Yes | Yes | · | · | · |
change event
|
· | Yes | Yes | Yes | Yes | Yes | Yes | Yes | Yes | Yes | Yes | · | · | · |
Some states of the type attribute define a value
sanitization algorithm.
Each input element has a value, which is
exposed by the value IDL attribute. Some states define an
algorithm to convert a string to a number, an
algorithm to convert a number to a string, an
algorithm to convert a string to a Date
object, and an algorithm to convert a
Date object to a string, which are used by max, min, step, valueAsDate, valueAsNumber, stepDown(), and stepUp().
Each input element has a boolean dirty
value flag. The dirty value flag must be
initially set to false when the element is created, and must be set to true whenever the user
interacts with the control in a way that changes the value.
(It is also set to true when the value is programmatically changed, as described in the definition
of the value IDL attribute.)
The value content attribute gives the default
value of the input element. When the value content attribute is added, set,
or removed, if the control’s dirty value flag
is false, the user agent must set the value of the element
to the value of the value content attribute, if there is
one, or the empty string otherwise, and then run the current value sanitization
algorithm, if one is defined.
Each input element has a checkedness,
which is exposed by the checked IDL attribute.
Each input element has a boolean dirty checkedness flag. When it is true, the
element is said to have a dirty checkedness.
The dirty checkedness flag must be initially
set to false when the element is created, and must be set to true whenever the user interacts with
the control in a way that changes the checkedness.
The checked content attribute is a
boolean attribute that gives the default checkedness of the input element. When the checked content attribute is added,
if the control does not have dirty checkedness, the
user agent must set the checkedness of the element to
true; when the checked content attribute is removed, if
the control does not have dirty checkedness, the user
agent must set the checkedness of the element to
false.
The reset algorithm for input
elements is to set the dirty value flag and
dirty checkedness flag back to false, set
the value of the element to the value of the value content attribute, if there is one, or the empty string
otherwise, set the checkedness of the element to true if
the element has a checked content attribute and false if
it does not, empty the list of selected
files, and then invoke the value sanitization algorithm, if the type attribute’s current state defines one.
Each input element can be mutable. Except where
otherwise specified, an input element is always mutable. Similarly, except where otherwise specified, the user
agent should not allow the user to modify the element’s value or checkedness.
When an input element is disabled, it is not mutable.
The readonly attribute can also in some
cases (e.g. for the Date state, but not the Checkbox state) stop an input element from
being mutable.
The cloning steps for input elements
must propagate the value, dirty value flag, checkedness, and dirty checkedness flag from the node being cloned
to the copy.
When an input element is first created, the element’s rendering and behavior must
be set to the rendering and behavior defined for the type
attribute’s state, and the value sanitization algorithm, if one is defined for the
type attribute’s state, must be invoked.
When an input element’s type attribute
changes state, the user agent must run the following steps:
-
If the previous state of the element’s
typeattribute
put thevalueIDL attribute in the value mode, and the element’s value is not the empty string, and the new state of the element’s
typeattribute puts thevalueIDL attribute in either the default mode or the default/on mode, then set the element’svaluecontent attribute to the element’s value. -
Otherwise, if the previous state of the element’s
typeattribute put thevalue
IDL attribute in any mode other than the value mode, and the
new state of the element’stypeattribute puts thevalueIDL attribute in the value mode, then set the value of the element to the value of thevaluecontent attribute, if there is one, or the empty string
otherwise, and then set the control’s dirty value
flag to false. -
Update the element’s rendering and behavior to the new state’s.
-
Invoke the value sanitization algorithm, if one is defined for the
typeattribute’s new state.
The name attribute represents the element’s name.
The dirname attribute controls how the element’s directionality is submitted.
The disabled attribute is used to make the control non-interactive and to prevent its value from being submitted.
The form attribute is used to explicitly associate the input element with its form owner.
The autofocus attribute controls focus.
The autocomplete attribute controls how the user agent provides autofill behavior.
The indeterminate IDL attribute must
initially be set to false. On getting, it must return the last value it was set to. On setting, it
must be set to the new value. It has no effect except for changing the appearance of checkbox controls.
The accept, alt, max,
min, multiple, pattern, placeholder, required, size, src,
and step IDL attributes must reflect
the respective content attributes of the same name. The dirName IDL attribute must reflect the
dirname content attribute. The readOnly IDL attribute must reflect the
readonly content attribute. The defaultChecked IDL attribute must
reflect the checked content attribute. The
defaultValue IDL attribute must
reflect the value content attribute.
The type IDL attribute must reflect
the respective content attribute of the same name, limited to only known values.
The maxLength IDL attribute must reflect
the maxlength content attribute, limited to only
non-negative numbers. The minLength IDL attribute must reflect
the minlength content attribute, limited to only
non-negative numbers.
The IDL attributes width and height must return the rendered width and height of
the image, in CSS pixels, if an image is being rendered, and is being rendered to a
visual medium; or else the intrinsic width and height of the image, in CSS pixels, if an image is
available but not being rendered to a visual medium; or else 0,
if no image is available. When the input element’s
type attribute is not in the Image Button state, then no image is available. [CSS]
On setting, they must act as if they reflected the respective
content attributes of the same name.
The willValidate, validity, and validationMessage IDL attributes, and the checkValidity(), and setCustomValidity() methods, are part of the
constraint validation API. The labels IDL
attribute provides a list of the element’s labels. The select(), selectionStart, selectionEnd, selectionDirection, setRangeText(), and setSelectionRange() methods and IDL attributes
expose the element’s text selection. The autofocus, disabled, form, and name IDL attributes are part of the element’s forms API.
4.10.5.1 States of the type attribute
4.10.5.1.1 Hidden state (type=hidden)
When an input element’s type attribute is in
the Hidden state, the rules in this section apply.
The input element represents a value that is not intended to be
examined or manipulated by the user.
Constraint validation: If an input element’s type attribute is in the Hidden state, it is barred from constraint
validation.
If the name attribute is present and has a value that is a
case-sensitive match for the string «_charset_«, then the element’s value attribute must be omitted.
The
value
IDL attribute applies to this element and is
in mode default.
The following content attributes must not be specified and do not
apply to the element:
accept,
alt,
autocomplete,
checked,
dirname,
formaction,
formenctype,
formmethod,
formnovalidate,
formtarget,
height,
list,
max,
maxlength,
min,
minlength,
multiple,
pattern,
placeholder,
readonly,
required,
size,
src,
step, and
width.
The following IDL attributes and methods do not apply to the
element:
checked,
files,
list,
selectionStart,
selectionEnd,
selectionDirection,
valueAsDate, and
valueAsNumber IDL attributes;
select(),
setRangeText(),
setSelectionRange(),
stepDown(), and
stepUp() methods.
The input and change events do not apply.
4.10.5.1.2 Text (type=text) state and Search state (type=search)
When an input element’s type attribute is in
the Text state or the Search state, the rules in this section apply.
The input element represents a one line plain text edit control for
the element’s value.
The difference between the Text state
and the Search state is primarily stylistic: on
platforms where search fields are distinguished from regular text fields, the Search state might result in an appearance consistent with
the platform’s search fields rather than appearing like a regular text field.
If the element is mutable, its value should be editable by the user. User agents must not allow
users to insert «LF» (U+000A) or «CR» (U+000D) characters into the element’s
value.
If the element is mutable, the user agent should allow the
user to change the writing direction of the element, setting it either to a left-to-right writing
direction or a right-to-left writing direction. If the user does so, the user agent must then run
the following steps:
-
Set the element’s
dirattribute to «ltr» if the user selected a left-to-right writing direction, and
«rtl» if the user selected a right-to-left writing
direction. -
Queue a task to fire a simple event that bubbles named
inputat theinputelement.
The value attribute, if specified, must have a value that
contains no «LF» (U+000A) or «CR» (U+000D) characters.
The following common input element content
attributes, IDL attributes, and methods apply to the element:
autocomplete,
dirname,
list,
maxlength,
minlength,
pattern,
placeholder,
readonly,
required, and
size content attributes;
list,
selectionStart,
selectionEnd,
selectionDirection, and
value IDL attributes;
select(),
setRangeText(), and
setSelectionRange() methods.
The value IDL attribute is
in mode value.
The input and change events apply.
The following content attributes must not be specified and do not
apply to the element:
accept,
alt,
checked,
formaction,
formenctype,
formmethod,
formnovalidate,
formtarget,
height,
max,
min,
multiple,
src,
step, and
width.
The following IDL attributes and methods do not apply to the
element:
checked,
files,
valueAsDate, and
valueAsNumber IDL attributes;
stepDown() and
stepUp() methods.
4.10.5.1.3 Telephone state (type=tel)
When an input element’s type attribute is in
the Telephone state, the rules in this section apply.
The input element represents a control for editing a telephone number
given in the element’s value.
If the element is mutable, its value should be editable by the user. User agents may change the
spacing and, with care, the punctuation of values that the
user enters. User agents must not allow users to insert «LF» (U+000A) or «CR» (U+000D) characters into the element’s value.
The value attribute, if specified, must have a value that
contains no «LF» (U+000A) or «CR» (U+000D) characters.
Unlike the URL and E-mail types, the Telephone type does not enforce a particular syntax. This is
intentional; in practice, telephone number fields tend to be free-form fields, because there are a
wide variety of valid phone numbers. Systems that need to enforce a particular format are
encouraged to use the pattern attribute or the setCustomValidity() method to hook into the client-side
validation mechanism.
The following common input element content
attributes, IDL attributes, and methods apply to the element:
autocomplete,
list,
maxlength,
minlength,
pattern,
placeholder,
readonly,
required, and
size content attributes;
list,
selectionStart,
selectionEnd,
selectionDirection, and
value IDL attributes;
select(),
setRangeText(), and
setSelectionRange() methods.
The value IDL attribute is
in mode value.
The input and change events apply.
The following content attributes must not be specified and do not
apply to the element:
accept,
alt,
checked,
dirname,
formaction,
formenctype,
formmethod,
formnovalidate,
formtarget,
height,
max,
min,
multiple,
src,
step, and
width.
The following IDL attributes and methods do not apply to the
element:
checked,
files,
valueAsDate, and
valueAsNumber IDL attributes;
stepDown() and
stepUp() methods.
4.10.5.1.4 URL state (type=url)
When an input element’s type attribute is in
the URL state, the rules in this section apply.
The input element represents a control for editing a single
absolute URL given in the element’s value.
If the element is mutable, the user agent should allow the
user to change the URL represented by its value. User agents
may allow the user to set the value to a string that is not
a valid absolute URL, but may also or instead
automatically escape characters entered by the user so that the value is always a valid
absolute URL (even if that isn’t the actual value seen and edited by the user in the
interface). User agents should allow the user to set the value to the empty string. User agents must not allow users to
insert «LF» (U+000A) or «CR» (U+000D) characters into the value.
The value attribute, if specified and not empty, must
have a value that is a valid URL potentially surrounded by spaces that is also an
absolute URL.
The following common input element content
attributes, IDL attributes, and methods apply to the element:
autocomplete,
list,
maxlength,
minlength,
pattern,
placeholder,
readonly,
required, and
size content attributes;
list,
selectionStart,
selectionEnd,
selectionDirection, and
value IDL attributes;
select(),
setRangeText(), and
setSelectionRange() methods.
The value IDL attribute is
in mode value.
The input and change events apply.
The following content attributes must not be specified and do not
apply to the element:
accept,
alt,
checked,
dirname,
formaction,
formenctype,
formmethod,
formnovalidate,
formtarget,
height,
max,
min,
multiple,
src,
step, and
width.
The following IDL attributes and methods do not apply to the
element:
checked,
files,
valueAsDate, and
valueAsNumber IDL attributes;
stepDown() and
stepUp() methods.
If a document contained the following markup:
<input type="url" name="location" list="urls">
<datalist id="urls">
 <option label="MIME: Format of Internet Message Bodies" value="http://tools.ietf.org/html/rfc2045">
 <option label="HTML 4.01 Specification" value="http://www.w3.org/TR/html4/">
 <option label="Form Controls" value="http://www.w3.org/TR/xforms/slice8.html#ui-commonelems-hint">
 <option label="Scalable Vector Graphics (SVG) 1.1 Specification" value="http://www.w3.org/TR/SVG/">
 <option label="Feature Sets - SVG 1.1 - 20030114" value="http://www.w3.org/TR/SVG/feature.html">
 <option label="The Single UNIX Specification, Version 3" value="http://www.unix-systems.org/version3/">
</datalist>
…and the user had typed «www.w3«, and the user agent had also found that the user
had visited http://www.w3.org/Consortium/#membership and
http://www.w3.org/TR/XForms/ in the recent past, then the rendering might look like
this:
The first four URLs in this sample consist of the four URLs in the author-specified list that
match the text the user has entered, sorted in some UA-defined manner (maybe by how frequently
the user refers to those URLs). Note how the UA is using the knowledge that the values are URLs
to allow the user to omit the scheme part and perform intelligent matching on the domain
name.
The last two URLs (and probably many more, given the scrollbar’s indications of more values
being available) are the matches from the user agent’s session history data. This data is not
made available to the page DOM. In this particular case, the UA has no titles to provide for
those values.
4.10.5.1.5 E-mail state (type=email)
When an input element’s type attribute is in
the E-mail state, the rules in this section apply.
How the E-mail state operates depends on whether the
multiple attribute is specified or not.
- When the
multipleattribute is not specified on the
element -
The
inputelement represents a control for editing an e-mail
address given in the element’s value.If the element is mutable, the user agent should allow the
user to change the e-mail address represented by its value. User agents may allow the user to set the value to a string that is not a valid e-mail
address. The user agent should act in a manner consistent with expecting the user to
provide a single e-mail address. User agents should allow the user to set the value to the empty string. User agents must not allow users to
insert «LF» (U+000A) or «CR» (U+000D) characters into the value. User agents may transform the value for display and editing; in particular, user agents should
convert punycode in the value to IDN in the display and
vice versa.Constraint validation: While the user interface is representing input that
the user agent cannot convert to punycode, the control is suffering from bad
input.The
valueattribute, if specified and not empty, must
have a value that is a single valid e-mail address. - When the
multipleattribute is specified on
the element -
The
inputelement represents a control for adding, removing, and
editing the e-mail addresses given in the element’s values.If the element is mutable, the user agent should allow the
user to add, remove, and edit the e-mail addresses represented by its values. User agents may allow the user to set any
individual value in the list of values to a
string that is not a valid e-mail address, but must not allow users to set any
individual value to a string containing «,» (U+002C), «LF» (U+000A), or «CR» (U+000D) characters. User agents should allow the user to remove all the addresses
in the element’s values. User agents may
transform the values for display and editing; in
particular, user agents should convert punycode in the value to IDN in the display and vice versa.Constraint validation: While the user interface describes a situation where
an individual value contains a «,» (U+002C) or is representing input that the user agent
cannot convert to punycode, the control is suffering from bad input.Whenever the user changes the element’s values, the user agent must run the following
steps:-
Let latest values be a copy of the element’s values.
-
Strip leading and trailing whitespace from each value in latest values.
-
Let the element’s value be the result of
concatenating all the values in latest values, separating each value from
the next by a single «,» (U+002C) character, maintaining the list’s order.
The
valueattribute, if specified, must have a value
that is a valid e-mail address list.The value sanitization algorithm is as follows:
-
Split on commas the element’s value, strip leading and trailing whitespace from
each resulting token, if any, and let the element’s values be the (possibly empty) resulting list of
(possibly empty) tokens, maintaining the original order. -
Let the element’s value be the result of
concatenating the element’s values, separating
each value from the next by a single «,» (U+002C) character, maintaining the list’s
order.
When the
multipleattribute is set, the user agent
must run the value sanitization algorithm.Constraint validation: While the value
of the element is not a valid e-mail address list, the element is suffering
from a type mismatch. -
A valid e-mail address is a string that matches the email
production of the following ABNF, the character set for which is Unicode. This ABNF implements the
extensions described in RFC 1123. [ABNF] [RFC5322] [RFC1034] [RFC1123]
email         = 1*( atext / "." ) "@" label *( "." label )
label         = let-dig [ [ ldh-str ] let-dig ]  ; limited to a length of 63 characters by RFC 1034 section 3.5
atext         = < as defined in RFC 5322 section 3.2.3 >
let-dig       = < as defined in RFC 1034 section 3.5 >
ldh-str       = < as defined in RFC 1034 section 3.5 >
This requirement is a willful violation of RFC 5322, which defines a
syntax for e-mail addresses that is simultaneously too strict (before the «@» character), too
vague (after the «@» character), and too lax (allowing comments, whitespace characters, and quoted
strings in manners unfamiliar to most users) to be of practical use here.
The following JavaScript- and Perl-compatible regular expression is an implementation of the
above definition.
/^[a-zA-Z0-9.!#$%&'*+/=?^_`{|}~-]+@[a-zA-Z0-9](?:[a-zA-Z0-9-]{0,61}[a-zA-Z0-9])?(?:.[a-zA-Z0-9](?:[a-zA-Z0-9-]{0,61}[a-zA-Z0-9])?)*$/
A valid e-mail address list is a set of comma-separated tokens, where
each token is itself a valid e-mail address. To obtain the list of
tokens from a valid e-mail address list, and implementation must split the string on commas.
The following common input element content
attributes, IDL attributes, and methods apply to the element:
autocomplete,
list,
maxlength,
minlength,
multiple,
pattern,
placeholder,
readonly,
required, and
size content attributes;
list and
value IDL attributes.
The value IDL attribute is
in mode value.
The input and change events apply.
The following content attributes must not be specified and do not
apply to the element:
accept,
alt,
checked,
dirname,
formaction,
formenctype,
formmethod,
formnovalidate,
formtarget,
height,
max,
min,
src,
step, and
width.
The following IDL attributes and methods do not apply to the
element:
checked,
files,
selectionStart,
selectionEnd,
selectionDirection,
valueAsDate, and
valueAsNumber IDL attributes;
select(),
setRangeText(),
setSelectionRange(),
stepDown() and
stepUp() methods.
4.10.5.1.6 Password state (type=password)
When an input element’s type attribute is in
the Password state, the rules in this section
apply.
The input element represents a one line plain text edit control for
the element’s value. The user agent should obscure the value
so that people other than the user cannot see it.
If the element is mutable, its value should be editable by the user. User agents must not allow
users to insert «LF» (U+000A) or «CR» (U+000D) characters into the value.
The value attribute, if specified, must have a value that
contains no «LF» (U+000A) or «CR» (U+000D) characters.
The following common input element content
attributes, IDL attributes, and methods apply to the element:
autocomplete,
maxlength,
minlength,
pattern,
placeholder,
readonly,
required, and
size content attributes;
selectionStart,
selectionEnd,
selectionDirection, and
value IDL attributes;
select(),
setRangeText(), and
setSelectionRange() methods.
The value IDL attribute is
in mode value.
The input and change events apply.
The following content attributes must not be specified and do not
apply to the element:
accept,
alt,
checked,
dirname,
formaction,
formenctype,
formmethod,
formnovalidate,
formtarget,
height,
list,
max,
min,
multiple,
src,
step, and
width.
The following IDL attributes and methods do not apply to the
element:
checked,
files,
list,
valueAsDate, and
valueAsNumber IDL attributes;
stepDown() and
stepUp() methods.
4.10.5.1.7 Date state (type=date)
When an input element’s type attribute is in
the Date state, the rules in this section apply.
The input element represents a control for setting the element’s
value to a string representing a specific date.
If the element is mutable, the user agent should allow the
user to change the date represented by its value, as obtained by parsing a
date from it. User agents must not allow the user to set the value to a non-empty string that is not a valid date
string. If the user agent provides a user interface for selecting a date, then the value must be set
to a valid date string representing the user’s selection. User agents should allow
the user to set the value to the empty string.
Constraint validation: While the user interface describes input that the user
agent cannot convert to a valid date string, the control is suffering from bad
input.
See the introduction section for a discussion of
the difference between the input format and submission format for date, time, and number form
controls, and the implementation notes
regarding localization of form controls.
The value attribute, if specified and not empty, must
have a value that is a valid date string.
The value sanitization algorithm is as follows: If the value of the element is not a valid date string, then
set it to the empty string instead.
The min attribute, if specified, must have a value that is
a valid date string. The max attribute, if
specified, must have a value that is a valid date string.
The step attribute is expressed in days. The step scale factor is 86,400,000
(which converts the days to milliseconds, as used in the other algorithms). The default step is 1 day.
When the element is suffering from a step mismatch, the user agent may round the
element’s value to the nearest date for which the element would not suffer from a step mismatch.
The algorithm to convert a string to a
number, given a string input, is as follows: If parsing a date from input results in an
error, then return an error; otherwise, return the number of milliseconds elapsed from midnight
UTC on the morning of 1970-01-01 (the time represented by the value «1970-01-01T00:00:00.0Z«) to midnight UTC on the morning of the parsed date, ignoring leap seconds.
The algorithm to convert a number to a
string, given a number input, is as follows: Return a
valid date string that represents the date that, in
UTC, is current input milliseconds after midnight UTC on the morning of
1970-01-01 (the time represented by the value «1970-01-01T00:00:00.0Z«).
The algorithm to convert a string to a
Date object, given a string input, is as follows:
If parsing a date from input results
in an error, then return an error; otherwise, return a new
Date object representing midnight UTC on the morning of the parsed date.
The algorithm to convert a
Date object to a string, given a Date object input, is as follows: Return a valid date string that
represents the date current at the time represented by input in the UTC time zone.
The following common input element content
attributes, IDL attributes, and methods apply to the element:
autocomplete,
list,
max,
min,
readonly,
required, and
step content attributes;
list,
value,
valueAsDate, and
valueAsNumber IDL attributes;
stepDown() and
stepUp() methods.
The value IDL attribute is
in mode value.
The input and change events apply.
The following content attributes must not be specified and do not
apply to the element:
accept,
alt,
checked,
dirname,
formaction,
formenctype,
formmethod,
formnovalidate,
formtarget,
height,
maxlength,
minlength,
multiple,
pattern,
placeholder,
size,
src, and
width.
The following IDL attributes and methods do not apply to the
element:
checked,
selectionStart,
selectionEnd, and
selectionDirection IDL attributes;
select(),
setRangeText(), and
setSelectionRange() methods.
4.10.5.1.8 Time state (type=time)
When an input element’s type attribute is in
the Time state, the rules in this section apply.
The input element represents a control for setting the element’s
value to a string representing a specific time.
If the element is mutable, the user agent should allow the
user to change the time represented by its value, as obtained by parsing a
time from it. User agents must not allow the user to set the value to a non-empty string that is not a valid time
string. If the user agent provides a user interface for selecting a time, then the value must be set
to a valid time string representing the user’s selection. User agents should allow
the user to set the value to the empty string.
Constraint validation: While the user interface describes input that the user
agent cannot convert to a valid time string, the control is suffering from bad
input.
See the introduction section for a discussion of
the difference between the input format and submission format for date, time, and number form
controls, and the implementation notes
regarding localization of form controls.
The value attribute, if specified and not empty, must
have a value that is a valid time string.
The value sanitization algorithm is as follows: If the value of the element is not a valid time string, then
set it to the empty string instead.
The form control has a periodic domain.
The min attribute, if specified, must have a value that is
a valid time string. The max attribute, if
specified, must have a value that is a valid time string.
The step attribute is expressed in seconds. The step scale factor is 1000 (which
converts the seconds to milliseconds, as used in the other algorithms). The default step is 60 seconds.
When the element is suffering from a step mismatch, the user agent may round the
element’s value to the nearest time for which the element would not suffer from a step mismatch.
The algorithm to convert a string to a
number, given a string input, is as follows: If parsing a time from input results in an
error, then return an error; otherwise, return the number of milliseconds elapsed from midnight to
the parsed time on a day with no time changes.
The algorithm to convert a number to a
string, given a number input, is as follows: Return a
valid time string that represents the time that is
input milliseconds after midnight on a day with no time changes.
The algorithm to convert a string to a
Date object, given a string input, is as follows:
If parsing a time from input results
in an error, then return an error; otherwise, return a new
Date object representing the parsed time in
UTC on 1970-01-01.
The algorithm to convert a
Date object to a string, given a Date object input, is as follows: Return a valid time string that
represents the UTC time component that is represented by input.
The following common input element content attributes, IDL attributes, and
methods apply to the element:
autocomplete,
list,
max,
min,
readonly,
required, and
step content attributes;
list,
value,
valueAsDate, and
valueAsNumber IDL attributes;
stepDown() and
stepUp() methods.
The value IDL attribute is in mode value.
The input and change events apply.
The following content attributes must not be specified and do not apply to the
element:
accept,
alt,
checked,
dirname,
formaction,
formenctype,
formmethod,
formnovalidate,
formtarget,
height,
maxlength,
minlength,
multiple,
pattern,
placeholder,
size,
src, and
width.
The following IDL attributes and methods do not apply to the element:
checked,
files,
selectionStart,
selectionEnd, and
selectionDirection IDL attributes;
select(),
setRangeText(), and
setSelectionRange() methods.
4.10.5.1.9 Number state (type=number)
When an input element’s type attribute is in
the Number state, the rules in this section apply.
The input element represents a control for setting the element’s
value to a string representing a number.
This specification does not define what user interface user agents are to use;
user agent vendors are encouraged to consider what would best serve their users’ needs. For
example, a user agent in Persian or Arabic markets might support Persian and Arabic numeric input
(converting it to the format required for submission as described above). Similarly, a user agent
designed for Romans might display the value in Roman numerals rather than in decimal; or (more
realistically) a user agent designed for the French market might display the value with
apostrophes between thousands and commas before the decimals, and allow the user to enter a value
in that manner, internally converting it to the submission format described above.
The value attribute, if specified and not empty, must
have a value that is a valid floating-point number.
The value sanitization algorithm is as follows: If the value of the element is not a valid floating-point
number, then set it to the empty string instead.
The min attribute, if specified, must have a value that is
a valid floating-point number. The max attribute,
if specified, must have a value that is a valid floating-point number.
The step scale factor is
1. The default step is 1 (allowing only
integers to be selected by the user, unless the step
base has a non-integer value).
When the element is suffering from a step mismatch, the user agent may round the
element’s value to the nearest number for which the element
would not suffer from a step mismatch. If
there are two such numbers, user agents are encouraged to pick the one nearest positive
infinity.
The algorithm to convert a string to a
number, given a string input, is as follows: If applying the
rules for parsing floating-point number values to input results
in an error, then return an error; otherwise, return the resulting number.
The algorithm to convert a number to a
string, given a number input, is as follows: Return a
valid floating-point number that represents input.
The following common input element content attributes, IDL attributes, and
methods apply to the element:
autocomplete,
list,
max,
min,
placeholder,
readonly,
required, and
step content attributes;
list,
value, and
valueAsNumber IDL attributes;
stepDown() and
stepUp() methods.
The value IDL attribute is in mode value.
The input and change events apply.
The following content attributes must not be specified and do not apply to the
element:
accept,
alt,
checked,
dirname,
formaction,
formenctype,
formmethod,
formnovalidate,
formtarget,
height,
maxlength,
minlength,
multiple,
pattern,
size,
src, and
width.
The following IDL attributes and methods do not apply to the element:
checked,
files,
selectionStart,
selectionEnd,
selectionDirection, and
valueAsDate IDL attributes;
select(),
setRangeText(), and
setSelectionRange() methods.
Here is an example of using a numeric input control:
<label>How much do you want to charge? $<input type=number min=0 step=0.01 name=price></label>
As described above, a user agent might support numeric input in the user’s local format,
converting it to the format required for submission as described above. This might include
handling grouping separators (as in «872,000,000,000») and various decimal separators (such as
«3,99» vs «3.99») or using local digits (such as those in Arabic, Devanagari, Persian, and
Thai).
The type=number state is not appropriate for input that
happens to only consist of numbers but isn’t strictly speaking a number. For example, it would be
inappropriate for credit card numbers or US postal codes. A simple way of determining whether to
use type=number is to consider whether it would make sense for the input
control to have a spinbox interface (e.g. with «up» and «down» arrows). Getting a credit card
number wrong by 1 in the last digit isn’t a minor mistake, it’s as wrong as getting every digit
incorrect. So it would not make sense for the user to select a credit card number using «up» and
«down» buttons. When a spinbox interface is not appropriate, type=text is
probably the right choice (possibly with a pattern
attribute).
4.10.5.1.10 Range state (type=range)
When an input element’s type attribute is in
the Range state, the rules in this section apply.
The input element represents a control for setting the element’s
value to a string representing a number, but with the caveat
that the exact value is not important, letting UAs provide a simpler interface than they do for
the Number state.
The value attribute, if specified, must have a value that
is a valid floating-point number.
The min attribute, if specified, must have a value that is
a valid floating-point number. The default
minimum is 0. The max attribute, if specified, must
have a value that is a valid floating-point number. The default maximum is 100.
The default value is the minimum plus half the difference between the minimum and the maximum,
unless the maximum is less than the minimum, in which case the default value is the minimum.
The step scale factor is
1. The default step is 1 (allowing only
integers, unless the min attribute has a non-integer
value).
When the element is suffering from a step mismatch, the user agent must round the
element’s value to the nearest number for which the element
would not suffer from a step mismatch, and
which is greater than or equal to the minimum, and, if the
maximum is not less than the minimum, which is less than or equal to the maximum, if there is a number that matches these constraints. If
two numbers match these constraints, then user agents must use the one nearest to positive
infinity.
For example, the markup
<input type="range" min=0 max=100 step=20 value=50>
results in a range control whose initial value is 60.
The algorithm to convert a string to a
number, given a string input, is as follows: If applying the
rules for parsing floating-point number values to input results
in an error, then return an error; otherwise, return the resulting number.
The algorithm to convert a number to a
string, given a number input, is as follows: Return a
valid floating-point number that represents input.
The following common input element content attributes, IDL attributes, and
methods apply to the element:
autocomplete,
list,
max,
min, and
step content attributes;
list,
value, and
valueAsNumber IDL attributes;
stepDown() and
stepUp() methods.
The value IDL attribute is in mode value.
The input and change events apply.
The following content attributes must not be specified and do not apply to the
element:
accept,
alt,
checked,
dirname,
formaction,
formenctype,
formmethod,
formnovalidate,
formtarget,
height,
maxlength,
minlength,
multiple,
pattern,
placeholder,
readonly,
required,
size,
src, and
width.
The following IDL attributes and methods do not apply to the element:
checked,
files,
selectionStart,
selectionEnd,
selectionDirection, and
valueAsDate IDL attributes;
select(),
setRangeText(), and
setSelectionRange() methods.
Here is an example of a range control using an autocomplete list with the list attribute. This could be useful if there are values along the
full range of the control that are especially important, such as preconfigured light levels or
typical speed limits in a range control used as a speed control. The following markup
fragment:
<input type="range" min="-100" max="100" value="0" step="10" name="power" list="powers">
<datalist id="powers">
 <option value="0">
 <option value="-30">
 <option value="30">
 <option value="++50">
</datalist>
…with the following style sheet applied:
input { height: 75px; width: 49px; background: #D5CCBB; color: black; }
…might render as:
![]()
Note how the UA determined the orientation of the control from the ratio of the
style-sheet-specified height and width properties. The colors were similarly derived from the
style sheet. The tick marks, however, were derived from the markup. In particular, the step attribute has not affected the placement of tick marks, the
UA deciding to only use the author-specified completion values and then adding longer tick marks
at the extremes.
Note also how the invalid value ++50 was completely ignored.
For another example, consider the following markup fragment:
<input name=x type=range min=100 max=700 step=9.09090909 value=509.090909>
A user agent could display in a variety of ways, for instance:

Or, alternatively, for instance:

The user agent could pick which one to display based on the dimensions given in the style
sheet. This would allow it to maintain the same resolution for the tick marks, despite the
differences in width.
Finally, here is an example of a range control with two labeled values:
<input type="range" name="a" list="a-values">
<datalist id="a-values">
 <option value="10" label="Low">
 <option value="90" label="High">
</datalist>
With styles that make the control draw vertically, it might look as follows:

4.10.5.1.11 Color state (type=color)
When an input element’s type attribute is in
the Color state, the rules in this section apply.
The input element represents a color well control, for setting the
element’s value to a string representing a simple
color.
In this state, there is always a color picked, and there is no way to set the
value to the empty string.
If the element is mutable, the user agent should allow the
user to change the color represented by its value, as
obtained from applying the rules for parsing simple color values to it. User agents
must not allow the user to set the value to a string that is
not a valid lowercase simple color. If the user agent provides a user interface for
selecting a color, then the value must be set to the result
of using the rules for serializing simple color values to the user’s selection. User
agents must not allow the user to set the value to the empty
string.
Constraint validation: While the user interface describes input that the user
agent cannot convert to a valid lowercase simple color, the control is
suffering from bad input.
The value attribute, if specified and not empty, must
have a value that is a valid simple color.
The following common input element content attributes and IDL attributes apply to the element:
autocomplete and
list content attributes;
list and
value IDL attributes.
The value IDL attribute is in mode value.
The input and change events apply.
The following content attributes must not be specified and do not apply to the
element:
accept,
alt,
checked,
dirname,
formaction,
formenctype,
formmethod,
formnovalidate,
formtarget,
height,
max,
maxlength,
min,
minlength,
multiple,
pattern,
placeholder,
readonly,
required,
size,
src,
step, and
width.
The following IDL attributes and methods do not apply to the element:
checked,
files,
selectionStart,
selectionEnd,
selectionDirection,
valueAsDate, and
valueAsNumber IDL attributes;
select(),
setRangeText(),
setSelectionRange(),
stepDown(), and
stepUp() methods.
4.10.5.1.12 Checkbox state (type=checkbox)
When an input element’s type attribute is in
the Checkbox state, the rules in this section
apply.
The input element represents a two-state control that represents the
element’s checkedness state. If the element’s checkedness state is true, the control represents a positive
selection, and if it is false, a negative selection. If the element’s indeterminate IDL attribute is set to true, then the
control’s selection should be obscured as if the control was in a third, indeterminate, state.
The control is never a true tri-state control, even if the element’s indeterminate IDL attribute is set to true. The indeterminate IDL attribute only gives the appearance of a
third state.
- input .
indeterminate[ = value ] -
When set, overrides the rendering of checkbox
controls so that the current value is not visible.
The following common input element content attributes and IDL attributes apply to the element:
checked, and
required content attributes;
checked and
value IDL attributes.
The value IDL attribute is in mode default/on.
The input and change events apply.
The following content attributes must not be specified and do not apply to the
element:
accept,
alt,
autocomplete,
dirname,
formaction,
formenctype,
formmethod,
formnovalidate,
formtarget,
height,
list,
max,
maxlength,
min,
minlength,
multiple,
pattern,
placeholder,
readonly,
size,
src,
step, and
width.
The following IDL attributes and methods do not apply to the element:
files,
list,
selectionStart,
selectionEnd,
selectionDirection,
valueAsDate, and
valueAsNumber IDL attributes;
select(),
setRangeText(),
setSelectionRange(),
stepDown(), and
stepUp() methods.
4.10.5.1.13 Radio Button state (type=radio)
When an input element’s type attribute is in
the Radio Button state, the rules in this section
apply.
The input element represents a control that, when used in conjunction
with other input elements, forms a radio button group in which only one
control can have its checkedness state set to true. If the
element’s checkedness state is true, the control
represents the selected control in the group, and if it is false, it indicates a control in the
group that is not selected.
The radio button group that contains an input element a also contains all the other input elements b
that fulfill all of the following conditions:
- The
inputelement b‘stypeattribute is in the Radio
Button state. - Either a and b have the same form owner,
or they both have no form owner. - Both a and b are in the same home
subtree. - They both have a
nameattribute, theirnameattributes are not empty, and the value of a‘snameattribute is a compatibility
caseless match for the value of b‘snameattribute.
A document must not contain an input element whose radio button group
contains only that element.
When any of the following phenomena occur, if the element’s checkedness state is true after the occurrence, the checkedness state of all the other elements in the same radio
button group must be set to false:
- The element’s checkedness state is set to true (for
whatever reason). - The element’s
nameattribute is set, changed, or
removed. - The element’s form owner changes.
If the element is mutable, then: The pre-click
activation steps consist of setting the element’s checkedness to true. The canceled activation steps
consist of setting the element’s checkedness to false. The
activation behavior is to fire a simple event that bubbles named input at the element and then fire a simple event that bubbles named change at the element. .
If the element is not mutable, it has no activation
behavior.
Constraint validation: If an element in the radio button group is required, and all of the input elements in the
radio button group have a checkedness that is
false, then the element is suffering from being missing.
If none of the radio buttons in a radio button group are checked when
they are inserted into the document, then they will all be initially unchecked in the interface,
until such time as one of them is checked (either by the user or by script).
The following common input element content attributes and IDL attributes apply to the element:
checked and
required content attributes;
checked and
value IDL attributes.
The value IDL attribute is in mode default/on.
The input and change events apply.
The following content attributes must not be specified and do not apply to the
element:
accept,
alt,
autocomplete,
dirname,
formaction,
formenctype,
formmethod,
formnovalidate,
formtarget,
height,
list,
max,
maxlength,
min,
minlength,
multiple,
pattern,
placeholder,
readonly,
size,
src,
step, and
width.
The following IDL attributes and methods do not apply to the element:
files,
list,
selectionStart,
selectionEnd,
selectionDirection,
valueAsDate, and
valueAsNumber IDL attributes;
select(),
setRangeText(),
setSelectionRange(),
stepDown(), and
stepUp() methods.
4.10.5.1.14 File Upload state (type=file)
When an input element’s type attribute is in
the File Upload state, the rules in this section
apply.
The input element represents a list of selected files, each file consisting of a file
name, a file type, and a file body (the contents of the file).
File names must not contain path components, even in the case that a user has selected an
entire directory hierarchy or multiple files with the same name from different directories.
Unless the multiple attribute is set, there must be
no more than one file in the list of selected
files.
If the element is mutable, then the element’s
activation behavior is to run the following steps:
-
If the algorithm is not allowed to show a popup, then abort these steps
without doing anything else. -
Return, but continue running these steps asynchronously.
-
Optionally, wait until any prior execution of this algorithm has terminated.
-
Display a prompt to the user requesting that the user specify some files. If the
multipleattribute is not set, there must be no more than one
file selected; otherwise, any number may be selected. Files can be from the filesystem or created
on the fly, e.g. a picture taken from a camera connected to the user’s device. -
Wait for the user to have made their selection.
-
Queue a task to first update the element’s selected files so that it represents the user’s
selection, then fire a simple event that bubbles namedinputat theinputelement, and finally fire a
simple event that bubbles namedchangeat the
inputelement.
If the element is mutable, the user agent should allow the
user to change the files on the list in other ways also, e.g. adding or removing files by
drag-and-drop. When the user does so, the user agent must queue a task to first
update the element’s selected files so that
it represents the user’s new selection, then fire a simple event that bubbles named
input at the input element, and finally fire
a simple event that bubbles named change at the
input element.
If the element is not mutable, it has no activation
behavior and the user agent must not allow the user to change the element’s selection.
Constraint validation: If the element is required and the list of selected files is empty, then the element is
suffering from being missing.
The accept attribute may be specified to
provide user agents with a hint of what file types will be accepted.
If specified, the attribute must consist of a set of comma-separated tokens, each
of which must be an ASCII case-insensitive match for one of the following:
- The string
audio/* - Indicates that sound files are accepted.
- The string
video/* - Indicates that video files are accepted.
- The string
image/* - Indicates that image files are accepted.
- A valid MIME type with no parameters
- Indicates that files of the specified type are accepted.
- A string whose first character is a «.» (U+002E) character
- Indicates that files with the specified file extension are accepted.
The tokens must not be ASCII case-insensitive matches for any of the other tokens
(i.e. duplicates are not allowed). To obtain the list of tokens from the
attribute, the user agent must split the attribute value on
commas.
User agents may use the value of this attribute to display a more appropriate user interface
than a generic file picker. For instance, given the value image/*, a user
agent could offer the user the option of using a local camera or selecting a photograph from their
photo collection; given the value audio/*, a user agent could offer the user
the option of recording a clip using a headset microphone.
User agents should prevent the user from selecting files that are not accepted by one (or more)
of these tokens.
Authors are encouraged to specify both any MIME types and any corresponding
extensions when looking for data in a specific format.
For example, consider an application that converts Microsoft Word documents to Open Document
Format files. Since Microsoft Word documents are described with a wide variety of MIME types and
extensions, the site can list several, as follows:
<input type="file" accept=".doc,.docx,.xml,application/msword,application/vnd.openxmlformats-officedocument.wordprocessingml.document">
On platforms that only use file extensions to describe file types, the extensions listed here
can be used to filter the allowed documents, while the MIME types can be used with the system’s
type registration table (mapping MIME types to extensions used by the system), if any, to
determine any other extensions to allow. Similarly, on a system that does not have file names or
extensions but labels documents with MIME types internally, the MIME types can be used to pick
the allowed files, while the extensions can be used if the system has an extension registration
table that maps known extensions to MIME types used by the system.
Extensions tend to be ambiguous (e.g. there are an untold number of formats
that use the «.dat» extension, and users can typically quite easily rename
their files to have a «.doc» extension even if they are not Microsoft Word
documents), and MIME types tend to be unreliable (e.g. many formats have no formally registered
types, and many formats are in practice labeled using a number of different MIME types). Authors
are reminded that, as usual, data received from a client should be treated with caution, as it may
not be in an expected format even if the user is not hostile and the user agent fully obeyed the
accept attribute’s requirements.
For historical reasons, the value IDL attribute prefixes
the file name with the string «C:fakepath«. Some legacy user agents
actually included the full path (which was a security vulnerability). As a result of this,
obtaining the file name from the value IDL attribute in a
backwards-compatible way is non-trivial. The following function extracts the file name in a
suitably compatible manner:
function extractFilename(path) {
  if (path.substr(0, 12) == "C:\fakepath\")
    return path.substr(12); // modern browser
  var x;
  x = path.lastIndexOf('/');
  if (x >= 0) // Unix-based path
    return path.substr(x+1);
  x = path.lastIndexOf('\');
  if (x >= 0) // Windows-based path
    return path.substr(x+1);
  return path; // just the file name
}
This can be used as follows:
<p><input type=file name=image onchange="updateFilename(this.value)"></p>
<p>The name of the file you picked is: <span id="filename">(none)</span></p>
<script>
 function updateFilename(path) {
   var name = extractFilename(path);
   document.getElementById('filename').textContent = name;
 }
</script>
The following common input element content attributes and IDL attributes apply to the element:
accept,
multiple, and
required content attributes;
files and
value IDL attributes.
The value IDL attribute is in mode filename.
The input and change events apply.
The following content attributes must not be specified and do not apply to the
element:
alt,
autocomplete,
checked,
dirname,
formaction,
formenctype,
formmethod,
formnovalidate,
formtarget,
height,
list,
max,
maxlength,
min,
minlength,
pattern,
placeholder,
readonly,
size,
src,
step, and
width.
The element’s value attribute must be omitted.
The following IDL attributes and methods do not apply to the element:
checked,
list,
selectionStart,
selectionEnd,
selectionDirection,
valueAsDate, and
valueAsNumber IDL attributes;
select(),
setRangeText(),
setSelectionRange(),
stepDown(), and
stepUp() methods.
4.10.5.1.15 Submit Button state (type=submit)
When an input element’s type attribute is in
the Submit Button state, the rules in this section
apply.
The input element represents a button that, when activated, submits
the form. If the element has a value
attribute, the button’s label must be the value of that attribute; otherwise, it must be an
implementation-defined string that means «Submit» or some such. The element is a button, specifically a submit
button.
![]()
The formaction, formenctype, formmethod, formnovalidate, and formtarget attributes are attributes for form
submission.
The formnovalidate attribute can be
used to make submit buttons that do not trigger the constraint validation.
The following common input element content attributes and IDL attributes apply to the element:
formaction,
formenctype,
formmethod,
formnovalidate, and
formtarget content attributes;
value IDL attribute.
The value IDL attribute is in mode default.
The following content attributes must not be specified and do not apply to the
element:
accept,
alt,
autocomplete,
checked,
dirname,
height,
list,
max,
maxlength,
min,
minlength,
multiple,
pattern,
placeholder,
readonly,
required,
size,
src,
step, and
width.
The following IDL attributes and methods do not apply to the element:
checked,
files,
list,
selectionStart,
selectionEnd,
selectionDirection,
valueAsDate, and
valueAsNumber IDL attributes;
select(),
setRangeText(),
setSelectionRange(),
stepDown(), and
stepUp() methods.
The input and change events do not apply.
4.10.5.1.16 Image Button state (type=image)
When an input element’s type attribute is in
the Image Button state, the rules in this section
apply.
The input element represents either an image from which a user can
select a coordinate and submit the form, or alternatively a button from which the user can submit
the form. The element is a button, specifically a submit button.
The coordinate is sent to the server during form submission by sending two entries for the element, derived from the name
of the control but with «.x» and «.y» appended to the
name with the x and y components of the coordinate
respectively.
The image is given by the src attribute. The
src attribute must be present, and must contain a valid
non-empty URL potentially surrounded by spaces referencing a non-interactive, optionally
animated, image resource that is neither paged nor scripted.
When any of the following events occur, unless the user agent cannot support images, or its
support for images has been disabled, or the user agent only fetches elements on demand, or the
src attribute’s value is the empty string, the user agent must
resolve the value of the src attribute, relative to the element, and if that is successful,
must fetch the resulting absolute URL:
- The
inputelement’stypeattribute is first
set to the Image Button state (possibly when the
element is first created), and thesrcattribute is
present. - The
inputelement’stypeattribute is
changed back to the Image Button state, and thesrcattribute is present, and its value has changed since the last
time thetypeattribute was in the Image Button state. - The
inputelement’stypeattribute is in
the Image Button state, and thesrcattribute is set or changed.
Fetching the image must delay the load event of the element’s document until the
task that is queued by the
networking task source once the resource has been fetched
(defined below) has been run.
If the image was successfully obtained, with no network errors, and the image’s type is a
supported image type, and the image is a valid image of that type, then the image is said to be
available. If this is true before the image is
completely downloaded, each task that is queued by the networking task source while the image is being fetched must update the presentation of the image appropriately.
The user agent should apply the image sniffing
rules to determine the type of the image, with the image’s associated Content-Type headers giving the official
type. If these rules are not applied, then the type of the image must be the type given by
the image’s associated Content-Type headers.
User agents must not support non-image resources with the input element. User
agents must not run executable code embedded in the image resource. User agents must only display
the first page of a multipage resource. User agents must not allow the resource to act in an
interactive fashion, but should honor any animation in the resource.
The task that is queued by
the networking task source once the resource has been fetched, must, if the download was successful and the image is available, queue a task to fire a simple
event named load at the input element; and
otherwise, if the fetching process fails without a response from the remote server, or completes
but the image is not a valid or supported image, queue a task to fire a simple
event named error on the input element.
The alt attribute provides the textual label for
the button for users and user agents who cannot use the image. The alt attribute must be present, and must contain a non-empty string
giving the label that would be appropriate for an equivalent button if the image was
unavailable.
The input element supports dimension attributes.
If the src attribute is set, and the image is available and the user agent is configured to display that image,
then: The element represents a control for selecting a coordinate from the image specified by the
src attribute; if the element is mutable, the user agent should allow the user to select this coordinate, and the element’s activation
behavior is as follows: if the element has a form owner, and the element’s
Document is fully active, take the user’s selected coordinate, and submit the input element’s form owner
from the input element. If the user activates the control without explicitly
selecting a coordinate, then the coordinate (0,0) must be assumed.
Otherwise, the element represents a submit button whose label is given by the
value of the alt attribute; if the element is mutable, then the element’s activation behavior is as
follows: if the element has a form owner, and the element’s Document is
fully active, set the selected
coordinate to (0,0), and submit the
input element’s form owner from the input element.
In either case, if the element is mutable but has no
form owner or the element’s Document is not fully active,
then its activation behavior must be to do nothing. If the element is not mutable, it has no activation behavior.
The selected coordinate must consist of
an x-component and a y-component. The coordinates
represent the position relative to the edge of the image, with the coordinate space having the
positive x direction to the right, and the positive y
direction downwards.
The x-component must be a valid integer representing a number
x in the range −(borderleft+paddingleft) ≤ x ≤ width+borderright+paddingright, where width is the rendered width of the image, borderleft is the width of the border on the left of the image, paddingleft is the width of the padding on the left of the
image, borderright is the width of the border on the right
of the image, and paddingright is the width of the padding
on the right of the image, with all dimensions given in CSS pixels.
The y-component must be a valid integer representing a number
y in the range −(bordertop+paddingtop) ≤ y ≤ height+borderbottom+paddingbottom, where
height is the rendered height of the image, bordertop is the width of the border above the image, paddingtop is the width of the padding above the image, borderbottom is the width of the border below the image, and paddingbottom is the width of the padding below the image, with
all dimensions given in CSS pixels.
Where a border or padding is missing, its width is zero CSS pixels.
The formaction, formenctype, formmethod, formnovalidate, and formtarget attributes are attributes for form
submission.
- image .
width[ = value ] - image .
height[ = value ] -
These attributes return the actual rendered dimensions of the image, or zero if the
dimensions are not known.They can be set, to change the corresponding content attributes.
The following common input element content attributes and IDL attributes apply to the element:
alt,
formaction,
formenctype,
formmethod,
formnovalidate,
formtarget,
height,
src, and
width content attributes;
value IDL attribute.
The value IDL attribute is in mode default.
The following content attributes must not be specified and do not apply to the
element:
accept,
autocomplete,
checked,
dirname,
list,
max,
maxlength,
min,
minlength,
multiple,
pattern,
placeholder,
readonly,
required,
size, and
step.
The element’s value attribute must be omitted.
The following IDL attributes and methods do not apply to the element:
checked,
files,
list,
selectionStart,
selectionEnd,
selectionDirection,
valueAsDate, and
valueAsNumber IDL attributes;
select(),
setRangeText(),
setSelectionRange(),
stepDown(), and
stepUp() methods.
The input and change events do not apply.
Many aspects of this state’s behavior are similar to the behavior of the
img element. Readers are encouraged to read that section, where many of the same
requirements are described in more detail.
Take the following form:
<form action="process.cgi">
 <input type=image src=map.png name=where alt="Show location list">
</form>
If the user clicked on the image at coordinate (127,40) then the URL used to submit the form
would be «process.cgi?where.x=127&where.y=40«.
(In this example, it’s assumed that for users who don’t see the map, and who instead just see
a button labeled «Show location list», clicking the button will cause the server to show a list
of locations to pick from instead of the map.)
4.10.5.1.17 Reset Button state (type=reset)
When an input element’s type attribute is in
the Reset Button state, the rules in this section
apply.
The input element represents a button that, when activated, resets
the form. If the element has a value
attribute, the button’s label must be the value of that attribute; otherwise, it must be an
implementation-defined string that means «Reset» or some such. The element is a button.
![]()
The value IDL attribute applies to this element and is in mode default.
The following content attributes must not be specified and do not apply to the
element:
accept,
alt,
autocomplete,
checked,
dirname,
formaction,
formenctype,
formmethod,
formnovalidate,
formtarget,
height,
list,
max,
maxlength,
min,
minlength,
multiple,
pattern,
placeholder,
readonly,
required,
size,
src,
step, and
width.
The following IDL attributes and methods do not apply to the element:
checked,
files,
list,
selectionStart,
selectionEnd,
selectionDirection,
valueAsDate, and
valueAsNumber IDL attributes;
select(),
setRangeText(),
setSelectionRange(),
stepDown(), and
stepUp() methods.
The input and change events do not apply.
4.10.5.1.18 Button state (type=button)
When an input element’s type attribute is in
the Button state, the rules in this section apply.
The input element represents a button with no default behavior. A
label for the button must be provided in the value
attribute, though it may be the empty string. If the element has a value attribute, the button’s label must be the value of that
attribute; otherwise, it must be the empty string. The element is a button.
The value IDL attribute applies to this element and is in mode default.
The following content attributes must not be specified and do not apply to the
element:
accept,
alt,
autocomplete,
checked,
dirname,
formaction,
formenctype,
formmethod,
formnovalidate,
formtarget,
height,
list,
max,
maxlength,
min,
minlength,
multiple,
pattern,
placeholder,
readonly,
required,
size,
src,
step, and
width.
The following IDL attributes and methods do not apply to the element:
checked,
files,
list,
selectionStart,
selectionEnd,
selectionDirection,
valueAsDate, and
valueAsNumber IDL attributes;
select(),
setRangeText(),
setSelectionRange(),
stepDown(), and
stepUp() methods.
The input and change events do not apply.
4.10.5.2 Implemention notes regarding localization of form controls
This section is non-normative.
The formats shown to the user in date, time, and number controls is independent of the format
used for form submission.
Browsers are encouraged to use user interfaces that present dates, times, and numbers according
to the conventions of either the locale implied by the input element’s
language or the user’s preferred locale. Using the page’s locale will ensure
consistency with page-provided data.
For example, it would be confusing to users if an American English page claimed
that a Cirque De Soleil show was going to be showing on 02/03, but their
browser, configured to use the British English locale, only showed the date 03/02 in the ticket purchase date picker. Using the page’s locale would at least ensure that the
date was presented in the same format everywhere. (There’s still a risk that the user would end up
arriving a month late, of course, but there’s only so much that can be done about such cultural
differences…)
4.10.5.3 Common input element attributes
These attributes only apply to an input
element if its type attribute is in a state whose definition
declares that the attribute applies. When an attribute
doesn’t apply to an input element, user agents must
ignore the attribute, regardless of the requirements and definitions below.
4.10.5.3.1 The maxlength and minlength attributes
The maxlength attribute, when it applies, is a form control maxlength attribute controlled by the input element’s dirty value flag.
The minlength attribute, when it applies, is a form control minlength attribute controlled by the input element’s dirty value flag.
If the input element has a maximum allowed value length, then the
code-unit length of the value of the element’s value attribute must be equal to or less than the element’s
maximum allowed value length.
The following extract shows how a messaging client’s text entry could be arbitrarily
restricted to a fixed number of characters, thus forcing any conversation through this medium to
be terse and discouraging intelligent discourse.
<label>What are you doing? <input name=status maxlength=140></label>
Here, a password is given a minimum length:
<p><label>Username: <input name=u required></label>
<p><label>Password: <input name=p required minlength=12></label>
4.10.5.3.2 The size attribute
The size attribute gives the number of
characters that, in a visual rendering, the user agent is to allow the user to see while editing
the element’s value.
The size attribute, if specified, must have a value that
is a valid non-negative integer greater than zero.
4.10.5.3.3 The readonly attribute
The readonly attribute is a boolean
attribute that controls whether or not the user can edit the form control. When specified, the element is not mutable.
Constraint validation: If the readonly attribute is specified on an input
element, the element is barred from constraint validation.
The difference between disabled and readonly is that read-only controls are still focusable, so the
user can still select the text and interact with it, whereas disabled controls are entirely
non-interactive. (For this reason, only text controls can be made read-only: it wouldn’t make
sense for checkboxes or buttons, for instances.)
In the following example, the existing product identifiers cannot be modified, but they are
still displayed as part of the form, for consistency with the row representing a new product
(where the identifier is not yet filled in).
<form action="products.cgi" method="post" enctype="multipart/form-data">
 <table>
  <tr> <th> Product ID <th> Product name <th> Price <th> Action
  <tr>
   <td> <input readonly="readonly" name="1.pid" value="H412">
   <td> <input required="required" name="1.pname" value="Floor lamp Ulke">
   <td> $<input required="required" type="number" min="0" step="0.01" name="1.pprice" value="49.99">
   <td> <button formnovalidate="formnovalidate" name="action" value="delete:1">Delete</button>
  <tr>
   <td> <input readonly="readonly" name="2.pid" value="FG28">
   <td> <input required="required" name="2.pname" value="Table lamp Ulke">
   <td> $<input required="required" type="number" min="0" step="0.01" name="2.pprice" value="24.99">
   <td> <button formnovalidate="formnovalidate" name="action" value="delete:2">Delete</button>
  <tr>
   <td> <input required="required" name="3.pid" value="" pattern="[A-Z0-9]+">
   <td> <input required="required" name="3.pname" value="">
   <td> $<input required="required" type="number" min="0" step="0.01" name="3.pprice" value="">
   <td> <button formnovalidate="formnovalidate" name="action" value="delete:3">Delete</button>
 </table>
 <p> <button formnovalidate="formnovalidate" name="action" value="add">Add</button> </p>
 <p> <button name="action" value="update">Save</button> </p>
</form>
4.10.5.3.4 The required attribute
The required attribute is a boolean
attribute. When specified, the element is required.
Constraint validation: If the element is required, and its value
IDL attribute applies and is in the mode value, and the element is mutable, and the element’s value is the empty string, then the element is suffering
from being missing.
The following form has two required fields, one for an e-mail address and one for a password.
It also has a third field that is only considered valid if the user types the same password in
the password field and this third field.
<h1>Create new account</h1>
<form action="/newaccount" method=post
      oninput="up2.setCustomValidity(up2.value != up.value ? 'Passwords do not match.' : '')">
 <p>
  <label for="username">E-mail address:</label>
  <input id="username" type=email required name=un>
 <p>
  <label for="password1">Password:</label>
  <input id="password1" type=password required name=up>
 <p>
  <label for="password2">Confirm password:</label>
  <input id="password2" type=password name=up2>
 <p>
  <input type=submit value="Create account">
</form>
For radio buttons, the required attribute is
satisfied if any of the radio buttons in the group is
selected. Thus, in the following example, any of the radio buttons can be checked, not just the
one marked as required:
<fieldset>
 <legend>Did the movie pass the Bechdel test?</legend>
 <p><label><input type="radio" name="bechdel" value="no-characters"> No, there are not even two female characters in the movie. </label>
 <p><label><input type="radio" name="bechdel" value="no-names"> No, the female characters never talk to each other. </label>
 <p><label><input type="radio" name="bechdel" value="no-topic"> No, when female characters talk to each other it's always about a male character. </label>
 <p><label><input type="radio" name="bechdel" value="yes" required> Yes. </label>
 <p><label><input type="radio" name="bechdel" value="unknown"> I don't know. </label>
</fieldset>
To avoid confusion as to whether a radio button group is required or not, authors
are encouraged to specify the attribute on all the radio buttons in a group. Indeed, in general,
authors are encouraged to avoid having radio button groups that do not have any initially checked
controls in the first place, as this is a state that the user cannot return to, and is therefore
generally considered a poor user interface.
4.10.5.3.5 The multiple attribute
The multiple attribute is a boolean
attribute that indicates whether the user is to be allowed to specify more than one
value.
The following extract shows how an e-mail client’s «Cc» field could accept multiple e-mail
addresses.
<label>Cc: <input type=email multiple name=cc></label>
If the user had, amongst many friends in his user contacts database, two friends «Arthur Dent»
(with address «art@example.net») and «Adam Josh» (with address «adamjosh@example.net»), then,
after the user has typed «a», the user agent might suggest these two e-mail addresses to the
user.
The page could also link in the user’s contacts database from the site:
<label>Cc: <input type=email multiple name=cc list=contacts></label>
...
<datalist id="contacts">
 <option value="hedral@damowmow.com">
 <option value="pillar@example.com">
 <option value="astrophy@cute.example">
 <option value="astronomy@science.example.org">
</datalist>
Suppose the user had entered «bob@example.net» into this text field, and then started typing a
second e-mail address starting with «a». The user agent might show both the two friends mentioned
earlier, as well as the «astrophy» and «astronomy» values given in the datalist
element.
The following extract shows how an e-mail client’s «Attachments» field could accept multiple
files for upload.
<label>Attachments: <input type=file multiple name=att></label>
4.10.5.3.6 The pattern attribute
The pattern attribute specifies a regular
expression against which the control’s value, or, when the
multiple attribute applies and is set, the control’s values, are to be checked.
If specified, the attribute’s value must match the JavaScript Pattern
production. [ECMA262]
If an input element has a pattern
attribute specified, and the attribute’s value, when compiled as a JavaScript regular expression
with the global, ignoreCase, and multiline flags disabled (see ECMA262 Edition 5, sections 15.10.7.2
through 15.10.7.4), compiles successfully, then the resulting regular expression is the element’s
compiled pattern regular expression. If the element has no such attribute, or if the
value doesn’t compile successfully, then the element has no compiled pattern regular
expression. [ECMA262]
Constraint validation: If the element’s value is not the empty string, and either the element’s multiple attribute is not specified or it does not apply to the input element given its type attribute’s current state, and the element has a
compiled pattern regular expression but that regular expression does not match the
entirety of the element’s value, then the element is
suffering from a pattern mismatch.
Constraint validation: If the element’s value is not the empty string, and the element’s multiple attribute is specified and applies to the input element, and the element has
a compiled pattern regular expression but that regular expression does not match the
entirety of each of the element’s values, then the
element is suffering from a pattern mismatch.
The compiled pattern regular expression, when matched against a string, must have
its start anchored to the start of the string and its end anchored to the end of the string.
This implies that the regular expression language used for this attribute is the
same as that used in JavaScript, except that the pattern
attribute is matched against the entire value, not just any subset (somewhat as if it implied a
^(?: at the start of the pattern and a )$ at the
end).
When an input element has a pattern
attribute specified, authors should provide a description of the pattern in text near the
control. Authors may also include a title
attribute to give a description of the pattern. User agents may use
the contents of this attribute, if it is present, when informing the
user that the pattern is not matched, or at any other suitable time,
such as in a tooltip or read out by assistive technology when the
control gains focus.
Relying on the title
attribute alone is currently discouraged as many user agents do not expose the attribute in an
accessible manner as required by this specification (e.g. requiring a pointing device such as a
mouse to cause a tooltip to appear, which excludes keyboard-only users and touch-only users,
such as anyone with a modern phone or tablet).
For example, the following snippet includes the pattern description in text below the input,
the pattern description is also included in the title attribute:
<label> Part number:
        <input pattern="[0-9][A-Z]{3}" name="part"
        data-x="A part number is a digit followed by three uppercase letters."/>
        </label>
        <p>A part number is a digit followed by three uppercase letters.</p>
The presence of the pattern description in text makes the advice available to any user regardless of device.
The presence of the pattern description in the title attribute, results in the description being announced by
assistive technology such as screen readers when the input receives focus.
If the user has attempted to submit the form with incorrect information, the presence of the title attribute text
could also cause the UA to display an alert such as:
A part number is a digit followed by three uppercase letters.
    You cannot submit this form when the field is incorrect.
In this example, the pattern description is in text below the input,
but not in the title attribute. The
aria-describedby attribute
is used to explicitly associate the text description with the control, the description is announced by
assistive technology such as screen readers when the input receives focus:
<label> Part number:
        <input pattern="[0-9][A-Z]{3}" name="part" aria-describedby="description">
        </label>
        <p id="description">A part number is a digit followed by three uppercase letters.</p>
When a control has a pattern attribute, the title attribute, if used, must describe the pattern. Additional
information could also be included, so long as it assists the user in filling in the control.
Otherwise, assistive technology would be impaired.
For instance, if the title attribute contained the caption of the control,
assistive technology could end up saying something like The text you have entered does not
match the required pattern. Birthday, which is not useful.
UAs may still show the title in non-error situations (for
example, as a tooltip when hovering over the control), so authors should be careful not to word
titles as if an error has necessarily occurred.
4.10.5.3.7 The min and max attributes
Some form controls can have explicit constraints applied limiting the allowed range of values
that the user can provide. Normally, such a range would be linear and continuous. A form control
can have a periodic domain, however, in which case the
form control’s broadest possible range is finite, and authors can specify explicit ranges within
it that span the boundaries.
Specifically, the broadest range of a type=time control is midnight to midnight (24 hours), and
authors can set both continuous linear ranges (such as 9pm to 11pm) and discontinuous ranges
spanning midnight (such as 11pm to 1am).
The min and max attributes indicate the allowed range of values for
the element.
Their syntax is defined by the section that defines the type attribute’s current state.
If the element has a min attribute, and the result of
applying the algorithm to convert a string to a
number to the value of the min attribute is a number,
then that number is the element’s minimum; otherwise, if the
type attribute’s current state defines a default minimum, then that is the minimum; otherwise, the element has no minimum.
The min attribute also defines the step base.
If the element has a max attribute, and the result of
applying the algorithm to convert a string to a
number to the value of the max attribute is a number,
then that number is the element’s maximum; otherwise, if the
type attribute’s current state defines a default maximum, then that is the maximum; otherwise, the element has no maximum.
If the element does not have a periodic domain, the
max attribute’s value (the maximum) must not be less than the min attribute’s value (its minimum).
If an element that does not have a periodic
domain has a maximum that is less than its minimum, then so long as the element has a value, it will either be suffering from an underflow
or suffering from an overflow.
An element has a reversed range if it has a periodic domain and its
maximum is less than its minimum.
An element has range limitations if it has a defined
minimum or a defined maximum.
Constraint validation: When the element has a minimum and does not have a
reversed range, and the result of applying the algorithm to convert a string to a number to the
string given by the element’s value is a number, and the
number obtained from that algorithm is less than the minimum,
the element is suffering from an underflow.
Constraint validation: When the element has a maximum and does not have a
reversed range, and the result of applying the algorithm to convert a string to a number to the
string given by the element’s value is a number, and the
number obtained from that algorithm is more than the maximum,
the element is suffering from an overflow.
Constraint validation: When an element has a reversed range, and
the result of applying the algorithm to convert a
string to a number to the string given by the element’s value is a number, and the number obtained from that algorithm is
more than the maximum and less than the minimum, the element is simultaneously suffering from an
underflow and suffering from an overflow.
The following date control limits input to dates that are before the 1980s:
<input name=bday type=date max="1979-12-31">
The following number control limits input to whole numbers greater than zero:
<input name=quantity required="" type="number" min="1" value="1">
The following time control limits input to those minutes that occur between 9pm and 6am,
defaulting to midnight:
<input name="sleepStart" type=time min="21:00" max="06:00" step="60" value="00:00">
4.10.5.3.8 The step attribute
The step attribute indicates the granularity
that is expected (and required) of the value, by limiting
the allowed values. The section that defines the type attribute’s current state also defines the default step, the step scale factor, and in some cases the default step base, which are used in processing the
attribute as described below.
The step attribute, if specified, must either have a value
that is a valid floating-point number that parses to a number that is greater than zero, or must have a
value that is an ASCII case-insensitive match for the string «any«.
The attribute provides the allowed value step for the
element, as follows:
- If the attribute is absent, then the allowed value
step is the default step multiplied by the
step scale factor. - Otherwise, if the attribute’s value is an ASCII case-insensitive match for the
string «any«, then there is no allowed
value step. - Otherwise, if the rules for parsing floating-point number values, when they are
applied to the attribute’s value, return an error, zero, or a number less than zero, then the
allowed value step is the default step multiplied by the step scale factor. - Otherwise, the allowed value step is the number
returned by the rules for parsing floating-point number values when they are applied
to the attribute’s value, multiplied by the step scale
factor.
The step base is the value returned by the following
algorithm:
-
If the element has a
mincontent attribute, and the
result of applying the algorithm to convert a
string to a number to the value of themincontent
attribute is not an error, then return that result and abort these steps. -
If the element has a
valuecontent attribute, and
the result of applying the algorithm to convert a
string to a number to the value of thevaluecontent
attribute is not an error, then return that result and abort these steps. -
If a default step base is defined for
this element given itstypeattribute’s state, then return
it and abort these steps. -
Return zero.
Constraint validation: When the element has an allowed value step, and the result of applying the algorithm to convert a string to a number to the
string given by the element’s value is a number, and that
number subtracted from the step base is not an
integral multiple of the allowed value step, the element
is suffering from a step mismatch.
The following range control only accepts values in the range 0..1, and allows 256 steps in
that range:
<input name=opacity type=range min=0 max=1 step=0.00392156863>
The following control allows any time in the day to be selected, with any accuracy (e.g.
thousandth-of-a-second accuracy or more):
<input name=favtime type=time step=any>
Normally, time controls are limited to an accuracy of one minute.
4.10.5.3.9 The list attribute
The list attribute is used to identify an
element that lists predefined options suggested to the user.
If present, its value must be the ID of a datalist
element in the same document.
The suggestions source element is the first element in
the document in tree order to have an ID equal to the
value of the list attribute, if that element is a
datalist element. If there is no list attribute,
or if there is no element with that ID, or if the first element
with that ID is not a datalist element, then there is
no suggestions source element.
If there is a suggestions source element, then, when
the user agent is allowing the user to edit the input element’s value, the user agent should offer the suggestions represented by
the suggestions source element to the user in a manner
suitable for the type of control used. The user agent may use the suggestion’s label to identify the suggestion if appropriate.
How user selections of suggestions are handled depends on whether the element is a control
accepting a single value only, or whether it accepts multiple values:
- If the element does not have a
multipleattribute
specified or if themultipleattribute does not
apply -
When the user selects a suggestion, the
inputelement’s value must be set to the selected suggestion’s value, as if the user had written that value himself. - If the element does have a
multiple
attribute specified, and themultipleattribute does
apply -
When the user selects a suggestion, the user agent must either add a new entry to the
inputelement’s values, whose value
is the selected suggestion’s value, or change an
existing entry in theinputelement’s values to have the value given by the selected
suggestion’s value, as if the user had himself added
an entry with that value, or edited an existing entry to be that value. Which behavior is to be
applied depends on the user interface in a user-agent-defined manner.
If the list attribute does not
apply, there is no suggestions source element.
This URL field offers some suggestions.
<label>Homepage: <input name=hp type=url list=hpurls></label>
<datalist id=hpurls>
 <option value="http://www.google.com/" label="Google">
 <option value="http://www.reddit.com/" label="Reddit">
</datalist>
Other URLs from the user’s history might show also; this is up to the user agent.
This example demonstrates how to design a form that uses the autocompletion list feature while
still degrading usefully in legacy user agents.
If the autocompletion list is merely an aid, and is not important to the content, then simply
using a datalist element with children option elements is enough. To
prevent the values from being rendered in legacy user agents, they need to be placed inside the
value attribute instead of inline.
<p>
 <label>
  Enter a breed:
  <input type="text" name="breed" list="breeds">
  <datalist id="breeds">
   <option value="Abyssinian">
   <option value="Alpaca">
   <!-- ... -->
  </datalist>
 </label>
</p>
However, if the values need to be shown in legacy UAs, then fallback content can be placed
inside the datalist element, as follows:
<p>
 <label>
  Enter a breed:
  <input type="text" name="breed" list="breeds">
 </label>
 <datalist id="breeds">
  <label>
   or select one from the list:
   <select name="breed">
    <option value=""> (none selected)
    <option>Abyssinian
    <option>Alpaca
    <!-- ... -->
   </select>
  </label>
 </datalist>
</p>
The fallback content will only be shown in UAs that don’t support datalist. The
options, on the other hand, will be detected by all UAs, even though they are not children of the
datalist element.
Note that if an option element used in a datalist is selected, it will be selected by default by legacy UAs
(because it affects the select), but it will not have any effect on the
input element in UAs that support datalist.
4.10.5.3.10 The placeholder attribute
The placeholder attribute represents a
short hint (a word or short phrase) intended to aid the user with data entry when the
control has no value. A hint could be a sample value or a brief description of the expected
format. The attribute, if specified, must have a value that contains no «LF» (U+000A) or
«CR» (U+000D) characters.
The placeholder attribute should not be used as a
replacement for a label. For a longer hint or other advisory text, place the text
next to the control.
Use of the placeholder
attribute as a replacement for a label can reduce the
accessibility and usability of the control for a range of users including older
users and users with cognitive, mobility, fine motor skill or vision impairments.
While the hint given by the control’s label is shown at all times, the short
hint given in the placeholder
attribute is only shown before the user enters a value. Furthermore,
placeholder text may be mistaken for
a pre-filled value, and as commonly implemented the default color of the placeholder text
provides insufficient contrast and the lack of a separate visible label
reduces the size of the hit region available for setting focus on the control.
User agents should present this hint to the user, after having
stripped line breaks from it,
when the element’s value is
the empty string and the control is not focused (i.e., by displaying
it inside a blank unfocused control).
Here is an example of a mail configuration user interface that uses the placeholder attribute:
<fieldset>
 <legend>Mail Account</legend>
 <p><label>Name: <input type="text" name="fullname" placeholder="John Ratzenberger"></label></p>
 <p><label>Address: <input type="email" name="address" placeholder="john@example.net"></label></p>
 <p><label>Password: <input type="password" name="password"></label></p>
 <p><label>Description: <input type="text" name="desc" placeholder="My Email Account"></label></p>
</fieldset>
In situations where the control’s content has one directionality but the placeholder needs to
have a different directionality, Unicode’s bidirectional-algorithm formatting characters can be
used in the attribute value:
<input name=t1 type=tel placeholder=" رقم الهاتف 1 "> <input name=t2 type=tel placeholder=" رقم الهاتف 2 ">
For slightly more clarity, here’s the same example using numeric character references instead of inline Arabic:
<input name=t1 type=tel placeholder="رقم الهاتف 1"> <input name=t2 type=tel placeholder="رقم الهاتف 2">
4.10.5.4 Common input element APIs
- input .
value[ = value ] -
Returns the current value of the form control.
Can be set, to change the value.
Throws an
InvalidStateErrorexception if it is set to any value other than the
empty string when the control is a file upload control. - input .
checked[ = value ] -
Returns the current checkedness of the form
control.Can be set, to change the checkedness.
- input .
files -
Returns a
FileListobject listing the selected files of the form control.Returns null if the control isn’t a file control.
- input .
valueAsDate[ = value ] -
Returns a
Dateobject representing the form control’s value, if applicable; otherwise, returns null.Can be set, to change the value.
Throws an
InvalidStateErrorexception if the control isn’t date- or
time-based. - input .
valueAsNumber[ = value ] -
Returns a number representing the form control’s value,
if applicable; otherwise, returns NaN.Can be set, to change the value. Setting this to NaN will set the underlying value to the
empty string.Throws an
InvalidStateErrorexception if the control is neither date- or
time-based nor numeric. - input .
stepUp( [ n ] ) - input .
stepDown( [ n ] ) -
Changes the form control’s value by the value given in
thestepattribute, multiplied by n.
The default value for n is 1.Throws
InvalidStateErrorexception if the control is neither date- or time-based
nor numeric, or if thestepattribute’s value is «any«. - input .
list -
Returns the
datalistelement indicated by thelistattribute.
The value IDL attribute allows scripts to
manipulate the value of an input element. The
attribute is in one of the following modes, which define its behavior:
- value
-
On getting, it must return the current value of the
element. On setting, it must set the element’s value to
the new value, set the element’s dirty value
flag to true, invoke the value sanitization algorithm, if the element’s
typeattribute’s current state defines one, and then, if
the element has a text entry cursor position, should move the text entry cursor position to the
end of the text field, unselecting any selected text and resetting the selection direction to
none. - default
-
On getting, if the element has a
valueattribute, it
must return that attribute’s value; otherwise, it must return the empty string. On setting, it
must set the element’svalueattribute to the new
value. - default/on
-
On getting, if the element has a
valueattribute, it
must return that attribute’s value; otherwise, it must return the string «on«. On setting, it must set the element’svalueattribute to the new value. - filename
-
On getting, it must return the string «
C:fakepath» followed by the
name of the first file in the list of selected
files, if any, or the empty string if the list is empty. On setting, if the new value is
the empty string, it must empty the list of selected files; otherwise, it must throw an
InvalidStateErrorexception.This «fakepath» requirement is a sad accident of history. See the example in the File Upload state section for more
information.
The checked IDL attribute allows scripts to
manipulate the checkedness of an input
element. On getting, it must return the current checkedness of the element; and on setting, it must set the
element’s checkedness to the new value and set the
element’s dirty checkedness flag to
true.
The files IDL attribute allows scripts to
access the element’s selected files. On
getting, if the IDL attribute applies, it must return a
FileList object that represents the current selected files. The same object must be returned
until the list of selected files changes. If
the IDL attribute does not apply, then it must instead return
null. [FILEAPI]
The valueAsDate IDL attribute represents
the value of the element, interpreted as a date.
On getting, if the valueAsDate attribute does not apply, as defined for the input element’s type attribute’s current state, then return null. Otherwise, run
the algorithm to convert a string to a
Date object defined for that state; if the algorithm returned a
Date object, then return it, otherwise, return null.
On setting, if the valueAsDate attribute does not apply, as defined for the input element’s type attribute’s current state, then throw an
InvalidStateError exception; otherwise, if the new value is null or a
Date object representing the NaN time value, then set the value of the element to the empty string; otherwise, run the algorithm to convert a Date object to a
string, as defined for that state, on the new value, and set the value of the element to the resulting string.
The valueAsNumber IDL attribute
represents the value of the element, interpreted as a
number.
On getting, if the valueAsNumber attribute does not apply, as defined for the input element’s type attribute’s current state, then return a Not-a-Number (NaN)
value. Otherwise, if the valueAsDate attribute
applies, run the algorithm to convert a string to a Date
object defined for that state; if the algorithm returned a Date object, then
return the time value of the object (the number of milliseconds from midnight UTC the
morning of 1970-01-01 to the time represented by the Date object), otherwise, return
a Not-a-Number (NaN) value. Otherwise, run the algorithm to convert a string to a number defined
for that state; if the algorithm returned a number, then return it, otherwise, return a
Not-a-Number (NaN) value.
On setting, if the new value is infinite, then throw a TypeError exception.
Otherwise, if the valueAsNumber attribute does not apply, as defined for the input element’s type attribute’s current state, then throw an
InvalidStateError exception. Otherwise, if the new value is a Not-a-Number (NaN)
value, then set the value of the element to the empty
string. Otherwise, if the valueAsDate
attribute applies, run the algorithm to convert a Date object to a
string defined for that state, passing it a Date object whose time
value is the new value, and set the value of the element
to the resulting string. Otherwise, run the algorithm to convert a number to a string, as
defined for that state, on the new value, and set the value
of the element to the resulting string.
The stepDown(n) and stepUp(n) methods, when invoked,
must run the following algorithm:
-
If the
stepDown()andstepUp()methods do not apply, as defined for the
inputelement’stypeattribute’s current state,
then throw anInvalidStateErrorexception, and abort these steps. -
If the element has no allowed value step, then
throw anInvalidStateErrorexception, and abort these steps. -
If the element has a minimum and a maximum and the minimum
is greater than the maximum, then abort these steps. -
If the element has a minimum and a maximum and there is no value greater than or equal to the
element’s minimum and less than or equal to the element’s
maximum that, when subtracted from the step base, is an integral multiple of the allowed value step, then abort these steps. -
If applying the algorithm to convert a
string to a number to the string given by the element’s value does not result in an error, then let value be the result of that algorithm. Otherwise, let value be
zero. -
If value subtracted from the step
base is not an integral multiple of the allowed value
step, then set value to the nearest value that, when subtracted from
the step base, is an integral multiple of the allowed value step, and that is less than value if the method invoked was thestepDown()and more than value
otherwise.Otherwise (value subtracted from the step base is an integral multiple of the allowed value step), run the following substeps:
-
Let n be the argument.
-
Let delta be the allowed value
step multiplied by n. -
If the method invoked was the
stepDown()method,
negate delta. -
Let value be the result of adding delta to value.
-
-
If the element has a minimum, and value is less than that minimum, then set
value to the smallest value that, when subtracted from the step base, is an integral multiple of the allowed value step, and that is more than or equal to minimum. -
If the element has a maximum, and value is greater than that maximum, then
set value to the largest value that, when subtracted from the step base, is an integral multiple of the allowed value step, and that is less than or equal to maximum. -
Let value as string be the result of running the algorithm to convert a number to a string, as
defined for theinputelement’stype
attribute’s current state, on value. -
Set the value of the element to value
as string.
The list IDL attribute must return the current
suggestions source element, if any, or null otherwise.
4.10.5.5 Common event behaviors
When the input and change
events apply (which is the case for all
input controls other than buttons and those with
the type attribute in the Hidden state), the events are fired to indicate that the
user has interacted with the control. The input
event fires whenever the user has modified the data of the control. The change event fires when the value is committed, if
that makes sense for the control, or else when the control loses focus. In all cases, the input event comes before the corresponding change event (if any).
When an input element has a defined activation behavior, the rules
for dispatching these events, if they apply, are given
in the section above that defines the type attribute’s
state. (This is the case for all input controls with the type attribute in the Checkbox state, the Radio Button state, or the File Upload state.)
For input elements without a defined activation behavior, but to
which these events apply, and for which the user
interface involves both interactive manipulation and an explicit commit action, then when the user
changes the element’s value, the user agent must
queue a task to fire a simple event that bubbles named input at the input element, and any time the user commits
the change, the user agent must queue a task to fire a simple event that
bubbles named change at the input element.
An example of a user interface involving both interactive manipulation and a
commit action would be a Range controls that use a
slider, when manipulated using a pointing device. While the user is dragging the control’s knob,
input events would fire whenever the position changed, whereas
the change event would only fire when the user let go of the
knob, committing to a specific value.
For input elements without a defined activation behavior, but to
which these events apply, and for which the user
interface involves an explicit commit action but no intermediate manipulation, then any time the
user commits a change to the element’s value, the user
agent must queue a task to first fire a simple event that bubbles named
input at the input element, and then fire a
simple event that bubbles named change at the
input element.
An example of a user interface with a commit action would be a Color control that consists of a single button that brings
up a color wheel: if the value only changes when the dialog
is closed, then that would be the explicit commit action. On the other hand, if the control can be
focused and manipulating the control changes the color interactively, then there might be no
commit action.
Another example of a user interface with a commit action would be a Date control that allows both text-based user input and user
selection from a drop-down calendar: while text input might not have an explicit commit step,
selecting a date from the drop down calendar and then dismissing the drop down would be a commit
action.
For input elements without a defined activation behavior, but to
which these events apply, any time the user causes the
element’s value to change without an explicit commit
action, the user agent must queue a task to fire a simple event that
bubbles named input at the input element. The
corresponding change event, if any, will be fired when the
control loses focus.
Examples of a user changing the element’s value would include the user typing into a text field, pasting a
new value into the field, or undoing an edit in that field. Some user interactions do not cause
changes to the value, e.g. hitting the «delete» key in an empty text field, or replacing some text
in the field with text from the clipboard that happens to be exactly the same text.
A Range control in the form of a
slider that the user has focused and is interacting with using a keyboard would be another example
of the user changing the element’s value without a commit
step.
In the case of tasks that just fire an input event, user agents may wait for a suitable break in the user’s
interaction before queuing the tasks; for example, a user agent
could wait for the user to have not hit a key for 100ms, so as to only fire the event when the
user pauses, instead of continuously for each keystroke.
When the user agent is to change an input element’s value on behalf of the user (e.g. as part of a form prefilling
feature), the user agent must queue a task to first update the value accordingly, then fire a simple event that
bubbles named input at the input element, then
fire a simple event that bubbles named change at
the input element.
These events are not fired in response to changes made to the values of form
controls by scripts. (This is to make it easier to update the values of form controls in response
to the user manipulating the controls, without having to then filter out the script’s own changes
to avoid an infinite loop.)
The task source for these tasks is the
user interaction task source.
4.10.6 The button element
- Categories:
- Flow content.
- Phrasing content.
- Interactive content.
- Listed, labelable, submittable, and reassociateable form-associated element.
- Palpable content.
- Contexts in which this element can be used:
- Where phrasing content is expected.
- Content model:
- Phrasing content, but there must be no interactive content descendant.
- Content attributes:
- Global attributes
autofocus— Automatically focus the form control when the page is loadeddisabled— Whether the form control is disabledform— Associates the control with aformelementformaction— URL to use for form submissionformenctype— Form data set encoding type to use for form submissionformmethod— HTTP method to use for form submissionformnovalidate— Bypass form control validation for form submissionformtarget— Browsing context for form submissionmenu— Specifies the element’s designated pop-up menuname— Name of form control to use for form submission and in theform.elementsAPItype— Type of buttonvalue— Value to be used for form submission- Tag omission in text/html:
- Neither tag is omissible
- Allowed ARIA role attribute values:
button
(default — do not set),
link,
menuitem,
menuitemcheckbox,
menuitemradio
orradio.- Allowed ARIA state and property attributes:
- Global aria-* attributes
- Any
aria-*attributes
applicable to the allowed roles. - DOM interface:
-
interface HTMLButtonElement : HTMLElement {
           attribute boolean autofocus;
           attribute boolean disabled;
  readonly attribute HTMLFormElement? form;
           attribute DOMString formAction;
           attribute DOMString formEnctype;
           attribute DOMString formMethod;
           attribute boolean formNoValidate;
           attribute DOMString formTarget;
           attribute DOMString name;
           attribute DOMString type;
           attribute DOMString value;

  readonly attribute boolean willValidate;
  readonly attribute ValidityState validity;
  readonly attribute DOMString validationMessage;
  boolean checkValidity();
  void setCustomValidity(DOMString error);

  readonly attribute NodeList labels;
};
The button element represents a button labeled by its contents.
The element is a button.
The type attribute controls the behavior of
the button when it is activated. It is an enumerated attribute. The following table
lists the keywords and states for the attribute — the keywords in the left column map to the
states in the cell in the second column on the same row as the keyword.
| Keyword | State | Brief description |
|---|---|---|
submit
|
Submit Button | Submits the form. |
reset
|
Reset Button | Resets the form. |
button
|
Button | Does nothing. |
The missing value default is the Submit
Button state.
If the type attribute is in the Submit Button state, the element is specifically a
submit button.
Constraint validation: If the type
attribute is in the Reset Button state, or the
Button state, the element is barred from constraint
validation.
When a button element is not disabled,
its activation behavior element is to run the steps defined in the following list for
the current state of the element’s type attribute:
- Submit Button
-
If the element has a form owner and the element’s
Documentis
fully active, the element must submit the
form owner from thebuttonelement. - Reset Button
-
If the element has a form owner and the element’s
Documentis
fully active, the element must reset the
form owner. - Button
-
Do nothing.
The form attribute is used to explicitly associate the
button element with its form owner. The name attribute represents the element’s name. The disabled attribute is used to make the control non-interactive and
to prevent its value from being submitted. The autofocus
attribute controls focus. The formaction, formenctype, formmethod, formnovalidate, and formtarget attributes are attributes for form
submission.
The formnovalidate attribute can be
used to make submit buttons that do not trigger the constraint validation.
The formaction, formenctype, formmethod, formnovalidate, and formtarget must not be specified if the element’s type attribute is not in the Submit Button state.
The value attribute gives the element’s value
for the purposes of form submission. The element’s value is
the value of the element’s value attribute, if there is
one, or the empty string otherwise.
A button (and its value) is only included in the form submission if the button
itself was used to initiate the form submission.
The type IDL attribute must
reflect the content attribute of the same name, limited to only known
values.
The willValidate, validity, and validationMessage IDL attributes, and the checkValidity(), and setCustomValidity() methods, are part of the
constraint validation API. The labels IDL
attribute provides a list of the element’s labels. The autofocus, disabled, form, and name IDL attributes are
part of the element’s forms API.
The following button is labeled «Show hint» and pops up a dialog box when activated:
<button type=button
        onclick="alert('This 15-20 minute piece was composed by George Gershwin.')">
 Show hint
</button>
4.10.7 The select element
- Categories:
- Flow content.
- Phrasing content.
- Interactive content.
- Listed, labelable, submittable, resettable, and reassociateable form-associated element.
- Palpable content.
- Contexts in which this element can be used:
- Where phrasing content is expected.
- Content model:
- Zero or more
option,optgroup, and script-supporting elements. - Content attributes:
- Global attributes
autofocus— Automatically focus the form control when the page is loadeddisabled— Whether the form control is disabledform— Associates the control with aformelementmultiple— Whether to allow multiple valuesname— Name of form control to use for form submission and in theform.elementsAPIrequired— Whether the control is required for form submissionsize— Size of the control- Tag omission in text/html:
- Neither tag is omissible
- Allowed ARIA role attribute values:
listbox
(default — do not set) or
menu.- Allowed ARIA state and property attributes:
- Global aria-* attributes
- Any
aria-*attributes
applicable to the allowed roles. - DOM interface:
-
interface HTMLSelectElement : HTMLElement {
           attribute boolean autofocus;
           attribute boolean disabled;
  readonly attribute HTMLFormElement? form;
           attribute boolean multiple;
           attribute DOMString name;
           attribute boolean required;
           attribute unsigned long size;

  readonly attribute DOMString type;

  readonly attribute HTMLOptionsCollection options;
           attribute unsigned long length;
  getter Element? item(unsigned long index);
  HTMLOptionElement? namedItem(DOMString name);
  void add((HTMLOptionElement or HTMLOptGroupElement) element, optional (HTMLElement or long)? before = null);
  void remove(); // ChildNode overload
  void remove(long index);
  setter creator void (unsigned long index, HTMLOptionElement? option);

  readonly attribute HTMLCollection selectedOptions;
           attribute long selectedIndex;
           attribute DOMString value;

  readonly attribute boolean willValidate;
  readonly attribute ValidityState validity;
  readonly attribute DOMString validationMessage;
  boolean checkValidity();
  void setCustomValidity(DOMString error);

  readonly attribute NodeList labels;
};
The select element represents a control for selecting amongst a set of
options.
The multiple attribute is a boolean
attribute. If the attribute is present, then the select element
represents a control for selecting zero or more options from the list of options. If the attribute is absent, then the
select element represents a control for selecting a single option from
the list of options.
The size attribute gives the number of options
to show to the user. The size attribute, if specified, must
have a value that is a valid non-negative integer greater than zero.
The display size of a select element is the
result of applying the rules for parsing non-negative integers to the value of
element’s size attribute, if it has one and parsing it is
successful. If applying those rules to the attribute’s value is not successful, or if the size attribute is absent, then the element’s display size is 4 if the element’s multiple content attribute is present, and 1 otherwise.
The list of options for a select
element consists of all the option element children of the select
element, and all the option element children of all the optgroup element
children of the select element, in tree order.
The required attribute is a boolean
attribute. When specified, the user will be required to select a value before submitting
the form.
If a select element has a required
attribute specified, does not have a multiple attribute
specified, and has a display size of 1; and if the value of the first option element in the
select element’s list of options (if
any) is the empty string, and that option element’s parent node is the
select element (and not an optgroup element), then that
option is the select element’s placeholder label option.
If a select element has a required
attribute specified, does not have a multiple attribute
specified, and has a display size of 1, then the
select element must have a placeholder label option.
Constraint validation: If the element has its required attribute specified, and either none of the
option elements in the select element’s list of options have their selectedness set to true, or the only
option element in the select element’s list of options with its selectedness set to true is the placeholder label
option, then the element is suffering from being missing.
If the multiple attribute is absent, and the element
is not disabled, then the user agent should allow the
user to pick an option element in its list
of options that is itself not disabled. Upon
this option element being picked (either
through a click, or through unfocusing the element after changing its value,
or through any other mechanism), and before the
relevant user interaction event is queued (e.g. before the
click event), the user agent must set the selectedness of the picked option element
to true, set its dirtiness to true, and then
send select update notifications.
If the multiple attribute is absent, whenever an
option element in the select element’s list of options has its selectedness set to true, and whenever an
option element with its selectedness
set to true is added to the select element’s list of options, the user agent must set the selectedness of all the other option
elements in its list of options to false.
If the multiple attribute is absent and the element’s
display size is greater than 1, then the user agent
should also allow the user to request that the option whose selectedness is true, if any, be unselected. Upon this
request being conveyed to the user agent, and before the relevant user interaction event is queued (e.g. before the click
event), the user agent must set the selectedness
of that option element to false, set its dirtiness to true, and then send
select update notifications.
If nodes are inserted or nodes are removed causing the list of options to gain or lose one or more
option elements, or if an option element in the list of options asks for a
reset, then, if the select element’s multiple attribute is absent, the select
element’s display size is 1, and no option
elements in the select element’s list of
options have their selectedness set to
true, the user agent must set the selectedness of
the first option element in the list of
options in tree order that is not disabled, if any, to true.
If the multiple attribute is present, and the element
is not disabled, then the user agent should allow the
user to toggle the selectedness of the option elements in its
list of options that are themselves not disabled. Upon such an element being toggled (either through a click,
or any other mechanism), and before the relevant user interaction event is queued (e.g. before a related click event), the selectedness of the option
element must be changed (from true to false or false to true), the dirtiness of the element must be set to true, and the
user agent must send select update notifications.
When the user agent is to send select update notifications, queue
a task to first fire a simple event that bubbles named input at the select element, and then fire a simple
event that bubbles named change at the
select element, using the user interaction task source as the task
source.
The reset algorithm for select
elements is to go through all the option elements in the element’s list of options, set their selectedness to true if the option element
has a selected attribute, and false otherwise, set their dirtiness to false, and then
have the option elements ask for a reset.
The form attribute is used to explicitly associate the
select element with its form owner. The name attribute represents the element’s name. The disabled attribute is used to make the control non-interactive and
to prevent its value from being submitted. The autofocus
attribute controls focus.
A select element that is not disabled is
mutable.
- select .
type -
Returns «
select-multiple» if the element has amultipleattribute, and «select-one»
otherwise. - select .
options -
Returns an
HTMLOptionsCollectionof the list of options. - select .
length[ = value ] -
Returns the number of elements in the list of
options.When set to a smaller number, truncates the number of
optionelements in the
select.When set to a greater number, adds new blank
optionelements to the
select. - element = select .
item(index) - select[index]
-
Returns the item with index index from the list of options. The items are sorted in tree
order. - element = select .
namedItem(name) -
Returns the first item with ID or
namename from the list of options.Returns null if no element with that ID could be found.
- select .
add(element [, before ]) -
Inserts element before the node given by before.
The before argument can be a number, in which case element is inserted before the item with that number, or an element from the
list of options, in which case element is inserted before that element.If before is omitted, null, or a number out of range, then element will be added at the end of the list.
This method will throw a
HierarchyRequestErrorexception if element is an ancestor of the element into which it is to be inserted. - select .
selectedOptions -
Returns an
HTMLCollectionof the list
of options that are selected. - select .
selectedIndex[ = value ] -
Returns the index of the first selected item, if any, or −1 if there is no selected
item.Can be set, to change the selection.
- select .
value[ = value ] -
Returns the value of the first selected item, if any,
or the empty string if there is no selected item.Can be set, to change the selection.
The type IDL attribute, on getting, must return
the string «select-one» if the multiple attribute is absent, and the string «select-multiple» if the multiple
attribute is present.
The options IDL attribute must return an
HTMLOptionsCollection rooted at the select node, whose filter matches
the elements in the list of options.
The options collection is also mirrored on the
HTMLSelectElement object. The supported property indices at any instant
are the indices supported by the object returned by the options attribute at that instant.
The length IDL attribute must return the
number of nodes represented by the options collection. On setting, it must act like the attribute
of the same name on the options collection.
The item(index) method must
return the value returned by the method of the same
name on the options collection, when invoked with
the same argument.
The namedItem(name)
method must return the value returned by the
method of the same name on the options collection,
when invoked with the same argument.
When the user agent is to set the value of a new
indexed property for a given property index index to a new value value, it must instead set the value
of a new indexed property with the given property index index to the
new value value on the options
collection.
Similarly, the add() method must act like its
namesake method on that same options collection.
The remove() method must act like its
namesake method on that same options collection when it
has arguments, and like its namesake method on the ChildNode interface implemented by
the HTMLSelectElement ancestor interface Element when it has no
arguments.
The selectedOptions IDL attribute
must return an HTMLCollection rooted at the select node, whose filter
matches the elements in the list of options that
have their selectedness set to true.
The selectedIndex IDL attribute, on
getting, must return the index of the first
option element in the list of options
in tree order that has its selectedness set to true, if any. If there isn’t one,
then it must return −1.
On setting, the selectedIndex attribute must set
the selectedness of all the option
elements in the list of options to false, and then
the option element in the list of
options whose index is the given new value, if
any, must have its selectedness set to true and its dirtiness set to true.
This can result in no element having a selectedness set to true even in the case of the
select element having no multiple attribute
and a display size of 1.
The value IDL attribute, on getting, must
return the value of the first option
element in the list of options in tree
order that has its selectedness set to
true, if any. If there isn’t one, then it must return the empty string.
On setting, the value attribute must set the selectedness of all the option elements in
the list of options to false, and then the first
option element in the list of
options, in tree order, whose value
is equal to the given new value, if any, must have its selectedness set to true and its dirtiness set to true.
This can result in no element having a selectedness set to true even in the case of the
select element having no multiple attribute
and a display size of 1.
The multiple, required, and size IDL attributes must reflect the
respective content attributes of the same name. The size IDL
attribute has a default value of zero.
For historical reasons, the default value of the size IDL attribute does not return the actual size used, which, in
the absence of the size content attribute, is either 1 or 4
depending on the presence of the multiple attribute.
The willValidate, validity, and validationMessage IDL attributes, and the checkValidity(), and setCustomValidity() methods, are part of the
constraint validation API. The labels IDL
attribute provides a list of the element’s labels. The autofocus, disabled, form, and name IDL attributes are
part of the element’s forms API.
The following example shows how a select element can be used to offer the user
with a set of options from which the user can select a single option. The default option is
preselected.
<p>
 <label for="unittype">Select unit type:</label>
 <select id="unittype" name="unittype">
  <option value="1"> Miner </option>
  <option value="2"> Puffer </option>
  <option value="3" selected> Snipey </option>
  <option value="4"> Max </option>
  <option value="5"> Firebot </option>
 </select>
</p>
When there is no default option, a placeholder can be used instead:
<select name="unittype" required>
 <option value=""> Select unit type </option>
 <option value="1"> Miner </option>
 <option value="2"> Puffer </option>
 <option value="3"> Snipey </option>
 <option value="4"> Max </option>
 <option value="5"> Firebot </option>
</select>
Here, the user is offered a set of options from which he can select any number. By default,
all five options are selected.
<p>
 <label for="allowedunits">Select unit types to enable on this map:</label>
 <select id="allowedunits" name="allowedunits" multiple>
  <option value="1" selected> Miner </option>
  <option value="2" selected> Puffer </option>
  <option value="3" selected> Snipey </option>
  <option value="4" selected> Max </option>
  <option value="5" selected> Firebot </option>
 </select>
</p>
Sometimes, a user has to select one or more items. This example shows such an interface.
<p>Select the songs from that you would like on your Act II Mix Tape:</p>
<select multiple required name="act2">
 <option value="s1">It Sucks to Be Me (Reprise)
 <option value="s2">There is Life Outside Your Apartment
 <option value="s3">The More You Ruv Someone
 <option value="s4">Schadenfreude
 <option value="s5">I Wish I Could Go Back to College
 <option value="s6">The Money Song
 <option value="s7">School for Monsters
 <option value="s8">The Money Song (Reprise)
 <option value="s9">There's a Fine, Fine Line (Reprise)
 <option value="s10">What Do You Do With a B.A. in English? (Reprise)
 <option value="s11">For Now
</select>
4.10.8 The datalist element
- Categories:
- Flow content.
- Phrasing content.
- Contexts in which this element can be used:
- Where phrasing content is expected.
- Content model:
- Either: phrasing content (with zero or more
optionelements descendants). - Or: Zero or more
optionelements. - Content attributes:
- Global attributes
- Tag omission in text/html:
- Neither tag is omissible
- Allowed ARIA role attribute values:
listbox
(default — do not set).- Allowed ARIA state and property attributes:
- Global aria-* attributes
- Any
aria-*attributes
applicable to the allowed roles. - DOM interface:
-
interface HTMLDataListElement : HTMLElement {
  readonly attribute HTMLCollection options;
};
The datalist element represents a set of option elements that
represent predefined options for other controls. In the rendering, the datalist
element represents nothing and it, along with its children, should
be hidden.
The datalist element can be used in two ways. In the simplest case, the
datalist element has just option element children.
<label>
 Sex:
 <input name=sex list=sexes>
 <datalist id=sexes>
  <option value="Female">
  <option value="Male">
 </datalist>
</label>
In the more elaborate case, the datalist element can be given contents that are to
be displayed for down-level clients that don’t support datalist. In this case, the
option elements are provided inside a select element inside the
datalist element.
<label>
 Sex:
 <input name=sex list=sexes>
</label>
<datalist id=sexes>
 <label>
  or select from the list:
  <select name=sex>
   <option value="">
   <option>Female
   <option>Male
  </select>
 </label>
</datalist>
The datalist element is hooked up to an input element using the list attribute on the input element.
Each option element that is a descendant of the datalist element,
that is not disabled, and whose value is a string that isn’t the empty string, represents a
suggestion. Each suggestion has a value and a label.
- datalist .
options -
Returns an
HTMLCollectionof theoptionselements of the
datalistelement.
The options IDL attribute must return an
HTMLCollection rooted at the datalist node, whose filter matches
option elements.
Constraint validation: If an element has a datalist element
ancestor, it is barred from constraint validation.
4.10.9 The optgroup element
- Categories:
- None.
- Contexts in which this element can be used:
- As a child of a
selectelement. - Content model:
- Zero or more
optionand script-supporting elements. - Content attributes:
- Global attributes
disabled— Whether the form control is disabledlabel— User-visible label- Tag omission in text/html:
- An
optgroupelement’s end tag may be omitted
if theoptgroupelement is
immediately followed by anotheroptgroupelement, or if there is no more content in
the parent element. - Allowed ARIA role attribute values:
- None
- Allowed ARIA state and property attributes:
- Global aria-* attributes
- DOM interface:
-
interface HTMLOptGroupElement : HTMLElement {
           attribute boolean disabled;
           attribute DOMString label;
};
The optgroup element represents a group of option
elements with a common label.
The element’s group of option elements consists of the option
elements that are children of the optgroup element.
When showing option elements in select elements, user agents should
show the option elements of such groups as being related to each other and separate
from other option elements.
The disabled attribute is a
boolean attribute and can be used to disable a group of option elements
together.
The label attribute must be specified. Its
value gives the name of the group, for the purposes of the user interface. User
agents should use this attribute’s value when labeling the group of option elements
in a select element.
The disabled and label attributes must reflect the
respective content attributes of the same name.
The following snippet shows how a set of lessons from three courses could be offered in a
select drop-down widget:
<form action="courseselector.dll" method="get">
 <p>Which course would you like to watch today?
 <p><label>Course:
  <select name="c">
   <optgroup label="8.01 Physics I: Classical Mechanics">
    <option value="8.01.1">Lecture 01: Powers of Ten
    <option value="8.01.2">Lecture 02: 1D Kinematics
    <option value="8.01.3">Lecture 03: Vectors
   <optgroup label="8.02 Electricity and Magnestism">
    <option value="8.02.1">Lecture 01: What holds our world together?
    <option value="8.02.2">Lecture 02: Electric Field
    <option value="8.02.3">Lecture 03: Electric Flux
   <optgroup label="8.03 Physics III: Vibrations and Waves">
    <option value="8.03.1">Lecture 01: Periodic Phenomenon
    <option value="8.03.2">Lecture 02: Beats
    <option value="8.03.3">Lecture 03: Forced Oscillations with Damping
  </select>
 </label>
 <p><input type=submit value="▶ Play">
</form>
4.10.10 The option element
- Categories:
- None.
- Contexts in which this element can be used:
- As a child of a
selectelement. - As a child of a
datalistelement. - As a child of an
optgroupelement. - Content model:
- If the element has a
labelattribute and avalueattribute: Empty. - If the element has a
labelattribute but novalueattribute: Text. - If the element has no
labelattribute: Text that is not inter-element whitespace. - Content attributes:
- Global attributes
disabled— Whether the form control is disabledlabel— User-visible labelselected— Whether the option is selected by defaultvalue— Value to be used for form submission- Tag omission in text/html:
- An
optionelement’s end tag may be omitted if
theoptionelement is immediately followed by anotheroptionelement, or
if it is immediately followed by anoptgroupelement, or if there is no more content
in the parent element. - Allowed ARIA role attribute values:
option
(default — do not set),
menuitem,
menuitemradio
orseparator.- Allowed ARIA state and property attributes:
- Global aria-* attributes
- Any
aria-*attributes
applicable to the allowed roles. - DOM interface:
-
[NamedConstructor=Option(optional DOMString text = "", optional DOMString value, optional boolean defaultSelected = false, optional boolean selected = false)]
interface HTMLOptionElement : HTMLElement {
           attribute boolean disabled;
  readonly attribute HTMLFormElement? form;
           attribute DOMString label;
           attribute boolean defaultSelected;
           attribute boolean selected;
           attribute DOMString value;

           attribute DOMString text;
  readonly attribute long index;
};
The option element represents an option in a select
element or as part of a list of suggestions in a datalist element.
In certain circumstances described in the definition of the select element, an
option element can be a select element’s placeholder label
option. A placeholder label option does not represent an actual option, but
instead represents a label for the select control.
The disabled attribute is a boolean
attribute. An option element is disabled if its disabled attribute is present or if it is a child of an
optgroup element whose disabled attribute
is present.
The label attribute provides a label for
element. The label of an option element is
the value of the label content attribute, if there is one,
or, if there is not, the value of the element’s text IDL
attribute.
The label content attribute, if specified, must not be
empty.
The value attribute provides a value for
element. The value of an option element is
the value of the value content attribute, if there is one,
or, if there is not, the value of the element’s text IDL
attribute.
The selected attribute is a boolean
attribute. It represents the default selectedness of the element.
The dirtiness of an option element is
a boolean state, initially false. It controls whether adding or removing the selected content attribute has any effect.
The selectedness of an option
element is a boolean state, initially false. Except where otherwise specified, when the element is
created, its selectedness must be set to true if
the element has a selected attribute. Whenever an
option element’s selected attribute is
added, if its dirtiness is false, its selectedness must be set to true.
Whenever an
option element’s selected attribute is
removed, if its dirtiness is false, its selectedness must be set to false.
The Option() constructor, when called with three
or fewer arguments, overrides the initial state of the selectedness state to always be false even if the third
argument is true (implying that a selected attribute is
to be set). The fourth argument can be used to explicitly set the initial selectedness state when using the constructor.
A select element whose multiple
attribute is not specified must not have more than one descendant option element with
its selected attribute set.
An option element’s index is the number of
option elements that are in the same list of
options but that come before it in tree order. If the option
element is not in a list of options, then the
option element’s index is zero.
- option .
selected -
Returns true if the element is selected, and false otherwise.
Can be set, to override the current state of the element.
- option .
index -
Returns the index of the element in its
selectelement’soptionslist. - option .
form -
Returns the element’s
formelement, if any, or null otherwise. - option .
text -
Same as
textContent, except that spaces are collapsed andscriptelements are skipped. - option = new
Option( [ text [, value [, defaultSelected [, selected ] ] ] ] ) -
Returns a new
optionelement.The text argument sets the contents of the element.
The value argument sets the
value
attribute.The defaultSelected argument sets the
selectedattribute.The selected argument sets whether or not the element is selected. If it
is omitted, even if the defaultSelected argument is true, the element is not
selected.
The disabled IDL attribute must
reflect the content attribute of the same name. The defaultSelected IDL attribute must
reflect the selected content attribute.
The label IDL attribute, on getting, must
return the element’s label. On setting, the element’s
label content attribute must be set to the new value.
The value IDL attribute, on getting, must
return the element’s value. On setting, the element’s
value content attribute must be set to the new value.
The selected IDL attribute, on getting,
must return true if the element’s selectedness is
true, and false otherwise. On setting, it must set the element’s selectedness to the new value, set its dirtiness to true, and then cause the
element to ask for a reset.
The index IDL attribute must return the
element’s index.
The text IDL attribute, on getting, must return
the result of stripping and collapsing
whitespace from the concatenation of data of all the
Text node descendants of the option element, in tree order,
excluding any that are descendants of descendants of the option element that are
themselves script elements in the HTML namespace or script elements in the SVG namespace.
On setting, the text attribute must act as if the
textContent IDL attribute on the element had been set to the new value.
The form IDL attribute’s behavior depends on
whether the option element is in a select element or not. If the
option has a select element as its parent, or has an
optgroup element as its parent and that optgroup element has a
select element as its parent, then the form IDL
attribute must return the same value as the form IDL attribute
on that select element. Otherwise, it must return null.
A constructor is provided for creating HTMLOptionElement objects (in addition to
the factory methods from DOM such as createElement()): Option(text, value, defaultSelected, selected). When invoked as a
constructor, it must return a new HTMLOptionElement object (a new option
element). If the first argument is not the empty string, the new object must have as its only
child a Text node whose data is the value of that argument. Otherwise, it must have
no children. If the value argument is present, the new object must have a
value attribute set with the value of the argument as its
value. If the defaultSelected argument is true, the new object must have a
selected attribute set with no value. If the selected argument is true, the new object must have its selectedness set to true; otherwise the selectedness must be set to false, even if the defaultSelected argument is true. The element’s document must be the active
document of the browsing context of the Window object on which
the interface object of the invoked constructor is found.
4.10.11 The textarea element
- Categories:
- Flow content.
- Phrasing content.
- Interactive content.
- Listed, labelable, submittable, resettable, and reassociateable form-associated element.
- Palpable content.
- Contexts in which this element can be used:
- Where phrasing content is expected.
- Content model:
- Text.
- Content attributes:
- Global attributes
autocomplete— — Hint for form autofill featureautofocus— Automatically focus the form control when the page is loadedcols— Maximum number of characters per linedirname— Name of form field to use for sending the element’s directionality in form submissiondisabled— Whether the form control is disabledform— Associates the control with aformelementinputmode— Hint for selecting an input modalitymaxlength— Maximum length of valueminlength— Minimum length of valuename— Name of form control to use for form submission and in theform.elementsAPIplaceholder— User-visible label to be placed within the form controlreadonly— Whether to allow the value to be edited by the userrequired— Whether the control is required for form submissionrows— Number of lines to showwrap— How the value of the form control is to be wrapped for form submission- Tag omission in text/html:
- Neither tag is omissible
- Allowed ARIA role attribute values:
textbox
(default — do not set).- Allowed ARIA state and property attributes:
- Global aria-* attributes
- Any
aria-*attributes
applicable to the allowed roles. - DOM interface:
-
interface HTMLTextAreaElement : HTMLElement {
           attribute DOMString autocomplete;
           attribute boolean autofocus;
           attribute unsigned long cols;
           attribute DOMString dirName;
           attribute boolean disabled;
  readonly attribute HTMLFormElement? form;
           attribute long maxLength;
           attribute long minLength;
           attribute DOMString name;
           attribute DOMString placeholder;
           attribute boolean readOnly;
           attribute boolean required;
           attribute unsigned long rows;
           attribute DOMString wrap;

  readonly attribute DOMString type;
           attribute DOMString defaultValue;
  [TreatNullAs=EmptyString] attribute DOMString value;
  readonly attribute unsigned long textLength;

  readonly attribute boolean willValidate;
  readonly attribute ValidityState validity;
  readonly attribute DOMString validationMessage;
  boolean checkValidity();
  void setCustomValidity(DOMString error);

  readonly attribute NodeList labels;

  void select();
           attribute unsigned long selectionStart;
           attribute unsigned long selectionEnd;
           attribute DOMString selectionDirection;
  void setRangeText(DOMString replacement);
  void setRangeText(DOMString replacement, unsigned long start, unsigned long end, optional SelectionMode selectionMode = "preserve");
  void setSelectionRange(unsigned long start, unsigned long end, optional DOMString direction);
};
The textarea element represents a multiline plain text edit
control for the element’s raw
value. The contents of the control represent the control’s default value.
The readonly attribute is a
boolean attribute used to control whether the text can be edited by the user or
not.
In this example, a text field is marked read-only because it represents a read-only file:
Filename: <code>/etc/bash.bashrc</code> <textarea name="buffer" readonly> # System-wide .bashrc file for interactive bash(1) shells. # To enable the settings / commands in this file for login shells as well, # this file has to be sourced in /etc/profile. # If not running interactively, don't do anything [ -z "$PS1" ] && return ...</textarea>
Constraint validation: If the readonly attribute is specified on a textarea
element, the element is barred from constraint validation.
A textarea element is mutable if it is
neither disabled nor has a readonly attribute specified.
When a textarea is mutable, its raw value should be editable by the user: the user agent
should allow the user to edit, insert, and remove text, and to insert and remove line breaks in
the form of «LF» (U+000A) characters. Any time the user causes the element’s raw value to change, the user agent must queue a
task to fire a simple event that bubbles named input at the textarea element. User agents may wait for a
suitable break in the user’s interaction before queuing the task; for example, a user agent could
wait for the user to have not hit a key for 100ms, so as to only fire the event when the user
pauses, instead of continuously for each keystroke.
A textarea element has a dirty value
flag, which must be initially set to false, and must be set to true whenever the user
interacts with the control in a way that changes the raw
value.
When the textarea element’s textContent IDL attribute changes value,
if the element’s dirty value flag is false, then the
element’s raw value must be set to the value of
the element’s textContent IDL attribute.
The reset algorithm for textarea
elements is to set the element’s value to the
value of the element’s textContent IDL attribute.
If the element is mutable, the user agent should allow
the user to change the writing direction of the element, setting it either to a left-to-right
writing direction or a right-to-left writing direction. If the user does so, the user agent must
then run the following steps:
-
Set the element’s
dirattribute to «ltr» if the user selected a left-to-right writing direction, and
«rtl» if the user selected a right-to-left writing
direction. -
Queue a task to fire a simple event that bubbles named
inputat thetextareaelement.
The cols attribute specifies the expected
maximum number of characters per line. If the cols
attribute is specified, its value must be a valid non-negative integer greater than
zero. If applying the rules for parsing non-negative integers to
the attribute’s value results in a number greater than zero, then the element’s character width is that value; otherwise, it is
20.
The user agent may use the textarea element’s character width as a hint to the user as to how many
characters the server prefers per line (e.g. for visual user agents by making the width of the
control be that many characters). In visual renderings, the user agent should wrap the user’s
input in the rendering so that each line is no wider than this number of characters.
The rows attribute specifies the number of
lines to show. If the rows attribute is specified, its
value must be a valid non-negative integer greater than zero. If
applying the rules for parsing non-negative integers to the attribute’s value results
in a number greater than zero, then the element’s character
height is that value; otherwise, it is 2.
Visual user agents should set the height of the control to the number of lines given by character height.
The wrap attribute is an enumerated
attribute with two keywords and states: the soft keyword which maps to the Soft state, and the hard keyword which maps to the Hard state. The missing value default is the
Soft state.
The Soft state indicates that the text in the
textarea is not to be wrapped when it is submitted (though it can still be wrapped in
the rendering).
The Hard state indicates that the text in the
textarea is to have newlines added by the user agent so that the text is wrapped when
it is submitted.
If the element’s wrap attribute is in the Hard state, the cols attribute must be specified.
For historical reasons, the element’s value is normalised in three different ways for three
different purposes. The raw value is the value as
it was originally set. It is not normalized. The API
value is the value used in the value IDL attribute.
It is normalized so that line breaks use «LF» (U+000A) characters. Finally, there is the
form submission value. It is normalized so that line breaks
use U+000D CARRIAGE RETURN «CRLF» (U+000A) character pairs, and in addition, if necessary
given the element’s wrap attribute, additional line breaks
are inserted to wrap the text at the given width.
The element’s API value is defined to be the
element’s raw value with the following
transformation applied:
-
Replace every U+000D CARRIAGE RETURN «CRLF» (U+000A) character pair from the raw value with a single «LF» (U+000A)
character. -
Replace every remaining U+000D CARRIAGE RETURN character from the raw value with a single «LF» (U+000A)
character.
The element’s value is defined to be the element’s raw value with the following transformation applied:
-
Replace every occurrence of a «CR» (U+000D) character not followed by a
«LF» (U+000A) character, and every occurrence of a «LF» (U+000A) character not
preceded by a «CR» (U+000D) character, by a two-character string consisting of a
U+000D CARRIAGE RETURN «CRLF» (U+000A) character pair. -
If the element’s
wrapattribute is in the Hard state, insert U+000D CARRIAGE RETURN «CRLF» (U+000A) character pairs into the string using a UA-defined algorithm so that each line
has no more than character width characters. For
the purposes of this requirement, lines are delimited by the start of the string, the end of the
string, and U+000D CARRIAGE RETURN «CRLF» (U+000A) character pairs.
The maxlength attribute is a form control maxlength attribute controlled
by the textarea element’s dirty value
flag.
If the textarea element has a maximum allowed value length, then the
element’s children must be such that the code-unit length of the value of the
element’s textContent IDL attribute is equal to or less than the element’s
maximum allowed value length.
The minlength attribute is a form control minlength attribute controlled
by the textarea element’s dirty value
flag.
The required attribute is a
boolean attribute. When specified, the user will be required to enter a value before
submitting the form.
Constraint validation: If the element has its required attribute specified, and the element is mutable, and the element’s value is the empty string, then the element is suffering
from being missing.
The placeholder attribute represents
a short hint (a word or short phrase) intended to aid the user with data entry when the
control has no value. A hint could be a sample value or a brief description of the expected
format.
The placeholder attribute
should not be used as a replacement for a label. For a
longer hint or other advisory text, place the text next to the control.
Use of the placeholder
attribute as a replacement for a label can reduce the
accessibility and usability of the control for a range of users including older
users and users with cognitive, mobility, fine motor skill or vision impairments.
While the hint given by the control’s label is shown at all times, the short
hint given in the placeholder
attribute is only shown before the user enters a value. Furthermore,
placeholder text may be mistaken for
a pre-filled value, and as commonly implemented the default color of the placeholder text
provides insufficient contrast and the lack of a separate visible label
reduces the size of the hit region available for setting focus on the control.
User agents should present this hint to the user when the element’s value is the empty string and the control is not focused (e.g. by
displaying it inside a blank unfocused control). All U+000D CARRIAGE RETURN U+000A LINE FEED
character pairs (CRLF) in the hint, as well as all other «CR» (U+000D) and «LF» (U+000A) characters in the hint, must be treated as line breaks when rendering the hint.
The name attribute represents the element’s name.
The dirname attribute controls how the element’s directionality is submitted.
The disabled attribute is used to make the control
non-interactive and to prevent its value from being submitted.
The form attribute is used to explicitly associate the
textarea element with its form owner.
The autofocus attribute controls focus.
The autocomplete attribute controls how the user agent
provides autofill behavior.
- textarea .
type -
Returns the string «
textarea«. - textarea .
value -
Returns the current value of the element.
Can be set, to change the value.
The cols, placeholder, required, rows, and wrap attributes must reflect the
respective content attributes of the same name. The cols
and rows attributes are limited to only non-negative
numbers greater than zero. The cols attribute’s
default value is 20. The rows attribute’s default value is
2. The dirName IDL attribute must
reflect the dirname content attribute. The maxLength IDL attribute must
reflect the maxlength content attribute,
limited to only non-negative numbers. The minLength IDL attribute must
reflect the minlength content attribute,
limited to only non-negative numbers. The readOnly IDL attribute must reflect
the readonly content attribute.
The type IDL attribute must return the value
«textarea«.
The defaultValue IDL attribute must
act like the element’s textContent IDL attribute.
The value attribute must, on getting, return
the element’s API value; on setting, it must set
the element’s raw value to the new value, set the
element’s dirty value flag to true, and should then
move the text entry cursor position to the end of the text field, unselecting any selected text
and resetting the selection direction to none.
The textLength IDL attribute must
return the code-unit length of the element’s API value.
The willValidate, validity, and validationMessage IDL attributes, and the checkValidity(), and setCustomValidity() methods, are part of the
constraint validation API. The labels IDL
attribute provides a list of the element’s labels. The select(), selectionStart, selectionEnd, selectionDirection, setRangeText(), and setSelectionRange() methods and IDL attributes
expose the element’s text selection. The autofocus, disabled, form, and name IDL attributes are part of the element’s forms API.
Here is an example of a textarea being used for unrestricted free-form text input
in a form:
<p>If you have any comments, please let us know: <textarea cols=80 name=comments></textarea></p>
To specify a maximum length for the comments, one can use the maxlength attribute:
<p>If you have any short comments, please let us know: <textarea cols=80 name=comments maxlength=200></textarea></p>
To give a default value, text can be included inside the element:
<p>If you have any comments, please let us know: <textarea cols=80 name=comments>You rock!</textarea></p>
You can also give a minimum length. Here, a letter needs to be filled out by the user; a
template (which is shorter than the minimum length) is provided, but is insufficient to submit
the form:
<textarea required minlength="500">Dear Madam Speaker,

Regarding your letter dated ...

...

Yours Sincerely,

...</textarea>
A placeholder can be given as well, to suggest the basic form to the user, without providing
an explicit template:
<textarea placeholder="Dear Francine,

They closed the parks this week, so we won't be able to
meet your there. Should we just have dinner?

Love,
Daddy"></textarea>
To have the browser submit the directionality of
the element along with the value, the dirname attribute can be
specified:
<p>If you have any comments, please let us know (you may use either English or Hebrew for your comments):
<textarea cols=80 name=comments dirname=comments.dir></textarea></p>
4.10.12 The keygen element
- Categories:
- Flow content.
- Phrasing content.
- Interactive content.
- Listed, labelable, submittable, resettable, and reassociateable form-associated element.
- Palpable content.
- Contexts in which this element can be used:
- Where phrasing content is expected.
- Content model:
- Empty.
- Content attributes:
- Global attributes
autofocus— Automatically focus the form control when the page is loadedchallenge— String to package with the generated and signed public keydisabled— Whether the form control is disabledform— Associates the control with aformelementkeytype— The type of cryptographic key to generatename— Name of form control to use for form submission and in theform.elementsAPI- Tag omission in text/html:
- No end tag.
- Allowed ARIA role attribute values:
- None
- Allowed ARIA state and property attributes:
- Global aria-* attributes
- DOM interface:
-
interface HTMLKeygenElement : HTMLElement {
           attribute boolean autofocus;
           attribute DOMString challenge;
           attribute boolean disabled;
  readonly attribute HTMLFormElement? form;
           attribute DOMString keytype;
           attribute DOMString name;

  readonly attribute DOMString type;

  readonly attribute boolean willValidate;
  readonly attribute ValidityState validity;
  readonly attribute DOMString validationMessage;
  boolean checkValidity();
  void setCustomValidity(DOMString error);

  readonly attribute NodeList labels;
};
The keygen element represents a key pair generator control. When the
control’s form is submitted, the private key is stored in the local keystore, and the public key
is packaged and sent to the server.
The challenge attribute may be specified.
Its value will be packaged with the submitted key.
The keytype attribute is an
enumerated attribute. The following table lists the keywords and states for the
attribute — the keywords in the left column map to the states listed in the cell in the
second column on the same row as the keyword. User agents are not required to support these
values, and must only recognize values whose corresponding algorithms they support.
| Keyword | State |
|---|---|
rsa
|
RSA |
The invalid value default state is the unknown state. The missing
value default state is the RSA state, if it is supported, or the unknown state otherwise.
This specification does not specify what key types user agents are to support
— it is possible for a user agent to not support any key types at all.
The user agent may expose a user interface for each keygen element to allow the
user to configure settings of the element’s key pair generator, e.g. the key length.
The reset algorithm for keygen
elements is to set these various configuration settings back to their defaults.
The element’s value is the string returned from the
following algorithm:
-
Use the appropriate step from the following list:
- If the
keytypeattribute is in the RSA state -
Generate an RSA key pair using the settings given by the user, if appropriate, using the
md5WithRSAEncryptionRSA signature algorithm (the signature algorithm
with MD5 and the RSA encryption algorithm) referenced in section 2.2.1 («RSA Signature
Algorithm») of RFC 3279, and defined in RFC 3447. [RFC3279] [RFC3447] - Otherwise, the
keytypeattribute is in the unknown state -
The given key type is not supported. Return the empty string and abort this algorithm.
Let private key be the generated private key.
Let public key be the generated public key.
Let signature algorithm be the selected signature algorithm.
- If the
-
If the element has a
challengeattribute, then let
challenge be that attribute’s value. Otherwise, let challenge be the empty string. -
Let algorithm be an ASN.1
AlgorithmIdentifier
structure as defined by RFC 5280, with thealgorithmfield giving the
ASN.1 OID used to identify signature algorithm, using the OIDs defined in
section 2.2 («Signature Algorithms») of RFC 3279, and theparametersfield
set up as required by RFC 3279 forAlgorithmIdentifierstructures for that
algorithm. [X690] [RFC5280] [RFC3279] -
Let spki be an ASN.1
SubjectPublicKeyInfostructure
as defined by RFC 5280, with thealgorithmfield set to the algorithm structure from the previous step, and thesubjectPublicKeyfield set to the BIT STRING value resulting from ASN.1 DER
encoding the public key. [X690] [RFC5280] -
Let publicKeyAndChallenge be an ASN.1
PublicKeyAndChallenge
structure as defined below, with thespkifield set to the spki structure from the previous step, and thechallenge
field set to the string challenge obtained earlier. [X690] -
Let signature be the BIT STRING value resulting from ASN.1 DER encoding
the signature generated by applying the signature algorithm to the byte
string obtained by ASN.1 DER encoding the publicKeyAndChallenge structure,
using private key as the signing key. [X690] -
Let signedPublicKeyAndChallenge be an ASN.1
SignedPublicKeyAndChallengestructure as defined below, with thepublicKeyAndChallengefield set to the publicKeyAndChallenge
structure, thesignatureAlgorithmfield set to the algorithm structure, and thesignaturefield set to the BIT
STRING signature from the previous step. [X690] -
Return the result of base64 encoding the result of ASN.1 DER encoding the signedPublicKeyAndChallenge structure. [RFC4648] [X690]
The data objects used by the above algorithm are defined as follows. These definitions use the
same «ASN.1-like» syntax defined by RFC 5280. [RFC5280]
PublicKeyAndChallenge ::= SEQUENCE {
    spki SubjectPublicKeyInfo,
    challenge IA5STRING
}

SignedPublicKeyAndChallenge ::= SEQUENCE {
    publicKeyAndChallenge PublicKeyAndChallenge,
    signatureAlgorithm AlgorithmIdentifier,
    signature BIT STRING
}
Constraint validation: The keygen element is barred from
constraint validation.
The form attribute is used to explicitly associate the
keygen element with its form owner. The name attribute represents the element’s name. The disabled attribute is used to make the control non-interactive and
to prevent its value from being submitted. The autofocus
attribute controls focus.
- keygen .
type -
Returns the string «
keygen«.
The challenge IDL attribute must
reflect the content attribute of the same name.
The keytype IDL attribute must
reflect the content attribute of the same name, limited to only known
values.
The type IDL attribute must return the value
«keygen«.
The willValidate, validity, and validationMessage IDL attributes, and the checkValidity(), and setCustomValidity() methods, are part of the
constraint validation API. The labels IDL
attribute provides a list of the element’s labels. The autofocus, disabled, form, and name IDL attributes are
part of the element’s forms API.
This specification does not specify how the private key generated is to be used.
It is expected that after receiving the SignedPublicKeyAndChallenge (SPKAC)
structure, the server will generate a client certificate and offer it back to the user for
download; this certificate, once downloaded and stored in the key store along with the private
key, can then be used to authenticate to services that use TLS and certificate authentication.
To generate a key pair, add the private key to the user’s key store, and submit the public key
to the server, markup such as the following can be used:
<form action="processkey.cgi" method="post" enctype="multipart/form-data">
 <p><keygen name="key"></p>
 <p><input type=submit value="Submit key..."></p>
</form>
The server will then receive a form submission with a packaged RSA public key as the value of
«key«. This can then be used for various purposes, such as generating a
client certificate, as mentioned above.
4.10.13 The output element
- Categories:
- Flow content.
- Phrasing content.
- Listed, labelable, resettable, and reassociateable form-associated element.
- Palpable content.
- Contexts in which this element can be used:
- Where phrasing content is expected.
- Content model:
- Phrasing content.
- Content attributes:
- Global attributes
for— Specifies controls from which the output was calculatedform— Associates the control with aformelementname— Name of form control to use for form submission and in theform.elementsAPI- Tag omission in text/html:
- Neither tag is omissible
- Allowed ARIA role attribute values:
status
(default — do not set), any role value.- Allowed ARIA state and property attributes:
- Global aria-* attributes
- Any
aria-*attributes
applicable to the allowed roles. - DOM interface:
-
interface HTMLOutputElement : HTMLElement {
  [PutForwards=value] readonly attribute DOMSettableTokenList htmlFor;
  readonly attribute HTMLFormElement? form;
           attribute DOMString name;

  readonly attribute DOMString type;
           attribute DOMString defaultValue;
           attribute DOMString value;

  readonly attribute boolean willValidate;
  readonly attribute ValidityState validity;
  readonly attribute DOMString validationMessage;
  boolean checkValidity();
  void setCustomValidity(DOMString error);

  readonly attribute NodeList labels;
};
The output element represents the result of a calculation or user
action.
The for content attribute allows an explicit
relationship to be made between the result of a calculation and the elements that represent the
values that went into the calculation or that otherwise influenced the calculation. The for attribute, if specified, must contain a string consisting of an
unordered set of unique space-separated tokens that are case-sensitive,
each of which must have the value of an ID of an element in the
same Document.
The form attribute is used to explicitly associate the
output element with its form owner. The name attribute represents the element’s name.
The element has a value mode flag which is either value or default.
Initially, the value mode flag must be set to default.
The element also has a default value. Initially,
the default value must be the empty string.
When the value mode flag is in mode default, the contents of the element represent both the
value of the element and its default value. When
the value mode flag is in mode value, the contents of the element represent the value of
the element only, and the default value is only
accessible using the defaultValue IDL attribute.
Whenever the element’s descendants are changed in any way, if the value mode flag is in mode default, the element’s default value must be set to the value of the element’s
textContent IDL attribute.
The reset algorithm for output
elements is to set the element’s value mode flag to default and then to set the element’s
textContent IDL attribute to the value of the element’s default value (thus replacing the element’s child
nodes).
- output .
value[ = value ] -
Returns the element’s current value.
Can be set, to change the value.
- output .
defaultValue[ = value ] -
Returns the element’s current default value.
Can be set, to change the default value.
- output .
type -
Returns the string «
output«.
The value IDL attribute must act like the
element’s textContent IDL attribute, except that on setting, in addition, before the
child nodes are changed, the element’s value mode flag
must be set to value.
The defaultValue IDL attribute, on
getting, must return the element’s default value.
On setting, the attribute must set the element’s default
value, and, if the element’s value mode flag is in
the mode default, set the element’s
textContent IDL attribute as well.
The type attribute must return the string
«output«.
The htmlFor IDL attribute must
reflect the for content attribute.
The willValidate, validity, and validationMessage IDL attributes, and the checkValidity(), and setCustomValidity() methods, are part of the
constraint validation API. The labels IDL
attribute provides a list of the element’s labels. The form and name IDL attributes are part
of the element’s forms API.
A simple calculator could use output for its display of calculated results:
<form onsubmit="return false" oninput="o.value = a.valueAsNumber + b.valueAsNumber">
 <input name=a type=number step=any> +
 <input name=b type=number step=any> =
 <output name=o for="a b"></output>
</form>
In this example, an output element is used to report the results from a remote
server, as they come in:
<output id="result"></output>
<script>
 var primeSource = new WebSocket('ws://primes.example.net/');
 primeSource.onmessage = function (event) {
   document.getElementById('result').value = event.data;
 }
</script>
4.10.14 The progress element
- Categories:
- Flow content.
- Phrasing content.
- Labelable element.
- Palpable content.
- Contexts in which this element can be used:
- Where phrasing content is expected.
- Content model:
- Phrasing content, but there must be no
progresselement descendants. - Content attributes:
- Global attributes
value— Current value of the elementmax— Upper bound of range- Tag omission in text/html:
- Neither tag is omissible
- Allowed ARIA role attribute values:
progressbar
(default — do not set).- Allowed ARIA state and property attributes:
- Global aria-* attributes
- Any
aria-*attributes
applicable to the allowed roles. - DOM interface:
-
interface HTMLProgressElement : HTMLElement {
           attribute double value;
           attribute double max;
  readonly attribute double position;
  readonly attribute NodeList labels;
};
The progress element represents the completion progress of a task.
The progress is either indeterminate, indicating that progress is being made but that it is not
clear how much more work remains to be done before the task is complete (e.g. because the task is
waiting for a remote host to respond), or the progress is a number in the range zero to a maximum,
giving the fraction of work that has so far been completed.
There are two attributes that determine the current task completion represented by the element.
The value attribute specifies how much of the
task has been completed, and the max attribute
specifies how much work the task requires in total. The units are arbitrary and not specified.
To make a determinate progress bar, add a value attribute with the current progress (either a number from
0.0 to 1.0, or, if the max attribute is specified, a number
from 0 to the value of the max attribute). To make an
indeterminate progress bar, remove the value
attribute.
Authors are encouraged to also include the current value and the maximum value inline as text
inside the element, so that the progress is made available to users of legacy user agents.
Here is a snippet of a Web application that shows the progress of some automated task:
<section>
 <h2>Task Progress</h2>
 <p>Progress: <progress id="p" max=100><span>0</span>%</progress></p>
 <script>
  var progressBar = document.getElementById('p');
  function updateProgress(newValue) {
    progressBar.value = newValue;
    progressBar.getElementsByTagName('span')[0].textContent = newValue;
  }
 </script>
</section>
(The updateProgress() method in this example would be called by some other code
on the page to update the actual progress bar as the task progressed.)
The value and max attributes, when present, must have values that are valid floating-point numbers. The value attribute, if present, must have a value equal to or
greater than zero, and less than or equal to the value of the max attribute, if present, or 1.0, otherwise. The max attribute, if present, must have a value greater than
zero.
The progress element is the wrong element to use for something that
is just a gauge, as opposed to task progress. For instance, indicating disk space usage using
progress would be inappropriate. Instead, the meter element is available
for such use cases.
User agent requirements: If the value
attribute is omitted, then the progress bar is an indeterminate progress bar. Otherwise, it is a
determinate progress bar.
If the progress bar is a determinate progress bar and the element has a max attribute, the user agent must parse the max attribute’s value according to the rules for parsing
floating-point number values. If this does not result in an error, and if the parsed value
is greater than zero, then the maximum value of the
progress bar is that value. Otherwise, if the element has no max attribute, or if it has one but parsing it resulted in an
error, or if the parsed value was less than or equal to zero, then the maximum value of the progress bar is 1.0.
If the progress bar is a determinate progress bar, user agents must parse the value attribute’s value according to the rules for
parsing floating-point number values. If this does not result in an error, and if the
parsed value is less than the maximum value and
greater than zero, then the current value of the
progress bar is that parsed value. Otherwise, if the parsed value was greater than or equal to the
maximum value, then the current value of the progress bar is the maximum value of the progress bar. Otherwise, if parsing
the value attribute’s value resulted in an error, or a
number less than or equal to zero, then the current
value of the progress bar is zero.
UA requirements for showing the progress bar: When representing a
progress element to the user, the UA should indicate whether it is a determinate or
indeterminate progress bar, and in the former case, should indicate the relative position of the
current value relative to the maximum value.
- progress .
position -
For a determinate progress bar (one with known current and maximum values), returns the
result of dividing the current value by the maximum value.For an indeterminate progress bar, returns −1.
If the progress bar is an indeterminate progress bar, then the position IDL attribute must return −1.
Otherwise, it must return the result of dividing the current
value by the maximum value.
If the progress bar is an indeterminate progress bar, then the value IDL attribute, on getting, must return 0.
Otherwise, it must return the current value. On
setting, the given value must be converted to the best representation of the number as a
floating-point number and then the value content
attribute must be set to that string.
Setting the value IDL attribute to itself
when the corresponding content attribute is absent would change the progress bar from an
indeterminate progress bar to a determinate progress bar with no progress.
The max IDL attribute must
reflect the content attribute of the same name, limited to numbers greater than
zero. The default value for max is 1.0.
The labels IDL attribute provides a list of the element’s
labels.
4.10.15 The meter element
- Categories:
- Flow content.
- Phrasing content.
- Labelable element.
- Palpable content.
- Contexts in which this element can be used:
- Where phrasing content is expected.
- Content model:
- Phrasing content, but there must be no
meterelement descendants. - Content attributes:
- Global attributes
value— Current value of the elementmin— Lower bound of rangemax— Upper bound of rangelow— High limit of low rangehigh— Low limit of high rangeoptimum— Optimum value in gauge- Tag omission in text/html:
- Neither tag is omissible
- Allowed ARIA role attribute values:
- None
- Allowed ARIA state and property attributes:
- Global aria-* attributes
- DOM interface:
-
interface HTMLMeterElement : HTMLElement {
           attribute double value;
           attribute double min;
           attribute double max;
           attribute double low;
           attribute double high;
           attribute double optimum;
  readonly attribute NodeList labels;
};
The meter element represents a scalar measurement within a known
range, or a fractional value; for example disk usage, the relevance of a query result, or the
fraction of a voting population to have selected a particular candidate.
This is also known as a gauge.
The meter element should not be used to indicate progress (as in a
progress bar). For that role, HTML provides a separate progress element.
The meter element also does not represent a scalar value of arbitrary
range — for example, it would be wrong to use this to report a weight, or height, unless
there is a known maximum value.
There are six attributes that determine the semantics of the gauge represented by the
element.
The min attribute specifies the lower bound of
the range, and the max attribute specifies the
upper bound. The value attribute specifies the
value to have the gauge indicate as the «measured» value.
The other three attributes can be used to segment the gauge’s range into «low», «medium», and
«high» parts, and to indicate which part of the gauge is the «optimum» part. The low attribute specifies the range that is considered to
be the «low» part, and the high attribute
specifies the range that is considered to be the «high» part. The optimum attribute gives the position that is
«optimum»; if that is higher than the «high» value then this indicates that the higher the value,
the better; if it’s lower than the «low» mark then it indicates that lower values are better, and
naturally if it is in between then it indicates that neither high nor low values are good.
Authoring requirements: The value attribute must be specified. The value, min, low, high, max, and optimum attributes,
when present, must have values that are valid
floating-point numbers.
In addition, the attributes’ values are further constrained:
Let value be the value attribute’s
number.
If the min attribute is specified, then let minimum be that attribute’s value; otherwise, let it be zero.
If the max attribute is specified, then let maximum be that attribute’s value; otherwise, let it be 1.0.
The following inequalities must hold, as applicable:
- minimum ≤ value ≤ maximum
- minimum ≤
low≤ maximum (iflowis specified) - minimum ≤
high≤ maximum (ifhighis specified) - minimum ≤
optimum≤ maximum (ifoptimumis specified) low≤high(if
bothlowandhighare
specified)
If no minimum or maximum is specified, then the range is assumed to be 0..1, and
the value thus has to be within that range.
Authors are encouraged to include a textual representation of the gauge’s state in the
element’s contents, for users of user agents that do not support the meter
element.
The following examples show three gauges that would all be three-quarters full:
Storage space usage: <meter value=6 max=8>6 blocks used (out of 8 total)</meter>
Voter turnout: <meter value=0.75><img alt="75%" src="graph75.png"></meter>
Tickets sold: <meter min="0" max="100" value="75"></meter>
The following example is incorrect use of the element, because it doesn’t give a range (and
since the default maximum is 1, both of the gauges would end up looking maxed out):
<p>The grapefruit pie had a radius of <meter value=12>12cm</meter>
and a height of <meter value=2>2cm</meter>.</p> <!-- BAD! -->
Instead, one would either not include the meter element, or use the meter element with a
defined range to give the dimensions in context compared to other pies:
<p>The grapefruit pie had a radius of 12cm and a height of
2cm.</p>
<dl>
 <dt>Radius: <dd> <meter min=0 max=20 value=12>12cm</meter>
 <dt>Height: <dd> <meter min=0 max=10 value=2>2cm</meter>
</dl>
There is no explicit way to specify units in the meter element, but the units may
be specified in the title attribute in free-form text.
The example above could be extended to mention the units:
<dl>
 <dt>Radius: <dd> <meter min=0 max=20 value=12 title="centimeters">12cm</meter>
 <dt>Height: <dd> <meter min=0 max=10 value=2 title="centimeters">2cm</meter>
</dl>
User agent requirements: User agents must parse the min, max, value, low, high, and optimum
attributes using the rules for parsing floating-point number values.
User agents must then use all these numbers to obtain values for six points on the gauge, as
follows. (The order in which these are evaluated is important, as some of the values refer to
earlier ones.)
- The minimum value
-
If the
minattribute is specified and a value could be
parsed out of it, then the minimum value is that value. Otherwise, the minimum value is
zero. - The maximum value
-
If the
maxattribute is specified and a value could be
parsed out of it, then the candidate maximum value is that value. Otherwise, the candidate
maximum value is 1.0.If the candidate maximum value is greater than or equal to the minimum value, then the
maximum value is the candidate maximum value. Otherwise, the maximum value is the same as the
minimum value. - The actual value
-
If the
valueattribute is specified and a value could
be parsed out of it, then that value is the candidate actual value. Otherwise, the candidate
actual value is zero.If the candidate actual value is less than the minimum value, then the actual value is the
minimum value.Otherwise, if the candidate actual value is greater than the maximum value, then the actual
value is the maximum value.Otherwise, the actual value is the candidate actual value.
- The low boundary
-
If the
lowattribute is specified and a value could be
parsed out of it, then the candidate low boundary is that value. Otherwise, the candidate low
boundary is the same as the minimum value.If the candidate low boundary is less than the minimum value, then the low boundary is the
minimum value.Otherwise, if the candidate low boundary is greater than the maximum value, then the low
boundary is the maximum value.Otherwise, the low boundary is the candidate low boundary.
- The high boundary
-
If the
highattribute is specified and a value could be
parsed out of it, then the candidate high boundary is that value. Otherwise, the candidate high
boundary is the same as the maximum value.If the candidate high boundary is less than the low boundary, then the high boundary is the
low boundary.Otherwise, if the candidate high boundary is greater than the maximum value, then the high
boundary is the maximum value.Otherwise, the high boundary is the candidate high boundary.
- The optimum point
-
If the
optimumattribute is specified and a value
could be parsed out of it, then the candidate optimum point is that value. Otherwise, the
candidate optimum point is the midpoint between the minimum value and the maximum value.If the candidate optimum point is less than the minimum value, then the optimum point is the
minimum value.Otherwise, if the candidate optimum point is greater than the maximum value, then the optimum
point is the maximum value.Otherwise, the optimum point is the candidate optimum point.
All of which will result in the following inequalities all being true:
- minimum value ≤ actual value ≤ maximum value
- minimum value ≤ low boundary ≤ high boundary ≤ maximum value
- minimum value ≤ optimum point ≤ maximum value
UA requirements for regions of the gauge: If the optimum point is equal to the
low boundary or the high boundary, or anywhere in between them, then the region between the low
and high boundaries of the gauge must be treated as the optimum region, and the low and high
parts, if any, must be treated as suboptimal. Otherwise, if the optimum point is less than the low
boundary, then the region between the minimum value and the low boundary must be treated as the
optimum region, the region from the low boundary up to the high boundary must be treated as a
suboptimal region, and the remaining region must be treated as an even less good region. Finally,
if the optimum point is higher than the high boundary, then the situation is reversed; the region
between the high boundary and the maximum value must be treated as the optimum region, the region
from the high boundary down to the low boundary must be treated as a suboptimal region, and the
remaining region must be treated as an even less good region.
UA requirements for showing the gauge: When representing a meter
element to the user, the UA should indicate the relative position of the actual value to the
minimum and maximum values, and the relationship between the actual value and the three regions of
the gauge.
The following markup:
<h3>Suggested groups</h3>
<ul>
 <li>
  <p><a href="/group/comp.infosystems.www.authoring.stylesheets/view">comp.infosystems.www.authoring.stylesheets</a> -
     <a href="/group/comp.infosystems.www.authoring.stylesheets/subscribe">join</a></p>
  <p>Group description: <strong>Layout/presentation on the WWW.</strong></p>
  <p><meter value="0.5">Moderate activity,</meter> Usenet, 618 subscribers</p>
 </li>
 <li>
  <p><a href="/group/netscape.public.mozilla.xpinstall/view">netscape.public.mozilla.xpinstall</a> -
     <a href="/group/netscape.public.mozilla.xpinstall/subscribe">join</a></p>
  <p>Group description: <strong>Mozilla XPInstall discussion.</strong></p>
  <p><meter value="0.25">Low activity,</meter> Usenet, 22 subscribers</p>
 </li>
 <li>
  <p><a href="/group/mozilla.dev.general/view">mozilla.dev.general</a> -
     <a href="/group/mozilla.dev.general/subscribe">join</a></p>
  <p><meter value="0.25">Low activity,</meter> Usenet, 66 subscribers</p>
 </li>
</ul>
Might be rendered as follows:
User agents may combine the value of the title attribute and the other attributes to provide context-sensitive
help or inline text detailing the actual values.
For example, the following snippet:
<meter min=0 max=60 value=23.2 title=seconds></meter>
…might cause the user agent to display a gauge with a tooltip
saying «Value: 23.2 out of 60.» on one line and «seconds» on a
second line.
The value IDL attribute, on getting, must
return the actual value. On setting, the given value
must be converted to the best representation of the number as a floating-point number
and then the value content attribute must be set to that
string.
The min IDL attribute, on getting, must return
the minimum value. On setting, the given value must be
converted to the best representation of the number as a floating-point number and
then the min content attribute must be set to that string.
The max IDL attribute, on getting, must return
the maximum value. On setting, the given value must be
converted to the best representation of the number as a floating-point number and
then the max content attribute must be set to that string.
The low IDL attribute, on getting, must return
the low boundary. On setting, the given value must be
converted to the best representation of the number as a floating-point number and
then the low content attribute must be set to that string.
The high IDL attribute, on getting, must return
the high boundary. On setting, the given value must be
converted to the best representation of the number as a floating-point number and
then the high content attribute must be set to that
string.
The optimum IDL attribute, on getting, must
return the optimum value. On setting, the given value
must be converted to the best representation of the number as a floating-point number
and then the optimum content attribute must be set to that
string.
The labels IDL attribute provides a list of the element’s
labels.
The following example shows how a gauge could fall back to localized or pretty-printed
text.
<p>Disk usage: <meter min=0 value=170261928 max=233257824>170 261 928 bytes used
out of 233 257 824 bytes available</meter></p>
4.10.16 The fieldset element
- Categories:
- Flow content.
- Sectioning root.
- Listed and reassociateable form-associated element.
- Palpable content.
- Contexts in which this element can be used:
- Where flow content is expected.
- Content model:
- Optionally a
legendelement, followed by flow content. - Content attributes:
- Global attributes
disabled— Whether the form control is disabledform— Associates the control with aformelementname— Name of form control to use for form submission and in theform.elementsAPI- Tag omission in text/html:
- Neither tag is omissible
- Allowed ARIA role attribute values:
group
(default — do not set)
orpresentation.- Allowed ARIA state and property attributes:
- Global aria-* attributes
- Any
aria-*attributes
applicable to the allowed roles. - DOM interface:
-
interface HTMLFieldSetElement : HTMLElement {
           attribute boolean disabled;
  readonly attribute HTMLFormElement? form;
           attribute DOMString name;

  readonly attribute DOMString type;

  readonly attribute HTMLFormControlsCollection elements;

  readonly attribute boolean willValidate;
  readonly attribute ValidityState validity;
  readonly attribute DOMString validationMessage;
  boolean checkValidity();
  void setCustomValidity(DOMString error);
};
The fieldset element represents a set of form controls optionally
grouped under a common name.
The name of the group is given by the first legend element that is a child of the
fieldset element, if any. The remainder of the descendants form the group.
The disabled attribute, when specified,
causes all the form control descendants of the fieldset element, excluding those that
are descendants of the fieldset element’s first legend element child, if
any, to be disabled.
The form attribute is used to explicitly associate the
fieldset element with its form owner. The name attribute represents the element’s name.
- fieldset .
type -
Returns the string «fieldset».
- fieldset .
elements -
Returns an
HTMLFormControlsCollectionof the form controls in the element.
The disabled IDL attribute must
reflect the content attribute of the same name.
The type IDL attribute must return the string
«fieldset«.
The elements IDL attribute must return an
HTMLFormControlsCollection rooted at the fieldset element, whose filter
matches listed elements.
The willValidate, validity, and validationMessage attributes, and the checkValidity(), and setCustomValidity() methods, are part of the
constraint validation API. The form and name IDL attributes are part of the element’s forms API.
This example shows a fieldset element being used to group a set of related
controls:
<fieldset>
 <legend>Display</legend>
 <div><label><input type=radio name=c value=0 checked> Black on White</label></div>
 <div><label><input type=radio name=c value=1> White on Black</label></div>
 <div><label><input type=checkbox name=g> Use grayscale</label></div>
 <div><label>Enhance contrast <input type=range name=e list=contrast min=0 max=100 value=0 step=1></label></div>
 <datalist id=contrast>
  <option label=Normal value=0>
  <option label=Maximum value=100>
 </datalist>
</fieldset>
The div elements used in the code samples above and below are not intended to
convey any semantic meaning and are used only to create a non-inline rendering of the grouped
fieldset controls.
The following snippet shows a fieldset with a checkbox in the legend that controls whether or
not the fieldset is enabled. The contents of the fieldset consist of two required text fields and
an optional year/month control.
<fieldset name="clubfields" disabled>
 <legend> <label>
  <input type=checkbox name=club onchange="form.clubfields.disabled = !checked">
  Use Club Card
 </label> </legend>
 <div><label>Name on card: <input name=clubname required></label></div>
 <div><label>Card number: <input name=clubnum required pattern="[-0-9]+"></label></div>
 <div><label>Expiry date: <input name=clubexp type=date></label></div>
</fieldset>
You can also nest fieldset elements. Here is an example expanding on the previous
one that does so:
<fieldset name="clubfields" disabled>
 <legend> <label>
  <input type=checkbox name=club onchange="form.clubfields.disabled = !checked">
  Use Club Card
 </label> </legend>
 <div><label>Name on card: <input name=clubname required></label></div>
 <fieldset name="numfields">
  <legend> <label>
   <input type=radio checked name=clubtype onchange="form.numfields.disabled = !checked">
   My card has numbers on it
  </label> </legend>
  <div><label>Card number: <input name=clubnum required pattern="[-0-9]+"></label></div>
 </fieldset>
 <fieldset name="letfields" disabled>
  <legend> <label>
   <input type=radio name=clubtype onchange="form.letfields.disabled = !checked">
   My card has letters on it
  </label> </legend>
  <div><label>Card code: <input name=clublet required pattern="[A-Za-z]+"></label></>
 </fieldset>
</fieldset>
In this example, if the outer «Use Club Card» checkbox is not checked, everything inside the
outer fieldset, including the two radio buttons in the legends of the two nested
fieldsets, will be disabled. However, if the checkbox is checked, then the radio
buttons will both be enabled and will let you select which of the two inner
fieldsets is to be enabled.
4.10.17 The legend element
- Categories:
- None.
- Contexts in which this element can be used:
- As the first child of a
fieldsetelement. - Content model:
- Phrasing content.
- Content attributes:
- Global attributes
- Tag omission in text/html:
- Neither tag is omissible
- Allowed ARIA role attribute values:
- Any role value.
- Allowed ARIA state and property attributes:
- Global aria-* attributes
- Any
aria-*attributes
applicable to the allowed roles. - DOM interface:
-
interface HTMLLegendElement : HTMLElement {
  readonly attribute HTMLFormElement? form;
};
The legend element represents a caption for the rest of the contents
of the legend element’s parent fieldset element, if
any.
- legend .
form -
Returns the element’s
formelement, if any, or null otherwise.
The form IDL attribute’s behavior depends on
whether the legend element is in a fieldset element or not. If the
legend has a fieldset element as its parent, then the form IDL attribute must return the same value as the form IDL attribute on that fieldset element. Otherwise,
it must return null.
4.10.18 Form control infrastructure
4.10.18.1 A form control’s value
Form controls have a value and a checkedness. (The latter is only used by input
elements.) These are used to describe how the user interacts with the control.
To define the behaviour of constraint validation in the face of the input
element’s multiple attribute, input elements
can also have separately defined values.
4.10.18.2 Mutability
A form control can be designated as mutable.
This determines (by means of definitions and requirements in this specification
that rely on whether an element is so designated) whether or not the user can modify the value or checkedness of a
form control, or whether or not a control can be automatically prefilled.
4.10.18.3 Association of controls and forms
A form-associated element can have a relationship with a form
element, which is called the element’s form owner. If a form-associated
element is not associated with a form element, its form owner is
said to be null.
A form-associated element is, by default, associated with its nearest ancestor form element (as described
below), but, if it is reassociateable, may have a
form attribute specified to override this.
This feature allows authors to work around the lack of support for nested
form elements.
If a reassociateable form-associated
element has a form attribute specified, then that
attribute’s value must be the ID of a form element in
the element’s owner Document.
The rules in this section are complicated by the fact that although conforming
documents will never contain nested form elements, it is quite possible (e.g. using a
script that performs DOM manipulation) to generate documents that have such nested elements. They
are also complicated by rules in the HTML parser that, for historical reasons, can result in a
form-associated element being associated with a form element that is not
its ancestor.
When a form-associated element is created, its form owner must be
initialized to null (no owner).
When a form-associated element is to be associated with a form, its form owner must be
set to that form.
When a form-associated element or one of its ancestors is inserted into a Document, then the user agent must
reset the form owner of that form-associated element. The HTML parser overrides this requirement when inserting form
controls.
When an element is removed from a
Document resulting in a form-associated element and its
form owner (if any) no longer being in the same home subtree, then the
user agent must reset the form owner of that form-associated
element.
When a reassociateable form-associated
element’s form attribute is set, changed, or removed,
then the user agent must reset the form owner of that element.
When a reassociateable form-associated
element has a form attribute and the ID of any of the elements in the Document changes, then the
user agent must reset the form owner of that form-associated
element.
When a reassociateable form-associated
element has a form attribute and an element with an
ID is inserted
into or removed from the
Document, then the user agent must reset the form owner of that
form-associated element.
When the user agent is to reset the form owner of a form-associated
element, it must run the following steps:
-
If the element’s form owner is not null, and either the element is not reassociateable or its
form
content attribute is not present, and the element’s form owner is its nearest
formelement ancestor after the change to the ancestor chain, then do nothing, and
abort these steps. -
Let the element’s form owner be null.
-
If the element is reassociateable, has a
formcontent attribute, and is itself in aDocument, then run these substeps:-
If the first element in the
Documentto
have an ID that is case-sensitively equal to the element’sformcontent attribute’s value is aformelement,
then associate the form-associated
element with thatformelement. -
Abort the «reset the form owner» steps.
-
-
Otherwise, if the form-associated element in question has an ancestor
formelement, then associate the
form-associated element with the nearest such ancestorform
element. -
Otherwise, the element is left unassociated.
In the following non-conforming snippet:
...
 <form id="a">
  <div id="b"></div>
 </form>
 <script>
  document.getElementById('b').innerHTML =
     '<table><tr><td><form id="c"><input id="d"></table>' +
     '<input id="e">';
 </script>
...
The form owner of «d» would be the inner nested form «c», while the form
owner of «e» would be the outer form «a».
This happens as follows: First, the «e» node gets associated with «c» in the HTML
parser. Then, the innerHTML algorithm moves the nodes
from the temporary document to the «b» element. At this point, the nodes see their ancestor chain
change, and thus all the «magic» associations done by the parser are reset to normal ancestor
associations.
This example is a non-conforming document, though, as it is a violation of the content models
to nest form elements.
- element .
form -
Returns the element’s form owner.
Returns null if there isn’t one.
Reassociateable form-associated elements have a form
IDL attribute, which, on getting, must return the element’s form owner, or null if
there isn’t one.
4.10.19 Attributes common to form controls
4.10.19.1 Naming form controls: the name attribute
The name content attribute gives the name of the
form control, as used in form submission and in the form element’s elements object. If the attribute is specified, its value must
not be the empty string.
Any non-empty value for name is allowed, but the names
«_charset_» and «isindex» are special:
isindex-
This value, if used as the name of a Text control
that is the first control in a form that is submitted using theapplication/x-www-form-urlencodedmechanism, causes
the submission to only include the value of this control, with no name. _charset_-
This value, if used as the name of a Hidden
control with novalueattribute, is automatically given a
value during submission consisting of the submission character encoding.
The name IDL attribute must reflect
the name content attribute.
4.10.19.2 Submitting element directionality: the dirname attribute
The dirname attribute on a form control element
enables the submission of the directionality of the element, and gives the name of
the field that contains this value during form submission. If such an attribute is
specified, its value must not be the empty string.
In this example, a form contains a text field and a submission button:
<form action="addcomment.cgi" method=post>
 <p><label>Comment: <input type=text name="comment" dirname="comment.dir" required></label></p>
 <p><button name="mode" type=submit value="add">Post Comment</button></p>
</form>
When the user submits the form, the user agent includes three fields, one called «comment»,
one called «comment.dir», and one called «mode»; so if the user types «Hello», the submission
body might be something like:
comment=Hello&comment.dir=ltr&mode=add
If the user manually switches to a right-to-left writing direction and enters «مرحبا«, the submission body might be
something like:
comment=%D9%85%D8%B1%D8%AD%D8%A8%D8%A7&comment.dir=rtl&mode=add
4.10.19.3 Limiting user input length: the maxlength attribute
A form control maxlength attribute,
controlled by a dirty value flag, declares a limit on the number of characters
a user can input.
If an element has its form control maxlength attribute specified, the attribute’s value must be a valid
non-negative integer. If the attribute is specified and applying the rules for
parsing non-negative integers to its value results in a number, then that number is the
element’s maximum allowed value length. If the attribute is omitted or parsing its
value results in an error, then there is no maximum allowed value length.
Constraint validation: If an element has a maximum allowed value
length, its dirty value flag is true, its value was last changed by a user edit (as opposed to a change made
by a script), and the code-unit length of the element’s value is greater than the element’s maximum allowed value
length, then the element is suffering from being too long.
User agents may prevent the user from causing the element’s value to be set to a value whose code-unit length is
greater than the element’s maximum allowed value length.
4.10.19.4 Setting minimum input length requirements: the minlength attribute
A form control minlength attribute,
controlled by a dirty value flag, declares a lower bound on the number of
characters a user can input.
The minlength attribute does not imply the
required attribute. If the form control has no minlength attribute, then the value can still be omitted; the
minlength attribute only kicks in once the user has entered
a value at all. If the empty string is not allowed, then the required
attribute also needs to be set.
If an element has its form control minlength attribute specified, the attribute’s value must be a valid
non-negative integer. If the attribute is specified and applying the rules for
parsing non-negative integers to its value results in a number, then that number is the
element’s minimum allowed value length. If the attribute is omitted or parsing its
value results in an error, then there is no minimum allowed value length.
If an element has both a maximum allowed value length and a minimum allowed
value length, the minimum allowed value length must be smaller than or equal
to the maximum allowed value length.
Constraint validation: If an element has a minimum allowed value
length, its value is not the empty string, and the
code-unit length of the element’s value is less
than the element’s minimum allowed value length, then the element is suffering
from being too short.
In this example, there are four text fields. The first is required, and has to be at least 5
characters long. The other three are optional, but if the user fills one in, the user has to
enter at least 10 characters.
<form action="/events/menu.cgi" method="post">
 <p><label>Name of Event: <input required minlength=5 maxlength=50 name=event></label></p>
 <p><label>Describe what you would like for breakfast, if anything:
    <textarea name="breakfast" minlength="10"></textarea></label></p>
 <p><label>Describe what you would like for lunch, if anything:
    <textarea name="lunch" minlength="10"></textarea></label></p>
 <p><label>Describe what you would like for dinner, if anything:
    <textarea name="dinner" minlength="10"></textarea></label></p>
 <p><input type=submit value="Submit Request"></p>
</form>
4.10.19.5 Enabling and disabling form controls: the disabled attribute
The disabled content attribute is a
boolean attribute.
A form control is disabled if its disabled attribute is set, or if it is a descendant of a
fieldset element whose disabled attribute
is set and is not a descendant of that fieldset element’s first
legend element child, if any.
4.10.19.6 Form submission
Attributes for form submission can be specified both on form elements
and on submit buttons (elements that represent buttons
that submit forms, e.g. an input element whose type attribute is in the Submit Button state).
The attributes for form submission that may be specified on form
elements are action, enctype, method, novalidate, and target.
The corresponding attributes for form submission that may be specified on submit buttons are formaction, formenctype, formmethod, formnovalidate, and formtarget. When omitted, they default to the values given on
the corresponding attributes on the form element.
The action and formaction content attributes, if specified, must
have a value that is a valid non-empty URL potentially surrounded by spaces.
The action of an element is the value of the element’s
formaction attribute, if the element is a submit button and has such an attribute, or the value of its
form owner’s action attribute, if it has
one, or else the empty string.
The method and formmethod content attributes are enumerated attributes with the following keywords and
states:
- The keyword
get, mapping to the
state GET, indicating the HTTP GET method. - The keyword
post, mapping to the
state POST, indicating the HTTP POST method.
The invalid value default for these attributes is the GET state. The missing value default for the method attribute is also the GET state. (There is no missing value default for the
formmethod attribute.)
The method of an element is one of those states. If the
element is a submit button and has a formmethod attribute, then the element’s method is that attribute’s state; otherwise, it is the form
owner’s method attribute’s state.
Here the method attribute is used to explicitly specify
the default value, «get«, so that the search
query is submitted in the URL:
<form method="get" action="/search.cgi">
 <p><label>Search terms: <input type=search name=q></label></p>
 <p><input type=submit></p>
</form>
On the other hand, here the method attribute is used to
specify the value «post«, so that the user’s
message is submitted in the HTTP request’s body:
<form method="post" action="/post-message.cgi">
 <p><label>Message: <input type=text name=m></label></p>
 <p><input type=submit value="Submit message"></p>
</form>
The enctype and formenctype content attributes are enumerated attributes with the following keywords and
states:
- The «
application/x-www-form-urlencoded» keyword and corresponding state. - The «
multipart/form-data» keyword and corresponding state. - The «
text/plain» keyword and corresponding state.
The invalid value default for these attributes is the application/x-www-form-urlencoded state. The missing
value default for the enctype attribute is also the application/x-www-form-urlencoded state. (There is no
missing value default for the formenctype
attribute.)
The enctype of an element is one of those three states.
If the element is a submit button and has a formenctype attribute, then the element’s enctype is that attribute’s state; otherwise, it is the
form owner’s enctype attribute’s state.
The target and formtarget content attributes, if specified, must
have values that are valid browsing context
names or keywords.
The target of an element is the value of the element’s
formtarget attribute, if the element is a submit button and has such an attribute; or the value of its
form owner’s target attribute, if it has
such an attribute; or, if the Document contains a base element with a
target attribute, then the value of the target attribute of the first such base element; or,
if there is no such element, the empty string.
The novalidate and formnovalidate content attributes are boolean attributes. If present, they indicate that the form is
not to be validated during submission.
The no-validate state of an element is true if the
element is a submit button and the element’s formnovalidate attribute is present, or if the element’s
form owner’s novalidate attribute is present,
and false otherwise.
This attribute is useful to include «save» buttons on forms that have validation constraints,
to allow users to save their progress even though they haven’t fully entered the data in the
form. The following example shows a simple form that has two required fields. There are three
buttons: one to submit the form, which requires both fields to be filled in; one to save the form
so that the user can come back and fill it in later; and one to cancel the form altogether.
<form action="editor.cgi" method="post">
 <p><label>Name: <input required name=fn></label></p>
 <p><label>Essay: <textarea required name=essay></textarea></label></p>
 <p><input type=submit name=submit value="Submit essay"></p>
 <p><input type=submit formnovalidate name=save value="Save essay"></p>
 <p><input type=submit formnovalidate name=cancel value="Cancel"></p>
</form>
The action IDL attribute must
reflect the content attribute of the same name, except that on getting, when the
content attribute is missing or its value is the empty string, the document’s address
must be returned instead. The target IDL attribute
must reflect the content attribute of the same name. The method and enctype IDL attributes must reflect the
respective content attributes of the same name, limited to only known values. The
encoding IDL attribute must reflect
the enctype content attribute, limited to only known
values. The noValidate IDL attribute must
reflect the novalidate content attribute. The
formAction IDL attribute must
reflect the formaction content attribute,
except that on getting, when the content attribute is missing or its value is the empty string,
the document’s address must be returned instead. The formEnctype IDL attribute must reflect
the formenctype content attribute, limited to only
known values. The formMethod IDL
attribute must reflect the formmethod content
attribute, limited to only known values. The formNoValidate IDL attribute must
reflect the formnovalidate content
attribute. The formTarget IDL attribute must
reflect the formtarget content attribute.
4.10.19.7 Autofocusing a form control: the autofocus attribute
The autofocus content attribute allows the
author to indicate that a control is to be focused as soon as the page is loaded,
allowing the user to just start typing
without having to manually focus the main control.
The autofocus attribute is a boolean
attribute.
An element’s nearest ancestor autofocus scoping root element
is the element’s root element.
There must not be two elements with the same nearest ancestor autofocus scoping root
element that both have the autofocus attribute
specified.
When an element with the autofocus attribute specified
is inserted into a document, user agents
should run the following steps:
-
Let target be the element’s
Document. -
If target has no browsing context, abort these
steps. -
If target‘s browsing context has no top-level
browsing context (e.g. it is a nested browsing context with no parent
browsing context), abort these steps. -
If target‘s active sandboxing flag set has the
sandboxed automatic features browsing context flag, abort these steps. -
If target‘s origin is not the same as the origin of the
Documentof the currently
focused element in target‘s top-level browsing context, abort
these steps. -
If target‘s origin is not the same as the origin of the active document of target‘s top-level browsing context, abort these steps.
-
If the user agent has already reached the last step of this list of steps in response to
an element being inserted into a
Documentwhose top-level browsing context’s active
document is the same as target‘s top-level browsing
context’s active document, abort these steps. -
If the user has indicated (for example, by starting to type in a form control) that he
does not wish focus to be changed, then optionally abort these steps. -
Queue a task that checks to see if the element is focusable, and
if so, runs the focusing steps for that element. User agents may also change the
scrolling position of the document, or perform some other action that brings the element to the
user’s attention. The task source for this task is the user interaction task
source.
This handles the automatic focusing during document load.
Focusing the control does not imply that the user agent must focus the browser
window if it has lost focus.
The autofocus IDL attribute must
reflect the content attribute of the same name.
In the following snippet, the text control would be focused when
the document was loaded.
<input maxlength="256" name="q" value="" autofocus>
<input type="submit" value="Search">
4.10.19.8 Autofilling form controls: the autocomplete attribute
User agents sometimes have features for helping users fill forms in, for example prefilling the
user’s address based on earlier user input. The autocomplete content attribute can be used to hint
to the user agent how to, or indeed whether to, provide such a feature.
The attribute, if present, must have a value that is an ASCII case-insensitive
match for the string «off«, or a single token that
is an ASCII case-insensitive match for the string «on«
The «off» keyword indicates either
that the control’s input data is particularly sensitive (for example the activation code for a
nuclear weapon); or that it is a value that will never be reused (for example a one-time-key for a
bank login) and the user will therefore have to explicitly enter the data each time, instead of
being able to rely on the UA to prefill the value for him; or that the document provides its own
autocomplete mechanism and does not want the user agent to provide autocompletion values.
The «on» keyword indicates that the
user agent is allowed to provide the user with autocompletion values, but does not provide any
further information about what kind of data the user might be expected to enter. User agents would
have to use heuristics to decide what autocompletion values to suggest.
If the autocomplete attribute is omitted, the default
value corresponding to the state of the element’s form owner’s autocomplete attribute is used instead (either «on» or «off«). If there is no form owner, then the
value «on» is used.
When an element’s autofill field name is «off«, the user agent should not remember the control’s
value, and should not offer past values to the user.
In addition, when an element’s autofill field name is «off«, values are reset
when traversing the history.
Banks frequently do not want UAs to prefill login information:
<p><label>Account: <input type="text" name="ac" autocomplete="off"></label></p>
<p><label>PIN: <input type="password" name="pin" autocomplete="off"></label></p>
When an element’s autofill field name is not «off«, the user agent may store the control’s value, and may offer previously stored values to the user.
When the autofill field name is «on«,
the user agent should attempt to use heuristics to determine the most appropriate values to offer
the user, e.g. based on the element’s name value, the position
of the element in the document’s DOM, what other fields exist in the form, and so forth.
The autocompletion mechanism must be implemented by the user agent acting as if the user had
modified the element’s value, and must be done at a time
where the element is mutable (e.g. just after the element has
been inserted into the document, or when the user agent stops
parsing). User agents must only prefill controls using values that the user could have
entered.
A user agent prefilling a form control’s value must not
cause that control to suffer from a type
mismatch, suffer from a pattern
mismatch, suffer from being too long,
suffer from being too short, suffer from an underflow, suffer from an overflow, or suffer from a step mismatch. Where possible given the control’s constraints, user
agents must use the format given as canonical in the aforementioned table. Where it’s not possible
for the canonical format to be used, user agents should use heuristics to attempt to convert
values so that they can be used.
A user agent may allow the user to override an element’s autofill field name, e.g.
to change it from «off» to «on» to allow values to be remembered and prefilled despite
the page author’s objections, or to always «off«,
never remembering values. However, user agents should not allow users to trivially override the
autofill field name from «off» to
«on» or other values, as there are significant
security implications for the user if all values are always remembered, regardless of the site’s
preferences.
The autocomplete IDL attribute, on getting,
must return the element’s IDL-exposed autofill value, and on setting, must
reflect the content attribute of the same name.
4.10.20 APIs for the text field selections
The input and textarea elements define the following members in their
DOM interfaces for handling their selection:
The setRangeText method uses the following
enumeration:
enum SelectionMode {
  "select",
  "start",
  "end",
  "preserve" // default
};
These methods and attributes expose and control the selection of input and
textarea text fields.
- element .
select() -
Selects everything in the text field.
- element .
selectionStart[ = value ] -
Returns the offset to the start of the selection.
Can be set, to change the start of the selection.
- element .
selectionEnd[ = value ] -
Returns the offset to the end of the selection.
Can be set, to change the end of the selection.
- element .
selectionDirection[ = value ] -
Returns the current direction of the selection.
Can be set, to change the direction of the selection.
The possible values are «
forward«, «backward«, and «none«. - element .
setSelectionRange(start, end [, direction] ) -
Changes the selection to cover the given substring in the given direction. If the direction
is omitted, it will be reset to be the platform default (none or forward). - element .
setRangeText(replacement [, start, end [, selectionMode ] ] ) -
Replaces a range of text with the new text. If the start and end arguments are not provided, the range is assumed to be the selection.
The final argument determines how the selection should be set after the text has been
replaced. The possible values are:- «
select« - Selects the newly inserted text.
- «
start« - Moves the selection to just before the inserted text.
- «
end« - Moves the selection to just after the selected text.
- «
preserve« - Attempts to preserve the selection. This is the default.
- «
For input elements, calling these methods while they don’t apply, and getting or setting these attributes while they don’t apply, must throw an InvalidStateError exception. Otherwise, they
must act as described below.
For input elements, these methods and attributes must operate on the element’s
value. For textarea elements, these methods and
attributes must operate on the element’s raw
value.
Where possible, user interface features for changing the text selection in input
and textarea elements must be implemented in terms of the DOM API described in this
section, so that, e.g., all the same events fire.
The selections of input and textarea elements have a
direction, which is either forward, backward, or none. This direction
is set when the user manipulates the selection. The exact meaning of the selection direction
depends on the platform.
On Windows, the direction indicates the position of the caret relative to the
selection: a forward selection has the caret at the end of the selection and a
backward selection has the caret at the start of the selection. Windows has no none
direction. On Mac, the direction indicates which end of the selection is affected when the user
adjusts the size of the selection using the arrow keys with the Shift modifier: the forward
direction means the end of the selection is modified, and the backwards direction means the start
of the selection is modified. The none direction is the default on Mac, it indicates that no
particular direction has yet been selected. The user sets the direction implicitly when first
adjusting the selection, based on which directional arrow key was used.
The select() method must cause the
contents of the text field to be fully selected, with the selection direction being none, if the
platform support selections with the direction none, or otherwise forward. The user
agent must then queue a task to fire a simple event that bubbles named
select at the element, using the user interaction task
source as the task source.
The selectionStart attribute
must, on getting, return the offset (in logical order) to the character that immediately follows
the start of the selection. If there is no selection, then it must return the offset (in logical
order) to the character that immediately follows the text entry cursor.
On setting, it must act as if the setSelectionRange() method had been called,
with the new value as the first argument; the current value of the selectionEnd attribute as the second argument,
unless the current value of the selectionEnd
is less than the new value, in which case the second argument must also be the new value; and the
current value of the selectionDirection
as the third argument.
The selectionEnd attribute
must, on getting, return the offset (in logical order) to the character that immediately follows
the end of the selection. If there is no selection, then it must return the offset (in logical
order) to the character that immediately follows the text entry cursor.
On setting, it must act as if the setSelectionRange() method had been called,
with the current value of the selectionStart attribute as the first argument,
the new value as the second argument, and the current value of the selectionDirection as the third argument.
The selectionDirection
attribute must, on getting, return the string corresponding to the current selection direction: if
the direction is forward, «forward«; if the direction is
backward, «backward«; and otherwise, «none«.
On setting, it must act as if the setSelectionRange() method had been called,
with the current value of the selectionStart attribute as the first argument,
the current value of the selectionEnd
attribute as the second argument, and the new value as the third argument.
The setSelectionRange(start, end, direction) method
must set the selection of the text field to the sequence of characters starting with the character
at the startth position (in logical order) and ending with the character at
the (end-1)th position. Arguments greater than the
length of the value of the text field must be treated as pointing at the end of the text field. If
end is less than or equal to start then the start of the
selection and the end of the selection must both be placed immediately before the character with
offset end. In UAs where there is no concept of an empty selection, this must
set the cursor to be just before the character with offset end. The direction
of the selection must be set to backward if direction is a
case-sensitive match for the string «backward«, forward
if direction is a case-sensitive match for the string «forward» or if the platform does not support selections with the direction
none, and none otherwise (including if the argument is omitted). The user agent must
then queue a task to fire a simple event that bubbles named select at the element, using the user interaction task
source as the task source.
The setRangeText(replacement, start, end, selectMode) method must run the following steps:
-
If the method has only one argument, then let start and end have the values of the
selectionStartattribute and theselectionEndattribute respectively.Otherwise, let start, end have the values of the
second and third arguments respectively. -
If start is greater than end, then throw an
IndexSizeErrorexception and abort these steps. -
If start is greater than the length of the value of the text field,
then set it to the length of the value of the text field. -
If end is greater than the length of the value of the text field,
then set it to the length of the value of the text field. -
Let selection start be the current value of the
selectionStartattribute. -
Let selection end be the current value of the
selectionEndattribute. -
If start is less than end, delete the sequence of
characters starting with the character at the startth position (in logical
order) and ending with the character at the (end-1)th
position. -
Insert the value of the first argument into the text of the value of the text field,
immediately before the startth character. -
Let new length be the length of the value of the first argument.
-
Let new end be the sum of start and new length.
-
Run the appropriate set of substeps from the following list:
- If the fourth argument’s value is «
select« -
Let selection start be start.
Let selection end be new end.
- If the fourth argument’s value is «
start« -
Let selection start and selection end be start.
- If the fourth argument’s value is «
end« -
Let selection start and selection end be new end.
- If the fourth argument’s value is «
preserve» (the default) -
-
Let old length be end minus start.
-
Let delta be new length minus old length.
-
If selection start is greater than end, then
increment it by delta. (If delta is negative, i.e.
the new text is shorter than the old text, then this will decrease the value of
selection start.)Otherwise: if selection start is greater than start, then set it to start. (This snaps the start of the
selection to the start of the new text if it was in the middle of the text that it
replaced.) -
If selection end is greater than end, then
increment it by delta in the same way.Otherwise: if selection end is greater than start, then set it to new end. (This snaps the end of the
selection to the end of the new text if it was in the middle of the text that it
replaced.)
-
- If the fourth argument’s value is «
-
Set the selection of the text field to the sequence of characters starting with the character
at the selection startth position (in logical order) and ending with the
character at the (selection end-1)th position. In UAs
where there is no concept of an empty selection, this must set the cursor to be just before the
character with offset end. The direction of the selection must be set to
forward if the platform does not support selections with the direction none, and
none otherwise. -
Queue a task to fire a simple event that bubbles named
selectat the element, using the user interaction task
source as the task source.
All elements to which this API applies have either a
selection or a text entry cursor position at all times (even for elements that are not being
rendered). User agents should follow platform conventions to determine their initial
state.
Characters with no visible rendering, such as U+200D ZERO WIDTH JOINER, still count as
characters. Thus, for instance, the selection can include just an invisible character, and the
text insertion cursor can be placed to one side or another of such a character.
To obtain the currently selected text, the following JavaScript suffices:
var selectionText = control.value.substring(control.selectionStart, control.selectionEnd);
…where control is the input or textarea
element.
To add some text at the start of a text control, while maintaining the text selection, the
three attributes must be preserved:
var oldStart = control.selectionStart;
var oldEnd = control.selectionEnd;
var oldDirection = control.selectionDirection;
var prefix = "http://";
control.value = prefix + control.value;
control.setSelectionRange(oldStart + prefix.length, oldEnd + prefix.length, oldDirection);
…where control is the input or textarea
element.
4.10.21 Constraints
4.10.21.1 Definitions
A submittable element is a candidate for constraint
validation except when a condition has barred
the element from constraint validation. (For example, an element is barred from
constraint validation if it is an object element.)
An element can have a custom validity error message defined. Initially, an element
must have its custom validity error message set to the empty string. When its value
is not the empty string, the element is suffering from a custom error. It can be set
using the setCustomValidity() method. The user
agent should use the custom validity error message when alerting the user to the
problem with the control.
An element can be constrained in various ways. The following is the list of validity
states that a form control can be in, making the control invalid for the purposes of
constraint validation. (The definitions below are non-normative; other parts of this specification
define more precisely when each state applies or does not.)
- Suffering from being missing
-
When a control has no value but has a
requiredattribute (inputrequired,selectrequired,textarearequired), or, in the case of an element in a radio
button group, any of the other elements in the group has arequiredattribute. - Suffering from a type mismatch
-
When a control that allows arbitrary user input has a value that is not in the correct syntax (E-mail, URL).
- Suffering from a pattern mismatch
-
When a control has a value that doesn’t satisfy the
patternattribute. - Suffering from being too long
-
When a control has a value that is too long for the
form controlmaxlengthattribute
(inputmaxlength,textarea
maxlength). - Suffering from being too short
-
When a control has a value that is too short for the
form controlminlengthattribute
(inputminlength,textarea
minlength). - Suffering from an underflow
-
When a control has a value that is too low for the
minattribute. - Suffering from an overflow
-
When a control has a value that is too high for the
maxattribute. - Suffering from a step mismatch
-
When a control has a value that doesn’t fit the
rules given by thestepattribute. - Suffering from bad input
-
When a control has incomplete input and the user agent does not think the user ought to
be able to submit the form in its current state. - Suffering from a custom error
-
When a control’s custom validity error message (as set by the element’s
setCustomValidity()method) is not the empty
string.
An element can still suffer from these states even when the element is disabled; thus these states can be represented in the DOM even
if validating the form during submission wouldn’t indicate a problem to the user.
An element satisfies its constraints if it is not suffering
from any of the above validity states.
4.10.21.2 Constraint validation
When the user agent is required to statically validate the constraints of
form element form, it must run the following steps, which return
either a positive result (all the controls in the form are valid) or a negative
result (there are invalid controls) along with a (possibly empty) list of elements that are
invalid and for which no script has claimed responsibility:
-
Let controls be a list of all the submittable elements whose form owner is form, in tree order.
-
Let invalid controls be an initially empty list of elements.
-
For each element field in controls, in tree
order, run the following substeps:-
If field is not a candidate for constraint validation,
then move on to the next element. -
Otherwise, if field satisfies its
constraints, then move on to the next element. -
Otherwise, add field to invalid
controls.
-
-
If invalid controls is empty, then return a positive result and
abort these steps. -
Let unhandled invalid controls be an initially empty list of
elements. -
For each element field in invalid controls, if any,
in tree order, run the following substeps:-
Fire a simple event named
invalidthat
is cancelable at field. -
If the event was not canceled, then add field to unhandled invalid controls.
-
-
Return a negative result with the list of elements in the unhandled
invalid controls list.
If a user agent is to interactively validate the constraints of form
element form, then the user agent must run the following steps:
-
Statically validate the constraints of form, and let unhandled invalid controls be the list of elements returned if the result was
negative. -
If the result was positive, then return that result and abort these steps.
-
Report the problems with the constraints of at least one of the elements given in unhandled invalid controls to the user. User agents may focus one of those
elements in the process, by running the focusing steps for that element, and may
change the scrolling position of the document, or perform some other action that brings the
element to the user’s attention. User agents may report more than one constraint violation. User
agents may coalesce related constraint violation reports if appropriate (e.g. if multiple radio
buttons in a group are marked as required, only one error
need be reported). If one of the controls is not being rendered (e.g. it has the
hiddenattribute set) then user agents may report a script
error. -
Return a negative result.
4.10.21.3 The constraint validation API
- element .
willValidate -
Returns true if the element will be validated when the form is submitted; false
otherwise. - element .
setCustomValidity(message) -
Sets a custom error, so that the element would fail to validate. The given message is the
message to be shown to the user when reporting the problem to the user.If the argument is the empty string, clears the custom error.
- element .
validity.valueMissing -
Returns true if the element has no value but is a required field; false otherwise.
- element .
validity.typeMismatch -
Returns true if the element’s value is not in the correct syntax; false otherwise.
- element .
validity.patternMismatch -
Returns true if the element’s value doesn’t match the provided pattern; false otherwise.
- element .
validity.tooLong -
Returns true if the element’s value is longer than the provided maximum length; false otherwise.
- element .
validity.tooShort -
Returns true if the element’s value, if it is not the empty string, is shorter than the
provided minimum length; false otherwise. - element .
validity.rangeUnderflow -
Returns true if the element’s value is lower than the provided minimum; false otherwise.
- element .
validity.rangeOverflow -
Returns true if the element’s value is higher than the provided maximum; false otherwise.
- element .
validity.stepMismatch -
Returns true if the element’s value doesn’t fit the rules given by the
stepattribute; false otherwise. - element .
validity.badInput -
Returns true if the user has provided input in the user interface that the user agent is
unable to convert to a value; false otherwise. - element .
validity.customError -
Returns true if the element has a custom error; false otherwise.
- element .
validity.valid -
Returns true if the element’s value has no validity problems; false otherwise.
- valid = element .
checkValidity() -
Returns true if the element’s value has no validity problems; false otherwise. Fires an
invalidevent at the element in the latter case. - element .
validationMessage -
Returns the error message that would be shown to the user if the element was to be checked
for validity.
The willValidate attribute must return
true if an element is a candidate for constraint validation, and false otherwise
(i.e. false if any conditions are barring it from
constraint validation).
The setCustomValidity(message), when invoked, must set the custom validity error
message to the value of the given message argument.
In the following example, a script checks the value of a form control each time it is edited,
and whenever it is not a valid value, uses the setCustomValidity() method to set an appropriate
message.
<label>Feeling: <input name=f type="text" oninput="check(this)"></label>
<script>
 function check(input) {
   if (input.value == "good" ||
       input.value == "fine" ||
       input.value == "tired") {
     input.setCustomValidity('"' + input.value + '" is not a feeling.');
   } else {
     // input is fine -- reset the error message
     input.setCustomValidity('');
   }
 }
</script>
The validity attribute must return a
ValidityState object that represents the validity states of the element.
This object is live, and the same object must be returned each time the element’s
validity attribute is retrieved.
interface ValidityState {
  readonly attribute boolean valueMissing;
  readonly attribute boolean typeMismatch;
  readonly attribute boolean patternMismatch;
  readonly attribute boolean tooLong;
  readonly attribute boolean tooShort;
  readonly attribute boolean rangeUnderflow;
  readonly attribute boolean rangeOverflow;
  readonly attribute boolean stepMismatch;
  readonly attribute boolean badInput;
  readonly attribute boolean customError;
  readonly attribute boolean valid;
};
A ValidityState object has the following attributes. On getting, they must return
true if the corresponding condition given in the following list is true, and false otherwise.
valueMissing-
The control is suffering from being missing.
typeMismatch-
The control is suffering from a type mismatch.
patternMismatch-
The control is suffering from a pattern mismatch.
tooLong-
The control is suffering from being too long.
tooShort-
The control is suffering from being too short.
rangeUnderflow-
The control is suffering from an underflow.
rangeOverflow-
The control is suffering from an overflow.
stepMismatch-
The control is suffering from a step mismatch.
badInput-
The control is suffering from bad input.
customError-
The control is suffering from a custom error.
valid-
None of the other conditions are true.
When the checkValidity() method is
invoked, if the element is a candidate for constraint validation and does not satisfy its constraints, the user agent must fire a simple
event named invalid that is cancelable (but in this case
has no default action) at the element and return false. Otherwise, it must only return true
without doing anything else.
The validationMessage attribute must
return the empty string if the element is not a candidate for constraint validation
or if it is one but it satisfies its constraints; otherwise,
it must return a suitably localized message that the user agent would show the user if this were
the only form control with a validity constraint problem. If the user agent would not actually
show a textual message in such a situation (e.g. it would show a graphical cue instead), then the
attribute must return a suitably localized message that expresses (one or more of) the validity
constraint(s) that the control does not satisfy. If the element is a candidate for
constraint validation and is suffering from a custom error, then the
custom validity error message should be present in the return value.
4.10.21.4 Security
Servers should not rely on client-side validation. Client-side validation can
be intentionally bypassed by hostile users, and unintentionally bypassed by users of older user
agents or automated tools that do not implement these features. The constraint validation features
are only intended to improve the user experience, not to provide any kind of security
mechanism.
4.10.22 Form submission
4.10.22.1 Introduction
This section is non-normative.
When a form is submitted, the data in the form is converted into the structure specified by the
enctype, and then sent to the destination specified by the
action using the given method.
For example, take the following form:
<form action="/find.cgi" method=get>
 <input type=text name=t>
 <input type=search name=q>
 <input type=submit>
</form>
If the user types in «cats» in the first field and «fur» in the second, and then hits the
submit button, then the user agent will load /find.cgi?t=cats&q=fur.
On the other hand, consider this form:
<form action="/find.cgi" method=post enctype="multipart/form-data">
 <input type=text name=t>
 <input type=search name=q>
 <input type=submit>
</form>
Given the same user input, the result on submission is quite different: the user agent instead
does an HTTP POST to the given URL, with as the entity body something like the following text:
------kYFrd4jNJEgCervE
Content-Disposition: form-data; name="t"

cats
------kYFrd4jNJEgCervE
Content-Disposition: form-data; name="q"

fur
------kYFrd4jNJEgCervE--
4.10.22.2 Implicit submission
A form element’s default button is the first submit button in tree order whose form
owner is that form element.
If the user agent supports letting the user submit a form implicitly (for example, on some
platforms hitting the «enter» key while a text field is focused implicitly submits the form), then
doing so for a form whose default button has a defined activation
behavior must cause the user agent to run synthetic click activation steps on
that default button.
Consequently, if the default button is disabled, the form is not submitted when such an implicit
submission mechanism is used. (A button has no activation behavior when
disabled.)
There are pages on the Web that are only usable if there is a way to implicitly
submit forms, so user agents are strongly encouraged to support this.
If the form has
no submit button, then the implicit submission
mechanism must do nothing if the form has more than one field that blocks implicit
submission, and must submit the form
element from the form element itself otherwise.
For the purpose of the previous paragraph, an element is a field that blocks implicit
submission of a form element if it is an input element whose
form owner is that form element and whose type attribute is in one of the following states:
Text,
Search,
URL,
Telephone,
E-mail,
Password,
Date,
Time,
Number
4.10.22.3 Form submission algorithm
When a form element form is submitted from an element submitter
(typically a button), optionally with a submitted from submit() method flag set, the user agent must run the
following steps:
-
Let form document be the form‘s
Document. -
If form document has no associated
browsing context or its active sandboxing flag set has its
sandboxed forms browsing context flag set, then abort these steps without doing
anything. -
Let form browsing context be the browsing context of form document.
-
If the submitted from
submit()
method flag is not set, and the submitter element’s no-validate state is false, then interactively
validate the constraints of form and examine the result: if the result
is negative (the constraint validation concluded that there were invalid fields and probably
informed the user of this) then fire a simple event namedinvalidat the form element and then abort these
steps. -
If the submitted from
submit()
method flag is not set, then fire a simple event that bubbles and is
cancelable namedsubmit, at form. If the
event’s default action is prevented (i.e. if the event is canceled) then abort these steps.
Otherwise, continue (effectively the default action is to perform the submission). -
Let form data set be the result of constructing the form data
set for form in the context of submitter. -
Let action be the submitter element’s action.
-
If action is the empty string, let action be
the document’s address of the form document. -
Resolve the URL action, relative to the submitter element. If this fails,
abort these steps. -
Let action be the resulting absolute URL.
-
Let action components be the resulting parsed
URL. -
Let scheme be the scheme of
the resulting parsed URL. -
Let enctype be the submitter element’s enctype.
-
Let method be the submitter element’s method.
-
Let target be the submitter element’s target.
-
If the user indicated a specific browsing context to use when submitting the
form, then let target browsing context be that browsing context.
Otherwise, apply the rules for choosing a browsing context given a browsing context
name using target as the name and form browsing
context as the context in which the algorithm is executed, and let target
browsing context be the resulting browsing context. -
If target browsing context was created in the previous step, or,
alternatively, if the form document has not yet completely
loaded and the submitted fromsubmit()
method flag is set, then let replace be true. Otherwise, let it be
false. -
Otherwise, select the appropriate row in the table below based on the value of scheme as given by the first cell of each row. Then, select the appropriate cell
on that row based on the value of method as given in the first cell of each
column. Then, jump to the steps named in that cell and defined below the table.GET POST httpMutate action URL Submit as entity body httpsMutate action URL Submit as entity body ftpGet action URL Get action URL javascriptGet action URL Get action URL dataGet action URL Post to data: mailtoMail with headers Mail as body If scheme is not one of those listed in this table, then the behavior is
not defined by this specification. User agents should, in the absence of another specification
defining this, act in a manner analogous to that defined in this specification for similar
schemes.Each
formelement has a planned navigation, which is either null or a
task; when theformis first created, its
planned navigation must be set to null. In the behaviours described below, when the
user agent is required to plan to navigate to a particular resource destination, it must run the following steps:-
If the
formhas a non-null planned navigation, remove it from
its task queue. -
Let the
form‘s planned navigation be a new task that consists of running the following steps:-
Let the
form‘s planned navigation be null. -
Navigate target browsing context to
the particular resource destination. If replace is
true, then target browsing context must be navigated with
replacement enabled.
For the purposes of this task, target browsing context and replace are the variables that were set up when the overall form submission
algorithm was run, with their values as they stood when this planned navigation
was queued. -
-
Queue the task that is the
form‘s new
planned navigation.The task source for this task is the DOM manipulation task
source.
The behaviors are as follows:
- Mutate action URL
-
Let query be the result of encoding the form data
set using theapplication/x-www-form-urlencodedencoding
algorithm, interpreted as a US-ASCII string.Set parsed action‘s query
component to query.Let destination be a new URL formed by applying the
URL serializer algorithm to parsed action.Plan to navigate to destination.
- Submit as entity body
-
Let entity body be the result of encoding the form data
set using the appropriate form encoding algorithm.Let MIME type be determined as follows:
- If enctype is
application/x-www-form-urlencoded - Let MIME type be «
application/x-www-form-urlencoded«. - If enctype is
multipart/form-data - Let MIME type be the concatenation of the string «
multipart/form-data;«, a U+0020 SPACE character, the string «boundary=«, and themultipart/form-databoundary
string generated by themultipart/form-dataencoding
algorithm. - If enctype is
text/plain - Let MIME type be «
text/plain«.
Otherwise, plan to navigate to action using the HTTP
method given by method and with entity body as the
entity body, of type MIME type. - If enctype is
- Get action URL
-
Plan to navigate to action.
The form data set is discarded.
- Post to data:
-
Let data be the result of encoding the form data
set using the appropriate form encoding algorithm.If action contains the string «
%%%%» (four U+0025
PERCENT SIGN characters), then percent encode all bytes in data that, if interpreted as US-ASCII, are not characters in the URL
default encode set, and then, treating the result as a US-ASCII string,
UTF-8 percent encode all the U+0025 PERCENT SIGN characters in the resulting
string and replace the first occurrence of «%%%%» in action with the resulting doubly-escaped string. [URL]Otherwise, if action contains the string «
%%»
(two U+0025 PERCENT SIGN characters in a row, but not four), then UTF-8 percent
encode all characters in data that, if interpreted as US-ASCII, are
not characters in the URL default encode set, and then, treating the result as a
US-ASCII string, replace the first occurrence of «%%» in action with the resulting escaped string. [URL]Plan to navigate to the potentially modified action (which
will be adata:URL). -
Let headers be the resulting encoding the form data
set using theapplication/x-www-form-urlencodedencoding
algorithm, interpreted as a US-ASCII string.Replace occurrences of «+» (U+002B) characters in headers with
the string «%20«.Let destination consist of all the characters from the first character
in action to the character immediately before the first «?» (U+003F) character, if any, or the end of the string if there are none.Append a single «?» (U+003F) character to destination.
Append headers to destination.
Plan to navigate to destination.
- Mail as body
-
Let body be the resulting of encoding the form data
set using the appropriate form encoding algorithm and then percent encoding all the bytes in the resulting byte string
that, when interpreted as US-ASCII, are not characters in the URL default encode
set. [URL]Let destination have the same value as action.
If destination does not contain a «?» (U+003F) character,
append a single «?» (U+003F) character to destination.
Otherwise, append a single U+0026 AMPERSAND character (&).Append the string «
body=» to destination.Append body, interpreted as a US-ASCII string, to destination.
Plan to navigate to destination.
The appropriate form encoding algorithm is
determined as follows:- If enctype is
application/x-www-form-urlencoded - Use the
application/x-www-form-urlencodedencoding
algorithm. - If enctype is
multipart/form-data - Use the
multipart/form-dataencoding algorithm. - If enctype is
text/plain - Use the
text/plainencoding algorithm.
-
4.10.22.4 Constructing the form data set
The algorithm to construct the form data set
for a form form optionally in the context of a submitter submitter is as follows. If not specified otherwise, submitter
is null.
-
Let controls be a list of all the submittable elements whose form owner is form, in tree order.
-
Let the form data set be a list of name-value-type tuples, initially
empty. -
Loop: For each element field in controls, in
tree order, run the following substeps:-
If any of the following conditions are met, then skip these substeps for this element:
- The field element has a
datalistelement ancestor. - The field element is disabled.
- The field element is a button but
it is not submitter. - The field element is an
inputelement whosetypeattribute is in the Checkbox state and whose checkedness is false. - The field element is an
inputelement whosetypeattribute is in the Radio Button state and whose checkedness is false. - The field element is not an
inputelement whosetypeattribute is in the Image Button state, and either the field element does not have anameattribute
specified, or itsnameattribute’s value is the empty
string. - The field element is an
objectelement that is not using
a plugin.
Otherwise, process field as follows:
- The field element has a
-
Let type be the value of the
typeIDL
attribute of field. -
If the field element is an
inputelement whosetypeattribute is in the Image Button state, then run these further nested
substeps:-
If the field element has a
name
attribute specified and its value is not the empty string, let name be
that value followed by a single «.» (U+002E) character. Otherwise, let name be the empty string. -
Let namex be the string consisting of the
concatenation of name and a single U+0078 LATIN SMALL LETTER X character
(x). -
Let namey be the string consisting of the
concatenation of name and a single U+0079 LATIN SMALL LETTER Y character
(y). -
The field element is submitter, and before
this algorithm was invoked the user indicated a coordinate. Let x be the x-component of the coordinate selected by the
user, and let y be the y-component of the coordinate
selected by the user. -
Append an entry to the form data set with the name namex, the value x, and the type type.
-
Append an entry to the form data set with the name namey and the value y, and the type
type. -
Skip the remaining substeps for this element: if there are any more elements in controls, return to the top of the loop step, otherwise, jump to the
end step below.
-
-
Let name be the value of the field element’s
nameattribute. -
If the field element is a
selectelement, then for each
optionelement in theselectelement’s list of options whose selectedness is true and that is not disabled, append an entry to the form data
set with the name as the name, the value of theoptionelement as the value, and
type as the type. -
Otherwise, if the field element is an
inputelement whose
typeattribute is in the Checkbox state or the Radio Button state, then run these further nested
substeps:-
If the field element has a
valueattribute specified, then let value
be the value of that attribute; otherwise, let value be the string «on«. -
Append an entry to the form data set with name
as the name, value as the value, and type as the
type.
-
-
Otherwise, if the field element is an
inputelement
whosetypeattribute is in the File Upload state, then for each file selected in theinputelement,
append an entry to the form data set with the name as
the name, the file (consisting of the name, the type, and the body) as the value, and type as the type. If there are no selected files, then append an entry to the
form data set with the name as the name, the empty
string as the value, andapplication/octet-streamas the type. -
Otherwise, if the field element is an
objectelement:
try to obtain a form submission value from the plugin, and if that is successful,
append an entry to the form data set with name as the
name, the returned form submission value as the value, and the string «object» as the type. -
Otherwise, append an entry to the form data set with name as the name, the value of the field element as the value, and type as the type.
-
If the element has a
dirnameattribute, and that
attribute’s value is not the empty string, then run these substeps:-
Let dirname be the value of the element’s
dirnameattribute. -
Let dir be the string «
ltr» if the
directionality of the element is ‘ltr’, and «rtl» otherwise (i.e. when the directionality of the element is
‘rtl’). -
Append an entry to the form data set with dirname as the name, dir as the value, and the string
«direction» as the type.
An element can only have a
dirname
attribute if it is atextareaelement or aninputelement whose
typeattribute is in either the Text state or the Search state. -
-
-
End: For the name of each entry in the form data set, and for the
value of each entry in the form data set whose type is not «file» or «textarea«, replace every occurrence of a «CR» (U+000D) character not followed by a «LF» (U+000A) character, and every
occurrence of a «LF» (U+000A) character not preceded by a «CR» (U+000D)
character, by a two-character string consisting of a U+000D CARRIAGE RETURN «CRLF» (U+000A) character pair.In the case of the value of
textareaelements, this newline normalization is already performed during the
conversion of the control’s raw value into the
control’s value (which also performs any necessary line
wrapping). In the case ofinputelementstype
attributes in the File Upload state, the value is not
normalized. -
Return the form data set.
4.10.22.5 Selecting a form submission encoding
If the user agent is to pick an encoding for a
form, optionally with an allow non-ASCII-compatible encodings flag set, it must run
the following substeps:
-
Let input be the value of the
formelement’saccept-charsetattribute. -
Let candidate encoding labels be the result of splitting input on spaces.
-
Let candidate encodings be an empty list of character encodings.
-
For each token in candidate encoding labels in turn (in the order in
which they were found in input), get an
encoding for the token and, if this does not result in failure, append the
encoding to candidate encodings. -
If the allow non-ASCII-compatible encodings flag is not set, remove any encodings
that are not ASCII-compatible character
encodings from candidate encodings. -
If candidate encodings is empty, return UTF-8 and abort these
steps. -
Each character encoding in candidate encodings can represent a finite
number of characters. (For example, UTF-8 can represent all 1.1 million or so Unicode code
points, while Windows-1252 can only represent 256.)For each encoding in candidate encodings, determine how many of the
characters in the names and values of the entries in the form data set the
encoding can represent (without ignoring duplicates). Let max be the
highest such count. (For UTF-8, max would equal the number of characters
in the names and values of the entries in the form data set.)Return the first encoding in candidate encodings that can encode max characters in the names and values of the entries in the form
data set.
4.10.22.6 URL-encoded form data
This form data set encoding is in many ways an aberrant monstrosity, the result of
many years of implementation accidents and compromises leading to a set of requirements necessary
for interoperability, but in no way representing good design practices. In particular, readers are
cautioned to pay close attention to the twisted details involving repeated (and in some cases
nested) conversions between character encodings and byte sequences.
The application/x-www-form-urlencoded encoding algorithm is as
follows:
-
Let result be the empty string.
-
If the
formelement has anaccept-charsetattribute, let the selected character
encoding be the result of picking an encoding for the form.Otherwise, if the
formelement has noaccept-charsetattribute, but the document’s
character encoding is an ASCII-compatible character encoding, then that is
the selected character encoding.Otherwise, let the selected character encoding be UTF-8.
-
Let charset be the name of the
selected character encoding. -
For each entry in the form data set, perform these substeps:
-
If the entry’s name is «
_charset_» and its
type is «hidden«, replace its value with charset. -
If the entry’s type is «
file«, replace its value with the file’s
name only. -
For each character in the entry’s name and value that cannot be expressed using the
selected character encoding, replace the character by a string consisting of a U+0026 AMPERSAND
character (&), a «#» (U+0023) character, one or more ASCII digits
representing the Unicode code point of the character in base ten, and finally a «;» (U+003B) character. -
Encode the entry’s name and value using the encoder for the selected character
encoding. The entry’s name and value are now byte strings. -
For each byte in the entry’s name and value, apply the appropriate subsubsteps from the
following list:- If the byte is 0x20 (U+0020 SPACE if interpreted as ASCII)
- Replace the byte with a single 0x2B byte («+» (U+002B) character if interpreted
as ASCII). - If the byte is in the range 0x2A, 0x2D, 0x2E, 0x30 to 0x39, 0x41 to 0x5A, 0x5F, 0x61 to
0x7A -
Leave the byte as is.
- Otherwise
-
-
Let s be a string consisting of a U+0025 PERCENT SIGN character
(%) followed by uppercase ASCII hex digits representing the hexadecimal value
of the byte in question (zero-padded if necessary). -
Encode the string s as US-ASCII, so that it is now a byte
string. -
Replace the byte in question in the name or value being processed by the bytes in
s, preserving their relative order.
-
-
Interpret the entry’s name and value as Unicode strings encoded in US-ASCII. (All of the
bytes in the string will be in the range 0x00 to 0x7F; the high bit will be zero throughout.)
The entry’s name and value are now Unicode strings again. -
If the entry’s name is «
isindex«, its type is
«text«, and this is the first entry in the form data
set, then append the value to result and skip the rest of the
substeps for this entry, moving on to the next entry, if any, or the next step in the overall
algorithm otherwise. -
If this is not the first entry, append a single U+0026 AMPERSAND character (&) to
result. -
Append the entry’s name to result.
-
Append a single «=» (U+003D) character to result.
-
Append the entry’s value to result.
-
-
Encode result as US-ASCII and return the resulting byte
stream.
To decode
application/x-www-form-urlencoded payloads, the following algorithm should be
used. This algorithm uses as inputs the payload itself, payload, consisting of
a Unicode string using only characters in the range U+0000 to U+007F; a default character encoding
encoding; and optionally an isindex flag indicating that
the payload is to be processed as if it had been generated for a form containing an isindex control. The output of this algorithm is a sorted list
of name-value pairs. If the isindex flag is set and the first control really
was an isindex control, then the first name-value pair
will have as its name the empty string.
Which default character encoding to use can only be determined on a case-by-case basis, but
generally the best character encoding to use as a default is the one that was used to encode the
page on which the form used to create the payload was itself found. In the absence of a better
default, UTF-8 is suggested.
The isindex flag is for legacy use only. Forms in conforming HTML documents
will not generate payloads that need to be decoded with this flag set.
-
Let strings be the result of strictly splitting the string payload on U+0026 AMPERSAND
characters (&). -
If the isindex flag is set and the first string in strings does not contain a «=» (U+003D) character, insert a «=» (U+003D) character at the start of the first string in strings.
-
Let pairs be an empty list of name-value pairs.
-
For each string string in strings, run these
substeps:-
If string contains a «=» (U+003D) character, then let name be the substring of string from the start of string up to but excluding its first «=» (U+003D) character, and let
value be the substring from the first character, if any, after the first
«=» (U+003D) character up to the end of string. If the first
«=» (U+003D) character is the first character, then name will be
the empty string. If it is the last character, then value will be the
empty string.Otherwise, string contains no «=» (U+003D) characters. Let
name have the value of string and let value be the empty string. -
Replace any «+» (U+002B) characters in name and value with U+0020 SPACE characters.
-
Replace any escape in name and value with the
character represented by the escape. This replacement must not be recursive.An escape is a «%» (U+0025) character followed by two ASCII hex
digits.The character represented by an escape is the Unicode character whose code point is equal
to the value of the two characters after the «%» (U+0025) character, interpreted as
a hexadecimal number (in the range 0..255).So for instance the string «
A%2BC» would become
«A+C«. Similarly, the string «100%25AA%21» becomes
the string «100%AA!«. -
Convert the name and value strings to their byte
representation in ISO-8859-1 (i.e. convert the Unicode string to a byte string, mapping code
points to byte values directly). -
Add a pair consisting of name and value to pairs.
-
-
If any of the name-value pairs in pairs have a name component
consisting of the string «_charset_» encoded in US-ASCII, and the value
component of the first such pair, when decoded as US-ASCII, is the name of a supported character
encoding, then let encoding be that character encoding (replacing the default
passed to the algorithm). -
Convert the name and value components of each name-value pair in pairs
to Unicode by interpreting the bytes according to the encoding encoding. -
Return pairs.
Parameters on the application/x-www-form-urlencoded MIME type are
ignored. In particular, this MIME type does not support the charset
parameter.
4.10.22.7 Multipart form data
The multipart/form-data encoding algorithm is as follows:
-
Let result be the empty string.
-
If the algorithm was invoked with an explicit character encoding, let the selected character
encoding be that encoding. (This algorithm is used by other specifications, which provide an
explicit character encoding to avoid the dependency on theformelement described
in the next paragraph.)Otherwise, if the
formelement has anaccept-charsetattribute, let the selected character
encoding be the result of picking an encoding for the form.Otherwise, if the
formelement has noaccept-charsetattribute, but the document’s
character encoding is an ASCII-compatible character encoding, then that is
the selected character encoding.Otherwise, let the selected character encoding be UTF-8.
-
Let charset be the name of the
selected character encoding. -
For each entry in the form data set, perform these substeps:
-
If the entry’s name is «
_charset_» and its
type is «hidden«, replace its value with charset. -
For each character in the entry’s name and value that cannot be expressed using the
selected character encoding, replace the character by a string consisting of a U+0026 AMPERSAND
character (&), a «#» (U+0023) character, one or more ASCII digits
representing the Unicode code point of the character in base ten, and finally a «;» (U+003B) character.
-
-
Encode the (now mutated) form data set using the rules described by RFC
2388, Returning Values from Forms:multipart/form-data, and
return the resulting byte stream. [RFC2388]Each entry in the form data set is a field, the name of the entry
is the field name and the value of the entry is the field value.The order of parts must be the same as the order of fields in the form data
set. Multiple entries with the same name must be treated as distinct fields.In particular, this means that multiple files submitted as part of a single
<input type=file multiple>element will result in each file
having its own field; the «sets of files» feature («multipart/mixed«) of
RFC 2388 is not used.The parts of the generated
multipart/form-dataresource that correspond
to non-file fields must not have aContent-Typeheader specified. Their names and
values must be encoded using the character encoding selected above (field names in particular do
not get converted to a 7-bit safe encoding as suggested in RFC 2388).File names included in the generated
multipart/form-dataresource (as
part of file fields) must use the character encoding selected above, though the precise name may
be approximated if necessary (e.g. newlines could be removed from file names, quotes could be
changed to «%22», and characters not expressible in the selected character encoding could be
replaced by other characters). User agents must not use the RFC 2231 encoding suggested by RFC
2388.The boundary used by the user agent in generating the return value of this algorithm is the
multipart/form-databoundary string. (This value is used to
generate the MIME type of the form submission payload generated by this algorithm.)
For details on how to interpret multipart/form-data payloads, see RFC 2388. [RFC2388]
4.10.22.8 Plain text form data
The text/plain encoding algorithm is as follows:
-
Let result be the empty string.
-
If the
formelement has anaccept-charsetattribute, let the selected character
encoding be the result of picking an encoding for the form, with the allow
non-ASCII-compatible encodings flag unset.Otherwise, if the
formelement has noaccept-charsetattribute, then that is the selected
character encoding. -
Let charset be the name of the
selected character encoding. -
If the entry’s name is «
_charset_» and its type
is «hidden«, replace its value with charset. -
If the entry’s type is «
file«, replace its value with the file’s
name only. -
For each entry in the form data set, perform these substeps:
-
Append the entry’s name to result.
-
Append a single «=» (U+003D) character to result.
-
Append the entry’s value to result.
-
Append a «CR» (U+000D) «LF» (U+000A) character pair to result.
-
-
Encode result using the encoder for the selected
character encoding and return the resulting byte stream.
Payloads using the text/plain format are intended to be human readable. They are
not reliably interpretable by computer, as the format is ambiguous (for example, there is no way
to distinguish a literal newline in a value from the newline at the end of the value).
4.10.23 Resetting a form
When a form element form is reset, the user agent must fire a simple event named
reset, that bubbles and is cancelable, at form, and then, if that event is not canceled, must invoke the reset algorithm of each resettable element whose form owner is form.
Each resettable element defines its own reset algorithm. Changes made to form controls as part of
these algorithms do not count as changes caused by the user (and thus, e.g., do not cause input events to fire).
Filling out forms on the web isn’t the most exciting activity in the world, especially when you enter something the website doesn’t expect. Most websites do a pretty poor job giving you feedback. For example, you submit your data, it reloads the page, deletes half the things you entered, and tells you «Please enter a password with 2 lower case letters, 4 uppercase letters, a number, and an even number of %^&# characters». 🤦 Lol & thanks, every travel or banking website I have ever used.
This feedback is called form validation. An example:
good luck submitting this
Many websites still roll their own form validation system, and making a something good from scratch is not a simple affair.
Obviously, your users deserve a good experience when they get something wrong. And you deserve minimal pain in building out this experience.
Fortunately today’s browsers have form validation features built in. These features are pretty good now and are actually supported by 🎉 all current browsers 🎉. As with many browser features, there are warts. But you can work around them with a small amount of code and have something that feels good.
I’m hoping this post exposes a couple more people to HTML5 form validation, or shows folks the current capabilities if they haven’t looked at these features in a while.
Just want the TL;DR and the code? Check out the valid-form project; a JavaScript library using the techniques from this blog post. You can also see it in action.
Example 1: The Basics
There are three categories of HTML5 form validation features:
- HTML attributes on
<input>,<select>, and<textarea>elements. (From here on out, I will just refer to them all as<input>cause brevity) - CSS pseudo selectors
- JavaScript APIs
And you can choose your own adventure. The only thing required to start validating is using a couple HTML attributes, which is crazy easy. So let’s start there.
We’ll add a required attribute to an <input> to ensure the user needs to put something in the email address box. We’ll also set the input’s type="email" which will render a text box but only allow email addresses. Notice you cannot submit the form unless you fill it out with an email address. This is just HTML, no JavaScript!
<form>
  <label>Your Email</label>
  <!-- `required` and `type="email"` does everything! -->
  <input
    required
    type="email"
    name="email"
    placeholder="a@b.com" />
</form>
Boom💥! 20 characters in HTML gave us validation! Now that we have it working, you might have a couple questions:
- How do I style the
<input>when it is valid or invalid? - Can I specify custom error messages? If so, how?
- How do I style the error message?
So let’s dig into each one of these with an example. We will build step-by-step on the simple example above until we have something more custom and attractive.
Example 2: Styling the input
There are a couple CSS pseudo classes supported by each <input>. Two potentially useful selectors in this situation:
:valid— when the input is valid:invalid— when the input is invalid
The most basic approach would be to change the border color when the input is invalid on our previous example:
/* CSS :invalid pseudo selector */
input:invalid {
  border-color: red;
}
basic example + :invalid styling
Notice, though, that it isn’t very good. What is even happening?
- The input is
requiredand initially empty, so on page load the input is:invalidand border is red.
- The input is
:invaliduntil you type a legit email address, so it is red when typing.

Ok, so the :invalid pseudo selector is kind of useless. Ideally we would not show an error up front or the whole time they are typing, just when they submit something unacceptable.
Dave Rupert has a good solution that uses an input’s invalid event. Instead of using the :invalid pseudo selector, he adds a CSS class to the input when it becomes invalid. We will extend this approach by removing the CSS class when the element becomes valid again.
The CSS
/* .invalid CSS class instead or pseudo selector */
input.invalid {
  border-color: red;
}
And the JavaScript will add the invalid class when the input is invalid
var invalidClassName = 'invalid'
var inputs = document.querySelectorAll('input, select, textarea')
inputs.forEach(function (input) {
  // Add a css class on submit when the input is invalid.
  input.addEventListener('invalid', function () {
    input.classList.add(invalidClassName)
  })

  // Remove the class when the input becomes valid.
  // 'input' will fire each time the user types
  input.addEventListener('input', function () {
    if (input.validity.valid) {
      input.classList.remove(invalidClassName)
    }
  })
})
basic example + .invalid CSS class
Better, eh?
This behavior feels better because you are punished with an error only after you try to submit with a unacceptable answer, not while you are typing a potentially legit answer. Plus you get immediate feedback when you correct an error. 🎉
Example 3: Custom Messages
The browser provides default error messages. But they are super generic—»Please fill out this field», etc.—and may not be what you want.
Generic as they may be, there is an upside to sticking with the default error messages: default errors are translated into the user’s local language. e.g. If a user is reading your site in German, the default error messages will be in German also.
The key to custom messages is using an input HTMLElement’s setCustomValidity function, e.g. input.setCustomValidity('My custom message'). You can call this function at any time. If you pass a non-empty string, it will treat the input as invalid and not allow form submission. It is a flexible function. For example, it can be used to build your own validation for custom types.
But setCustomValidity is a bit cumbersome for custom messages as you can’t just override a specific message. It’s «show this error no matter what» or nothing.
<input> HTMLElements also have a validity object that tells you what, if anything, on the element is invalid. We can use input.validity in conjunction with input.setCustomValidity() to override specific messages.
// The keys (e.g. valueMissing) map onto
// a key in the `input.validity` object
const customMessages = {
  valueMissing:    'Custom required!',       // `required` attr
  emailMismatch:   'Custom email mismatch',  // Invalid email
  patternMismatch: 'Custom pattern mismatch',// `pattern` attr
}

function getCustomMessage (type, validity) {
  if (validity.typeMismatch) {
    return customMessages[`${type}Mismatch`]
  } else {
    for (const invalidKey in customMessages) {
      if (validity[invalidKey]) {
        return customMessages[invalidKey]
      }
    }
  }
}

var inputs = document.querySelectorAll('input, select, textarea')
inputs.forEach(function (input) {
  // Each time the user types or submits, this will
  // check validity, and set a custom message if invalid.
  function checkValidity () {
    const message = input.validity.valid
      ? null
      : getCustomMessage(input.type, input.validity, customMessages)
    input.setCustomValidity(message || '')
  }
  input.addEventListener('input', checkValidity)
  input.addEventListener('invalid', checkValidity)
})
example with custom messages
You could extend this technique even further by passing in a special customMessages object for each <input>, or having it read custom attributes on the <input> containing the messages. FWIW, valid-form (a JS lib based on this post) does support custom attributes.
Example 4: Custom Message Rendering
Unfortunately the browser doesn’t give you any control over styling the default error message display, and they are (of course) different on every browser.
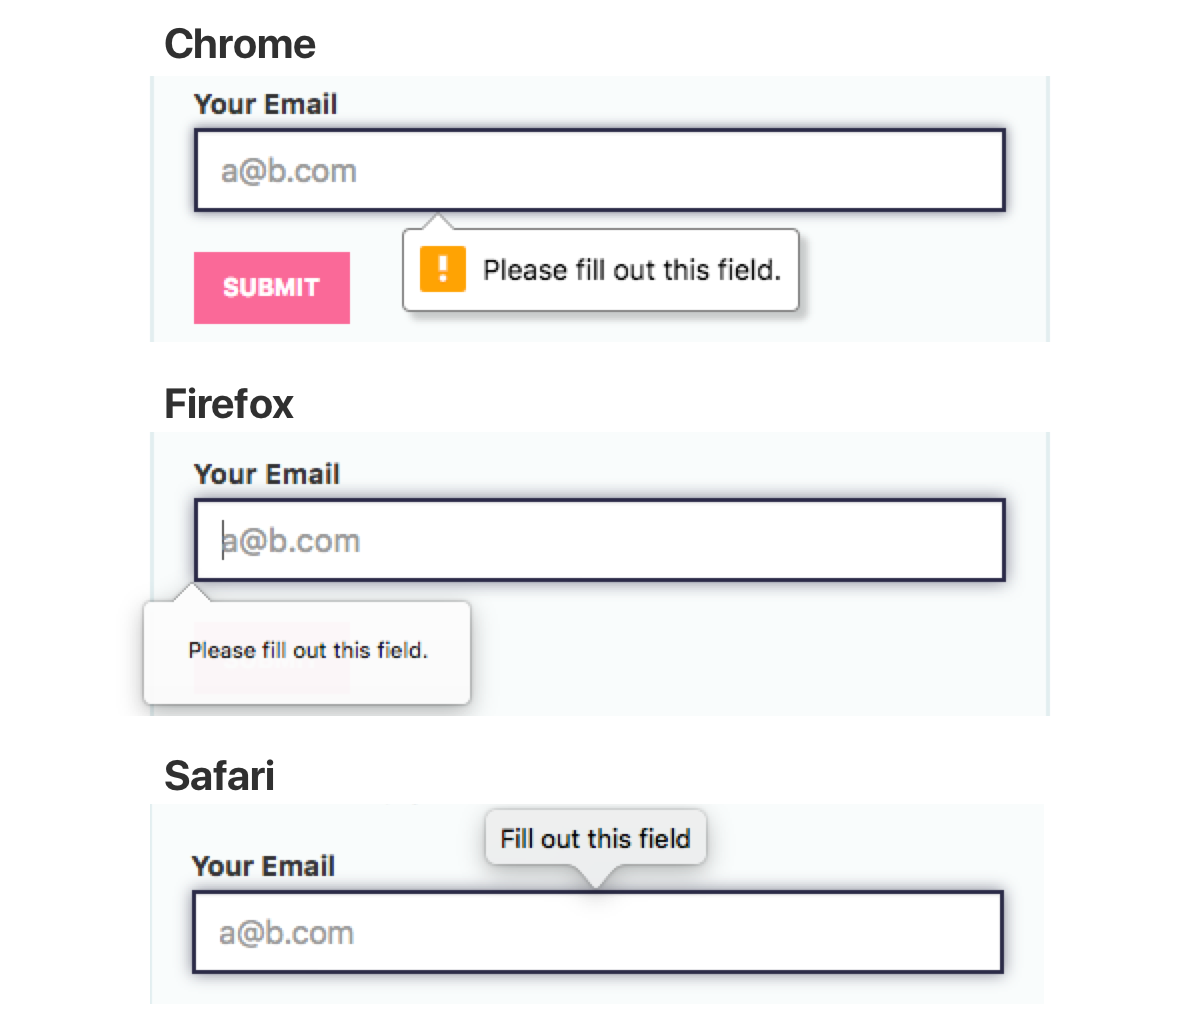
But you can render your own element when there is an error. Basically, you just hook the same events as the other examples, and insert a div wherever you like with the error. This example is the same as above, but it will show the error message next to the label instead of as a tooltip thing under the input.
example with custom messages + rendering
const validationErrorClass = 'validation-error'
const parentErrorClass = 'has-validation-error'
const inputs = document.querySelectorAll('input, select, textarea')
inputs.forEach(function (input) {
  function checkValidity (options) {
    const insertError = options.insertError
    const parent = input.parentNode
    const error = parent.querySelector(`.${validationErrorClass}`)
      || document.createElement('div')

    if (!input.validity.valid && input.validationMessage) {
      error.className = validationErrorClass
      error.textContent = input.validationMessage

      if (insertError) {
        parent.insertBefore(error, input)
        parent.classList.add(parentErrorClass)
      }
    } else {
      parent.classList.remove(parentErrorClass)
      error.remove()
    }
  }
  input.addEventListener('input', function () {
    // We can only update the error or hide it on input.
    // Otherwise it will show when typing.
    checkValidity({insertError: false})
  })
  input.addEventListener('invalid', function (e) {
    // prevent showing the default display
    e.preventDefault()

    // We can also create the error in invalid.
    checkValidity({insertError: true})
  })
})
Get The Code
I created a small JavaScript library that rolls up all three techniques from this post so you dont have to: valid-form. You can also see it in action.
Server Validation
The HTML5 form validation techniques in this post only work on the front end. Someone could turn off JavaScript and still submit jank data to a form with the tightest JS form validation.
To be clear, you should still do validation on the server. How you display those errors to a user is up to you. With these JavaScript techniques, the display of server validation errors could be a lot simpler if you expect most of your users to have JS enabled. For example, Rails still encourages you to dump all validation errors at the top of a form, which is lulzy in this age of touchy UX. But you could do that minimal thing with server errors, then rely on HTML5 validation to provide a good user experience for the vast majority of your users.
Reference
The examples in this post didn’t show absolutely all the validation possibilities. Here are a couple quick tables that hopefully help in your validation quest.
HTML Validation Attributes
Using these attributes will show validation errors, or limit what the user can enter into an <input>.
| Attribute | Notes |
|---|---|
<input required> |
Ensure the user enters at least one character |
<input minlength="2"> |
Ensure the <input> has a length greater than or equal to the value specified |
<input maxlength="10"> |
Ensure the <input> has a length less than or equal to the value specified |
<input pattern="[a-z]+"> |
Match a regular expression |
<input min="2"> |
Number value must be >= the value. Only works on type="number" or type="range" inputs! |
<input max="10"> |
Number value must be <= the value. Only works on type="number" or type="range" inputs! |
<input step="2"> |
Number value must be a multiple of this number. Only works on type="number" or type="range" inputs! |
<form novalidate> |
Disable HTML5 form validation for the form. |
HTML Type Attributes
In addition to the validation attributes, you should use the correct type attribute for your input. e.g. for email addresses, you should use type="email", for numbers, you should use type="number". Some types provide extra validation, and will show a message when the input does not match the type. These types will show error messages:
| Type | Notes |
|---|---|
email |
Input must be a valid email address. |
url |
Input must be a URL that starts with http. |
number |
Input must be a number. |
There are many more acceptable values for the type field. Using the correct type may save you from having to validate an input at all, yay.
CSS Pseudo Classes
You can style <input>s in various states with a couple pseudo selectors.
| Pseudo Selector | Notes |
|---|---|
:valid |
When the input is valid |
:invalid |
When the input is invalid |
:required |
When the input has a required attribute |
:optional |
When the input does not have a required attribute |
Validity State
Remember the object with custom messages above?
const customMessages = {
  valueMissing:    'Custom required!',       // `required` attr
  patternMismatch: 'Custom pattern mismatch',// `pattern` attr
}
valueMissing etc. are based on an <input>‘s input.validity object. e.g. input.validity.valueMissing is true when an <input> requires data from the user.
Here is a table of all values reproduced (with clarifying changes) from the MDN ValidityState docs:
| Property | Note |
|---|---|
valid |
Boolean indicating the element meets all constraint validations, and is therefore considered to be valid. When true, all of the following properties in this table will be false. When input.validity.valid === false, one or more of the properties will be true. |
badInput |
Boolean indicating the user has provided input that the browser is unable to convert. |
patternMismatch |
Boolean indicating the value does not match the regex pattern specified in the pattern attribute. |
rangeOverflow |
Boolean indicating the value is greater than the maximum specified by the max attribute. |
rangeUnderflow |
Boolean indicating the value is less than the minimum specified by the min attribute. |
stepMismatch |
Boolean indicating the value does not fit the rules determined by the step attribute (that is, it’s not evenly divisible by the step value). |
tooLong |
Boolean indicating the value exceeds the specified maxlength attribute for HTMLInputElement or HTMLTextAreaElement objects. Note: This will never be true in Gecko, because elements’ values are prevented from being longer than max attribute. |
tooShort |
Boolean indicating the value fails to meet the specified minlength attribute for HTMLInputElement or HTMLTextAreaElement objects. |
typeMismatch |
Boolean indicating the value is not in the required syntax (when type is email or url). |
valueMissing |
Boolean indicating the element has a required attribute, but no value. |