Are you looking some ways to get rid of “Android: Installation error: INSTALL_FAILED_INSUFFICIENT_STORAGE”?
Don’t worry, this blog will help you to get away of such error message on your Android device. Not only you, but there are several other users who have come across such unexpected situation while accessing their android device.
So let us go further and know about the error and also how to fix Android: Installation error: INSTALL_FAILED_INSUFFICIENT_STORAGE.
About Installation error: INSTALL_FAILED_INSUFFICIENT_STORAGE
This error is one type of headache to the developers of Android. Generally, it occurs though your device has sufficient storage. However, when several people reported about the problem and they requested for the solution then Google was silent in the issue.
Later on, it was found that rebooting the device might help to get away of the situation. After rebooting, the device was normal and the problem was fixed but again the same problem occurs.
So, how to solve such error? Don’t worry, let us read further.
Practical scenario:
Android: Installation error: INSTALL_FAILED_INSUFFICIENT_STORAGE
I’m getting “Installation error: INSTALL_FAILED_INSUFFICIENT_STORAGE” error while installing the application on my device today. It is working fine till yesterday, today only im facing this problem. I have deleted some files on my SD card, but still facing the issue. I’m sure it is not the issue with the space on SD card. Can anybody suggest how to resolve this.
– From Stack Overflow
To Fix Android Installation Error INSTALL_FAILED_INSUFFICIENT_STORAGE, we recommend this tool:
This effective tool can fix Android issues such as boot loop, black screen, bricked Android, etc. in no time. Just follow these 3 easy steps:
- Download this Android System Repair tool (for PC only) rated Excellent on Trustpilot.
- Launch the program and select brand, name, model, country/region, and carrier & click Next.
- Follow the on-screen instructions & wait for repair process to complete.
Reasons behind the error
Generally, everyone knows how Android app installation or updates effect takes place. If anyone don’t know then here is what you should know about. When any app is installed then the APK file is saved as /data/app/-1.apk (1.apk).
Now when the same app needs an update then the APK file is saved as /data/app/-2.apk (2.apk). In normal situations after the update, the first version (1.apk) gets erased.
Now here you can find out why the error occurs. When you install any updated app on your device and the old APK file is still present in the device then it is a common problem with many user.
The first APK file which was named as (1.apk) still remains in the same place and when the updated app is installed then it has no place for 2.apk file. In such condition, an installation error: INSTALL_FAILED_INSUFFICIENT_STORAGE occurs.
Now the question arises, how to fix the error message on android?
Related: [GUIDE]- How to Fix “Insufficient Storage” Error Message on Android
How to fix Android error “INSTALL_FAILED_INSUFFICIENT_STORAGE”
It is very important to know how to fix any error that you come across on your android device. The error that you have faced now, it has simple solution.
Simply rebooting the device one to two times can clear the message. But it has a chance to come back again (already mentioned above).
This situation is really an irritating one as users cannot install any popular games app, video apps, music apps and many others just because of the unwanted popup error message.
Therefore, to get out of the unexpected error message, here you will get some of the best ways to deal with such condition.
But before going to any solution, you have do some simple steps so that you don’t have to face any data loss situation further.
So follow the below steps carefully.
Step 1: Backup your Android data
Yes, this is one of the important step that you must do before going for any solution. You have to backup all your data’s including photos, contacts, videos, text messages, call history etc to safe place but do you know how?
Use Android Data Backup & Restore software to backup all your important data from your android device. This is one of the best ways to keep your data in safe place and whenever it is needed, you can restore them without any issue.
btn_img btn_img
Note: It is recommended to download and use the software on your PC or laptop. It is because recovery of phone data on the phone itself is risky as you may end up losing all your data because of data overriding.
Steps to backup and restore android data
With Toolkit for Android — Data Backup & Restore, you can easily backup your Android data. This tool has make it quite easier to back up your Android data to computer and even selectively restore backed up data to your Android device. Let us have a look how one can easily backup and restore their Android phone.
Part I: Back up your Android Phone
Step 1: Connect your Android device to computer
At first, there is a need to launch Toolkit for Android on your computer and then select Phone Backup

After the above step, connect your Android phone to the computer with the use of a USB cable. But it is quite important to make sure that you have enabled USB debugging mode on your Android phone. If your Android OS version is above 4.2.2, then remember that there will be a pop-up message display on your phone. Now simply tap on OK so that you can allow USB debugging on your device.
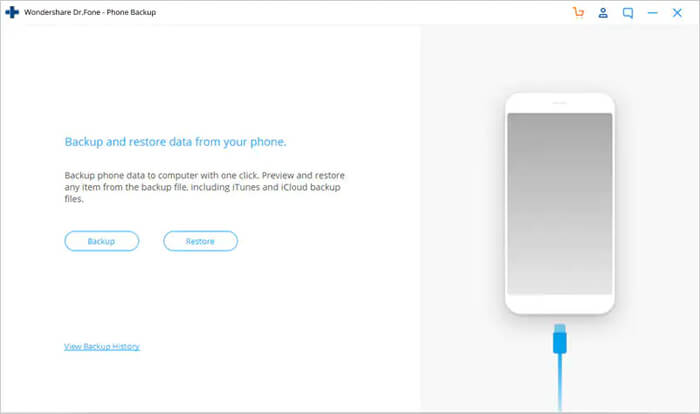
Click Backup to start the backup Android phone data.
If you have already used this tool to back up your device in the past, then you can simply view your past backup by clicking on ‘View backup history’.
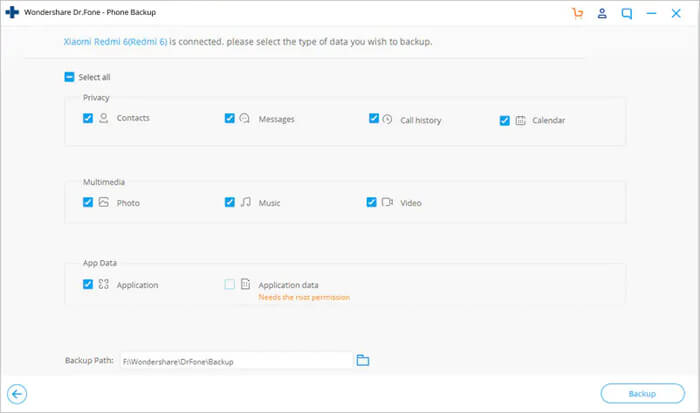
Step 2: Select file types to back up
When your Android phone gets connected, then you have to select the file types you want to backup. Remember one thing that Toolkit for Android has checked all the file types for you by default. After this, simply click on Backup so that you can begin the backup process.
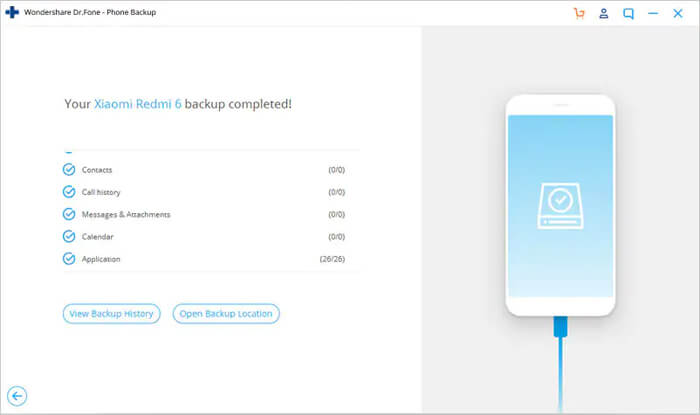
It will take a few minutes to complete the backup process. So, please do not disconnect your Android phone and also do not use the device or delete any data on the phone when the backup process is in progress.

After the backup process gets over, you can then click on View the backup button to see what is there in the backup file.
Part II: Restore Backup To Android Phone
Step 1: Connect your Android device to computer
Here, you are required to launch Toolkit for Android on your computer and then select ‘Phone Backup. Now simply connect your Android phone to the computer with the use of a USB cable.

Step 2: Select the backup file you would like to restore
After clicking on Restore button, by default, the program will display the files from the latest backup on computer. Here you need to select backup file you need and then tap on View next to it.
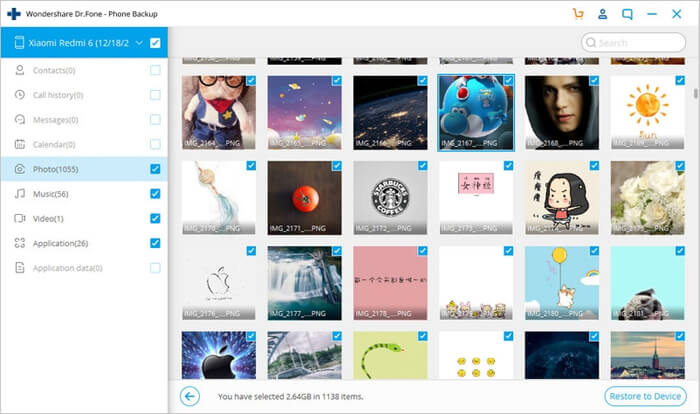
Step 3: Preview and Restore Backup file to Android Phone
You can have a preview here of each file in the backup. From here, you can check the files you need and then simply click on ‘Restore”.

The overall process will take few minutes to complete. So, please do not disconnect your Android phone or do not open any Android phone management software during the process

Step 2: Check each method to fix installation error: INSTALL_FAILED_INSUFFICIENT_STORAGE
Here you have to follow some methods to fix the error. In between, it may happen that some of the data might get lost then also no need to worry. Using Android Data Recovery tool will help you to get back all your erased data.
After that, follow the methods to get out of the problem.
Method 1: Erase both APK files
- First, uninstall the app
- Now search the both files path and delete them (/data/app/-1.apk) (/data/app/-2.apk)
In fact there is another way by which you can get out of this, for that, you have to run
- adb shell “pm uninstall”
- adb shell “rm -rf /data/app/-*”
Method 2: Add android:installLocation attribute
You have to add android:installLocation=”preferExternal” in your AndroidManifest.xml file within manifest tag. This will force the app to get installed on external storage of device.
For example:
<manifest xmlns:android=”http://schemas.android.com/apk/res/android”
package=”com.andrewsmith.android.darkness”
android:installLocation=”preferExternal”
Now go to Settings > Storage > hit on cached data and then clear the cache data from device. Doing this will help you to clear cache files and some space will be available.
At last, reconnect your device, then clean the project and run it again on your device. Now your device will be able to run the project.
Also Read: [Solved] “No Command” Error In Recovery Mode On Android
Method 3: Increase the capacity of Android emulator’s memory
The error also occur at the time of running Android application on Emulator and it occurs due to less virtual memory. So to fix it, follow the steps:
- First, right click on root of Android project and then go to “Run As” and then “Run configurations…”
- Here you have to locate “Android Application” and after that select your project and then go to “Target” tab
- After that, search “Additional Emulator Command Line Options” and there you have to paste “-partition-size 1024”
- At last, click on Apply option and Run to use emulator
I hope that after following all these methods and fixes, you will not get any such type of error on your Android device.
Conclusion
The error you have come across is common to many Android users so there is nothing to get worried about. However, I have mentioned some of the best methods to fix installation error: INSTALL_FAILED_INSUFFICIENT_STORAGE.
Further, you can visit our Facebook, Twitter and G+ page and if you have, any questions then you can ASK HERE
btn_729

James Leak is a technology expert and lives in New York. Previously, he was working on Symbian OS and was trying to solve many issues related to it. From childhood, he was very much interested in technology field and loves to write blogs related to Android and other OS. So he maintained that and currently, James is working for androiddata-recovery.com where he contribute several articles about errors/issues or data loss situation related to Android. He keeps daily updates on news or rumors or what is happening in this new technology world. Apart from blogging, he loves to travel, play games and reading books.

Learn Few Effective Solutions To Fix Android Emulator Installation Error – “Install Failed Insufficient Storage”!
Overview: Are you getting installation error “INSTALL_FAILED_INSUFFICIENT_STORAGE” on Android Emulator while running an application. If so, then this post offer different solutions that will help you to fix Android emulator installation error “INSTALL_FAILED_INSUFFICIENT_STORAGE”. So, just go through the post and solve the issue by yourself.
- Solution 1: Restart The AVD/Restart The Android Emulator Or Create A New AVD
- Solution 2: Increase Android Emulator’s Internal Memory Storage
- Solution 3: Delete Both The APK Files
- Solution 4: Add android:installLocation attribute
Let’s start with real user practical scenario!
Practical Scenario 1: A User Getting Install Failed Insufficient Storage Error When Ionic Emulate Android
Insufficient storage error when ionic emulate android?
When I am running ionic emulate android, it building APK and opening emulator, but showing error that failure (Install failed insufficient storage ) and emulator not showing app.
Source: Ionic Forum
Practical Scenario 2: A User Experiencing Install Failed Insufficient Storage While Installing App From Android Studio
Android Studio [Install_Failed_Insufficient_Storage]
I have a problem with installing an apk of my app on my phone from Android Studio. Every time i tried i got this error message:
09/10 22:40:00: Launching app
$ adb push C:UserspokefAndroidStudioProjectsRunescapeappbuildoutputsapkapp-debug.apk /data/local/tmp/com.myapps.myproductions.rsstats.
$ adb shell pm install -r "/data/local/tmp/com.myapps.myproductions.rsstats."
pkg: /data/local/com.myapps.myproductions.rsstats.
Failure [INSTALL_FAILED_INSUFFICIENT_STORAGE]

$ adb shell pm uninstall com.myapps.myproductions.rsstats.
DELETE_FAILED_INTERNAL_ERROR
Error while Installing APK
I know there are a lot of threads out there talking about this problem, but Ive already tried everything. Im certain i have enough storage, i cleared all caches, i uninstalled all previous versions, i changed the manifest to “android:installLocation=”preferExternal” , i restarted my phone etc, so please dont mark this as a duplicate.
This problem only happens since i changed the package path from com.example.myapp etc. to com.myapps.myproductions.rsstats. Im sure that I correctly adapted all paths in the files to this location. What else could I try?
Source: stackoverflow
Also Read: [Solved]: ‘Insufficient Storage’ Error on Android
Just like above practical scenarios, there are many Android Developer who faces “INSTALL_FAILED_INSUFFICIENT_STORAGE” error while they try to run the application on the Emulator.
The error message is displayed as:-
Installation error: INSTALL_FAILED_INSUFFICIENT_STORAGE
So, how do you fix this error?
Well, there are several solutions as per several causes. So, let’s get to the solution section.
Solution 1: Restart The AVD/Restart The Android Emulator Or Create A New AVD
Things get automatically fixed in most of the cases when you restart the device. In this case, you can restart the AVD (Android Virtual Machine) on which you are installing the app or testing the project on.
In some cases, things get so bad that you have to restart the emulator as well.
However, if you are still getting the same error, then you can delete the AVD and create a new one. Here how to do this: Window >Android SDK AVD Manager >Delete >New.
Also Read: How Do I Get My Android Phone Out Of Headphone Mode?
Solution 2: Increase Android Emulator’s Internal Memory Storage
The Android Emulator default internal storage is 64MB, due to which you may get INSTALL_FAILED_INSUFFICIENT_STORAGE error message.
To fix this issue, you can increase the Android Emulator’s internal memory in the Eclipse launch configuration for your Android app with the additional parameter: “partition-size 1024”.
To do this follow the below steps:
- Right-click the root of your Android Project.
- Go to “Run As”, and then click on “Run Configuration”.

- Select your “Android Application” from the left section.
- Then go to “Target” tab. Located on the right side of the window.
- Scroll down and look for “Additional Emulator Command Line Options” and add “-partition-size 1024” there.

- Finally, Click on “Apply” to save changes and then click on “Run” to use your emulator.
Also Read: Fixes For “Sorry, This Media File Doesn’t Exist On Your SD Card/Internal Storage
Solution 3: Delete Both The APK Files
First of all you need to know how an Android app installation or update works. For example, first time when an app is installed then the APK file is saved as /data/app/-1.apk (1.apk). And when the app is to be updated then the updated APK file is saved as /data/app/-2.apk (2.apk).
Now you have to understand the point. When an updated app is about to get install while the old APK file was not deleted then 1.apk stays where it was and the system does not going to place 2.apk instead it display the installation error “INSTALL_FAILED_INSUFFICIENT_STORAGE”.
Hence, you have to delete both the APK files, to do so follow the below steps:
Simply uninstall the app. Find the path of both the APK files and use your own method to delete them all.
/data/app/-1.apk
/data/app/-2.apk
Alternatively, you can also delete both the apk file by running the following command:
adb shell “pm uninstall “
adb shell “rm -rf /data/app/-*”
You May Also Like:
- How To Fix Android Error “Process System Isn’t Responding”
- How To Fix “android.process.acore keeps stopping” Error
- [Fixed]: “System UI isn’t responding. Do you want to close it?” Error
- Solved: “Android Is Starting” Followed By “Optimizing App” Issue
Solution 4: Add android:installLocation attribute
You can also fix install_failed_insufficient_storage error by adding android:installLocation attribute.
Below follow how to do it:
In your AndroidManifest.xml file, within the manifest tag, add android:installLocation=”preferExternal”
package=”com.packagename.appname”
android:versionCode=”1″
android:versionName=”1.0″
android:installLocation=”preferExternal”>
Next go to Settings> Storage and then click on cached data and then clear the cache data on your device. This will clear the cache and free up the space.
Now reconnect your device. Clean your project and then again run it on the device. The project will run on your device without any error.
Wrap Up
I hope above mentioned-solutions have helped you in fixing the Installation error: INSTALL_FAILED_INSUFFICIENT_STORAGE on Android emulator. Just follow the solution one-by-one and see if problem solved or not.

Max Field is a founder of recoverandroid-data.com. He is an Android lover and loves to write tips, tricks, fixes for errors, data recovery solutions and more related to Android.
Summary
Carefully follow the detailed guide to fix Android & SD card error INSTALL_FAILED_INSUFFICIENT_STORAGE without worrying about losing data. First, download Android data backup and recovery software to backup Android files to PC, to ensure that nothing is going to lose during the fix; and then apply each of the suggested methods to resolve the insufficient storage issue while installing apps.
Installation error: INSTALL_FAILED_INSUFFICIENT_STORAGE
I’m getting «Installation error: INSTALL_FAILED_INSUFFICIENT_STORAGE» error while installing the application on my device today. I have deleted some files on my SD card, but still face the issue. I’m sure it’s not the issue with the space on SD card. Can anybody suggest how to resolve this?
Overview
It’s said that 9 out of 10 Android users have been facing the insufficient space on Android while installing an app or whatever, even though there is a plenty of storage space on both the internal memory or external SD card. How did the failure come?
Causes
Primarily, you got to know how an Android app installation or update takes effect. For example, the first time an app is installed, and the APK file is saved as /data/app/-1.apk (1.apk). When the app is to be updated, the updated APK file is saved as /data/app/-2.apk (2.apk). Under normal circumstances, the first version (1.apk) gets deleted.
Now you ought to get the point. When an updated app is about to install, whereas the old APK file was not deleted, and it’s really happened a lot amongst many Android devices. 1.apk stays where it was, the system is now going nowhere to place the 2.apk only sends an installation error: INSTALL_FAILED_INSUFFICIENT_STORAGE.
Solutions
So, how are you going to troubleshoot the wrongly reported «insufficient storage» error? Usually, just reboot your device once or twice would clear the message away, but it’ll surely come back soon. We know it’s a nightmare for Android players not being able to install desired game apps, music apps, video apps and others due to such irritating prompt.That’s why we did a lot of research and studies, to verify the following 3 fixing methods that can fix INSTALL_FAILED_INSUFFICIENT_STORAG error.
First of all, before attempting to try the workarounds, never, on any account, forgot to backup Android to PC in advance. It’s an essential procedure that you must do it likewise.
Step 1. Backup Android, including contacts, messages, pictures, videos and anything important
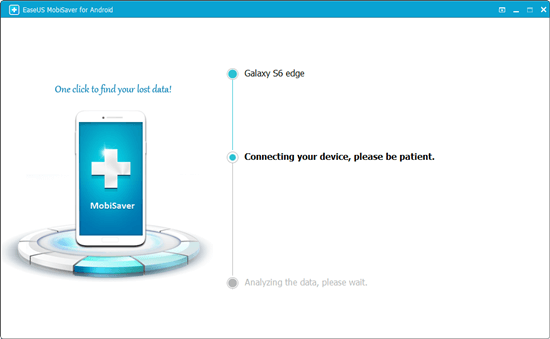
1) Download and install EaseUS MobiSaver for Android on a Windows PC.
2) Connect the target Android device to the PC, and wait for the software to recognize the device. Click «Start».
3) The scanning process is for searching the existing and lost data on the Android phone.
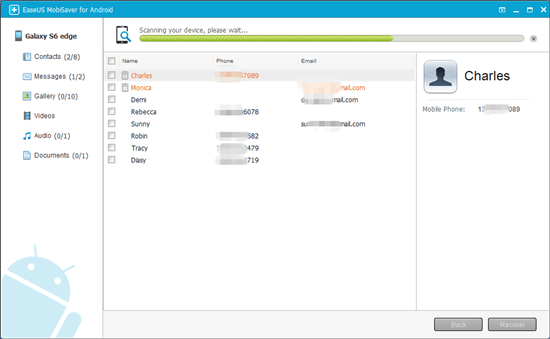
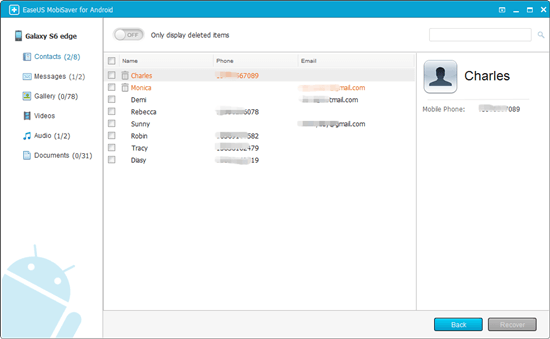
4) All the Android data is found and displayed, select all files that you’d like to save a copy and click «Recover» button. You can put the bakcup file to the PC storage or other storage media like a USB flash drive or a memory card.
Step 2. Check each workaround to fix installation error: INSTALL_FAILED_INSUFFICIENT_STORAG
EaseUS Android data recovery tool has ensured the data safety, so you can carefully check each workaround we provided in the below part to nail it.
Fix 1. Delete both apk files
1) Uninstall the app
2) find the path of both files and use your method to delete them all.
/data/app/-1.apk
/data/app/-2.apk
Or just run(this is somewhat higher leveled):
adb shell «pm uninstall»
adb shell «rm -rf /data/app/-*»
Fix 2. Add android:installLocation attribute
1) In your AndroidManifest.xml file add android:installLocation=»preferExternal» within your manifest tag.
2) Go to settings —> storage —> click on cached data and clear the cache data in your device. This will clear the cache and free the space.
3) Reconnect your device, clean your project and again run it on the device. The project will now run on your device.
Fix 3. Increase Android emulator’s memory capacity
1) Right click the root of your Android Project, go to «Run As» and then go to «Run Configurations…».
2) Locate the «Android Application» node in the tree at the left, and then select your project and go to the «Target» tab on the right side of the window.
3) look down for the «Additional Emulator Command Line Options» field and finally paste «-partition-size 1024» there.
4) Click Apply and then Run to use your emulator.
Снова Flutter. Ни с того ни с сего при запуске разрабатываемого приложения в эмуляторе стала вылетать такая ошибка.
Performing Streamed Install

adb: failed to install /Users/alexander/projects/cportal_flutter/build/app/outputs/flutter-apk/app.apk:
Exception occurred while executing 'install':
android.os.ParcelableException: java.io.IOException: Requested internal only, but not enough space
	at android.util.ExceptionUtils.wrap(ExceptionUtils.java:34)
	at com.android.server.pm.PackageInstallerService.createSession(PackageInstallerService.java:557)
	at com.android.server.pm.PackageManagerShellCommand.doCreateSession(PackageManagerShellCommand.java:3143)
	at com.android.server.pm.PackageManagerShellCommand.doRunInstall(PackageManagerShellCommand.java:1341)
	at com.android.server.pm.PackageManagerShellCommand.runInstall(PackageManagerShellCommand.java:1303)
	at com.android.server.pm.PackageManagerShellCommand.onCommand(PackageManagerShellCommand.java:193)
	at com.android.modules.utils.BasicShellCommandHandler.exec(BasicShellCommandHandler.java:97)
	at android.os.ShellCommand.exec(ShellCommand.java:38)
	at com.android.server.pm.PackageManagerService.onShellCommand(PackageManagerService.java:24742)
	at android.os.Binder.shellCommand(Binder.java:950)
	at and
Error launching application on sdk gphone64 arm64.
Решилось простыми действиями:
Открываем в андроид студии AVD Manager и делаем Wipe Data
![Flutter Error: [INSTALL_FAILED_INSUFFICIENT_STORAGE]](https://tehnojam.ru/wp-content/uploads/2021/12/snimok-jekrana-2021-12-30-v-09.49.47-1024x706.png "Flutter Error: [INSTALL_FAILED_INSUFFICIENT_STORAGE]")
После чего в терминале выполняем:
flutter clean
flutter pub get
P.S. Проблема носила регулярный характер, и приходилось почти каждый запуск эмулятора производить действия выше. Решением оказалось создать новый эмулятор и выделить под него 4000 мегабайт оперативной памяти
![Flutter Error: [INSTALL_FAILED_INSUFFICIENT_STORAGE]](https://i.stack.imgur.com/C7BjJ.png "Flutter Error: [INSTALL_FAILED_INSUFFICIENT_STORAGE]")
![Flutter Error: [INSTALL_FAILED_INSUFFICIENT_STORAGE]](https://secure.gravatar.com/avatar/0c40ffbd3645e1b4478470fe161e91cf?s=100&d=mm&r=g "Flutter Error: [INSTALL_FAILED_INSUFFICIENT_STORAGE]")
Гик, хакинтошник, линуксоид, считаю себя flutter разработчиком. Завёл канал, в котором изначально хотел показывать как я с нуля и до бесконечности погрузился в дорвей тематику, а в итоге просто рассказываю о себе, своих успехах и неудачах в сайтах, приложениях, офлайн проектах. Добро пожаловать в https://www.youtube.com/channel/UCbrTUrElICx4pewX0NbolmQ
1 024