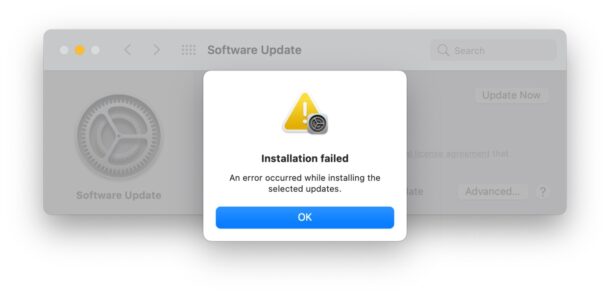
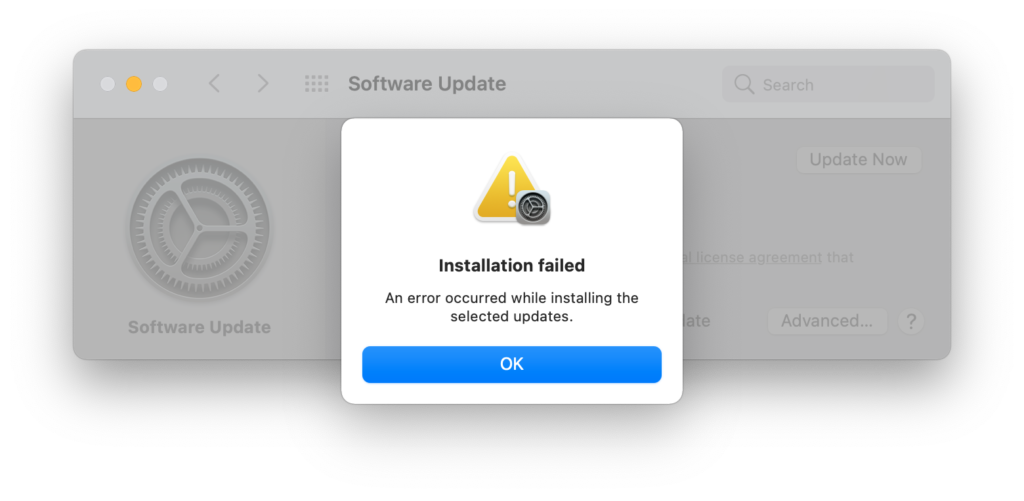
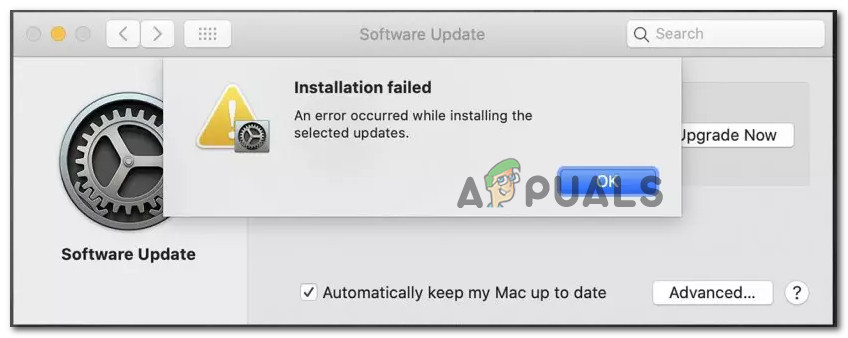
Some Mac users have run into an error when attempting to download or install system software updates that says “Installation failed, An error occurred while installing the selected updates.” This alert comes up in the Software Update system preference panel, and has been encountered in macOS Big Sur, macOS Catalina, macOS Mojave, and prior versions too.
There are a variety of reasons Mac users may see the “installation failed” error when trying to download and install a particular MacOS software update, and we’ll go through some troubleshooting steps to help resolve the issue here.
Troubleshooting macOS “Installation failed, An error occurred while installing the selected updates.” Errors
We’ll go through a variety of troubleshooting steps, as well as offer an alternate solution to download macOS installers even if the System Preference panel for Software Update is repeatedly showing failure errors.
Wait a bit
Users may encounter failures to download and install macOS updates when Apple servers are overloaded, therefore sometimes simply waiting a bit can be helpful. This is particularly relevant if the software update you are trying to install is brand new, like a major system software release (this happened with Big Sur for example).
Reboot the Mac
Sometimes simply rebooting the Mac and trying again can resolve the failed installation error.
Make sure the Mac is online and functionally connected to the internet
Some Mac users have encountered the Installation Failed error because their Mac has dropped an internet connection, or because of a DNS issue.
In either case, make sure the Mac is online, and easy way to do this is by opening Safari and going to a great website like https://osxdaily.com and make sure it loads and works as expected.
If you’re having DNS issues, you may want to check to see if custom DNS has been set on the Mac (or at the router level), or if your ISP DNS servers are offline. If those name servers are not functioning you may encounter various issues with downloading software updates, amongst other problems. Using Google DNS 8.8.8.8 is a common DNS for many users, as is OpenDNS 1.1.1.1.
Make Sure MacOS is Not Enrolled in Beta Updates
If you’re trying to download a final version of MacOS but it’s failing, you may still be enrolled in the beta program. Some users have experienced this and found that unenrolling from the beta updates resolves the Installation Failed error.
From the Software Update system preference panel, click on “Details” and choose “Restore Defaults” to unenroll from receiving Mac beta updates.
Try downloading the macOS installers directly
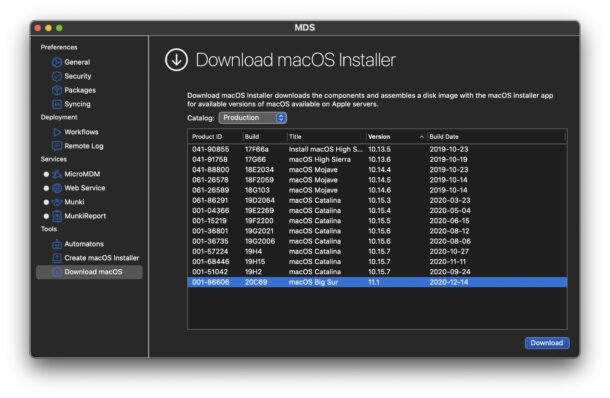
This is more of a workaround, as it bypasses the Software Update system preference panel on the Mac, but you can try to download the macOS installer via App Store or direct download link from Apple, downloading the full macOS installer application directly using the command line, or by using the excellent free third party app MDS (Mac Deploy Stick).
If you go with the MDS route, download and install the application (it’s free from the developer TwoCanoes and can be downloaded here), then launch the MDS app and choose “Download MacOS” from the sidebar, selecting the version of macOS system software you want to download and install.
Once you have the full installer of macOS, you should be able to launch it directly without experiencing the ‘installation failed’ error as you see it only in System Preferences.
For what it’s worth, this problem has been seen periodically over time with various macOS system software versions.
It looks like this in modern macOS 11 (Big Sur) and later:
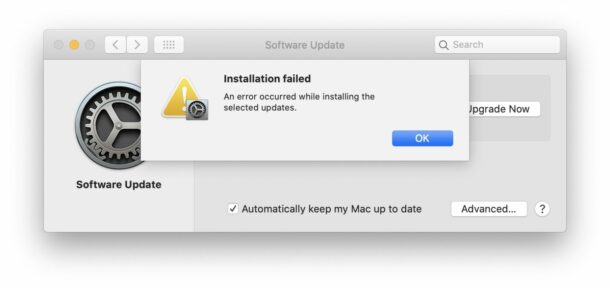
And it looks like this in macOS 10.15 (Catalina) and earlier:
Did one of the tips above resolve the “Installation failed, An error occurred while installing the selected updates.” macOS error for you? Did you find another solution? Share your experiences in the comments!
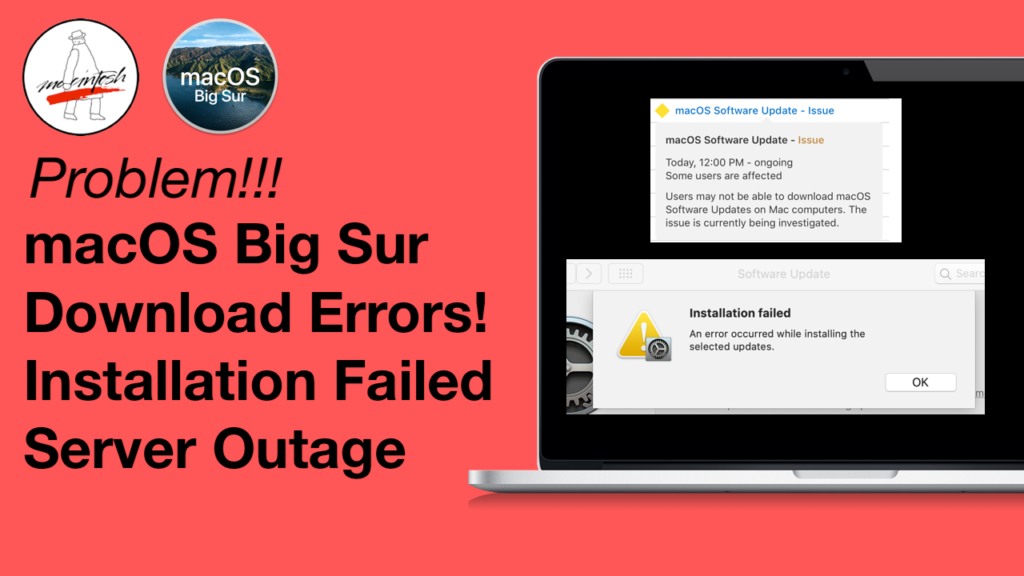
macOS Big Sur was launched at 12:00PM CST. A few hours later, users started to report download problems.
UPDATE 02/20/21 – I’m still getting a bunch of people reaching out saying that they are still getting the error even after Apple fixed the issue! You can download the full macOS Big Sur installer directly from Apple’s servers via Safari.
macOS Big Sur 11.2.1 download
http://swcdn.apple.com/content/downloads/00/60/071-05432-A_QOY2QE0UMR/puuz6c0epc7o0ozyovvi6tjxhzpf6uf04s/InstallAssistant.pkg
What this will do is download the entire InstallAssistant.pkg file. Install this package and it will put macOS Big Sur into your /Applications folder!
UPDATE 11/12 7:30PM CST – The download is working in the Software Update pane now. LET THE BIG SUR DOWNLOADING COMMENCE!!!
UPDATE 11/12 7:00PM CST – Some users are reporting that the download is starting to work. installinstallmacos.py is working for me but I’m still getting the error in the Software Update pane.
If you were able to download the full Big Sur installer before this issue happened, then you are one of the only people with a full installer right now! Maybe you can burn it to a Dual Layer DVD and sell it on ebay haha! (will have to be a blu-ray disc as a DL dvd is only 8.5GB and the Big Sur Installer is 12.2GB LOL)
My videos explaining the issue is below.
Apple Server issues.
Apple did report a server side issue for macOS Software Updates.
.apple.com/support/systemstatus/
That section was marked as resolved though at 3:30 CST. The problem is, the download is still not working.
The issue is with one file
After digging in, the issue is with one file installassistant.pkg
If you use installinstallmacos.py to attempt to download macOS Big Sur 11.0.1 (20B29)
curl: (22) The requested URL returned error: 403 Forbidden
Could not replicate http://swcdn.apple.com/content/downloads/50/49/001-79699-A_93OMDU5KFG/dkjnjkq9eax1n2wpf8rik5agns2z43ikqu/InstallAssistant.pkg: Command '[u'/usr/bin/curl', u'-fL', u'--create-dirs', u'-o', u'./content/downloads/50/49/001-79699-A_93OMDU5KFG/dkjnjkq9eax1n2wpf8rik5agns2z43ikqu/InstallAssistant.pkg', u'--compressed', 'http://swcdn.apple.com/content/downloads/50/49/001-79699-A_93OMDU5KFG/dkjnjkq9eax1n2wpf8rik5agns2z43ikqu/InstallAssistant.pkg']' returned non-zero exit status 22
We do not have access to download InstallAssistant.pkg and get a 403 Forbidden Error.
Once this issue is fixed, I will will let everyone know.
Once access to this file is restored, we should be able to download Big Sur again. I will keep you updated.
Liked it? Take a second to support Mr. Macintosh on Patreon!

The Error ‘An error occurred while downloading the updates (Update Failed)‘ prompt when attempting to install a newer version of macOS. This problem is typically reported to occur when the user attempts to install the Catalina and Big Sur versions of macOS.
After investigating various user reports and attempting to replicate the issue on our machines, it turns out that there are several different underlying causes that might lead to the apparition of this error code. Here’s a shortlist of potential culprits that might be responsible for this error code:
- Apple Server issue – As it turns out, you can expect to face this issue if Apple is currently dealing with an issue in regards to the Software Update delivery infrastructure. If this scenario is applicable, the only thing you can do is identify the server issue and wait for Apple to fix the issue on their side.
- Network inconsistency – A network glitch can also interfere with your attempts at installing the latest system update for your macOS computer. If the problem is related to an IP or TCP data inconsistency, you should be able to get the issue resolved by restarting or resetting your router.
- A Conflict caused by 3rd party kernel extension software – According to a lot of affected users, there are several 3rd party tools that might cause this error due to the fact that they interact with the kernel. To avoid this particular issue, you’ll need to uninstall kernel extension software like Parallels, CPU Gadget, or Little Snitch before attempting to install the pending update once again.
- An issue with PRAM or NVRAM caches – Another scenario that might prevent your system from installing a pending system update is an issue with the NVRAM or PRAM caches. Several users dealing with the same problem have reported that they finally managed to get the issue fixed after resetting both of these caches.
- Corrupted iTunes entry in the /hosts file – As it turns out, there are certain situations where your /etc/hosts file might become unusable due to a corrupted iTunes entry and interfere with the installation of a pending system update. If this scenario is applicable, you should be able to fix the issue by removing the problematic iTunes entry from the hosts file manually.
- Corrupted OS-related temporary files – Corrupted remnants from a previous attempt at installing the system OS version might interfere with any new attempts at making the leap to Big Sur. In this case, you’ll need to start by cleaning the caches folder before retrying the update.
- Corrupted Software Update Catalog – MacOS Catalina and older versions might suffer from a glitch that affects the Software Update Catalog and ‘convinces’ your system that it doesn’t actually need the pending update. In this case, you will need to clear the software update catalog first before attempting to install the pending update once again.
Now that you are familiar with every potential reason that might cause the error occurred while downloading the updates message pop-up when you attempt to update your macOS to the latest version available, let’s take a look at a couple of fixes that other dealing with the same issue have successfully used:
Check for a Server Issue
Before you go ahead and follow the other methods below to troubleshoot a local issue that’s causing the update failed error, you should start by ensuring that Apple is not currently experiencing issues with their Software Update delivery function.
In the past (when the Big Sur update was officially released), there was a surge of “An error occurred while downloading the updates (Update Failed)” reports as the Software Update component of Apple effectively broke.
If you are encountering this issue due to a server issue, none of the methods below will work in your case, so take the time to investigate if this is true or not.
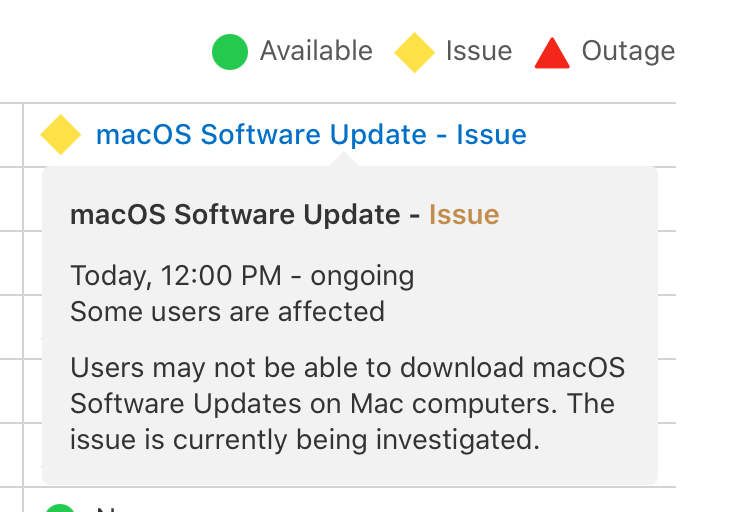
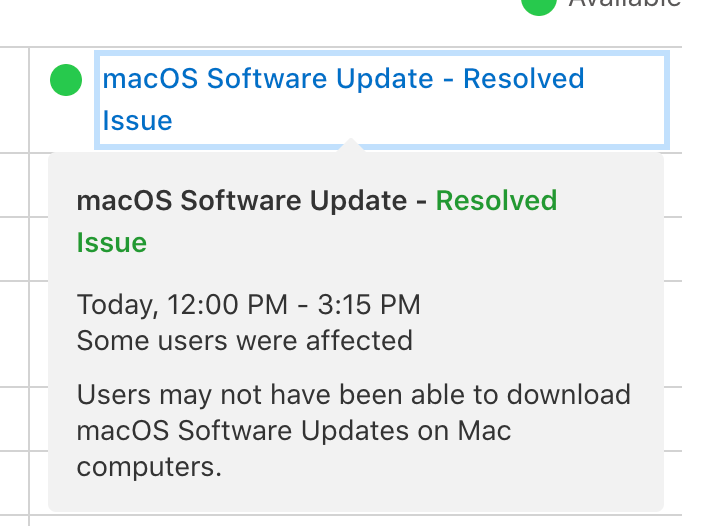
Fortunately, there is an easy way of checking if Apple is currently experiencing issues with the macOS Software update component – Simply access Apple’s System Status page and check if there’s an Issue or Outage revolving around macOS Software Update.
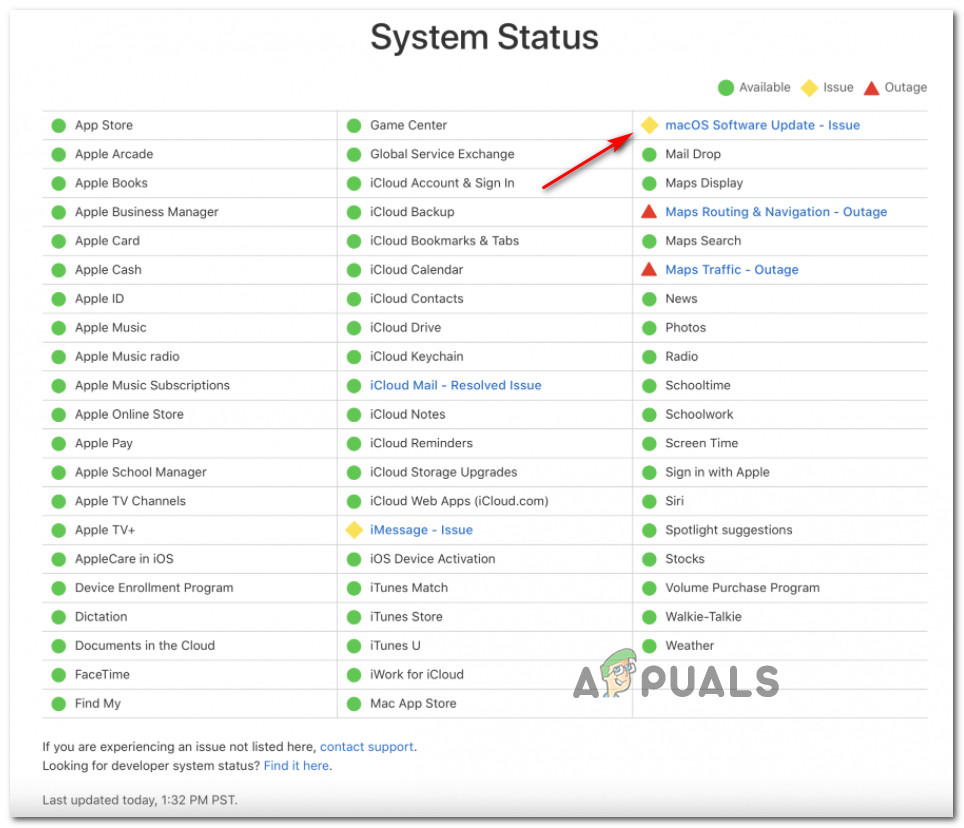
If this investigation has allowed you to discover an underlying server issue, there’s nothing you can really do to fix the problem – All you can do is wait for Apple’s engineers to resolve their server issue.
On the other hand, if the status page is reporting no underlying issues or outages with the macOS Software Update component, you can conclude the problem is not server-related – In this case, start following the next potential fixes below.
Restart or Reset your Router
If you see this error occurring every time you attempt to download the pending system update for macOS, there’s a very big chance you’re dealing with a networking glitch that has affected a lot of Mac users in the past.
In case you are dealing with this problem, you’ll end up seeing the update failed error regardless if you’re performing the update from the System Preferences tab or downloading it from the official download page.
Fortunately, the problem is most likely occurring due to a generic case of badly cached IP / TCP data that is forcing the Apple server to reject the connection due to a security concern.
If this scenario is applicable, you should be able to fix the issue by performing a router restart or reset procedure.
Note: If you can get the issue fixed with a simple router restart, do that instead of resetting your network
Restart your Router
A simple router reboot procedure will achieve the purpose of clearing the currently cached data for Internet Protocol and Transmission Control Protocol data.
To go for a router reboot on your network device, start by identifying the power button (it’s typically located on the back of the device). When you see it, press it once to cut off power.
As soon as power is cut off from the device, go ahead and disconnect the power cable from the power outlet and wait for 1 minute or more before plugging it back in in order to allow the power capacitors enough time to drain themselves.

Once the time period has passed, start your router once again, attempt to install the same update that was previously failing with the ‘An error occurred while downloading the updates (Update Failed)’ error prompt and see if the problem is now fixed.
If the problem is still not fixed, move down to the next potential fix below.
Reset your Router Configuration
If the simple router restart didn’t fix the issue for you, the next logical step is to go for a complete network device reset to ensure that no network-related setting or cached data is currently preventing your macOS system from updating itself.
Important: Prior to resetting your network device, it’s important to understand that this operation will affect your current network setup. Any forwarded ports, blocked items, and any other type of custom settings will be lost once you go through with this procedure. Even more, if you’re using PPPoE, you will need to re-do the credentials before you can restore Internet access.
If you understand the consequences, you can initiate a router reset by locating the reset button on the back of your router.
Note: Typically, this is a built-in button that can only be reached with a sharp object (needle, toothpick, etc.) in order to prevent the accidental process.
Once you manage to locate the reset button, press and hold it for 10 seconds or more or until you notice that the front LEDs all flash at the same time.

After the router is successfully reset, go ahead and re-establish the connection by re-inserting your PPPoE credentials and see if the problem is now fixed.
If you’re still unable to complete the update on your macOS, move down to the next potential fix below.
Get rid of Kernel Extension Software (if applicable)
If you’re seeing the ‘An error occurred while downloading the updates (Update Failed)’ while attempting to install the Big Sur update, one fairly common culprit is 3rd party software that works by installing kernel extensions.
Common culprits in this particular case are software like Parallels, CPU Gadget, and Little Snitch.
If any of the 3rd party software mentioned above is currently installed on your Mac (or a similar tool), the only thing you have to do to bypass the error is to temporarily uninstall them from your macOS in order to ensure that the Big Sur update can be installed with no roadblocks.
If you’re looking for specific instructions on how to do this, follow the steps below:
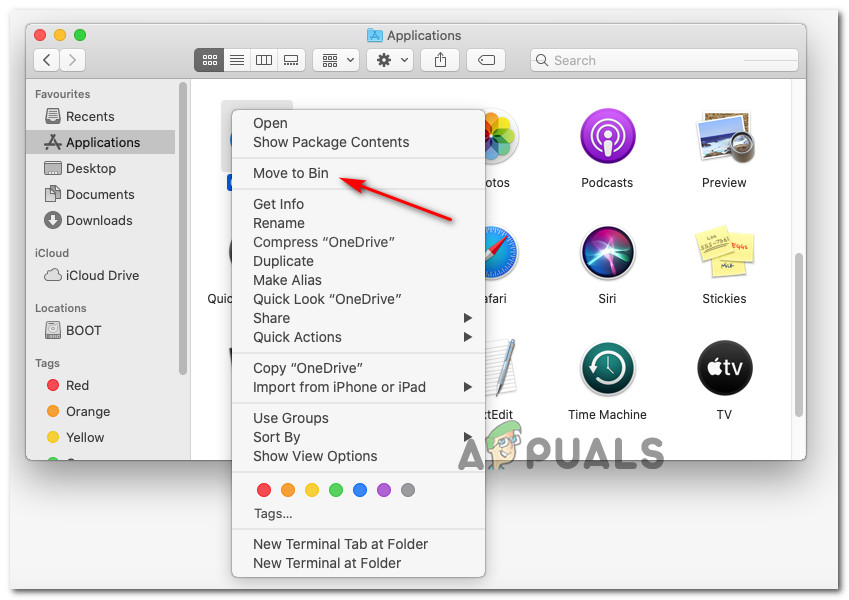
- Open the Finder app from the Launchbar at the bottom of the screen.

Open the Finder app - Once you’re inside the Finder app, access the Applications tab and locate the kernel extension software that you suspect might be conflicting with the Big Sur update.
- After you locate the problematic software, right-click on it and choose Move to Trash (Move to Bin) from the context menu that just appeared.

Uninstalling the problematic macOS application - If you get asked to insert your username and password, do so in order to grant the necessary permissions to uninstall the application.
- Once the uninstallation procedure is complete, reboot your macOS device and wait for the next startup to complete before attempting to install the Big Sur update once again.

If the problem is still not fixed, move down to the next method below.
Reset PRAM & NVRAM Caches
If none of the other fixes above have worked in your case, it’s very likely that you’re dealing with an NVRAM (Non-Volatile Random-Access Memory) or PRAM (Parameter Random-Access Memory) issue that is preventing your system from properly dealing with temporary files.
Info: macOS computers will use NVRAM to store certain settings data that can be accessed quickly, while PRAM is used to store information related to some core components of your MAC.
If you’re indeed dealing with an issue cause by either of these caches (NVRAM or PRAM), you should be able to fix the problem by resetting both the PRAM and NVRAM caches.
If you’re looking for specific step by step instructions on doing this, here’s what you need to do:
- Start by shutting down your MAC conventionally (regular shut down, not hibernation mode).
- After you made sure that your Mac is turned off completely, turn it ON and immediately press and hold on the following keys:
Option + Command + P key + R key
- Keep all keys pressed for over 20 seconds or more.
- When your macOS gives the impression that it’s preparing to restart, DON’T let go of the four keys yet.

Resetting the NVRAM and PRAM caches on macOS - Next, listen for the 2 startup tones. Once you hear the second beep, release all keys at once.
Note: If you’re using a Mac with T2 Security chip implementation, you’ll need to be releasing all 4 keys after the Apple logo disappears for the second time. - Once the next startup is complete, attempt to install the pending update once again and see if the problem is now fixed.

If the problem is still not fixed, move down to the next potential fix below
Remove iTunes entries from the /hosts File
According to some affected users, you can expect to see this particular error code due to a bad /etc/hosts file that is interfering with the updating process.
Most likely, the problematic key that is effectively blocking the update to the Big Sur iteration is 127.0.0.1 osxapps.itunes.apple.com.
Several affected users that were previously dealing with the same kind of issue have confirmed that the problem was resolved once they accessed the /hosts file and removed the problematic entries that we’re interfering within the updating process.
If you’re looking for specific instructions on accessing and modifying the hosts file on macOS, follow the instructions below:
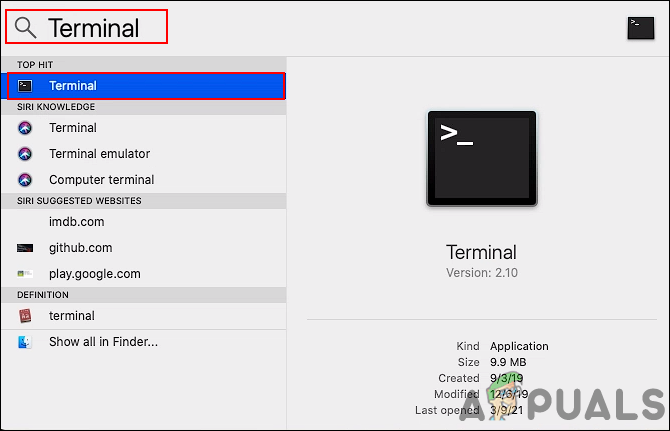
- Use the Launchpad at the bottom of the screen to open the Finder app.
Opening the Finder app - Once you’re inside the Finder, access the Applications tab, then open the Terminal app from the list of available options.

Opening the Terminal app - Once you’re inside the Terminal app, type the following command and press Return (Enter):
sudo nano /etc/hosts.
- When you’re asked to enter the password for your active user account, enter the required information so you’ll be granted access to the hosts file.
- Once the /hosts file is opened, scroll through the Hosts Database and locate the following entry:
127.0.0.1 osxapps.itunes.apple.com.
- Once you see it, simply delete the line from the hosts file to remove it completely and press Control + O to save the changes and ovveride the hosts file with this variant.
- Finally, exit the Nano Editor app and restart both your macOS and your router before attempting to install the pending update once again.

If the problem is still not fixed, move down to the next potential fix below.
Clean the Caches folder of macOS
As it turns out, this particular issue can occur due to a series of corrupted temp files that might reside in the Caches folder. Under certain circumstances, corrupted cache files can interfere with the installation of new pending system updates and cause the Update Failed error.
Several affected users that were also dealing with this problem have managed to fix it by accessing the Library folder and clean the contents of this folder.
Note: This procedure is perfectly safe and will not cause any issues with your macOS installation.
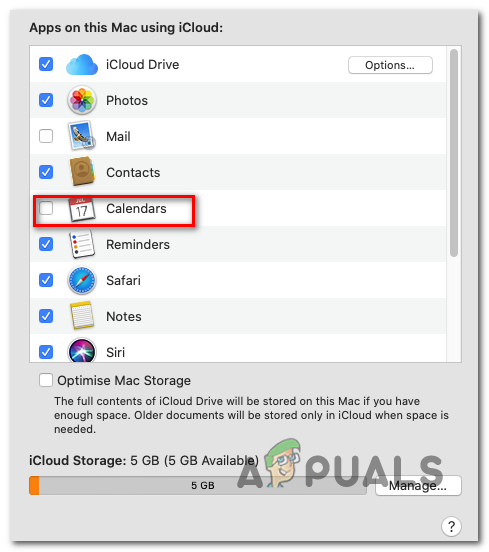
Keep in mind that in order to do that, you will need to start by accessing the System Preferences menu and disable the iCloud integration with Calendar in order to be able to remove the files from the Caches folder.
Important: If you want to ensure that you don’t end up doing any collateral damage, we recommend that you start by doing Time Machine Backup before starting with the steps below.
Once you are ready to get started, begin following the steps below:
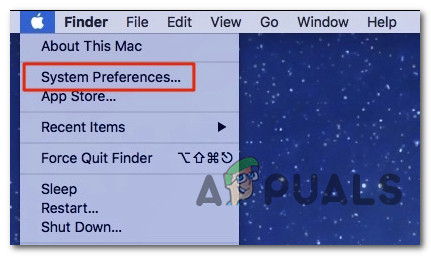
- Use the ribbon at the top to click on the apple icon, then click on System Preferences from the list of available options.

Accessing the System Preferences screen - Inside the System preferences menu, click on the iCloud entry (left-hand section) of the screen.
- Next, from the iCloud settings, move over to the right-hand section, then uncheck the box associated with Calendars.

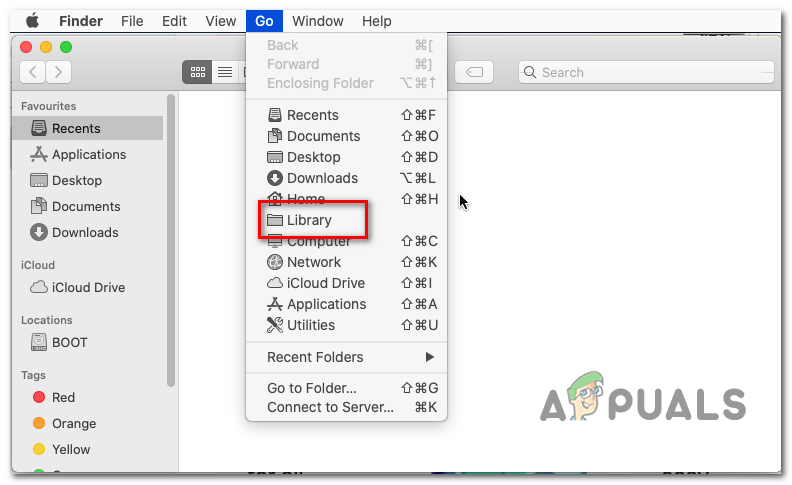
Accessing the Calendar apps - After iCloud calendar sync has been disabled, use the action bar at the bottom to click on your Finder app.
- Once you’re finally inside the Finder app, press and hold on to the Option key, then press the Go entry from the ribbon menu at the top and select Library from the list of available items.

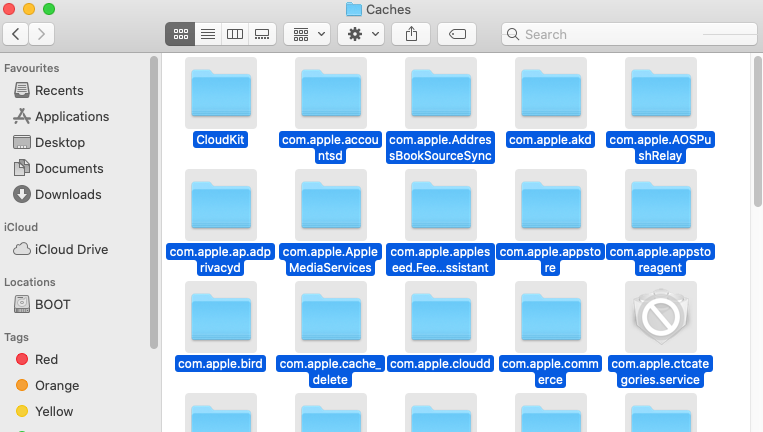
Accessing the Library folder - When you manage to arrive inside the Library folder, start by finding the Caches folder. Double-click on it to select it once you finally see it.
- Once you arrive inside the Caches folder, press CMD + A on your keyboard to select everything, then press CMD + Backspace to delete them (or right-click > Move to Bin).

Deleting everything in the caches folder Note: Keep in mind that the Cache folder will only contain temporary files that various applications installed in your macOS ecosystem use. Deleting them might prompt you to sign in again with some applications, but it won’t break any applications.
- Restart your macOS machine, then attempt to reinstall the pending System update once the next startup is complete to see if the problem is now resolved.
If the same kind of issue is still occurring, move down to the final potential fix below.
Clear the Software Update Catalog
If none of the fixes above have proven to be effective in your case, you should start considering a scenario in which there’s a glitch affecting the Software Update Catalog of your macOS computer.
Several macOS users facing the same kind of issue have confirmed that they were finally able to bypass the ‘An error occurred while downloading the updates (Update Failed)’ error by opening the Terminal app and deploying a command that cleared the Software Update Catalog.
This operation will effectively re-generate the Software catalog and eliminate any type of glitch that is currently causing the error message.
If you find yourself in this particular situation, follow the instructions below to open a Terminal app and clear the software update catalog using a sudo command:
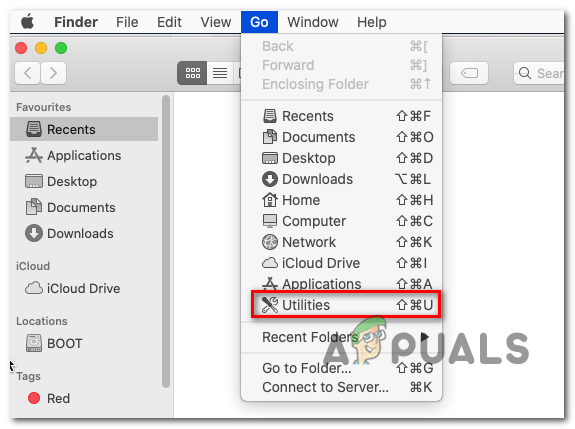
- Start by opening the Finder app using the action bar at the bottom of the screen.
Accessing the Finder app - Once you’re inside the Finder app interface, click on the Go button (using the ribbon bar at the top), then click on Utilities from the newly appeared context menu.

Accessing the Utilities menu - Once you’re inside the Utilities screen, double-click on the Terminal app and insert your account password if asked for it.
- After you’re finally inside the Terminal app, type the following command and press Enter (Return) to effectively clear the Software Update Catalog on macOS:
sudo softwareupdate --clear-catalog
- After the command is processed successfully, reboot your Mac and attempt to install the pending system software once your computer boots back up.

Mar 13, 2021 1:53 PM in response to michael_m40
Hi michael_m40,
We’d be happy to help out with getting your Mac updated.
The error you’re running into is usually related to a network-related problem. Amongst other things, it could just be a temporary hiccup in the connection, or can be an issue with how data is being routed.
Try checking for anything such as firewalls, VPNs, security software or other networking software on your Mac. If you have any of these, try temporarily uninstall/disabling them, and then try again. If possible, you may also try connecting via Ethernet: Connect your Mac to the internet using Ethernet
If you have another strong Wi-Fi connection available to connect to, you may also give that a shot.
Take care!
Mar 14, 2021 5:39 PM in response to mingoslkd
Hi mingoslkd
Thank’s for your answer and help.
Both Firevault and Firewall are turned off in my system settings.
I don’t use any VPN’s on my system that I’m aware of.
My computer is ethernet connected, I only use WiFi when
airdropping from another device.
In my router settings under Security/Firewall, both
IPv4 and IPv6 firewall protections are enabled.
Under VPN Passthrough:
IPSec Passthrough
PPTP Passthrough and
L2TP Passthrough are all checked as enabled.
I’ll try disabling these items on my router and installing the new OS.
Thanks again for your help.
Mar 15, 2021 6:30 AM in response to michael_m40
Suggest — restart Router and then Shutdown Computer and connect via Ethernet connection. Restart computer in Safe Mode — Shift — Key immediately at startup. It does a Repair Disk, clears cache files and load only Apple Software — load slowly — Normal. Once in Open Apple Apps Store and find Big Sur and download. Try not to let computer go to sleep mode or Screen Save to activate. Be patient as one knows it Big Sur is 12.18 GB size. There are often periods where it seems to pause the download , normal be patient as countdown clock may say 15 minutes but in Real Time could be 30 — 45 minutes. This can and will happen several time in the process. If all goes well. it will successfully download and attempt to Launch. Do NOT allow it to start — Quit the Installer. Check Applications Folder for new App called Install Bug Sur. Make a copy to External Drive — future usage. Now, restart again in Safe Mode — then launch the Installer.
Mar 21, 2021 11:54 AM in response to mingoslkd
Hi mingoslkd,
Before making any changes to my router settings, I tried a couple old mac maintenance fixes I hadn’t performed for a while.
I turned off screen saver
Disconnected external drives and all peripheral devices
Zapped PRAM
Shut down computer and unplugged it for a minute
Started back up
Went to system preferences/updates
Double clicked on System Update/Big Sur 11.2.3
This time everything downloaded in a little less than an hour and so far, running with no problem.
Will wonders never cease?
Let me thank you again for your help and kind response to my query.
m
Mar 21, 2021 12:02 PM in response to P. Phillips
Thanks for your response. I was able to finally load the new system after performing some basic apple maintenance operations.
I turned off screen saver
Disconnected external drives and all peripheral devices
Zapped PRAM
Shut down computer and unplugged it for a minute
Started back up
Went to system preferences/updates
Double clicked on System Update/Big Sur 11.2.3
This time everything downloaded in a little less than an hour and so far, running with no problem.
Thanks for your kind offer of help. Greatly appreciated.
m
I was having a problem when trying to install the third macOS Mojave public beta in the System Preferences. When I click the «Update Now» button, a popup comes up saying «Installation failed, An error occurred while installing the selected updates.» And I could not install the update. Does anyone know what the problem is and why I couldn’t install the update? Thanks.
Replies
Go back to the Apple website and re-download the tool to enroll your Mac in the beta program. Fixed it for me right away.
If there is any measure to remove the catch of the newer version of 10.14? I want to redownload it.
I had this issue going from beta 4 to beta 5 and I first had to restore update defaults from the update dialog and then reinstall the beta access utility as mentioned by Shawn-SEA. Then It worked.
Can you explain the steps for «restore update defaults from the update dialog»?
I think what he means is: open preferences and go to Software Update. Once the update window is open, in the left, you can see «This mac is enrolled in the Apple Beta Software Programme» and just below, you’ll see Details… click on it and you’ll have the option of Restore update defaults.
I’ve just done it and it’s working at the moment
Thank you so much, I didn’t know that option was there.
Worked perfectly!
Thank you so much! working for me🙂
Hi there, this process erase my current storage data? thanks in advance
«I cant upgrade from macOS Mojave to macOS Catalina. Unable to install Catalina. ‘An error occurred while installing selected updates’. The network connection was lost.»
Trying to upgrade to Catalina and it says an error occured.»
— From discussions.apple.com
macOS Catalina brings with it some of the really cool features that you can enjoy on your Mac machines. If you are running an old version of macOS, you can get your Mac upgraded from the Mac App Store easily. But this is also the point for many users where they are facing an issue with the update. They get a screen that says «The update has been deleted since being downloaded from the Apple Software Update server. An error occurred while installing selected updates» and the update just fails to install on the machine.

If you are also in the same situation and you are having trouble updating your Mac to the latest Catalina update, you might want to do something about the issue and get it fixed. There are a few fixes that has worked for some users and these are listed in the following guide. You can try and use these on your Mac to see if they also help you fix the update issue on your Mac.
- Part 1. Working Ways to Fix «An error occurred while installing selected updates» (3 Ways)
- Part 2. Other Potential Ways to Fix macOS Catalina Update Install Errors(4 Ways)
- Bonus Tips: The Best Mac Data Recovery Software 2023
Part 1. Working Ways to Fix «An error occurred while installing selected updates»
The 3 ways below are proved to work by users who experienced «An error occurred while installing selected updates» when installing macOS Catalina and finally solved this problem.
- 1. Turn On Content Caching
- 2. Download and Update the Upgrade in Safe Mode
- 3. Install Catalina Using a Bootable Installer
1. Turn On Content Caching
Enabling content caching has also helped some users fix macOS Catalina install or update errors so it is worth giving this method a try.
Step 1. Click on the Apple logo at the top-left corner and select System Preferences.
Step 2. Click on the Sharing option.
Step 3. Tick-mark the Content Caching option on the following screen. Also, select All Content from the Cache dropdown menu.
Try downloading and installing the update on your machine.
2. Download and Update the Upgrade in Safe Mode
When you boot your Mac in safe mode, it only loads the essential files it needs to make your operating system function. If there are any apps or settings that you think could be interfering with your macOS update procedure, safe mode should resolve the issue for you.
Step 1. Click on the Apple logo at the top-left corner and select Restart.
Step 2. While your Mac is being restarted, press and hold down the Shift key on your keyboard.
Step 3. Your Mac should now be in safe mode. Launch the Mac App Store and download and install the Catalina update.
3. Install Catalina Using a Bootable Installer
You can also install macOS Catalina from a USB installer but you will need to first download the update to your Mac.
Step 1. Download the macOS Catalina update from the Mac App Store. Plug-in your USB drive having 16GB or more capacity to your Mac.
Step 2. Download and launch Disk Creator on your Mac. Select your USB drive in the app, choose your Catalina file, and click on Create Installer.
Step 3. Reboot your Mac and press hold down Option. Select your USB installer from the list to install the macOS update.
Part 2. Other Potential Ways to Fix macOS Catalina Update Install Errors
Besides methods listed above, below we list some other potential ways that not only fix «An error occurred while installing selected updates» but also fix many other macOS Catalina download and install errors.
- 1. Force Restart Your Mac
- 2. Switch to a Wired Connection
- 3. Check Your Storage Space
- 4. Remove and Re-donwload Catalina Update again
1. Force Restart Your Mac
When an update fails on your Mac, the first thing you are suggested to do is force reboot your Mac. It reboots your machine even if it is stuck and gives it a fresh start.
Force rebooting a Mac is pretty easy as you do not need to go into any settings menu to be able to do the task. All you need to do is press a keyboard combination and it will get the job done for you.
2. Switch to a Wired Connection
Since your Mac downloads the update from the Internet, you must make sure your wireless connection is working properly. If you have any doubts or there are any issues with your connection, you might want to use a wired connection instead.
A wired connection is usually more stable and lets you update your Mac to the latest version of macOS without any issues. In order to connect your Mac to an Ethernet cable, you are going to need an adapter that works with both your cable as well as your Mac.
Once the cables are all connected, try to download and install the Catalina update. This should fix an error occurred while installing selected updates on your machine.
3. Check Your Storage Space
macOS updates have never been small and macOS Catalina is no exception. Before you even proceed to download the update, you must make sure you have enough storage space available on your Mac to accommodate the update. You are likely going to need at least 10GB of space on your disk to download and install the update on your machine.
If you have not got enough space available on your Mac, find the large files lying around on your disk and get rid of them. This should help make more space available and you can then use it for installing the Catalina update.
4. Remove and Re-donwload Catalina Update again
If you’re having problems downloading and installing Catalina update via Software Update or Mac App Store, you can remove the download and redownload the update again. Moreove, while downloading the macOS update from the Mac App Store is a preferred method for many users, it is not the only method to download the update.
The macOS Catalina, or any other update for that matter, is usually also available on the Apple website for you to download. So if you are experiencing issues downloading the update from the App Store, head over to the Apple website and get the update downloaded.
Once the update is downloaded and saved to your Mac, double-click on the downloaded file and it will start installing the update on your machine.
You may also want to know How Do I Fix macOS Catalina Could Not be Verified?
Bonus Tips: The Best Mac Data Recovery Software 2023
Your files can get lost unexpectedly before, during, or after installing a macOS update. If that happens, there is really no option for you to recover your files unless you have a backup.
Fortunately, there is a software called Tenorshare 4DDiG for Mac Data Recovery that helps you recover your files even when you do not have a backup. The following is how it works.


-
Download and launch the software on your Mac. Select your drive where you lost your files and click on Scan.

-
Preview the scan results, select the files you want to recover, and click on Recover.
-
Select the folder where you want to save the recovered files.
Sum Up
If you are constantly getting the «an error occurred while installing selected updates» while updating to macOS Catalina on your Mac, the above guide will be of tremendous help to you as it teaches how to fix this issue and update the Mac without a hitch.
-
#126
Ugh, this free update that the entire world is trying to download simultaneously isn’t going exactly how I want it to. Also, I’m supposed to wait?!? I wait for no one! When my mother and I were being chased by Congolese Spotted Lions, did I wait for her when she tripped and fell? No! I yelled «It’s your incompetence at running, idiot! That’s why you’re being eaten!» Wait… pssh. Try doing better technology next time, Apple. Where’s the manager?
-
#127
Maybe they pulled the download last minute to fix the messages and facetime icons
-
#128
Of course this has to affect me, too. I wished you could just download the installer like before. I’m actually using it to install on an unsupported mac…
-
#129
Had the same issue. Blamed it on Microsoft updater for the edge browser. My Macbook 16″ was so slow that I had to restore a backup.
damn that’s extreme
-
#130
same here in Germany …

-
#131
Had the same issue. Blamed it on Microsoft updater for the edge browser. My Macbook 16″ was so slow that I had to restore a backup.
Same here on MBP16″. Really, really slow. Restarting didn’t help, so went through recovery and then restarted and that seems to have cured it.
-
#132
I can’t install Big Sur at all. All I get is an error.
Welcome to the club.
-
#133
It installed very quickly on my MacBook Pro 13 2018 running RC2– I bet RC2 is almost identical to the release today.
But my iMac 2020 had the problems described above.
The beta installation experience of Big Sur has been very disappointing. I could not even install it for the first several betas then suddenly it worked around beta 6. Installing RC1 brought lots of trouble — my MacBook entered a reboot loop but I fixed it. And yesterday RC2 gave me the same headache of a reboot loop and the solution for RC1 did not work!!! Took me a few hours to get it sorted out. But this is beta and I get it. Now this for the final release? What is happening to Apple?
-
#134
Just think
iMessage, AppleCard and ApplePay are failing or fell down completely… wow, that’s the big stuff.
Even 3rd party services are having issues, like Zoom. It’s insane!
-
#135
Same issue: «Installation Failed: An error occurred while installing the selected updates.» Tried install from system pref, and link from App Store. This morning it was stuck on downloading, but now I just get this error, no downloading at all
-
#137
Here is how to fix slow down issue.
Press cmd+R when booting, and run disk utility->first aid on your disk.
I did it, it’s work for me.
-
#138
Imagine being lost though… Maps is down as well. That way you’ll never get home to see your Big Sur update fail…
Can’t buy gas because you ditched your physical cards for the future… Now you’re lost and stranded.
-
#139
Based on the server status site, apple is having wider issues
-
#140
Same here on MBP16″. Really, really slow. Restarting didn’t help, so went through recovery and then restarted and that seems to have cured it.
I booted into recovery and ran first aid on the 2 Mac portions. that fixed the slowness and the issue I was having with third party apps not working.
-
#142
Well, we’re off to a good start. I hope this is not the proverbial canary in the coal mine for next week’s launch of the M1 lineup.
-
#143
Can’t buy gas because you ditched your physical cards for the future… Now you’re lost and stranded.
Isn’t it great that we have the «cloud»?… Access everything from everywhere they said. LMAO
-
#144
I was able to install Big Sur on the current Mac mini. Had beta profile on there removed it and it installed a smaller update around 2.5gb bu too go on any of my MacBooks. Thought it was my Macs and have run first aid and a few other fixes but. Feel a little better know it is not my devices. At least my new iPhones are arriving today. Something to be happy about.
-
#145
This has to be it. I am getting «update not found» error in terminal when I run the update:
Code:
REDACTED@REDACTED ~ % sudo softwareupdate --fetch-full-installer --full-installer-version 11.0.1
Password:
Downloading and installing 11.0.1 installer
SUPreferenceManager: Failed to set object of class: __NSCFConstantString for key: LastRecommendedMajorOSBundleIdentifier with error: Error Domain=SUPreferenceManagerErrorDomain Code=1 "(null)"
Install failed with error: Update not found
Did you do this already on Big Sur? If so, it only worked on earlier versions of macOS, from what I read earlier.
-
#146
Don’t worry guys, it’s just Craig setting the mood. 

Last edited: Nov 12, 2020
-
#147
Same here on MBP16″. Really, really slow. Restarting didn’t help, so went through recovery and then restarted and that seems to have cured it.
Glad its not me. All apps were beach balling. What really ticks me off is that it downloaded the full update then everything slowed down just so it could fail. Then the entire computer was slow. At least I know CCC works so I will be purchasing it when my trail is up just waiting to see if they have any black Friday deals on the license.
-
#148
Well, glad to know I am not the only one having an issue. I thought my poor mac was screwed up after that botched install attempt.
-
#149
For those who’s install failed and are having issues running slow / faulty 3rd party programs:
Had the same problem, it’s back to normal after doing the following:
1. Obviously, shutdown and run a quick: command + option + p + r after the apple shows up hold until it disappears and reappears.
2. Reset SMC on a Mac with the T2 chip:
- Shut down your Mac
- Press and hold Shift + Ctrl + Option for about 7 seconds (make sure the cable is plugged in)
- While holding the keys, press and hold the power button for another 7 seconds
- Restart your computer.
3. Finally, reset SMC on a desktop computer with the T2 chip:
- Shut down your computer
- Unplug the power cord, wait for about 15 seconds, and plug it back in
- Wait a few seconds and restart the computer.
I’m pretty sure the T2 chip was my issue. Best of luck.
-
#150
Started at 1:30 and got through 2.5 GB before it quit. I tried deleting the files from «/Library/Updates/» and using my hotspot to download, but all I get is the «Installation Failed» alert.
Question
Issue: MacOs Big Sur error “An error occurred while installing the selected updates” – how to fix?
Hi, I have been impatiently waiting for the release of Big Sur for my Mac, and I am now greatly disappointed, as I cannot upgrade my OS version. When trying to launch the update, I receive the “Installation failed. An error occurred while installing the selected updates” message. Any tips to fix this issue?
Solved Answer
Today, Apple launched its seventeenth version of macOS – Big Sur (11.0), a successor to the widely popular Catalina (10.15). First announced by Apple in June 2020, the release date was set to November 12, and many users were waiting for the launch. The new version is meant to bring in many changes to the operating system, including the major update to the user interface (UI), support for Apple-designed ARM64-based processors, improvements to system security, and much more.[1]
Considering that Catalina was still causing users issues despite being patched several times (HP printer issues, internet connection disruptions, Accountsd high CPU usage, etc.), many users were hoping that Big Sur will be a success, with a lot of improvements. However, it seems like even the launch is not working as intended – many users complained about extremely slow download speeds when it comes to the update file. The slow download speeds for thousands of users are just the begging of problems for Apple’s newest iteration.
Apple’s community forums and other IT boards were flooded with user reports about the “An error occurred while installing the selected updates” error when trying to download Big Sur. The issue seems to occur more often when users attempt to download it via the update launcher rather than the Mac App Store.
In addition to that, many of Apple’s services, such as Maps Traffic, iCloud Mail, iMessage, and others, were also down, as most users struggled to connect to these. The tech giant rushed to fix “An error occurred while installing the selected updates” errors that users have been getting, along with renewing the operation of its services and the Apple’s Developer site. Unfortunately, even after several hours of the launch, users are still struggling with the same issues.
 MacOs Big Sur error «An error occurred while installing the selected updates» — how to fix?
To make matters worse, even those who decided to postpone the Big Sure installation to a later date could also be affected. Namely, systems running Catalina could also be affected by the launch. Many users on Twitter reported a slow computer and application operation.[2]
Today we will attempt to provide ways to fix “An error occurred while installing the selected updates” error along with other issues that you might be suffering from. Before you proceed, we highly recommend scanning the system with ReimageMac Washing Machine X9, as the slow download speed could be a result of too much clutter on your Mac.
Fix 1. Download Big Sur update directly from Apple Store
Fix it now!
Fix it now!
To repair damaged system, you have to purchase the licensed version of Mac Washing Machine X9 Mac Washing Machine X9.
Most users tend to download the newest updates via the update launcher on their Macs. Unfortunately, this way does not always work, and it seems like Big Sur download succeeded to those that downloaded it from the Apple Store instead of the launcher.
Therefore, head to the official Apple’s website, and attempt to download the update from there.
 Download from App Store
Fix 2. Reboot your system
Fix it now!
Fix it now!
To repair damaged system, you have to purchase the licensed version of Mac Washing Machine X9 Mac Washing Machine X9.
macOS Big Sur is 12GB large, which means that it could take a while to download for some users, especially those that do not have speedy internet. However, even those with fast internet seeds claimed that it took them over 12 hours to download the update fully.
Thus, if an error “Installation failed. An error occurred while installing the selected updates” shows up during that time, it can be extremely frustrating, especially after waiting for hours. Some users claimed that simply rebooting their machines helped them to avoid being interrupted by the annoying error.
 Reboot your Mac
Fix 3. Repair the Drive
Fix it now!
Fix it now!
To repair damaged system, you have to purchase the licensed version of Mac Washing Machine X9 Mac Washing Machine X9.
While this solution might not help everybody, it is worth a try.
- Restart your Mac
- Right after that, press and hold Command + R keys on your keyboard
- Once Disk Utility menu shows up, select Disk Utility and click Continue
- Pick the Macintosh HD drive from the list
- Click on First Aid, and then follow up with Done as soon as it becomes available
- Quit Disk Utility and restart your Mac.
Fix 4. Free up some space
Fix it now!
Fix it now!
To repair damaged system, you have to purchase the licensed version of Mac Washing Machine X9 Mac Washing Machine X9.
As previously mentioned, too little space on your hard drive could result in the inability to install Big Sur, hence the “An error occurred while installing the selected updates” issue. According to some users who were eligible to try the new version of macOS in Beta, they were facing space issues when trying to install it.
Many macOS systems, especially older ones, have limited space, and many users import many files. Besides, certain invisible files could be causing low space issue – Time Machine is known to take up space that is not initially shown. While you could disable Time Machine to free up some space, it is not recommended – you should rather take up some tips we provide in the How to free up Disk space on Mac OS? article. Also, using an automatic tool such as ReimageMac Washing Machine X9 could spare a lot of time for you.
 Clean your hard drive
Fix 5. Wait
Fix it now!
Fix it now!
To repair damaged system, you have to purchase the licensed version of Mac Washing Machine X9 Mac Washing Machine X9.
Since the issue is universal and millions of people are trying to download Big Sur simultaneously, the problem highly lies within Apple servers itself. Therefore, the tech team needs to sort out the issues in order to allow all the users to update the operating system smoothly.
In the meantime, if none of the above helped you fix “An error occurred while installing the selected updates” error and you are experiencing lag on Catalina, proceed with the next solution.
If your machine can’t run 3rd party apps (or they run very slowly)
Fix it now!
Fix it now!
To repair damaged system, you have to purchase the licensed version of Mac Washing Machine X9 Mac Washing Machine X9.
Mac and iOS developer Jeff Johnson[3] claimed that issues regarding the slow startup of third-party applications are related to a failed connection to ocsp.apple.com. Thus, in order to stop your computer from connecting to the server, you should download and install Little Snitch and deny the TCP connection to it (using the trustd feature).
Alternatively, you could simply turn off your internet connection, this would also stop the performance issues.
 Deny ocsp.apple.com connection
Repair your Errors automatically
ugetfix.com team is trying to do its best to help users find the best solutions for eliminating their errors. If you don’t want to struggle with manual repair techniques, please use the automatic software. All recommended products have been tested and approved by our professionals. Tools that you can use to fix your error are listed bellow:
do it now!
Download Fix
Happiness
Guarantee
Compatible with Microsoft Windows
Compatible with OS X
Still having problems?
If you failed to fix your error using , reach our support team for help. Please, let us know all details that you think we should know about your problem.
— a patented specialized Windows repair program. It will diagnose your damaged PC. It will scan all System Files, DLLs and Registry Keys that have been damaged by security threats. — a patented specialized Mac OS X repair program. It will diagnose your damaged computer. It will scan all System Files and Registry Keys that have been damaged by security threats.
This patented repair process uses a database of 25 million components that can replace any damaged or missing file on user’s computer.
To repair damaged system, you have to purchase the licensed version of malware removal tool.

A VPN is crucial when it comes to user privacy. Online trackers such as cookies can not only be used by social media platforms and other websites but also your Internet Service Provider and the government. Even if you apply the most secure settings via your web browser, you can still be tracked via apps that are connected to the internet. Besides, privacy-focused browsers like Tor is are not an optimal choice due to diminished connection speeds. The best solution for your ultimate privacy is Private Internet Access – be anonymous and secure online.
Data recovery software is one of the options that could help you recover your files. Once you delete a file, it does not vanish into thin air – it remains on your system as long as no new data is written on top of it. Data Recovery Pro is recovery software that searchers for working copies of deleted files within your hard drive. By using the tool, you can prevent loss of valuable documents, school work, personal pictures, and other crucial files.