- Обязательно представиться на русском языке кириллицей (заполнить поле «Имя»).
- Фиктивные имена мы не приветствуем. Ивановых и Пупкиных здесь уже достаточно.
- Не писать свой вопрос в первую попавшуюся тему — вместо этого создать новую тему.
- За поиск и предложение пиратского ПО и средств взлома — бан без предупреждения.
- Рекламу и частные объявления «куплю/продам/есть халтура» мы не размещаем ни на каких условиях.
- Перед тем как что-то написать — читать здесь и здесь.
-
ZETs
- здесь недавно

- Сообщения: 36
- Зарегистрирован: 14 июл 2020, 04:29
- Имя: Евгений
- Страна: Россия
- город/регион: Чита
- Благодарил (а): 9 раз

Не могу залить проект в HMI
Сообщение
ZETs » 19 фев 2022, 13:47
Здравствуйте!
Проект был написан на TiaPortal v14 (S7-1200 и HMI TP900 Comfort) все работало прекрасно.
Проект обновили до TiaPortal v16
В S7-1200 всё залилось и поехало как надо.
С панелью возникли проблемы, сперва TiaPortal v16 ругался на таргет при загрузке софта и не активны поля загрузки хардваре в девайс.
В нете нарыл инфу что через ProSave надо обновить OS панели.
Обновил версию панели без особых проблем в TiaPortal v16 так и не активны поля загрузки хардваре в девайс.
При загрузке софта выдает 3 ошибки и пишет:
1. adaptation of target device failed
2. download has failed due to missing panel image. please install the missing panel images.
3. error downloading to module hmi_rt_1
перевод:
1. сбой адаптации целевого устройства
2. загрузка не удалась из-за отсутствия изображения панели. пожалуйста, установите недостающие изображения панелей.
3. ошибка загрузки в модуль hmi_rt_1
Подскажите пожалуйста с чем это связано?
Как решить данную проблему?
-
POV
- специалист
- Сообщения: 643
- Зарегистрирован: 12 авг 2008, 11:05
- Имя: Патрушев Олег Валерьевич
- Страна: Россия
- город/регион: г. Н.Новгород
- Благодарил (а): 69 раз
- Поблагодарили: 123 раза

Не могу залить проект в HMI
Сообщение
POV » 19 фев 2022, 15:01
Портал и сам неплохо загружает образы в панель, ProSave особо и не нужен для этого. Но в 16 версии образы лежат на отдельном ДВД (2 или 3) из комплекта, посмотрите сами. Их надо поставить, там и сетап лежит. Или можно загрузить с интернета через Update.
Вы поменяли в проекте версию используемой панели? Это делается вручную после апгрейда v14 ![]() v16.
v16.
Портал при загрузке смотрит на версию в проекте, затем на устройстве, если не равны, то следует или апгрейд или даунгрейд до нужной.
Перевод у вас не очень Image это не изображение, это именно образ панели.
-
v0v
- не первый раз у нас
- Сообщения: 319
- Зарегистрирован: 12 дек 2018, 14:47
- Имя: Влад
- Благодарил (а): 1 раз
- Поблагодарили: 41 раз

Не могу залить проект в HMI
Сообщение
v0v » 19 фев 2022, 16:26
Могу добавить что очень часто проблемы возникают с языками и даже, наверное, зависит от системы windows (рус, англ. и т.д.)То есть если в проекте используются несколько языков обратите внимание на это.
-
ZETs
- здесь недавно
- Сообщения: 36
- Зарегистрирован: 14 июл 2020, 04:29
- Имя: Евгений
- Страна: Россия
- город/регион: Чита
- Благодарил (а): 9 раз
Не могу залить проект в HMI
Сообщение
ZETs » 19 фев 2022, 20:04
POV писал(а): ↑19 фев 2022, 15:01
Вы поменяли в проекте версию используемой панели? Это делается вручную после апгрейда v14v16.
Да сперва сделали апгрейд v14 ![]() v16. а потом в ручную заменил версию панели.
v16. а потом в ручную заменил версию панели.
При этом онлайн проект с панелью связывается (зеленый шар) и даже не показывает что различия в софте.
v0v писал(а): ↑19 фев 2022, 16:26
То есть если в проекте используются несколько языков обратите внимание на это.
Гляну
-
POV
- специалист
- Сообщения: 643
- Зарегистрирован: 12 авг 2008, 11:05
- Имя: Патрушев Олег Валерьевич
- Страна: Россия
- город/регион: г. Н.Новгород
- Благодарил (а): 69 раз
- Поблагодарили: 123 раза
Не могу залить проект в HMI
Сообщение
POV » 19 фев 2022, 21:15
ZETs писал(а): ↑19 фев 2022, 20:04
При этом онлайн проект с панелью связывается (зеленый шар) и даже не показывает что различия в софте.
А портал научился верифицировать панели? Что показывает этот зеленый шар? Может то, что панель с таким адресом просто есть?
Я посмотрю, как будет реальная панель или прошу тут отписаться людей, которые точно проверяли это.
То есть грузим панель, меняем что-то в проекте, переходим онлайн и имеем не зеленый шар. Грузим снова и тогда зеленый?
Если это так, может кто знает с какой версии это работает.
ZETs писал(а): ↑19 фев 2022, 20:04
Да сперва сделали апгрейд v14 v16. а потом в ручную заменил версию панели.
Ок, а что с образами? Можно конечно prosave закатать именно ваш образ, но его все равно брать с диска или из интернета.
Кстати какой версии сейчас панель — там в настройках можно посмотреть номер вида 16.0.0.5 и что у вас в проекте?
-
ZETs
- здесь недавно
- Сообщения: 36
- Зарегистрирован: 14 июл 2020, 04:29
- Имя: Евгений
- Страна: Россия
- город/регион: Чита
- Благодарил (а): 9 раз
Не могу залить проект в HMI
Сообщение
ZETs » 20 фев 2022, 09:31
POV писал(а): ↑19 фев 2022, 21:15
А портал научился верифицировать панели? Что показывает этот зеленый шар? Может то, что панель с таким адресом просто есть?
Грузим снова и тогда зеленый?
Если панели идентичны но имеются отличия (софта конфигурации) в онлайн режиме шарик не зелёный.
А тут в панели ничего нет а TiaPortal говорит все хорошо.
POV писал(а): ↑19 фев 2022, 21:15
Кстати какой версии сейчас панель — там в настройках можно посмотреть номер вида 16.0.0.5 и что у вас в проекте?
Сейчас не на работе на вскидку панель версии 16.0.0.0. TiaPortal отрезает все что после 4-й точки
ProSave показывает версию по длинней 16.0.0.0.(015) в скобках точно не помню
-
ZETs
- здесь недавно
- Сообщения: 36
- Зарегистрирован: 14 июл 2020, 04:29
- Имя: Евгений
- Страна: Россия
- город/регион: Чита
- Благодарил (а): 9 раз
Не могу залить проект в HMI
Сообщение
ZETs » 20 фев 2022, 11:56
Можно конечно prosave закатать именно ваш образ, но его все равно брать с диска или из интернета.
[/quote]
Образ с панели не снимали так как есть проект… или возможно с проекта создать образ и залить через prosave?
-
POV
- специалист
- Сообщения: 643
- Зарегистрирован: 12 авг 2008, 11:05
- Имя: Патрушев Олег Валерьевич
- Страна: Россия
- город/регион: г. Н.Новгород
- Благодарил (а): 69 раз
- Поблагодарили: 123 раза
Не могу залить проект в HMI
Сообщение
POV » 20 фев 2022, 16:11
Файл образа .img это не бакап в виде образа. Это совершенно разные образы.
Обсуждаемый тут образ .img это, если хотите, системная прошивка.
Сначала в панель заливается она (не надо, если с завода нужная версия). Это один раз до смены версии.
Потом туда устанавливается Runtime. Это тоже один раз, потом при необходимости будет добавлять компоненты.
Потом уже ваш проект — это всего 1-3 файла. Вот это будет менять по мере того, как вы вносите изменения.
Бакап содержит в себе все.
Вот образы https://support.industry.siemens.com/cs … 0&lc=en-RU
-
ZETs
- здесь недавно
- Сообщения: 36
- Зарегистрирован: 14 июл 2020, 04:29
- Имя: Евгений
- Страна: Россия
- город/регион: Чита
- Благодарил (а): 9 раз
Не могу залить проект в HMI
Сообщение
ZETs » 20 фев 2022, 17:30
POV писал(а): ↑20 фев 2022, 16:11
Файл образа .img это не бакап в виде образа. Это совершенно разные образы.
Обсуждаемый тут образ .img это, если хотите, системная прошивка.
Сначала в панель заливается она (не надо, если с завода нужная версия). Это один раз до смены версии.
Потом туда устанавливается Runtime. Это тоже один раз, потом при необходимости будет добавлять компоненты.
Потом уже ваш проект — это всего 1-3 файла. Вот это будет менять по мере того, как вы вносите изменения.
Бакап содержит в себе все.
Вот образы https://support.industry.siemens.com/cs … 0&lc=en-RU
Спасибо.
Я от туда прошивки и брал.
После апгрейда v14 ![]() v16 проекта он перестал грузиться в панель.
v16 проекта он перестал грузиться в панель.
Шерстил форумы… решил сменить прошивку панели (в поекте версии тоже менял), но это не помогло.
Панель коннектится но проект в неё не грузится…..
-
v0v
- не первый раз у нас
- Сообщения: 319
- Зарегистрирован: 12 дек 2018, 14:47
- Имя: Влад
- Благодарил (а): 1 раз
- Поблагодарили: 41 раз
Не могу залить проект в HMI
Сообщение
v0v » 20 фев 2022, 18:43
ZETs писал(а): ↑19 фев 2022, 13:47
Проект был написан на TiaPortal v14 (S7-1200 и HMI TP900 Comfort) все работало прекрасно.
Хотелось бы узнать Вы пробовали загружать этот же проект на этом же PC v14 в панель или только после конвертации.
-
POV
- специалист
- Сообщения: 643
- Зарегистрирован: 12 авг 2008, 11:05
- Имя: Патрушев Олег Валерьевич
- Страна: Россия
- город/регион: г. Н.Новгород
- Благодарил (а): 69 раз
- Поблагодарили: 123 раза
Не могу залить проект в HMI
Сообщение
POV » 20 фев 2022, 19:16
ZETs писал(а): ↑20 фев 2022, 17:30
Я от туда прошивки и брал.
Ошибки 1 и 2 из первого сообщения говорят об обратном. Образов или нет вообще или портал их не видит.
Ошибка 3 уже следующий шаг — естественно облом, так как 1 и 2 не исполнены.
-
ZETs
- здесь недавно
- Сообщения: 36
- Зарегистрирован: 14 июл 2020, 04:29
- Имя: Евгений
- Страна: Россия
- город/регион: Чита
- Благодарил (а): 9 раз
Не могу залить проект в HMI
Сообщение
ZETs » 21 фев 2022, 06:30
Всем спасибо что подсказали как и что делать.
Я понимал что где-то туплю, но не знал где.
Установил WinCC image на комп и все поехало )))
-
LexSL
- осмотрелся
- Сообщения: 176
- Зарегистрирован: 16 дек 2011, 15:13
- Имя: Алексей
- Страна: Россия
- Благодарил (а): 39 раз
- Поблагодарили: 39 раз

Не могу залить проект в HMI
Сообщение
LexSL » 22 фев 2022, 07:13
stesl писал(а): ↑22 фев 2022, 03:28
Что это такое? Образы панелей для WinCC?
Нет, это не образ WinCE для панели, это Runtime, обычно на отдельном DVD. Если на панели с завода установлен Runtime, например, версии 14.х.х, а в проекте заложена панель с версией 16.хх.х, то TIA Portal при загрузке обновляет Runtime и заливает проект.
-
POV
- специалист
- Сообщения: 643
- Зарегистрирован: 12 авг 2008, 11:05
- Имя: Патрушев Олег Валерьевич
- Страна: Россия
- город/регион: г. Н.Новгород
- Благодарил (а): 69 раз
- Поблагодарили: 123 раза
Не могу залить проект в HMI
Сообщение
POV » 22 фев 2022, 08:28
LexSL писал(а): ↑22 фев 2022, 07:13
Нет, это не образ WinCE для панели, это Runtime, обычно на отдельном DVD. Если на панели с завода установлен Runtime, например, версии 14.х.х, а в проекте заложена панель с версией 16.хх.х, то TIA Portal при загрузке обновляет Runtime и заливает проект.
Это именно образ системы без Runtime. Не вводите людей в заблуждение. Можно prosave залить такой образ в панель и там будет система без runtime. Портал добавит (проинсталлирует) Runtime нужной версии в панель на следующем шаге после заливки образа. Это отлично видно при чтении логов загрузки.
-
chernsergey
- здесь недавно
- Сообщения: 35
- Зарегистрирован: 21 июл 2021, 14:39
- Имя: Сергей
- Страна: Россия
- город/регион: Тула
- Благодарил (а): 1 раз
Не могу залить проект в HMI
Сообщение
chernsergey » 28 фев 2022, 22:02
Подскажите, в случае когда создают кнопку пуск,например насоса, на панели оператора ,ее подвязывают к какому- нибудь физическому битовому входу на контроллере ? Или она подвязывается другим путем ?
-
stesl
- авторитет
- Сообщения: 871
- Зарегистрирован: 31 мар 2018, 12:05
- Имя: Вячеслав
- Благодарил (а): 79 раз
- Поблагодарили: 101 раз

Не могу залить проект в HMI
Сообщение
stesl » 02 мар 2022, 04:07
chernsergey писал(а): ↑28 фев 2022, 22:02
ее подвязывают к какому- нибудь физическому битовому входу на контроллере ?
Для того чтобы понимать нелепость вопроса, нужно знать принцип работы ОС ПЛК. Как Вы будете менять значение входа с какого то HMI интерфейса, если в каждом цикле считывается его реальное состояние?
Обычно используется бит в М области.
-
chernsergey
- здесь недавно
- Сообщения: 35
- Зарегистрирован: 21 июл 2021, 14:39
- Имя: Сергей
- Страна: Россия
- город/регион: Тула
- Благодарил (а): 1 раз
Не могу залить проект в HMI
Сообщение
chernsergey » 02 мар 2022, 17:50
stesl писал(а): ↑02 мар 2022, 04:07
chernsergey писал(а): ↑28 фев 2022, 22:02
ее подвязывают к какому- нибудь физическому битовому входу на контроллере ?Для того чтобы понимать нелепость вопроса, нужно знать принцип работы ОС ПЛК. Как Вы будете менять значение входа с какого то HMI интерфейса, если в каждом цикле считывается его реальное состояние?
Обычно используется бит в М области.
вопрос обычный ,ответ нашел без вас, по существу ответили только в последнем предложении 4 словами.
-
stesl
- авторитет
- Сообщения: 871
- Зарегистрирован: 31 мар 2018, 12:05
- Имя: Вячеслав
- Благодарил (а): 79 раз
- Поблагодарили: 101 раз
Не могу залить проект в HMI
Сообщение
stesl » 03 мар 2022, 09:08
chernsergey писал(а): ↑02 мар 2022, 17:50
по существу ответили
А то что не по существу — это Вам толчок к совершенствованию  Чтобы след остался, что идея работать с областями входов из HMI в АСУТП — заранее обречена на провал.
Вернуться в «Simatic TIA Portal»
Перейти
- Работа форума
- База знаний (Knowledge Exchange)
- ↳ Eplan Electric P8
- ↳ Общий F.A.Q.
- ↳ Общие вопросы
- ↳ Новости
- ↳ Ошибки
- ↳ Проект
- ↳ Изделия
- ↳ Устройства
- ↳ Соединения
- ↳ Кабели
- ↳ Клеммы
- ↳ ПЛК
- ↳ Компоновка 2D
- ↳ Макросы
- ↳ Eplan API
- ↳ Сценарии (Только готовые решения)
- ↳ Внешняя обработка
- ↳ ProPanel
- ↳ Инструкции ProPanel (Только готовые решения)
- ↳ Прочие направления Eplan
- ↳ FieldSys (Топология)
- ↳ Preplanning
- ↳ Harness proD
- ↳ EEC One
- ↳ Advantech
- ↳ F.A.Q., Инструкции
- ↳ Allen Bradley
- ↳ Общие вопросы
- ↳ ПЛК
- ↳ Операторские панели
- ↳ B&R Automation
- ↳ F.A.Q.
- ↳ Danfoss
- ↳ DEIF A/S
- ↳ Общие вопросы
- ↳ UNI-LINE
- ↳ MULTI-LINE
- ↳ MULTI-LINE 300
- ↳ Emerson
- ↳ Общие вопросы
- ↳ КИП и регуляторы
- ↳ DeltaV
- ↳ ОВЕН
- ↳ Прософт-Системы
- ↳ Общие вопросы
- ↳ ПЛК REGUL
- ↳ Schneider Electric
- ↳ Общие вопросы
- ↳ ПЛК
- ↳ Панели оператора
- ↳ SCADA
- ↳ Электротехника
- ↳ Приводная техника
- ↳ SIEMENS
- ↳ Общие вопросы
- ↳ LOGO!
- ↳ ПЛК SIMATIC (S7-200, S7-1200, S7-300, S7-400, S7-1500, ET200)
- ↳ Simatic Step7
- ↳ Simatic TIA Portal
- ↳ Simatic PCS 7
- ↳ Операторские панели
- ↳ WinCC
- ↳ Приводная техника (Sinamics, Micromaster, Masterdrive, Simoreg, Simotics)
- ↳ SmartGen
- ↳ Общие вопросы
- ↳ Промышленные (береговые) контроллеры
- ↳ Морские контроллеры и устройства
- ↳ WEINTEK (операторские панели)
- ↳ F.A.Q., Инструкции
- ↳ Архив
- ↳ Микроконтроллеры и электроника
- ↳ Arduino
- ↳ Другие микроконтроллеры
- ↳ Электроника
- Общие вопросы АСУТП
- ↳ Общие вопросы
- ↳ Вопросы от студентов
- ↳ Литература
- ↳ Новости и отчётность
- ↳ Нормативы, ГОСТы, стандарты
- ↳ Информационная безопасность
- ↳ Проектирование и САПР
- ↳ Системная интеграция
- ↳ Разбор полетов
- ↳ Работа
- ↳ Заготовки для базы знаний
- ↳ Производство и технология
- ↳ MES — Системы автоматизации управления производством
- ↳ Метрология, КИП и датчики
- ↳ Исполнительные устройства, регуляторы
- ↳ Средний уровень автоматизации (управляющий)
- ↳ Алгоритмы
- ↳ Операторские панели
- ↳ Верхний уровень автоматизации (отображение)
- ↳ GE iFix
- ↳ Wonderware Intouch
- ↳ MasterScada
- ↳ SCADA+
- ↳ Alpha.Platform
- ↳ Интерфейсы, протоколы, связь
- ↳ Радиосвязь
- ↳ Полезное ПО
- ↳ Электротехника, энергетика и электропривод
- ↳ Генераторы и электростанции
- ↳ Теплотехника
- ↳ Подбор аналогов
- F.A.Q. (краткая выжимка из некоторых сообщений форума)
- ↳ Электротехника и электроэнергетика
- ↳ Документация
- ↳ Общие вопросы
- ↳ Оформление документации
- ↳ Нижний уровень автоматизации
- ↳ Средний уровень автоматизации
- ↳ Верхний уровень автоматизации
- ↳ Интерфейсы, протоколы, связь
- ↳ Функциональная и промышленная безопасность
- ↳ Электротехника и энергетика
- ↳ Автоматизация предприятия
- ↳ Описания средств автоматизации
- ↳ F.A.Q. по программируемым логическим контроллерам (PLC)
- ↳ Обсуждение F.A.Q. по PLC
- ↳ F.A.Q. по выбору PLC
- ↳ F.A.Q. по аппаратной части PLC
- ↳ F.A.Q. по языкам программирования
- ↳ F.A.Q. по структуре программ
- ↳ F.A.Q. по взаимодействию PLC с HMI
- О жизни
- ↳ Для дома, для семьи
- ↳ Комната смеха
- ↳ Электродвижение
 Довольно распространённая проблема среди пользователей операционной системы Windows любых версий – ошибка msi при установке программ из файла с расширением .msi. В этой статье я опишу часто встречаемые проблемы с установщиком Windows 7/10/XP и варианты их решения, а также сделаю видео по текущему вопросу.
Файлы с расширением .msi это обычные пакеты установки (дистрибутивы) из которых ставится программа. В отличии от обычных «setup.exe», для запуска файла msi система использует службу Windows Installer (процесс msiexec.exe). Говоря простыми словами, установщик Windows разархивирует и запускает файлы из дистрибутива. Когда Windows Installer не работает, то появляются различные ошибки.
Вообще, меня это жутко бесит, т.к. после глупого сообщения об ошибке совсем непонятно что делать дальше. Microsoft специально разработали установщик Windows Installer для расширения возможностей установки программ (в основном это касается системных администраторов), но не позаботились должным образом о безглючной работе этой службы или хотя бы об адекватных сообщениях о проблемах. А нам теперь это разгребать 🙂
Неполадки могут быть с работой самой службы или могут возникать в процессе установки программ, когда всё настроено, в принципе, правильно. В первом случае нужно ковырять службу установщика, а во втором решать проблему с конкретным файлом. Рассмотрим оба варианта, но сначала второй.
Ошибки msi файлов
Очень часто ошибки появляются из-за недостаточных прав системы на файлы или папки. Нельзя сказать, что Windows Installer не работает, в этом случае достаточно просто добавить нужные права и всё заработает. Буквально вчера я столкнулся с тем, что скаченный дистрибутив .msi не захотел устанавливаться, при этом успешно запускается мастер установки, выбираются параметры, но затем система думает несколько секунд и выдаёт ошибку:
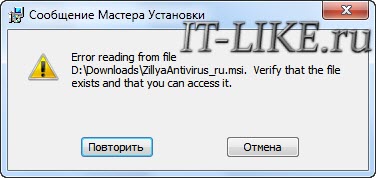
«Error reading from file «имя файла» verify that the file exists and that you can access it» (Error 1305). Переводится «Ошибка чтения из файла … проверьте существует ли файл и имеете ли вы к нему доступ». Ну не тупняк ли? Естественно, что кнопка «Повторить» не помогает, а отмена прекращает всю установку. Сообщение особой смысловой нагрузки также не несёт, т.к. файл точно существует и я имею к нему доступ, иначе бы просто не смог его запустить и получить это сообщение, к тому же почему-то на английском языке 🙂
А ошибка в том, что не Я должен иметь доступ к файлу, а установщик Windows, точнее сама Система. Решается очень просто:
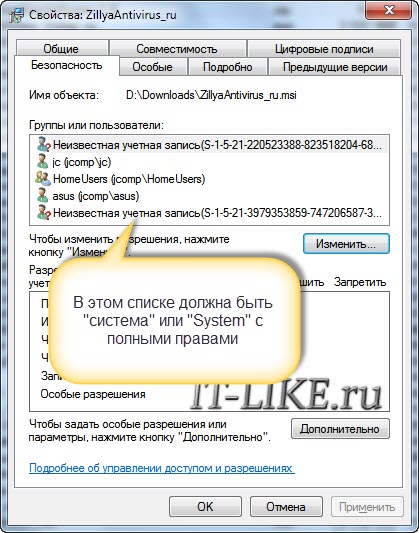
- Кликаем правой кнопкой по файлу с расширением .msi, выбираем «Свойства»
- На вкладке «Безопасность» смотрим, есть ли в списке пользователь с именем «система» или «System»

- Скорее всего вы такого не увидите. Поэтому будем добавлять вручную. Нажимаем кнопку «Изменить…», затем «Добавить…»
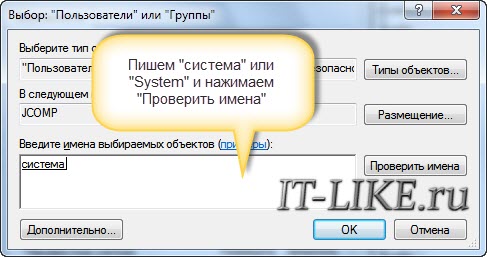
- В поле пишем «система» или «System» (если у вас английская Windows) и нажимаем «Проверить имена». При этом слово должно стать подчёркнутым как на картинке.

- Нажимаем «ОК», ставим галочку «Полный доступ», «ОК»
- Кнопка «Дополнительно» -> «Изменить разрешения…» ставим «Добавить разрешения, наследуемые от родительских объектов», «ОК» три раза.
Теперь ошибка установщика не появится! Можно добавить доступ на всю папку, из которой вы обычно инсталлируете программы, например на папку «Downloads», как у меня. Смотрим видео по решению проблем с правами доступа:
В Windows XP вкладки «Безопасность» не будет, если включён простой общий доступ к файлам. Чтобы его выключить, нужно зайти в и выключить опцию «Использовать простой общий доступ к файлам». В урезанных версиях Windows 7/10 и XP вкладки «Безопасность» нет в принципе. Чтобы её увидеть, нужно загрузить Windows в безопасном режиме и зайти в неё под администратором.
Ещё способы решить проблему
- Запускайте установку, войдя в систему под администраторским аккаунтом
- Правой кнопкой по пакету «.msi» и выбираем «Запуск от имени Администратора»
- Выключите антивирус на время
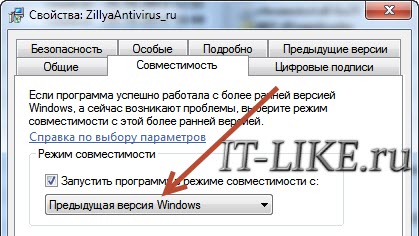
- Включить режим совместимости с предыдущими операционными системами. Для этого зайдите в свойства файла msi и на вкладке «Совместимость» поставьте галочку «Запустить программу в режиме совместимости»

- Если файл на флешке, то попробуйте скопировать его куда-нибудь на жёсткий диск и запустить оттуда (бывает, что запрещена установка программ со съёмных накопителей)
- Попробуйте просто создать новую папку с любым именем в корне диска, перекинуть туда дистрибутив и запустить его оттуда
Описанный метод поможет при разных сообщениях, с разными номерами. Например, вы можете видеть такие ошибки файлов msi:
- Error 1723
- Internal Error 2203
- Системная ошибка 2147287035
- Ошибка «Невозможно открыть этот установочный пакет»
- Ошибка 1603: Во время установки произошла неустранимая ошибка
Во всех этих случаях должна помочь установка прав на файл и/или на некоторые системные папки. Проверьте, имеет ли доступ «система» к папке временных файлов (вы можете получать ошибку «Системе не удается открыть указанное устройство или файл»). Для этого:
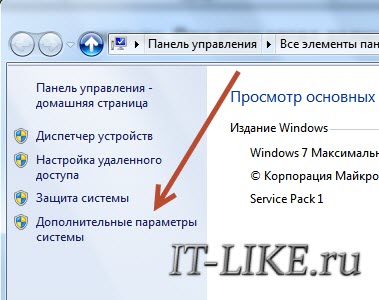
- Сначала узнаем нужные пути. Нажмите «Win + Pause» и зайдите в

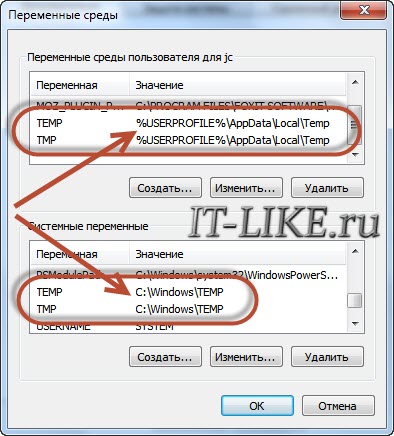
- В списках ищем переменные с названиями «TEMP» и «TMP» (значения обычно совпадают), в них записаны пути к временным папкам, которые использует установщик Windows

- Теперь идём к этим папкам и смотрим в их свойствах, имеет ли к ним доступ «система». Чтобы быстро получить путь к временной папке пользователя, кликните два раза по переменной, скопируйте путь и вставьте его в адресной строке «Проводника» Windows
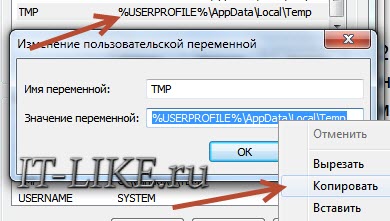

После нажатия «Enter» путь преобразится на «нормальный» и вы переместитесь в реальную временную папку. Права на неё и надо проверять. Также рекомендую очистить временные папки от всего что там скопилось или даже лучше удалить их и создать новые с такими же названиями. Если не получается удалить папку, почитайте как удалить неудаляемое, но это не обязательно.
Если служба Windows Installer всё равно не хочет работать, то проверьте права на папку «C:Config.Msi», сюда «система» также должна иметь полный доступ. В этом случае вы могли наблюдать ошибку «Error 1310». На всякий случай убедитесь, что к папке КУДА вы инсталлируете софт также есть все права.
Если вы используете шифрование папок, то отключите его для указанных мной папок. Дело в том, что хотя мы сами имеем к ним доступ, служба Microsoft Installer не может до них достучаться пока они зашифрованы.
Ещё ошибка может быть связана с битым файлом. Может быть он не полностью скачался или оказался битым уже на сервере. Попробуйте скачать его ещё раз оттуда же или лучше с другого места.
Ошибка установщика Windows
В случае общих проблем не будут устанавливаться никакие msi файлы, процесс установки, скорее всего, даже не начнётся. При этом могут появляться ошибки вида:
- Нет доступа к службе установщика Windows
- Не удалось получить доступ к службе установщика Windows
- Ошибка пакета установщика Windows (1719)
или ещё нечто подобное со словами «ошибка msi», «Windows Installer Error». Всё это означает, что система дала сбой и теперь её надо лечить. Может вы ставили какой-то софт, который испортил системные файлы и реестр, или подхватили вирус. Конечно, никогда не будет лишним удалить вирусы, или убедиться что их нет. Но оставьте этот вариант на потом, т.к. обычно проблема кроется в другом.
Сначала давайте проверим работает ли служба Windows Installer:
- Нажмите «Win + R» и введите services.msc
- Найдите в конце списка службу «Установщик Windows» или «Windows Installer»

- Тип запуска должен быть «Вручную». Если она «Отключена», то зайдите в «Свойства» и выберите «Вручную»
- Затем кликните по ней правой кнопкой и выберите «Запустить» или «Перезапустить». Если ошибок нет и состояние переходит в режим «Работает», то здесь всё нормально.
- Нажмите «Win + R» и введите msiexec. Если модуль MSI работает нормально, то должно появиться окно с версией установщика и параметрами запуска, а не ошибка.

Следующее что я посоветую сделать – это выполнить команду сканирования системы на повреждённые и изменённые системные файлы. Нажмите «Win + R» и введите
Sfc /scannow
Произойдёт поиск и замена испорченных файлов на оригинальные, при этом может потребоваться вставить установочный диск с Windows XP-7-10. После окончания процесса перегрузитесь и посмотрите, решена ли проблема.
Microsoft сам предлагает утилиту, призванную решить нашу проблему. Запустите программу Easy Fix и следуйте мастеру.
Скачать Easy Fix
Параметры реестра и службы
Следующий способ устранения ошибки – восстановление рабочих параметров в реестре установщика Windows Installer.
Скачать msiserver.reg
Для этого скачайте архив и запустите оттуда два reg-файла, соответственно своей версии Windows. Согласитесь с импортом настроек.
Важно! Перед последним действием желательно создать точку восстановления системы! Если способ не поможет или станет хуже, вы сможете восстановиться до прежнего состояния.
В Windows XP или Windows Server 2000 установите последнюю версию установщика 4.5.
Скачать Windows Installer 4.5
Если не помогло, то проделайте ещё перерегистрацию компонентов:
- Нажмите «Win + R» и введите «cmd». Затем в чёрном окне введите последовательно команды:
MSIExec /unregister
MSIExec /regserver - В ответ должна быть пустота, никаких ошибок. Если проблема не решена, введите ещё команду
regsvr32 msi.dll - Закройте чёрное окно
Если пишет, что не хватает прав, то нужно запускать командную строку от имени Администратора.
Если команды выполнились, но не помогло, то скачайте файл и запустите msi_error.bat из архива, проверьте результат.
Последний вариант — скачайте программу Kerish Doctor, почитайте мою статью, там есть функция исправления работы службы установщика и многих других частых проблем Windows.
Также, многие программы используют .NET Framework, поэтому не будет лишним установить последнюю версию этого пакета. И, напоследок, ещё один совет: если в пути к файлу-дистрибутиву есть хоть одна папка с пробелом в начале названия, то удалите пробел. Такой простой приём решит вашу проблему 🙂
Подведение итогов
Ошибки с установщиком Windows очень неприятные, их много и сразу непонятно куда копать. Одно ясно – система дала сбой и нужно восстанавливать её до рабочего состояния. Иногда ничего не помогает и приходится переустанавливать Windows. Однако не торопитесь это делать, попробуйте попросить помощи на этом форуме. В точности опишите вашу проблему, расскажите что вы уже делали, какие сообщения получили, и, возможно, вам помогут! Ведь мир не без добрых людей 🙂
|
|
#1 |
|
Member
Join Date: Jan 2006 Location: Seattle Posts: 271 |
S7-1200 HMI Internal Error I’m using S7 Basic to create HMI for a KTP1000 panel. I’ve been using the runtime simulation to test out the panel as I created new screens. After creating one screen, I’m started getting the following Internal error message during compilation from the WinCC RT HMI: Internal ERROR (detail: Item has already been added. Key in dictionary: ‘0’ Key being added: ‘0’).,1,0,12:59:11 PM I have removed the screen from the project, but the Internal error message during compilation is still there. Any thoughts on what might be causing this? |
|
|
|


|
|
#2 |
|
Member
Join Date: Jan 2006 Location: Seattle Posts: 271 |
Update… I guess I could start over, but I’m 3/4 of the way through the project so that would be a large waste of time. Using this S7-Basic software has been nothing but a struggle. |
|
|
|
|
|
#3 |
|
Member
Join Date: Jun 2002 Location: Upstate South Cackalacky Posts: 2,181 |
if you have an FTP site to post to- |
|
|
|

|
|
#4 |
|
Lifetime Supporting Member
Join Date: Jan 2005 Location: Down South Posts: 2,711 |
Can you try a different computer with step7 basic installed? I’d agree it’s a win doze problem, possibly microsoft
__________________ Dave «When you are courting a nice girl an hour seems like a second. When you sit on a red-hot cinder a second seems like an hour. That’s relativity.» |
|
|
|


|
|
#5 |
|
Lifetime Supporting Member
Join Date: Jan 2005 Location: Down South Posts: 2,711 |
Forgot to say are you on SP2 with Step7 Basic ?
__________________ Dave «When you are courting a nice girl an hour seems like a second. When you sit on a red-hot cinder a second seems like an hour. That’s relativity.» |
|
|
|
|
|
#6 |
|
Member
Join Date: Jan 2006 Location: Seattle Posts: 271 |
Yes, I’m using S7 Basic SP2. I don’t have another computer, but I’m thinking of re-installing S7 Basic and see if that helps. I hope I don’t need to start over on the project as I’m 3 weeks into it. |
|
|
|
|
|
#7 |
|
Member
Join Date: Sep 2002 Location: NC Posts: 300 |
Quote:
Originally Posted by junior Yes, I’m using S7 Basic SP2. I don’t have another computer, but I’m thinking of re-installing S7 Basic and see if that helps. I hope I don’t need to start over on the project as I’m 3 weeks into it. Did you try the Siemens hotline??? 18003337421 Also- is it only that project or all projects? |
|
|
|

|
|
#8 |
|
Member
Join Date: Feb 2005 Posts: 117 |
Have you tried saving the project under a new name and open the new project? |
|
|
|

|
|
#9 |
|
Lifetime Supporting Member
Join Date: Jan 2005 Location: Down South Posts: 2,711 |
Quote:
Originally Posted by Pego Have you tried saving the project under a new name and open the new project? Yes that sometimes works Other thing i had a few weeks back was a weird error (not this one) and i had to reinstall with the german (not english) language selected to get S& Basic working again Error was on ethernet comms
__________________ Dave «When you are courting a nice girl an hour seems like a second. When you sit on a red-hot cinder a second seems like an hour. That’s relativity.» |
|
|
|
|
|
#10 |
|
Member
Join Date: Jan 2006 Location: Seattle Posts: 271 |
@ Pego, I did try that and that didn’t fix it. I ended up un-installing S7 Basic from my computer and re-booted and re-installed it again and now I don’t get that error. Not sure what was causing it, but it looks like it was something between S7 Basic and windows XP |
|
|
|
|
|
#11 |
|
Member
Join Date: Dec 2008 Location: Las Vegas Posts: 12 |
I’ve had similar problems with S71200s and the software. When I get a weird error, the easiest thing to do, and it’s quicker than uninstalling and reinstalling is to open up another instance of TIA Portal, then just copy and paste everything into a new project. Then try to compile. It has always worked for me when I get a strange error. -=BP |
|
|
|
Siemens S7 Error Codes, error number, error description and error cause.
| Error number: | Text: | Cause: | Remedy: |
| 34:178 | Block call invalid because interface was changed in the meantime. | With Step7 V5.0 the instance DB of the DB type is entered in the symbol list for an FB call. This is no longer permitted with Step7 V5.0. In this case the “Update Call” function doesn’t work. | Enter the instance DB of the FB type in the symbol list. |
| 34:4321 | Error in column 1, distribute the program in little
blocks. |
||
| 34:4355 | F Ze %2!06d! Sp %3!03d!: No PLC type description found for called or addressed block
%4. |
The block called is not available. | The block is to be compiled before the call. |
| In the case of SFB/SFC calls, please copy into your offline database with the
SIMATIC Manager (block container). |
|||
| If the SFB/SFC is not available on the CPU addressed, then it should not be
called! |
|||
| 34:4461 | The block %4 that was called/used is protected or created by S7-GRAPH and cannot be generated. | You are trying to generate a KNOW_HOW_PROTECT block into an STL source. | The block named is protected and cannot be generated into an STL source. |
| 34:4469 | The declaration range of your formal parameter does not match the declaration range of the actual parameter, for example, no OUTPUT paramater from the actual end can be assigned to an INPUT parameter from the formal end. | It is not allowed, that an OUT variable of the calling function block is parameterized with the IN variable of the function block called. | We recommend first saving the data temporarily on a static variable. In a further network this static variable is parameterized with the IN variable of the FB called. The output variable of the higher-level block, the static variable and the input variable of the lower-level block must be of the same data type. |
| 34:4485 | The parameter assignments can be specified in any order in the ASCII source. The comments, however, are stored separately from the actual online block in the order entered. Thus, when exchanging parameters in the source, the order of comments might then be wrong. When the block is opened, the comments are then assigned incorrectly. In the worst case comments might even be lost. The following comments in the network are also affected, even when the exchanged parameters are not even commented. | If you have entered comments for parameters, then when assigning the parameters, please keep to the order in which the parameters of the block called are declared. | |
| Message appears when opening a VAT. The directory S7USS is missing
in the SIEMENSSTEP7 directory. |
Reinstall STEP 7. | ||
| 88:47 | Unable to reach the module %1 by means of the online interface that is set. | Programming device is connected to the MPI interface of the CPU. | Check whether the CPU is routing-compatible. If Not, then please set your MPI driver to PROFIBUS and connect up with the PROFIBUS DP. Then repeat the desired function. |
| Error number: | Text: | Cause: | Remedy: |
| 256:24 | Function open Environment is not implemetiert | Multiple start of the SIMATIC Manager | In the STEP7_V2/S7met directory delete the files S7CacheA.dat and S7ser.dat with Win95 Explorer. The ending .dat can be left out; depending on the options package, there is also an S7CacheB -E.dat |
| 256:26 | Internal OLE Error. | Not enough space on the hard disk, the database cannot be started. | Create space on the hard disk and set user-defined virtual memory. |
| Wrong DLL in Windows/System and/or wrong Registry entry. | Start program editor via Explorer and evaluate error message. | ||
| If the following message appears: “The file S7HRVERX.DLL is linked with the missing export S7OTBLDX.DLL: s7_set_password.”, then check whether the file ‘S7OTBLDX.DLL’ is in the Windows system directory. When implementing STEP 7 V4.02, you must delete this file from the Windows system directory. | |||
| If the following message appears: “The file S7KAFAPX is linked with the missing export OT5050R.DLL:4224”, check whether the OT5050R 2x is on the computer. Rename all except those that are in the S7BIN directory. | |||
| With V3.1 when printing | With V3.1 copy block comment into network comment. | ||
| WIN 95: the OLE was not installed properly when installing WINDOWS. | Delete Windows directory and then reinstall WINDOWS. | ||
| Message appears when opening a VAT.
The S7USS directory is missing in the directory SIEMENSSTEP7. |
Reinstall STEP 7. | ||
| 256:30 | SCL: Programming of S7 moduls. The object was
deleted. |
Error occurs when you export an SCL source, delete it in the SIMATIC
Manager and then import it again and compile it. |
Delete the block contained in the source in the SIMATIC Manager first and
only then compile. |
| 256:31 | This object was not found. | An object that fulfills the criteria specified is not available. The function triggered cannot be executed. The assignments in the OFFLINE database with regard to the HW configuration are no longer consistent. | You can reorganize the addresses with key combination
<CTRL>+<ALT>+<F11>. |
| 256:32 | Not valid objects. | A link has obviously been lost. | In V2.1 projects the solution is to use “Save As with Reorganization” |
| 256:35 | Internal system error is not repairable. | ||
| 256:49 | The quoted entry is not in the registry by Windows or contains a not valid value. | Error occurred when downloading SDBs into a remote CPU via TeleService. The cause here was a bad telephone line connection (analog) (in the USA). After several attempts to set up an ONLINE connection, the SDBs could be transferred without this error message. An attempt was also made to achieve a higher transmission rate with the ONLINE connection. | Set up the connection over and over again and wait for a better line quality. Try to get a higher transmission rate (<- indicator for better line quality at the time of connection set up). |
| Error number: | Text: | Cause: | Remedy: | |
| 256:53 | Internal error: Not valid pointer. | In PLCSIM an attempt was made to load the last simulation in PLCSIM via the menu item Simulation -> Last Simulation. Since the old project data (e.g. also block interfaces) has perhaps changed in the meantime, some of the data of the simulation originally created no longer matches the current project. | Create a new simulation via Simulation -> New PLC. The next time you run the last simulation the latest new simulation will be loaded without error message. | |
| 256:56 | There is an internal error in the system. | Project might be damaged. | Terminate application and restart. | |
| If the error re-occurs, restart Windows. | ||||
| STEP 7 V5.x: There is an internal error in the
system. |
Send project in to the Technical SIMATIC Customer Support. | |||
| 256:57 | There is an not repairable error in the system during the programming. The function can not be implemented. | ProjID.pro might possibly exist when dearchiving. | Copy/move ProjID.pro. | |
| 256:62 | Not repairable internal system error in refer to the
file “symlist.dbf”. |
Project might be damaged. | Computer might have crashed. | Save as … with consistency check or recreate the project. |
| 256:63 | Please see the remedies by errror number 258:15. | |||
| 256:68 | The object … cannot be edited because it is currently opened by another application or another user. | This message appears when you start the “File > Save as…” function together with the “With reorganization (slowly)” option if there are still applications open (e.g. Symbol Table) in the project which is being reorganized. | Before reorganizing, close all the applications in the project. | |
| 256:85 | SIMATIC Manager expects formatted names. | Enter correct name with VAT<digit>. | ||
| 256:89 | The version 513 of the objekt XR00001 is not
compatible in refer to the installed software. |
Legacy from V2 in XUTIL catalog | Delete the XUTIL directory in the project path | |
| 256:92 | The data can only be read. | This might be data, for example, from a project or library. The cause might be that there are no write rights for the directory or drive in which the data are located. | Make sure that you have the appropriate rights to access the drive or directory where the data is located.
Remedy: Using a virus scanner in Runtime mode can lead to faults. Do the virus scanning offline (i.e. at times when you are not working on your STEP 7 project) or disable the virus scanner on your computer. |
|
| The data is being processed by a different application or by a different
user. |
Save the modifications made in a different application and make sure that
no other user processes this data at the time in question. |
| Error number: | Text: | Cause: | Remedy: |
| The data are read-only. | You have copied a data backup of a project from a CD onto your hard disk and now cannot open this project. The reason for this is that all the files of the project have the attribute “write-protected” set. There are various ways of removing the write-protection from files. One such is described below. | 1. Mark the project in the explorer, where is saved in the folder and click on the right mouse botton (example: D:…SiemensStep7S7Proj<Project>).
2. Open in the context menu the “Properties” and select “Security”. 3. Here you can allow the “Read” and other functions by “Permissions for Administrators”. 4. Click after on “Apply” and “OK”. |
|
| 256:93 | The rights of write is missing in the directory. | The directory in which the S7P file is located is write-protected. | Remove the write-protection from all directories that have to do with the
project. |
| Not enough space on the disk < 100 bytes | |||
| If STEP 7 V4.x is concerned, then it might be that a file has not been deleted, which still specifies that the project is still on a write-protected drive. | Delete S7APROMX.TXT in the root directory of the project. | ||
| 256:94 | Problems with the offline folder. | This message may be due to the fact that the project has been dearchived on a computer and edited with an options package whose version is no longer compatible with the current STEP 7 version. | First of all check the versions of all the options packages installed on your computer which are required for editing the project. You may need to install one or other update (service pack) or upgrade (new version).
You can find information about compatibility with SIMATIC software packages for your STEP 7 version in Entry ID 18734363. Then make a copy of your project with “File > Save as…” and the option “With reorganization (slow)”. |
| 256:100 | Authorization of STEP 7 is not found. | No Basic Authorization installed. Error occurs when attempting to start an installed options package. Probably STEP 7 is only authorized as Mini. | Install Basic Authorization |
| 256:104 | Authorization of optional package is not found. | No user rights (authorization) found for the options software on drive C:. | Install the options authorization from the authorization floppy disk included in the delivery package. If you have lost the authorization (e.g. through a fault on the hard disk), you can install the emergency authorization to be able continue working for a limited period of time. You must then procure a replacement for the lost authorization during this limited time. |
| WIN NT: insufficient access rights. | To operate S7 software under NT you need at least main user rights. | ||
| 256:107 | The object specified could not be copied. There might not be enough space left on the data medium. Possibly the target directory is momentarily blocked by another application. | Press the “Yes” button to continue the copy or save operation for the remaining objects. The copied objects might possibly be incomplete or defective in the new environment. If you press the “No” button, the copy or save operation is aborted. |
| Error number: | Text: | Cause: | Remedy: |
| Possibly another STEP 7 application has opened the object to be copied and has thus blocked it. In this case, close all other STEP 7 applications and trigger the process again. | |||
| 256:111 | Access denied | Your have repeatedly loaded a program in the SPS and now it is not
possible to load the program again, also not after a new start. |
Start the service “Server” in the control panel. |
| 256:119 | There is no authorization for STEP 7. To operate this optional package, you require the authorization for “STEP 7 V4.x”. | No authorization installed or the path in which the STEP 7 project is located is too long. | Install the authorization or shorten the project path as appropriate. |
| 257:5 | One or more objects of a type cannot be represented. Unable to load the server ‘s7uvpomx.dll’ for _S7UV_LIST_CT-objects. Make sure that the required optional packages are installed. | The process variable server cannot be started. Installation problem with STEP 7. There must not be any incompatible version of WinCC installed on the computer. | Please check the version of the software package installed against the compatibility list. This is located in your STEP 7 directory as the file S7KOMP_x.PDF. x stands for the language: a=German b=English, c=French, d=Spanish, e=Italian. |
| Mixed installation, a V4.0 or V4.01 was installed before the installation
STEP 7 V5.x. |
Deinstall STEP 7 manually and then reinstall it.
See FAQ 189025 |
||
| Paths in Autoexec.bat are not set. | Edit Autoexec.bat so that the paths are set or not overwritten, as the case
may be. |
||
| One or more objects of a type cannot be represented.
Unable to load the server ‘s7hkdmax.dll’ for _S7H_DP_ETCR_INTGR_414_2_ROCF_CT- objects. Make sure that the required optional packages are installed. |
A file required by STEP 7 has not been found. Probably the project contains objects for which you need an options package that is not installed to process them. | Reinstall the DVA_S7 package. | |
| One or more objects of a type cannot be represented.
Unable to load the server ‘p7spumax.dll’ for _SIPROM_CONTAINER_CT-objects. Make sure that the required optional packages are installed. |
There is no authorization permitting you to integrate SIMATIC PDM in STEP 7. This authorization is an options authorization which has to be installed in addition to the basic authorization of SIMATIC PDM. | You must install the options authorization for integrating SIMATIC PDM in STEP 7. |
| Error number: | Text: | Cause: | Remedy: |
| One or more objects of a type cannot be represented.
Unable to load the server ‘s7jthomx.dll’ for _AUT_TH_AT-objects. Make sure that the required optional packages are installed. |
The S7 project to be opened contains an object that has been created with the options package Technological Hierarchies. This package is not installed or has not been recognized properly after an over-installation of STEP 7. | Reinstall the options package Technological Hierarchies. | |
| One or more objects of a type cannot be represented.
Unable to load the server ‘s7hk31ax.dll’ for _S7H_PLC315_2DPD_Modul_CT-objects. Make sure that the required optional packages are installed. |
Toolbox of SINUMERIK 840D is missing or is badly installed. | Reinstall the toolbox for SINUMERIK 840 D. | |
| The S7 project is opened with STEP 7 V5.x and the SINUMERIK 840D
toolbox is installed with version under V5. |
The SINUMERIK 840 D V4.x toolbox is incompatible with STEP 7 V5.
Please install the toolbox for SINUMERIK 840 D V5. |
||
| One or more objects of a type cannot be represented.
Unable to load the server S7HK31AX.DLL for _S7H_6ES7_315_1AF03_0AB0_CT – objects. Make sure that the required optional packages are installed. |
Your project contains objects that have been created with the options package C7_626P, but this options package is now not installed. | Please install the options packages concerned; in this case C7_626P. | |
| The message appears with each project you open, even if it doesn’t contain a C7_626P object. | In STEP 7 you have installed the options package C7_626P with an older version than the version of STEP 7. Please upgrade the package C7_626P. | ||
| One or more objects of a type cannot be represented.Unable to load the server ‘s7wb53ax dll’ for _S7H_6GK7_443_1BX00_0Xe_CT-objects. Make sure that the required optional packages are installed. | The NCM package is not installed and the S7 project contains corresponding objects. | Please install the options packages concerned; in this case the NCM options package. | |
| One or more objects of a type cannot be represented.Unable to load the server S7HK31AX.DLL for
_S7H_PLC314_Modul_CT_objects. Make sure that the required optional packages are installed. |
Toolbox of SINUMERIK 810 is missing or badly installed. | Reinstall the toolbox for SINUMERIK 810. |
| Error number: | Text: | Cause: | Remedy: |
| One or more objects of a type cannot be represented.Unable to load the server “s7hsl7ax.dll” for
_S7H_DP_PA_LINK_1_ETER_CT-objects. Make sure that the required optional packages are installed. |
The error is probably caused by the permanent upgrading of STEP 7. There are several older versions of STEP 7 one on top of the other. | Deinstall STEP 7 manually and then reinstall it. | |
| One or more objects of a type cannot be represented.Unable to load the server “p7ss357x.dll” for
_P7_FM357_6ES7_4AH00_0AE0_CT-objects. Make sure that the required optional packages are installed. |
|||
| One or more objects of a type cannot be represented. Unable to load the server S7HK31AX.DLL for _P7_PUSTCH_CPU
314_CT_objects. Make sure that the required optional packages are installed. |
|||
| One or more objects of a type cannot be represented.Unable to load the server S7HK31AX.DLL for _P7_POSTECH_CPU
314_CT_objects. Make sure that the required optional packages are installed. |
Either the tool MCU-Pit is not installed at all (product of Simodrive/Sinumerik) or the tool MCU-Pit V4.x has been installed in combination with STEP 7 V5.x. Warning: only the version V4.10 of MCU-Pit is released for STEP 7 V5.x. | Install the tool MCU-Pit V4.10. Also, in the directory Drive: SiemensStep7S7MET you must change the name of the file “p7skmcux.mv5” to “p7skmcux.met”. Then you must delete all the remaining
*.DAT files in this directory and restart STEP 7 (so that the metafiles can be recompiled). |
|
| 257:7 | Type of object is not declared | A file needed by STEP 7 has not been found. Possibly the project contains objects for which you need an options package that is not installed to process them. | |
| 257:8 | One or more objects of a type (%1!X!) cannot be represented. Make sure that the required optional packages are installed. | There is an object in the project that has to be parameterized with an S7 options package. This options package is not installed. | Install the missing S7 options package. |
| One or more objects of a type (%1!X!) cannot be represented. Make sure that the required optional packages are installed. | There is an object in the project that has to be parameterized with an S7 options package. This options package is not installed. | Please import the type file for the sensor module IF961-ENC4 configured on the FM456. | |
| 257:9 | The project contains objects of the optional package ‘xxxx’ that cannot be processed because the optional package is not installed or an outdated version is installed. | The project probably contains objects for which you need an options package that is not installed to process them, or a newer version of the options package. | Please install the options package concerned. |
| Error number: | Text: | Cause: | Remedy: |
| In the SIMATIC Manager create a copy of your project (with File > Save as…, Option “With Reorganization (slow)”). Here, the objects that belong to non-installed options packages are deleted in the target project. This error message will then no longer be issued when working with the copy of the project. | |||
| 257:24 | creat environment is not implemented. | SIMATIC Manager has been started double or computer has crashed. | With V2.x, delete the *.dat files in the S7met directory. In any case, procure
the latest correction version. |
| 257:26 | Not repairable internal system error. The link could
not be inserted. |
Message appears when you trigger the function “Display Reference
Data”. Links are distorted in the project. |
Use the function “Save as” together with the option “With Reorganization
(slowly)”. |
| Message also appears when forwarding a project in conjunction with the
symbol table. |
|||
| 257:79 | The project or parts of it are currently being edited by another application. | This message appears when you start the “File > Reorganize…” function if there is still an application open (e.g. Symbol Table) in the project which is being reorganized. | Before reorganizing, close all the applications in the project. |
| 257:90 | The project ‘%1’ contains errors in the internal data structure. | Project data damage by a crash/power failure on the computer.
With the “Details” button you can receive more information on the error, if available. |
1. Close all the STEP 7 applications except the SIMATIC Manager.
2. With the menu command “File > Save as (with reorganization (slow)) ” create a of the project which you can then continue to work with. Because of the faults in the existing project, this copy might not contain all the data of the original project. |
| 257:94 | Open of project: <Date and Time>
S7fupos: Internal error during save of data of server S7ombstx.dll. |
Inconsistent project.
Application FM 453 has registered errors when saving the machine DBs. A possible cause is the shortage of storage space on the computer. |
1. Close all the STEP 7 applications except the SIMATIC Manager.
2. With the menu command “File > Save as (with reorganization (slow)) ” create a of the project which you can then continue to work with. Because of the faults in the existing project, this copy might not contain all the data of the original project. |
| 258:1 | Unable to open project data %1. | IDB defined as GDB in the symbol table. | Define IDB correctly. In the case of V2.1, use Save as… for the project. |
| 258:17 | The directory C:SiemensSTEP7S7projtemp
exist already. |
The temporary SDBDATA directory created must have been destroyed by
the crash. |
In the directory [DRIVE]:SiemensSTEP7S7TEMP delete the directory
SDBDATA including subdirectories. |
| 258:20 | After archiving call File > Title Field and note the Title Field specifications. After dearchiving you can reestablish these specifications manually via File
> Title Field. |
||
| 258:15 | Some files or data blocks are write-protected and, therefore, the data can only be accessed on a read-only basis. This may be due to the fact that write access does not exist for the directory or drive where this data is located, or the block may have been saved as write-protected for reference purposes. | Ensure that you are authorized to access the drive or folder where the data is located. |
| Error number: | Text: | Cause: | Remedy: |
| There are still blocks (FCs, FBs, DBs and/or OBs) open and, as a result, the associated projects and directories cannot be deleted. | Close any STEP 7 (and WinCC flex) editors which are still open. We also advise you to close STEP 7 (and WinCC flex). Go to the Task Manager to check whether there are still any S7 processes in operation and, if so, close them. Then start STEP 7 again and delete the project via “File > Delete”. | ||
| If the remedies under the last above points do not help, close STEP 7 again and delete the project in the Explorer. You can find the folder for the saved project in Fig. 01 under
“<Drive>Program FilesSiemensStep7S7Proj<Project> It is possible that the data areas of the HW Config, NetPro, Symbol Table or other STEP 7 components have not been released again completely after being closed. You should be able to delete the projects again after rebooting your PC. |
|||
| If the last remedy point does not help either and the project which you wish to delete is still present under the menu commands “File > Open…” and “File > Delete…”, some of the files in the SIMATIC software may be damaged. In most cases, the repair function on the STEP 7 CD can be used to restore the software status on your PC. | Otherwise, we recommend that you uninstall STEP 7 completely beforehand and also delete the directories in the Registry Editor. Follow the procedure precisely as described in our FAQ on “Complete Deinstallation of STEP 7 including all Software Packages”. You can find this FAQ in Entry ID 189025. | ||
| 275:5020 | There is an internal error in the file S7nlvblx.dll. | Save your entries and close the application. Switch your computer off/on and restart the application. If the error reoccurs, then please get in touch with your system administrator. | |
| 276:27 | No valid connection path between local and remote partners (e.g.
because of missing network connection or exhausted resources). |
HotFix 1 for SP2 clears this problem. This error is still in SP3 at the moment,
but will be cleared by another Add On. |
|
| 276:42 | Loopback – Connecting are not allowed! | Loopback connections are not permitted. You can specify an identical address as local and remote user address, but then SDB generation is rejected with an error message. | Problem (V4.02 and higher) is cleared with correction release K4.02.5. You can ignore this error message, because the communication functions despite this error message. |
| 276:5020 | An internal error occurred. (Call:
AUTReloadObject) |
||
| 288:48 | Unable to reach the module (z.B.) 413-2DP by means of the subnet assigned to the programming device/PC. | In a new project, for example, a hardware upload was made from the CPU to the PG. In the attempt to immediately download this upload, this error message appears. Problem: under Properties in Options -> Set PG/PC interface, 1 is preset as local user address on the MPI bus. But this does not match the address configured in the hardware upload and hence the error message. | Under Properties in Options -> Set PG/PC interface, set the local user address to 0 (or the one configured previously). |
| Error number: | Text: | Cause: | Remedy: |
| 289:2 | The data base is write-protected or there are not
enough memory. |
XREF with V2.1.0 + standard control | ->Correction K2.1.3 or higher |
| 289:25 | Two modules could not be translated back. | XREF with V2.1.0 + standard control | ->Correction K2.1.3 or higher |
| 289:35 | The selected button can not be executed for the selected menu. | You have selected a block folder and triggered printing. | This is how you print out the reference data for the blocks contained in the folder:
1. Mark the block folder. 2. Select the menu command Options > Reference Data > Display. In this way you display the reference data first. A check is made as to whether reference data is available and whether it is up to date. If necessary you can have the data updated. You can choose which table you want to have printed with which filter setting. |
| This is how you print out the all the blocks of the container with the editor with which they have been created: 1. Open the block folder.
2. Select all the blocks (e.g. via the menu command Edit > Select All). 3. Select the menu command File > Print > Object. |
|||
| 291:416 | The file is occupied by another application for writing. | Close all the applications that have opened the symbol table and restart the
function. |
|
| 291:416 | The symbol table is being by another process. | In the window that opens, the symbols are greyed out since editing is not possible. The Symbol Editor does not show any changes (it is not possible to save the table) and it is not possible to access the symbols. | Editing the entries in the symbol editor is still possible. Make the changes directly in the symbol table and save it. After saving the table, you can edit the symbols in the LAD/FBD/STL editor after closing and opening the dialog box again.
If you want to edit the symbols directly in the LAD/FBD/STL editor, close the symbol editor and reopen the dialog box “Edit symbols” in the LAD/FBD/STL editor. Editing is now possible. You can also simultaneously open the symbol table. Changes in other applications are automatically applied in the table. |
| Error number: | Text: | Cause: | Remedy: |
| 291:416 | The symbol table is occupied by another process | In this case you can no longer edit, delete or import the symbol table. The symbol table is not occupied by any other application for writing. You have stored the project locally on the hard disk. The same error is also displayed with the “Save with Reorganization” function of the project. | One possible cause of the error is that after a program crash of the symbol editor, temporary files are not deleted in the S7 data management. In order to control this, check your project:
1. In each project there is a “..YDBs” directory where all the symbol lists are stored. 2. Use Explorer to find files with the suffix .dbf tmp in this and all subordinate directories. 3. Terminate the STEP7 applications and delete these files. Then you can edit all the symbol lists again. It is imperative to make sure that you do not delete other files by mistake in the project, because this could destroy the project. |
| 1. First of all try closing all the STEP 7 applications including the SIMATIC Manager. If the symbol table is then opened via the SIMATIC Manager, an attempt is first made to clear any inconsistencies in the symbol table through a sort of internal “repair” service.
2. If editing the symbol table continues to be impossible, then please reboot your computer to make sure that all the STEP 7 applications have been closed. Then open the symbol table again. 3. If none of the above steps is successful, open the “..YDB” path mentioned above in the project directory. In this directory delete any files with the file name “deleted.txt” and “update.txt” and a size of 0 KB and any empty folders. You will then be able to edit the symbol table again |
|||
| 291:560 | Internal error: Incorrect object ID. | The symtabs function has failed – ambiguous entry in the symbol list for
FC names. |
Delete the line for the FC in the symbol table. |
| When calling an FB, a DB was assigned that is already assigned to
another FB in the symbol table. |
Assign a different DB in the call or correct the assignment in the symbol
table. |
||
| Copy out the symbol table, then open and close the block, and then copy
back the symbol table. |
|||
| 291:1392 | No symbol table found. No symbol could be
created. |
||
| 292:19 | Error by opening of a file. | The file either has no valid B+C287trieve format or it is damaged. | Replace the file or delete it. |
| 293:1 | The reference data could no be generated. | The data medium is write-protected. | Remove write-protection. |
| Under NT: possibly insufficient access rights. | You need at least main user rights. | ||
| 293:2 | The reference data could no be generated for the
SFC14 or the FC22. |
Use the function “Save as” together with the option “With Reorganization
(slowly)”. |
| Error number: | Text: | Cause: | Remedy: |
| 294:6 | Unable to copy the block %2. | The OBxy is not supported by the CPU. | This OBxy cannot and must not be downloaded into this CPU. You can possibly use another OBxy with a similar function, which is suitable for this CPU and then download it. |
| When programming an EPROM via an external prommer: the prommer
cable is plugged in incorrectly. |
Plug in the prommer cable so that the connector with the yellow sticker is
connected to the prommer. |
||
| Illegal command in the modul | The module FCxx could not be copied.
(D280) Error during compiling of module in the S7-300. |
This message appears, if your program has a marker (example M8000.0) which address is not supported in the CPU. Change the address and repeat the download. If the SF LED is not still erased after download, switch the CPU into STOP and after in RUN again. | |
| 294:23 | Unable to copy the block %2. Do you want to
continue the copy procedure? |
A block of this type already exists and it may not be overwritten. | Delete the equivalent block in the ONLINE database and repeat the transfer. |
| The automation system is in the RUN operating mode. | Put the automation system into an operating mode that permits copying. | ||
| SDBs can only be transferred in the STOP mode. | |||
| A block of this type and number is not permitted on the automation
system. |
Check whether a block of this type and this number may be copied onto an
automation system of the present type. |
||
| The block is using operands beyond the area of the CPU (e.g. EW 128
with S7-300 CPU). |
Check the block with reference to the addresses used whether they do not
exceed the permitted address area in the CPU implemented. |
||
| The block is using statements that are not realized in the CPU (e.g. ENT
with S7-300 CPU). |
Check the block with reference to the commands used based on the
operations list for the CPU implemented. |
||
| The block has to much local data (e.g. more than 256 bytes with S7-300 CPU). | When implementing an S7-300, you must reduce the local data area for this block. If you implement an S7-400 CPU, you can parameterize the necessary local data area for each run level. | ||
| Referenced block SFC, SFB is not permitted in this module. | Check whether the blocks that are to be downloaded are permitted on the
CPU concerned. |
||
| 294:27 | The block %2 is being processed by another application or another user at the moment.nDo you want to create the reference data for the saved version of the block? | Multi-users: the block specified is being processed at the moment by another application or by another user. You can create a copy of the last version saved or cancel the function. | If you are working with several colleagues on your S7 project, then it is recommended not to process this block without prior synchronization with your colleagues. |
| Single Users: the block is opened ONLINE as OFFLINE. | Close the block once; ONLINE or OFFLINE. | ||
| 295:17240 | |||
| 295:17248 | The order was interrupted to the TS-Adapter
because of transmission error. |
The initialization string is not correct or in this form does not work together
with the modem connected to the system. |
The initialization string in the TS adapter must be modified in the direct
operating mode so that it matches the modem. |
| Error number: | Text: | Cause: | Remedy: |
| On the system there is not a TS adapter but a PC adapter on the modem. The TS adapter has order number
6ES7972-0CA3x-0XA0 |
Exchange the adapter for a TS adapter. | ||
| Possibly the terminator on the PROFIBUS cable on the system side
(TeleService) is switched on. |
Switch off the bus terminator. | ||
| Possible the modem is sending too much information to the TS adapter so that it doesn’t get the CONNECT. (Occurs with V5 adapters) | Add W0 to the Initstring in the adapter (this suppresses the sending of extended data) | ||
| If you attempt to get connected via long telephone routes (abroad), then it might happen that some feedback messages have too long a runtime. | In TeleService under Options -> Settings -> Monitoring Times, change the value for Acknowledgment/Signal from Automatic to 5000ms / 4000ms. | ||
| 295:20484 | There is not installed a modem which is compatible with teleservice. | Install a suitable modem and set the modem to correspond with your configuration. Define the TeleService-specific properties of your installed modem in the menu command Options > Settings. | |
| 295:20486 | The TAPI-Order was closed with the error “Order
failure”. |
Basically communication between (local) PC and modem (via the serial
connection) is not correct or cannot even be started. |
Check the connection between the (local) PC and modem for both hardware
and software/driver faults. |
| Under Windows (Start –> Settings –> Control Panel –> Modems) an incorrect (or no) modem driver has been installed, which does not work in conjunction with the modem connected. | Install the appropriate modem driver for this modem. Also set this new modem in TeleService under Set Connection —> Modem (double-click the telephone book entry and then select the Modem item). | ||
| The wrong modem driver was selected under TeleService from the
selection list of modems that are already installed under Windows. |
Set the correct modem driver in the selection list. | ||
| The modem is not connected to a serial interface (or to the wrong one). | Connect the modem to the correct serial interface. | ||
| The modem is switched off. | Switch on the modem. | ||
| 295:32768 | TAPI-subsystem dues supply not expected error
code <TAPI-Error-Code> |
||
| ALLOCATED 0x80000001 | |||
| INVALDEVICECLASS 0x80000023 | |||
| 296:5309 | The variables of the instance data block which contain system attributes for messages are not aggree with the variables in the function block. | Clearance: check the function block and save it again if necessary. |
| Error number: | Text: | Cause: | Remedy: |
| 300:13 | Data basis could not be started. | Occurs as a consequence of message 256:94 and details 256:24/256:63 when executing the function “Reorganize” or “Save as… with consistency check”.
This occurs when a link is lost in the SYBASE database. |
The problem can be solved by deleting the file AMDBASE.LOG. Search in your project path for the log file of the SYBASE database (Amdbase.db). WARNING: if this file does not exist, then search the project for LOG or LOC files. |
| If you cannot find this file, then proceed as follows.
Restore the log file by entering the following start line via “Start/Run…” on the Windows user interface: dbsrv50 -f D:..Project path..ProjectAMOBJSAmdbase.db For example, for the “Deissw01” project on drive “C” in the standard STEP 7 project directory you enter dbsrv50 -f c:Siemensstep7S7projdeissw01AmobjsAmdbase.db The -f (force) switch has the effect that the DB file is recovered to the last status saved even if the necessary log file is not available. |
|||
| Occurs after dearchiving a project in STEP 7 V5.0. It has been created in
the version V4.02.x. |
After <Save as…><with reorganization> again clears the problem. | ||
| 314:8 | At least one of the selected variables cannot be inserted at this point. | If, while you are processing a project in STEP 7 V5.3 which has been created with STEP 7 V5.1 and the error message described above appears in the LAD/STL/FBD editor when you insert a declaration line within an FB or FC, please check the names of the formal parameters in the declaration line for the block in question. This could be due to the fact that the name “Ret_Val” has been assigned to a formal parameter (IN, OUT, IN_OUT, STAT or TEMP variable). | In this event, the name “Ret_Val” must be renamed.
1. From STEP 7 version V5.2 onwards, users may no longer define the key term “Ret_Val” for the formal parameters. Version V5.2 still supported the entry “Ret_Val” in the declaration line in STEP 7 projects which were created in V5.1 and did not stop the block. 2. However, STEP 7 version V5.3 no longer supports the name “Ret_Val” in the declaration line, and the behavior described above occurs. |
| 724:21 | OM TD/OP: Data basis conflict of version
file: C:[step7-pfad][Projektname]S7TDOP.DBF has the version 50000. This program expected the version 10000. |
The versions of STEP 7 and ProTool are incompatible with those of the project. STEP 7 is V4.02.x and ProTool V5. | Upgrade STEP 7 to V5.x or deinstall ProTool and install V4.02 of ProTool |
| 1230:1001 | Opening of the station failed. | ||
| 1230:2001 | Unable to insert the object. | You have tried to slot an object that is not available (e.g. the header for an
object group or module class). |
Select an object (subrack, module, interface module…) from the hardware
catalog, which you can slot in the required location. |
| Error number: | Text: | Cause: | Remedy: |
| 1230:2009 | Changes cannot be made. Save your changes in other applications | The error message indicates that access to the object is not possible at the moment and that the object could not be blocked. This error message can have various causes:
1. The object is currently being processed by another application or user and has therefore been blocked. 2. There is insufficient memory available. |
The following steps permit you to process the object:
1. Save the changes made in all other applications and make sure that no other user is currently processing this object. 2. Make sure that there is sufficient virtual memory on your computer, see in this case the informations of the Readme file of STEP 7 by 3.2 Memory Requirements. Notes: Please consider the requirements of the actual installed STEP 7 software in refer to your PC, which are described in the readme file. |
| 1230:2015 | Creating the configuration data failed. | Hard disk is full. | Deleted all the unnecessary files on the hard disk. |
| No folder “…SIEMENSSTEP7S7TMP” available or the folder is write-
protected. |
Remove the write-protection from the folder “…SIEMENSSTEP7S7TMP” or
create the folder. |
||
| S7 program or M7 program container is missing. | Create S7 program or M7 program container. | ||
| Defective project? | Use “Save as… with reorganization” | ||
| The compilation (= creation of the configuration data) has been
interrupted. |
Reinstall STEP 7. | ||
| Error attempting to generate the configuration data. Message refers to the V2-projects by Save as with Reorganization. | Subnet addresses of different networks are identical. | Check the subnet addresses and make appropriate corrections in the case of identical subnet addresses. | |
| 1230:2016 | No changes can be made in this station. | No more modules can be inserted in the HW Config. | Use “Save as… with reorganization” for the project. Please see also the
instruction by the error message 256:92. |
| 1230:2018 | Another application made changes to your station. Close this station and re-open it. | Another S7 application has changed, for example, via network, the station currently being processed. The changed objects (subrack, modules, slaves, etc.) can no longer be displayed.
The station has been blocked for further processing. |
You can remove the block by closing the station and re-opening it. This makes the changes of the other application effective. |
| 1230:3000 | The system data could not be recreated because
the configuration is inconsistent. |
Check consistency. | |
| 2508:1099 | Error by programming of error diagnostic data for
<name of variable>. |
Group message, behind it detailed messages are listed that occurred
during the last function executed. |
Please press the “Details” button and analyze the detailed messages. |
| Error number: | Text: | Cause: | Remedy: |
| 2517:5 | The start of an application has occurred an error. | Message appears when opening a HIGRAPH source. With the following software constellation:
STEP 7 V5.0 + SP 3 S7-HIGRAPH V4.01.1 S7 project created with S7-Higraph V5.x |
Cleared with K4.01.2. |
| 2665:4156 | Because of the changes made to the configuration, the configuration file for this SIMATIC PC station has to be created again with NetPro. To do this, use the NetPro menu command “Network > Save and Compile …” | ||
| 2760:11 | communication to higraph cannnot be accessed | ||
| 2775:777 | Address is not correct. | You have selected a user address that is already occupied. | Please select another address or connect your user to another subnetwork. |
| 2775:785 | The bit rate of 187,5 kbit/s for the modul MBK-P is
not supported in station SIMATIC 400(1). |
In STEP7 V5+SP3 and higher the baud rate must not be written with a
comma, e.g. 187,5_supp =1 |
Open and edit the file: enter ‘187.5_supp =1’ instead of ‘187,5_supp =1’.
Execute Options -> UPDATE CATALOG. |
| 2775:1829 | The data management of “Set PG/PC interface” can not save the requested value. | An attempt was made to save a parameter value in the database of the program “Set PG/PC interface”. This write procedure could not be concluded successfully. | |
| 2775:1860 | Caution: there are other active nodes (sender parameter assignment master) in station %1 which also have to be reloaded. | ||
| 3020:13 | File name entered is not valid, or Project is invalid,
if you attempt to open a project. |
This message appears when you stored your project on a network drive which is connected to the following path via the Internet Explorer or a logon script:
\<Servername>.<DNS-Suffix><Share> (Example: \computer.siemens.deshare) or \<IP address><share> (Example: \192.168.1.1share). However, this path cannot be found since the network connection is stored only symbolically in the registry. |
In order to be able to open your project, please connect the share (without the domain name) via
\<Servername><share> (Example: \COMPUTERshare). Note: If you have to enter the pathname via the IP address, you can establish a connection between the IP address and the computer name in the “hosts” file. The file can be found with the Windows path “system32driversetc” (Example: C:WINNTsystem32driversetc). |
| Error number: | Text: | Cause: | Remedy: |
| 3020:25 | Projects which are opened can not be archived. Make sure that in non STEP 7 application objects of the projects … are opened in the directory C:… | The reason for this error message are blocked files, which are also blocked though all the windows of editors and projects are closed. This is possible when the program is activ and the last access was to the archived project. Souch programs are not always to see as user window. | With WinCC or WinCC flexible will be started a SQL server which should be stopped. You will find this in the task bar. You will also find here icons of WinCC flexible, which are mini web or smart server. If you will stop these applications the archiving should be possible again. If not, then start the task manager and check in the process list whether the process “hmies.exe” is activ. If you delete this process, then the archiving should be possible again. |
| 3020:47 | This processing status is triggered by PKUnZip in different situations, in particular always when an existing project is overwritten during dearchiving and in the dearchiving options the entry “Overwrite objects with identical names” is not set to “All Files”. | In this – most common – case you can ignore the message. | |
| The archive file has not been created with PKZip. In particular archives that have been created with WinZip or “PKZip for Windows” and contain “long file names” can lead to this error. | Execute dearchiving with the archiving program used to create the archive. | ||
| The archive file has been created with a version of PKZip that is newer
than the version of PKUnZip that is installed on the computer. |
If you are using an old version of PKUnZip, install the latest version. | ||
| The archive file is damaged. Checksum errors (so-called CRC errors) have been detected for one or more files. Therefore the files could not be dearchived correctly. The cause of such checksum errors can in particular be:
damaged floppy disks, transfer errors when copying, in particular with network drives, file transfer or e-mail, or at the time of archiving the project or parts of it were still open. |
Try to get a good copy of your archive file. If this is not possible, you can try to save what is possible to save using the repair option of PKZip. Start the MS-DOS prompt and enter the command ‘pkzipfix archiv’. A file is created called pkfixed.zip – if pkzipfix can even identify the file as being ZIP- compatible. From the SIMATIC Manager dearchive the file pkfixed.zip instead of your original archive file. |
||
| The directories in the archive file have too great a nesting depth to be able to be unpacked under the specified target directory. PKUnZip cannot create any directories whose absolute path name is longer than 66 characters (from the drive designation to the ‘’ at the end of the path). | You can either dearchive the archive file with PKUnZip as follows: select the target directory for dearchiving the Root directory of drive. Close all the STEP 7 applications. Move the dearchived project directory with the Explorer to the location where the project is to be stored. Start the SIMATIC Manager and open the project via the “Browse” button in the “Open” dialog. Or you can use WinZip or PKZIP 2.50 directly at the required location. | ||
| The project already exists and individual files could not be overwritten when dearchiving, because they are write-protected. | Delete the file attribute “write-protected”. You can do this for example for individual files from the Explorer via the file properties, or you start the MS- DOS prompt, get into the project directory using “cd” and then enter the command “attrib -r /s”. Now repeat the dearchiving procedure.
D330 |
| Error number: | Text: | Cause: | Remedy: |
| The project already exists and individual files could not be overwritten when dearchiving, because the project or objects from the project are already open. | Close all the STEP 7 applications, restart the SIMATIC Manager and dearchive the project without opening the project to be overwritten beforehand. | ||
| 3020:49 | Unable to retrieve the project. The archive file might be defective. | The archive file has not been created with PKZip. In particular archives that have been created with WinZip or “PKZip for Windows” and include “long file names” can lead to this error. | Dearchive using the archiving program with which the archive was created. |
| The archive file has been created with a version of PKZip that is newer
than the version of PKUnZip installed on this computer. |
If you are using an old version of PKUnZip, then install the latest version. | ||
| The archive file is damaged. | Try to get a good copy of your archive file. If this is not possible, you can try to save what is possible to save using the repair option of PKZip.
1. Start the MS-DOS prompt and enter the command ‘pkzipfix archiv’. A file is created called pkfixed.zip – if pkzipfix can even identify the file as being ZIP-compatible. From the SIMATIC Manager dearchive the file pkfixed.zip instead of your original archive file. |
||
| The data medium or the directory in which the dearchived project is to be stored is write-protected, or you have no write authorization for the network drive. | Remove the write-protection or obtain write authorization for the network drive or dearchive the project into a different directory. | ||
| 3022:4121 | The FB is not available
The instance declaration is missing |
If during compilation in S7-PDIAG the mentioned error message, then it is probably the case that the S7-PDIAG blocks have also been copied from another STEP 7 during the copying procedure. This is not permissible, because the associated SFBs are then no longer up to date. | 1. Delete all SFBs. Open and save the FBs, FCs and OBs, which fetches the SFBs from the current library.
2. Now compile the blocks of the S7 program again with S7-DIAG, which should solve the problem. |
| Make the Check Block Consistency and compile the complete STEP 7
program. |
|||
| 3022:4121 | Invalid data type…”, | The error message is probably caused by an associated value with an invalid data type. Please also refer to the information in the Online Help of S7-DIAG concerning the data types that are valid for associated values. | Excerpt of the Online Help of S7-PDIAG:
“This associated value can have a parameter of the type BOOL, BYTE, CHAR, WORD, INT, DWORD, DINT or REAL from the E, A, M or DB areas. Likewise you can enter local variables of an FB to which an error definition is attached. These are extended upon generation according to the type instance concept. |
| 3280:503 | The registry database is not set up correctly for the
SIMATIC Manager. Install STEP 7 again. |
Installation is faulty. |
| Error number: | Text: | Cause: | Remedy: |
| 3280:708 | No objects can be copied or moved from projects/libraries of the current version to projects/libraries of version 2.x. | In STEP 7 there is no downward compatibility, the data management in V2 and >V3 is not the same, so blocks created with STEP 7 V3 or higher cannot be copied or moved into V2.x projects . | An attempt was made to copy or move an object from a version V3 project or from a version V3 library into a version V2 project or library. This is not possible because of incompatibility. |
| 3280:709 | The project or the library ‘%1’ is on a write-
protected medium. |
The project is either located on a write-protected floppy disk or you do not
have write authorization for the drive. |
Remove the write-protection if you want to modify objects in this project.
Please see the instruction by error message 256:92. |
| The project catalog was released in the Windows Explorer with read/write
access. |
Release higher-level catalog of the project (e.g. Step7S7Proj) for access
via network drive. |
||
| 3280:712 | File name entered is not valid. Project is invalid.
(If you attempt to open a project) |
Please see the informations by error message 3020:13. | |
| 3280:999 | The internet explorer is not installed in your PC. | STEP 7 V5 has been installed without the Internet Explorer and you are
trying to start the ONLINE Help. |
Please install the Internet Explorer V4.0 and then reinstall STEP 7. |
| The ONLINE Help was started and the Internet Explorer was installed
after the installation of STEP 7. |
Reinstall STEP 7. | ||
| 3531:1 | The diagnostic block could not be created. | Standard blocks in the program originate from the PLC and not from the library.
If the project has been created per upload by the PLC with an earlier version of STEP 7 or standard blocks have been copied from the PLC into the offline program, then the interface of the SFBs and SFCs in the project only has a Default Symbolic (parameter name = “IN0”, “IN1” etc. instead of symbolic names as described in the Help). In this case the same error is reported. |
Check your interface to the user block.
If your user program contains standard blocks with Default Symbolic, then please delete these SFBs and SFCs and reinsert them from the library. This corrects the interface of these blocks. |
| 3534:63 | While reporting a system error: an internal error has ocurred | To be able to generate the reference data without this message, proceed as follows:
1. Delete Diagnostics-FB49 and Diagnostics-DB49 from your STEP 7 Project resp. Block container. 2. Newly generate the reference data by selecting the block container and the menu task Extras > Reference data > generate. This message does no longer appear when generating reference data. |
You can regenerate the FB49 and DB49 in the Hardware-configuration as follows:
1. Highlight the CPU with the cursor. Under “Extras > reporting system errors… > Register: General”, you can now newly generate the Diagnostics- FB and the Diagnostics-DB. Finally, save and translate the Hardware configuration once more. 2. You can also newly generate the Diagnostics-FB and the Diagnostics-DB by means of “Save and translate” if you change the following setting: Under “Station > Properties … > Register: Settings” the option “Calling when saving and translating” has to be activated. |
| 3534:94 | Inconsistent of hardware configuration | The hardware configuration is either inconsistent or it was made changing which are not still save and compiled. | If it is not possible to compile the hardware configuration after this message, so make a little change in the hardware configuration. After it is possible again to save and compile. |
| Error number: | Text: | Cause: | Remedy: |
| 4050:1 | The resources file for this language is not in the directory in which you have installed this program. This is why the menus, dialog boxes and the online Help are in English in S7-PLCSIM. | Install the files that are required for the language desired. If necessary, reinstall S7-PLCSIM and select the required language. | |
| 4050:2 | Closing the subwindow “CPU” simultaneously closes the simulation session. However, you can close a CPU and start a new simulation session with another CPU. | Make sure that you always have on subwindow open in S7-PLCSIM. If you need more space on your screen, you can reduce the subwindow to icon size. | |
| 4050:3 | You can only change the MPI address if there are no applications linked
with the simulation. |
Close all the associated applications or disconnect from the simulation. | |
| 4050:4 | You can only ever have one simulated automation system activated. If you open a second simulated automation system, the one opened first is closed. If you want to continue the function, press “Yes”. Press “No” to cancel. | ||
| 4050:5 | You cannot exit S7-PLCSIM if there is still a connection set up to STEP 7 (e.g. SIMATIC Manager, variable table, program editor). STEP 7 indicates in a message that the connection to the CPU has been interrupted. You can then continue working offline. | Before exiting S7-PLCSIM you must close the associated applications in STEP 7 or clear down the connection to STEP 7. (In order to disconnect the SIMATIC Manager from S7-PLCSIM you must close both the online program and the offline program.) | |
| 4050:6 | When doing an overall reset (MRES), all the blocks are deleted and the
memory of the simulated automation system is reset. |
If you want to abort the overall reset, click “No”. If you wish to do an overall
reset, click “Yes” to continue the function. |
|
| 4050:7 | You have attempted to open a simulation that has just recently been used, but which is no longer available or cannot be found. S7-PLCSIM deletes the file name from the menu. | Find the simulated program using the menu command Simulation > Open PLC. If the program is no longer available, you must recreate the simulation. | |
| 4050:100 | The address you have specified has a format that STEP 7 does not support. | Enter the address in a format that is supported by STEP 7 (IEC or SIMATIC).
Examples: IEC: PIB0, PQB0, PIW2, PQW2, I0.0, Q0.0 C1SIMATIC: PEB0, PAB0, PEW2, PAW2, E0.0, A0.0, Z1 |
|
| 4050:101 | The value you have entered is not in the valid range for the selected format. For example, you cannot enter “FF” (hexadecimal value) in a field in which binary values are supposed to be entered. | Enter the value in a valid format or change the format of the field. | |
| 4050:102 | The value you have entered is not a decimal number. | Enter decimal number (e.g. 0, 1, 13). | |
| 4050:200 | Since there is a danger of changing an actual online program by mistake, you cannot communicate with “real” CPUs whilst the simulation is activated. | Close all the windows and applications that have been used in the simulation of your program before going online with an actual CPU. | |
| 4299:158 | No connection to FM355/455. | Old firmware on the FM. | Upgrade the firmware of FM. |
| Error number: | Text: | Cause: | Remedy: |
| 4431:2011 | The Authorisation for SIMATIC PDM is not installed. SIMATIC PDM could not be started. | Authorization permitting you to integrate SIMATIC PDM in STEP 7 is missing. This authorization is an option authorization that has to be installed in addition to the basic authorization of SIMATIC PDM. | You must install the additional authorization for integrating SIMATIC PDM in STEP 7. |
| 4502:298 | System error 33 | This meesage appears during the upload of the hardware configuration. It is possible that the load of the SDBs was not complete or incorrect. | Make a reset of the CPU modul and load the hardware configuration of the offline project again. |
| 4502:625 | An error occured while creating or interpreting the system SDB’s. “.
Error while creating systemdata………………………………. “. |
Regarding mentioned messages occur while saving and translating in HW config if the following applies:
1. You projected and assigned a CP to a subnet in your Hardware configuration. Files with the extension .”err” are missing in the folder “<Siemens-index>Step7S7WBXRUL”. 2. Files with the extension .”err” will be deleted by some optimization programs – like e.g. TuneUp. |
Step7 has to be reinstalled or the missing “.err” files have to be copied from a different computer in order to be able to translate the hardware configuration again.
Attention: If you copy the files from a second STEP 7 installation, please make sure that this installation contains exactly the same STEP 7 version, the same servicepack and the same hotfix. |
| 4561:142 | The Authorisation for Standard PID Control is not
installed. |
.. | .. |
| Meldung von
Baugruppen |
|||
| D033 | Error of protokol | Job jam on the CPU. | In the HW Config increase the setting for the communications load for the
CPU. |
| D042 | Error during notice by module status of CPU400. | A PQW is being monitored. You cannot read back PQWs, the CPU then
reports this error. |
Monitor values with VAT and wait for new CPUs. |
| D043 | Error of data: The reference order is not available. | When controlling using Variable Monitoring it might happen that if too many control jobs are sent to the CPU, they are rejected by the CPU because its buffer is full. | Acknowledge the message and reduce the frequency of control jobs. |
| D062 | Resources error, job list is too full. | Please see the informations by error message 33:53346. | |
| D063 | Same as D064 | ||
| D064 | CPU 300 does not delete trigger events, the events then build up. | Switch CPU off/on. Problem cleared in the following CPUs: 6ES7 313-1AD01-0AB0
6ES7 314-5AE01-0AB0 6ES7 314-1AE02-0AB0 6ES7 315-1AF01-0AB0 6ES7 315-2AF01-0AB0 |
|
| D0AA | D0AA: The time limit is exceeded in process
operating. |
Communications load is too high. | Increase the communications load of the CPU from (default) 20% to 50%. |
| Error number: | Text: | Cause: | Remedy: |
| Message appears with the function “Control via VAT” to an address from the memory areas I, O, M, Timer, Counter, DB, which is not available in the broadest sense. | Please check the syntax of the address in the VAT, or whether the address is available in the system or perhaps not addressable (wiring fault, hardware fault). | ||
| D204 | D204: An error in the rules of coordinating has
occured. |
When attempting to load system data, in the background a variable table
was still open online. |
Close the variable table and retransfer the system data. |
| D20C | The OB can not be copied because the belong
layer is not available. |
Message comes from a CPU. An attempt is being made to transfer an OB
onto this CPU, which is not permissible. |
If possible, rename the OB or even delete it in the OFFLINE database and
retrigger the transfer. |
| D240 | An error in the rules of coordinating has occured. | Occurs if a block that is to be overwritten online is still being accessed. In
V4.01 with blocks in the call environment. |
Deactivate the setting “Call path with test/call environment”, then the block
can be downloaded. |
| An error in the rules of coordinating has occured. | Occurs when an object is accessed online (also VAT). | Close everything except HW Config. | |
| Error during opening of a empty document. Error
during opening of a symbolic table. |
An incompatible OPC Manager is installed. In the system path of
Windows vcf1.lic is responsible for this. |
Delete this file and the file vcf132.ocx and reinstall STEP 7. | |
| Setup does not start with error message: in function “Sdbitmap”:unable to crate dialog make sure the _isres.dll is in _setup.lib | The _isres.dll is needed for switching languages. | Start Setup with the extension ol:b, then the Setup is forced to start in English. | |
| D280 | Error during compilation of a modul in S7-300. The module OB1 could not be copied. | This message appears, when the defined variable (marker, in- or output) in a module is not in the power range of the CPU. | Example, this message appears if the number of outputs is 8192 byte by the CPU and you have defined a variable outside of this range. Check the addresses with the definition of your variables. |
| D406 | The requested informations are not available. | Number of possible connections has been exceeded. | Check the connections and reduce where appropriate. Static connections
can be converted into dynamic connections. |
| EA 02 | The protocols of communication software (S7DOS) and the interface module (CP) are not compatible. | The customer has a STEP 7 V5+SP1 + recent PDM and a CP 443-5 Ext
> V2.7. The new RPC 7 protocol is used for data record routing between the CP and S7DOS. Unfortunately the CP up to version V2.7 does not support this function. |
Upgrade CP 443-5 to a version >V2.7. |
| The user is using the correct components STEP 7 V5 + SP2 + PDM, but
has a CP that does not have the DSGW. |
Check the configuration and replace the CP being used with a different CP
that has this function. |
||
| Set PG/PC interface | |||
| None | Error message by diagnostic: “Profibus/MPI Network diagnostic”.
Error: requested parameter could not be read from the register data basis! |
Firmware/driver error | This behavior no longer occurs in SOFTNET PROFIBUS S7 V5.0. |
| Message without numerical order | |||
| S7OTBLSTX | Incompatible versionen by S7OTBLDX.DLL and
S7OTBLSX.DLL. |
S7 applications are still running at Setup of STEP 7. | Please close all S7 applications and restart SETUP. |
| Error number: | Text: | Cause: | Remedy: |
| STEP 7 has been installed on a computer on which an S7 options package or version of ProTool /WIN CC is already installed which is not compatible with the version of STEP 7. | Please search for “S7OT*.*” on all your local drives and delete them. Then please restart the Setup of STEP 7. |
-
obok
- Любитель
- Сообщения: 53
- Зарегистрирован: 10 апр 2018, 20:16
KTP 400 basic Ошибка при записи новой программы
При записи новой программы в TIA PORTAL 16v предлагается обновить версию программы (см. рисунок №1)
Рисунок 1.jpg
Затем я устанавливаю все галочки:
Рисунок 2.jpg
и программа не заливается в HMI:
Рисунок 3.jpg
Выдает следующую ошибку:
HMI_1
Adaptation of target device failed.
Download has failed due to missing panel image. Please install the missing panel images. Refer to documentation.
Error downloading to module HMI_RT_1.
Loading aborted (errors: 3; warnings: 0).,8
Помогите как это победить?!
У вас нет необходимых прав для просмотра вложений в этом сообщении.
-
obok
- Любитель
- Сообщения: 53
- Зарегистрирован: 10 апр 2018, 20:16
Re: KTP 400 basic Ошибка при записи новой программы
Сообщение
obok » 30 авг 2020, 20:45
Михайло писал(а): ↑
23 авг 2020, 07:59
Версия прошивки панели (=panel image) не соответствует (слишком старая). Надо обновить ее. Не помню как. Либо в проекте поставьте более старую прошивку.
К сожалению не помогает. Пробовал по очереди выбирать все прошивки в Tia Portal результата «0»
-
POV
- Специалист
- Сообщения: 127
- Зарегистрирован: 04 авг 2016, 16:28
- Откуда: Нижний Новгород
Re: KTP 400 basic Ошибка при записи новой программы
Сообщение
POV » 30 авг 2020, 20:52
Надо не все, надо нужный. Посмотрите версию в панели. Посмотрите в проекте. Выберите что вы хотите. Если при установке портала не ставили образы на диск, ищите нужный на 2 или 3 двд, все есть на сайте германском. Если панель прямо совсем новая, там есть отдельная статья с образами свежими панелей, скачайте нужный оттуда. Тип панели указывайте очень точно. Любое отклонение в знаках заказного номера недопустимо.
-
obok
- Любитель
- Сообщения: 53
- Зарегистрирован: 10 апр 2018, 20:16
Re: KTP 400 basic Ошибка при записи новой программы
Сообщение
obok » 25 фев 2021, 18:22
Добрый день, прошу прощения, что так и не ответил болел…, потом так и не ездил на дачу (там где у меня стоит контроллер и я пробую свои силы).
Еще в конце лета попробовал сделать то что вы сказали но к сожалению не сработало.
а именно:
Михайло писал(а): ↑
01 сен 2020, 07:49
Или при загрузке операционной системы может отображаться версия…
Версия не отображается
Все четко как тут
https://youtu.be/YBu107KAalE
пробовал сделать также записывал разные версии прошивки на флешку но дисплей ни как не входит в рекавери мод
Буду сного пробовать уже на майские праздники, может у меня сам дисплей с браком…

@CityCat4
Жил-был у бабушки серенький троллик…
Почему не выполняется миграция работающей машины?
ESXi 5.1. Два совершенно идентичных старых сервера HP ML350G5. У обоих по две сетевухи, vSwitch-и называются одинаково — Provider и Internal. При выполнении миграции включенной машины (одновременная смена хоста и датастора) одна из машин хоста мигрирует нормально, а все остальные — нет! Возникает вот такое сообщение:
A general system error occurred: Storage vMotion failed to copy one or more of the virtual machine’s disks. Consult the virtual machine’s log for more details, looking for lines starting with «SVMotion».
Failed to load one or more destination disks. Canceling Storage vMotion.
Failed to start the virtual machine.
Module Migrate power on failed.
vMotion migration [173474057:1466140341164140] failed to read stream keepalive: Connection closed by remote host, possibly due to timeout
При этом выключенные машины между этими же хостами мигрируют нормально. Общего стора нет, диски машин лежат на локальных дисках каждого хоста. На обеих хостах к vSwitch Internal подключен vmKernel, IP адреса настроены.
-
Вопрос заданболее трёх лет назад
-
1468 просмотров
Пригласить эксперта
В сообщении уже всё описано, что вам стоит делать — Обратитесь лог виртуальной машины для более подробной информации, ищем строки, начинающиеся с «SVMotion». Если в логах ничего путного нет, то проверяйте всю инфраструктуру — диски серверов, коммутатор соединяющий эти два сервера, стоят ли VMWare Tolls в вируалках — может их стоит обновить. А вообще-то лучше обновить ESXi хотя бы до версии 5.5
При этом выключенные машины между этими же хостами мигрируют нормально. Общего стора нет, диски машин лежат на локальных дисках каждого хоста. На обеих хостах к vSwitch Internal подключен vmKernel, IP адреса настроены.
как вы это делаете? у меня только так(общая хранилка есть):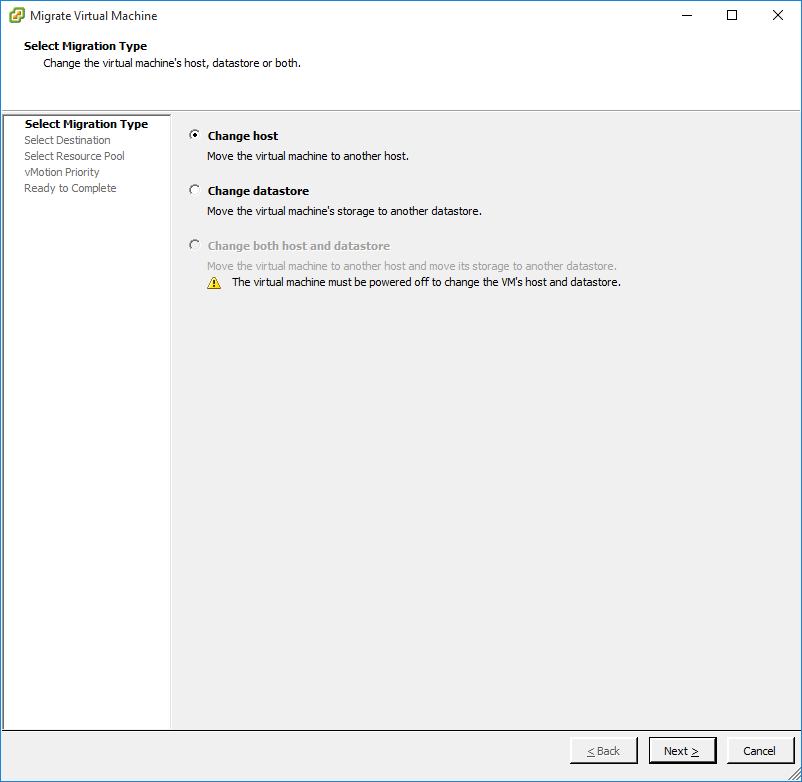
по существу: проверьте vmotion интерфейс
-
Показать ещё
Загружается…
09 февр. 2023, в 23:14
1500 руб./за проект
09 февр. 2023, в 23:00
1500 руб./за проект
09 февр. 2023, в 22:06
500 руб./за проект
Минуточку внимания
У меня проблема с моей установкой HAXM. Вот в чем дело. Я получил эту ошибку каждый раз, когда я пытался установить HAXM для моего компьютера:

проблема в том, что мой компьютер поддерживает технологию виртуализации (см. рис ниже). Есть идеи, как исправить эту проблему?

6139
11
11 ответов:
просто выполните следующие действия:
- на Панель управления → программа и функция.
- нажать на кнопку включение и выключение функций окна. Откроется окно.
- убрать Hyper-V опция и перезагрузите систему.
теперь вы можете начать установку HAXM без каких-либо ошибок.
извините, я забыл ответить на этот вопрос. После нескольких дней поиска в Интернете я обнаружил, что эта проблема была вызвана гиперпоточностью (или hyper — v). Я решил отредактировать свой ботинок.ini-файл с возможностью запуска Windows с HyperThreading отключен.
Я последовал в этом уроке и теперь все работает замечательно
скорее всего, у вас установлена windows 8 с hyper-v? если да, удалите hyper-v, и ваша проблема исчезнет!
прежде всего убедитесь, что вы Включили технологию виртуализации в вашем BIOS. После перезагрузки компьютера нажмите F1-F12 на клавиатуре и найдите эту опцию.
убедитесь, что вы отключили Hyper-V в Windows 7/Windows 8. Вы можете отключить его в Панели управления -> Программы -> функции Windows
вы можете попробовать отключить антивирусную программу на весь процесс установки. Не забудьте восстановить все антивирусы услуги после установки HAXM.
некоторые люди рекомендуют «холодная» загрузка что:
- отключение виртуализации в BIOS
- перезагрузите компьютер и выключите его
- включить VT в вашем BIOS
- перезагрузите компьютер, выключите его
- вполне вероятно, что теперь может быть разрешено установить HAXM
к сожалению, этот шаг не работает для я
- и последнее, но не менее важное: попробуйте этот обходной патч, выпущенный Intel.
http://software.intel.com/en-us/blogs/2013/04/25/workaround-patch-for-haxm-installation-error-failed-to-configure-driver-unknown
все, что вам нужно сделать, это загрузить пакет, распаковать его, положить его вместе с файлом HAXM installator и запустить .cmd файл входит в пакет — помните, запустите его от имени администратора.
у меня было много из проблем с установкой HAXM и только последний шаг помог мне.
возможно, VT-X не включен в вашем BIOS.
смотрите документацию Intel HAXM здесь: http://software.intel.com/en-us/articles/installation-instructions-for-intel-hardware-accelerated-execution-manager-windows
Intel VT-x не включен
в некоторых случаях Intel VT-x может быть отключен в BIOS системы и должен
быть включен в программу настройки BIOS. Чтобы получить доступ к настройке BIOS
утилита, ключ должен быть нажал во время загрузки компьютера.
Этот ключ зависит от того, какой BIOS используется, но обычно это
F2, удалить или клавиша Esc. В утилите настройки BIOS Intel VT может быть
обозначается терминами «VT», «технология виртуализации» или » VT-d.»
Обязательно включите все функции виртуализации.
антивирусное программное обеспечение может помешать установке HAXM.
После попытки выяснить , что пошло не так в течение нескольких часов, я нашел странное решение — удаление моего антивирусного программного обеспечения, установка HAXM (который работал), а затем переустановка антивирусного программного обеспечения (Avast в моем случае, но это может произойти и с другими антивирусными программами.полная проверка, которую я прошел, чтобы получить этот запуск:
- Проверьте функцию «виртуализация» и vt-X биография.
- проверка Hyper-V не установлена.
- проверка погоды vt-X включена в windows с помощью инструмента Intel и инструмента MS (упомянутого в предыдущих сообщениях в этой теме).
- Отключение антивируса, который не помог.
- удаление антивируса (что решило проблему для меня).
во многих случаях некоторые антивирусы также запускают HyperV с запуском окна и не позволяют устанавливать HAXM.
Я столкнулся с этой проблемой из — за Avast antivirus.
Поэтому я удалил AVAST, а затем HAXM правильно установлен после перезагрузки.
Затем я переустановил AVAST.Так что его просто проверить при установке, как сейчас даже с AVAST установлен обратно, HAXM работает правильно с виртуальной коробки и android эмуляторов.
в окне» включение и выключение компонентов Windows » снимите флажок Hyper-V, а также убедитесь, что платформа гипервизора Windows не отмечена. Включенная платформа гипервизора Windows также может блокировать установку Intel HaxM

в Windows 10 Защитник Windows имеет функцию изоляции ядра, которая использует технологию виртуализации, которая также будет вмешиваться в работу HAXM. Отключите его и повторите попытку. В моем случае отключение его решило мою проблему.
после установки Visual Studio 2013 Update 2 Visual Studio уведомила меня об обновлении эмулятора Windows Phone, которое я установил (это был действительно новый компонент, а не обновление). Оказалось, что это позволило Hyper-V, который сломал HAXM.
решение состояло в том, чтобы удалить эмулятор из программ и компонентов и отключить Hyper-V от функций Windows (поиск «функции Windows» и нажмите «Включить или выключить функции Windows»).
Если вы не найдете опцию Hyper-V в панели управления, как сказано в другом ответ, попробуйте войти в BIOS setup (перезагрузка и нажатие F-12 или ESC или других в зависимости от вашего ПК) и включить виртуализацию, расположенную, вероятно, в параметрах процессора.